

Page 1
PKTX
INSTALLATION
GUIDE
DATA KEY BYPASS
Rev: 20140401
Update Alert: Firmware updates are posted to the web on a regular
basis. We recommend you check for firmware and/or install guide
updates prior to installing this product.
Avertissement de mise à jour : Des mises à jour de micrologiciels sont
affichées sur le Web sur une base régulière. Nous vous
recommandons de vérifier si des mises à jour de micrologiciels et/ou
de guides d’installation sont disponibles avant d’installer ce produit.
Requires Firmware and Hardware version 2.00 or up
Requiers version matériel et micrologiciel 2.00 et plus
© 2014 Directed. All rights reserved.
www.xpresskit.com
Rev.: 20140325
Page 2
PKTX
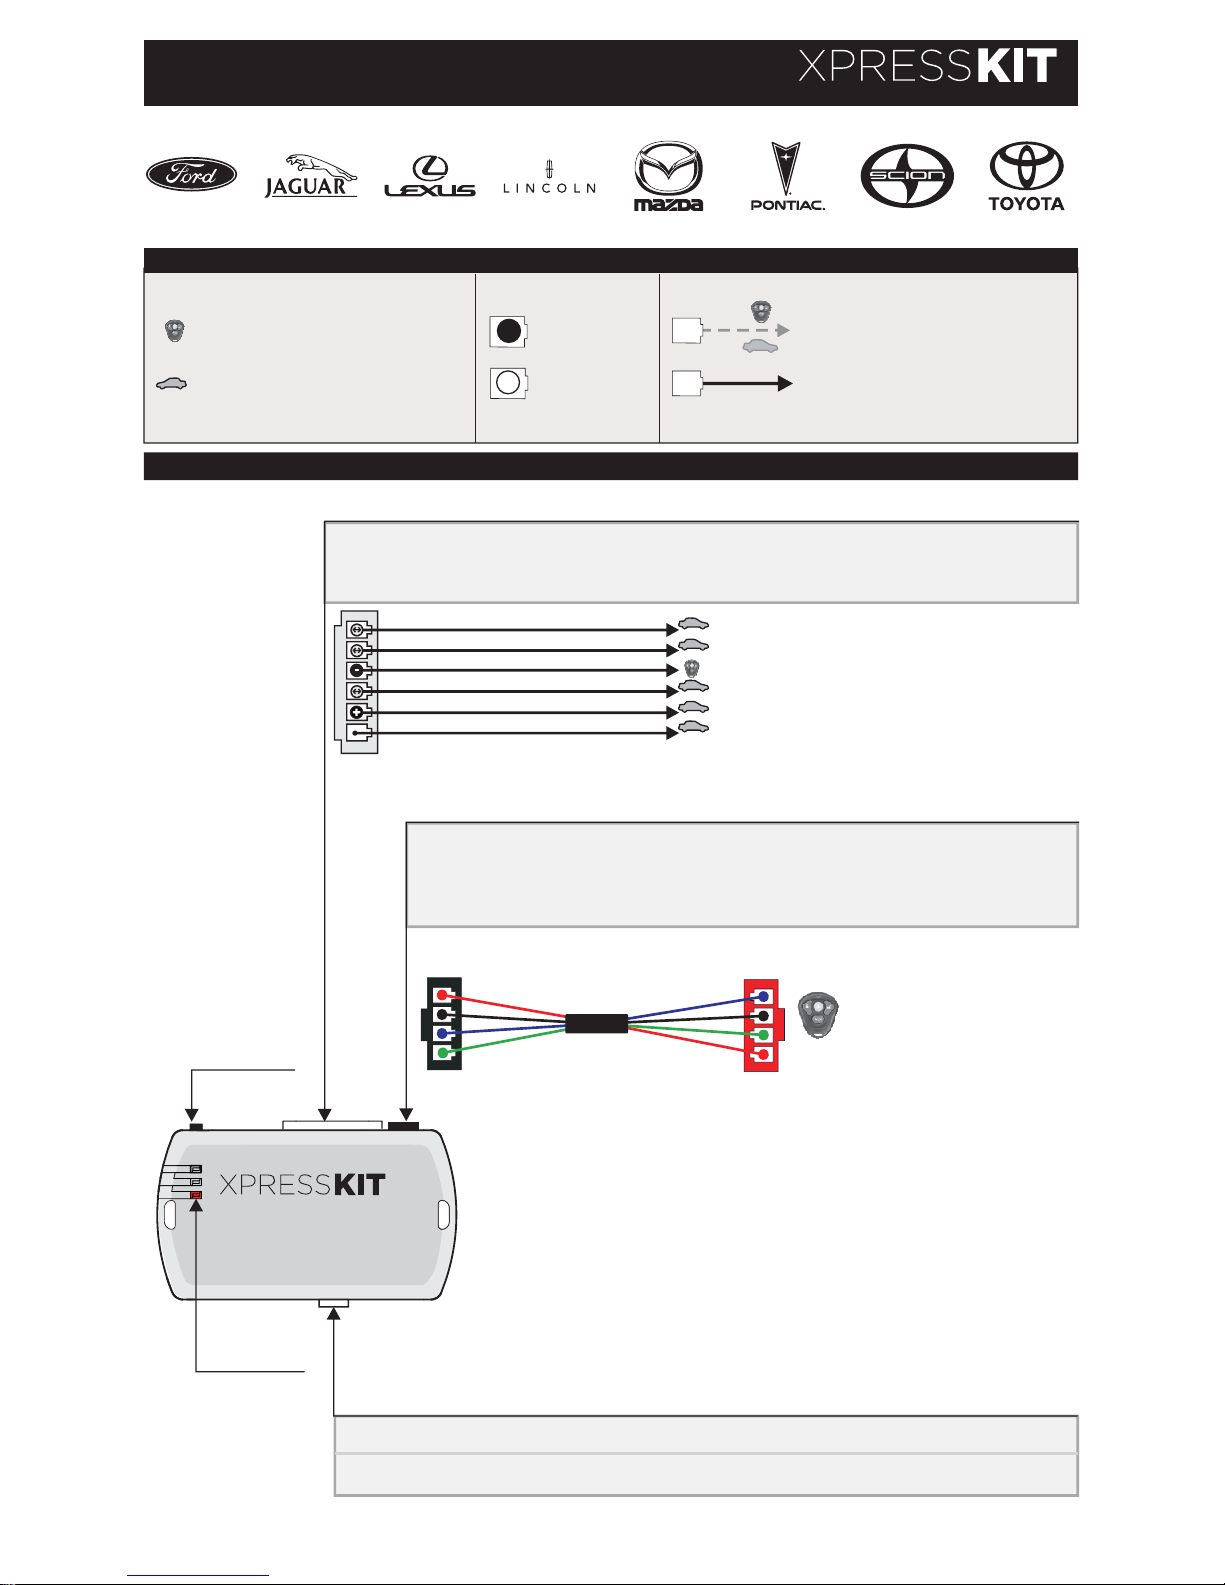
Connect the provided D2D cable to the XKLOADER to update the module firmware via Internet
Connectez le câble D2D fourni au XKLOADER pour les mises à jour du module par internet.
Connector 1 (Black/Red - 4 ):
Determine the type of installation:
- INSTALLATION WITH D2D
- INSTALLATION WITHOUT D2D
See page 3
pin
Connector 2 (White - 6 pin):
See connection and Programming associated
with the vehicle in the Vehicle Fit Guide (P.4-5).
2
conn.
conn.
Data 2
Purple/White | Mauve/Blanc
Yellow/Black | Jaune/Noir
Blue | Bleu
Green | Vert
Pink | Rose
Black | Noir
Data 1
(-)While running (status)
See configuration
Key Sense
Connecteur 2 (Blanc - ):
Déterminez le type de branchement et de
programmation selon votre véhicule. (Voir GUIDE
DES VOITURES, P.4-5).
6 pins
Ground
Connect wire to Remote Starter/Alarm
Branchement du filage au démarreur
à distance/Alarme
Connect wire to vehicle
Branchement du filage au véhicule
WIRE LEGEND | LEGENDE
D2D Cable | Câble D2D
HARDWARE : 2 and higher
White 4-pin connector for Internet Firmware Update
MATÉRIEL : 2 et plus
Connecteur Blanc 4 pins pour mise à jour par internet
Connector 2 (White - 6 pin) | Connecteur 2 (Blanc - 6 pins)
(Red - 4 pin)
(Rouge - 4 pins)
(Black - 4 pin)
(Noir - 4 pins)
Programming
button
Bouton de
programmation
Red LED
RougeDEL
W
WIRING GUIDE
Connecteur 1 (Noir/Rouge - ):
Déterminez le type d’installation:
-Pour l’INSTALLATION D2D
-Pour l'INSTALLATION SANS D2D
4 pins
Voir page 3
Connection always required
Branchement toujours requis
Connection not required with D2D
Branchement non requis avec D2D
Input | Entrée
Output | Sortie
PKTX
DATA KEY BYPASS
Rev.: 20140401
Page 2 / 12
Page 3
1
1
2
4
3
2
Port
D2D
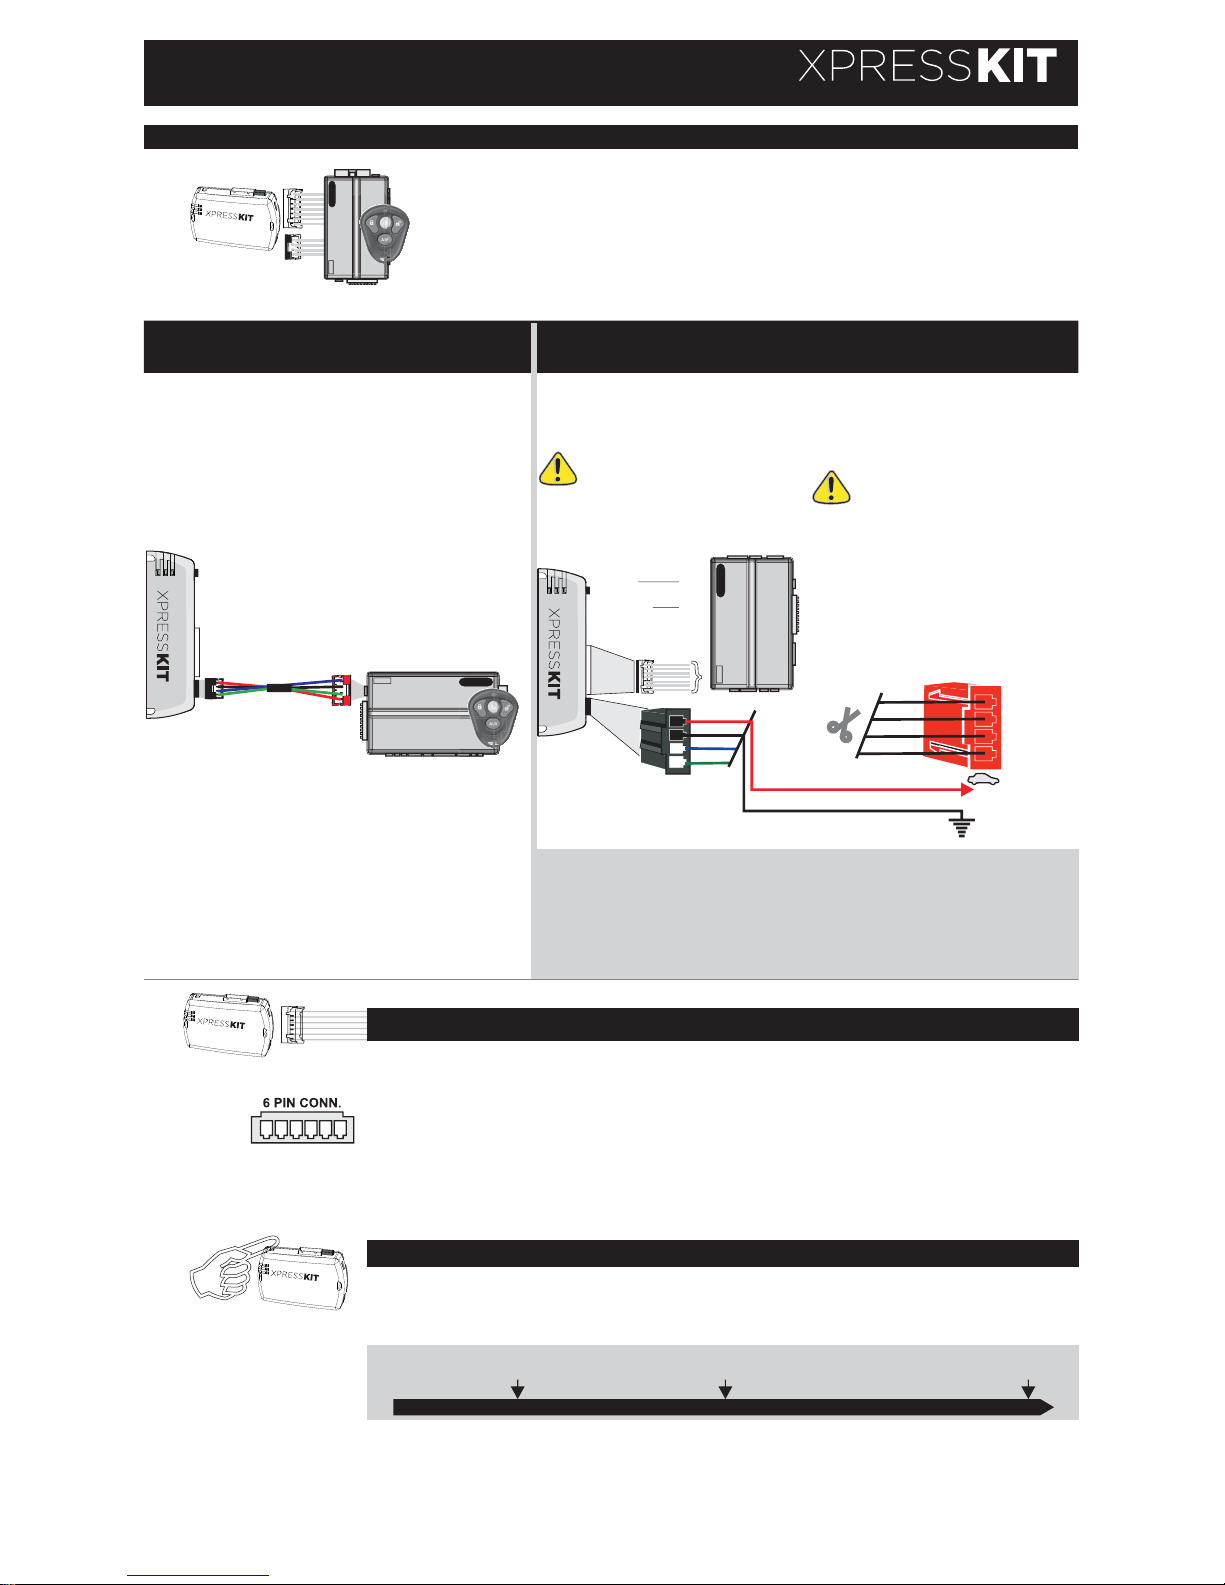
INSTALLATION WITHOUT D2D /
INSTALLATION SANS D2D
INSTALLATION WITH D2D
/ INSTALLATION AVEC D2D
2
1
Starter or alarm
without D2D
Démarreur ou alarme
sans D2D
D2D Cable
Pin 1 Red | Rouge (+)12V
CUT
Pin 2 Black | Noir Ground
1
Déterminez si le démarreur
à distance ou système
d'alarme est compatible en
D2D 2-voies.
Determine if the remote
starter or alarm system
supports 2-way D2D.
INSTALLATION PROCEDURE
In order to utilize this type of connection the
remote starter or alarm system must be
compatible with the XpressKit D2D protocol.
Consult the installation guide.
For all other remote starters or
alarm systems perform the
following connections.
Pour tout autres types de
démarreurs à distance ou
alarme, effectuez les
branchements suivants.
Port
D2D
Remote
Starter/Alarm
Démarreur à
distance/alarme
Le démarreur à distance ou le système
d'alarme doit être compatible avec le
XpressKit D2D pour ces branchements.
Consultez le guide d'installation du démarreur
à distance ou du système d'alarme.
Faire les branchements
Make the connections
3
PROCÉDURE DE PROGRAMMATION
PROGRAMMING PROCEDURE
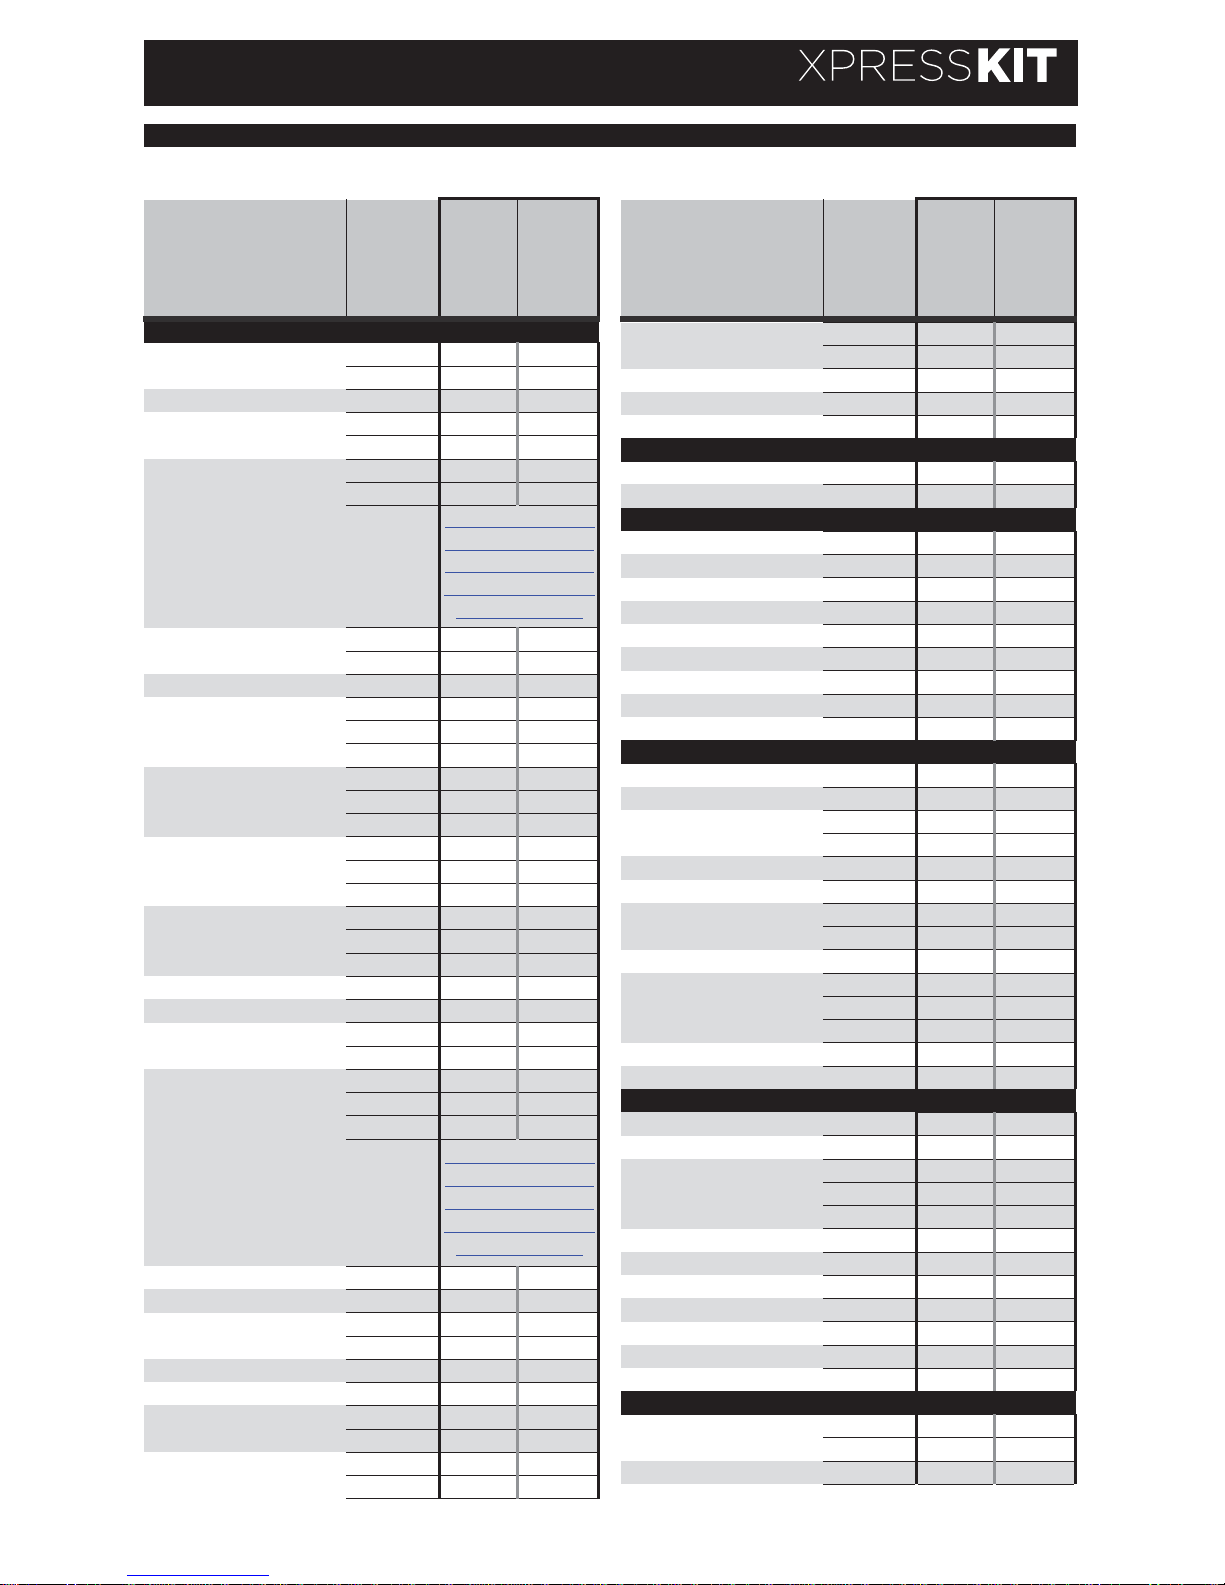
Determine the programming procedure
required for the vehicle in the VEHICLE
FIT GUIDE.
Déterminez le type de programmation selon
votre véhicule dans le GUIDE DES
VÉHICULES.
VEHICLE MAKE MODEL YEAR
CONNECTION #
PROGRAM: #
Connection number
Numéro de connexion
Programming number
Numéro de programmation
Vehicle(s) associated with the procedure
Véhicule(s) associé(s) à la configuration
6 Pins Connecteur (Blanc ):
Effectuez les branchements associés au
véhicule dans le GUIDE DES VÉHICULES.
6 Pin Connector (White):
Make the connections associated with
the vehicle from the VEHICLE FIT
GUIDE.
Cut off the Red connector
of the D2D cable
4 Pin
Connect the Red
wire to +12V
(Pin1)
Connect the Black
wire to Ground
(Pin2)
1
2
3
Coupez le Rouge
du câble D2D
connecteur 4 pins
Connectez le fil rouge (Pin1)
au 12V
Connectez le fil noir
à la masse du véhicule.
(Pin2)
1
2
3
(Black - 4 pin)
(Noir - 4 pins)
(Red - 4 pin)
(Rouge - 4 pins)
(Black - 4 pin)
(Noir - 4 pins)
(Red - 4 pin)
(Rouge - 4 pins)
NOTE: The firmware should
be updated (if required)
before cutting the D2D
connector.
NOTE: Le microprogramme
devrait être mis à jour (si
requis) avant de couper le
connecteur D2D.
PKTX
DATA KEY BYPASS
Rev.: 20140401
Page 3 / 12
Page 4
VEHICLESVEHICULES YEARSANNÉES
Connection#
programming#
programmation#
FORD
CrownVictoria 2003Ͳ200
4
1B 2
2005Ͳ2012 1A 2
EconolineͲESerie
s
2008Ͳ201
4
1B 2
Edge 2007Ͳ201
1
1
A
2
80bit
(
S
A ) 2011Ͳ201
4
31
Escape 2001Ͳ200
7
1C 2
40bi
t
2008Ͳ201
2
1
A
2
2013Ͳ2014
EscapeHybrid 2005Ͳ200
7
1C 2
40bi
t
2008Ͳ201
2
1
A
2
Excursion 2003Ͳ200
5
1
A
2
Expedition 2002 1
A
2
2003Ͳ2006 1C 2
40bi
t
2007Ͳ201
4
1
A
2
Explorer 2001Ͳ200
5
1C 2
40bi
t
2006Ͳ201
1
1
A
2
80bit
(
S
A ) 2011Ͳ201
4
31
F150 2004Ͳ200
8
1C 2
40bi
t
2009Ͳ201
1
1
A
2
80bit
(
S
A ) 2011Ͳ201
4
31
F250ͲF350ͲF45
0
2007Ͳ200
8
1
A
2
40bi
t
2009Ͳ201
1
1
A
2
80bit
(
S
A ) 2011Ͳ201
3
31
Fiesta 2011Ͳ201
3
1
A
2
FiveHundred 2005Ͳ200
7
1
A
2
Flex 2009Ͳ201
0
1
A
2
80bit
(
S
A ) 2011Ͳ201
3
31
Focus 2000Ͳ200
7
1C 2
40bi
t
2008Ͳ201
1
1
A
2
80bit
(
S
A ) 2011Ͳ201
4
31
2012Ͳ2014
Freestar 2004Ͳ200
7
1B 2
Freestyle 2005Ͳ200
7
1
A
2
Fusion 2006 1
A
2
40bi
t
2007Ͳ201
2
1
A
2
GT 2005Ͳ200
8
1
A
2
Mustang 2005Ͳ201
4
1
A
2
Ranger 2001Ͳ200
6
1D 2
40bi
t
2007Ͳ201
3
1B 2
SportTra
c
2001Ͳ200
5
1B 2
40bi
t
2006Ͳ201
2
1
A
2
http://www.xpresskit.
com/DocumentDownl
oad.aspx?documentid
=7175&productid=471
&firmwareid=2180
http://www.xpresskit.
com/DocumentDownl
oad.aspx?documentid
=7175&productid=471
&firmwareid=2180
VEHICLESVEHICULES YEARSANNÉES
Connection#
programming#
programmation#
Taurus 2000Ͳ200
7
1B 2
40bi
t
2008Ͳ201
3
1
A
2
TaurusX 2008Ͳ200
9
1
A
2
Thunderbird 2002Ͳ200
5
1C 2
Windstar 2001Ͳ200
3
1B 2
JAGUAR
SͲType 2000Ͳ200
7
1C 2
XͲType 2003Ͳ200
9
1C 2
LEXUS
ES350 2007Ͳ200
8
23
GX470 2003Ͳ200
8
23
IS250 2006Ͳ200
8
23
IS350 2007Ͳ200
8
23
LS430 2003Ͳ200
6
23
LX470 2003Ͳ200
7
23
RX330 2004Ͳ200
6
23
RX350 2007Ͳ200
9
23
RX400H 2006Ͳ200
9
23
LINCOLN
Aviator 2003Ͳ200
5
1C 2
Blackwood 2003 1B 2
LS 2000Ͳ200
2
1C 2
2003Ͳ2006 1C 2
MarkL
T
2006Ͳ200
8
1C 2
MKS 2009Ͳ201
2
1
A
2
MKX 2007Ͳ201
0
1
A
2
80bit
(
S
A ) 2011Ͳ201
2
31
MKZ 2007Ͳ201
2
1
A
2
Navigator 2002 1B 2
2003Ͳ2006 1C 2
2007Ͳ2014 1A 2
TownCa
r
2003Ͳ201
1
1
A
2
Zephy
r
2006 1
A
2
MAZDA
3ͲAxela 2004Ͳ201
3
1F 2
5 2006Ͳ201
2
1F 2
6ͲAtenza 2003Ͳ200
5
1F 2
2006Ͳ2008 1F 2
2009Ͳ2013 1E 2
BͲSeries 2002Ͳ200
9
1B 2
CXͲ7 2007Ͳ201
2
1F 2
CXͲ9 2007Ͳ201
3
1F 2
Mazda2 2011Ͳ201
3
1E 2
MXͲ5ͲMiata 2006Ͳ201
2
1F 2
RXͲ8 2003Ͳ201
1
1F 2
Tribute 2001Ͳ201
2
1C 2
MERCURY
GrandMarquis 2003Ͳ200
4
1B 2
2005Ͳ2010 1A 2
Maraude
r
2003Ͳ200
4
1B 2
VEHICLE FIT GUIDE | GUIDE DES VÉHICULES
PKTX
DATA KEY BYPASS
Rev.: 20140401
Page 4 / 12
Page 5
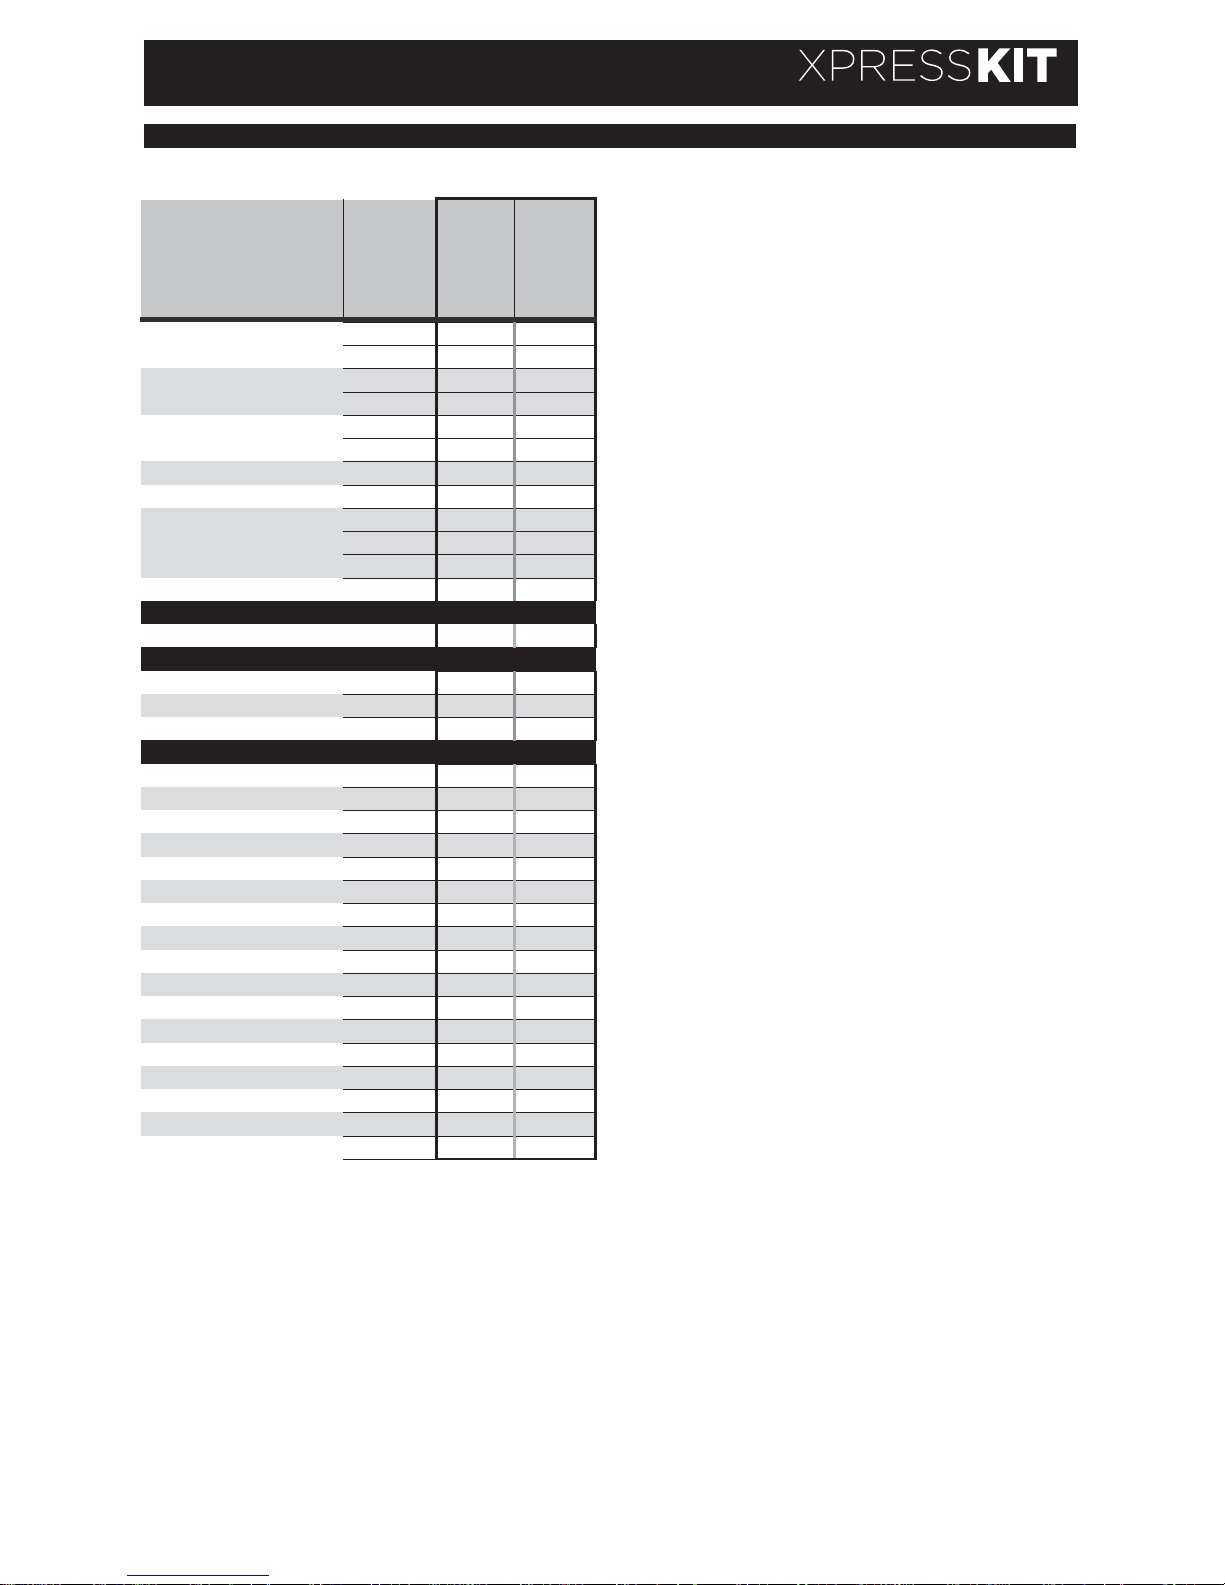
VEHICLESVEHICULES YEARSANNÉES
Connection#
programming#
programmation#
Marine
r
2005Ͳ200
7
1C 2
2008Ͳ2010 1A 2
MarinerHybrid 2005Ͳ200
7
1C 2
2008Ͳ2010 1A 2
Milan 2006 1B 2
2007Ͳ2010 1A 2
Montego 2005Ͳ200
7
1B 2
Monterey 2004Ͳ200
7
1
A
2
Mountainee
r
2001 1B 2
2002Ͳ2005 1C 2
2006Ͳ2010 1A 2
Sable 2000Ͳ200
9
1
A
2
PONTIAC
Vibe 2008Ͳ2010
23
SCION*
TC 2005Ͳ201
0
23
XB 2008Ͳ201
0
23
XD 2008Ͳ201
0
23
TOYOTA*
4Runne
r
2003Ͳ200
9
23
Avalon 2005Ͳ200
9
23
Camry 2004Ͳ201
0
23
Corolla 2003Ͳ201
0
23
FJCruise
r
2007Ͳ200
9
23
HighlanderͲKluge
r
2004Ͳ201
0
23
HighlanderHybrid 2006Ͳ201
0
23
LandCruise
r
2003Ͳ200
9
23
Matrix 2005Ͳ201
0
23
Rav4 2004Ͳ201
0
23
Sequoia 2008Ͳ200
9
23
Sienna 2004Ͳ201
0
23
Solara 2004Ͳ200
8
23
Tacoma 2005Ͳ201
0
23
Tundra 2007Ͳ201
0
23
Venza 2009Ͳ201
2
23
Yaris 2006Ͳ201
0
23
*Toyota/Scion: G Keys are not supported
*Toyota/Scion: Clés G ne sont pas supportées
VEHICLE FIT GUIDE | GUIDE DES VÉHICULES
PKTX
DATA KEY BYPASS
Rev.: 20140401
Page 5 / 12
Page 6
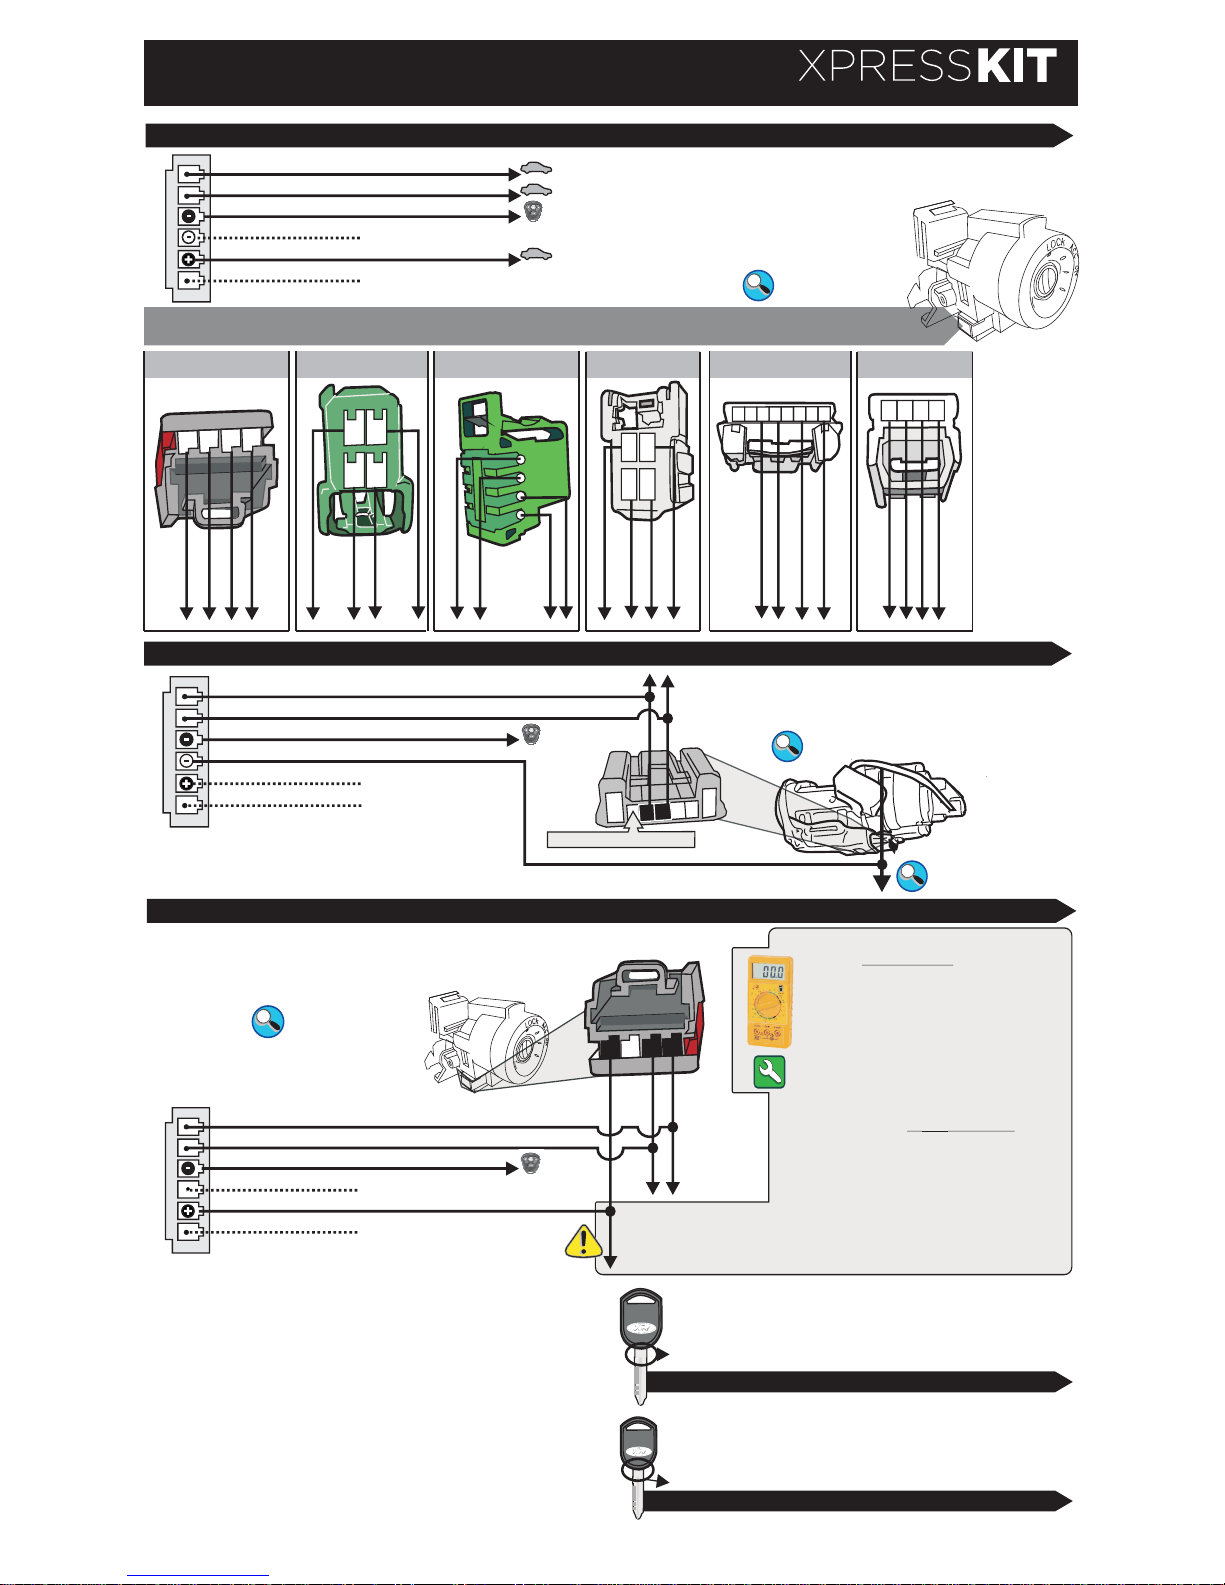
GO PROGRAM: 2
FORD / MAZDA / JAGUAR / LINCOLN / MERCURY
Key Sense:
Next to White/Black.
À côté du fil
Blanc/Noir
Ignition barrel
Barillet d'ignition
Tx (Data Out)
Key Sense
Purple/White
Yellow/Black
Blue
Green
Pink
Black
N.c.
Rx (Data In)
N.c.
Tx (Data Out)
Purple/White
Yellow/Black
Blue
Green
Pink
Black
N.c.
Rx (Data In)
N.c.
Ignition
B
1
2
3
4
C
1
2
3
4
D
E
F
12
3
4
12345678
12
3
4
A
12
3
4
GO PROGRAM: 3
TOYOTA / LEXUS / SCION
TX
RX
Empty Pin | Pin Vide
CONNECTION 1
CONNECTION 2
Front view
Vue de Face
TX
RX
Ignition
Ground
Ground
Ignition
TX
Ignition
Ground
TX
RX
RX
TX
RX
Ignition
Ground
RX
TX
RX
TX
Ignition
Ground
Ground
Ignition
IGNITION BARREL CONNECTOR | CONNECTEURS AU BARILLET D'IGNITION
Back view
Back Face
Ignition barrel
Barillet d'ignition
FORD SA KEY
CONNECTION 3
RX
TX
Connected only at
Immo Power Pin1
Branchement seulement
au Immo Power Pin1
1 234
Purple/White
Yellow/Black
Blue
Green
Pink
Tx (Data Out)
Rx (Data In)
Black
N.c.
Ignition barrel
Barillet de l'ignition
Immo Power
N.c.
Voltage test to determine if
SA key is 40-bit or 80-bit:
80-bit Key (See programming 1):
NO Key IN : 0V
Key IN & Ign OFF : +12V
Key IN & Ign ON : +12V
40-bit Key (See programming 2):
NO Key IN : 0V
Key IN & Ign OFF : 0V
Key IN & Ign ON : +12V
Tests de voltage pour déterminer si
la clé SA est une 40 ou 80-bits.
Clé
-bits
80-bits (Voir programmation 1):
Pas de Clé : 0V
Clé insérée & Ign éteinte : +12V
Clé insérée & Ign allumée : +12V
Clé 40-bits (Voir programmation 2):
Pas de Clé : 0V
Clé insérée & Ign éteinte : 0V
Clé insérée & Ign allumée : +12V
(-)While running (status)
(-)While running (status)
(-)While running (status)
GO PROGRAM: 1
SA
SA
80-bit
GO PROGRAM: 2
SA
SA
40-bit
PKTX
DATA KEY BYPASS
Rev.: 20140401
Page 6 / 12
Page 7
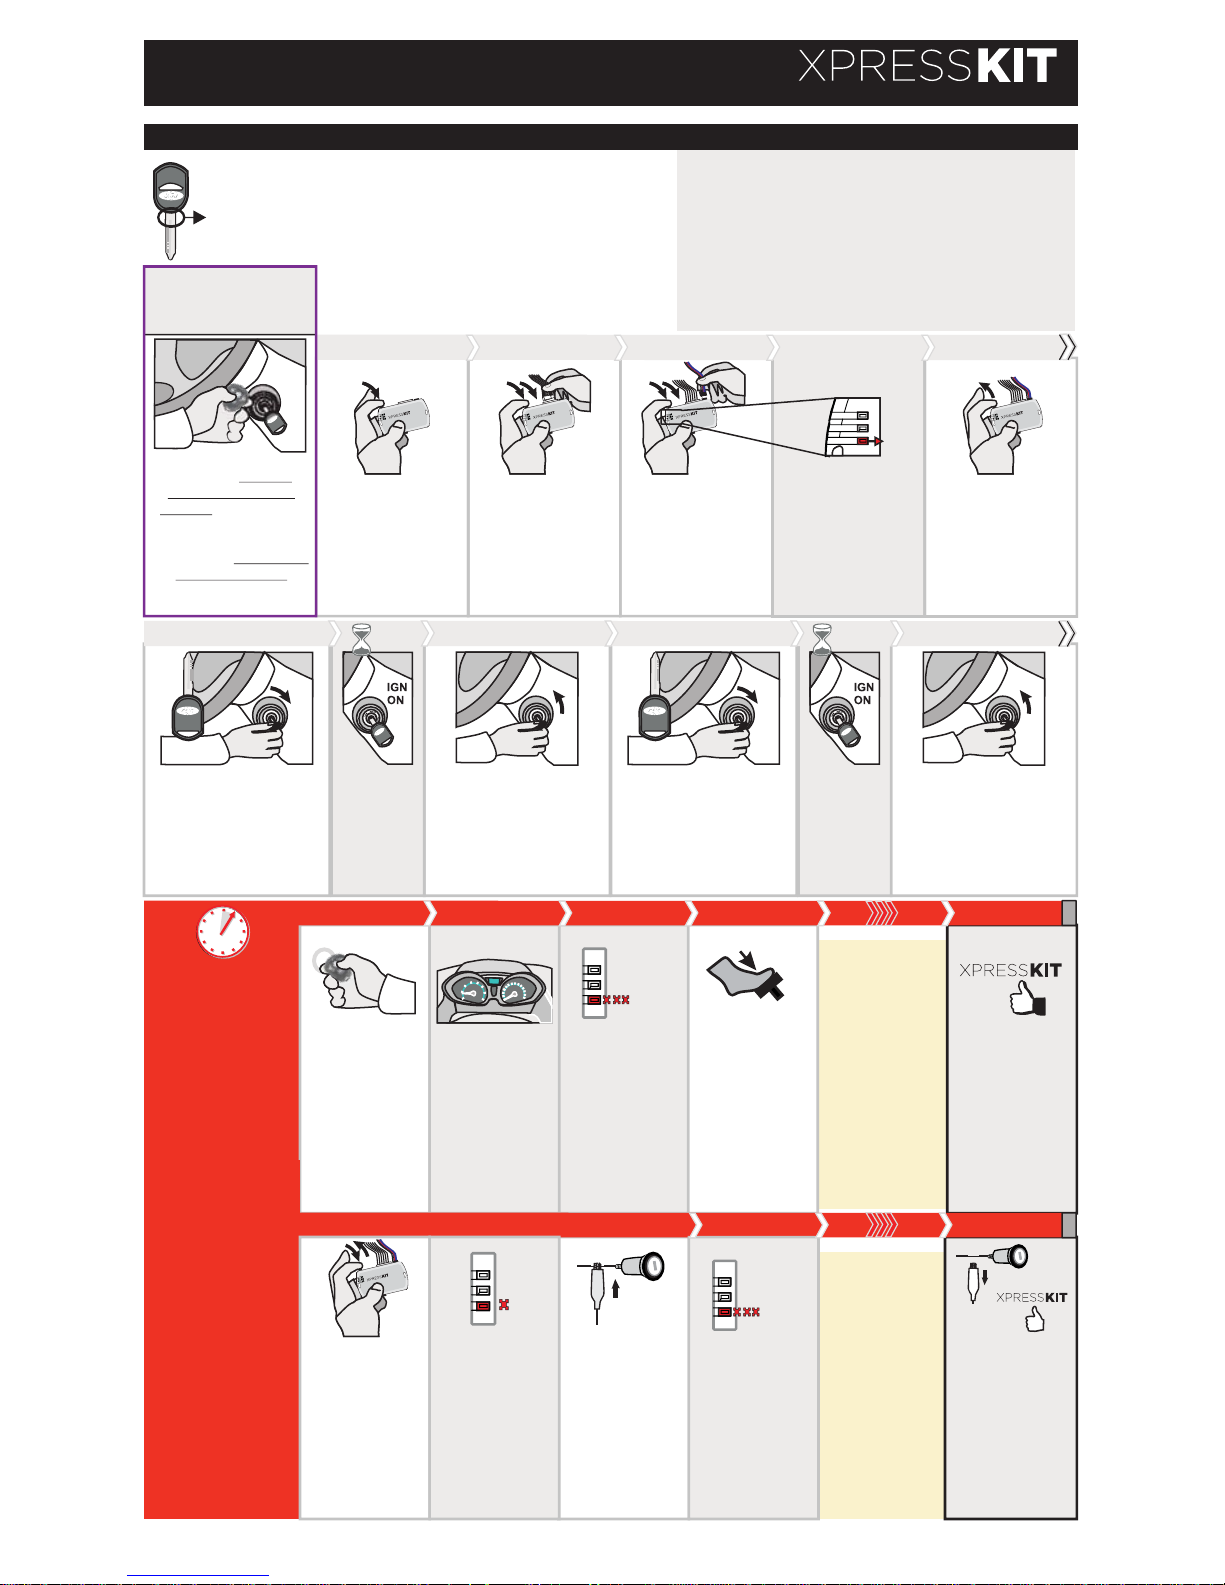
Wait 3
seconds.
Attendre 3
secondes.
LOCK
ACC ON
PUSH
START
OFF
Turn the ignition to the
OFF position and
remove the key.
Tournez la clé à la
position ARRÊT (OFF)
et retirez la clé du
barillet.
Turn the first key in
the ignition to the
ON/RUN position.
Tournez la clé
fonctionnelle #1 à la
position ON/RUN.
LOCK
ACC ON
PUSH
START
IGN
KEY#1
Turn the second key
in the ignition to the
ON/RUN position.
Tournez la clé
fonctionnelle #2 à la
position ON/RUN.
LOCK
ACC ON
PUSH
START
IGN
KEY#2
Wait 3
seconds.
Attendre 3
secondes.
Press and hold the
programming
button:
Appuyez et
maintenir enfoncé
le bouton de
programmation:
The RED LED
turn ON.
La DEL ROUGE
s'allume.
Insert the 4 Pin
(D2D) connector.
Insérez le
connecteur 4 pins
(D2D).
Release the
programming
button.
Relâchez le bouton
de programmation.
Insert the 6 Pin
connector.
Insérez le
connecteur 6 pins.
1
1
2
3
3 sec.
The remote starter must
be able to start the
vehicle with the key
inserted in the ignition
barrel at OFF position.
Le démarreur à distance
doit pouvoir démarrer le
véhicule avec clé
insérée dans le barillet
en position OFF.
LOCK
ACC ON
START
IGN
OFF
3 sec.
LOCK
ACC ON
PUSH
START
OFF
Turn the ignition to the
OFF position and
remove the key.
Tournez la clé à la
position ARRÊT (OFF)
et retirez la clé du
barillet.
The first key that is inserted during programming will
be the key which is copied. NOTE : All ''MY KEY''
restrictions of key 1 (used during programming) will be
applied after the vehicle is remote started (key
takeover).
La première clé inserée durant la programmation sera
la clé copiée. NOTE : Toutes les restrictions ''MY KEY''
de la clé 1 (utilisée pour la programmation) seront
appliqués à la conduite du véhicule après le
démarrage à distance.
SA
SA
80-bit
Before programming
the PKTX
Avant de programmer
le PKTX
PROGRAM. 1
AUTOMATIC
Transmission
AUTOMATIQUE
4
x10
FLASH
5 sec. max
Ignition1
12V
Ignition ON
If the LED is
solid RED
disconnect the 4
Pin conn. (D2D)
and go back to
step 1.
Si le DEL est
ROUGE solide
débranchez le
conn. 4 pins
(D2D) et
retournez à
l'étape 1.
Activate the
remote starter.
Actionnez le
démarreur à
distance.
The RED LED
will flash rapidly
ten (10) times.
La DEL ROUGE
clignotera dix
(10) fois
rapidement.
The module is
now
programmed.
Le module est
programmé.
The vehicle's
ignition will turn
on but the
vehicle will not
start.
L'ignition du
véhicule
s'allume,
mais le véhicule
ne démarre pas.
Press the foot-
brake to
disengage the
remote starter.
Appuyez sur le
frein pour
désengager le
démarreur à
distance.
CAUTION
The next step must be
completed in less than
5 seconds. If you go
over 5 seconds,
disconnect all
connectors and go
back to step 1.
ATTENTION
la prochaine étape
doit être complétée en
moins de 5
secondes. Si vous
dépassez le 5
secondes,
débranchez tous les
connecteurs et allez à
l'étape 1.
Using a jumper
wire, apply
power (12v) to
the vehicle's
ignition1.
À l’aide d’un fil
(jumper)
appliquez 12v
sur l’ignition1 du
véhicule.
Remove the
jumper.
The module is
now
programmed.
Retirez le fil
(jumper).Le
module est
programmé.
MANUAL
Transmission
MANUELLE
AUTOMATIC
MANUAL
If the LED is
solid RED
disconnect the 4
Pin conn. (D2D)
and go back to
step 1.
Si le DEL est
ROUGE solide
débranchez le
conn. 4 pins
(D2D) et
retournez à
l'étape 1.
x10
FLASH
The RED LED
will flash rapidly
ten (10) times.
La DEL ROUGE
clignotera dix
(10) fois
rapidement.
X1
The RED LED
will flash once
(1x).
La DEL
ROUGE
clignote 1 fois.
Press and
release the
programming
button.
Pesez et
relâchez le
bouton de
programmation.
Ignition
80-BIT KEY
PKTX
DATA KEY BYPASS
Rev.: 20140401
This programming procedure is
only for 80-bit keys. To determine
if the vehicle utilizes an 80-bit key
refer to Connection #3 on page 6.
Cette programmation est
seulement pour les clés 80-bit.
Pour déterminer si le véhicule
utilise une clé 80-bit référez-vous
à la Connexion #3, page 6.
2 clés requises
2 keys required
Page 7 / 12
Page 8
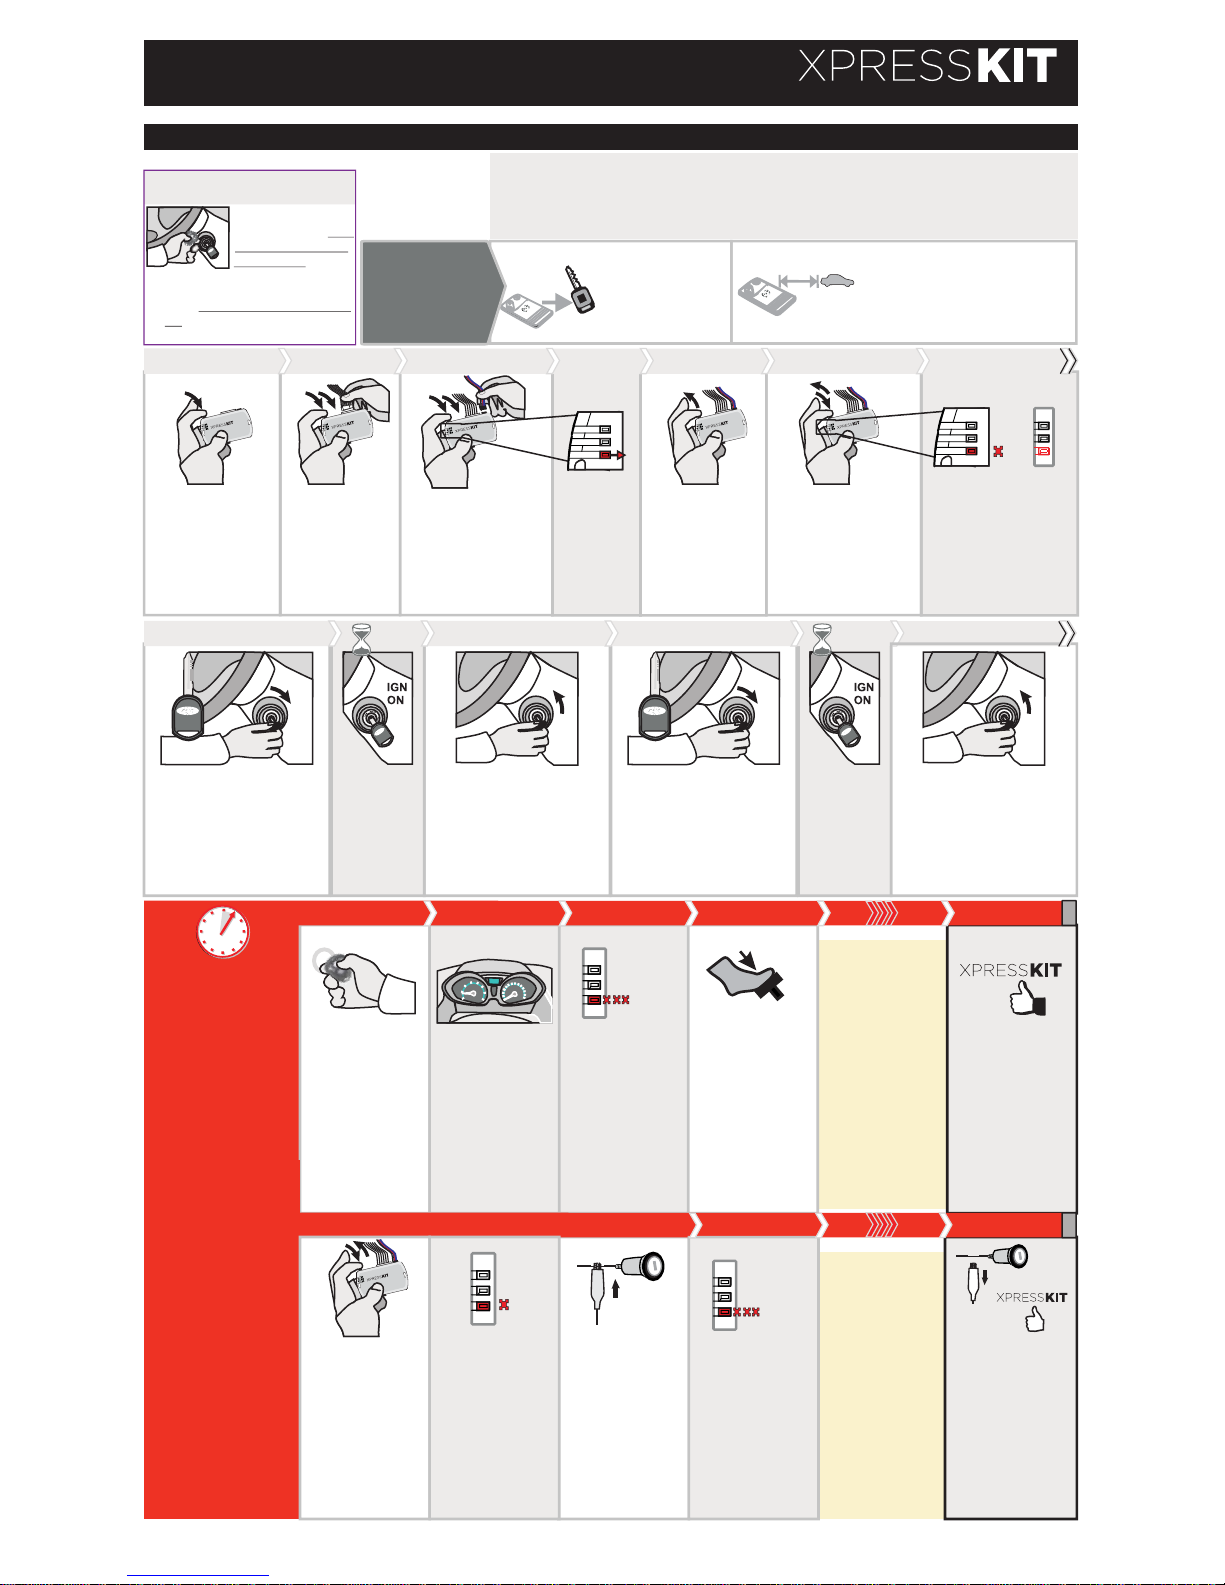
Wait 3
seconds.
Attendre 3
secondes.
LOCK
ACC ON
PUSH
START
OFF
Turn the ignition to the
OFF position and
remove the key.
Tournez la clé à la
position ARRÊT (OFF)
et retirez la clé du
barillet.
Turn the first key in
the ignition to the
ON/RUN position.
Tournez la clé
fonctionnelle #1 à la
position ON/RUN.
LOCK
ACC ON
PUSH
START
IGN
KEY#1
Turn the second key
in the ignition to the
ON/RUN position.
Tournez la clé
fonctionnelle #2 à la
position ON/RUN.
LOCK
ACC ON
PUSH
START
IGN
KEY#2
Wait 3
seconds.
Attendre 3
secondes.
3
3
4
3 sec. 3 sec.
LOCK
ACC ON
PUSH
START
OFF
Turn the ignition to the
OFF position and
remove the key.
Tournez la clé à la
position ARRÊT (OFF) et
retirez la clé du barillet.
AUTOMATIC
Transmission
AUTOMATIQUE
5
x10
FLASH
5 sec. max
Ignition1
12V
Ignition ON
If the LED is
solid RED
disconnect the 4
Pin conn. (D2D)
and go back to
step 1.
Si le DEL est
ROUGE solide
débranchez le
conn. 4 pins
(D2D) et
retournez à
l'étape 1.
Activate the
remote starter.
Actionnez le
démarreur à
distance.
The RED LED
will flash rapidly
ten (10) times.
La DEL ROUGE
clignotera dix
(10) fois
rapidement.
The module is
now
programmed.
Le module est
programmé.
The vehicle's
ignition will turn
on but the
vehicle will not
start.
L'ignition du
véhicule
s'allume,
mais le véhicule
ne démarre pas.
Press the foot-
brake to
disengage the
remote starter.
Appuyez sur le
frein pour
désengager le
démarreur à
distance.
CAUTION
The next step must be
completed in less than
5 seconds. If you go
over 5 seconds,
disconnect all
connectors and go
back to step 1.
ATTENTION
la prochaine étape
doit être complétée en
moins de 5
secondes. Si vous
dépassez le 5
secondes,
débranchez tous les
connecteurs et allez à
l'étape 1.
Using a jumper
wire, apply
power (12v) to
the vehicle's
ignition1.
À l’aide d’un fil
(jumper)
appliquez 12v
sur l’ignition1 du
véhicule.
Remove the
jumper.
The module is
now
programmed.
Retirez le fil
(jumper).Le
module est
programmé.
MANUAL
Transmission
MANUELLE
AUTOMATIC
MANUAL
If the LED is
solid RED
disconnect the 4
Pin conn. (D2D)
and go back to
step 1.
Si le DEL est
ROUGE solide
débranchez le
conn. 4 pins
(D2D) et
retournez à
l'étape 1.
x10
FLASH
The RED LED
will flash rapidly
ten (10) times.
La DEL ROUGE
clignotera dix
(10) fois
rapidement.
X1
The RED LED
will flash once
(1x).
La DEL
ROUGE
clignote 1 fois.
Press and
release the
programming
button.
Pesez et
relâchez le
bouton de
programmation.
Ignition
Press and hold
the programming
button:
Appuyez et
maintenir
enfoncé le bouton
de programmation:
The RED
LED turns
ON.
La DEL
ROUGE
s'allume.
Insert the 4 Pin
(D2D) connector.
Insérez le
connecteur 4 pins
(D2D).
Release the
programming
button.
Relâchez le
bouton de
programmation.
Insert the 6
Pin
connector.
Insérez le
connecteur 6
pins.
1
Press 2 times on
the programming
button.
Appuyez 2 fois sur
le bouton de
programmation.
2
The Red LED will
flash once every
second.
La DEL ROUGE
clignotera 1 fois
par secondes.
x2
X1
PROGRAM. 2
FORD / MAZDA / JAGUAR / LINCOLN / MERCURY
Remove all keys
from key remote
cards. | Retirez les
2 clés des télécommandes. (cartes).
10’
Keep all cards at least 3 meters
(10 feet) away from the vehicle
to proceed. | Éloignez les
télécommandes du véhicule (10
pieds / 3 mètres minimum) pour
procéder à la programmation.
Vehicle equipped
with SMART KEY
Véhicule équipé
d'une clé
INTELLIGENTE
The first key that is inserted during programming will be the key which is copied. NOTE : All
''MY KEY'' restrictions of key 1 (used during programming) will be applied after the vehicle is
remote started (key takeover). | La première clé inserée durant la programmation sera la
clé copiée. NOTE : Toutes les restrictions ''MY KEY'' de la clé 1 (utilisée pour la
programmation) seront appliqués à la conduite du véhicule après le démarrage à distance.
Before programming the PKTX
Avant de programmer le PKTX
The remote starter
must be able to start
the vehicle with the
key inserted in the
ignition barrel at OFF position.
Le démarreur à distance doit
pouvoir démarrer le véhicule avec
clé insérée dans le barillet en
position OFF.
LOCK
A
C
C ON
START
IGN
ON
40-BIT KEY
PKTX
DATA KEY BYPASS
Rev.: 20140401
2 clés
requises
2 keys
required
Page 8 / 12
Page 9
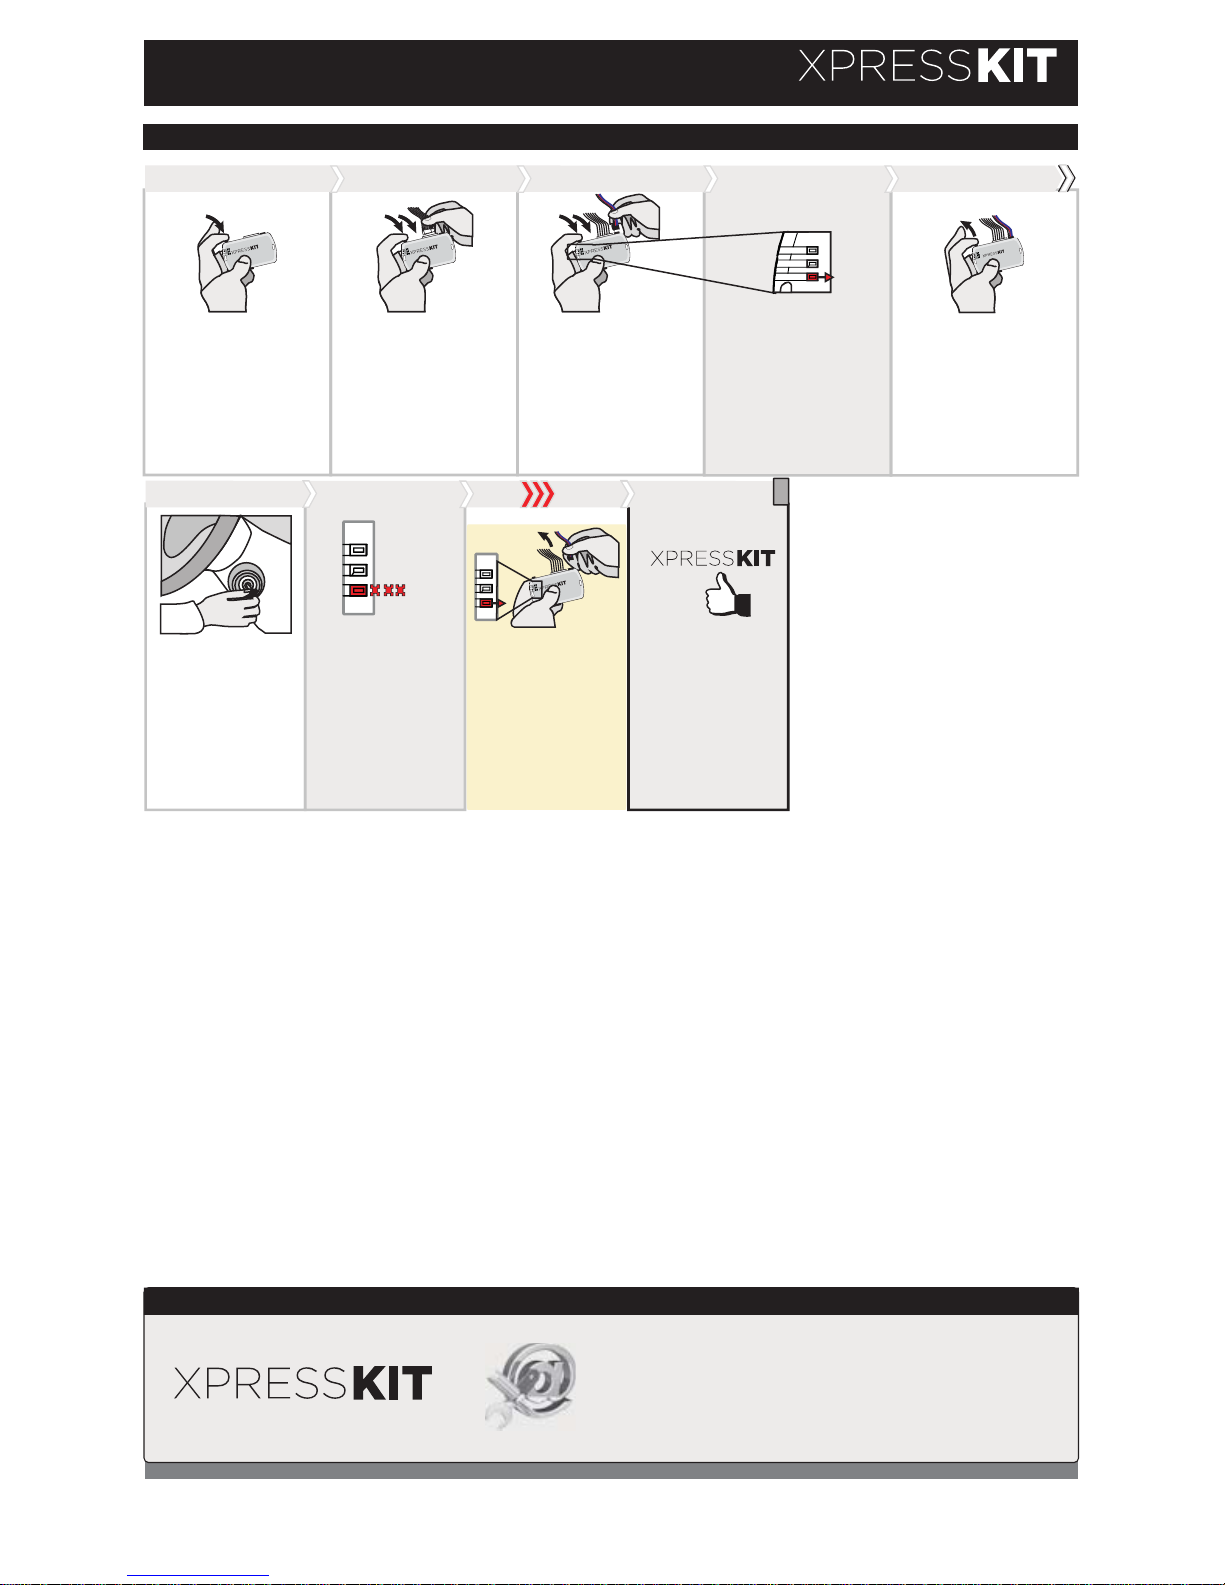
Press and hold
the programming
button:
Appuyez et
maintenir
enfoncé le bouton
de programmation:
Release the
programming button.
Relâchez le bouton
de programmation.
Insert the 6 Pin
connector.
Insérez le
connecteur 6 pins.
Insert the 4 Pin
(D2D) connector.
Insérez le
connecteur 4 pins
(D2D).
The RED LED
turn ON.
La DEL ROUGE
s'allume.
1
1
LOCK
ACC ON
PUSH
START
Insert any functional
key into the ignition
barrel.
Insérez une clé
fonctionnelle dans le
barillet.
x10
The RED LED will
flash rapidly ten (10)
times.
La DEL ROUGE
clignotera dix (10) fois
rapidement.
The module is
now
programmed.
Le module est
programmé.
If the LED is solid
RED disconnect the 4
Pin connector (D2D)
and go back to step
1.
Si le DEL est ROUGE
solide débranchez le
connecteur 4 pins
(D2D) et retournez à
l'étape 1.
FLASH
PROGRAM. 3
TOYOTA / LEXUS / SCION
TECHNICAL SUPPORT / INFORMATION
web resources:
www.xpresskit.com
www.directechs.com
2
PKTX
DATA KEY BYPASS
Rev.: 20140401
Page 9 / 12
Page 10

NOTES
PKTX
DATA KEY BYPASS
Rev.: 20140401
Page 10 / 12
Page 11

NOTES
PKTX
DATA KEY BYPASS
Rev.: 20140401
Page 11 / 12
Page 12
LIMITED ONE-YEAR CONSUMER WARRANTY
© 2014 Directed. All rights reserved.
www.xpresskit.com
For a period of ONE YEAR from the date of purchase of a Directed Electronics remote start or security product,
Directed Electronics. (“DIRECTED”) promises to the original purchaser, to repair or replace with a comparable
reconditioned piece, the security or remote start accessory piece (hereinafter the “Part”), which proves to be
defective in workmanship or material under normal use, provided the following conditions are met: the Part was
purchased from an authorized DIRECTED dealer; and the Part is returned to DIRECTED, postage prepaid, along
with a clear, legible copy of the receipt or bill of sale bearing the following information: consumer’s name, address,
telephone number, the authorized licensed dealer’s name and complete product and Part description.
This warranty is nontransferable and is automatically void if the Part has been modified or used in a manner
contrary to its intended purpose or the Part has been damaged by accident, unreasonable use, neglect, improper
service, installation or other causes not arising out of defect in materials or construction.
TO THE MAXIMUM EXTENT ALLOWED BY LAW, EXCEPT AS STATED ABOVE, ALL WARRANTIES,
INCLUDING BUT NOT LIMITED TO EXPRESS WARRANTY, IMPLIED WARRANTY, WARRANTY OF
MERCHANTABILITY, FITNESS FOR PARTICULAR PURPOSE AND WARRANTY OF NONINFRINGEMENT OF
INTELLECTUAL PROPERTY, ARE EXPRESSLY EXCLUDED; AND DIRECTED NEITHER ASSUMES NOR
AUTHORIZES ANY PERSON OR ENTITY TO ASSUME FOR IT ANY DUTY, OBLIGATION OR LIABILITY IN
CONNECTION WITH ITS PRODUCTS. DIRECTED HEREBY DISCLAIMS AND HAS ABSOLUTELY NO
LIABILITY FOR ANY AND ALL ACTS OF THIRD PARTIES INCLUDING DEALERS OR INSTALLERS.
DIRECTED IS NOT OFFERING A GUARANTEE OR INSURANCE AGAINST VANDALISM, DAMAGE, OR
THEFT OF THE AUTOMOBILE, ITS PARTS OR CONTENTS, AND DIRECTED HEREBY DISCLAIMS ANY
LIABILITY WHATSOEVER, INCLUDING WITHOUT LIMITATION, LIABILITY FOR THEFT, DAMAGE, OR
VANDALISM. IN THE EVENT OF A CLAIM OR A DISPUTE INVOLVING DIRECTED OR ITS SUBSIDIARY, THE
PROPER VENUE SHALL BE SAN DIEGO COUNTY IN THE STATE OF CALIFORNIA. CALIFORNIA STATE
LAWS AND APPLICABLE FEDERAL LAWS SHALL APPLY AND GOVERN THE DISPUTE. THE MAXIMUM
RECOVERY UNDER ANY CLAIM AGAINST DIRECTED SHALL BE STRICTLY LIMITED TO THE AUTHORIZED
DIRECTED DEALER’S PURCHASE PRICE OF THE PART. DIRECTED SHALL NOT BE RESPONSIBLE FOR
ANY DAMAGES WHATSOEVER, INCLUDING BUT NOT LIMITED TO, ANY CONSEQUENTIAL DAMAGES,
INCIDENTAL DAMAGES, DAMAGES FOR THE LOSS OF TIME, LOSS OF EARNINGS, COMMERCIAL LOSS,
LOSS OF ECONOMIC OPPORTUNITY AND THE LIKE. NOTWITHSTANDING THE ABOVE, THE
MANUFACTURER DOES OFFER A LIMITED WARRANTY TO REPLACE OR REPAIR AT DIRECTED’S
OPTION THE PART AS DESCRIBED ABOVE.
This warranty only covers Parts sold within the United States of America and Canada. Parts sold outside of the
United States of America or Canada are sold “AS-IS” and shall have NO WARRANTY, express or implied. Some
states do not allow limitations on how long an implied warranty will last or the exclusion or limitation of incidental or
consequential damages. This warranty gives you specific legal rights and you may also have other rights that vary
from State to State. DIRECTED does not and has not authorized any person or entity to create for it any other
obligation, promise, duty or obligation in connection with this Part.
For further details relating to warranty information of Directed products, please visit the support section of
DIRECTED’s website at: www.directed.com
920-10012-01 2013-07
This Interface kit / Data Bus Interface part has been tested on the listed vehicles. Other vehicles will be added to
the select vehicle list upon completion of compatibility testing. Visit website for latest vehicle application guide.
DISCLAIMER: Under no circumstances shall the manufacturer or the distributors of the bypass kit / data bus
interface part(s) be held liable for any consequential damages sustained in connection with the part(s)
installation. The manufacturer and it’s distributors will not, nor will they authorize any representative or any other
individual to assume obligation or liability in relation to the interface kit / data bus interface part(s) other than its
replacement. N.B.: Under no circumstances shall the manufacturer and distributors of this product be liable for
consequential damages sustained in connection with this product and neither assumes nor authorizes any
representative or other person to assume for it any obligation or liability other than the replacement of this product
only.
Protected by U.S. Patents: 5,719,551; 6,011,460 B1 *; 6,243,004 B1; 6,249,216 B1; 6,275,147 B1; 6,297,731 B1;
6,346,876 B1; 6,392,534 B1; 6,529,124 B2; 6,696,927 B2; 6,756,885 B1; 6,756,886 B2; 6,771,167 B1; 6,812,829
B1; 6,924,750 B1; 7,010,402 B1; 7,015,830 B1; 7,031,826 B1; 7,046,126 B1; 7,061,137 B1; 7,068,153 B1;
7,205,679 B1; Cdn. Patent: 2,320,248; 2,414,991; 2,415,011; 2,4
15,023; 2,415,027; 2,415,038; 2,415,041;
2,420,947; 2,426,670; 2,454,089; European Patent: 1,053,128; Pat. Pending: 2,291,306. Made in Canada.
PKTX
DATA KEY BYPASS
Rev.: 20140401
 Loading...