

Page 1
Platform: DBALL/DBALL2
Firmware: CHRYSLER3 Remote Start Ready (RSR) Installation
Update Alert: Firmware updates are posted on the web on a regular basis. We recommend
that you check for firmware and/or install guide updates prior to installing this product.
Installation Guide
This guide supports the installation of a DBALL in Remote Start Ready (RSR). This solution offers
three (3) configuration options to control your system: 3x OEM Lock Remote Start Activation, Optional
RF Kit or SmartStart (both sold separately).
The optional Plug & Play T-Harness THCHD3 (sold separately) provides simpler and faster installation.
Remote Start Ready (RSR) is a function that enables the interface module to remote start the vehicle
completely on its own. Consequently, there is no need for an aftermarket or an OEM remote starter in order to
start the vehicle from a distance.
Important!
This product is NOT compatible with vehicles equipped with a manual transmission.
Rev.: 20160608
Index
Vehicle Application Guide......................................................................................................................................................................
Key2GO................................................................................................................................................................................................
Installation (Wiring Diagrams & Vehicle Wiring Reference Charts)
Type 1 - Without T-Harness..................................................................................................................................................
Type 1 - With T-Harness THCHD3.......................................................................................................................................................
Type 2 - Without T-Harness..................................................................................................................................................
Type 2 - With T-Harness THCHD3.......................................................................................................................................................
SmartStart/XL202 Installation Notes.....................................................................................................................................................
Module Programming............................................................................................................................................................................
Key2GO Programming..........................................................................................................................................................................
Module Reset & Hard Reset..................................................................................................................................................................
Feature & Option List............................................................................................................................................................................
Feature Programming...........................................................................................................................................................................
LED Diagnostics &Troubleshooting......................................................................................................................................................
Parking Light Error Codes.....................................................................................................................................................................
Limited One-Year Consumer Warranty..................................................................................................................................................
Quick Reference Guide.........................................................................................................................................................................
SmartStart Compatible
SmartStart is equipped with D2D, which means it can be connected to an interface module and used in Remote
Start Ready (RSR) mode without the use of a remote starter. See the Module Programming section for more
information.
02
02
03
04
06
07
09
10
11
12
13
13
15
16
17
18
® Chrysler, Dodge and Jeep are registered trademarks and property of their respective companies.
© 2016 Directed. All rights reserved.
Page 2
Platform: DBALL/DBALL2
Firmware: CHRYSLER3 Remote Start Ready (RSR) Installation
Rev.: 20160608
Page 2
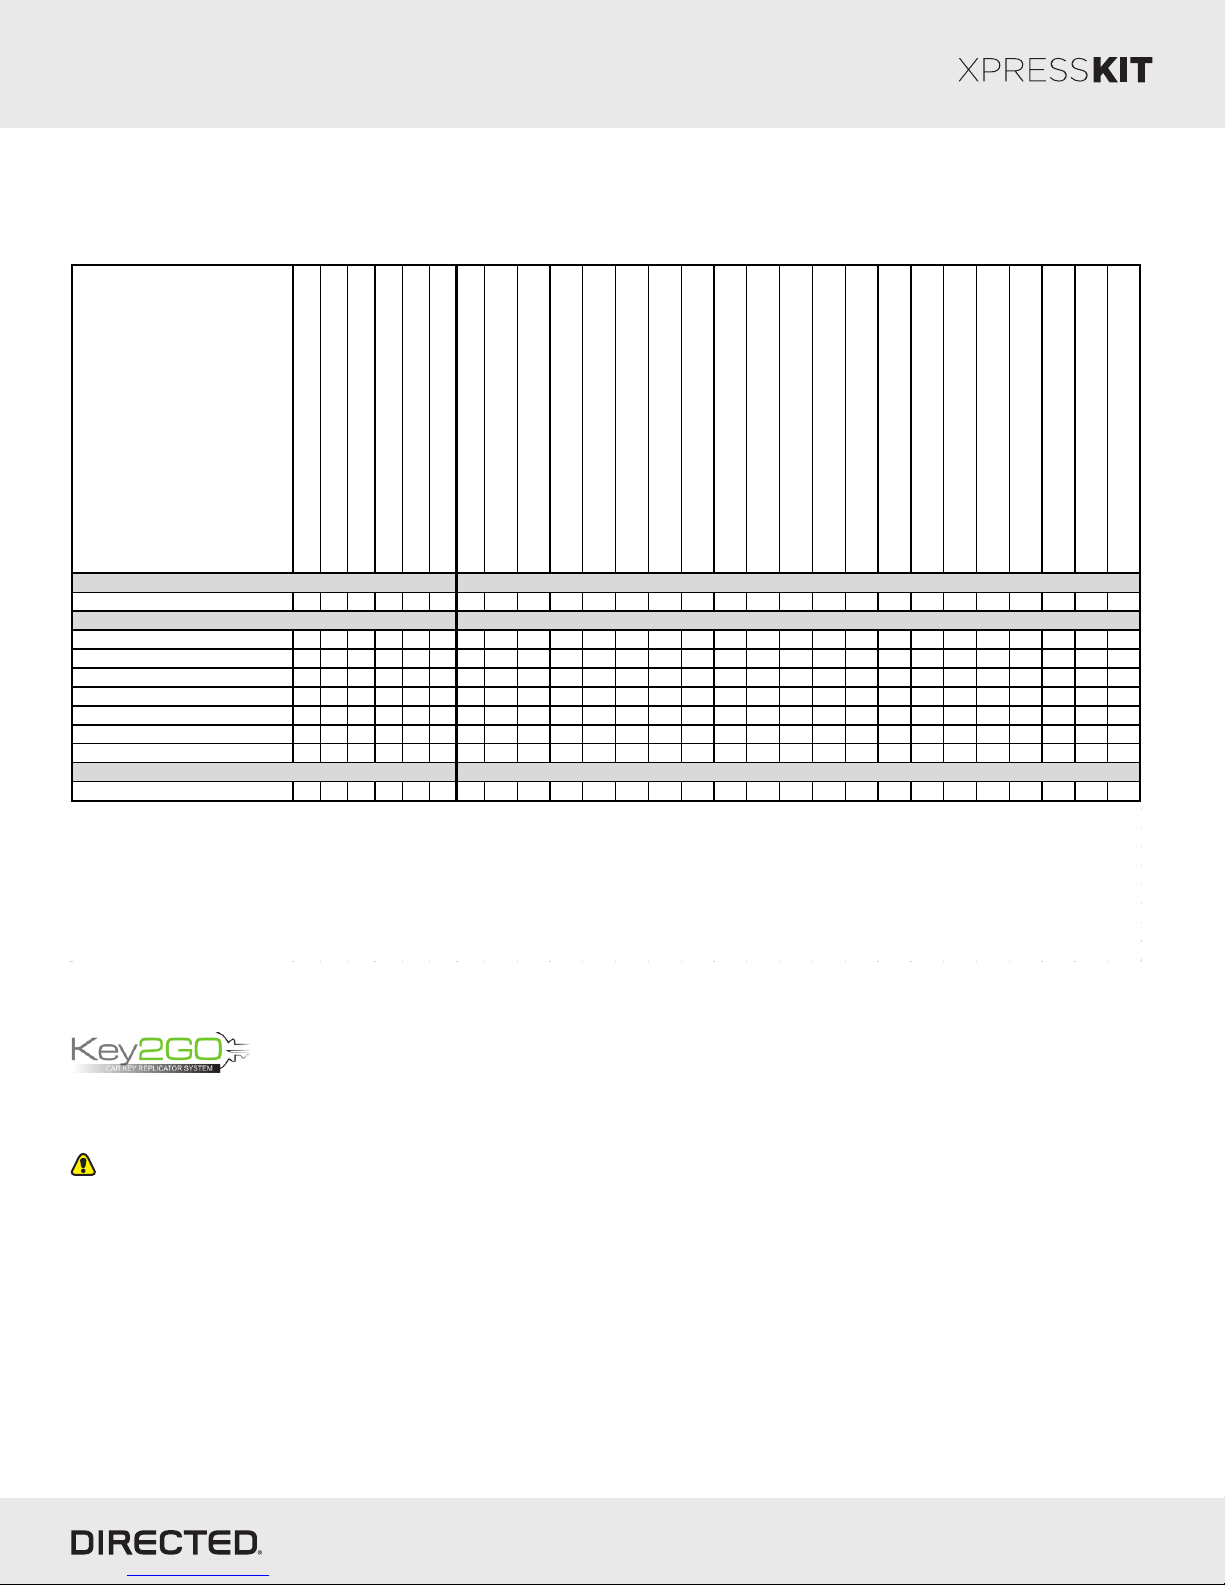
Vehicle Application Guide
The table below lists the vehicles and features which are compatible with this product. Refer to the following pages for more
information on installation wiring, programming and troubleshooting for these vehicles.
Vehicle s
2016
2015
2014
2013
2012
2011
PK-Immobilizer Bypass -Data No Key Req'd
AV-Parking Lights Contr ol
CC-Heated Seats Activation
CC-Rear Window Defogger Activation
DL-Arm Factory Security
DL-Disar m Factor y Secur ity
DL-Door Lock C ontrol
DL-Door Unlock
DL-Driver Priority Unloc k
DL-Tr unk / Hatc h Release
Key2GO
RS-3x LO CK START ( Start control us ing OEM Remote)
RS-3x LO CK STOP ( Stop control using OEM Remote)
RS-Remote Start Ready
RS-SmartStart
RS-Tac h / RPM Output
SS-Entry Monitoring ALL Door Pins
SS-Entry Monitoring Driv er Door Pin
SS-Entry Monitoring Tr unk/Hatc h Pin
ST-Brak e Status (foot br ake)
Chrysler
300/300c (Smart Key) 1 1 1 1 1 1 • • • • • • • • • • • • • • • • • • • • •
Dodge/Ram
1500 (Smart Key) 2 2 2 2 • • • • • • • • • • • • • • • • • • • •
2500 (Smart Key) 2 2 2 2 • • • • • • • • • • • • • • • • • • • •
3500 (Smart Key) 2 2 2 2 • • • • • • • • • • • • • • • • • • • •
Challenger (Smart Key) 1 1 • • • • • • • • • • • • • • • • • • • • •
Charger (Smart Key) 1 1 1 1 1 1 • • • • • • • • • • • • • • • • • • • • •
Durango (Smart Key) 1 1 • • • • • • • • • • • • • • • • • • • •
Journey (Smart Key) 1 1 1 1 1 1 • • • • • • • • • • • • • • • • • • • •
Jeep
Grand Cherokee (Smart Key) 2 2 2 • • • • • • • • • • • • • • • • • • • • •
Lege nd:
AV: Horn & Lights Control
CC: Comf ort & Convenience Controls
DL: OE Door Lock & Alarm Controls
PK: Transponder & Immobilizer Override
RS: Remote Start & Status
SS: Entry Point Status-Security
ST: Function/Feature Status
ST-Ignition Status
* Features will only function if vehicle is equipment with OEM touchscreen radio package.
This feature is mandatory.
Key2GO has been designed and developed to bypass the advanced encryption layers found in modern vehicles. It uses
an array of servers to generate a duplicate of the original key, allowing the installation of a remote starter without
having to give up a key.
The advantage is that this feature allows you to use one original key and the server to configure the bypass in the vehicle.
All Key2GO-compatible firmware are clearly indicated in the function list of each vehicle search result page and will also
appear on the flash page. Any first-time user must re-register to gain access to Key2GO, and some additional information
will be required to complete the registration process, such as your Directed account number and store name.
Key2GO is compatible with XpressVIP 4.5 or higher and requires an XKLoader.
Refer to page 8 of this guide for instructions on how to program features using Key2GO.
© 2016 Directed. All rights reserved.
Page 3
Platform: DBALL/DBALL2
Firmware: CHRYSLER3 Remote Start Ready (RSR) Installation
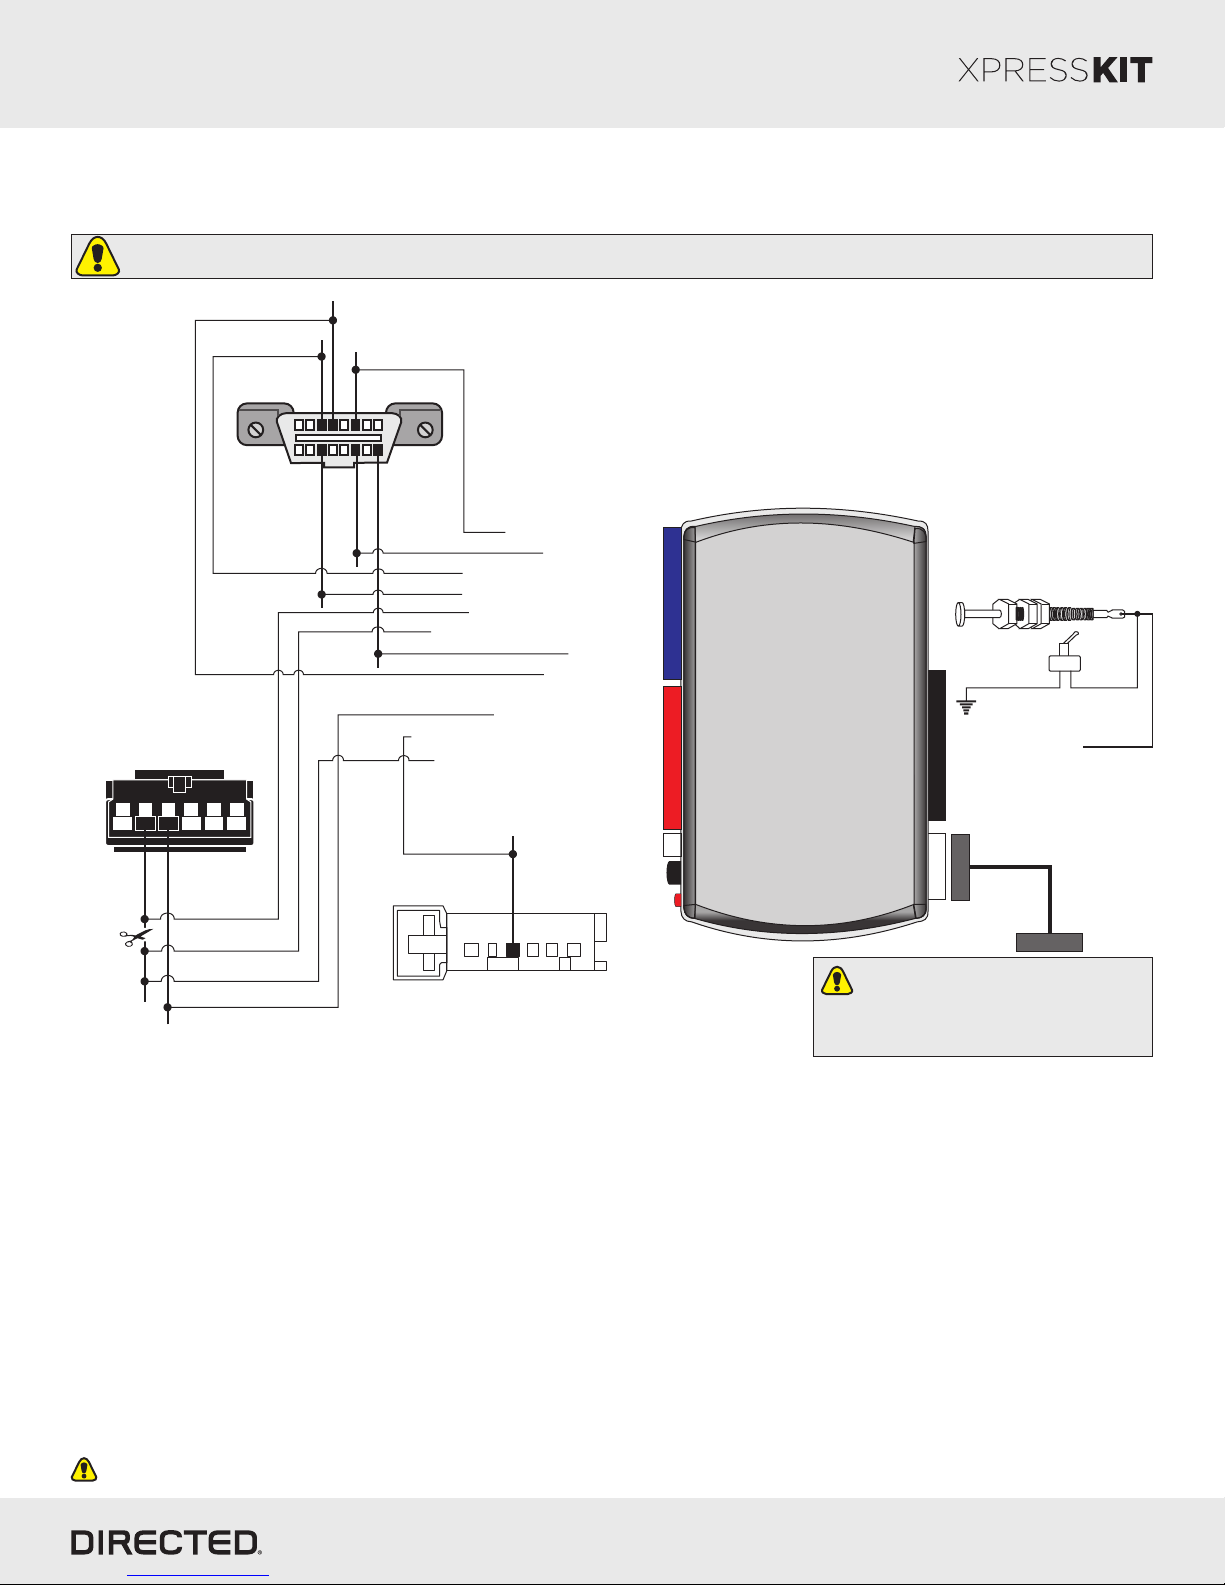
Type 1 Installation without T-harness
Refer to "Vehicle Wiring Reference Charts" section on page 5 for more information on vehicle-specific connections.
Important! The Hood Pin and Remote Start Safety Override Switch are mandatory safety devices, but are NOT supplied with the DBALL.
Mini-relay is recommended, but is not supplied.
(-) Ground: Black, pin 4
Rev.: 20160608
Page 3
Keyless Ignition Node
(Black 6-pin conn.
at PTS switch)
Immo. Data:
White/Lt. Green,
pin 5
HS CA N2 High:
DBAL L2 ONLY
DBAL L2 ONLY
123456
(+) PTS: pin 4
Gray, pin 3 [2]
1 8
HS CA N2 Low:
White, pin 11 [2]
HS CA N High:
Gray/White, pin 6
Yellow, pin 14
HS CA N Low:
OBDII
Diagnostic
169
(+) 12V:
Red, pin 16
Parking Light (MUX):
White/Lt. Green, pin 3
Connector
HS CA N High: Tan/Black: 3
HS CA N Low: Tan: 4
[2] HS C AN2 High: Orange/Green: 5
[2] HS C AN2 Low: Orange/Brown: 6
Immo. Data (conn. side): Yellow: 8
Immo. Data (veh. side): Orange/Yellow: 9
(+) 12V: Red: 13
(-) Ground: Black: 14
(+) PTS Output: Gray/Black: 7
(MUX) Parking Lights Output: Violet/Brown: 9
Immo. Data (veh. side): Yellow/Black: 10
White/Brown or
14 12 2
RF
Programming button
LED
DBALL/
DBALL2
Hood Pin
Required only when factory
hood pin is not available.
Remote Start Safety
10
Override Switch [1]
6: White/Black: (-) Hood
4
1 2 3 4 5 6
Black Connector
(at Headlight Switch)
You can connect to either a XL202
RFTD OR a SmartStart module.
Refer to the SmartStart/XL202
Installation Notes for more information.
[1] If grounded, the vehicle will NOT start.
[2] DBALL2 Only. Required for heated seats. Do NOT connect on DBALL.
With the exception of the OBDII Diagnostic connector, all adapters are displayed from the wire side (unless specified otherwise).
© 2016 Directed. All rights reserved.
Page 4
Platform: DBALL/DBALL2
Firmware: CHRYSLER3 Remote Start Ready (RSR) Installation
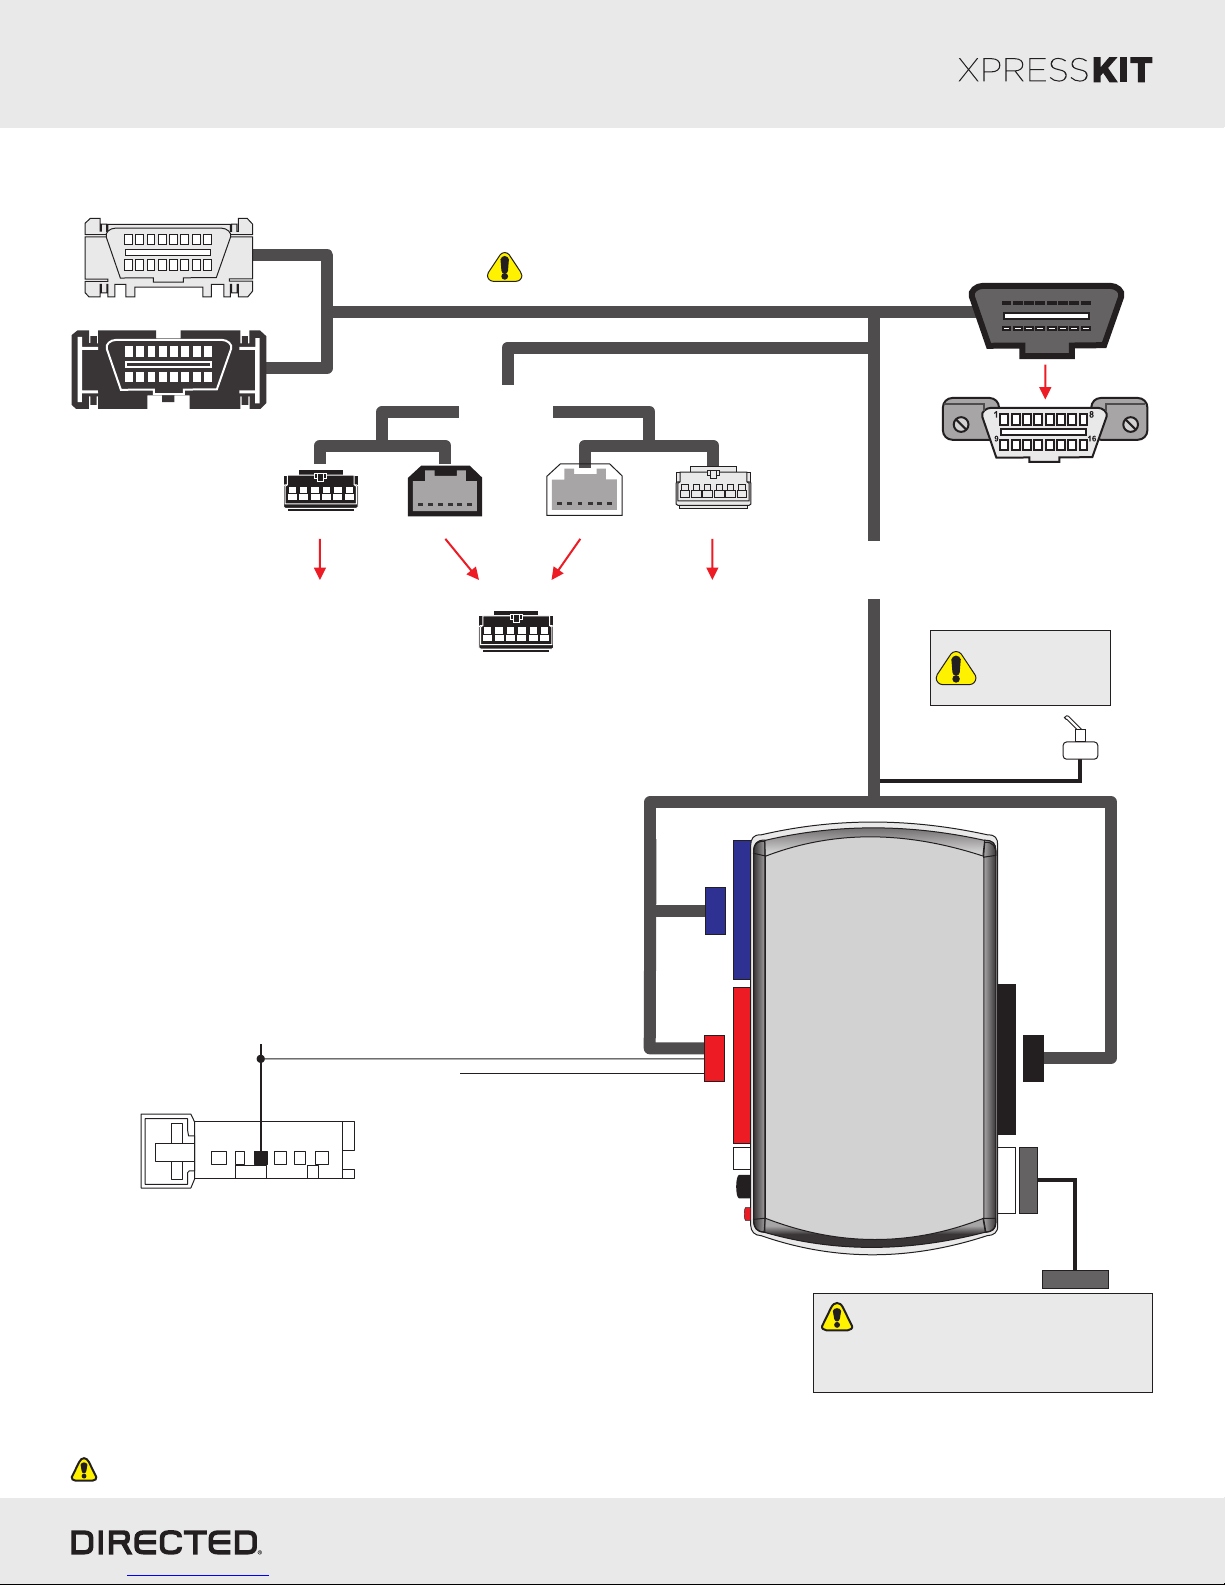
Type 1 Installation with T-harness THCHD3
These T-Harness connectors are
NOT interchangeable. They will fit
ONLY the appropriate vehicles.
OR
6-pin
Connectors
Rev.: 20160608
Page 4
OBDII
Parking Light (MUX):
White/Brown or
White/Lt. Green, pin 3
T-01
male male
femalefemale
T-02
OR
Connect T-harness
male connector
into PTS switch
Keyless Ignition Node
Black 6-pin conn. (at PTS switch)
(MUX) Parking Lights Output: Violet/Brown
male
Not Connected: Orange/Black
Connect T-harness
male connector
into PTS switch
14 12 2
Diagnostic 16-pin Connector
OBDII
THCHD3 Rev. 1
(Optional T-Harness)
The Remote Start
Safety Override
Switch MUS T be in
the OFF position.
Remote Start Safety
Override Switch
10
1 2 3 4 5 6
Black Connector
(at Headlight Switch)
With the exception of the OBDII Diagnostic connector, all adapters are displayed from the wire side (unless specified otherwise).
Loop (RFL Series)
Programming button
LED
You can connect to either a XL202
RFTD OR a SmartStart module.
Refer to the SmartStart/XL202
Installation Notes for more information.
DBALL/
4
DBALL2
© 2016 Directed. All rights reserved.
Page 5
Platform: DBALL/DBALL2
Firmware: CHRYSLER3 Remote Start Ready (RSR) Installation
Rev.: 20160608
Page 5
Type 1 - Vehicle Wiring Reference Charts
Wire colors should only be used as a reference. You should always test a wire's function and pin location before
connecting to it. For more detailed information on wiring connections, visit www.directechs.com.
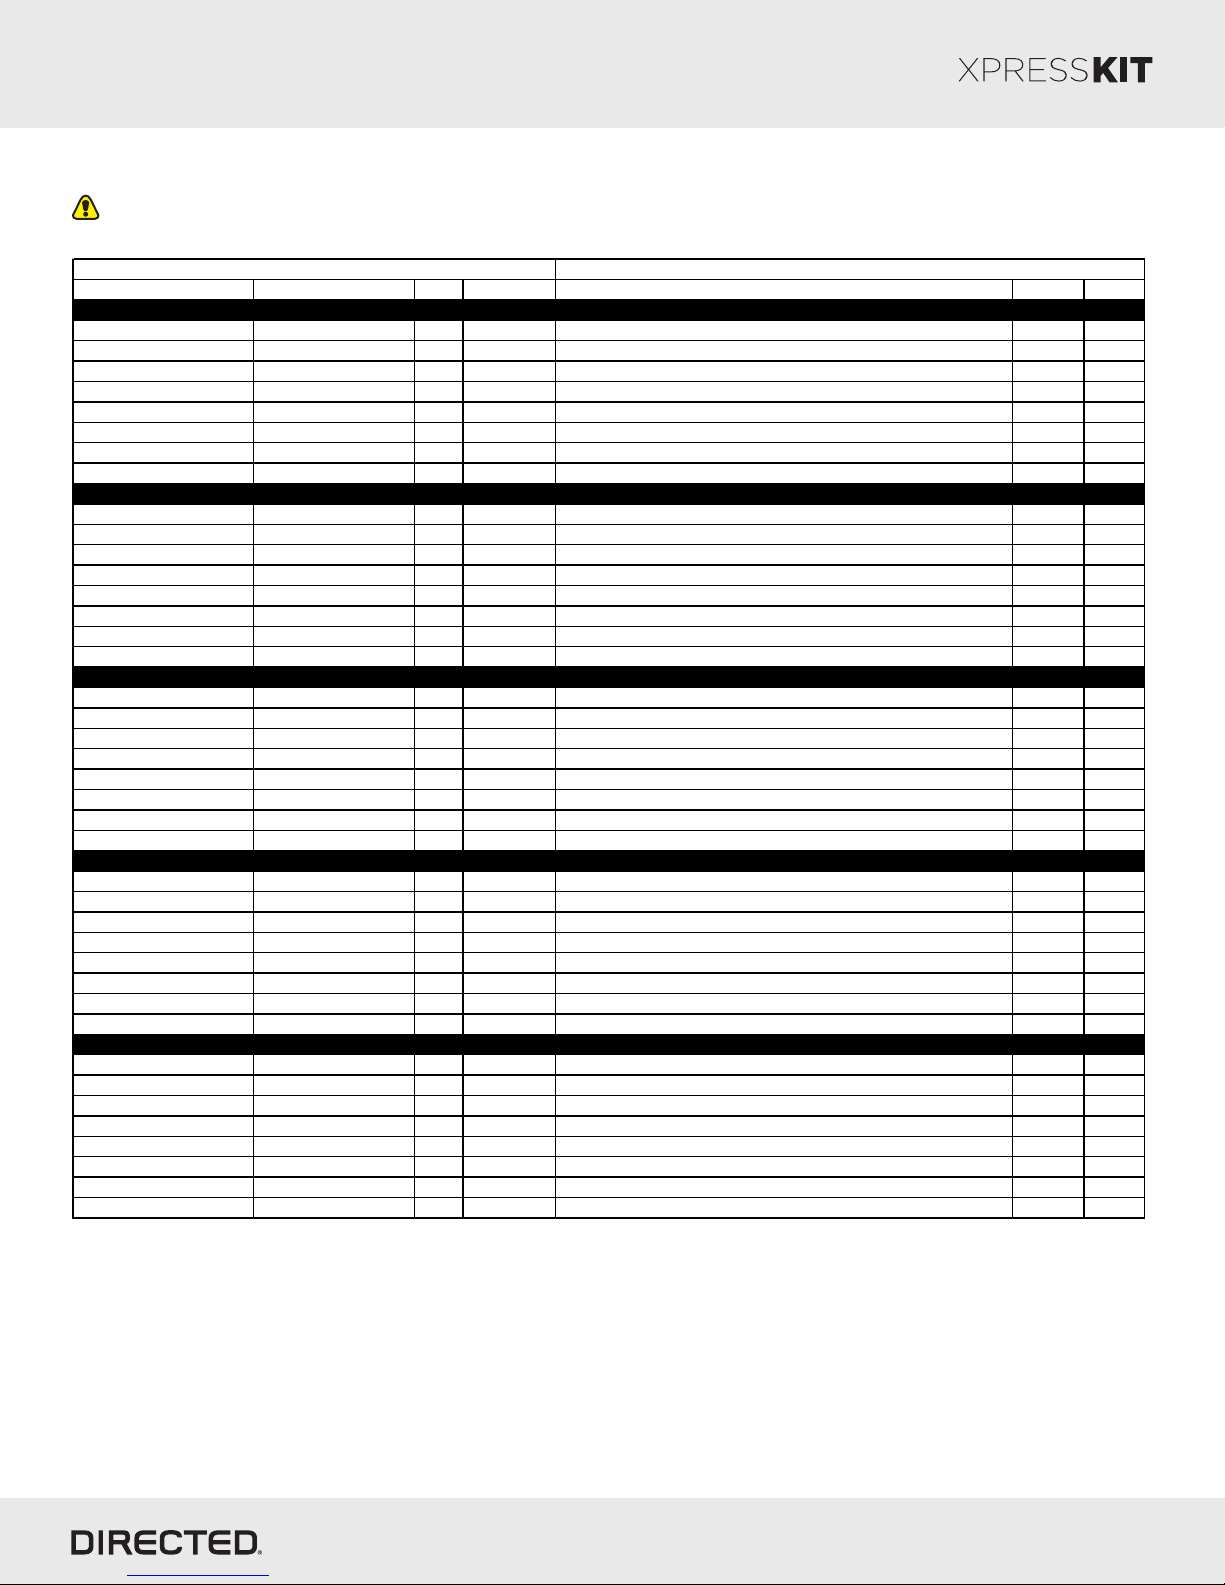
Wire Information Conne ctor Inform a tion
Function Color Pin Pola rity Loca tion Color Pins
Chrysler 300/300C (Sma rt Ke y) 2011-2016
HS CA N High Gray/White 6 Data OBDII diagnost ic connector. Blac k 16
HS CA N Low Yellow 14 Data OBDII diagnost ic connector. Blac k 16
HS CA N2 High Gray 3 Data OBDII diagnostic c onnect or. Black 16
HS CA N2 Low White 11 Data OBDII diagnost ic connector. Blac k 16
Immobilizer Data White/Lt . Green 5 Data Keyless Ignition node, loc ated at S tart/Stop button. Blac k 6
PTS (Push-To-Start) Violet/Blue 4 (+) Keyless Ignition node, locat ed at Start/Stop button. Black 6
Parking Light MUX White/Brown 3 MUX Headlight Swit ch Blac k 6
12V Red or Red/Y ellow 3 (+) C2 connector, at B CM located in passenger kick panel. Lt. Gray 4
Dodge Challe nge r (Smart Key) 2015-2016
HS CA N High Gray/White 6 Data OBDII diagnost ic connector. Blac k 16
HS CA N Low Yellow 14 Data OBDII diagnost ic connector. Black 16
HS CA N2 High Gray 3 Data OBDII diagnostic c onnect or. Black 16
HS CA N2 Low White 11 Data OBDII diagnost ic connector. Blac k 16
Immobilizer Data White/Lt . Green 5 Data Keyless Ignition node, loc ated at S tart/Stop button. Blac k 6
PTS (Push-To-Start) Violet/Lt. B lue 4 (+) Keyles s Ignition node, loc ated at S tart/St op button. Blac k 6
Parking Light MUX White/Brown 3 MUX Headlight Swit ch Blac k 6
12V Red or Red/Y ellow 3 (+) C2 connector, at B CM located in passenger kick panel. Lt. Gray 4
Dodge Charger (Sm art Key) 2011-2016
HS CA N High Gray/White 6 Data OBDII diagnost ic connector. Blac k 16
HS CA N Low Yellow 14 Data OBDII diagnost ic connector. Black 16
HS CA N2 High Gray 3 Data OBDII diagnostic c onnect or. Black 16
HS CA N2 Low White 11 Data OBDII diagnost ic connector. Blac k 16
Immobilizer Data White/Lt . Green 5 Data Keyless Ignition node, loc ated at S tart/Stop button. Blac k 6
PTS (Push-To-Start) Violet/Blue 4 (+) Keyless Ignition node, locat ed at Start/Stop button. Black 6
Parking Light MUX White/Brown 3 MUX Headlight Swit ch Blac k 6
12V Red or Red/Y ellow 3 (+) C2 connector, at B CM located in passenger kick panel. Lt. Gray 4
Dodge Durango (Smart Key) 2014-2015
HS CA N High Gray/White 6 Data OBDII diagnost ic connector. Blac k 16
HS CA N Low Yellow 14 Data OBDII diagnost ic connector. Black 16
HS CA N2 High Gray 3 Data OBDII diagnostic c onnect or. Black 16
HS CA N2 Low White 11 Data OBDII diagnost ic connector. Blac k 16
Immobilizer Data White/Lt . Green 5 Data Keyless Ignition node, loc ated at S tart/Stop button. Blac k 6
PTS (Push-To-Start) Violet/Brown 4 (+) Keyless Ignition node, loc ated at S tart/Stop button. Black 6
Parking Light MUX White/Lt. Green 3 MUX Headlight Switch Black 6
12V Red or Red/Y ellow 3 (+) C2 connector, at B CM located in passenger kick panel. Lt. Gray 4
Dodge Journe y (Sma rt Ke y) 2011-2016
HS CA N High Gray/White 6 Data OBDII diagnost ic connector. Blac k 16
HS CA N Low Yellow 14 Data OBDII diagnost ic connector. Black 16
HS CA N2 High Gray 3 Data OBDII diagnostic c onnect or. Black 16
HS CA N2 Low White 11 Data OBDII diagnost ic connector. Blac k 16
Immobilizer Data White/Lt . Green 5 Data Keyless Ignition node, loc ated at S tart/Stop button. Blac k 6
PTS (Push-To-Start) Violet 4 (+) Keyless Ignition node, locat ed at Start/Stop button. Black 6
Parking Light MUX White/Brown 3 MUX Headlight Swit ch Blac k 6
12V Red or Red/Y ellow 3 (+) C2 connector, at B CM located in passenger kick panel. Lt. Gray 4
© 2016 Directed. All rights reserved.
Page 6
Platform: DBALL/DBALL2
Firmware: CHRYSLER3 Remote Start Ready (RSR) Installation
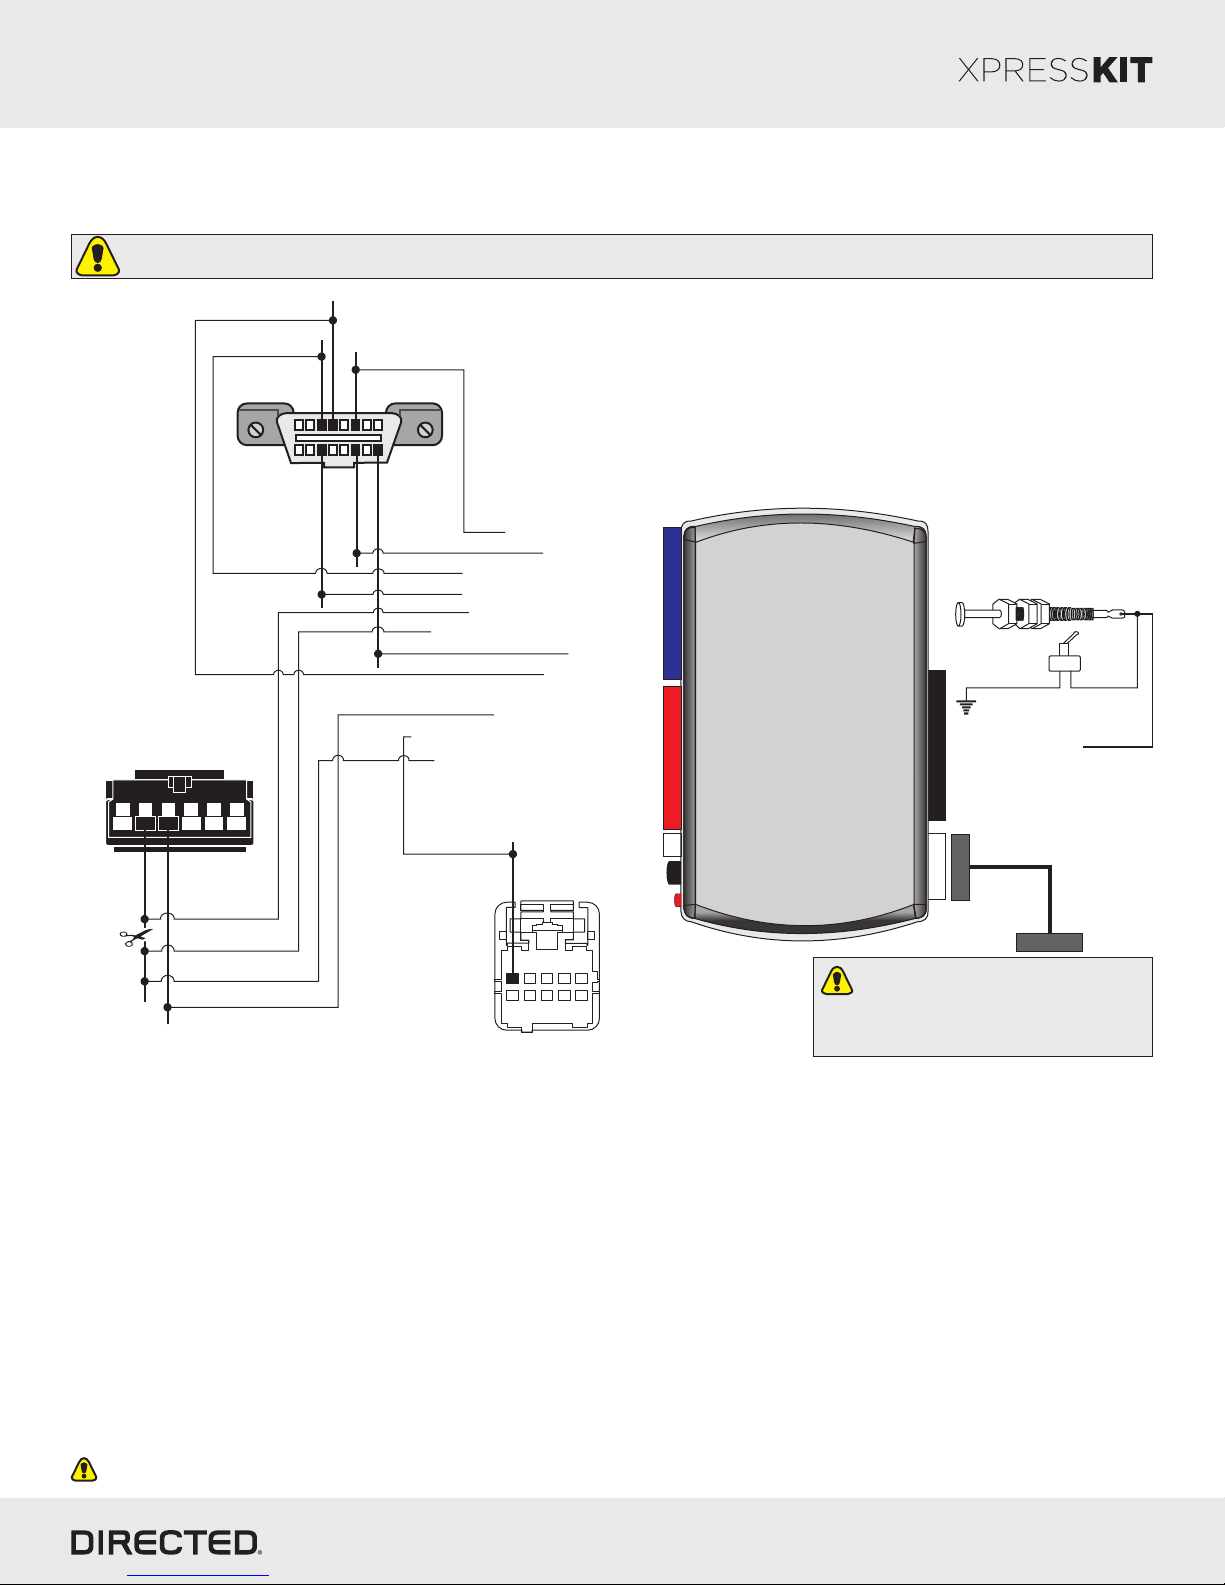
Type 2 Installation without T-harness
Refer to "Vehicle Wiring Reference Charts" section on page 5 for more information on vehicle-specific connections.
Important! The Hood Pin and Remote Start Safety Override Switch are mandatory safety devices, but are NOT supplied with the DBALL.
Mini-relay is recommended, but is not supplied.
(-) Ground: Black, pin 4
Rev.: 20160608
Page 6
Keyless Ignition Node
(Black 6-pin conn.
at PTS switch)
Immo. Data:
White/Lt. Green,
pin 5
HS CA N2 High:
DBAL L2 ONLY
DBAL L2 ONLY
123456
(+) PTS: pin 4
Gray, pin 3 [2]
1 8
HS CA N2 Low:
White, pin 11 [2]
HS CA N High:
Gray/White, pin 6
Yellow, pin 14
HS CA N Low:
OBDII
Diagnostic
169
(+) 12V:
Red, pin 16
Parking Light (MUX):
White/Lt. Green, pin 1
Connector
HS CA N High: Tan/Black: 3
HS CA N Low: Tan: 4
[2] HS C AN2 High: Orange/Green: 5
[2] HS C AN2 Low: Orange/Brown: 6
Immo. Data (conn. side): Yellow: 8
Immo. Data (veh. side): Orange/Yellow: 9
(+) 12V: Red: 13
(-) Ground: Black: 14
(+) PTS Output: Gray/Black: 7
(MUX) Parking Lights Output: Violet/Brown: 9
Immo. Data (veh. side): Yellow/Black: 10
White/Brown or
14 12 2
RF
Programming button
LED
DBALL/
DBALL2
Hood Pin
Required only when factory
hood pin is not available.
Remote Start Safety
10
Override Switch [1]
6: White/Black: (-) Hood
4
[1] If grounded, the vehicle will NOT start.
[2] DBALL2 Only. Required for heated seats. Do NOT connect on DBALL.
With the exception of the OBDII Diagnostic connector, all adapters are displayed from the wire side (unless specified otherwise).
2 3 541
7 8 1096
Black Connector
(at Headlight Switch)
You can connect to either a XL202
RFTD OR a SmartStart module.
Refer to the SmartStart/XL202
Installation Notes for more information.
© 2016 Directed. All rights reserved.
Page 7
Platform: DBALL/DBALL2
Firmware: CHRYSLER3 Remote Start Ready (RSR) Installation
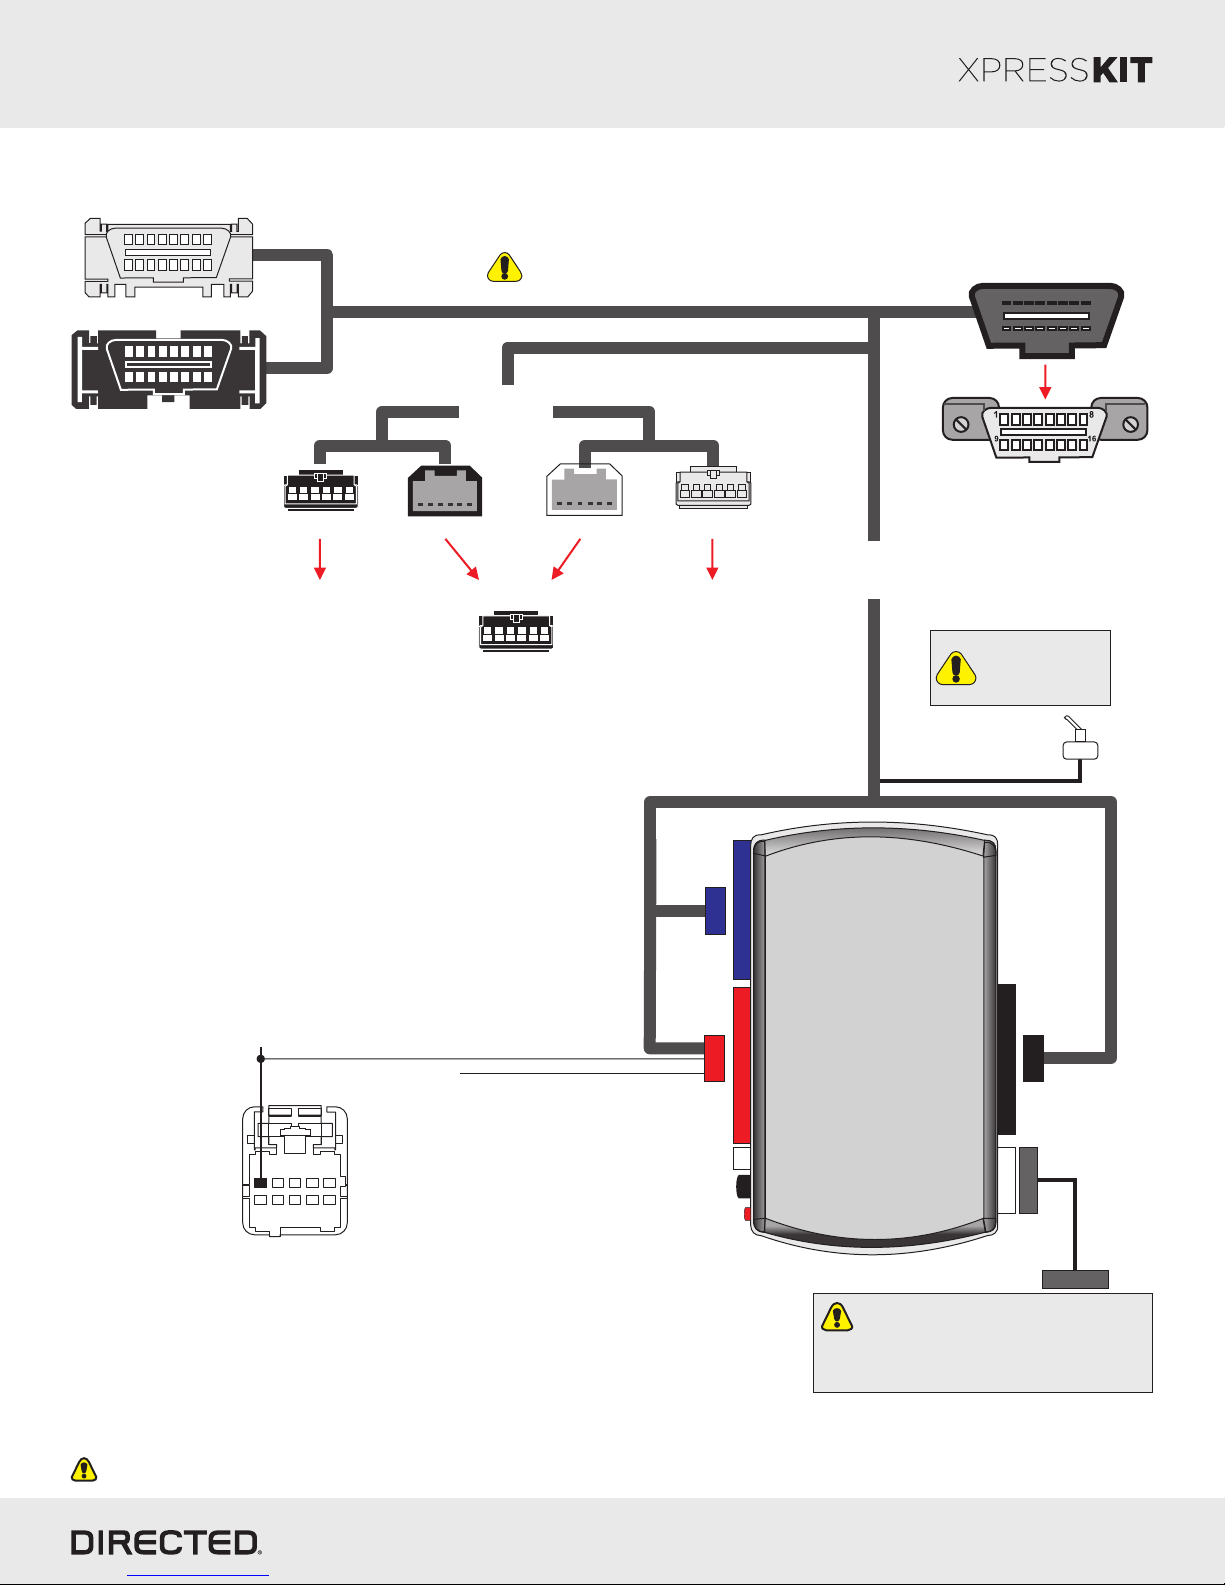
Type 2 Installation with T-harness THCHD3
These T-Harness connectors are
NOT interchangeable. They will fit
ONLY the appropriate vehicles.
OR
6-pin
Connectors
Rev.: 20160608
Page 7
OBDII
Parking Light (MUX):
White/Brown or
White/Lt. Green, pin 1
T-01
male male
femalefemale
T-02
OR
Connect T-harness
male connector
into PTS switch
Keyless Ignition Node
Black 6-pin conn. (at PTS switch)
(MUX) Parking Lights Output: Violet/Brown
male
Not Connected: Orange/Black
Connect T-harness
male connector
into PTS switch
14 12 2
Diagnostic 16-pin Connector
OBDII
THCHD3 Rev. 1
(Optional T-Harness)
The Remote Start
Safety Override
Switch MUS T be in
the OFF position.
Remote Start Safety
Override Switch
10
2 3 541
7 8 1096
Black Connector
(at Headlight Switch)
With the exception of the OBDII Diagnostic connector, all adapters are displayed from the wire side (unless specified otherwise).
Loop (RFL Series)
Programming button
LED
You can connect to either a XL202
RFTD OR a SmartStart module.
Refer to the SmartStart/XL202
Installation Notes for more information.
DBALL/
4
DBALL2
© 2016 Directed. All rights reserved.
Page 8
Platform: DBALL/DBALL2
Firmware: CHRYSLER3 Remote Start Ready (RSR) Installation
Rev.: 20160608
Page 8
Type 2 - Vehicle Wiring Reference Charts
Wire colors should only be used as a reference. You should always test a wire's function and pin location before
connecting to it. For more detailed information on wiring connections, visit www.directechs.com.
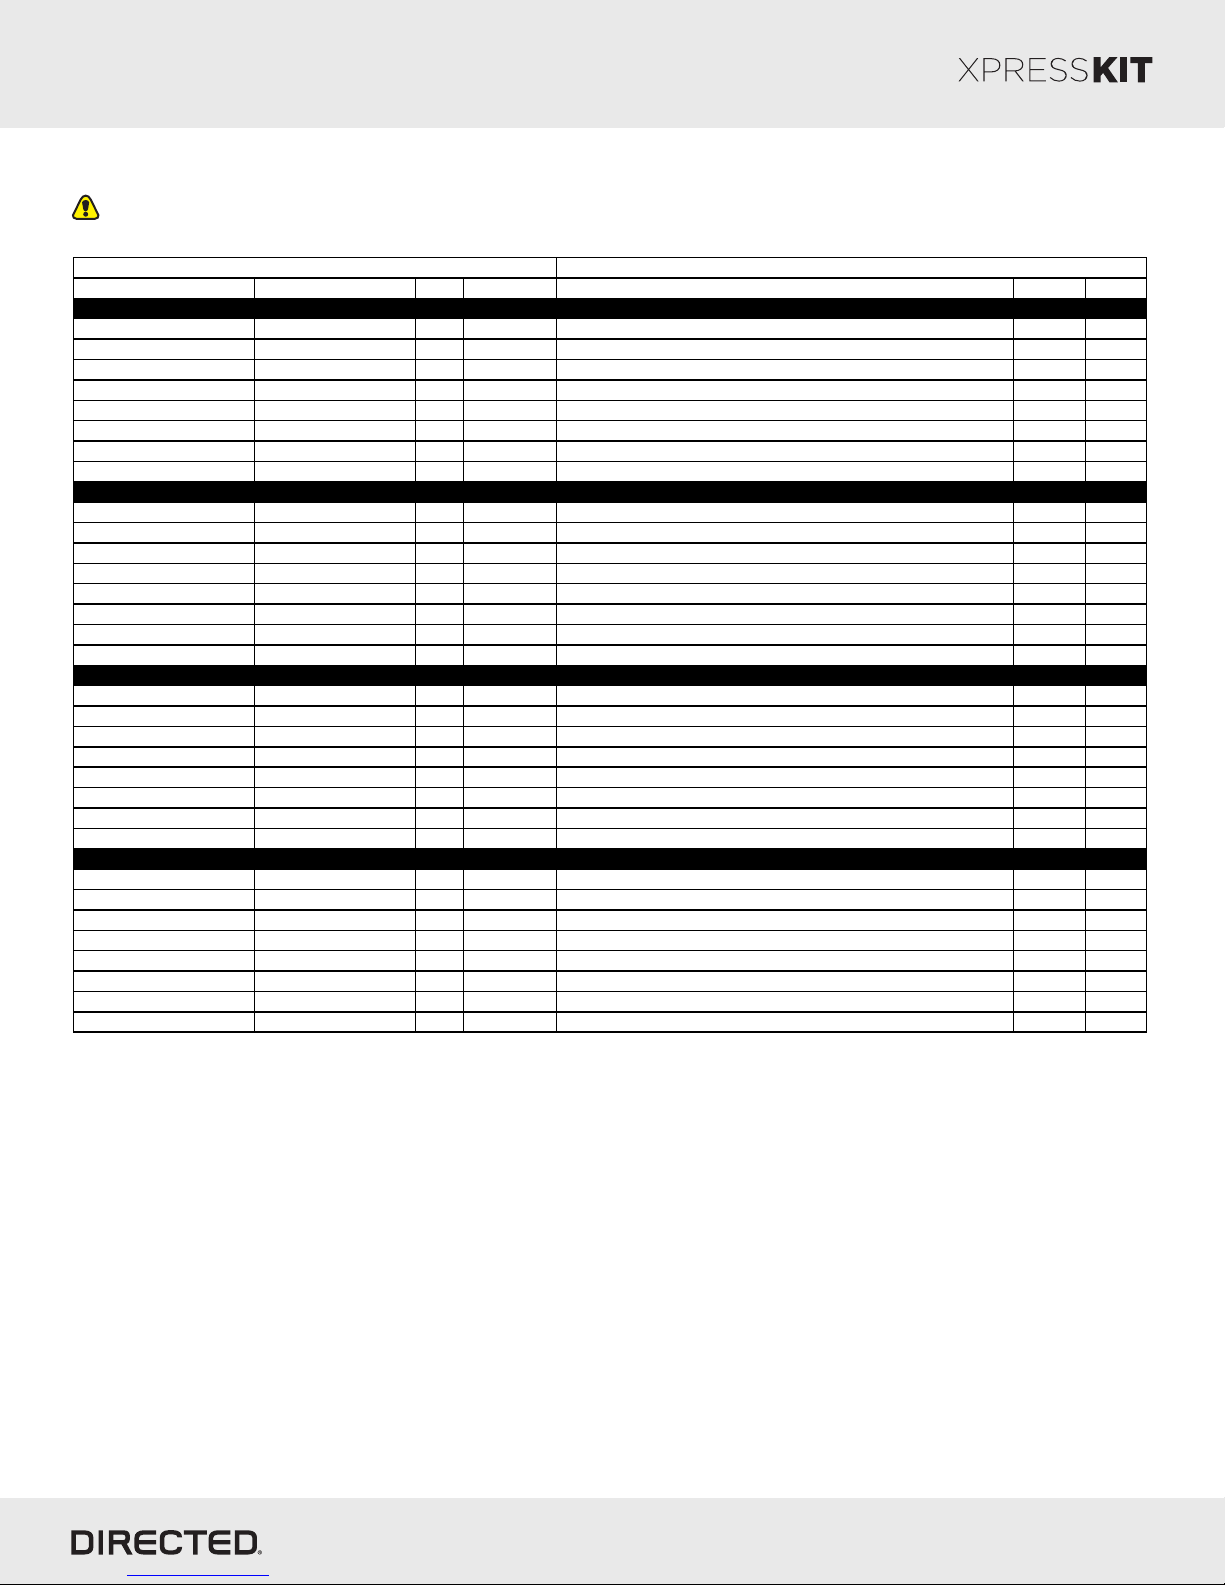
Wire Information Connector Information
Function Color Pin Pola rity Location Color Pins
Dodge Ram 1500 (Smart Key) 2013-2016
HS CA N High Gray/White 6 Data OBDII diagnostic connector. Black 16
HS CA N Low Yellow 14 Data OBDII diagnostic connector. Black 16
HS CA N2 High Gray 3 Data OBDII diagnostic connec tor. Black 16
HS CA N2 Low White 11 Data OBDII diagnostic connector. Black 16
Immobilizer Data White/Lt. Green 5 Data Keyless Ignition node, located at Start/Stop button. B lack 6
PTS (Push-To-Start) Violet/B rown 4 (+) Keyless Ignition node, located at Start/Stop button. B lack 6
Parking Light MUX W hite/ Brown 1 M UX Headlight Switch Black 10
12V Red or Red/Yellow 3 (+) C2 connector, at BCM loc ated in the driver dash. Lt. Gray 4
Dodge Ram 2500 (Smart Key) 2013-2016
HS CA N High Gray/White 6 Data OBDII diagnostic connector. Black 16
HS CA N Low Yellow 14 Data OBDII diagnostic connector. Black 16
HS CA N2 High Gray 3 Data OBDII diagnostic connec tor. Black 16
HS CA N2 Low White 11 Data OBDII diagnostic connector. Black 16
Immobilizer Data White/Lt. Green 5 Data Keyless Ignition node, located at Start/Stop button. B lack 6
PTS (Push-To-Start) Violet/B rown 4 (+) Keyless Ignition node, located at Start/Stop button. B lack 6
Parking Light MUX W hite/ Brown 1 M UX Headlight Switch Black 10
12V Red or Red/Yellow 3 (+) C2 connector, at BCM loc ated in the driver dash. Lt. Gray 4
Dodge Ram 3500 (Smart Key) 2013-2016
HS CA N High Gray/White 6 Data OBDII diagnostic connector. Black 16
HS CA N Low Yellow 14 Data OBDII diagnostic connector. Black 16
HS CA N2 High Gray 3 Data OBDII diagnostic connec tor. Black 16
HS CA N2 Low White 11 Data OBDII diagnostic connector. Black 16
Immobilizer Data White/Lt. Green 5 Data Keyless Ignition node, located at Start/Stop button. B lack 6
PTS (Push-To-Start) Violet/B rown 4 (+) Keyless Ignition node, located at Start/Stop button. B lack 6
Parking Light MUX W hite/ Brown 1 M UX Headlight Switch Black 10
12V Red or Red/Yellow 3 (+) C2 connector, at BCM loc ated in the driver dash. Lt. Gray 4
Jee p Gra nd Che roke e (Sm a rt Ke y) 2014-2016
HS CA N High Gray/White 6 Data OBDII diagnostic connector. Black 16
HS CA N Low Yellow 14 Data OBDII diagnostic connector. Black 16
HS CA N2 High Gray 3 Data OBDII diagnostic connec tor. Black 16
HS CA N2 Low White 11 Data OBDII diagnostic connector. Black 16
Immobilizer Data White/Lt. Green 5 Data Keyless Ignition node, located at Start/Stop button. B lack 6
PTS (Push-To-Start) Violet/B rown 4 (+) Keyless Ignition node, located at Start/Stop button. B lack 6
Parking Light MUX W hite/ Lt. Green 1 MUX Headlight Switch Black 10
12V Red or Red/Yellow 3 (+) C2 connector, at BCM loc ated in pas senger kic k panel. Lt. Gray 4
© 2016 Directed. All rights reserved.
Page 9
Platform: DBALL/DBALL2
Firmware: CHRYSLER3 Remote Start Ready (RSR) Installation
Rev.: 20160608
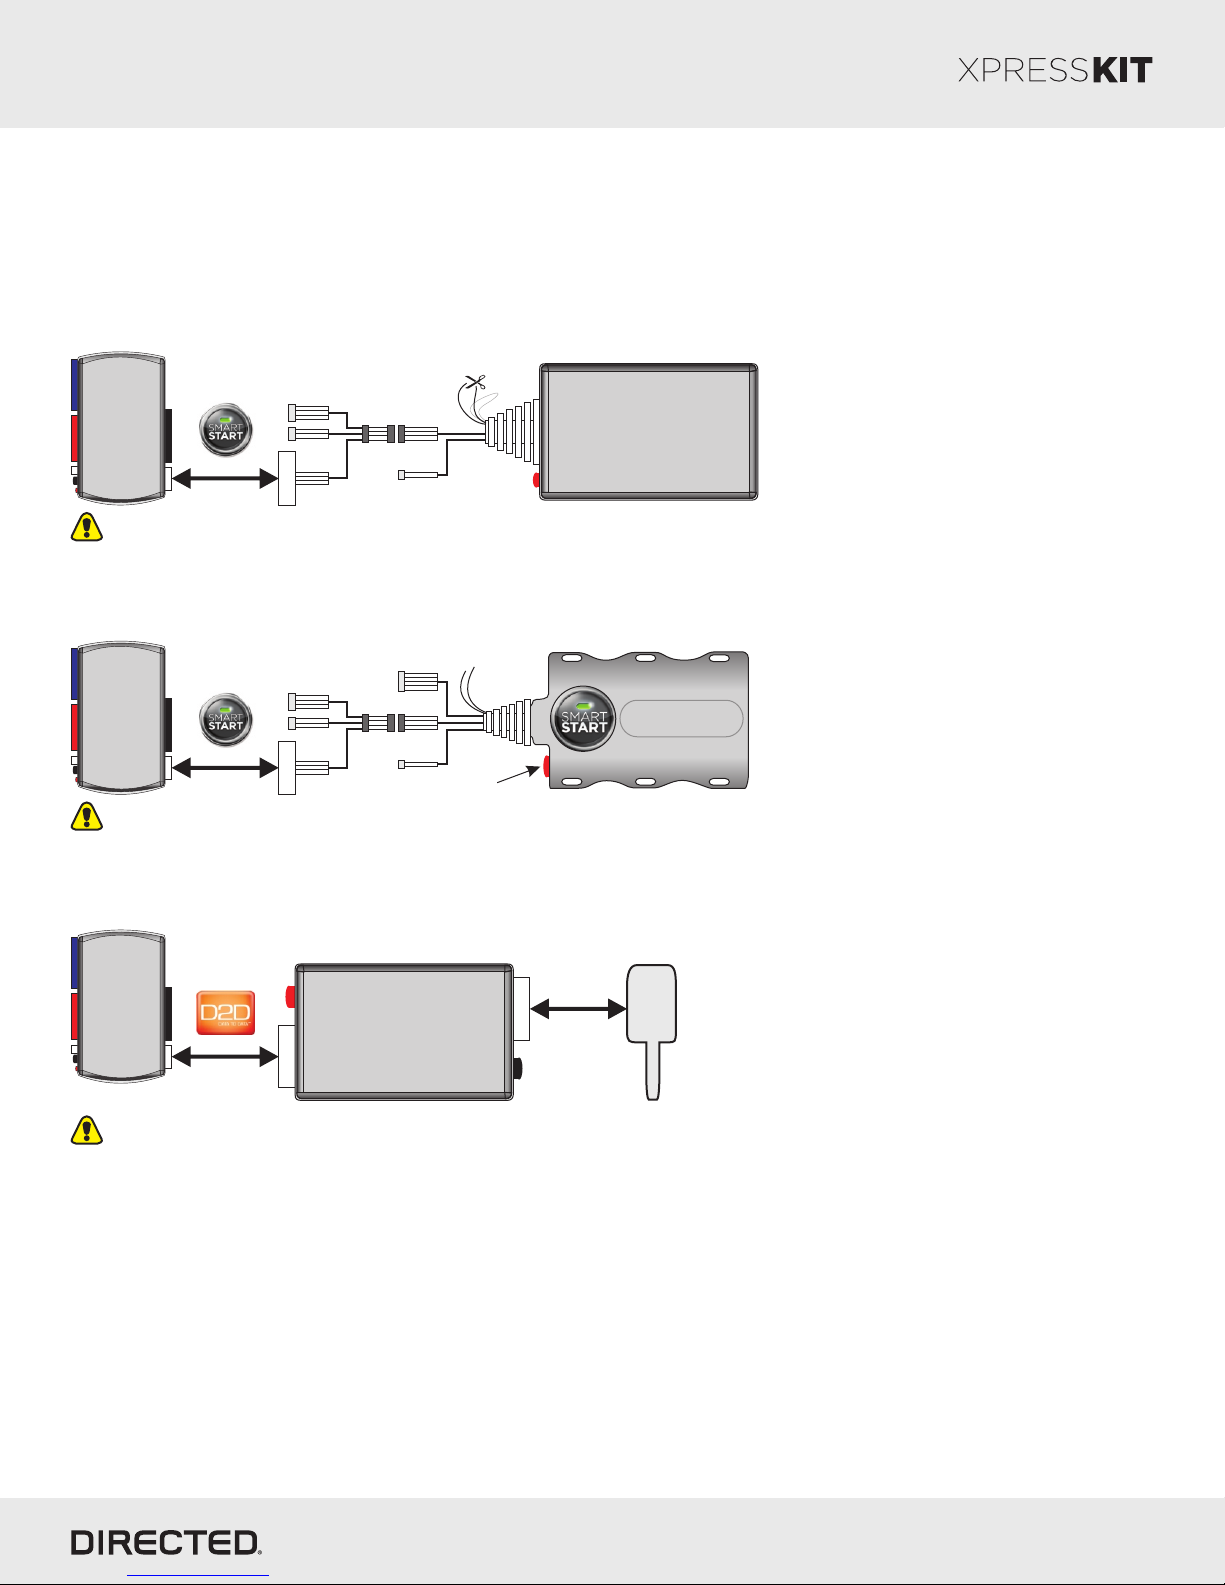
SmartStart/XL202 Installation Notes
The DBALL Remote Start Ready (RSR) solution offersthree (3) configuration options to control your system; 3x OEM
Lock Remote Start Activation, RF Kit or SmartStart (all sold separately). This section provides specific installation
information for SmartStart and XL202.
SmartStart Revision A
SmartStart is optional and not included. It MUST be purchased separately.
Configuration Wires (White & Brown or Blue)
Cut Brown or Blue Loop
OR
Page 9
DBALL/
DBALL2
CABLE
D2D (4 pins, white)
The modules must be connected in a specific order. Refer to the Module Programming section for more information.
4 pins
2 pins,
not used
SmartStart
LED
SmartStart Revision B
SmartStart is optional and not included. It MUST be purchased separately.
Configuration Wires (Gray & White)
Connect Gray wire to (-) Ground
5 pins
DBALL/
DBALL2
CABLE
D2D (4 pins, white)
The modules must be connected in a specific order. Refer to the Module Programming section for more information.
4 pins
2 pins,
not used
THIS SIDE UP
LED
RF Kit
The optional XL202 and antenna are not included and MUST be purchased separately.
Antenna
DBALL/
DBALL2
XOVER
LED
4
XL202
Prog.
Button
4
1. Use the D2D Crossover (XOVER) cable that is provided with XL202, and NOT the one in the DBALL package.
2. The modules must be connected in a specific order. Refer to the Module Programming section for more information.
RF Kit & PKE Combination
Refer to the Passive Keyless Entry (PKE) Installation Guide (N2102T) for detailed wiring information.
RF Kit, PKE & SmartStart BT Combination
Refer to the Passive Keyless Entry (PKE) Installation Guide (N2102T) for detailed wiring information.
© 2016 Directed. All rights reserved.
Page 10
Platform: DBALL/DBALL2
Firmware: CHRYSLER3 Remote Start Ready (RSR) Installation
Rev.: 20160608
Module Programming
Refer to the LED Diagnostics section on page 13 for more information and for troubleshooting purposes.
Important
Make all the required connections to the vehicle, as described in the wiring diagram(s) found in this guide, and double check to
ensure everything is correct prior to moving onto the next step.
Note: Before connecting either the XL202 or SmartStart module to DBALL, it is important to ensure that the proper feature and
function programming is selected using XpressVIP (version 4.5 or higher). Visit www.directechs.com to download the latest
version of the application.
Warning! To take advantage of advanced features, you must use XpressVIP 4.5 (and higher) or the Directechs Mobile app.
Flashing a module using your computer:
1. Connect the interface module to your computer using the
XKLoader2.
2. Go to www.directechs.com using Internet Explorer, and
select the Config for RSR button.
3. Follow the instructions to select your vehicle, installation
type, and configure your options.
4. Once you have configured the firmware options, click on the
FLASH button.
When the flashing operation is successful, you can proceed with the programming instructions below.
Flashing a module using your smartphone or tablet
1. Connect the interface module to your XKLoader3.
2. Launch the Directechs Mobile app on your smartphone or
tablet.
3. Select FLASH YOUR MODULE and follow the on screen
instructions.
Page 10
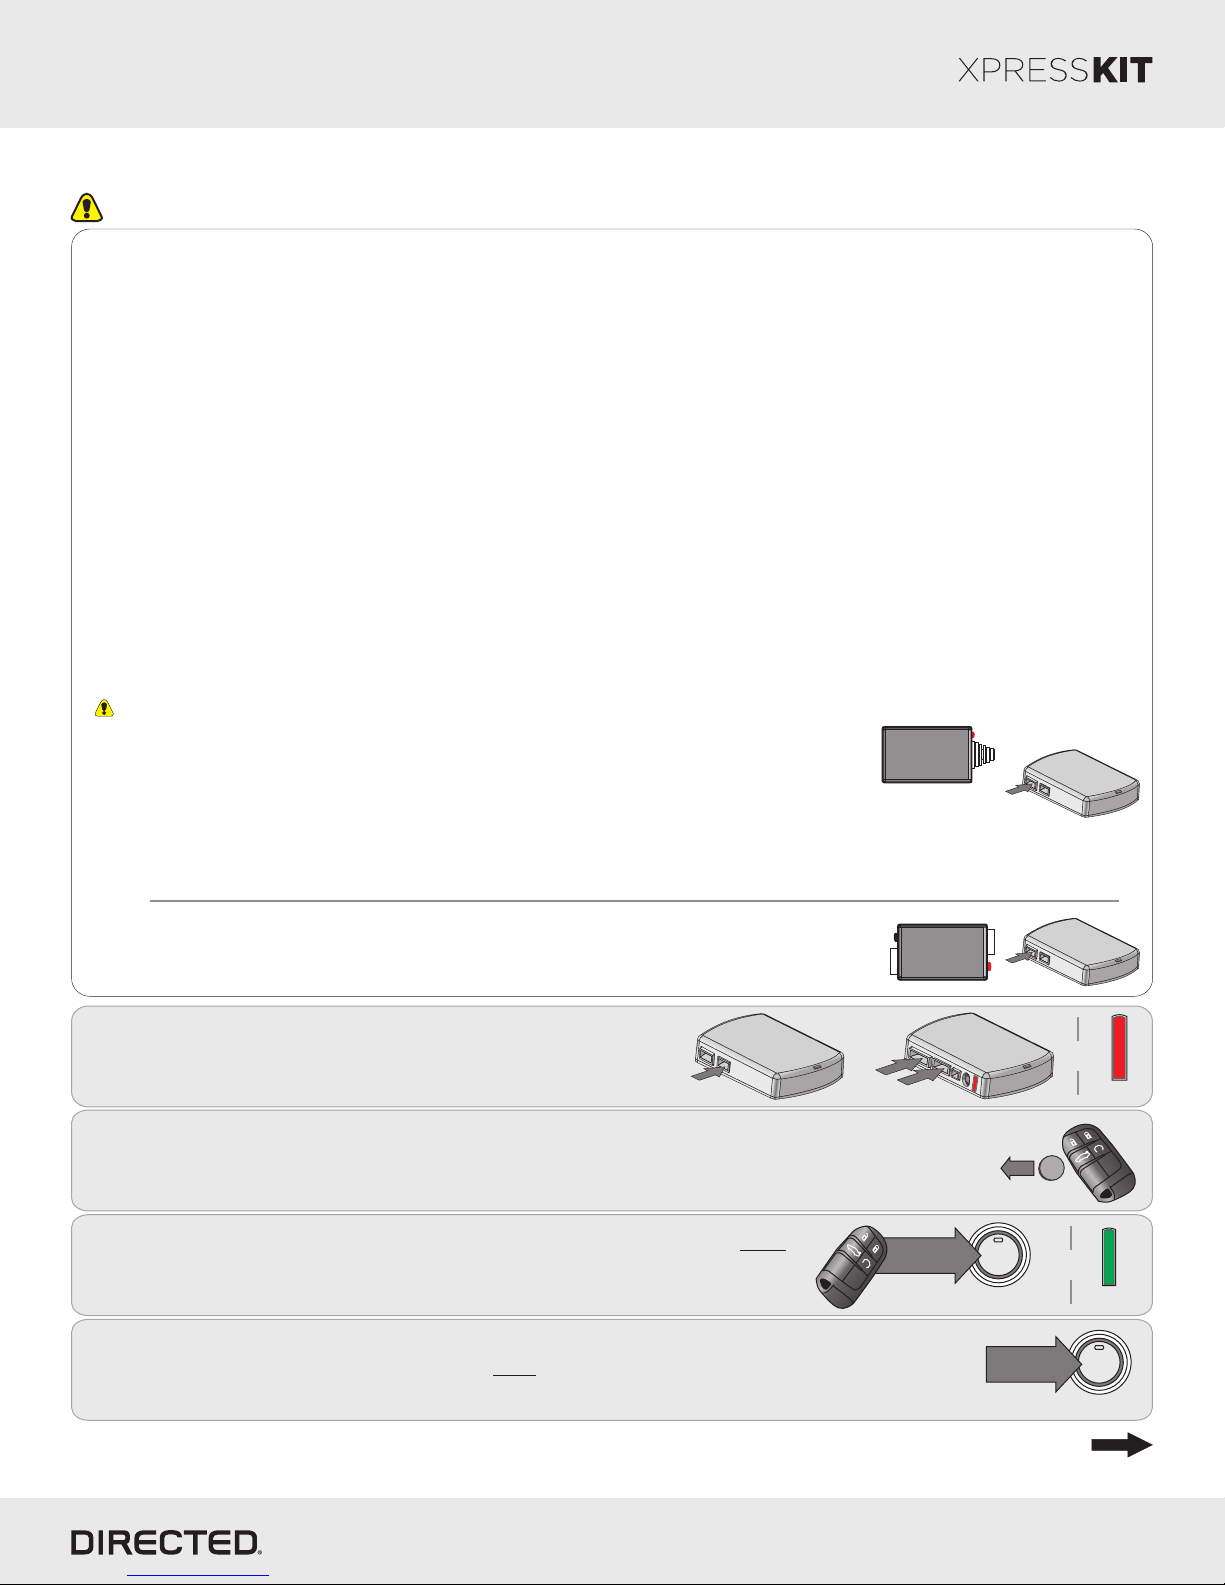
SmartStart Installation
The DBALL module must be disconnected from any power source before SmartStart can
be connected to it. Failing to do so could damage DBALL.
a. To ensure that the D2D communication between SmartStart and DBALL works properly, the
Gray wire must be connected to a ground source (Rev B SmartStart), and the Brown or Blue
loop must be cut (Rev A SmartStart).
b. Do NOT connect the 2-pin harness (on SmartStart). Power and ground will be provided by
the DBALL D2D connector.
Connect SmartStart to DBALL using the D2D port.
OR
XL202 Installation
Connect XL202 to DBALL using the D2D port.
D2D
10-pin
st
1
PANIC
1
2
3
Connect the 10-pin, 12-pin and 14-pin harnesses to
DBALL, then wait until the LED turns ON solid red.
Remove the battery from the factory keyless remote
Use the tip of the remote to press on the Start/Stop button (PTS) twice
to turn the ignition ON ("RUN" illuminates on Start/Stop switch).
The LED flashes green.
rd
3
x2
x2
SmartStart
XL202
14-pin
nd
2
remove
battery
PUSH x2
12-pin
Open
and
ENGINE
START
STOP
to ON (RUN)
D2D
D2D
10-pin
10-pin
&
&
Solid
x2
x2
ANIC
P
Flashes
4
Press on the Start/Stop button (PTS) once to turn the ignition OFF.
PUSH x1
Go to the next page for Key2GO programming.
© 2016 Directed. All rights reserved.
ENGINE
START
STOP
to OFF
Page 11
Platform: DBALL/DBALL2
Firmware: CHRYSLER3 Remote Start Ready (RSR) Installation
Rev.: 20160608
Page 11
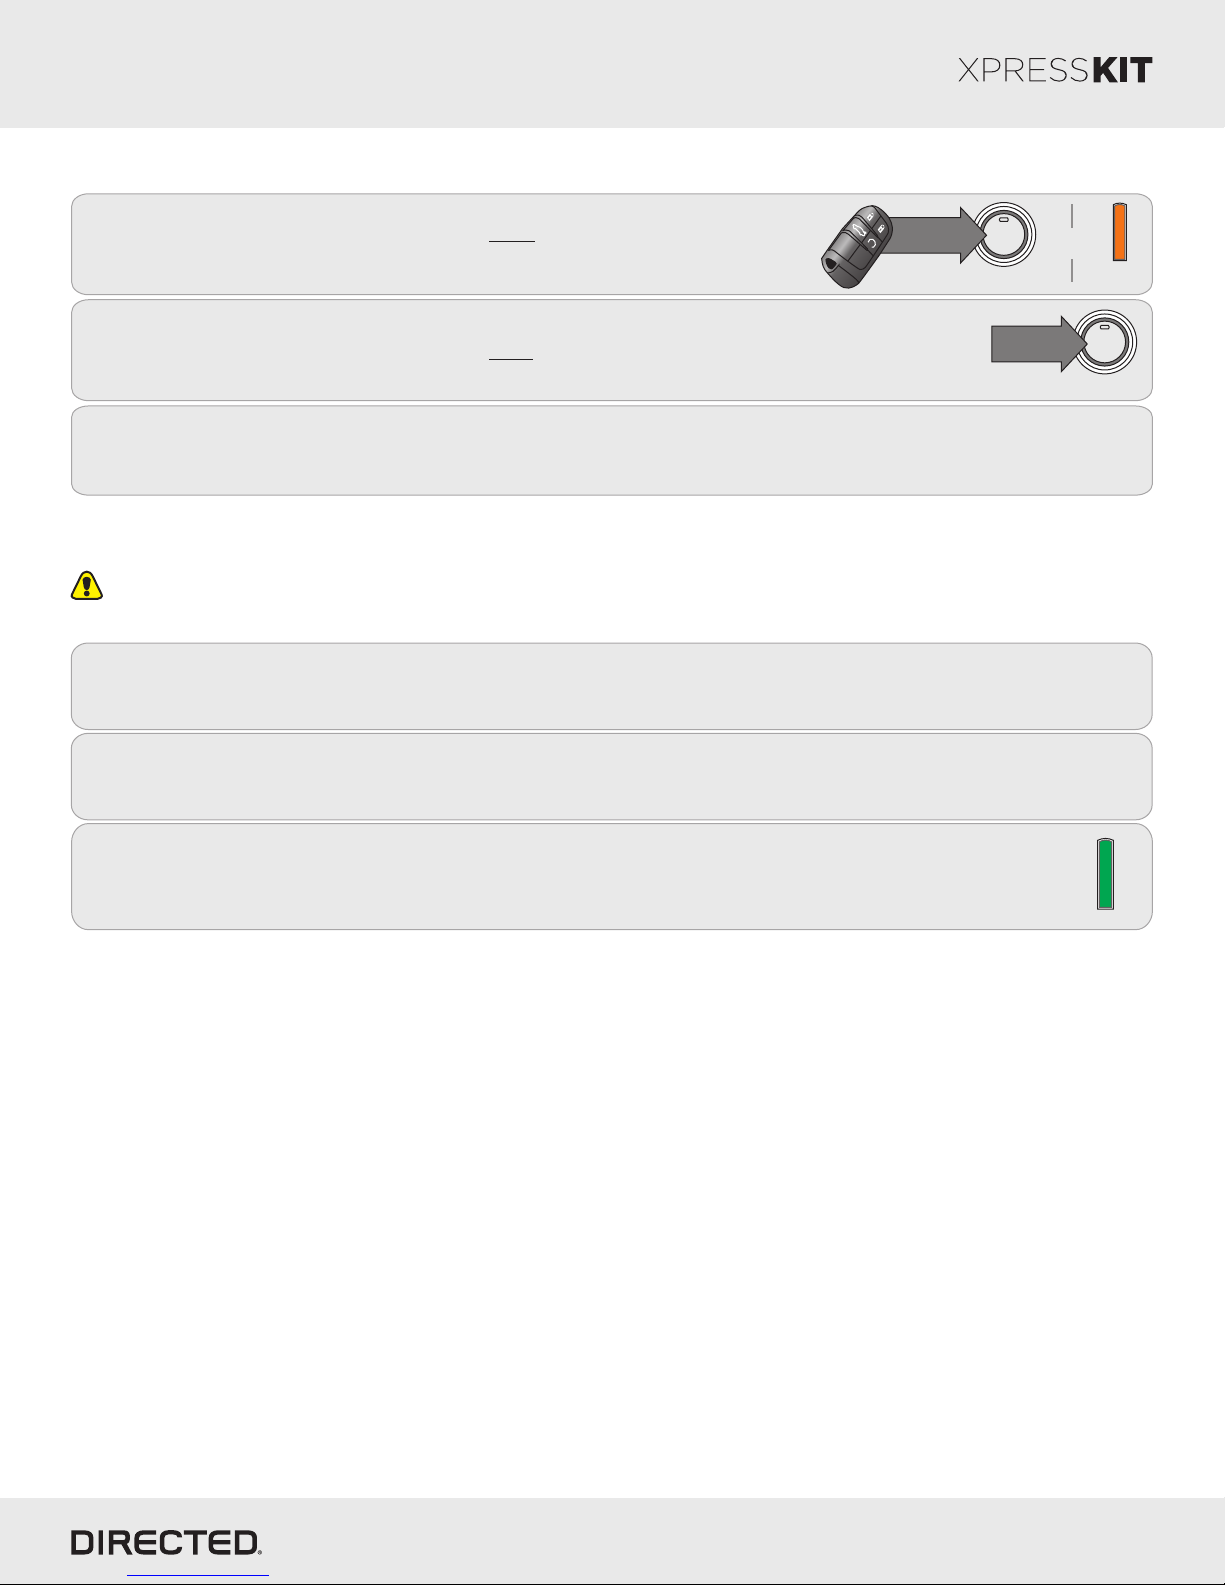
Press on the Start/Stop button (PTS) twice
to turn the ignition ON. The LED flashes orange slowly.
5
Press on the Start/Stop button (PTS) once to turn the ignition OFF.
6
Disconnect the module and complete the Key2GO procedure (see below).
7
x2
x2
PAN
IC
PUSH x2
ENGINE
START
STOP
to ON (RUN)
PUSH x1
Web Programming (for Key2GO)
Refer to the LED Diagnostics section for more information and for troubleshooting purposes.
Version 4.5 or higher of XpressVIP must be installed on your computer to complete this programming sequence.
Remove the DBALL from the vehicle and reconnect it to your computer. The Directechs web site will
8
9
automatically recognize that you are moving onto the second phase of the programming sequence.
Click on Submit Key2GO Request.
&
Flashes
Slowly
ENGINE
START
STOP
to OFF
Once the configuration is completed, reconnect the module.
10
You have successfully completed the module programming sequence.
The LED turns solid green.
Solid Green
© 2016 Directed. All rights reserved.
Page 12
Platform: DBALL/DBALL2
Firmware: CHRYSLER3 Remote Start Ready (RSR) Installation
Rev.: 20160608
Page 12
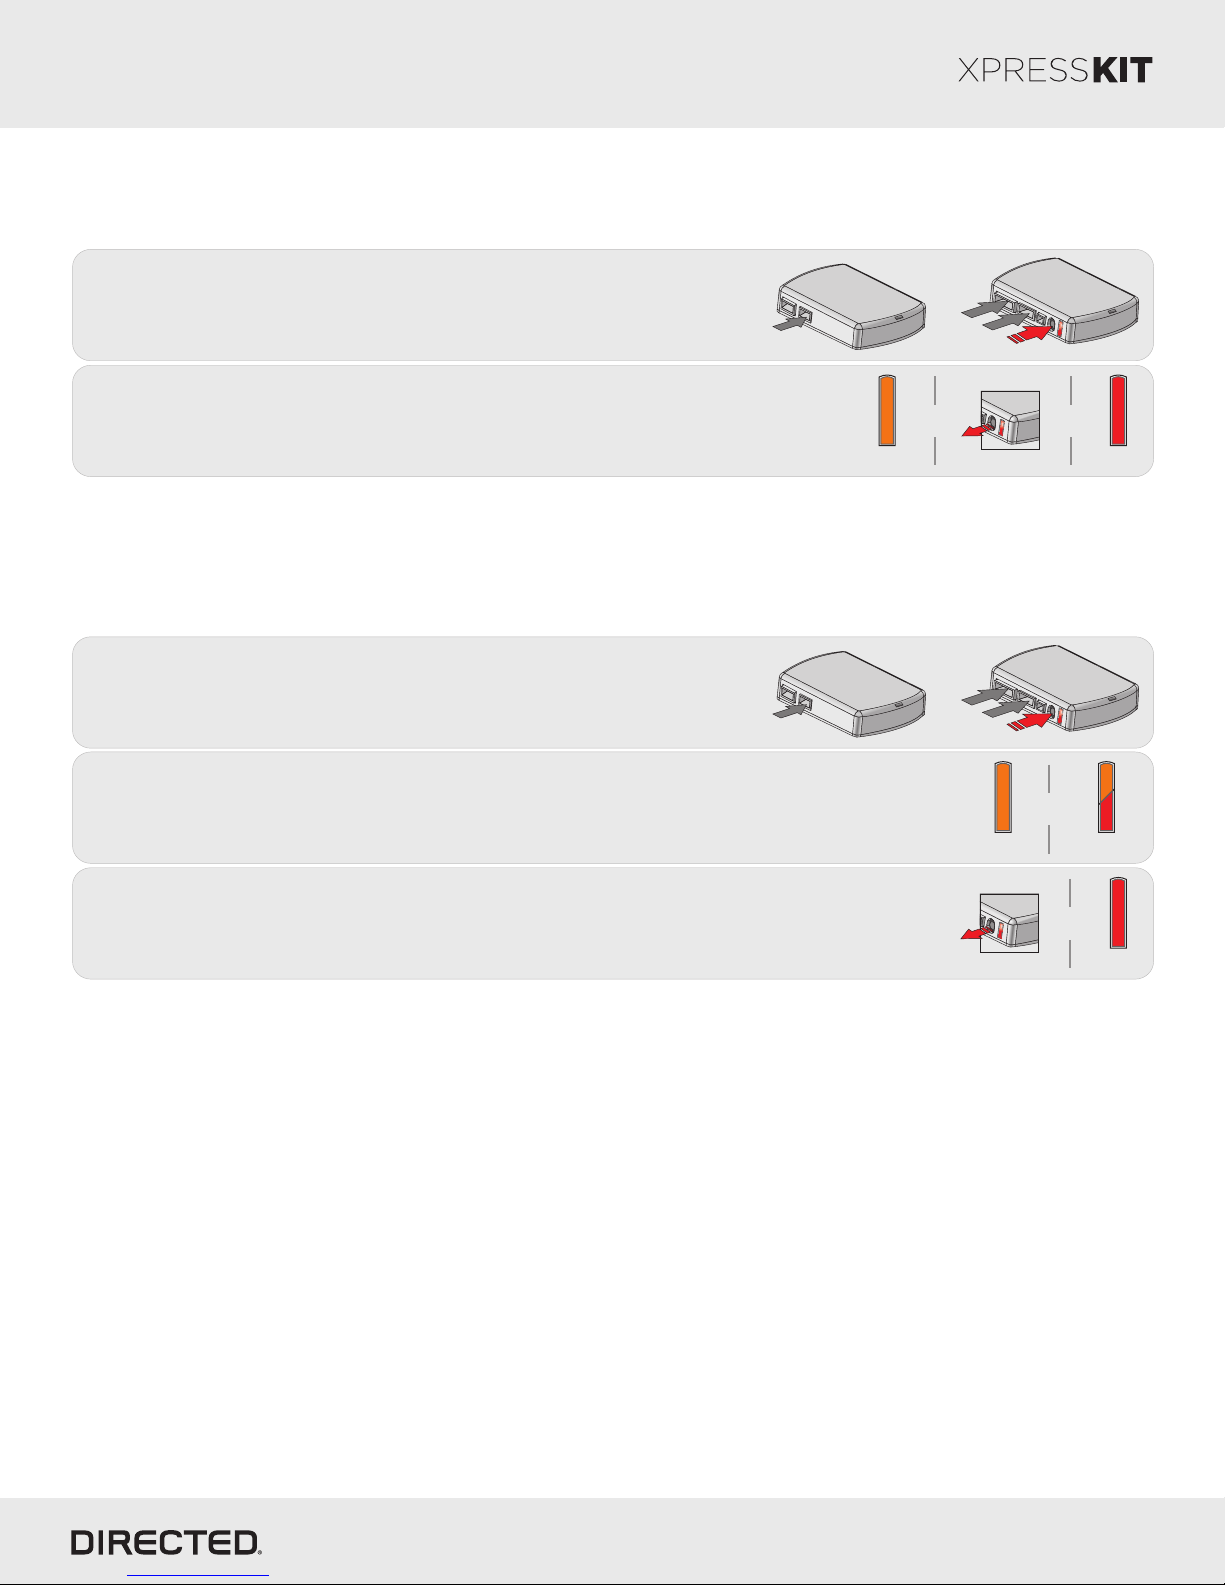
Module Reset
A module reset will only erase programming performed in the previous steps. All settings (firmware) and settings flashed
to the module using the web config tool will not be affected.
14-pin
12-pin
nd
2
rd
3
1
If required for your installation, connect the 10-pin & 12-pin
harnesses to the module. Press and hold the programming
button, then connect the 14-pin harness to the module.
D2D
10-pin
st
1
th
4
Wait 3 seconds until the LED turns ON solid orange then release the
2
programming button. The LED turns ON solid red.
& &
Solid
Release
Solid
Hard Reset
Warning Against Executing a Hard Reset!
A hard reset will revert the flashed firmware back to its default settings. Depending on the installation, some settings (such
as RFTD and D2D options) may have to be reconfigured. See the Feature & Option List section of this guide.
1
2
If required for your installation, connect the 10-pin & 12-pin
harnesses to the module. Press and hold the programming
button, then connect the 14-pin harness to the module.
D2D
10-pin
st
1
Wait 3 seconds until the LED turns ON solid orange, and wait 10 more seconds
until the LED starts to flash orange and red.
th
4
nd
2
rd
3
Solid
14-pin
12-pin
&
Flashes
3
Release the programming button. The LED turns ON solid red.
Release
&
Solid
© 2016 Directed. All rights reserved.
Page 13
Platform: DBALL/DBALL2
*Default Option
Feat. Ope ration Flashes / Option Description
Firmware: CHRYSLER3 Remote Start Ready (RSR) Installation
Rev.: 20160608
Page 13
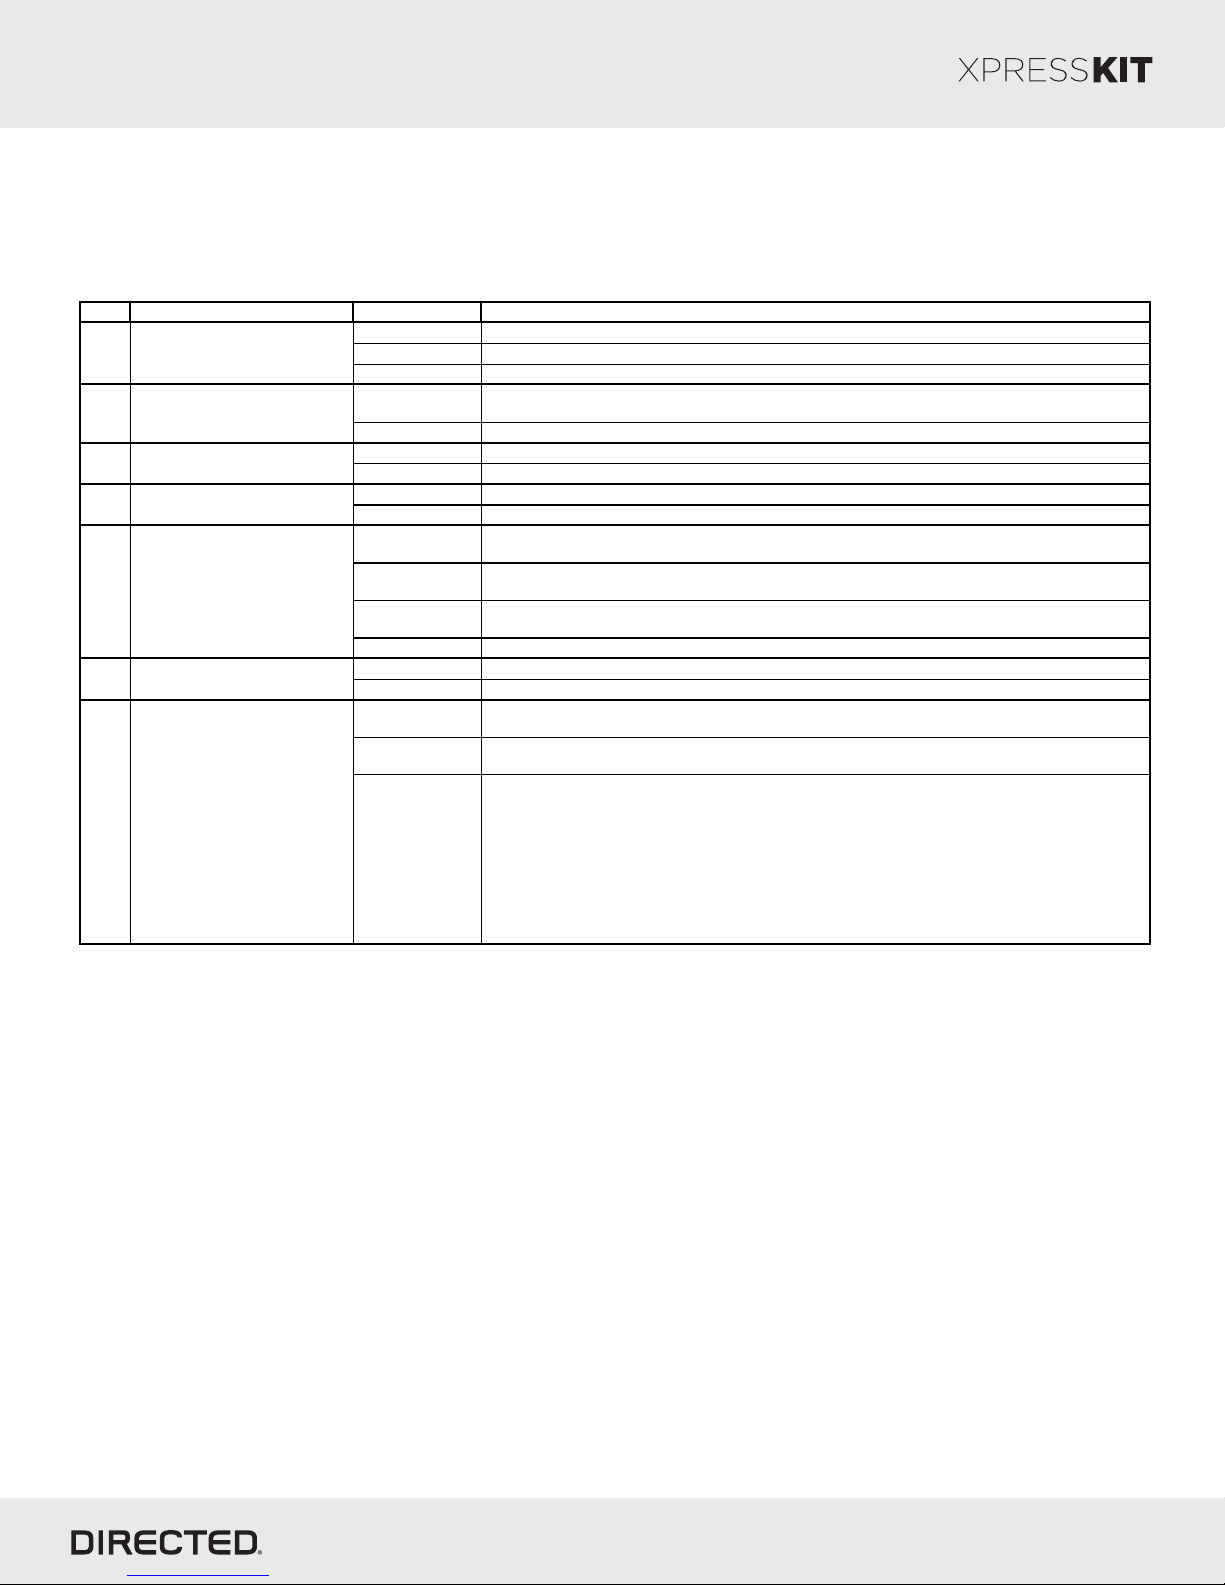
Feature & Option List
It is recommended to configure all the features and options listed below using the configuration tool found on the module
flashing page on www.directechs.com. The web offers more options; however, manual configuration of the features is possible
using the information on this page.
1. No RF Output*
1 RFTD Output Type
2 Unlock Driver Priority
3 Heated Seats
4 Defroster
Heated Seats/Defroster
5
Temperature Control
6 Heated Seats Temperature Level
7 Smart OEM Alarm Control
2. RFTD Output Module is connected to an XL202 using an RSR or RXT installation (when available).
3. SmartStart Module is connected to SmartStart using an RSR or RXT installation (when available).
1. Driver priority*
2. All Unlocks all doors when the button is first pressed.
1. Disabled*
2. Enabled When the feature is enabled, it will activate the Heated Seats and heated steering wheel.
1. Disabled*
2. Enabled When the feature is enabled, it will activate the rear defroster and heated mirrors.
1. 32 °F (0 °C)*
2. 23 °F (-5 °C)
3. 41 °F (5 °C)
4. Always ON When Heated Seats or Defroster feature is enabled, it will activate the feature at any temperature.
1. High*
2. Low When Heated Seats are activated, they will be set to LOW.
1. Disabled
2. Safelock
3. Enabled*
Module is connected to a remote starter using a standard installation.
Unlocks only the driver door when the button is first pressed, and unlocks all doors when it is pressed a
second time within 5 seconds.
No operation.
No operation.
When Heated Seats or Defroster feature is enabled, it will activate the feature upon remote start when
temperature is below 32 °F (0 °C).
When Heated Seats or Defroster feature is enabled, it will activate the feature upon remote start when
temperature is below 23 °F (-5 °C).
When Heated Seats or Defroster feature is enabled, it will activate the feature upon remote start when
temperature is below 41 °F (5 °C).
When Heated Seats are activated, they will be set to HIGH.
The OEM alarm will not be controlled by DBALL upon remote start. No disarm or arm command will be
executed at the beginning or end of the sequence; it must be controlled by the Remote Starter.
Smart OEM Alarm Control will behave like a standard Safelock feature on a remote starter. It will unlock
at the beginning of the sequence, and relock after start and shutdown.
Smart OEM Alarm Control will synchronize with the OEM alarm so that it will disarm and rearm the
vehicle in the remote start sequence, only when required. The reason for this is, factory alarm control
must often be done by lock or unlock operation. This could create unnecessary actions on door lock
modules, such as the horn to honk. When possible, Smart OEM Alarm Control will monitor the alarm
and door lock status to detect if the disarm or rearm is required. If the vehicle is unlocked or is not
equipped with factory alarm, the disarm/rearm will not be executed. Smart OEM Alarm Control will also
monitor the remote starter actions so that the factory alarm control is not done twice. A remote starter,
for which the Safelock feature is active, will work perfectly with this option and will make it invisible to the
user.
© 2016 Directed. All rights reserved.
Page 14
Platform: DBALL/DBALL2
Firmware: CHRYSLER3 Remote Start Ready (RSR) Installation
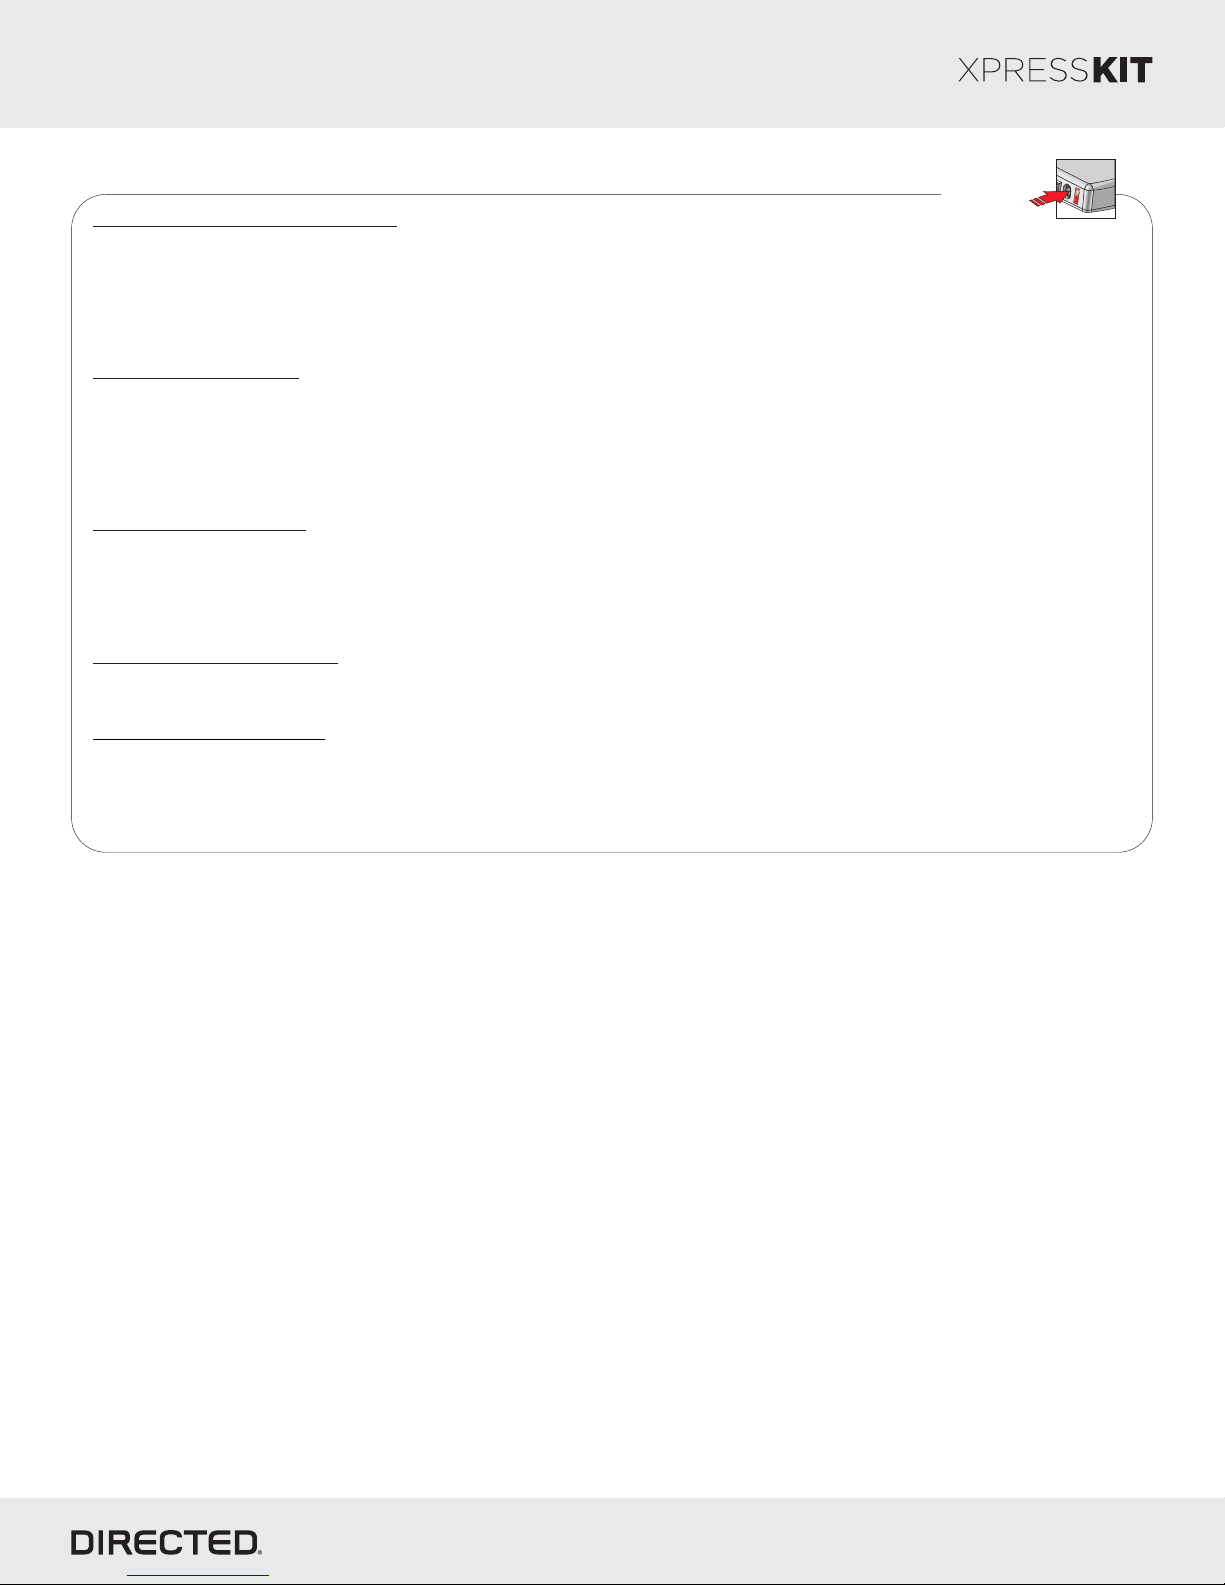
Feature Programming
To enter feature programming routine
-
Turn the ignition ON, then OFF.
-
Within 5 seconds, press and HOLD the programming button until the LED turns ON orange (after 3 seconds). Release the
Programming button.
-
The LED will flash green once slowly to indicate the feature number is 1. After a short delay, the LED flashes red rapidly to indicate
the current option of feature 1 (i.e. 1x green followed by 1x red indicates feature 1 is set to option 1). The flashing sequence will repeat
until a new command is entered.
Changing feature options
Press the lock/arm or unlock/disarm button on aftermarket transmitter to change the option of the selected feature. When installing the
DBALL in RSR using 3x OEM Lock Remote Start Activation only, there is no aftermarket transmitter on which to press lock/unlock to
change the options of the selected feature. Tapping the green or blue lock/unlock wires on the black 10-pin harness to ground will
change the option for the selected feature.
The LED flashes red rapidly the number of times equal to the current option number. After a short delay, the LED flashes green slowly
the number of times to indicate the current feature. The flashing sequence will repeat until a new command is entered.
Accessing another feature
-
Press and release the programming button a number of times to advance from the current feature to the next desired feature.
-
The LED flashes green slowly the number of times equal to the feature number. After a short delay, the LED flashes red rapidly to
indicate the current option of the current feature. The flashing sequence will repeat until a new command is entered.
When the maximum number of features or options is reached, the LED will start flashing again from the first feature or option.
Programming
Button
Rev.: 20160608
Page 14
Once a feature is programmed
-
Other features can be programmed.
-
The feature programming can be exited.
Exiting feature programming
-
No activity for 30 seconds; after 30 seconds, the LED will turn ON orange for 2 seconds to confirm the end of the programming
sequence.
OR
-
Press and HOLD the programming button for 3 seconds. After 3 seconds, the LED will turn ON orange for 2 seconds to confirm the
end of the programming sequence.
© 2016 Directed. All rights reserved.
Page 15
Platform: DBALL/DBALL2
LED Description Troubleshooting
Firmware: CHRYSLER3 Remote Start Ready (RSR) Installation
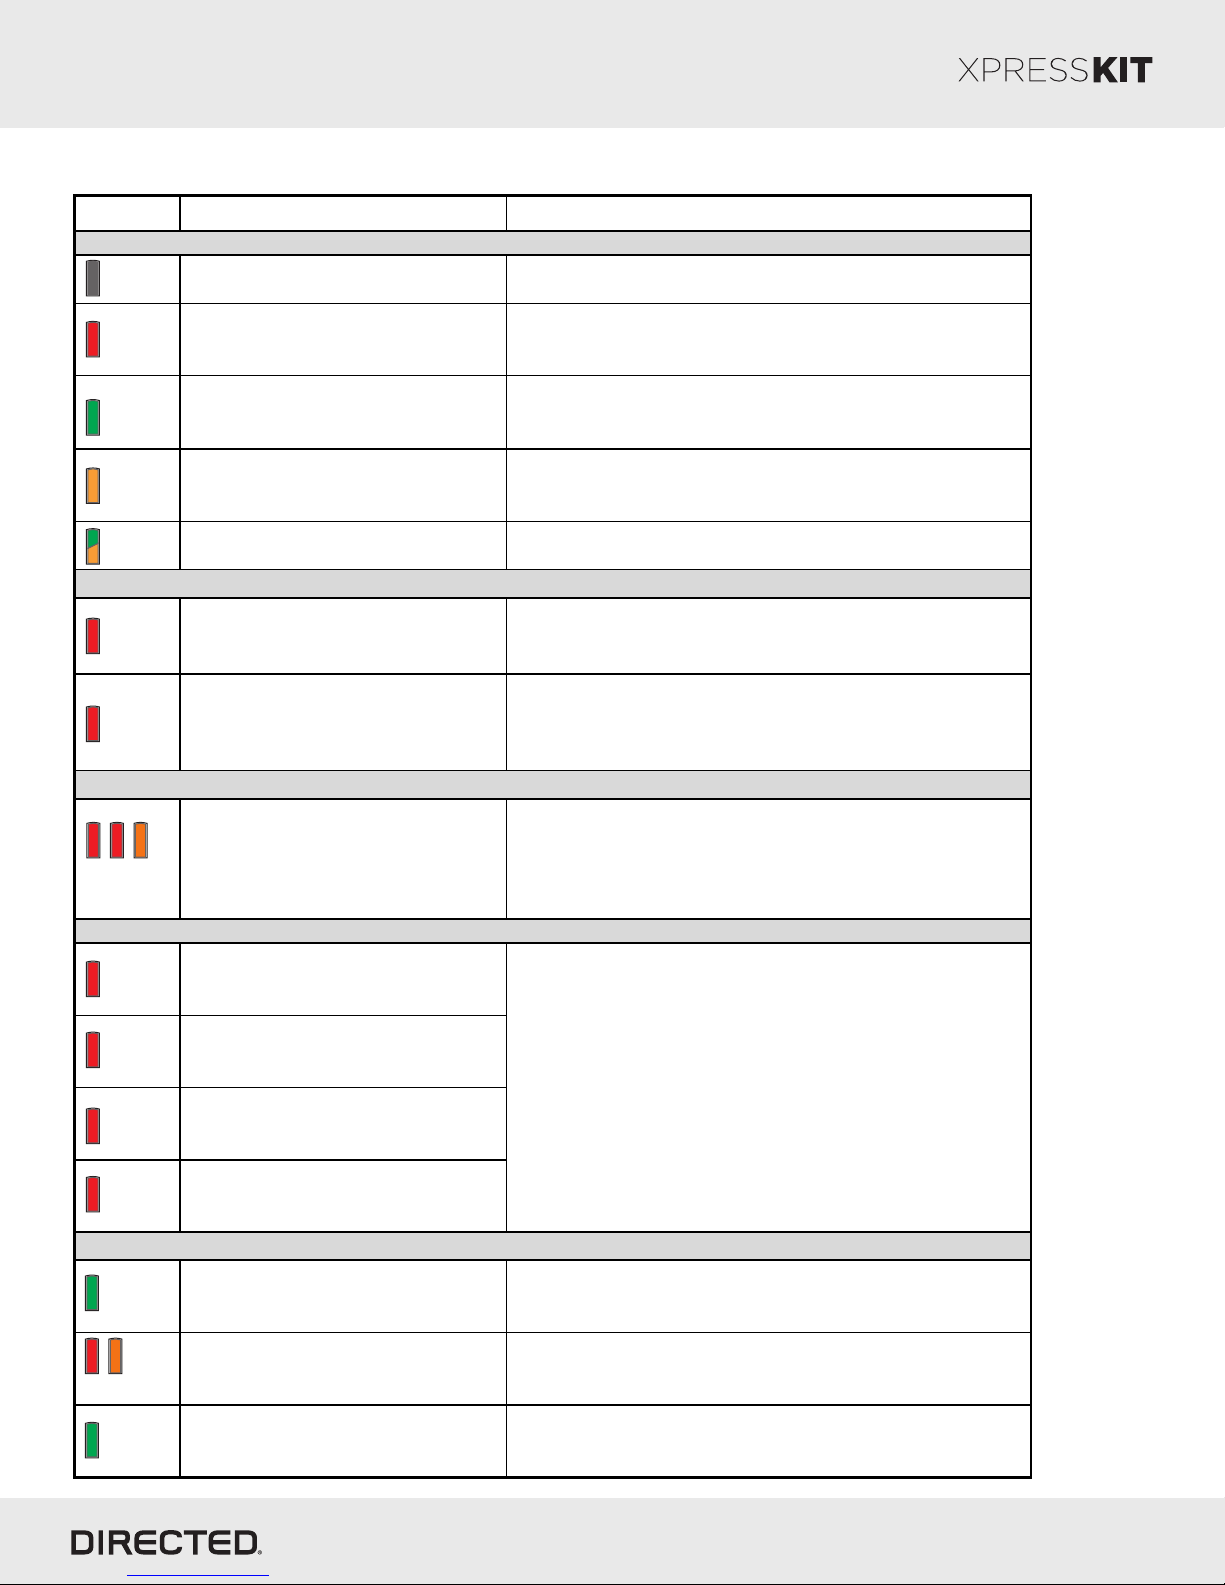
LED Diagnostics & Troubleshooting
Module progra mming
Rev.: 20160608
Page 15
Off
Solid
Module has no power. Check the power connections.
If the LED is red after the ignition is ON, check for CAN-High
Start of programming is normal
and CAN-Low connections as the ignition is not seen on
CAN.
Flashes
green
Flashes
orange
Solid and
quick flash
CAN programmed and waiting for
bypass programming.
Waiting for offline key2go
programming.
Module successfully programmed or
is already programmed.
Normal operation
Normal operation
Normal operation
Module progra mming - Error codes
Flashes
red x2
CAN not detected.
Check the Tan - Tan/Black wire connections. Wake up the
data bus by turning the ignition on and try again.
Check the bypass line connection, make sure there is a
Flashes
red x3
Bypass data not detected.
continuity between the 2 sides of the cut and turn the ignition
ON. Make sure the battery was removed when turning the
ignition ON.
External Module Synchronisation
Diagnostic OBDII BUS statuses like DTC codes will not be
available on SmartStart because the BUS was not detected.
Please check your HSCAN connections, reset, and
reprogram the module. SmartStart can still be used but will
Flashes
red, red,
orange
Diagnostic OBDII feature not
initialized.
work with limited statuses.
Shutdown codes
Flashes
red x1
Flashes
red x2
Flashes
red x3
Flashes
red x4
Run safe shutdown.
Brake shutdown.
No key detected shutdown.
Speed detected.
Remote Start sequence (status)
Flashes
green
Flashes red
& orange
Flashes
green
GROUND OUT ON (GWR) command
received.
IGNITION ON command received.
START ON command received.
Used to check the installation and for troubleshooting
purposes. Used to check for internal safety operation. Does
not represent an error.
Otherwise, the Ground While Running (status) signal was lost
or was never received by the module. Commands can come
from RF, D2D or W2W.
Otherwise, the ignition signal was not received by the module.
In a W2W install, it will show only if the ignition input wire is
used.
Otherwise, the start signal was not received by the module. In
a W2W install, it will show only if the ignition input wire is
used.
© 2016 Directed. All rights reserved.
Page 16
Platform: DBALL/DBALL2
LED Description Troubleshooting
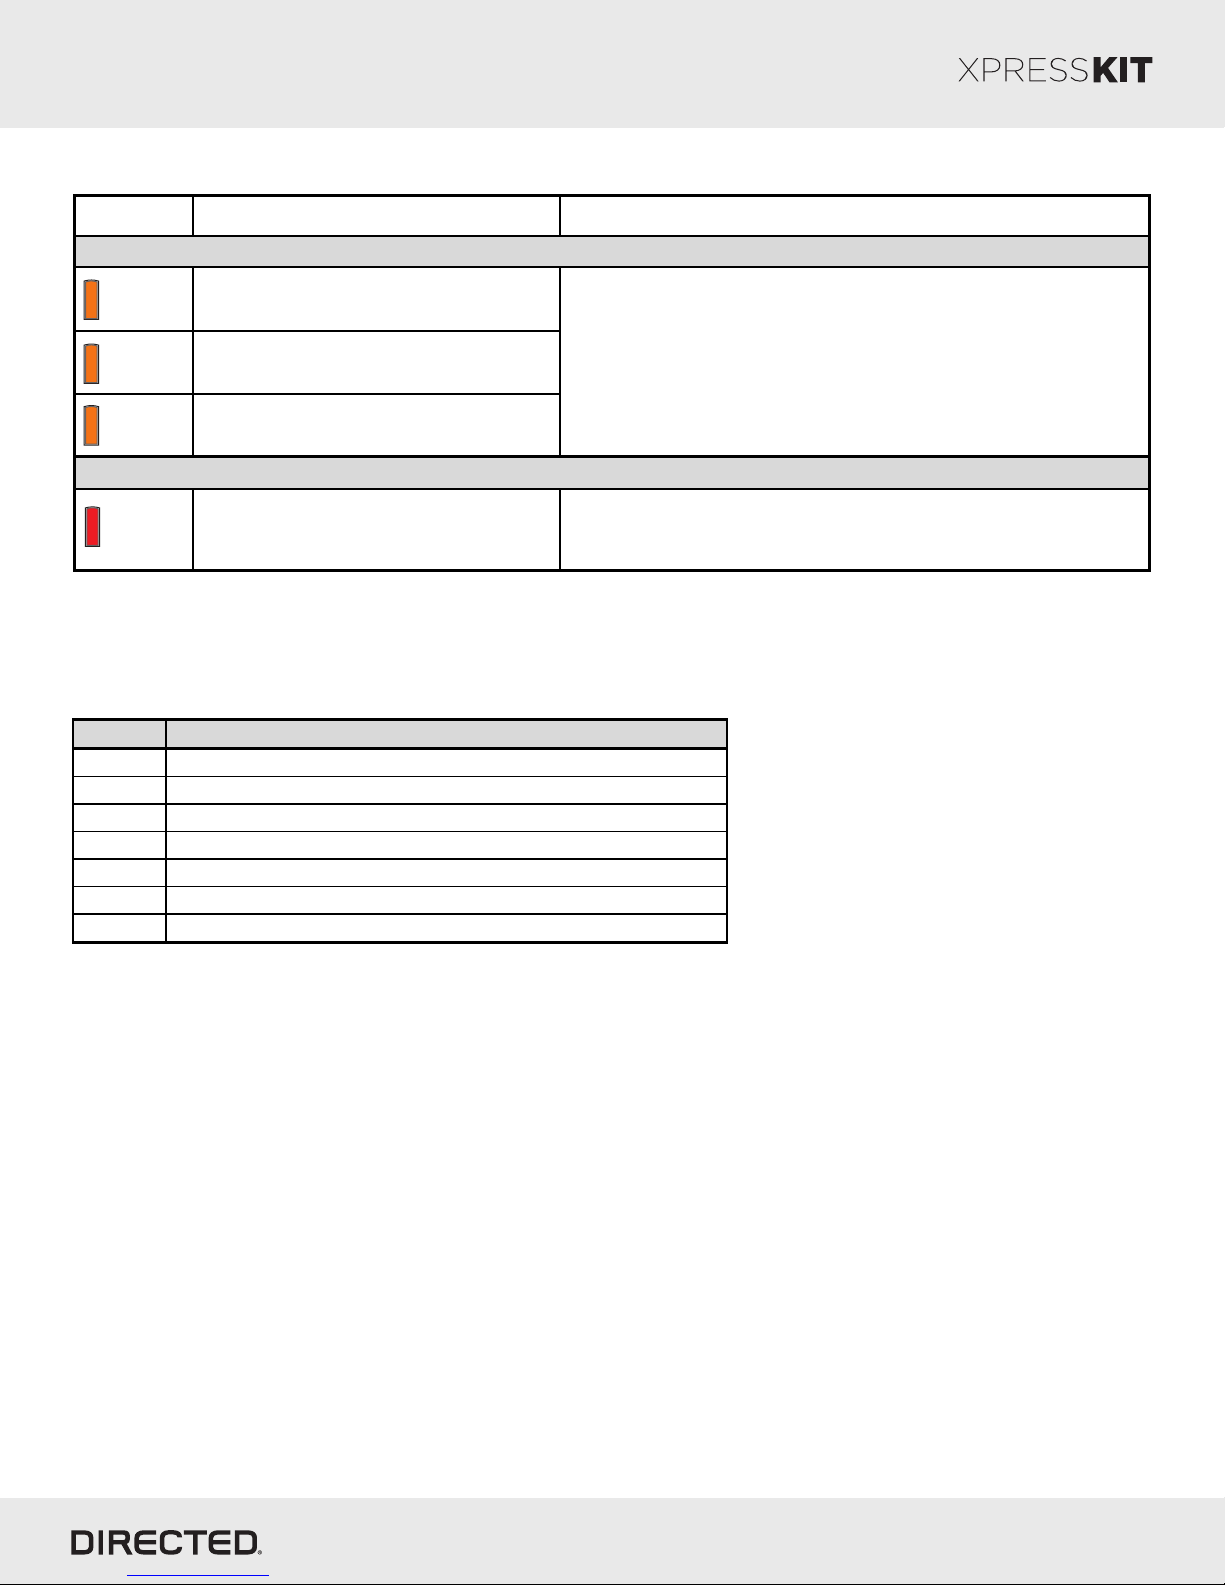
D2D a nd W2W comma nds
Firmware: CHRYSLER3 Remote Start Ready (RSR) Installation
Flashes
orange
x1
Flashes
orange
x2
LOCK command received.
UNLOCK command received.
If the bypass module fails to flash, it means the module did
not receive the signal. Commands can come from RF, D2D or
W2W.
Flashes
orange
x3
TRUNK command received.
RSR Code
Flashes
red x7
3x OEM Lock Remote Start
Activation was attempted when RFTD
feature is disabled.
Activated from Web automatically when using RSR flash tool
or can be done manually. Refer to feature programming
section for more information.
Parking Light Error Codes
Rev.: 20160608
Page 16
The parking lights on your vehicle will flash a specific number of times 3 seconds following an unscheduled shutdown or
failure to start. Each flashing pattern is described below.
Fla shes Diagnostic
1 Runtime expired.
2 Over-rev shutdown.
3 Low/No RPM.
4 Transmitter shutdown.
5 Brake shutdown.
6 Hood shutdown/Remote start safety override switch is ON*.
7 Remote start safety override switch is ON*.
* If the vehicle hood status is supported through data, safety override switch input will report 7 flashes.
© 2016 Directed. All rights reserved.
Page 17
Platform: DBALL/DBALL2
Firmware: CHRYSLER3 Remote Start Ready (RSR) Installation
Rev.: 20160608
Page 17
Limited One Year Consumer Warranty
For a period of ONE YEAR from the date of purchase of a Directed Electronics remote start or security product, Directed
Electronics. (“DIRECTED”) promises to the original purchaser, to repair or replace with a comparable reconditioned piece, the
security or remote start accessory piece (hereinafter the “Part”), which proves to be defective in workmanship or material
under normal use, provided the following conditions are met: the Part was purchased from an authorized DIRECTED dealer;
and the Part is returned to DIRECTED, postage prepaid, along with a clear, legible copy of the receipt or bill of sale bearing the
following information: consumer’s name, address, telephone number, the authorized licensed dealer’s name and complete
product and Part description.
This warranty is nontransferable and is automatically void if the Part has been modified or used in a manner contrary to its
intended purpose or the Part has been damaged by accident, unreasonable use, neglect, improper service, installation or
other causes not arising out of defect in materials or construction.
TO THE MAXIMUM EXTENT ALLOWED BY LAW, EXCEPT AS STATED ABOVE, ALL WARRANTIES, INCLUDING
BUT NOT LIMITED TO EXPRESS WARRANTY, IMPLIED WARRANTY, WARRANTY OF MERCHANTABILITY,
FITNE SS FOR PARTICULAR PURPOSE AN D WARRANTY OF NON INFRING EMENT OF INTELLE CTUAL
PROPERTY, ARE EXPRESSLY EXCLUDED; AND DIRECTED NEITHER ASSUMES NOR AUTHORIZES ANY
PERSON OR ENTITY TO ASSUME FOR IT ANY DUTY, OBLIGATION OR LIABILITY IN CONNECTION WITH ITS
PRODUCTS. DIRECTED HEREBY DISCLAIMS AND HAS ABSOLUTELY NO LIABILITY FOR ANY AND ALL ACTS OF
THIRD PARTIES INCLUDING DEALERS OR INSTALLERS. DIRECTED IS NOT OFFERING A GUARANTEE OR
INSURANCE AGAINST VANDALISM, DAMAGE, OR THEFT OF THE AUTOMOBILE, ITS PARTS OR CONTENTS,
AND DIRECTED HEREBY DISCLAIMS ANY LIABILITY WHATSOEVER, INCLUDING WITHOUT LIMITATION,
LIABILITY FOR THEFT, DAMAGE, OR VANDALISM. IN THE EVENT OF A CLAIM OR A DISPUTE INVOLVING
DIRECTED OR ITS SUBSIDIARY, THE PROPER VENUE SHALL BE SAN DIEGO COUNTY IN THE STATE OF
CALIFORNIA. CALIFORNIA STATE LAWS AND APPLICABLE FEDERAL LAWS SHALL APPLY AND GOVERN THE
DISPUTE. THE MAXIMUM RECOVERY UNDER ANY CLAIM AGAINST DIRECTED SHALL BE STRICTLY LIMITED
TO THE AUTHORIZED DIRECTED DEALER’S PURCHASE PRICE OF THE PART. DIRECTED SHALL NOT BE
RESPONSIBLE FOR ANY DAMAGES WHATSOEVER, INCLUDING BUT NOT LIMITED TO, ANY CONSEQUENTIAL
DAMAGES, INCIDENTAL DAMAGES, DAMAGES FOR THE LOSS OF TIME, LOSS OF EARNINGS, COMMERCIAL
LO S S, L O SS OF ECONOMI C OPPORTUNITY AND THE L IKE. NOTWIT HSTANDI NG THE AB OVE, THE
MANUFACTURER DOES OFFER A LIMITED WARRANTY TO REPLACE OR REPAIR AT DIRECTED’S OPTION THE
PART AS DESCRIBED ABOVE.
This warranty only covers Parts sold within the United States of America and Canada. Parts sold outside of the United States of
America or Canada are sold “AS-IS” and shall have NO WARRANTY, express or implied. Some states do not allow limitations
on how long an implied warranty will last or the exclusion or limitation of incidental or consequential damages. This warranty
gives you specific legal rights and you may also have other rights that vary from State to State. DIRECTED does not and has
not authorized any person or entity to create for it any other obligation, promise, duty or obligation in connection with this Part.
For further details relating to warranty information of Directed products, please visit the support section of DIRECTED’s
website at: www.directed.com
920-10012-01 2013-07
This Interface kit / Data Bus Interface part has been tested on the listed vehicles. Other vehicles will be added to the select
vehicle list upon completion of compatibility testing. Visit website for latest vehicle application guide. DISCLAIMER: Under no
circumstances shall the manufacturer or the distributors of the bypass kit / data bus interface part(s) be held liable for any
consequential damages sustained in connection with the part(s) installation. The manufacturer and it’s distributors will not, nor
will they authorize any representative or any other individual to assume obligation or liability in relation to the interface kit / data
bus interface part(s) other than its replacement. N.B.: Under no circumstances shall the manufacturer and distributors of this
product be liable for consequential damages sustained in connection with this product and neither assumes nor authorizes
any representative or other person to assume for it any obligation or liability other than the replacement of this product only.
Protected by U.S. Patents: 5,719,551; 6,011,460 B1 *; 6,243,004 B1; 6,249,216 B1; 6,275,147 B1; 6,297,731 B1; 6,346,876
B1; 6,392,534 B1; 6,529,124 B2; 6,696,927 B2; 6,756,885 B1; 6,756,886 B2; 6,771,167 B1; 6,812,829 B1; 6,924,750 B1;
7,010,402 B1; 7,015,830 B1; 7,031,826 B1; 7,046,126 B1; 7,061,137 B1; 7,068,153 B1; 7,205,679 B1; Cdn. Patent:
2,320,248; 2,414,991; 2,415,011; 2,415,023; 2,415,027; 2,415,038; 2,415,041; 2,420,947; 2,426,670; 2,454,089; European
Patent: 1,053,128; Pat. Pending: 2,291,306. Made in Canada.
© 2016 Directed. All rights reserved.
Page 18
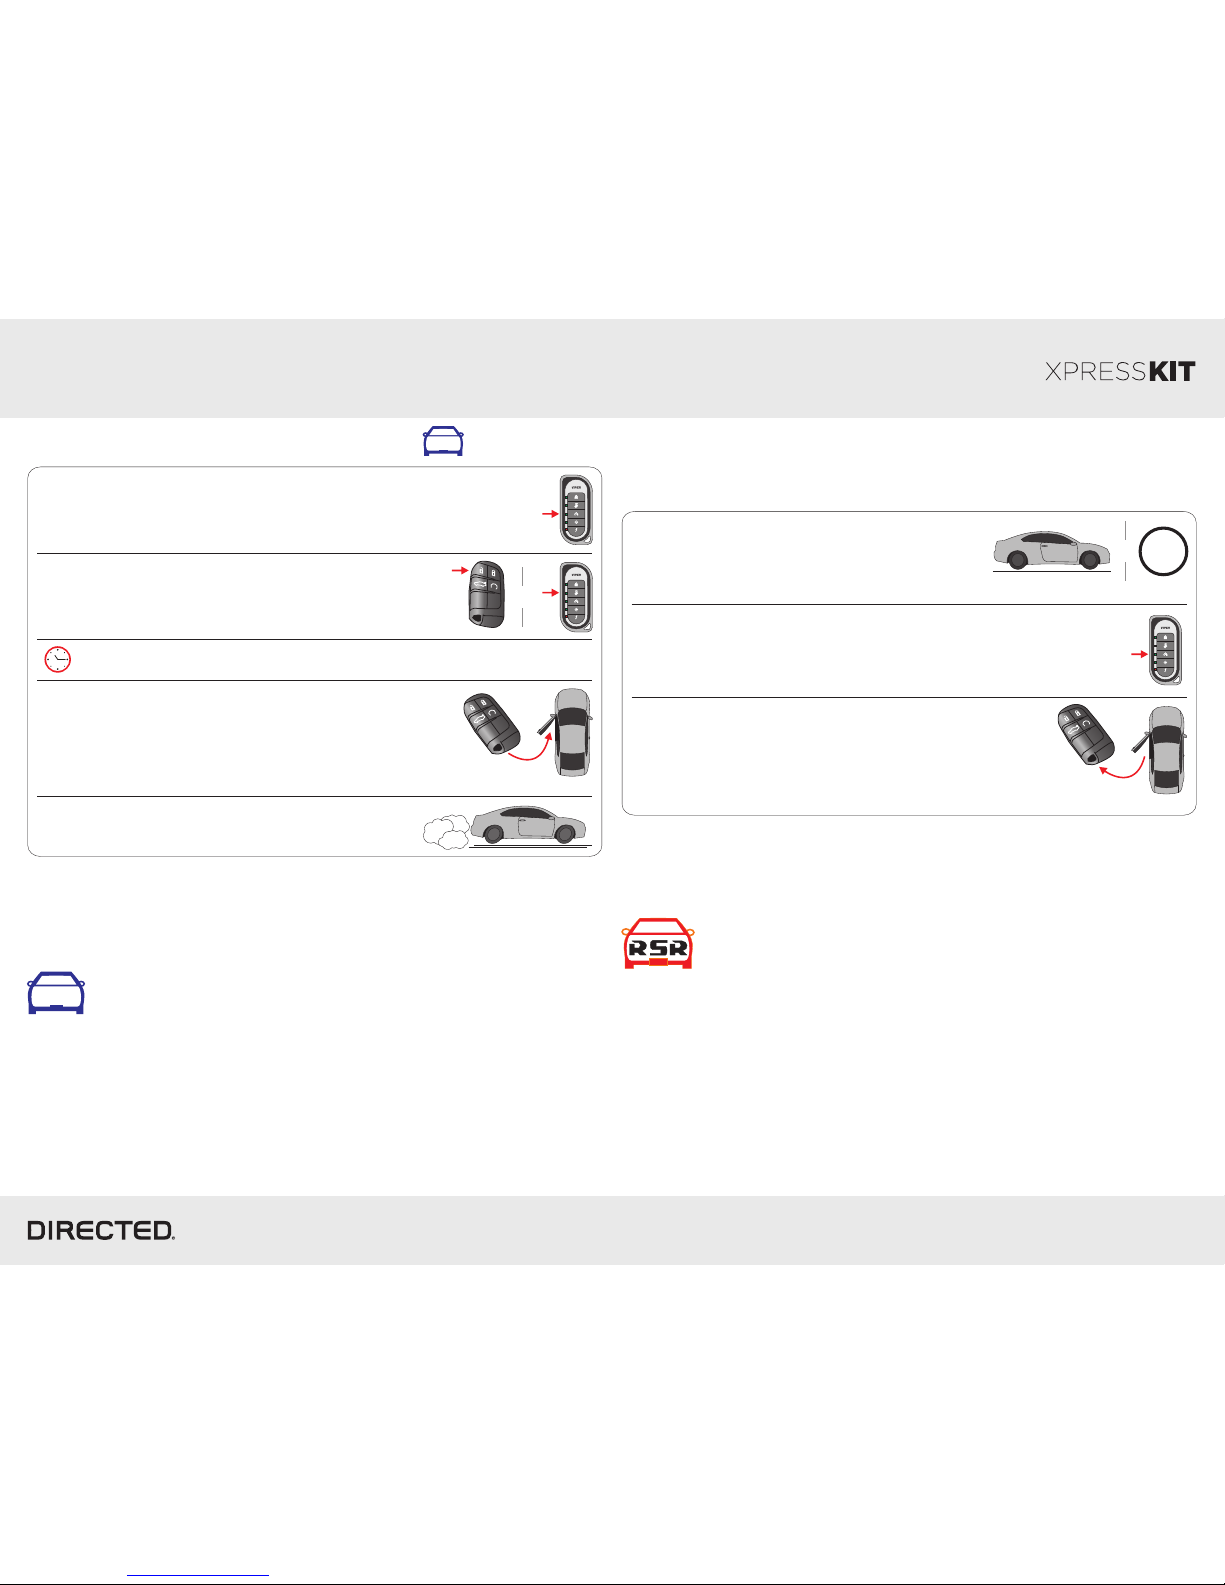
Quick Reference Guide
DBALL/DBALL2-CHRYSLER3 Remote Start Ready (RSR) Installation
© 2016 Directed. All rights reserved.
1
2
3
Stop the vehicle in a safe parking spot
and put the gear in Park (P).
Press
remote start
button*
* Your aftermarket remote may differ from the model shown in the illustrations.
Stop & put vehicle in Park (P)
P
&
Exit vehicle with
Smart Key
Pit Stop Mode
The Pit Stop Mode feature is practical when you need to stop and run an errand, but
wish to keep the engine running.
Note: We recommend that you always lock the doors
of your vehicle when leaving it unattended.
It is now safe to leave the engine running and exit the
vehicle with the factory remote in hand.
Press the button to remote start the vehicle.*
PANIC
x2
x2
PANIC
x2
x2
Vehicle Takeover with Get In and Go*
4
3
1
Close the vehicle doors, hood and trunk, then press
the Remote Start button on the transmitter to start
the vehicle.**
2
Press the brake pedal, put the car
in gear and drive off.
Enter the vehicle, while making sure the
factory remote is inside with you.
Press the Unlock button on the factory
or aftermarket remote.**
Ready to
drive off
Press
remote start
button**
Press Unlock
button on
either remote**
OR
** Your aftermarket remote may differ from the model shown in the illustrations.
Enter vehicle
with key fob
GG
* Get In and Go connections required.
Get In and Go
Get In and Go is designed to provide users with easy takeover when
entering their Push-to-Start (PTS) equipped vehicle, once it has been
remote started.
Typically, users would have to remote start their vehicle, then get inside and press
the vehicle start button to perform a takeover. There is therefore a physical action
required to drive away. With Get In and Go technology, you simply remote start the
vehicle, unlock the doors, get in and go... Nothing to do but put the gear in drive and
enjoy your vehicle.
This unique feature monitors a variety of parameters such as the key fob, vehicle
speed sensor and door sensor, in order to perform takeover securily.
GG
Complete the following steps within 45 seconds
or the vehicle will shut down.
P
ANIC
x2
x2
Remote Start Ready (RSR)
Remote Start Ready (RSR) is a function that enables the interface
module to remote start the vehicle completely on its own.
Consequently, there is no need for an aftermarket or an OEM remote
starter in order to start the vehicle from a distance.
Page 19
Quick Reference Guide
DBALL/DBALL2-CHRYSLER3 Remote Start Ready (RSR) Installation
© 2016 Directed. All rights reserved.
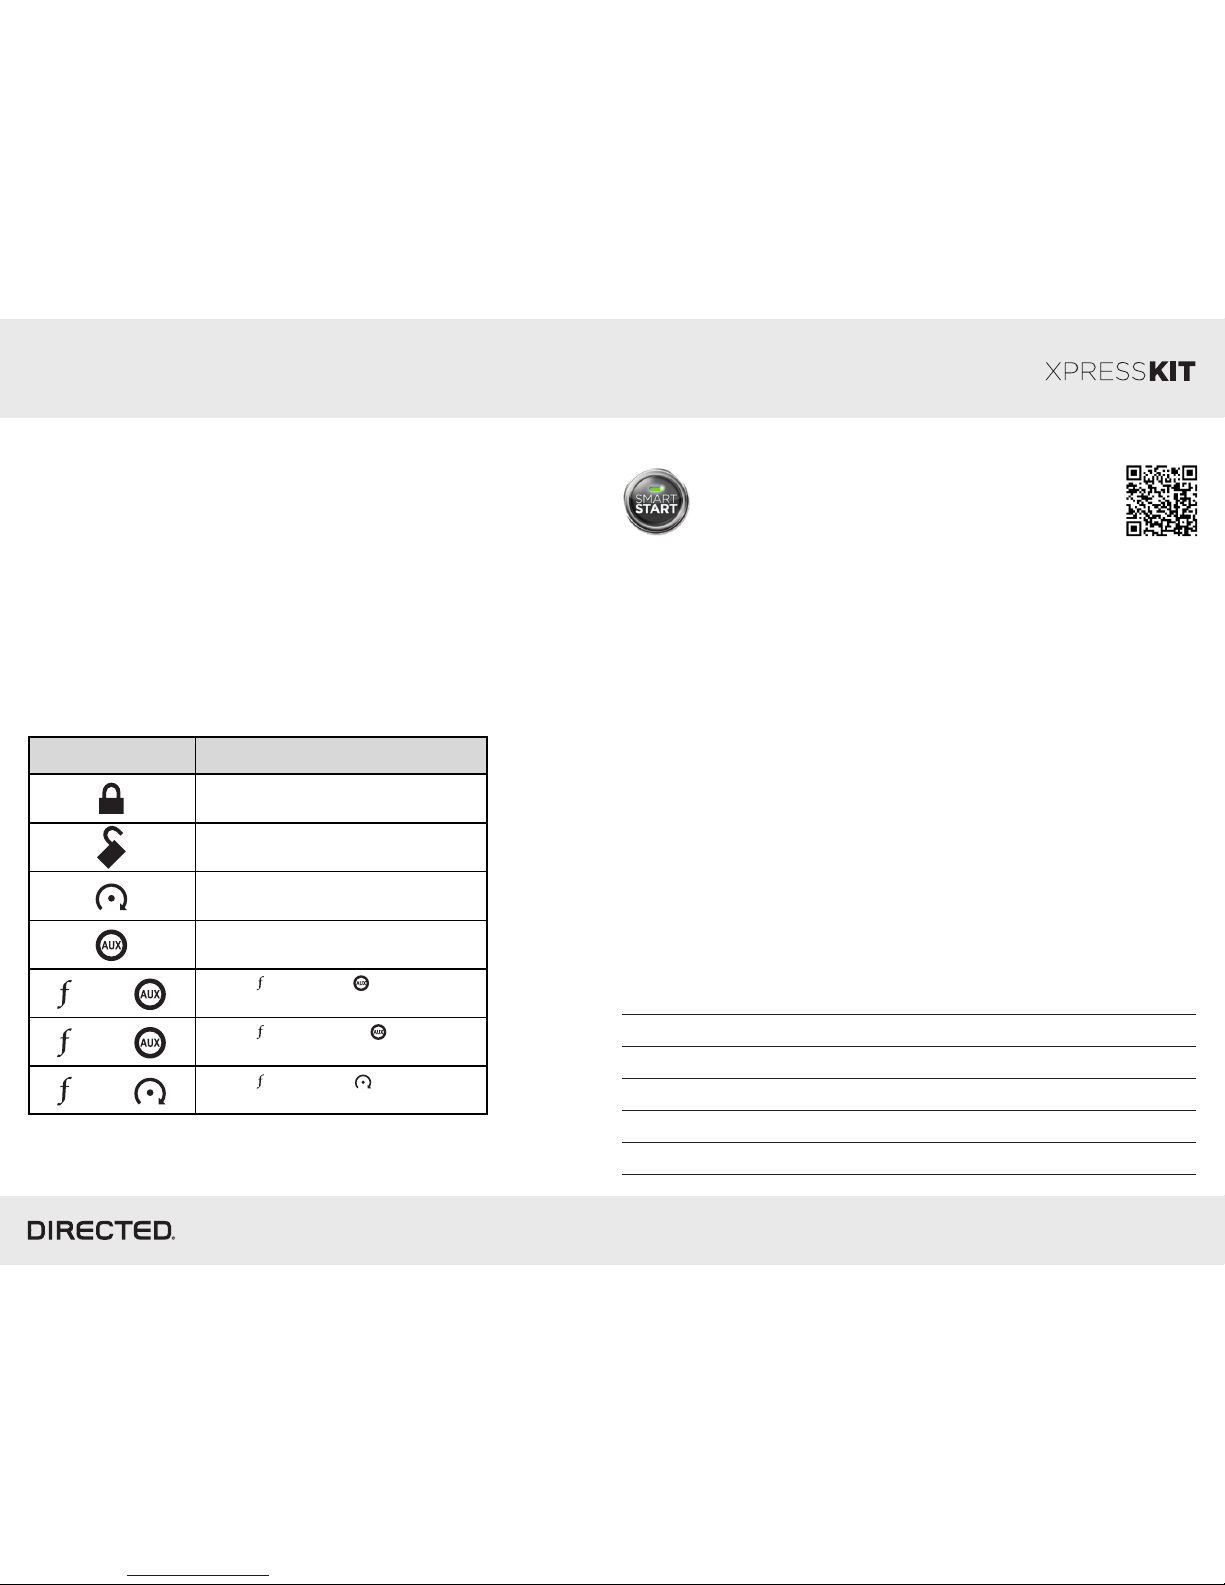
Button(s)
Actions
Press & hold for 1 second to lock.
Press & hold for 1 second to unlock.
Press & hold for 1 second to remote
start.
Press & hold for 5 seconds to activate
the trunk release (optional).
Press once, then to activate the
rear hatch/tail glass release (optional).*
Press 3 times, then to activate
the panic mode.
Press once, then to reset the
remote starter runtime.
List of Available Commands
x1 +
x3 +
x1 +
* This output is configurable. see your authorized installation center for more
information.
Note that the information below is for Viper, Clifford and Python models. Icons and
commands may differ depending on the remote brand and model purchased. Refer
to your authorized installation center for more information.
SmartStart Compatible
This system is compatible with Directed SmartStart 3.0. For
a complete list of supported features, please visit
www.mysmartstart.com.
What is SmartStart?
Now you can remote start, lock and unlock your car just by pushing a button on
your smartphone; using the SmartStart App from Directed, the leader in vehicle
security and remote start. The simple graphical interface gives you control over the
following features of your installed remote start or security with remote start system:
Lock/Arm
Unlock/Disarm
Remote Car Starter
Trunk Release
Panic
Aux Channels
You can also control multiple vehicles – great for families – and assign more than
one user to control a vehicle. It's easy with SmartStart!
But, this is only the beginning! SmartStart is loaded with additional features
including GPS tracking, SmartSchedule, vehicle status, roadside assistance, home
control, parked car finder and more.
3.0 enables a "Cloud-Connected Car" like never before, providing an entirely new
level of 2-way interaction with your vehicle. Connectivity is managed through the
Directed Cloud Services (DCS) network linking car, app, end user, and the Internet.
For more information, visit www.mysmartstart.com.
Notes
3x OEM Lock Remote Start Activation
This solution includes the option to remote start your vehicle by pressing the Lock
button 3 times consecutively. If your vehicle allows the OEM remote to remain
active while the engine is running, you may shut down your remote starter by
pressing the Lock button 3 times once more.
Note: The range offered by OEM remotes is limited and typically requires you to be
within eyesight of the vehicle to control it.
 Loading...