

Page 1
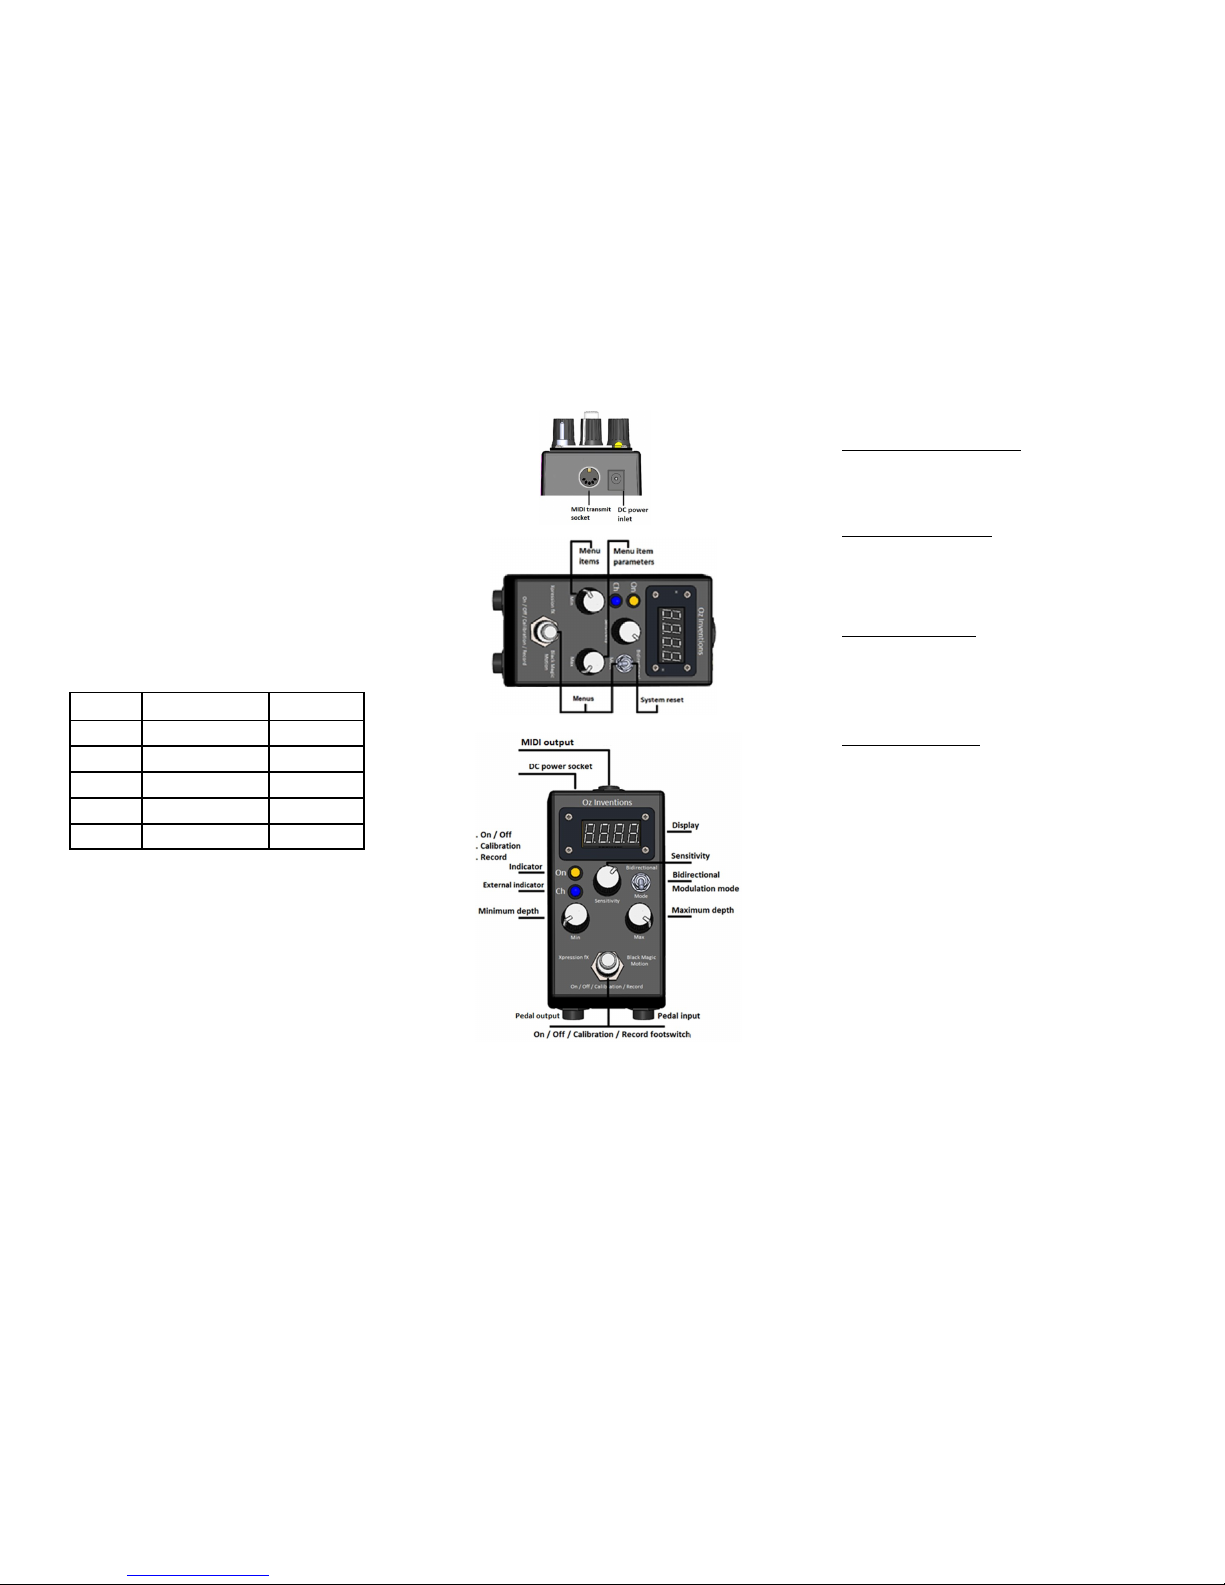
Xpression fx Enhancer —MIDI controller, Description V1.13 © Oz Inventions 2018
Xpression fX Enhancer —MIDI
Description
Xpression fX Enhancer – MIDI, from Oz Inventions, is a expression pedal to MIDI controller convertor. It is compatible
with most MIDI devices with a 5-pin DIN MIDI receive socket,
including keyboards and effect units.
Important message
1. The position of the sensitivity, minimum depth and maxi-
mum depth controls are of extreme importance in obtaining the correct amount of control. Having these controls
in the incorrect position may mean no control, minimum
control or erratic control. If in doubt set minimum depth
to minimum, maximum depth to maximum and set the
sensitivities as follows.
2. It is easy to accidently assign values to the full range of
continuous controllers (0 – 119) . So, when changing continuous controller numbers ensure that either the on/off /
calibrate, switch is off, or that the continuous controller is
disabled. (----). Resetting the receiving MIDI device is an
option if this unwanted condition exists.
See the full manual at www.ozinventions.com
1.
Bidirectional switch – Bidirectional sweep
Minimum depth – sets how low control can fall
Maximum depth – sets how high control can rise
Menu access
System/ADSR menu entry and exit
1. Press and hold on/off/calibrate/recording switch
2. Hold mode switch forward and release
Step size menu entry and exit
1. Hold mode switch forward
2. Press and hold on/off/calibrate/recording switch and
release
MIDI menu entry and exit
1. Fully rotate anti-clockwise the maximum depth control
2. Press and hold on/off/calibrate/recording switch
3. Hold sensor select switch forward and release
Preset menu entry and exit
1. Rotate maximum depth control fully anti-clockwise (0)
2. Rotate minimum depth control fully clockwise (127)
3. Press on/off/calibrate/recording switch
Navigating a menu
The minimum and maximum depth controls function as menu
controls when inside a menu. They will retain their depth values when in a menu, but will revert to the knobs current position when a menu is exited. And so they should be returned to
the position they were in before the menu was entered.
Use minimum depth to move through menu items and maximum depth to change menu item parameters
Saving menu parameters
Quit/save is the last menu item in all menus. Select ‘Save’ in
menu, and exit menu to save. This saves all menu settings and
calibration settings for the current preset.
Default settings
The default settings can be restored by resetting the system.
(Hold mode switch forward whilst powering on)
3.
Mode Sensitivity
function
Suggested
start point
Automatic Step size 0
External Step size 0
Playback Trim recording 0
Page 2

Xpression fx Enhancer —MIDI controller, Description V1.13 © Oz Inventions 2018
4.
5.
Preset menu
items
Item Identifier Range
Preset PS 0 – 9
MIDI menu
items
Item Identifier Range
Channel Ch 1 – 16
Program
change marker
PC.. NA
Program
change value
- - - - 0—127
Program
change speed
SP 0—99
Continuous
controller
marker
CC.. NA
Continuous
controller 2
2 -- 4 0 - 119
CC2 value - - - - 0 – 127
Continuous
controller 3
3 -- 5 0 - 119
CC3 value - - - - 0 – 127
Continuous
controller 4
4 -- 7 0 - 119
CC4 value - - - - 0 – 127
Pitch wheel P 0 – 127
After touch
(channel)
A 0 – 127
Reset volume
and pitch*
rv Yes or No
Reset controllers
rc Yes or No
All sound off So Yes or No
Reset receivers rS Yes or No
quit / save quit/save quit / save
Modes
Modes are accessed via the mode switch in the following order
1. Automatic ADSR (A) - Continuously plays the ADSR enve-
lope using the ADSR settings in the menu
2. External (E) - accepting data from the input jack
3. Playback recorded ADSR (P) - Plays the recorded ADSR
envelope as recorded in record mode.
Reset to default settings
The device can be reset to factory settings by holding the mode
switch forward whilst connecting power. The system will be
reset to default values when the mode switch is released.
*Resetting the pitch and/or volume can be useful. For exam-
ple, if controlling volume and the volume is at minimum , and
then the on/off/calibrate switch is turned off, the volume will
remain at minimum. Having ‘Reset volume and pitch” to ‘YES’
will automatically bring the volume back to maximum when
the control is turned off. This also needs to be considered when
sending data to other continuous controllers as the MIDI data
will remain at the last value read before control was turned
off.
See the full manual at www.ozinventions.com
6.
System menu
items
Item Identifier Range
Use mode Free / Atg1 /
Atg2 / Rec
Free / Atrg /
Atg2 / Rec
Logarithmic /
Linear scale
Log - (linear)
L (log)
A (anti-log)
Trigger level tL 0 – 99
Record time Rt 1-99 (x 10 sec)
Reverse sweep rS No / Yes
Off Level L 0—128
ADSR items
Item Identifier Range
Attack rate Ar 0 – 99 –00
(x 10mS)
Decay rate Dr 0 – 99 –00
(x 10mS)
Sustain level SL 0 – 99—00
(x 10mS)
Sustain time St 0 – 99—00
(x 10mS)
Release rate Rr 0 – 99—00
(x 10mS)
Scale SC 1 – 99—00
(x envelope)
Trigger mode T nnr / nni/
nnH / nnr
quit / save quit /save quit / save
Step size
items
Item Identifier Range
Step size S 0 – 127
Custom step 1 1 0 – 127
Through to -
Custom step 16 16 0 – 127
quit / save quit /save quit / save
Page 3

Xpression fx Enhancer —MIDI controller, Description V1.13 © Oz Inventions 2018
Operation
1. Access the MIDI menu see ‘Menu access’ pg 3
2. Set the MIDI channel to match the receiving MIDI
device.
3. After the ‘CC..’ menu item, select a continuous controller (CC) and assign control data to it. Menu item
“nnod” (fully right) is mode data, rather than values
that are hard set. Exit the menu.
4. Change exit mode from ‘quit’ to ‘Save’ and exit the
menu by first pressing and holding the on/off/
calibrate/record switch and then pulling the mode
switch forward
5. Remover power from the controller-receiver
6. Connect the MIDI transmit jack to the receiving MIDI
device via a MIDI cable
7. Connect the controller and the device to be controlled
to power. Route a parameter on the receiving device to
a the chosen CC on the transmitting device
8. Set min depth to zero (fully anti-clockwise)
9. Set max depth to 127 (fully clockwise)
10. Select ‘A’ (Automatic) with the sensor select switch
11. Turn control on by pressing the on/off/calibration/
record switch. (the ON indicator will illuminate)
12. The CC data will now be transmitted .
7.
Calibrating the external input
External mode may require calibration.
1. Hold the external device at the required starting position
2. Press and hold the on/off/calibration/record button on
the controller-receiver. The ON indicator will start to
flash, signalling that the start position has been set and
that an output of zero will be at that point.
3. Continue to hold the button and move the external
device to its finishing position
4. Release the button. The finishing position has now
been set and output will be at maximum at that point.
5. No other modes require calibration but they may require sensitivity adjustment. See sensitivity settings
(pg 1).
Recording an external pattern
1. Enter the system menu and select ‘Rec-‘
2. Scroll through menu and select a maximum recording
time (1 equates to 10 seconds, 2 to 20 etc) and exit the
menu
3. A flashing dot will appear under the last digit on the
display to signify that record mode has been entered
4. Hold external device at your chosen start position, this
does not need to be the calibrated starting position
5. Press and hold the On/Off/Calibration/Record button,
until the indicator light starts to flash
6. Release the On/Off/Calibration/Record button. The
indicator light will cease flashing and the system is
armed for recording, but will not start recording yet.
7. Activate the external device as required.
8. When the output moves past the trigger level as set in
the system menu, and defaulting at ‘10’, the system will
begin to record external data and the indicator light
will flash continuously.
9. Manipulate the external device as you wish
10. Recording will cease when the On/Off/Calibration/
Record button is pressed, or when the recording time,
as set in the menu, has elapsed, whichever is sooner.
*The recorded pattern cannot be saved
8.
Playing back a recording
1. Select ‘P’ with the mode switch and the recording will
play back continuously, modulating the output
2. Trim the recording in ‘Playback’ mode if required with
the sensitivity control. Work from fully left (0).
Aautomatic ADSR mode
1. Start the controller with the default settings (see system reset pg 6).
2. Set MIDI channel, choose a Continuous Controller
(CC)and set it to respond to mode data (“nnod”)
3. Choose a parameter to control on the receiving MIDI
device and route it to the selected CC.
4. Select ‘A’ using the sensor select switch and the ADSR
envelop will immediately start repeating.
5. Press the on/off/calibration switch so that the ON LED
lights
6. Play a note on the MIDI instrument, and the modulation will be heard. The modulation waveform will be
using the default ADSR parameters in the system
menu.
7. Access the menu (on/off/calibration switch + sensor
select switch)
8. Rotate the minimum depth control to find “Ar” (Attack
rate). This sets how quickly the envelop rises. Set this
to 10 using the max depth control.
9. Rotate the min depth control further until “dr” (decay
rate) is found. This sets how quickly the envelope will
fall to the sustain level. Set this to 10 using the max
depth control.
10. Continue to rotate the minimum depth control and set
SL (sustain level), St (sustain time) and rr (release
rate) to zero.
11. Rotate the min depth control to find the Sc (scale setting). This adjusts the overall time for the envelope. Set
this at 5.
12. Play a note on the instrument being controlled and the
modulation will be heard.
13. Adjust the scale setting for the overall length required.
See the full manual at www.ozinventions.com
9.
Page 4

Xpression fx Enhancer —MIDI controller, Description V1.13 © Oz Inventions 2018
ADSR trigger mode
1. Start the receiver-controller with the default settings
(See system reset pg 6)
2. Set MIDI channel, choose a Continuous Controller
(CC) and set it to respond to mode data (“nnod”) and
exit the menu
3. Choose a parameter to control on the receiving MIDI
device and route it to the chosen CC.
4. Open the system menu (on/off/calibration switch +
mode switch).
5. Set ADSR trigger mode from the 1st menu item (‘Atg1’
from ‘Free / Rec / Atg1 / Atg2’ )
6. Scroll through the menu and set AR to 30 (Attack rate
30 x 10mS = 300 milliseconds). Use the default settings for the other envelope values.
7. Scroll through the menu and set the trigger mode to
trigger the envelope just once (‘tnno – Trigger mode
once)
8. Exit the menu and change to External mode (E)
9. Active the external device so that an output of 127 is
read on the display
10. The envelope will play once using the ADSR settings.
Attack rate is 30 so there will be a slow rise before the
envelope completes
11. Change the trigger mode to hold.(‘tnnH’ – Trigger
Hold). Activate the external device so that an output of
127 is read on the display. The ADSR envelop will start
and stay in the sustain section indefinitely. Activate the
external device to maximum depth again, and the envelop will complete
12. 12. Change the trigger mode to repeat. (‘tnnr’ – Trigger Repeat). Activate the external device so that an
output of 127 is read on the display. The ADSR envelop
will repeat continuously. Reach 127 again, and the
envelop will stop playing
*The trigger for all modes is the maximum depth.
10.
About the step size menu
By default the sweep ranges from 0—127 in steps of 1. This can
be changed to steps of 2, 3, 4 …. etc by entering the step size
menu and rotating the maximum depth control or by moving
the sensitivity control outside of the menu.
Choosing a step size of ‘0’ enables the custom step size option
which is particularly useful for controlling a pitch parameter.
The custom step sizes are accessed with the minimum depth
control and modified with the maximum depth control.
There are 16 possible custom steps and these can be set to any
interval such as semi-tone, tone, 3rd, 5th, octave etc.
The steps do not need to be set in ascending order but instead
can be set in any order such as C, E, G, D, E, G, F, E, G …. Etc
Scroll to the quit/save menu item to save any changes.
Setting custom intervals
Setting intervals is a process of playing a note on an instrument
and rotating the minimum depth control to determine which
sweep value equates to which musical note. Repeating this
process enables mapping out intervals for a specific keyboard
or other MIDI device.
To set the intervals accurately requires a good ear or a chromatic tuner.
1. Route CC on the receiving MIDI device to a pitch parameter and turn on the relevant CC in the MIDI menu
2. Set the step size to ‘0’ and exit the step menu
3. Set minimum depth to ‘0’ (fully left)
4. Choose External mode (E) and turn on/off/cal switch,
on
5. Set the receiving device to a pitch parameter with a
range of at least one octave
6. Play a note on the instrument
7. Rotate the minimum depth control until the interval
has increased by one semi-tone and physically record
the setting on paper or electronically.
8. Repeat this process until all intervals in an octave or
more are mapped.
Different brand and model devices will require different settings. These can be saved as presets.
11.
About the preset menu
There are 10 presets numbered from 0—9. By default all presets contain the same values.
The preset menu is selected by rotating the minimum depth
control fully right (127), the maximum depth control fully left
(0) and then pressing the on/off/calibrate/record button.
The presets can then be cycled through using the mode switch.
Exit from the preset menu by rotating either the minimum
depth or maximum depth control.
Before changing presets be sure to save any changes in the
current preset else any changes will be lost.
About Xpression fX—Enhancer—MIDI
There are three continuous controllers, program change, pitch
wheel and channel aftertouch . All six can transmit simultaneously.
Each can be set with a hard value from 0—127, or with mode
data, signified in the menu by “nnod”.
All are disabled by default as shown in the menu by “----”.
Either the on/off/calibrate/record switch should be off, or a
controller should be disabled before changing its number, otherwise multiply controllers will be set with unwanted values as
the CCs are scrolled through.
The ‘sound off’, ‘reset receivers’ and ‘reset controllers’ are off by
default. They can be reset within the MIDI menu.
Assigning ADSR control to the external device
All ADSR parameters such as attack rate and scale can be assigned to the external device. To do that, enter the ADSR menu
and choose the item to be controlled. Then fully rotate right the
maximum depth control until ‘0.’ is seen on the display. The
item is now under external control.
Xpression fX will change the way you play music. We hope
you enjoy using it as much as we enjoyed making it.
See the full manual at www.ozinventions.com
12.
 Loading...