

Page 1

PS2
EN
FR
IT
ES DE
NL
Super Stabilized Power
1. OVERVIEW
1.1 Introduction
The PS2 is XPR’s unique power supply unit, which is fully compatible with XPR products. It has suicient capacity to power readers,
EM locks or strikes, in addition to the Controller EWS. It provides stable DC output even with varying input voltages. It comes in a
strong and elegant steel housing. It has a built-in charger circuit and an option to house a battery for backup, in case of power failure.
The PS2 has built-in automatic protection against battery over-charging. It also has built-in over voltage and surge protection.
This ensures highly stabilized power output even at luctuating input voltages.
1.2 Features
- Switched Mode Power Supply.
- Steel housing.
- In-built battery charger.
- Provision for battery for backup power.
- Fuse protection for mains input.
- Fuse protection against battery polarity reversal.
- Short-circuit and output overload protection.
- Tamper protection.
- Protection against battery over-charging.
1. 4 General information
PS2 is speciically designed (intended) for use as a
reliable power supply for access control systems.
1.3 Speciications
Main input power : 220V AC+/-15%, 50Hz
Output Voltage : 12.8 V to 13.8VDC, Nominal 13.5 VDC
Output Current : Average 1.5 A, Maximum 2A
Output Ripple : < 6mV at nominal input voltage.
Electrical protection : Against high voltages and surges
Monitoring : Green LED indicates output
Battery speciication : 12V, 7.2 Ah sealed lead acid type battery.
Fuse protection : 2A for mains.
2A fuse for battery polarity reversal.
Note: On polarity reversal the fuse protects
both the battery and the circuit.
Dimensions (mm) : 210(L) x 179 (W) x 73 (H)
Housing : 1.2 mm white powder coated CRCA steel
IP Factor : IP30
2. INSTALLATION
2.1 Mounting instructions
1. Identify a suitable location to mount the PS2.
2. Separate the top cover of the PS2 carefully from the base plate.
3. Stick the drilling template provided onto the wall and drill 5 holes as indicated in the template. Four holes are for ixing the base
plate to the wall and the 5th hole is to ix a bush for the tamper.
4. Insert the 6 mm wall plugs (5 nos provided) into the drilled holes.
5. Place the round blackened bush (provided) on the hole drilled in the central part of the template, and ix it to the wall with the
screw provided.
6. Ensure that PS2 unit is grounded properly (Refer Section 2.2).
7. Route the cables through the holes in the base plate and ix the base plate to the wall using the screws provided.
8. Wire the PS2 referring Section “2.3 Overall PCB view” as a guide.
9. Place the battery (not provided) in place & ensure proper connection.
Note: For Battery connection, the wires on one end are already connected to PS2 and the other end of the wires have clips
for battery connection.
Caution: Please observe correct polarity, as otherwise the fuse may blow.
10. Place the top-cover against the wall over the base plate, and slide it down to lock it in place.
11. Fix the top cover to the base plate with 2 screws (M3x6mm security screw) at the bottom, using the security screwdriver provided.
2.2 Earthing
Several layers of protection are provided against transient voltages from static discharge, lightning and power supply spikes. For
protection to be fully eective, earthing of the housing should be done properly (XPR recommends common earthing for PS2, O2LA
and EWS) Use 16 AWG or heavier cable and keep the cable length as short as possible.
v.b4
www.xprgroup.com
1
Page 2
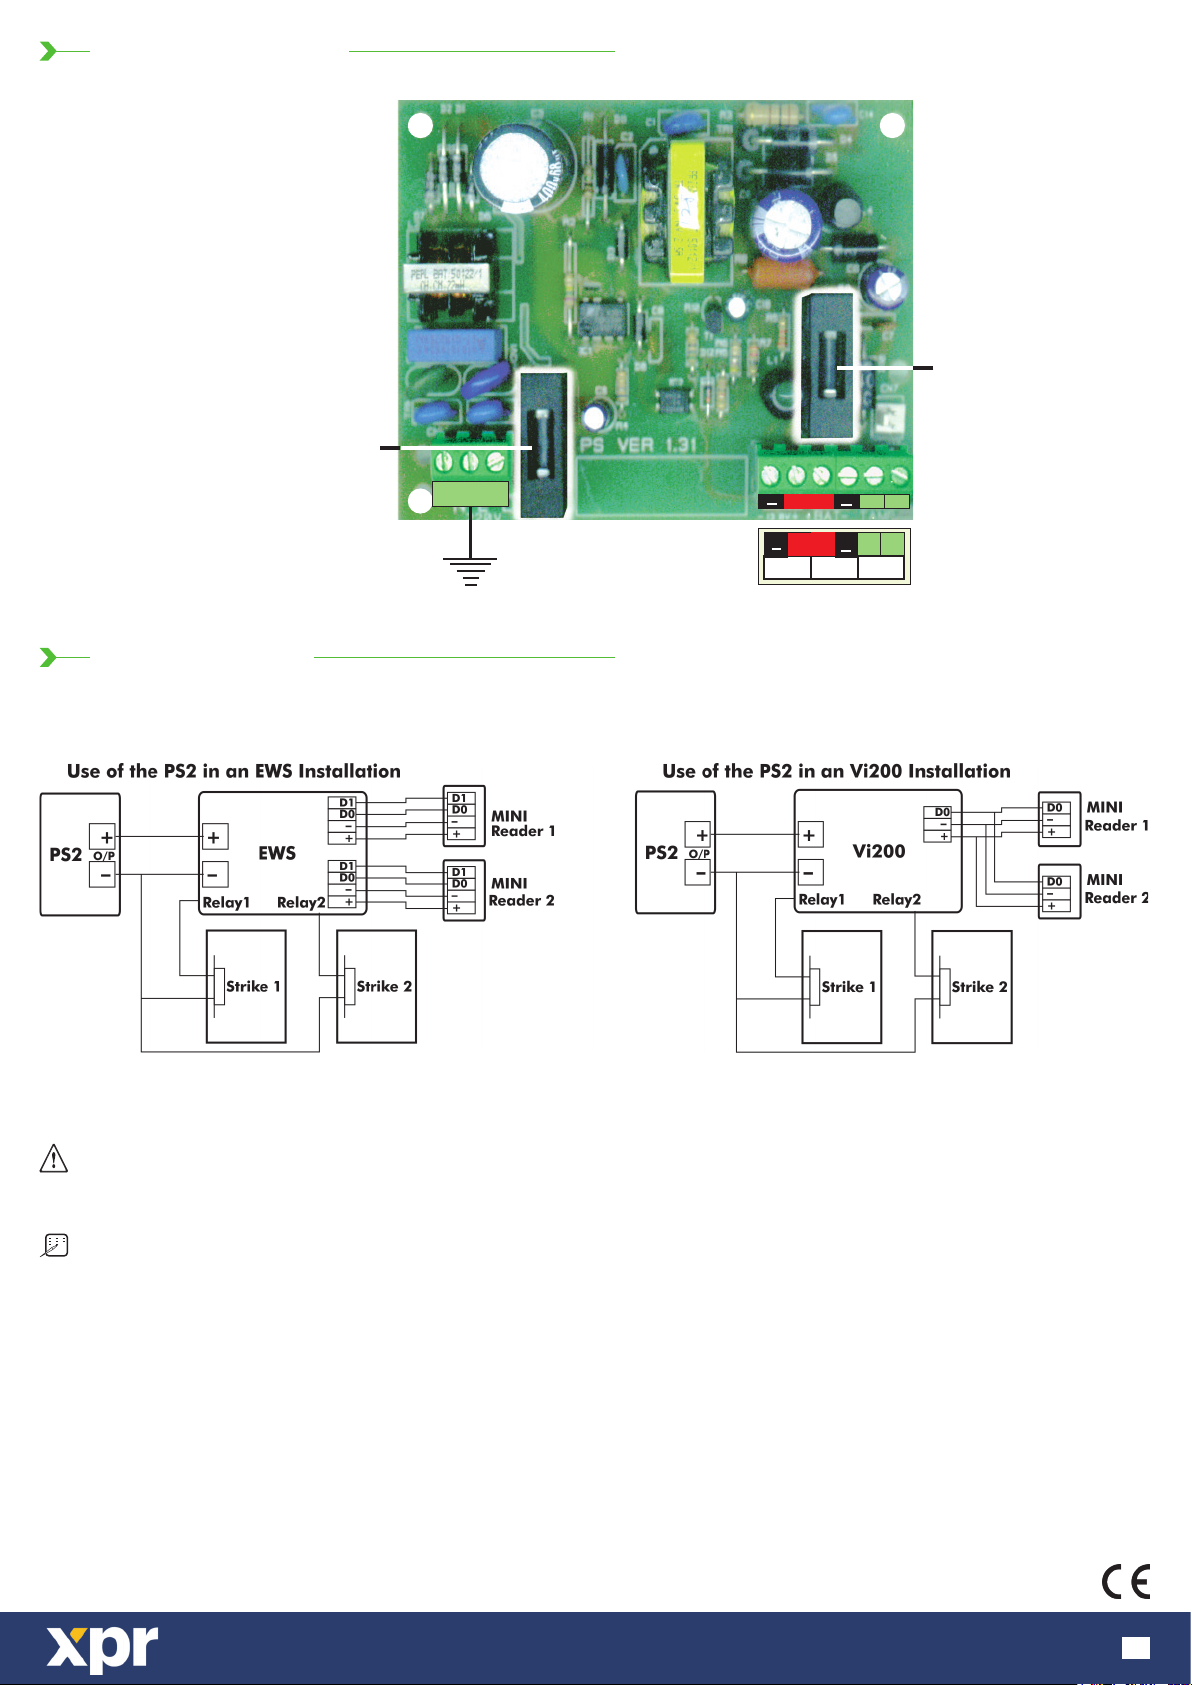
2.3 Overall PCB view
Main Fuse (2A)
Protection against battery
polarity reversal (2A)
3.0 APPLICATION
N LE
220V AC
1
1
13.8V Battery Tamper
4
3
2
+
2
+
556
+
4
3
+
6
Caution: The capacity of the PS2 (rating/ 2 Amp) is used for both charging the battery and to power devices connected to it.
Care should be taken to ensure that the battery does not get completely discharged as charging of exhausted batteries will
draw excessive current and other connected devices may not receive suicient power to function.
Note: A typical installation, comprising one EWS unit, two MINIM proximity readers and two door strikes, will operate solely
on a 7.2 Ah battery for about 3½ hours before there is danger of battery exhaustion. However, this igure is only to be used as a
guide since power consumption will depend upon usage i.e. the number of times per hour the door is used.
This product herewith complies with requirements of EMC directive 2014/30/EU. In addition it complies with RoHS2 directive EN50581:2012
www.xprgroup.com
2
Page 3

PS2
EN
FR
IT
ES DE
NL
Puissance Super Stabilisée
1. VUE GENERALE
1.1 Vue Generale
L’alimentation PS2 a été conçue pour répondre aux besoins des produits XPR. Elle possède la capacité suisante pour alimenter les
lecteurs, ventouses ou gâches qui sont reliés à une EWS. Elle délivre un courant continu constant quelque soient les variations de
l’alimentation secteur. Elle possède un coret métallique élégant et très résistant. La qualité de son alimentation interne ainsi que la
présence d’une batterie rechargeable (non livrée) assurent un niveau de sauvegarde suisant pour ce type d’installation.
Une protection automatique contre les surcharges protège la batterie et l’ensemble du système.
Ceci assure une alimentation de sortie constante quelle que soient les luctuations à l’entrée.
1.2 Caractéristiques
- Alimentation à découpage
- Coret métallique
- Chargeur de batterie
- Fusible de protection secteur
- Fusible de protection contre les inversions de polarité
- Protection contre court-circuits et surcharges
- Autoprotection à l’ouverture et à l’arrachement
- Alimentation de batterie régulée
1. 4 Information Générale
La PS2 est destinée plus spéciiquement à l’alimentation
des systèmes de contrôle d’accès.
1.3 Spéciications
Tension d’alimentation : 220VCA +/-15%, 50Hz
Tension de sortie : 12.8V - 13.8VCC, Nominale 13.5VCC
Courant : 1.5 A, 2A max.
Rendement : < 6mV avec charge nominale
Protection électrique : Contre surtensions et surcharges
LED : LED Verte indique présence secteur
Spéciication de pile : 12V, Batterie Standard de 7.2Ah.
Fusibles de protection : 2A secteur
2A contre inversion de polarité (batterie)
Remarque: En cas d’inversion, le fusible
protège la batterie et le circuit électronique
Dimensions (mm) : 210(H) x 179(L) x 73(P)
Coret : Métallique 1.2mm épaisseur peint epoxy blanc
Indice IP : IP30 (Indice de Protection )
2. INSTALLATION
2.1 Instructions De Montage
1. Choisir un bon emplacement pour le montage de la Ps2
2. Enlever le capot
3. Apposer le gabarit de perçage sur le mur et percer 5 trous comme indiqué. Quatre trous sont utilisés pour la ixation du coret
et le 5ème pour l’autoprotection.
4. Insérer des chevilles de 6mm dans les trous
5. Insérer le manchon noir dans la vis et placer l’ensemble dans le trou approprié pour qu’il puisse maintenir fermé le switch
d’autoprotection
6. Raccorder le coret à la terre au moyen de la vis prévue à cet eet (Voir Section 2.2)
7. Faire passer les câbles après avoir ixé le coret au mur
8. Câbler en se referant au schéma de câblage de la Section 2.3.
9. Loger la batterie (non fournie) dans sa position
Raccorder le câble prévu à cet eet vers les cosses de la batterie
Remarque: Attention à la polarité si non le fusible risque de sauter
10. Placer le capot sur sa base en le faisant coulisser vers le bas
11. Fermer l’ensemble au moyen des deux vis de sécurité M3x6 et du tournevis (fournis).
2.2 Mise à la terre
Plusieurs barrières de protection sont fournies contre les décharges électrostatiques et les surtensions. Pour en augmenter la
protection, une mise à la terre du boîtier métallique est fortement recommandée.
Utiliser un câble de type 16 AWG ou supérieur en gardant une longueur la plus courte possible.
www.xprgroup.com
3
Page 4
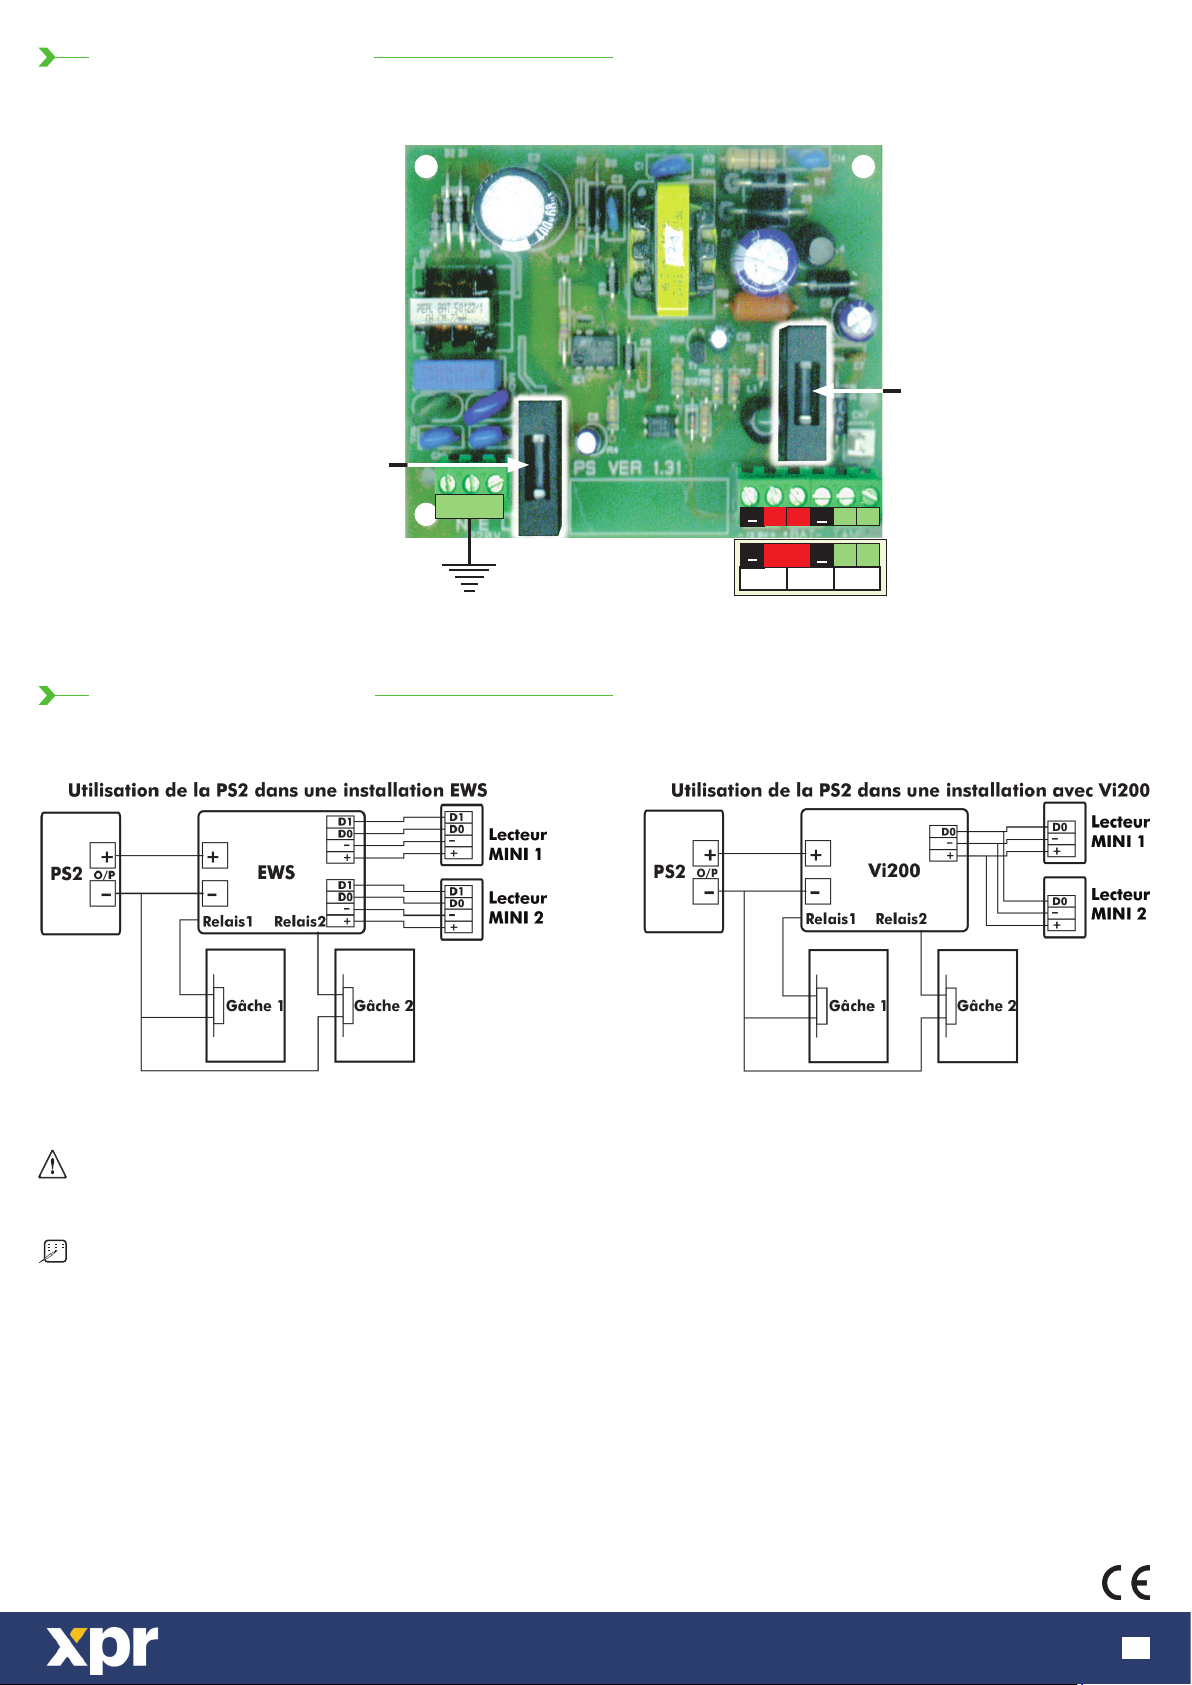
2.3 Circuit électronique
Fusible Secteur (2A)
N LT
220V CA
1
3
2
+
+
1
3
2
+
+
13.8V Batterie
4
4
556
Auto
protection
Fusible 2A contre
inversion de polarité (2A)
6
3.0 APPLICATION TYPE
Attention: L’alimentation 2A de la PS2 est prévue pour charger la batterie et alimenter les équipements qui lui sont raccordés.
Il faut éviter des décharges prolongées de la batterie qui peuvent l’endommager, réduire sa durée de vie et qui nécessitent de
l’alimentation une charge plus importante qui pourrait entraver la bonne marche des équipements annexes.
Remarque: Une installation standard, qui comprend une EWS, deux lecteurs MINIM et deux gâches électriques, couplée avec
une batterie de 7.2 Ah peut fonctionner pendant 3½ heures avant qu’il y ait risque que la batterie soit déchargée. Cependant la
durée doit être prise à titre purement indicatif car l’on n’a pas pris en compte le nombre d’ouvertures des portes pendant cette
période.
Ce produit est conforme aux exigences de la directive CEM 2014/30/UE.En outre, il est conforme à la directive RoHS EN50581:2012
www.xprgroup.com
4
Page 5

PS2
EN
FR
IT
ES DE
NL
Alimentazione Super Stabilizzata
1. GENERALITÀ
1.1 Introduzione
L’unità PS2 è l’alimentatore stabilizzato di XPR, pienamente compatibile con gli altri prodotti XPR. E’ suicientemente capace per
fornire alimentazione ai lettori, alle elettroserrature o alle chiusure magnetiche, oltre ad alimentare il controllore EWS. Fornisce un
output stabilizzato anche se la tensione di ingresso varia ed è dotato di un robusto ed elegante box metallico in grado di contenere
anche il circuito di ricarica della batteria e - in opzione - anche la batteria di back-up. Dispone inoltre di una protezione automatica
contro il sovraccarico della batteria nonché protezioni da picchi di tensione e di corrente.
Tutto questo garantisce un’uscita altamente stabilizzata anche in presenza di tensione di ingresso luttuante.
1.2 Prestazioni
- Alimentatore switching.
- Contenitore metallico.
- Carica batterie integrato.
- Spazio disponibile per la batteria di back-up.
- Fusibile per la protezione degli ingressi.
- Fusibile per la protezione da polarità inversa della batteria.
- Protezione da cortocircuito e da sovraccarico.
- Protezione anti-manomissione.
- Protezione contro il sovraccarico della batteria.
1. 4 Informazioni Generali
L’alimentatore PS2 va utilizzato quale sorgente di
alimentazione aidabile per sistemi di controllo accessi.
1.3 Speciiche
Ingresso alimentazione : 220 Vca +/- 15%, 50 Hz.
Tensione di Uscita : Da 12,8 a 13,8 Vcc; nominali 13,5 Vcc.
Corrente di Uscita : Media 1,5 A massima 2A.
Ripple di uscita : < 6mV sulla tensione di ingresso nominale.
Protezione elettrical : Contro le sovratensioni e sovracorrenti.
Monitor : Il LED verde indica l’uscita.
Speciiche batteria : 12V, 7,2 Ah sigillata al piombo-acido.
Protezione fusibile : 2A sull’ingresso.
Fusibile da 2A per l’inversione di polarità
Della batteria.
Nota: Sull’inversione di polarità il fusibile
protegge sia la batteria che il circuito.
Dimensioni (mm) : 210 (L) x 179 (P) x 73 (H).
Contenitore : Acciaio verniciato a polvere si spessore
1,2 mm, colore bianco.
Fattore di protezione : IP30.
2. INSTALLAZIONE
2.1 Istruzioni di Montaggio
1. Identiicare un sito conveniente dove montare il PS2.
2. Separare con attenzione il coperchio dalla base.
3. Attaccare la dima adesiva al muro e forare quest’ultimo nei cinque punti indicati nella dima. Quattro fori sono necessari al
issaggio della base nel muro e il quinto foro serve per il tamper.
4. Inserire i cinque tasselli da 6 mm (forniti nella confezione) nei fori praticati nel muro.
5. Piazzare la rondella (fornita) nel foro centrale della dima e issarla al muro con la vite fornita.
6. Assicurarsi che l’unità PS2 abbia una corretta messa a terra (riferirsi alla sezione 2.2).
7. Guidare i cavi attraverso i fori della base e issare quest’ultima al muro con le viti fornite nella confezione.
8. Cablare l’unità PS2 usando lo schema circuitale e il diagramma applicativo come guida.
9. Posizionare la batteria (non fornita) e assicurarsi della correttezza della connessione.
Nota: I cavi sono già connessi da un lato all’unità PS2, mentre dall’altra estremità sono provvisti di clip per la connessione
alla batteria.
Attenzione: Rispettare scrupolosamente la polarità per evitare che il fusibile bruci.
10. Porre il coperchio sopra la base e contro al muro e farlo scorrere in basso per bloccarlo.
11. Fissare il coperchio alla base con le due viti di sicurezza (M3x6 mm) usando l’apposito strumento fornito nella confezione.
2.2 Messa a Terra
Diversi strati di protezione sono previsti contro le tensioni transitorie causate da scariche elettro-statiche, scariche da illuminazione
e picchi di tensione. Perché la protezione sia totale, si consiglia una messa a terra del contenitore appropriata.
Usare un cavo tipo almeno 16 AWG e utilizzare la minima lunghezza di cavo possibile.
www.xprgroup.com
5
Page 6
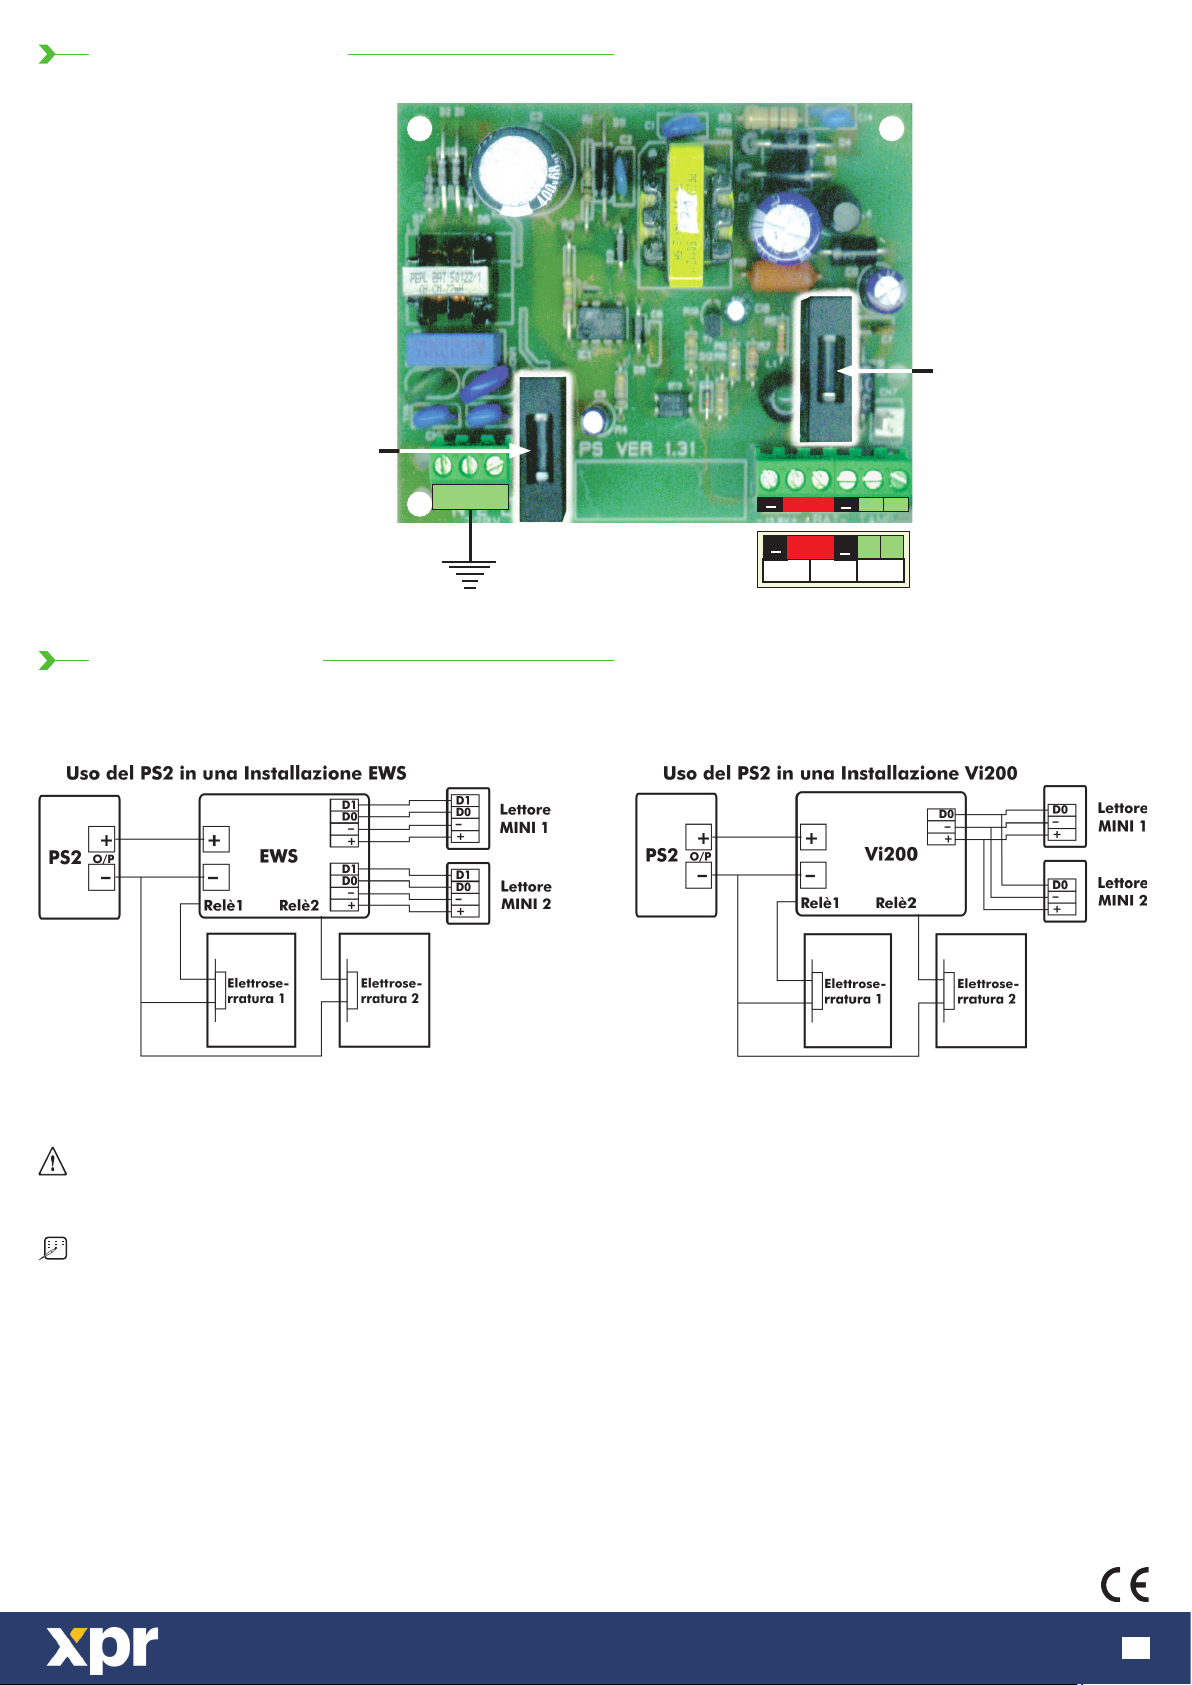
2.3 Vista del Circuito
Fusibile principale (2A)
Protezione contro
l'inversione di polarità
della batteria(2A)
3.0 APPLICAZIONI
N LE
220V CA
1
1
13.8V
2
2
+
+
3
+
3
+
Batteria
4
4
556
AntiManomissione
6
Attenzione: La capacità del PS2 (2 A) è utilizzata sia per caricare la batteria sia per alimentare i dispositivi connessi all’uscita
dell’alimentatore. Bisogna prestare attenzione che la batteria non si scarichi completamente perché la ricarica di tale batteria
richiede eccessiva corrente tale da farne mancare agli altri dispositivi connessi.
Nota: Una installazione tipica, comprendente una centrale EWS, due lettori di prossimità MINIM e due elettroserrature, potrà
operare in assenza di tensione per circa 3 ore e mezza con una batteria da 7,2 Ah prima che questa diventi esausta. Comunque
questa indicazione è da considerare una guida di massima in quanto il consumo di corrente dipende dall’uso cioè dal numero
di aperture delle porte per ora.
Questo prodotto è conforme ai requisiti della Direttiva EMC 2014/30/UE. Inoltre, è conforme alla Direttiva RoHS EN50581:2012
www.xprgroup.com
6
Page 7

PS2
EN
FR
IT
ES
DE
NL
Potencia super estabilizada
1. VISTA PREVIA
1.1 Introducción
PS2 es una fuente de alimentación estable, compatible con todos los productos XPR. Tiene suiciente capacidad para alimentar
lectores, pestillos o cerraduras electromagnéticas además del controlador EWS. Suministra una salida estable de CC, incluso con
variaciones en la tensión de entrada, en una caja fuerte y elegante de acero que contiene el circuito de carga para la batería opcional
de soporte en caso de fallo del suministro.Tiene incorporada una protección automática ante sobrecargas y sobretensiones.
Todo ello asegura una tensión estabilizada a la salida frente a variaciones en la tensión de entrada.
1.2 Características
- Fuente de alimentación conmutable.
- Caja de acero.
- Cargador de batería incorporado
- Previsión para batería de soporte.
- Fusible de protección en la entrada
- Fusible de protección ante polaridad invertida de la batería
- Protección ante cortocircuito y sobrecarga en la salida
- Protección antisabotaje.
- Protección ante sobrecarga de la batería
1. 4 Información general
PS2 está diseñado para usar como fuente de alimentación
estable en los sistemas de control de accesos.
1.3 Especiicaciones
ensión de entrada : 220V CA +/-10%, 50 Hz.
Tensión de salida : 12,8 a 13,8 V CC, nominal :13,5 V Corriente
de salida : Promedio: 1,5 A, Máximo 2 A
Oscilación en salida : < 6mV de la tensión nominal
Protección eléctrica : Frente a altas tensiones y descargas
Observación : El LED verde indica salida.
Especiicación de la Batería : 12V, 7,2 Ah tipo estanca al ácido.
Fusibles : 2A para polaridad invertida de la batería
Nota: En caso de polaridad invertida el
fusible proteje a la batería y al circuito.
Medidas (mm) : 210(L) x 179 (W) x 73 (H)
Caja : Acero de 1,2 mm recubierta con pintura blanca
Factor IP : IP30
2.INSTALACIÓN
2.1 Instrucciones de montaje para Ps2
1. Localizar un ubicación adecuada para montar PS2.
2. Separar con cuidado la tapa frontal del resto.
3. Colocar la plantilla autoadhesiva sobre la pared y taladrar los 5 oriicios indicados. Cuatro oriicios son para ijar la base en
la pared y el quinto para ijar el esparrago del tamper.
4. Insertar los tacos de 6 mm. (suministrados) en los oriicios.
5. Colocar el esparrago negro en el oriicio central de la plantilla y ijarlo en la pared con el tornillo suministrado.
6. Asegurar que la unidad PS2 está debidamente puesta a tierra. (ver sección 2.3)
7. Introducir los cables a través de los agujeros de la base y ijarla en la pared mediante los tornillos suministrados.
8. Cablear PS2 usando los diagramas siguientes “Vista general del circuito” y “Aplicación”
9. Colocar la batería (no suministrada) y asegurar su correcta conexión.
Nota: Los cables deben conectarse por un extremo en la unidad PS2 y en el otro extremo disponen de clips para la
conexión a la batería.
Atención: Observe la polaridad correcta, para evitar que el fusible salte.
10. Colocar la tapa superior sobre la base y deslizarla hacia abajo para emplazarla.
11. Fijar la tapa con los dos tornillos de seguridad M3x6 , en la parte inferior, mediante el destornillador de seguridad suministrado.
2.2 Uesta a tierra
Las varias capas de protección evitan los peligros de altos voltajes y descargas de la fuente de alimentación. Para que la protección
resulte efectiva, es precisa una correcta puesta a tierra de la caja.
Utilizar cable 16 AWG o similar y con la menor longitud posible.
www.xprgroup.com
7
Page 8
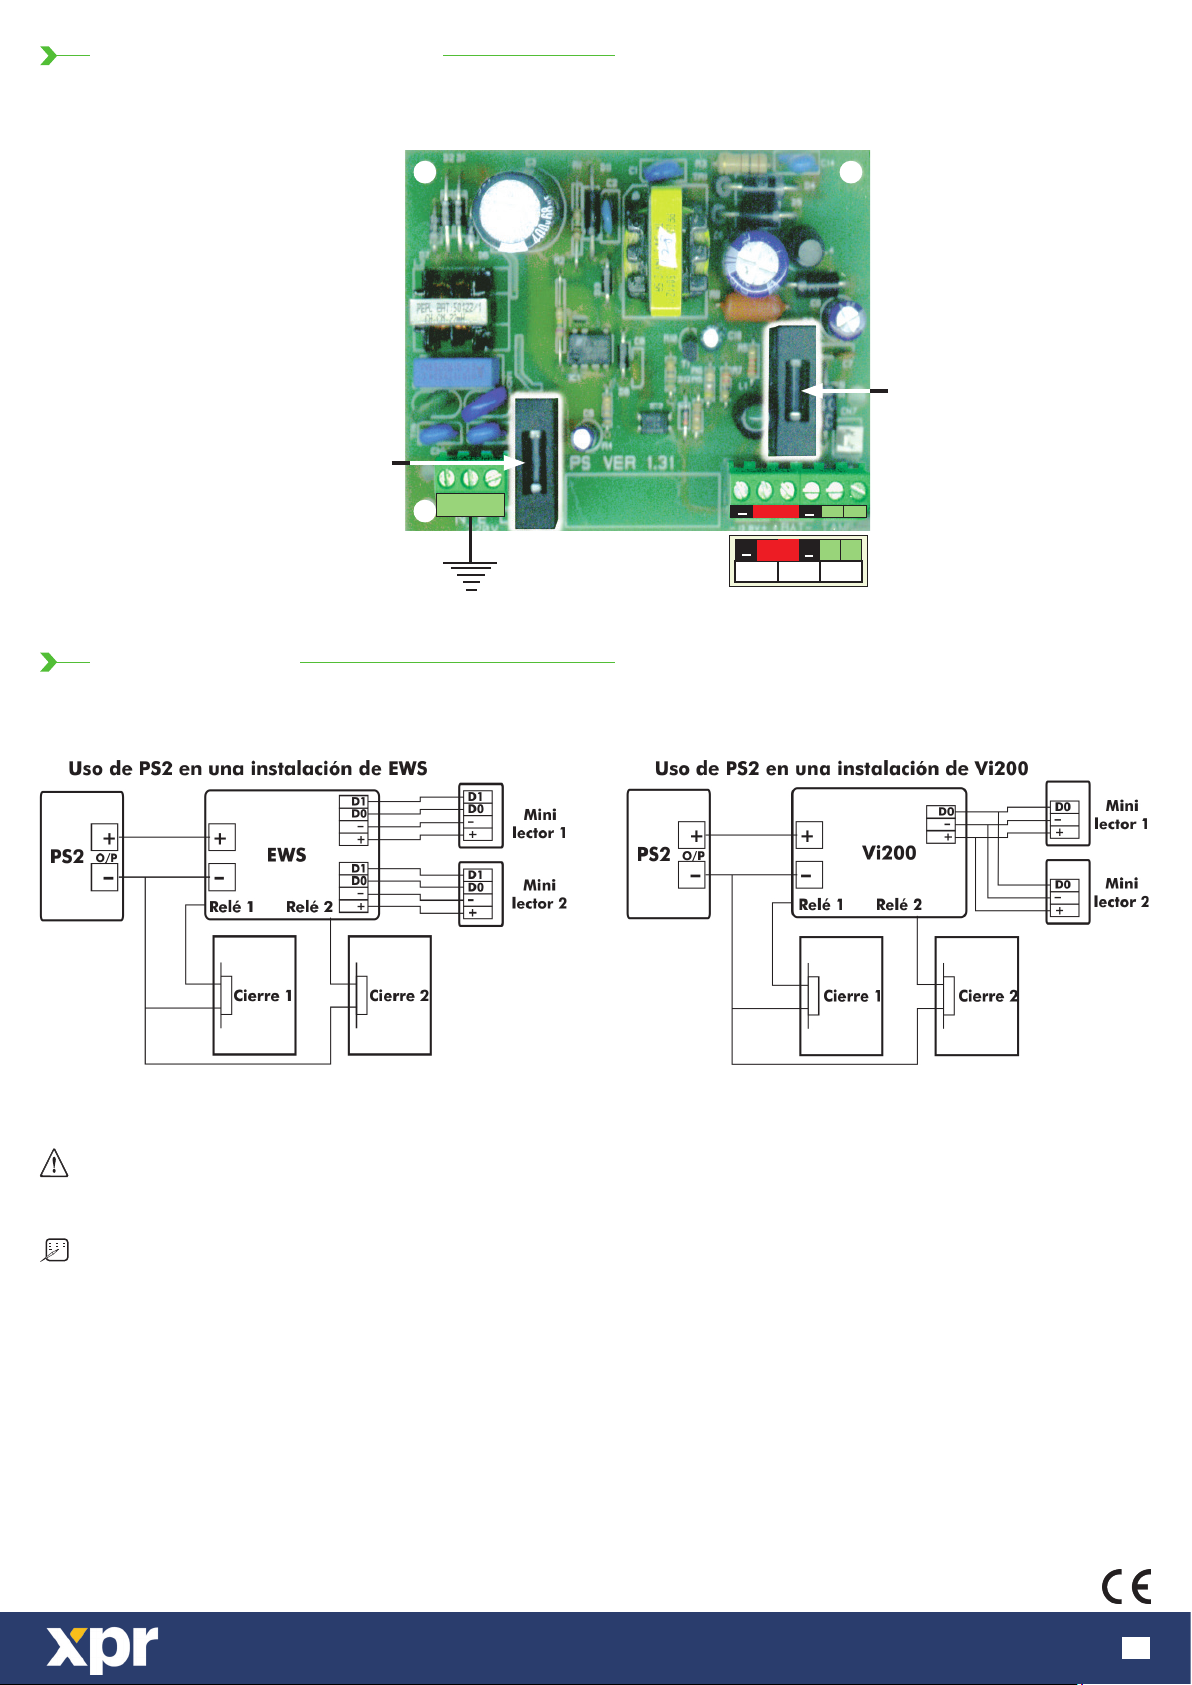
2.3 Vista general del circuito
Fusible principal (2A)
Protección ante
plaridad de la batería
invertida (2A)
3.0 APLICACIÓN
N LE
220V AC
1
1
13.8V Battery Tamper
4
3
2
+
+
4
3
2
556
+
+
6
Atención: La capacidad de PS2 (2A) se usa o para cargar la batería o para alimentar los dispositivos.
Es preciso garantizar que la batería no está totalmente descargada para evitar que un consumo excesivo de corriente impida
recibir suiciente potencia para funcionar los dispositivos conectados.
Nota: Una instalación típica, comprende un EWS, dos Mini-M lectores de proximidad y dos cerraduras de puerta y sera
operarativa con una batería de 7, 2 Ah, solo alrededor de 3 horas y media antes de quedar agotada.Sin embargo esta
referencia se usa como guía de consumo y depende del número de veces que la puerta se utilice durante este intervalo.
Este producto cumple con los requisitos de la Directiva EMC 2014/30/UE. Cumple además con la Directiva RoHS EN50581:201
www.xprgroup.com
8
Page 9

PS2
EN
FR
IT
ES
DE
NL
Zuverlässige Spannungsversorgung
1. ÜBERSICHT
1.1 Einführung
Das PS2 ist ein einzigartiges Netzgerät, das mit allen XPRProdukten kompatibel ist. Es kann, zusätzlich zum EWSController, Leser,
Magnetschlösser oder Türöner ausreichend mit Strom versorgen. Selbst bei schwankender Eingangsspannung sorgt es für eine
stabile Versorgung mit Gleichstrom. Das PS2 verfügt über ein robustes und elegantes Stahlgehäuse mit integriertem Ladekreislauf und der
Möglichkeit eine Batterie anzuschließen, damit die Stromversorgung auch während eines Stromausfalls gewährleistet ist. Es verfügt
außerdem über einen automatischen Batterieüberladeschutz und ist über eine Sicherung vor Überspannungen und Stromspitzen
geschützt. Daher sorgt das Netzgerät für eine äußerst stabile Ausgangsspannung auch bei schwankender Eingangsspannung
1.2 Produktdetails
- Schaltnetzgerät
- Stahlgehäuse
- Integriertes Batterieladegerät
- Möglichkeit eine Batterie zur Notstromversorgung anzuschließen
- Eingangsspannungsschutz
- Batteriepolaritätsschutz
- Kurzschluss- und Überspannungsschutz
- Sabotageschutz
- Batterieüberladungsschutz
1. 4 Allgemeine Informationen
Das PS2 wurde speziell für die Verwendung zur zuverlässigen
Spannungsversorgung von Zutrittkontrollsystemen entwickelt.
1.3 Technische Daten
Eingangsspannung : 220V AC +/-15%; 50Hz
Ausgangsspannung : 12,8 V bis 13,8 VDC, Nominal 13,5 VDC
Ausgangsstrom : durchschnittlich 1,5A, Max. 2A
Überlagerte Wechselspannung : < 6mV bei nominaler Eingangsspannung
Elektrische Sicherung : gegen Überspannung und Stromspitzen
Kontrollanzeige : grüne LED zeigt Stromausgang an
Batterie : geschlossene 12V, 7,2 Ah Blei-Säure-Batterie
Sicherungen : 2A Hauptsicherung
2A Batteriepolaritätssicherung
Hinweis: Sowohl die Batterie als auch der
Stromkreislauf sind durch eine Sicherung gegen
eine Polaritätsumkehrung geschützt
Abmessungen (in mm) : 210 L x 179 B x 73 T
Gehäuse : 1,2 mm; weißer pulverbeschichteter
kaltgewalzter Stahl
Schutzart : IP 30
2. INSTALLATION
2.1 Montage
1. Suchen Sie einen geeigneten Ort für die Montage des PS2.
2. Entfernen Sie die Frontabdeckung des PS2 vorsichtig vom Gerät.
3. Befestigen Sie die mitgelieferte Bohrvorlage an die Wand und bohren Sie 5 Löcher wie auf der Vorlage angegeben. Vier Löcher
sind für die Befestigung der Rückwand an der Wand vorgesehen, und das fünfte Loch wird für den Sabotageschutz benötigt.
4. Platzieren Sie die mitgelieferten 6 mm Dübel in den Löchern.
5. Befestigen Sie die mitgelieferte schwarze Mue für den Sabotageschalter, in dem dafür in der Mitte gebohrten Loch und ixieren
Sie sie mit der mitgelieferten Schraube an der Wand.
6. Stellen Sie sicher, dass das PS2 vorschriftsmäßig geerdet ist (siehe Kapitel 2.2.)
7. Ziehen Sie die Kabel durch das Loch in der Rückwand und ixieren Sie diese mit den mitgelieferten Schrauben an der Wand.
8. Verdrahten Sie nun das PS2 laut den Anweisungen in Kapitel 2.3. Platinenansicht
9. Schließen die Batterie an (nicht im Lieferumfang enthalten) und überprüfen Sie die Stromversorgung.
Bitte beachten: Die Kabel für den Batterieanschluss sind auf einer Seite bereits an das PS2 angeschlossen, am anderen
Ende beinden sich Klammern für den Anschluss an der Batterie.
Wichtig: Bitte stellen Sie sicher, dass die Batterie korrekt angeschlossen ist, da es ansonsten zu einem Kurzschluss kommen kann.
10. Bringen Sie nun die Abdeckung am Gerät an, indem Sie sie von oben nach unten schieben und einrasten lassen.
11. Befestigen Sie die Abdeckung mit den 2 mitgelieferten Schrauben (3x6mm Sicherheitsschrauben), verwenden Sie dazu den
ebenfalls mitgelieferten Sicherheitsschraubenzieher, an der Rückwand
2.2 Erdung
Das Gerät ist mehrfach gegen transiente Überspannungen, die durch statische Entladung, Blitzschlag und Stromspitzen verursacht
werden, geschützt. Damit der Schutz vollständig gewährleistet werden kann, muss das Gehäuse vorschriftsmäßig geerdet werden
(XPR empiehlt eine gemeinsame Masse für PS2, O2LA und EWS). Verwenden Sie mindestens ein 16 AWG Kabel und halten Sie das
Kabel so kurz wie möglich.
www.xprgroup.com
9
Page 10
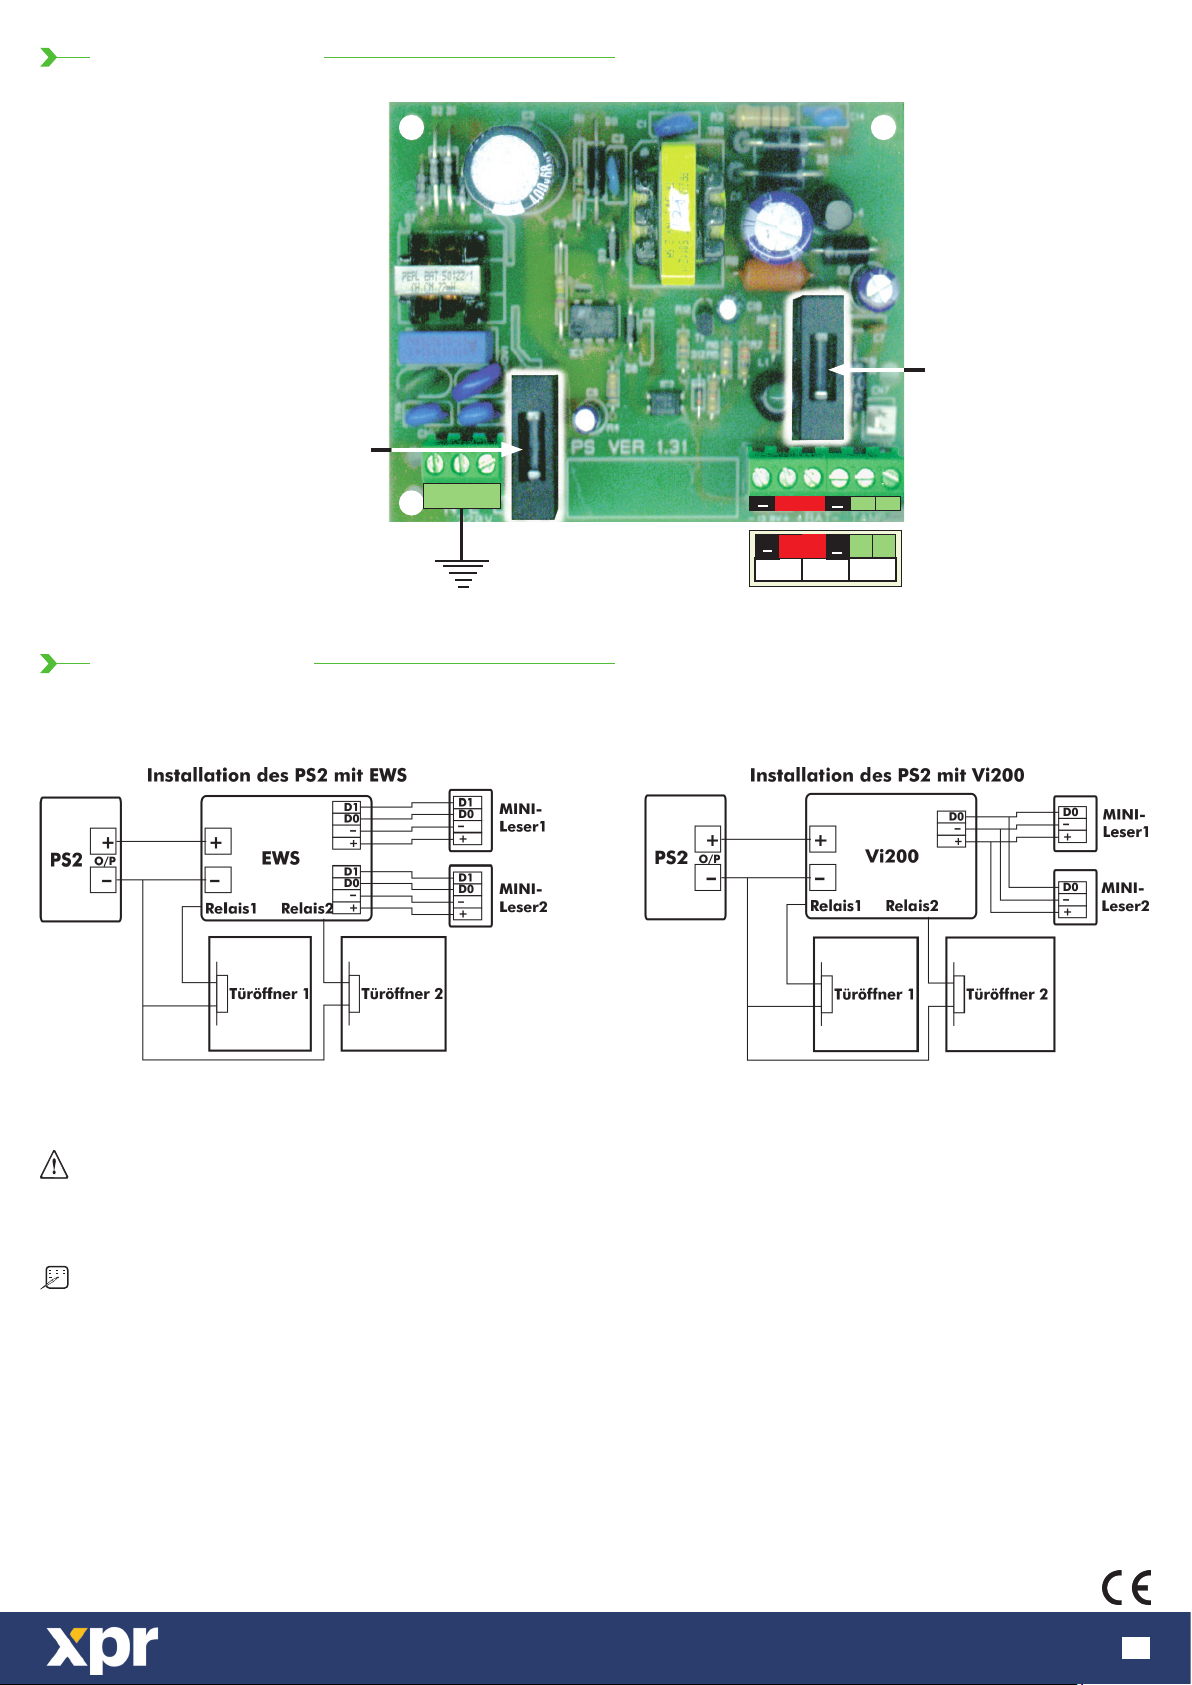
2.3 Platinenansicht
Hauptsicherung (2A)
Sicherung gegen
Batteriepolaritätsumkehrung (2A)
3.0 ANWENDUNG
N LE
220V AC
1
1
13.8V
3
2
+
+
3
2
+
+
Battery Tamper
4
566
4
5
Wichtig: Die Kapazität (2A) des PS2 wird sowohl für das Laden der Batterie als auch für die Stromversorgung der angeschlossenen
Geräte aufgewendet. Daher sollte eine komplette Entladung der Batterie vermieden werden, da das Wiederauladen entladener
Batterien sehr viel Energie benötigt, was dazu führen kann, dass die angeschlossenen Geräte nicht ausreichend mit Strom versorgt
werden, und eventuell nicht korrekt arbeiten können.
Hinweis: Ein typisches Zutrittskontrollsystem, bestehend aus einem EWS Controller, zwei Mini-M RFIDLesern und zwei Türönern,
kann ca. 3,5 Stunden über eine 7,2 Ah Batterie versorgt werden, bevor die Batterie droht vollständig zu entladen. Dies ist jedoch
nur ein grober Richtwert, da der Stromverbrauch abhängig ist vom Gebrauch, d.h. wie oft die Tür pro Stunde geönet wird.
Dieses Produkt erfüllt die Bestimmungen der EMVRichtlinie 2014/30/EU. Darüber hinaus entspricht es der RoHS2Richtlinie EN50581:2012.
www.xprgroup.com
10
Page 11

PS2
EN
FR
IT
ES DE
NL
Betrouwbare Elektronische 2 Ampere voeding
1. OVERZICHT
1.1 Introductie
De PS2 is XPR’s unieke voeding unit, welke volledig compatible is met de XPR producten. De PS2 heeft voldoende vermogen voor het
voeden van lezers, elektrische sloten of deurmagneten, dit als uitbreiding op de controller EWS. De PS2 is voorzien van een stabiele
DC uitgang zelfs met grote verscheidenheid aan ingangsspanningen. De PS2 wordt geleverd in een elegante stalen kast voorzien van
een laadinrichting voor een noodstroomvoorziening. De unit voorziet verder in een automatisch beveiliging tegen overladen van de
accu en ingebouwde overspanningbeveiliging met stroom begrenzing.
1.2 Kenmerken
- Geschakelde voeding eenheid.
- Stalen behuizing.
- Inbouwde accu laadinrichting.
- Mogelijkheid voor plaatsen accu tbv noodstroomvoorziening.
- Zekering primaire gedeelte.
- Zekering tegen polariteitomwisseling van de accu.
- Beveiligd met kortsluitbeveiliging en stroombegrenzing.
- Sabotage beveiliging.
- Beveiliging tegen overladen van Accu.
1. 4 Algemene informatie
PS2 is bedoeld voor gebruik al een betrouwbare
voedingseenheid voor toegangscontrole systemen.
Spanning primair (Net) : 220V AC+/-15%, 50Hz.
Spanning secundair : 12.8 V tot 13.8 VDC, Nominaal 13.5 VDC.
Stroom secundair : Gemiddeld 1.5 A, Maximaal 2 Amp.
Rimpel : < 6mV bij nominale ingang spanning.
Elektrische beveiliging : Beveiligd tegen hoge voltages en spanningsschommelingen.
Indicatie : Groene LED indicatie uitgangspanning.
Accu speciicatie : 12V, 7.2 Ah gesloten lood batterij.
Zekeringen : 2A primair.
2A zekering voor bewaking polariteitverwisseling.
Noot: Bij polariteitverwisseling beveiligd de
zekering zowel de accu als het laadcircuit..
Afmeting (mm) : 210(L) x 179 (B) x 73 (H).
Behuizing : 1.2 mm wit gepoedercoat CRCA staal.
IP waarde : IP30
1.3 Speciicaties
2. INSTALLATIE
2.1 Montage instructies voor de PS2
1. Zoek een geschikte locatie voor montage van de PS2..
2. Verwijder het deksel van de PS2 voorzichtig van het bodemdeel.
3. Plaats de boormal op de locatie waar u de PS2 wilt plaatsen en boor de 5 gaten zoals aangegeven op de mal. Vier gaten voor
montage van de PS2 en het vijfde gat voor het plaatsen van een onderdeel van de sabotageschakelaar.
4. Plaats de bijgeleverde 6mm pluggen in de geboorde gaten.
5. Monteer het zwarte sabotagebus ( bijgeleverd) onder de sabotageschakelaar en bevestig dit met de bijgeleverde schroeven.
6. Bekabel de PS2 overeenkomend met (sectie 2.2).
7. Routeer de bekabeling door de gaten in het bodemdeel en bevestig dit met de bijgeleverde schroeven.
8. Draag zorg voor een goede aarding van de PS2 door gebruikmaking van de aardaansluiting op het bodemdeel ( zie sectie 2.3)
9. Plaats de accu ( niet bijgeleverd ) en sluit deze aan op de accu bekabeling.
Noot: De accudraden zijn reeds voor gemonteerd op de PCB van de PS2 en voorzien van kabelschoenen voor plaatsing op
de accuklemmen.
Let Op: Denk aan de polariteit van de accu. Verkeerd aansluiten zal resulteren in een defecte zekering.
10. Plaats het deksel over het bodemdeel en schuif dit wat naar beneden zodat het deksel vast op het bodemdeel zit.
11. Bevestig, middels de twee bijgeleverde veiligheidsschroeven (M3 x 6mm), het deksel aan het bodemdeel met de bijgeleverde
veiligheidsschroevendraaier.
2.2 Aarding
De PS2 bezit diverse ingebouwde beveiligingskenmerken zoals tegen statische ontladingen, overspanning veroorzaakt door bliksem
en spanningsspikes op de netvoeding. Om de beveiliging eectief en doeltreend te maken dient de metalen behuizing correct te
worden geaard.
www.xprgroup.com
11
Page 12
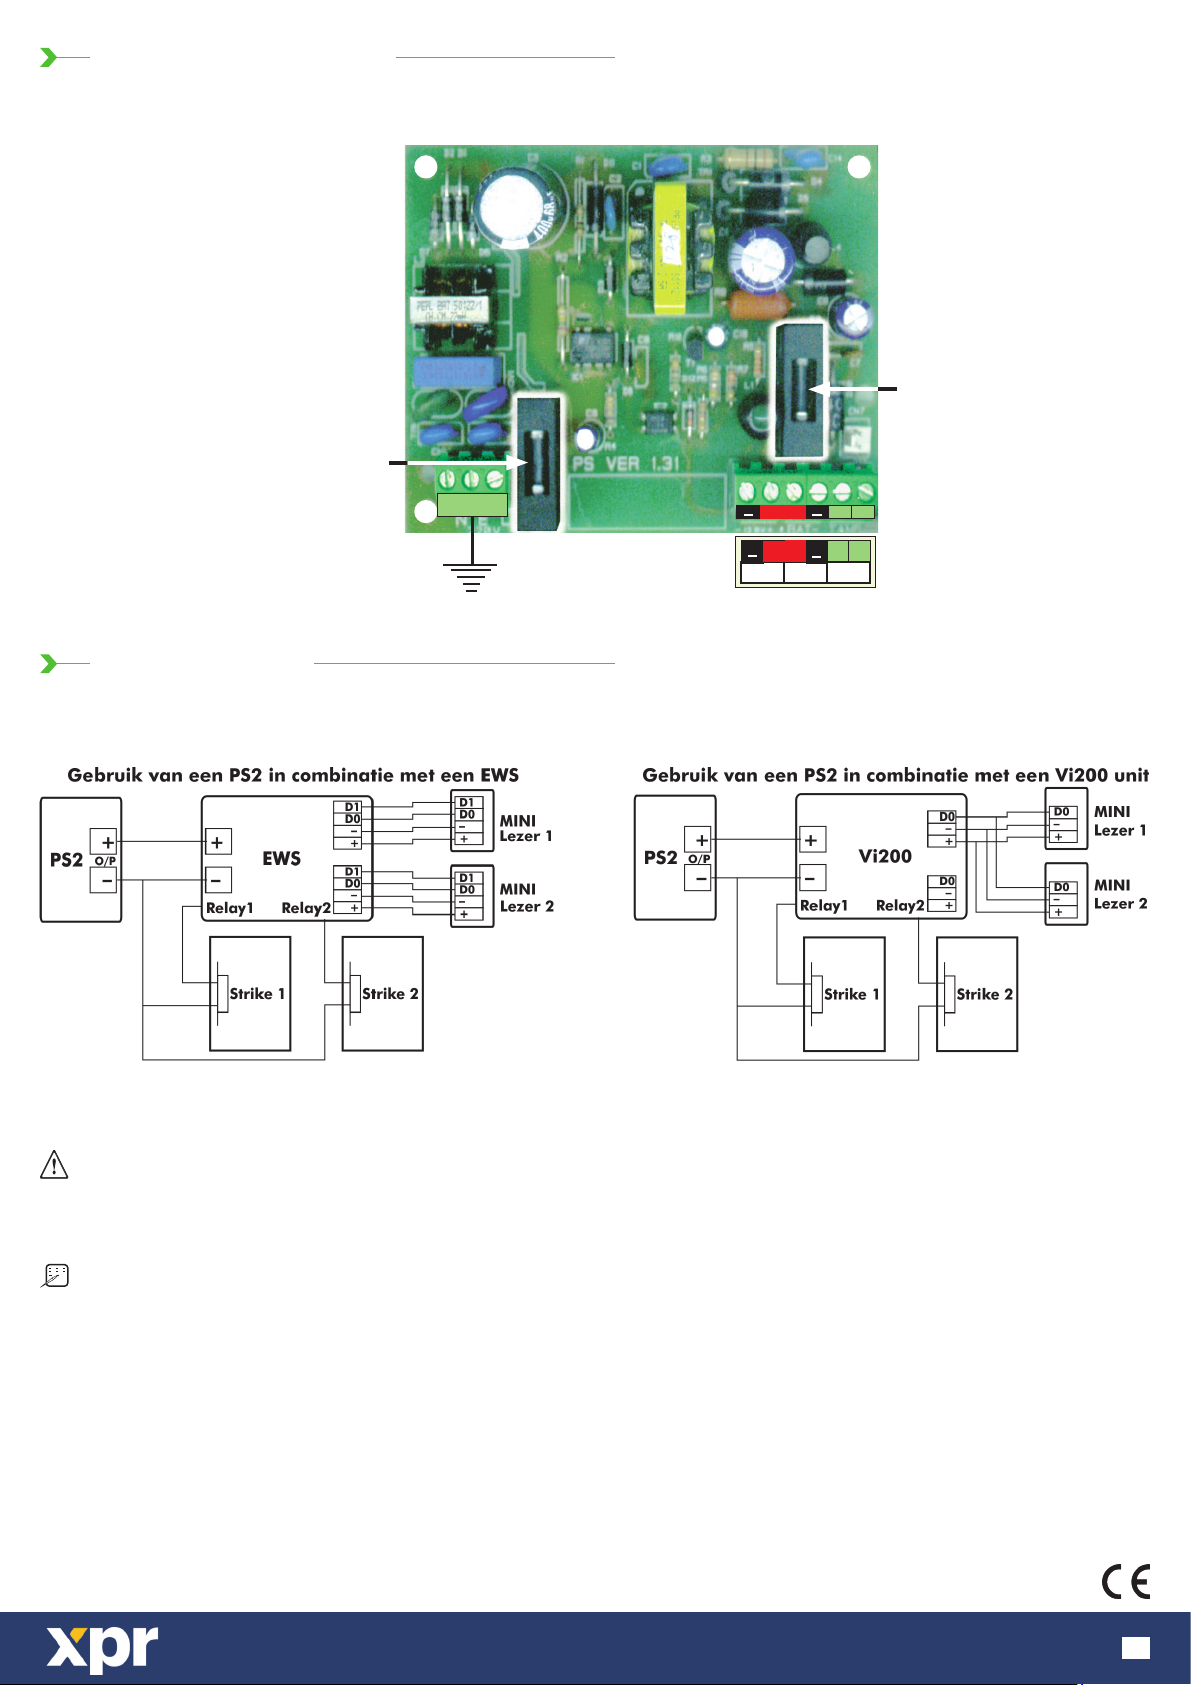
2.3 Overzicht PCB layout
Hoofd zekering (2A)
Beveiligd tegen polariteits
wisseling voor Accu..(2A)
3.0 APPLICATION
N LE
220V AC
1
1
13.8V Accu Sabotage
4
3
2
+
+
4
3
2
556
+
+
6
Waarschuwing: De capaciteit van de PS2 ( max 2 Amp) wordt gebruikt voor het laden van de accu alsmede het vermogen te
leveren voor de aangesloten randapparatuur. U dient ervoor te zorgen dat de Accu niet volledig ontladen wordt daar het
laden van een nagenoeg lege Accu een extreem hoge laadstroom vraagt. Door deze hoge laadstroom bestaat de mogelijkheid
dat aangesloten apparatuur niet voldoende vermogen geleverd krijgen en hierdoor niet naar behoren functioneert.
Noot: Een typische installatie, welke voorzien is van een EWS, twee MINIM proximity lezers en twee deursloten, zal
gegarandeerd met een 7,2 Ah accu gedurende 3½ uurn blijven functioneren alvorens de accu ontladen is. metbedienen
alleen op een 7,2 Ah batterij voor ongeveer 3½ uren voor er gevaar van batterij uitputting is. Nochtans, zal deze waarde niet
gebruikt worden als richtlijn enkel als indicatie daar het niet mogelijk bv het aantal schakelingen per uur in te schatten.
Dit product voldoet aan de eisen van de EMC-richtlijn 2014/30/EU. En voldoet tevens aan de RoHS-richtlijn (BGS) EN50581:2012
www.xprgroup.com
12
 Loading...