


LCSP-MF
www.xprgroup.com
LCSP-MF
Multiprotocol Keypad with integrated mifare reader
Produktdetails
D
Características
Eigenschappen
ESP
NL
Caractéristiques
FR
• Clavier périphérique multi protocole avec
lecteur Mifare intégré
• Lit les badges et les cartes Mifare Classic,
Ultralight, Desfire
• Mode d’entrée : carte uniquement,
code PIN uniquement, carte ou PIN,
carte et PIN (double sécurité)
• Distance de lecture des badges et
cartes Mifare: 3 à 8 cm
• Fonctionne sur du 12 V CC
• Utilisation intérieure / extérieure
• Compatible WIEGAND 26, 30, 34, 40 bits,
Clock&Data ou Codix
• 2 LEDs sans tension (rouge et vert)
• Feedback sonore et visuel
• Consommation de courant: 140 mA
• Touches rétroéclairées
• Longueur de code PIN sélectionnable
Features
Caratteristiche
UK
ITA
• Tastiera periferica multi protocollo con
lettore di Mifare integrato
• Legge tag e tessere Mifare Classic,
Ultralight, Desfire
• Modalità immissione Solo tessera,
solo codice PIN, tessera o PIN,
tessera e PIN (Doppia sicurezza)
• Portata di lettura:
Tessere e tag Mifare: 3-8 cm
• Opera a 12 V CC
• Uso in interni/esterni
• Compatibile con WIEGAND 26, 30, 34,
40 bit, Clock&Data o Codix
• 2 LED potenziale libero (Rosso e verde)
• Feedback audio e video
• Consumo di corrente: 140 mA
• Tasti retroilluminati
• Lunghezza del codice PIN selezionabile
• Teclado periférico multiprotocolo con lector
Mifare integrado
• Lectura de tarjetas y llaveros
Mifare Classic, Ultralight y Desfire
• Modo de entrada: solo con tarjeta,
solo con código PIN, tarjeta o PIN,
tarjeta y PIN (doble seguridad)
• Rango de lectura de las
tarjetas y llaveros Mifare: 3-8cm
• Funciona con 12V CC
• Uso interior y exterior
• Compatible con protocolo Clock&Data o
Codix de 26, 30, 34 o 40 bits WIEGAND
• 2 LED sin alimentación eléctrica
(rojo y verde)
• Retroalimentación sonora y visual
• Consumo de corriente: 140 mA
• Teclas retroiluminadas
• Longitud de código PIN configurable
• Multiprotokoll-Peripherietastatur mit
integriertem RFID-Leser
• Liest Mifare Classic, Ultralight, Desfire
Tags und Karten
• Zutrittsmodus: Nur Karte, nur PIN-Code,
Karte oder PIN, Karte und PIN
(doppelte Sicherheit)
• Leseabstand für Mifare-Karten und Tags:
3-8 cm
• Betrieb mit 12 V DC
• Verwendung im Innen- und Außenbereich
• Kompatibel mit Wiegand 26, 30, 34, 40bit,
Clock&Data oder Codix
• 2 potentialfreie LEDs (rot & grün)
• Akustische und optische Rückmeldung
• Stromaufnahme: 140 mA
• Tastatur mit Hintergrundbeleuchtung
• PIN-Code-Länge frei wählbar
• Multi protocol peripheral keypad with
integrated mifare reader
• Reads Mifare Classic, Ultralight, Desfire
tags and cards
• Entry Mode: Card only, PIN Code only,
Card or PIN, Card and PIN (Double
security)
• Read range:
Mifare Cards and Tags: 3-8 cm
• Operates on 12V DC
• Indoor/outdoor use
• Compatible with WIEGAND 26, 30, 34,
40bit, Clock&Data or Codix
• 2 Free tension LEDs (Red & Green)
• Audible and visual feedback
• Current Consumption: 140mA
• Backlit keys
• Selectable PIN Code length
• Randapparatuurtoetsenpaneel met
geïntegreerde Mifarelezer en
ondersteuning voor meerdere protocollen
• Leest Mifare Classic, Ultralight, Desfire
tags en kaarten
• Toegangsmodus: Alleen kaart,
Alleen pincode, Kaart of pincode,
Kaart en pincode (dubbele beveiliging)
• Leesbereik:
Mifare kaarten en tags: 3-8 cm
• Werkt op 12 VDC
• Voor binnen- en buitengebruik
• Compatibel met WIEGAND 26, 30, 34
en 40 bits, Clock&Data of Codix
• Twee vrije spannings-LED's (rood & groen)
• Akoestische en visuele feedback
• Stroomverbruik: 140 mA
• Verlichte toetsen
• Selecteerbare lengte van de pincode
1
UK
FR IT
ES
DE NL

www.xprgroup.com
LCSP-MF
2
43B
Mounting Installazione Montage Montage Montaje Montage
UK
FR ITA
ESP
D NL
4.1. 2. 3.
7.5.
3 (4 x 30 CSK)
8.
Cable
Ø6.0
30mm
Cable
Ø6.0
30mm
6.
2 (M3 x 6mm)
84mm
120mm
40mm
43B

www.xprgroup.com
LCSP-MF
3
FR ITA
ESP
D
POR
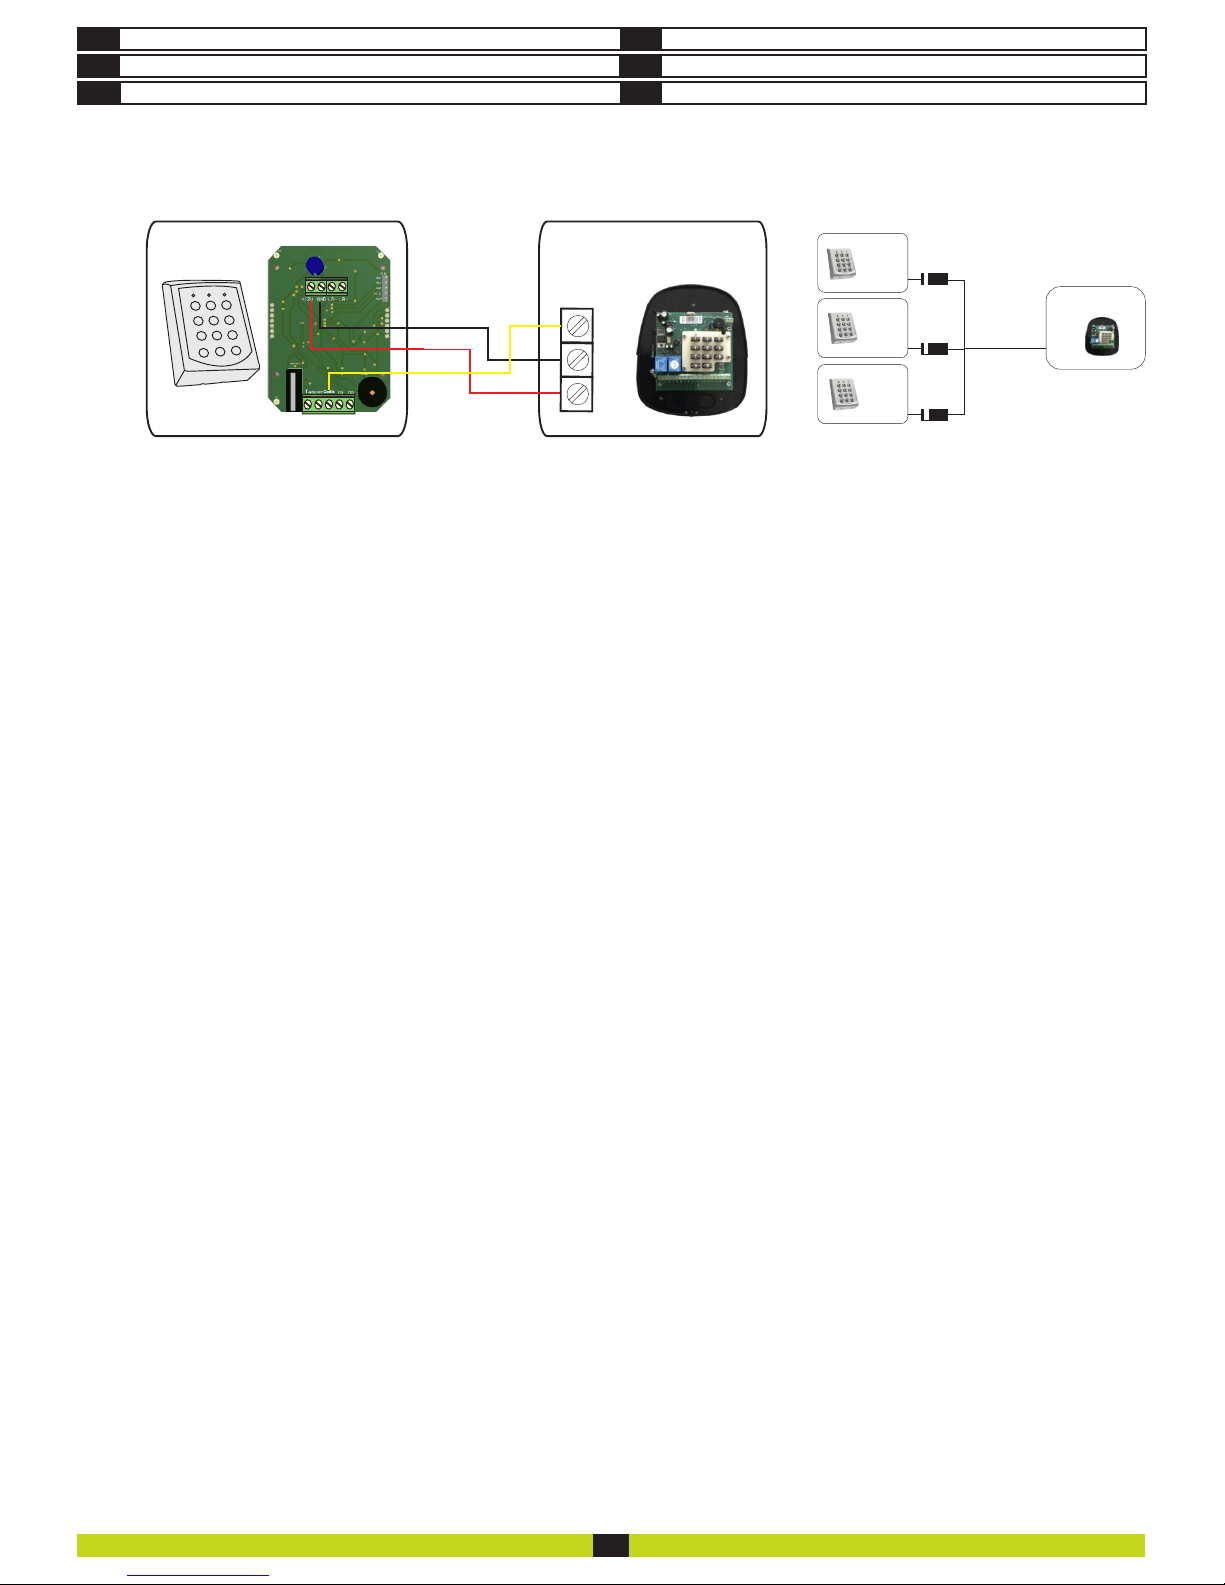
Wiring Cablaggio Câblage Cableado Verdrahtung Aansluiting
ITA
ESP
D
NL
+12V DC
GND
Tamper
Led Green -
Led Red -
D0 / Clock
D1 / Data
Tamper
Codix
UK
LCSP
1
4
7
A
2
5
8
0
3
6
9
B
LD16
R55
C28
L2
L11
C18
C33
R9
R45
D13
GND
LD14
R46
ZD3
C29
L9
LD13
R14
ZD4
C32
L7
L1
C27
L6
ZD5
R3
R4
L8
R47
FUSE1
IC8
IC7
ICN2
R1
C6
FUSE3
+12V
ZD2
LD15
R13
ZD1
D3
R2
+12V
A
+12V
led2
A
D0 D1
led2
D1
A
led1
A
GND led1 D0
GND
R2 R1
Free Led 1
Free Led 2
GND
12V out
D0
D1
Free Led 1
Free Led 2
GND
12V out
D0
D1
Fuse
D0
D1
Led Green Led Red GND
12 VDC
EWS
WIEGAND Connection
LCSP
1
4
7
A
2
5
8
0
3
6
9
B
GND
12 VDC
Vi200
16
17
18
Codix
CODIX Connection
+12V
CL
DA
LCSP
1
4
7
A
2
5
8
0
3
6
9
B
D0/Clock
D1/Data
GND
12 VDC
Controller
Clock & Data Connection
GND
Red LED
Free Tension
Green LED
Free Tension
Orange LED
Key press and Menu
LCSP
1
4
7
A
2
5
8
0
3
6
9
B
Tamper
Redefining Master code Redéfinition du code Maître Ridefinizione del codice Master
UK
FR ITA
ESP
D NL
1. Disconnect Power
2. Press and hold “A” and reconnect
Power.
3. Hold the “A” Key for at least 3
seconds.
1. Coupez l’alimentation.
2. Appuyez longuement sur la touche « A
» et rebranchez le courant.
3. Maintenez la touche « A » enfoncée
pendant au moins 3 secondes.
1. Scollegare dall'alimentazione
2. Tenere premuto "A" e ricollegare
all'alimentazione.
3. Tenere premuto il tasto "A" per almeno
3 secondi.
1. Desconecte la alimentación eléctrica.
2. Mantenga pulsada la tecla "A" y vuelva
a conectar la alimentación.
3. Mantenga pulsada la tecla "A" durante
al menos 3 segundos.
1. Koppel de voeding los
2. Houd "A" ingedrukt en sluit de voeding
opnieuw aan.
3. Houd de toets "A" ten minste 3
seconden ingedrukt.
Redefinición del código Maestro Mastercode neu definieren Opnieuw definiëren Master Code
1. Gerät von Stromversorgung trennen
2. Taste "A" gedrückt halten und Gerät
wieder an Stromversorgung anschließen.
3. Taste "A" mindestens 3 Sekunden
gedrückt halten.
max. 50m
max. 50m
max. 50m

UK
PROGRAMMING FLOWCHART
Validation OK?
No
Yes
Enter “Master Code” B + 000000
Error Beep
(3 short beeps)
1 small beep + 1 long beep + Orange LED is ‘ON’
Press “A” to validate
and exit the menu
(orange LED OFF)
Change
Master Code
1
Enter New
Master Code
Press 6 Digits
2
Select Type of Wiegand
1
Wiegand
26bit
2
3
4
Wiegand
30bit
Wiegand
34bit
Wiegand
40bit
3
Select Output Protocol
1 2
3
4
Single
Wiegand
Double
Wiegand
Clock &
Data
Codix
PIN Code Length
4
0
1 - 8
for any length
with “A”
in the end
for lengths
between
1 to 8 digits
6
Presets
1 2
3
4 5
Wiegand
26bit
normal
Codix
Wiegand
34bit
normal
Wiegand
34bit
EWS
Wiegand
26bit
EWS
7
Site Code Length
1 2
3
4
No Site
Code
Site Code
between
0 to 15
Site Code
between
0 to 255
Site Code
between
0 to 65535
Enter Site
Code
8
5 digits
Backlight
9
0 1
Backlight
OFF
Backlight
ON
5
Entry Mode
1 2
3
4
only PIN
Code
only
Card
Card and
PIN
Code
Card or
PIN
Code
Direct Menu
exit
Entering Menu is always done with B + 000000 if the Master Code is not changed.
Submenu 1 - Change Master Code. The Master Code must be 6 digits. After enrolling new Master Code the LCSP automatically exits the
Menu and the new master code must be typed to enter the menu.
Submenu 2 - Select Type of Wiegand. With this the Keypad can be adjusted to send 4 different Wiegand Outputs. The Wiegand selected
must be the same as the controller’s Wiegand Input where the LCSP Keypad is being connected. Example: If you use a controller that
recognizes Wiegand 34bit, then enter the menu of LCSP, press 2, then press 3.
Submenu 3 - Select Output Protocol. The Keypad can send the Code by different Protocols. Use “Single Wiegand” when connected to third
party controllers. When “Single Wiegand” is selected, what is typed on the Keypad the same will be sent as Wiegand Number. Use Double
Wiegand when connected to EWS, use Clock&Data when connected to controller with Clock&Data input, use Codix when connected to Vi200,
EX5, EX7, INOX99 or VKP99.
Submenu 4 - PIN Code Length. If “0” is selected, then any PIN Code with any length can be sent, but the PIN Code is typed with “A” for
confirmation( ex. 123 + A). If 1 to 8 is selected the PIN Code length is determinated by the number selected.
Submenu 5 - Entry Mode. “Only PIN Code” is disabling the proximity and LCSP works as keypad only. “Only Card” is disabling the Keypad
and the LCSP works as Proximity Reader. “Card and PIN Code” defines the double security, both the Card and PIN Code is required for the
Wiegand to be sent. “Card or PIN Code” enables normal operation.
Submenu 6 - Presets. The Presets are set of preprogrammed parameters for easy programming.
6-1 “Wiegand 26bit Normal” - Type: Wiegand 26bit; Output: Single Wiegand; PIN Length: 4 digits; Entry Mode: Card or PIN Code
6-2 “Wiegand 34bit Normal” - Type: Wiegand 34bit; Output: Single Wiegand; PIN Length: 4 digits; Entry Mode: Card or PIN Code
6-3 “Wiegand 34bit EWS Mode” - Type: Wiegand 34bit; Output: Double Wiegand; PIN Length: 4 digits; Entry Mode: Card or PIN Code
6-4 “Wiegand 26bit EWS Mode” - Type: Wiegand 26bit; Output: Double Wiegand; PIN Length: 4 digits; Entry Mode: Card or PIN Code
6-5 “Codix” - Output: Codix; PIN Length: any length with “A” in the end; Entry Mode: Card or PIN Code
Presets 6-3 and 6-4 to be used always when LCSP is connected to EWS firmware ver.2.42 or higher.
Submenu 7 - Site Code Length. S . Defaul is “0”. To be used only in specific cases.et the code length sent to Host
Submenu 8 - Enter Site Code. Put the site code always in 5 digit format (ex. 00170).
Submenu 9 - Backlight. Turns ON/OFF the backlight.
www.xprgroup.com
LCSP-MF
4

FR
SCHÉMA DE
PROGRAMMATION
Validation OK?
Non
Oui
Entrez le code principal B + 000000
Signal sonore d’erreur
(3 bips courts)
1 bip court + 1 bip long + LED orange allumé
Validez par (A)
(LED orange s'éteint)
Modification du
code principal
1
Entrez le
nouveau
code principal
Entrez 6 chiffres
2
Sélection du type
Wiegand
1
Wiegand
26bit
2
3
4
Wiegand
30bit
Wiegand
34bit
Wiegand
40bit
3
Sélection du protocole
de sortie
1 2
3
4
Simple
Wiegand
Double
Wiegand
Clock &
Data
Codix
Longueur du
code PIN
4
0
1 - 8
pour toute
longueur de
code suivi de “A”
pour toutes
les longueurs
comprises entre
1 et 8 chiffres
6
Préréglages
1 2
3
4 5
Wiegand
26bit
normal
Codix
Wiegand
34bit
normal
Wiegand
34bit
EWS
Wiegand
26bit
EWS
7
Longueur du code de site
1 2
3
4
Pas
de code
de site
Code de
site entre
0 et 15
Code de
site entre
0 et 255
Code de
site entre
0 et 65535
Saisie du
code de site
8
5 chiffres
Rétroéclairage
9
0 1
Rétroéclairage
désactivé
Rétroéclairage
activé
5
Mode d’entrée
1 2
3
4
Code
PIN seul
Carte
seule
Carte et
code
PIN
Carte ou
code
PIN
Sortie du
menu direct
Pour entrer dans le menu, toujours entrer B + 000000 si le code principal n’a pas été changé.
Sous-menu 1 - Modification du code principal. Le code principal doit comporter 6 chiffres. Une fois l’enregistrement du nouveau code
principal terminé, le LCSP quitte automatiquement le menu et le nouveau code principal doit être saisi pour entrer à nouveau dans le menu.
Sous-menu 2 - Sélection du type Wiegand. Le clavier peut être paramétré pour envoyer 4 sorties Wiegand différentes. Le type Wiegand
sélectionné doit être identique à celui de l’entrée Wiegand du contrôleur auquel le clavier du LCSP est raccordé. Exemple : Si vous utilisez un
contrôleur qui reconnaît le type Wiegand 34 bits, vous devez entrer dans le menu du LCSP, appuyer sur la touche 2, puis sur 3.
Sous-menu 3 - Sélection du protocole de sortie. Le clavier peut envoyer le code à travers différents protocoles. Utilisez l’option Simple
Wiegand en cas de connexion à des contrôleurs tiers. Si l'option Simple Wiegand est sélectionnée, ce qui est saisi sur le clavier est envoyé
comme numéro Wiegand. Utilisez l'option double Wiegand en cas de connexion à l'EWS, utilisez Clock & Data en cas de connexion à un
contrôleur à saisie Clock & Data et utilisez Codix en cas de connexion à Vi200, EX5, EX7, INOX99 ou VKP99.
Sous-menu 4 - Longueur du code PIN. Si vous sélectionnez « 0 », n’importe quel code PIN de n’importe quelle longueur peut être envoyé,
mais le code PIN doit être suivi de la lettre « A » pour confirmation (ex. 123 + A). Si vous choisissez un chiffre compris entre 1 et 8, la longueur
du code PIN correspond au chiffre sélectionné.
Sous-menu 5 - Mode d’entrée. L’option « Code PIN seul » désactive la fonction de proximité et le LCSP fonctionne comme clavier
uniquement. L’option « Carte seule » désactive le clavier et le LCSP fonctionne comme lecteur de proximité. L’option « Carte et code PIN »
définit la double sécurité ; la carte et le code PIN sont nécessaires pour que le Wiegand soit envoyé. L’option « Carte ou code PIN » permet
un fonctionnement normal.
Sous-menu 6 - Préréglages. Les préréglages sont des ensembles de paramètres prédéfinis pour faciliter la programmation.
6-1 “Wiegand 26bit Normal” - Type: Wiegand 26bit; Sortie: Simple Wiegand; Longueur du code PIN: 4 chiffres; Mode d’entrée: Carte ou code PIN
6-2 “Wiegand 34bit Normal” - Type: Wiegand 34bit; Sortie: Simple Wiegand; Longueur du code PIN: 4 chiffres; Mode d’entrée: Carte ou code PIN
6-3 “Wiegand 34bit EWS Mode” - Type: Wiegand 34bit; Sortie: Double Wiegand; Longueur du code PIN: 4 chiffres; Mode d’entrée: Carte ou code PIN
6-4 “Wiegand 26bit EWS Mode” - Type: Wiegand 26bit; Sortie: Double Wiegand; Longueur du code PIN: 4 chiffres; Mode d’entrée: Carte ou code PIN
6-5 “Codix” - Sortie: Codix; Longueur du code PIN: toute longueur de code suivi de “A”; Mode d’entrée: Carte ou code PIN
Les préréglages 6-3 et 6-4 doivent être toujours utilisés lorsque le LCSP est connecté à l’EWS, firmware version 2.42 ou supérieure.
Sous-menu 7 - Longueur du code de site. Définissez la longueur du code envoyé à l’hôte. La valeur par défaut est « 0 ». À n’utiliser que
dans des cas particuliers.
Sous-menu 8 - Saisie du code de site. Le format du code de site doit toujours avoir 5 chiffres (ex. 00170).
Sous-menu 9 - Rétroéclairage. Permet d'activer et de désactiver le rétroéclairage.
www.xprgroup.com
LCSP-MF
5

PROGRAMMAZIONE
ITA
Convalida OK?
No
Si
Immettere “Master Code” B + 000000
Beep di errore
(3 beep brevi)
1 beep breve + 1 beep lungo + LED arancione 'ON'
Convalidare con (A)
(LED arancione si spegne)
Modifica del
Master Code
1
Immettere il nuovo
Master Code
Immettere
6 cifre
2
Selezionare il tipo di Wiegand
1
Wiegand
26bit
2
3
4
Wiegand
30bit
Wiegand
34bit
Wiegand
40bit
3
Selezionare il protocollo
di output
1 2
3
4
Singolo
Wiegand
Doppio
Wiegand
Clock &
Data
Codix
Lunghezza del
codice PIN
4
0
1 - 8
per qualsiasi
lunghezza con
“A" alla fine
per lunghezze
tra 1 e 8 cifre
6
Preset
1 2
3
4 5
Wiegand
26bit
normal
Codix
Wiegand
34bit
normal
Wiegand
34bit
EWS
Wiegand
26bit
EWS
7
Lunghezza del codice sito
1 2
3
4
Nessun
codice sito
Codice sito
tra 0 e 15
Codice sito
tra 0 e
255
Codice sito
tra 0 e
65535
Immettere
codice sito
8
5 cifre
Retroilluminazione
9
0
1
Retroillumi-
nazione
OFF
5
Modalità immissione
1 2
3
4
solo
codice
PIN
solo
tessera
Tessera
e codice
PIN
Tessera
o codice
PIN
Uscita diretta
menu
L'ingresso nel menu si effettua sempre con B + 000000 se il Master Code non è stato cambiato.
Submenu 1 - Modifica Master Code. Il Master Code deve essere di 6 cifre. Dopo aver immesso un nuovo Master Code l'LCSP esce
automaticamente dal menu ed è quindi necessario immettere il nuovo master code per accedere nuovamente.
Submenu 2 - Selezionare tipo di Wiegand. Da questo menu la tastiera può essere impostata in modo che invii 4 output Wiegand differenti. Il
protocollo Wiegand selezionato deve essere lo stesso dell'input Wiegand del controller a cui è collegata la tastiera LCSP. Esempio: Se si
utilizza un controller che riconosce Wiegand 34bit, è quindi necessario accedere al menu di LCSP, premere 2, quindi premere 3.
Submenu 3 - Selezionare protocollo di output. La tastiera può inviare il codice tramite diversi protocolli. Utilizzare “Singolo Wiegand” se la
tastiera è connessa a controller di terze parti. Selezionando “Singolo Wiegand” quello che viene inserito sulla tastiera è lo stesso che viene
inviato come numero Wiegand. Utilizzare Doppio Wiegand se la tastiera è connessa ad un EWS, utilizzare Clock&Data se connessa ad un
controller con input Clock&Data, utilizzare Codix se connessa a Vi200, EX5, EX7, INOX99 o VKP99.
Submenu 4 - Lunghezza codice PIN. Selezionando “0”, sarà possibile inviare un codice PIN di qualsiasi lunghezza, ma il codice PIN deve
essere inserito con "A" per conferma (es. 123 + A). Selezionando da 1 a 8, la lunghezza del codice PIN è determinata dal numero selezionato.
Submenu 5 - Modalità inserimento. “Solo codice PIN” disabilita il lettore di prossimità, LCSP funziona esclusivamente come tastiera. “Solo
tessera” disabilita la tastiera e l'LSCP funziona come lettore di prossimità. “Tessera e codice PIN” definisce che la doppia sicurezza, sia la
tessera, sia il codice PIN sono necessari per inviare il Wiegand. “Tessera o codice PIN” abilita il funzionamento normale.
Submenu 6 - Preset. I Preset sono set di parametri preprogrammati per semplificare la programmazione.
6-1 “Wiegand 26bit Normal” - Tipo: Wiegand 26bit; Output: Singolo Wiegand; Lunghezza del codice PIN: 4 cifre; Modalità immissione: Tessera o codice PIN
6-2 “Wiegand 34bit Normal” - Tipo: Wiegand 34bit; Output: Singolo Wiegand; Lunghezza del codice PIN: 4 cifre; Modalità immissione: Tessera o codice PIN
6-3 “Wiegand 34bit EWS Mode” - Tipo: Wiegand 34bit; Output: Doppio Wiegand; Lunghezza del codice PIN: 4 cifre; Modalità immissione: Tessera o codice PIN
6-4 “Wiegand 26bit EWS Mode” - Tipo: Wiegand 26bit; Output: Doppio Wiegand; Lunghezza del codice PIN: 4 cifre; Modalità immissione: Tessera o codice PIN
6-5 “Codix” - Output: Codix; Lunghezza del codice PIN: qualsiasi lunghezza con “A" alla fine; Modalità immissione:Tessera o codice PIN
I preset 6-3 e 6-4 devono essere utilizzati quando LCSP è connesso ad un firmware EWS ver.2.42 o successiva.
Submenu 7 - Lunghezza codice sito. Imposta la lunghezza del codice inviata all'Host. Il valore di default è “0”. Da utilizzare solo in casi
specifici.
Submenu 8 - Immettere codice sito. immettere sempre il codice sito in formato 5 cifre (es. 00170).
Submenu 9 - Retroilluminazione. Accende/Spegne la retroilluminazione.
Retroillumi-
nazione
ON
www.xprgroup.com
LCSP-MF
6

PROGRAMACIÓN
ESP
¿Validación correcta?
No
Si
Introducir el “Código maestro” B + 000000
Pitido de error
(3 pitidos cortos)
1 pitido corto + 1 pitido largo + LED naranja activado
Presionar A para validar
(LED naranja OFF)
Cambiar código
maestro
1
Especificar el
nuevo código
maestro
Introducir 6 dígitos
2
Seleccionar tipo de Wiegand
1
Wiegand
26bit
2
3
4
Wiegand
30bit
Wiegand
34bit
Wiegand
40bit
3
Seleccionar protocolo
de salida
1 2
3
4
Simple
Wiegand
Doble
Wiegand
Clock &
Data
Codix
Longitud del código PIN
4
0
1 - 8
para cualquier
longitud con
“A” al final
para longitudes
de entre
1 y 8 dígitos
6
Ajustes predeterminados
1 2
3
4 5
Wiegand
26bit
normal
Codix
Wiegand
34bit
normal
Wiegand
34bit
EWS
Wiegand
26bit
EWS
7
Longitud del código de sitio
1 2
3
4
Sin código
de sitio
Código de
sitio entre
0 y 15
Código de
sitio entre
0 y 255
Código de
sitio entre
0 y 65535
Introducir
código de sitio
8
5 dígitos
Retroiluminación
9
0
1
Retroiluminación
OFF
Retroilu-
minación
ON
5
Modo de entrada
1 2
3
4
solo con
código
PIN
solo con
Tarjeta
tarjeta y
código
PIN
tarjeta o
código
PIN
Salida directa
del Menú
Al menú siempre se accede con B + 000000 si no se ha modificado el código maestro.
Submenú 1: Cambiar código maestro. El Código maestro debe tener 6 dígitos. Tras registrar un nuevo código maestro, el LCSP sale
automáticamente del menú y resulta necesario introducir el nuevo código maestro para acceder a dicho menú.
Submenú 2: Seleccionar tipo de Wiegand. Con este submenú, el teclado se puede ajustar para enviar cuatro salidas de Wiegand distintas.
El tipo de Wiegand seleccionado debe ser el mismo que la entrada de Wiegand del controlador al que se conecta el teclado LCSP. Ejemplo:
si usa un controlador que reconozca Wiegand de 34 bits, acceda al menú de LCSP, pulse 2 y, a continuación, pulse 3.
Submenú 3: Seleccionar protocolo de salida. El teclado puede enviar el código mediante diferentes protocolos. Use “Wiegand sencillo”
cuando se conecte a controladores de otros fabricantes. Cuando la opción “Wiegand sencillo” esté seleccionada, se enviará como número de
Wiegand exactamente lo que se escriba en el teclado. Use Wiegand doble cuando se conecte a EWS, use Clock&Data cuando se conecte a
un controlador con entrada de Clock&Data y use Codix cuando se conecte a Vi200, EX5, EX7, INOX99 o VKP99.
Submenú 4: Longitud del código PIN. Si se selecciona “0”, se podrá enviar cualquier código PIN con cualquier longitud, pero se añadirá “A”
al código PIN como confirmación (por ejemplo, 123 + A). Si se selecciona de 1 a 8, la longitud del código PIN vendrá determinada por el
número seleccionado.
Submenú 5: Modo de entrada. “Sólo con código PIN” desactiva la proximidad y el LCSP solo funciona como teclado. “Solo con tarjeta”
desactiva el teclado y el LCSP funciona como lector de proximidad. “Tarjeta y código PIN” establece la doble seguridad, al requerir tanto la
tarjeta como el código PIN para el envío de la señal Wiegand. “Tarjeta o código PIN” activa el funcionamiento normal.
Submenú 6: Ajustes predeterminados. Los ajustes predeterminados son un conjunto de parámetros preprogramados que facilitan la
programación.
6-1 “Wiegand 26bit Normal” - Tipo: Wiegand 26bit; Salida: Simple Wiegand; Longitud del código PIN:4 dígitos; Modo de entrada: tarjeta o código PIN
6-2 “Wiegand 34bit Normal” - Tipo: Wiegand 34bit; Salida: Simple Wiegand; Longitud del código PIN:4 digitos; Modo de entrada: tarjeta o código PIN
6-3 “Wiegand 34bit EWS Mode” - Tipo: Wiegand 34bit; Salida: Doble Wiegand; Longitud del código PIN: 4 digitos; Modo de entrada: tarjeta o código PIN
6-4 “Wiegand 26bit EWS Mode” - Tipo: Wiegand 26bit; Salida: Doble Wiegand; Longitud del código PIN: 4 digitos; Modo de entrada: tarjeta o código PIN
6-5 “Codix” - Salida: Codix; Longitud del código PIN: cualquier longitud con “A” al final; Modo de entrada: tarjeta o código PIN
Los ajustes predeterminados 6-3 y 6-4 se utilizan siempre cuando el LCSP se conecta a EWS con versión de firmware 2.42 o superior.
Submenú 7: Longitud del código de sitio. Defina la longitud del código enviada a Host. El valor predeterminado es “0”. Solo se usa en
casos concretos.
Submenú 8: Introducir el código de sitio. Utilice siempre 5 dígitos para el código de sitio (por ejemplo, 00170).
Submenú 9: Retroiluminación. Activa y desactiva la retroiluminación.
www.xprgroup.com
LCSP-MF
7

PROGRAMMIERUNG
D
www.xprgroup.com
LCSP-MF
8
Bestätigung
abwarten?
Nein
Ja
„Master-Code“ eingeben B + 000000
Fehlermeldung
(drei kurze Pieptöne)
1 kurzer Piepton + 1 langer Piepton + orangefarbene LED leuchtet
Bestätigen mit Taste A
(orangefarbene LED erlischt)
Master-Code
ändern
1
Neuen
6-stelligen
Mastercode
eingeben
2
Wiegand-Typ wählen
1
Wiegand
26bit
2
3
4
Wiegand
30bit
Wiegand
34bit
Wiegand
40bit
3
Ausgabeprotokoll wählen
1 2
3
4
Einzel
Wiegand
Doppel
Wiegand
Clock &
Data
Codix
PIN-Code-Länge
4
0
1 - 8
beliebige Länge
Bestätigung
mit „A“
Code 1-8-stellig
6
Voreinstellungen
1 2 3 4
5
Wiegand
26bit
normal
Codix
Wiegand
34bit
normal
Wiegand
34bit
EWS
Wiegand
26bit
EWS
7
Standortcode-Länge
1 2
3
4
Kein
Standort-
code
Standortcode von
0 bis 15
Standortcode von
0 bis 255
Standortcode von
0 bis 65535
Standortcode
eingeben
8
5 Ziffern
Beleuchtung
9
0
1
Beleuchtung
AUS
Beleuchtung
EIN
5
Zutrittsmodus
1
2
3
4
nur
PIN-
Code
nur
Karte
Karte
und
PIN-Code
Karte
oder
PIN-Code
Menü wird
beendet
Das Menü wird immer mit B + 000000 aufgerufen, sofern der Master-Code nicht geändert wurde.
Untermenü 1 - Master-Code ändern. Der Master-Code muss sechsstellig sein. Nach dem Erfassen eines neuen Master-Codes wird das
Menü automatisch vom LCSP beendet, und der neue Master-Code muss eingegeben werden, um das Menü erneut aufzurufen.
Untermenü 2 - Wiegand-Typ wählen. Hiermit kann die Tastatur so konfiguriert werden, dass es vier verschiedene Wiegand-Ausgangssignale
sendet. Der gewählte Wiegand-Typ muss mit dem Wiegand-Eingang des Controllers übereinstimmen,an dem die LCSP-Tastatur
angeschlossen ist. Beispiel: Wenn Sie einen Controller verwenden, der Wiegand 34bit erkennt, dann rufen Sie das LCSP-Menü auf, drücken
„2“ und dann „3“.
Untermenü 3 - Ausgangsprotokoll wählen. Die Tastatur kann zum Senden des Codes verschiedene Protokolle verwenden. Wählen Sie
„Einzel-Wiegand“ beim Anschluss an Controller anderer Hersteller. Wurde „Einzel-Wiegand“ gewählt, wird die Tastatureingabe als WiegandCode gesendet. Wählen Sie „Doppel-Wiegand“ beim Anschluss an den EWS, „Clock&Data“ beim Anschluss an Controller mit Clock&DataEingang und „Codix“ beim Anschluss an VI200, EX5, EX7, INOX99, oder VKP99.
Untermenü 4 - PIN-Code-Länge. PIN-Code-Länge. Bei der Einstellung „0“ kann ein PIN-Code beliebiger Länge gesendet werden, der PINCode muss jedoch mit „A“ bestätigt werden (Bsp. 123+A). Bei der Eingabe von 1 bis 8, wird die PIN-Code-Länge durch die gewählte Zahl
festgelegt.
Untermenü 5 - Zutrittsmodus. BZutrittsmodus. Bei „Nur PIN-Code“ ist der RFID-Leser deaktiviert und es funktioniert nur die Tastatur des
LSCP. Bei „Nur Karte“ ist die Tastatur deaktiviert und LCSP funktioniert nur als RFID-Leser. Doppelte Sicherheit bei der Einstellung „Karte und
PIN-Code“, da sowohl die Karte als auch der PIN-Code für das Senden des Wiegandcodes erforderlich sind. „Karte oder PIN-Code“ aktiviert
den Normalbetrieb.
Untermenü 6 - Voreinstellungen. Die Voreinstellungen sind vorgegebenen Parameter für eine vereinfachte Programmierung.
6-1 “Wiegand 26bit Normal” - Typ: Wiegand 26bit; Output: Einzel Wiegand; PIN-Code-Länge: 4 ziffern; Zutrittsmodus: Karte oder PIN-Code
6-2 “Wiegand 34bit Normal” - Typ: Wiegand 34bit; Output: Einzel Wiegand; PIN-Code-Länge: 4 ziffern; Zutrittsmodus: Karte oder PIN-Code
6-3 “Wiegand 34bit EWS Mode” - Typ: Wiegand 34bit; Output: Doppel Wiegand; PIN-Code-Länge: 4 ziffern; Zutrittsmodus: Karte oder PIN-Code
6-4 “Wiegand 26bit EWS Mode” - Typ: Wiegand 26bit; Output: Doppel Wiegand; PIN-Code-Länge: 4 ziffern; Zutrittsmodus: Karte oder PIN-Code
6-5 “Codix” - Output: Codix; PIN-Code Länge: beliebige Länge, jedoch Bestätigung mit „A“;; Zutrittsmodus: Karte oder PIN-Code
Wird LCSP mit EWS-Firmware Vers. 2.42 oder höher betrieben, müssen die Einstellungen 6-3 und 6-4 verwendet werden.
Untermenü 7 - Standort-Code-Länge. Einstellung der Länge des an den Host gesendeten Codes. Standardeinstellung ist „0“. Sollte nur in
Ausnahmesituationen verwendet werden.
Untermenü 8 - Standort-Code eingeben. Der Standort-Code muss immer fünfstellig ein (Bsp. 00170).
Untermenü 9 - Beleuchtung. Schaltet die Hintergrundbeleuchtung EIN/AUS.

PROGRAMMEER OVERZICHT
NL
Het menu wordt altijd geopend met B + 000000 (mits de mastercode niet is gewijzigd).
Submenu 1 - Mastercode wijzigen. De mastercode moet uit 6 cijfers bestaan. Na registratie van een nieuwe mastercode wordt het menu
automatisch door LCSP gesloten en moet de nieuwe mastercode worden ingevoerd om het menu te openen.
Submenu 2 - Type van Wiegand selecteren. Hiermee kan het toetsenpaneel worden aangepast om 4 verschillende Wiegand-uitgangen te
verzenden. De geselecteerde Wiegand moet identiek zijn aan de Wiegand-ingang van de controller waarop het LCSP-toetsenpaneel wordt
aangesloten. Voorbeeld: als u gebruik maakt van een controller die Wiegand 34 bits herkent, opent u het menu van LCSP, drukt u op 2 en
vervolgens op 3.
Submenu 3 - Uitgangprotocol selecteren. Het toetsenpaneel kan de code via verschillende protocollen verzenden. Gebruik "Enkelvoudige
Wiegand" bij aansluiting op controllers van derden. Bij "Enkelvoudige Wiegand" komt de waarde die op het toetsenpaneel wordt ingevoerd,
overeen met de waarde die als Wiegand-nummer wordt verzonden. Gebruik Tweevoudige Wiegand bij aansluiting op EWS, Klok&gegevens
bij aansluiting op een controller met een klok&gegevensingang, en gebruik Codix bij aansluiting op Vi200, EX5, EX7, INOX99 of VKP99.
Submenu 4 - Lengte pincode. Als hier "0" wordt geselecteerd, kan er een pincode van elke gewenste lengte worden verzonden. Wel moet
ter bevestiging na de pincode een "A" worden ingevoerd (bijv. 123 + A). Als hier een waarde tussen 1 en 8 wordt geselecteerd, wordt de lengte
van de pincode bepaald door de geselecteerde waarde.
Submenu 5 - Toegangsmodus. Bij "Alleen pincode" wordt de naderingsfunctie uitgeschakeld en werkt LCSP alleen met het toetsenpaneel.
Bij "Alleen kaart" wordt het toetsenpaneel uitgeschakeld en werkt LCSP als naderingslezer. "Kaart en pincode" biedt een dubbele beveiliging:
zowel de kaart als de pincode zijn vereist om de Wiegand te kunnen verzenden. Met "Kaart of pincode" wordt de normale werking geactiveerd.
Submenu 6 - Standaardinstellingen. De standaardinstellingen bestaan uit een set voorgeprogrammeerde parameters voor een eenvoudige
programmering.
6-1 “Wiegand 26bit Normal” - Type: Wiegand 26bit; Uitgang: Enkelvoudig Wiegand; Lengte pincode: 4 cijfers; Toegangsmodus: Kaart of pincode
6-2 “Wiegand 34bit Normal” - Type: Wiegand 34bit; Uitgang: Enkelvoudig Wiegand; Lengte pincode: 4 cijfers; Toegangsmodus: Kaart of pincode
6-3 “Wiegand 34bit EWS Mode” - Type: Wiegand 34bit; Uitgang: Tweevoudig Wiegand; Lengte pincode: 4 cijfers; Toegangsmodus: Kaart of pincode
6-4 “Wiegand 26bit EWS Mode” - Type: Wiegand 26bit; Uitgang: Tweevoudig Wiegand; Lengte pincode: 4 cijfers; Toegangsmodus: Kaart of pincode
6-5 “Codix” - Uitgang: Codix; Lengte pincode: willekeurige lengten afgesloten met een "A"; Toegangsmodus: Kaart of pincode
Standaardinstellingen 6-3 en 6-4 worden altijd gebruikt wanneer LCSP op EWS firmware versie 2.42 of hoger wordt aangesloten.
Submenu 7 - Lengte locatiecode. Bepaalt de lengte van de code die naar de host wordt verzonden. De standaardwaarde is "0". Gebruik
alleen in specifieke gevallen een andere waarde.
Submenu 8 - Locatiecode invoeren. Voer de locatiecode altijd in 5-cijferig formaat in (bijv. 00170).
Submenu 9 - Achtergrondverlichting. Zet achtergrondverlichting AAN/UIT.
Validatie OK?
Nee
Ja
"Mastercode" B + 000000 invoeren
Fouttoon
(3 korte tonen)
1 korte toon + 1 lange toon + oranje LED is 'AAN’
Toets A om te bevestigen
(oranje LED UIT)
Mastercode
wijzigen
1
Nieuwe
mastercode
invoeren
6 cijfers invoeren
2
Type van Wiegand
selecteren
1
Wiegand
26bit
2
3
4
Wiegand
30bit
Wiegand
34bit
Wiegand
40bit
3
Uitgangsprotocol selecteren
1
2
3
4
Enkelvoudig
Wiegand
Tweevoudig
Wiegand
Clock &
Data
Codix
Lengte pincode
4
0
1 - 8
voor willekeurige
lengten afgesloten
met een "A"
voor lengten
tussen 1 tot en
met 8 cijfers
6
Standaardinstellingen
1 2 3 4
5
Wiegand
26bit
normal
Codix
Wiegand
34bit
normal
Wiegand
34bit
EWS
Wiegand
26bit
EWS
7
Lengte locatiecode
1 2
3
4
Geen
locatie
code
Locatiecode
tussen
0 en 15
Locatiecode
tussen
0 en 255
Locatiecode
tussen
0 en 65535
Locatiecode
invoeren
8
5 cijfers
Achtergrond-
verlichting
9
0
1
Achtergrond-
verlichting
UIT
Achtergrond-
verlichting
AAN
5
Toegangsmodus
1
2
3
4
Alleen
pincode
Alleen
kaart
Kaart
en
pincode
Kaart
of
pincode
Menu direct
afsluiten
www.xprgroup.com
LCSP-MF
9

Connecting LCSP to EWS controller
UK
FR
When LCSP is connected to EWS Controller, settings must be
done in the PROS Software and in the LCSP Keypad.
Example:
Create a User to access with Card AND PIN Code (double
security). The Card Number is 8744987 and the PIN Code 12345.
Settings in the PROS Software
1. In the PROS Software, right click on the Reader and select
properties. In the Properties window select for Type: “LCSP”
(1.1)
2. Select Entry Mode (Card AND Keycode) (1.2)
3. Select the Wiegand 26bit (1.3)
4. Press Save & Exit. In the event window a confirmation message
will appear as shown in fig.2
5. Adjust the PIN Length. Go to Settings/ System parameters. For
Keycode length select 5 digits. (fig3)
6. Go To Users Menu and select the user. In the Field User ID
(Card Number) write 8744987. In the Field ”Keycode” write the
PIN Code 12345. Save the User. fig.4
Settings in the LCSP
1. Enter the Menu of LCSP. Press B+000000.
2. Press 6, press 4. The Preset, programs the LCSP Keypad to
work with EWS controller in Wiegand 26bit.
3. Adjust the PIN Length. Press 4, then press 5.
4. Press 5, then press 3 to select the double security entry mode.
Present the Card then type the PIN Code and access will be
granted.
fig.2
fig.3
fig.4
Lorsque le LCSP est connecté au contrôleur EWS, les paramètres
doivent être définis dans le logiciel PROS et à l’aide du clavier du
LCSP.
Exemple:
Création d’un utilisateur avec accès à l’aide de la carte ET du code
PIN (double sécurité). Le numéro de la carte est 8744987 et le code
PIN est 12345.
Configuration dans le logiciel PROS
1. Dans le logiciel PROS, cliquez avec le bouton droit de la souris sur
le lecteur et sélectionnez les propriétés. Dans la fenêtre des
propriétés, sélectionnez le type : LCSP (1.1)
2. Sélectionnez le mode d’entrée (Carte ET code clavier) (1.2)
3. Sélectionnez Wiegand 26 bits (1.3)
4. Cliquez sur Enregistrer et quitter. Dans la fenêtre d’événement, un
message de confirmation identique à celui de la figure 2 s’affiche
5. Définissez la longueur du PIN. Accédez à Configuration /
Paramètres système. Sélectionnez 5 chiffres comme longueur du
code clavier. (fig. 3)
6. Accédez au menu Utilisateurs et sélectionnez l’utilisateur. Dans le
champ ID utilisateur (Numéro de carte), tapez 8744987. Dans le
champ Code clavier, entrez le code PIN 12345. Enregistrez
l’utilisateur. (fig. 4)
Configuration sur le LCSP
1. Entrez dans le menu du LCSP. Entrez B+000000.
2. Appuyez sur la touche 6, puis sur 4. Les préréglages programment
le clavier du LCSP afin qu’il fonctionne avec le contrôleur EWS en
Wiegand 26 bits.
3. Réglez la longueur du PIN. Appuyez sur 4, puis sur 5.
4. Appuyez sur 5, puis sur 3 pour sélectionner le mode d’entrée à
double sécurité.
Pré-envoyez la carte, puis saisissez le code PIN et l’accès est
accordé.
Connexion du LCSP au contrôleur EWS
fig.2
fig.3
fig.4
www.xprgroup.com
LCSP-MF
10

Connessione della LCSP ad un controller EWS
ITA
ESP
Quando la tastiera LCSP è collegata ad un controller EWS, le
impostazioni devono essere eseguite nel software PROS e nella
tastiera LCSP.
Esempio:
Creare un utente con accesso a tessera E codice PIN (doppia
sicurezza). Il numero della tessera è 8744987 ed il codice PIN
12345.
Impostazioni nel software PROS
1. Nel software PROS, fare doppio clic sul Reader e selezionare le
proprietà. Nella finestra Proprietà, selezionare come tipo: “LCSP”
(1.1)
2. Selezionare la modalità di inserimento (Tessera e codice chiave)
(1.2)
3. Selezionare il Wiegand 26 bit (1.3)
4. Fare clic su Salva e Esci. Nella finestra evento apparirà un
messaggio di conferma come mostrato nella fig.2
5. Impostare la lunghezza del PIN. Accedere ai parametri
Impostazioni/Sistema. Per la lunghezza del codice chiave
selezionare 5 cifre. (fig. 3)
6. Accedere al Menu utenti e selezionare l'utente. Nel campo ID
utente (numero tessera) scrivere 8744987. Nel campo ”Codice
chiave” scrivere il codice PIN 12345. Salvare l'utente. fig.4
Impostazioni sulla LCSP
1. Accedere al menu della LCSP. Premere B+000000.
2. Premere 6, premere 4. Il preset programma la tastiera LCSP per
funzionare con un controller EWS in Wiegand 26 bit.
3. Impostare la lunghezza del PIN. Premere 4, quindi premere 5.
4. Premere 5, quindi premere 3 per selezionare la modalità di
inserimento a doppia sicurezza.
Presentare la tessera quindi immettere il codice PIN. Verrà
consentito l'accesso.
Cuando el LCSP se conecta al controlador EWS, se deben configurar
los ajustes en el software PROS y en el teclado LCSP.
Ejemplo:
Cree un usuario para acceder con tarjeta Y código PIN (doble
seguridad). El número de la tarjeta será 8744987 y el código PIN
12345.
Ajustes en el software PROS
1. En el software PROS, haga clic con el botón derecho en el lector y
seleccione Propiedades. En la ventana Propiedades, seleccione el
tipo: “LCSP” (1.1)
2. Seleccione el Modo de entrada (Tarjeta Y código) (1.2)
3. Seleccione el Wiegand de 26 bits (1.3)
4. Pulse Guardar y salir. En la ventana de eventos, aparecerá un
mensaje de confirmación, tal y como se muestra en la fig. 2.
5. Ajuste la longitud del PIN. Vaya a Configuración/Parámetros del
sistema. Para la longitud del código, seleccione 5 dígitos. (fig. 3).
6. Vaya al menú Usuarios y seleccione el usuario. En el campo Id. de
usuario (número de tarjeta) escriba 8744987. En el campo
“Código”, escriba el código PIN 12345. Guarde el usuario, fig. 4.
Ajustes en el LCSP
1. Acceda al menú de LCSP. Pulse B+000000.
2. Pulse 6 y, a continuación, pulse 4. El valor predeterminado
programa el teclado LCSP para que funcione con el controlador
EWS con Wiegand de 26 bits.
3. Ajuste la longitud del PIN. Pulse 4 y, a continuación, pulse 5.
4. Pulse 5 y, a continuación, pulse 3 para seleccionar el modo de
entrada de doble seguridad.
Presente la tarjeta, introduzca el código PIN y se le concederá el
acceso.
Conexión del LCSP a un controlador EWS
fig.2
fig.3
fig.4
fig.2
fig.3
fig.4
www.xprgroup.com
LCSP-MF
11

LCSP mit EWS-Controller verbinden
DE
NL
Wenn der LCSP-Leser an einen EWS-Controller angeschlossen ist,
müssen die Einstellungen in der PROS-Software und über die
LCSP-Tastatur vorgenommen werden.
Beispiel:
Einrichten eines Benutzers für den Zutritt mit Karte UND PIN-Code
(doppelte Sicherheit). Die Kartennummer lautet „8744987“ und der
PIN-Code „12345“.
Einstellungen in der PROS-Software:
1. In der PROS-Software den Leser mit der rechten Maustaste
anklicken und Eigenschaften wählen. Im Eigenschaftenfenster
den Typ wählen: „LCSP“ (1.1)
2. Zutrittsmodus wählen (Karte UND Tastencode) (1.2)
3. Wiegand 26bit wählen (1.3)
4. Speichern & Beenden wählen. Im Ereignisfenster erscheint eine
Bestätigungsmeldung wie in Abb. 2 gezeigt.
5. PIN-Länge einstellen. Einstellungen / Systemparameter aufrufen.
Als Tastencodelänge fünf Ziffern wählen (Abb. 3)
6. Das Benutzermenü aufrufen und den Benutzer auswählen. Im
Feld Benutzer-ID (Kartennummer) „8744987“ eingeben. Im Feld
„Tastencode“ den PIN-Code „12345“ eingeben. Den Benutzer
speichern (Abb. 4).
Einstellungen im LCSP
1. Das LCSP-Menü aufrufen. „B+000000“ drücken.
2. „6“ und dann „4“ drücken. Über die Voreinstellung wird die LCSPTastatur für den Betrieb mit dem EWS-Controller über 26-BitWiegand programmiert.
3. PIN-Code-Länge festlegen. Erst „4“ und dann „5“ drücken.
4. „5“ und dann „3“ drücken, um den Zutrittsmodus mit doppelter
Sicherheit zu wählen.
Die Karte einlesen und dann PIN-Code eingeben, damit der Zutritt
gewährt wird.
Als LCSP op een EWS-controller is aangesloten, moeten instellingen
in de PROS-software en op het LCSP-toetsenpaneel worden
opgegeven.
Voorbeel:
Maak een gebruiker aan voor toegang met Kaart en pincode (dubbele
beveiliging). Het kaartnummer is 8744987 en de pincode is 12345.
Instellingen in de PROS-software
1. Klik in de PROS-software met de rechtermuisknop op de lezer en
selecteer Eigenschappen. Selecteer in het venster Eigenschappen
bij Type: "LCSP" (1.1)
2. Selecteer de toegangsmodus (Kaart en pincode) (1.2)
3. Selecteer Wiegand 26 bits (1.3)
4. Druk op Opslaan en afsluiten. In het venster Gebeurtenis verschijnt
een bevestigingsbericht zoals in fig. 2 is weergegeven
5. Stel de lengte van de pincode in. Ga naar de
Instellingen/Systeemparameters. Selecteer voor Lengte pincode 5
cijfers. (fig. 3)
6. Ga naar het menu Gebruikers en selecteer de gebruiker. Voer in het
veld Gebruikers-ID (kaartnummer) de waarde 8744987 in. Voer in
het veld "Pincode" de pincode 12345 in. Sla de gebruiker op. Fig. 4
Instellingen in LCSP
1. Open het menu van LCSP. Druk op B+000000.
2. Druk op 6 en vervolgens op 4. De standaardinstelling programmeert
het LCSP-toetsenpaneel voor gebruik in combinatie met EWScontroller en Wiegand 26 bits.
3. Pas de lengte van de pincode aan. Druk op 4 en vervolgens op 5.
4. Druk op 5 en vervolgens op 3 om de toegangsmodus met dubbele
beveiliging te selecteren.
Presenteer de kaart en typ vervolgens de pincode om toegang te
verkrijgen.
LCSP op EWS aansluiten
fig.2
fig.3
fig.4
fig.2
fig.3
fig.4
www.xprgroup.com
LCSP-MF
12
Connecting LCSP to V 200, E 5, E 7, INOX99,I X X VKP99
UK
FR
ITA
CODIX Connection
If LCSP needs to be connected to Vi200, EX5, EX7, INOX99, VKP99, then Codix protocol should be applied to the Keypad.
1. Enter the Menu of LCSP. Press B+000000.
2. Press 6, press 5. The Preset, programs the LCSP Keypad to work in Codix Protocol compatible with Vi200, EX5, EX7,
INOX99 or VKP99.
3. Adjust the PIN Length. Press 4, then press 5. (in this case the length will be 5 digits).
Note: The Keypad can work with any length if it is set with pressing 4 then 0. In this case the PIN Code must be typed with “A”
in the end. (example: if the PIN code is 123, in operation must be pressed 123+A).
Ones the Keypad is set, enroll the User in the Master Unit (Vi200, EX5, EX7, INOX99, VKP99) as described in the manual of
this Master Units.
Press 000+B.
Press 0
Press 01
Enter the Code
Confirm with A
Exit the Menu with B
ESP
D
NL
Connessione della LCSP a VI200,EX5,EX7,INOX99,VKP99
LCSP mit VI200, EX5, EX7, INOX99, VKP99 verbinden
Connexion du LCSP au VI200, EX5, EX7, INOX99, VKP99
Conexión del LCSP a VI200, EX5, EX7, INOX99, VKP99
LCSP op VI200, EX5, EX7, INOX99, VKP99 aansluiten
Si le LCSP doit être connecté au Vi200, EX5, EX7, INOX99, VKP99, le protocole Codix doit être appliqué au clavier.
1. Entrez dans le menu du LCSP. Entrez B+000000.
2. Appuyez sur la touche 6, puis sur 5. Les préréglages programment le clavier du LCSP afin qu’il fonctionne à travers le
protocole Codix compatible avec Vi200, EX5, EX7, INOX99 ou VKP99.
3. Réglez la longueur du PIN. Appuyez sur la touche 4, puis sur 5 (dans ce cas, la longueur sera de 5 chiffres).
Remarque: le clavier peut fonctionner avec n’importe quelle longueur si cette option est définie en appuyant sur la touche 4,
suivie de la touche 0. Dans ce cas, le code PIN doit être saisi suivi de la lettre « A » à la fin du code. (Exemple : si le code PIN
est 123, 123+A doit être saisi.)
Une fois le clavier défini, enregistrez l’utilisateur sur l'unité principale (Vi200, EX5, EX7, INOX99, VKP99) comme indiqué dans
le manuel de ces unités.
Entrez 000+B.
Entrez 0
Entrez 01
Entrez le code
Confirmez le code en entrant la lettre A
Quittez le menu en entrant B
www.xprgroup.com
LCSP-MF
13
LCSP
1
4
7
A
2
5
8
0
3
6
9
B
GND
12 VDC
Vi200
16
17
18
Codix
max. 50m
LCSP
LCSP
LCSP
Vi200
codix
codix
K
K
K
D
D
D
codix
codix

Se la tastiera LCSP deve essere connessa a Vi200, EX5, EX7, INOX99, VKP99, il protocollo Codix deve essere applicato alla
tastiera.
1. Accedere al menu della LCSP. Premere B+000000.
2. Premere 6, premere 5. Il preset programma la tastiera LCSP per funzionare con protocollo Codix compatibile con Vi200,
EX5, EX7, INOX99 o VKP99.
3. Impostare la lunghezza del PIN. Premere 4, quindi premere 5. (in questo caso la lunghezza sarà di 5 cifre).
Nota: La tastiera può funzionare con qualsiasi lunghezza premendo prima 4, poi 0. In questo caso il codice PIN deve essere
inserito con una "A" al termine. (esempio: se il codice PIN è 123, deve essere inserito 123+A).
Una volta che la tastiera è impostata, immettere l'utente nell'unità principale (Vi200, EX5, EX7, INOX99, VKP99) come descritto
nel rispettivo manuale.
Premere 000+B.
Premere 0
Premere 01
Immettere il codice
Confermare con A
Uscire dal menu con B
Si es necesario conectar el LCSP a Vi200, EX5, EX7, INOX99, VKP99, se debe aplicar el protocolo Codix al teclado.
1. Acceda al menú del LCSP. Introduzca B+000000.
2. Pulse 6 y, a continuación, 5. El ajuste predeterminado programa el teclado LCSP para que funcione con el protocolo Codix
compatible con Vi200, EX5, EX7, INOX99 o VKP99.
3. Ajuste la longitud del PIN. Pulse 4 y, a continuación, 5 (en este caso la longitud será de 5 dígitos).
Nota: el teclado puede funcionar con cualquier longitud, lo que se define pulsando 4 y, a continuación, 0. (ejemplo: si el código
PIN es 123, al operar se deberá introducir 123+A).
Una vez definido el teclado, registre el usuario en la unidad maestra (Vi200, EX5, EX7, INOX99, VKP99), tal y como se
describe en el manual de estas unidades maestras.
Pulse 000+B.
Pulse 0
Pulse 01
Introduzca el código
Confirme con A
Salga del menú con B
CODIX Connection
www.xprgroup.com
LCSP-MF
14
Connecting LCSP to V 200, E 5, E 7, INOX99,I X X VKP99
UK
FR
ITA
ESP
D
NL
Connessione della LCSP a VI200,EX5,EX7,INOX99,VKP99
LCSP mit VI200, EX5, EX7, INOX99, VKP99 verbinden
Connexion du LCSP au VI200, EX5, EX7, INOX99, VKP99
Conexión del LCSP a VI200, EX5, EX7, INOX99, VKP99
LCSP op VI200, EX5, EX7, INOX99, VKP99 aansluiten
LCSP
1
4
7
A
2
5
8
0
3
6
9
B
GND
12 VDC
Vi200
16
17
18
Codix
max. 50m
LCSP
LCSP
LCSP
Vi200
codix
codix
K
K
K
D
D
D
codix
codix

Für die Verbindung des LCSP mit VI200, EX5, EX7, INOX99, VKP99 muss das Codix-Protokoll beim Tastenfeld angewandt
werden.
1. Das LCSP-Menü aufrufen. „B+000000“ drücken.
2. „6“ und dann „5“ drücken. Über die Voreinstellungen wird die LCSP-Tastatur für den Betrieb mit VI200, EX5, EX7, INOX99
oder VKP99 über Codix Protokoll programmiert.
3. PIN-Code-Länge festlegen. Erst „4“ und dann „5“ drücken (in diesem Fall ist der Code fünfstellig).
Hinweis: Über die Tastatur kann ein PIN-Code beliebiger Länge eingegeben werden, wenn „4“ und „0“ gewählt wurde. In
diesem Fall muss der PIN-Code jedoch mit „A“ bestätigt werden. (Beispiel: Lautet der PIN-Code „123“, muss „123+A“
eingegeben werden).
Nachdem das Tastenfeld konfiguriert ist, wird der Benutzer an der Master-Einheit (Vi200, EX5, EX7, INOX99, VKP99) wie im
entsprechenden Handbuch beschrieben erfasst.
„000+B“ drücken.
„0” drücken.
„01“ drücken.
Code eingeben.
Mit „A“ bestätigen.
Menü mit „B“ verlassen.
Als LCSP op Vi200, EX5, EX7, INOX99, VKP99 moet worden aangesloten, moet het Codix-protocol op het toetsenpaneel
worden toegepast.
1. Open het menu van LCSP. Druk op B+000000.
2. Druk op 6 en vervolgens op 5. De standaardinstelling programmeert het LCSP-toetsenpaneel voor gebruik in combinatie met
het Codix-protocol dat met Vi200, EX5, EX7, INOX99 of VKP99 compatibel is.
3. Pas de lengte van de pincode aan. Druk op 4 en vervolgens op 5. (In dit geval wordt een lengte van 5 cijfers gebruikt.)
Opmerking: het toetsenpaneel kan met elke gewenste lengte werken als het wordt ingesteld door op 4 en vervolgens op 0 te
drukken. In dit geval moet na de pincode een "A" worden ingevoerd. (Voorbeeld: als de pincode 123 is, moet tijdens het gebruik
123+A worden ingevoerd.)
Nadat het toetsenpaneel is ingesteld, registreert u de gebruiker in de mastereenheid (Vi200, EX5, EX7, INOX99, VKP99). Volg
hiervoor de beschrijving in de handleiding van de desbetreffende mastereenheid.
Druk op 000+B.
Druk op 0
Druk op 01
Voer de code in
Druk op A om deze te bevestigen
Druk op B om het menu te sluiten
LCSP
1
4
7
A
2
5
8
0
3
6
9
B
GND
12 VDC
Vi200
16
17
18
Codix
CODIX Connection
www.xprgroup.com
LCSP-MF
15
Connecting LCSP to V 200, E 5, E 7, INOX99,I X X VKP99
UK
FR
ITA
ESP
D
NL
Connessione della LCSP a VI200,EX5,EX7,INOX99,VKP99
LCSP mit VI200, EX5, EX7, INOX99, VKP99 verbinden
Connexion du LCSP au VI200, EX5, EX7, INOX99, VKP99
Conexión del LCSP a VI200, EX5, EX7, INOX99, VKP99
LCSP op VI200, EX5, EX7, INOX99, VKP99 aansluiten
max. 50m
LCSP
LCSP
LCSP
Vi200
codix
codix
K
K
K
D
D
D
codix
codix

www.xprgroup.com
LCSP-MF
16
ver. b3
Warranty: VPC warrants its products to be free from defects in material and workmanship for 24 months from the date of shipment. The product is to be
installed in accordance with VPC's instructions and the unit should not be modified or tampered with. VPC does not assume any responsibility for
damages arising from misuse of the product. VPC's sole responsibility is limited to the repair or replacement when the product is sent to VPC ’s facility.
Drève Richelle 161, Bâtiment G, WOP - Bte 34, 1410 Waterloo - Belgium
Garantie: VPC garantit ses produits au regard des défauts matériels et ce pendant 24 mois à compter de la date d'expédition. Le produit doit être installé
conformément aux instructions de VPC et l'unité ne doit pas être modifiée ou manipulée. VPC n'endosse aucune responsabilité pour les dommages
résultant d'une mauvaise utilisation du produit. La responsabilité de VPC se limite à la réparation ou à son remplacement, le produit ayant été retourné à
VPC.
Drève Richelle 161, Bâtiment G, WOP - Bte 34, 1410 Waterloo - Belgium
Garanzia: VPC garantisce che i suoi prodotti sono esenti da difetti dei materiali e di fabbricazione per 24 mesi dalla data di consegna. Il prodotto deve
essere installato secondo le istruzioni fornite da VPC e l'unità non deve essere modificata o manomessa. VPC non si assume alcuna responsabilità per
danni derivanti da un utilizzo errato del prodotto. La responsabilità di VPC si limita alla riparazione o alla sostituzione del prodotto, previo l'invio di
quest'ultimo allo stabilimento VPC.
Drève Richelle 161, Bâtiment G, WOP - Bte 34, 1410 Waterloo - Belgium
Garantía: VPC garantiza que sus productos carecen de defectos de materiales y mano de obra durante 24 meses a partir de la fecha de expedición. El
producto debe instalarse de acuerdo con las instrucciones de VPC y no debe modificarse ni manipularse indebidamente la unidad. VPC no asume
ninguna responsabilidad por daños surgidos por el mal uso del producto. La única responsabilidad de VPC se limita a la reparación o sustitución, si se
envía el producto a las instalaciones de VPC.
Drève Richelle 161, Bâtiment G, WOP - Bte 34, 1410 Waterloo - Belgium
Garantie: VPC garantiert für die Dauer von 24 Monaten ab Lieferdatum, dass die Produkte keine Material- und Verarbeitungsfehler aufweisen. Das
Produkt ist gemäß den Anweisungen von VPC zu installieren. Änderungen oder andere Eingriffe sind untersagt. VPC übernimmt keine Haftung für
Schäden, die infolge einer unsachgemäßen Verwendung des Produkts entstanden sind. Die Gewährleistung beschränkt sich ausschließlich auf die
Reparatur oder den Austausch des Produktes, sofern dieses an die Betriebsstätte von VPC eingesandt wurde.
Drève Richelle 161, Bâtiment G, WOP - Bte 34, 1410 Waterloo - Belgium
UK
ITA
ESP
D
Garantievoorwaarden: VPC garandeert dat de producten vrij zijn van materiaal- en of productiefouten gedurende de tijd van 24 maanden na
verzending. Het product dient volgens de gelden normen en installatievoorschriften, opgesteld door VPC, te worden behandeld en gemonteerd. Bij
modificatie van het product vervalt per direct de garantie. VPC neemt geen verantwoordelijkheid voor schade voortvloeiende uit onechtgebruik van het
product. De verantwoording van VPC beperkt zich tot het repareren en of vervangen van het product mits deze geretourneerd zijn naar VPC.
Drève Richelle 161, Bâtiment G, WOP - Bte 34, 1410 Waterloo - Belgium
NL
FR
UK
This product herewith complies with requirements of EMC directive 2014/30/EU. In addition it complies with RoHS directive EN50581:2012
ITA
Il presente prodotto è conforme ai requisiti della direttiva EMC 2014/30/UE. È, inoltre, conforme alla direttiva RoHS EN50581:2012
D
NL
Le produit décrit en cela est conforme aux exigences de la directive CEM 2014/30/EU. En outre, il est conforme à la directive RoHS EN50581:2012
FR
ESP
Este producto cumple con los requisitos de la directiva EMC 2014/30/UE. Además cumple con la normativa RoHS, directiva EN50581:2012
Dieses Produkt erfüllt die Anforderungen der EMV Richtlinie 2014/30/EU, sowie die RoHS Richtlinie EN50581:2012.
Dit product voldoet hierbij aan de vereisten van EMC-richtlijn 2014/30/EU. Het voldoet ook aan RoHS-richtlijn EN50581:2012
 Loading...