


20
www.xprgroup.com
This product herewith complies with requirements of EMC directive 2014/30/EU. In addition it complies with
RoHS directive EN50581:2012
Visual Plus Corporation, s.a.
Drève Richelle 161
WOP G - Bte 34
1410 Waterloo - Belgium
www.xprgroup.com
User Manual
v.a3
EN
B100-SA-KIT Standalone Biometric Kit
B100-SA
Standalone Biometric Reader
RTT
1 Relay Remote Unit
and request-to-exit Buon

2
www.xprgroup.com
1.0 INTRODUCTION
2.0 MOUNTING
3.0 SPECIFICATIONS
4.0 A DPPLICATION IAGRAM
5.0 WIRING
6.0 R S TECOMMENDED WIPING ECHNIQUE
6.1 Tapping the sensor
6.2 Scrolling the sensor up and down
7.0 INDICATION
8.0 Q PUICK ROGRAMMING
8.1 Adding Master Finger and delete all users
8.2 Add User In Group 1
8.3 Add User In Group 2
8.4 Delete user
8.5 Delete All Users in Group 1
8.6 Delete All Users in Group 2
9.0 P- B EA RRUAIRING IOMETRIC R DER AND EMOTE ELAY NIT
9.1 Pairing B100-SA with DINRTT
9.2 Pairing B100-SA with RTT
10.0 K D UEEP THE OOR NLOCK
11.0 B100-SA P MROGRAMMING ENU
Adding Users11.1
11.2 Delete User
11.3 Delete All users
11.4 Delete Group of Users
11.5 Add Administrator
11.6 Delete Administrator
11.7 Settings
Entry Mode and Backlight11.7.1
11.7.2 Buzzer Sound and Remote Relay Touch Function
11.8 Set Door Relay Time
2
3
3
4
4
5
5
5
5
6
6
7
7
7
7
7
8
8
8
8
9
9
10
10
11
12
13
14
15
16
17
Contents
..............................................................
..................................................
..............................................................
.....................................................
.........................................................................
...........................................
............................................................
.................................................
....................................................................
....................................................
.........................................
...........................................................
.........................................................
...................................................
..............................
...........................................................
.................................................
.....................................................................
.....................................................................
...................................................................
.............................................................
...............................................................
.............................................................
.........................................................................
.....................................................
....................................
...........................................................
...........................................................
...............................................................
.......................................................
.......................................................
B100-SA is a simple one-door standalone biometric system. The reader can store up to 97 finger templates, it has one
relay output and one exit button input. If secure installation is needed, the reader can be connected to remote relay unit at
secured area, which also plays the role of request-to-exit push button. Complete setup and programming can be done by
scrolling and tapping on the sensor.
The sensor incorporates dedicated sensing hardware to facilitate the detection of “spoofing” attacks based on fake
fingers. This data is embedded into the image data stream, and is processed on the processor. The system is capable of
detecting and defeating well-known fake finger mechanisms, such as molded “gummy” fingers.
RTT is remote relay control unit for B100-SA(DI NB100-SA) biometric reader. If secure installation is needed, the
biometric reader can be connected to remote relay unit at secured area, which also plays the role of exit push button. It has
one relay output and one exit button input.
1.0 INTRODUCTION
19
www.xprgroup.com

18
www.xprgroup.com
4.
3
www.xprgroup.com
2.0 MOUNTING
Donot installthe device andcabling closeto a sourceof strongelectro-magnecfields likeradio-transmi ngantenna.
Donot place thedevice nearor above heang equipments.
Ifcleaning, do notspray orsplash wateror other cleaningliquids butwipe it outwith smoothcloth or towel.
Donot let childrentouch thedevice withoutsupervision.
Notethat ifthe sensor iscleaned bydetergent, benzeneor thinner,the surfacewill bedamaged and thefingerprint can'tbe entered.
If thebiometric reader is installedand used outdoor, thereader MU ST befi ed with the MC-MINI metal cover available inour accessories in order toprotect the sensor from
direct rainfall.The operang temperatureof the product is between -20ºC - + 50ºC. Ifthe reader is installed in an environment wherethe temperature can drop below -10ºC
or/and ifthe sensor could only be exposedto direct sunlight, it is stronglyrecommended to install the readerinside a third party sealed wallmount box (fi ed withaddional
heater if very lowtemperature) to keep a constant sensor levelperformance. X PR™ cannot guarantee thefunconality of the product if measures and advice beforeare not
followed.
It is also strongly recommended to use double technology biometric readers when use outdoor tooffer first higher security but also the possibilityto use different readers
dependingon users.
3.0 SPECIFICATIONS
Fingerprint Capacity:
Output:
Push Button Input:
Door Open Time:
Entry Mode:
Programming:
Master/Admin Fingers:
Image resolution:
Backlight ON/OF F:
Buzzer ON/OF F:
Firmware upgrade:
Current Consumption:
Power Supply:
Indication:
Mounting:
IP Factor:
Storage/Operating Temperature:
Storage/Operating Humidity:
Dimensions(mm):
97 templates
1 x Relay ( )1 A /24V A C/DC
Yes
Pulse (1, 3, 5, 10, 20, 30, 60sec) or Toggle(ON/OFF)
Finger
By scrolling and tapping on the sensor or by keypad
1 Master and 2 Admin Fingers
Up to 508 DPI
Yes
Yes
via converter and windows applicationR 485S
100 mA max.
9-14 V DC
Tricolor tatus LED and 4 x Programming LEDsS
Flush mount
IP65
-20°C to +50°C
5% to 93% RH without condensation
xx92 51 25
B100-SA
1.
Cable
Ø6.0(3NoS)
30mm
5mm
2.
3 (3 x 30mm)
3.
1 (M3 x 6mm)
MC-MINI
Output:
Push Bu on Input:
Door Time:
Backlight ON/OF F:
Buzzer ON/OF F:
Current Consumpon:
Mounng:
IP Factor:
Operang Temperature:
Dimensions:
1 x Relay (2A/24V AC/DC)
1
Pulse (1 to 60sec) or Toggle (ON/OFF)
Yes
Yes
60 mA
surface mount
IP40 (indoor use only)
-20°C to +50°C
92 x 51 x 25
RTT
S DIN B100-SAPECIFICATIONS
SDINRTTPECIFICATIONS

4
www.xprgroup.com
4.0 A DPPLICATION IAGRAM
B100-SA
Standalone Biometric Reader
RTT (Oponal)
1 Relay Remote Unit
and request-to-exit Buon
Secured Area
Outside
5.0 WIRING
NC
COM
NO
Tamp
Blue
Yellow
Red
Black
Pink
Violet
Orange
Gray
White
PB
R 485S
+
_
12VDC
POWER SUPPLY
+
_
NC
COM
GND (PB)
PB
+
_
Electro Magnetic Lock
Green
Blue
Yellow
Red
Black
Pink
Violet
Orange
Gray
White
Green
Relay
(2A)
Push Button
1N4001
Diode
12V DC
GND
A
B
R 485 (max. 50m)S
Wiring B100-SA + R TT (Remote Relay Unit)
Wiring B100-SA
12 VDC
+
-
1N4007
+
-
RTT
Black
Red
Pink
Violet
Black
Brown
Pink
Violet
Red
White
Yellow
COM
NO
GND
12V out
A
(RS485)
B (RS485)
B100-SA
Pink
Violet
Brown
Red
Black
White
Yellow
Gray
Green
Orange
Blue
+12V
GND
NO
COM
A
B
NC
P1B
TAMP
TAMP
RS 485
Relay
(2A)
+12V Out
Power Supply
B100-SA
Standalone Biometric Reader
RTT
1 Relay Remote Unit
and request-to-exit Buon
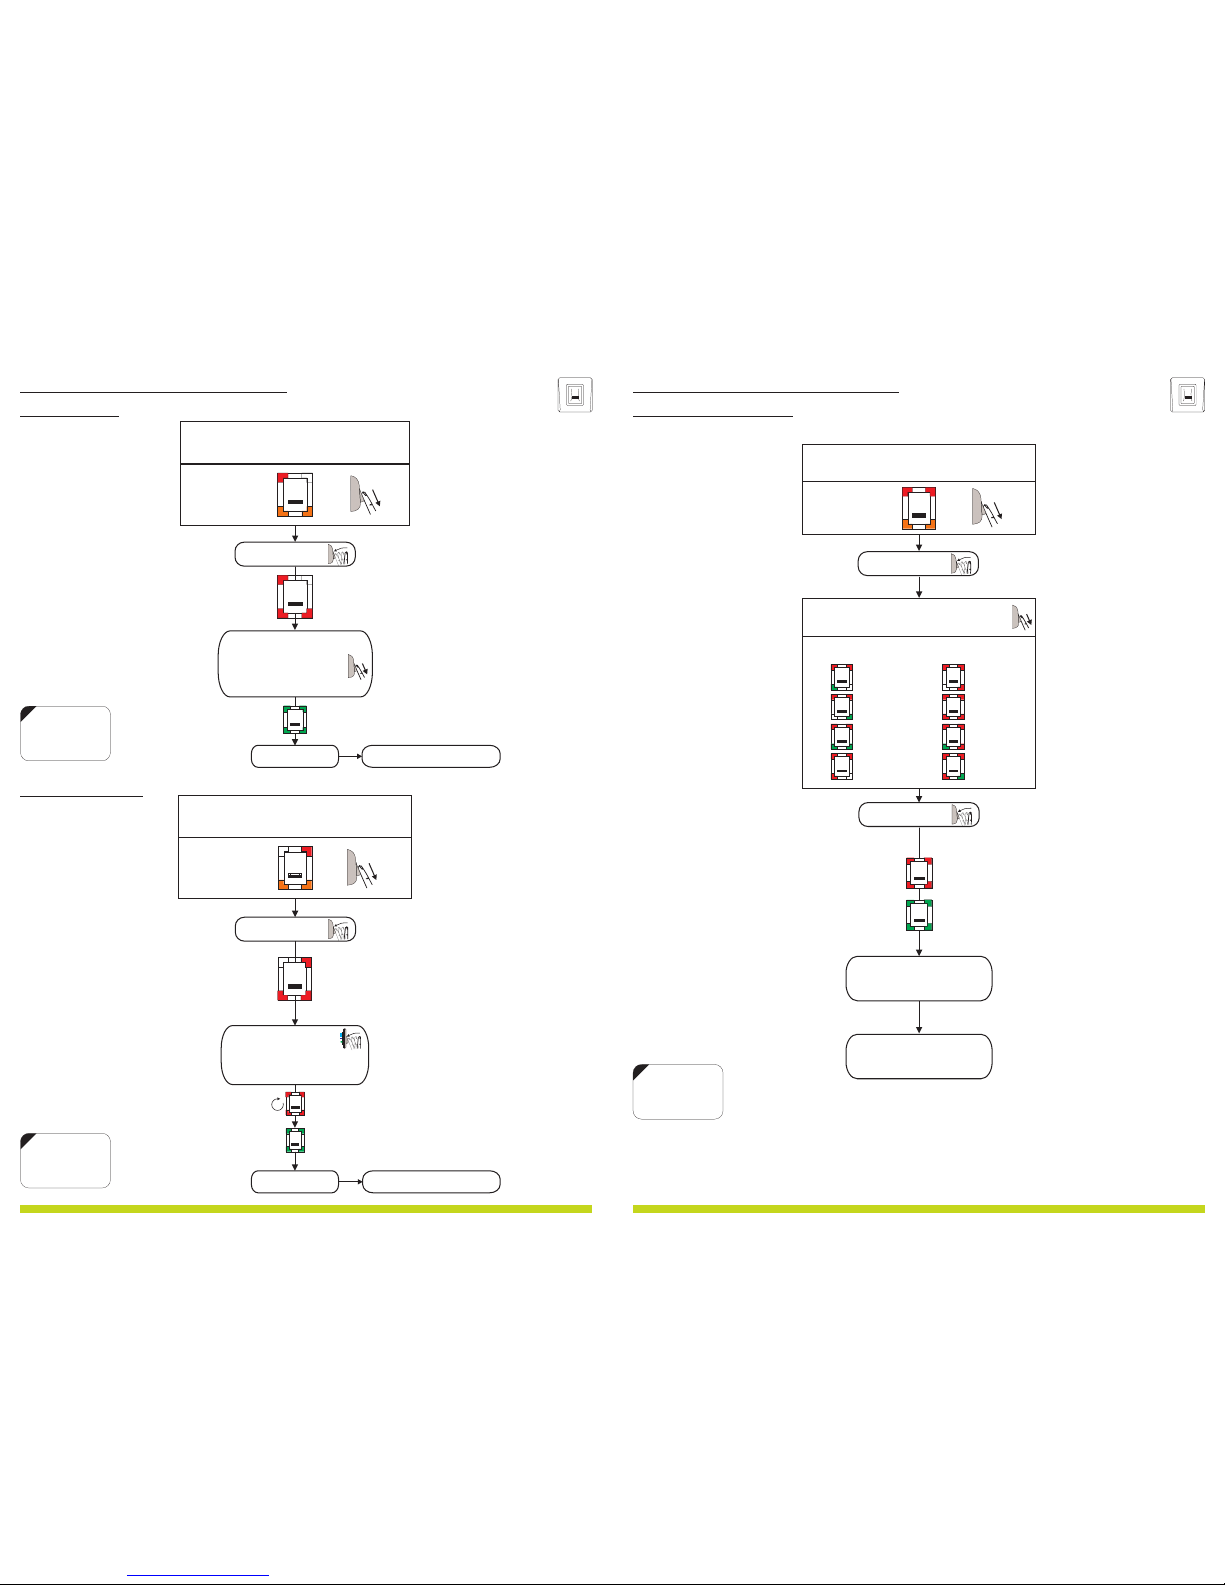
Relay1 time
(for Relay 1 in B100-SA, RTT and DINRTT )
Swipe the Master/Admin
finger 8 times
Select relay open time
1 sec
3 sec
5 sec
10 sec
20 sec
30 sec
60 sec
Toggle
Scroll down to select:
OK Beep
Back to MAIN MENU
Blinking row >
BL
BL
BL
BL
BL
BL
BL
BL
Relay2 time
(for Relay 2 in DINRTT Remote Relay Unit)
Select relay open time
1 sec
3 sec
5 sec
10 sec
20 sec
30 sec
60 sec
Toggle
Scroll down to select:
OK Beep
Back to MAIN MENU
Blinking row >
BL
BL
BL
BL
BL
BL
BL
BL
11.8 Set Door Relay Time
11.0 B100-SA P MROGRAMMING ENU
17
www.xprgroup.com
Swipe the Master/Admin
finger 9 mes
Tap sensor
Tap sensor
x 9
x 8
Tap sensor
Tap sensor
NOTE:
Swipe UPWAR DS
to exit the MENU
Example:
Task: Put Relay1 to stay acvated 10 seconds.
Scroll Master Finger 8 mes, tap, scroll 3mes, tap, swipe UP to exit.

Buzzer ON/OFF
OK Beep
Buzzer sound
Back to MAIN MENU
OK Beep
1 ON
2 OFF
Back to MAIN MENU
Remote Relay Touch Function
Touch Button ON/OFF
Scroll down to select:
Scroll down to select:
Reader OFF
Remote OFF
All ON
All OFF
11.7.2 Buzzer Sound and Remote Relay Touch Funcon
16
www.xprgroup.com
11.0 B100-SA P MROGRAMMING ENU
11.7 Se ngs
NOTE:
Swipe UPWAR DS
to exit the MENU
Example:
Task: Put the BuzzerO FF.
Scroll Master Finger 10 mes, tap, scroll 4mes, tap, scroll ones, tap,, swipe UP to exit.
Tap sensor
Tap sensor
6.0 R S TECOMMENDED WIPING ECHNIQUE
Follow thebelow instructionsfor correctfinger swiping
Starting from the first finger joint, place the selected finger on the swipe
sensor andmove itevenly towardsoneself in onesteady movement.
Result:
For a valid swipe: Tricolour Status LED turns green + OK Beep(short + long
beep)
For aninvalid or misreadswipe: Tricolour StatusLED turns red+ Error Beep
( 3short beeps)
5
www.xprgroup.com
6.1 Taping the sensor
Tap the sensor to enter Submenu or to confirm a command
Enter and confirm
6.2 Scrolling the sensor up and down
Scroll the sensor DOWN to navigate the programming menu
Scroll the sensor UP to exit the programming menu
Navigate the Programming Menu
Exit the Programming Menu
7.0 INDICATION
4 x Tricolor Programming LEDs
(red, green, orange)
Tricolor Status LED
Green - Access Granted
Red - Access denied
Orange - Idle Mode
OK Beep - short + long beep
- 3 short beepsError Beep
Swipe Again - 2 short beeps

6
www.xprgroup.com
8.0 Q PUICK ROGRAMMING
1.Push dip switch no.2 in position ON.
2.Reset the Power of the device.
3.Wait for One long + mulple short beeps
4.Put the dip switch in position OFF.
(short beeps will stop)
5.Wait for the bo om row LEDs to blink in Orange.
6.Swipe the Master finger . (Unl Ok Beep)min.6 mes
Note: Aer enrolling the Master finger the device will auto-Reset (wait for 7 seconds and the OK beep).
Note: This procedure also deletes all the users and administrators previously enrolled.
<BlinkingBlinking>
8.1 Adding Master Finger and delete all users
1. There is 1 Master Finger. The master finger can enroll/delete user and all the other se ngs. The Master finger
can be changed ONLY with the jumper.
2. There are 2 Administrator Fingers. The administrator can do all the things that Master can do. The Master can
delete the Administrator, but the Administrator can not delete the Master.
3. The User can be assigned to one of the 8 available User Groups. With the Quick programming feature, the Users
are assigned in Group 1 or Group 2. For most of the installaons 2 groups are enough and can be used as: Group
1 for permanent residents, Group 2 for guest and visitors.
4. The user can be deleted by swiping its user finger or by deleng the group in which that user is enrolled. Once
the Group of users is deleted, all the users within that group will be deleted.
5. The Groups are not limited by the number of users. (ex. Group 1 can contain 20 users, Group 2 can contain 70
users, but the total number must remain bellow 97...)
x 6
12
ON
12
ON
No.2
No.2
OK Beep
Entry MODE
Back to MAIN MENU
Scroll down to select:
Finger
Finger OR PIN
Finger AND PIN
Finger OR Card
Finger AND Card
Finger ON Card
BL
BL
BL
BL
BL
BL
By swiping finger select entry mode
11.0 B100-SA P MROGRAMMING ENU
11.7.1 Entry Mode and Backlight
11.7 Se ngs
15
www.xprgroup.com
Backlight ON/OFF
OK Beep
Reader OFF
Backlight
Back to MAIN MENU
Scroll down to select:
Remote OFF
All ON
All OFF
NOTE:
Swipe UPWAR DS
to exit the MENU
Example:
Task: Set the Reader to work in“Finger and Card” mode
Scroll Master Finger 10 mes, tap, scroll twice, tap, scroll 4mes, tap, swipe UP to exit.
Tap sensor
Tap sensor

11.0 B100-SA P MROGRAMMING ENU
Continues on the
next 2 pages
Sensor sensitivity
Sensor security
Entry mode
Remote Relay
Touch Function
Buzzer
Backlight
Reserved
Swipe the finger to select:
Blinking row >
BL
BL
BL
BL
BL
BL
BL
Swipe the Master/Admin finger unl10 mes
the light pa ern on figure.7 is shown
Figure.7
By swiping finger select appropriate light paern
11.7 Se ngs
14
www.xprgroup.com
x 10
Entry Mode - used when addional proximity or keypad reader is connected
Remote Relay Touch Funcon - Enabling/Disabling the Touch Buon Funcon in the remote relay Unit
Buzzer - Enabling/Disabling the Buzzer
Backlight - Enabling/Disabling the Backlight
go to next page
NOTE:
Swipe UPWAR DS
to exit the MENU
Tap sensor
Tap sensor
8.2 Add User In Group 1
8.5 Delete All Users in Group 1
8.6 Delete All Users in Group 2
1. Swipe the Master or Admin Finger twice
2. Swipe the user finger min. (unl Ok Beep)6 mes
1. Swipe the Master or Admin finger ,3 mes
2. Wait for the light pa ern on figure.46 seconds
3. Swipe the Master or Admin finger once more
Figure.1
Figure.2
6 sec.
6 sec.
7
www.xprgroup.com
1. Swipe the Master or Admin Finger
2. Swipe the user finger min. (unl Ok Beep)6 mes
Master Finger x 1
User Finger x 6
8.3 Add User In Group 2
Master Finger x
2
User Finger x 6
8.4 Delete User
Figure.1
1. Swipe the Master or Admin Finger
2. Swipe the user finger (already enrolled)
Master Finger x
1
User Finger x 1
Master Finger x 3
Master Finger x 1
wait 6 seconds
1. Swipe the Master or Admin finger ,4 mes
2. Wait for the light pa ern on figure.66 seconds
3. Swipe the Master or Admin finger once more
Master Finger x
4
Master Finger x 1
wait 6 seconds
Note: Allfingers that are enrolled in Group 2 will be deleted.
Note: Allfingers that are enrolled in Group 1 will be deleted.
With this, the quick programming is completed. The system is now operaonal with default value for Door Open Time of 3
seconds.
For more comprehensive programming, refer to the “ ” secon.B100-SA Programming
If you make any mistake or you just simply want to Quick Programming, wait for the meout of .exit 10 seconds
Figure.4
Figure.6

B (RS485)
A (RS485)
9.0 P - B EA R R UAIRING IOMETRIC R DER AND EMOTE ELAY NIT
1. Close the Jumper. DINRTT beeps connuously and the red led
blinks.
2. Open the Jumper
3. Wait for Beep + OK Beep (short + short + long beep)
Aer the OK beep, the coupling is done.
9.1 Pairing B100-SA with D INRT T
P2B
GND
P1B
GND
N1C
COM
N1O
N2C
COM
N2O
A
B
TAMP
TAMP
R485S
GND
+12V
GND
+12V
Exit Button
(NO)
1N4007
+
-
12 VDC
+
-
DINRTT
+12V
+12V
GND
GND
GND
P1B
N1O
COM
12
9.2 Pairing B100-SA with RTT
1. Put Dipswitch No.1 to posion ON. RTT beeps connuously and the red led blinks.
2. Put Dipswitch No.1 to posion OF F.
3. Wait for Beep + OK Beep (short + short + long beep)
Aer the OK beep, the coupling is done.
12
ON
If secure installation is needed, the reader can be connected to remote relay unit at secured area, which also plays the
role of request-to-exit push button. Follow the instructions bellow to pair(couple) both devices or refer to the Remote
Relay’s Manual.
10.0 K D UEEP THE OOR NLOCKED
User Finger x 2
Swipe ANY enrolled finger twice (within 7 seconds) and the Door will stay unlocked, unl
valid finger is swiped.
While the door is unlocked the tricolor status LED stays green.
8
www.xprgroup.com
12 VDC
+
-
1N4007
+
-
RTT
Black
Red
Pink
Violet
Black
Brown
Pink
Violet
Red
White
Yellow
COM
NO
GND
12V out
A
(RS485)
B (RS485)
B100-SA
Black
Red
Pink
Violet
B
R485S
12 VDC
+
-
Select Admin nr.
Admin 1
Admin 2
Scroll down to select:
BL
BL
BL
OK Beep
deleting..
Back to MAIN MENU
Swipe the Master/Admin finger unl13 mes
the light pa ern on figure.11 is shown
Figure.11
11.6 Delete Administrator
11.0 B100-SA P MROGRAMMING ENU
13
www.xprgroup.com
x 13
- There is 1 Master Finger. The masterfinger can enroll/delete user and all the other se ngs.
- The Master finger can be changed ONLY with the jumper.
- There are 2 Aministrator Fingers. The administrator can do all the things that Master can do. The Master can delete the Administrator,
but the Administrator can not delete the Master.
NOTE:
Swipe UPWAR DS
to exit the MENU
Tap sensor
Tap sensor

Select Admin nr.
(Orange Blinking)
Admin 1
Admin 2
Scroll down to select:
BL
BL
BL
Back to MAIN MENU
(to Add User menu)
Swipe the Master/Admin finger unl12 mes
the light pa ern on figure.10 is shown
Figure.10
Swipe the Admin finger (Unl Ok beep)min.6 mes.
11.5 Add Administrator
11.0 B100-SA P MROGRAMMING ENU
12
www.xprgroup.com
x 12
x 6
- There is 1 Master Finger. The masterfinger can enroll/delete user and all the other se ngs.
- The Master finger can be changed ONLY with the jumper.
- There are 2 Aministrator Fingers. The administrator can do all the things that Master can do. The Master can delete the Administrator,
but the Administrator can not delete the Master.
NOTE:
Swipe UPWAR DS
to exit the MENU
Tap sensor
Tap sensor
Select User Group
(Orange Blinking)
Group 1
Group 2
Group 3
Group 4
Group 5
Group 6
Group 7
Group 8
Assign Relay Output
Relay 1
Relay 2
Both
None
Swipe the finger to select:
Swipe the finger to select:
BL
BL
BL
BL
BL
BL
BL
BL
BL
BL
BL
BL
BL
BL
Swipe the Master/Admin finger unl5 mes
the light pa ern on figure.9 is shown
Figure.9
Swipe the user finger for modeFinger min.6 mes.
11.1 Adding Users
11.0 B100-SA P MROGRAMMING ENU
9
www.xprgroup.com
x 5
Tap sensor
NOTE:
Swipe UPWAR DS
to exit the MENU
Example:
Task: Add a user in Group2, that will acvate Relay1.
Scroll Master Finger 5 mes, tap, scroll ones, tap, tap, swipe user finger 6 mes, swipe UP to exit.
Tap sensor
Tap sensor
x 6
Swipe finger
OK Beep
Blinking row >
Back to MAIN MENU
Swipe the Master/Admin finger 7 mes
unl the light pa ern on figure.12 is shown
Figure.12
11.2 Delete User
11.0 B100-SA P MROGRAMMING ENU
10
www.xprgroup.com
x 7
11.3 Delete All Users
Blinking row >
Tap sensor
to confirm or swipe UP
to Cance
l
Swipe the Master/Admin finger unl11 mes
the light pa ern on figure.14 is shown
Figure.14
x 11
deleting...
OK Beep
Back to MAI N ME NU
Note: The Master and the Administrators
will not be deleted
NOTE:
Swipe UPWAR DS
to exit the MENU
NOTE:
Swipe UPWAR DS
to exit the MENU
Tap sensor
Tap sensor
Select User Group to Delete
Swipe the finger to select:
OK Beep
Group 1
Group 2
Group 3
Group 4
Group 5
Group 6
Group 7
Group 8
BL
BL
BL
BL
BL
BL
BL
BL
Back to MAIN MENU
Swipe the Master/Admin finger unl6 mes
the light pa ern on figure.13 is shown
Figure.13
11.4 Delete Group of Users
11.0 B100-SA P MROGRAMMING ENU
11
www.xprgroup.com
x 6
Note: All fingers that are enrolled in the Group will be deleted.
NOTE:
Swipe UPWAR DS
to exit the MENU
Example:
Task: Delete all users in Group3
Scroll Master Finger 6 mes, tap, scroll twice, tap, swipe UP to exit.
Tap sensor
Tap sensor
 Loading...