


Contents pages
Introduction...................................................... 2
Description ....................................................... 5
Assembly .......................................................... 6
Alkaline or Rechargeable Batteries,
Battery Life, Battery Low Alert........................ 8
Controls .......................................................... 10
Start I/0, Sensitivity ......................................................... 10
Iron Threshold................................................................... 11
Ground ............................................................................ 12
Silencer............................................................................ 13
FREQ. SHIFT. ................................................................... 14
Iron Volume...................................................................... 15
Multi Tones Informations............................... 16
Detecting Techniques ................................... 18
Care Instructions............................................ 19
Trouble Shooting Problems............................ 21
Advice to Detectorists .................................. 22
Specifications................................................. 23
XP Accessories .............................................. 24
Warranty conditions
1

INTRODUCTION
1
C
ONGRATULATIONS ON PU RCHASING AN XP METAL DETECTOR
AND WELCOME TO THE WORLD OF RESEARCH AND
EXPLORATION!
You have invested in a high tech detector with extreme performance, designed and
developed in France. Therefore, you are taking part in the development of the
research in the field of metal detecting undertaken by our company, we thank you
for that.
GMAXX II is a clever combination of analog/digital technology and
benefits from the latest advances in the field. Our knowledge of that
technology has led us to integrate a microprocessor to analyze
discrimination signals. This microprocessor, faster for discrimination
signal analysis, gives our detectors an increased power and stability,
as well as a better rejection of unwanted targets. Thanks to its 4,6
kHz search frequency, the GMAXX II is a powerful and versatile
detector for coins and artefacts in various types of ground.
The development of the GMAXX, the GMAXXII has led to the
inclusion of a new circuit board with specially optimised
specifications. This new powerful circuit board combining
performance and choice – two aspects which are usually very difficult
to bring together.
9 faster target detection through the use of new, more
discriminating analogue filters. It will therefore be easier for you
to pinpoint targets in iron infested areas.
9 The transmitter of the wireless WS1 headphones is now
integrated on your detector's circuit board. You can therefore
now use your new optional wireless WS1 2 Channel headphones
without having to change parts to change channels.
9 The IRON THRESHOLD potentiometer enables you to adjust the
iron level setting threshold to a low tone.
9 The new FREQ. SHIFT switch gives you the option of choosing
between two working channels for the wireless WS1 headphones
– channel 1 or channel 2 – and between two detection
frequencies – Freq 1 or Freq 2 – for your detector. You can then
search for targets in the same area as another XP detector
without any interference issues.
2

INTRODUCTION
1
You will find it much easier to adjust the controls to optimise your
search technique to the type of area you are searching in, thanks to
the Multi-Tone mode with setting of the low tone (IRON LEVEL) and
the rocker threshold.
We chose instantaneous sound signalling, rather than an LCD display
because of the extraordinary ability of the human ear to analyse
compared to an LCD display.
LCD displays cannot respond in real time and do not capture weak
signals that are too brief or too close to other signals
GMAXX II sound signalling provides real-time output of
the most imperceptible signal.
.
3

INTRODUCTION
1
You will appreciate the sturdiness and the manufacturing quality of our
equipment. Because a metal detector is generally used in extreme
conditions, we have given full attention to the most sensitive parts.
GMAXX II is been developed and manufactured with quality
components and material, thus ensuring your XP detector a maximum
useful life.
• Connector XP : designed to resist movement failures,
moulded, completely waterproof, gold contacts (30 μ gold
plated)
• New Cable, double electromagnetic shield, very resistant,
designed to resist movement failures.
• Robust, waterproof and lightened search coil. GMAXX II is
fitted with a new DD 9” (22.5cm) carbon fibre search head
with a more robust coil cover. Our high sensibility "double
D" search coils, provide very good ground penetration.
• Very resistant polypropylene armrest,
• 3 Piece stem
• Fibreglass lower stem.
• Provided with Hipmount bag, backphone and coil cover.
GMAXX II
is high performance detector specially designed
to give you greater ease of use.
Before using your GMAXX II for the first time, we
recommend that you read this instruction manual
carefully in order to make full use of its abilities.
.
4
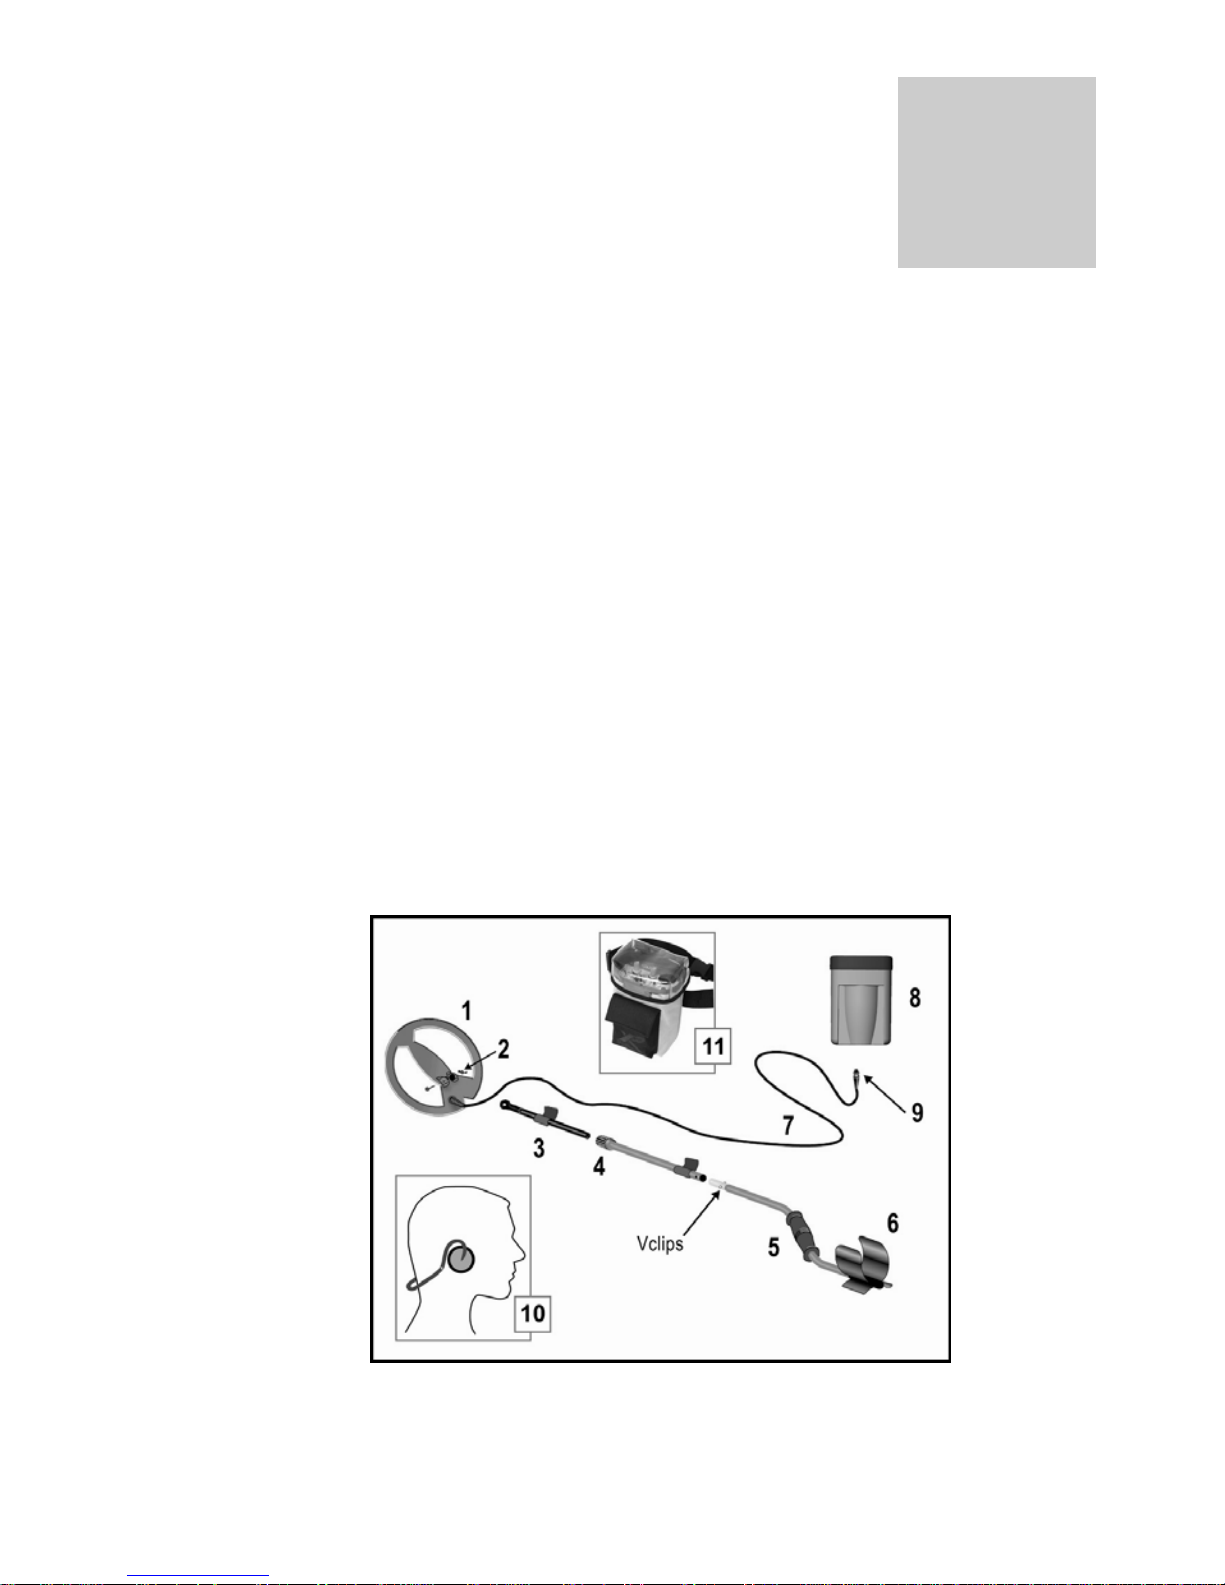
DESCRIPTION
2
1 - Robust, waterproof search coil. Diam.9” (22.5 cm), provided
with coil cover.
2 – Fibreglass Nut and Bolt
3 - Fibreglass lower stem
4 – Double Twist lock
5 - Comfortable foam handle
6 - Impact resistant polypropylene armrest
7 - Strong cable, designed to resist movement failures.
8 - ABS electronics box. For maximum comfort, the box is worn
hipmounted. It can also be fixed to the armrest thanks to slides
specially designed for that purpose or on the shaft thanks to the
accessory XP-100.
9 - Waterproof connector, metal and plastic.
10 - Headphones FX-01
11 - Hipmount bag.
5

ASSEMBLY
3
The assembly of your detector will only take you a few seconds.
Put the shaft together as shown on the diagram.
1. Press the 2 shafts (3) and (5) one towards the other to help the
spring clips (4) locate themselves.
2. The twist lock (6) is used to stop the movement of the
fiberglass tube (7) inside the aluminium shaft (5). Release it
before inserting the fiberglass tube and then lock it without
forcing too much as shown on the diagram 9 once it is inserted
to the right length.
3. Put the 2 rubber washers on each side of the plastic end (8).
To facilitate the insertion you can dampen the rubber washers.
Insert the plastic end on the search head an screw the nylon
bolt through the hole, lastly attaching the nylon nut.
4. Wind the cable around the shaft.
6
5. Le boîtier (1) se porte sous le repose-
bras. Pour le fixer, il suffit d’insérer les 2
ailettes du repose-bras dans les glissières du
boîtier prévues à cet effet (schéma cicontre).

ASSEMBLY
3
6. Once the control box in place under the
armrest, insert the connector (female) (2) in
its panel connector (male), lock it, the
connector is now watertight.
The control box is now fixed under the armrest
as indicated on the opposite diagram
L Disassembling
To remove the control box from the armrest, proceed as indicated
below.
Put your hands around the control box and
press slightly with your thumbs on the side of
the armrest 1.
Whilst you keep the pressure on, slip the
armrest off, and remove completely the
control box from the armrest2.
L Optional accessory
With this optional accessory (XP
– 100) you can fix the
electronic box on the shaft in
front of the handle.
The hipmount bag provided with your detector can allow you protect
your detector from rain when the electronic box is fix on the shaft or
on the armrest.
7

ALKALINE OR
RECHARGEABLE
BATTERY, BATTERY
LIFE, BATTERY LOW
ALERT
4
ALKALINE
BATTERIES____________________________
GMAXX II powered with 12 volts from 8 AA
Alkaline batteries using 2 batteries holders, 4
batteries each.
Pay close attention to the battery ± polarity
before inserting the batteries holders in the
electronic box.
The metal rivets (3) of the batteries holder must
be on the right. Screw the nuts 1 and 2 to close
the batteries lid.
In the event of nonprolonged use,
remove the alkaline batteries from the detector.
BATTERIES NIMH_________________________________
A rechargeable battery pack and a charger will allow you to power
your detector.
The insertion of the rechargeable battery pack is similar to the Alkaline
batteries pack.
Recharging the batteries can be done in a very simple way:
Always turn off the detector before recharging batteries.
Remove the search coil connector of the electronic box and
insert the charger instead. 12 to 18 hours are necessary to
have a full recharge.
Avoid leaving the batteries recharging for more than 20 hours.
WARNING! Before inserting your charger, check that you are not
recharging Alkaline batteries.
8
 Loading...