


USER'S MANUAL
V 2.0
V 2.0

Page 60
Page 02
Page 04
Page 05
Page 06
Page 07
Page 08
Page 09
Page 10
Page 11
Page 12
Page 13
Page 15
Page 15
Page 16
Page 17
Page 18
Page 18
Page 20
Page 21
Page 22
Page 23
Page 24
Page 25
Page 26
Page 26
Page 26
Page 27
Page 27
Page 27
01
CORDLESS HEADPHONES
Menu —
Discrimination-Sensitivity-Ground
Frequency-Tones-Volume-Coil
Pairing with a new coil —
Factory Programmes —
Replacement of the backphone —
POWER SUPPLY - BATTERIES
Low battery lights —
Battery life —
Charging time and charging progress —
Charge —
Battery durability —
Replacement —
Precautions —
EXPERT
Multi-Tones —
Pitch —
Multi-Tones, thresholds and tones —
TX Power —
Audio Overload —
Frequency shift —
Silencer —
Multi-Notch —
Page 29 / 30
Page 30
Page 31
Page 31
Page 32
Page 32
Page 32
Page 33
Page 34
Page 34
Page 35
Page 36
Page 36
Page 37
Page 38
Page 38
Page 39
Page 39
Page 40
Page 41 / 42
Page 43
Page 44 / 45
Page 46
Page 47
Page 48
Page 49
Page 50 / 51
Page 52 / 53
Page 54 / 55
Page 56 / 57
Page 58
QUICK START
—
TECHNICAL INTRODUCTION —
LIST OF PARTS —
ASSEMBLY —
USE
Remote control —
Factory programs, Description —
Starting up —
MENU
Discrimination —
Sensitivity —
Frequency —
Iron Level —
Reactivity —
Audio Response —
Notch —
GROUND
General —
Manual Mode —
Pumping Mode —
Tracking Mode —
Beach Mode —
NONE MOTION
—
OPTION
Programmes —
Coil —
Pairing with a new coil
—
Conguration —
Speakers —
Back light —
Contrast —
Clock setting —
Prol —
Update —
PRACTICAL INFORMATION
—
PRECAUTIONS FOR USE
—
TROUBLESHOOTING AND SOLUTIONS
—
SPECIFICATIONS
—
ACCESSORIES
—
SPARE PARTS
—
RECOMMENDATIONS / LAW
—
FACTORY PROGRAMMES
—
YOUR SETTINGS
—
MENU STRUCTURE —
DECLARATION OF CONFORMITY
—
WARRANTY
—
TABLE OF CONTENTS

CONGRATULATIONS ON THE PURCHASE OF YOUR XP METAL DETECTOR
AND WELCOME TO THE WORLD OF RESEARCH AND EXPLORATION!
®, the rst fully wireless detector
You have invested in a high-tech detector capable of exceptional performance, which was
designed and developed in France. You are therefore helping our Company to further research
in the eld of metal detecting and we thank you for your contribution.
02
Dēus
is innovative in terms of metal detector design as it oers an architecture based on three
elements communicating via a digital radio link. In this new design the coil, remote control
and audio headphones have each been made independent through the integration of very
compact, high-capacity lithium batteries.
An ultra-miniature electronic circuit, incorporated in the search coil, digitises and analyses
the signals. Data is then sent to the headphones and remote control in real time via a digital
radio link. With this method, the signal is processed at source and not conveyed via a wire link,
which greatly improves data quality.
Incorporating components from leading-edge technologies such as scientic instrumentation
has enabled us to produce a powerful, rapid, lightweight, compact and fully controllable digital
detector.
Whether you are an experienced user or a beginner, Dēus lets you decide whether or not to
modify any of its settings. Powerful pre-congured factory programmes enable all users to get
started immediately, while expert detectorists can choose more advanced parameters via the
intuitive interface.
What is described in this manual as the "Remote Control" is in fact the user interface, known as
the ‘control box’ on conventional detectors.
It enables the detector’s many functions to be precisely adjusted via a graphical interface.
It can also receive programme updates (via internet) through its USB socket.

Dēus
is also exceptional in being able to function without the remote control, with just the
coil and the wireless headphones, for an even more compact, lightweight conguration
(just 875 g)!
Like the remote control, the headphones contain all the components needed for detection,
they are a genuine control unit in themselves, but on an ultra-miniature scale. They take over
in the absence of the remote control for adjusting the detector settings.
With the headphones you can turn Dēus on and o, change the main detection settings such
as sensitivity, discrimination, ground balance, tone, frequency (4 kHz, 8 kHz, 12 kHz, 18 kHz),
volume, etc. as well as selecting the factory programmes or those previously congured with
the remote control!
Performance is identical whether you are searching with or without the remote control!
Lastly, the new patented XP stem has the combined advantages of an S-shaped stem and a
straight telescopic stem.
It enables you to deploy or fold away the device in just a few seconds, and to change the coil
in an instant.
Its user-friendly design ensures comfort and convenience for the user: length adjustable by
millimetre increments, improved operating angle and shaped rubber handle for a rm, controlled
grip.
So now you’re ready for a new adventure!
03
TECHNICAL INTRODUCTION continued ...

One assembled fully telescopic stem
One set of wireless headphones
with storage case
One 22.5 cm search coil with coil cover
One user interface (remote control)
with case
One connection cable: USB / one mini-B plug
One connection cable: USB / three mini-B plugs
One power supply transformer-charger
One connection clamp for recharging the coil
One set of fastenings (2 screws, 2 wing nuts,
1 washer, 1 spacing washer)
04
LIST OF PARTS
The box for your Dēus metal detector contains the following parts:

05
3 positions
Fitting the coil on the stem
Insert the single rubber
washer in the lower shaft.
Line up the stem with the coil
and t the two parts together.
Install bolt and nut.

Access to
(Ground Balance)
Manual / Pumping / Beach / Tracking
ON/OFF
Access to menu
Conguration / Programs /
Coil / Factory programs
Decrease values
Change programme
USB connection for charging
the lithium battery or for updating
the software via internet
Increase values
Change programme
None motion mode (Pinpoint)
3.5 plug: 3.5mm
audio output jack
MENU
MENU
G.B.
OPTION
OPTION
1 - BASIC 1
MENU
EXPERT
NOTCH
SENS.
FREQ.
DISCRI.
Battery level
of coil and remote control
(displayed alternately)
Name of active programme
Change programme with
Time
Analog scale
of target conductivity
Digital scale of target conductivity,
from 0 to 99
Detection frequency used
4 - 8 - 12 - 18 kHz
The ground mineralisation index
(phase measured constantly
for information)
The actual level of ground eect
corrections (phase adjustment
underway)
Choose your own prol for this area with
OPTION>CONFIGURATION>PROFILE
G.B.
Reminds you of the target conductivity index to help you optimise your settings
Valid and return to main menu
To scroll through the menu
Access to expert menu
Access to
DISCRI - SENS - FREQ ...
/
Example of secondary page
06
Mineralisation strength

From the main menu navigate with to change the programmes
1 - BASIC 1
2 - GM POWER
3 - DEUS FAST
4 - PITCH
5 - G-MAXX
6 - RELIC
7 - WET BEACH
8 - DRY BEACH
9 - BASIC 2
General use (12 kHz).
Similar settings to the XP Gold Maxx Power detector, powerful
and fast.
Faster than the Gold Maxx Power with small targets on iron-infested
ground.
Responsive pitch that varies in frequency and amplitude according
to the signal’s strength, same speed as the Gold Maxx Power.
Similar settings to those of the XP G-Maxx1 detector, medium
speed, particularly eective for large masses and highly
conductive coins.
Slower than the G-Maxx1, adapted for large, deep masses in
relatively uncontaminated ground.
Tuned to operate more eectively on wet beaches, although in
situ adjustments are needed for the ground eect, either by
pumping or manually (pg 17).
Suitable for dry sand.
Ease of operation with settings that oer greater stability, perfect
for starting out while avoiding false signals.
(pg 50/51)
Name of the active programme
MENU G.B.
OPTION
1 - BASIC 1
07

To switch o Dēus
Hold down Power for two seconds on the remote control.
Press left- and right-hand buttons on the headphones.
-
YES
NO
DISC
SENS
GND
FREQ
TONE
VOL
COIL
After charging your device. (pg 33)
Switch on
the remote control
Coil far from metal surfaces
Switch on
the headphones
Validate or not the use
of the loudspeaker
-
Do not switch on Dēus when the coil is near a metal sur face, inside a car, or when the stem has
been folded away, as this may interfere with calibration and lead to abnormal performance.
If this should occur, switch Dēus o and move away from any metal masses before switching it on again.
Nevertheless, this does not represent any risk to the equipment or its electronics!
By default you begin by using the 1 - BASIC 1 factory programme which is suitable for general use.
If you wish to test one of the 9 other factory programmes,
simply scroll through them with
08
The LED on the coil gives 20 long, successive ashes to indicate that it is waking
up and recalibrating.
Once recalibration is complete, the coil becomes operational and its LED ashes
every second.
When the coil is on standby, its LED ashes every 4 seconds, whereas when it is on it ashes every second.

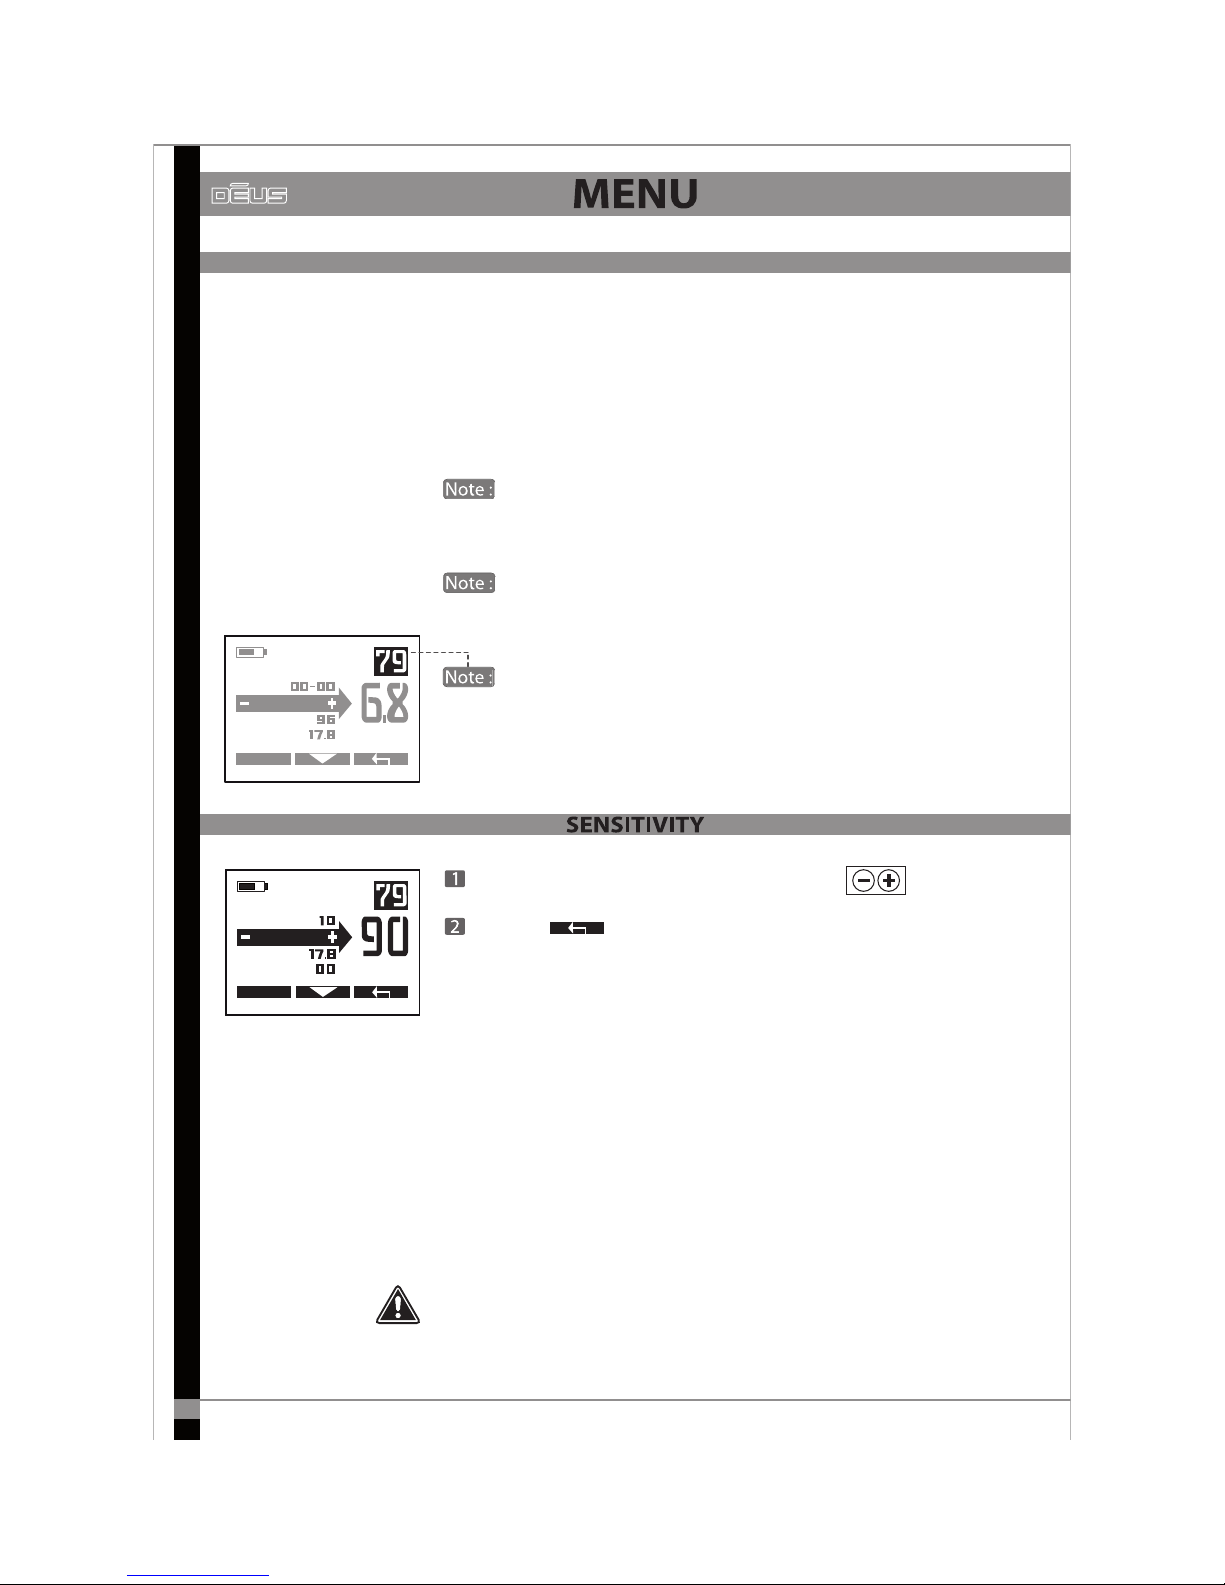
Adjust the Discrimination level (from 0 to 99) with
Exit with to return to the main menu.
Discrimination enables undesirable targets to be rejected by raising or
lowering a threshold below which certain metals are dierentiated.
The conductivity scale (0 to 99) for metal targets shown below will help
you better understand the discrimination range and its limits, and see
how it corresponds to the digital display of target conductivity on the
remote control main menu.
Increasing the discrimination value enables you to gradually reject any
target whose conductivity is lower than the setting. For example, if you
tune the discrimination level to 10, you will reject iron with a value of
between 0 and 10. If you tune it to 40 you will also eliminate small
pieces of aluminium foil whose conductivity is less than 40.
If you wish to reject other rubbish with higher conductivity, such as pull
tabs from aluminium drinks cans, lead shot or copper hunting cartridges
(whose conductivity is 60-75), you must also be prepared to accept the
elimination of certain good metals with similar conductivity.
If you are particularly bothered by contamination registering as highly
conductive on the digital screen, and you still wish to reject it, it is better
to do so using the NOTCH rejection setting.
Conguring the main detection settings.
Press menu
Scroll through the menu by pressing
MENU
MENU G.B.
OPTION
1 - BASIC 1
Coke Foil Bronze coins
(medium size)
Large silver and
copper coins
Iron
Nails
Small targets
Small jewellery, leads
Fine coins
Poor alloys
Small pure silver coins
MENU
EXPERT
NOTCH
SENS.
FREQ.
DISC
09
0 10 20 30 40 50 60 70 80 90 99
MENU
EXPERT
DISC
FREQ.
IRON VOL.
SENS
Adjust the Sensitivity level (from 0 to 99) with
Exit with
Sensitivity is often simplistically described as the setting which adjusts
the device’s power level. However this is incorrect. As its name indicates,
it actually determines the device’s sensitivity level. It reacts after receiving
a signal via the receiver coil. Nevertheless, the results are somewhat similar
in practice, as increasing a device’s sensitivity enables it to detect the
presence of more distant targets. However it must be noted that this
setting has no eect on the power emitted.
The most commonly used sensitivity levels range from 70 to 90. It may be
necessary to reduce the level if there is too much interference, as is often
the case near overhead or buried power lines, fences, radio-relay stations,
mobile telephones, computers, televisions, etc.
Do not test your device in your home as there is considerable electromagnetic
and metal interference in urban environments.
Two alternatives involve selecting a low level of discrimination, between
5 and 10, then using either:
1/ The digital target display to more or less visually discriminate a target
category.
2/ The Multi-tone mode to discriminate undesirable targets using a selected
audio tone.
In both cases the decision then lies with you on whether or not to dig.
Depending on the frequency setting used, a target’s conductivity
is perceived dierently by the detector. The digital conductivity display
may therefore vary depending on the frequency.
The 0 to 10 range relates to the rejection of iron. To achieve greater
precision in this range there is a digit after the decimal point (from 2.1 to 9.9),
which in eect gives you 82 dierent levels for iron.
In several menus, particularly at the top right of the Discrimination
screen, a reminder of the target conductivity index is displayed, which helps
you when adjusting the discrimination level.
MENU
EXPERT
NOTCH
SENS.
FREQ.
DISC
Depending on the frequency setting used, a target’s conductivity
Depending on the frequency setting used, a target’s conductivity
T
T
In several menus, particularly at the top right of the Discrimination
In several menus, particularly at the top right of the Discrimination
10
DISCRIMINATION continued...

Scroll through the frequencies with
Exit with
Dēus gives you the choice of four detection frequencies (4 kHz, 8 kHz,
12 kHz and 18 kHz) which cover most detection needs.
They enable you to adapt your research more closely to the characteristics
of the ground and the targets to be detected.
MENU
EXPERT
SENS.
IRON VOL.
REACTIVITY
FREQ.
KHZ
Small coins made from any alloy (gold, silver, copper, etc.) and bigger but very ne coins,
low conductivity gold coins, lead, rings, sheet metal, aluminium foil.
Small objects can be found even on mineralised ground contaminated with iron.
Discriminates (distinguishes) coke more easily.
More unstable on non-mineralised and moist ground.
Here is a non-exhaustive list of the most likely targets that may be detected according to
the frequency:
4 kHz
8 kHz
12 kHz
18 kHz
Large, mainly ferrous and non-ferrous masses.
Coins of sucient conductivity and size.
All other medium or relatively small targets in non-mineralised ground relatively
uncontaminated by iron.
Good for ferrous masses and militaria.
General use.
Coins and large masses, militaria.
Medium and small targets in low-mineralised ground.
General use, small coins.
Coins of all sizes in medium to highly mineralised ground.
11

If you are just starting out, the 8 kHz frequency is a good compromise for
general use. On a wet beach the 18 kHz frequency will be better at nding
small gold jewellery such as chain necklaces and bracelets that are usually
so dicult to detect.
MENU
FREQ.
REACTIVITY
AUDIO RESP.
IRON VO.
Adjust the Iron Volume (from 0 to 5) with
Exit with
- At 0 the low-pitched tone is cut o.
- At 5 the low-pitched tone will have a sound level equivalent to other medium
- or high-pitched tones.
12
You have the option of controlling the sound volume of the low-pitched
tone which generally corresponds to iron. Depending on the circumstances,
this enables more attention to be paid to other sounds, by reducing those
generated by iron.
On the other hand, some users prefer that the low-pitched signals from
iron are more audible, as they know that good targets at the detector’s
range limit in mineralised ground sometimes generate low amplitude,
low-pitched sounds.
If the discrimination threshold is too low, 0 or 2 for example,
most iron will generate not low- but medium-pitched tones, as you will
practically be in the All Metals mode. In this case, the iron level setting
will not be of much use.
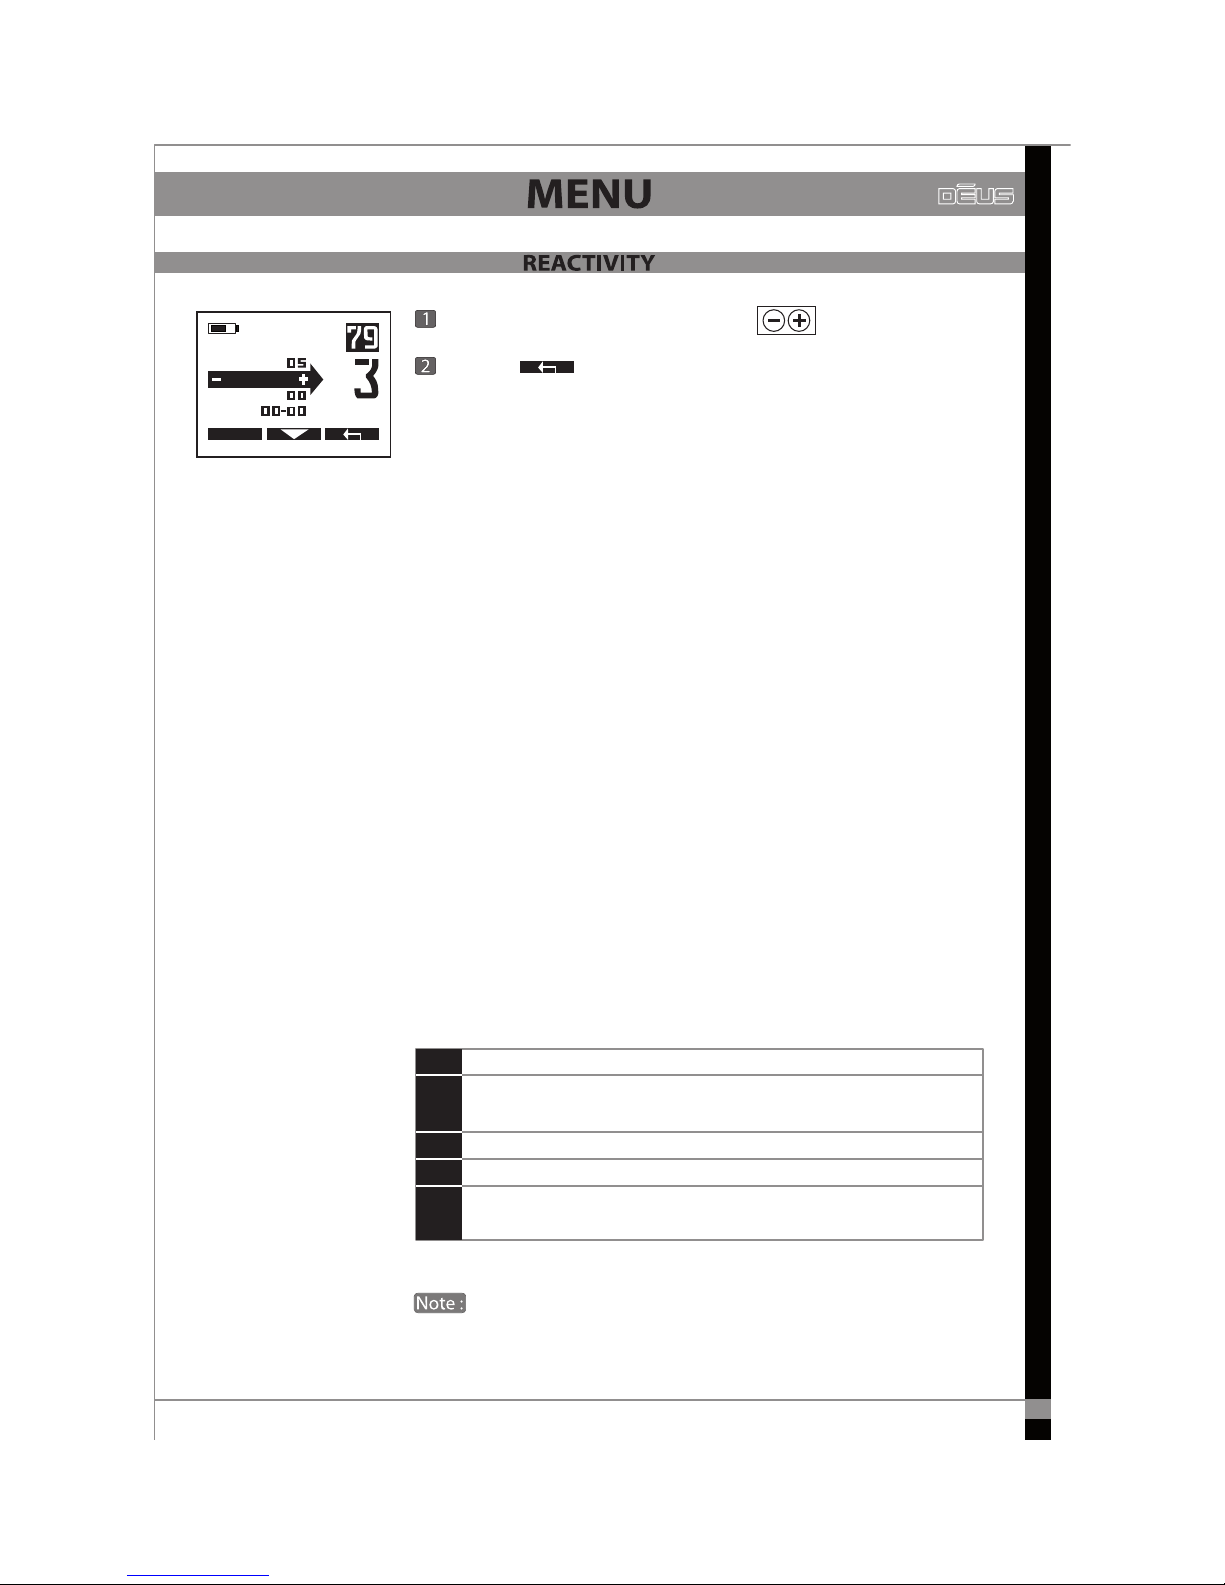
Adjust the Reactivity from 0 to 5 with
Exit with
EXPERT
MENU
IRON VOL.
AUDIO RESP.
NOTCH
REACTIV.
Large masses and coins, in ground uncontaminated by iron.
Large masses and coins, in ground with little iron contamination,
and general use.
General use, and mineralised soils contaminated with iron.
Dicult soils contaminated with iron, hot rocks, etc.
Very dicult soils, highly contaminated with iron and hot rocks,
sensitivity to small targets.
0
1
2
3
4/5
Most likely nds with the recommended settings are as follows:
13
Reactivity is a vital setting that determines the detector’s performance
in terms of speed of analysis and selectivity.
If a soil contains a great deal of iron, hot rocks or other mineralised
debris, soil penetration is generally reduced, as is a detector’s ability to
identify targets similar to iron.
In these conditions, Dēus enables you to select a high degree of reactivity
which will help you speed up the analysis of signals.
On the other hand, if the ground is "clean", it is better to reduce the
reactivity and sweep more slowly, in order to be more sensitive to deep
masses and obtain more thorough penetration.
Users familiar with the Gold Maxx Power have already had a foretaste
of the Reactivity (recovery speed) of XP’s detectors. And even though Dēus
is a particularly fast and selective detector, you now have the option
of adjusting the reactivity setting to make it even more selective!
By way of example, and to help you better understand the reactivity
levels available, you should note that the reactivity of most detectors
on the market is generally only equivalent to level 1 of the Dēus.
This is true, for instance, of the Gold Maxx and earlier XP models.
The Gold Maxx Power has a reactivity equivalent to level 2 of the Dēus.
Higher reactivity levels (3, 4, 5) enable the detector to tolerate
fast sweeps better.

Example
Passing the coil over an iron object close to
the surface then over a good metal target
(ring).
With a low Reactivity level, the iron is detected
for a longer duration, to the extent that it
completely hides the ring.
A high Rea ctiv ity level e nabl es you to
distinguish the ring completely from the iron.
The audio signal fully indicates the target.
Full sound
Short sound
No sound
0
1
2
3
4
5
3
&
"
$
5
*
7
*
5
:
14
In terms of pure performance, the greatest detection ranges are obtained with low reactivity
levels. However, you will nd more targets on dicult ground with medium or high reactivity
levels.
So do not just rely on performance in optimal conditions.
Depending on the reactivity level, you will notice that the length of the audio signal varies
when it passes over a target:
Low reactivity (0, 1) = long sound High reactivity (3, 4, 5) = short sound
Evidently the length of any false signals (the crackling of iron for example) will vary proportionately
as well.
You are therefore advised not to constantly change the reactivity level, as this may interfere
with your ability to distinguish good and bad sounds.
With a medium Reactivity level, you begin
detecting the ring.
The audio signal partially indicates the target.
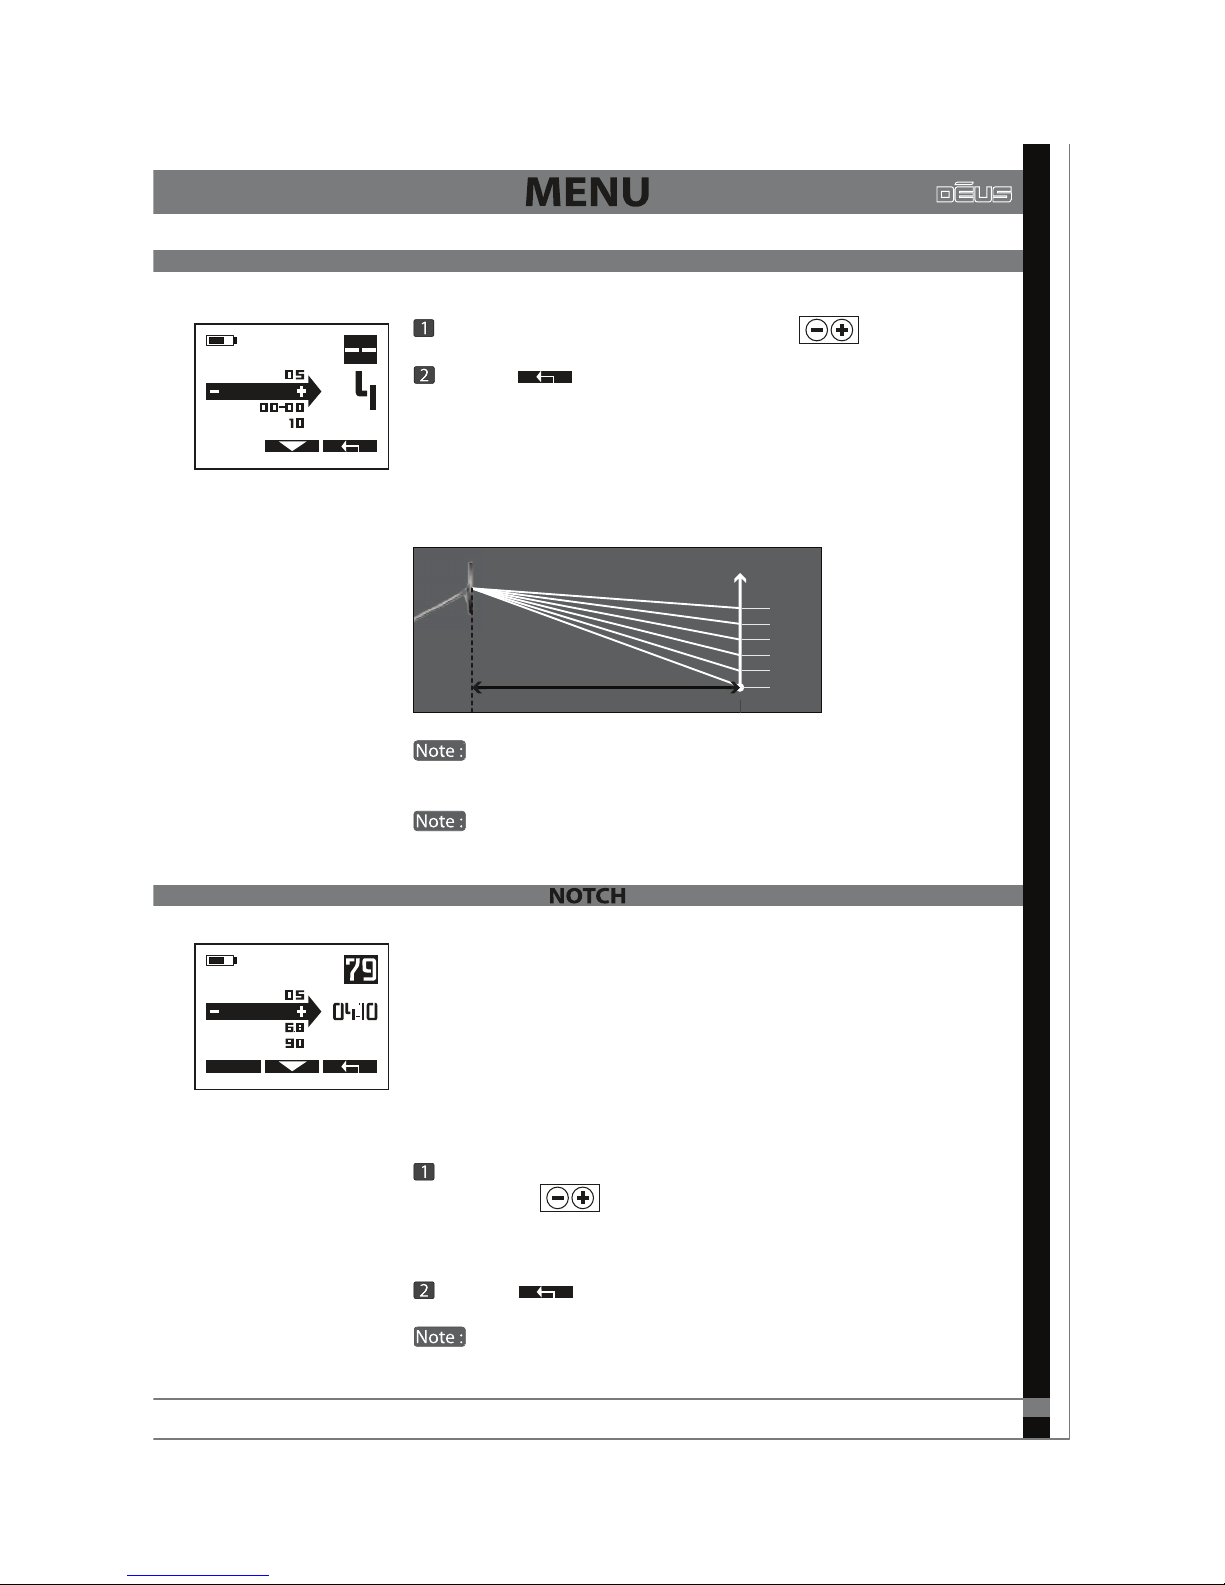
The Audio Curve enables you to amplify the sound volume of distant
targets and therefore to be more alert to them.
It gives the sensation of greater power, however it does not provide
any additional depth as this setting only aects the sound curve (the
dynamic range of sounds).
By amplifying small signals you will also be amplifying small
spurious false signals.
By increasing th e s oun d resp ons e you will compress the
dynamic range and thus reduce the appreciation of a target’s distance.
Notch complements discrimination: it enables a "window" of targets
to be rejected whereas discrimination rejects all targets below a
selected threshold.
For example, if you detect a redundant, undesirable target in the
ground, you can decide just to reject the corresponding conductivity
group and continue to detect targets whose conductivity is higher and
lower than those in this group.
If the reference target has a conductivity of 37, adjust the Notch value
to 34-40 using
All targets whose conductivity is between 34 and 40 will then be silenced.
Exit with
By default, the width of the rejection window is 6 points.
EXPERT
MENU
AUDIO RESP.
DISC
SENS
NOTCH
Adjust the Audio Response from 0 to 5 with
Exit with
MENU
REACTIVITY
NOTCH
DISC
AUDIO R.
Distance to target
Audio Level
5
4
3
2
1
0
By amplifying small signals you will also be amplifying smal
By amplifying small signals you will also be amplifying smal
By default, the width of the rejection window is 6 points.
By default, the width of the rejection window is 6 points.
15
AUDIO RESPONSE

The dierent levels of soil mineralisation you encounter when prospecting
can sometimes aect the performance of your detector.
For example, this may be due to natural magnetic mineralisation such as
iron oxide, hot rocks and magnetite, or sporadic mineralisation from sites
of former human settlement (also magnetic): hearths, pottery, hot rocks,
slag, etc. At the seashore this may also involve mineralisation ranging from
magnetic grade (black sand) to electrical conductor grade (salt water)
depending on the beach or region.
If you are an experienced detectorist you may wish to optimise your
searches to achieve better penetration in some of these mineralised soils.
In magnetic ground with relatively uniform mineralisation, a setting
which is adjusted according to the ground eect will improve penetration
by reducing the amplitude of the ground signals sent back by the receiver
circuits. This ‘adapted setting’ involves adjusting your ground balance
value to the average value of the ground being detected, while adding
1 so as not to hear the ground signals as much. The tracking and pumping
modes do this automatically if the ground conditions allow it.
Attention: As the ground balance setting is the one requiring the most
experience of the ground, we recommend that you read this chapter
carefully and use the dierent ground balance modes carefully, while
acquiring your own experience of the ground.
By default, remain in manual mode at level 90 on inland ground and on
dry beach sand.
If the ground is not mineralised (see below the bargraph : Mineralisation strength) there is no need to adjust your ground balance to a level
other than 90: since the ground does not send back any signicant
spurious echo the performance will be optimal even at level 90 and you
will reduce interference resulting from knocks to the coil.
On the main menu, two values are permanently displayed:
16
The ground mineralisation index (phase measured constantly
for information).
The actual level of ground eect corrections
(phase adjustment underway).
General features
MENU G.B.
OPTION
1 - BASIC 1
Mineralisation strength. More this value is high more the
ground is mineralised. Pump the coil to the ground several
times to evaluate the mineralisation strength.
If the level is low, it is less needed to adjust the ground phase.

Go to Pumping with
Press and pump the coil on the ground several times until
you obtain the display G.B OK
Exit with
G.B.
TRACKING
PUMPING
BEACH
MANUAL
START
Go to Manual with
Adjust with
Exit with
G.B.
MANUAL
BEACH
TRACKING
PUMPING
START
SOL
MANUAL
BEACH
TRACKING
IN PROGRESS
G.B OK
Press Ground
4 modes are available:
MANUAL - PUMPING - TRACKING - BEACH (ON / OFF)
G.B.
17
You can manually adjust the ground rejection levels from 60 to 95 (Beach
O mode) or from 0 to 30 (Beach On mode)
90 is the default level, it is the most common level which enables you to
reject all magnetic minerals found in the ground.
By reducing G.B towards 87 you will begin detecting hot rocks, and
knocks to the coil may result in false signals. Even lower, between 75/85,
pottery and the ground itself will begin interfering with your device.
If you are inexperienced in working with ground eects, we strongly
suggest that you limit yourself to a Ground Balance level of 90, which is
the default setting, and is the most stable reference level recommended
for inland ground. Levels lower than 90 will result in increasing instability.
.

Go to Tracking with
Exit with
G.B FAIL
15 cm (6")
~
MANUAL
PUMPING
G.B.
BEACH
TRACKING
IN PROGRESS
G.B.
MANUAL
BEACH
TRACKING
G.B FAIL
18
Pumping is a semi-automatic process which allows you to adjust the ground
balance in a zone that you have determined as being representative of the
mean level of the ground being prospected.
Henceforth, the measured value of the ground is entered in memory and
used as the new active ground balance value.
If this value is unsuitable, or if it generates too much instability, you can
repeat the process in a dierent zone or switch to manual mode in order
to modify it by, for instance, adding several extra rejection points.
If a metal target is detected while you are pumping, Dēus will recognise
this and display the message
It will then retain the previous ground balance value.
This problem is generally caused by iron being present. If this is the case
then move to another location and restart the pumping mode.
In low- or non-mineralised ground, there is no need to adjust the
ground balance and you are advised to remain on 90 for greater stability.
In this mode, Dēus repeatedly scans the ground and digitally lters the
extracted signals to determine the mean value on a continual basis.
This mode may be useful in soils with relatively uniform mineralisation,
and where the mineralisation varies gradually from zone to zone, which
is often the case in naturally mineralised ground. In this case, Dēus
automatically readjusts the ground balance according to the most
recent value measured.
However, in ground where mineralisation has resulted from human
presence (ancient settlements, for example) this mode may be unsuitable
due to the disparity in the ground events.

19
Indeed, within the same sweep of just one meter, a considerable variety
of ground events may be encountered, ranging from one extreme to
the other (values between 70 and 90): hot rocks, brick, slag, pottery
interspersed with soil that is neutral or characterised by diverse mineralisation.
This may be to such an extent that any mean value would be meaningless.
You must then determine an acceptable level of rejection for the
ground based on your own experience of the site, your detection methods
and the interference that you are prepared to tolerate.
This mode is not available in Beach mode, in wet areas, as the
Pumping mode is more eective.
Low ground balance levels also generate the clearest signals
on certain irons that are already dicult to eliminate.
With some digital detectors on the market, you will note that when
the ground balance settings are low – either in Manual, Pumping or
Tracking mode – hot rocks do not register, as they have been
somewhat ‘notched’ or inhibited. This trick gives you good stability
regardless of the ground rejection level, however it also deprives you of
the benets of a well-adjusted ground balance, and worse, gives you
the impression that your settings are well congured.
Very often the deepest targets in magnetic soil are identied with
a signature similar to that of hot rocks, and are therefore detected poorly
with this kind of device (as they are ‘notched’).
Dēus on the contrary gives you full control over the ground settings.
When you lower the ground balance (87-85-82 etc.) you fully accept hot
rocks, which is the only way to obtain real gains in terms of penetration
on certain magnetic soils.

Go to Beach with
Choose YES
(00-30)
Activates calculation of the ground balance on the zone corresponding to
highly saline wet ground, so as to reduce interference caused by conducting
salt water.
After selecting Beach ON, you need to adjust the ground balance
manually or by pumping on the wet zone concerned, in order to cancel out
the ground signal.
Go to or go to with
Press and pump the coil on the ground several times until you
obtain the display
In Manual Mode, adjust it from 00 to 30 with
Exit with
In wet zones (salt water), it is important to sweep while keeping the
coil parallel to the ground, yet not touching it.
In wet zones select the Wet Beach factory programme.
PUMPING
G.B. BEACH
PUMPING
MANUAL
BEACH
YES
START
In wet zones (salt water), it is important to sweep while keeping the
In wet zones (salt water), it is important to sweep while keeping the
In wet zones
G.B. BEACH
MANUAL
BEACH
PUMPING
START
20
To improve stability on wet beach
(salt water)
:
Reduce Audio Response (0-1)
Increase Reactivity (4)
Power: Level 1 maximum.
Sensitivity: (70-85).
G.B OK

Raise the coil in the air (>1 meter) .
Press
The audio threshold should disappear as you get close to the ground,
if it does not raise the coil again and reduce the TUNE.
Be aware that as you increase the TUNE the more powerful the machine
is but the more instable it becomes.
Regularly raise the coil in the air and press to re Tune the threshold.
The Tune will drift if there are variations in temperature for example
from sunny to shaded area, under these conditions you will need to
re Tune more often until the coil temperature is stabilised.
Always adjust the Tune, Sens, Ground, Disc with coil in the air, each
time you press a touchpad it will automatically re Tune the threshold.
On wet beach,
- adjust DISC at 25/28 (mode Non-Motion Disc).
- adjust G.B. at 15/27 (mode Non-Motion Audio Disc).
- select the wet beach programme before using none motion mode.
21
Meter Accept/Reject
TUNE : allows to calibrate threshold to the ground.
SENS : in conjunction with TUNE, SENS allows to adjust the depth. If you
alter SENS you need to adjust the TUNE again.
MODE : allow to choose between 4 modes :
Used to access the NON MOTION mode and/or to update the threshold
(re-TUNE).
The none motion mode allows the user to operate the coil motionless above a target. It is useful
to locate metal targets inside houses, cellars; also it is widely used to follow underground metal pipes.
1-Pinpoint: to locate metal targets
2-Non-motion Disc : discrimination with single tone.
3-Non-motion Audio Disc: audio tone upwards for good targets
and down for ferrous.
4-Non-motion All Metal : All Metal + will also detect anomaly’s in
ground minerals plus some ceramics
Non-motion Audio Disc and Non-motion All Metal require an
adjustment of the ground balance. Pump the coil to the ground (refer
to explanation on page 17) and manually adjust the ground setting
on the value displayed at the top of the Ground Balance screen.
-
OUI
G.B.
MANUAL
BEACH
TRACKING
PUMPING
START
1m
~
NON MOTION AUDIO DISC
G.B.
On wet beach,
On wet beach,

Press to scroll through the menu and stop on the programme
you wish to save, then press
Scroll with and stop on
Press to save.
Choose either YES or NO to conrm.
Press X2 to return to the main menu.
Press to scroll through the menu and stop on the programme
you wish to modify, then press
Press and stop on
Press and scroll with
And to advance to the next data entry zone
Or to delete the previous character.
Press and X2 to return to the main menu.
Press
Choose with then press
Modify the name of a programme
2
OPTION
PROGRAM
SELECT
OPTION
CONFIGURATION
COIL
PROGRAM
SELECT
OPTION
Save a modied programme
SELECT
SELECT
OPTION
VALID
These enable you to save your settings, create new programmes and congure your equipment’s
basic parameters.
Listed here are the nine detection programmes which were pre-congured at the factory.
You can modify the name of a programme, save modications made to a programme or restore a
factory programme.
22
PROGRAM
RESTORE
SAVE
EDIT NAME
SELECT
PROGRAM
EDIT NAME
RESTORE
SAVE
SELECT
SAVE
EDIT NAME

Press
Choose with then press
Switch on the headphones close to the remote control.
On the remote control, press to scroll through the list of
available coils and stop on the one you wish to activate.
This coil automatically becomes active within 4 seconds, while the
previous coil reverts to standby mode.
Press X2 to return to the main menu.
If you switch on the headphones after changing the coil via the
remote control, the headphones will not automatically register this
change. You will therefore need to change the coil manually via the
headphones. (pg 24)
2
OPTION
2
COIL
SELECT
OPTION
PROGRAM
CONFIGURATION
COIL
SELECT
Restore a programme
COIL
2-COIL 34 CM (13")
1-COIL 22.5 CM (9")
OPTION
Example
23
PROGRAM
SAVE
EDIT NAME
RESTORE
SELECT
Press to scroll through the menu and stop on the programme
you wish to restore, then press
Scroll with and stop on
Press to restore.
Choose either YES or NO to conrm.
Press X2 to return to the main menu.
SELECT
RESTORE
OPTION
When rst purchased,
Dēus
is only congured to operate with its original
coil.
If you have one or more optional coils which have already been paired
(pg 24), you can select which one you want to use for your detection
session, from the list in the menu.

Press
Choose with then press
Select an unused slot ( -------) with then press
EDIT NAME :
At the point where the cursor is ashing, scroll through the characters
using to make your choice.
Press to advance to the next character.
Once the name of the new coil has been entered
(e.g: "34 cm Coil")
,
Press
OPTION
PROGRAM
CONFIGURATION
COIL
SELECT
2
OPTION
OPTION
SELECT
VALID
Entering the name
If you purchase an additional coil, you need to pair it with the remote control and the headphones
the rst time you use it, to enable Dēus to recognise and communicate with it. You can then switch
between coils just with a simple click via the remote control.
To pair a new coil you have to give it a name (e.g: "34cm Coil") and enter its serial number in the remote
control and headphones.The serial number is printed on the coil and is sometimes found on the
invoice as well.
Before you pair a new coil, turn on the headphones and remote control.
Check that they both work correctly with your original coil.
Keep the headphones, remote control and also the new coil close to each other and follow the
following steps:
COIL
1- COIL 22.5CM (9")
2-----------------
OPTION
Pairing the remote control and the headphones with a new coil
24
COIL
EDIT NAME
34 CM COIL

Entering the serial number
At the point where the cursor is ashing, scroll through the characters.
using and press to advance to the next digit.
At the sixth digit press then X2 to return
to the main menu.
The remote control now adds this new coil to its list, then transfers the
updated list to the headphones.
VALID
if the headphones do not recognise this coil, for example because they were switched o
while the serial number was being entered in the remote control, You then have 2 options
to pair it:
1: Turn on the headphones and the remote control with the previous coil (for example the
original one). The list of coils from the remote control will be sent automatically to the
headphones.
2: enter this new coil’s serial number manually in the headphones as well (pg 30).
A coil’s serial number is unique. The headphones or remote control cannot function with
a coil if the number entered does not correspond to the actual serial number printed on
the coil.
This allows you to modify the remote control’s general technical settings.
Press
Choose with then press
2
OPTION
CONFIGURATION
SELECT
OPTION
PROGRAM
COIL
CONFIGURATION
SELECT
25
EDIT SERIAL NUMBER
1-----
EDIT SERIAL NUMBER
123456

To improve readability in all lighting conditions you can adjust the contrast
of the display.
The remote control screen has a backlighting function which comes on
as soon as any button is pressed and goes o automatically after a certain
length of time. You can dene this time in seconds:
OFF - 3s - 10s - 60s -120s - ON (permanent)
Enables the remote control’s loudspeaker to be activated or deactivated.
You can leave the backlighting on permanently (ON) as this function
uses very little power and only aects the remote control’s battery life by
about 10%.
CONFIGURATION
UPDATE
BACKLIGHT
CONTRAST
SPEAKER.
OFF
CONFIGURATION
SPEAKER
CONTRAST
CLOCK SETTING
BACKLIG.
3s
CONFIGURATION
BACKLIGHT
CLOCK SETTING
UPDATE
CONTRAS.
3
Duration of backlighting
Loudspeaker
Contrast
You can leave
26
Time
This changes the time that is displayed on the main menu.
CONFIGURATION
CONTRAST
UPDATE
SPEAKER
CLOCK S.

The software can be updated via the
Dēus
USB interface and an internet connection.
Full information is available on our website:
www.xpmetaldetectors.com/deus/update
Updates
27
-
1 - BASIC 1
Use the single USB cable.
MENU
G.B
OPTION
Prol
This option enables you to personalise the
left part of the main screen.
You have several choices :
Representative curve for the detector's active settings
relating to Sensitivity.
Ferrous/None Ferrous target strength (or depth indicator), at
the left strength of the ferrous, at the right strength of the
good target.
Fast
Slow and Deep
CONFIGURATION
SPEAKER
CONTRAST
CLOCK SETTING
PROFIL
MENU
G.B.
OPTION
1 - BASIC 1

Control pads
Increase / decrease values
To switch ON : Press
To switch OFF : Press simultaneously
and
Displayed : Coil battery level
Not displayed : Headphones battery level
Used to scroll through the detection
menus and their setting values:
DISC ---------------------
SENS --------------------------
GND ------------------------------
FREQ -------------------------
TONE ----------------------
VOL -----------------------
COIL ------------------------
P1 to P9 --------
USB/mini-B charging connection
DISC
SENS
GND
FREQ
TONE
VOL
COIL
Indicates the setting value
or the number of the factory
programme P1, P2, etc
Indicates the battery charge level of the coil
and the headphones (alternates every 4 seconds)
Indicates that the radio link
with the coil is active
Discrimination
Sensitivity
Ground
Frequency
Tone number
Audio volume
Selected coil
Factory programmes
28

Menus accessed via the headphones have the same range of settings as
the remote control.
Remote control ON: Only the volume control can be adjusted.
Remote control OFF: All settings can be adjusted.
Press to access the dierent menus
DISC Discrimination: 0-99 (pg 09).
Adjusts with
A ashing digit represents a digit after the decimal point.
SENS
Sensitivity: 0-99 (pg10).
Adjusts with
FREQ Choice of frequency used: 4, 8, 12, 18kHz (pg 11).
Change with
TONE
Choice of number of tones: 2, 3, 4 tons, P (PITCH) (pg 36).
Change with
VOL Adjusts sound volume in headphones: 0-9.
Adjusts with
COIL Choice of coil used when several are available.
The coils are numbered according to the order in which they were entered:
01 = Original coil
02= Optional coil 1
03= Optional coil 2, etc.
FREQ
DISC
SENS
GND
FREQ
TONE
VOL
COIL
SENS
COIL
GND
TONE
VOL
29
GND Ground balance (pg 17).
60-95: (inland ground)
0-30: (Only with program N°7, for beach, wet zone)
Adjusts with

When delivered, the headphones and remote control have already been paired
with the original coil, so no action is required on your part.
However, if you purchase an additional coil, before using it for the rst time
you need to pair it with the remote control and the headphones, to enable it
to recognise and communicate with them.
You can then change coils with a simple click using the remote control (pg 23)
or your headphones (pg 30).
If you leave the headphones switched on when you pair the remote control
with a new coil, they are also paired with this new coil, which is then added
automatically to the list in the headphones menu (pg 24).
If you do not have the remote control, or in the event of a problem, you can
manually pair the headphones with a new coil. To do this you need the serial
number of the coil to be paired:
Press until you reach COIL
Choose the ashing free slot with for example 02
(01 is already assigned to the original coil).
If this coil has already been paired with the remote control, ensure you choose
the same slot number in the headphones.
Press for 5 seconds to switch to serial number entry mode.
With enter the rst digit of the serial number then
validate it with
continued
If you are detecting with the remote control and you use it to change to
a new coil, the headphones will automatically register this change (if they
are switched on). Otherwise it can be done manually with this menu.
Always leave the headphones switched on when you are changing the coil
via the remote control, otherwise they will not register the change and
will remain connected to the previous coil. If this should occur, use the
remote control to return to the previous coil (with the headphones switched
on) and switch to the new coil again to re-register it with the headphones.
Remember that before you can use a new coil for the rst time, you need to
enter its serial number in the headphones and remote control (pg 24/30).
COIL
Pairing the Headphones with a new Coil
30

With enter the second digit then validate it with
With enter the third digit then validate it with
Continue in this way until you reach the sixth digit.
The new coil is now operational in this slot and should become active.
Choice of one of the 9 pre-congured factory programmes.
Press and go to P1/9 screen.
Scroll with and choose the programme number.
The programmes are identical to those in the remote control and are
numbered in the same way from 1 to 9.
e.g. P3 headphone = factory programme 3 in the remote control.
Programme 7 is the remote control’s wet beach mode and is designed to
be used in the wet zone of a beach. Its ground balance settings range
from 0 to 30, not 60 to 95 like the other settings.
Each time that the remote control is switched on next to its
accompanying headphones, all the remote control’s settings are loaded
into the headphones, which then store them in memory even when
switched o. This only works if the headphones and remote control
have both been paired and are using the same (serial number) coil.
The earphone of the wireless headphones contains all the electronics and
the lithium battery, it represents your headphone’s brain! (ref: D091).
Fitted on a sliding support, it has the advantage of being able to disconnect
from the backphone with a single click.
This backphone is an inexpensive wearing part that can easily be replaced
by any of our resellers (ref: D096).
A coil’s serial number is unique.
Dēus cannot use a coil if the number entered does not correspond to the actual
serial number printed on the coil (and sometimes appearing on the invoice as well).
Programs P1 to P9
Replacement of the backphone
31

The remote control alternately displays :
The symbol
which indicates the coil’s charge level.
The symbol
which indicates its own charge level.
If you only use the
headphones without the remote control, you will also
need to know the coil’s charge level.
Displayed = coil’s charge level.
Not displayed = headphone's charge level.
HEADPHONES: 27 hours / REMOTE CONTROL: 27 hours / COIL :± 15 hours
CHARGING TIME
DISC
SENS
GND
FREQ
TONE
VOL
COIL
The search coil’s battery life may vary depending on the modes used.
The table below shows battery life according to frequency and power
selected.
Dēus is regulated in such a way that avoids any deterioration in
performance even when the battery level is lower!
100% charged 60% charged 30% charged
May vary
depending
on the age
of the battery.
DISC
SENS
GND
FREQ
TONE
VOL
COIL
Frequency 4 kHz
Frequency 8 kHz
Frequency 12 kHz
Frequency 18 kHz
Power at 1 Power at 2 Power at 3
11 hours
(Fixed power)
19 hours
19 hours
20 hours
13 hours
13 hours
14 hours
11 hours
11 hours
11 hours
COIL: 2h15 / REMOTE CONTROLand HEADPHONES: 3h00.
LiPo batteries (Lithium polymer) do not suer from the ‘memory eect’ so you
can recharge them at any time without rst having to wait for them to fully
discharge.
The LED on the coil is on continually when charging is underway.
When charging is complete, the LED reverts to ashing intermittently.
(3 seconds ON, 3seconds OFF)
MENU G.B.
OPTION
1 - BASIC 1
32
POWER SUPPLY-batteries
LOW BATTERY LIGHTS
BATTERY LIFE

The search coil is charged via the connection clamp supplied, which is connected to the coil
according to the grooves in the coil cover.
You will see that the clamp is shaped in such a way to prevent it being connected the wrong way
round.
Ensure that the clamp is the right way round before connecting it to the coil
Connect the mini-B plugs to the remote control, headphones and to the charging
clamp.
The search coil, remote control and headphones are all powered by identical
lithium polymer batteries. These miniature, high-capacity batteries can be
recharged quickly. The dierent Dēus elements can be charged while switched
on or o, but switching them o speeds up the process.
You should use the power adaptor supplied, which enables all three elements
to be charged simultaneously when used with the USB/3 mini-B cable, also
supplied.
Connect the USB plug to the power adaptor
DISC
SENS
GND
FREQ
TONE
VOL
COIL
Correct
Incorrect
33
POWER SUPPLY-batteries
-
MENU
G.B
OPTION
1 - BASIC 1

The LiPo batteries are designed to bear hundreds of charges and to last several
years in your detector, thus resulting in signicant savings in terms of purchase
of batteries.
After 300 to 400 charging cycles the battery still has 80% of its capacity, which
then gradually begins to decrease over subsequent cycles.
As an indication, the batteries should last for around 3 to 4 years when used on
a weekly basis.
Attention: long-term storage of discharged batteries may reduce their overall
durability. If the detector has to be placed in storage, rst charge the batteries to
half of their capacity (40 to 70%).
Ideally you should then discharge/recharge them at least once a month.
Do not store your device for long periods with discharged batteries!
The three Dēus batteries are identical.
The batteries for the wireless headphones and the remote control are easy to
replace as they are connected to the circuit with a mini-connector and double-sided
adhesive tape.
The search coil battery is sealed for obvious reasons of safety and impermeability.
It must be returned to our service department or an XP distributor for replacement.
REPLACING BATTERIES
34

The batteries are tted with internal protection systems which shield them from
extreme overloads and discharges. They must not be dismantled or short-circuited,
which is dangerous and could destroy the protection systems or cause the batteries
to smoulder or ignite.
Do not leave batteries charging unnecessarily and disconnect the power adaptor
when the charge cycle is complete or after 180mn.
If you notice any perforation, odour or other anomaly, please return the battery
to the seller in a sealed plastic bag and don't try to charge again.
Never dispose of lithium batteries with your household waste: return them to
your XP seller or take them to a designated collection point.
Do not place the batteries near heat sources and never throw them onto a re
Never perforate the battery cover or try and weld/solder the battery.
Do not short-circuit the battery terminals.
Risk o explosion if battery is incorrectly replaced.
Replacing the battery with another of the incorrect type can lead to an explosion
risk. Only use LiPo batteries supplied by XP (ref : D088).
PRECAUTIONS RELATING TO USE OF THE POWER ADAPTOR AND BATTERY
Batteries
Power adaptor
Acceptable ambient temperature during charging: 0° to 35°C Maximum
Recommended storage temperature: 25°C
35
The power adaptor is only designed for indoor use and should not be exposed
to water or humidity.
Always connect your power adaptor in an accessible, visible place to ensure that
it can be unplugged quickly in the event of overheating or other problems.
Use the special XP chargers in the recommended charging method to charge
the battery, do not use other charger, that will cause the batter y internal
short-circuit and make it heat, smoke or burn.
Do not charge the devices during a thunderstorm and unplug the power adaptor
from the supply.
Do not charge close to inammable parts.
Xplorer shall not be held liable for any consequences arising from a failure to comply with
the precautions for use.

P
ress
Choose DISCRI with
Press
Choose 2 tones - 3 tones - 4 tones - Pitch using
You can use the Multi-tones menu to sort targets into categories according
to their conductivity, by assigning a specic audio tone to each category.
The higher the target’s conductivity, the higher the pitch of the tone.
Take some time to become familiar with the 2 tones, 3 tones, 4 tones modes
using dierent targets, such as an iron nail and some aluminium foil,
dierent coins, etc.
The lowest pitched tone is assigned to iron. If you do not wish to hear it,
select “Iron Volume” from the menu and reduce its volume to 0.
If you are in 2 tones mode (low/medium tone) and you reduce
the iron level (low-pitched tone) to 0, you then nd yourself in 1 tone
mode (medium), which is why there is no 1 tone mode in this scrolling
menu.
Pitch mode is completely dierent from the others. It does not take into
account the target’s conductivity: the strength of the signal generates an
audio signal that varies both in amplitude and height (the audio frequency).
This means that a more distant target will generate a low-pitched, weak
sound whereas a closer target will generate a high-pitched, strong sound.
Pitch mode gives signals particular "characteristics" and can be useful for
locating targets.
It also makes the detector seem more reactive. However, it does not
fundamentally aect reactivity, just the audio.
MULTI TONES
This section covers the advanced settings. You should ensure that you have studied all the basic
parameters before moving on to this section.
2 TONES - 3 TONES- 4 TONES
PITCH
MENU
EXPERT
MULTI TONES
PITCH
3 TONES
4 TONES
2 TONES
EXPERT
MULTI TONES
2 TONES
3 TONES
PITCH
4 TONES
36

Press
Scroll with and select
Press
Choose 2 tones - 3 tones - 4 tones - Pitch with
Once you have selected the number of tones (for example: 4 tones)
Press
You have the option of customising the sound partitioning of the
discrimination range.
A sound frequency (comparatively low- or high-pitched) is assigned to
each part of the discrimination range. In this example, a low-pitched
sound (202 Hz) is assigned to the signals from 0 to 10, a higher-pitched
sound (518 Hz) is assigned to the part from 10 to 60, then 644 Hz is
assigned to 60 to 87 and lastly a very high-pitched sound (757 Hz) is
assigned to the part from 87 to 99.
Press in order to move the cursor (black triangle) from one
setting zone to another.
Note that the cursor rst moves up and down to indicate the sound
frequencies used, then from left to right to indicate each threshold.
Adjust the sound frequencies and thresholds with
Example: If a coin type, which your device registers as 58 on the conductivity
index, signals as “medium low” (518 Hz) and you wish it to be signalled
as “medium high” (644 Hz), you simply lower the threshold from 60 to 57
or less.
Now, all coins with this conductivity value will register at 644 Hz.
The black bar showing the index of the target is displayed in the
top left of the screen (black bar) for help. This enables you to directly
adjust the sound responses for targets you select as references.
The threshold 1 separating the low-pitched tone (tone 1) from
the medium tone (tone 2) is the same as the Discrimination value.
These are the same settings.
MENU
EXPERT
EXPERT
MULTI TONES
PITCH
2 TONES
4 TONES
EXPERT
3 TONES
4 TONES
202
518
644
757
10
60
87
TONE1 202 HZ
THRESH 1T / 2T
=
4 TONES
202
518
644
757
10
87
THRESH. 2T/3T 57
57
10
87
The black bar showing the index of the target is displayed in the
The black bar showing the index of the target is displayed in the
MULTI TONES, Thresholds and Tones
37

Press
Scroll with and select
Press
Dēus enables you to adjust the strength of the emitted electromagnetic
eld according to three levels (from 1 to 3).
It is adjusted using
Press x 2 to return to the main menu.
By default the power is set to level 2, which oers a very dependable
performance level that is largely sucient in most cases.
The power only has a subtle eect on the device’s pure performance with
regard to sensitivity. However, it increases your detector’s power consumption
as well as alter its stability on dicult ground.
On iron-infested, mineralised ground, there is no need to use a high power
setting, level 1 will be sucient as in any case it is impossible to detect
deeply in this kind of ground.
It is therefore better to limit the saturation caused by iron and the ground
by lowering the setting. In this way you will improve analysis and will
ultimately nd as many, if not more, targets since you will be better able
to hear them.
Power is set to maximum for the 4 kHz frequency. You do not
therefore have access to the Expert menu when you are on this
frequency.
MENU
EXPERT
SENS
TX POWER
MENU
EXPERT
DISC.
FREQ.
IRON VOL.
SENS
38
Press
Scroll through the menu to reach the AUDIO RESPONSE
EXPERT
Press
Adjust AUDIO OVERLOAD with
Press x2 to exit.
AUDIO OVERLOAD
Allow the user to choose an overload sound when a target is close
to the coil.
AUDIO OVERLOAD

Press
Scroll with and select
Press
Adjust the Silencer with
Press x2 to return to the main menu.
Iron is more easily discriminated than other metals because of its unique
signature which is related to its ferromagnetic properties.
However, large iron objects or certain unusual shapes are often more
dicult, or even impossible, to discriminate.
Press
Scroll with and select
Press
Adjust the frequency with
Press x2 to return to the main menu.
You can shift your operational frequency slightly to avoid occasional
interference, particularly that generated by another detector nearby.
Starting from the central frequency, two other frequencies are available.
Wherever possible, remain on the central frequency, which is more
closely attuned to the emitter coil.
During a rally or other group event, if you suer from any interference
do not hesitate to shift the frequency.
You can also simply change the basic frequency (4, 8, 12, 18kHz) to avoid
interference from your team mate’s detector
4kHz frequency is xed and cannot be shifted.
MENU
EXPERT
FREQ
MENU
EXPERT
SENS.
IRON VOL.
REACTIVITY.
FREQ.
FREQ SHIFT
HZ
MENU
EXPERT
REACTIVITY
SILENCER
EXPERT
MENU
IRON VOL.
AUDIO RESP.
NOTCH.
REACTIV.
Wherever possible, remain on the central frequency, which is more
Wherever possible, remain on the central frequency, which is more
4kHz frequency is xed and cannot be shifted.
4kHz frequency is xed and cannot be shifted.
39

These partially discriminated iron objects often generate a few audible
remnants of broken, inconsistent signals (crackling).
Depending on your abilities and preferences, you may wish to remove
this crackling using the Silencer.
When you increase the value of the silencer you are applying a lter which
eliminates the crackling caused by iron.
Level 2 represents a good compro mise, but if you have diculty
distinguishing iron from non-iron, then use a higher level such as 2, 3 or 4.
The Reactivity menu takes precedence over the silencer, so if you
change the reactivity value this automatically imposes an appropriate
silencer value. This is designed to avoid the silencer being set to a value
that could reduce the eectiveness of the reactivity setting.
MENU
EXPERT
NOTCH
EXPERT
MENU
AUDIO RESP.
DISC.
SENS.
NOTCH
NOTCH
N 1
46
THRESH 128THRESH 2
46
40
Press
Scroll with and select
Press and go to NOTCH screen.
This advanced notch function enables you to widen the rejection
window in the event that the undesirable target(s) have a wider conductivity
range than the standard 6-point window.
For example, if the undesirable target is generating a signature ranging
from 28 to 46, you can use this option to lower the value of Threshold
1 to 28 and increase Threshold 2 to 46.
Select threshold 1 or 2 with
Adjust the values with
Press X2 to return to the main menu.
If several targets with dierent conductivity levels are bothering you, you
can activate two other notches: N2 and N3
Use to select N2 or N3, and adjust as for N1.
To exit use
You will note that the notched zones are greyed out in the
conductivity bar on the main page.

INCORRECTCORRECT
41
Metal detecting is a fascinating leisure activity that can bring you a lot of satisfaction.
However, it requires a minimum of learning in order to get the most enjoyment.
Begin by familiarising yourself with your equipment and its operation on a suitable practice ground.
To do this, we recommend that you take an assortment of dierent objects: coins, everyday
items, metal rubbish, etc. Then nd a patch of ground relatively free from metal pollution and far
away from any electromagnetic interference (high voltage power lines, electric fences, domestic
appliances, etc.). For instance your garden would probably be one of the most unsuitable places
to begin as there is too much domestic waste in the vicinity.
To ensure that the site is suitable for practising, swing the coil over the ground as if detecting.
If you hear a multitude of sounds then move to another place.
Once you have found a suitable spot, arrange your objects on the ground, spacing them approximately
two coil widths apart. Before placing an object, use the device to check that there is no metal
already in the ground.
Then, take some time to observe your device’s reactions when it passes over each target. You can
then sort them according to the sound response type and try and understand what makes them
similar or dierent. If you feel comfortable with this exercise, you can also try out some of the
pre-congured settings.
When detecting, it is important that you sweep the coil parallel to the ground, using wide movements,
as close as possible to the surface (without actually touching it). Proximity to the ground will increase
the likelihood of detecting a deep target and will enable the most discreet objects to be identied
more easily. You are advised to avoid knocking the coil, as although it is designed to tolerate this kind of
stress, careful treatment will prolong the life of the device and guarantee you better perception of targets.
PRACTICAL INFORMATION

When you are detecting, you are free to choose the rate at which you move.
For example, if you prefer to cover a zone at high speed while detecting, this will certainly give you
a global ‘snapshot’ of the site. However, it is clear that this way of detecting will also leave large
areas of ground unexplored between each sweep. On the other hand, if you insist on closely
scrutinising every inch of the ground, you should ensure that each sweep slightly overlaps the
previous one, in order to reduce to a minimum the area that your coil has not scanned.
You should also bear in mind that you will further increase your chances of nding and identifying
a target by sweeping more slowly. This particularly applies in metal-infested ground (when there
are more targets to be sorted) or when you are searching for deeper targets.
Once the detector has indicated the approximate presence of a target in Motion mode, if you are
having diculty locating the target then sweep the place where you heard the sound.
Slowly reduce the amplitude of your movements and make a mental note of the spot where the
sound is loudest. If necessary, indicate it with a mark on the ground. Then move a quarter turn
around the spot and begin sweeping again in the same way (at 90° to the rst sweep).
You should then locate the precise zone containing your target at the intersection of the two
sweeps, where the sound is loudest.
Continue with crossed sweeps over the target. The loudest and highest pitched audio signal
indicates the centre of the coil and therefore the position of the target.
42
Target

Dēus is a precision device, designed to better address any detection constraints and be as robust
as possible. Despite this, it is important to take care of it and exercise certain precautions in order
to prolong its life:
43
Do not store your device for long periods with discharged batteries.
Ideally you should discharge/recharge the batteries at least once a month, and
if possible store them 40 to 70% charged.
Do not expose your detector to extreme temperatures, particularly inside a car
in full sun.
Do not expose your detector to the sun without reason when it is not being used.
When you switch on the detector ensure that the coil is not near any metal objects.
Neither the remote control nor the headphones are waterproof. In wet weather
be sure to protect them!
Use the storage case that is supplied with the headphones and never carry them
at the bottom of a bag without protection.
Use the case that is supplied with the remote control to protect it in adverse
conditions, and when the detector is stored away.
Do not use solvents or alcohol to clean the detector. Soapy water is sucient.
Depending on how you use your detector, it may be advisable to clean its
elements regularly. A damp cloth can be used to clean the non-waterproof parts
(headphones and remote control).
After use, remove any dirt from the stem’s locking mechanisms.

CAUSES SOLUTIONS
Select the corresponding coil
(pg 24/29).
Check the coil’s serial number
(pg 24/30).
Recharge it.
Contact your reseller or XP.
Contact your reseller or XP.
CAUSES SOLUTIONS
You become aware of abnormal performance, instability,
false signals, misplaced interference, for no apparent reason
Recharge it.
Find a less infested place.
Don’t practice in your garden!
44
Lower it.
Lower the sensitivity or move to
a dierent zone.
Switch o and wait for the storm to pass
Change or shift the frequency
(pg 11/12).
Switch it o, then on again with the coil
in the air and the stem fully deployed,
away from any sources of metal.
In manual mode set it to 90.
Sensitivity is too high.
You are in a zone with a lot of interference
(high-voltage power lines, electric transformer,
electric fence).
There is a storm nearby and the electromagnetic
discharges of lightning are interfering with the detector.
You are close to other working metal detectors.
You switched on the detector with the coil near a metal
surface or near the stem’s aluminium tube (in the
folded-up position).
The ground balance is set too low.
The battery is discharged.
The ground is heavily infested with iron and other metals.
The coil does not switch on, unlike the remote control and the headphones
You have a dierent coil selected in the menu :
OPTION / Coil from the remote control or in the menu
COIL from the headphones.
The serial number of the coil that you had entered in
the remote control was incorrect or was changed
inadvertently.
The coil battery is drained.
The coil battery has reached the end of its lifespan.
The coil is defective.

CAUSES SOLUTIONS
CAUSES SOLUTIONS
CAUSES SOLUTIONS
Check that you do not have a dierent coil selected
in the COIL menu (pg 29/30).
The headphones have not yet been paired with the
coil.
The coil’s serial number was changed inadvertently
in the headphones and the headphones are no
longer paired with the coil.
Select the right coil (pg 29/30).
Pair them (pg 30).
Pair them (pg 30).
The backphone is faulty.
The earpiece is faulty, for example its keypad was poorly
reconnected to the circuit after being dismounted, or the
audio contacts are faulty or dirty.
Change it, it is easy to replace
(pg 31/48).
Contact your reseller or XP.
The ground balance is set too low.
Dicult ground, highly mineralised and infested.
Adjust the ground balance to 90 then try again.
Change to a dierent zone.
Ground control is too low.
Increase the ground balance level until
false signals stop.
Too many false signals when the coil is knocked
The detectors beeps on potery and "hot rocks"
CAUSES SOLUTIONS
45
There is no detection sound in the headphones despite them
being switched on (and pressing the buttons generates an audible beep)
There is no sound in the headphones when passing
over a target and pressing the buttons generates no audible beep

Radio
General Features
Settings
46
Digital wireless
36 automatic channels
2.4 GHz / 0.56 mW
4 kHz, 8 kHz, 12 kHz, 18 kHz + shifts
99 levels
3 levels
6 levels
6 levels
6 levels
1, 2, 3, 4 tones, Pitch,+ Expert
Tracking, Pumping, Manual, Wet beach
Yes, with adjustable window width
Motion/None Motion
Yes, audio and visual
Audio and visual
82 levels
90 levels
x9 (can be modied and saved)
Yes on wireless headphones
8192 pixels
Yes, very low power consumption
Yes, via USB / Internet connection
Yes (can also serve as control unit)
DD - Carbon bre - Waterproof - Wireless
Yes
Yes
Yes
Fully telescopic, S-shaped
Lithium polymer, miniature x3
Yes, for all 3 elements
27 hours
27 hours
15 hours on average
Yes - rapid and simultaneous charging of all 3
elements. Input 100-200V 50/60Hz, Output 5V 1A
Optional, with 1 AA battery + 5 LED torch function
Optional
Coil: 2h15 , Headphones/Remote control: 3h00
979 g (880g without remote control)
435 g
— 100 g
— 80 g
— 430 g with coil cover
58 cm
130 cm
-5°C to 40°C
0°C to 35°C
25°C
Yes, but need an optional accessory to work
2 years parts and labour
(mains power charger and batteries included)
Registered and pending
Link
Channels
Radio frequencies and Radio power
Detection frequencie
Sensitivity
Transmitter Power
Reactivity
Sound Curve
Iron level
Multi tones
Ground balance
Multi-notch
Mode
Pinpoint
Discrimination
Iron discrimination range
Non-iron discrimination range
Factory programmes
Audio volume
Display screen
Backlighting
Software updates
Wireless headphones
Coil
Coil cover
Belt-mounted remote control case
Headphones storage case
Stem
Batteries
Battery level indicator
Remote control battery life
Wireless headphones battery life
Coil battery life
Mains power charger
Field charger
Car cigarette lighter charger
Charging time
Total weight with batteries
Total weight of stem
Weight of remote control with battery
Weight of headphones with battery
Weight of coil
Length of folded stem
Length of deployed stem
Operating T°
Max ambiant T° during charging
Recommended storage T°
Waterproof coil
Guarantee
Patents
SPECIFICATIONS

Emergency charger with AA battery (x1)
with 5 LED torch function
(Battery not provided)
Car charger
Other optional coils 34 / 28 cm DD
47
Security Strap for remote control
Armband case
MENU
G.B.OPTION

Screwing kit for search coil
Ref: D038B
Top part
(with keyboard)
Ref: D081
Rubber
Ref: D086
Rubber Top
Ref: D084
Rubber
Ref: D086
Rubber Bottom
Ref: D085
Top part (with LCD and keypad)
Ref: D092
Backphone
Ref: D096
Board PCB
Ref: D083
(with LCD and battery)
Bottom part
Ref: D082
(with speaker and metal plate)
LCD - Ref: D087
Battery - Ref:
D088
Speaker - Ref: D089
Full camlock
Ref: D041
Coil cover
Ref: D02
Coil
Ref: D01
Lower stem
Ref: D03
Middle part of aluminium stem
Ref: D04
Magnetic holder
for remote control
(with screws)
Ref: D05
Handle
Ref: D06
Armrest
(with screws)
Ref: D07
Locking parts for handle
Ref: D061
Full electronic box
Ref: D091
PCB (with Battery)
Ref: D093
Bottom part
Ref: D094
Rubber Ref: D095
Battery - Ref: D088
FULL HEADPHONES -
Ref: D09
FULL REMOTE CONTROL -
Ref: D08
48
Top part
Aluminium stem
Réf: D042

Detecting is an activity which, like other leisure activities, requires a few general
guidelines. These recommendations will enable everyone to enjoy their hobby to the
full while respecting laws, places, the environment and other people.
49
Ensure you are informed of current legislation relating to discovery of treasure in order
to abide by the law.
Declare any fortuitous archaeological discoveries to the local authorities (town hall) of
the discovery site within 48 hours.
Before prospecting on a site, obtain permission from its owner(s) or guardian(s).
Respect the natural environment in which you are prospecting and any other places to
which you need access.
Systematically back-ll any holes you make so as to leave a site exactly how you
found it.
Keep any rubbish you nd in order to dispose of it in a dustbin.
Avoid detecting in areas where battles are known to have taken place during
wartime.
Exercise extreme caution with any suspect object resembling munitions, grenades,
mines, shells, bombs, etc. and notify the relevent authorities (police, local
authorities, etc.) of any such object you nd.
Remember that you are an ambassador for metal detecting and it is important that
you convey a positive image!

03
MENU
DISC.
SENSITIVITY
FREQUENCY
IRON LEVEL
REACTIVITY
AUDIO.R
PROFIL
NOTCH 1
GROUND
MENU EXPERT
DISC
(threshold 1 TONE / 2 TONES)
2 TONES
3 TONES
4 TONES
PITCH
TRESHOLD 2T/3 TONES
TRESHOLD 3T/4 TONES
FREQUENCY "TONE 1"
FREQUENCY "TONE 2"
FREQUENCY "TONE 3"
FREQUENCY "TONE 4"
TX POWER
FREQUENCY SHIFT
SILENCER
NOTCH 2
NOTCH 3
MANUAL
BEACH
TRACKING (Except Beach mode)
SETTINGS
0 to 99
YES/NO
YES/NO
YES/NO
YES/NO
0 to 99
0 to 99
200 to 791
200 to 791
200 to 791
200 to 791
0 to 99
1 to 3
4K/8K/12K/18K
-1 to 1
0 to 5
0 to 5
-1 to 4
0 to 5
00-00 to 99-99
00-00 to 99-99
00-00 to 99-99
0-30 (Beach)
60-95(normal)
YES/NO
YES/NO
* Settings common to all programs
BASIC 1
10
NO
YES
NO
NO
76
95
202
518
644
757
90
2
12K
0
0
2
2
4
00-00
00-00
00-00
90
NO
NO
GMPOWER
6,8
NO
YES
NO
NO
76
95
202
518
644
757
90
2
18K
0
3
2
2
4
00-00
00-00
00-00
90
NO
NO
Programme 1 Programme 2
50
Mineralised
grounds
Smalls targets
General use
FACTORY PROGRAMS

WET BEACH
10
NO
YES
NO
NO
76
95
202
518
644
757
85
1
18K
0
0
3
-1
1
00-00
00-00
00-00
27
YES
DRY BEACH
10
NO
NO
YES
NO
74
88
202
455
791
455
90
2
18K
0
0
2
4
4
00-00
00-00
00-00
90
NO
NO
BASIC 2
10
NO
YES
NO
NO
76
95
202
518
644
757
80
2
8K
0
0
1
4
3
00-00
00-00
00-00
90
NO
NO
PITCH
6,8
NO
NO
NO
YES
76
95
202
518
644
757
90
2
12K
0
0
2
2
4
00-00
00-00
00-00
90
NO
NO
G-MAXX
8
NO
YES
NO
NO
76
95
202
518
644
757
90
2
8K
0
0
1
3
4
00-00
00-00
00-00
90
NO
NO
DEUS FAST
6,8
NO
YES
NO
NO
76
95
202
518
644
757
90
2
18K
0
3
3
2
4
00-00
00-00
00-00
90
NO
NO
RELIC
8
NO
YES
NO
NO
76
95
202
518
644
757
90
3
8K
0
3
0
3
4
00-00
00-00
00-00
90
NO
NO
Programme 3 Programme 4 Programme 5 Programme 6 Programme 7 Programme 8 Programme 9
51
Standard use
Greater stability
Beginner
General use
Audio signal
varies both in
amplitude
and height
Mineralised
and iron infested
grounds
Smalls targets
Faster than
GMPOWER
For large
masses
and highly
conductive coins
Large, deep
masses
in relatively
uncontaminated
ground.
More eectively
for wet beach
area
More eectively
for dry beach
area

* Settings common to all programs
03
Programme 1 Programme 2
52
MENU
DISC.
SENSITIVITY
FREQUENCY
IRON LEVEL
REACTIVITY
AUDIO.R
PROFIL
NOTCH 1
GROUND
MENU EXPERT
DISC
(Threshold 1 TONE / 2 TONES)
2 TONES
3 TONES
4 TONES
PITCH
TRESHOLD 2T/3 TONES
TRESHOLD 3T/4 TONES
FREQUENCY "TONE 1"
FREQUENCY "TONE 2"
FREQUENCY "TONE 3"
FREQUENCY "TONE 4"
TX POWER
FREQUENCY SHIFT
SILENCER
NOTCH 2
NOTCH 3
MANUAL
BEACH
TRACKING (EXCEPT BEACH MODE)
SETTINGS
0 to 99
YES/NO
YES/NO
YES/NO
YES/NO
0 to 99
0 to 99
200 to 791
200 to 791
200 to 791
200 to 791
0 to 99
1 to 3
4K/8K/12K/18K
-1 to 1
0 to 5
0 to 5
-1 to 4
0 to 5
00-00 to 99-99
00-00 to 99-99
00-00 to 99-99
0-30 (Beach)
60-95(normal)
YES/NO
YES/NO

Programme 3 Programme 4 Programme 5 Programme 6 Programme 7 Programme 8 Programme 9
53

MENU
EXPERT
NOTCH
SENS
FREQ
DISC
2 TONES
202
518
10
TONE 1 202 HZ
OPTION
CONFIGURATION
COIL
PROGRAM
SELECT
OPTION
PROGRAM
CONFIGURATION
COIL
SELECT
PROGRAM
RESTORE
SAVE
EDIT NAME
SELECT
PROGRAM
EDIT NAME
RESTORE
SAVE
SELECT
PROGRAM
SAUVE
EDIT NAME
RESTORE
SELECT
OPTION
PROGRAM
CONFIGURATION
SELECT
COIL
BASIC -
EDIT NAME
676767
EDIT SERIAL NUMBER
COIL
EDIT NAME
EDIT SERIAL NUMBER
SELECT
COIL 2A
EDIT NAME
COIL
EDIT SERIAL NUMBER
EDIT NAME
SELECT
COIL
2-COIL 34 CM (13")
1-COIL 22.5 CM (9")
OPTION
CONFIGURATION
UPDATE
BACKLIGHT
CONTRAST
SPEAKER.
OFF
CONFIGURATION
SPEAKER
CONTRAST
CLOCK SETTING
BACKLIG.
3
s
CONFIGURATION
BACK LIGHT
CLOCK SETTING
UPDATE
CONTRAS.
3
CONFIGURATION
CONTRAST
UPDATE
SPEAKER
CLOCK S.
UPDATE
SELECT
CONFIGURATION
CLOCK SETTING
SPEAKER
BACKLIGHT
MULTI TONES
PITCH
3 TONES
4 TONES
2 TONES
EXPERT
MENU
G.B.
OPTION
1 - BASIC 1
OPTION MENU
PROGRAM
9-BASIC 2
2-GM POWER
3-DEUS FAST
1-BASIC 1
OPTION
54
CONFIGURATION
SPEAKER
CONTRAST
CLOCK SETTING
PROFIL

G.B.
TRACKING
PUMPING
BEACH
MANUAL
G.B.
MANUAL
BEACHE
TRACKING
PUMPING
START
MANUAL
PUMPING
G.B.
BEACH
TRACKING
BEACH
G.B.
MANUAL
PUMPING
LANCER
G.B.
PUMPING
MANUAL
BEACH
NO
TRACKING
IN PROGRESS
G.B.
MANUEL
PLAGE
TRACKING
G.B. FAIL
MENU
EXPERT
DISC.
FREQ.
IRON VOL.
SENS
MENU
EXPERT
SENS.
IRON VOL.
REACTIVITY.
FREQ.
KHZ
MENU
FREQ.
REACTIVITY
AUDIO RESP.
IRON VO.
MENU
REACTIVITY.
NOTCH.
DISC.
AUDIO R.
EXPERT
MENU
IRON VOL.
AUDIO RESP.
NOTCH.
REACTIV.
EXPERT
MENU
AUDIO RESP.
DISC.
SENS.
NOTCH
TX POWER SILENCER
4 TONES
202
518
644
757
10
60
87
TONE 1 202 HZ
3 TONES
202
518
644
10
60
TONE 1 202 HZ
FREQ. SHIFT
HZ
MULTI TONES
PITCH
2 TONES
4 TONES
EXPERT
3 TONES
MULTI TONES
2 TONES
3 TONES
PITCH
4 TONES
MULTI TONES
2 TONES
4 TONES
PITCH
3 TONES
EXPERT
G.B.
NOTCH
N 1
46
THRESH. 128THRESH. 2
46
55
EXPERT
PINPOINT
AUDIO OVERLOAD
NON MOTION AUDIO DISC
G.B.

This declaration is made under the responsibility of the manufacturer:
XPLORER SARL - 8 rue du Développement – F-31320 CASTANET-TOLOSAN
We, XPLORER, hereby certify that this detector complies with the essential requirements of
European R&TTE Directive no. 1999/5/EC, which aims to harmonise legislation in member
states on the use of the radio spectrum, electromagnetic compatibility and electrical safety.
Assessment of the device’s compliance was carried out in accordance with the essential
requirements of this directive and the harmonised standards:
SECURITY (art 3.1.a) : EN60950-1:2001 + A11, EN50366:2003 and EN50371:2002
EMC (art 3.1.b) : EN301489-3:V1.4.1, EN61326-1:1997 + A1 +A2 +A3, EN55011:2007
RADIO SPECTRUM (art 3. 2) : EN300440-1:V1.3.1, EN300440-2:V1.1.2
OTHERS : EN300330-1:V1.5.1
Declaration date : September 10th, 2009
For more information please contact:
XPLORER SARL - 8 rue du Développement – F-31320 CASTANET-TOLOSAN - FRANCE
This product complies with standards for user safety with regard to electromagnetic waves.
The strength of the radio signals used is considerably weaker and on a much smaller scale than
those emitted by mobile telephones (2,000 to 4,000 times weaker), as well as being much
less than those used by Wi-Fi systems.
Moreover, when the complete system is used, the audio headphones only act as a passive radio
receiver, and do not emit any signals.
WARNING
The accessories delivered with these detectors may vary, and similarly the menus and certain
features described in this manual may dier slightly from the product purchased.
This detector is not suitable for applications involving the search for dangerous targets such as
munitions, mines, etc.
56
Safety relating to electromagnetic radio waves

If this symbol is displayed on the product or its packaging, it means that the product must not
be disposed of with your household waste. You must take it to a designated collection point for
recycling electrical and electronic waste. This selective waste sorting and recycling helps to
preserve natural resources and avoid any potential risks for human health and the environment
that could result from inappropriate scrapping, due to the possible presence of dangerous
substances in the electric and electronic equipment. For more information on places where you
can take your electrical waste, please contact the shop where you purchased this product.
Alternatively you can return it to your supplier, or directly to XP.
The same is true for the lithium batteries which must be recycled appropriately, or returned to
your supplier or directly to XP.
57
© 2009 Xplorer sarl
This document contains information that is protected by existing legislation on copyright,
brands and royalties.
Any reproduction, even partial, of this document, the logos or the XP and Dēus brands is
prohibited without the agreement of:
XPLORER SARL - 8 rue du Développement – F-31320 CASTANET-TOLOSAN
FRANCE

Contacts
Website : www.xpmetaldetectors.com
e-mail : info@xpmetaldetectors.com
XPLORER sarl
8 rue du développement
F-31320 CASTANET TOLOSAN
France
Tel : 33 (0)5.61.73.63.29
Fax : 33 (0)5.61.73.48.39
XP and Dēus are trademarks of Xplorer sarl.
Xplorer reserves the right to modify its detectors’ characteristics or specications without notice.
58
In addition to the statutory guarantee ensuing from Articles 1641 et seq. of the French Civil
code, due in any case for aws and latent defects, Xplorer provides a contractual warranty
which takes eect from the purchase date:
Of 24 months on the entire product, including the lithium batteries and charger.
In the event of a malfunction, the complete device must be returned to your reseller, accompanied
by the purchase invoice and a note explaining the fault detected, with postage being payable
by you. If a faulty device has been replaced by a new or reconditioned one, the guarantee will
continue to apply as if the device was the one originally purchased.
This guarantee for parts and labour does not cover:
Breaks caused by falls or impacts
Accidental damage
Damage caused by abnormal use
Degradation resulting from non-compliance with the conditions of use stipulated in the device’s
instructions.
Alteration of the electronic circuit by any unauthorised person.
The guarantee does not cover the normal reduction in battery life due to battery ageing.

QUICK START
By default you begin by using the 1 - BASIC 1 factory programme which is suitable for general use.
If you wish to test one of the 9 other factory programmes,
simply scroll through them with
-
DISC
SENS
GND
FREQ
TONE
VOL
COIL
After charging your device. (pg 33)
Validate or not the use
of the loudspeaker
-
OUI
You’re now ready for detecting!
Note
Do not switch on Dēus when the coil is near a metal surface, inside a car, or when the stem has
been folded away, as this may interfere with calibration and lead to abnormal performance.
If this should occur, switch Dēus o and move away from any metal masses before switching it on again.
Nevertheless, this does not represent any risk to the equipment or its electronics!
If you wish to change the main detection settings:
MENU
Press arrow to scroll
through the functions
Press Menu Set with - / +
Press return arrow
to return to the main menu
Switch on
the headphones
To switch o Dēus
Hold down Power for two seconds on the remote control
Press left and right buttons on the headphone.
YES
NO
Switch on
the remote control
Coil far from metal surfaces
 Loading...