


M60 User's Guide
(Regulatory Model M6)
TM
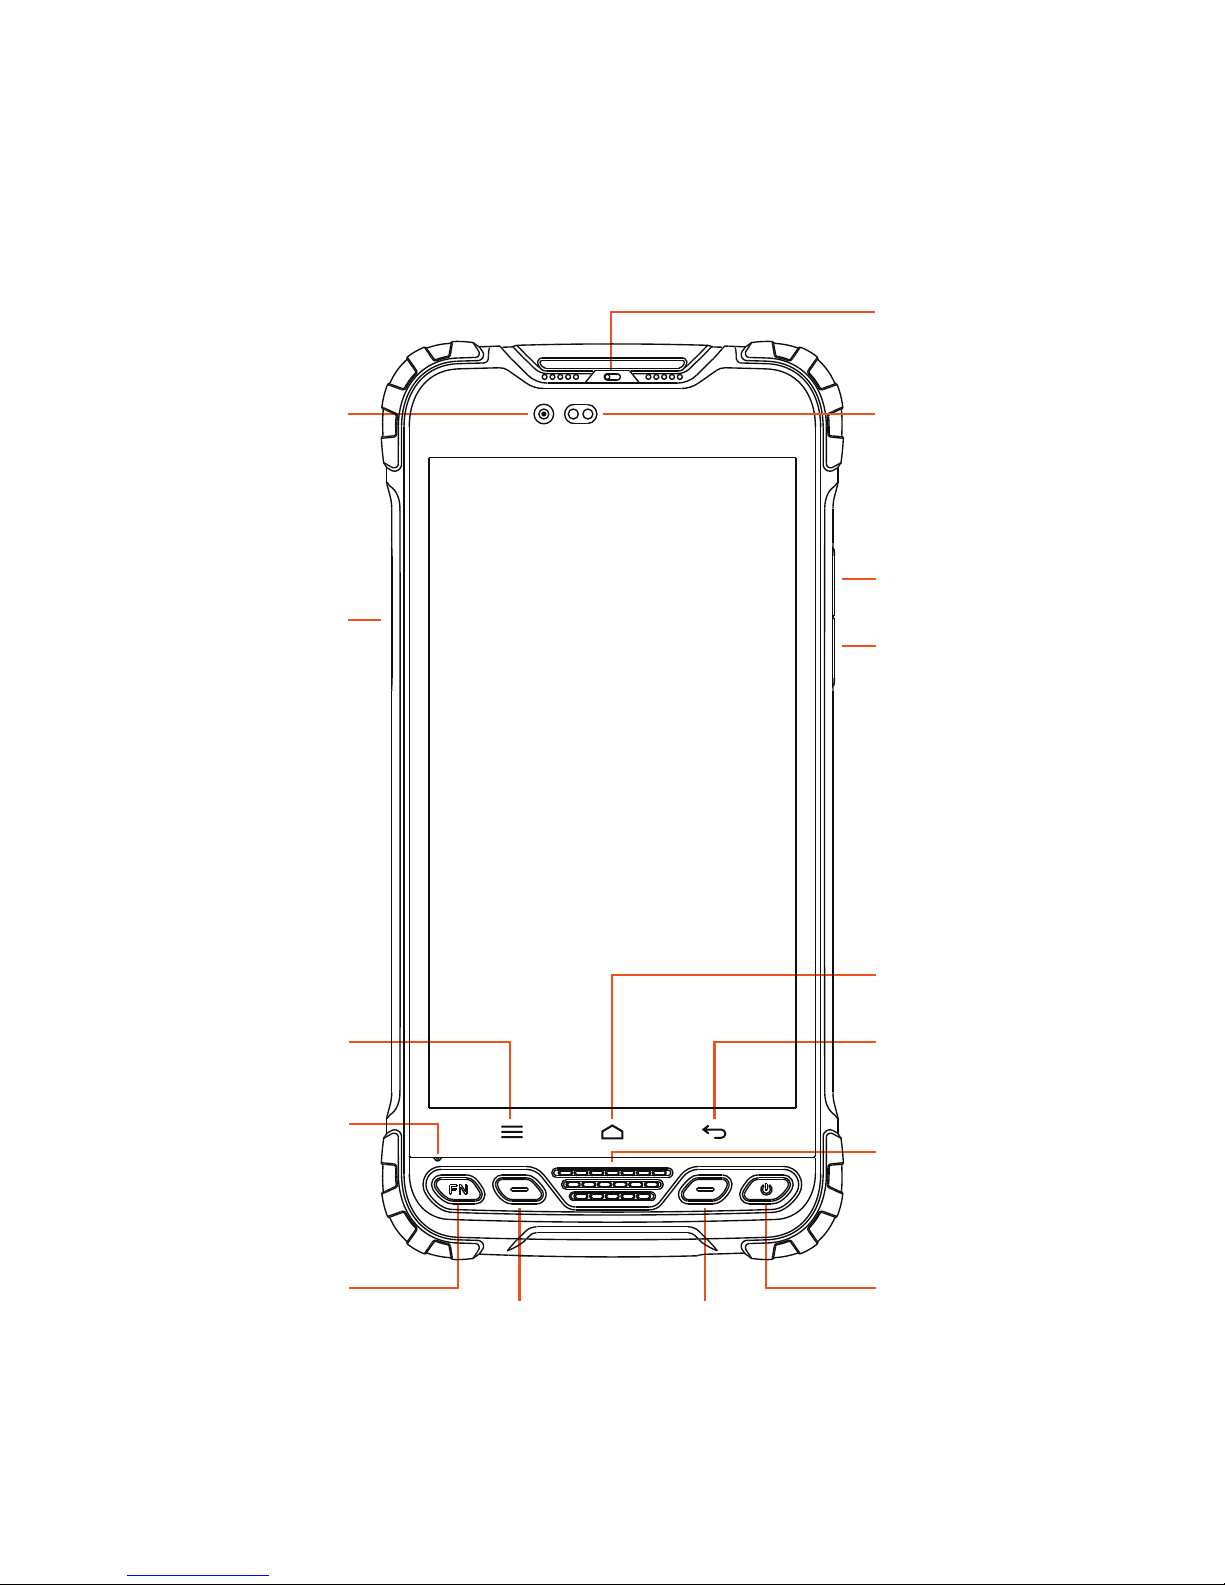
Menu button
Microphone
Extended
function button 1
Extended
function button 2
Increase volume
Decrease volume
Back button
Power buttonCustom button
Custom side button
Home screen button
Speaker
Front camera
Earpiece
Ambient light sensor

TYPE-C interface Lanyard hole
Rear camera
External device docking station
Battery cover lock
External antenna port

1. Battery Charging
• Charge with travel charger
Insert the small plug end of the USB data cable into the
TYPE-C port of the device, insert
the large plug end of the USB data cable into the travel charger plug, and then insert the
travel charger plug into a power outlet to charge.
•
Charge with USB data cable
Insert the small plug end of the USB data cable into the
TYPE-C port of the device, insert
the large plug end into the USB port of the computer to charge.
Note: During normal charging, the home screen status bar will display the charging icon
when screen is on.
When the charging is completed, the home screen status bar will display the full
battery icon when screen is on.
2. Install SIM card, memory card, battery
Power of
f the device before installing or removing the SIM card, MicroSD card or
battery.
Flip the device to its rear, follow the directions shown in Figure 1 and push the back cover
lock to the open position, and remove the battery cover. Install the SIM card and MicroSD
card according to the battery compartment label instructions, as shown in Figure 2.
Figure 1

• Face the SIM card metal contacts downwards and push into the slot. Take note on the direc-
tion of the notched corner.
• Face the MicroSD card metal contacts downwards and push into the slot. Take note on the
direction of the notched corner.
• Align the contacts of the battery with the terminals of the battery compart ment and put in the
battery gently.
• After the battery is installed, replace the battery compartment cover and push the back cover
lock to locked position to secure the battery compartment cover.
Figure 2
SIM2 SIM1 Micro SD

3. Turning the device on and off
To turn on the device, firmly press and hold the bottom right【Power Button】until the boot
screen appears.
To turn off the device, firmly press and hold the 【Power Button】 to display the options
menu. Select the Power off option to shutdown.
With the device turned on, press the 【Power Button】to turn off the screen and go into
sleep mode; Press the 【Power Button】 again to wake the device, swipe upwards on the
screen to unlock; If the device has been idle for a period of time, the screen will automatically turn off and go into sleep mode.
4. Home screen operation
From the home screen, you can view the device status and access the applications.
The home screen can have multiple panels;
Swipe left or right on the screen to view each panel.
At the top of the home screen is the status bar,
which contains the notification area, the status area
and the display area; the shortcut panel is at the bottom.
• Using the notification panel
When new notification icons appear in the notification
area of the status bar, hold the status bar and drag
down to open the notification panel; To hide the panel,
drag the bottom border of the panel upwards.
• Customize the shortcut panel
You can customize the shortcuts at the bottom of the
home screen by adding or removing “Shortcut Icons”.
To remove the “Shortcut icon”, press and hold the
“Shortcut icon” and drag it to the “Delete icon”.
To add a “Shortcut icon”, press and hold the icon
on the home screen and drag it to the Shortcut panel.
• Using applications
Slide the screen left and right to see all the included
applications.Touch the [Home button] below the screen
to close it and return to the home screen.
Figure 3

• Expanding the home screen
Swipe your finger horizontally on the home screen to expand to the left or right of the home
screen.
- Adding an icon on the home screen
Press and hold any application or widget icon and drag it to an empty area on the home
screen.
- Moving icons on the home screen
Press and hold the icon on the home screen and drag the icon to the desired location on
the screen.
- Removing icons on the home screen
Press and hold the home screen icon and drag the icon to the "Delete" icon until the icon
turns red.
• Create folder
- On the home screen, folders are automatically formed when you drag an icon onto another
icon.
- Touch the new folder on the screen to open it.
Click on the folder’s label to rename it.
• Changing the home screen wallpaper
Press and hold a blank area on the home screen or touch the [Menu button] → "Wallpaper"
to change the home screen wallpaper by selecting options such as wallpaper, live wallpaper, gallery, etc.
5. Connecting to a computer
Use the USB data cable to connect the device to the computer, pull down the top status bar,
and you can see the message "Connected as a media device" in the notification area.
Clicking on that notification bar will bring up 3 options "Media device", "Camera" and
"Charging mode", which can be selected according to your needs. Select "Media device"
mode to transfer files between the device and the computer.
If you need to remove the MicroSD card when the device is turned on, slide the screen to
the left or right "→ Settings, or touch the [Menu button] → "System Settings", go into the
Settings panel, scroll down the screen, and then select "Save"→"Uninstall SD Card".
6. Installation and management of applications
Users can enter the applications store to download and install related application programs.
Slide the screen left or right → "Settings", select "Apps", or touch the [Menu button] →
"Manage apps" to view and manage application programs on your device.
7. Using Beidou/GPS positioning function
Slide the screen left or right → "Settings", select "Location Information" to go into the
location service panel, turn on the location information switch.
In the "Satellite Positioning Mode" option, select GPS + BDS or GPS + GLONASS or BDS
options as needed.
The meaning of the following 2 options:
(1) The NMEA switch turns on the NMEA data output function, which requires the use of a
dedicated data line.
(2) SBAS: To use differential positioning.
The user can view the status of the BeiDou Satellite, GPS satellites and GLONASS satellites at the current position through an application with the corresponding functions. The
program can display real-time information such as the serial number, signal strength,
position of the satellite, etc. at the current position.
After the location service is turned on, the applications downloaded and installed from the
applications store can obtain the current location information and provide location-related
services and applications through the corresponding service interfaces.
Note: "Satellite Positioning Mode" "SBAS" is only supported in certain models.
8. Camera and videos
Slide the screen left or right → "Camera", to turn on the camera, the screen orientation
will change according to how the device is held.
Use two fingers to make a gesture of zooming in or zooming out on the subject.
Touch the camera switch icon on the top middle part of the screen to select the front or
rear camera.
Touch the button at the bottom right of the screen to switch between taking photos and
videos.
After taking a photo or video, tap the gallery button at the bottom left of the screen to share,
delete, edit or other operations.

9. Mobile network connection (WLAN/Bluetooth)
• WLAN connection
Slide the screen left or right → "Settings" to go into the settings panel, go to the WLAN
options and turn the "On" switch to activate WLAN. After WLAN is turned on, the WLAN icon
will be displayed in the status bar. Select the connection to be used from the list of available
networks and follow the prompts to enter the network key to connect.
• Bluetooth connection
(1) Activate Bluetooth Slide the screen left or right → "Settings", go into the Settings
panel, go to the Bluetooth option and turn on the "on" switch to activate Bluetooth. After
Bluetooth is turned on, a Bluetooth icon is displayed in the status bar.
(2) Bluetooth pairing The system will search for connectable Bluetooth devices in the list of
available devices. Click on the Bluetooth device you want to connect to, enter the
Bluetooth password when "Bluetooth pairing request" pops up, and select pairing.
When the owner of the external Bluetooth device accepts the connection or enters the
same password, the connection to the external device is completed.
(3) Bluetooth transmission Photos, videos and music files can be shared with family
members and friends via Bluetooth.
• Mobile network connection
Slide the screen left or right → "Settings", "More", go to Wireless and Network panel.
Select "VPN" to make the relevant settings. Precautions
Notice
This device is restricted to indoor use where operated in the European
Community using frequency in 5150MHz ~ 5250MHz to reduce the potential for
interference. Restriction in BE, BG, CZ, DK, DE, EE, IE, EL, ES, FR, HR, IT,
CY,LV,LT,LU,HU,MT,NL,AT, PL, PT, RO, SI, SK, FI, SE, UK.

Figure 4 Figure 5
10. Shortcut Keys setting
11. Side Key setting
Slide the screen left or right → "Settings" to go into the settings panel, go to the
"PTT Key Set" and select the APK that you want to start when you Press Side button.
12. Front Functional keys setting
Slide the screen left or right → "Settings" to go into the settings panel>system, go to
the "F1F2FN Key Set" and select the shortcut to set F1 button, and select the APK that
you want to start when you Press F1 button.
You can choose the shortcut of the F2/FN button in the same way.

Notice
1. Some special places, such as airports, hospitals, gas stations and other places, do not
allow the use of electronic equipment. Please comply with the rules and do not use this
product in these places.
2. For your safety and the safety of others, please do not use this product while driving
a vehicle.
3. In order to avoid potential safety problems, do not put this product near the vehicle's
airbag.
4. For your safety, please do not use this product during thunderstorms.
5. Although this product is waterproof, do not leave this product for long periods of time in
areas with water or moisture.
6. This product has an operating temperature range of -20°C~+45°C and a storage
temperature range of -30°C~+70°C. Extreme temperatures can affect the device's
performance and service life.
7. Please use an original rechargeable lithium battery
. Low-quality batteries will af
fect the
performance and service life of the device, and may even have the danger of explosion.
8. Although the product has been tested to withstand harsh operating environments, do use
the product in an improper manner
.
9. Please do not disassemble this product. In case of failure, please send to our authorized
service centres to proceed with repairs.
10.
After the device has reached the end of its service life, please discard in a proper way to
avoid environmental pollution.
1
1. When replacing the battery or during the use of an external power supply, shut down the
device completely before removing the battery or disconnecting the external power
supply to prevent damage.
12.
This product is a Class B product, which may cause radio interference. The user may be
required to take necessary preventive measures.

Battery Instructions
1. This product uses a rechargeable lithium battery as a power source. When the power is
low
, please charge the battery. T
o maintain battery life, it is recommended to deplete the
battery's power before charging.
2.
When the battery charger is not in use, please remove it from the power supply
. Do not
connect the charger to the battery for more than one week. Excessive charging will
shorten the battery life.
3.
Temperature affects the battery charging limit. Therefore, the battery may need to be
cooled or warmed up before charging.
4. Please use the battery for its original intended purpose to prevent short-circuiting the
battery
. A short circuit will occur when a conductive material connects the battery’s posi-
tive and negative terminals.
5. Do not use a battery that is damaged.
6. Placing the battery in extremely cold or hot places will lead to shortened battery life.
Exposing the battery to extreme temperatures may cause the phone to malfunction, even
if the battery is fully charged.
7. Do not put the battery in a fire. Please discard the battery in a proper manner or take the
battery to a battery recycling station. Please dispose waste batteries in accordance with
local laws and regulations.
Google,Google Play
, the Google Play logo and other marks are trademarks of Google LLC.

NOTICE:
The SAR limit of Europe is 2.0 W/kg. Device types M6 has also been tested against this SAR
limit. The highest SAR value reported under this standard during product certification for use at
the ear is 0.19W/kg and when properly worn on the body is 1.4W/kg This device was tested for
typical body - worn operations with the back of the handset kept 0.5cm from the body. To maintain compliance with RF exposure requirements, use accessories that maintain a 0.5 cm separation distance between the user's body and the back of the handset. The use of belt clips, holsters
and similar accessories should not contain metallic components in its assembly. The use of
accessories that do not satisfy these requirements may not comply with RF exposure requirements, and should be avoided.
Working Temperature: -20℃ ~ +45℃
Storage Temperature: -40℃ ~ +70℃
CAUTION RISK OF EXPLOSION IF BATTERY IS REPLACED BY AN INCORRECT TYPE.
DISPOSE OF USED BATTERIES ACCORDING TO THE INSTRUCTIONS
Hereby, [ Xplore Technologies Corp ] declares that the radio equipment type [M6] is in compliance with Directive 2014 / 53 /EU.
The full text of the EU declaration of conformity is available at the following internet address:
https://support.xploretech.com/us/support/userdocs/
This device complies with Part 22 & 24 and Part 27 of the FCC Rules.
SAR INFORMATION
The SAR limit of FCC and ISED is 1.6 W/kg averaged over one gram of tissue. Device types
M6 ( FCC ID:Q2GiX006M1 and IC:4596A-iX006M1) has also been tested against this SAR limit.
The highest SAR value reported under this standard during product certification for use at the ear
is 0.702 W/kg and when properly worn on the body is 1.305 W/kg. This device was tested for
typical body -worn operations with the back of the handset kept 1 cm from the body. To maintain
compliance with FCC and ISED RF exposure requirements, use accessories that maintain a 1
cm separation distance between the user's body and the back of the handset. The use of belt
clips, holsters and similar accessories should not contain metallic components in its assembly.
The use of accessories that do not satisfy these requirements may not comply with FCC and
ISED RF exposure requirements, and should be avoided.
Charging mode need to operate indoors, please pay
attention to the environment temperature should be
-20℃ ~ +35℃

NOTICE:
This device complies with Part 15 of the FCC Rules and with RSS-210 of Industry Canada.
Operation is subject to the following two conditions:
(1) this device may not cause harmful interference, and
(2) this device must accept any interference received, including interference that may cause
undesired operation.
Le présent appareil est conforme aux CNR d'Industrie Canada applicables aux appareils radio
exempts de licence. L'exploitation est autorisée aux deux conditions suivantes : (1) l'appareil ne
doit pas produire de brouillage, et (2) l'utilisateur de l'appareil doit accepter tout brouillage
radioélectrique subi, même si le brouillage est susceptible d'en compromettre le fonctionnement.
NOTICE:
Changes or modifications made to this equipment not expressly approved by Shenzhen UniStrong Science & Technology Co.,Ltd. may void the FCC authorization to operate this equipment.
NOTE: This equipment has been tested and found to comply with the limits for a Class B digital
device, pursuant to Part 15 of the FCC Rules. These limits are designed to provide reasonable
protection against harmful interference in a residential installation. This equipment generates,
uses and can radiate radio frequency energy and, if not installe d and used in accordance with
the instructions, may cause harmful interference to radio communications. However, there is no
guarantee that interference will not occur in a particular installation. If this equipment does cause
harmful interference to radio or television reception, which can be determined by turning the
equipment off and on, the user is encouraged to try to correct the interference by one or more of
the following measures:
Reorient or relocate the receiving antenna.
Increase the separation between the equipment and receiver.
Connect the equipment into an outlet on a circuit different from that to which the receiver is
connected.
Consult the dealer or an experienced radio/TV technician for help.
NOTICE:
This Class [B] digital apparatus complies with Canadian ICES -003.
Cet appareil numérique de la classe [B] est conforme à la norme NMB - 003 du Canada.
RF mode and power tune-up refer to appendix A

Normal Mode RF Power Range (GSM, WCDMA)
Mode Range(dBm)
GSM900 31.00-33.00
GPRS900(1 Slot) 31.00-33.00
GPRS900(2 Slots) 30.00-32.00
GPRS900(3 Slots) 28.50-30.50
GPRS900(4 Slots) 26.00-28.00
EGPRS (8PSK, 1-Slot) 24.50-26.50
EGPRS (8PSK, 2-Slots) 23.00-25.00
EGPRS (8PSK, 3-Slots) 22.00-24.00
EGPRS (8PSK, 4-Slots) 21.00-23.00
GSM1800 28.50-30.50
GPRS1800(1 Slot) 28.50-30.50
GPRS1800(2 Slots) 28.00-30.00
GPRS1800(3 Slots) 27.00-29.00
GPRS1800(4 Slots) 25.50-27.50
EGPRS (8PSK, 1-Slot) 24.00-26.00
EGPRS (8PSK, 2-Slots) 22.50-24.50
EGPRS (8PSK, 3-Slots) 21.50-23.50
EGPRS (8PSK, 4-Slots) 20.50-22.50
WCDMA Band 1 RMC 21.50-23.50
HSDPA Band 1 20.50-22.50
HSUPA Band 1 19.50-22.50
WCDMA Band 8 RMC 21.50-23.50
HSDPA Band 8 20.50-22.50
HSUPA Band 8 19.50-22.50
Appendix A

Normal Mode RF Power Range (LTE)
Mode
Bandwidth
RB Modulation Range(dBm)
LTE Band 1
20 MHz
1
QPSK
19.80-21.80
50 19.00-21.00
100 19.00-21.00
1
16QAM
19.00-21.00
50 18.00-20.00
100 18.00-20.00
15 MHz
1
QPSK
19.80-21.80
36 19.00-21.00
75 19.00-21.00
1
16QAM
19.00-21.00
36 18.00-20.00
75 18.00-20.00
10 MHz
1
QPSK
19.80-21.80
25 19.00-21.00
50 19.00-21.00
1
16QAM
19.00-21.00
25 18.00-20.00
50 18.00-20.00
5 MHz
1
QPSK
19.80-21.80
12 19.00-21.00
25 19.00-21.00
1
16QAM
19.00-21.00
12 18.00-20.00
25 18.00-20.00

Mode
Bandwidth
RB Modulation Range(dBm)
LTE Band 3
20 MHz
1
QPSK
20.80-22.80
50 20.00-22.00
100 20.00-22.00
1
16QAM
20.00-22.00
50 19.00-21.00
100 19.00-21.00
15 MHz
1
QPSK
20.80-22.80
36 20.00-22.00
75 20.00-22.00
1
16QAM
20.00-22.00
36 19.00-21.00
75 19.00-21.00
10 MHz
1
QPSK
20.80-22.80
25 20.00-22.00
50 20.00-22.00
1
16QAM
20.00-22.00
25 19.00-21.00
50 19.00-21.00
5 MHz
1
QPSK
20.80-22.80
12 20.00-22.00
25 20.00-22.00
1
16QAM
20.00-22.00
12 19.00-21.00
25 19.00-21.00

1
16QAM
20.00-22.00
3 19.00-21.00
6 19.00-21.00
3 MHz
QPSK 8 20.00-22.00
15 20.00-22.00
1
16QAM
20.00-22.00
8 19.00-21.00
15 19.00-21.00
1.4 MHz
1
QPSK
20.80-22.80
3 20.00-22.00
6 20.00-22.00
1 20.80-22.80
LTE Band 3

Mode
Bandwidth
RB Modulation Range(dBm)
LTE Band 7
20 MHz
1
QPSK
19.80-21.80
50 19.00-21.00
100 19.00-21.00
1
16QAM
19.00-21.00
50 18.00-20.00
100 18.00-20.00
15 MHz
1
QPSK
19.80-21.80
36 19.00-21.00
75 19.00-21.00
1
16QAM
19.00-21.00
36 18.00-20.00
75 18.00-20.00
10 MHz
1
QPSK
19.80-21.80
25 19.00-21.00
50 19.00-21.00
1
16QAM
19.00-21.00
25 18.00-20.00
50 18.00-20.00
5 MHz
1
QPSK
19.80-21.80
12 19.00-21.00
25 19.00-21.00
1
16QAM
19.00-21.00
12 18.00-20.00
25 18.00-20.00

Mode
Bandwidth
RB Modulation Range(dBm)
LTE Band 8
10 MHz
1
QPSK
21.00-23.00
25 20.00-22.00
50 20.00-22.00
1
16QAM
20.00-22.00
25 19.00-21.00
50 19.00-21.00
5 MHz
1
QPSK
21.00-23.00
12 20.00-22.00
25 20.00-22.00
1
16QAM
20.00-22.00
12 19.00-21.00
25 19.00-21.00
3 MHz
1
QPSK
21.00-23.00
8 20.00-22.00
15 20.00-22.00
1
16QAM
20.00-22.00
8 19.00-21.00
15 19.00-21.00
1.4 MHz
1
QPSK
21.00-23.00
3 21.00-23.00
6 21.00-23.00
1
16QAM
20.00-22.00
3 19.00-21.00
6 19.00-21.00

Mode
Bandwidth
RB Modulation Range(dBm)
LTE Band 20
20 MHz
1
QPSK
21.00-23.00
50 20.50-22.50
100 20.50-22.50
1
16QAM
20.50-22.50
50 19.00-21.00
100 19.00-21.00
15 MHz
1
QPSK
21.00-23.00
36 20.50-22.50
75 20.50-22.50
1
16QAM
20.50-22.50
36 19.00-21.00
75 19.00-21.00
10 MHz
1
QPSK
21.00-23.00
25 20.50-22.50
50 20.50-22.50
1
16QAM
20.50-22.50
25 19.00-21.00
50 19.00-21.00
5 MHz
1
QPSK
21.00-23.00
12 20.50-22.50
25 20.50-22.50
1
16QAM
20.50-22.50
12 19.00-21.00
25 19.00-21.00

Mode
Bandwidth
RB Modulation Range(dBm)
LTE Band 28
20 MHz
1
QPSK
21.50-23.50
50 20.50-22.50
100 20.50-22.50
1
16QAM
20.50-22.50
50 19.50-21.50
100 19.50-21.50
15 MHz
1
QPSK
21.50-23.50
36 20.50-22.50
75 20.50-22.50
1
16QAM
20.50-22.50
36 19.50-21.50
75 19.50-21.50
10 MHz
1
QPSK
21.50-23.50
25 20.50-22.50
50 20.50-22.50
1
16QAM
20.50-22.50
25 19.50-21.50
50 19.50-21.50
5 MHz
1
QPSK
21.50-23.50
12 20.50-22.50
25 20.50-22.50
1
16QAM
20.50-22.50
12 20.00-22.00
25 20.00-22.00
3 MHz
1
QPSK
21.50-23.50
8 20.50-22.50
15 20.50-22.50
1
16QAM
20.50-22.50
8 20.00-22.00
15 20.00-22.00

Mode
Bandwidth
RB Modulation Range(dBm)
LTE Band 38
20 MHz
1
QPSK
20.00-22.00
50 19.00-21.00
100 19.00-21.00
1
16QAM
19.50-21.50
50 18.00-20.00
100 18.00-20.00
15 MHz
1
QPSK
20.00-22.00
36 19.00-21.00
75 19.00-21.00
1
16QAM
19.50-21.50
36 18.00-20.00
75 18.00-20.00
10 MHz
1
QPSK
20.00-22.00
25 19.00-21.00
50 19.00-21.00
1
16QAM
19.50-21.50
25 18.00-20.00
50 18.00-20.00
5 MHz
1
QPSK
20.00-22.00
12 19.00-21.00
25 19.00-21.00
1
16QAM
19.50-21.50
12 18.00-20.00
25 18.00-20.00

Mode
Bandwidth
RB Modulation Range(dBm)
LTE Band 40
20 MHz
1
QPSK
20.00-22.00
50 19.00-21.00
100 19.00-21.00
1
16QAM
19.00-21.00
50 18.00-20.00
100 18.00-20.00
15 MHz
1
QPSK
20.00-22.00
36 19.00-21.00
75 19.00-21.00
1
16QAM
19.00-21.00
36 18.50-20.50
75 18.50-20.50
10 MHz
1
QPSK
20.00-22.00
25 19.00-21.00
50 19.00-21.00
1
16QAM
19.00-21.00
25 18.00-20.00
50 18.00-20.00
5 MHz
1
QPSK
20.00-22.00
12 19.00-21.00
25 19.00-21.00
1
16QAM
19.00-21.00
12 18.00-20.00
25 18.00-20.00

Normal Mode RF Power Range (WLAN/Bluetooth)
Band (GHz)
Mode
Channel
Freq. (MHz)
Range(dBm)
WIFI 2.4G
(2.4~2.4835)
802.11b
CH1
2412
11.50-13.50
CH 7
2442
11.50-13.50
CH 13
2472
11.50-13.50
802.11g
CH 1 2412 11.50-13.50
CH 7
2442
11.50-13.50
CH 13 2472 11.50-13.50
802.11n(HT20)
CH 1
2412
10.50-12.50
CH 7
2442
10.50-12.50
CH 13
2472
10.50-12.50
Band (GHz) Mode
Channel
Freq. (MHz)
Range(dBm)
WIFI 5.2 G
(5.15~5.25)
802.11ac(VHT20)
36 5180 10.00-12.00
44 5220 10.00-12.00
48 5240 10.00-12.00
802.11ac(VHT40)
38 5190 10.00-12.00
46 5230 10.00-12.00
802.11ac(VHT80) 42 5210 9.00-11.00
WIFI 5.8G
(5.725~5.850)
802.11ac(VHT20)
149 5745 12.50-14.50
157 5785 12.50-14.50
165 5825 12.50-14.50
802.11ac(VHT40)
151 5755 12.00-14.00
159 5795 12.00-14.00
802.11ac(VHT80) 155 5775 12.00-14.00
Band (GHz) Mode Range(dBm)
Bluetooth
(2.4~2.4835)
GFSK 3.00-5.00
π/4-DQPSK 1.00-3.00
8-DPSK 1.00-3.00
BLE 2.00-4.00

www.xploretech.com
 Loading...