

Page 1
Misgav Industrial Park, POB 60, D.N. Misgav 20174, Israel
Tel: +972-4-9951999; Fax: +972-4-9990287
PM0614.02 – XV0500 Video MCU Getting Started Guide Page 1 of 3
XV0500 Video MCU
Getting Started Guide
Package Contents
XV0500 (2U 19'' width unit)
Short CAT 6 Ethernet cable
USB cable
Power cord
Support hardware for 19'' cabinet
Prerequisites
You need a computer equipped with Internet browser. Firefox is recommended.
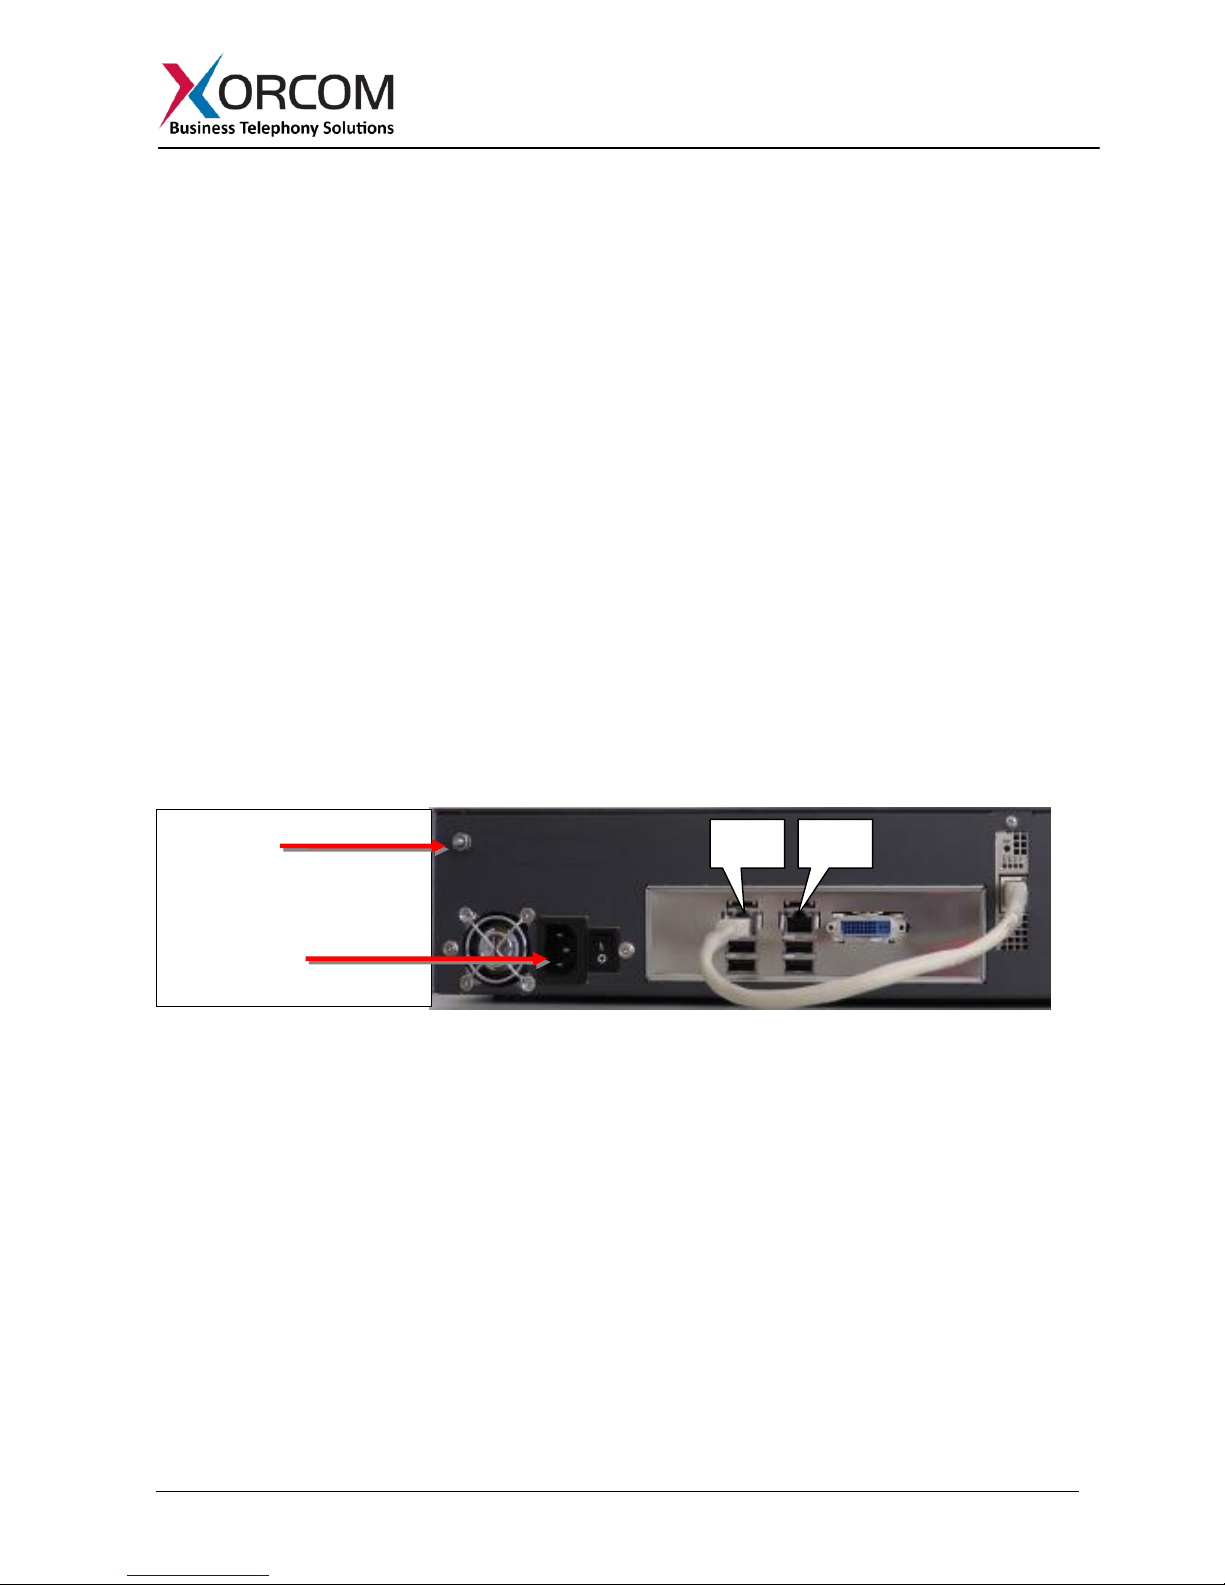
Step 1: Power the Unit
1. For safety reasons, if the line wiring exits the building, it is essential to ground the unit.
Note: Not connecting this device to grounding will void your warranty!
a. Connect a grounding tab to the grounding screw on the rear panel.
b. Using 12-16 gauge wire, connect the grounding tab to a reliable ground.
Figure 1: Grounding Screw on XV0500 Rear Panel
2. Connect Ethernet interface of the MCU-DSP card to the eth1 interface by using supplied Ethernet
cable.
3. Connect the unit to the LAN via the eth0 interface.
4. Connect the power cord to the device and turn on the power using the switch on the rear panel.
The device startup process takes about 2 minutes.
Step 2: Configure or Obtain the IP Settings for XV0500
Please note that eth1 interface and the MCU-DSP card Ethernet interface are pre-configured for
172.16.200.1 and 172.16.200.2 correspondingly. If the 172.16.200.nnn addresses are already in use
on the LAN then it is necessary to change the IP addresses of the MCU-DSP and the eth1 interface in
order to avoid conflict of IP addresses. Please refer to “XV0500 MCU User’s Guide” for further
details.
It is possible to configure or obtain the eth0 and eth1 IP settings by using a keyboard and a display
monitor.
eth0
eth1
Grounding
Power Supply
Page 2

Misgav Industrial Park, POB 60, D.N. Misgav 20174, Israel
Tel: +972-4-9951999; Fax: +972-4-9990287
PM0614.02 – XV0500 Video MCU Getting Started Guide Page 2 of 3
1. Connect a keyboard and a display monitor.
2. Login to the XV0500 as follows:
User name: root
Password: akuo-kfo
Note: The default Linux keyboard configuration is U.S. When entering the password the (dash/hyphen) key is to the right of the 0 (zero) key, no matter which keyboard layout you are
using.
a. How to obtain IP address(es) received from DHCP server
To see the IP addresses of the eth0 and eth1 interfaces use the command: ifconfig -a
As a result you’ll get a block of data like this:
eth0 Link encap:Ethernet HWaddr 38:60:77:21:11:D9
inet addr:192.168.0.61 Bcast:192.168.15.255 Mask:255.255.240.0
UP BROADCAST RUNNING MULTICAST MTU:1500 Metric:1
RX packets:835971 errors:0 dropped:0 overruns:0 frame:0
TX packets:25179 errors:0 dropped:0 overruns:0 carrier:0
collisions:0 txqueuelen:1000
RX bytes:71081837 (67.7 MiB) TX bytes:6761865 (6.4 MiB)
Interrupt:58 Memory:fe600000-fe620000
eth1 Link encap:Ethernet HWaddr 38:60:77:21:11:DA
inet addr:172.16.200.1 Bcast:172.16.200.255 Mask:255.255.255.0
UP BROADCAST RUNNING MULTICAST MTU:1500 Metric:1
RX packets:24735549 errors:0 dropped:0 overruns:0 frame:0
TX packets:30644197 errors:0 dropped:0 overruns:0 carrier:0
collisions:0 txqueuelen:2000
RX bytes:2167528619 (2.0 GiB) TX bytes:1477936510 (1.3 GiB)
Interrupt:177 Memory:fe400000-fe420000
In this example the XV0500 eth0 interface received IP address 192.168.0.61. The eth1
interface has the default statically defined 172.16.200.1 address.
b. How to configure a static IP address(es)
Insert the required variables into /etc/sysconfig/network-scripts/ifcfg-eth0:
cat > /etc/sysconfig/network-scripts/ifcfg-eth0 <<EOF
DEVICE=eth0
BOOTPROTO=static
IPADDR=192.168.0.64
NETMASK=255.255.255.0
ONBOOT=yes
TYPE=Ethernet
EOF
If you also want to define the eth1 interface, then:
cat > /etc/sysconfig/network-scripts/ifcfg-eth1 <<EOF
DEVICE=eth1
BOOTPROTO=static
IPADDR=172.16.200.1
NETMASK=255.255.255.0
ONBOOT=yes
Page 3
Misgav Industrial Park, POB 60, D.N. Misgav 20174, Israel
Tel: +972-4-9951999; Fax: +972-4-9990287
PM0614.02 – XV0500 Video MCU Getting Started Guide Page 3 of 3
TYPE=Ethernet
EOF
Please note that eth1 is used for communication to the MCU-DSP board and it is rare case
when you will need to change this address.
1. Define the default gateway in the /etc/sysconfig/network file. For example:
GATEWAY=192.168.0.1
2. Define the DNS server in the /etc/resolv.conf file. For example:
nameserver 192.168.0.1
Note: Correct network parameters settings are extremely important for normal MCU
functionality. Always make sure that the 'localhost' is defined in the /etc/hosts file:
127.0.0.1 localhost.localdomain localhost
Step 3: Configure the XV0500
Pre-configuration Parameters
All XV0500 models come pre-configured, as described below.
There is a conference room with the following parameters:
room number = 100
participant PIN = 1
leader PIN = 2
Configuring the MCU
In order to configure the MCU follow these steps:
1. From another computer’s browser enter the http://<XV0500-ip-address>
2. User name admin, Password admin
3. Now you are in the XV0500 MCU setup screen.
4. Refer to the “XV0500 MCU User's Guide” for more details.
Step 4: Protect the XV0500 Against Unauthorized Access
Once you have fully configured the IP-PBX we highly recommend that you use the following
procedures and applications supported in Elastix to protect your IP-PBX against unauthorized access:
Change the Default Password
a) Login to the MCU Web interface
b) Go to the SYSTEM SETTINGS -> USER MANAGEMENT
Change the Linux Password
The password for the Linux root user can be changed by using the Linux passwd command.
 Loading...