

Page 1
XT-13P IP Indoor Monitor User Manual
Page 2

About this manual
Thank you for choosing XT-13P IP indoor monitor. This manual is intended for end users, who need to use and configure the
indoor monitor. It provides an overview of the most essential functions and features of the product.
Contact us
For more information about the product, please visit us at www.xontel.com or feel free to contact us
by
Email: [email protected]
Telephone: +965 1880005
We highly appreciate your feedback about our products.
Page 3

Content
Product overview......................................................................................................................................................................................8
1.1 Product Description............................................................................................................................................................................8
1.2 Power connection……………………..................................................................................................................................................9
Daily use.................................................................................................................................................................................................10
2.1 Making call..................................................................................................................................................................................... 10
2.1.1 Calling from digital keypad.............................................................................................................................................................10
2.1.2 Calling from phonebook………………………………………………………......……………………………………............................ 10
2.1.3 Calling from call resident…………………......................................................................................................................................11
2.1.4 Calling from call log................ ........................................................................................................................................... ........... 12
2.1.5 Calling from door phone............................................................................................................................................................... 13
2.2 Receiving a call............................................................................................................................................................................. 13
2.2.1 Receive an incoming call............................................................................................................................................................. 13
2.2.2 During the session....................................................................................................................................................................... 14
2.3 Contact........................................................................................................................................................................................... 15
2.3.1 Local Phonebook..................... ................................................................................................................................................. ... 15
2.3.1.1 Add a group............................ ............................................................................................................................................... ... 15
2.3.1.2 Manage Contact....................... ............................................................................................................................................... . 16
2.3.1.3 Add a contact................................... ....................................................................................................................................... . 17
2.4 Status.................................................................... ......................................................................................................................... 18
2.4.1 Basic Status..................................................................... ............................................................................................................ 18
2.4.2 Network Status............................................................. ............................................................................................................. .. 18
2.4.4 Account Status............................................................................................................................................................................ 19
Page 4

2.5 Live view.........................................................................................................................................................................................19
2.5.1 Intercom.......................................................................................................................................................................................20
2.5.2 Camera............................................................................................................................................................................. .......... 21
2.6 Message(s).....................................................................................................................................................................................22
2.6.1 Text Message..............................................................................................................................................................................22
2.6.2 Create message......................................................................................................................................................................... 23
2.6.3 Maintenance................................................................................................................................................................................24
2.6.4 Capture Log.................................................................................................................................................................................24
2.6.5 Family MSG.................................................................................................................................................................................25
2.7 Arming............................................................................................................................................................................................27
2.7.1 Arming Mode...............................................................................................................................................................................27
2.7.2 Disarm Code...............................................................................................................................................................................28
2.7.3 Alarm Log....................................................................................................................................................................................29
2.7.4 Status..........................................................................................................................................................................................30
Settings................................................................................................................................................................................................31
3.1 Display settings..............................................................................................................................................................................31
3.2 Sound settings................................................................................................................................................................................32
3.3 Time settings..................................................................................................................................................................................33
3.4 DND (Do not Disturb) Settings.......................................................................................................................................................34
3.5 Language.......................................................................................................................................................................................35
3.6 Album.............................................................................................................................................................................................35
3.7 Reboot............................................................................................................................................................................................36
3.8 Screen clean...................................................................................................................................................................................36
Advance Settings..................................................................................................................................................................................37
4.1 Network Settings.............................................................................................................................................................................37
Page 5

4.2 SOS Settings....................................................................................................................................................................................38
4.3 Account Settings...............................................................................................................................................................................38
4.4 Direct IP............................................................................................................................................................................................40
4.5 Zone settings....................................................................................................................................................................................41
4.6 Password setting..............................................................................................................................................................................42
4.7 Door station ....................................................................................................................................................................................43
4.8 Reset................................................................................................................................................................................................45
Website..................................................................................................................................................................................................46
5.1 Status-Basic.....................................................................................................................................................................................47
5.1.1 Product Information.......................................................................................................................................................................47
5.1.2 Network Information......................................................................................................................................................................47
5.1.3 Account Information......................................................................................................................................................................47
5.2 Account-Basic..................................................................................................................................................................................48
5.2.1 SIP Account..................................................................................................................................................................................48
5.2.2 SIP Server 1..................................................................................................................................................................................48
5.3 Account-Advanced...........................................................................................................................................................................49
5.3.1 SIP Account..................................................................................................................................................................................49
5.3.2 Call................................................................................................................................................................................................49
5.3.3 Audio Codecs...............................................................................................................................................................................49
5.3.4 Video Codecs...............................................................................................................................................................................50
5.3.5 Encryption.....................................................................................................................................................................................50
5.3.6 NAT..............................................................................................................................................................................................50
5.4 Network Basic..................................................................................................................................................................................51
5.5 Phone-Time/Lang.............................................................................................................................................................................52
5.5.1 Web Language..............................................................................................................................................................................52
Page 6

5.5.2 LCD Language...............................................................................................................................................................................52
5.5.3 Format Setting...............................................................................................................................................................................52
5.5.4 Type...............................................................................................................................................................................................53
5.5.5 NTP................................................................................................................................................................................................53
5.5.6 Daylight Saving time......................................................................................................................................................................53
5.6 Phone-Call Feature...........................................................................................................................................................................54
5.6.1 Forward Transfer...........................................................................................................................................................................54
5.6.2 DND (Do Not Disturb)....................................................................................................................................................................55
5.6.3 Open Lobby...................................................................................................................................................................................55
5.6.4 Open Local Door...........................................................................................................................................................................56
5.7 Phone-Key/Display...........................................................................................................................................................................56
5.7.1 Display...........................................................................................................................................................................................56
5.8 Phone-Ringtones..............................................................................................................................................................................56
5.8.1 All Ringtones..................................................................................................................................................................................56
5.9 Phone-Intercom................................................................................................................................................................................57
5.9.1 SOS...............................................................................................................................................................................................57
5.10 Phone-Monitor................................................................................................................................................................................58
5.10.1 Door Phone.................................................................................................................................................................................58
5.10.2 Web Camera...............................................................................................................................................................................59
5.11 Phone-Address book......................................................................................................................................................................60
5.11.1 Contact........................................................................................................................................................................................60
5.11.2 Search.........................................................................................................................................................................................60
5.11.3 Contact Setting............................................................................................................................................................................60
5.11.4 Group...........................................................................................................................................................................................61
5.11.5 Group Setting...............................................................................................................................................................................61
Page 7

5.11.6 Import/Export...............................................................................................................................................................................61
5.12 Upgrade-Basic............................................................................................................................................................................... 62
5.12.1 Upgrade-Basic.............................................................................................................................................................................62
5.13 Upgrade-Advanced.........................................................................................................................................................................63
5.13.1 PNP Option..................................................................................................................................................................................63
5.13.2 Manual Autop...............................................................................................................................................................................63
5.13.3 Automatic AutoP..........................................................................................................................................................................64
5.13.4 System Log..................................................................................................................................................................................64
5.13.5 PCAP...........................................................................................................................................................................................65
5.13.6 Capture Log.................................................................................................................................................................................66
5.13.7 Screenshots.................................................................................................................................................................................66
5.13.8 Others..........................................................................................................................................................................................66
5.14 Arming-Zone Setting.......................................................................................................................................................................67
5.14.1 Zone Setting................................................................................................................................................................................67
5.15 Arming-Arming Mode.....................................................................................................................................................................68
5.15.1 Arming Mode...............................................................................................................................................................................68
5.15.2 Home/Sleeping/Away..................................................................................................................................................................68
5.16 Arming-Disarm Code....................................................................................................................................................................69
5.16.1 Disarm Code...............................................................................................................................................................................69
5.17 Security-Basic................................................................................................................................................................................69
5.17.1 Web Password Modify.................................................................................................................................................................69
5.17.2 Session Time Out........................................................................................................................................................................70
Page 8
1.
Product overview
1.1 Product Description
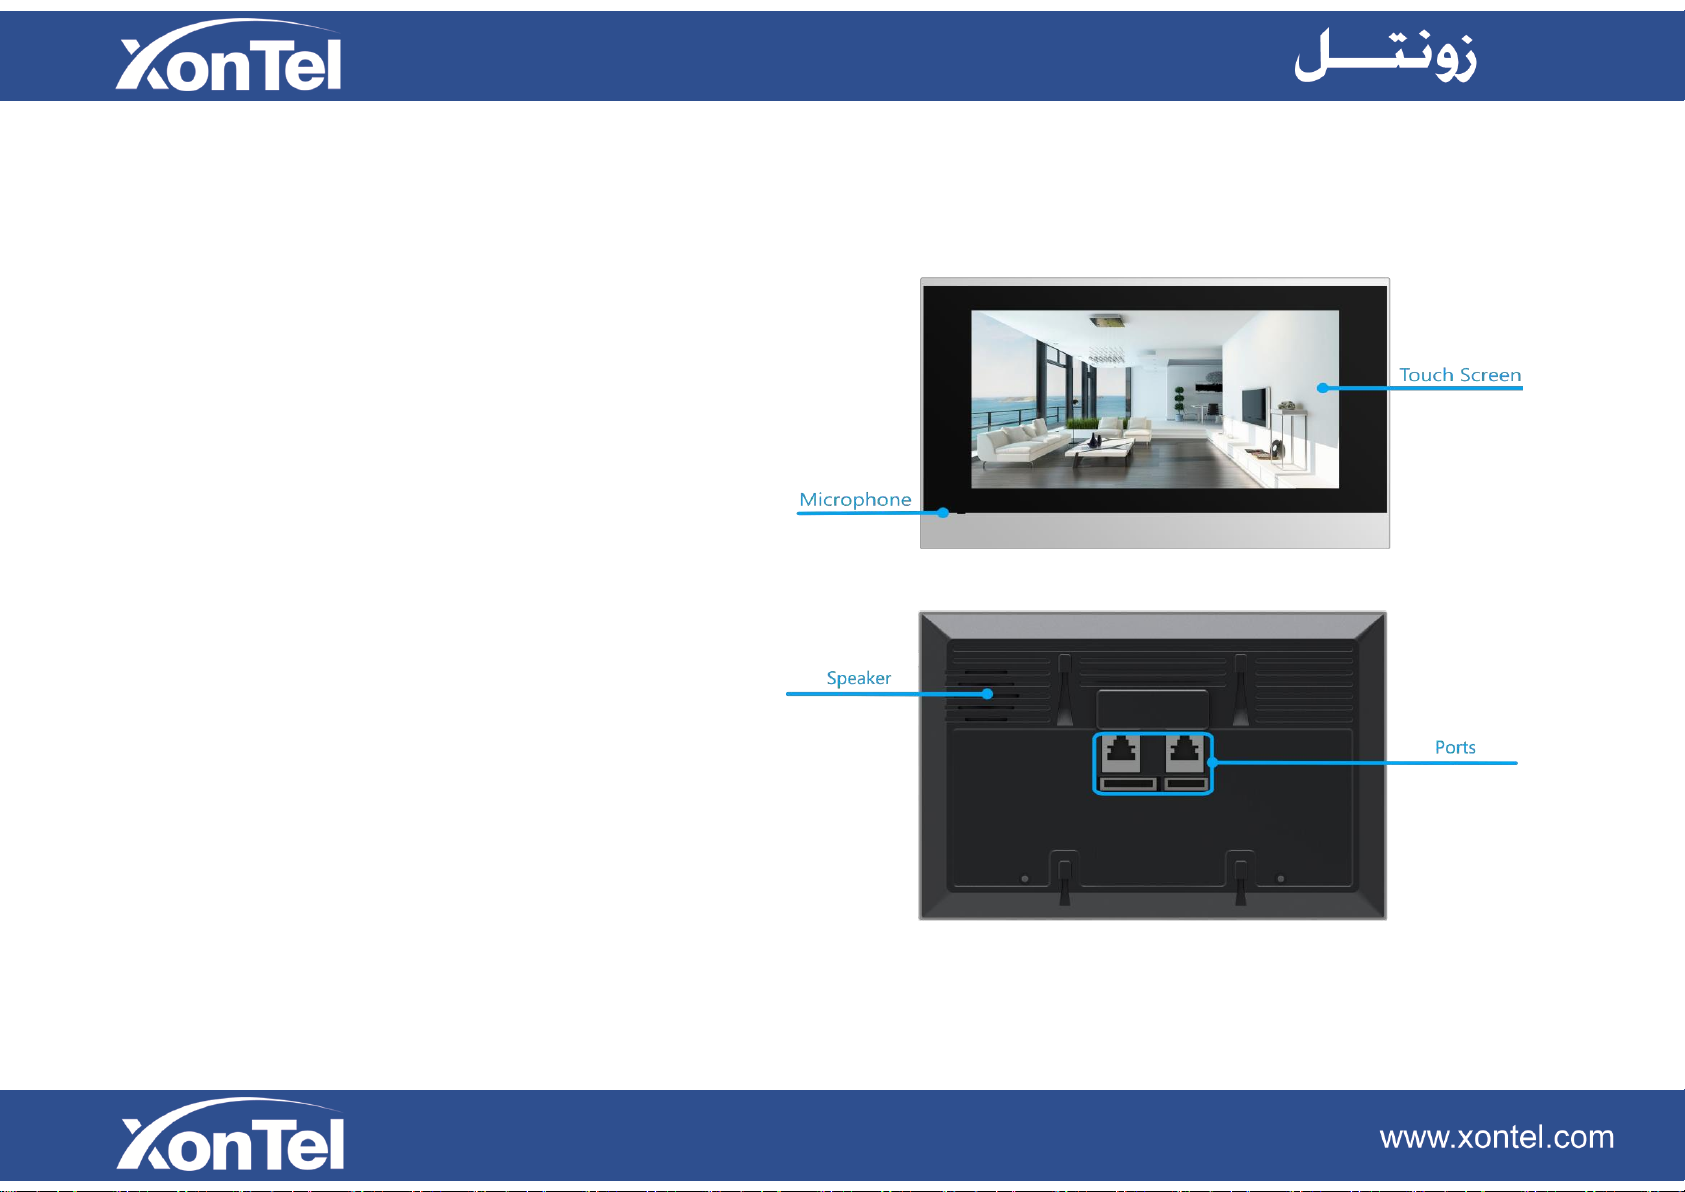
XT-13P is a Linux-based IP indoor monitor with a touch
screen. It incorporates audio communications, access control
sensor arming and obtain video stream from door phone or
IPC.
Its finely-tuned Linux OS allows for better suit the habit of
usage of local people. Powered by it, XT-13P multiple
ports, such as IO and Bell ports, can be used to easily
integrate external Arming systems, such as bell controller
and fire alarm detector, helping create a holistic control of
home safety and access control and giving occupants a
great sense of security.
It is applicable to multi-storey residential buildings or villas.
Page 9
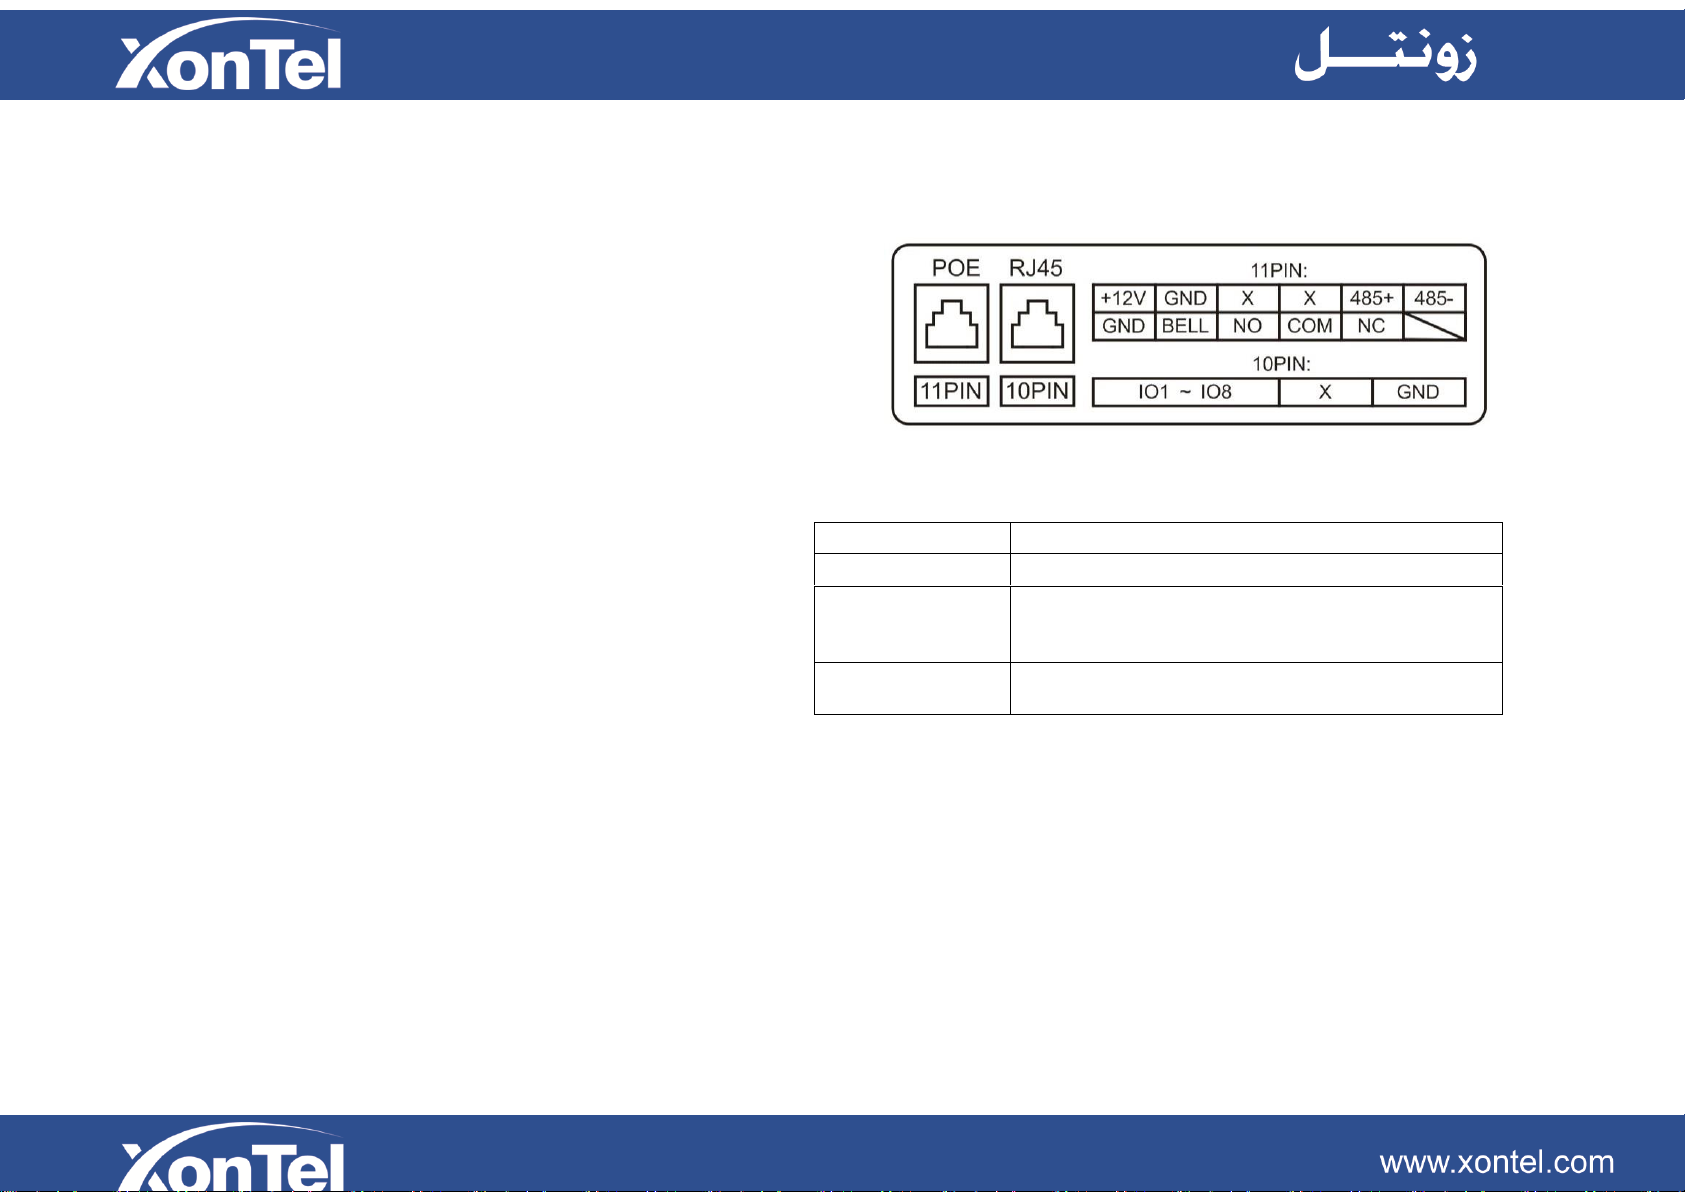
11 PIN connector
For power supply, RS485, Bell and Relay connector.
10PIN connector
For 8 security connector.
Ethernet 1
Network port with POE(Power over Ethernet),can be
connected to a hub, switch or other network access
devices.
Ethernet 2
Share the network access from Ethernet 1 port, and
for PC and other equipment connection.
1.2 Power connection
The XT-13P is powered by simply connecting the two wires
of the power adapter to the wiring interface on the back of
the indoor monitor.
XT-13P also support POE (Power Over Ethernet).
Page 10
2.
Daily use
2.1 Making call
There are two ways to make a call from the indoor monitor
to other units, which can be another indoor monitor or an
intercom app.
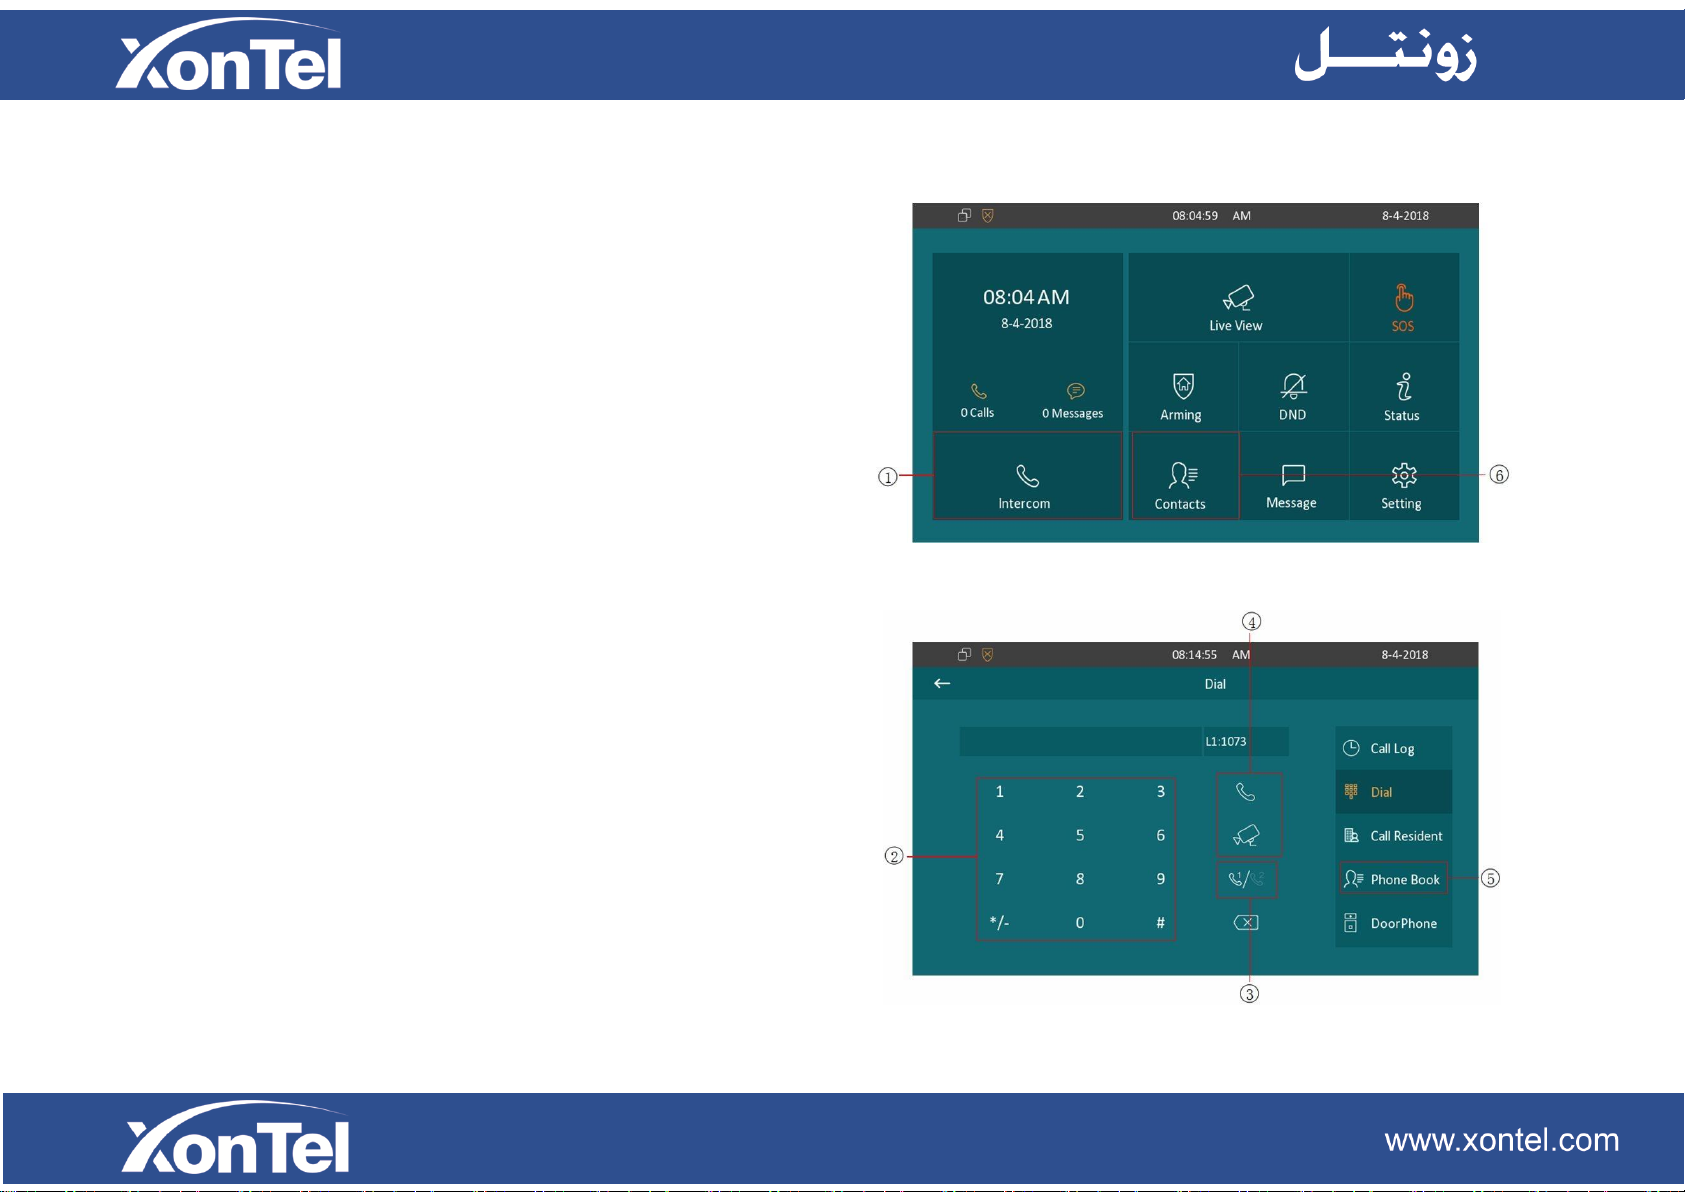
2.1.1 Calling from digital keypad
①Tap the icon to enter the call interface.
②Enter the number to call on the digital keypad,
③ Choose an account for this outgoing call.
④Tap the dial key, you can choose voice call or video call
to dial out.
2.1.2 Calling from phonebook
⑤ Tap the icon to enter the phonebook.
⑥ Or tap this icon to enter the phonebook.
Page 11
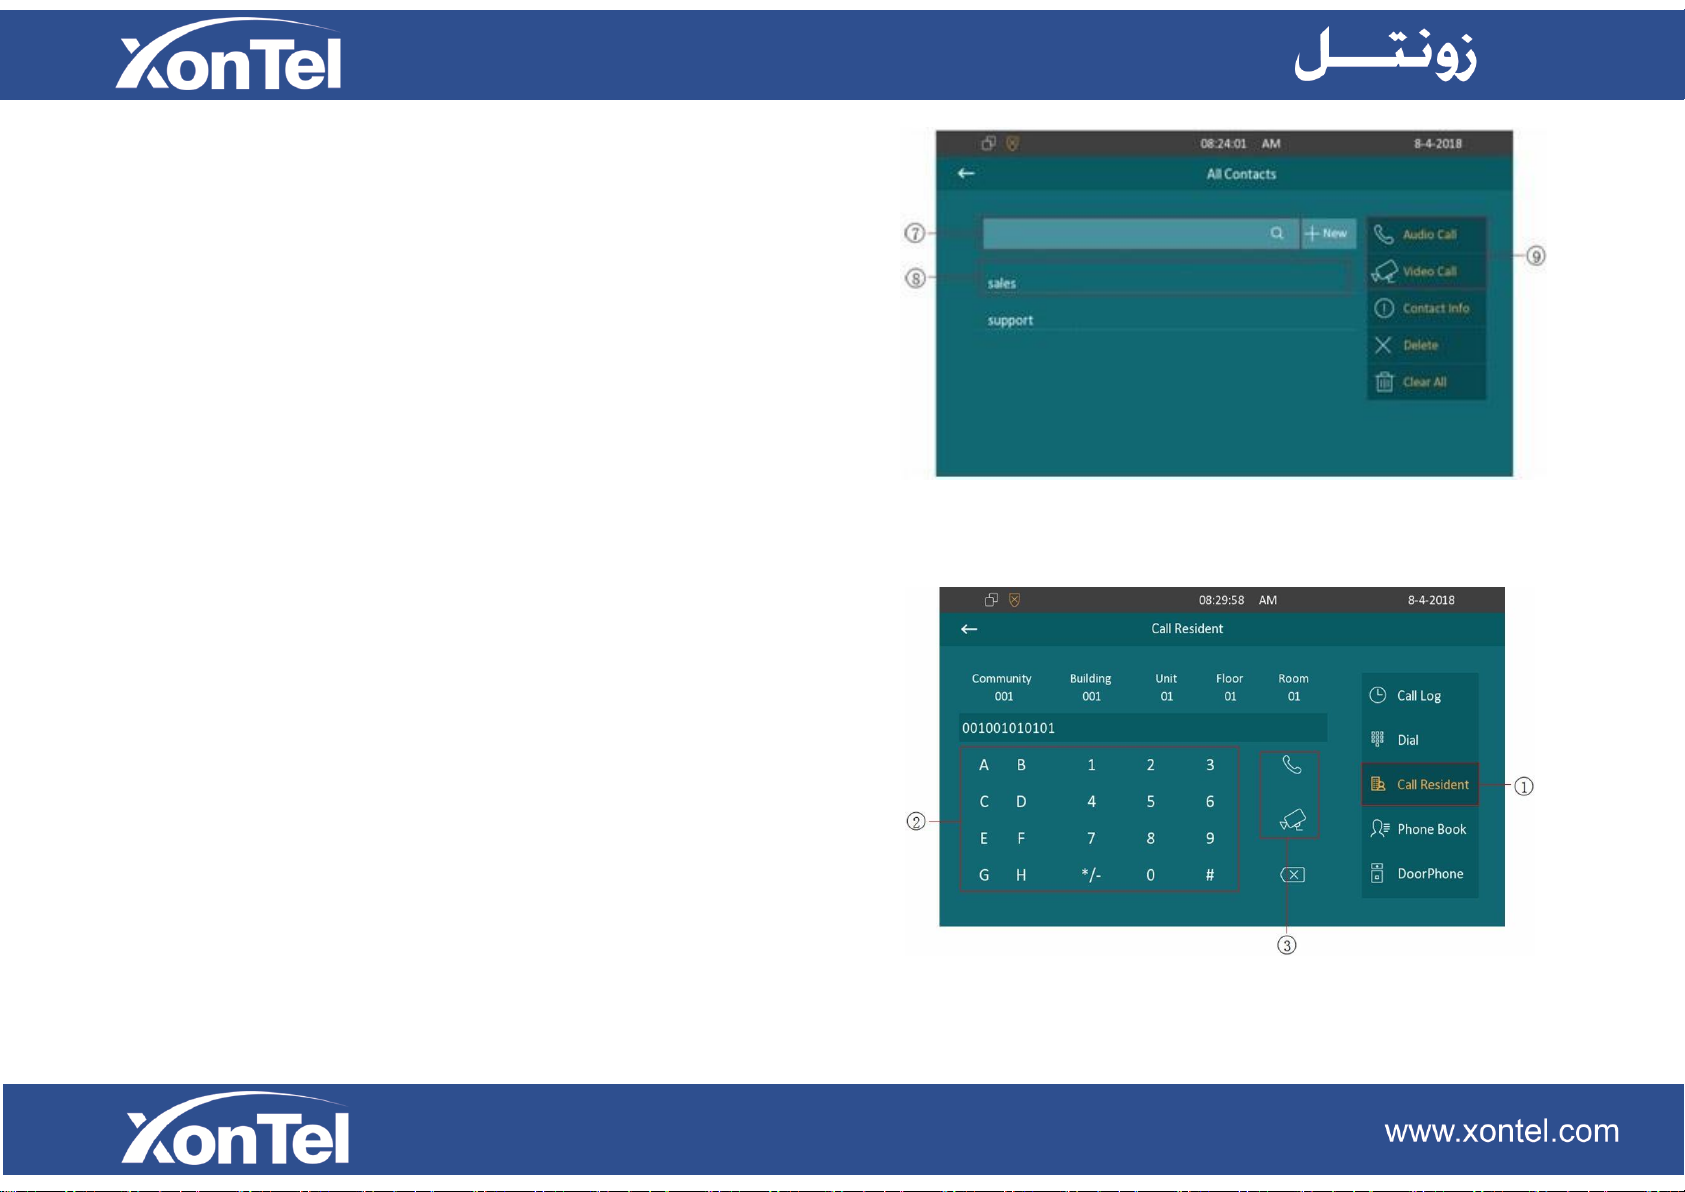
⑦After choosing group to search the list by number or
alphabet. XT-13P supports fuzzy matching query.
⑧Scroll up or down the pre-imported contact list.
⑨Tap the dial key next to the contact found.
2.1.3 Calling from call resident
①Press the icon to enter the call resident interface.
②Enter the room number you want to call, for example, if
you want to call the community1,Building 1, Unit 1, Floor 1,
Room1;enter 001001010101,and then ③press dial key.
You can choose the audio call or video call.
Page 12
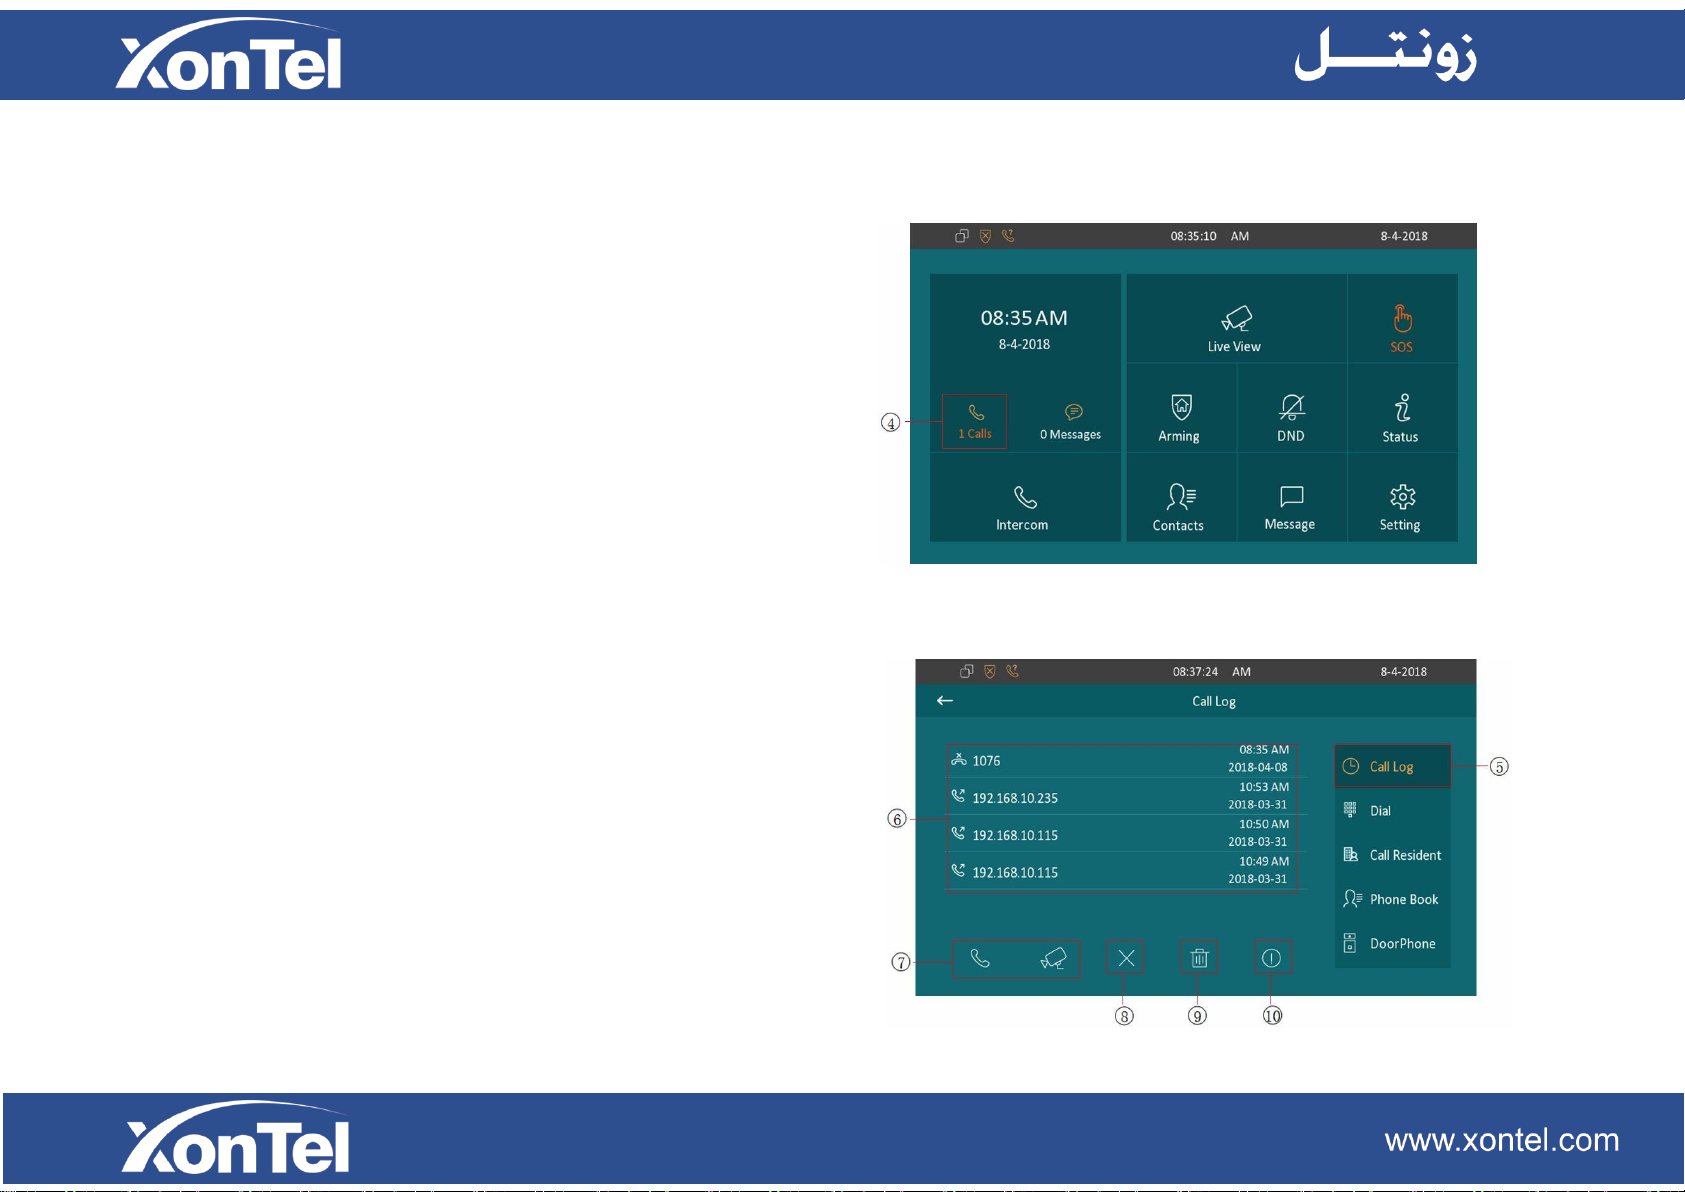
2.1.4 Calling from call log
④ Press the icon to enter the call log interface.
⑤You can also choose the icon in intercom interface to
check call log.
⑥Choose a log.
⑦Choose audio or video call to dial out.
⑧ Press the icon to delete the selected call log.
⑨ Press the icon to delete all of the call log.
⑩Press the icon to check exact information of the selected
call log.
Page 13
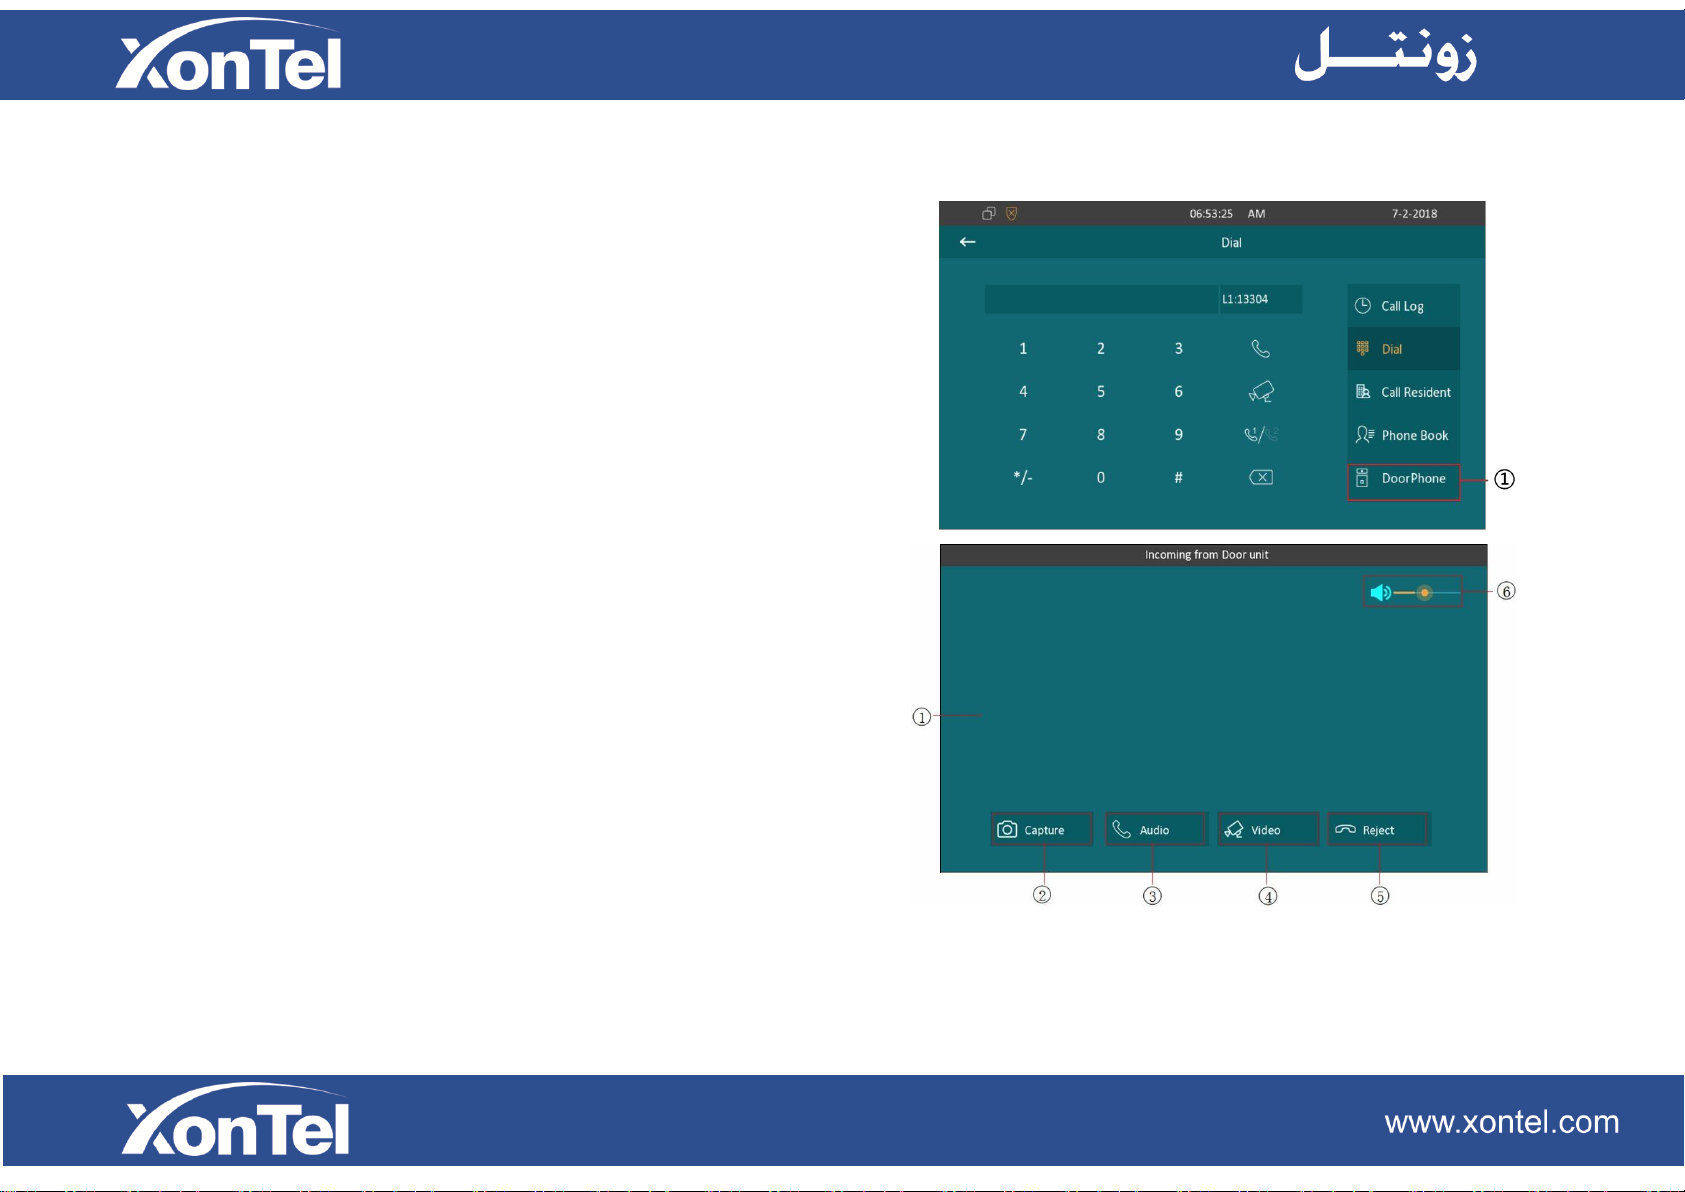
2.1.5 Calling from door phone
①Press to make a call out, if you want to call door phone
unit.
2.2 Receiving a call
2.2.1 Receive an incoming call
①There will be a video preview in this window, when you
receive an incoming call.
②Press the capture icon to manually capture the pictures
in interval time (5 seconds). If not, device will automatically
capture one picture in the video preview procedure (the
video preview procedure should more than 5 seconds).
③Press this icon to pick up the incoming call as an audio
call.
④Press this icon to pick up the incoming call as a video
call.
Page 14
⑤Press this icon to reject the incoming call.
⑥Press this icon to adjust the ring tone volume
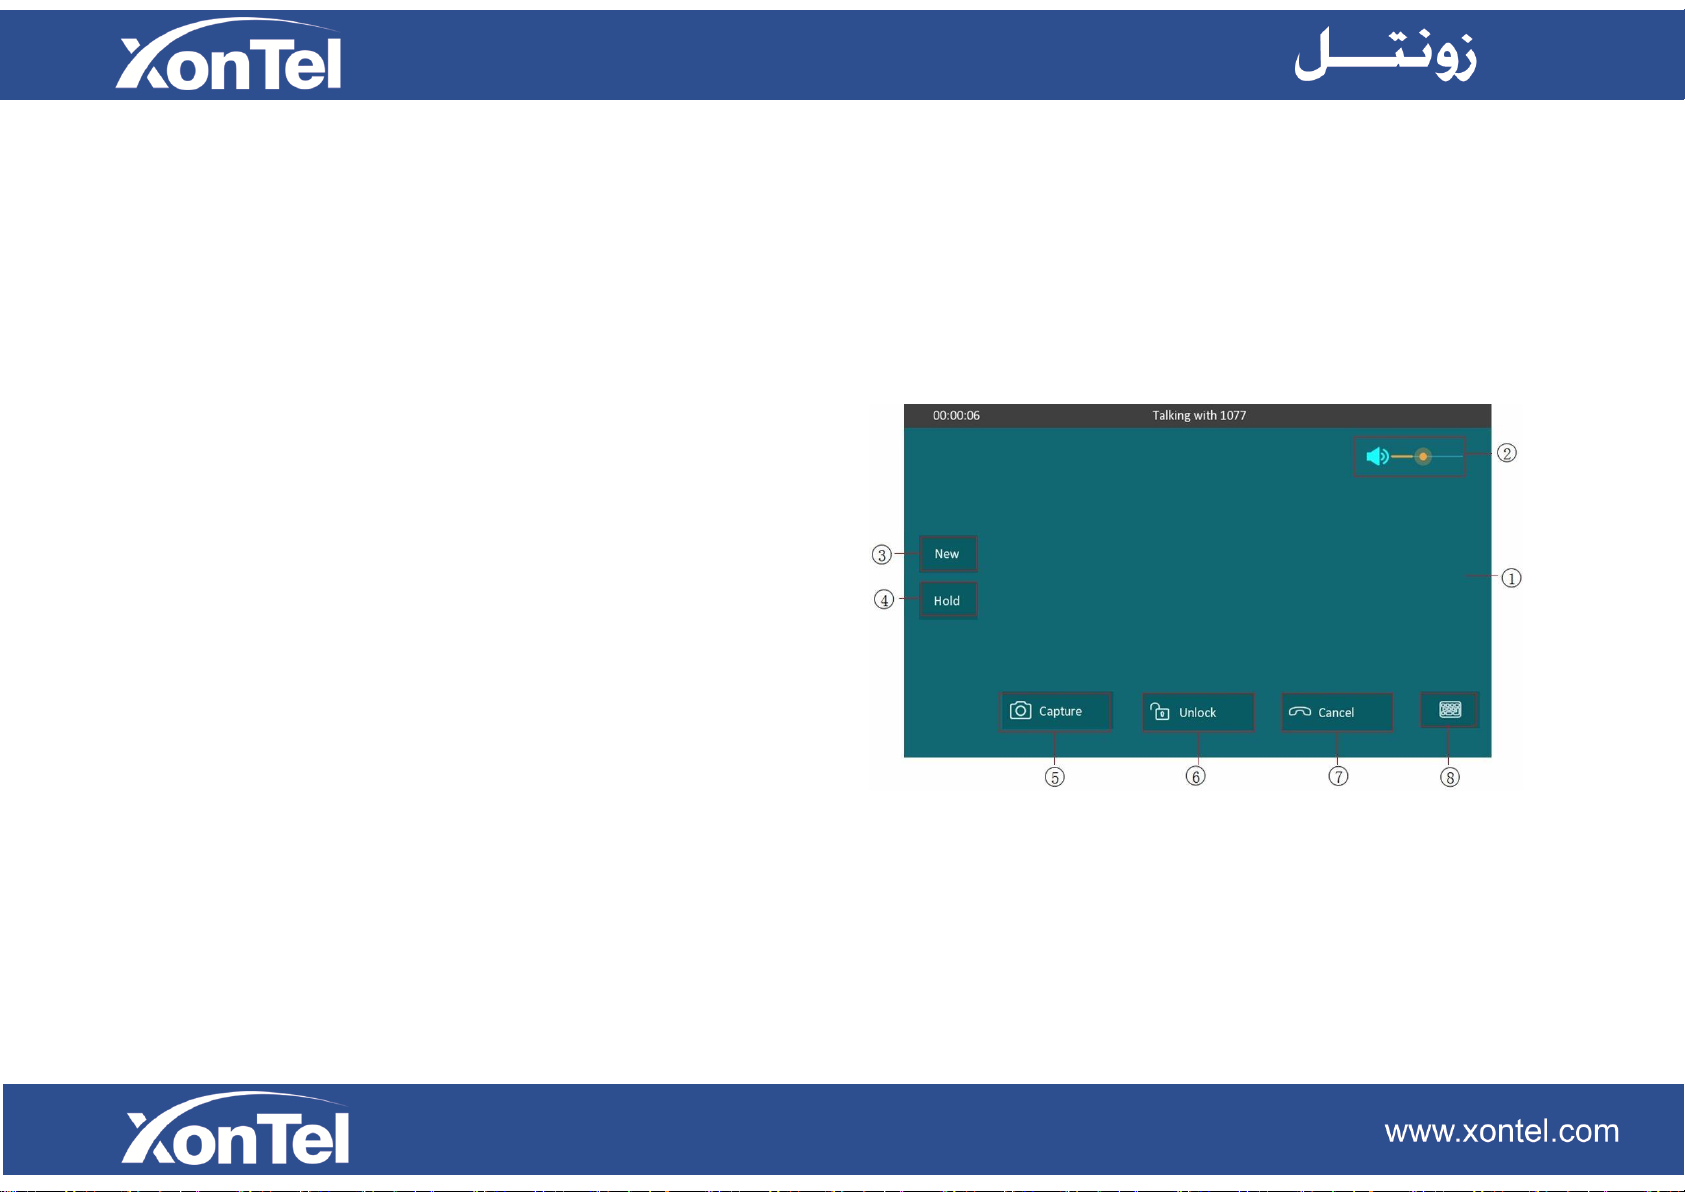
2.2.2 During the session
①The call video will be showed in this window.
②To adjust the volume here.
③Press this icon to dial out another number.
④Press this icon to hold the current call.
⑤Press this icon to capture the video.
⑥Press this icon to unlock the corresponding door
phone (if the call is from door phone)
⑦Press this icon to hang up the current call.
⑧Press this icon to open the 3*3 digital keypad.
Page 15
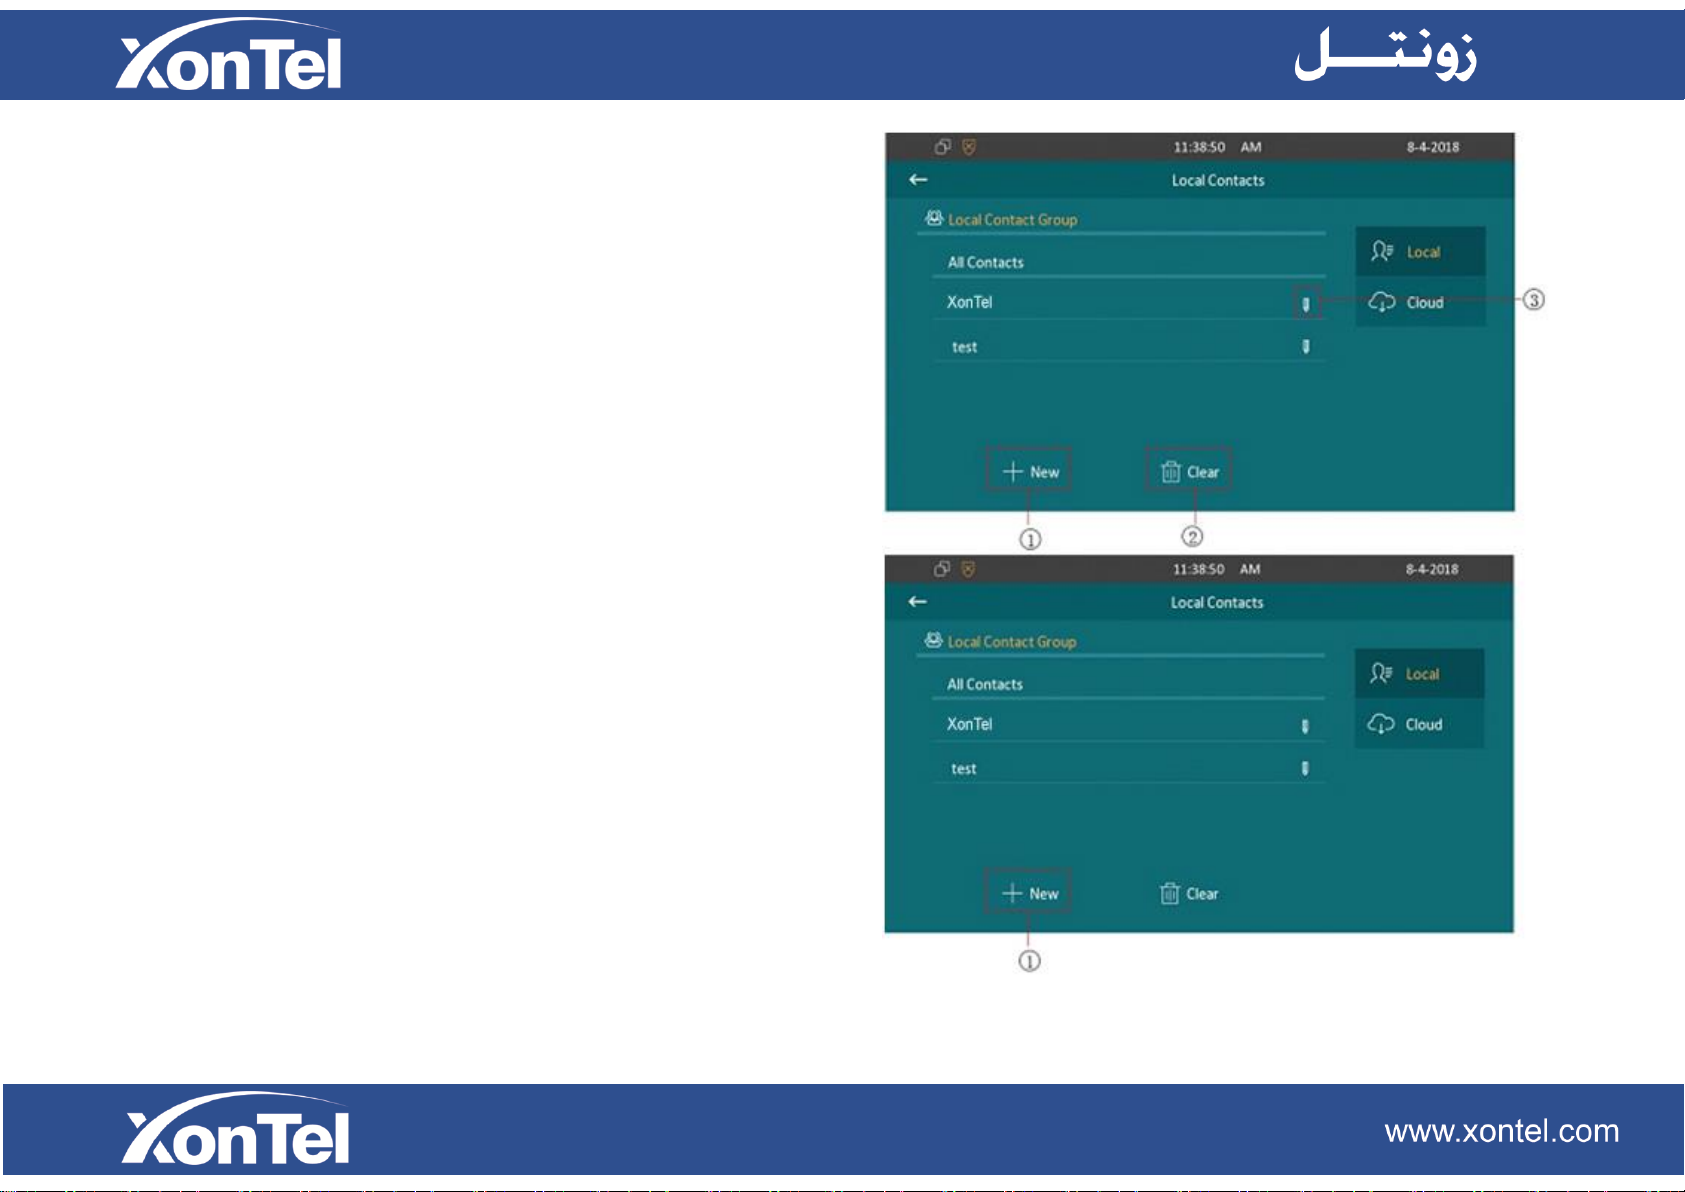
2.3 Contact
2.3.1 Local Phonebook
①Press the icon to create a new group.
②Press the icon to delete the groups you want to delete.
③Press the icon to modify the corresponding group.
Note: For cloud contact, it needs XT-13P to work
with a cloud server. Then cloud server will assign
contacts automatically. For more information, please
contact with your administrator.
2.3.1.1 Add a group
Enter the phone book interface, you can ①press the icon
to add a group.
② Type in the group name.
③ Choose a ring tone for this group.
Page 16
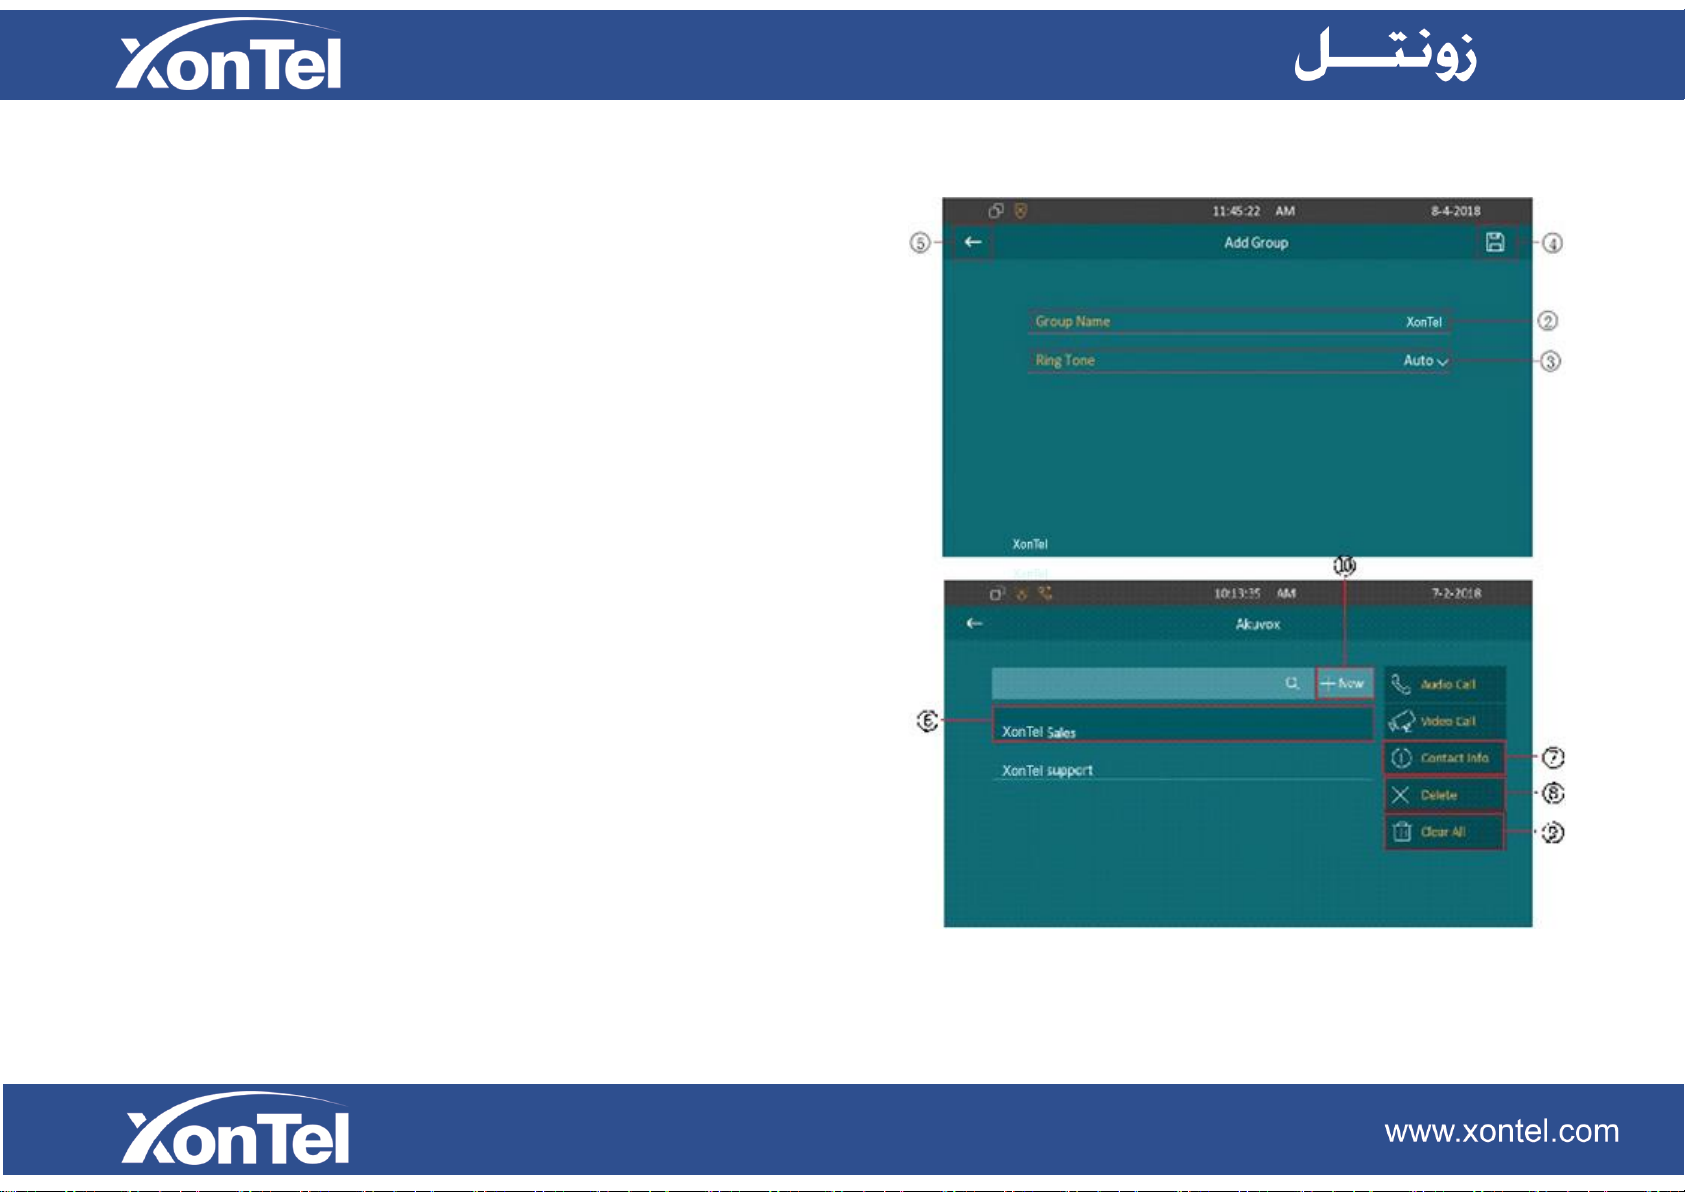
④Press this icon to save the group.
⑤Press the icon to cancel the operations.
2.3.1.2 Manage Contact
Enter the contacts interface, ⑥select a contact.
⑦Press the icon to check the exact information of selected
contact, you can also modify it in contact info interface.
⑧Press this icon to delete the selected contact.
⑨Press this icon to clear all contacts.
⑩Press this icon to create a new contact.
Page 17
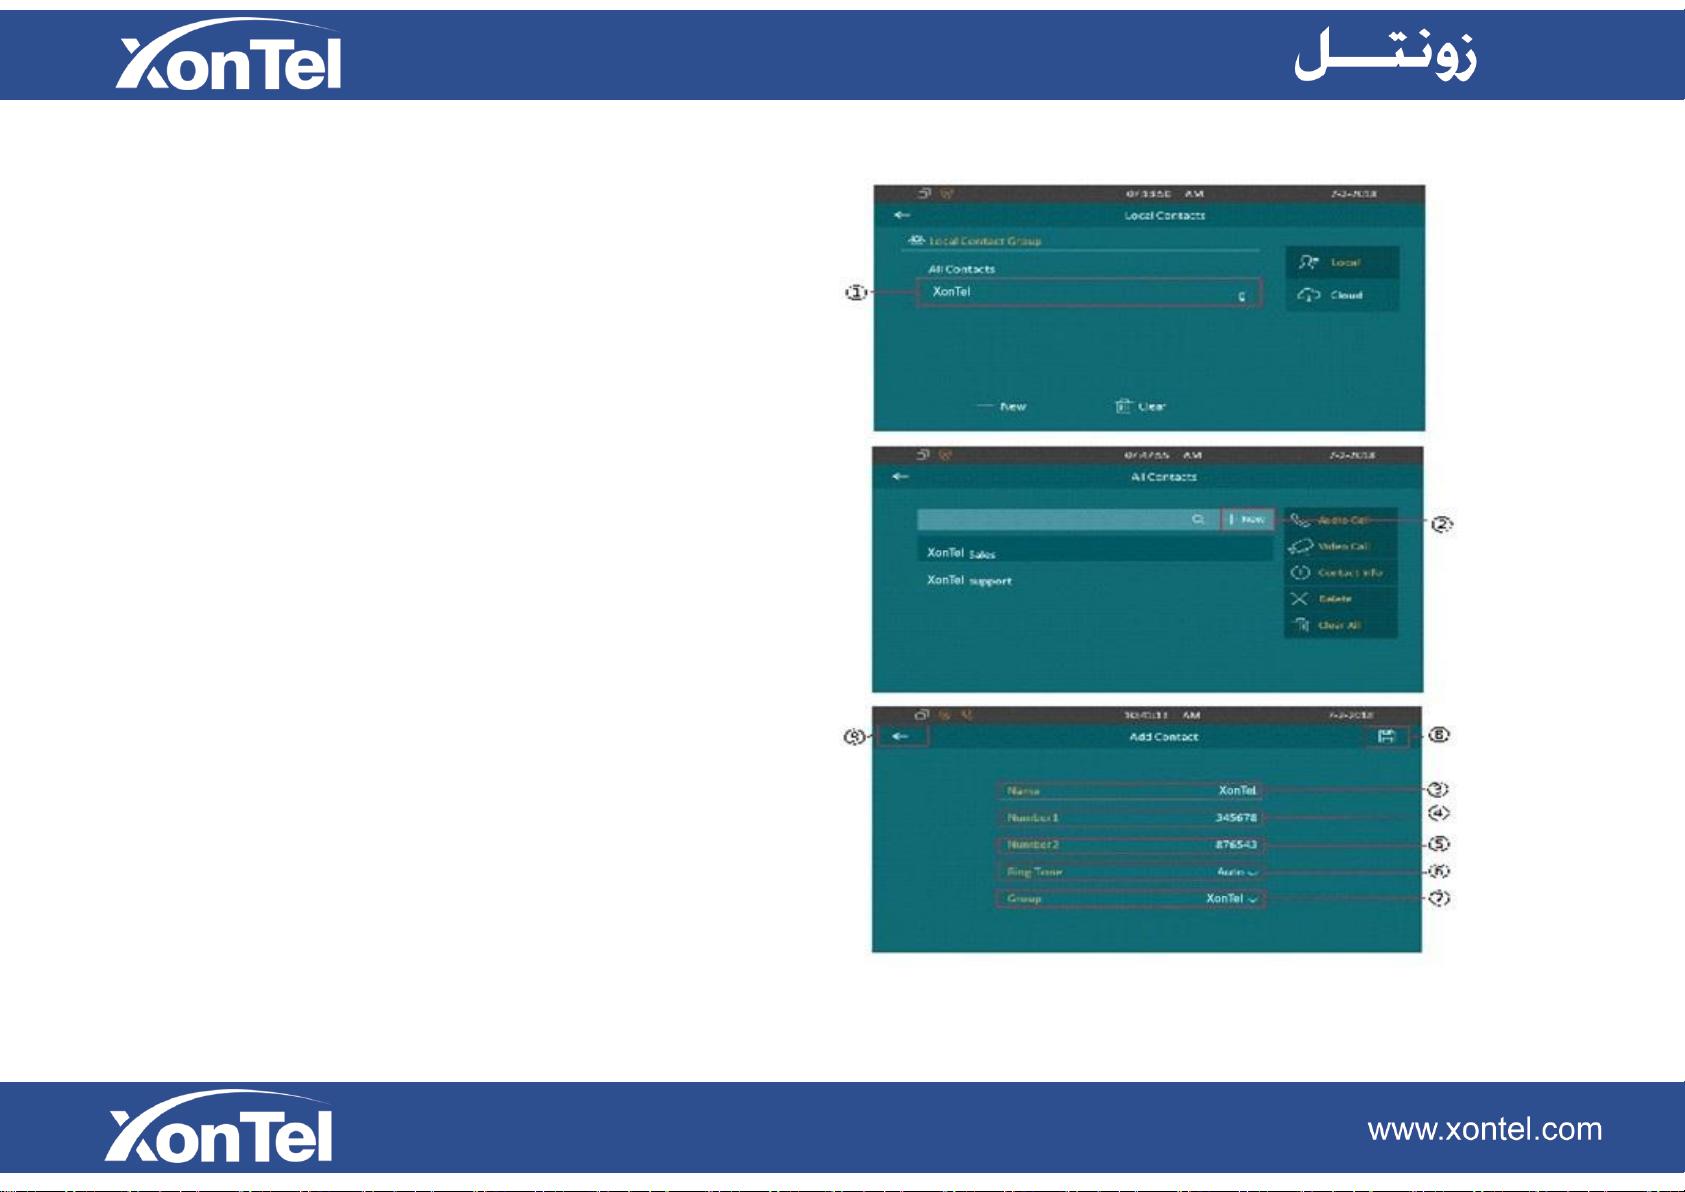
2.3.1.3 Add a contact
①Select a group, to check the contacts in this group.
②Press the icon to add a contact.
③Type in the contact name.
④Type in the number 1, it must be a room number.
⑤Type in the number 2, it can be a SIP number or IP
number.
⑥Select a specific ring tone for this contact.
⑦Select a group for this contact
⑧Press this icon to save the contact.
⑨Press this icon to cancel the operations.
Page 18
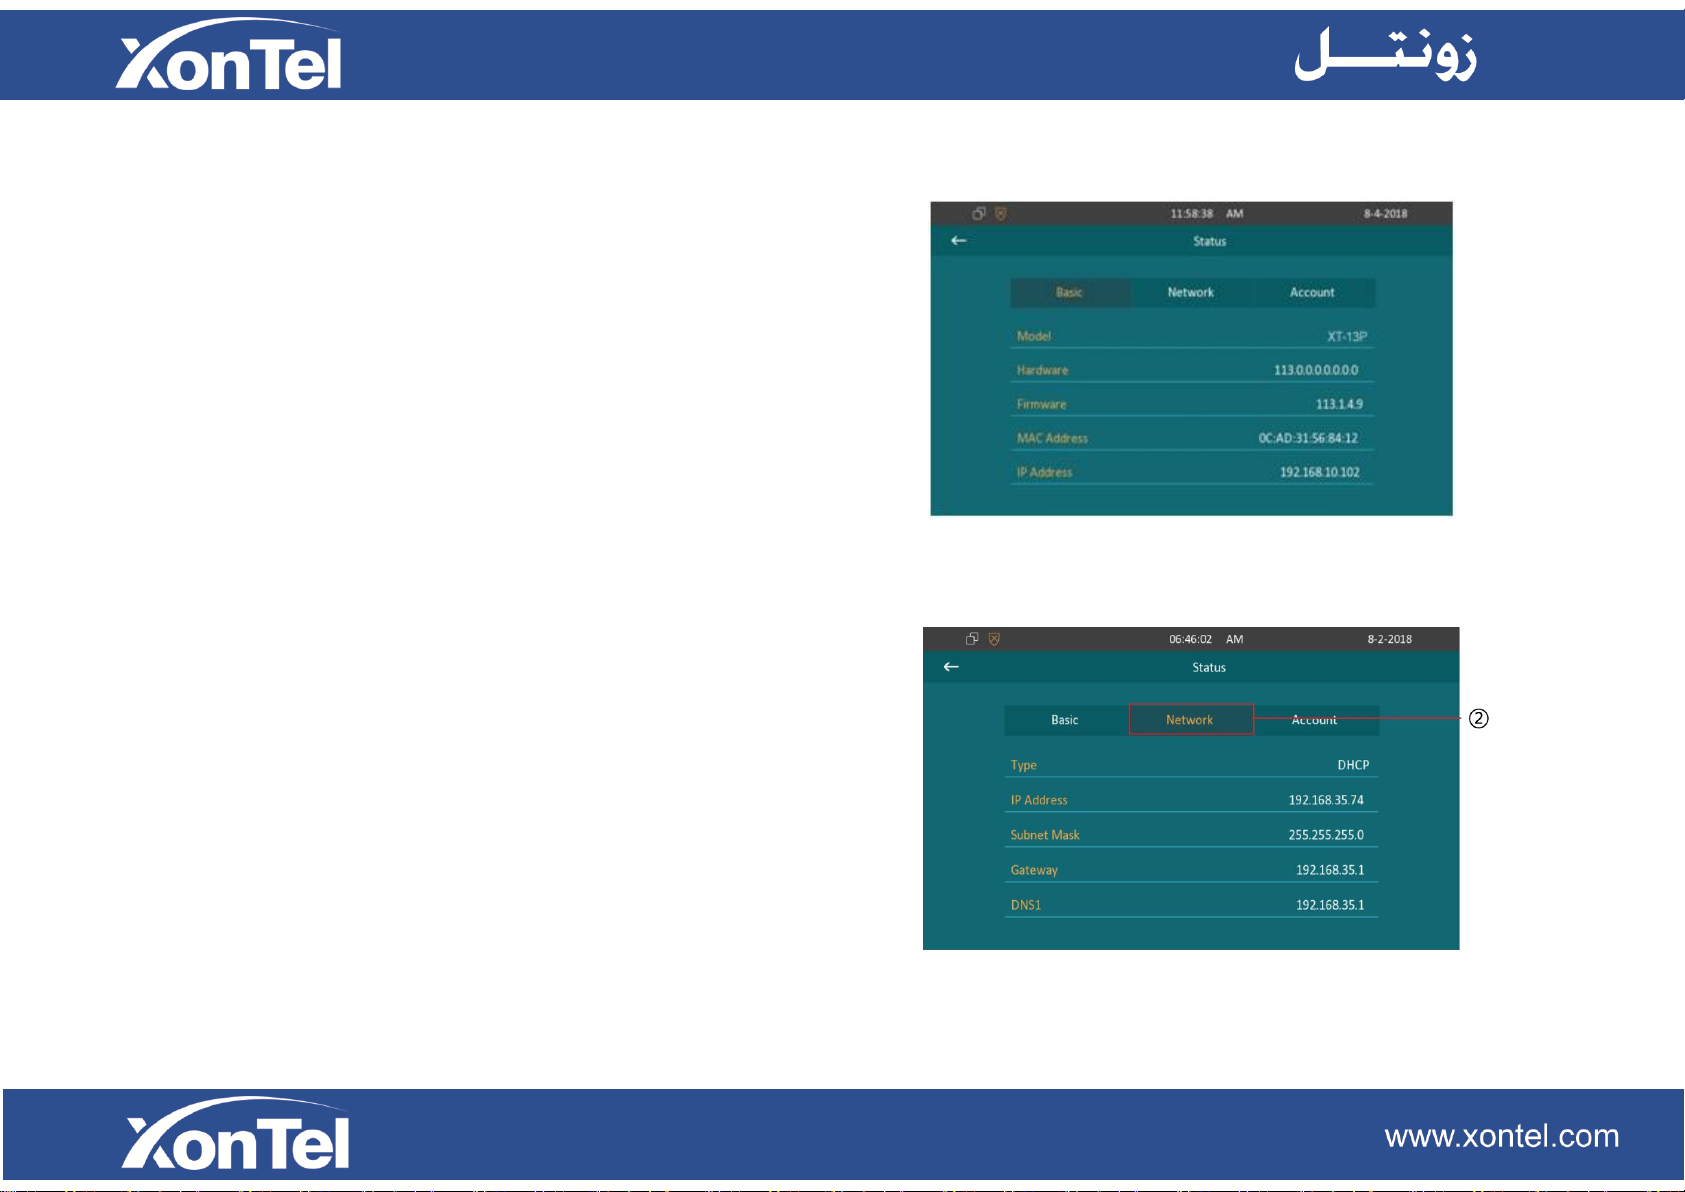
2.4 Status
2.4.1 Basic Status
To check XT-13P status by pressing Status icon on the
XT-13P idle screen.
After entering the status interface, it shows the basic status
as default. You can check the Model, Hardware version,
Firmware version, Mac Address, IP Address information
and so on.
2.4.2 Network Status
② Press the icon to check the network status. You can
check the LAN type, LAN IP, subnet mask, gateway and
DNS here.
Page 19
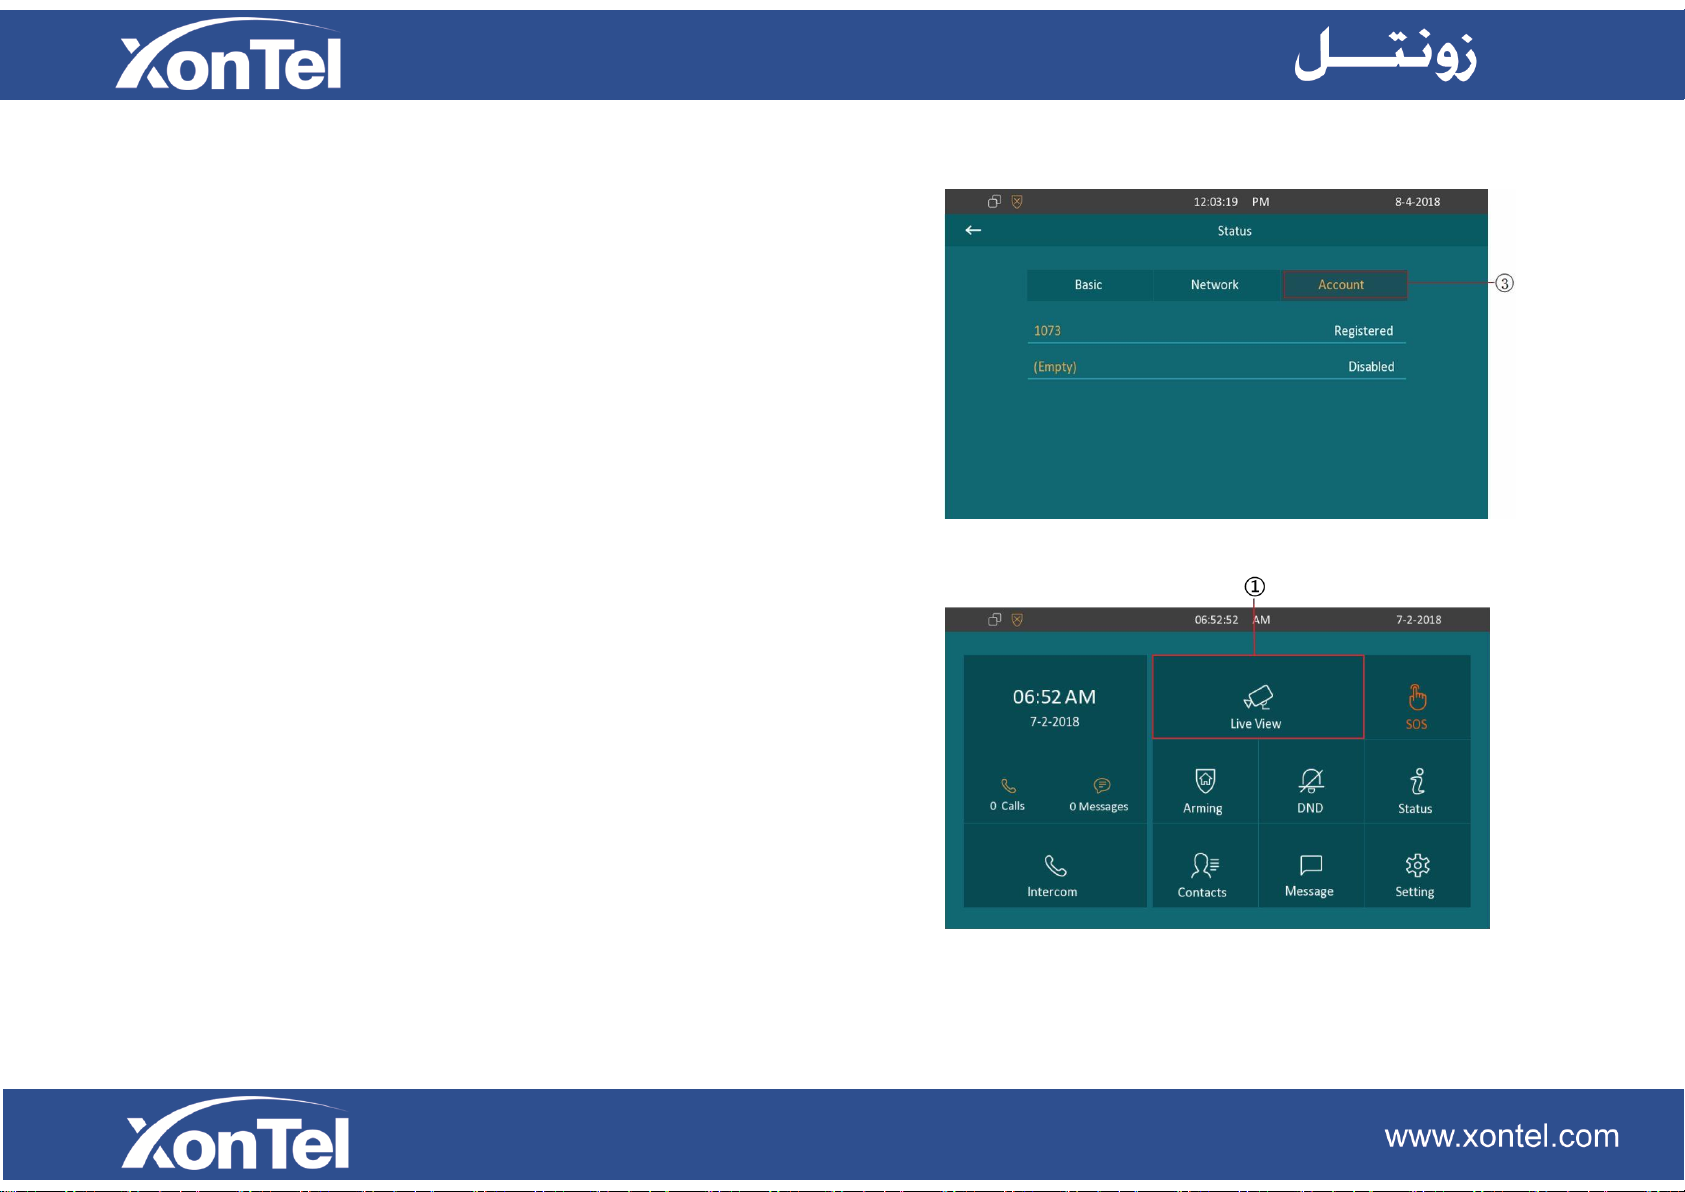
2.4.4 Account Status
③ Press the icon to check the account status. You can
check the account number and status here, registered
means it works normally.
2.5 Live view
Press the icon ① “ Live View “ to receive the video from
video intercom or community IP camera any time.
Page 20
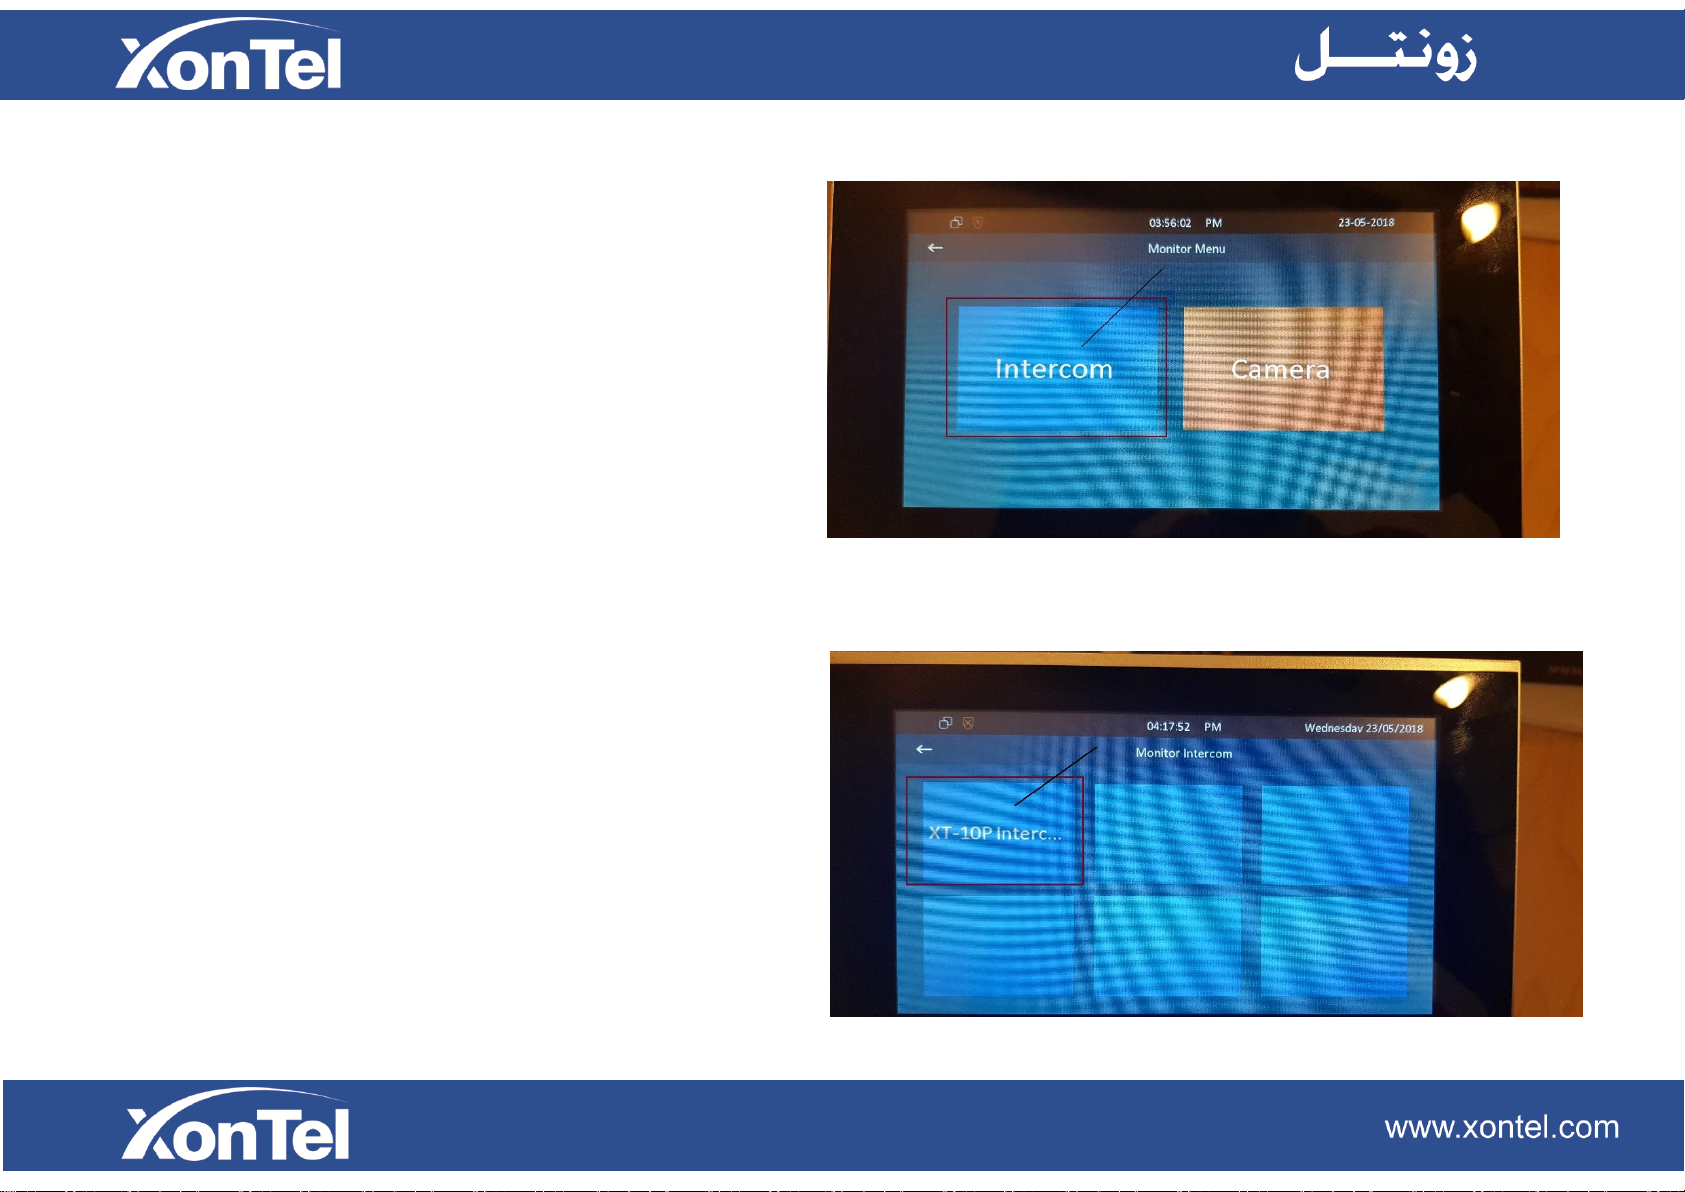
2.5.1 Intercom
By pressing the icon “ Intercom “ then choosing the
defined door phone station in the “ Monitor Intercom “
menu which you set under the path "Setting-Advance-
Door Station", you can receive video from this door
phone.
Page 21
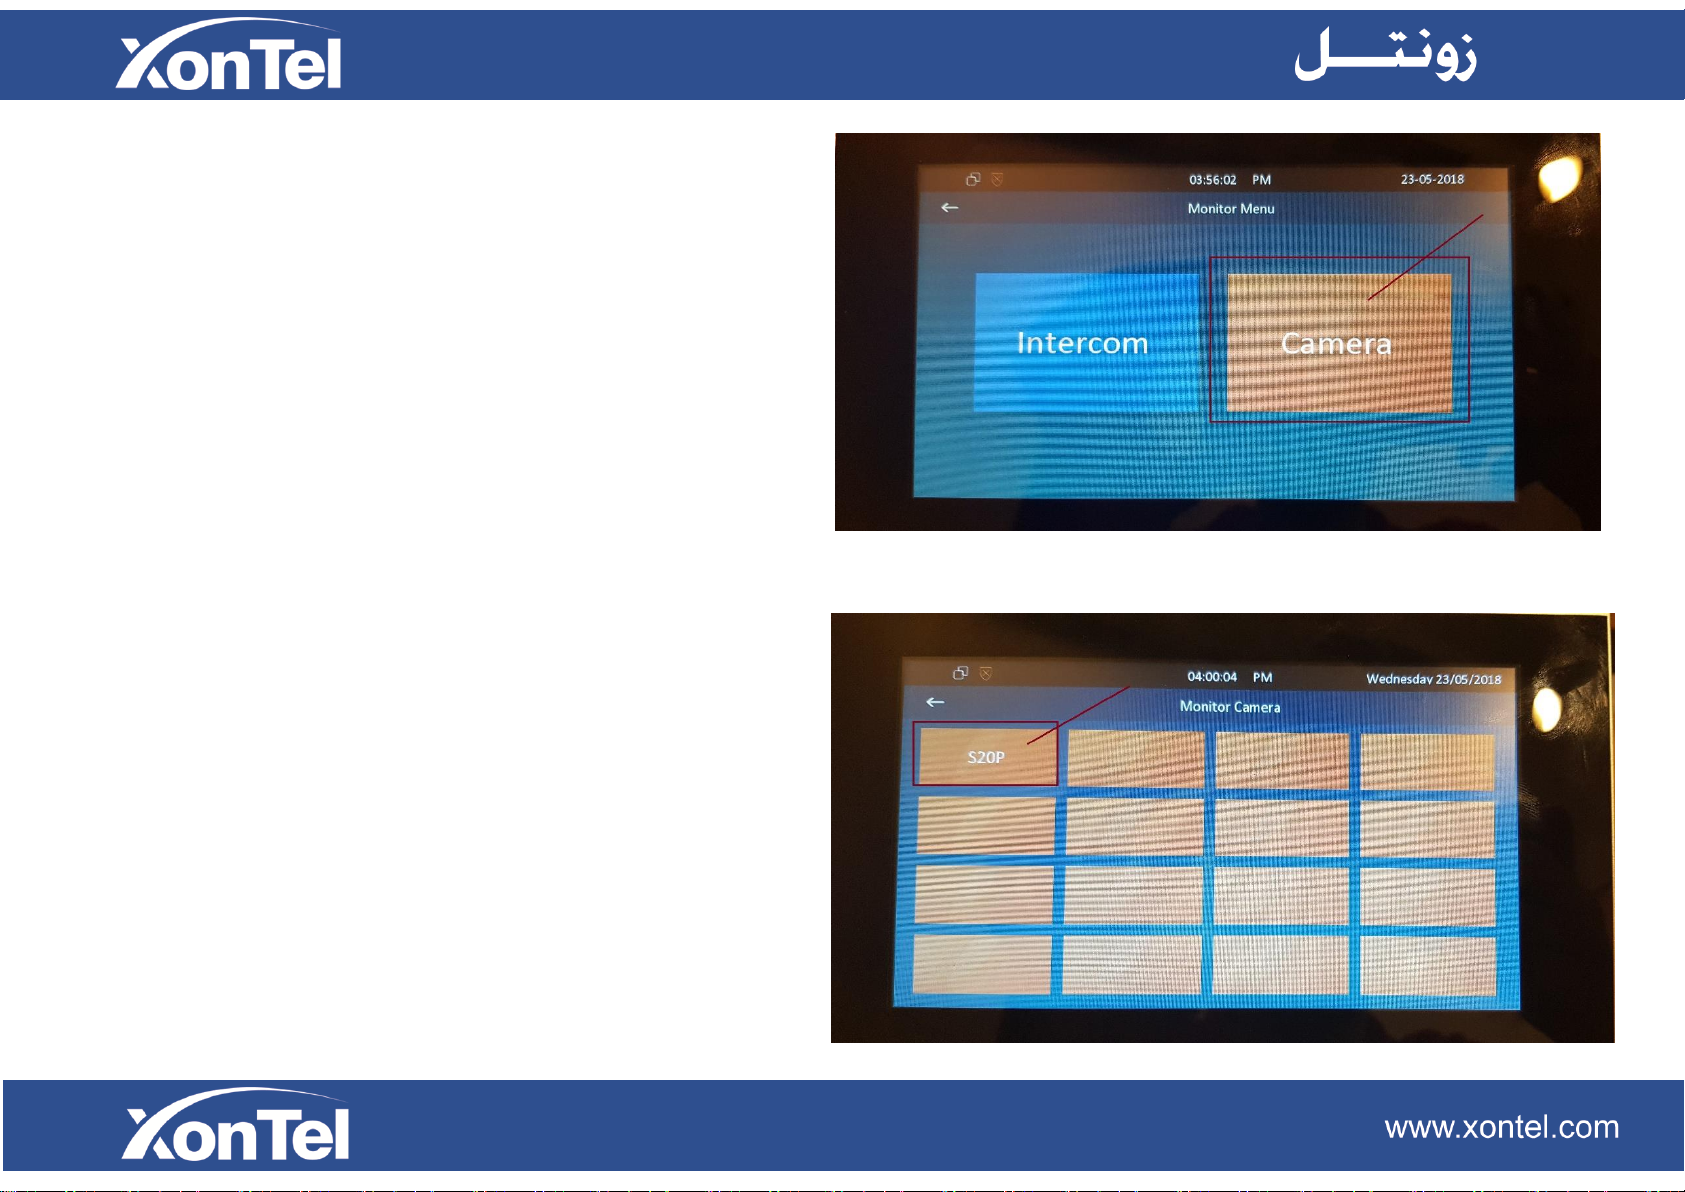
2.5.2 Camera
By pressing the icon “ Camera “ then choosing the defined
IP camera in the “ Monitor Camera “ menu which you set
through XT-13P web interface under the path " Phone-
Monitor- Web Camera", you can receive video from this
IP camera.
Page 22
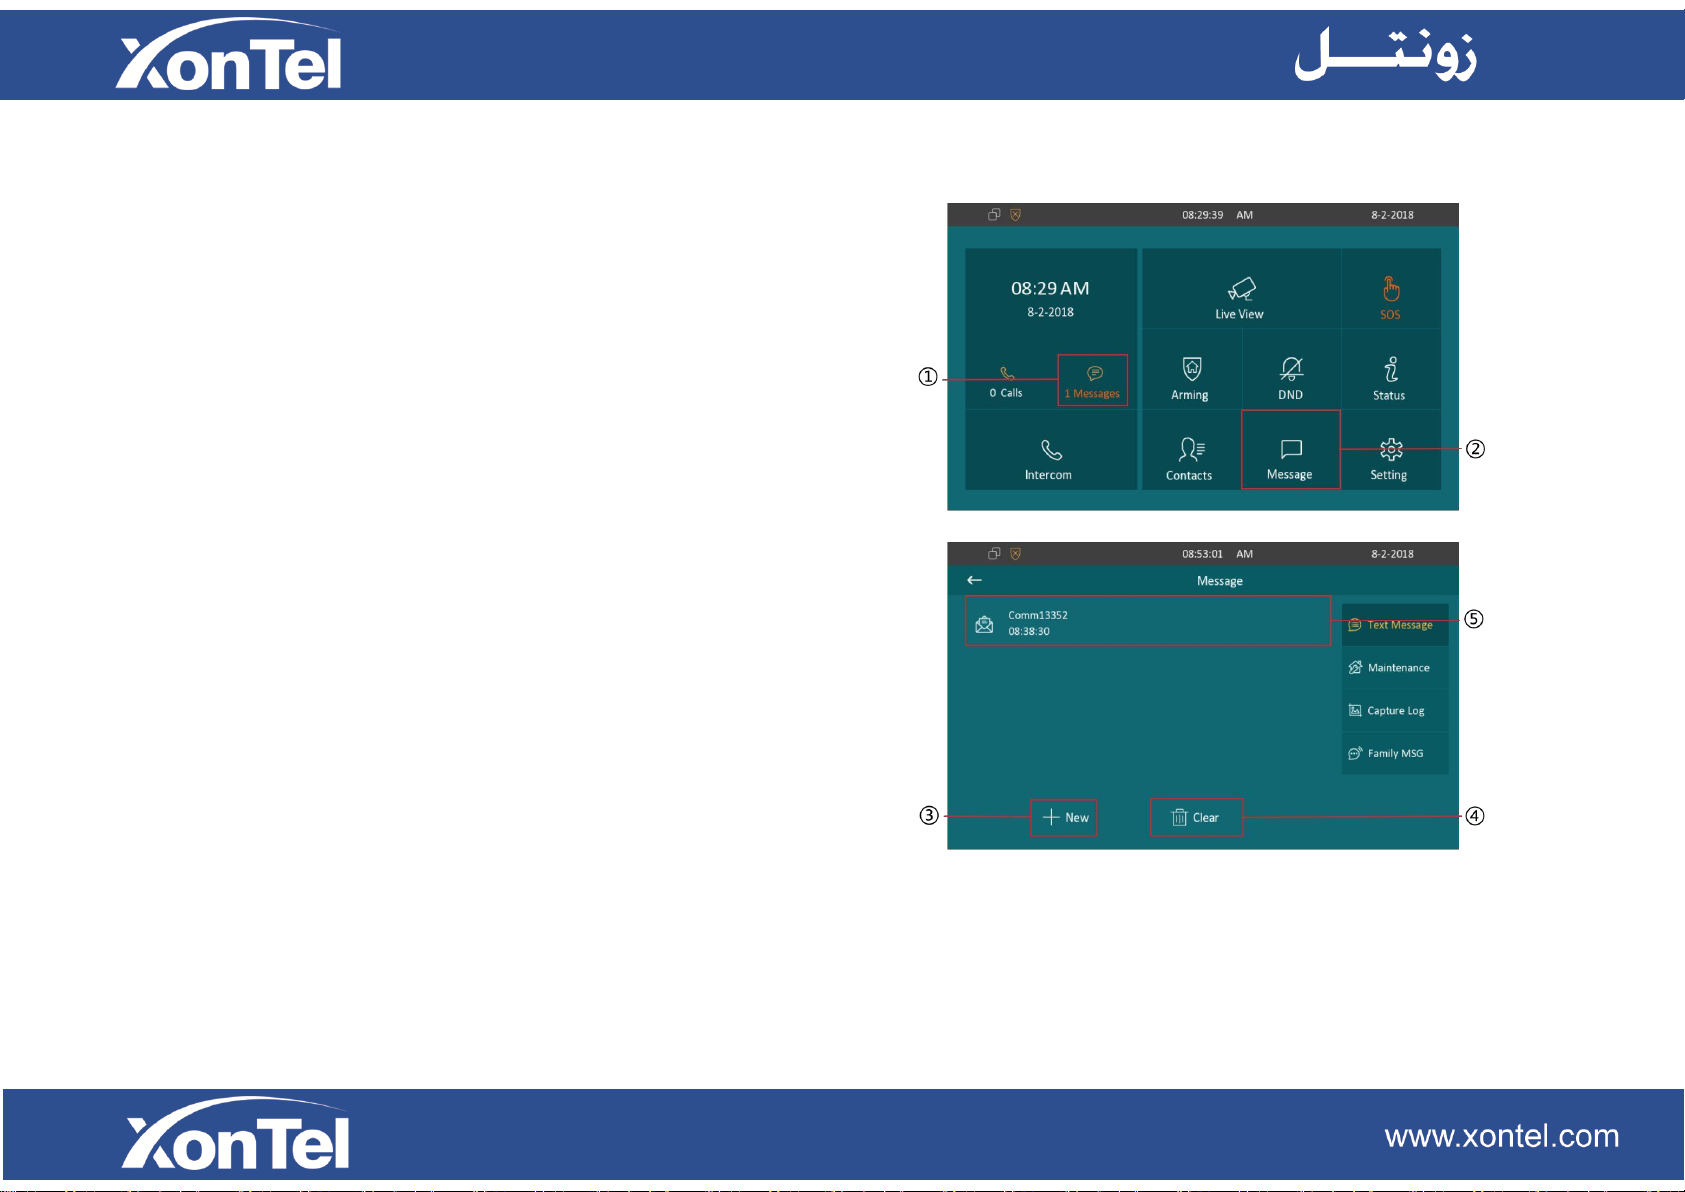
2.6 Message(s)
①Press the icon to enter the message interface. There will
be a notification here if there is any unread message.
Or ② press this icon to enter the message interface.
2.6.1 Text Message
By entering the message interface, it is text message list.
You can check the message you received or what you sent
here.
③Press this icon to create a new message.
④Press this icon to delete messages.
⑤Select a message to check the content.
Page 23
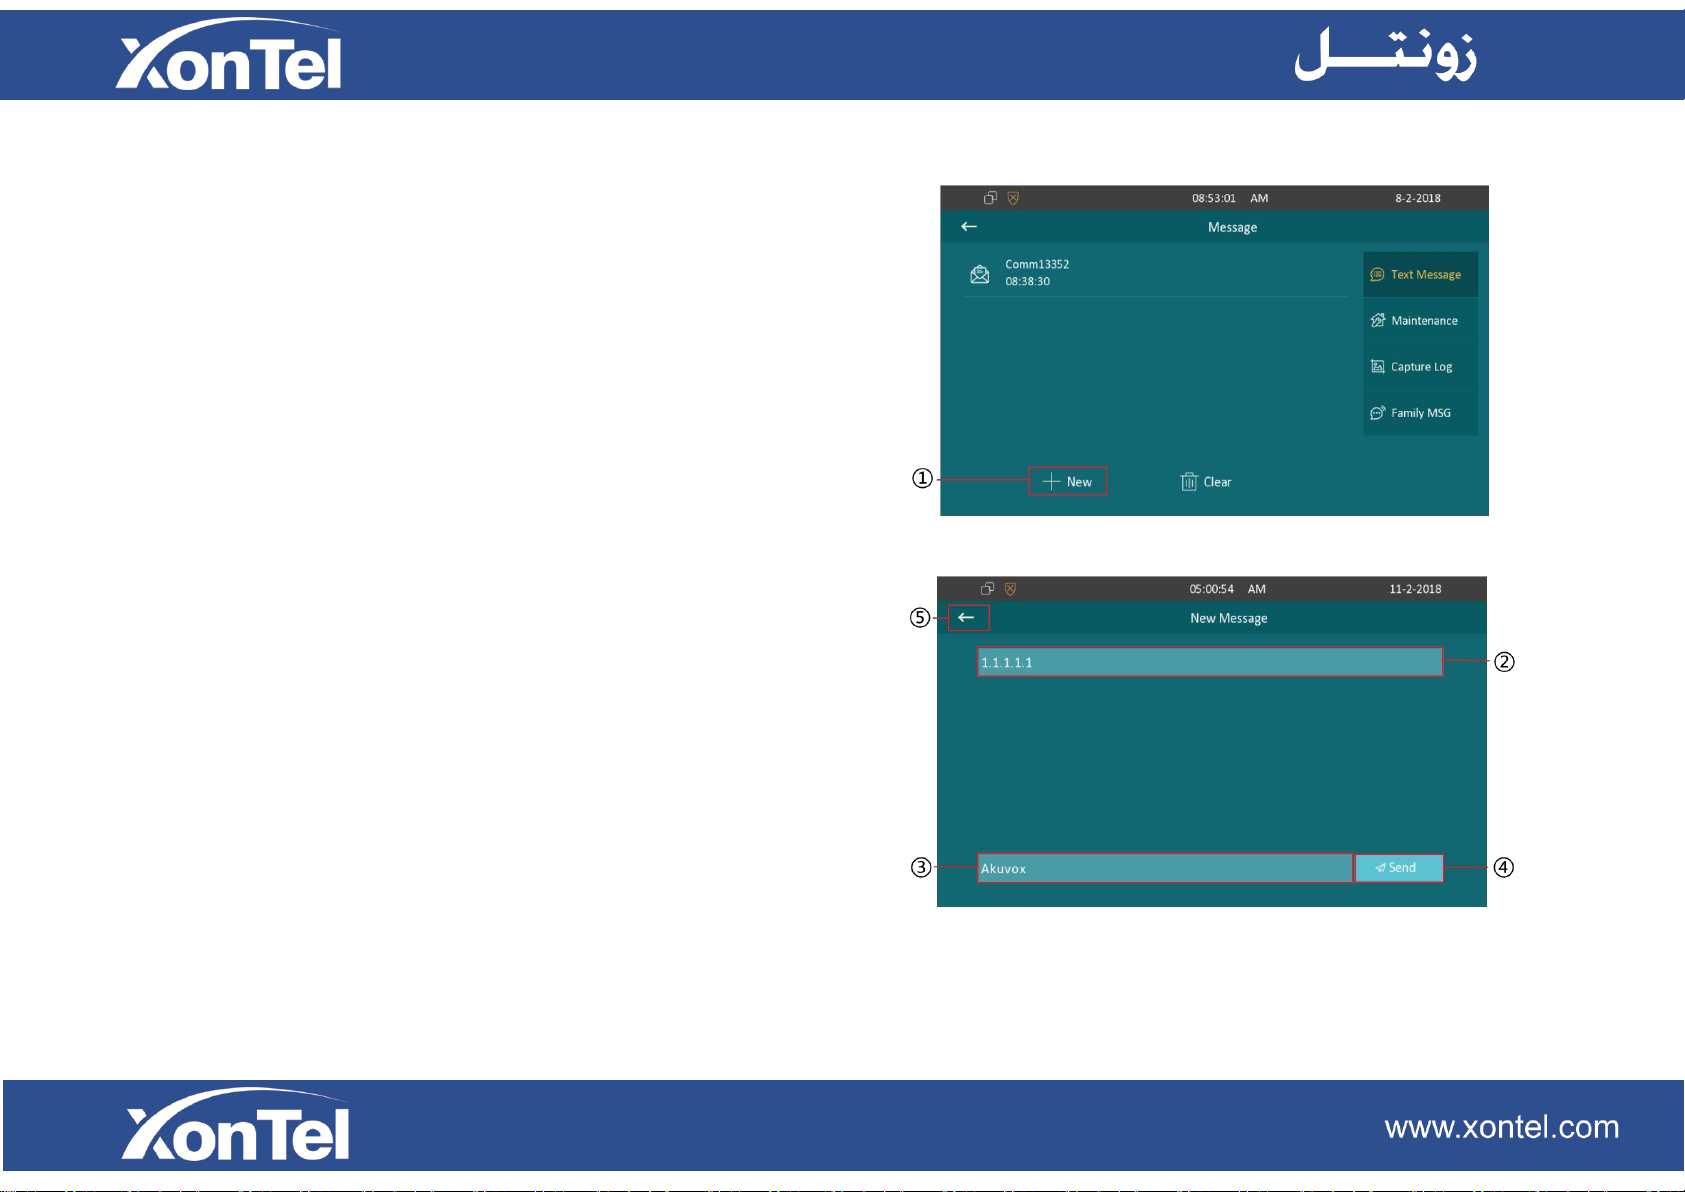
2.6.2 Create message
①Press this icon to create a new message.
②This option is to set the destination. If you want to call
community 1, building 1, unit 1, floor1, room 1, you need to
enter 1.1.1.1.1
③This option is to type in your message context.
④ Press the icon to send the message to the predefined
destination.
⑤Press the icon to cancel and back to sent list.
Page 24
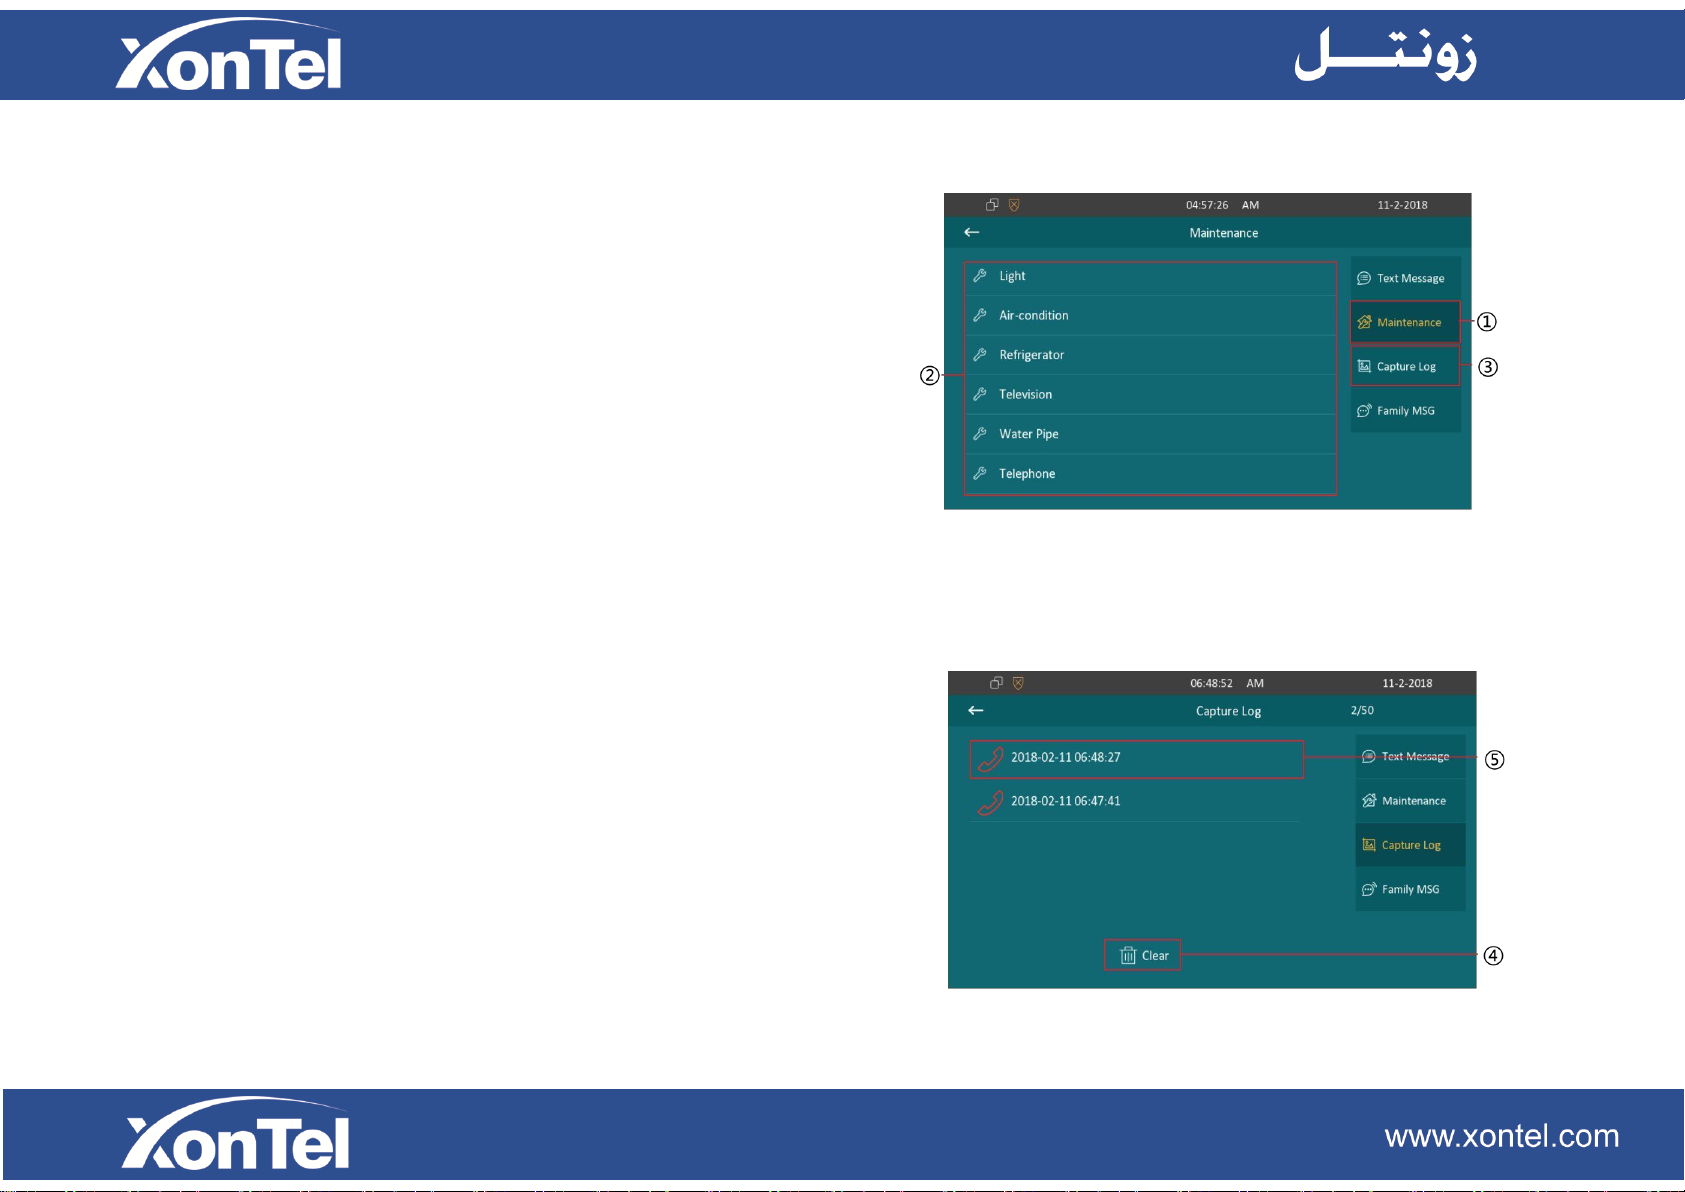
2.6.3 Maintenance
① Press this icon to enter the maintenance list. The
maintenance message will be sent to the property
management center so that you can asked for help.
②Select which problem you are facing. And press confirm
when you see the prompt. For example, if the light does
not work, click Light column, then confirm to ask for help.
2.6.4 Capture Log
③Press this icon to enter capture log list.
④Press this icon to delete capture logs.
⑤Choose a log to check the capture.
Page 25
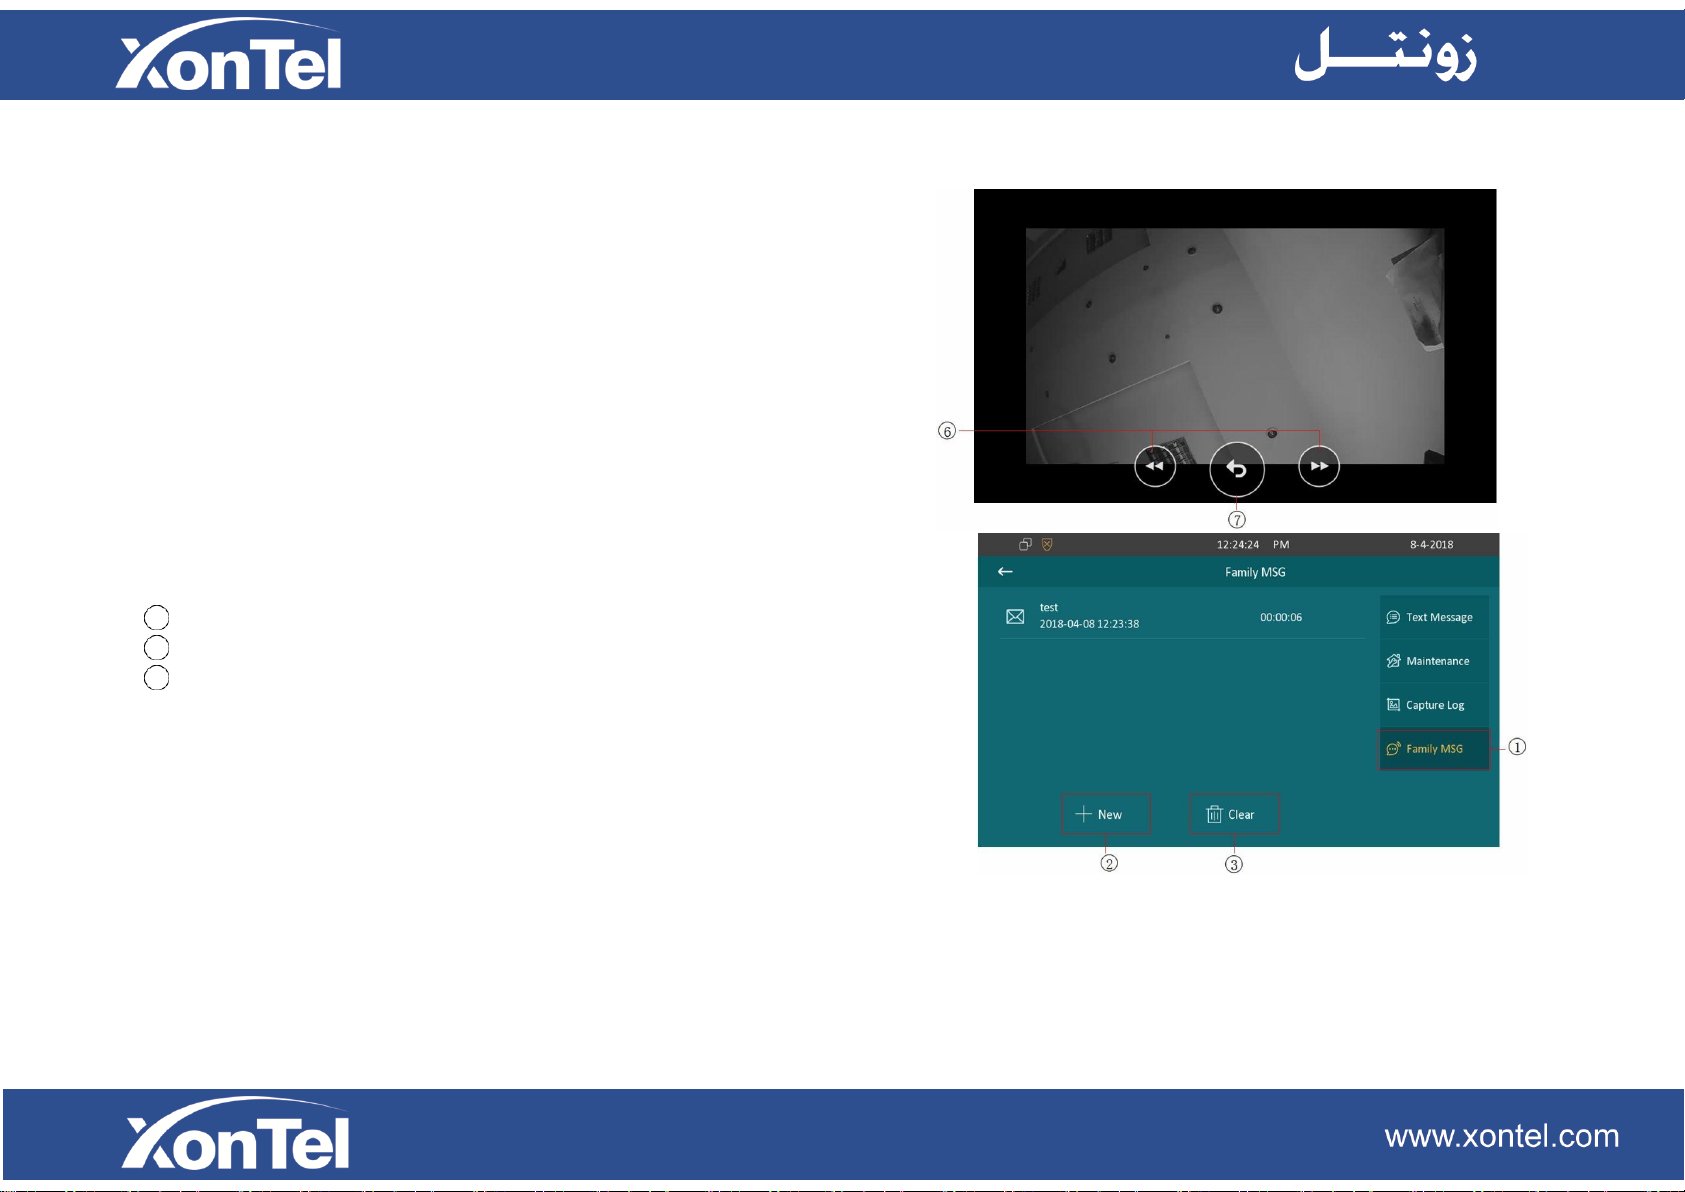
⑥Press left/right key to check the previous/next capture.
⑦ Press this icon to back to capture log list.
2.6.5 Family MSG
1
Press Family MSG icon to enter family audio messages list.
2
Press this icon to add a new audio massage.
3
Press this icon to delete the audio message.
Page 26
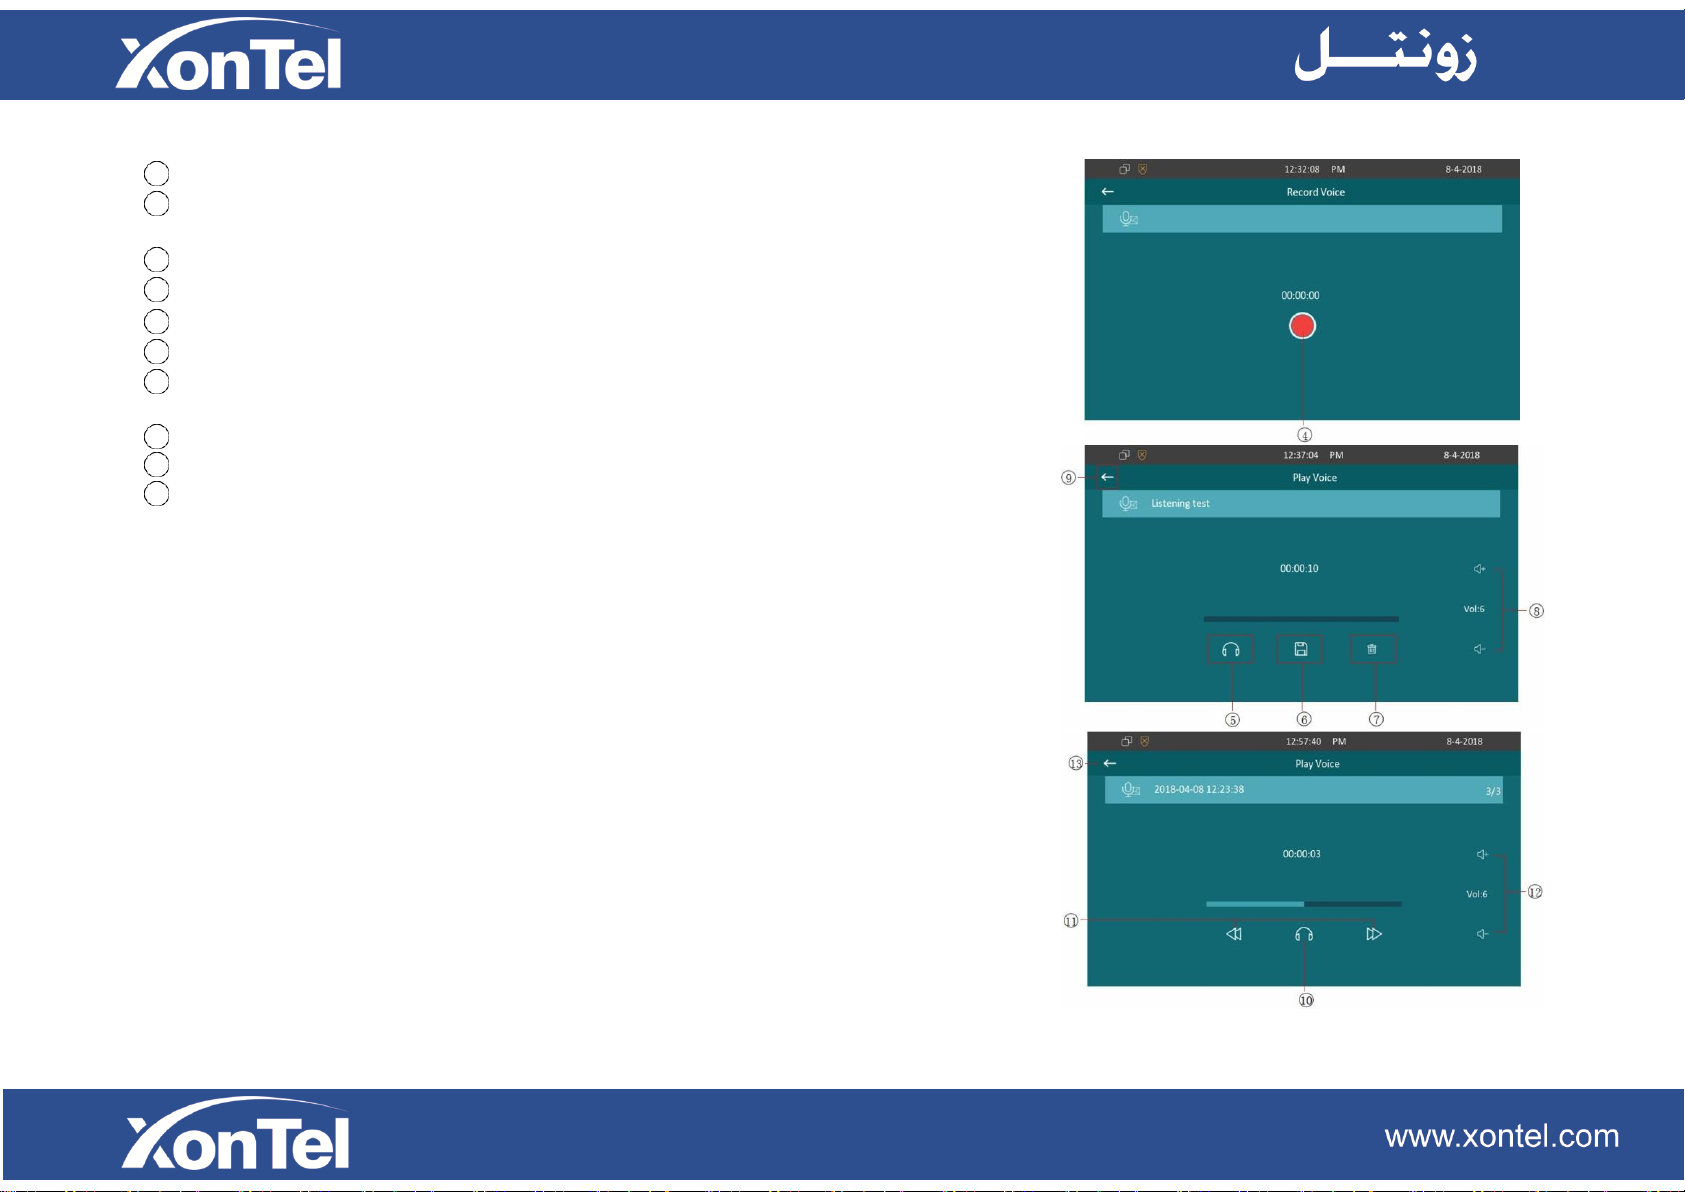
4
5
8
9
10
6
7
11
12
13
Press this icon to start/finish the record audio message.
When you finish the record audio message, press this icon to play/stop the record
voice message.
Press this icon to save and edit the name of the record voice message.
Press this icon to delete this voice message.
Press these icons to adjust the volume of the record voice message.
Press this icon to exit the record voice message page.
Click one of record voice message to view the voice message. Click this icon to
play/stop the playing audio.
Press the icon to play the last/next voice message.
Press the icon to adjust the volume of the voice message.
Press the icon to exit the voice message view page.
Page 27
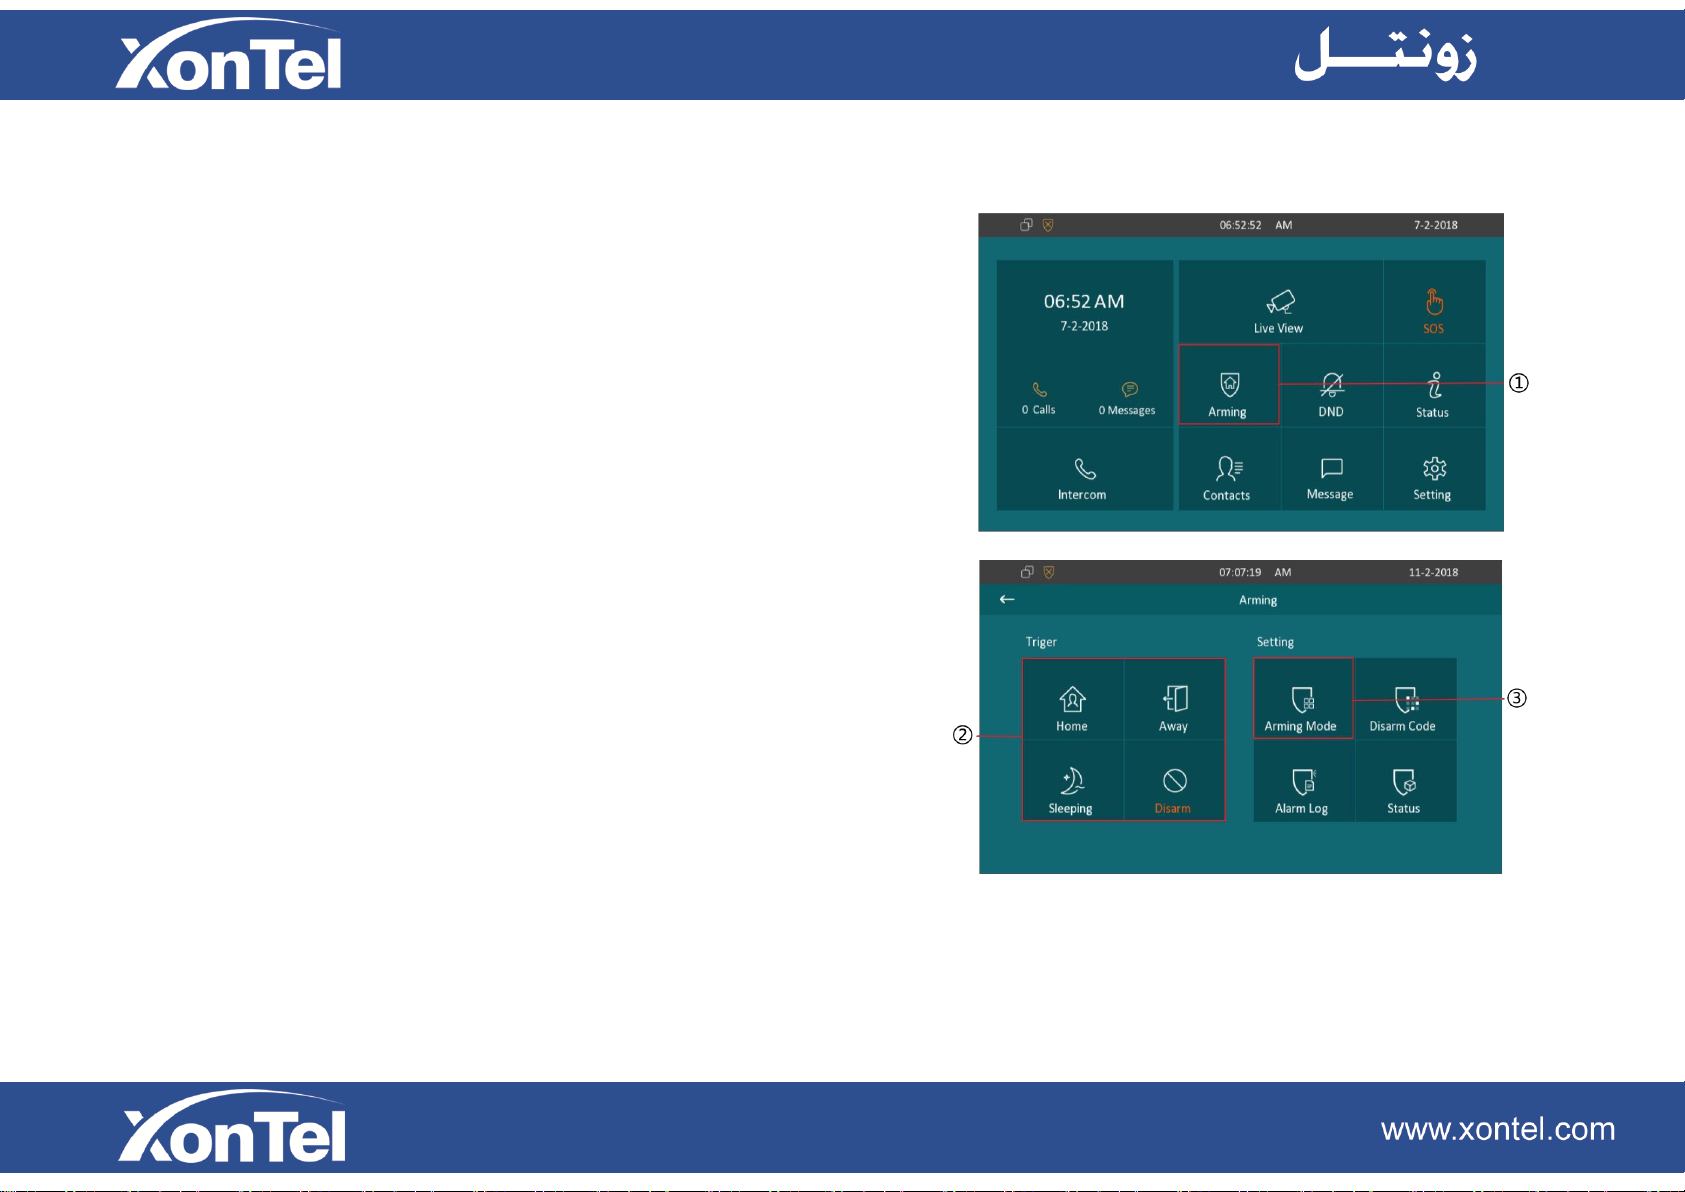
2.7 Arming
①Press the icon to enter the Arming interface.
②XT-13P supports 4 mode, they are indoor mode,
sleeping mode, outdoor mode and disarm mode.
2.7.1 Arming Mode
③Press this icon to enter the arming mode settings
interface.
④You can see all of the 8 zones and corresponding
sensor types
(slide down to check more information) in this interface.
Page 28
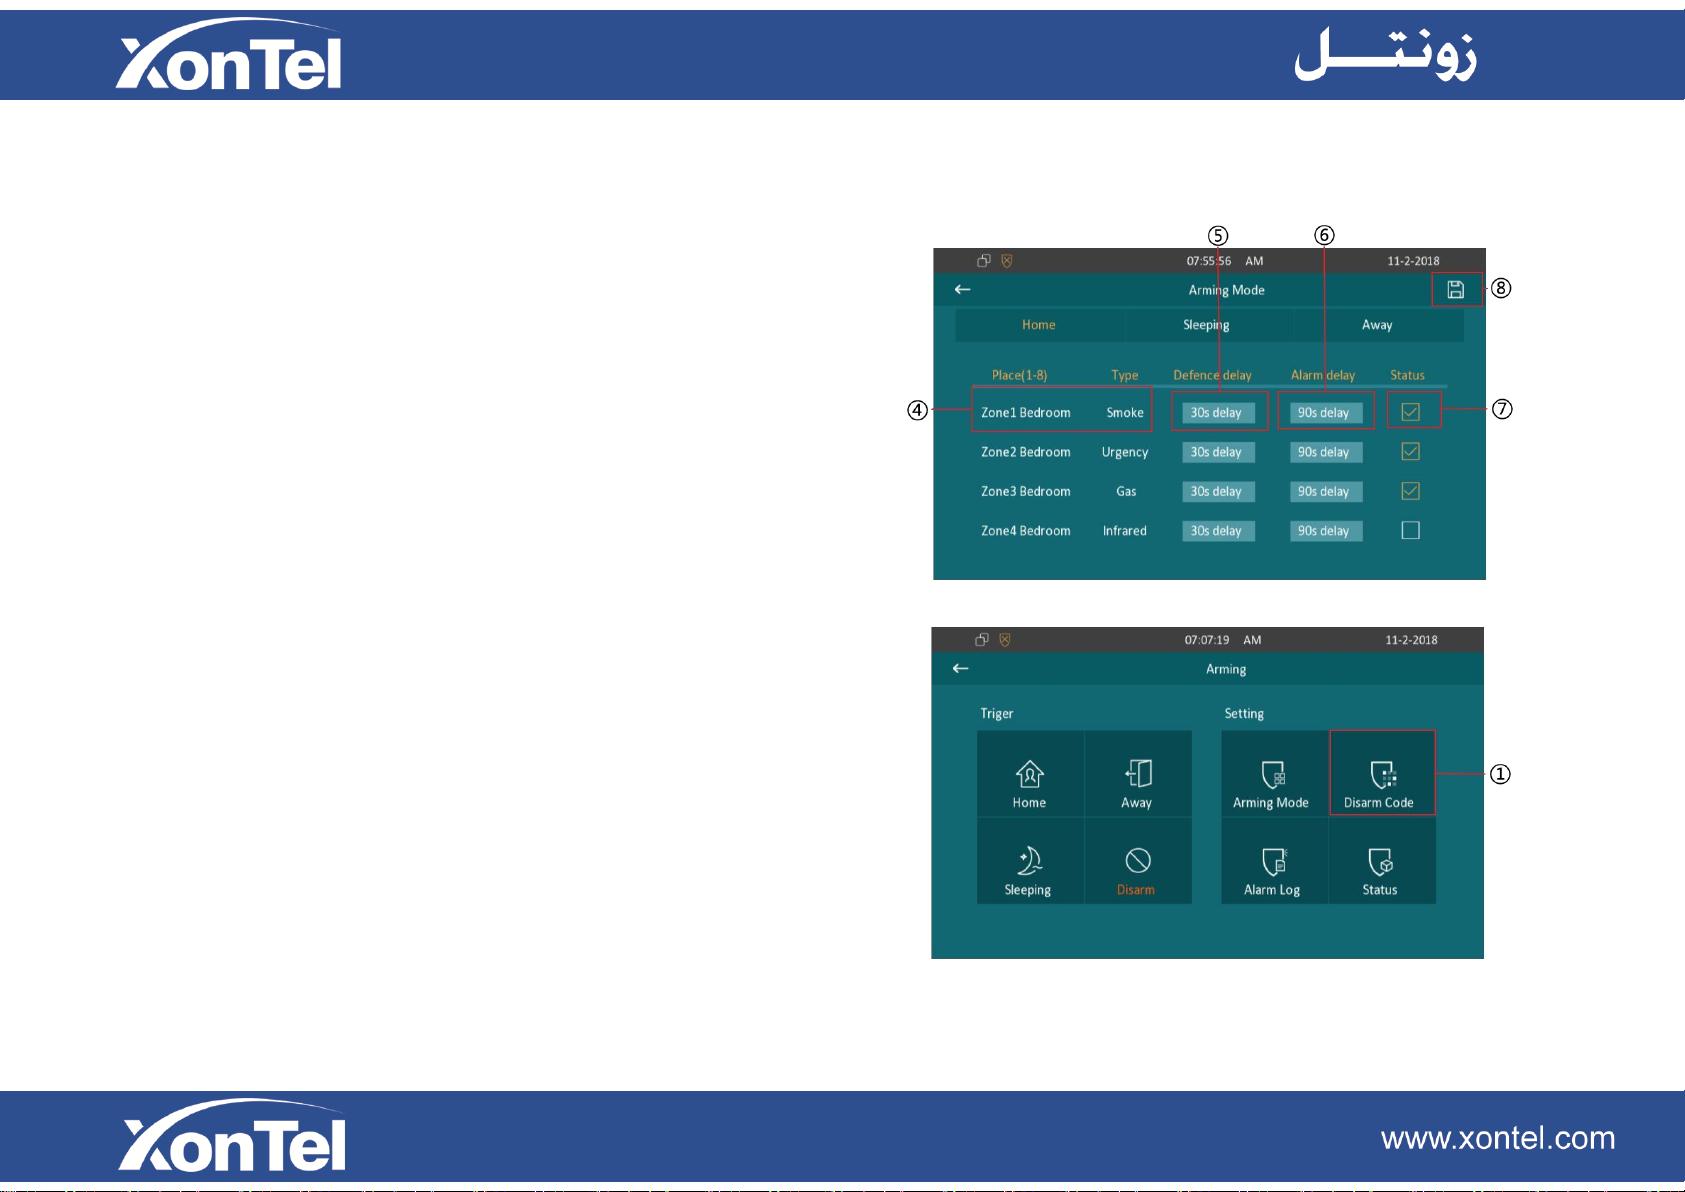
⑤Press this icon to set the defence delay time. It means
when you change to the arming mode from other modes,
there will be 30 seconds delay time.
⑥Press this icon to set the alarm delay. It means when the
sensor triggered, there will be 90 seconds delay time to
announce the notification.
⑦Tick/untick to enable/disable the corresponding zone
under the selected mode.
⑧Press save icon to save the modification.
2.7.2 Disarm Code
①Press this icon to enter the disarm code settings
interface.
You can modify the disarm code here.
Page 29
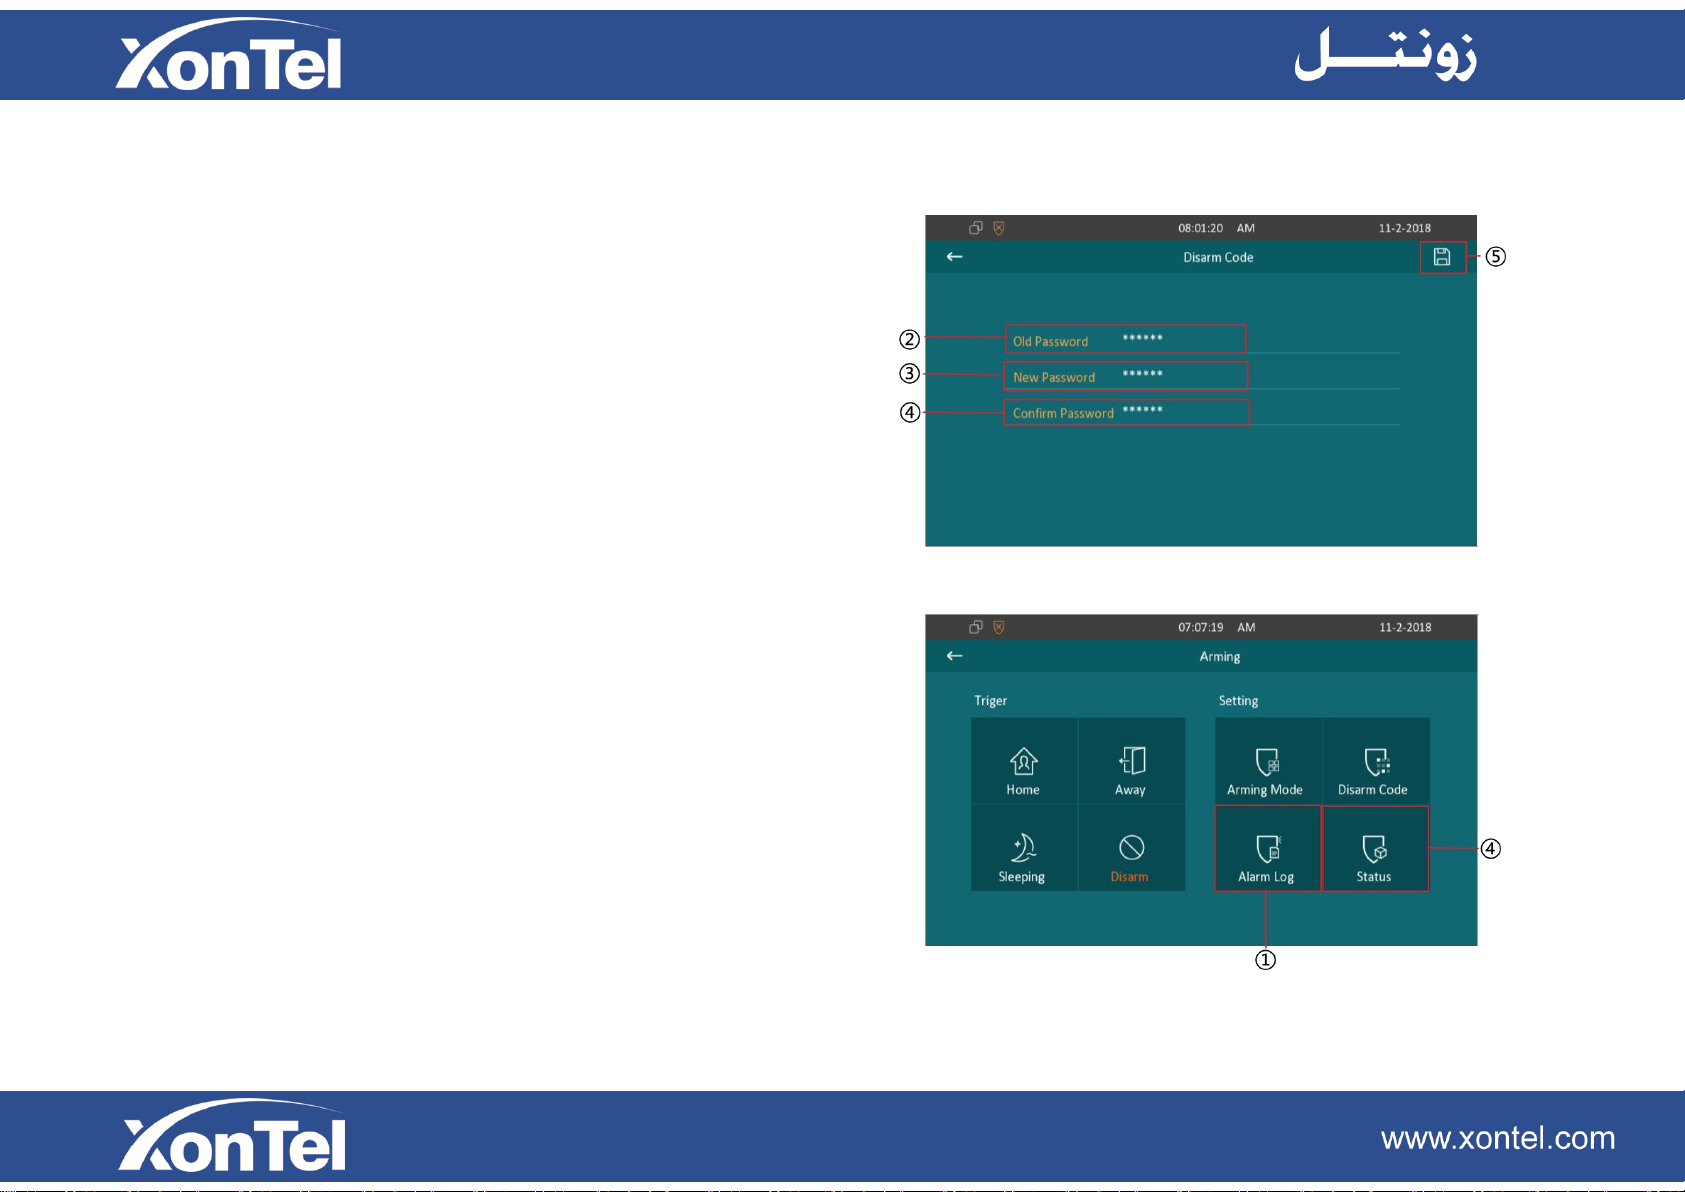
②Enter the old disarm code first, it is 0000 as default.
③Enter the new disarm code
④Enter the new disarm code again for confirming.
⑤Press save icon to save the modification.
2.7.3 Alarm Log
①Press this icon to enter the alarm log interface. You can
see the alarm log here including location, zone, zone type
and alarm time.
②Press this icon to delete the selected alarm log.
Page 30
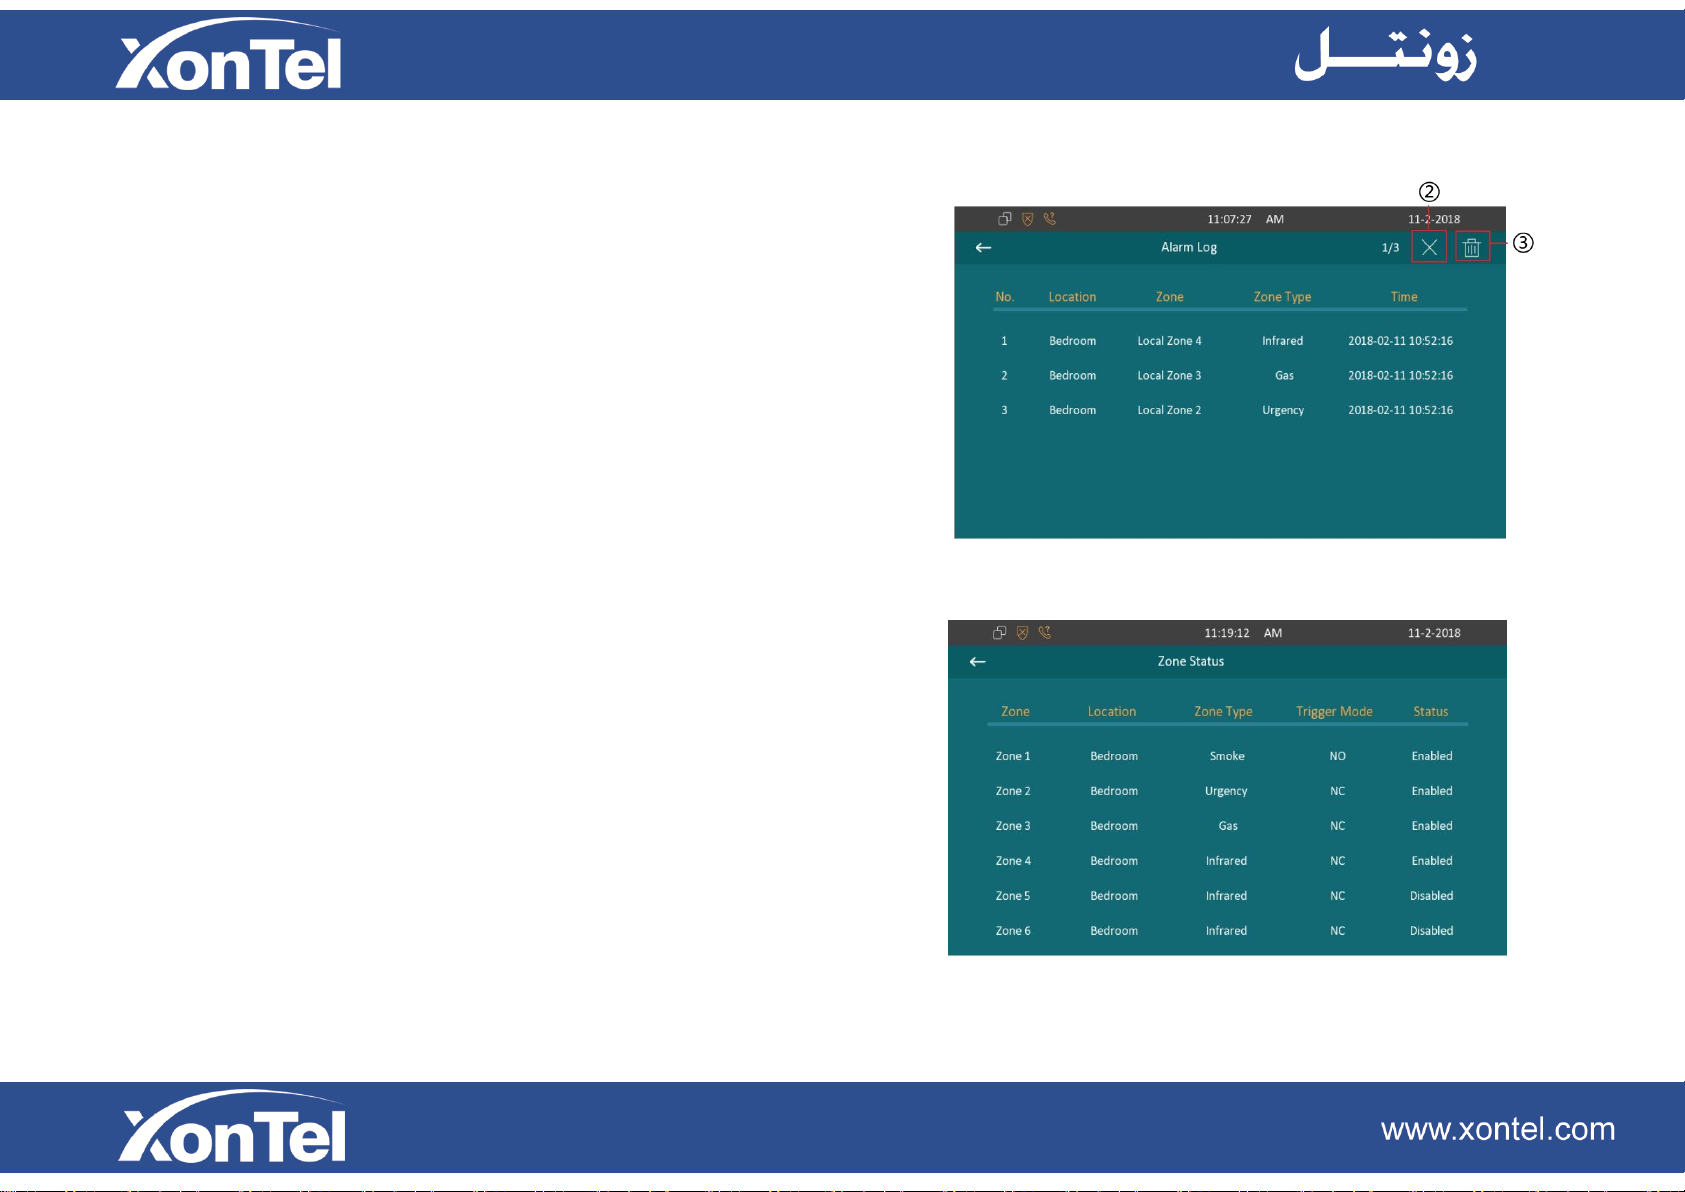
③Press this icon to delete all alarm log.
2.7.4 Status
④Press the icon to enter the zone status interface.
You can check the status of every zone, including location,
zone type, trigger mode and status.
Page 31
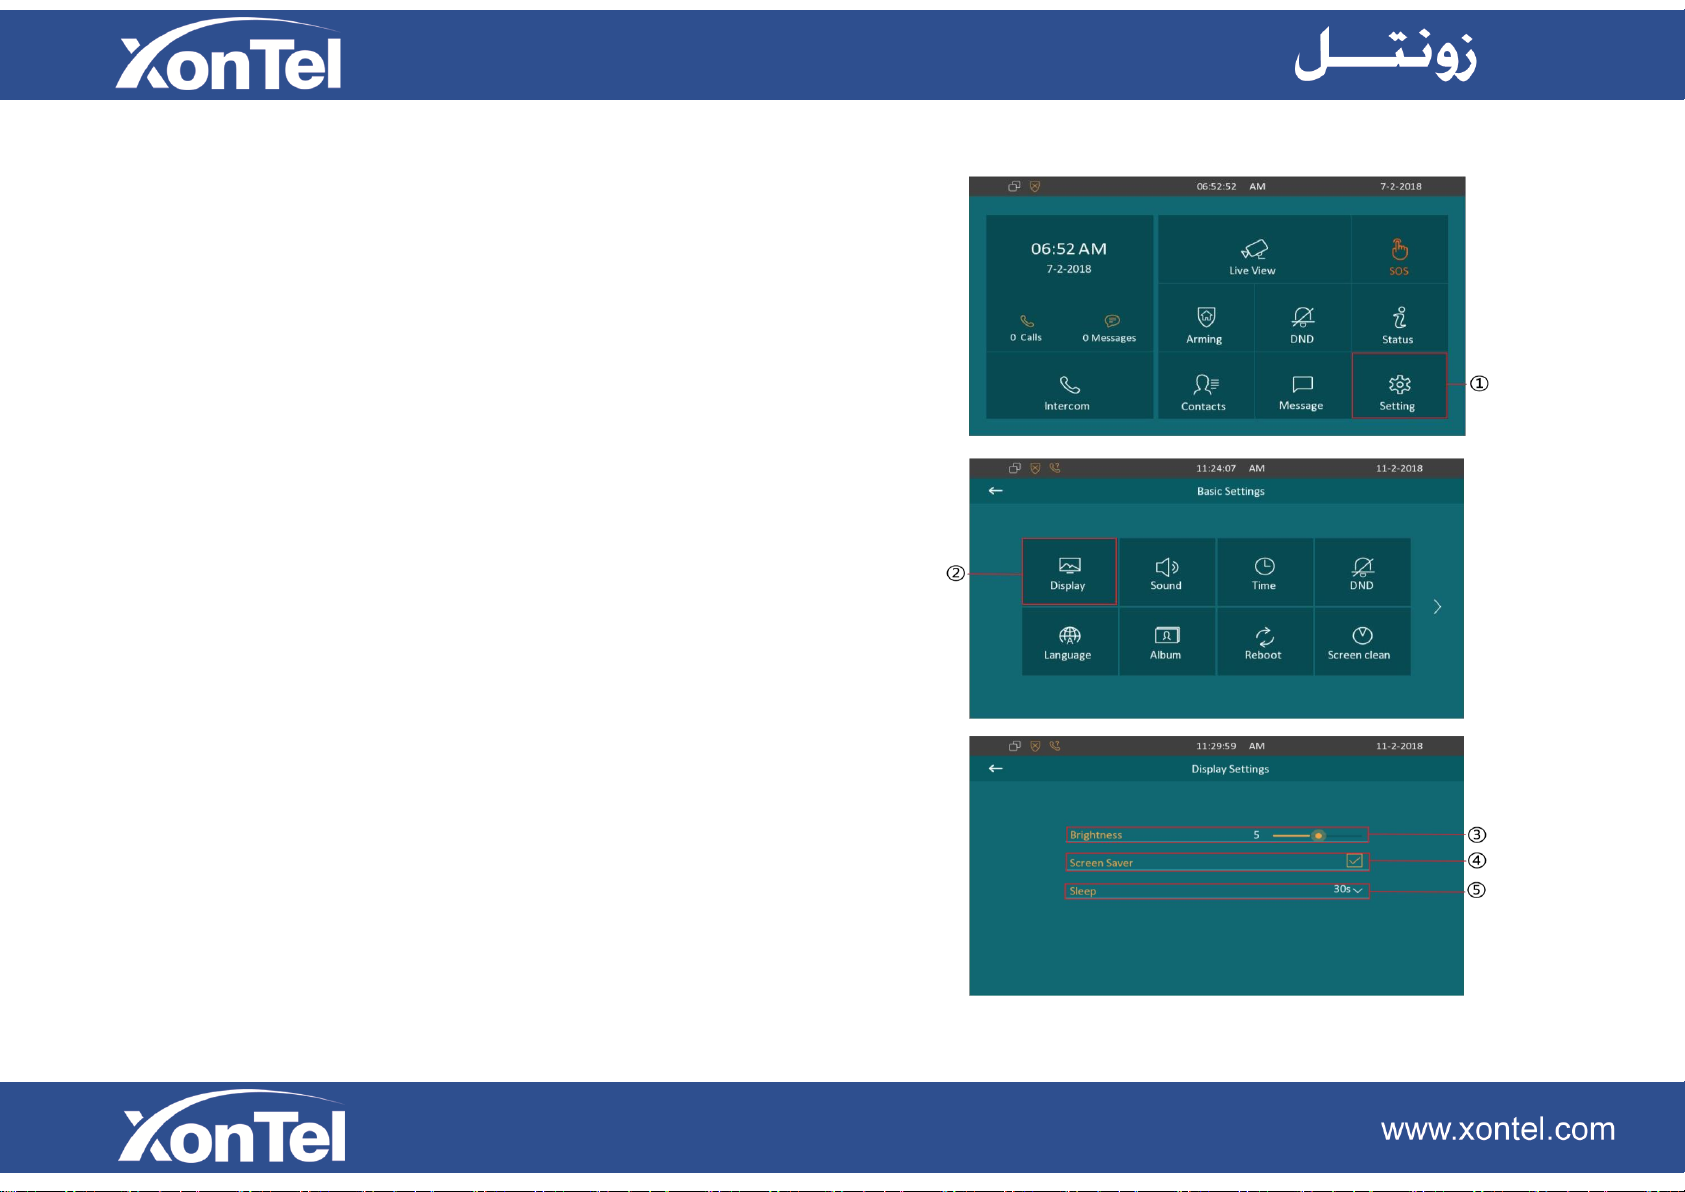
3.
Settings
① Press the icon to enter the basic settings
interface.
3.1 Display settings
②Press this icon to enter display settings interface.
③To adjust the brightness here, it is 5 level as default.
There are 10 levels totally, the bigger value means the
lighter screen.
④To select whether to enable the screen saver.
⑤To configure the sleep mode delay, it is 30 seconds as
default.
Page 32
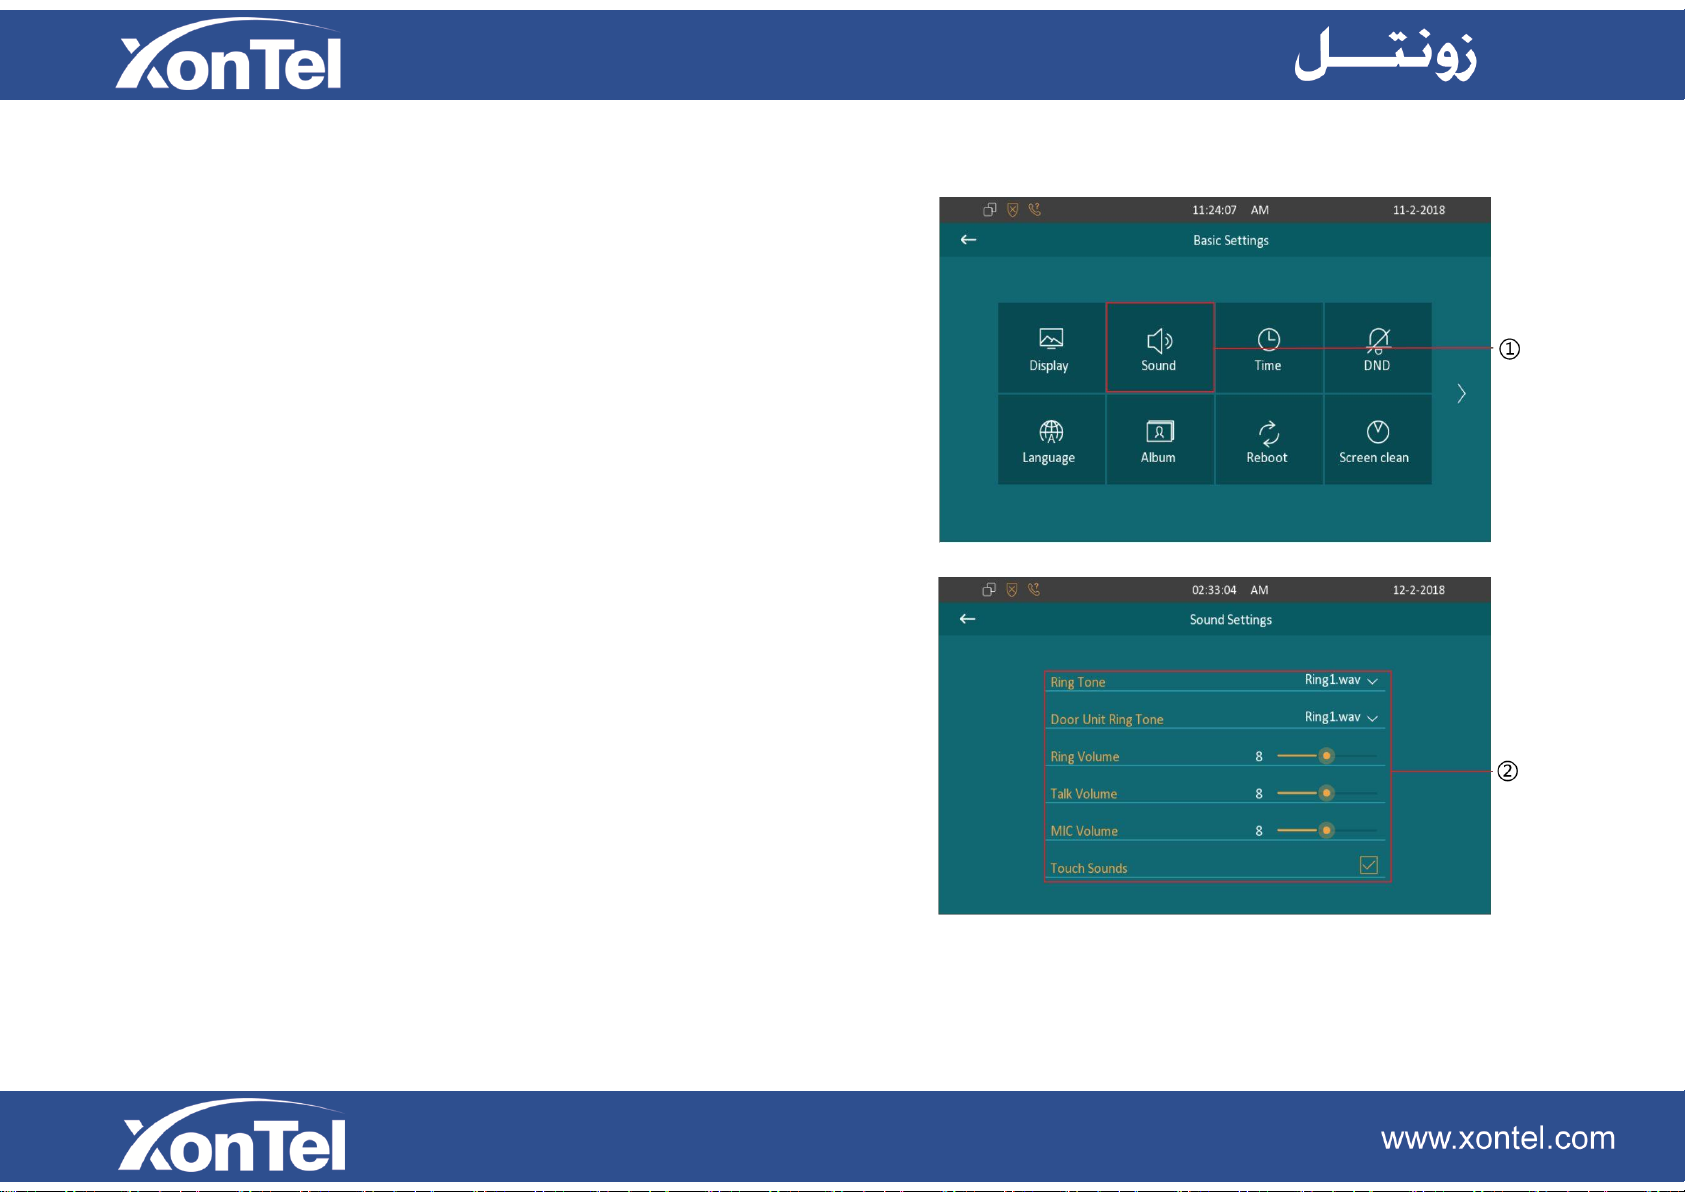
3.2 Sound settings
①Press this icon to enter the sound settings interface.
②You can set Ring Tones for incoming call, even to set a
special Ring Tone for door unit, or set the Ring Volume,
Talk Volume and MIC Volume.
You can also choose whether to enable the Touch Sounds
here.
Page 33
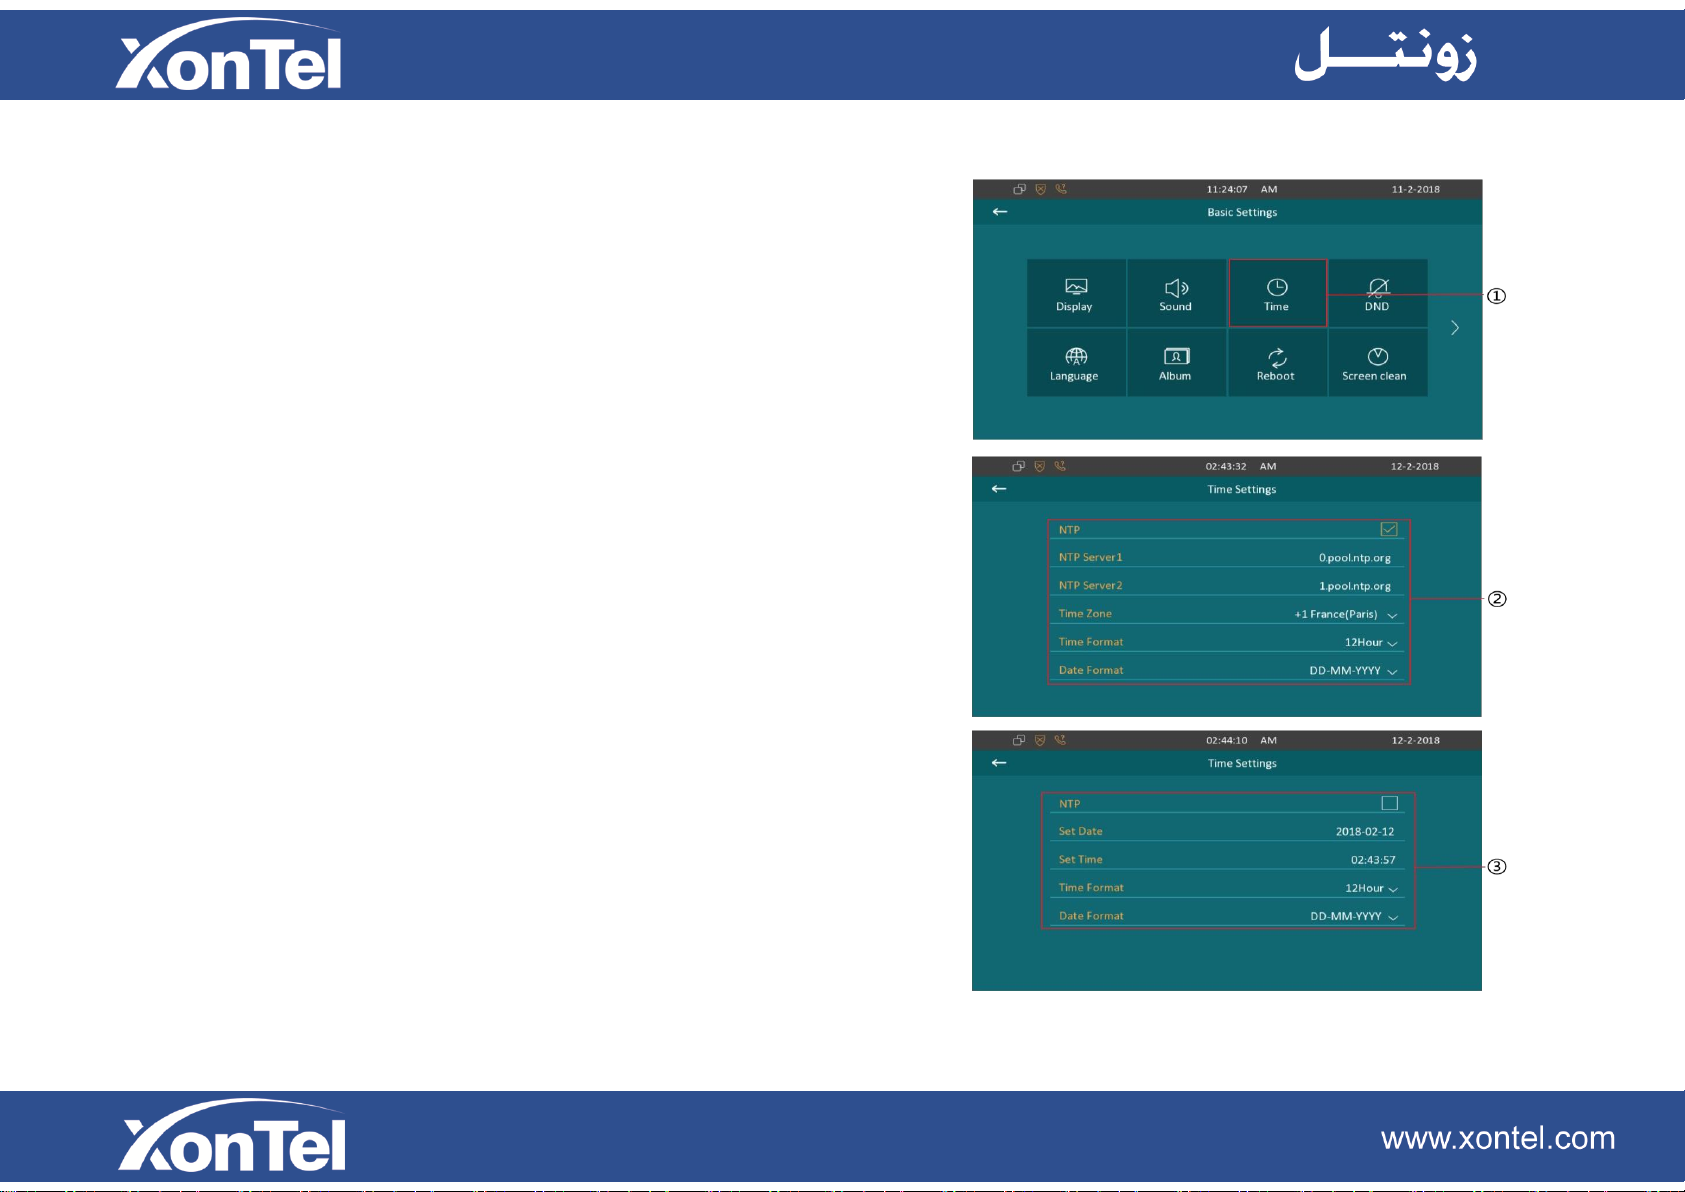
3.3 Time settings
①By pressing this icon to enter the time settings interface.
② NTP (Network Time Protocol) is enabled as default. XT-
13P will get the Date and Time automatically. And users
can also setup NTP server. Setup a suitable Time Zone,
Time format and Date Format.
③ To set time manually by disabling the NTP, users can
set exact time for the XT-13P.
Page 34
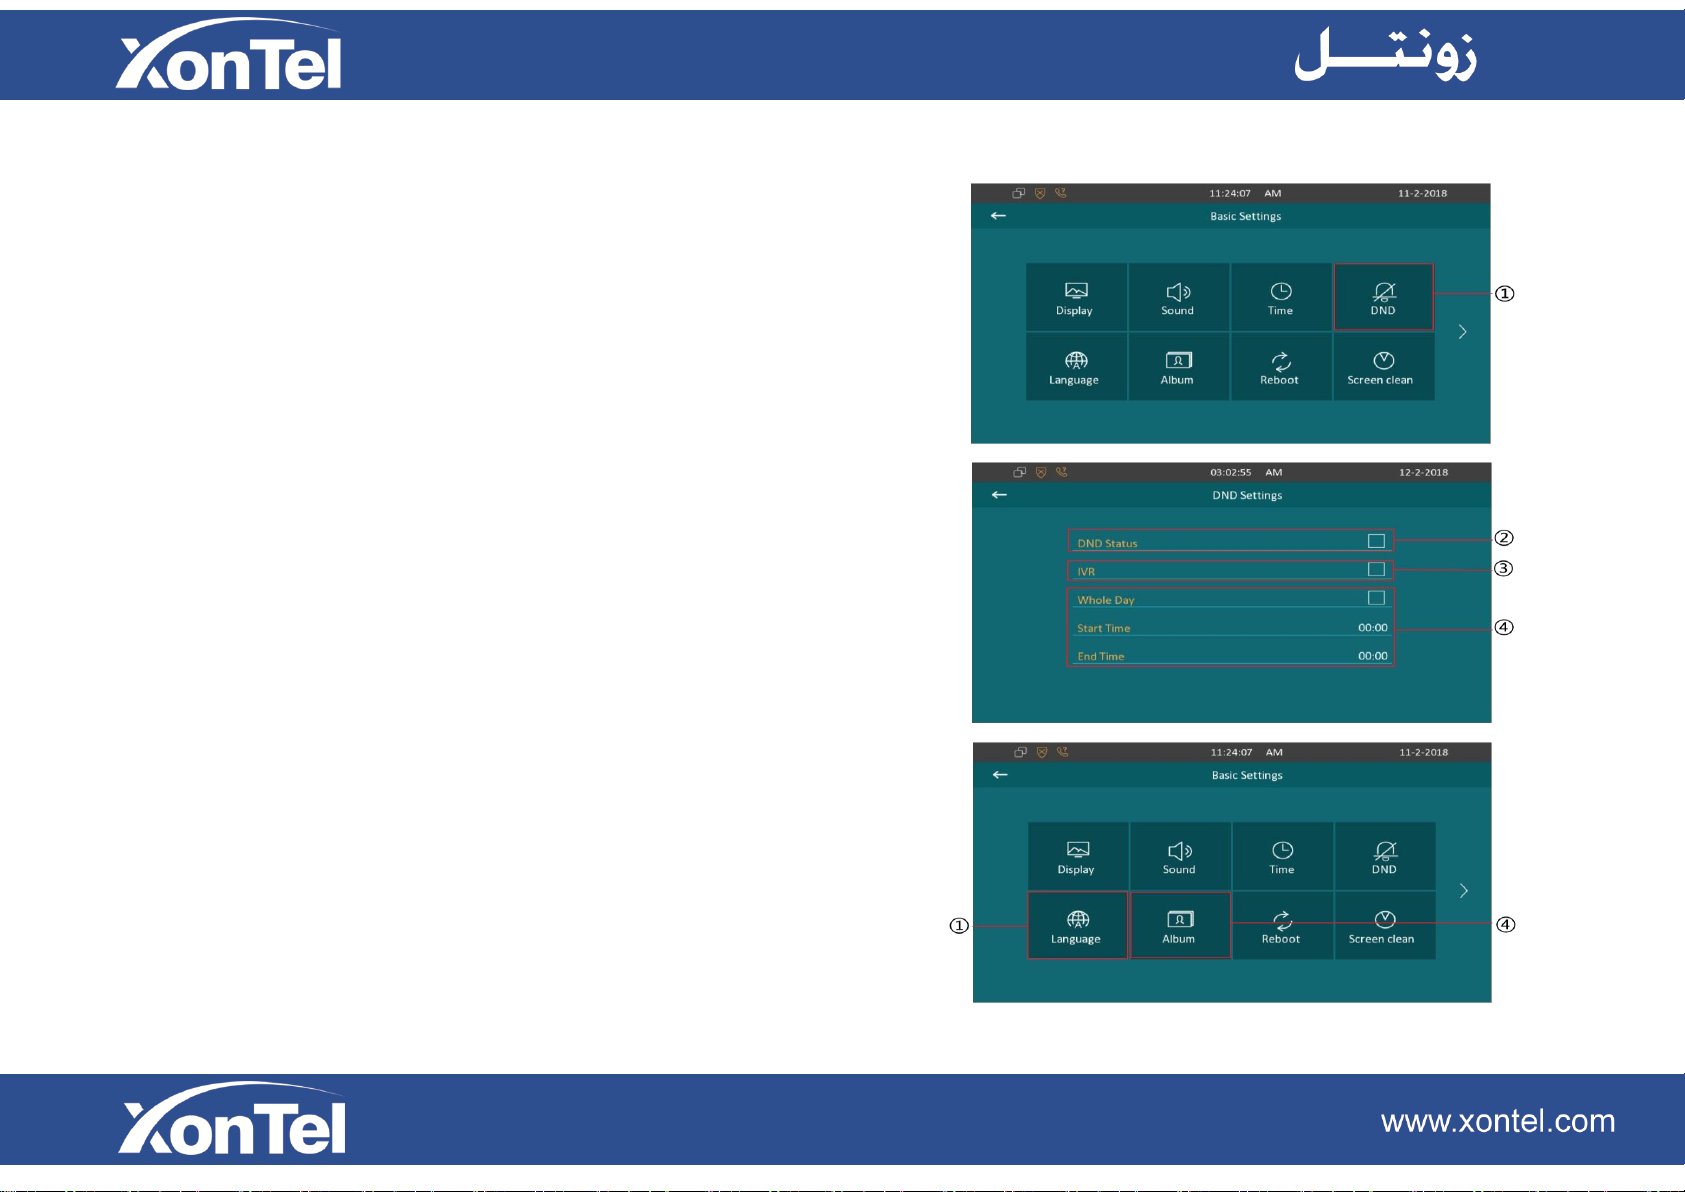
3.4 DND (Do Not Disturb) Settings
This function is used to prevent the phone from disturbing.
Go to Setting-DND. If open DND, external phone call is
unable to call in, turned off by default.
①By pressing this icon to enter the DND settings interface.
②Enable/Disable DND function.
③Enable/Disable the IVR (Interactive Voice Response).
④ Select valid time of DND. Users can also setup the
accurate Start and End time or enable the DND whole day.
Page 35
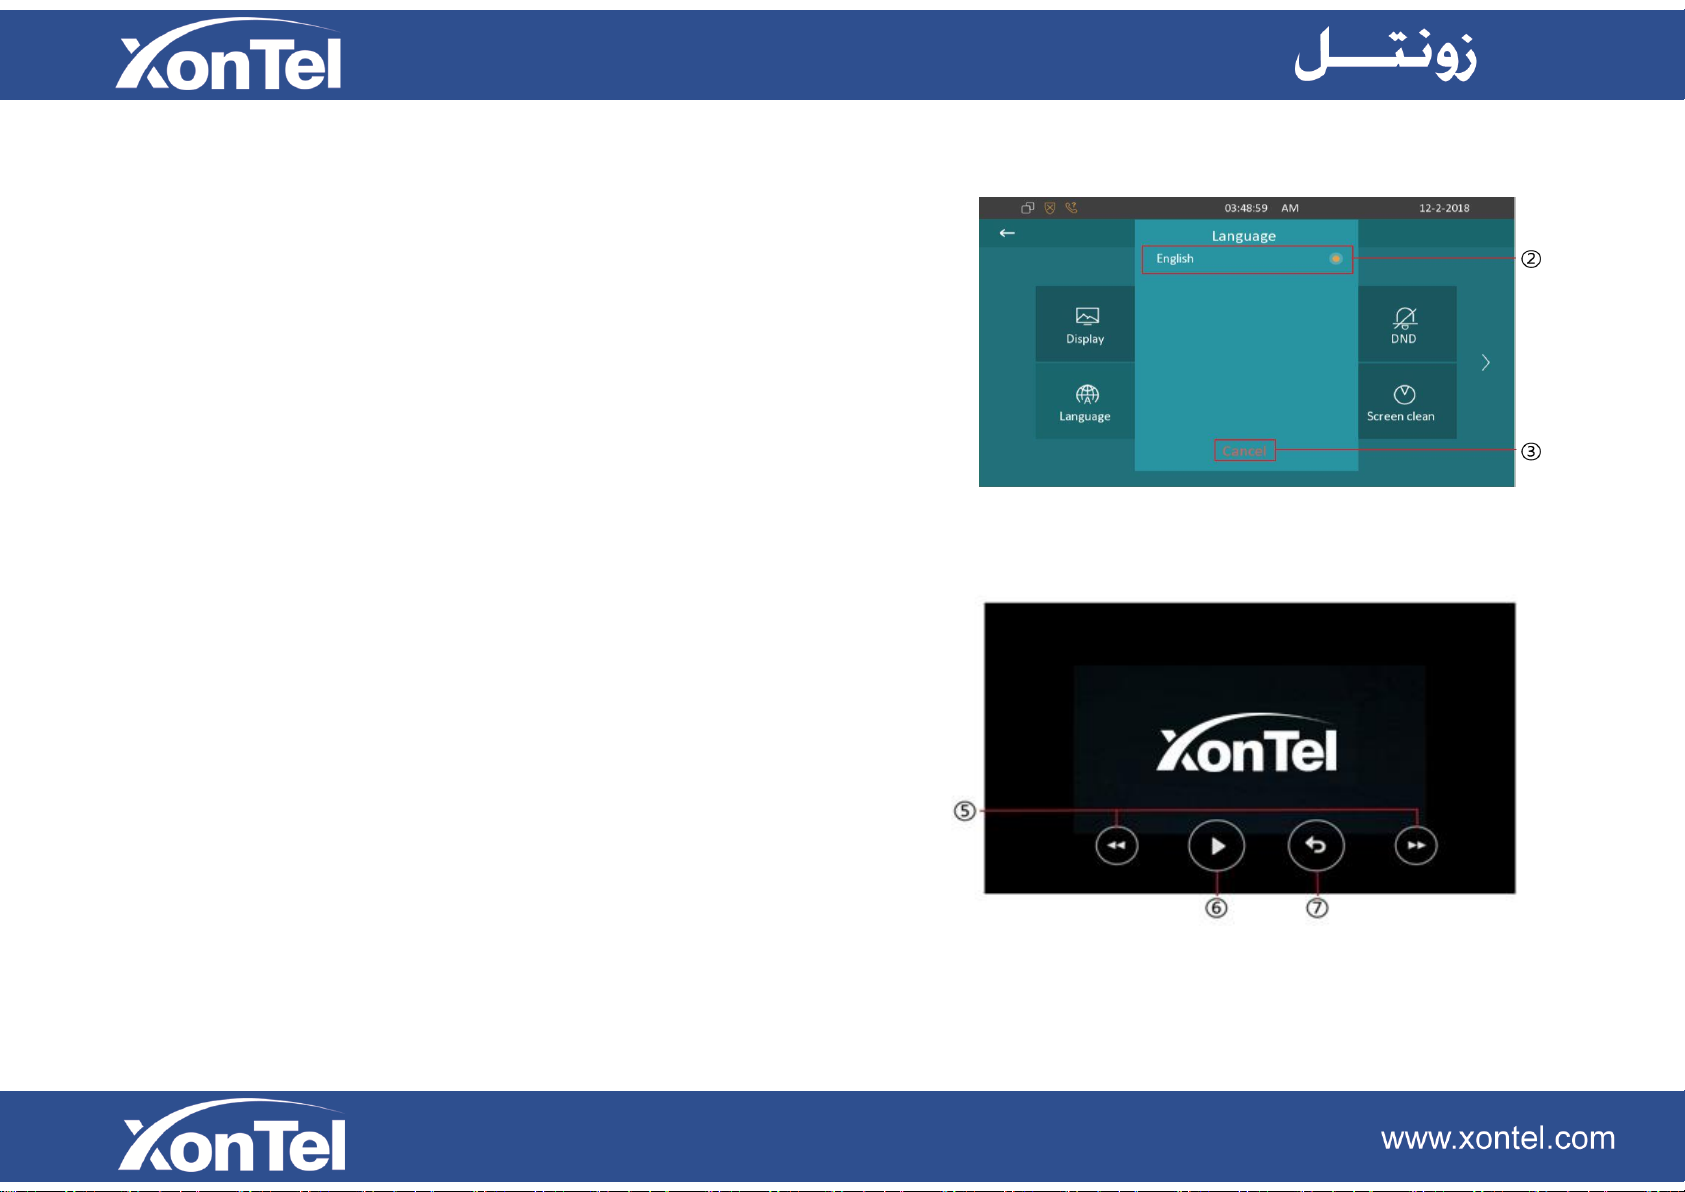
3.5 Language
①Press this icon to enter language setting interface.
②To select a suitable language. It only supports English on this
firmware.
③Press this icon to go back to settings interface.
3.6 Album
④Press this icon to enter album interface.
⑤Press these 2 icon to check previous/next picture.
⑥Press this icon to play the photos.
⑦Back to settings interface by pressing this icon.
Page 36
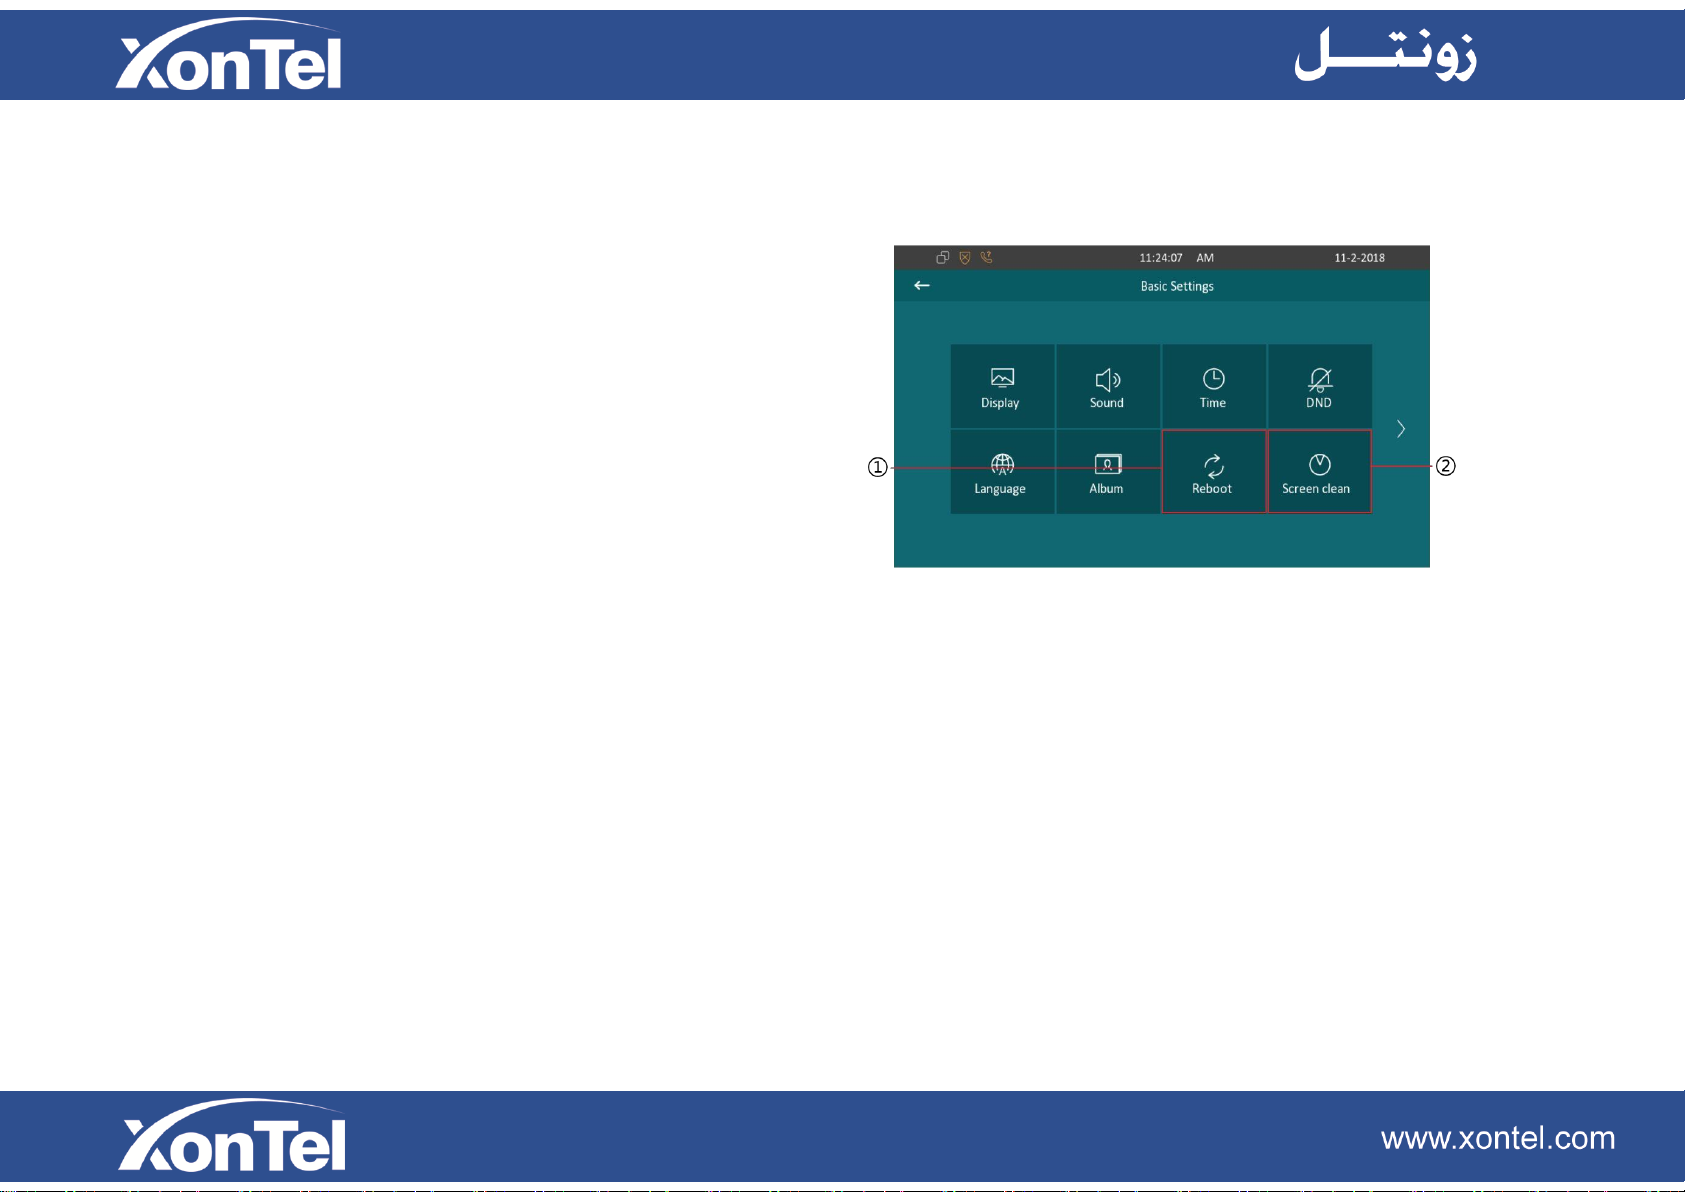
3.7 Reboot
①Press the icon to reboot XT-13P, click Confirm when you
see the prompt. The phone will reboot.
3. 8 Screen clean
②Press the icon to clean the XT-13P screen, it will keep
you from misusing for 30 seconds.
Page 37
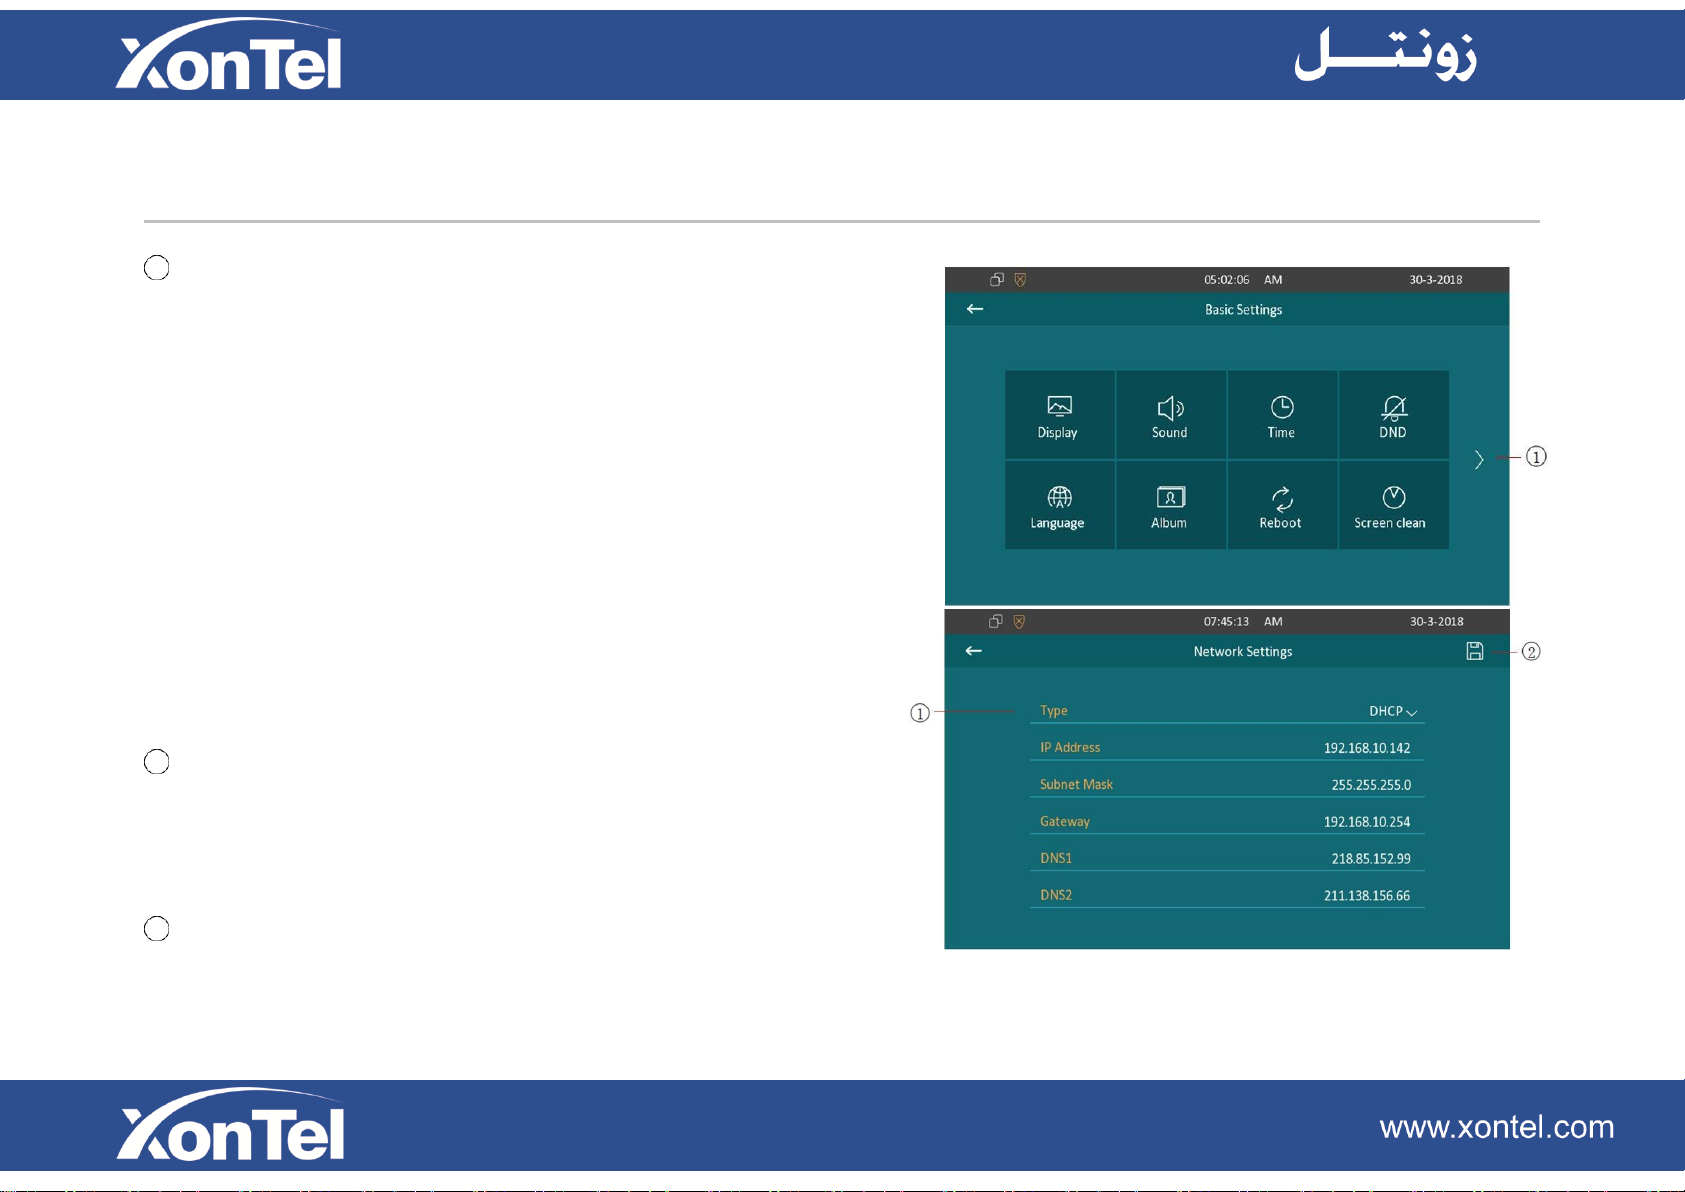
4. Advance Settings
1 Press the icon in settings interface to enter the advance settings
interface.
Enter the password and press OK. The password is 123456 as default.
4.1 Network Settings
Enter the advance settings interface, click Network icon to enter the
network setting page. XT-13P use DHCP mode to get IP address
by default.
1
To select Static IP or DHCP network of XT-13P. If selected
Static IP Network. Enter the IP address parameters in the
corresponding area: IP Address/Subnet
Mask/Gateway/DNS1/DNS2.
2
Save icon to save the modified.
30
Page 38
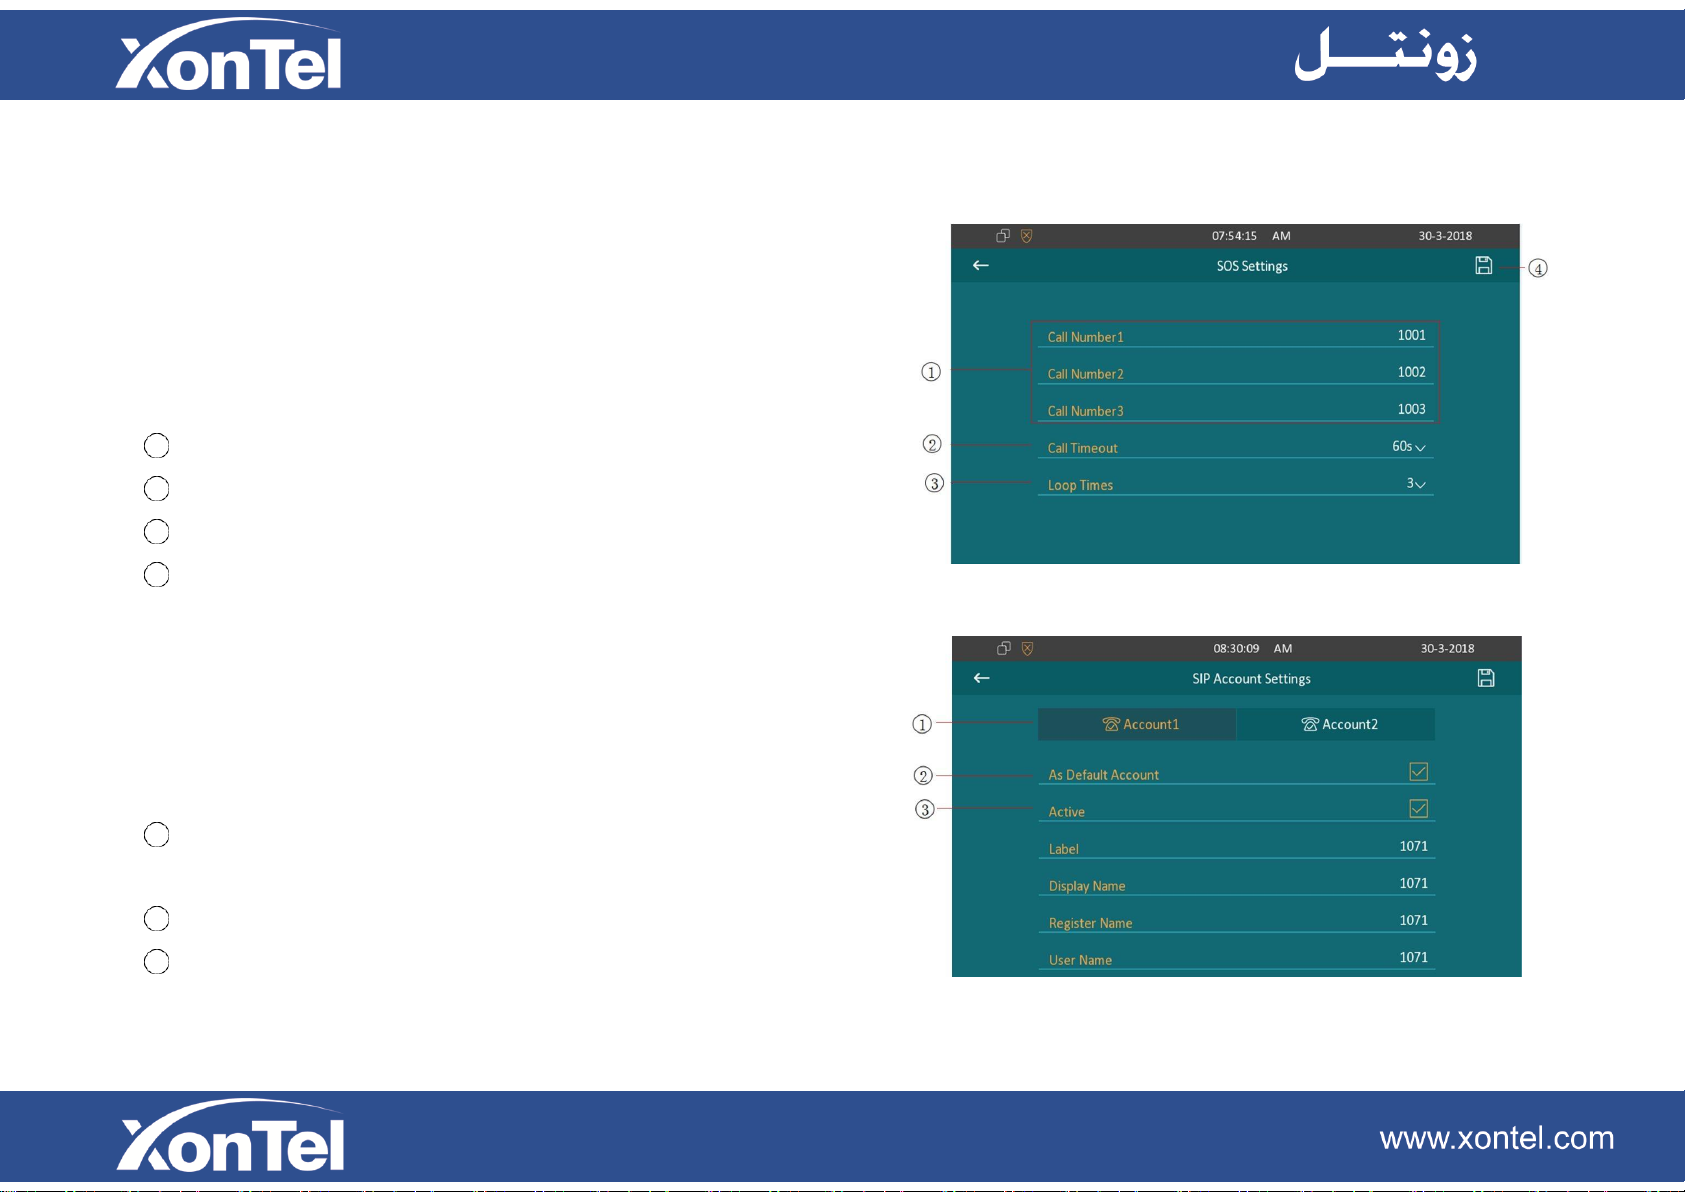
4.2 SOS Settings
Enter the advance settings interface, click SOS icon to enter the SOS
setting page. XT-13P can call out for up to three predefined numbers
in a loop, each number will be called for 60 seconds (by default) when
end user presses SOS icon.
1
Setup SOS call numbers. XT-13P support up to 3 numbers.
2
Setup the call timeout. It is 60 seconds as default.
3
Setup the loop times. It is 3 times as default.
4
Save icon to save the modified.
4.3 Account Settings
Enter the advance settings interface, click Sip Account icon to enter
the account setting page. SIP account is provided by SIP server.
1
XT-13P support 2 accounts, press Account 1 or Account 2 icon
to enter the corresponding account setting page.
2
Click to enable the account as default account to call out numbers
3
Click to enable this account.
31
Page 39
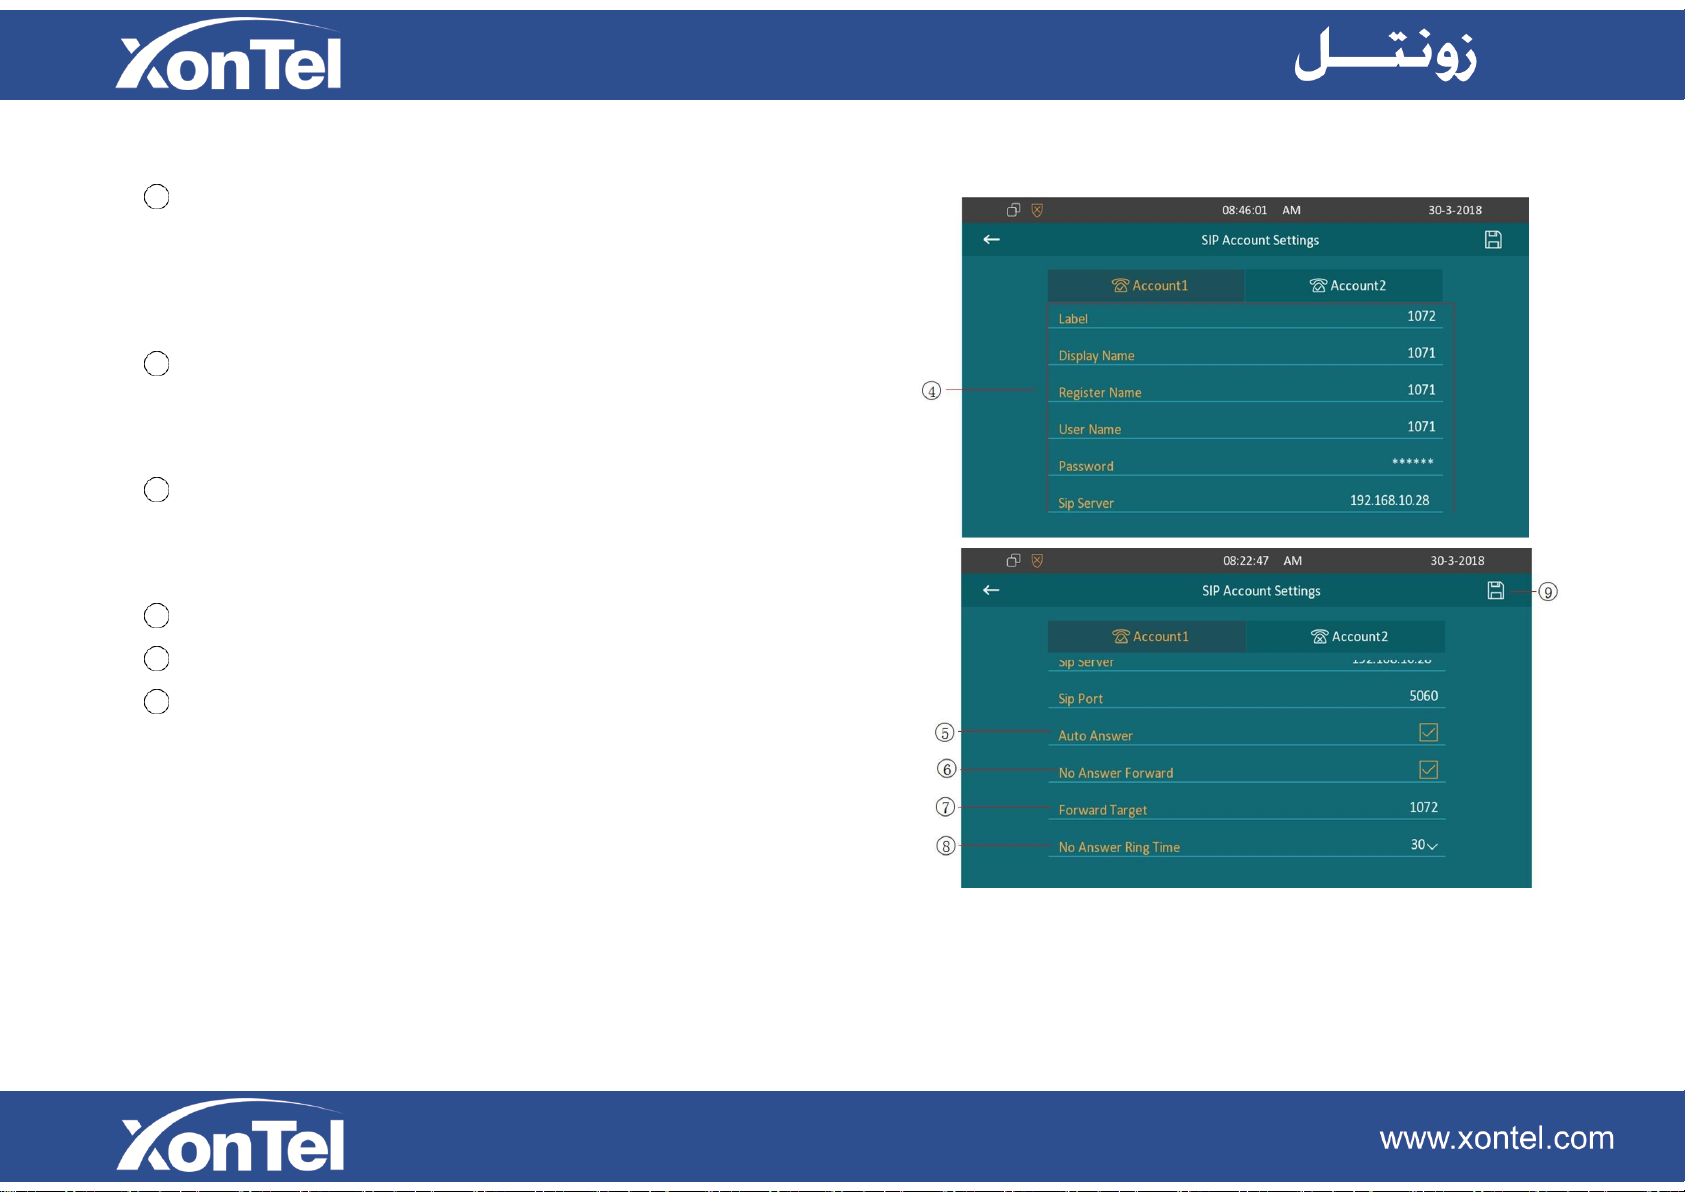
4
5
6
7
8 9
Fill in the corresponding sip account parameters: Label/Display
Name/Register Name/User name/Password/Sip Server/Sip Port. Slide
down to check more account information.
Enable/disable the auto answer of this account. If enabled, when
this account receives the incoming call, XT-13P will answer the call
automatically.
Enable/disable the no answer forward feature of this account. If
enabled, the incoming calls of this account will be forwarded to the
specified sip account when the ringtone is time out without answering.
Setup the specified sip account of the No Answer Forward feature.
Setup the ring tone timeout of the No answer Forward feature.
Save icon to save the modification.
Note: The sip account parameters are provided by sip server
32
Page 40
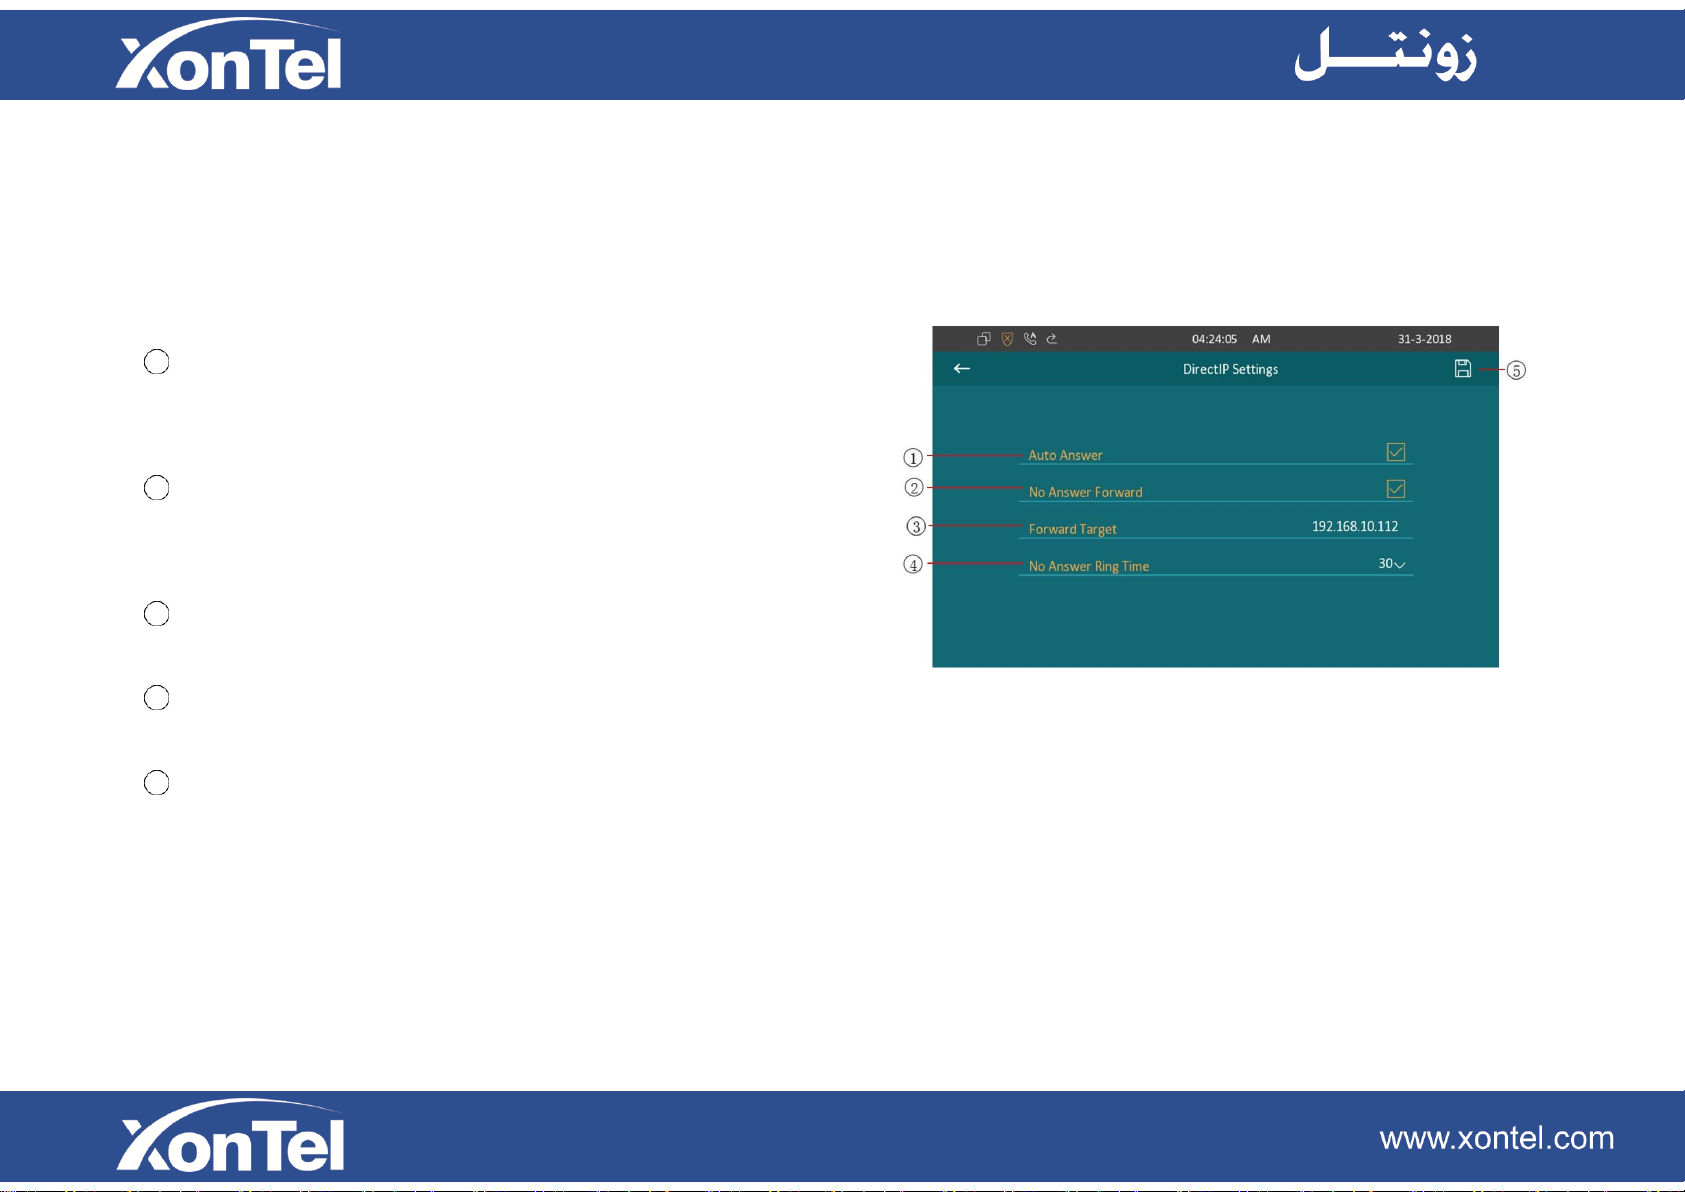
4.4 Direct IP
Enter the advance settings interface, click Direct IP icon to
enter the direct IP call setting page.
1
Enable/disable the auto answer feature of the Direct IP calls. If
enabled, when there is a direct IP incoming call, XT-13P will
answer the call automatically.
2
Enable/disable the no answer forward feature. If enabled, the
direct IP incoming calls will be forwarded to the specified IP
address when the ringtone is time out without answering.
3
feature.
4
feature
5
Setup the specified IP address of the No Answer Forward
Setup the ring tone timeout of the No answer Forward
Save icon to save the modification.
33
Page 41
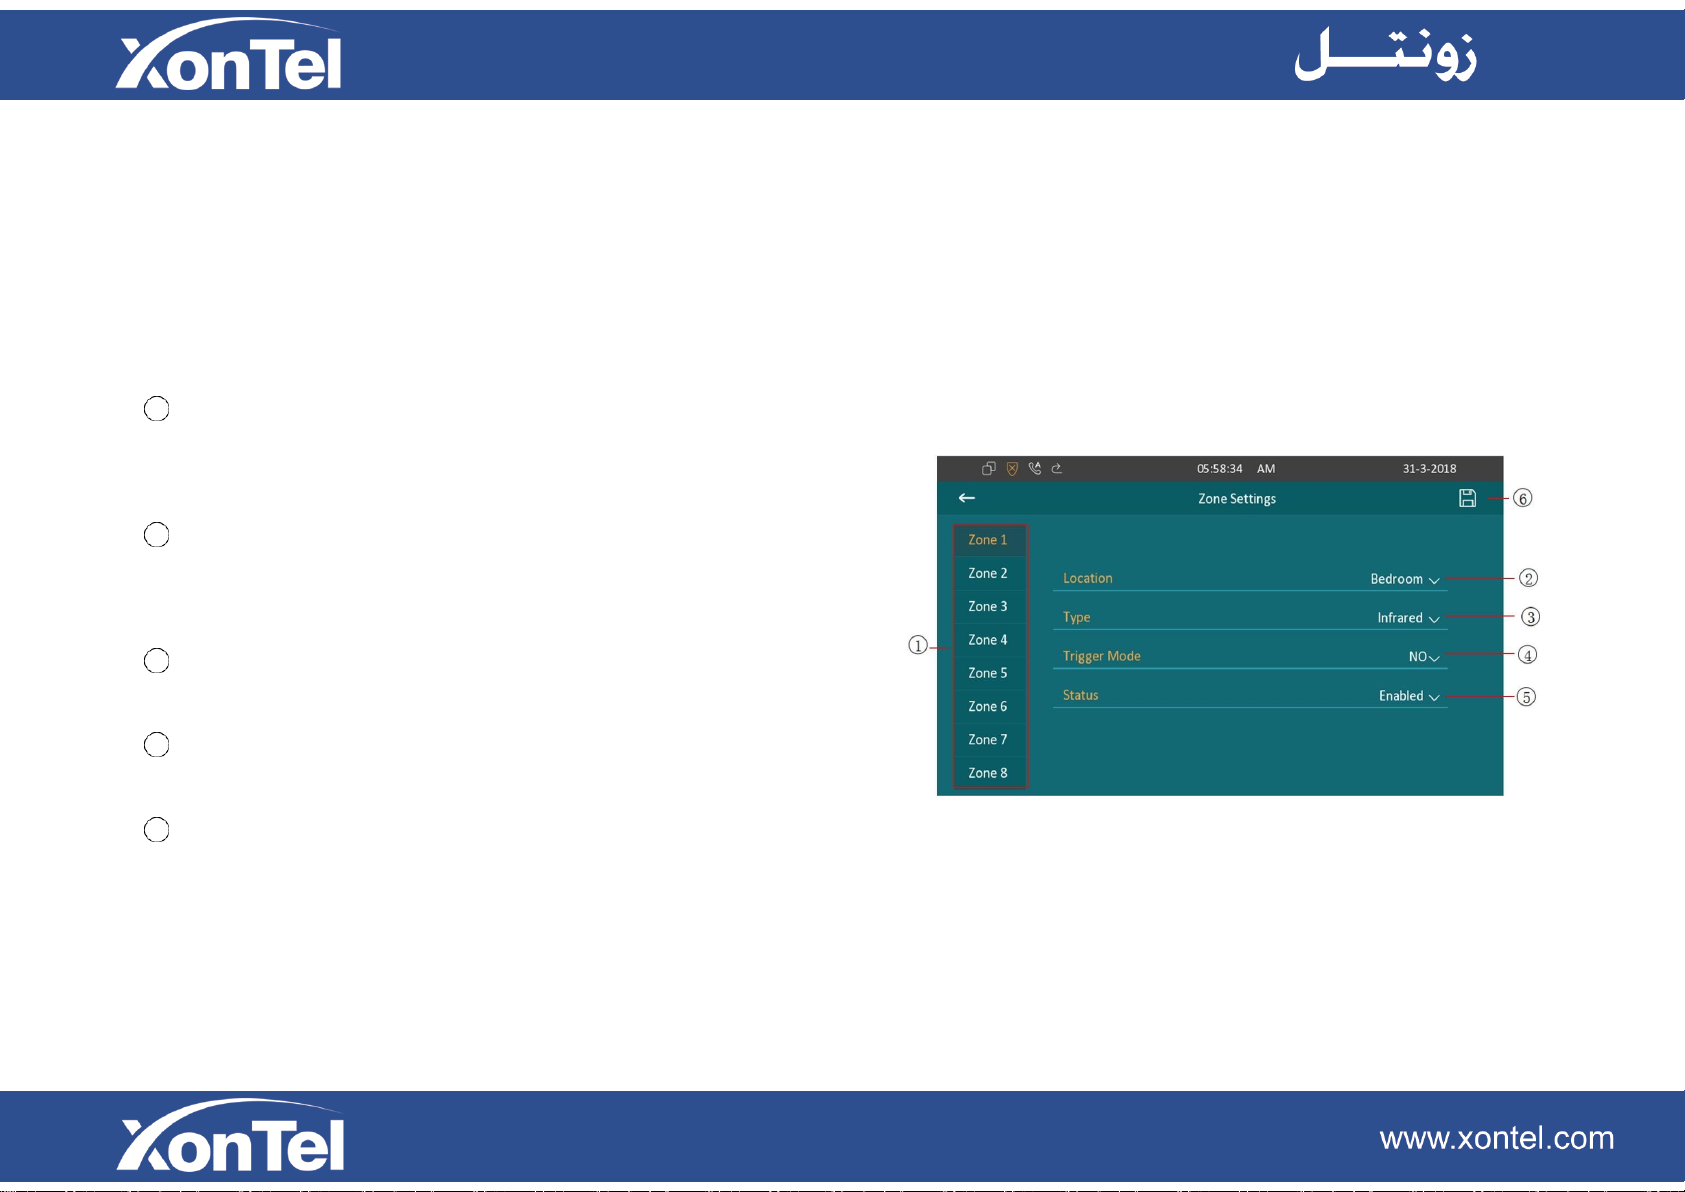
4.5 Zone settings
Enter the advance settings interface, click Zone Settings
icon to enter the alarm setting page.
1
To choose a zone to set corresponding parameters.
XT-13P support up to 8 zones, you can connect up to 8 alarm sensors
to XT-13P.
2
Setup location of the alarm sensor, including Gate, Door,
Bedroom, Guest room, Hall, Window, Balcony, Kitchen, Study and
Bathroom.
3
Setup the type of the alarm sensor, including Infrared, Drmagnet,
Smoke, Gas, and Urgency.
4
Setup the trigger mode of the alarm sensor, including NC
(Normal Close) and NO (Normal Open).
5
Setup the status of alarm feature, including disabled,
enabled and 24H.
Disabled option: disable the XT-13P alarm feature.
34
Page 42
6
Enabled option: when the arming mode enabled and the
alarm sensor device is triggered, XT-13P will be alarm, the
alerting can be off by inputting the password on XT-13P
screen. The status will matter the arming mode.
24H option: when the alarm sensor device is triggered,
XT-13P will be alarm, the alerting cannot be off by
inputting the password on the XT-13P screen, until the
alarm sensor device cannot detect the triggered source.
Save icon to save the modification.
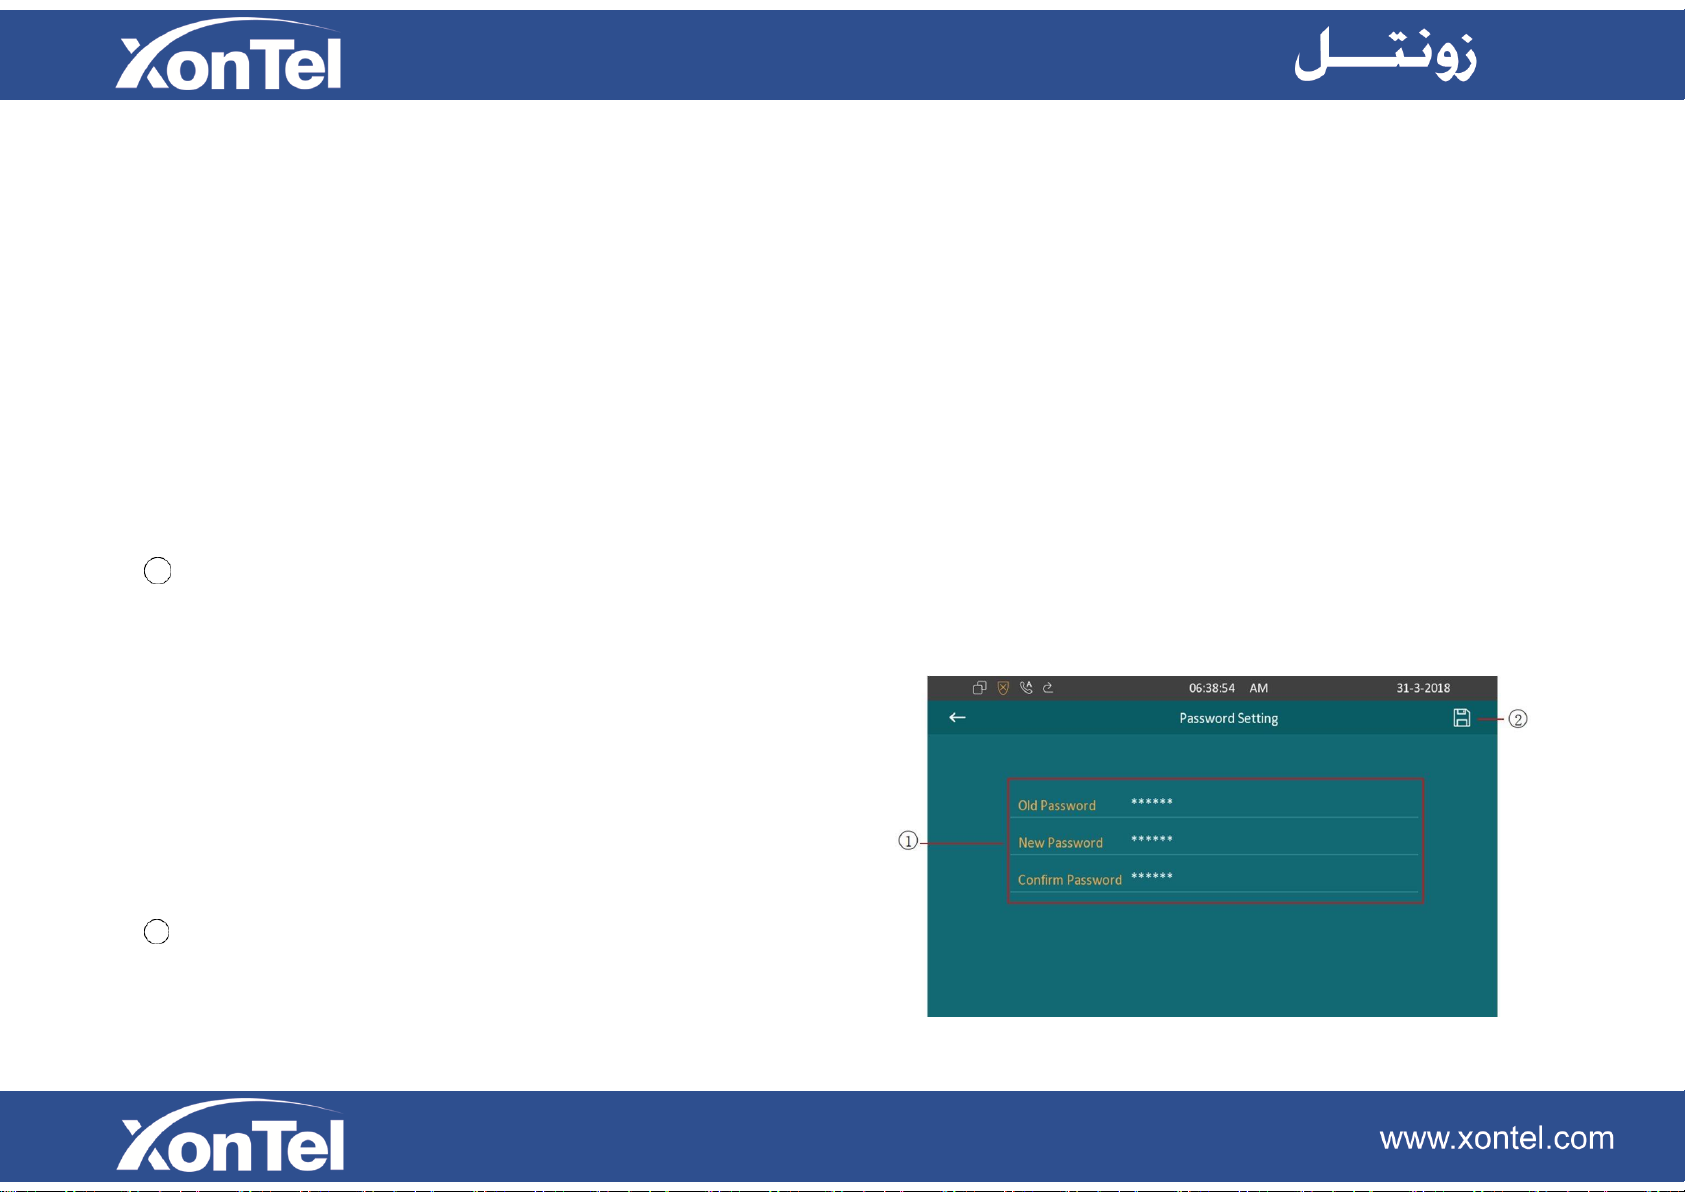
4.6 Password setting
Enter the advance settings interface, click Password Setting icon to
enter the password setting of Setting-Advanced page.
1
Click the Old Password to input the password of entering
advance settings interface. It is 123456 as default. Click the
New
35
Page 43
Password and Confirm Password to input the new
password.
2
Save icon to save the modification.
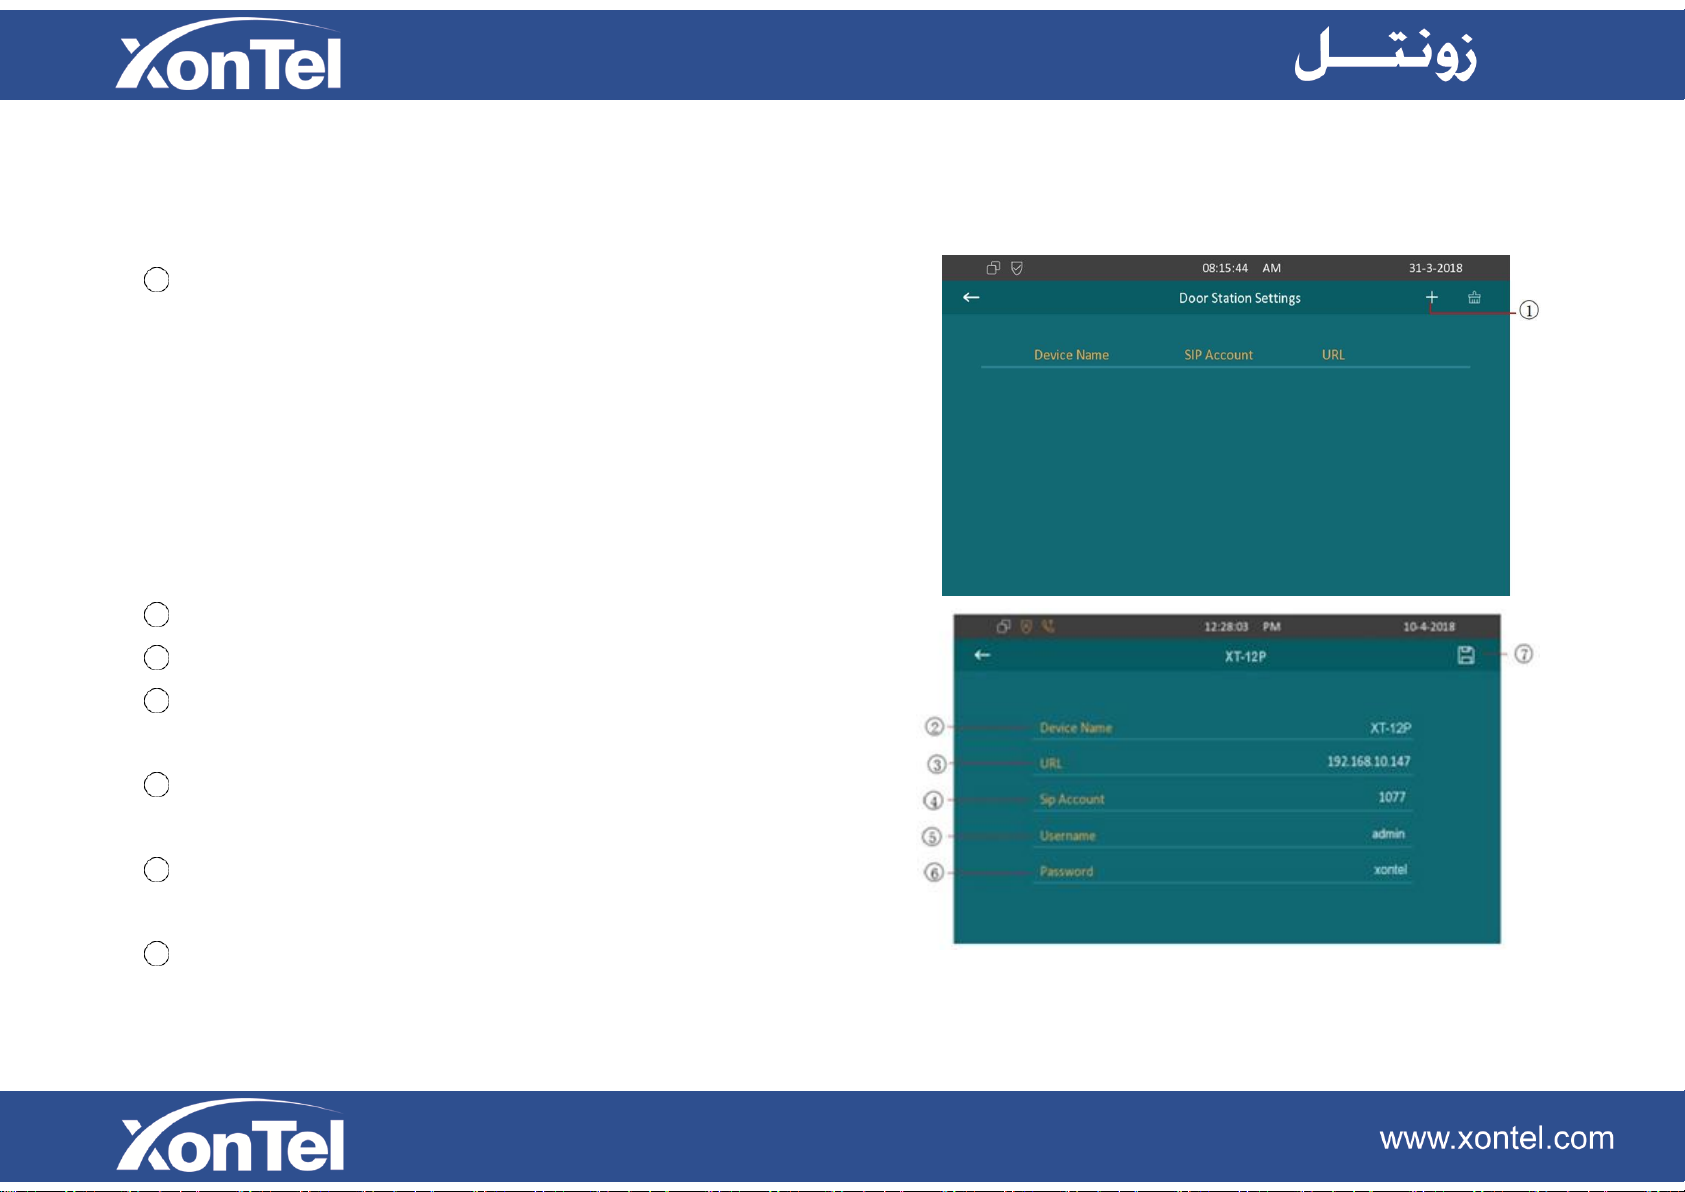
4.7 Door station
Enter the advance settings interface, click Door Station icon to enter the
door station settings.
1
Click to enter the adding door station interface.
2
Click the Device Name to set the XonTel door phone name.
3
Click the URL to set the video url of XonTel door phone, input the
door phone IP address here.
4
Click the Sip Account to set the sip extension of the XonTel door
phone.
5
Click the Username to set the authentication of the XonTel
door phone for monitor.
6
Click the Password to set the authentication of the XonTel door
36
Page 44
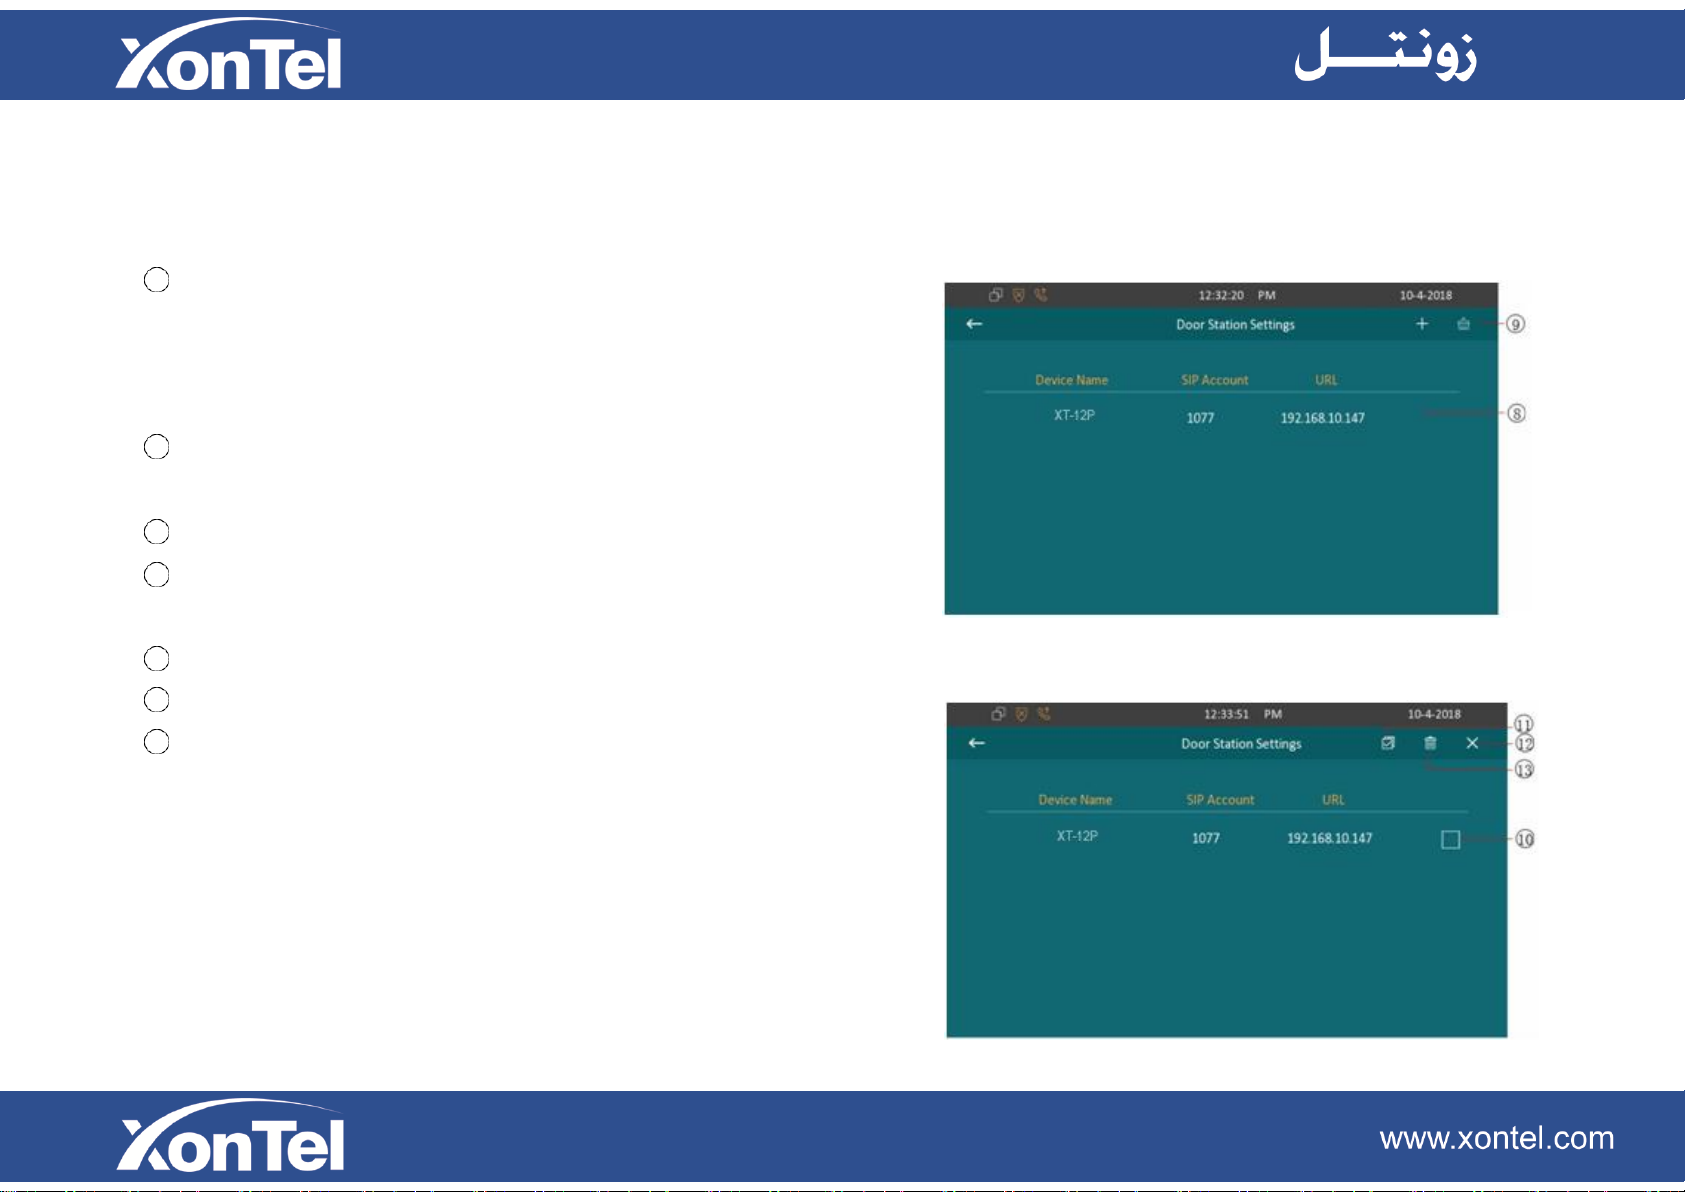
8
7
9
10
11
12
13
phone for monitor. To monitor door phone camera, needs
to type in correct user name and password.
Save icon to save the modification.
Click the existed door station can modify this door station
information.
Click the icon to enter deletion interface.
Click the icon to choose the door
station.
Click the icon to choose all existed door stations.
Click the icon to cancel or back to the previous level.
Click the icon to delete the selected door station.
37
Page 45

4.8 Reset
Enter the advance settings interface, click Reset icon to
reset XT-13P to factory. And press confirm when you
see the prompt. It will reset to factory automatically.
38
Page 46
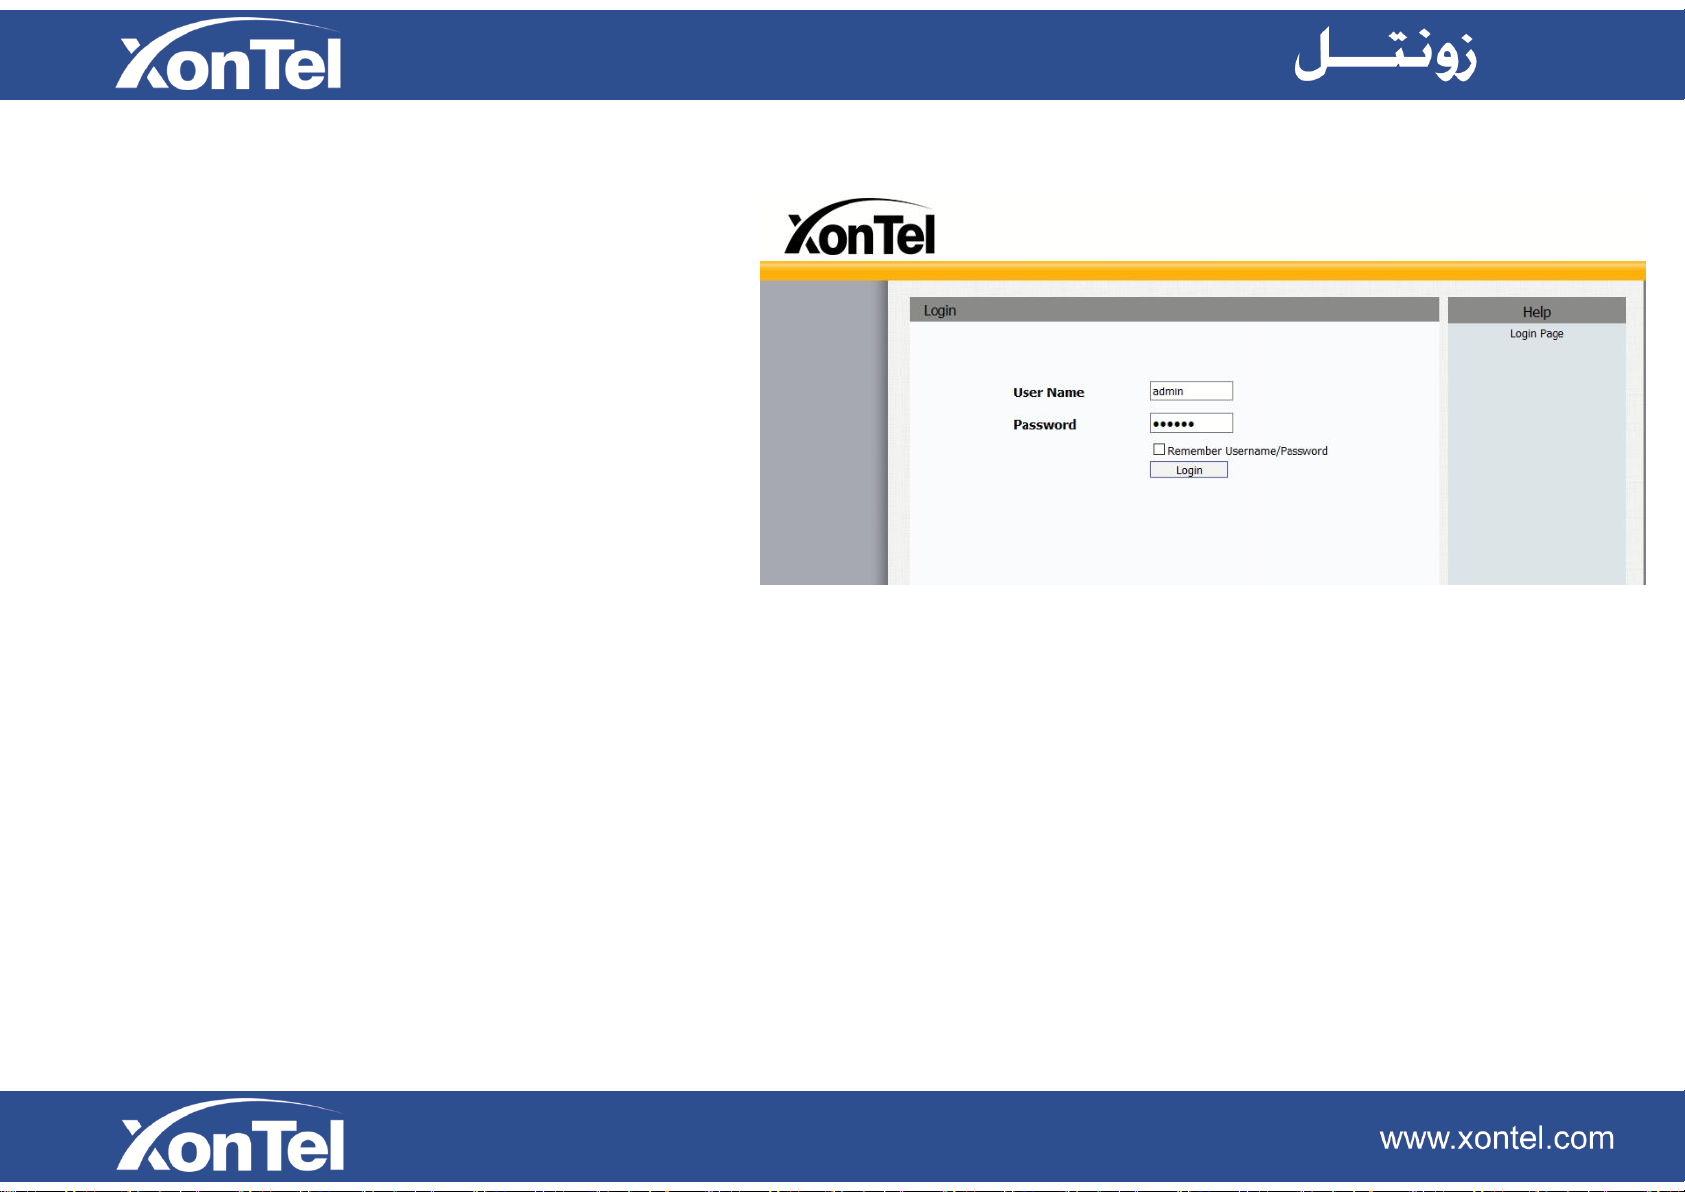
5. Website
Web user interface (we will used Web UI for short in the
following context) which is used for user or administrator
to check or change XT-13P settings.
Click Status icon on desktop to check the XT-13P IP
address.
Type the IP address on browser, input default User
Name and Password: admin/xontel to login the web
interface.
39
Page 47
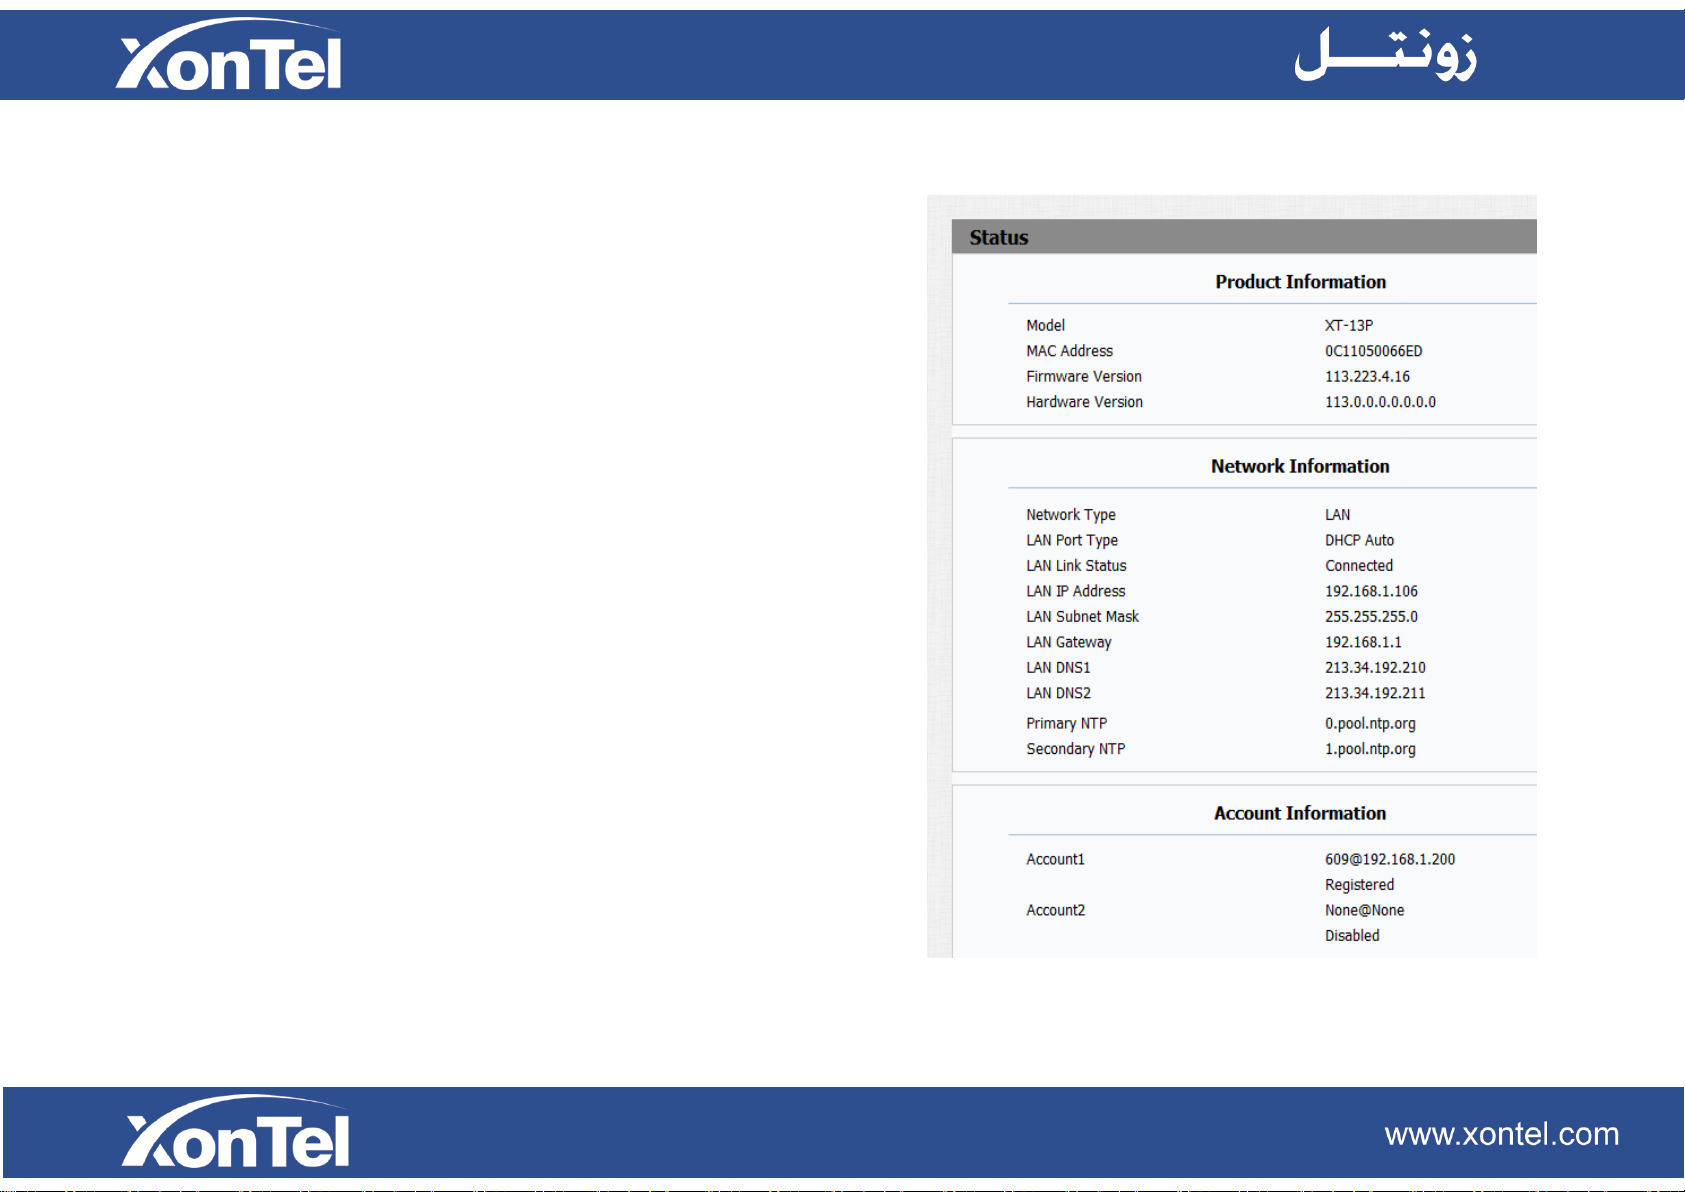
5.1 Status-Basic
5.1.1 Product Information
To display the device’s information such as Model name, MAC
address (IP device physical address), Firmware version and
Hardware firmware.
5.1.2 Network Information
To display the device networking status (LAN Port), such as Port
Type (which could be DHCP/Static/PPPoE), Link Status, IP
Address, Subnet Mask, Gateway, Primary DNS server, Secondary
DNS server, Primary NTP server and Secondary NTP server (NTP
server is used to synchronize time from INTERNET automatically).
5.1.3 Account Information
To display device’s Account information and Registration status
(account username, registered server’s address, Register result).
Page 48
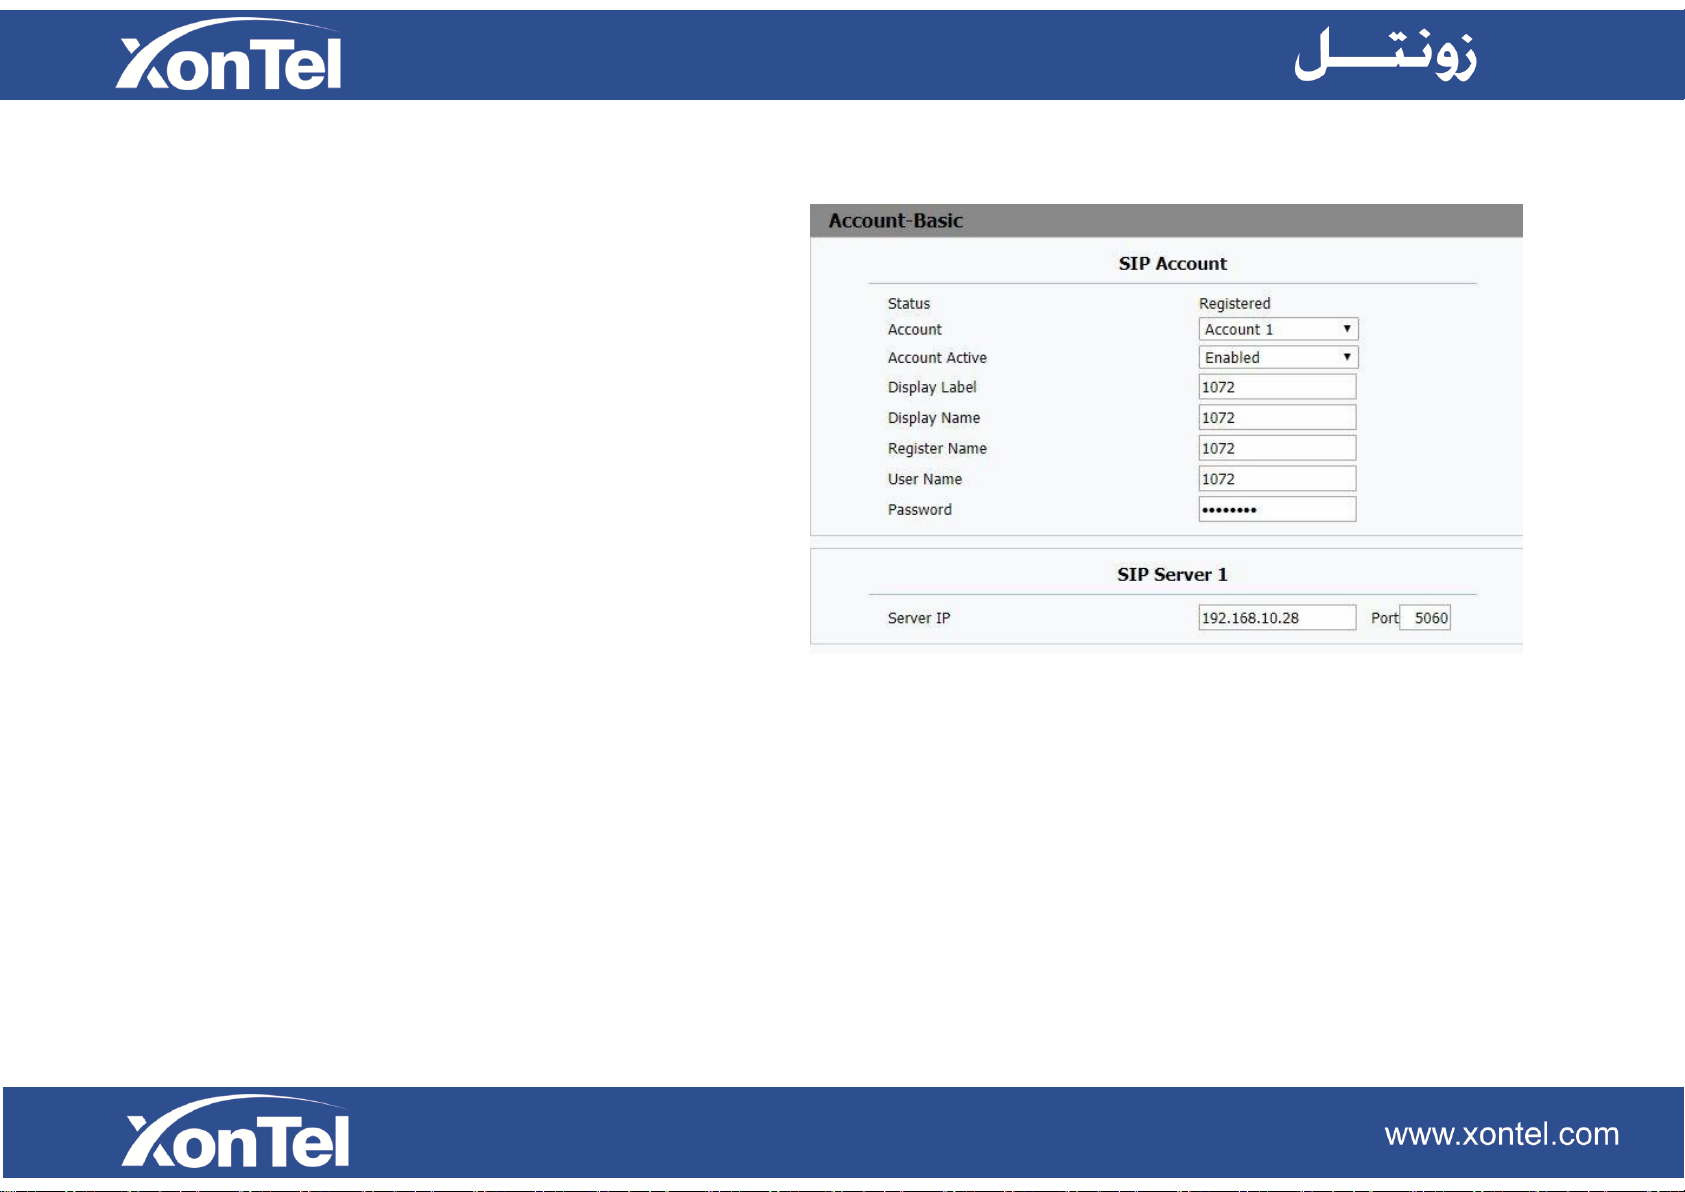
5.2 Account-Basic
5.2.1 SIP Account
To display and configure the specific Account settings.
Status: to display the register result.
Display Label: Which is displayed on the XT-13P monitor
LCD screen.
Display Name: Which is sent to the other call party for
displaying.
Register Name: Allocated by SIP server provider, type in
the extension number you want to register.
User Name: Allocated by your SIP server provide, used
for authentication.
Password: Used for authorization
5.2.2 SIP Server 1
To display and configure Primary SIP server settings.
Server IP: SIP server address, it could be an URL or IP
address.
Page 49
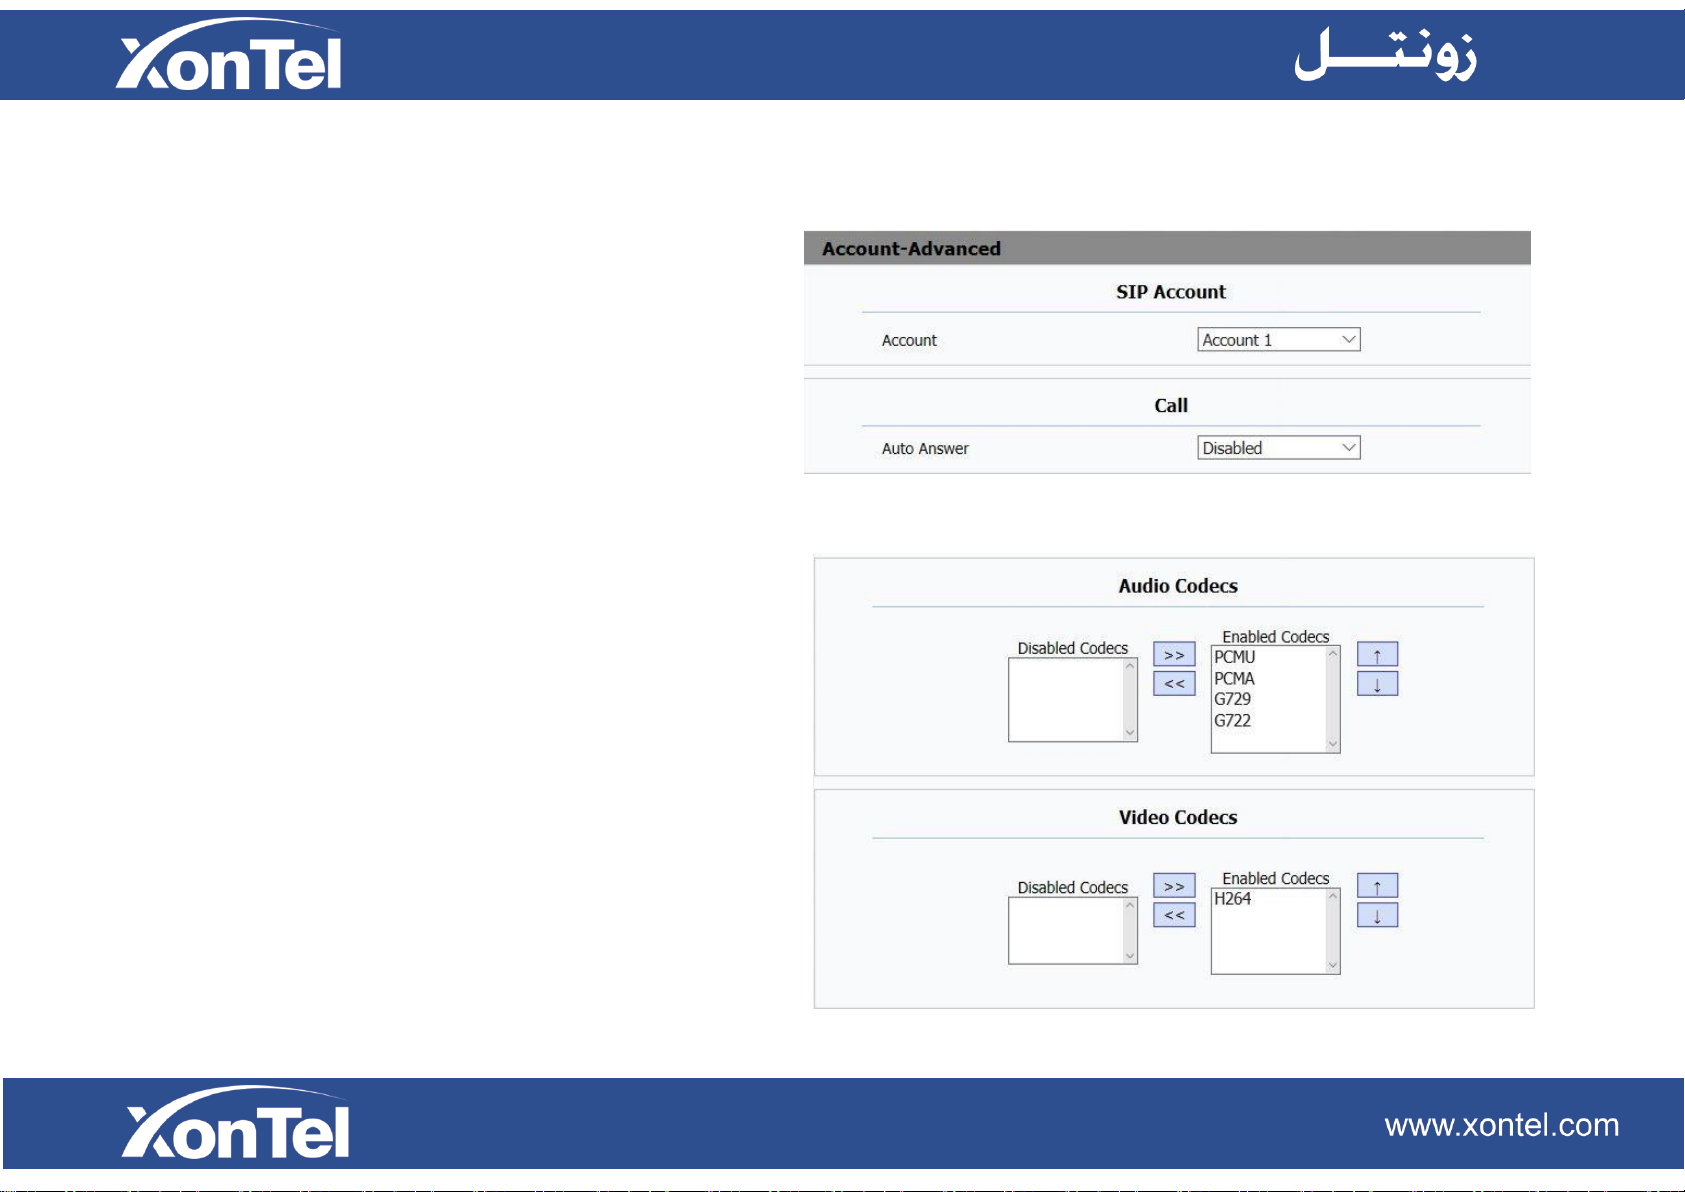
5.3 Account-Advanced
5.3.1 SIP Account
Account: XT-13P support dual SIP account, you
can choose which one to be configured here.
5.3.2 Call
Auto Answer: Enable this feature, XT-13P will pick up the
incoming calls automatically, disabled by default.
5.3.3 Audio Codecs
To display and configure available/unavailable codecs list.
Codec means coder-decoder which is used to transfer
analog signal to digital signal or vice versa. Familiar
codecs are PCMU (G711U), PCMA (G711A), G722 (widebandth codecs), G729 and so on.
Page 50
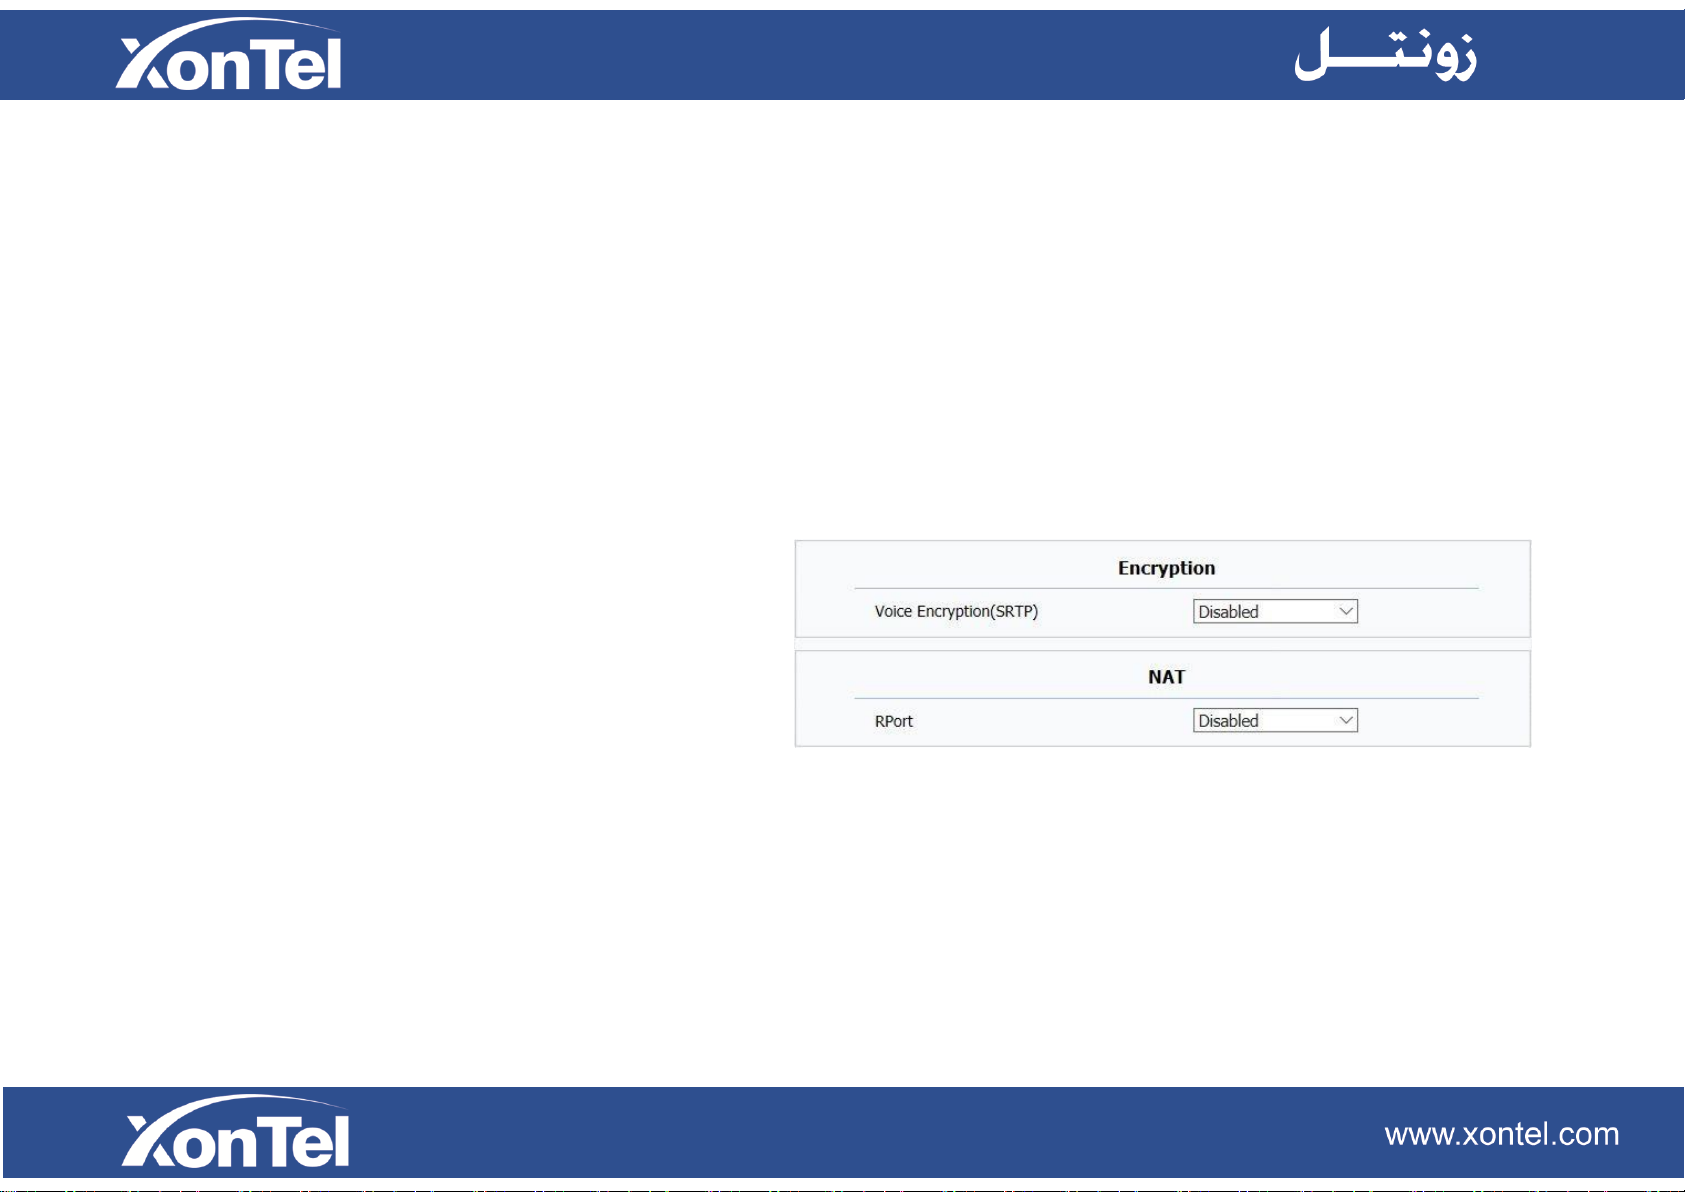
5.3.4 Video Codecs
XT-13P support H264 video codec.
5.3.5 Encryption
Voice Encryption (SRTP): If enabled, all audio signal
(technically speaking it’s RTP streams) will be encrypted
for more security.
5.3.6 NAT
RPort: Remote Port, if enabled, it will add Remote Port in
to outgoing SIP message for designated account.
Page 51
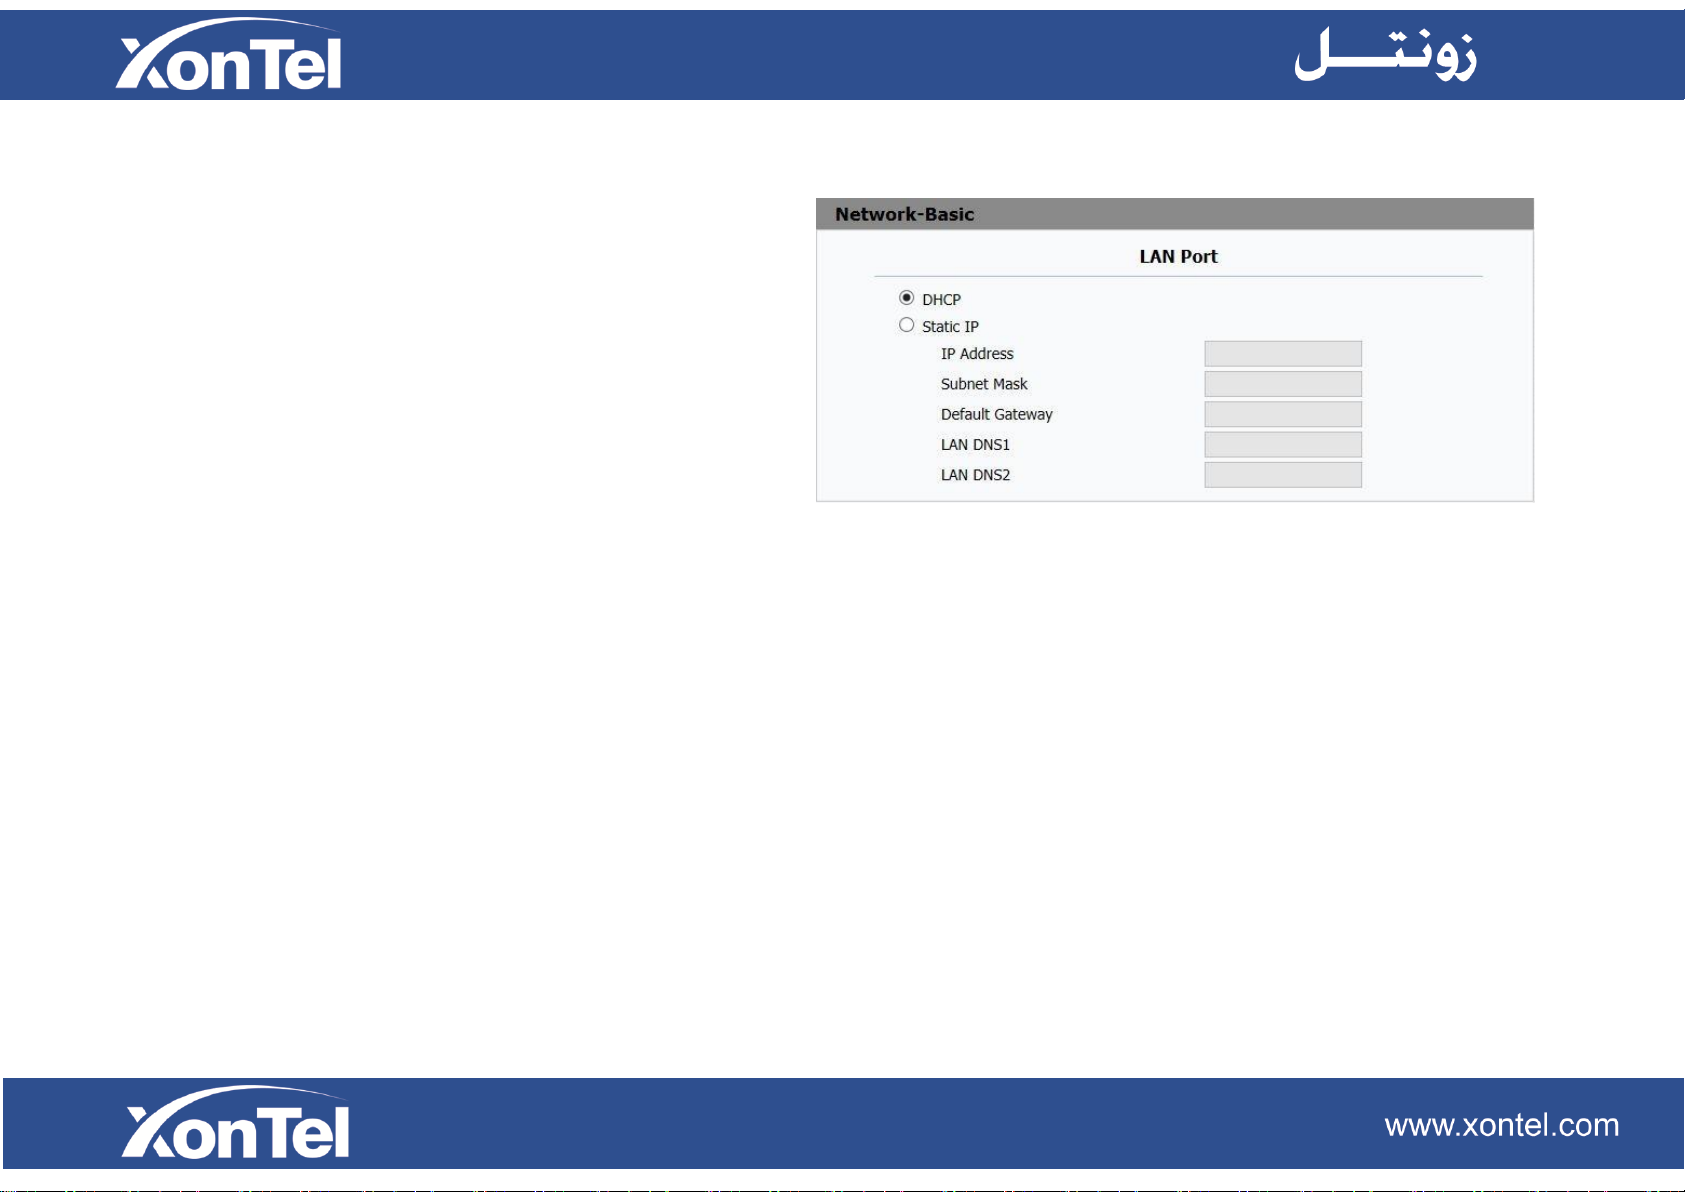
5.4 Network-Basic
To display and configure LAN Port settings.
DHCP: If selected, XT-13P IP monitor will get IP address,
Subnet Mask, Default Gateway and DNS server address
from DHCP server automatically.
Static IP: If selected, you have to set IP address, Subnet
Mask, Default Gateway and DNS server manually.
Page 52
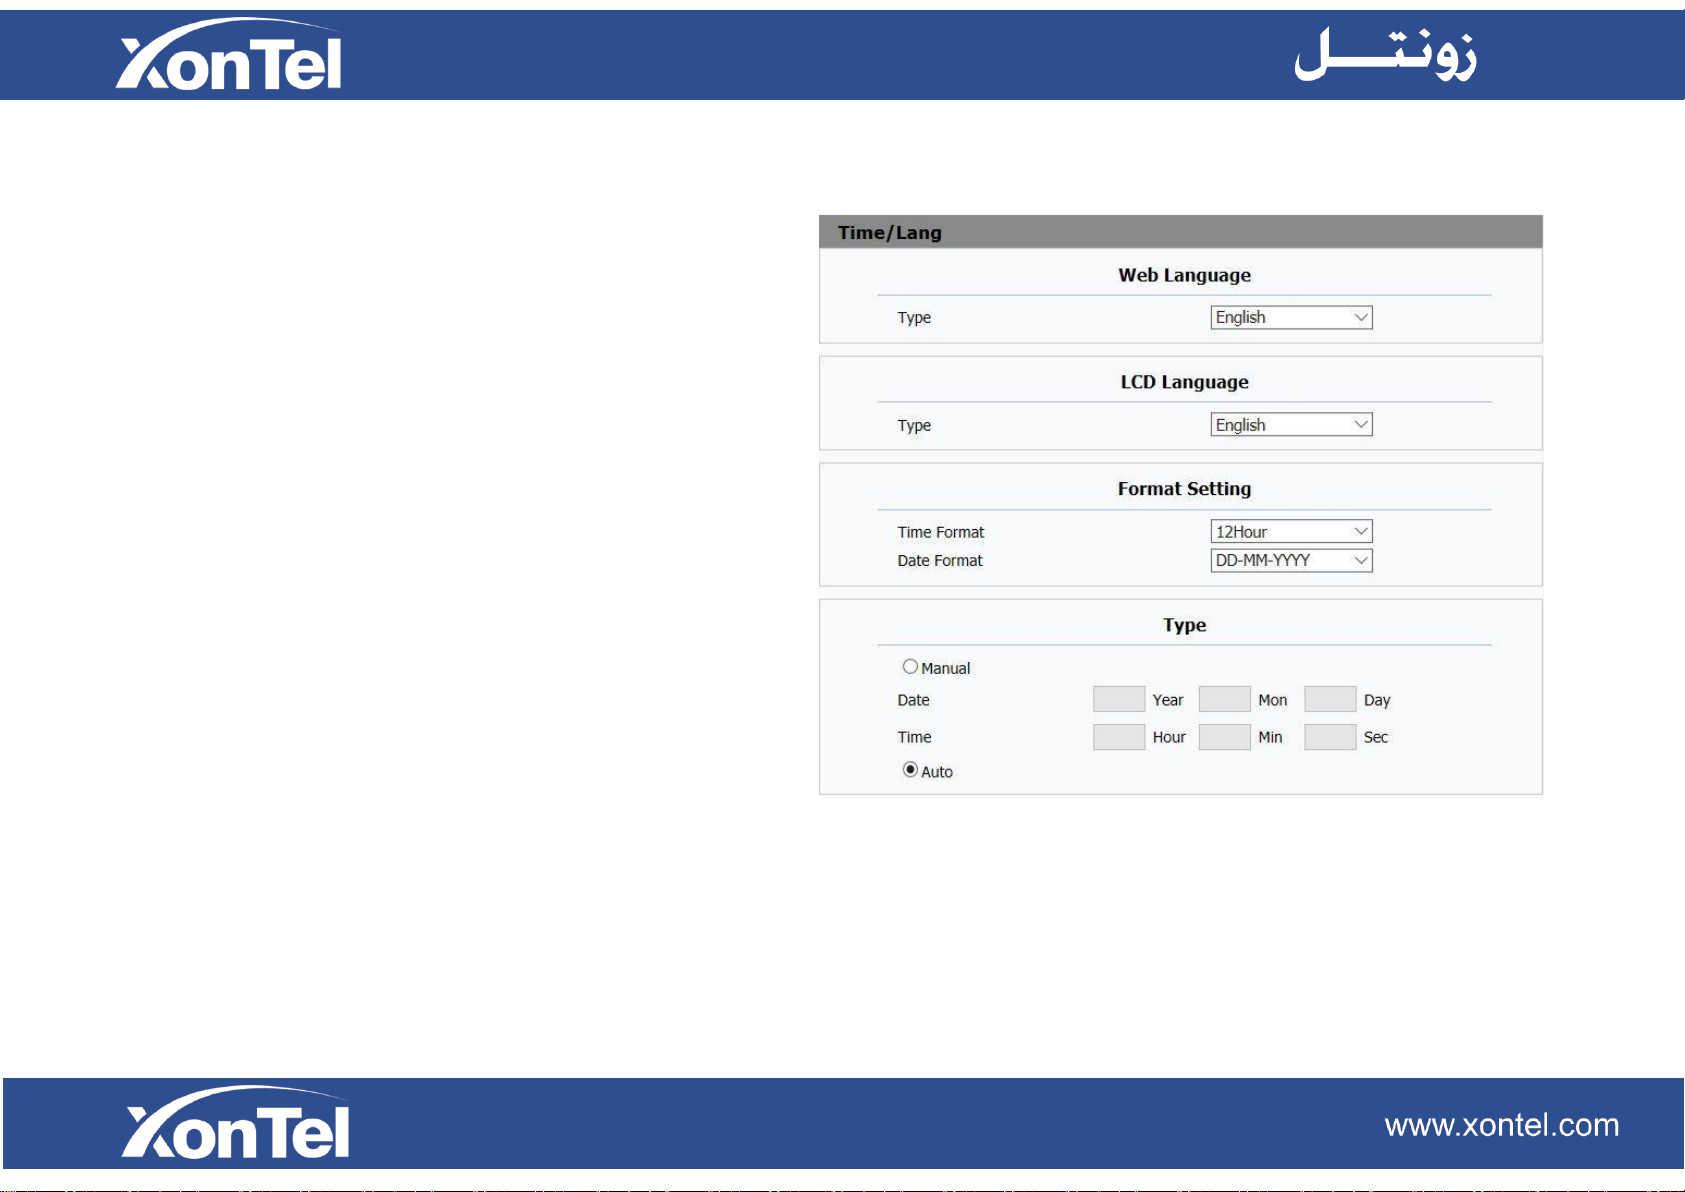
5.5 Phone-Time/Lang
To display and configure Time/Language.
5.5.1 Web Language
To choose the web language. (Only English
supported now)
5.5.2 LCD Language
To choose the device language. (Only English
supported now)
5.5.3 Format Setting
Time Format: Determine what format to display on Phone
UI (12 hour/24 hour).
Date Format: Determine what format to display on Phone
UI for Date.
Page 53
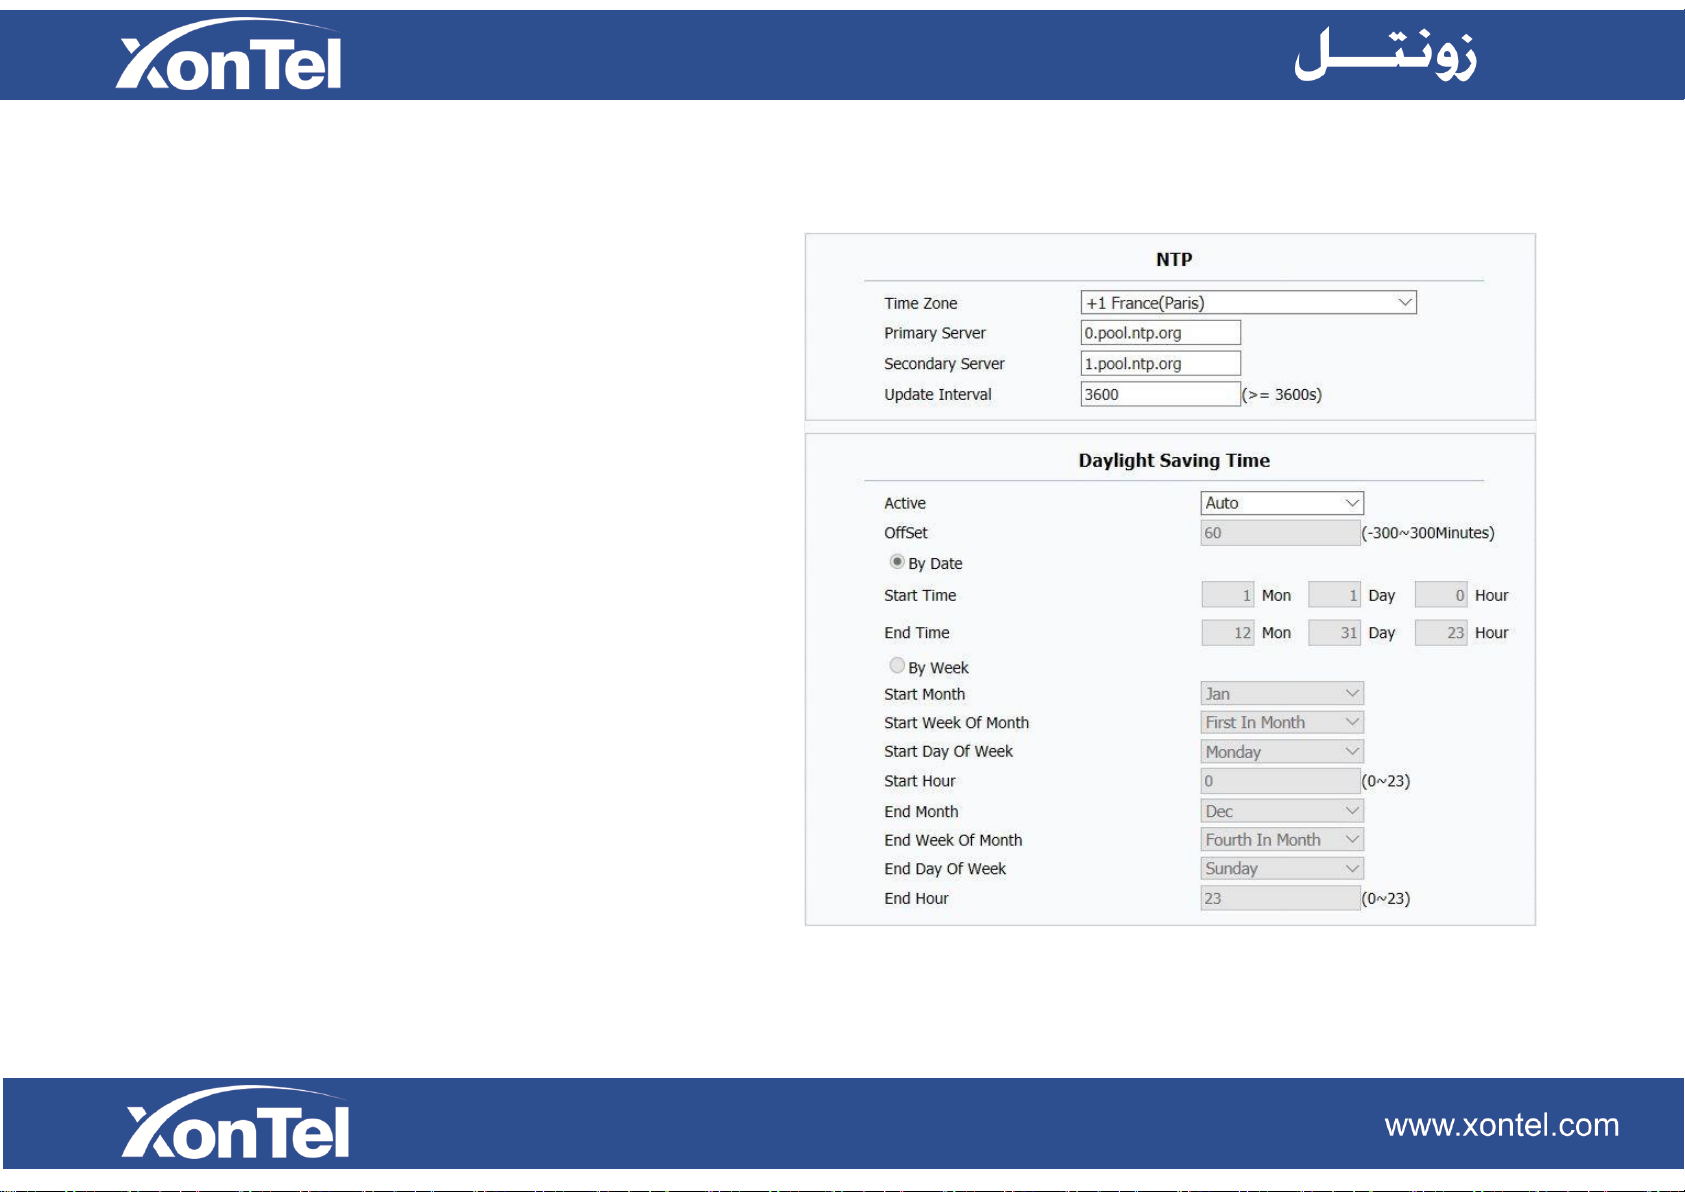
5.5.4 Type
To select how to configure time, it could be set by manually
or get from Internet automatically via NTP server. Manual:
To set Time and Date manually.
Auto: To get Time via NTP server.
5.5.5 NTP
To configure NTP server related settings.
Time Zone: To select local Time Zone for NTP server.
Primary Server: To configure primary NTP server address.
Secondary Sever: This is for redundancy, if getting time
from Primary NTP server fails, the XT-13P will go to
Secondary NTP server for getting time.
Update Interval: Set the period of synchronization with the
server.
5.5.6 Daylight Saving Time
Page 54
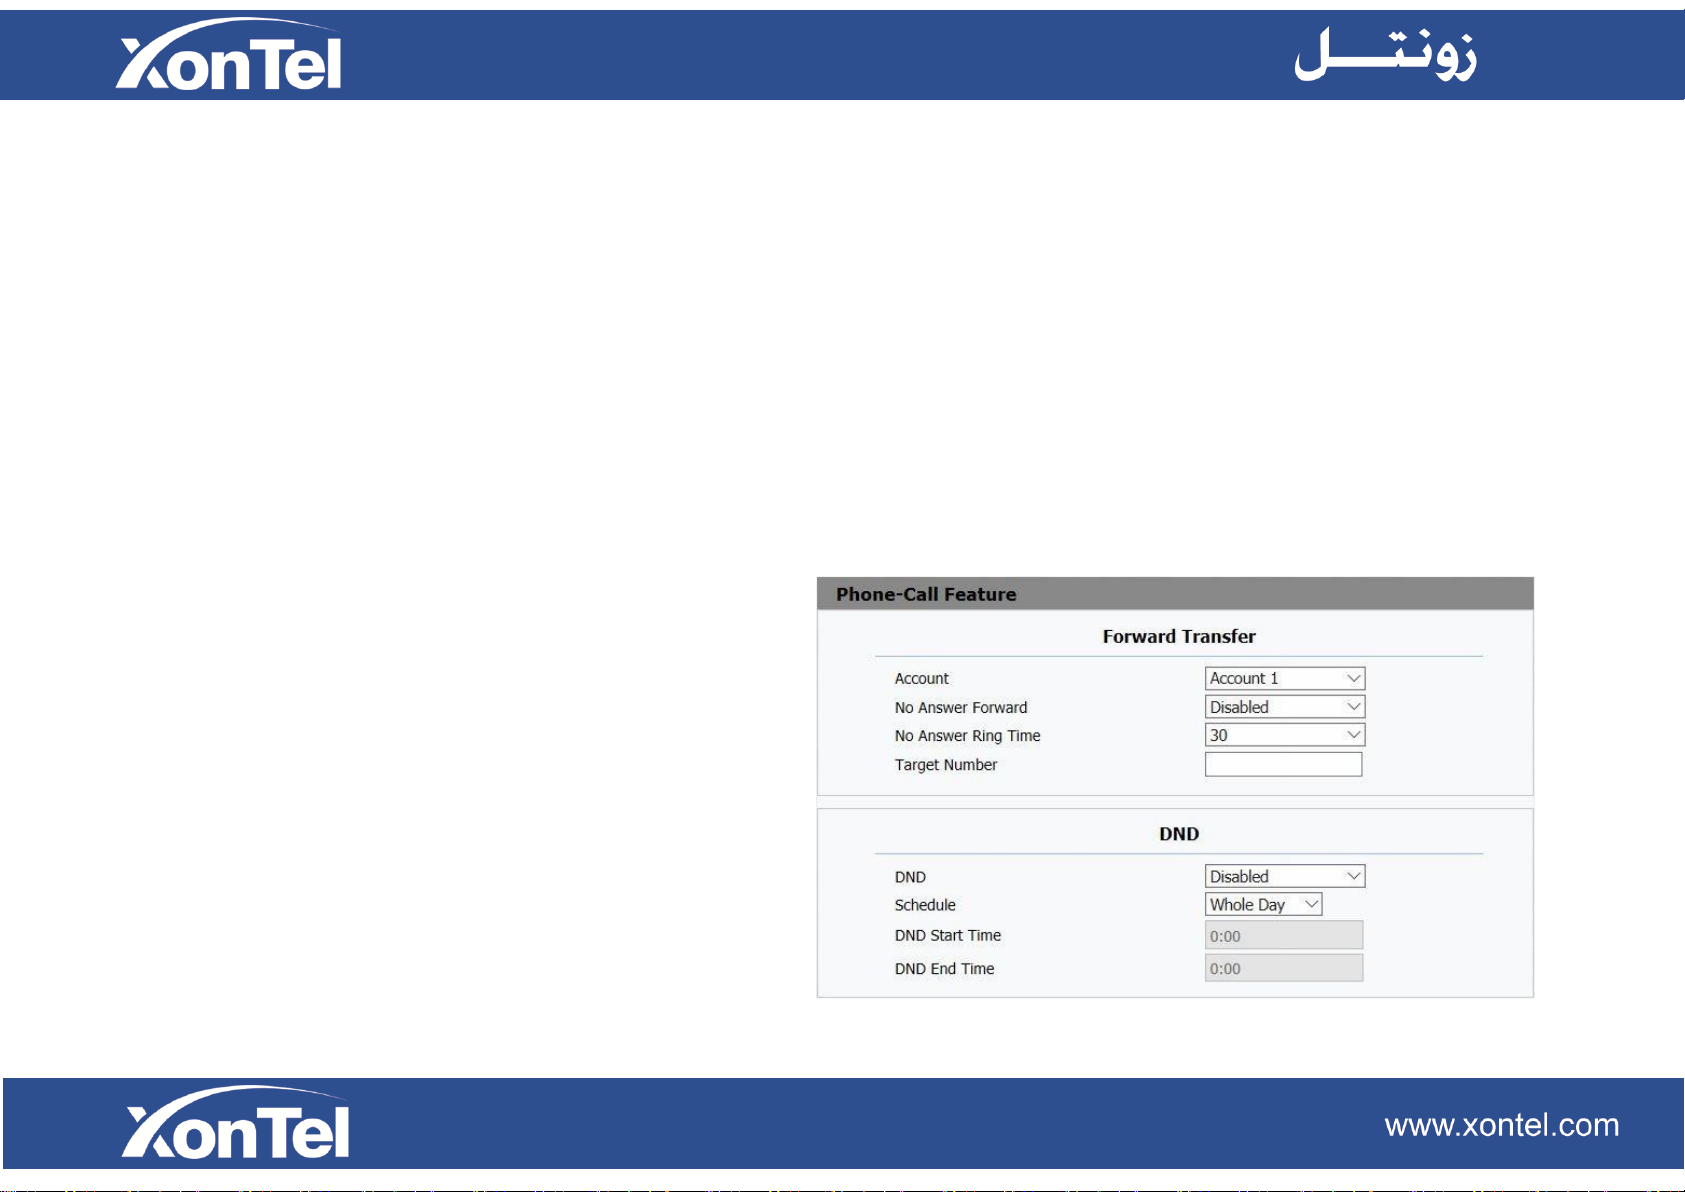
Time as adjusted to achieve longer evening daylight,
especially in summer.
Active: To enable/disable the daylight saving time. You
can also configure to make XT-13P to adjust the daylight
saving time automatically.
Offset: To set the offset value, it is 60 minutes as default,
setting the clocks an hour ahead of the standard time.
By Date: To set the date schedule for daylight saving time.
By Week: To set the schedule for daylight saving time
according to the week and month.
5.6 Phone-Call Feature
5.6.1 Forward Transfer
To display and configure Forward setting.
Always Forward: Any incoming call will be forwarded in
any situation.
Page 55
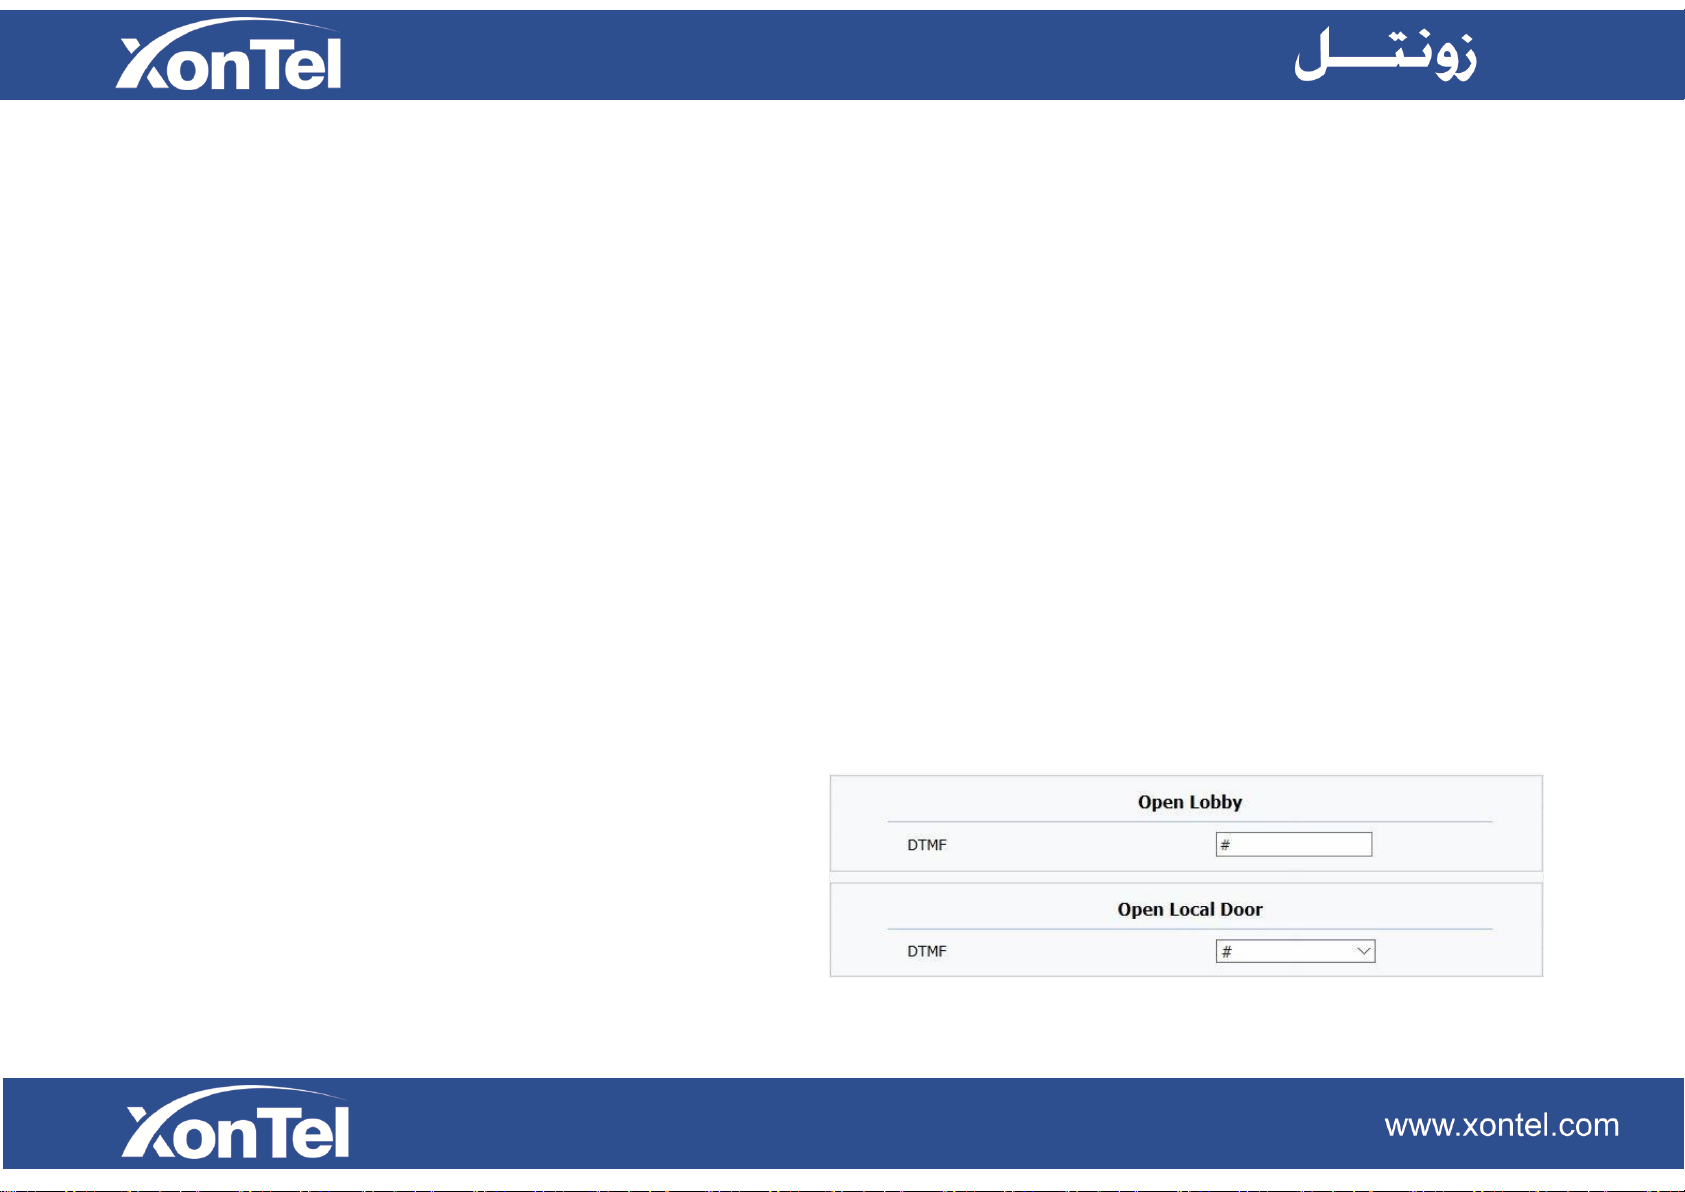
Busy Forward: incoming call will be forwarded if XT-13P
phone is busy.
No answer Forward: Any incoming call will be forwarded
if it’s no answer after a specific time.
5.6.2 DND (Do Not Disturb)
DND allows XT-13P IP monitor to ignore any incoming calls.
DND: Enable or disable this function.
Schedule: For setting the DND function valid time, choose
whole day or time period from the dropdown.
DND Start Time: Setup start time for time period.
DND End Time: Setup end time for time period.
5.6.3 Open Lobby
DTMF: To set the DTMF code which be sent when you
press the open door icon during call on XT-13P screen.
Page 56
5.6.4 Open Local Door
DTMF: To set the DTMF code which can trigger the local
relay.
5.7 Phone-Key/Display
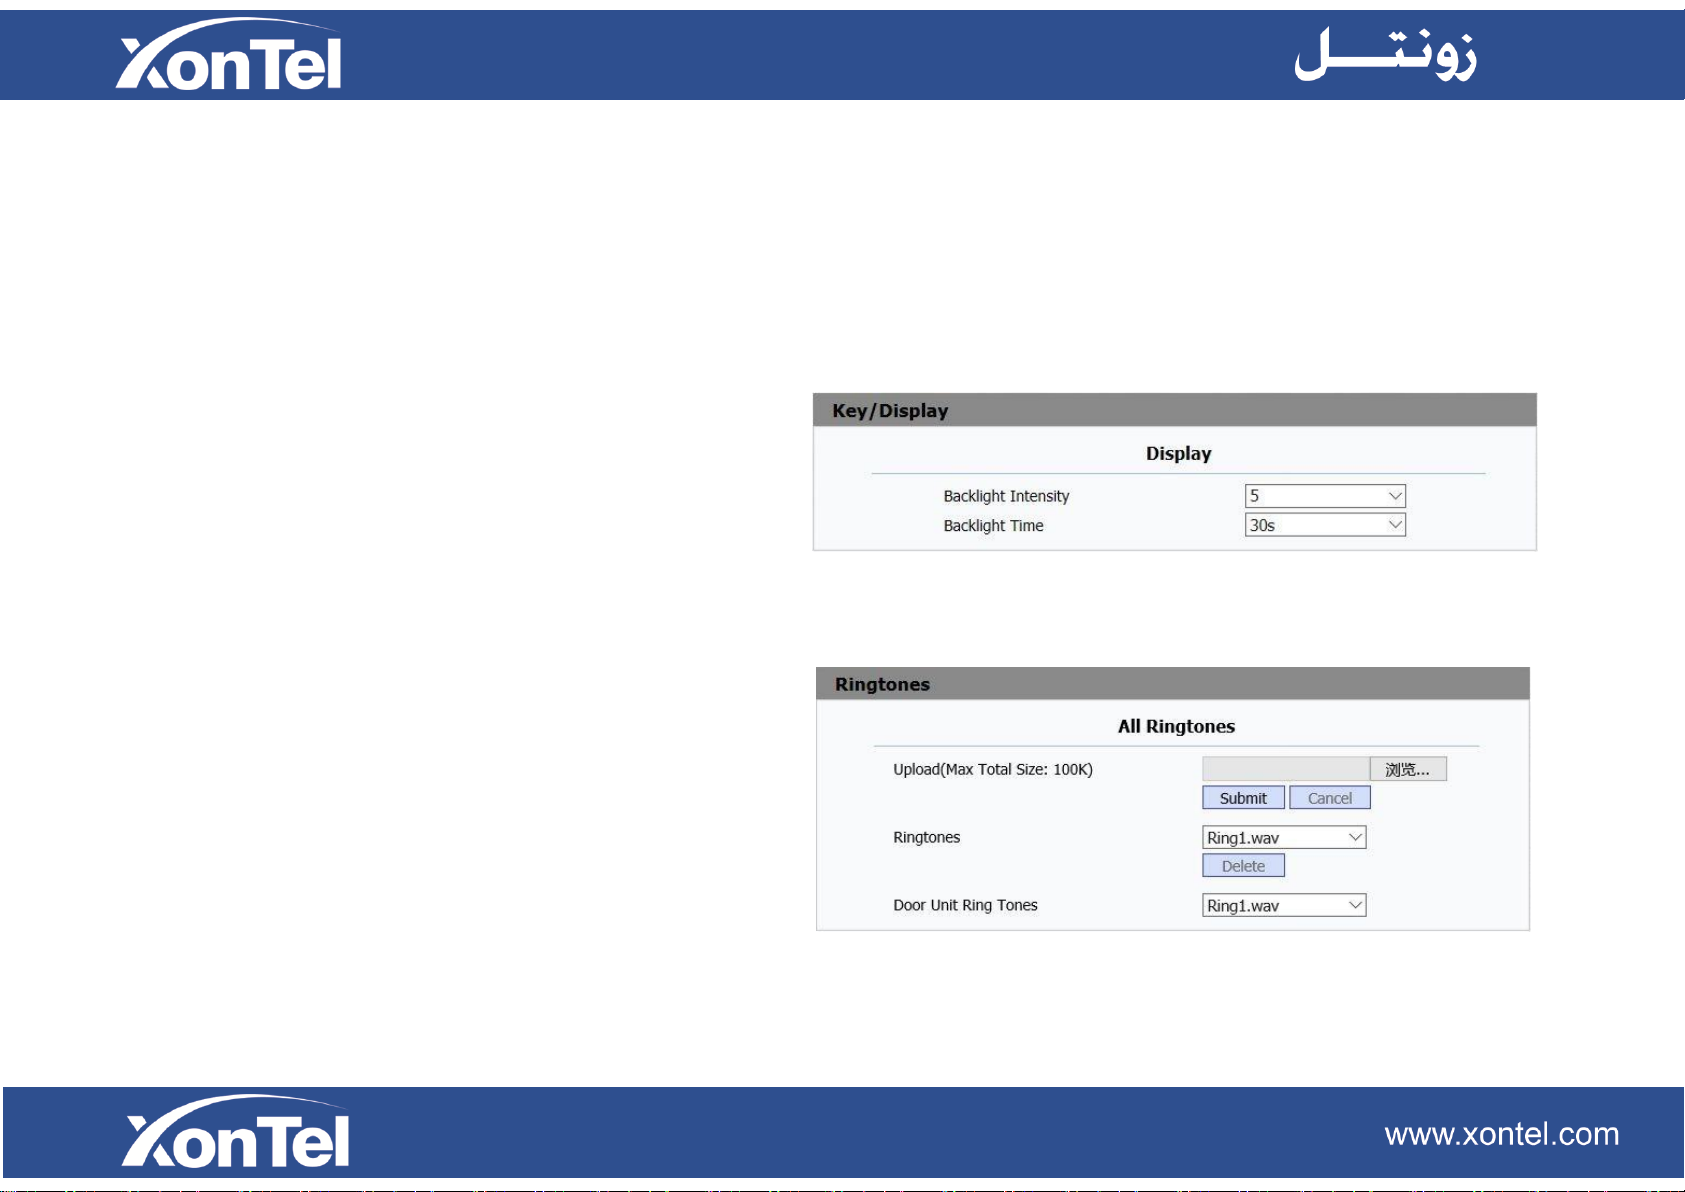
5.7.1 Display
Backlight Intensity: Adjust the screen backlight Intensity.
From 1-10.
Backlight Time: Adjust Backlight time. After the configured
time, the phone will enter standby mode. Click again to
wake up.
5.8 Phone-Ringtones
5.8.1 All Ringtones
Upload: Upload the customized ringtone you need, click
submit to save.
Page 57
Ringtones: To setup a general ringtone from the system.
Door Unit Ring Tone: select the specific ringtone for door
phone
5.9 Phone-Intercom
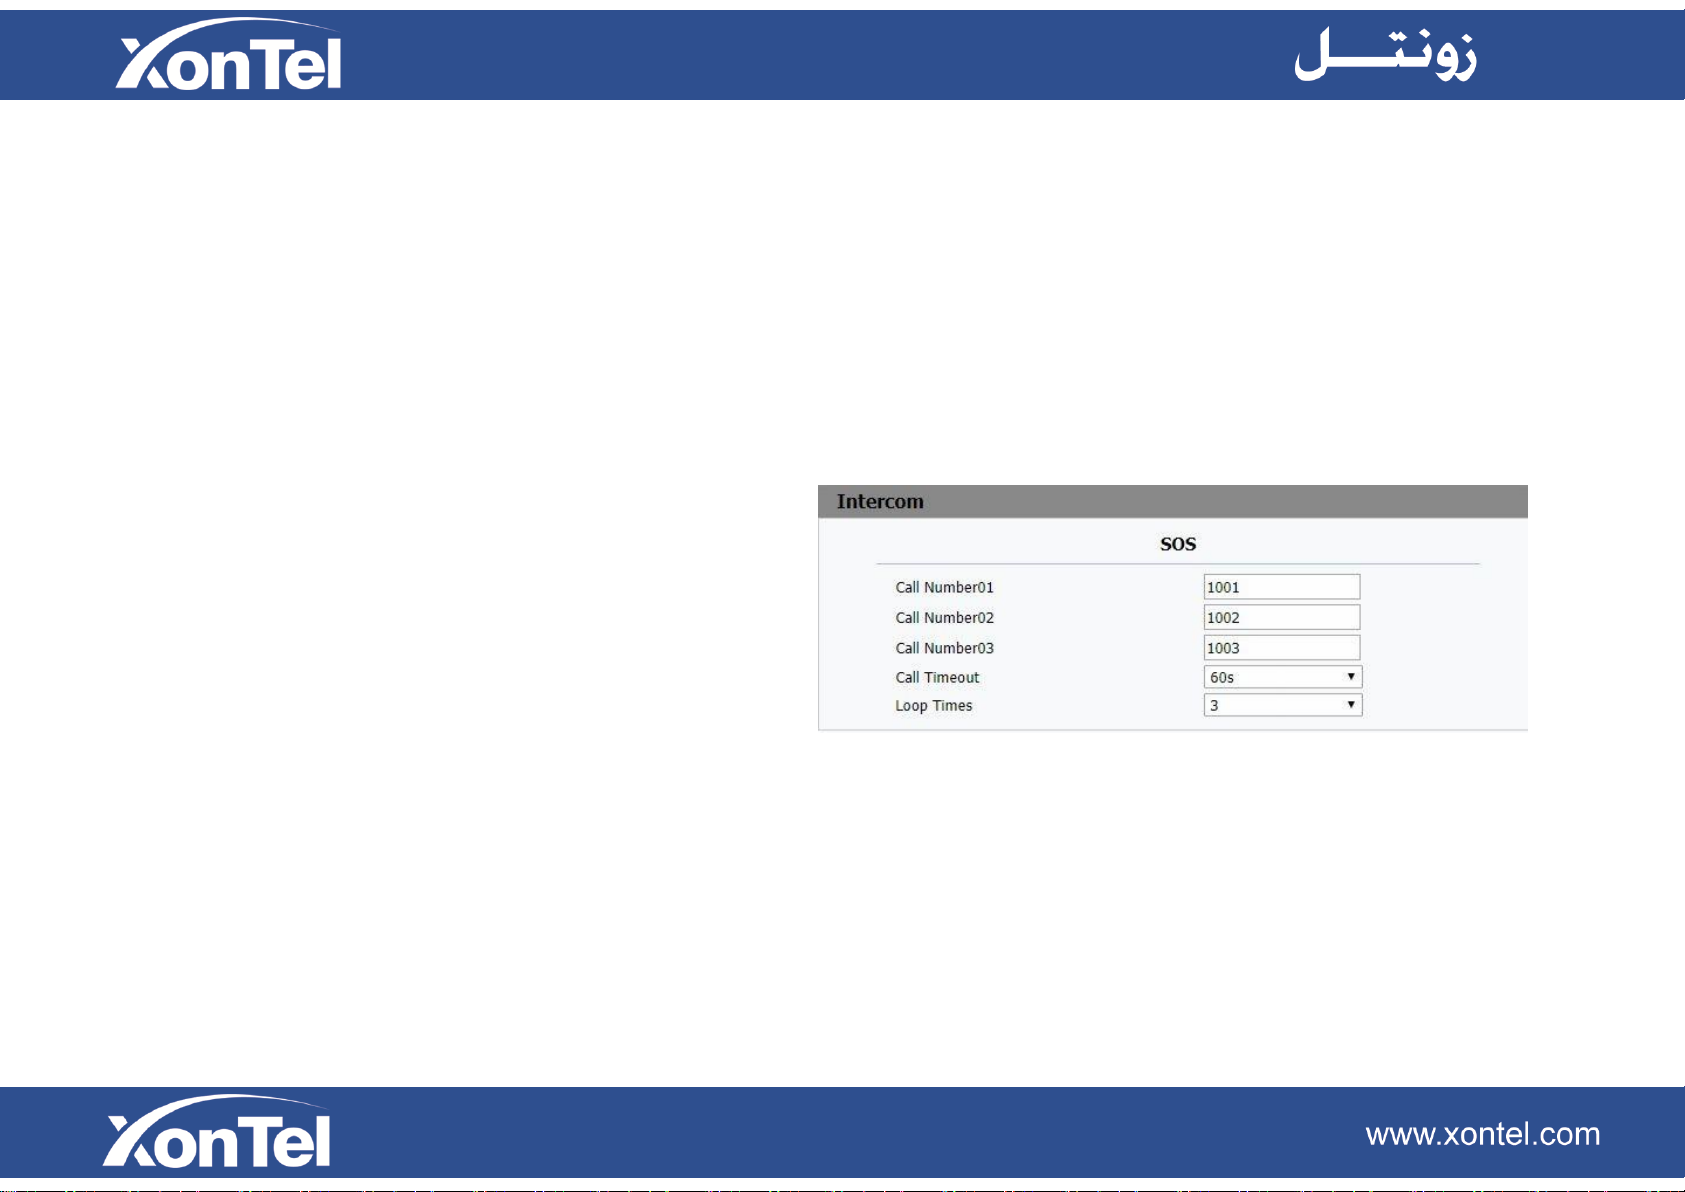
5.9.1 SOS
SOS function is used to call out the emergency numbers in
loop time when someone needs help.
Call Number: setup 3 SOS numbers. Once users press
SOS key, the XT-13P monitor will call out the number in
order.
Call Timeout: Setup the timeout for each number. Once
you call out, if the other side will not answer within the
timeout, the XT-13P will continue to call the next number
Loop Times: To setup the call loop time.
Page 58
5.10 Phone-Monitor
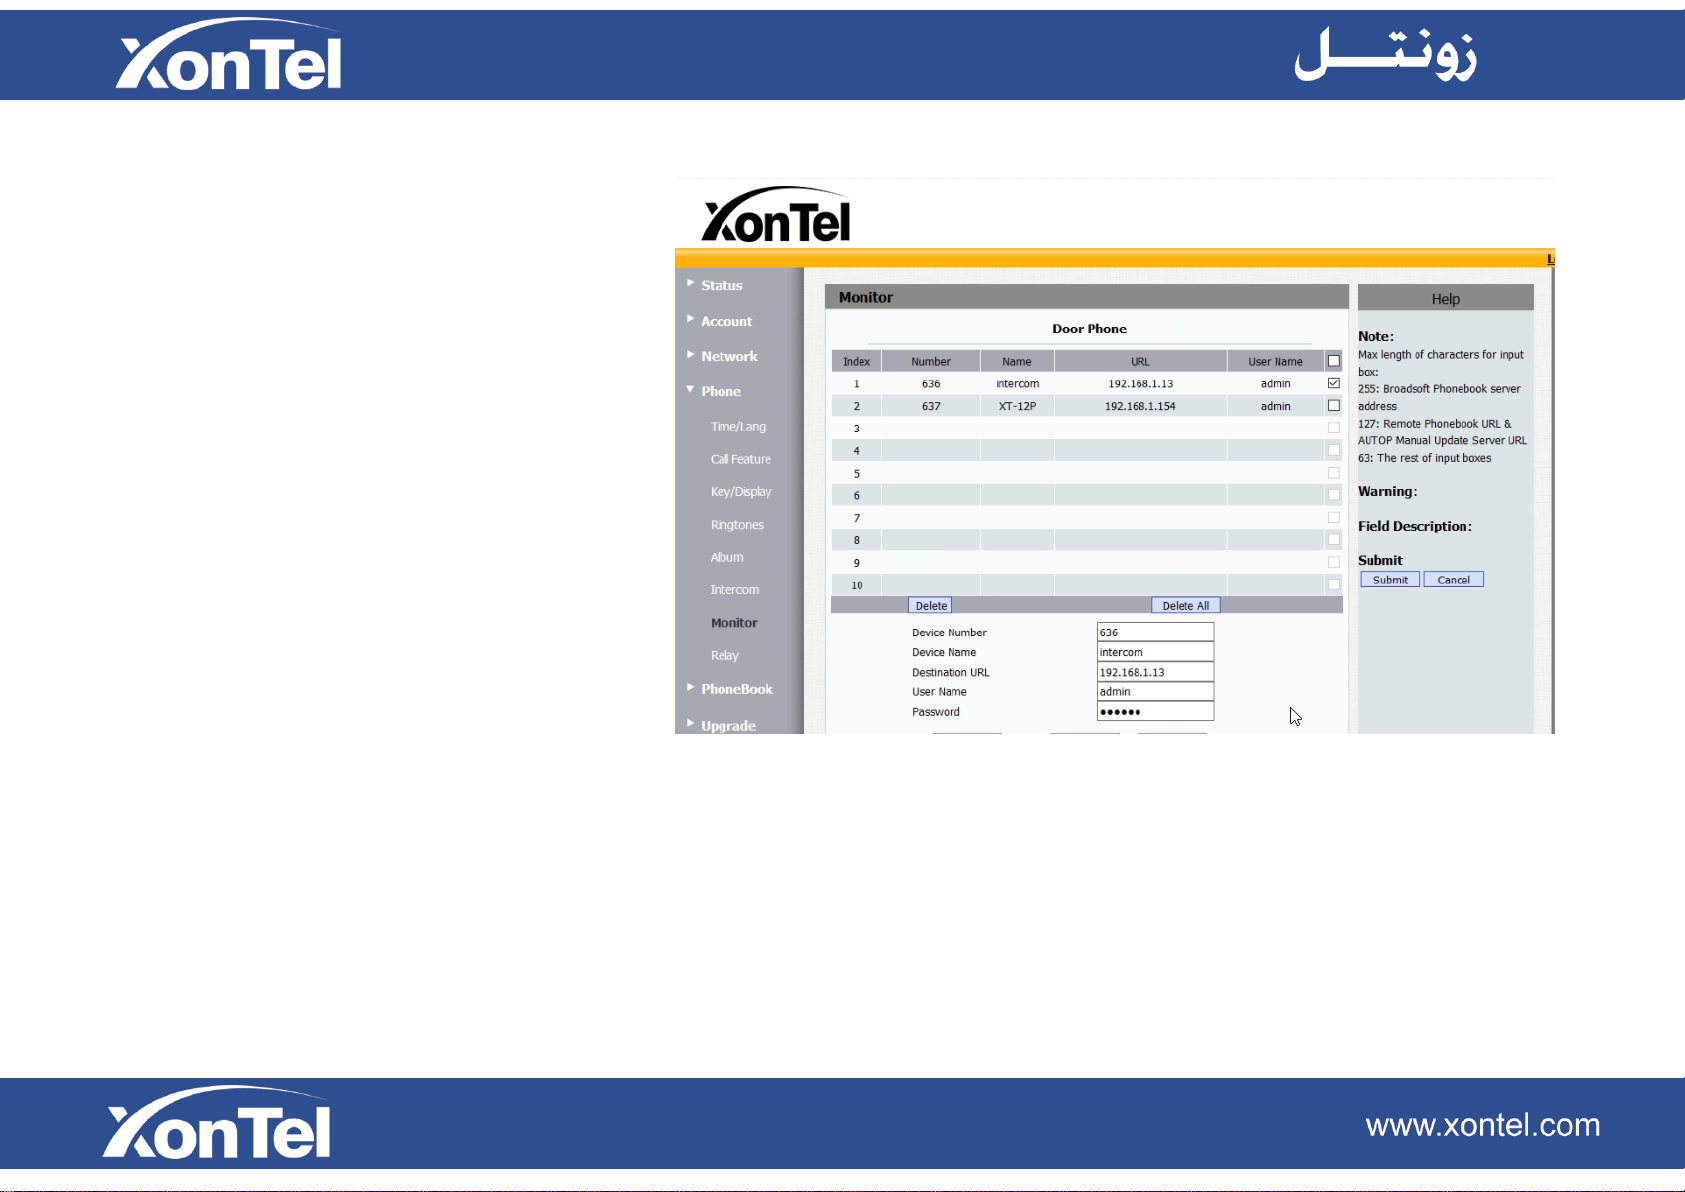
5.10.1 Door Phone
To set a special group for XonTel door phone.
Account: Number of XonTel door phone.
Device Name: To set a name for XonTel door
phone.
Destination URL: To set the IP address of
XonTel door phone.
User Name For monitor authentication.
Password: For monitor authentication. To
monitor door phone camera, needs to type in
correct user name and password.
Page 59
5.10.2 Web Camera
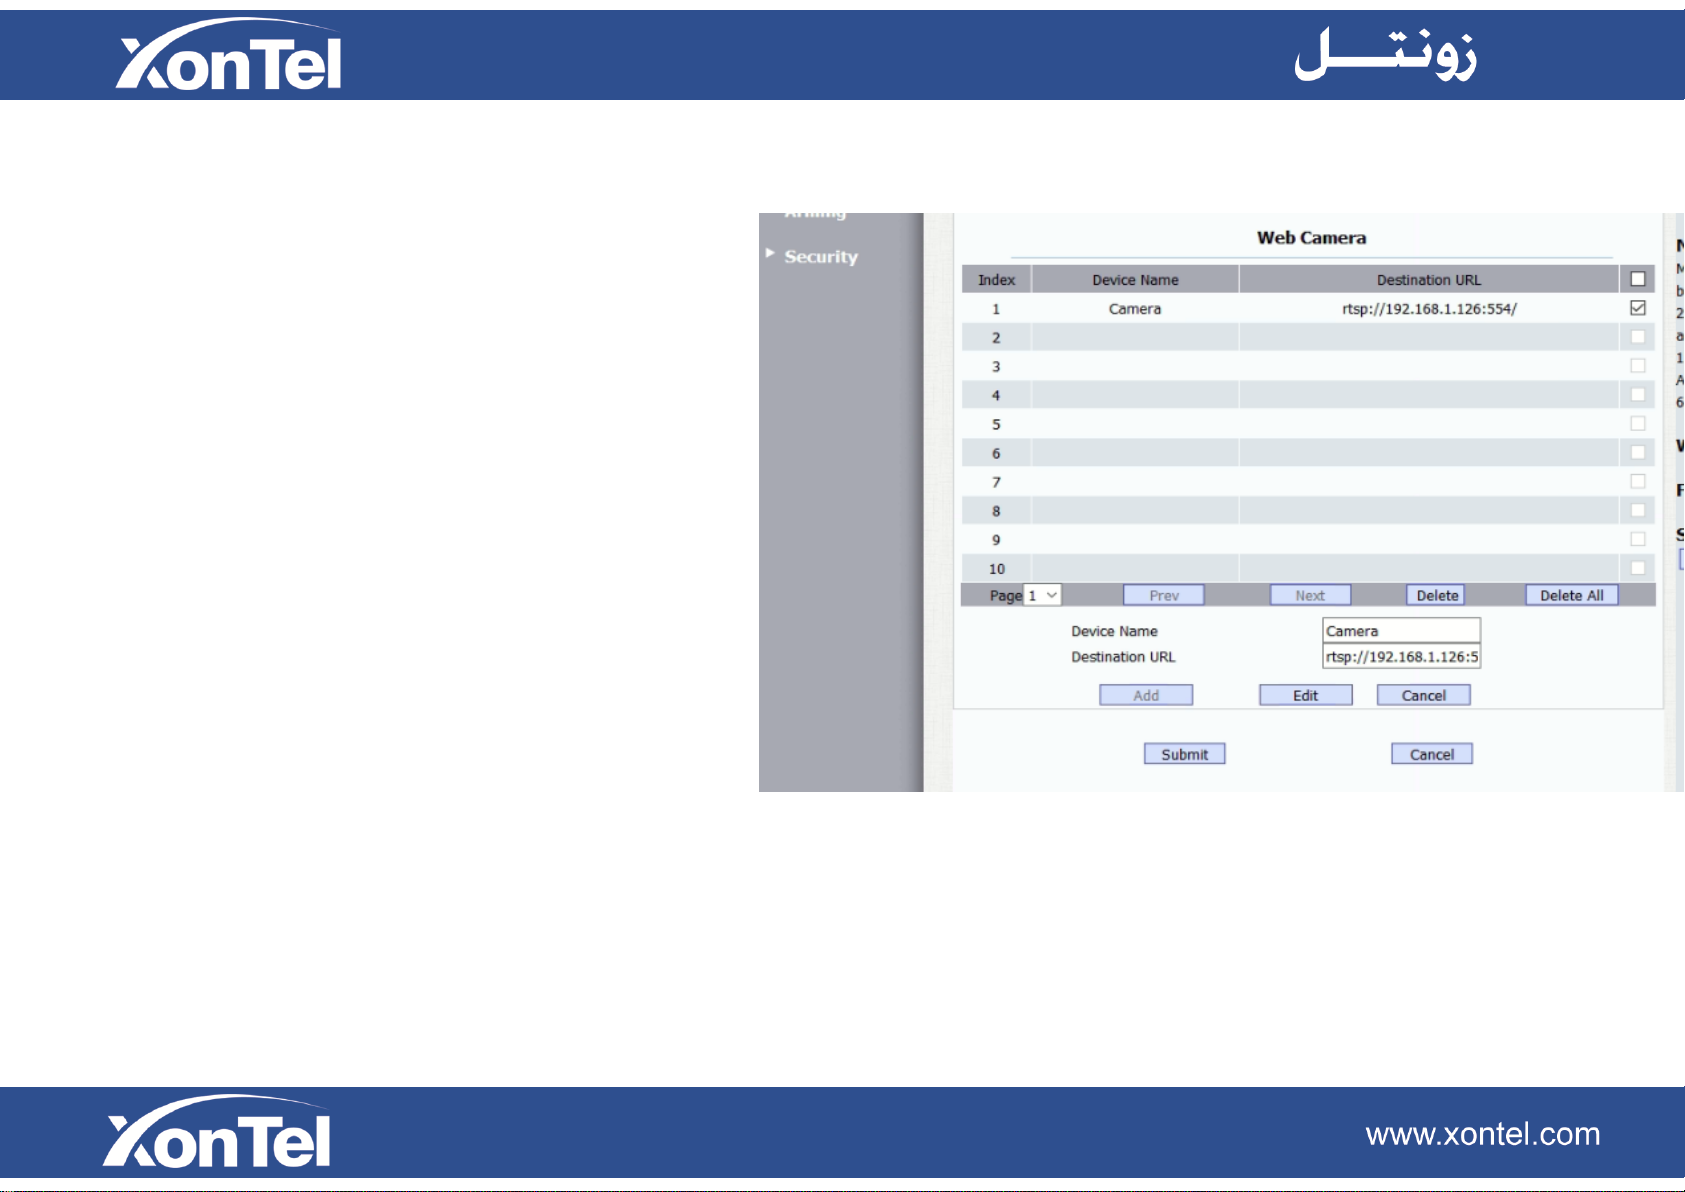
Device Name: To set the device name for web camera.
Destination URL: To set the URL of web camera.
Please connect with IPC vendor for URL format.
After setup, click “Add“ to add the camera information.
You can check or edit the web camera from the list
then click “ Submit ” to save.
Page 60
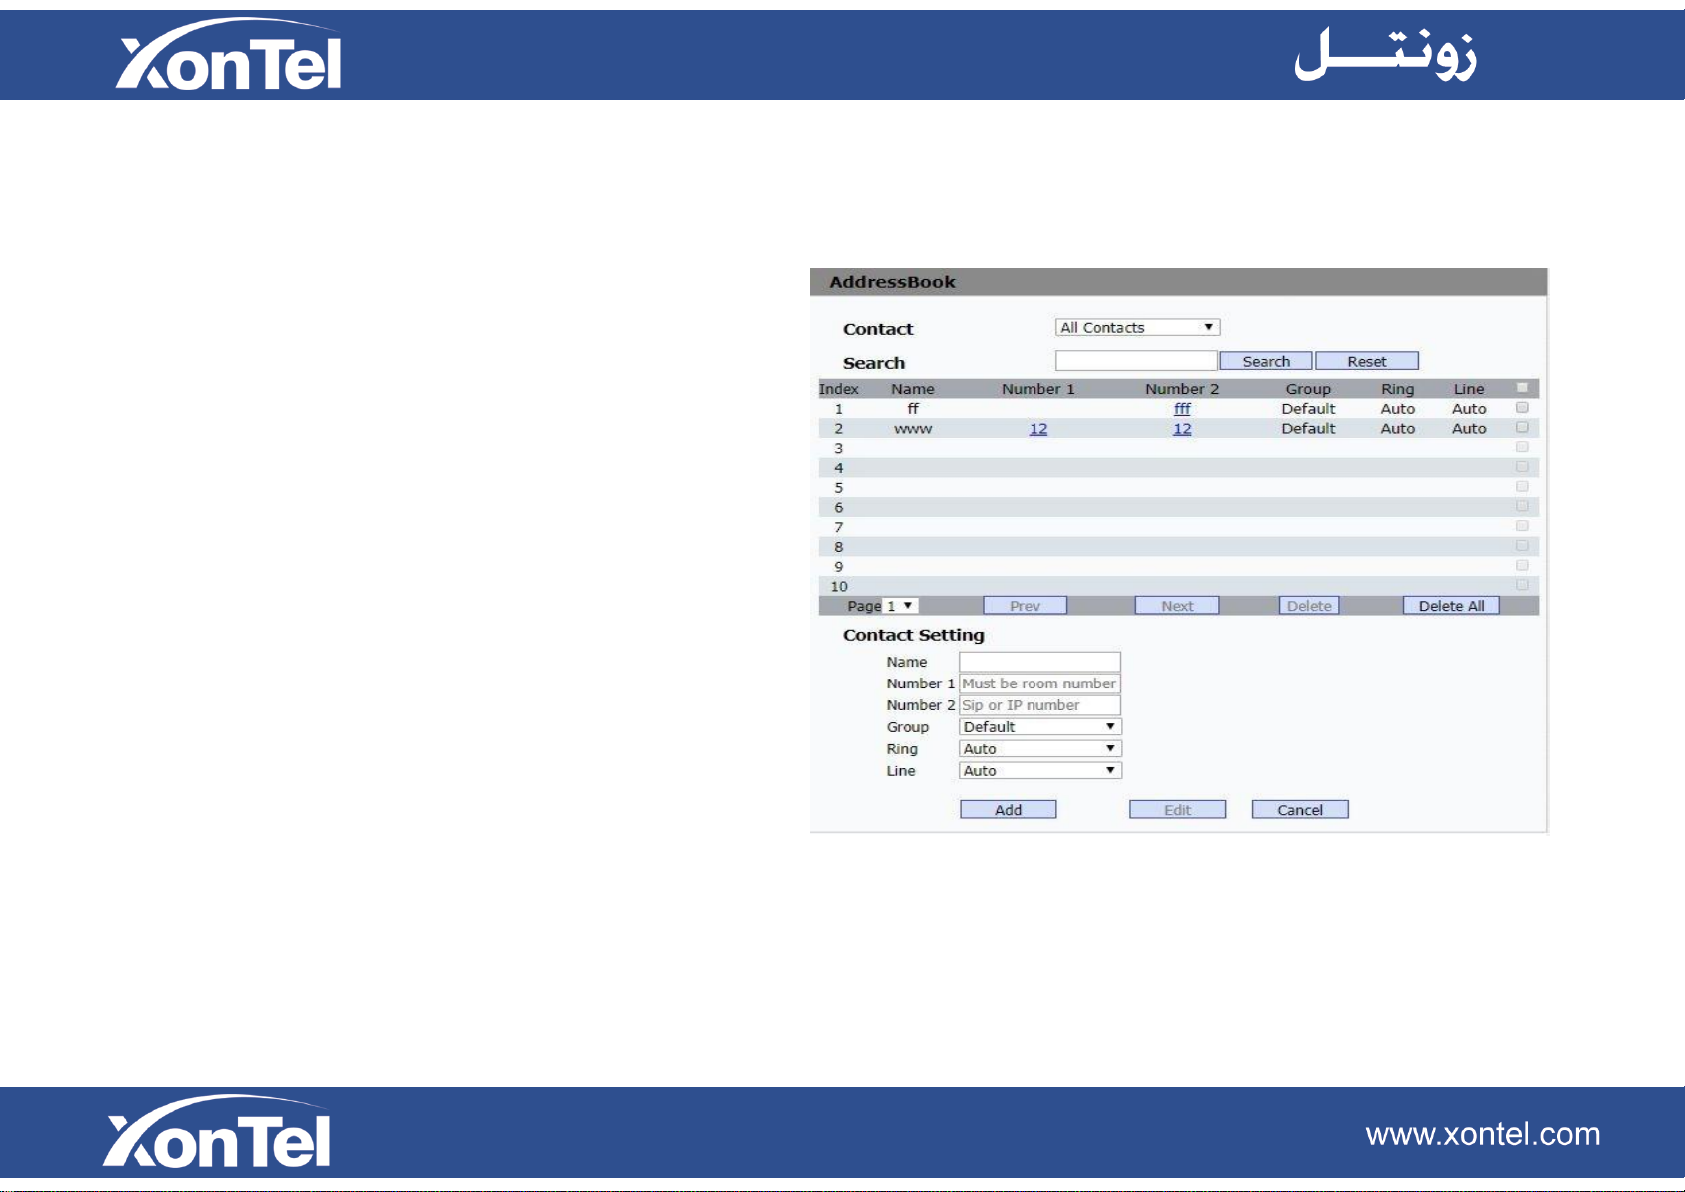
5.11 Phone-Address book
5.11.1 Contact
Select a group to manage corresponding contacts.
5.11.2 Search
To search a special contact.
5.11.3 Contact Setting
To add a new contact.
Name: To set a name for the new contact.
Number 1: To set the number for the new contact, this
number must be room number, when connected to SDMC,
you will assign a room number.
Number 2: To set the number for the new contact,
this number can be SIP number or IP number.
Group You can set a group for the new contact.
Ring: To select a special ring tone for the new contact.
Page 61
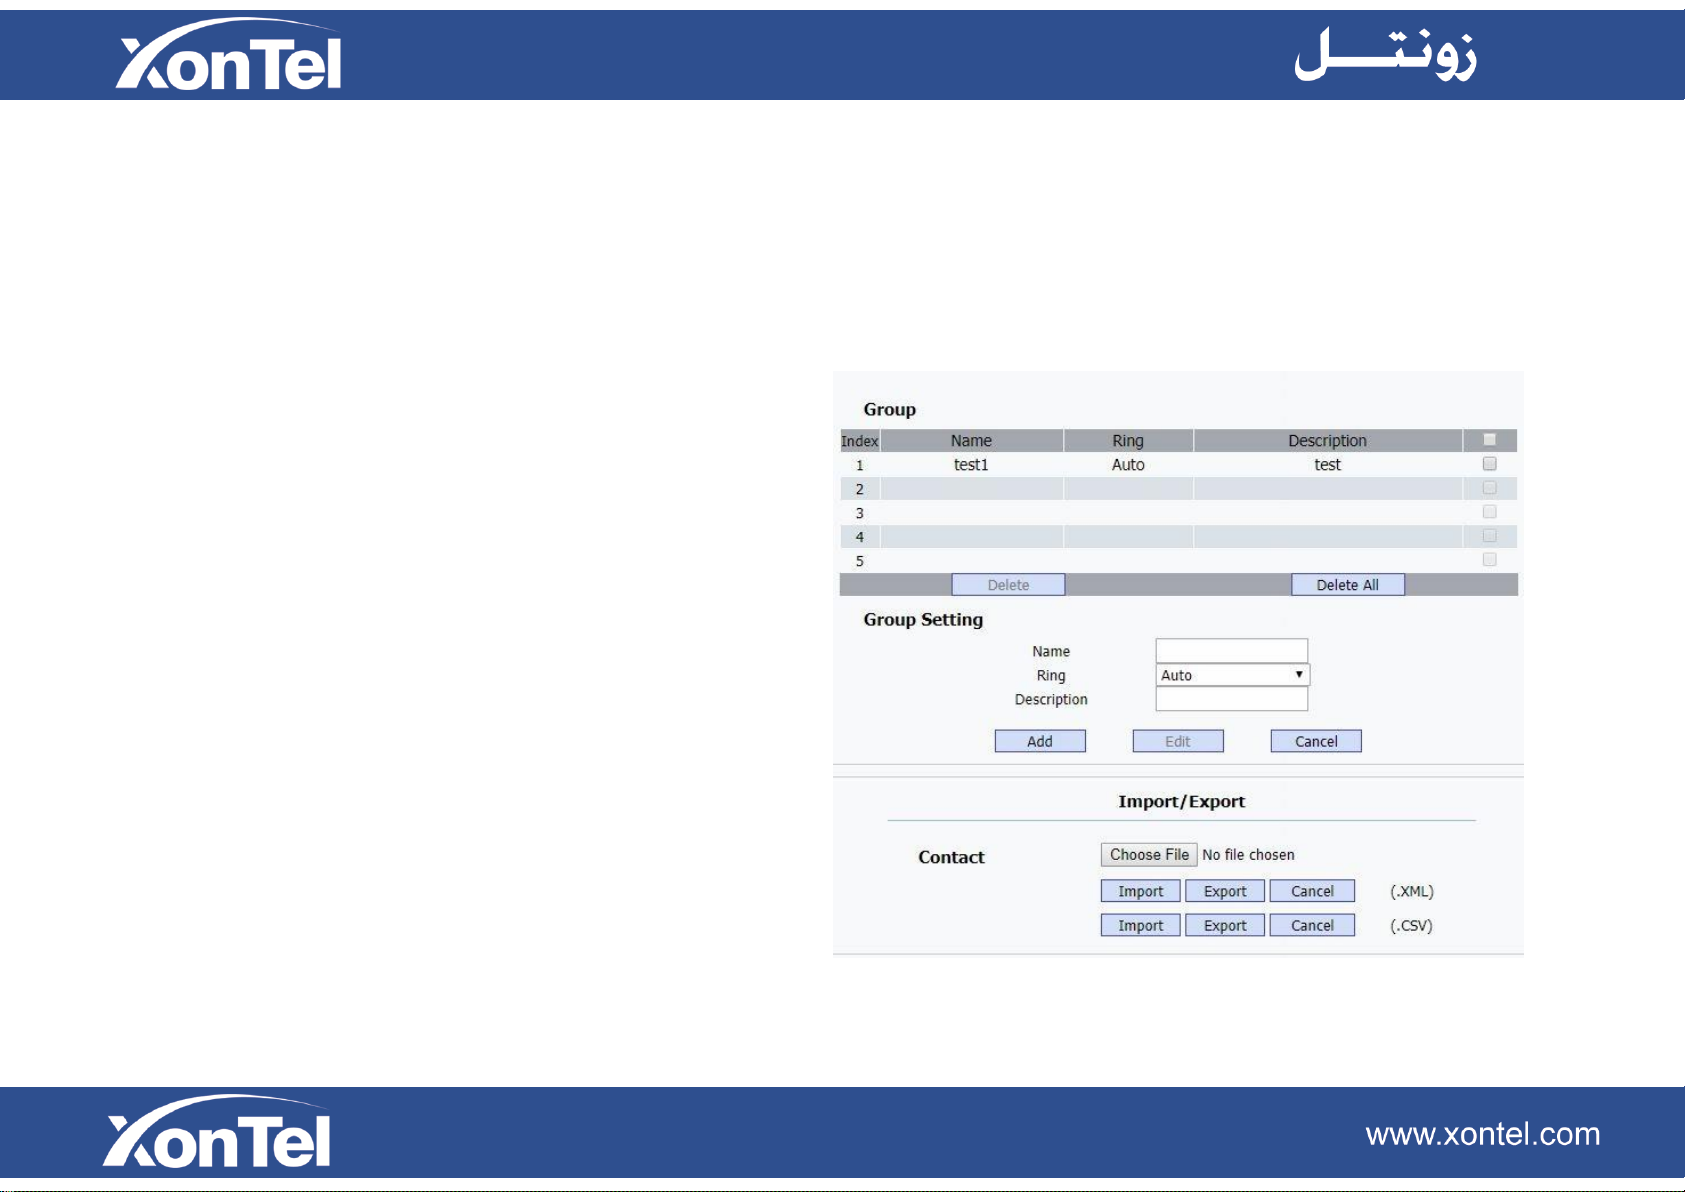
Account: To select which account to dial out to the new
contact.
5.11.4 Group
To manage the group.
5.11.5 Group Setting
To add a new group or modify existing group.
Name: To set a name for the group.
Ring: To set special ring tone for the group members.
Description: To set description for the group.
5.11.6 Import/Export
A easy way to manage mass of contacts.
To import/export contacts with a XML file or CSV file.
Page 62
Note: Please make sure it is right file format for right
model.
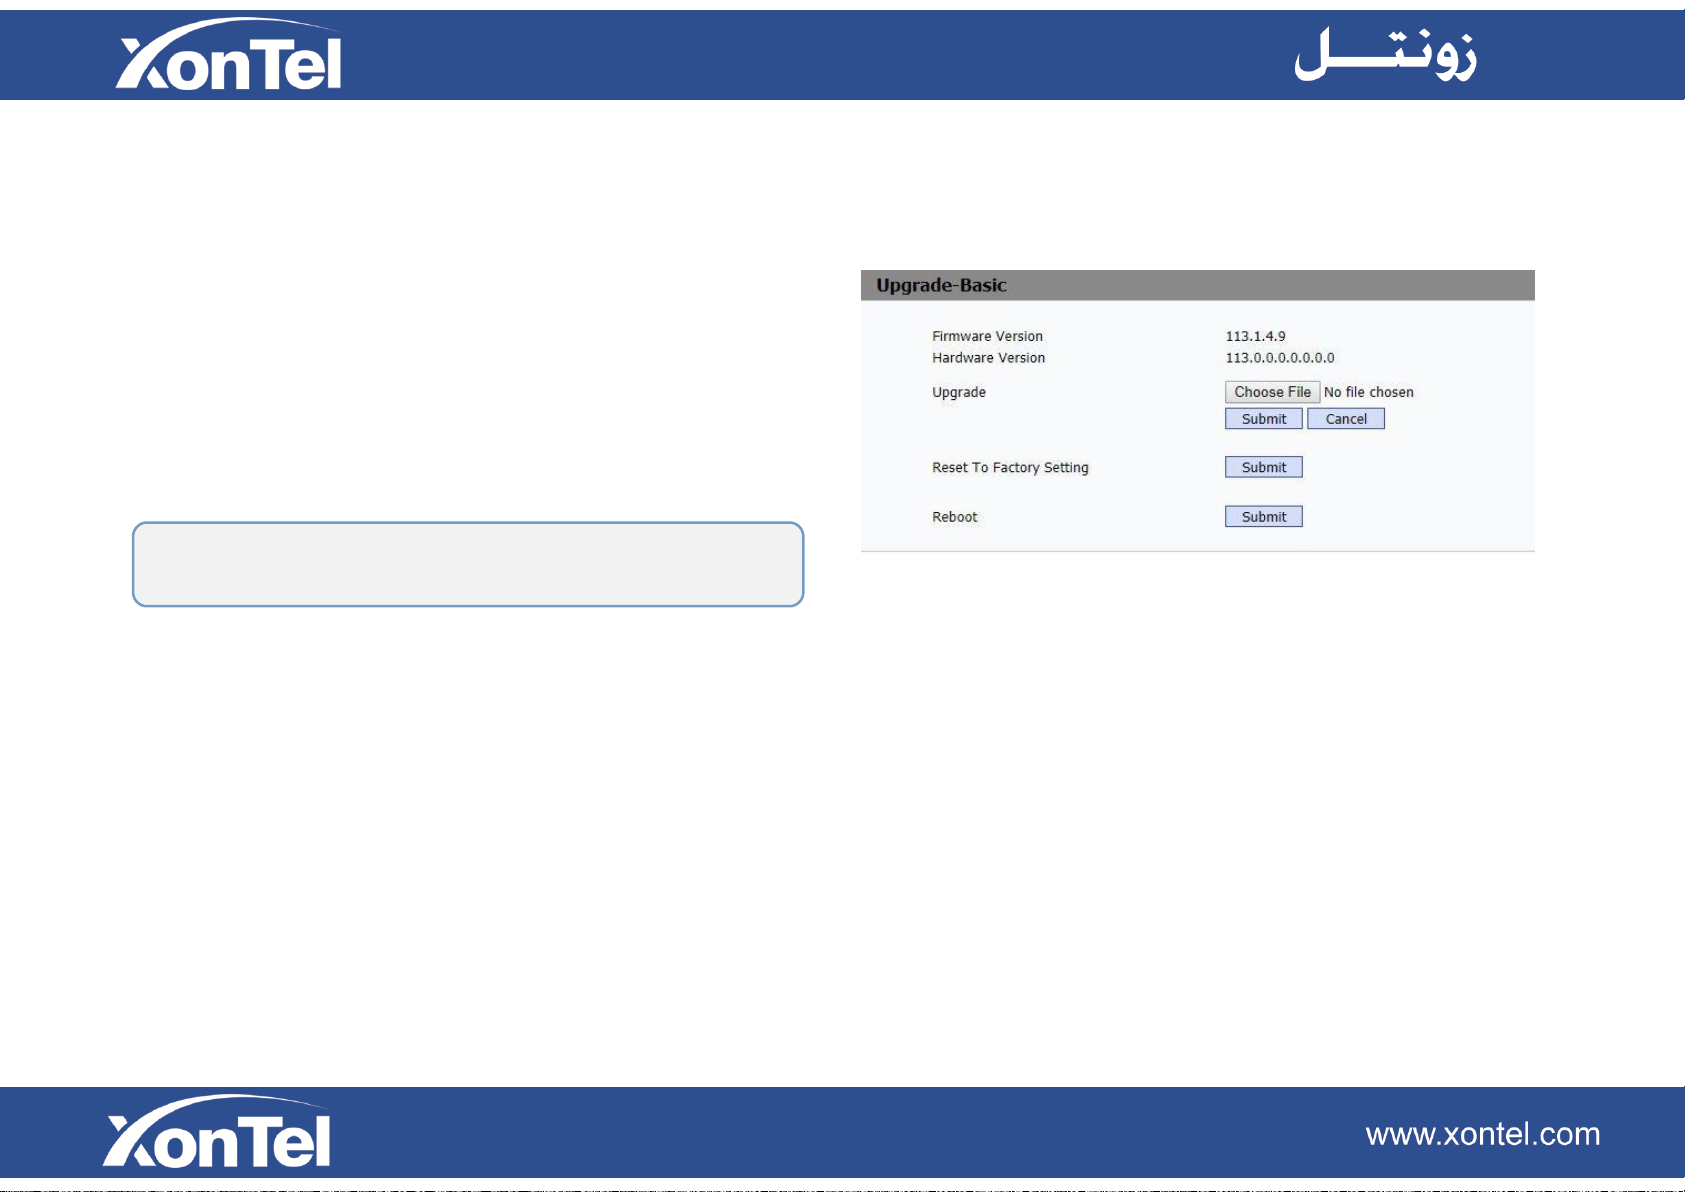
5.12 Upgrade-Basic
5.12.1 Upgrade-Basic
Firmware Version: To display the current firmware version.
Hardware Version: To display the current hardware version.
Upgrade: To select upgrading rom file from your PC manually,
then click “ submit “ to begin update.
Rest To Factory setting: To enable you to reset IP
phone’s setting to factory settings.
Reboot: To reboot IP phone remotely from Web UI.
Page 63
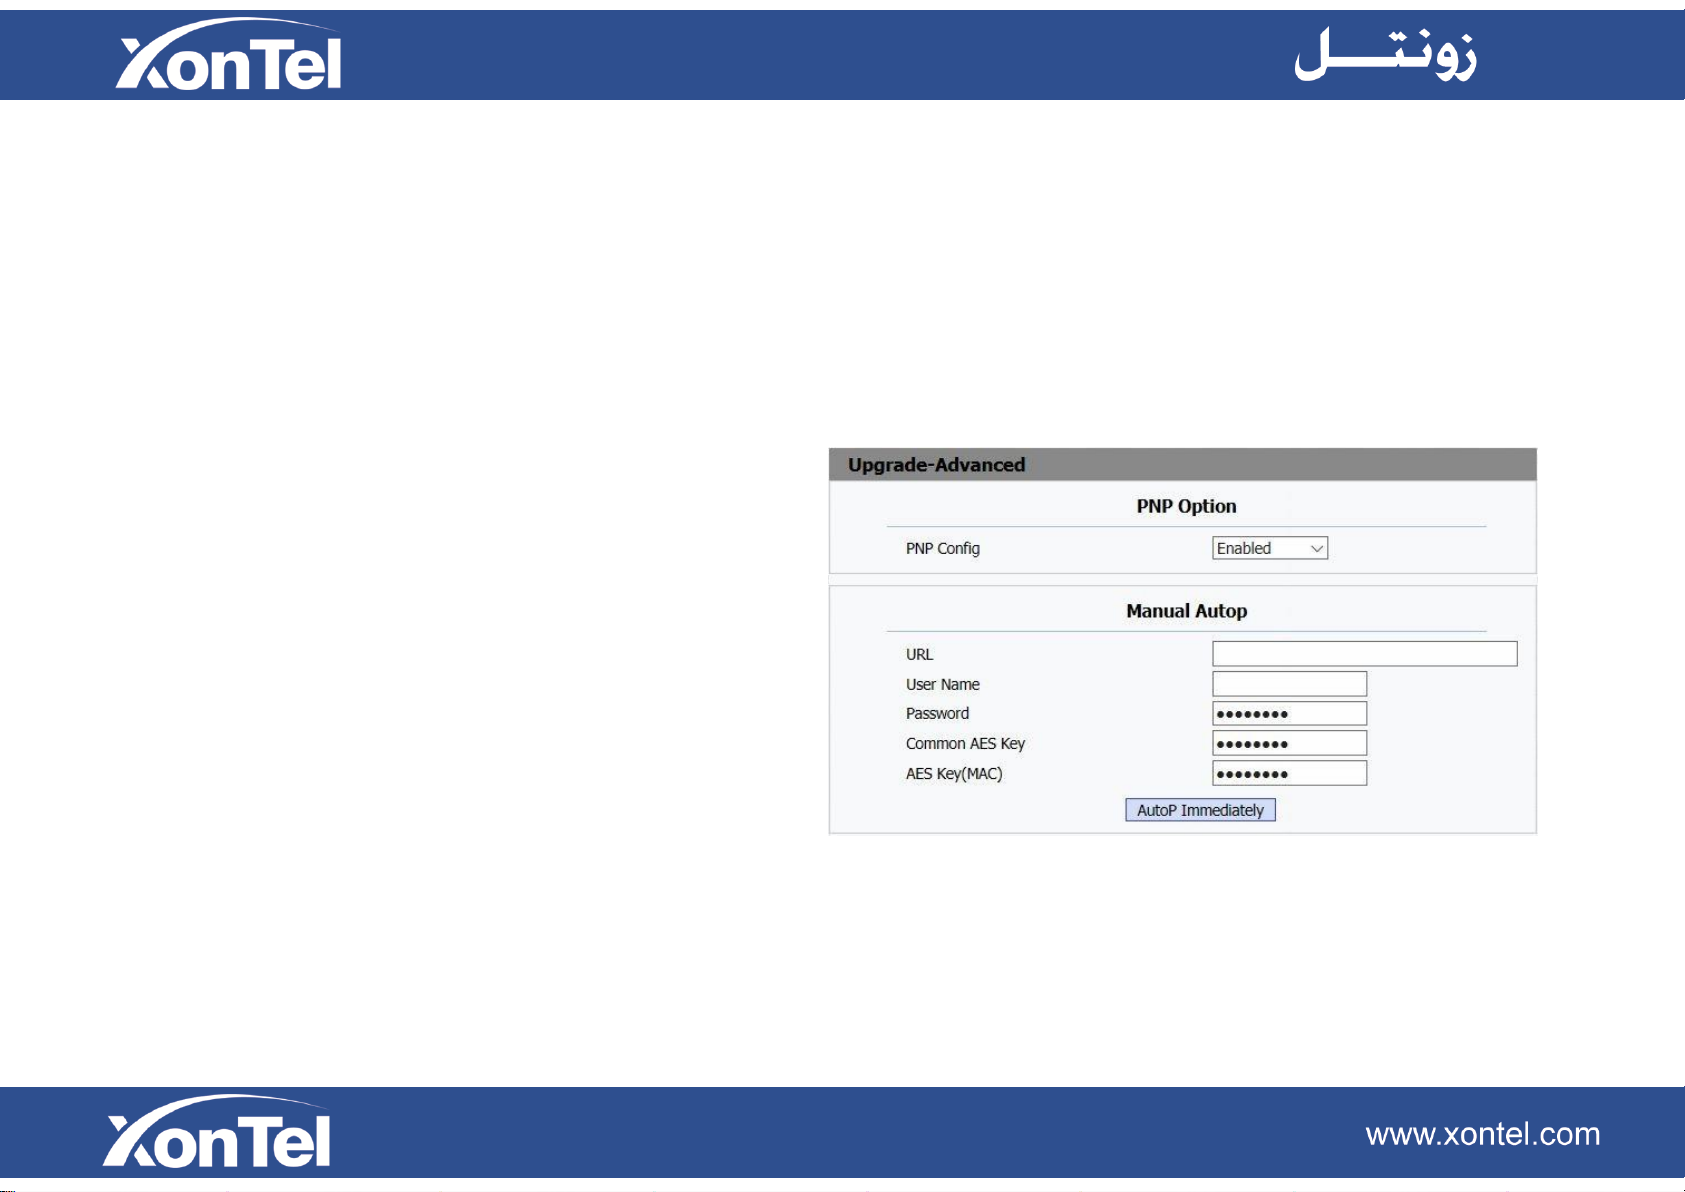
5.13 Upgrade-Advanced
5.13.1 PNP Option
To display and configure PNP setting for Auto Provisioning.
PNP: Plug and Play, once PNP is enabled, the phone will
send SIP subscription message to PNP server
automatically to get Auto Provisioning server’s address.
By default, this SIP message is sent to multicast address
224.0.1.75(PNP server address by standard).
5.13.2 Manual Autop
To display and configure manual update server’s settings.
URL: Auto provisioning server address.
User name: Configure if server needs an username to
access, otherwise left blank.
Password: Configure if server needs a password to
access, otherwise left blank.
Common AES Key: Used for IP phone to decipher
common Auto Provisioning configuration file.
Page 64
Note: AES is one of many encryption, it should be
configured only when configure file is ciphered with
AES, otherwise left blank.
AES Key (MAC): Used for IP phone to decipher MAC-
oriented auto provisioning configuration file (for example,
file name could be 0c1105888888.cfg if IP phone’s MAC
address is 0c1105888888).
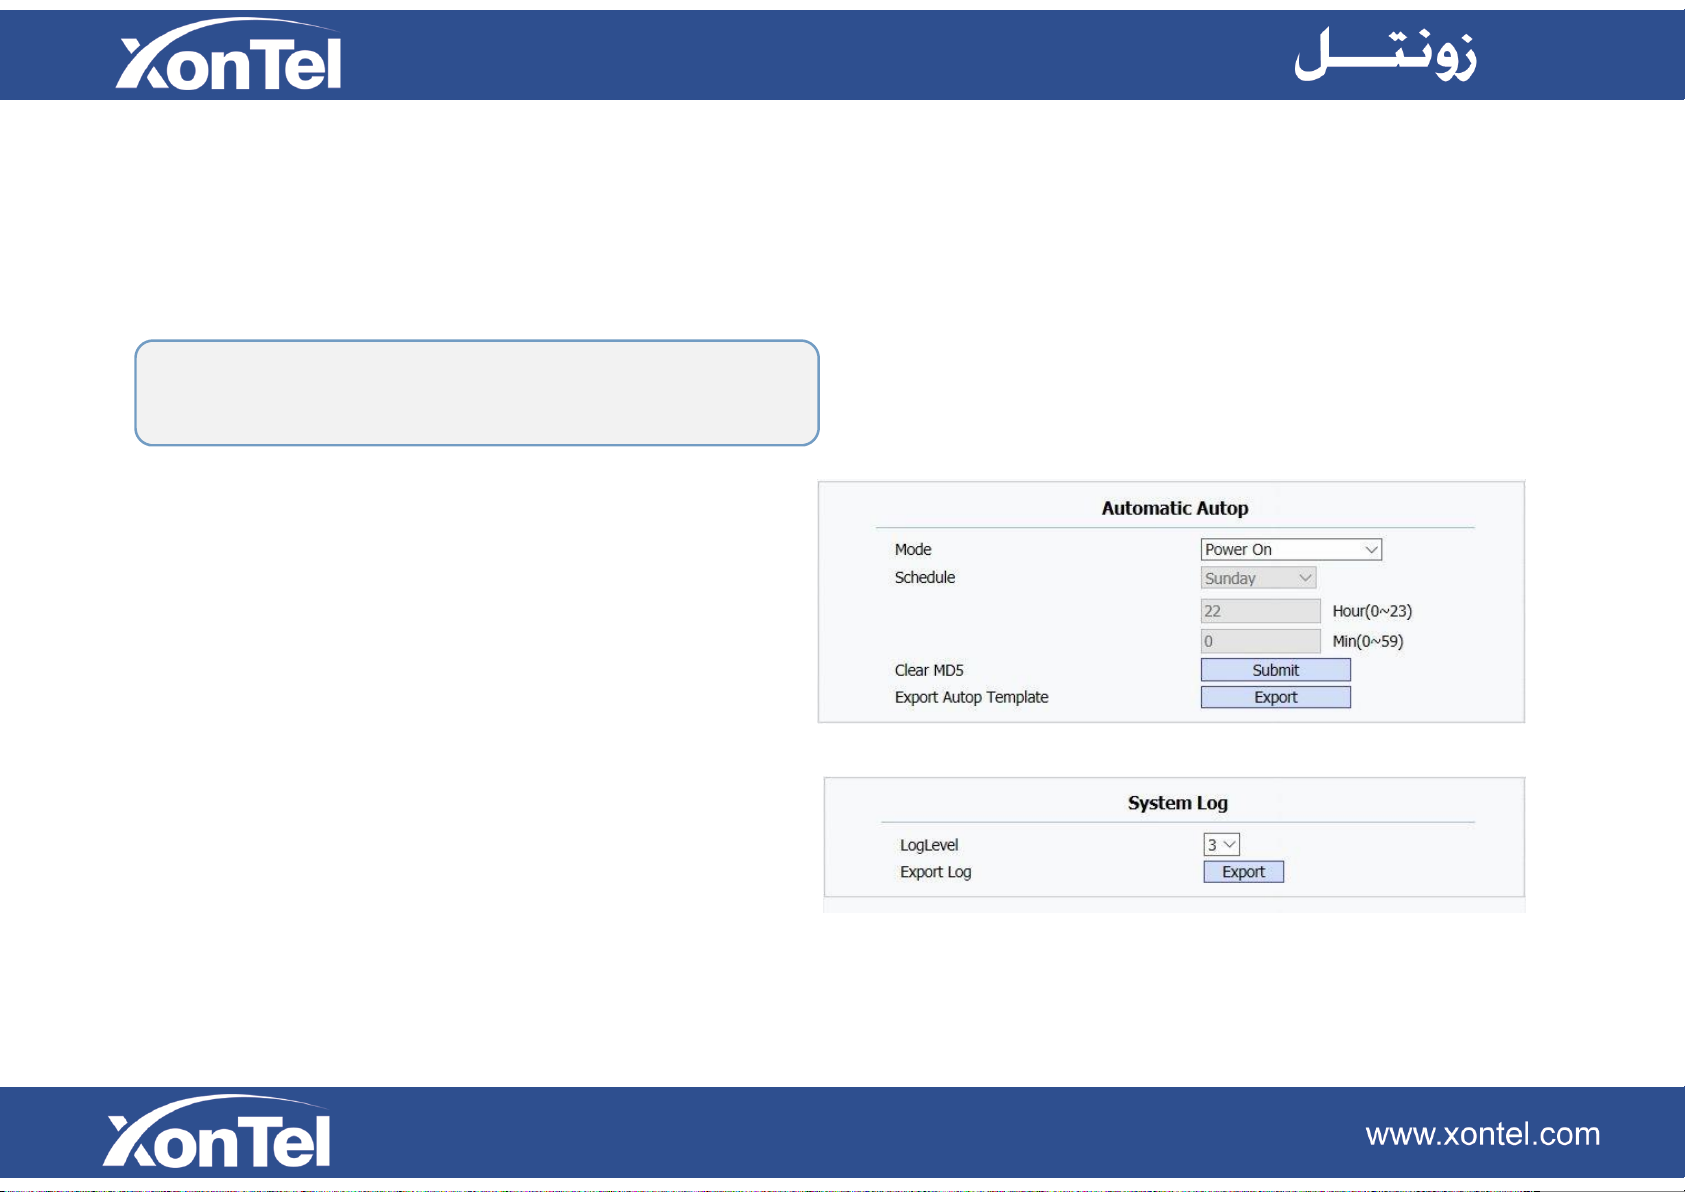
5.13.3 Automatic AutoP
To display and configure Auto Provisioning mode settings.
This Auto Provisioning mode is actually self-explanatory.
For example, mode “Power on” means IP phone will go to
do Provisioning every time it powers on.
5.13.4 System Log
To display system log level and export system log file.
Page 65
Note: IP phone will save captured packets file to a
temporary file, this file maximum size is 1M(mega bytes),
and will top capturing once reaching this maximum size.
System log level: From level 0~7.The higher level means
the more specific system log is saved to a temporary file.
By default, it’s level 3.
Export Log: Click to export temporary system log file to
local PC.
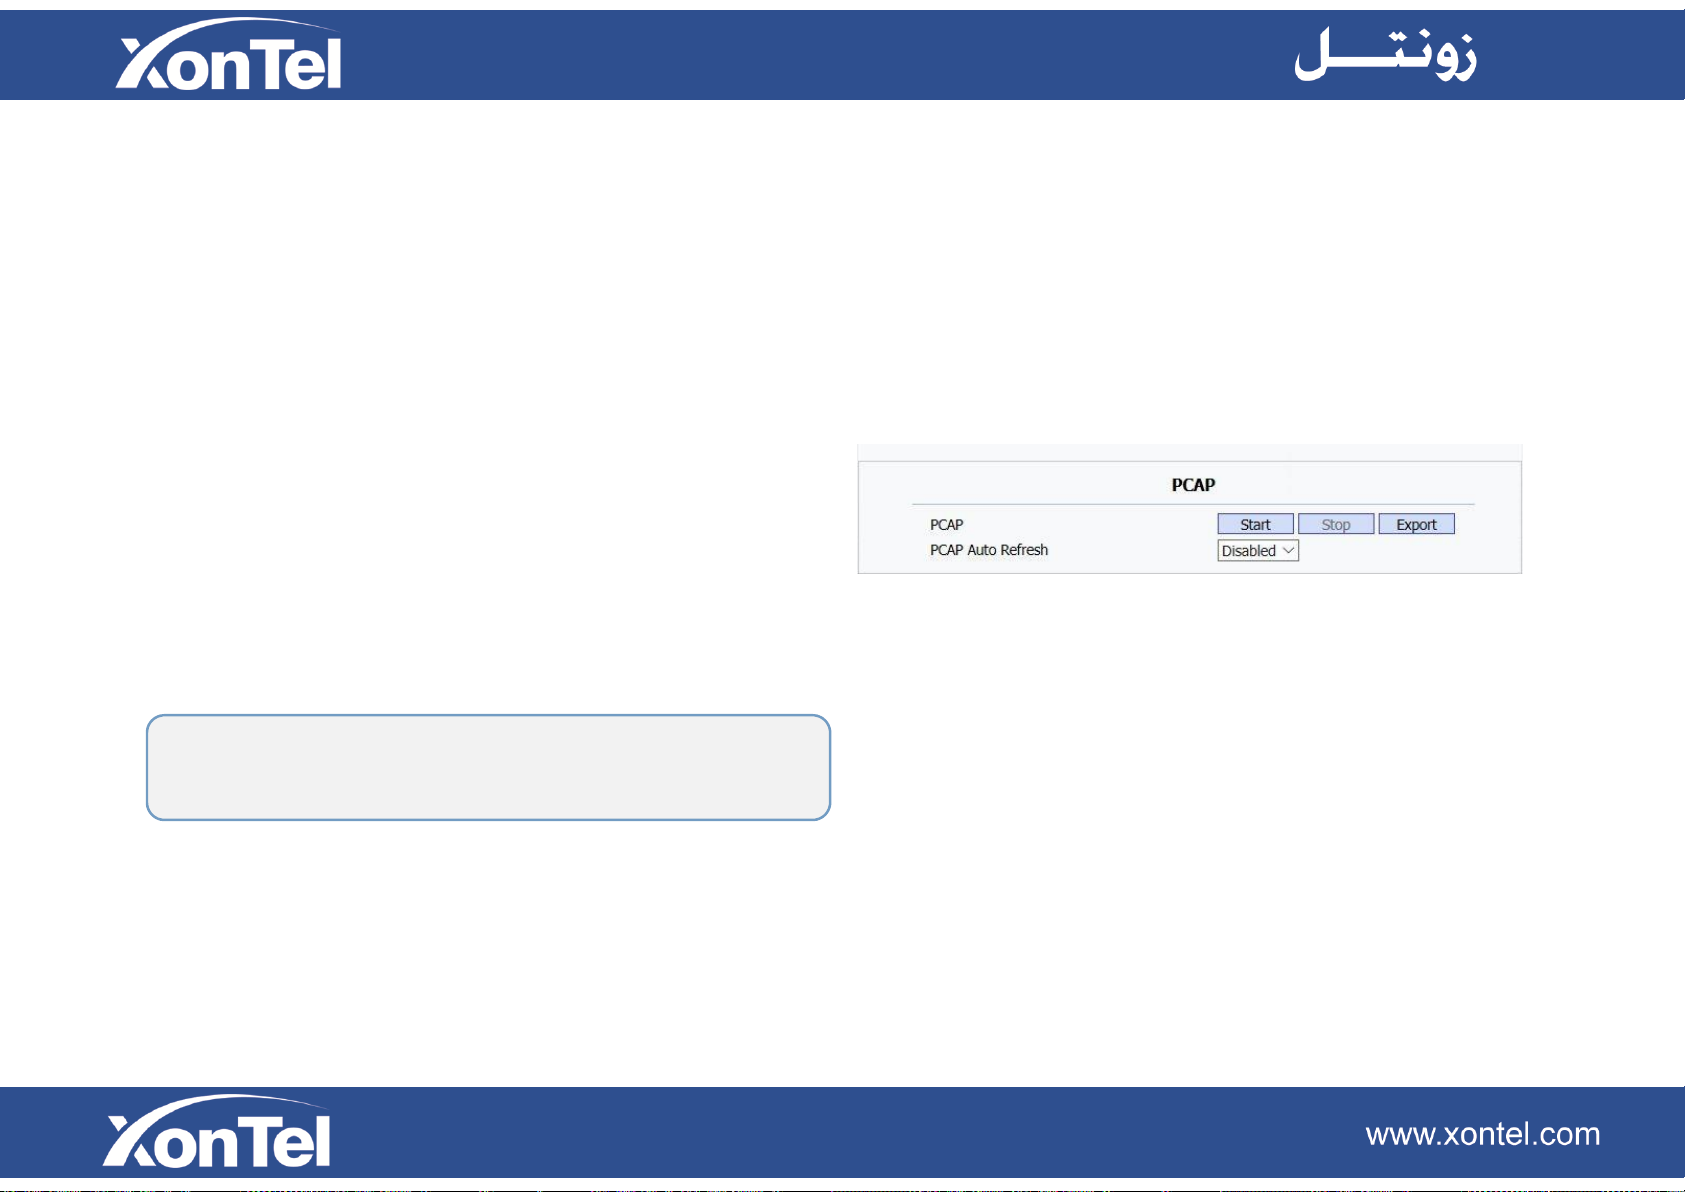
5.13.5 PCAP
To start, stop packets capturing or to export captured
Packet file.
Start: To start capturing all the packets file sent or received
from IP phone.
Stop: To stop capturing packets.
Page 66
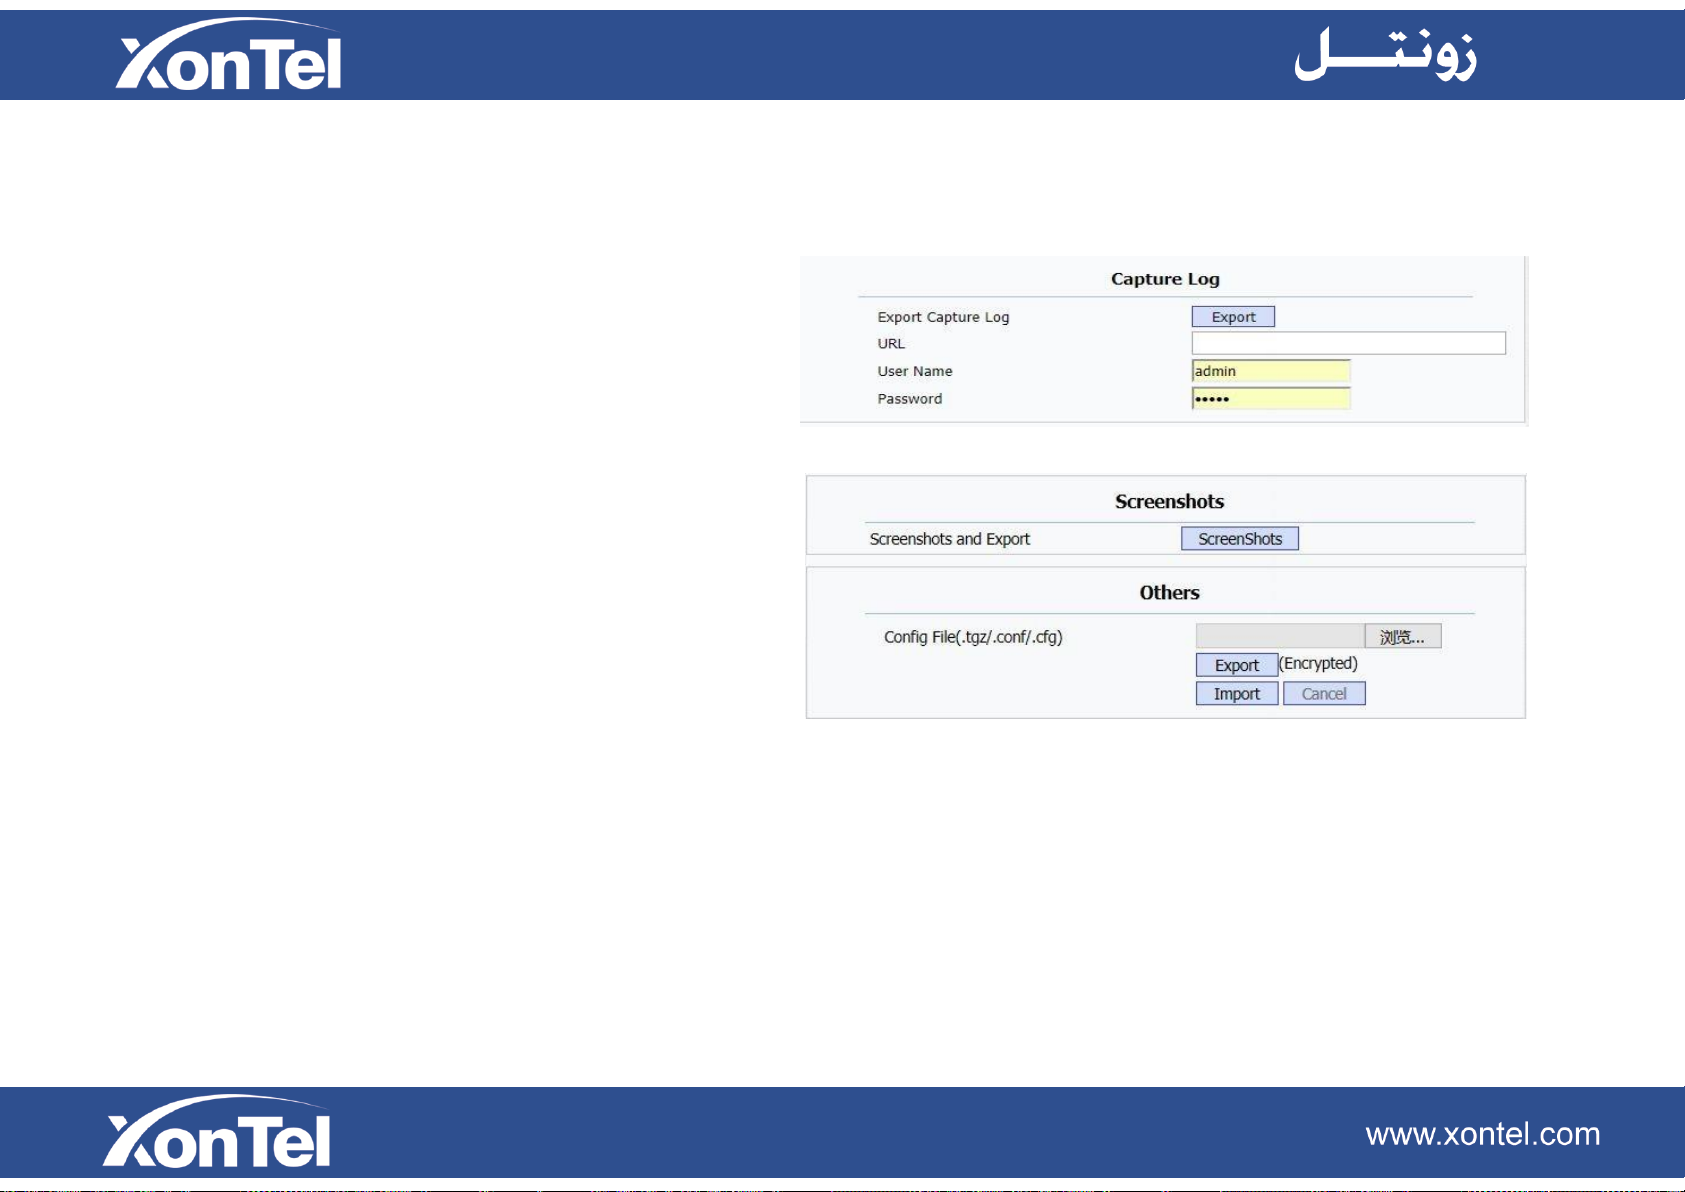
5.13.6 Capture Log
To export the capture log from XT-13P.
URL: input the address to export the capture log.
User Name/Password: the authentication of the server
5.13.7 Screenshots
To capture the screenshots and export from XT-13P.
5.13.8 Others
To export current config file or import new config file.
Page 67
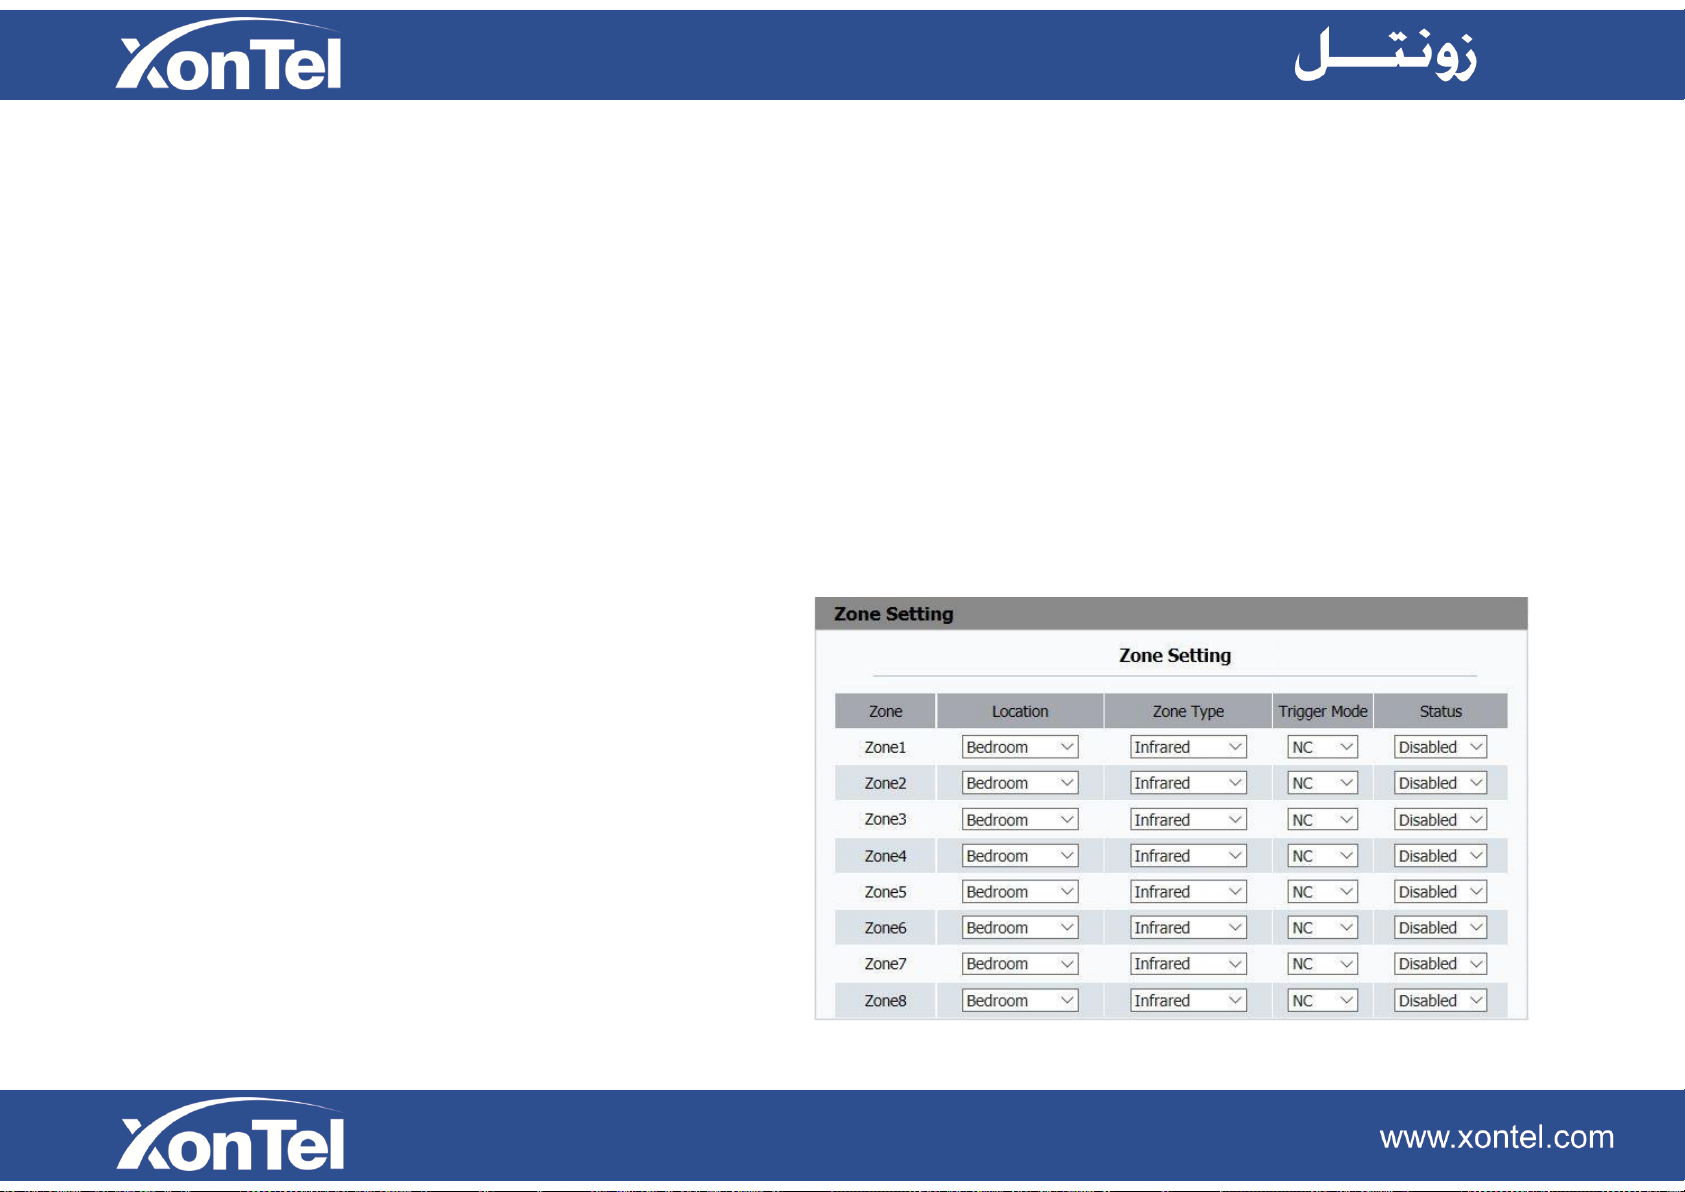
5.14 Arming-Zone Setting
Users can connect XT-13P to some sensors like infrared
sensor, gas sensor, smoke sensor and so on.
XT-13P support up to 8 alarm zone, you can manage
these zone here. And then you can design 3 different
modes for the arming zone under the path “Arming-Arming
mode”.
5.14.1 Zone Setting
Location: To set the location for the zone, it can be
Bedroom, Guest room, Hall, Window, Balcony, Kitchen,
Study and Bathroom.
Zone Type: To set the sensor type for corresponding
zone, it can be Infrared, Drmagnet, Smoke, Gas, Urgency.
Trigger Mode: To set the trigger mode for corresponding
zone, it can be NC (Normal Close) and NO (Normal Open).
Status: To set the sensor status type for corresponding
zone including disable, enable and 24H.
The status will matter the arming mode. Disable status
Page 68
means it cannot be triggered, 24H status means it
cannot be disabled. Enable status means it depends
on arming mode.
5.15 Arming-Arming Mode
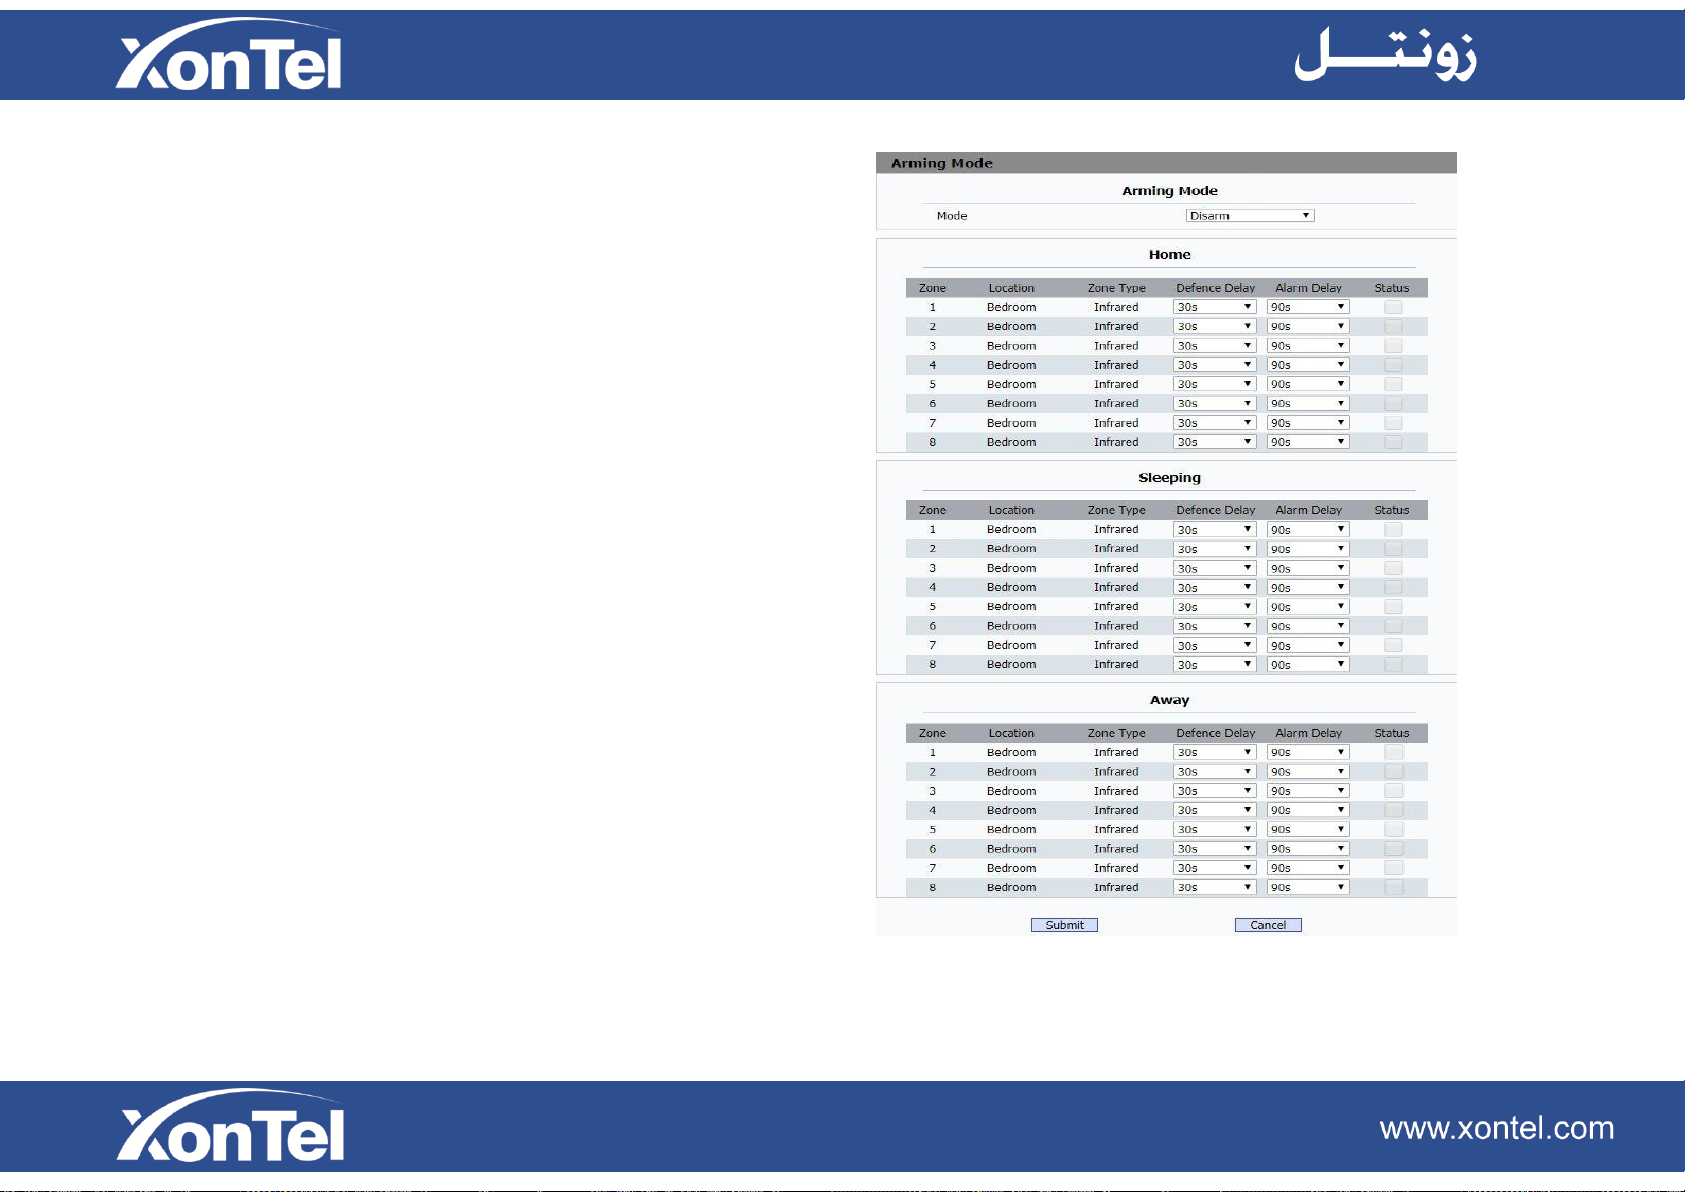
5.15.1 Arming Mode
To choose arming mode for XT-13P, different arming modes
meet different requirements. It can be Indoor mode, Outdoor
mode, Sleeping Mode and Disarm Mode. We will take
Indoor for an example.
5.15.2 Home/Sleeping/Away
Location: To display location information of 8 zone.
Zone Type: T display the sensor type of 8 zone.
Defence Delay: To set defence delay time, it means when you
change to the arming mode from other modes, there will be 30
seconds delay time by default.
Page 69
Alarm Delay: To set alarm delay time, it means when the
sensor triggered, there will be 90 seconds delay time to
announce the notification by default.
5.16 Arming-Disarm Code
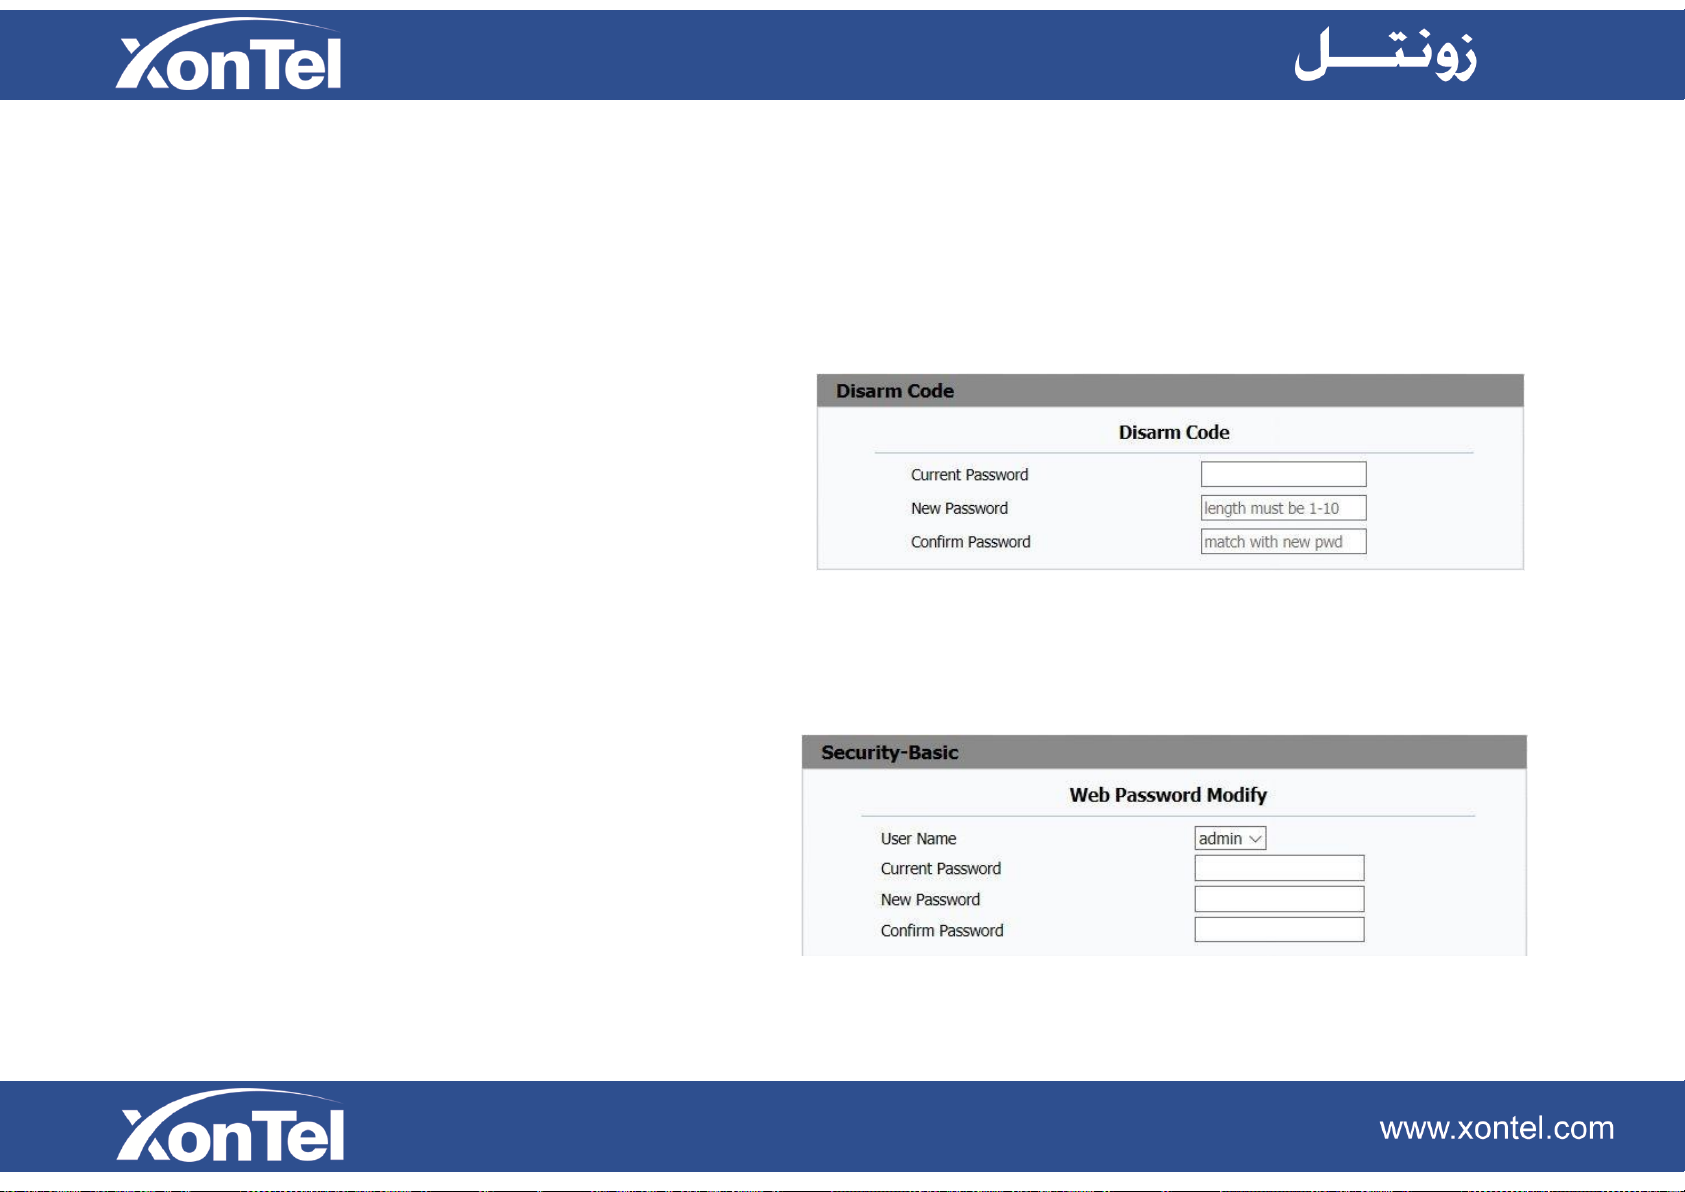
5.16.1 Disarm Code
To modify the disarm code.
Current Password: To type in the current disarm code for
authentication.
New Password: To set a new disarm code.
Confirm Password: To type in new disarm code again for
confirmation.
5.17 Security-Basic
5.17.1 Web Password Modify
To modify the password for web GUI.
Page 70
User Name: Choose admin account or user account to
modify corresponding password.
Current Password: To type in the current password for
authentication.
New Password: To set a new password.
Confirm Password: To type in new password again for
confirmation.
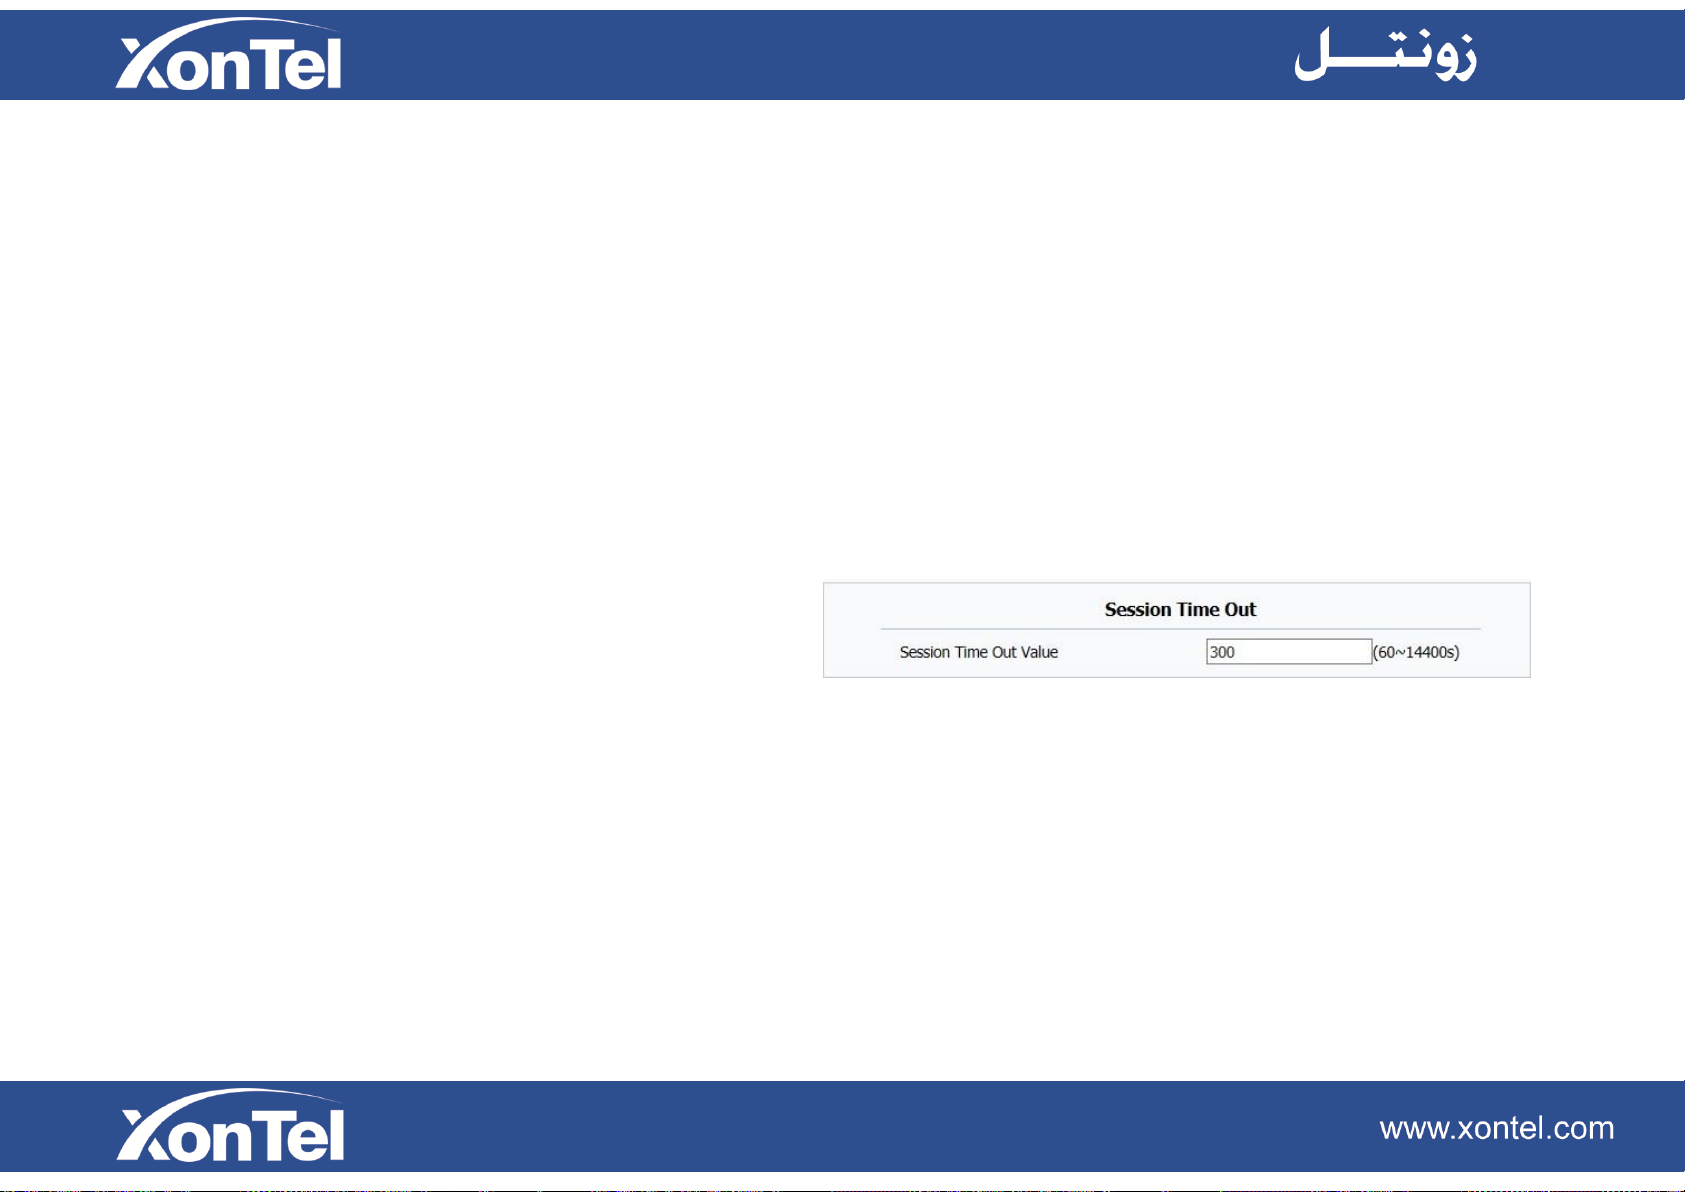
5.17.2 Session Time Out
Session Time Out Value: To modify the session time out
value, it is 300 by default. That means if it has been 300
seconds since you operated last time, you need to login
again.
 Loading...