

XONTEL S3200-FXS User Manual
S3200-FXS Gateway
User Manual

Copyright
Copyright 2006-2015 XonTel. All rights reserved.
No parts of this publication may be reproduced or transmitted in any form or by any
means, electronic or mechanical, photocopying, recording, or otherwise, for any purpose,
without the express written permission of XonTel. Under the law, reproducing includes
translating into another language or format.
Declaration of Conformity
Hereby, XonTel declares that S3200-FXS Gateway is in
conformity with the essential requirements and other
relevant provisions of the CE, FCC.
2

Warranty
The information in this document is subject to change without notice.
XonTel makes no warranty of any kind with regard to this guide, including, but not
limited to, the implied warranties of merchantability and fitness for a particular purpose.
XonTel. Shall not be liable for errors contained herein nor for incidental or
consequential damages in connection with the furnishing, performance or use of this
guide
WEEE Warning
In accordance with the requirements of council directive 2002/96/EC on
Waste of Electrical and Electronic Equipment (WEEE), ensure that at endof-life you separate this product from other waste and scrap and deliver to
the WEEE collection system in your country for recycling.
3

Contents
About This Guide
Getting Started
Accessing Web GUI
Web Configuration Panel
Making and Receiving Calls
Basic Operations
Voice Menu
Call Hold
Call Waiting
Call Transfer
Three-party Conference
Direct IP Call
Change S3200-FXS Gateways IP Address Using Analog Phones
FXS Port Settings
General Settings
Other Settings
Hunt Group
................................................................................................................................................................... 10
......................................................................................................................................................................... 11
................................................................................................................................................................... 11
................................................................................................................................................................. 11
................................................................................................................................................................. 12
................................................................................................................................................................... 17
.......................................................................................................................................... 6
.............................................................................................................................................. 7
...................................................................................................................................................... 7
............................................................................................................................................. 9
........................................................................................................................................ 9
......................................................................................................................................... 10
............................................................................................................................................ 12
....................................................................................................................................... 14
.......................................................................................................................................................... 14
.............................................................................................................................................................. 16
.................................................................... 12
VoIP Settings
VoIP Server Settings
Dial Pattern Template
SIP Settings
IAX Settings
Gateway Settings
Basic Preferences
Feature Codes
Speed Dial
Prompt Settings
Custom Prompts
Music on Hold Prompts
System Prompts
Advanced Settings
Distinctive Ringtones
Tone Zone Settings
RADIUS Settings
................................................................................................................................................ 20
.................................................................................................................................................................. 23
................................................................................................................................................................... 29
........................................................................................................................................ 30
........................................................................................................................................................ 30
............................................................................................................................................................. 31
..................................................................................................................................................................... 33
........................................................................................................................................... 34
........................................................................................................................................................ 34
......................................................................................................................................................... 35
...................................................................................................................................... 37
.................................................................................................................................................... 37
......................................................................................................................................................... 38
Network Preferences
LAN Settings
Service
VLAN Settings
................................................................................................................................................................ 40
........................................................................................................................................................................... 41
............................................................................................................................................................. 42
................................................................................................................................................... 20
................................................................................................................................................. 22
............................................................................................................................................ 35
................................................................................................................................................ 37
................................................................................................................................. 40
4

VPN Settings
DDNS Settings
Static Route
SNMP Settings
TR-069 Settings
Security Center
Security Center
Alert Settings
AMI Settings
Certificates
Firewall Rules
IP Blacklist
................................................................................................................................................................. 42
............................................................................................................................................................. 43
.................................................................................................................................................................. 44
............................................................................................................................................................ 46
............................................................................................................................................................ 46
............................................................................................................................................ 48
............................................................................................................................................................ 48
............................................................................................................................................................... 49
.................................................................................................................................................................. 51
.................................................................................................................................................................... 52
............................................................................................................................................................... 53
..................................................................................................................................................................... 55
System Preferences
Password Settings
Date and Time
Email Settings
Firmware Upgrade
............................................................................................................................................................. 57
.............................................................................................................................................................. 58
....................................................................................................................................................... 60
Upgrade through HTTP
Upgrade through TFTP
Backup and Restore
Reset and Reboot
....................................................................................................................................................... 62
................................................................................................................................ .... 57
..................................................................................................................................................... 57
.......................................................................................................... 60
........................................................................................................... 61
................................................................................................................................................... 62
Status
Reports
............................................................................................................................................................. 64
FXS Port Status
Network status
System Info
................................................................................................................................................................... 65
........................................................................................................................................................... 66
Call Logs
System Logs
Packet Tool
Port Monitor Tool
....................................................................................................................................................................... 66
................................................................................................................................................................... 67
........................................................................................................................................................... 64
............................................................................................................................................................ 65
................................................................................................................................................................ 66
........................................................................................................................................................ 68
5

Do not open the device when the device is powered on.
Do not work on the device, connect or disconnect cables when
lightning strikes.
About This Guide
Xontel S3200-FXS Analog VoIP Gateways are cutting-edge products that connect
legacy telephones, fax machines and PBX systems with IP telephony networks and IPbased PBX systems. Featuring rich functionalities and easy configuration, XonTel FXS
Gateway is ideal for small and medium enterprises that wish to integrate a traditional
phone system into IP-based system. XonTel helps them to preserve previous investment
on legacy telephone system and reduce communication costs significantly with the true
benefits of VoIP.
Audience
This manual will help you learn how to operate and manage your S3200-FXS Analog
VoIP Gateway. In this guide, we describe every detail on the functionality and
configuration of S3200-FXS.
FXS
and familiar with networking and other IT disciplines.
We begin by assuming that you are interested in
Safety when working with electricity
S3200-
Features Highlights
32 FXS ports
Fully compliant with SIP and IAX2
Hunt Group
Configurable VoIP Server templates
Reliable FAX performance with T.38
3-party conference
Direct IP Calling
Inter-port Calling
Attended Transfer
Blind Transfer
Support RADIUS protocol
Support SNMP
Support TR-069
6

Getting Started
In this chapter, we guide you through the basic steps to start with a new S3200-FXS
Gateway:
Accessing Web GUI
Web Configuration Panel
Making and Receiving Calls
Accessing Web GUI
The S3200-FXS Gateway attempts to contact a DHCP server in your network to
obtain valid network settings (e.g., the IP address, subnet mask, default gateway
address and DNS address) by default.
Please enable DHCP Server in your network to obtain the XonTel S3200-FXS
Gateway IP address.
How to check S3200-FXS Gateway IP address:
1. Pick up the analog phone, then access the voice menu prompt by dialing
2. Dial "1" to check the IP address.
3. Dial "2" for web access address.
After entering the IP address in the web browser, users will see a log-in screen.
Check the default settings below:
Username: admin
Password: xontel
“***”.
7
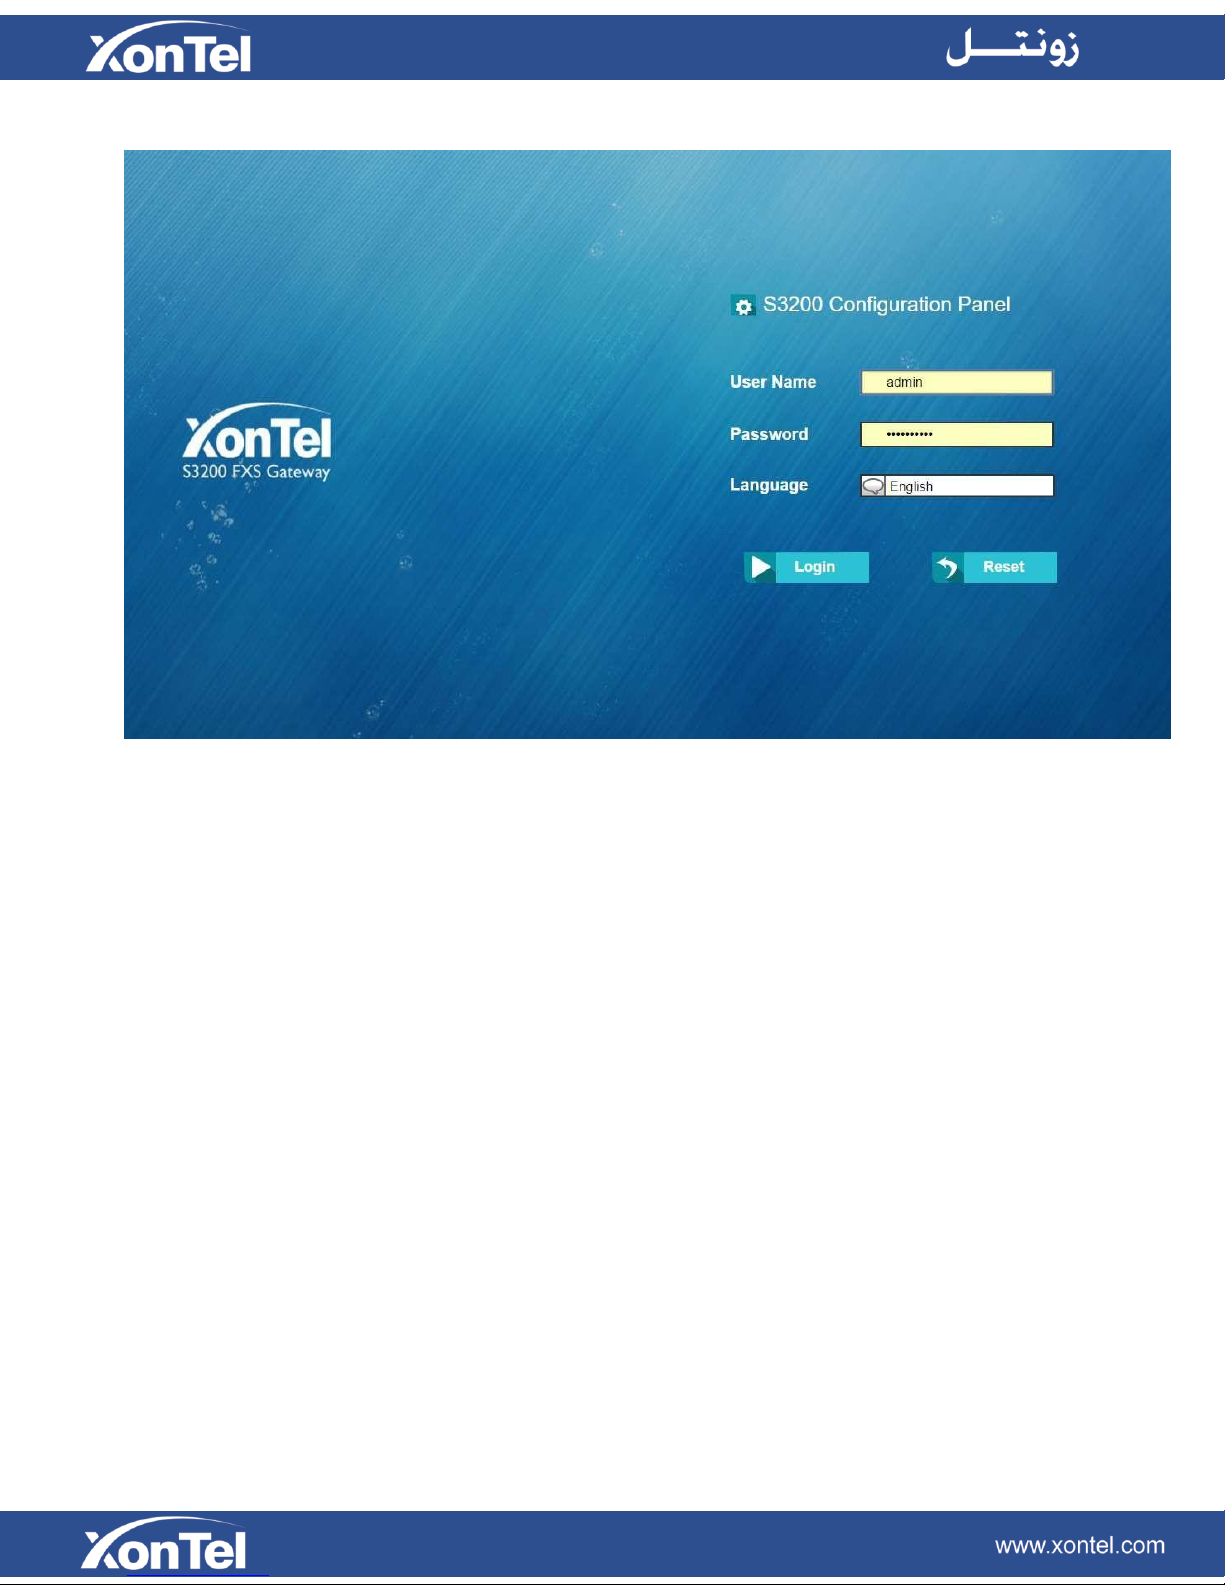
Figure 2-1 S3200-FXS Gateway Login page
8

Web Configuration Panel
There are 4 main sections on the Web Configuration Panel for users to check the S3200FXS’s Gateway status and configure it.
Status: check System Status, Port Status, Trunk Status, Network Status and check
call logs, system logs.
System: configure Network Settings, Security related Settings, System Date and
Time, Password, Backup and Restore, etc.
Gateway: configure FXS ports, gateway settings and SIP settings, etc.
Logout: log out S3200-FXS Gateway.
Note:
After saving the changes, remember to click the “Apply changes” button on the upper
right corner of the Web GUI to make the changes take effect.
Making and Receiving Calls
You will need an active VoIP account from a VoIP service provider or PBX, which
provides a VoIP telephone number to allow you to make and receive calls.
Making internal calls
To place an internal call, pick up the analog phone and dial the other port’s caller
ID number or dial *99 followed by the port number.
For example, to reach the other port with caller ID number 300, dial “300”.
To reach port 2, you can dial *9902 to ring the phone connected to port 2.
Making outbound calls
To make an outbound call, you need to dial according to the FXS port dial pattern.
By the default dial pattern, you can dial the desired outgoing number directly.
Answering calls
To answer a call, pick up the handset as you usually do.
9
Basic Operations
In this chapter, we give instructions about how to operate on analog phones
connected to S3200-FXS Gateway to use some features.
Voice Menu
Call Hold
Call Waiting
Call Transfer
Three-party Conference
Direct IP Call
Change S3200-FXS Gateways IP Address
Voice Menu
S3200-FXS Gateway provides a voice menu to guide you to configure the network
settings for the device. You need to press *** on the analog phone which is connected to
S3200-FXS Gateways FXS port to enter the voice menu.
The default password to enter “Advanced Settings” is 123456. You can change the
S3200 FXS Gateway password in Web page.(Gateway→Gateway Settings→Feature
Codes→Voice Menu Password Settings)
Figure 3-1 S3200-FXS Gateway Voice Menu
10

Tips:
1. Press “9” to listen to the prompt again.
2. Press
“*”
to return to the last menu.
Call Hold
An active call can be held by pressing "flash" key on the analog phone. Press the key
again to resume the call.
If there is no "flash" key on the phone, you can use "hook flash" (quickly toggle on-off
hook) to hold a call. The call may be disconnected by chance if using "hook flash".
Call Waiting
If the call waiting is activated for the FXS port, the FXS user who is in a call can hear a
call waiting tone "beep" when there is a new incoming call. The user can press "hook
flash" to toggle between the active call and the incoming call.
Call Transfer
Blind transfer and attended transfer are supported on S3200-FXS Gateway. Users
can achieve call transfer by pressing the feature code during the call.
Blind Transfer
Default feature code: *03
1. Dial "*03" during the call;
2. Dial the called number after hearing a prompt "transfer";
3. The call will be transferred after the number is dialed.
Figure 3-2 Enable Call Waiting
11

Attended Transfer
Default feature code: *3
1. Dial "*3" during the call;
2. Dial the called number after hearing a prompt "transfer";
3. Talk to the transfer recipient;
4. The call will be transferred after hanging up.
Three-party Conference
Users can make a three-party conference call on S3200-FXS Gateway.
Assuming that A and B are in the call and B wants to invite C to a conference. Please
check the following steps of how to establish a conference.
1. B presses "flash" key or taps hook flash to get a dial tone; A will hear the on hold
music meanwhile;
2. B dials C's number;
3. If C answers the call, then B presses "flash" key or tap hook flash, the conference
will be established, including A, B, and C.
4. If there is no answer on C, A can press "flash" key or tap hook flash to resume the
call with A.
5. C will be ejected if B presses "flash" key or taps flash hook during the conference
call.
Direct IP Call
Direct IP call allows two parties, that is, a FXS Port with an analog phone and another
VoIP Device, to talk to each other in an ad hoc fashion without a SIP proxy. The default
"Direct IP Calling" feature code is *96.
Example:
Target IP address: 192.168.2.123
Destination port: 5060
To call the IP phone, you should dial *96192*168*2*123*5060 on the analog phone.
Change S3200-FXS Gateways IP Address Using Analog
Phones
By default, S3200-FXS Gateway obtains a dynamic IP address from the DHCP
server. You can change the device’s IP address via the analog phone which is
connected to the FXS port.
There are 3 modes supported on S3200-FXS Gateway access the internet.
DHCP
Static IP Address
PPPoE
12

Here we introduce how to set a static IP address for S3200-FXS Gateway.
IP address: 192.168.10.125
Subnet mask: 255.255.255.0
Gateway: 192.168.10.1
DNS: 8.8.8.8
1. Press
2. Press 3 to enter the “Advanced Settings”.
3. Enter the password follow by the pound key: 123456# (The default password is
4. Press 2 to change the IP address.
5. Press 2 to enable the static IP.
6. Press 1 to change the IP address and follow by the new IP address
7. Press 2 to change the subnet mask and follow by the new subnet mask
8. Press 3 to change the gateway and follow by the new gateway (3192*168*10*1).
9. Press 4 to change the DNS and followed by the new DNS (48*8*8*8).
10. Press 5 to reboot the device.
11. After reboot, you can access the device by the new IP address.
***
to enter the voice menu.
123456).
(1192*168*10*125).
(2255*255*255*0).
13
Items
Description
FXS Port Settings
This chapter explains how to configure FXS port on S3200-FXS Gateway, go to
Gateway→ Port List→ Port List page to configure the FXS ports.
General Settings
Other Settings
Hunt Group
Click "Edit" button
to configure the FXS port.
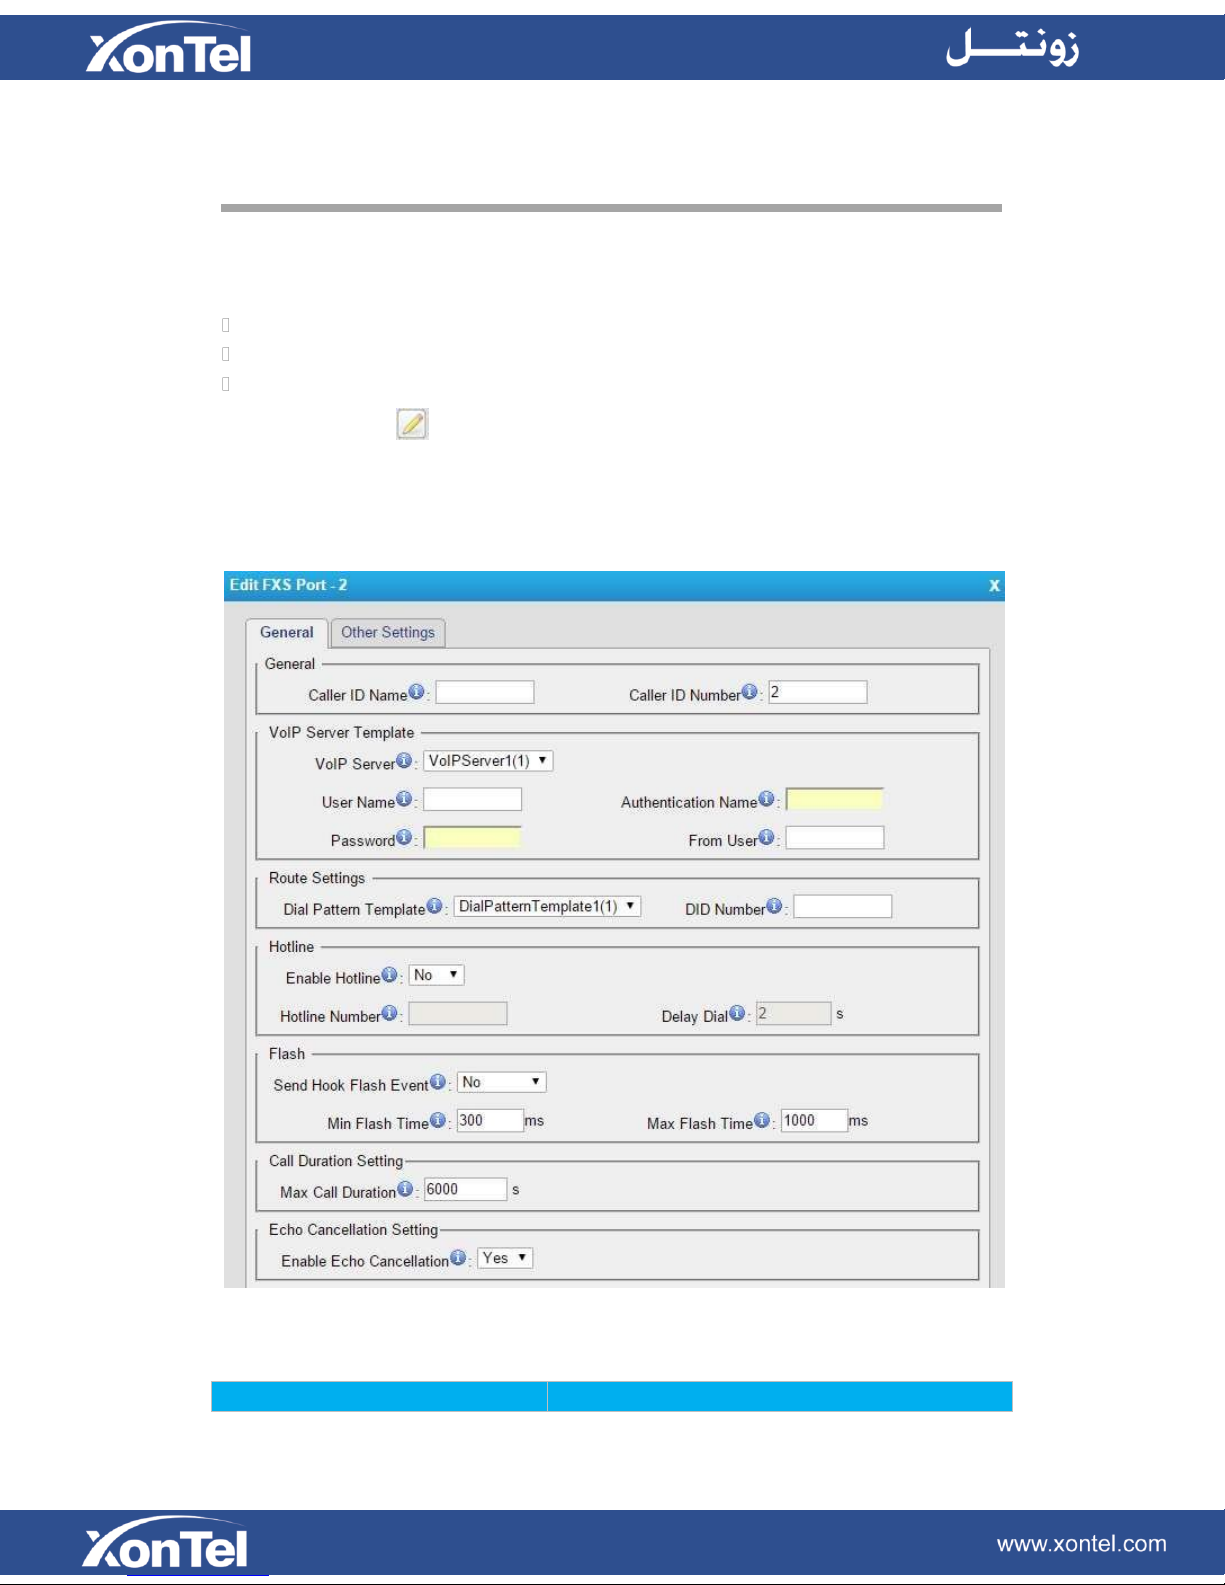
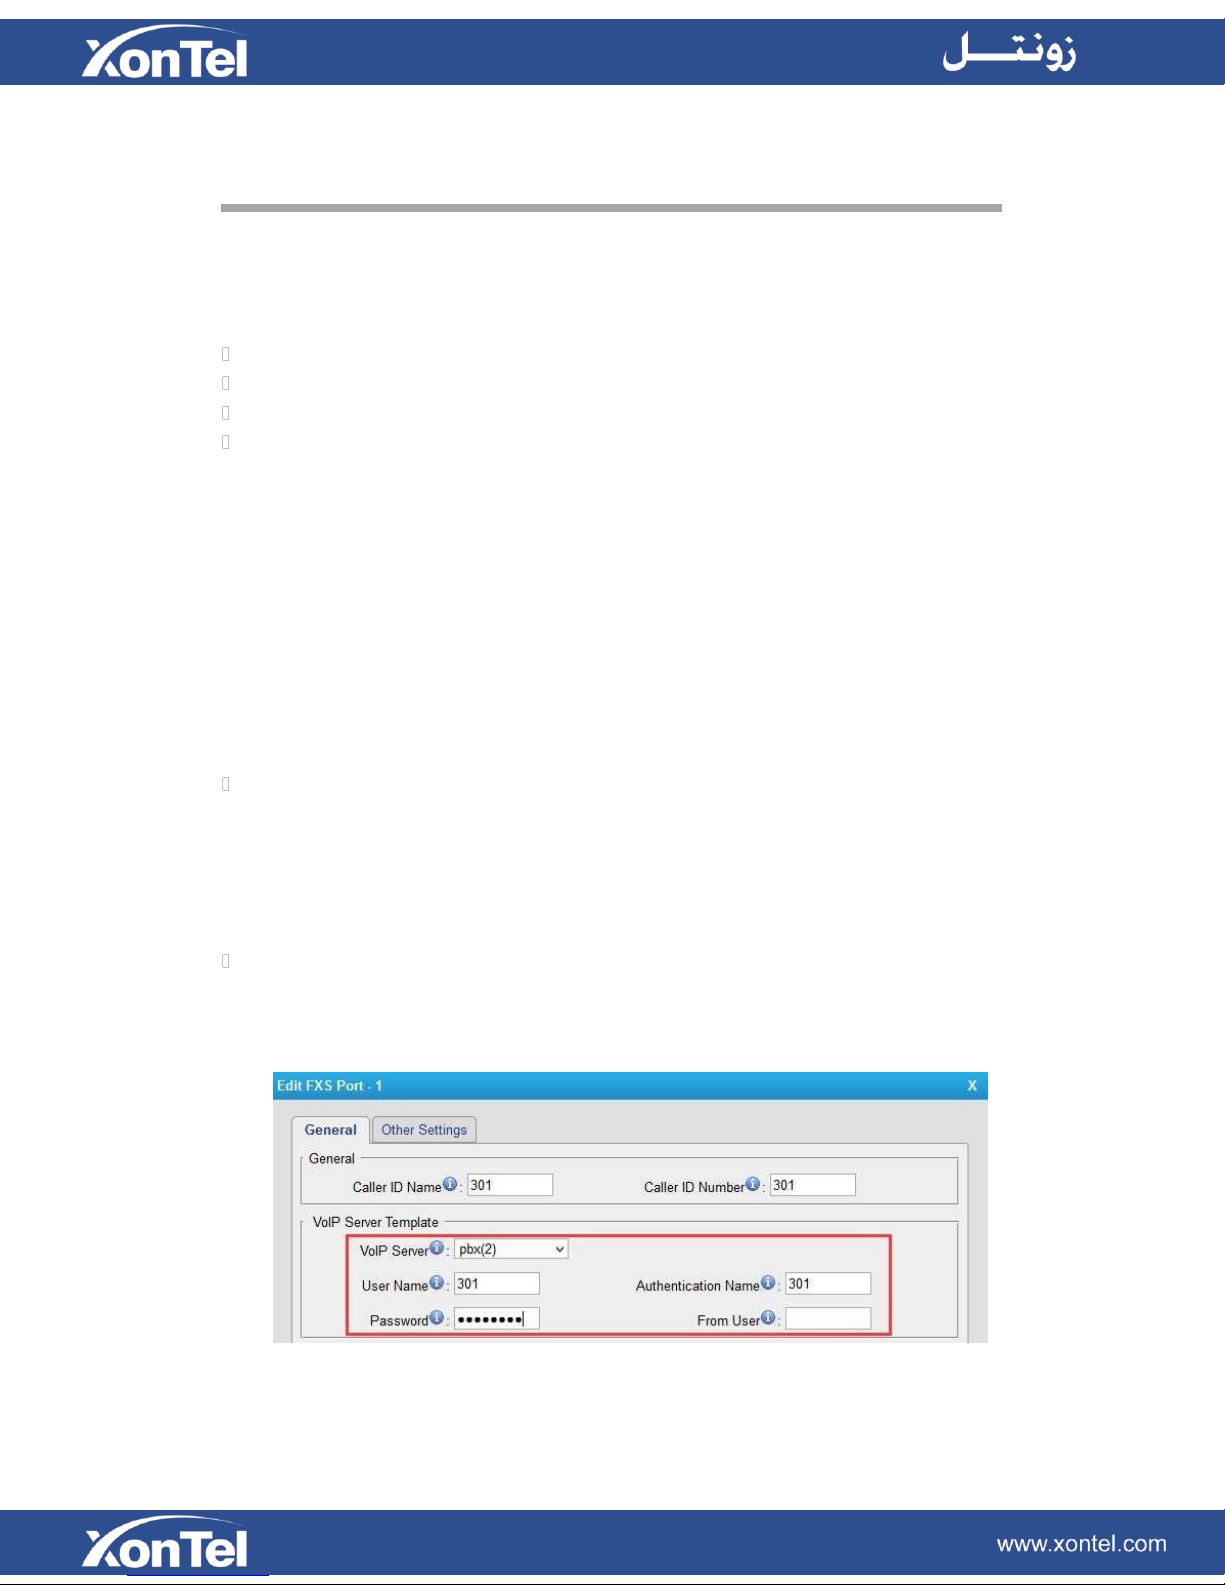
General Settings
Table 4-1 Description of FXS Port General Settings
Figure 4-1 FXS Port General Settings
14

General
Caller ID Name
A character-based name for this user. For
example, Bob Jones.
Caller ID Number
The Caller ID string used when this user calls
another user.
VoIP Serer
Template
VoIP Server
Choose a VoIP server, where the account will be
registered.
User Name
User name provided by VoIP server.
Authentication
Name
Authentication name provided by VoIP server.
Password
Authentication password provided by VoIP
server.
From User
Provided by VoIP server. Keep this field blank if
not needed.
Route
Settings
Dial Pattern
Template
The account will be allowed to make outbound
calls according to the selected template.
DID Number
Defines the expected DID number if this trunk
passes DID on incoming calls. Leave this field
blank to match calls with any or no DID info.
Hotline
Enable Hotline
Select whether to use Hotline or not. Hotline is
disabled by default. If this feature is enabled, the
system will dial out the hotline number
automatically after off-hook.
Hotline Number
Set the number to dial out automatically after
off-hook.
Delay Dial
Define how long to make Hotline take effect after
you pick up the phone.
Flash
Send Hook Flash
Event
If the option “Send Hook Flash Event” is set to
“Yes”, when pressing the flash key on the analog
phone during an active call. TA will send a SIP
DTMF flash event to the VoIP server. It can be
an interoperation with a FXO gateway which is
used for informing FXO gateway to generate the
flash signal to the CO line.
Min Flash Time
Sets the minimum time the phone is on hook
before being detected as a hook flash.
Max Flash Time
Sets the maximum flash time.
Call Duration Setting
Setup the max cull duration for every call of this
user, but it’s only valid for outbound calls.
Note: this setting will not be valid for internal
calls.
Echo Cancellation Setting
To disable or enable echo cancellation. If the line
is used to connect POS machine, it is suggested
that echo cancellation is disabled.
15
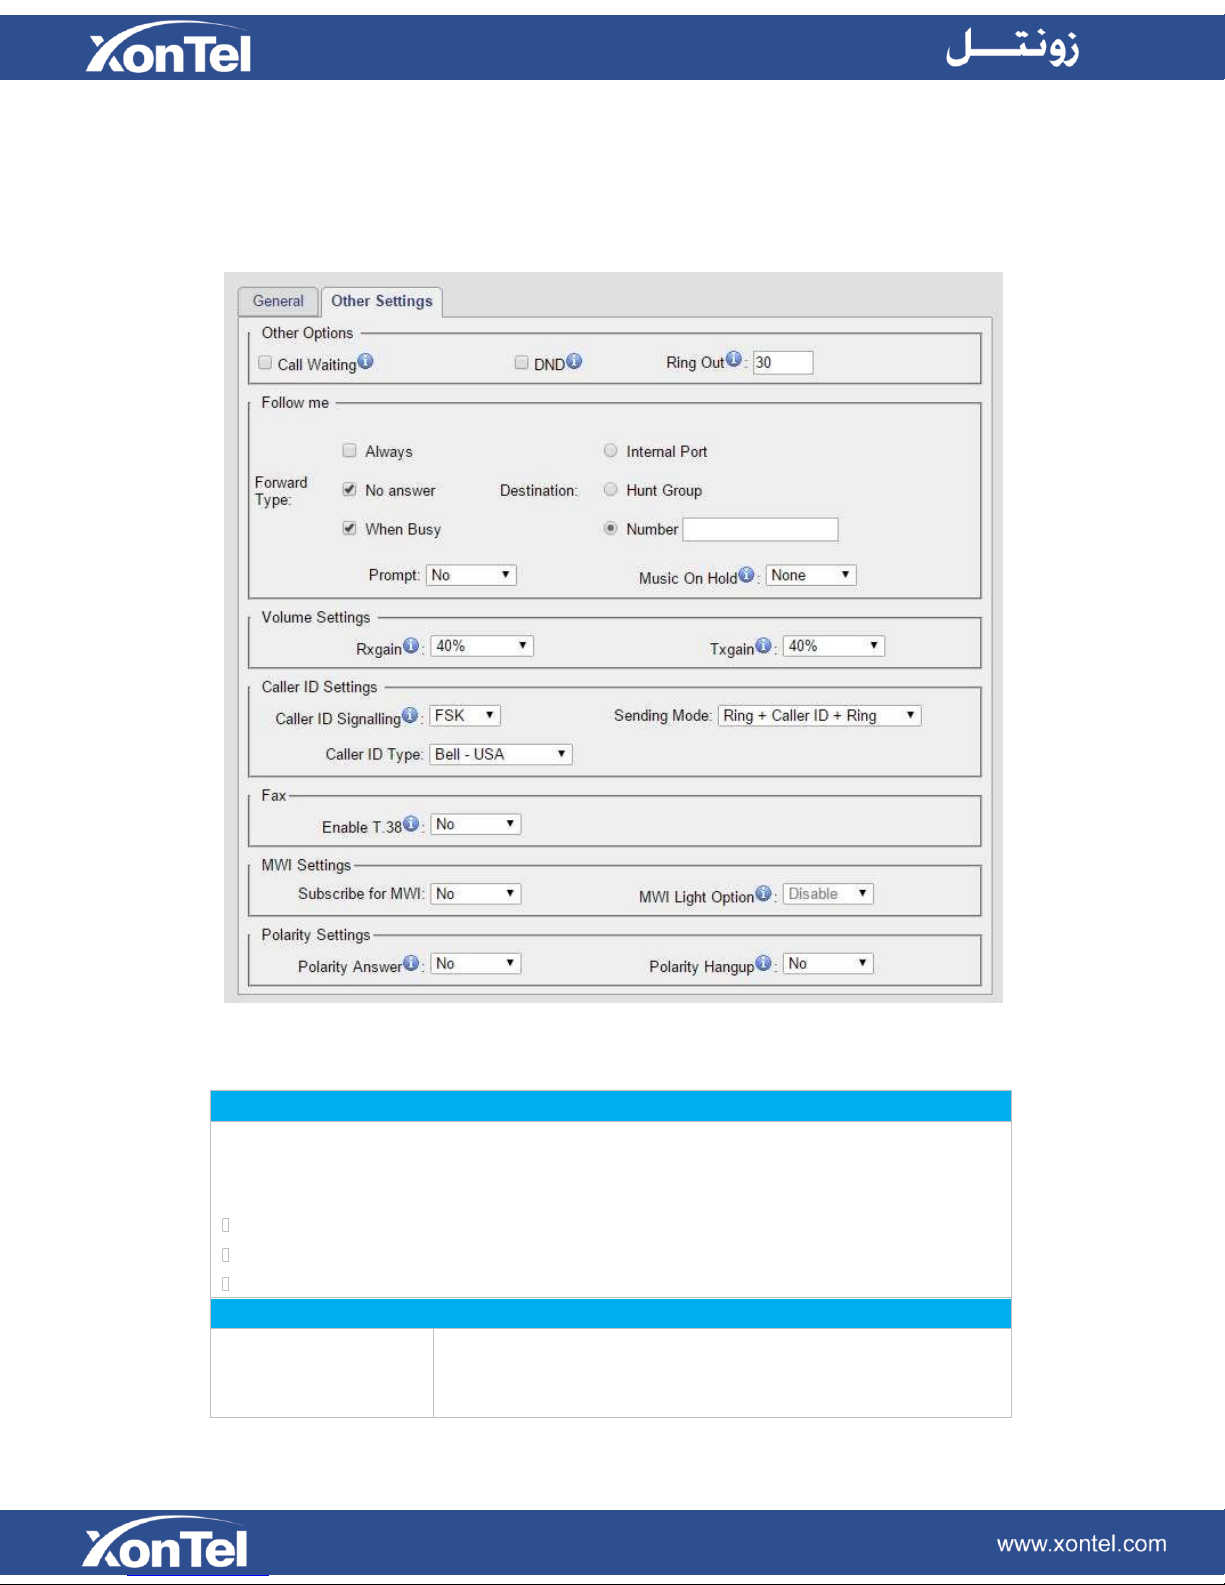
Follow Me
Choose the forward type and configure the relevant destination number. In different
conditions, the incoming calls to the account will be forwarded to different
destinations.
Always: always forward calls to the destination number.
No Answer: forward calls when no one answers the call.
When Busy: forward the call when the account is busy.
Features
Call Waiting
Check this option if the extension should have Call Waiting
capability. If this option is checked, the “When busy” follow me
options will not be available.
Other Settings
Figure 4-2 FXS Port Other Settings
Table 4-2 Description of FXS Port Other Settings
16
DND
Don’t Disturb. When DND is enabled for an extension, the
extension will not be available.
Ring Timeout
Check this option if you want to customize the ring time. Ring
tone will stop over the time defined.
Volume Settings
Rxgain
Adjust receive gain.
Txgain
Adjust transmit gain.
Caller ID Settings
Caller ID Signalling
choose the Caller ID signaling:
FSK
DTMF.
Sending Mode
choose the Caller ID Sending mode:
Ring + Caller ID + Ring
Caller ID + Ring
Polarity + Caller ID + Ring
Note: if the FXS port is connected to a device’s FXO port,
Caller ID settings on FXS port and FXO port should be the
same, or the call cannot be established.
Caller ID Type
choose the Caller ID Type:
Bell-USA
V23-UK
V23-NTT Japan
Fax
Enable T.38
If the FXS port is connected to a Fax machine, this option
should be checked.
MWI Settings
Subscribe for MWI
Message Waiting Indicator (MWI) refers to a special LED on
the analog phone, which indicates the voice mail status.
MWI Light Option
There are three lighting methods supported on S3200-FXS
Gateway: neon, FSK and Polarity. Choose the lighting method
according to your phone. S3200-FXS Gateway will light the
lamp up once receiving a new message; the lamp will
goes off if there is no unread voice mail.
Polarity Settings
A polarity signal is required on some systems for reverse polarity billing. Select if
reverse polarity signal is activated on this FXS port. It is not activated by default.
Polarity Answer: Whether to send polarity signal while picking up the phone.
Polarity Hangup: Whether to send polarity signal while hanging up the phone.
Hunt Group
Hunt group is a feature that allows a call reaching multiple FXS ports. The FXS ports
will act as a single group, called a hunt group. The number of hunt groups is limited by
17
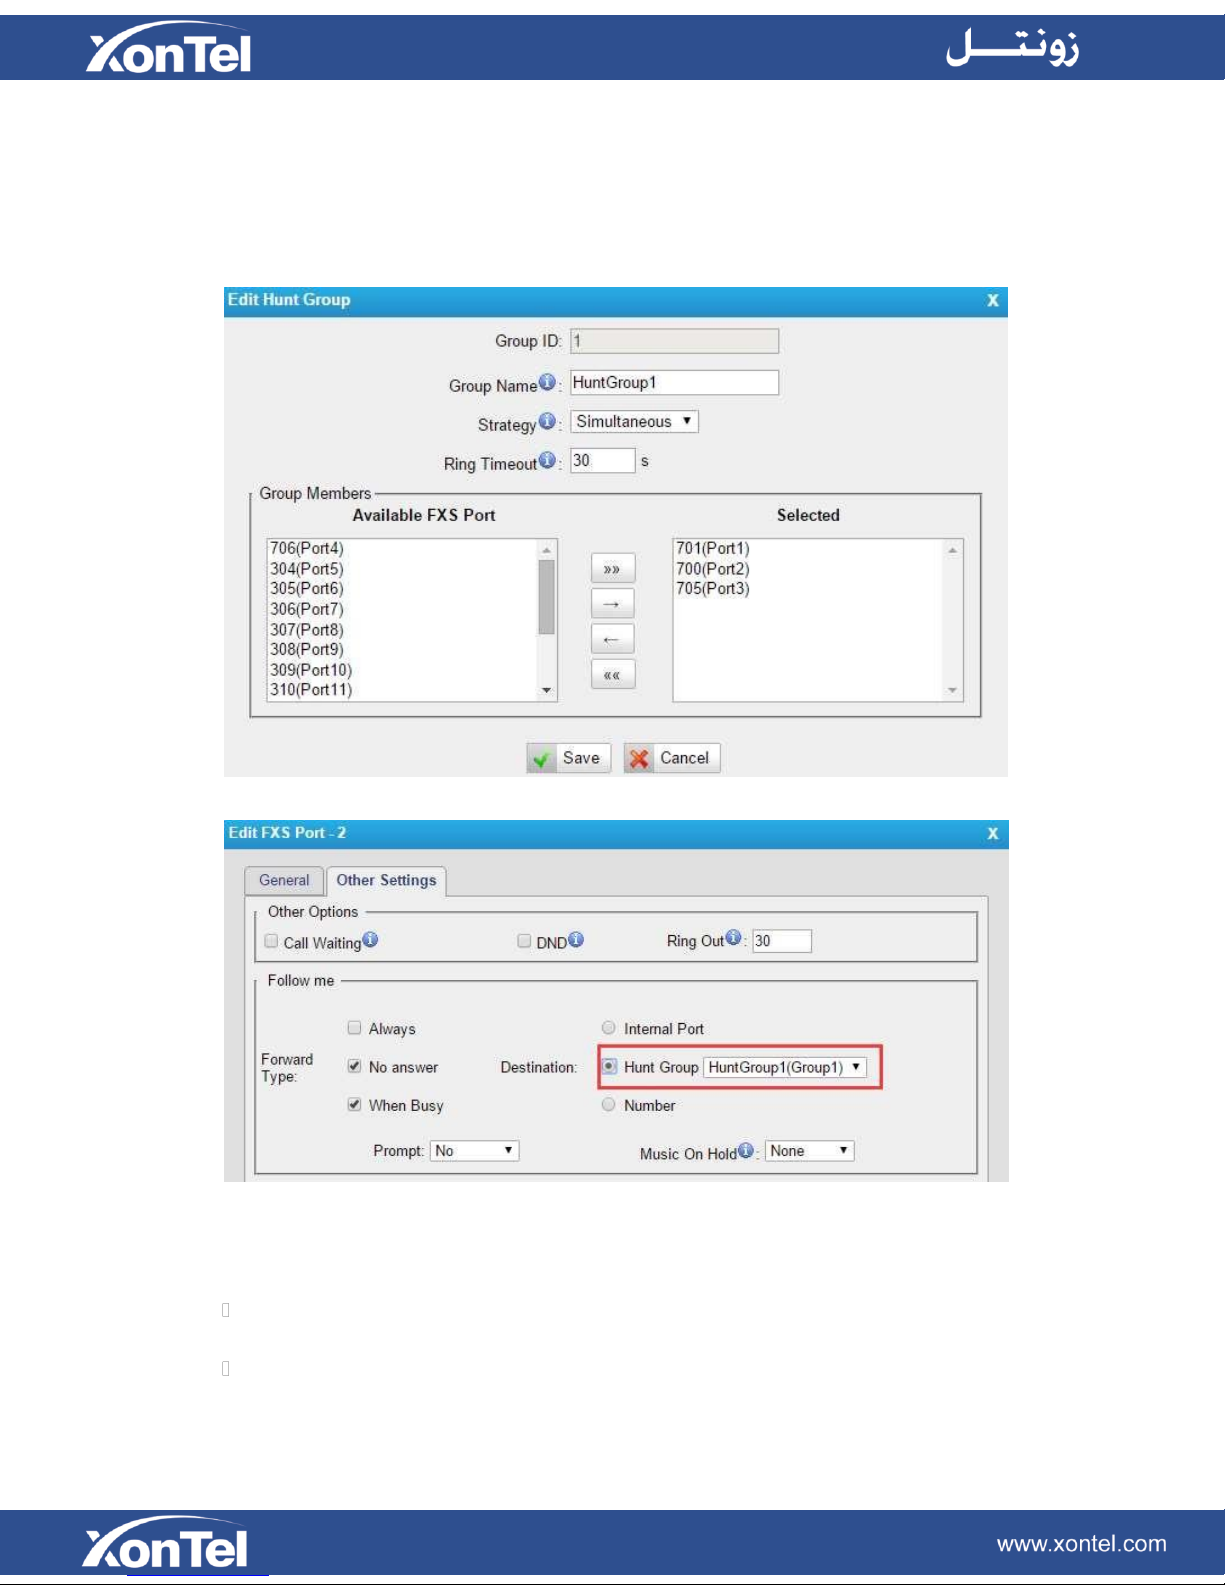
the number of ports each S3200-FXS Gateway model has. For example, there are 24
hunt groups on S3200-FXS Gateway.
Hunt group will be chosen when configuring the FXS port "Follow Me". The hunt group
will work when a call reaches the FXS port associated user which is busy or no answer.
Figure 4-3 Hunt Group
Figure 4-4 Set Hount Group on "FXS Port" Page
There are 3 strategies for hunt group on S3200-FXS Gateway.
Simultaneous
All
the FXS users
Circular
will
ring at the same time.
In circular hunting, the calls are processed "round-robin". If a call is delivered to
18

FXS port1, the next call will go to 2, the next to 3. The succession throughout each
of the FXS users even if one of the previous local users becomes free. When the end
of the hunting group is reached, the hunting starts over at the first local users.
Linear
Linear hunting is also referred to serial hunting. In linear hunting, calls are always
delivered to the first FXS users, unless it is busy, then the second, third, and so on.
19
VoIP Settings
To integrate with other IP PBX, we need to configure the VoIP settings in S3200-FXS
Gateway to set up VoIP trunk (SIP and IAX). In this chapter, we introduce the following
settings:
VoIP Server Settings
Dial Pattern Template
SIP Settings
IAX Settings
VoIP Server Settings
There are some configurable VoIP (SIP/IAX) Server templates on this page. The number
of VoIP Server templates is the half of FXS ports on TA FXS Gateway. The VoIP server
settings help the FXS ports to register to the VoIP server. Once configured, the
templates can be chosen on FXS port setting page.
There are 3 register modes for VoIP server. Users could select one mode for the VoIP
server and apply it to FXS ports.
Service Provider - IP Based VoIP Provider, do not generally require the S3200FXS Gateway to register with the provider. Only IP address or domain is needed
to configure on S3200-FXS Gateway.
Note: this is a peer-to-peer mode to connect VoIP server and S3200-FXS
Gateway, you also need to create a service provider trunk connecting to S3200
FXS-Gateway on your VoIP server.
Port Register – the VoIP server requires S3200-FXS gateway to register with the
provider using an authentication ID and password.
If you choose the VoIP server, you need to fill in User Name, Authentication Name and
Password to register the FXS port.
Figure 5-1 Port Register
20
Items
Description
Server ID
The ID for the VoIP server template.
Server Name
The name for the VoIP server template.
Type
Choose the type of the VoIP server, SIP or IAX.
Transport
This will be the transport method used by the SIP Trunk. This
method is given by the SIP trunk provider. The options are UDP
(default),TCP ,and TLS.
Hostname/IP
VoIP server hostname or IP address.5060 is the standard port
number used by SIP protocol. Don’t change this part if it is not
required.
Domain
VoIP server hostname. An IP address also can be filled here.
Enable
Outbound
Proxy Server
A proxy that receives requests from a client. Even though it may
not be the server resolved by the Request-URI.
Failover
Hostname/IP
Set the failover server. This server will be used if the primary
server is unavailable.
Register Mode
Port Register: ports will register to this server with individual
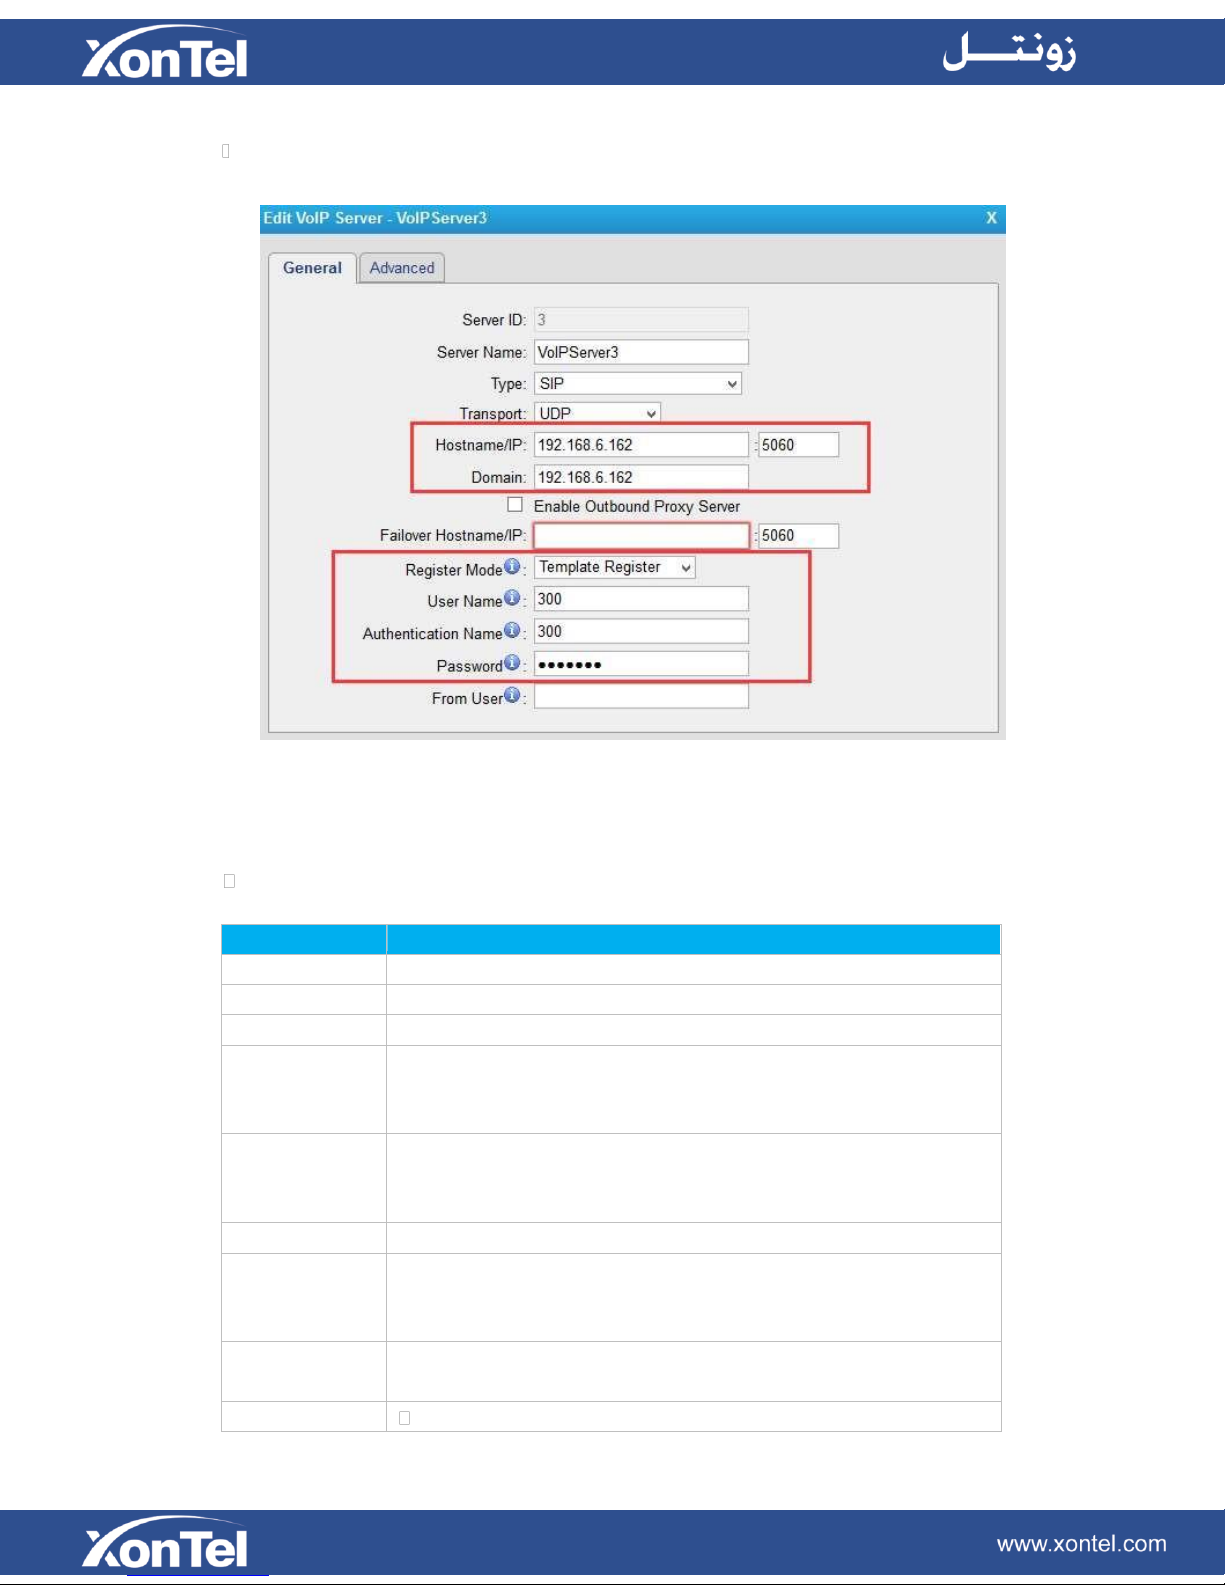
Template Register – register to your VoIP server and apply the template to FXS
ports. The FXS ports
will
register to the server with the same account.
Check VoIP settings below.
General
Figure 5-2 Template Register
Table 5-1 Description of VoIP Server General Settings
21
 Loading...