

DIGITAL VARIOMETER
NX-Vario
User’s manual
It’s rough
,
but it works
! J
Device, its firmware and this manual made by Iliushenko Andrei (nuclear_XONIX)

2
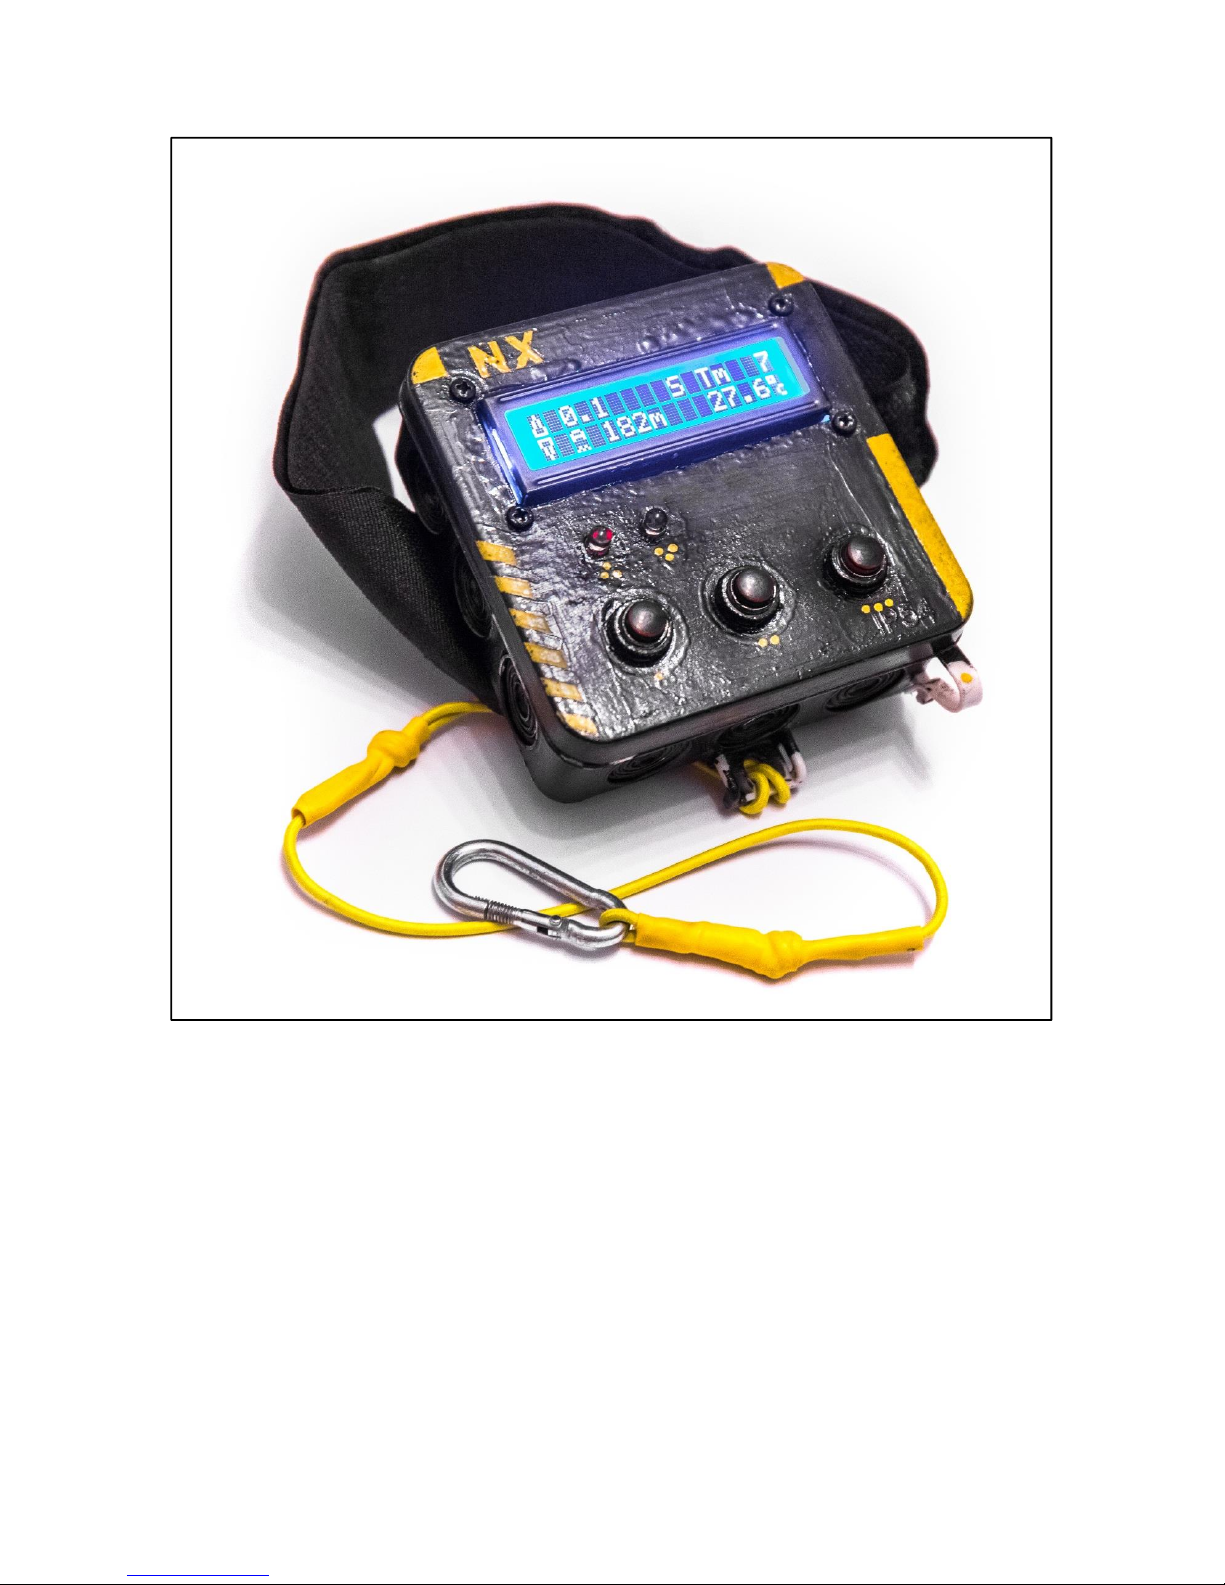
Variometer NX-Vario
is the beginner’s device. It has all necessary functions for
paragliding and hang gliding. Hardware is implemented on the Arduino platform.
Specifications
· Dimensions: 94x94x35mm;
· Main board – Arduino Nano (ATMEGA328P);
· Sensor BMP180;
· LCD screen 16x2 (white symbols, blue background);
· Power consumption 45mAh in standby mode (with backlight ON), 25mAh in standby
mode (with backlight OFF);
· Powered with one 9V Brick Battery;
· Estimated period of operation on one battery is not less than 10 hours of continuous
operation with the backlight ON, with backlight OFF up to 20 hours;
· The case is equipped with a leg fastener (Velcro 5 cm wide). Also the case has two lugs
for securing the safety rope.
Functions
Altimeters 3
Pressure setup (QNH) +
Climb threshold setup (for vario indication) +
Descent threshold setup (for vario indication) +
Light indication for climb/descent +
Mute for button beep +
Mute for vario +
Falling alarm +
Long beep for certain altitude pass on climb +
Long beep for certain altitude pass on descent +
Vario modes 2
Switchable LCD backlight +
Flight timer +
Max altitudes display +
Max and min vario display +
Temperature display +
3
Features
· Reliable height measurement in the range: 0-9999 meters;
· Accuracy of altimeter: 1 meter;
· Three independent nullable heights: absolute, relative to start point, relative additional;
· Possibility of manual entering pressure at sea level (QNH) to set the correct absolute
altitude;
· Measurement step of the variometer: 10 cm;
· Display of the ambient air temperature with accuracy up to 1/10 ⁰C;
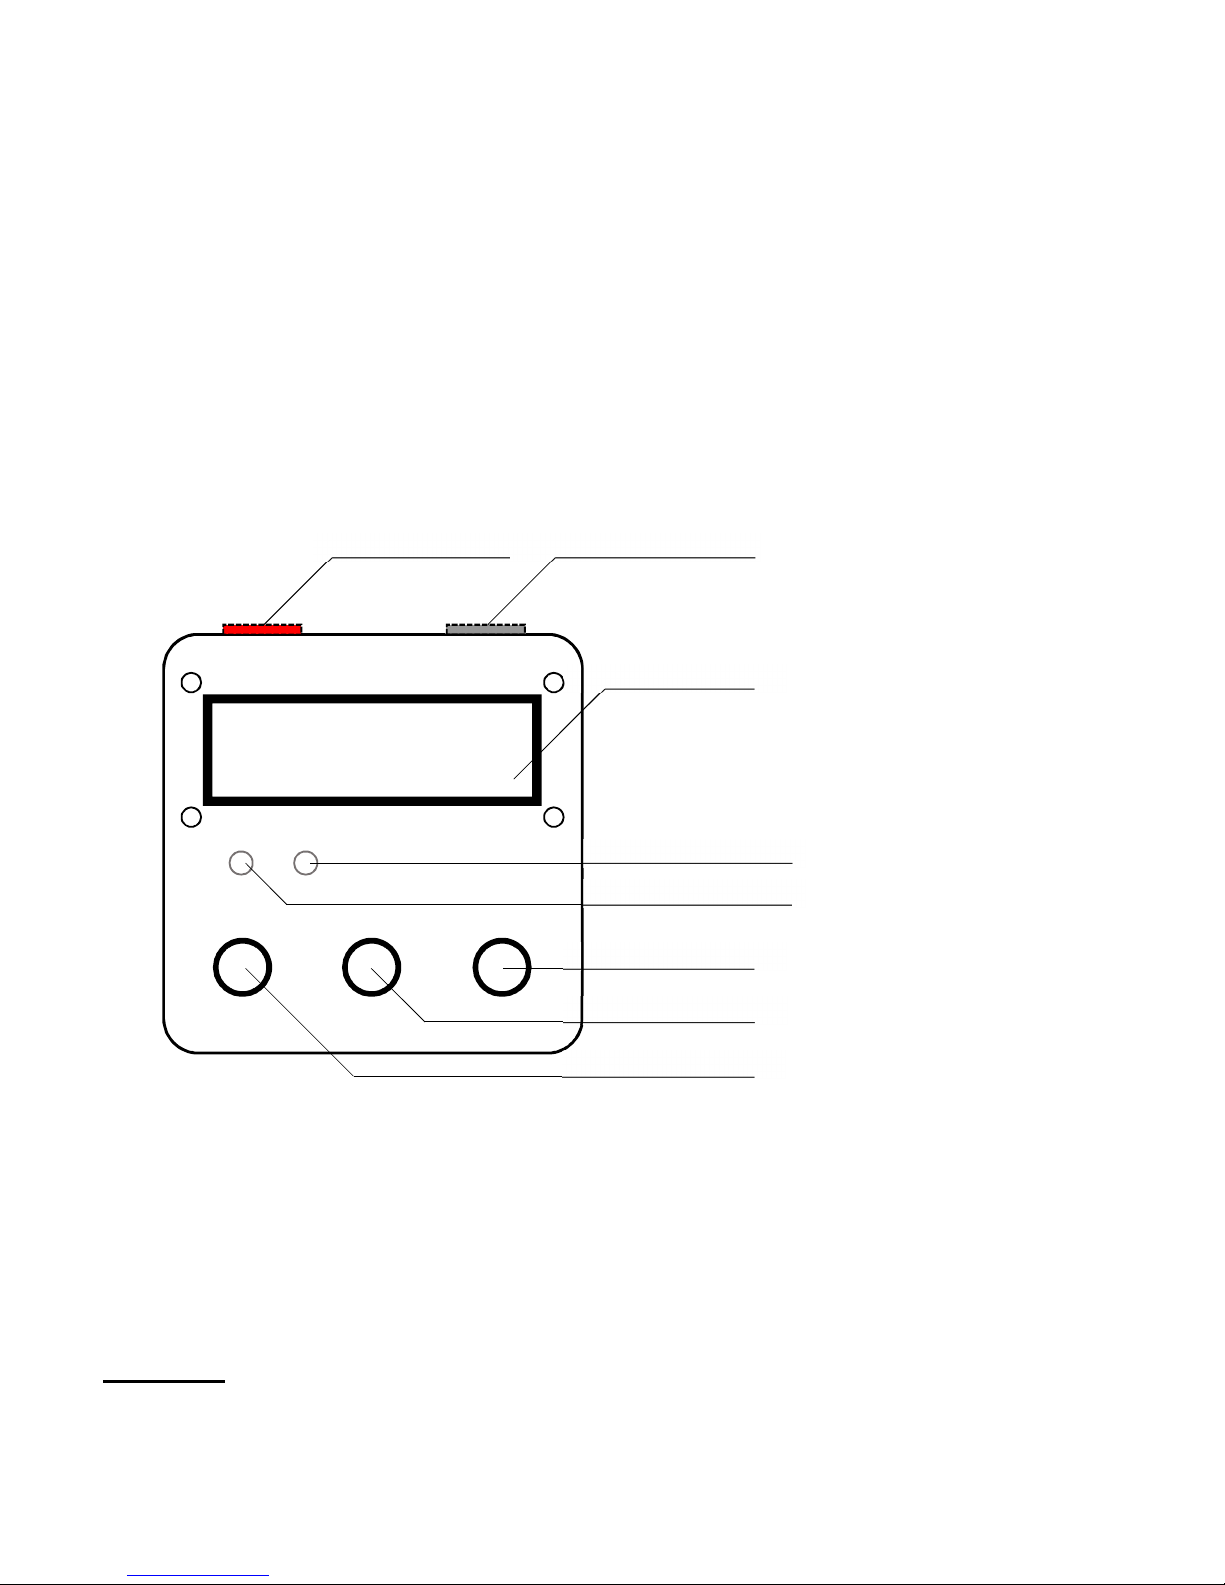
Front panel
USB-port
The USB port is on the right side of the front of the device. It is required for the vario
firmware update. It can also be used to supply power in case of energy exhaustion by the main
battery. To power the device via USB-port you need to have the external power supply
(PowerBank), which has Mini-USB Type B (Male) plug.
WARNING! The use of external power is possible, but undesirable, since the port connector
may be damaged if careless handling.
ON/OFF button USB-port
16x2 LCD screen
Descent light
Climb light
Button 3
Button 2
Button 1
4
Key Assignment
•
ON/OFF button.
Located on the left side of the front of the device. To switch on the device, press the
button until it clicks and locks in the lower position. Press again to switch off;
•
Button 1.
In the main screen:
Short press
"MENU" on/off
Long press
restart the flight timer
•
Button 2.
In the main screen:
Short press
select the altitude (absolute , relative to start point , relative
additional )
Long press
zero the selected altitude
In "MENU" screen:
Short press
switching between menu items
Long press
Enable/disable pressure at sea level (QNH) input mode
("MENU 1")
•
Button 3.
In the main screen:
Short press
switch between the main screen, the maximum altitude screen
and the vario max/min screen.
Long press
enable/disable the vario sound
In "MENU" screen:
Short press
setting a value from the list of possible items for the selected
MENU item (except "MENU 1")
Long press
pressure at sea level (QNH) reset to the initial value
"760.00" mmHg (only for "MENU 1")
5
Operation with the device
To turn on, you need to press the red button on the left side of the front of the device.
After the power is turned on, the screen backlight will light up and the top line of the screen
will fill with rectangular symbols. There will be a boot and a self-test. During booting, the
device will consistently display the welcome screen ("nx-Vario; baro-sensor-test") and the
initial value screen of the pressure at the sea level ("def.pres, 760.00"). Also at boot time, the
relative to start altitude and the additional relative altitude are set to zero. If the device is
successfully loaded, it flashes twice with indicator LEDs and emits a short double beep. If the
sensor is defective or the communication line is broken, the inscription "Sensor error" appears
on the screen.
After loading the device you’ll see the main screen, which will display information about
the current value of the variometer, the selected altitude, air temperature, and also the flight
time (the flight timer automatically starts after the device is turned on).
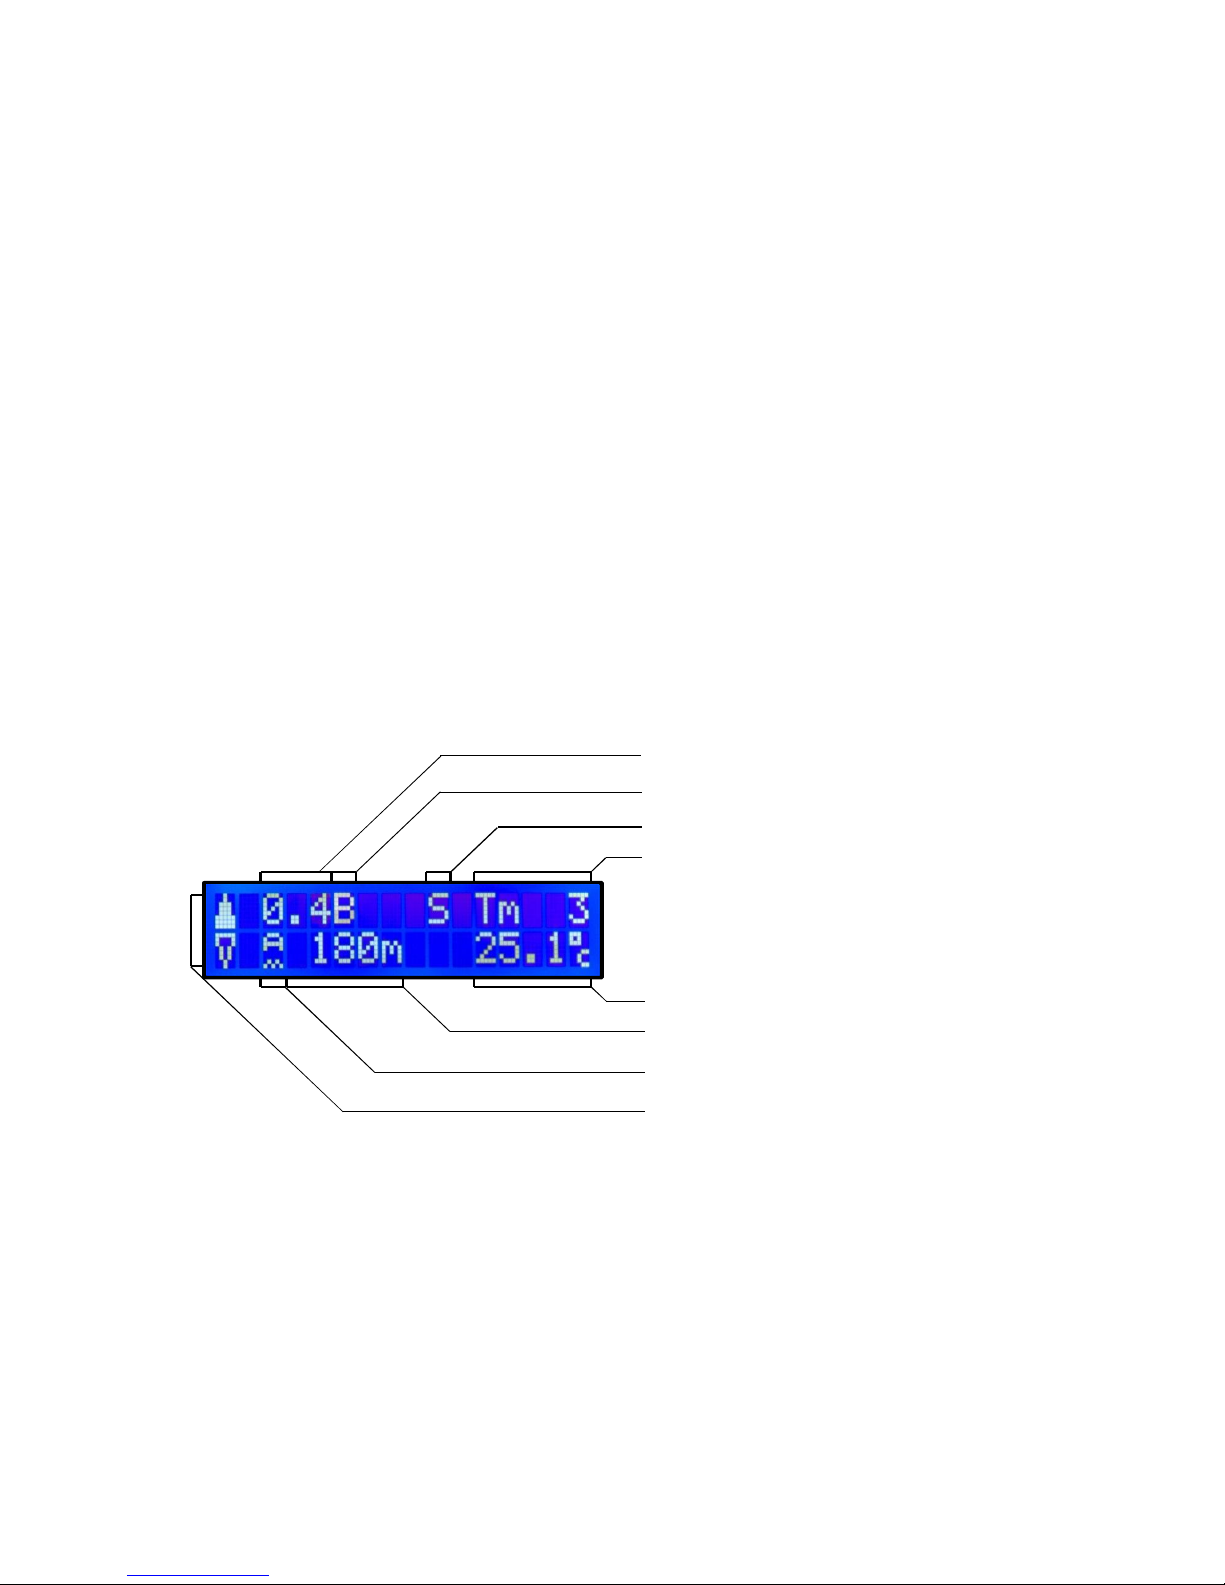
Main screen
In this case, read the screen values as follows: the aircraft is climbing with vario value
+0.4 m/s, the vario signal is active, the buzzer is switched on, the flight time is 3 minutes, the
selected absolute altitude is 180 meters, the air temperature is +25.1 degrees.
Variometer value
Variometer sound ON/OFF indicator
Flight time value
Value of the selected altitude
Indicator of the selected altitude
CLIMB/DESCENT indicator
Indicator of the signal of the variometer
Air temperature value

6
Description of the main screen symbols
The CLIMB/DESCENT indicator (up and down arrows) is located in the left corner of the
main screen. This indicator reflects the current state of the aircraft. If the vertical velocity is
zero, then two contour arrows are displayed one above the other . In the case of positive
vertical velocity, the top arrow is filled with color , if the vertical velocity is negative, then
the bottom arrow is painted over .
Just to the right of the upper arrow is a numerical indicator of the variometer value.
The next is the symbol of the vario signal . This symbol is displayed only when the vario
beeper works. Even if you turn off the sound and light indication, this symbol will continue to
be displayed on the screen when climb/descent. The difference from the arrow indicator,
mentioned above, is that the indicator has the ability to adjust the threshold, as well as
light and sound indication. For details, refer to "MENU 2" and "MENU 3".
Next to the right in the top line is displayed the vario sound ON/OFF indicator
("Button 3" long press to change the state).
The last in the top line is the indicator of flight time, measured in minutes . The time
starts counting when the device is turned on. Resetting the timer is done by long pressing
"Button 1".
In the second line to the right of the lower arrow of the variometer stands the symbol of
the chosen altitude ( , , ). Switching of altitudes is made by short pressing of
"Button 2". Zeroing of the selected altitude is made by long pressing of "Button 2". The
absolute altitude can also be set by direct entering the value of the pressure at the sea level
(refer to "MENU 1").
Next to the right is the value of the selected altitude in meters.
The last in the bottom line is an indicator of the air temperature in degrees Celsius .

7
Max altitudes screen
Switch to the maximal altitudes screen by short pressing "Button 3" in the "Main screen".
Zeroing of the maximal altitudes can be done by long pressing "Button 3".
Max and min vario screen
Switching to the MAX/MIN variometer value screen is made by short pressing
"Button 3" in the "Max altitudes screen".
Zeroing of MAX/MIN variometer values can be done by long pressing of "Button 3".
Absolute altitude value
Additional relative altitude
Altitude relative to the start point
Maximal vario value
Minimal vario value

8
Description of menu items
Entering the "MENU" mode is done by short pressing "Button 1". Switching through the
menu items is made by short pressing "Button 2". Changing the values of the selected menu
items is done by short press of "Button 3" (except for "MENU 1", see below). To exit the
"MENU" mode, press "Button 1" again.
MENU 1
This menu item displays the value of the sea level
pressure (QNH) required for calculating the absolute
altitude . After the device is turned on, the value is
set to the initial value (760.00 mm Hg). The pressure can be entered manually (for setting the
absolute altitude). To do this, long press "Button 2" before the beep sounds. The device will
enter the manual pressure input mode, the symbol will appear above the first digit of the
pressure value. Press "Button 3" briefly to set the first digit in the pressure value, then briefly
press "Button 2", the symbol will switch to the next digit. Similarly, enter all the remaining
digits. After the input is completed, to save the entered value, hold down "Button 2" until the
device beeps. In case of incorrect input, repeat the procedure. To set the pressure to the initial
value, hold down "Button 3" until the beep sounds.
The pressure value can also be determined by zeroing the absolute altitude directly at sea
level. After zeroing, when entering the "MENU", the correct pressure value will be displayed
on the screen.
MENU 2
Setting the threshold value of the vario signal response
when climbing. It can be selected from the list of
possible values {0.3, 0.4, 0.5, 0.6, 0.7} by pressing the
"Button 3" for a short time. The initial value after switching on the device is 0.3 m/s.
MENU 3
Setting the threshold value of the vario signal response
while descent. It can be selected from the list of
possible values {-0.9, -1.1, -1.3} by pressing the
"Button 3" for a short time. The initial value after switching on the device is -1.1 m/s.

9
MENU 4
Turn the variometer LED indication ON/OFF to duplicate
or replace the beeper. The ON/OFF value is selected by
briefly pressing the "Button 3".
Use. This option is useful for the motored flights, when the sound of the engine muffles the
beeper of the variometer. It is also useful for saving energy (in case of a small energy reserve,
the beeper should be turned off, leaving only a light indication).
MENU 5
Turn ON/OFF the sound confirmation of pressing the
buttons. The ON/OFF value is selected by briefly
pressing the "Button 3".
MENU 6
Setting the threshold value for the activation of sound
and light alarms in the event of a falling. The value is
selected from the list {OFF, -2.5, -3.0, -4.0, -5.0} by
briefly pressing "Button 3". The initial value after switching on the device is -3.0 m/s.
This option will help to detect the falling in a timely manner and warn the pilot about it.
If the flight altitude is more than 100 meters, the following warning will be displayed on
the screen: "ALARM! FALLING! "(The first line), as well as the relative height above the start
level at the moment (second line). In addition, a two-tone audio signal will be output, and
simultaneously the red and green vario indicator lights will turn on and off.
If the height is less than 100 meters, the recommendation on the top line will be to open
the rescue parachute "DEPLOY PARACHUTE", on the second line, the remaining height will still
be displayed. The alarm will switch to more high-tonal, and the light indicators will flash
alternately rapidly.
When the vertical speed is normalized, the alarm will be turned off, the screen will return
to the previous state.
WARNING! This function operates based on the relative altitude above the start level data !
It is necessary to zero the relative altitude before the flight!

10
MENU 7
Turn ON/OFF the falling alarm test mode. Initially, the
option was included in the menu for setting up this
mode. But in the future it was decided to leave it, so
that the pilot could independently turn on the alarm, get acquainted with its screens and
memorize the sound and light signals. This was done, so that when the alarm turns on in flight,
the pilot should not be distracted by reading the screen, but direct effort to bring the wing out
of dangerous regime and normalize the flight.
If this option is enabled, if the rate of decline becomes greater than -0.3 m/s, an alarm will
be activated. All subsequent signals will be the same as signals given during a real flight alarm.
The only difference is that in this case, the altitude indication is based on the altitude above
sea level . This is done so that the pilot, without changing his position could check the alarm
at a height of more than 100 meters and less than 100 meters at the same time (by selecting
the pressure at sea level (QNH) to set the altitude).
When the device is turned on, this option is disabled.
MENU 8
Turning ON/OFF the long beep function when passing
through a threshold altitude (on descent). The value is
selected from the list {OFF, 20, 30, 50, 100, 150, 200,
250} by pressing the "Button 3" for a short time. The initial value after switching on the device
is "OFF". The sound signal is given based on the relative height above the start level .
Use. The function will be useful for pilots who like acro. When the head most of the time looks
at the wing, or on the partner (in the case of synchronous elements), there is not always time
to look down, and the earth is rapidly approaching. This function is intended to warn the pilot
with a long beep if he passes a certain, predetermined height threshold.
MENU 9
Turning ON/OFF the long beep function when passing
through a threshold altitude (on climb). The value is
selected from the list {OFF, 50, 100, 150, 200, 250, 300,
400, 500} by pressing the "Button 3" for a short time. The initial value after switching on the
device is "OFF". The sound signal is given based on the relative height above the start level .

11
Use. The function will be useful for pilots flying with a winch and participating in competitions.
Often during the competition, the winch acts as a conveyor, and it is desirable to minimize the
tightening time of each wing. This function allows you to give a long beep after passing certain,
determined in advance by the rules of the competition height threshold on climb, and do not
waste time on an extra lift.
MENU 10
Variometer mode switch. The device has two possible
vario modes: «Standard» and «Thermal»
. When the device is turned on, the initial value
is set to "Standard". When the "Thermal" position is selected, the variometer switches to a
more sensitive mode of operation, but this can lead to an increase in the probability of false
positives, and this should be used with caution.
Use. The "Standard" mode is suitable for most flight situations, including: free flights in
dynamic flows, motor flights, etc. However, in thermal flows, when a rapid response of the
variometer is required, it is recommended to set the "Thermal" mode.
WARNING! The "Thermal" mode is in the testing stage and in real thermal flows at the time of
writing this instruction was not checked.
MENU 11
Turn ON/OFF the LCD backlight. The ON/OFF value is
selected by briefly pressing the "Button 3". The initial
value is set to "ON" when the device is turned on.
Use. When flying during daylight hours, it is recommended to turn off the screen backlight to
save energy. Based on the tests performed, in the daytime the values from the screen without
the backlight are read no worse than with the backlight.
Additional information
To reduce the firmware development time, the algorithm of the variometer averager was
borrowed from these two awesome projects:
http://www.instructables.com/id/GoFly-paraglidinghanglidinggliding-altimeter-v/?ALLSTEPS
http://redhats.ru/variometer-arduino-2015/
A lot of thanks to their authors!

12
From the author
I started flying the paraglider pretty long time ago, somewhere in the beginning of 2008.
And quite quickly I understood that I need a variometer. But at that time it was unrealizable,
as prices were heavily biting (however, since that moment the situation with prices has not
changed at all). Several years passed, I graduated the University, changed couple of jobs and
again lit up with this device, however, this time I planned to create it myself on the basis of the
bare ATmega controller. There were already projects for assembling from other guys, but I
wanted to make the device myself. However, I had a bad try, because I did not have enough
knowledge and skills in microcontroller programming. And now, a few years later, I first
touched the platform Arduino and realized that this is my chance. In January 2017, I started
the development, and in mid-March of the same year, the beta version of the device was
ready and already tested in the air a couple of times. I tried to put in this device a maximum of
useful functions that may be needed in different flight modes and situations.
If you, dear sky fellow, want to repeat this device, then here's a list of necessary elements:
1. Arduino Nano (necessarily on a 328 chip, 168 is not suitable - not enough memory);
2. LCD screen 16x2 (that would not change either the connection diagram, or the firmware
code, the screen should be with a soldered I2C adapter;
3. BMP180 sensor (I wrapped my with soft foam that it would calmly bear sharp noisy
pressure surges);
4. Piezo buzzer (I got my from the old PC, it’s pretty loud);
5. Red and green super-bright LEDs;
6. Couple of 220 Ohm resistors for LEDs;
7. Three buttons without fixation;
8. Three 10K resistors for buttons;
9. One button with fixation (or any switch);
10. About a meter of a thin wire for connecting the elements together;
11. The case (here for your fantasy full expanse, I used an electric box from the hardware
store, it fit perfectly in size);
12. A 9V Brick Battery and a connector for it (you can make one from the old 9V Brick
Battery);

13
The assembly of elements looks like this:

14
After the assembly of the circuit and loading the firmware in the controller, the device
must turn on and show you the welcome screen. If something went wrong, check the
connection diagram!
P.S. If, or more correctly, when the device shows up bugs, throw me a description on my
E-mail (xonix2004@list.ru), or you can find me in VK or Facebook for more convenient
communication. If you know some tricky function that should be built into the variometer, but
did not find it in the list of available ones, also write. If it’s possible, I’ll try to implement and
upload a new version of the firmware.
P.P.S. I will add from myself, although there are some shortcomings in the work of the
device (in particular, the thermometer can pick up 3-5 degrees, but it's understandable, the
sensor is hidden deep in the case), personally I'm glad with the device’s work at the moment.
Next on the list is a vario in a much more compact case, based on Arduino Pro Mini with OLED
display, BMP280 sensor and reduced current consumption. I hope this idea will not be put on
hold.
Px3.S. I have to honestly admit, this is my first serious project on Arduino and this is my
first code for seven years after graduation from University. Therefore, the code itself is creepy
enough, complicated, poorly optimized and all stands on crutches! But it works! And, as is
known, works - do not touch! And, in general, this is not a bug, it's a feature! J
Px4.S. And I wildly apologize for my terrible English to all foreign readers, if, of course,
there are such! I sometimes even used Google Translate - there is no forgiveness for me!
Yours, nuclear_XONIX (Iliushenko Andrei, Ильюшенко Андрей)
Live long and fly safe! J

15
Bug records

16
Changes in firmware
 Loading...