

Page 1
XM-VRSU4309BT v2
INSTALLATION MANUAL
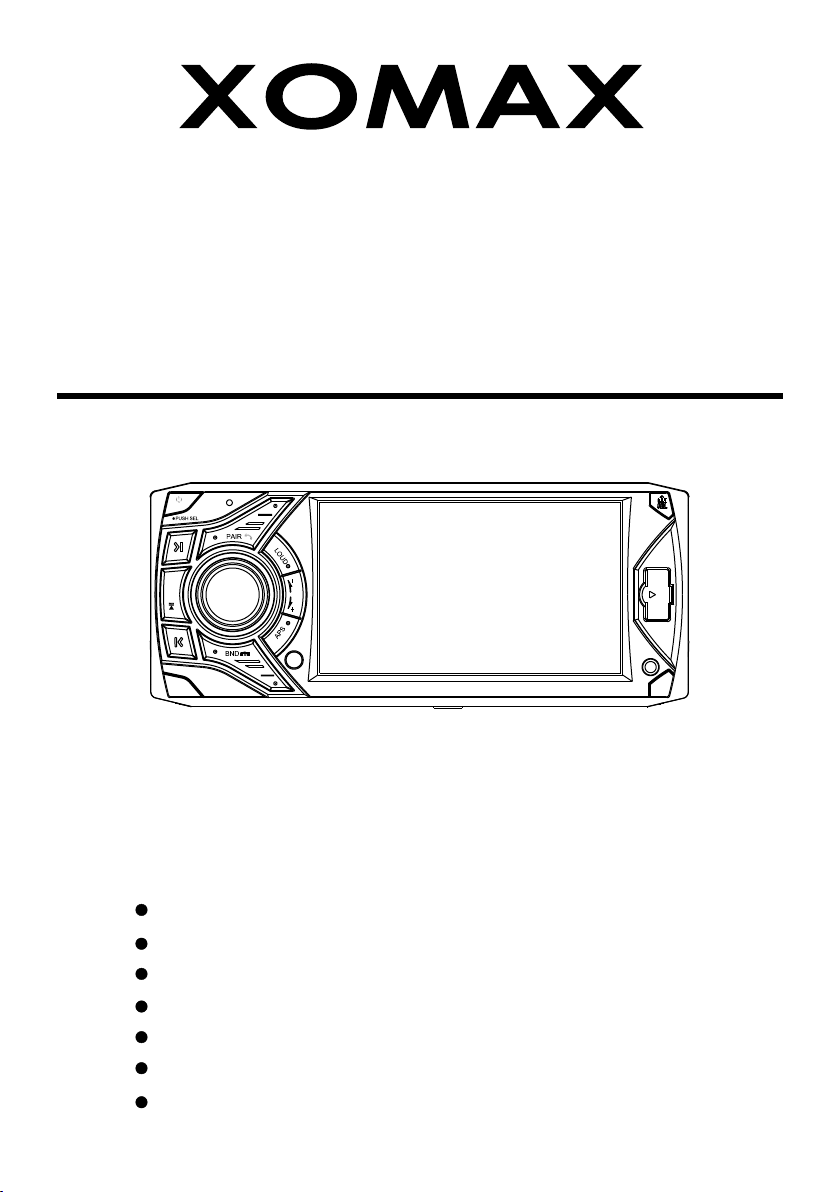
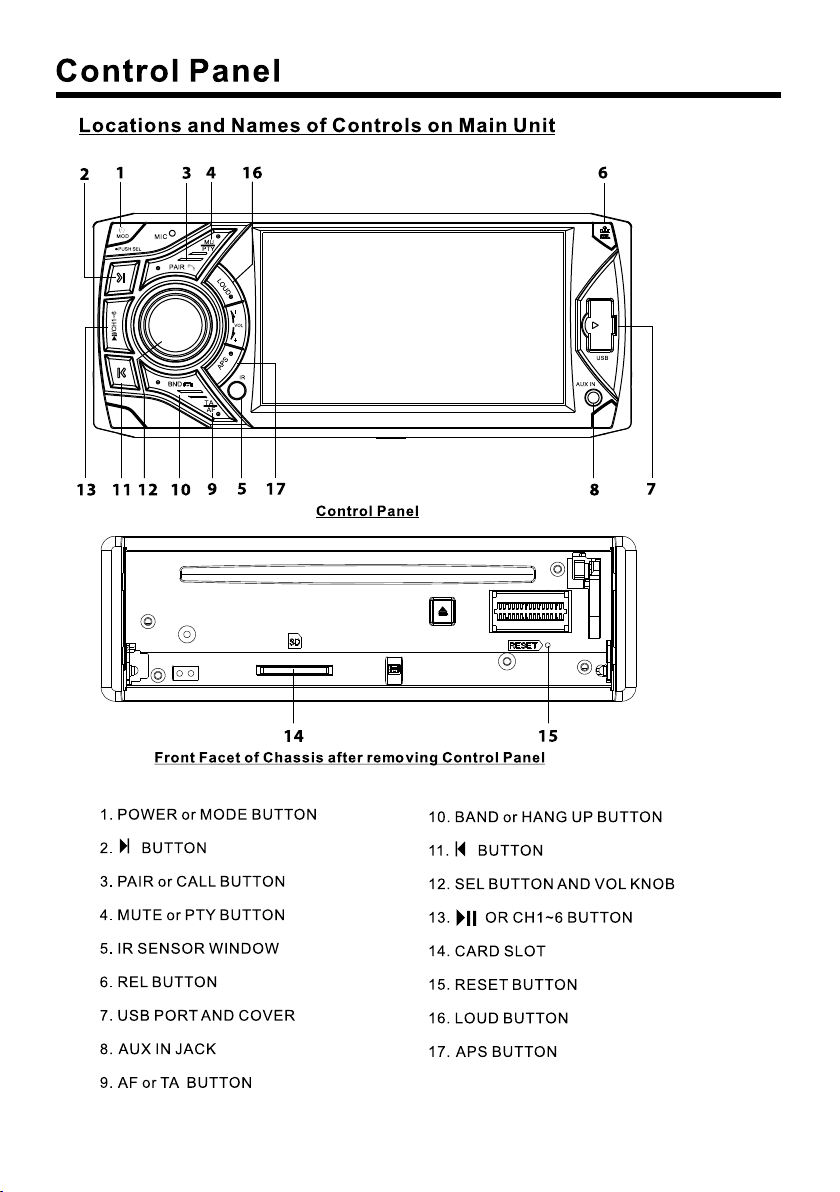
MOD
MIC
MU
PTY
/CH1~6
VOL
IR
TA
AF
USB
AUX IN
CAR AUDIO/VIDEO SYSTEM
FLIP DOWN AND REMOVABLE CONTROL PANEL
4.3” Wide Color TFT Touch Screen
REMOTE CONTROL
CONTROL PANEL USB PORT AND AUX INPUT
SD/MMC CARD SLOT
BUILT-IN MW/FM-RDS TUNER
BLUETOOTH A2DP & AVRCP COMPITABLE
Page 2

To ensure safety while driving
and to comply with laws,
drivers should not watch video or
operate the video device while driving.
Page 3
Page 4

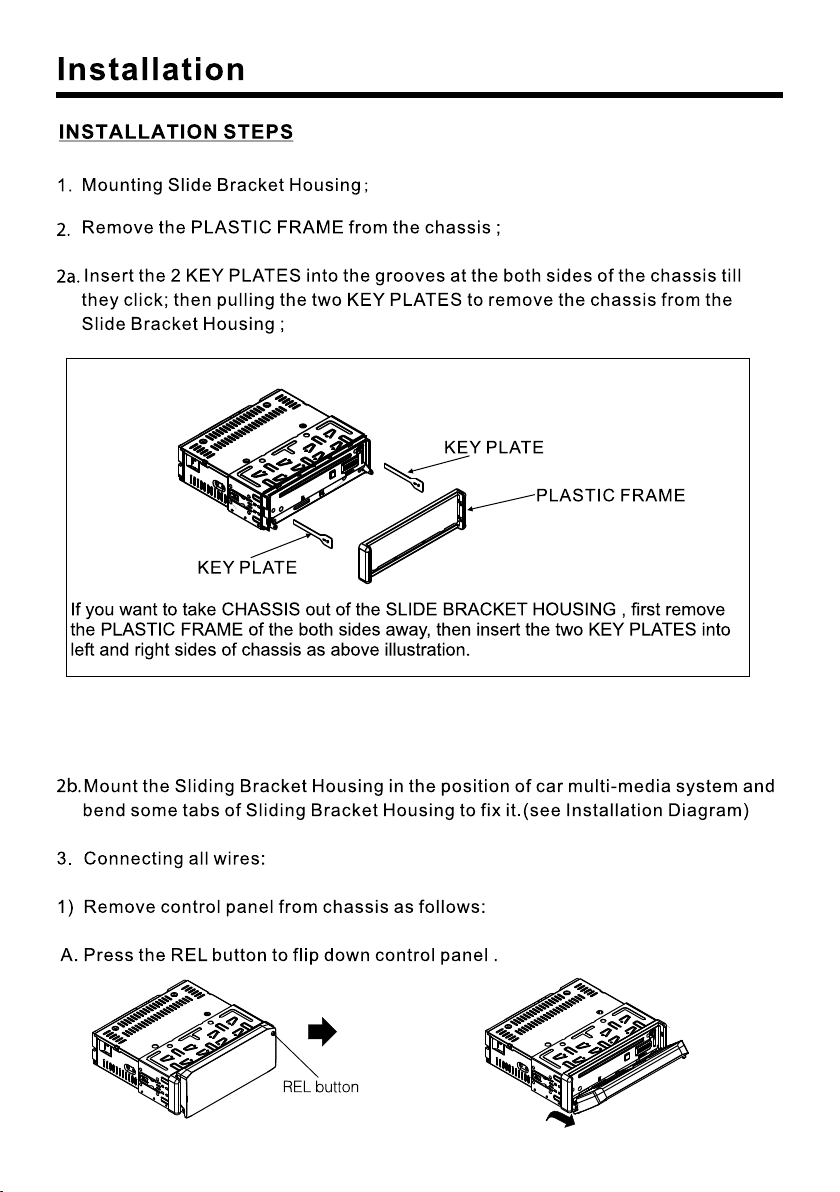
Installation
B. Hold the left end of t he c ontrol panel to sli de r ightwards a little an d pu ll it towards
you to remove it .
2
1
2) Connecting all wir es according ot the wir in g diagram as follows:
3) Attach control pane l onto chassis.
A. Make the right hollow o f control panel aim at th e ri ght bulge of chassis, t he n push
and hold control pane l rightwards; at one ti me , move the left end of co nt rol panel
towards chassis to ma ke the left hollow of con tr ol panel aim at the left bu lge of
chassis and then rele ase holding .
Bul ge
Hol low
Bul ge
Hol low
B. Flip control panel u p till hearing a click so un d to attach onto chassi s.
Con nec tor
* How to clean panel connector
Frequent detach me nt will deteriorate p an el connectors. To minimize deteriora ti on,
periodically wipe t he panel connectors w it h a clean/soft/dry cl oth .
4) Testing it for m ak ing sure that it can work p roperly .
Page 5
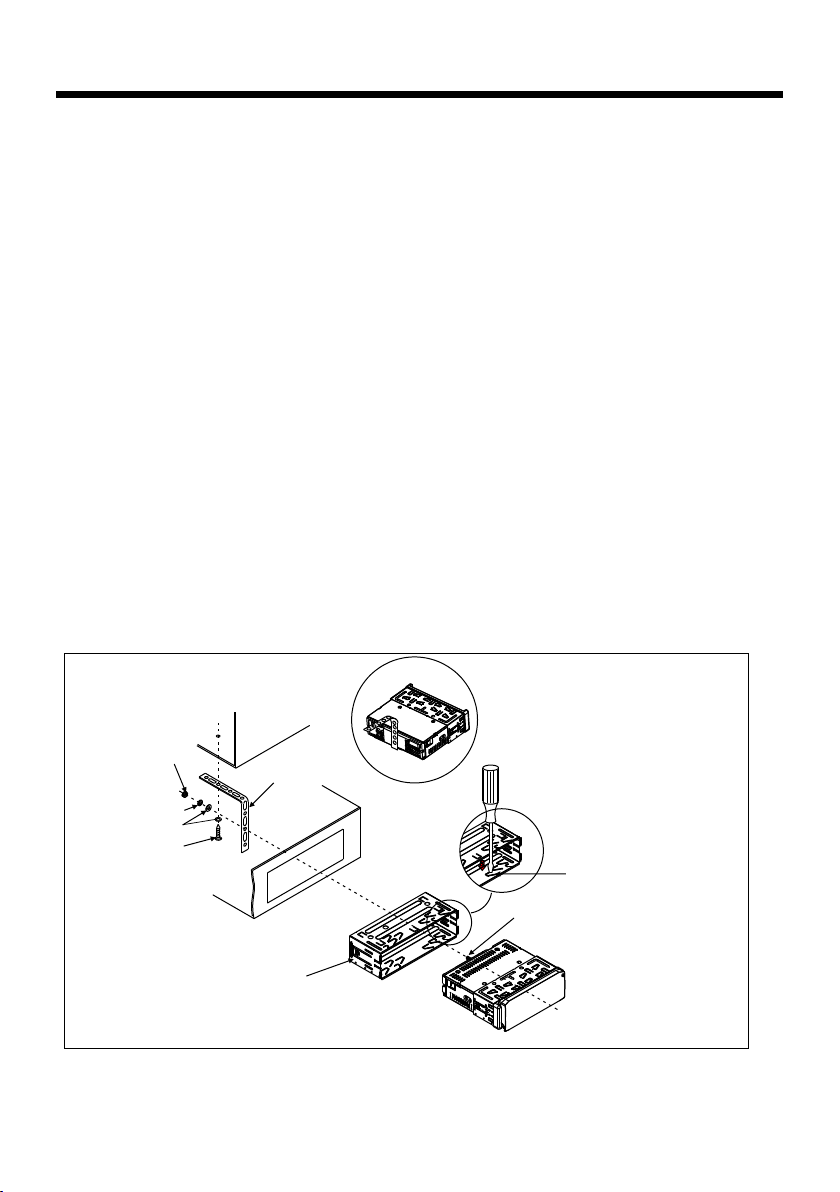
Installation
4. Installing main un it according to insta ll ation diagram:
1) Insert the chassis o f the car multi-media s ys tem into the sliding me tal housing.
2) Use the metal stra p to f ix the rear part of chass is.
* Uninstalling main u nit:
1) Remove metal strap f rom main unit;
2) Remove plastic tri m frame from main unit;
3) Insert a key plate i nt o left and right side of ma in u nit and draw main unit ou t of
sliding metal housi ng.
Installation diagram
HEX NUT
SPRING W ASHE R
PLAIN WA SHER
TAPP ING S CRE W
DASH BOA RD
META L MOUN TING
STR AP
SLIDE BR ACK ET
HOU SING
CON SOLE
FIX ING TAB
HEX BOLT
Page 6
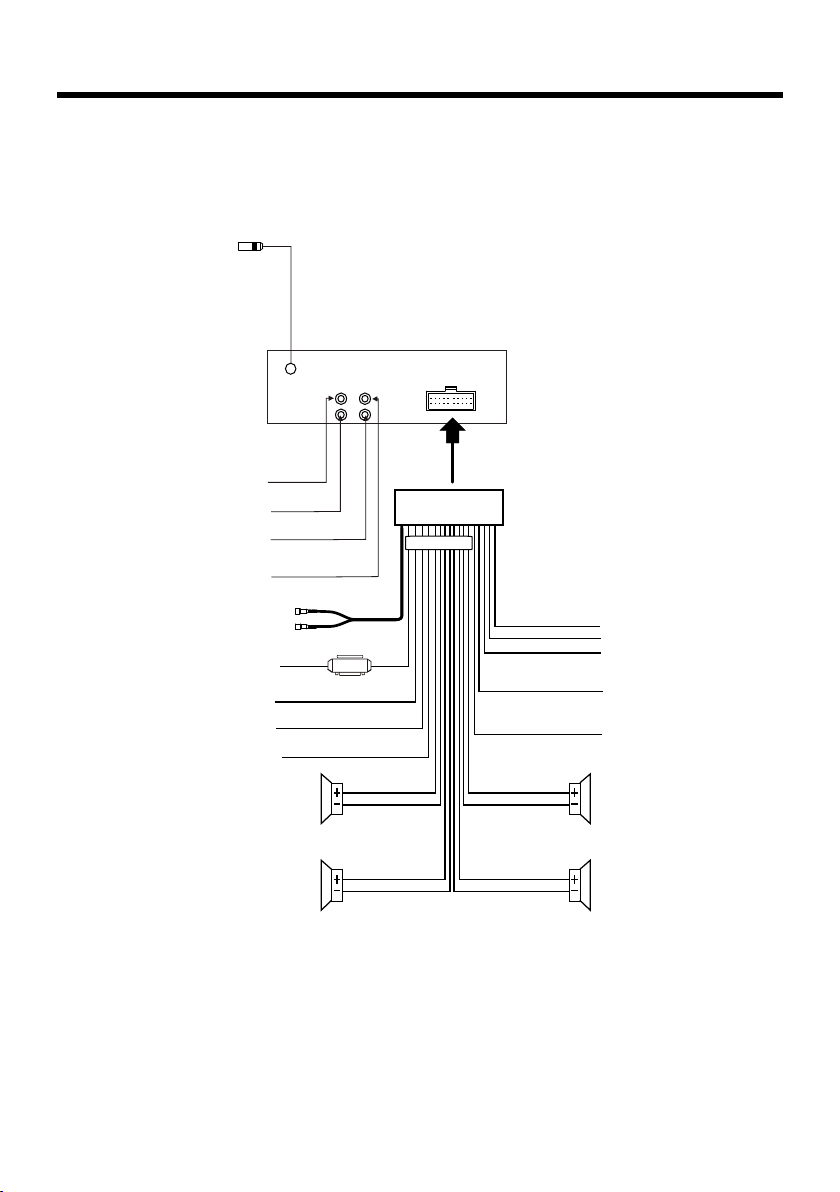
Electric Connection
WI RIN G CONNE CTI ON
RADIO AN TEN NA JACK
White Yellow
Red
Yellow
RCA AUDIO OUT SOCKET
RCA AUDIO OUT SOCKET
VIDEO OUTPUT SOCKET
VIDEO OUTPUT SOCKET
ISO CO NNECT OR
REAR CA MER A INPUT YELLO W
SUBWO OFE R GRE Y
IGNIT ION S WIT CH(B+ )
MEMORY BACK-UP(B +)
GROUN D(B -)
AUTO AN TENNA
FRONT
LCH SPK .
REAR
LCH SPK .
RED
YEL LOW
BLA CK
BLU E
FUSE
WHI TE
WHI TE/BL ACK
GRE EN
GRE EN/BL ACK
PIN K
LIG HT GREE N
GRE Y
GRE Y/BLA CK
VIO LET
VIO LET/B LACK
KEY GROUND (BL ACK)
KEY 1(BROW N)
KEY 2(WHIT E)
(B+)1 2V
REAR CA MER A SWITCH
(B-)PARKI NG BR AKE
FRONT
RCH SPK .
REAR
RCH SPK .
Note:
the earth connectio n cable (parking brak e B- ) must be connected in or de r for
pictures to be played b ack to the monitor. If the c ab le has not been correct ly
connected, the mess age “PARKING BRA KE” appears on the moni to r.
Page 7
Page 8
Page 9

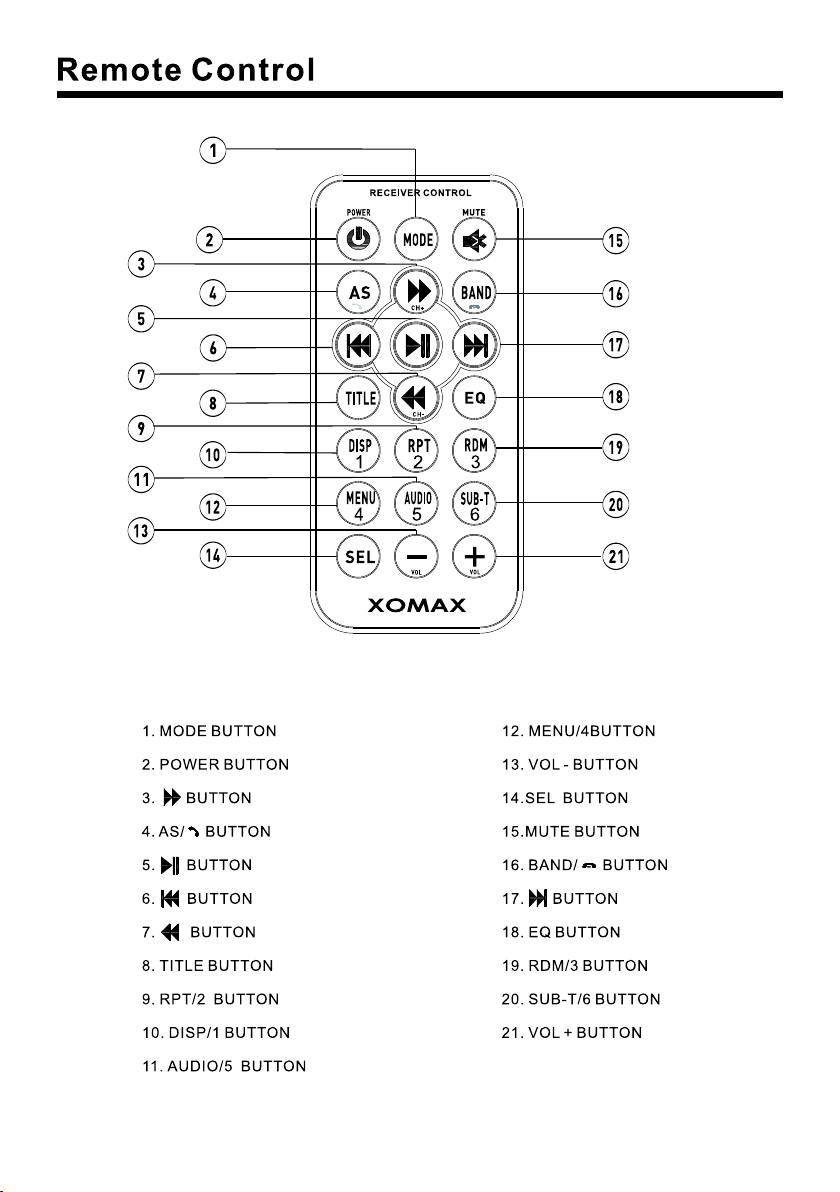
Remote Control
Preparing the Remote Control
Insert ing the Battery
1.First push to ins id e as the direction indi ca ted by the arrow (See )An d then
Remove the batter y ho lder as the direction i nd icated by the arrow (Se e ).
2.Replace the batte ry Set a new battery prop er ty with (+)side up as i ll ustrated
(See ).
3.Insert the batt er y holder. Push in the hold er t o the original positi on(See ).
3
1
2
4
Using th e Re mote Control
Face the remote con tr ol towards the player f ro nt face IR mark (remo te c ontrol signal
receiver).
Operation angle: Abo ut 30 degree in each the di re ction of the front of the I R mark.
Changing of the view angl e on mu lti-angle Digital Video media.
Note :
The lithium cell in t he b attery compartmen t of remote control has b ee n secured for
transport with a . Before initial us e pl ease remove this plas ti c so that the
remote control is rea dy for operation .
plasti c
Page 10

Basic Operation
Main Menu Operation
In many modes, touc h th e icon
or touch the range to e nt er the
main menu, the messag e like following
as below.
(2)
(1)
1. POWER icon
In any modes, touch t he P OWER icon
to switch the unit off .
2. When the unit is pow er o n, tap to turn
off the displ ay a nd the unit still wor k,
tap anywhere of the d is play to turn on
the display again.
3. SETUP icon
Touch to enter th e SE TTING mode,
the message will disp lay as follow :
Touch the “ ” section on th e
setting menu, tou ch t he “ / ”
ranges to select the ad justment item,
Touch the “ ” icon to retur n to t he
previous playback .
GENE RAL
CLOC K
AUDI O
VIDE O
(3)
ADJUSTABLE I TE MS:
GENE RAL
ANIM ATION 2 MI NUTE
KEY BE EP ON
DISC . ..
RADI O ...
General s etup in terface 1
GENE RAL
BLUE TOOTH O N
WALLPA PER ...
ABOU T ...
General s etup in terface 2
ANIMATION
In RADIO mode, you ca n ch ange the
playing time of anima tion among of
“OFF, 10S, 30S, 1M,90 S, 2 M, 3M and 4M ”.
Note:
Please set the playin g time of the
animation to “ 10S ” fo r th e first, when
you turn the unit on .
KEY BEEP : ON or OFF.
Disc set up as follow:
DISC
FORM AT AUTO
TV TYP E 16:9
RATIN G ADULT
Setup int erfac e 1
LANG UAGE
ILLU MINATI ON COLO R
CALI BRATIO N
Setup int erface 2
FORMAT
This player is capabl e of playing discs
recorded in either PAL or N TSC formats.
Make the selection ba sed on whether
you are connecting th e unit to a PAL TV
or an NTSC TV. You can al so set the unit
to AUTO (auto se le ct). The disa dv antage
to auto select is tha t ea ch time you turn
the unit on it checks t o se e what kind of
monitor is connecte d, which causes a
Page 11

Basic Operation
small delay and some fl ic kering of the
display image which y ou m ay find
unpleasant.
TV TYPE
16: 9
4:3 P an Scan
4:3 L etter Box
This is to select the a pp ropriate TV
aspect (4:3 or 16:9 ) ac cording to the
connected TV se t.
Normal/PS (For 4: 3 TV )
Played back in the PAN & SCAN style.
(If connected to wi de -screen TV, the
left and right edge s ar e cut off.)
Normal/LB (For 4: 3 TV )
Played back in LETTER B OX style.
(If connected to wi de -screen TV, black
bands appear at top and b ottom of the
screen.)
Wide (For 16:9 TV )
Select when a wide-sc re en TV set is
connected
RATING
Select to turn Pare nt al Control on or off.
The factory defau lt p assword is 1234.
(The password must be u sed to make
changes to the Pare nt al Control
menu below .)
Key in “1234” an d then turn to rating
then you can settin g as f ollow:
KID SAFE -> G -> PG -> PG-1 3
-> PG R -> R ->NC-17 -> ADULT
RADIO
ST/MONO: touch to s el ect stereo or mono.
LOCAL: touch to sel ec t local or distant.
REGION: touch to se le ct radio frequency.
BT
Touch to select BT fu nction on or off.
WALLPAPER
Touch to select wallpap er .
ABOUT
Touch to show the version i nformation.
CLOCK SETUP
Touch the CLOCK to adjust t he time and
time format.
CLOC K
HOUR 1 2
MINU TE 36
FORM AT 12HR
AM PM
clock s etup in terfa ce
AUDIO SETUP
Touch the audio to turn to au dio quality
adjustment.
BASS
TREBL E
SUBWO OFER .. .
EQ USER
AUDIO
audio setup interface1
LOUD NESS OFF
FADER /BALA NCE ...
AUDI O
audio setup interface2
TREBLE: -7 to +7
Adjust treble level .
BASS: -7 to +7
Adjust bass level .
SUBWOOFER: touc h to a djust
subwoofer on or off.
Page 12

Page 13

Touch Screen Operation
RADIO OPERATION
Listening to Radi o
Touch the RADIO ICON in h om e menu
to enter the RADIO mo de . In radio mode,
tap icon to adjust th e br ightness for
the display .
Briefly touch “ ” to de cr ease frequency
by one step of channel sp acing.
Automatic Searc h
During Radio mode, to uc h and hold
(for more than 2 seco nd s ) either “ / ”
ICONS to start sear ch f or a radio station
automatically.
To tune in strong-signal FM
Statio n only (LO/DX function)
In radio mode, LOC
remote control to select
select LOC/DX
Long-distance tra ffic news.
Press button on the
or tap icon
mode of Local and
Storing and Listening to a
Memory Station
Settin g Memory
87.50
90.10
98.10
101.7 0
107.9 0
100.8 0
Select ing The Frequency Band
Touch the screen of “ BAND ” se ct ion
repeatedly to sel ec t the band , the
message will show in tu rn :
FM1 FM2 FM3
AM2(MW2)
AM1(MW1)
When an FM s te reo broadcast
is hard to r ec eive
Press ST/MO butto n on t he remote
control to select the M ONO or STEREO
mode .
Start Se arching For a Station
Manual Search
During Radio mode, br ie fly touch “ ”
to increase frequen cy by one step of
channel spacing.
With this system, a t ot al of 30 stations
can be stored in the memo ry of six
buttons. Each ban d st ores up to six
preset stations . The stations mi gh t be
FM1, FM2, FM3, AM1(M W1 ), and
AM2(MW2) band.
The operation is as bel ow :
- Store in Memory
>S elect the frequency b an d
>S elect the station
>Press and the statio n until it show
the frequency band yo ur select.
- Retrieve a preset sta tion
Touch the 1-6 ranges brie fl y to retrieve
a station which had b ee n stored in the
memory in advance the c hose number
is shown on display .
Page 14

Touch Screen Operation
Automatic Memory Storing &
Program Scanning
Automa tic Preset Setup
In Radio Mode, touch an d keep (for more
than 2 ’ S) t he screen of “ ” range to
active automati c st ation storage.
The radio searches wi thin the current
frequency band, e.g . FM , fo r th e
3
stronger signal lev el until the search
cycle has finished . The six strongest
stations are then a ll ocated to the
corresponding sto ra ge locations .
Then the station of t he f irst storage
location is set .
Scan Fun ction
In Radio mode, briefl y touch the “ ”
section on the touc h sc reen , the radio
briefly plays all the p reset stations of the
frequency band .
RDS FUNCTION
REG FUNCTION
at certain times so me s tations divide up
their programs into r egional programs
with varying conten t .
REG ON : the message “REG O N” will
appears in the displa y for a few seconds .
Note :
- the display capacit y is limited . It is
possible that in th e do uble display mode
some segments of the di splay are deleted .
- the function REG ON p re vents the
radio from switch in g to alternative
frequency which hav e a di fferent reg io nal
program content .
REG OFF : the program i de ntification(PI)
of the regional progr am is ignored during
the search for an alter native frequency
(AF) or a program ide nt ification (PI) .
RADI O
RDS PI M UTE
RDS TA OFF
RDS AF OF F
Select RDS REGION AL to turn RD S
function on or off.
In home menu, then to uc h the “ ”
ICON to enter the set m od e, the
message in the displa y :
RADI O
ST/M ONO STE REO
LOCA L DX
REGI ON EURO PE
RDS RE GIONA L ON
ADJUSTABLE ITEMS:
REGION SET
Touch to switch the regio n area as:
EUROPE, USA, AMERICA N 1,
AMERICAN 2 and OIRT .
PI SET
Touch to change between P I MUTE and
PI SOUND .
PI MUTE / PI SOUND
(only for r adio op eration)
f you are in an area where tw o program
I
identificatio ns ( PI) overlap, you can
select the option P I SO UND and
PI MUTE for playbac k of t he sound.
Alternate switch in g of the program
identificatio n sh ould be avoided .
PI SOUND :
I
f switching neve rt heless occurs the
sound of another st at ion is heard for
less than one second .
Page 15

Touch Screen Operation
PI MUTE :
the sound of anothe r st ation is
suppressed .
TA Traffic Announcement
(Priority For Traffic Informati on )
In Radio mode, touch th e cursor button
to switch the TA functio n ON and OFF .
When the TA function is activate d, t he
TA symbol appea rs i n the display .
During radio operat io n in one FM
frequency band the se arch for a traffi c
announcement stat ion is started
automatically (TA SEEK) .
If an FM station is bei ng r eceived which
transmits the lat es t traffic ann ou ncements from time to ti me , the TP di sp lay
lights up.
When the TA function is switched o n ,
the FM traffi c automatically int er rupt
CD operation (the wor d TRAFFIC
appears in the displa y) .
The volume level is inc re ased to the
minimum value for the t ransmission of
traffic ann ou ncements.
After the traffic announcement s ha s
finished, the progr am that was
previously runnin g is resumed.
Touch the AF s ection on touch scree n or
swing and keep the SEL knob in the
TA/AF direct io n for about 2 seconds ,
the AF function is activ ated. The AF
symbol appears in the d is play .
When the AF function h as b een switched
on, the radio continu ously tests the
signal strength of th e AF frequency .
The test interval f or e ach AF frequency
depends on the signal s trength of the
current station a nd v aries from a few
minutes in the case of we ak signals.
Whenever the new AF freq uency is
stronger than the s ta tion that is currentl y
tuned in , the radio swit ched to this
frequency for a sho rt t ime for a short
time and the message
“NEW FREQUENCY “ is displayed for
one or two seconds.
PTY FUNCTION
In Radio mode, touch sc reen of “PTY”
range to select the P ro gram type .
PTY Selecti on of the program type
besides the stati on s name, some FM
stations also tra ns mit information on th e
type of program. This information ca n
be displayed by your ca r radio .
Interruption of t he TA Function:
If you would like to in te rrupt the current
traffic ann ou ncement, touch th e TA
section on screen bri efly . This does
switch off th e TA mo de .
AF FUNCT ION
(Alternative Fr eq uencies)
In Radio mode, touch th e cursor button
to switch the AF f unction ON and OFF .
AF is a function that w or ks with the help
of RDS (Radio Data Sy st em) and can
only be used with FM st at ions. The rad io
searches in the backg ro und for the best
frequency recepti on of the station that
has been tuned into .
Examples of such ty pe s of program are :
SPORT NEWS POP WEATHER .... ..
With PTY func tion you can specific al ly
select stations t ra nsmitting a particu la r
type of program. Touch the PTY on sc re en
repeatedly to cal l up t he PTY select io n
menu. The mes sa ge “PTY SEEK” t he n
appears briefly in th e display .
When PTY has be en s elected the radio
start searching f or c orresponding PTY
information and sto ps when the PTY
information has bee n found, “NO PTY”
appears in the displa y. If the PTY
information being s earched for no longer
exists, the PTY function automat ic ally
switches to norma l mo de .
Page 16

Touch Screen Operation
BASIC OPERATION
Pause (s till picture)
Touch the “ ” section on to uc h
screen during playb ac k will stop
play temporary, touch it again to
return the normal pla yback .
Rapid Fo rward/Rapid Reverse
During media playba ck , touch the
screen of “ / ” range the
speed of rapid forwar d/reverse
changes according t o the disc as
follow:
Skippi ng Track
During media playba ck , Touch the
/ section on the touc h sc reen
to skip to next/bac k on e track.
Zoom Fun ction
Touch the button repeat edly,
the displayshow as “z oom 2,
zoom 3, zoom 4 , zoom ½ ,
zoom 1/3, zoom 1/ 4 , zoom off . ”
Use the keys ( / / / on
remote control to m ov e the enlarged
picture .
SELECTING PLAY MODES
During the media play ba ck, select the
“RPT, RDM ” to select your fa vour
play mode.
1). REPE AT FUNCTION
FOR MP3 :
Tap the icon or press the R PT button
on the remote contr ol ) to select REPEAT
mode as follows :
2). RDM( RANDOM) FUNCTION
During media playba ck , touch screen
of “ ” section ( press th e RD M button
REP EAT ONE REP EAT FOLD ER( or DI R)
REP EAT OFF
REP EAT ALL
on on the remote contro l to play in random.
Each play mode the orde r is different .
Touch it again to cancel th is function .
Note : in random mode , th e button
is not available .
ON-SCR EEN DISPLAY FUNCTION
screen or press the D IS P on the
remote control, i t wi ll display
the following as be lo w :
Note: touch the scr ee n or press the DISP
on the remote contr ol a gain to cancel
the OSD informati on .
Example for Movie o r PH OTO .
When it is on, it will di sp lay the
information such as :
During playback, to uc h the
OS D
F 001/ 003 T 001 /001
Search (GOTO)
For Movie/Photo :
Touch the screen as show or p re ss the
GOTO button o n remote control;
F 001/003 T 00 1/0 01
the screen will displ ay the following
message :
Touch the to select the y ou r
adjustment item , th en select the item
your favour by touchi ng the numberic
buttons , then touc h th e OK button
to confirm .
Page 17

Touch Screen Operation
BT Operation
1. Pairing and Connec ting
Prior to using the BT device named BC_HF _VG04 as a hands-free s ys tem
for a BT-enabled mo bi le phone for the first ti me , you must
connect them
Press the BT ha nd s-free icon or press
the pair button on th e re mote control
to turn to BT mod e as right:
* During the use of the B T de vice named
BC_HF_VG04” as a h an ds-free system
“
for a BT- enabled mob il e phone; Switch
on the BT mode of y our mobile phone; the n s BT device
and enter it; BT device car
BC_HF_VG04 , select it and enter it ; then i
will be displayed t will pair and
with the BT dev ic e BC_HF_VG704 of the ca r A/V system, Confir m it ,
connect
then the frame of the B T logo will light all t he time.
When connect , the audio of the mobile p hone transfers
* finishi ng p airing and ing
to the car audio system w henever a call is made or r ec eived
or the mobile phone
plays music
2. BT PHONE
In power off mo de , a incoming call or call o ut to wake up this unit and t ur n to BT
hands-free mode, wh en the phone call ended t he u nit back to power off mode.
as follows:
elect the item to fin d a
When it finds the of the A/V system, the nam e
.
pair and
1) Make a call
(1) Dial with mobile ph one directly;
Dial wit h BT Phone or on t ouch screen;
(2)
a. Touch the BT PHONE icon in home men u or t ouch the icon during pl aying
to turn to BT PHO NE interface,the ic on s function as follo ws :
: Tap to mu te the sound that the
subscriber you dial ed can’t hear
your vioce, tap aga in t o return normal.
& : Same as VOL+ and VOL- o r
VOL kno b.
: Tap to tu rn to dial interface.
: Tap to ch eck the outgoing call .
: Tap to ch eck the incoming call .
: Tap to ch eck the missed call.
: Tap to tu rn to the contacts.
: During talk, tap to c ha nge the
sound from the phon e to t he unit.
: Tap to do d isconnection.
Page 18

Touch Screen Operation
Tap a icon such as to show as fol low:
CONTACT S
b. Use the number icons t o input your desired ph on e number;
* When inputting a wr on g digit, use icon or < butt on to delete it.
c. After finishin g in putting, touch icon o r press button on con tr ol panel
to dial out.
2) Redial last dialed p ho ne number
Touch icon to dial out th e la st dialed phone numbe r.
3) Answer a call
During an incoming ca ll , the incoming tele ph one number displays i n th e the BT
PHONE interface . If y ou want to receive it, to uch icon or press butto n
on remote control ; if y ou want to reject it, t ou ch icon or press button
on remote control .
4) Ending a call
When ending a call, t ou ch icon or use button .
: Tap to do wnload the contacts f ro m
your phone.
: Tap for p hone number search.
& : For page turning.
5) Switch the audio b et ween the unit and your de vi ce
During phone hands-free syst em o f the car A/V system,
touch icon or press b utton on remote contr ol t o switch the audio
between the unit an d yo ur device.
6)
Adjusting the volume d uring a call
During phone and icon or
talking, use VOL kno b or VOL+ and VOL-
; use the MUTE button t o mu te sound
buttons to adjust v ol ume level .
* * / # icons and buttons
they perform as * / # but to ns on mobile phone.
talking using the BT
Page 19
Touch Screen Operation
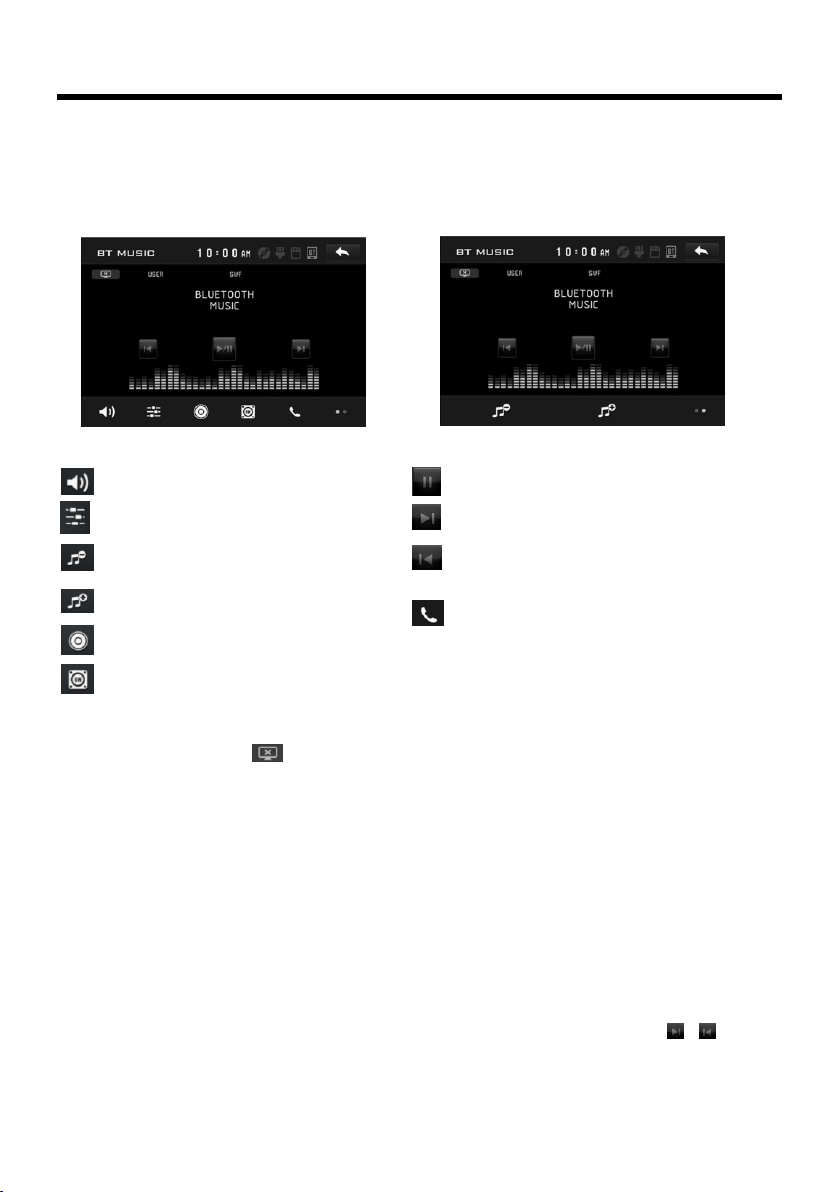
3 BT MUSIC
.
1 Touch BT MUS IC in home menu or pressi ng MODE button can pop up B T
)
MUSIC interface a s fo llows:
Mute function
To select the Equalizer m od e
To decrease the volume le ve l
To increase the volume le ve l
Loudness Function
Subwoofer Functio n
In BT music mod e, tap icon to adjust the b ri ghtness for the dis pl ay .
) using your mobile pho ne w ith BT function to audio if it
2 When the play , is
paired and connecte d to the unit,
into .
The BT de vice of the car A/ V system support A2DP, w hich enables the user t o
stream audio from t he ir device.
3 he device o f supports AVRCP,
) T BT the car A/V system so these icons on the
BT Music inte rf ace except BT Mus ic and their buttons on contro l
panel or on remote cont rol are available for a ud io/video playback o f yo ur mobile
phone during playba ck . But n for / icon,
and the function of r es ume playback after pa us ing or stopping is avai lable only
for some mobile phone
the audio of the mobile p hone will change
the car A/V system
o fast forward/ba ck ward functions
.
Play/Pause the play ing
To skip the next track
To skip the previous trac k
Tap to turn to BT PHONE mode.
(After pair ing and conne cting a phone
with BT fun ction).
corresponding
Page 20

Touch Screen Operation
AUX IN ope ra tion
An external AV system can use th e ca r
AV system as mon itor and amplifier.
1. Use an AV cable to make the car AV
system and the exte rn al AV system
connected through t he AUX IN jack on
control panel of th e ca r AV system and
the AV Ou t jacks of the external AV system.
AUX IN
AUX IN
MOD
VIDEO IN (ye llo w)
RCH IN (red)
LCH IN (whit e)
2. In radio mode, tou ch t he screen
of “ ” ICON to enter the ma in m enu,
touch the “ AU X ” IC ON to enter the
AUX IN mode .
In AUX mode, tap icon to a dj ust
the brightness fo r th e display .
AUX INTERFAC E 2
As the interface sh ow, h ere is only the
audio output, now t ap t he icon,
the picture of the au xi liary input video
show on the display and t ap the display
again to turn to audi o mo de.
Now you can watch the vid eo from your
External video equi pm ent such as
Digital Vid eo p layers, computers , etc.
The function of the i co ns as follow:
Tap to mute the sou nd .
Tap to select EQ as t he s ame on the
remote control.
Loudness Functi on .
Subwoofer Functio n.
Tap to ad just audio volume.
Tur ni ng pre-switching fo r tr affic
announcements on an d off.
Switching on and off an
Alternative fre qu ency.
AUX INTERFAC E 1
Tap to turn to BT PHO NE mode.
(after pair ing and conne cting a mob il e
phone with BT f unction).
Page 21

Page 22

Touch Screen Operation
STEERING WHEEL CONTROL
Touch the SWC icon as fol lo w to turn to
steering wheel cont rol .
During setting, tou ch the icon to
turn to home menu.
Then tap Assign and tap th e button 1
and then select the ico n as the picture
show, the icon show in but ton 1 position.
After selection t ap c onfirm and back to
home menu that means se lect finish.
The function of the i co ns as follow:
Touch t o begin function save .
After selection to uc h to confirm
operation.
Touch t his icon to cancel the
input and resume lo ad .
Before operation, p ress the icon
to cancel the origina l input that to
set your favour.
There are 2 KEY for n o more than 12
buttons to select .
For first time use th is f unction, input a
key (such as 0.38,0 .3 8 is a magnitude
of voltage, accor di ng to your car )
through the steer in g remote and
show in button 1 positi on.
0.3 8
High-z means high -i mpedance.
Tap to re duce the magnitude
of voltage. This key for avoid
that voltage is too h ig h that the
car system can not di fferentiate
the input key set for s om e car.
Low-z means low-i mp edance.
Tap to in crease the magnitud e
of voltage. This key for avoid
that voltage is too l ow t hat the
car system can not di fferentiate
the input key set for s om e car.
Page 23

Page 24

Troubleshooting
Before going throug h the check list, check w ir ing connection. If an y of the problems
persist after che ck l ist has been made, cons ul t your nearest servic e de aler.
SYMPTOM CAUSE SOLUTI ON
If the power supply i s pr operly
connected to the ca r ac cessory
terminal,switch t he ignition key
to "ACC"
Replace the fuse
Remove the disc in the pl ayer,
then put a new one
Insert the compact di sc with
the label facing upwa rd
Clean the disc or try to pl ay a
new one
Cool off or unt il t he ambient
temperature retur n to normal
Please switch to corr ect color
system from menu
Make proper conne ction
according to wire connection “ ”
For safety reason s no v ideo/
images are displaye d wh ile the
vehicle is moving.
Engaging the parkin g br ake will
cause images to be disp la yed.
Please choose a prope r co lor
system.
Change the disc
Change the disc Recor d JP EG
files using a complia nt
application
Press the RESET button.
Front panel is not pr op erly fixed
into its place
Insert the antenn a ca ble firmly
Select a station ma nu ally
No power
Disc can not be
loaded or ejected
Video/ima ge
appears
black-white
No video/image
appears
No color in picture
JPEG disc can
not be played
back
The operation keys
do not work
The radio does not
work
The car ignition swit ch is
not on
The fuse is blown
Presence of disc insi de the
player.
Inserting the dis c in r everse
direction
The disc is extremely d irty
or defective
Temperature inside th e ca r
is too high
The color system is
set incorrectly
The unit is not conne ct ed
to the parking brake
detection switc h
The parking brake is no t
engaged
The disc form at i s not
according to the TV-set
used (PAL/NT SC )
No JPEG files are recor de d
on the disc.
JPEG files are not reco rded
in a compliant format
The built-in microc omputer
is not operating prop erly
due to noise
The antenna cable is no t
connected
The signals are too wea k
Made
IRU67(/0XOWLPHGLD*PE+
 Loading...