

Page 1
Instruction Manual
Car 3.0 inch MP5 player
Model No.: XM-VRSU307
I. Basic Operations
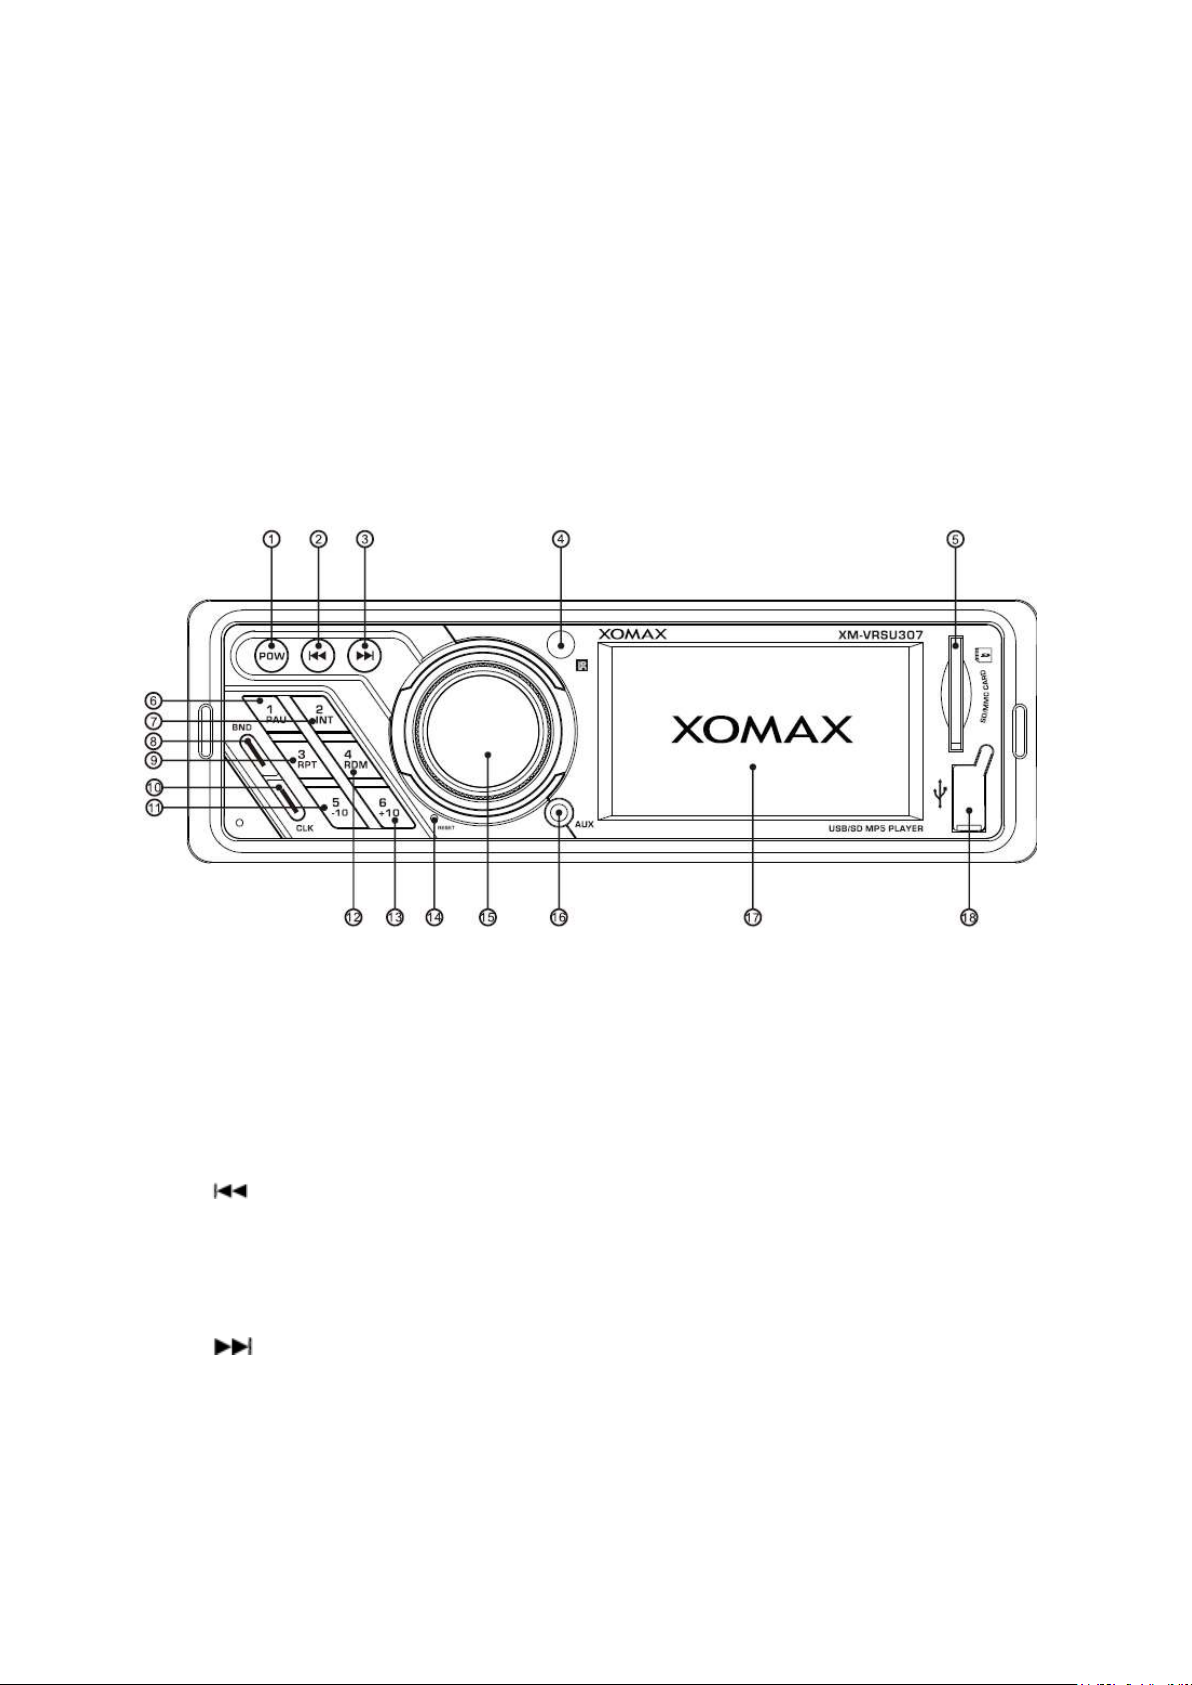
1. POW button
Under power off station, short press for power on.
Short press under working state can change the playing mode :
AUX—Radio—SD—USB (If the u disk and SD card are available, long press is
power off.
2. button
Under the radio mode, short press to automatically search the stations backwardly,
long press is backwardly searching the states by hand. Under U disk and SD
displaying mode, short press to play last song, long press to backward displaying
quickly.
3. button
Under the radio mode, short press to automatically search the stations forwardly, long
press to search the stations by hand forwardly. Under U disk and SD displaying mode,
short press to play next song, long press to forward displaying quickly.
4. Remote receiver
Receive the signal release from remote control.
Page 2

5. SD card slot
Insert the SD or MMC card, the system will play it accordingly.
6. 1/PAU
Under the radio mode, short press this button to choose the station number, long
press to save the present station to this button.
Under U disk and SD displaying mode, Short press this button will stop playing,
Short press again will play music again.
7. 2/INT
Under the radio mode, short press this button to choose the station number, long
press to save the present station to this button.
Under U disk and SD displaying mode, short press this button will look-through the
songs (each song play 10seconds).
8 . BND button
Under the radio mode, short press to change the band as: FM1-FM2-FM3. Long
press can scan and save stations automatically, when finish the search, will enter
into the radio reviewing function (every station play in 10 seconds) Remark: Before
search the stations automatically, please make sure AF OFF)
Under U disk and SD displaying mode, short press to change the television system
(PAL or NTSC)
9 . 3/RPT
Under the radio mode, short press this button to choose the station number, long
press to save the present station to this button.
Under U disk and SD displaying mode, short press this button to repeat function
ON/ OFF
10. CLK button
Short press can show the present time. Long press to enter into time setting,
rotating the knob to adjust the data and short press the knob continuously to adjust
Year—Month—Date—Hour—Minute—12/24 hours—Format. (Remark: The number
will in red when you are setting it)
11. 5/TYPE
Under the radio mode, short press this button to choose the station number, long
press to save the present station to this button.
Under U disk and SD displaying mode, short press to -10 songs, long press to
switch the type of music, picture or video
12. 4/RDM
Under the radio mode, short press this button to choose the station number, long
press to save the present station to this button.
Under U disk and SD displaying mode, short press this button to random function
ON/ OFF
13. 6/10+
Under the radio mode, short press this button to choose the station number, long
press to save the present station to this button.
Under U disk and SD displaying mode, short press to +10 songs, long press to
switch the channel ( Left—Right—Stereo)
Page 3

14. Reset
To reset the player.
15. Rotary Volume knob
Volume control: Turn the rotary Volume clockwise can turn up the volume, turn
the rotary Volume counter-clockwise can turn down the volume.
Under radio mode: Short press the volume knob continuously to adjust menu as
following : BAS(-7—+7) →TRE(07—+7) →BAL(10L—10R) →FAD(10R—+7)
→Loud(ON/OFF) →EQ(FLAT, CLASS, POP, ROCK, JAZZ) →LOC(ON/OFF)
→STEREO/MONO→AF (ON/OFF) →TA(ON/OFF) →
PTY(MUSIC,SPEECH,OFF) →REG(ON/OFF) →EON(DX/LOC→
MASK(DPI/ALL) →LED(A,B,C,D) adjust each menu by rotating the knob.
Under U disk and SD displaying mode: Short press the volume knob continuously
to adjust menu as following : BAS(-7—+7) →TRE(07—+7) →BAL(10L—10R)
→FAD(10R—+7) →Loud(ON/OFF) →EQ(FLAT, CLASS, POP, ROCK, JAZZ)
→LOC(ON/OFF) →STEREO/MONO→BRI(0-50) →CON(0-50) →CHR(0-50)
→ SHA(0-7) → AF (ON/OFF) → TA(ON/OFF) → PTY(MUSIC,SPEECH,OFF)
→REG(ON/OFF) →EON(DX/LOC→MASK(DPI/ALL) →LED(A,B,C,D) adjust
each menu by rotating the knob.
Remark:
1.When EQ ON, you can’t adjust the BAS and TRE.
2. When AF OFF, you can’t find REG function
3. LED D mean to change the color (red-blue-purple) automatically in 20s.
No matter which mode, long press the volume knob can enter into the main face, rotate the knob
to choose which mode you prefer, then press the knob to enter. For setting mode, rotate the knob
to choose Sound setting→Quality setting→Time setting→radio Area setting( China, Europe,
Russia, America) short press the knob to enter each setting, then rotate the knob to adjust the value
and short press to next option. Long press to back to last surface.
16. Aux In
Outer connection signal input.
17. LCD Display
Display the channel of radio or the playing information
18. USB Slot
Insert the USB,the system will play it accordingly
II. Technical Parameters
Tuner Section:
Frequency Range-----------------------------------------------------------87.5MHz-108MHz
Intermediate frequency---------------------------------------------------------------10.7MHZ
Signal to noise ratio (S/N)----------------------------------------------------------------≥50dB
Play Section:
Signal to noise ratio (S/N)----------------------------------------------------------------≥50dB
Channel Separation (1KHZ) ------------------------------------------------------------≥50dB
Voltage Harmonic Distortion--------------------------------------------------------------≤5%
Page 4

Frequency Response ---------------------------------------------------100Hz-10kHz (+6dB)
Amplifier Section:
Out put----------------------------- ---------------------------------------------speaker out put
Speaker Impedenc ---------------------------------------------------------------------4Ω-8Ω
Power source---------------------------------------------------------------------------12 V DC
car battery (the negative pole connect ground, see on the unit in detail)
III-Cautions
When replacing fuse, please select the fuse of same specification, do not
replace it with others.
IV-Installation Diagram
1 .Before install the main unit, please place the main unit at desired position,
connect the speaker wire and power wire for test use.
2. After the working effect of the main unit is ideal, fix the main unit.
。Install the main unit
I. Install the support on the instrument panel of the car, bend the clamp
of the support.
II. Connect the power wire and speaker wire, fix the fixing piece on the car.
III. Insert the antenna plug, push the main unit into the support, and tighten
the fixing nut of the fixing piece.
。Disassemble the main unit
Insert two disassembly key s into the left and right gap, make the keys hook
the main unit, pull out it to remove the main unit from the support, then
Page 5

disassemble the connection wire and unplug the antenna plug.
V. Wiring Diagram
Brake Line (Orange): to connect with the hand brake, video can be watched when you
pick up the hand brake.
Green wire: Car rear viewing line
IX. Remote Control
Same operation as the device button.
Page 6

Fault
Reasons
Solutions
LCD doesn’t display
1.Yellow wire is not connected
with battery+
2.Fuse of red wire is open
3.The panel connector is dirty
1 .Assure yellow wire is
connected with battery+
2. Replace fuse
3. Clean the panel
connector with absolute
alcohol
No sound
1.No power supply
2.Speaker wire is open circuit
3.SD/MMC card, U disk don’t
have song with corresponding
format.
4.SD/MMC card, U disk golden
finger is dirt which causes bad
contact.
1. Connect the power wire
2. Connect speaker wire.
3. Check the contents of
SD/MMC card, U disk.
4. Clean with absolute
alcohol
Low sound
(not clear)
1.Power internal resistance is
high
2.Antenna is bad contact.
Replace the power supply
Tighten the antenna plug.
Mono track
1.One channel of speaker wire is
open circuit
2.Amplifier integrated circuit is
damaged.
Connect speaker wire
Replace the IC of
amplifier
System down
Power supplier not stable
Long press the reset
button
X. Trouble and solution.
Note: Technical data is subject to change without prior notice.
 Loading...