

Page 1
LCD TELEVISION
LC-52R36
Page 2

CONTENTS
Safety precautions………………………………………………………………………..…
Alignment instructions …………………………….…….…………………………………
Working principle analysis of the unit……………………………………………………………..
Block diagram…………………………………..………………………………….…………
IC block diagram………………………………………………………………………..……
Wiring diagram …………………………………………………………………………….
Troubleshooting guide ………………………………………………………………..……
Schematic diagram…………………………………………………………………………
APPENDIX-A: Assembly list
APPENDIX-B: Exploded View
1
2
6
7
8
20
21
27
Page 3

Attention: This service manual is only for service personnel to take reference with. Before
servicing please read the following points carefully.
Safety precautions
1. Instructions
Be sure to switch off the power supply before replacing or welding any components or
inserting/plugging in connection wire Anti static measures to be taken (throughout the entire
production process!):
a) Do not touch here and there by hand at will;
b) Be sure to use anti static electric iron;
c) It’s a must for the welder to wear anti static gloves.
Please refer to the detailed list before replacing components that have special safety requirements.
Do not change the specs and type at will.
2. Points for attention in servicing of LCD
2.1 Screens are different from one model to another and therefore not interchangeable. Be sure to
use the screen of the original model for replacement.
2.2 The operation voltage of LCD screen is 700-825V. Be sure to take proper measures in
protecting yourself and the machine when testing the system in the course of normal operation or
right after the power is switched off. Please do not touch the circuit or the metal part of the module
that is in operation mode. Relevant operation is possible only one minute after the power is
switched off.
2.3 Do not use any adapter that is not identical with the TV set. Otherwise it will cause fire or
damage to the set.
2.4 Never operate the set or do any installation work in bad environment such as wet bathroom,
laundry, kitchen, or nearby fire source, heating equipment and devices or exposure to sunlight etc.
Otherwise bad effect will result.
2.5 If any foreign substance such as water, liquid, metal slices or other matters happens to fall into
the module, be sure to cut the power off immediately and do not move anything on the module lest it
should cause fire or electric shock due to contact with the high voltage or short circuit.
2.6 Should there be smoke, abnormal smell or sound from the module, please shut the power off at
once. Likewise, if the screen is not working after the power is on or in the course of operation, the
power must be cut off immediately and no more operation is allowed under the same condition.
2.7 Do not pull out or plug in the connection wire when the module is in operation or just after the
power is off because in this case relatively high voltage still remains in the capacitor of the driving
circuit. Please wait at least one minute before the pulling out or plugging in the connection wire.
2.8 When operating or installing LCD please don’t subject the LCD components to bending, twisting
or extrusion, collision lest mishap should result.
2.9 As most of the circuitry in LCD TV set is composed of CMOS integrated circuits, it’s necessary
to pay attention to anti statics. Before servicing LCD TV make sure to take anti static measure and
ensure full grounding for all the parts that have to be grounded.
2.10 There are lots of connection wires between parts behind the LCD screen. When servicing or
moving the set please take care not to touch or scratch them. Once they are damaged the screen
1
Page 4
would be unable to work and no way to get it repaired.
If the connection wires, connectors or components fixed by the thermotropic glue need to disengage
when service, please soak the thermotropic glue into the alcohol and then pull them out in case of
damage.
2.11 Special care must be taken in transporting or handling it. Exquisite shock vibration may lead to
breakage of screen glass or damage to driving circuit. Therefore it must be packed in a strong case
before the transportation or handling.
2.12 For the storage make sure to put it in a place where the environment can be controlled so as to
prevent the temperature and humidity from exceeding the limits as specified in the manual. For
prolonged storage, it is necessary to house it in an anti-moisture bag and put them altogether in one
place. The ambient conditions are tabulated as follows:
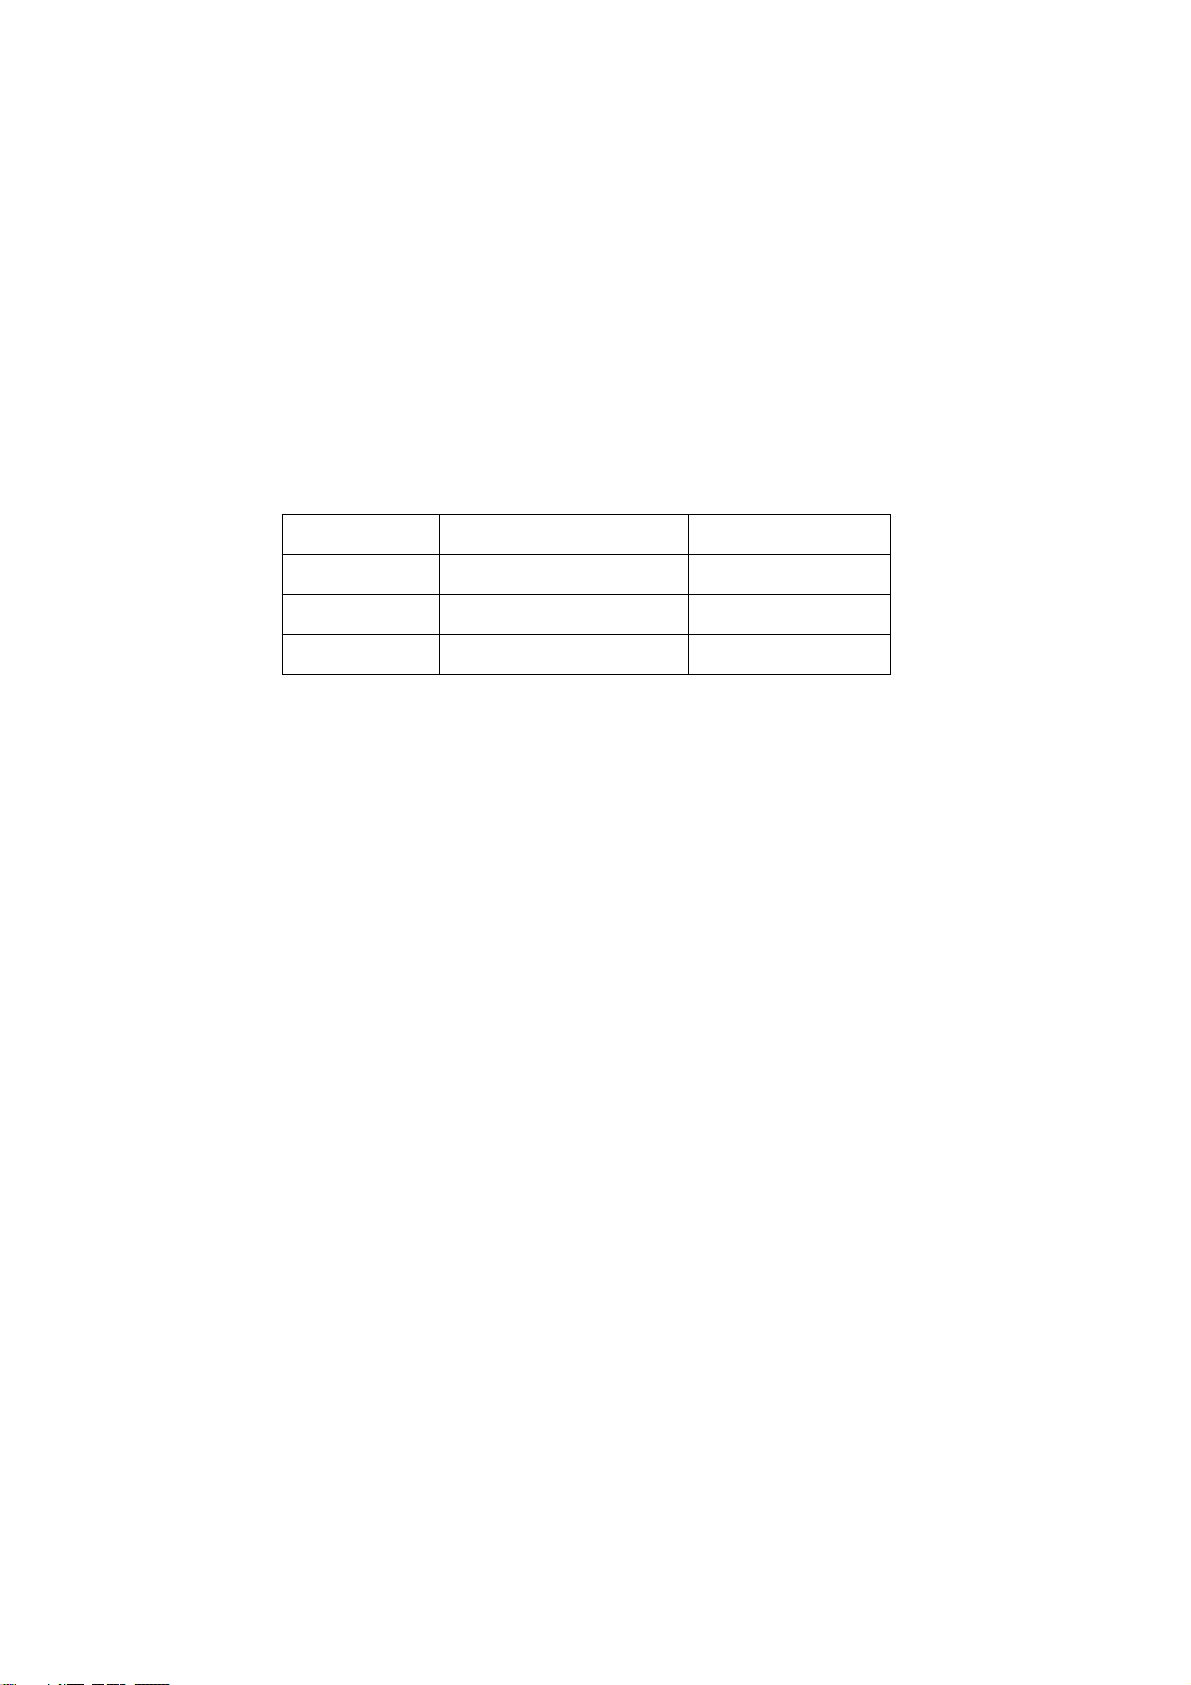
Temperature Scope for operation 0 ~ +50 oC
Scope for storage -20 ~ +60 oC
Humidity Scope for operation 20% ~ 85%
Scope for storage 10% ~ 90%
2.13 Display of a fixed picture for a long time may result in appearance of picture residue on the
screen, as commonly called “ghost shadow”. The extent of the residual picture varies with the
maker of LCD screen. This phenomenon doesn’t represent failure. This “ghost shadow” may remain
in the picture for a period of time (several minutes). But when operating it please avoid displaying
still picture in high brightness for a long time.
3. Points for attention during installation
3.1 The front panel of LCD screen is of glass. When installing it please make sure to put it in place.
3.2 For service or installation it’s necessary to use specified screw lest it should damage the screen.
3.3 Be sure to take anti dust measures. Any foreign substance that happens to fall down between
the screen and the glass will affect the receiving and viewing effect
3.4 When dismantling or mounting the protective partition plate that is used for anti vibration and
insulation please take care to keep it in intactness so as to avoid hidden trouble.
3.5 Be sure to protect the cabinet from damage or scratch during service, dismantling or mounting.
Alignment instructions
1. Test equipment
PM5518 (Video signal generator)
VG-848 (Signal generator)
CA210 (White balancer)
2
Page 5
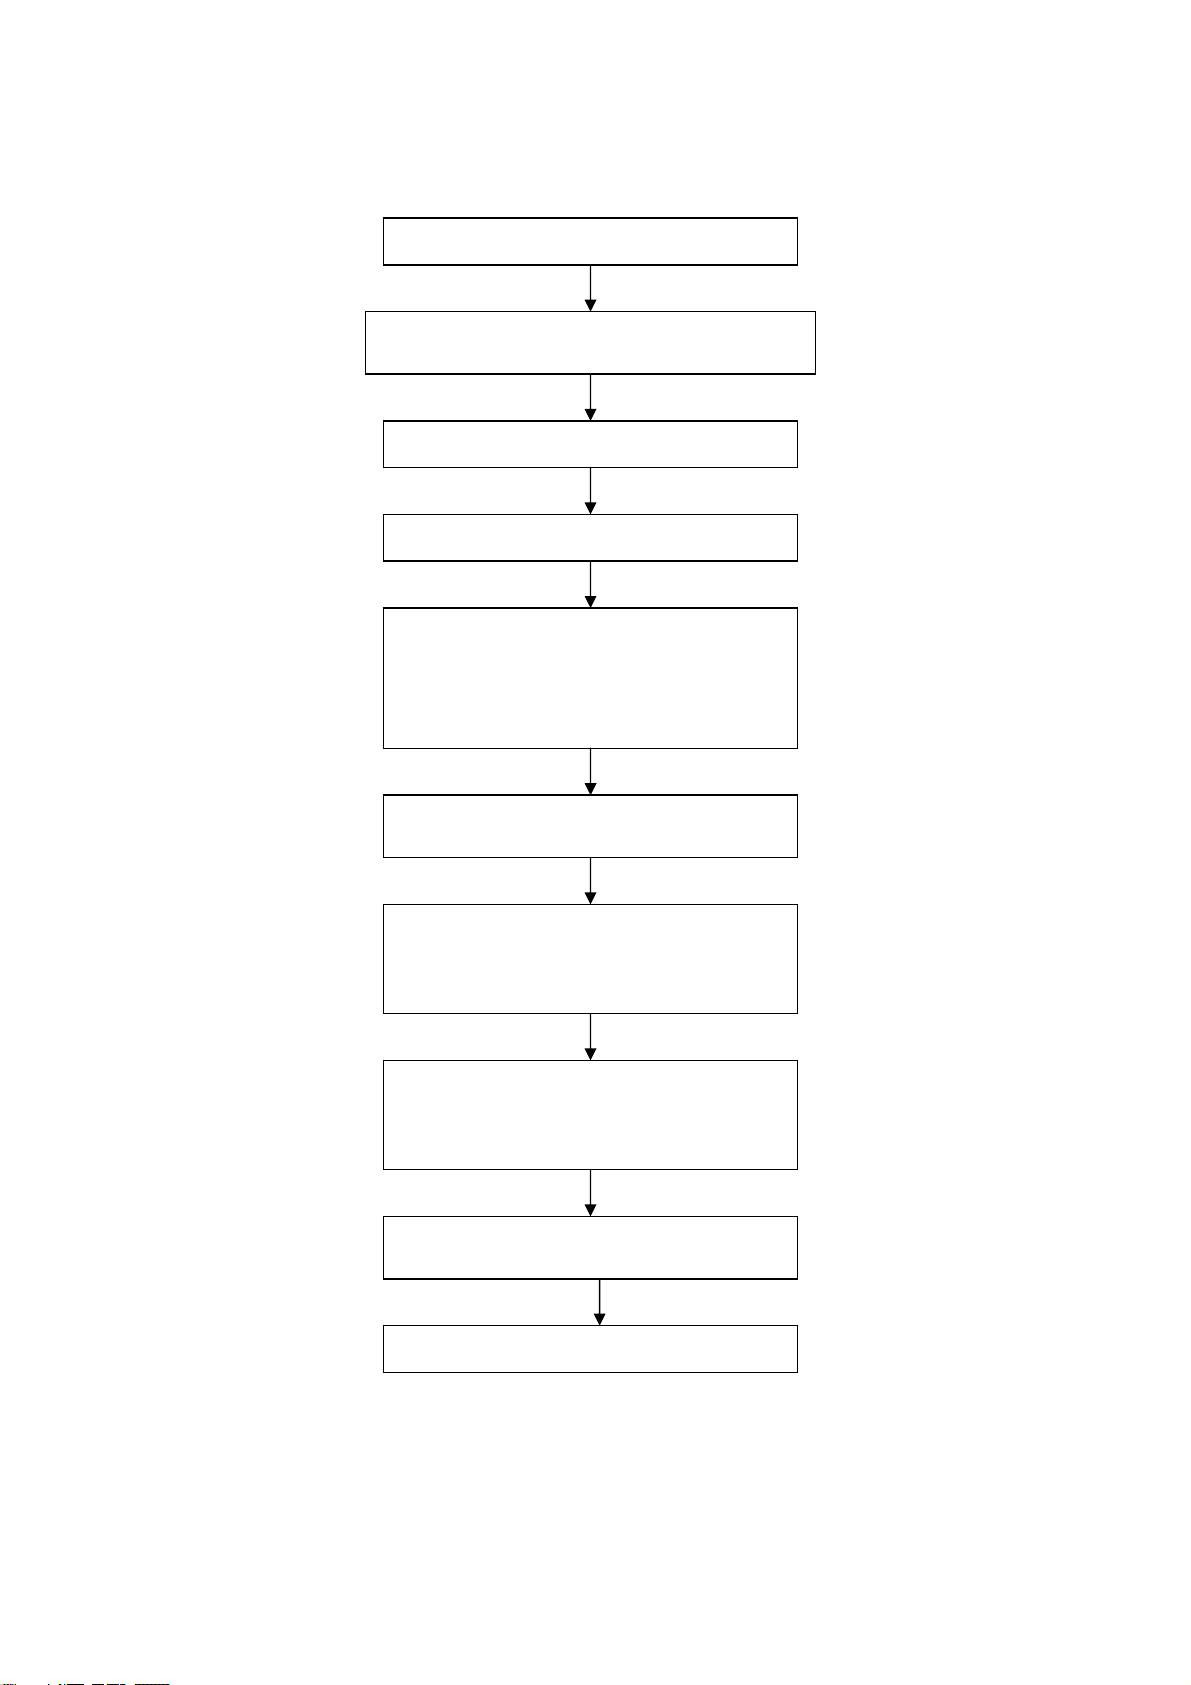
2. The alignment flow chart (see below figure)
Production of main board and analog board on the line.
Check DDC, HDCP KEY and FLASH
Check CPU board and analog board
Combined test for general assembly
Connect to central signal source; check if various
TV functions (station skipping, modulate quantity
control etc), check if the output of earphone and
speaker are normal.
Input AV/S signal and HDTV signal; check various
functions under AV/S terminal
Input VGA signal and check if display is normal in
the state of PC and various functions (analog
quantity control, line/field center etc.)
Input HDMI signal and check if display is normal in
the state of HDMI and various functions (sound
and analog quantity control).
Preset ex-factory
Check accessories and then packing
3
Page 6
3. Adjustment illustration
3.1 The unit adjustment
Connect all the boards according the wiring diagram, then power on and check the display.
3.2 The method for entering factory menu
Enter factory menu method: press the SOURCE→ 2→ 5→8→0 buttons one by one on the remote
control to enter factory menu. When the first line of the adjustment item is light, press the MENU
button to select item and press the DSP button to exit the factory menu.
3.3 EEPROM initialization
Enter the firs page of factory menu, adjust item OPTION-1 to 25, OPTION-2 to 5, select the
EEPROM Initial after, press the VOL+ button, then display the DOING, still the DOING disappear
and turn off the unit.
Note: option-1 and option-2 function as follows:
Option-1 Option-2
Bit4 0: RS232 can’t be controlled by the external unit
1: RS232 can be controlled by the external unit
Bit3 0: No memory function after power off for 10s
1: memory function after power off for 10s
Bit2,1 00: STANDBY
01: turn on
10: memory function of turn on
Bit0 0: without LOGO
1: With LOGO
0: Gammar On
1: Gammar Off
0:no signal noise wave of TV
1:no signal blue screen of TV
hold
0: Video and Graphic channel white balance no share
1: Video and Graphic channel white balance share
3.2 HDMI channel adjustment
Input the VG-848 TIME854(800X600/60Hz) and PATTERN920 8-LEVEL gray signal, enter the
factory menu2(white balance adjustment menu), adjust the third step and the seventh step.
Adjust R-offset, G-offset and B-offset item, still the third step color coordinate to (275, 285). Adjust
R-gain, G-gain and B-gain item, still the seventh step color coordinate to (275, 285). Repeat
adjustment R-offset, G- offset and B- offset item and R-gain, G-gain and B-gain item, still two step
gray to (275, 285).
Note: R-offset, G-offset, B-offset values must be an item value to 128 at least; R-gain, G-gain,
B-gain values must be an item value to 255 at least.
3.3 VGA channel adjustment
3.3.1 mode pre-set
Input the VGA signal of VG-848 (PATTERN 980:1 dot ON/OFF), select the TIME877 (720x400/70Hz)
signal, press auto-adjust button to all screen or adjust PC settings menu to auto correction.
Separate auto adjust for TIME885 (640x480/60Hz) and TIME854 (800x600/60Hz).
3.3.2 VGA channel auto color adjustment
Input the VG-848 TIME854(800x600/60Hz) and PATTERN920(GRAY 8 STEP(H)), enter the factory
menu1, select the AUTO COLOR after, press the VOL+ button to select AUTO COLOR.
3.4 YPBPR channel adjustment
Input the VG-848 TIME972(1080i/60Hz) and PATTERN976(64 GRAY & Color), enter the factory
menu1, select the AUTO COLOR after, press the VOL+ button to select AUTO COLOR.
4
Page 7

4. Performance check
4.1 TV function
Input center source signal to RF-TV terminal, enter search menu→auto search, check if the channel
is leak for auto searching.
4.2 AV/S and YPbPr terminal
Input AV/S and HDTV signal, check if the signal is normal.
4.3 VGA terminal
Input 640 x 480 @60Hz VGA format signal, check if the signal is normal.
4.4 HDMI terminal
Separate input HDMI and DVI signal; check the picture and sound is normal, check if the HDCP
function is normal.
4.5 check the sound channel
Check the speaker and headphone of each channel.
4.6 check the clock
Enter user’s clock setting menu, set the clock and calendar and power off, then power on and check
if the clock and calendar settings are stored.
4.7 light sensor function
Enter user’s picture menu, set “light sensor” to On and check if the brightness of picture changes
according to the ambient room light conditions
4.6 ex-factory setting
Enter the first page of factory menu, select the factory out after, press the VOL+ button to display
“doing”, then “doing” disappear while it can auto ex-factory setting.
5
Page 8

Working principle analysis of the unit
The RF1 via integrative tuner TUNER1 after, the FBAS VIDEO1 and SIF is generated. The RF2 via
integrative tuner TUNER2 after, the FBAS VIDEO2 and AUDIO is generated. Video signal and
audio signal of VIDEO1,VIDEO2,AV1/SVHS1,AV2,AV3 and audio signal of VGA and so on, its sent
NA3 (CXA2089Q) to switch selection. The output video signal of main picture (Y/V, C) sent N7
(TVP5160) to decode. The signal via N7 decode after, it sent 8-bit ITU-R656 format signal to N10
(FLI2310) non-interlaced processing. It sent 24bit YUV signal to main processing control chip
N15(GM1501/1601).
The sub-picture video signal via CXA2089Q select after, it sent N8 (TVP5147) to decode. The signal
via N8 decode after, it sent 8-bit ITU-R656 format signal to N15 (GM1501/1601). Therein, the signal
of TUNER2 is sub-picture only.
The main-picture video signal from CXA2089Q is sent to decoder and also AV OUTPUT.
USB signal via A/V decoder AML278 to output RGB and digital audio signal, the audio signal via
CS4334 D/A convert then output L/R-USB.
Two ways YPBPR signal via HDTV switch NA1(PI5V330W) selection after, it sent to HDTV switch
device NA15(PI5V330W) switch selection together with USB signal, then sent RGB switch
N4(PI5V330W) select with RGB from VGA port of PC , then it sent to GM1501/1601.
Another two ways HDMI via HDMI switch (FSHDMI04) selecting after, it sent to HDMI receiver
N34(MST3383MB), then output RGB signal of 24bit to GM1501/1601.
They sent to GM1501/1601 picture processing, therein YPBYP or RGB to A/D conversion after, it
and other two signals are switched selection and digital display processing, it include OSD, GAMMA
correction, brightness and contrast processing, then LVDS conversion to signal acceptable for LCD
panel, namely four pairs of differential signal and one pair of clock signal, then it is sent to image
enhancer PW9702 to improve the image, and then to LCD panel for picture display.
The SIF of tuner output signal to audio processing NA4(MSP3420),The audio of main-picture and
sub-picture via switch conversion CXA2089Q to MSP3410; the audio of two YPBPR and USB
processed by AML3278 via switch conversion NA2(HEF4052) to MSP3410, the HDMI via
MST3383MB decode to audio, it audio via N26(CS4334) D/A conversion to MSP3410 too.
The stereo of the SIF with other four ways audio switch conversion selection to volume control and
audio processing. One way output right/left channel audio of main-picture, the signal sent SRS
processing NA5 (M62494) to SRS sound stereo processing. It via sound amplifier NA20, NA21
(TPA3001D1) to speaker; one way output right/left channel audio of sub-picture, it sent to earphone,
another way is AV OUT R/L output.
The work of whole unit is controlled by MCU, which includes GM1501/1601.
6
Page 9
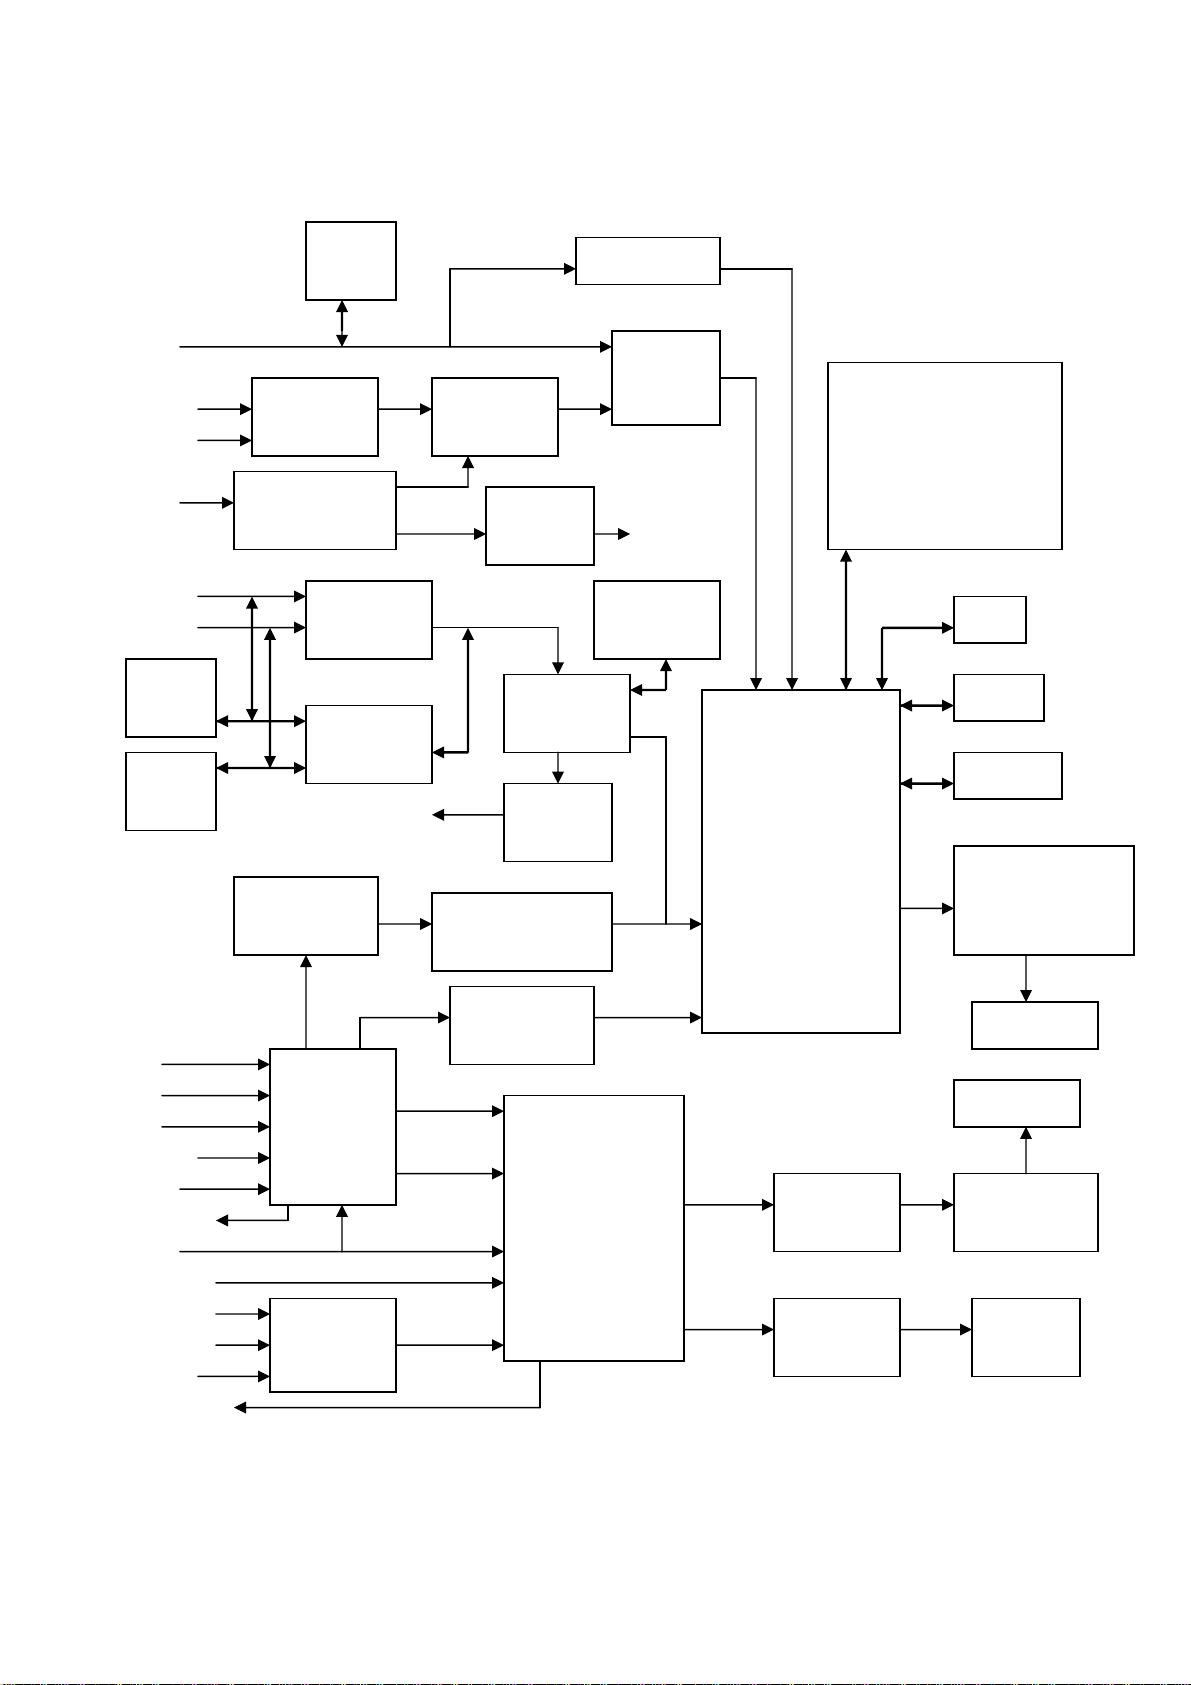
Black diagram
Hs,Vs
RGB
VGA
YPbPr1
YPbPr2
USB
A/V Processor
AML3278
HDMI1
HDMI2
EDID
24C02
EDID
24C02
L/R-HDMI
Y Main/C Main V-PIP
AV1
AV2 L/R-PIP
AV3
L/R-VGA L/R-Main
Tuner2
V-AVOUT SIF
Tuner1
L/R-HDMI
L/R-YPbPr1
L/R-YPbPr2
L/R-USB
L/R-AVOUT
VIDEO DEC.
TVP5160
EDID
24C02
HDTV SW.
PI5V330
HDMI SW.
FSHDMI04
LOGIC SW.
CBT3257
AV SW.
CXA2089Q
AUDIO SW.
HEF4052
HDTV SW.
PI5V330
D/A
CS4334
HDMI RX
MST3383
D/A
CS4334
DEINTERLACER
FLI2310
VIDEO DEC.
TVP5147
AUDIO
PROCESSOR
MSP3410/MSP3420
SN74AHC14
RGB SW.
PI5V330
L/R-USB
HDCP KEY
24C04
Power-ON,IR,KeyA,
KeyB,Led1,Led2,Mute,
HP-SW,VGA-CAB,DV
I-CAB,YUV/VGA,YU
V-SW,YUV/USB
LCD TV
CONTROLLER
GM1501/GM1601
SRS
M62494
HP AMP
TDA7053
DDR
FLASH
EEPROM
IMAGE QUALITY
ENHANCER
PW9702
PANEL
SPEAKER
AUDIO AMP .
TPA3001 x2
HEAD
PHONE
7
Page 10

IC block diagram
1.MSP34X0G
The MSP 34x0G family of single-chip Multistandard Sound Processors covers the sound
processing of all analog TV-Standards worldwide, as well as the NICAM digital sound standards.
The full TV sound processing, starting with analog sound IF signal-in, down to processed analog
AF-out, is performed on a single chip. Figure 1–1 shows a simplified functional block diagram of the
MSP 34x0G.
This new generation of TV sound processing ICs now includes versions for processing the
multichannel television sound (MTS) signal conforming to the standard recommended by the
Broadcast Television Systems Committee (BTSC). The DBX noise reduction, or alternatively,
Micronas Noise Reduction (MNR) is performed alignment free.
Other processed standards are the Japanese FM-FM multiplex standard (EIA-J) and the FM Stereo
Radio standard.
Current ICs have to perform adjustment procedures in order to achieve good stereo separation for
BTSC and EIA-J. The MSP 34x0G has optimum stereo performance without any adjustments.
All MSP 34xxG versions are pin compatible to the MSP 34xxD. Only minor modifications are
necessary to adapt a MSP34xxD controlling software to the MSP 34xxG. The MSP 34x0G further
simplifies controlling software. Standard selection requires a single I2C transmission only.
The MSP 34x0G has built-in automatic functions: The IC is able to detect the actual sound standard
automatically (Automatic Standard Detection). Furthermore, pilot levels and identification signals
can be evaluated internally with subsequent switching between mono/ stereo/bilingual; no I2C
interaction is necessary (Automatic Sound Selection).
The MSP 34x0G can handle very high FM deviations even in conjunction with NICAM processing.
This is especially important for the introduction of NICAM in China.
The ICs are produced in submicron CMOS technology. The MSP 34x0G is available in the following
packages: PLCC68 (not intended for new design), PSDIP64, PSDIP52, PQFP80, and PLQFP64.
8
Page 11

Fig. 1–1: Simplified functional block diagram of the MSP 34x0G
9
Page 12

2. TVP5160
The TVP5160 device is a high quality; digital video decoder that digitizes and decodes all popular
baseband analog video formats into digital component video. The TVP5160 decoder supports the
A/D conversion of component YPbPr and RGB (SCART) signals, as well as the A/D conversion and
decoding of NTSC, PAL, and SECAM composite and S-Video into component YCbCr. Additionally,
component progressive signals can be digitized. The chip includes two 11-bit, 60-MSPS, A/D
converters (ADCs). Prior to each ADC, each analog channel contains an analog circuit, which
clamps the input to a reference voltage and applies a programmable gain and offset. A total of 12
video input terminals can be configured to a combination of YPbPr, RGB, CVBS,
and S-Video video inputs. Progressive component signals are sampled at 2x clock frequency (54
MHz) and are then decimated to the 1x rate. In SCART mode the component inputs and the CVBS
inputs are sampled at 54 MHz alternately, then decimated to the 1x rate. Composite or S-Video
signals are sampled at 4x the ITU-R BT.601 clock frequency (54 MHz), line-locked for correct pixel
alignment, and are then decimated to the 1x rate. CVBS decoding utilizes advanced 3D Y/C filtering
and 2-dimensional complementary 5-line adaptive comb filtering for both the luma and chroma data
paths to reduce both cross-luma and cross-chroma artifacts. 3D Y/C color separation may be used
on both PAL and NTSC video signals. A chroma trap filter is also available. On CVBS and Y/C
inputs, the user can control video characteristics such as hue, contrast, brightness, and saturation
via an I2C host port interface. Furthermore, luma peaking with programmable gain is included, as
well as a patented color transient improvement (CTI) circuit. Attenuation at higher frequencies or
asymmetrical color subcarrier sidebands are compensated using the IF compensation block. Frame
adaptive noise reduction may be applied to reduce temporal noise on CVBS, S-Video, or
component inputs. 3D noise reduction and 3D Y/C separation may be used at the same time or
independently. The TVP5160 decoder utilizes Texas Instruments’ patented technology for locking
to weak, noisy, or unstable signals and can auto-detect between broadcast quality and VCR-style
(nonstandard) video sources. The TVP5160 decoder generates synchronization, blanking, field,
active video window, horizontal and vertical syncs, clock, genlock (for downstream video encoder
synchronization), host CPU interrupt and programmable logic I/O signals, in addition to digital video
outputs. The TVP5160 decoder includes methods for advanced vertical blanking interval (VBI) data
retrieval. The VBI data processor (VDP) slices and performs error checking on teletext, closed
caption, and other VBI data. A built-in FIFO stores up to 11 lines of teletext data, and, with proper
host port synchronization, full-screen teletext retrieval is possible. The TVP5160 decoder can pass
through the output formatter 2x sampled raw Luma data for host-based VBI processing. Digital RGB
overlay can be synchronously switched with any video input, with all signals being oversampled at
4x the pixel rate.
10
Page 13
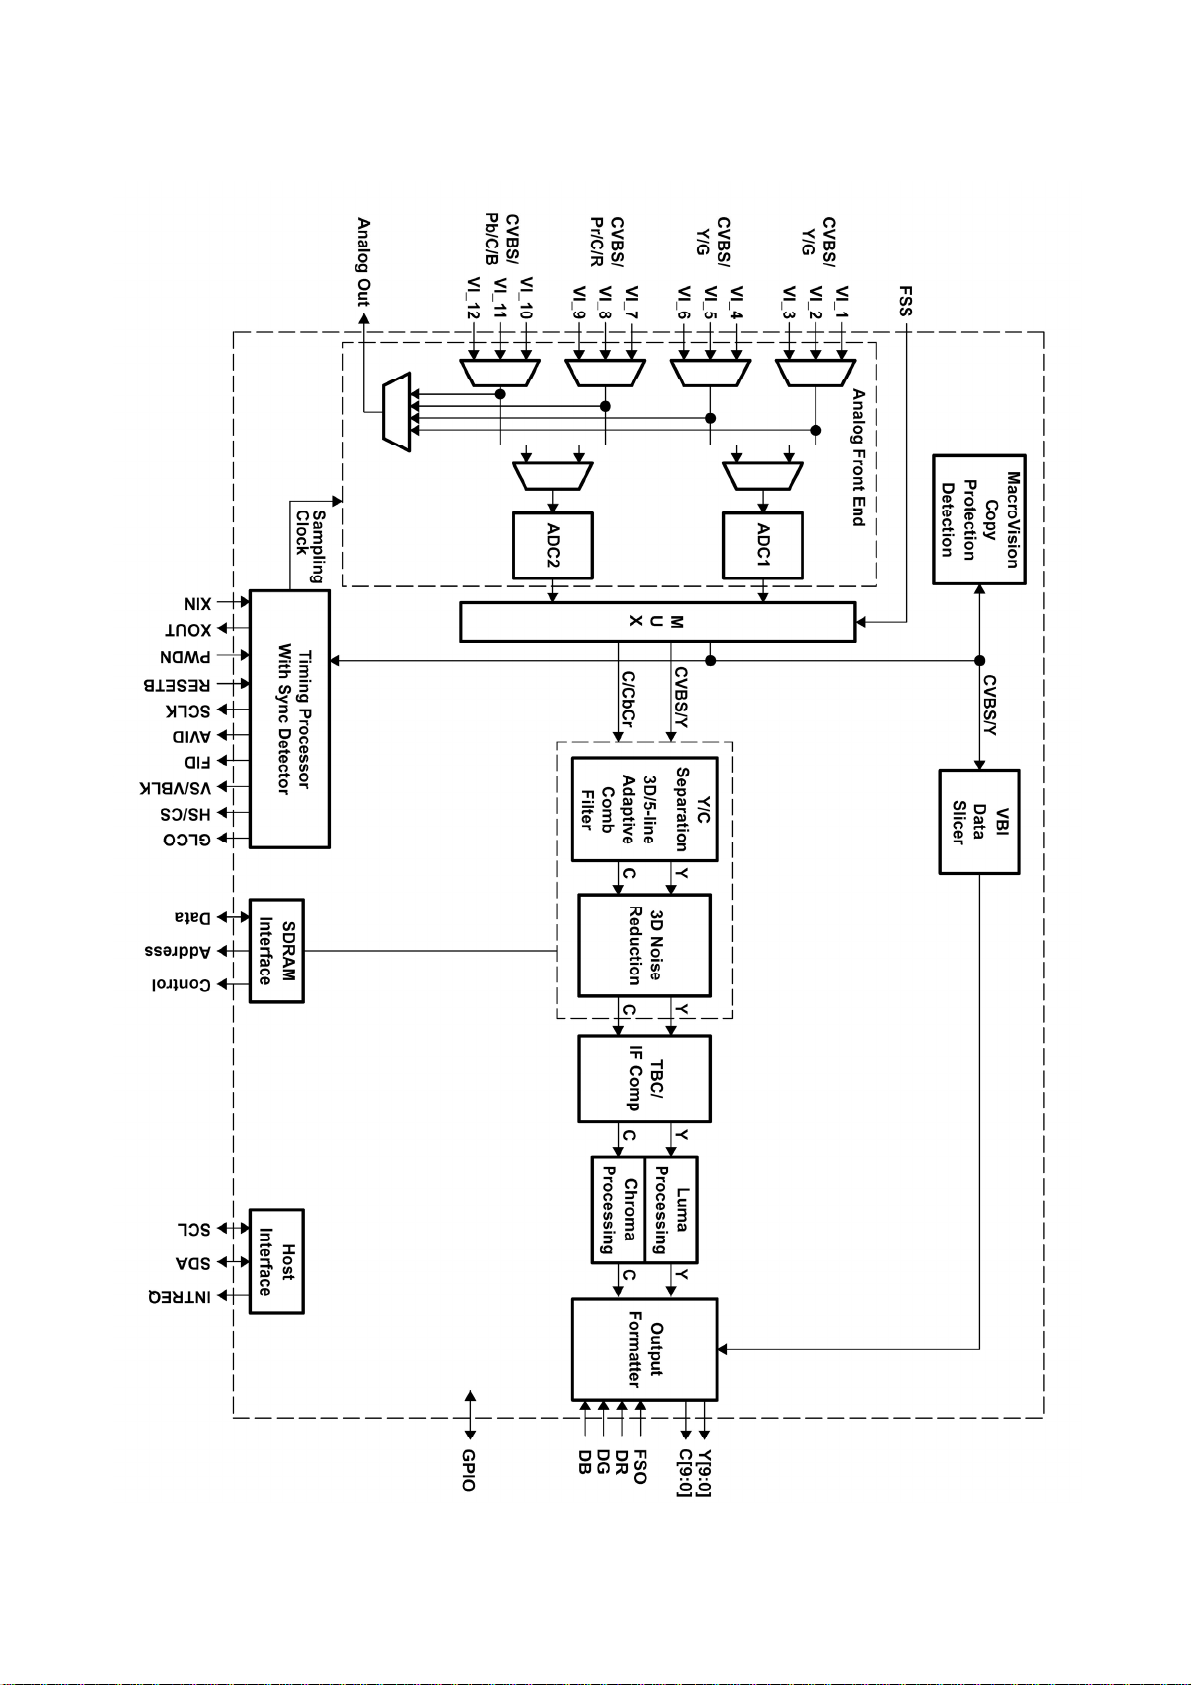
INTERNAL BLOCK DIAGRAM:
11
Page 14
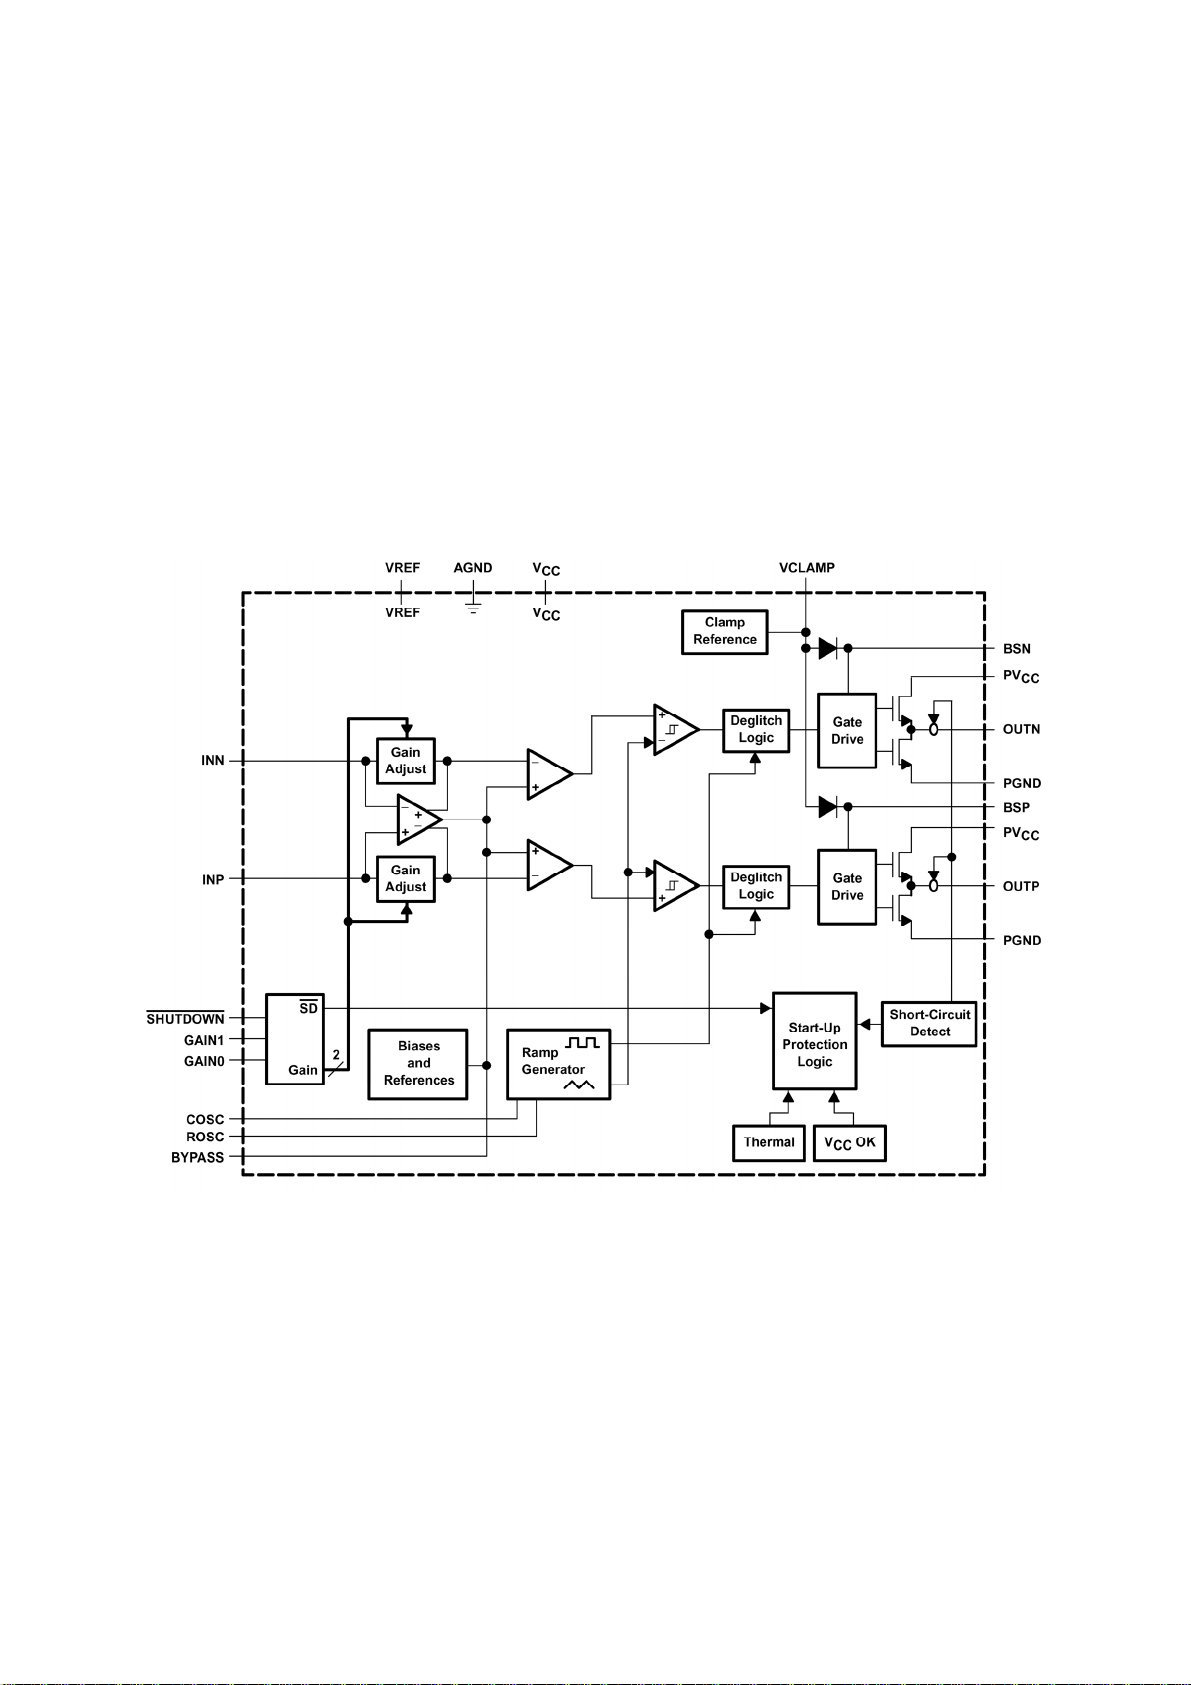
3. TPA3001D1
The TPA3001D1 is a 20-W mono bridge-tied load (BTL) class-D audio power amplifier with high
efficiency, eliminating the need for heat sinks. The TPA3001D1 can drive 4-Ω or 8-Ω speakers with
only a ferrite bead filter required to reduce EMI.
The gain of the amplifier is controlled by two input terminals,GAIN1 and GAIN0. This allows the
amplifier to be configured for a gain of 12, 18, 23.6, and 36 dB. The differential input stage provides
high common mode rejection and improved power supply rejection.
The amplifier also includes depop circuitry to reduce the amount of pop at power-up and when
cycling SHUTDOWN.
The TPA3001D1 is available in the 24-pin thermally enhanced TSSOP package (PWP) which
eliminates the need for an external heat sink.
INTERNAL BLOCK DIAGRAM:
12
Page 15

4. MST3383MB
The MST3383MB integrates the HDMI compliant receiver for enabling advanced digital display
devices such as digital TVs, plasma displays, LCD TVs and projectors to receive and display.
Compliant with the HDMI 1.0 specification, the MST3383MB enables consumer electronic devices
to receive uncompressed, high quality, digital audio and video HD content over a single, low-cost
HDMI cable. The MST3383MB is available in a 128-pin PQFP package.
FUNCTIONAL DESCRIPTION
DVI/HDMI Interface
The MST3383MB integrates an HDMI compliant receiver and enables a high quality and secure
delivery of digital video and audio. The HDMI link input supports up to 170 MHz pixel rate. With the
HDMI input and signal detection, the MST3383MB provides a high-performance solution for up to
1080p for video and 1600x1200 (UXGA) for monitor applications. The MST3383MB’s HDMI
receiver is fully backward compatible to DVI 1.0 and HDCP 1.0.
MCU Interface
The MST3383MB provides 2-wire serial bus for interfacing with an MCU. It detects active inputs for
both on-line and off-line operations. During on-line operation, the MST3383MB also provides
polarity and period count information of active input’s DE signals. The MCU can easily adjust the
input mode and switch to active input properly.
Color Space Conversion
The MST3383MB supports all general color space conversions such as RGB to YUV or RGB to
YCbCr using parameters programmable by 2-wire serial bus.
Digital Video Output Formatting
The MST3383MB can output digital data in the following configurations:
. 24-bit 4:4:4 YCbCr/RGB output formats
. 16-bit 4:2:2 YCbCr output formats (ITU.601)
. 8-bit 4:2:2 YCbCr output formats (ITU.656)
. Channel swap
. MSB/LSB swap
Audio Stream
S/PDIF port output is supported to enable PCM, Dolby Digital, DTS with sample rates of 32~48 kHz
and a sample size of 16~24 bits.
Audio Serial bus is supported to enable 2-channel PCM audio with sample rates of 32~192 kHz and
a sample size of 16~24 bits.
13
Page 16

5.GM1601/GM1501
The gm1601H is a dual channel graphics and video processing IC for Liquid Crystal Display (LCD)
monitors and televisions incorporating Picture in Picture, up to WUXGA output resolutions. The
gm1601H provides all key IC functions required for image capture, processing and display timing
control. On-chip functions include a high-speed triple-ADC and PLL, Ultra-Reliable DVI® receiver,
high quality zoom and shrink scaling engines, Motion Adaptive De-Interlacing (MADI), Low Angle
Diagonal Interpolation (LADI), an on-screen display (OSD) controller, a 100MHz on-chip X186
micro-controller (OCM), and a selectable double wide TTL or dual channel LVDS transmitter for
interface to displays. With all these functions integrated onto a single device, the gm1601H
eliminates the need for several system components, simplifying the design and reducing the cost of
high-end multimedia LCD monitors and televisions while maintaining a high degree of flexibility and
quality. The gm1601H is available in two silicon revisions – “BD” and “CF”. GM1601H-CF is a
backwards-compatible addition that incorporates some functional and quality improvements.
Applliicattiions
z Multi-media LCD monitors up to WUXGA resolutions
z LCD, PDP and Rear Projection TV at WXGA, UXGA, WUXGA and HD(720P & 1080P)
resolutions
GM1601H Systtem Desiign Examplle
Figure 2 below shows a typical high-resolution multi-media LCD monitor/TV system based on the
gm1601H. Designs based on the gm1601H have reduced system cost, simplified hardware and
firmware design and increased reliability because only a minimal number of components are
required in the system.
Figure 2. gm1601H System Design Example
14
Page 17

6. FLI2310
The FLI230x and FLI2310 are highly integrated digital video format converters for DTV and DVD
applications using patented deinterlacing and post processing algorithms from Faroudja
Laboratories, coupled with highly flexible scaling, a wide variety of aspect ratio conversions, and
other special video enhancing features to produce the highest quality image.
6.1 Inputs
z Input all industry standard and non-standard video resolutions, including 480i (NTSC), 576i
(PAL/SECAM), 480p, 720p, 1080i, and VGA to XGA
z Digital input, 8-bit Y/Cr/Cb (ITU-R BT656), 8-bit Y/Pr/Pb, 16-bit Y Cr/Cb (ITU-R BT601), 24-bit
RGB, YCrCb, YPrPb
z Input pixel rate up to 75MHz maximum
6.2 Outputs
z Output resolutions include 480p, 576i, 576p, 720p, 1080i, 1080p, and VGA to SXGA
z Interlaced or Progressive output
z In the FLI230x, the output can be either analog YUV/RGB (through the integrated 10-bit DAC),
or digital 24-bit RGB, YCrCb, YPrPb (4:4:4), or digital 16/20-bit Y Cr/Cb (4:2:2)
z The FLI2301 can provide 525P/625P Macrovision compliant analog output
z In the FLI2310, digital output of 24-bit RGB, YCrCb, YPrPb (4:4:4), or 16/20-bit Y Cr/Cb (4:2:2)
are available
z Output pixel rate up to 150 MHz maximum
6.3 Formats
z Input color manipulation matrix supports all color spaces: RGB, YPrPb, 4:4:4 YCrCb, 4:2:2
YCr/Cb, ITU-R BT656, ITU-R BT601
z Output supports analog RGB, YPrPb, and YCrCb in the FLI230x; and digital RGB, YPrPb, 4:4:4
YCrCb and 4:2:2 YCr/Cb in FLI230x/FLI2310
6.4 Frame Rate Conversion
Tearless Frame Rate Conversion 50/60/72/75/100/120 Hz
6.5 Front End Processing
z Motion Adaptive Noise Reduction – Improves picture quality for off-air material.
z Cross Color Suppressor (CCS) - Removes cross color artifacts in composite video signals due
to poor Y/C separation in standard 2-D video decoders, eliminating the need for expensive 3-D
video decoders.
6.6 Deinterlacing
z Per-pixel Motion Adaptive Deinterlacing
z Patented FilmMode Processing - Used for proper de-interlacing of 3:2 and 2:2 pulldown
material.
z Edit Correction - Film content is continuously monitored for any break in sequence caused by
“bad edits” and quickly compensates for the most effective reduction in artifacts.
z DCDi™ - Video is analyzed on a single pixel granularity to detect presence or absence of
angled lines and edges, which are then processed to produce a smooth and natural looking
image without visible artifacts or “jaggies”.
6.7 Scaling
z High Quality Fully Programmable Two Dimensional Scaler
z Aspect Ratio Conversion for “Anamorphic” or “Panoramic” (non-linear)
z Display 4:3 images on 16:9 displays and vice versa, including Letterbox to Fullscreen, Pillarbox,
15
Page 18

and Subtitle Display Modes
6.8 TrueLife™ Enhancer
Two dimensional, non-linear, luma and chroma video enhancer brings out details in the picture,
producing a more life-like image.
6.9 Memory
32-bit wide SDRAM (i.e. one 2M x 32-bit, or two 1M x 16-bit) controller, up to 166 MHz operation, for
external SDRAM
INTERNAL BLOCK DIAGRAM:
7. TVP5147
Functional Block Diagram
16
Page 19

8. CXA2089Q
17
Page 20

9. AML3278
The AML3478 is a highly integrated device that provides cost-effective solutions for portable players,
media players and integrated entertainment centers.
10. PW9720
The PW9702 is a highly-integrated, 10-bit processing, advanced image quality enhancer. It is used
to improve the detail, color, and contrast performance for the existing platform of various
applications.
18
Page 21

19
Page 22

Wiring diagram
To key board
T
o
I
R o
b r
a
d
Speaker
or
or
Power board
Board
board
board
CPU board
or
Analog board
20
Page 23

Trouble shooting
1. Fault clearance
Before servicing please check to find the possible causes of the troubles according to the table
below.
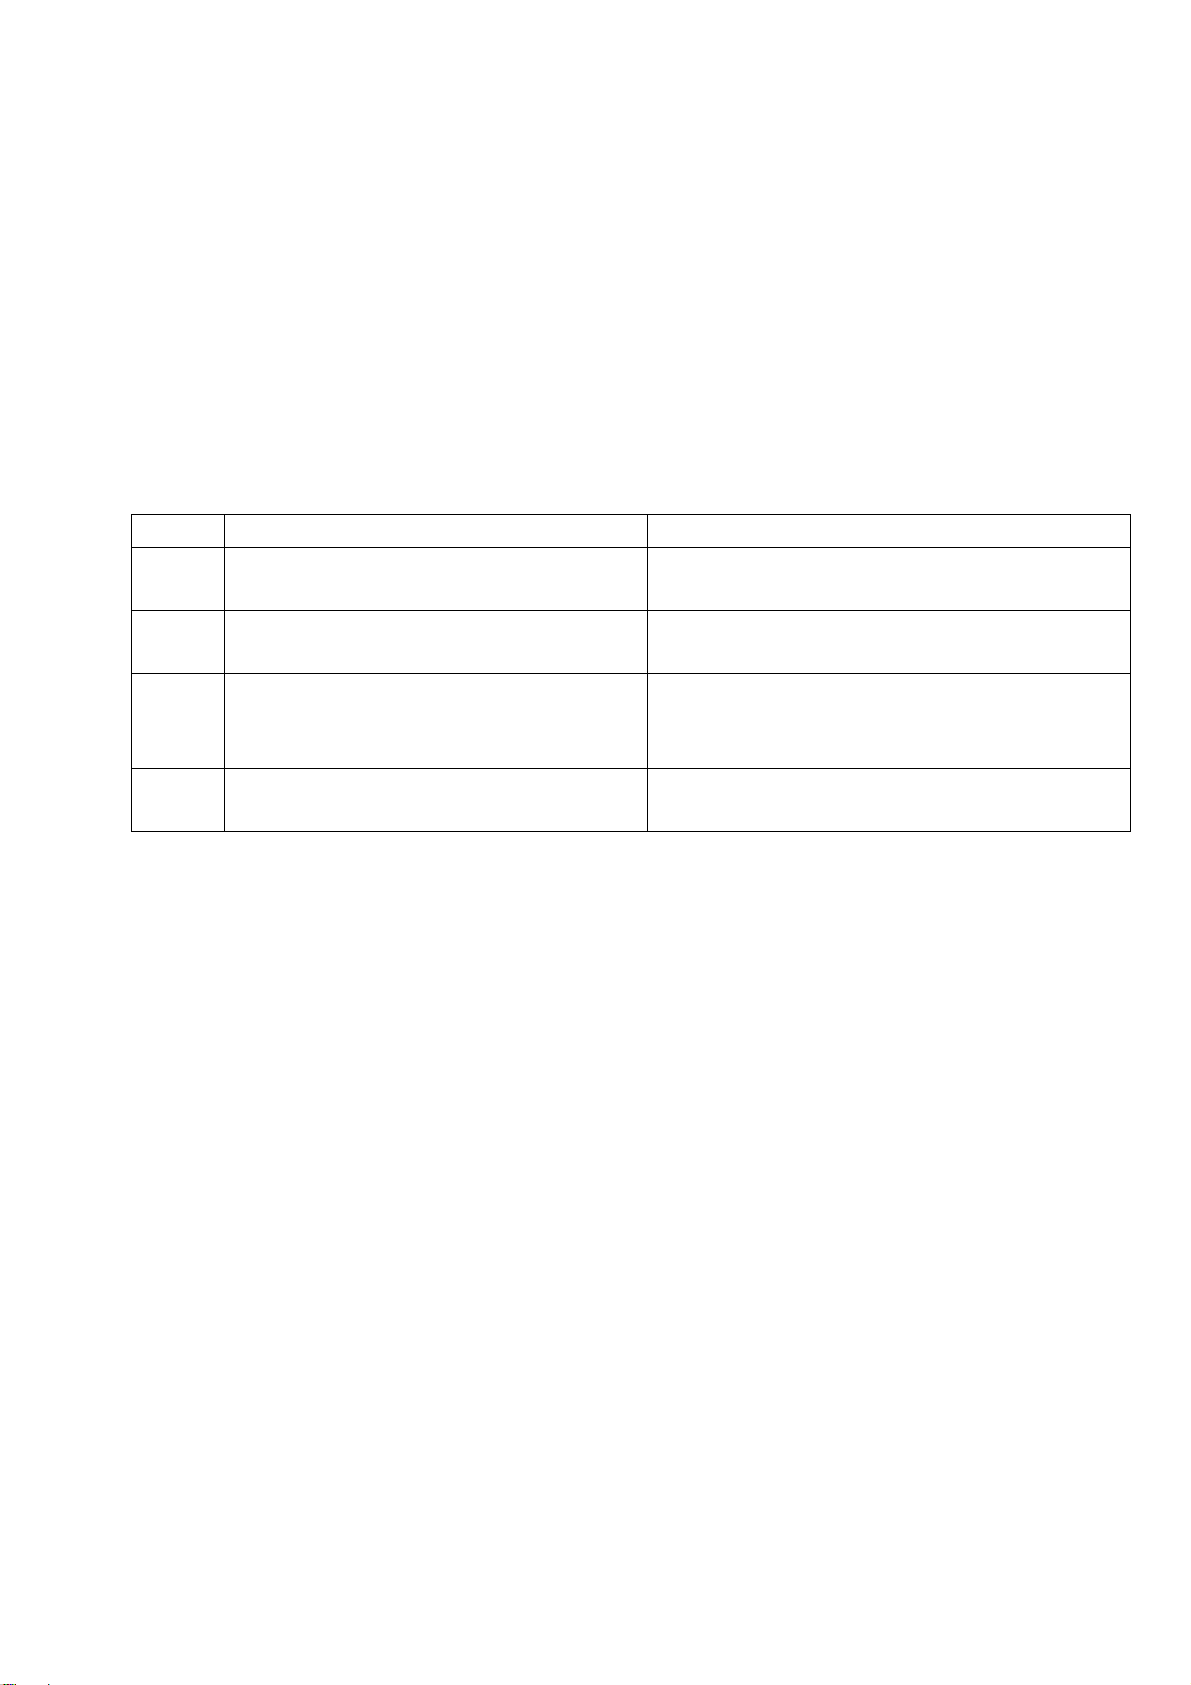
1.1 Antenna (signal):
Picture is out of focus or jumping z Bad status in signal receiving
z Poor signal
z Check if there are failures with the electrical connector or
the antenna.
z Check if the antenna is properly connected.
Fringe in picture z Check if the antenna is correctly oriented.
z Maybe there is electric wave reflected from hilltop or
building.
Picture is interfered by stripe shaped
bright spots
There appear streaks or light color
on the screen
1.2 TV set:
Symptoms Possible cause
Unable to switch the power on z Check to see if the power plug has been inserted properly
No picture and sound z Check to see if the power supply of liquid crystal TV has
Deterioration of color phase or color
tone
Screen position or size is not proper z Check is the screen position and size is correctly set up.
Picture is twisted and deformed z Check to see if the picture-frame ratio is properly set up.
Picture color changed or colorless z Check the “Component” or “RGB” settings of the liquid
z Possibly due to interference from automobile, train, high
voltage transmission line, neon lamp etc.
z Maybe there is interference between antenna and power
supply line. Please try to separate them in a longer
distance.
z Maybe the shielded-layer of signal wire is not connected
properly to the connector.
z Check if interfered by other equipment and if interfered
possibly by the equipment like transmitting antenna,
non-professional radio station and cellular phone.
into the socket.
been switched on. (As can be indicated by the red LED at
the front of the TV set)
z See if it’s receiving the signal that is transmitted from other
source than the station
z Check if it’s connected to the wrong terminal or if the input
mode is correct.
z Check if the signal cable connection between video
frequency source and the liquid crystal TV set is correct.
z Check if all the picture setups have been corrected.
crystal TV set and make proper adjustment according to the
21
Page 24

signal types.
Picture too bright and there is
distortion in the brightest area
Picture is whitish or too bright in the
darkest area of the picture
No picture or signal produced from
the displayer if “XXX in search”
appears.
There appears an indication -
“outside the receivable scope)
Remote control cannot work
properly
No picture and sound, but only
hash.
Blur picture z Check if the antenna cable is correctly connected.
No sound z Check if the “mute” audio frequency setting is selected.
When playing VHS picture search
tape, there are lines at the top or
bottom of the picture.
z Check if the contrast setting is too high.
z Possibly the output quality of DVD broadcaster is set too
high.
z It maybe also due to improper terminal connection of the
video frequency signal in a certain position of the system.
z Check if the setting for the brightness is too high
z Possibly the brightness grade of DVD player (broadcaster)
is set too high.
z Check if the cable is disconnected.
z Check if it’s connected to the proper terminal or if the input
mode is correct.
z Check if the TV set can receive input signal. The signal is
not correctly identified and VGA format is beyond the
specified scope.
z Check if the batteries are installed in the reverse order.
z Check if the battery is effective.
z Check the distance or angle from the monitor.
z Check if there is any obstruct between the remote control
and the TV set.
z Check if the remote control signal- receiving window is
exposed to strong fluorescence.
z Check if the antenna cable is correctly connected, or if it
has received the video signal correctly.
z Of if it has received the right video signal.
z Check if the sound volume is set to minimum.
z Make sure the earphone is not connected.
z Check if the cable connection is loose.
z When being played or in pause VHS picture search tape
sometimes can’t provide stable picture, which may lead to
incorrect display of the liquid crystal TV, In this case please
press “auto” key on the remote control so as to enable the
liquid crystal TV set to recheck the signal and then to
display correct picture signal
22
Page 25

2. Troubleshooting guide
Make sure that the IR board, key board and their connection wires are good then judge below:
2.1 Without backlight
In STANDBY, does
LED red light
No
Check if the pin3 of X505 has
+5V output
No
Is the FUSE
melted?
No
Ye s
Press POWER button
to turn on the unit,
then check the LED
Ye s
Replace CPU board
Check power
board
No change color
Blue
No
Press any key on the RC,
Does LED flicker?
Yes
Check if the X506
(pin6-7) of the power
board has 18V, pin1-5
has 18V.
If N21 pin4 is 18V?
No
Replace N21
Replace CPU board
No
LCD screen has problem
Yes
Replace CPU.
Yes
Low High
Check if FU1 of CPU
No
board is melted?
Replace the fuse.
Check if L43, L44 have
+3.3V?
No
Check if base of V15
is 3.3V
Ye s
Yes
No
Is it 18V for pin1-5 of
X16 of CPU ?
Check if the back light
socket is well insert?
Ye s
Replace N22
Yes
23
Page 26

2.2 With backlight, without picture
p
Does remote control
and key of the unit
operate?
Does not picture
of all channel
No Yes
No
Ye s
Enter the factory
menu, the CLEAR
EEPROM
adjustment after,
turn off the unit,
and check if the
picture is normal
when turn on.
No
Replacing
N21
If R335 R334 R325
R324 has signal
Yes
Ye s
Display OSD?
No
Is LVDS
cord
loose?
Does N21
(pin5-8)
output
18V?
Ye s
Check FU1
HDMI
Does R223 and
R216-R219
output signal?
No Ye s No
Replace
CPU
assy
DoesR252
,R251 has
output
Replace
N38
Which no picture
VGA
Check the
pin4 and
pin8 of
N24 has
H-V sync?
Replace
N34
YPBPR
TV/VIDEO
Check if C16
has SOG
signal
Sub
picture
No Yes Yes No
Main
picture or
sub
picture?
Main
picture
If N41
No
output
1.9V
Yes
Replace
N40
Replacing CPU
Replacing N7
Replacing
N24
Replacing N4
Replacing N8
Yes
No
Does
R70-R73
input signal
Ye s
Check if the pin1 and pin5
of N24 has input signal
Ye s
Check if the pin2 and pin3
of N4 has input signal
No
Check if R74, R75 has
output signal
Ye s
Ye s
No
Check the
N10 input
and output
Replacing
CPU assy
Yes
Check the N35
No
and N36 input
and out
ut
24
Page 27

2.3 No sound
Check if the pin2 of
XA15 is 18V?
No Yes
Check if the
pin1 and pin2 of
XA17 is 18V?
Check if XA14
pin3 is low
level?
Yes
Is high level of
NA20 NA21 pin5?
No
High
Low
Check CPU board
Check if VA21 VA22
break down
No
Check the
supply power
Ye s
Is the signal
output from NA5
(pin5 and pin8)
Ye s
Replacing NA20 NA21
Is the signal output from
NA4 (pin27 and pin28)
Does NA4 (pin67) input
signal?
Is the signal output from
TUNA1 (pin12)
No
Ye s
Replacing NA5
No
Ye s
Replacing NA4
No
No
Replacing TUNA2
25
Page 28

Page 29

Page 30

Page 31

Page 32

Page 33

Page 34

Page 35

Page 36

Page 37

Page 38

Page 39

Page 40

Page 41

APPENDIX-A: Main assembly 9252LR3611
NAME NO.
Analog board
CPU board
IR receive board
Key board
Side AV board
USB board
Power board
Remote control
Panel
MAIN COMPONENT AND IT'S NO.
NA4
6LR0375310
6LR0385610
6LR0380910
6LR03805A0
6LR0382910
6LR02316A0 NU4 AML3278 (5273278001)
6LR0372010
6010L01601
5203528501
NA5
NA20, NA21
N15
N10
N7
N8
N34
N40
RC-L16-0A
V520H1- L03
MSP3410 (5273410001)
M62494FP (5276249401)
TPA3001D1 (5273001001)
GM1601 (5271601001)
FLI2310 (5272310002)
TVP5160 (5275160001)
TVP5147 (5275147001)
MST3383MB (5273383001)
PW9702 (5279702001)
Page 42

APPENDIX-B: Exploded view (LC-52X36)
Page 43

PART LIST OF EXPLODED VIEW
NO. DESCRIPTION
1 Front cabinet
2 decorative board
3 speaker net
4 side AV board
5 push bar
6 push bar
7 push bar
8 push bar
9 key board
10 speaker assy
11 panel
12 power bracket
13 panel fixed bracket
14 panel fixed bracket
15 panel fixed bracket
16 panel fixed bracket
17 conncetion bracket
18 panel fixed bracket
19 conncetion bracket
20 stand fixed bracket
21 wall mount bracket
22 main board frame
23 digital board
24 main board frame
25 analog board
26 power board
27 back cabinet
28 stand
Note: design and specifications are subject to change without notice.
Page 44

9252LR3611
Ver.1.0
 Loading...