

Page 1

LCD TELEVISION
LC20H15
Page 2

CONTENT
Safety instructions………………………………………………………………………..…
Instructions on adjusting and testing…………………………….…….…………………
Trouble shooting……………………………………………………….……………………
Method of software upgrading………………………………………….…………………
Briefing on LC20H15 and its working principle………………………………..………….
Wiring diagram……………………………………………………………..……………....
Serial NO. of parts……………………………………………………………………….…
Identification criteria for the bright spot and dark spot of the LCD screen………..….
Troubleshooting guide………………………………………………………………..……
Exploded views…………………………………………………………………………..…
Schematic diagram…………………………………………………………………….…..
1
3
5
7
9
18
19
19
20
22
24
Page 3

No sound (with TV input as an example)
Attention: This service manual is only for service personnel to take reference with. Before servicing
please read the following points carefully.
Safety instructions
1. Instructions
1.1 Be sure to switch off the power supply before replacing or welding any components
or inserting/plugging in connection wire
1.2 Anti static measures to be taken (throughout the entire production process!):
a)Do not touch here and there by hand at will;
b) Be sure to use anti static electric iron;
c) It’s a must for the welder to wear anti static gloves.
1.3 Please refer to the detailed list before replacing components that have special
safety requirements. Do not change the specs and type at will.
2. Points for attention in servicing of LCD
2.1 Screens are different from one model to another and therefore not interchangeable. Be sure to use
the screen of the original model for replacement.
2.2 The operation voltage of LCD screen is 700-825V. Be sure to take proper measures in protecting
yourself and the machine when testing the system in the course of normal operation or right after
the power is switched off. Please do not
touch the circuit or the metal part of the module that is in operation mode.
Relevant operation is possible only one minute after the power is switched off.
2.3 Do not use any adapter that is not identical with the TV set. Otherwise it will cause fire or damage
to the set.
2.4 Never operate the set or do any installation work in bad environment such as wet bathroom,
laundry, kitchen,or nearby fire source, heating eq uipment and devices or expo sure to sunlight etc.
Otherwise bad effect will result.
2.5. If any foreign substanc e such as water, liquid, metal slices or other matt ers happe ns t o fall into the
module, be sure to cut the power off immediately and do not move anything on the module lest it
should cause fire or electric shock due to contact with the high voltage or short circuit.
2.6. Should there be smoke, abnormal smell or sound from the module, please shut the power off at
once. Likewise, if the scre en is not working after the power is on or in the course of operation, the
power must be cut off immediately and no more operation is allowed under the same condition.
2.7. Do not pull out or plug in the connection w ire when the module i s in operat ion or just after t he power
is off because in this case relatively high voltage still remains in the capacitor of the driving
circuit.Please wait at least one minute befor e t he pulling out or plugging in t he connection wire.
2.8. When operating or installing LCD please don’t subject the LCD components to bending, twisting or
extrusion, collision lest mishap should result.
1
Page 4

2.9 As most of the circuitry in LCD T V set is comp osed of CMOS i ntegrate d circuits, it’s neces sary to pay
attention to anti statics. Before servicing LCD TV make sure to take anti static measure and
ensure full grounding for all the parts that have to be grounded.
2.10.There are lots of connection wires between parts behind the LCD screen. When servicing or
moving the set please take care not to touch or scratch them. Once they are damaged the screen
would be unable to work and no way to get it repaired.
2.11. Special care must be taken in transporting or handling it. Exquisite shock
vibration may lead to breakage of screen glass or damage to driving circuit.
Therefore it must be packed in a strong case before the transportation or
handling.
2.12. For the storage make sure to put it in a place where the environment can be controlled so as to
prevent the temperature and humidity from exceeding the limits as specified in the manual. For
prolonged storage, it is necessary to house it in an anti-moisture bag and put them altogether in
one place. The ambient conditions are tabulated as follows:
Temperature Scope for
0----+50 C
operation
Scope for
-20----+60 C
storage
humidity Scope for
20%---85%
operation
Scope for
10%---90%
storage
2.13. Display of a fixed picture for a lon g time may result in ap pear ance of p ictur e residue on t he screen,
as commmonly called “ghost shadow”. The extent of the residual picture varies with the maker of
LCD screen. This phenon menon does n’t repre sent failure. This “ghost shadow ” may remain in t he
picture for a period of time (several minutes).But when operating it please avoid displaying still
picture in high brightness for a long time.
3.Points for attention during installation
3.1. The front panel of LCD screen is of glass. Wheng installing it please make sure to put it in place.
3.2. For service or instatallation it’s necessary to use specified screw lest it should damage the screen.
3.3. Be sure to take anti dust measures. Any foreign substance that happens to fall down between the
screen and the glass will affect the receiving and v iew ing effect
3.4. When dismantling or mounting the protective partition plate that is used for anti vibration and
insulation please take care to keep it in intactness so as to avoid hidden trouble.
3.5. Be sure to protect the cabinet from damage or scratch during service, dismantling or mounting.
2
Page 5
Instructions on adjusting and testing
p
m
f
e
1 Adjusting and calibrating equipment
Digital multi-meter (or oscilloscope)
5515 signal generator
5518 signal generator
PC set(FLASH writing programs have to be installed first. )
K7253(VGA, YprPb signal generator)
CA210 (LCD white balancer)
DVD broadcaster
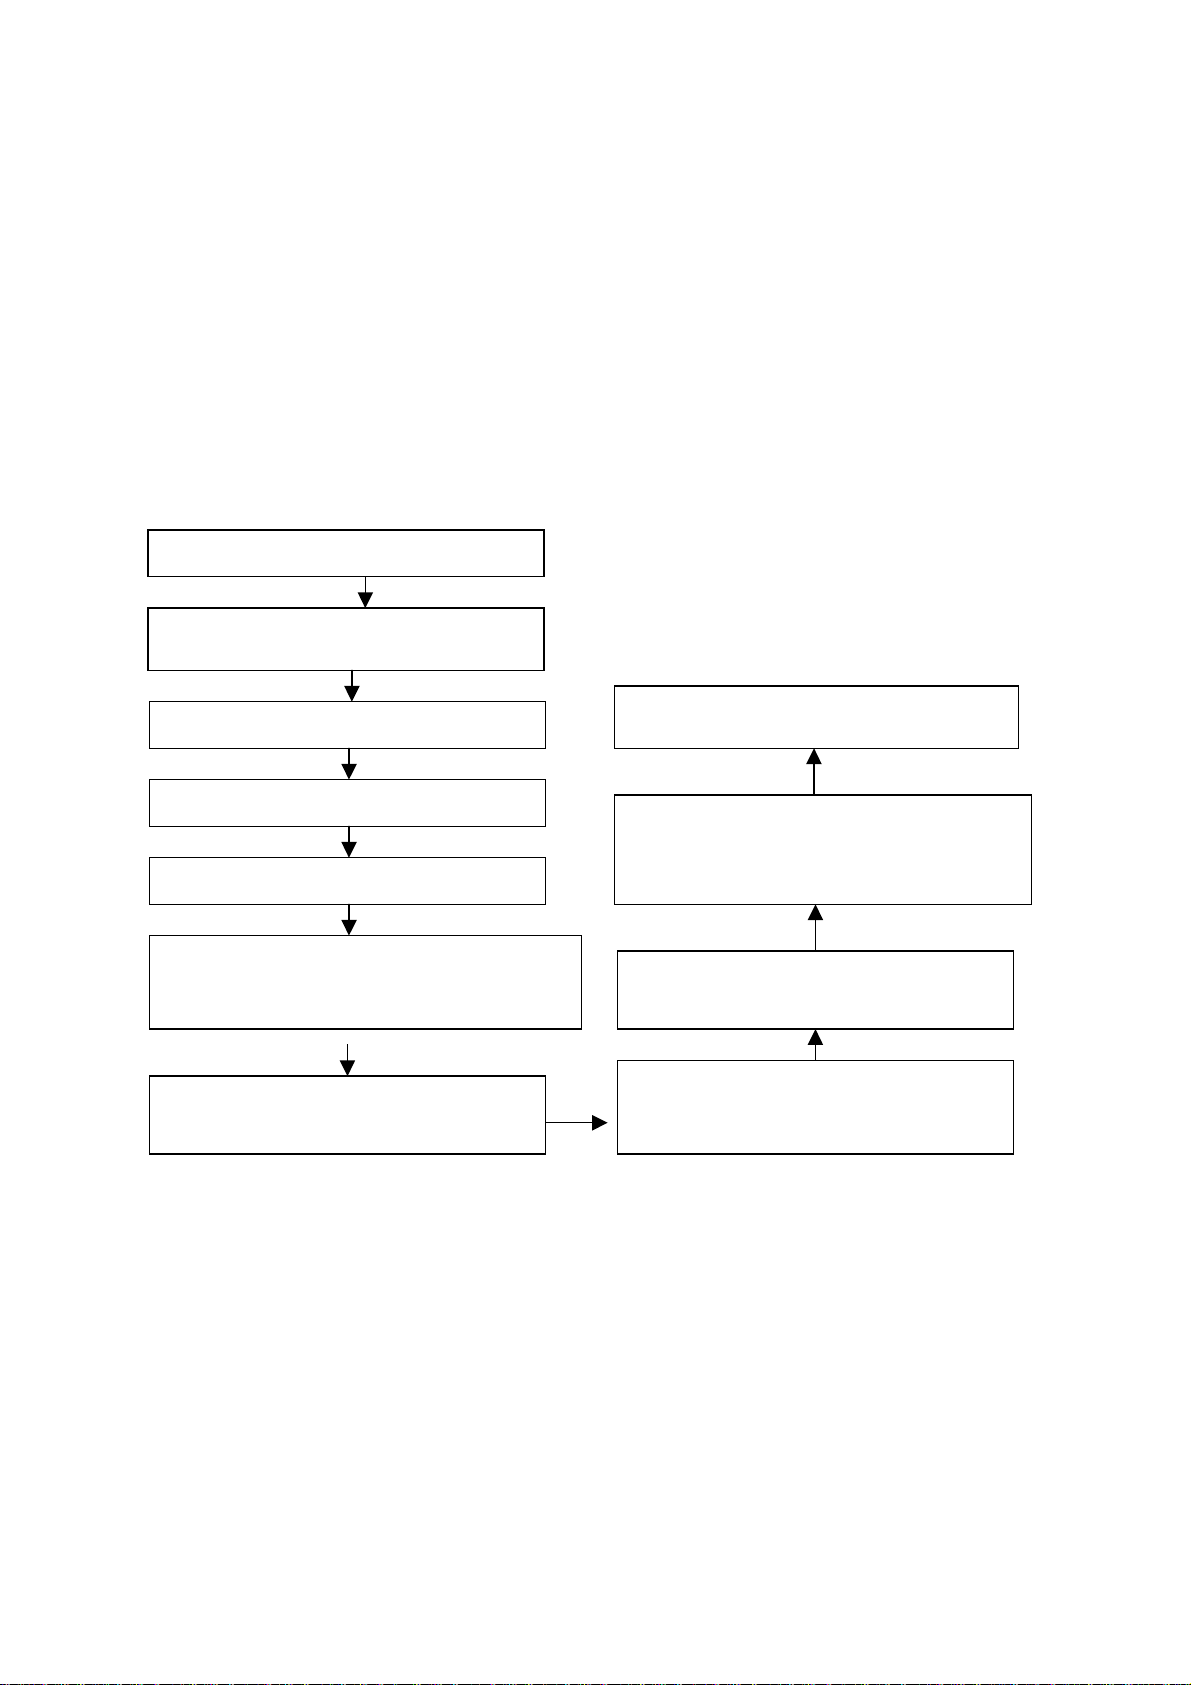
2 Flow chart for the adjustment and calibration
See fig.1.
Production of main board and TV board in the
Connect the central signal source and check if the
functions of TV (Station missing, syste
identification ,analog control etc.), and the output o
Input AV/S signal and check for various functions
3 Flash writing programs
Flash write memory U
4 Adjustment and calibration for the main board
a) Connect the main board X501 to infrared receiving board (as per wiring diagram
b)Connect PC, upgrade the program of FLASH U13, push the POWER key on the remote control
c) About 4 minutes later the indication lamp of the infrared receiving board turns blue. Measure U2
PIN2 to be 3.3 V, measure U4 PIN2 to be 1.8 V,and measure U5 PIN2 to be 1.8 V.
d) Flash write DDC program.
Flash memor y U13 U3 N301 N303
production line
Check the main board
Check TV board
Functional adjustment for general assembly
in the case of AV/S terminal
Input YprPb signal and see if the display is normal
Input VGA signal and see if the displ ay is normal
under PC status and check for various functions
(analog control), l ine/field centerect.
Check if the AV OUT function is normal
separately in the status of input separately in th
status of input TV/S terminal/Av signal, and if
Fig.1 Adjustment and
rocess
U3 N
13
calibration
1 N2
203-L20H80-01JL) and insert the plug of power supply adapter (FSP060-1AD103) into X101.
Now the indication lamp of the infrared receiving board is red.
set. Now the indication lamp of the infrared receiving board is out.
Check accessories,packing
under PC status and check for various
functions (analog control), line/field center etc.
3
Page 6

5 Adjustment and calibration for the TV board
Connect the main board X 501 to infrared receiving board (as per wiring diagra m 2 03-L20H80-01JL)
and press the POWER key on the remote control set. Now Now the indication lamp of the infrared
receiving board is blue. Measure N3 PIN2 of TV board to be 3.3 V, one terminal of inductor L107 to
be 5 V and one terminal of inductor L4 to be 12 V
6 Adjustment of white balance (using the white balancer CA210 and K7253 signal generator
specialized for LCD)
a) Install the whole TV set
b) Enter the factory menu and perform”PW1306 reset”
c) Exit from the factory menu. Press “signal source” key and enter YpbPr.
d) Input YpbPr signal: 640x480p 60Hz (K7253).
e) Enter the user menu. Set the brightness to 50 and contrast to 50. Press “factory” key to enter
the factory menu, perform “ADC calibration”, input signals of “black field”(EMPT),”white
field”(White-(100%))”fully red”(Full_Magenta)respectively and then calibrate three times.
f) Input signal of “four grade gray”(Gray(H)-4 ). Use CA-210 to measure the third grade and adjust
the brightness and contrast so that Y is around 150. Enter factory menu and adjust the green
color temperature and blue color temperature so that x=270,y=283(red color temperature is
constant as128).
g) Exit from the factory menu and enter route RGB. Input 640x480 @75Hz “pane
signal”(C_Hat_16x12(W))through port VGA. Enter the user menu and adjust the brightness to
50 and contrast to 50. Adjust the line center and the field center so that the picture is correctly
positioned.
h) Input signal of “16 gray grades” (Gray(H)-16). Enter the factory menu and perf orm “calibration of
ADC”.
i) Exit from the factory menu, input the signal of “four grade gray” (Gray(H)-4 ) and enter the user
menu. Adjust the brightness and contrast. Use CA-210 to measure the third grade so that Y is
around 200. Enter the factory menu and adjust the green color temperature and blue color
temperature so that x=270,y=283(red color temperature is constant as128).
j) Enter TV mode and adjust channel No. Enter “D8”signal and adjust the color to 0. Adjust the
brightness and contrast. Use CA-210 to measure the third grade so that Y is around 200.
k) Enter the factory menu and adjust the green color temperature and blue color temperature so
that x=270,y=283(red color temperature is fixed as128).
7 Performance check
a) TV Interfaces
Connect RF port to central signal source. Enter station search menu - auto station search. After
system adjustment is over, check if there is any station missing and then check semi-auto station
search. Check if fine tuning is normal.
Check if the output of earphone or loudspeaker is normal and if the picture is normal.
b) Interface of AV/S Terminals
Connect to access the signal of AV/S terminals separately and check if the picture or sound is
normal.
c) AV OUT Termianl
Input the signals separately in the status of TV/AV/ S terminal. Connect AV OUT terminal to monitor
and check if the output pic ture and sou nd fro m AV OUT is n or mal. (Not e: In t he st atus o f S t er mina l,
4
Page 7
the output picture from AV OUT is colorless.)
d) VGA Interface
Input VGA signal(K7253 signal generator). Separately input the four types of VGA format signals as
listed in Table 1. Wait till auto calibration is over. Then check if the picture and sound is normal. If
there has been interference to the picture then press the auto set key on the remote control once
again and check if the display is normal.
Table 1 Display Format of PC
Item
1 640 x 480 @ 60 25.175 31.469 59.900
2 720 x 400 @ 70 28.322 31.469 70.086
3 800 x 600 @ 60 40.000 37.879 60.317
5 1024 x 768 @ 60 65.000 48.363 60.004
Resolution
Picture
element clock
(MHz)
H-SYNC
(kHz)
V-SYNC
(Hz)
Remark
e) YprPb Interface
Connect to access YPrPb signal(K7253 signal generator). Separately input the five types of YprPb
format signals -- 480P/50 Hz,480P/60 Hz,720P/60 Hz,1080I/50 Hz,1080I/60 Hz and check if the
picture and sound is normal after auto calibration is over.
Connect to access YprPb signal(DVD signal generator). Input the signals -- 480I/50 Hz,480I/60 Hz
separately and check if the picture and sound is normal.
8 Preset ex-works
In the status of TV enter the factory menu by pushing the factory key and then perform presetting.
9 Ex-works packing
Check accessories and then pack them in box.
Trouble shooting
Before servicing please check to find the possible causes of the troubles according to the table below.
1.Antenna:
Picture is out of focus or jumping Bad status in signal receiving
Maybe broadcast signal itself is not good
Check if the outdoor antenna is disconnected.
Check if the antenna is correctly oriented.
Fringe in picture Check if the antenna is correctly oriented.
Maybe there is electric wav e reflect ed from hillt op or building.
Picture is interfered by stripe
shaped bright spots
There appear streaks or light color
on the screen
Possibly due to interference from automobile, train, high
voltage transmission line, neon lamp etc.
Maybe there is interference between antenna and power
supply line. Please try to separate them in a longer distance.
Check if interfered by other equipment and if interfered
possibly by the equipment like transmitting antenna, non
professional radio station and cellular phone.
5
Page 8
2.TV set:
Symptoms Possible cause
Unable to switch the power on Check to see if the power plug has been inserted properly into
the socket.
No picture and sound Check to see if the po wer supply of liquid cr ystal T V ha s been
switched on. (as ca n be indic ated by th e red LED at the front
of the TV set)
See if it’s receiving the sig nal that is transmitted f rom other
source than the station
Check if it’s connected to the wrong terminal or if the input
mode is correct.
Check if the signal cab le co nnec ti on b et we en vid eo f r equency
source and the liquid crystal TV set is correct.
Deterioration of color phas e or c olor
tone
Screen position or size is not proper Check is the screen position and size is correctly set up.
Picture is twisted and deformed Check to see if the picture-frame ratio is properly set up.
Picture color changed or colorless Check the “Component” or”RGB”setti ngs of the liqui d c r ystal
Picture too bright and there is
distortion in the brightest area
Picture is whitish or too bri ght in the
darkest area of the picture
No picture or signa l produced from
the displayer if “XXX in
search”appears.
There appears an indication “outside the receivable scope)
Remote control cannot work
properly
No picture and sound, but only
hash.
Check if all the picture setups have been corrected.
TV set and m ake proper adjus tment according to the signal
types.
Check if the contrast setting is too high.
Possibly the output quality of DVD broadcaster is set too high.
It maybe also due to improper terminal connection of the video
frequency signal in a certain position of the system.
Check if the setting for the brightness is too high
Possibly the brightness grade of DVD player(broadcaster)is
set too high.
Check if the cable is disconnected.
Check if it’s connected to the proper terminal or if the input
mode is correct.
Check if the TV se t can receive inpu t signal. T he signa l is not
correctly identified and VGA format is beyond the specified
scope.
Check if the batteries are installed in the reverse order.
Check if the battery is effective.
Check the distance or angle from the monitor.
Check if there is any obstr uct bet ween the rem ote contr ol and
the TV set.
Check if the remote control signal- receiving window is
exposed to strong fluorescence.
Check if the antenna cable is correctly connected, or i f it has
received the video signal correctly.
6
Page 9
Blur picture Check if the antenna cable is correctly connected.
Of if it has received the right video signal.
No sound Check if the “mute” audio frequency setting is selected.
Check if the sound volume is set to minimum.
Make sure the earphone is not connected.
Check if the cable connection is loose.
When playing VHS picture search
tape, there are lines at the top or
bottom of the picture.
When being played or in pause VHS picture search tape
sometimes can’t provide stable picture, which may lead to
incorrect display of the liquid crystal TVIn this case please
press “auto” key on the remote control so as to enable the
liquid crystal TV set to recheck the signal and then to
display correct picture signal
Method of software upgr adi ng
Steps of soft w are upgrading are as follows :
1. Select a serial connection wire and a VGA connection wire and then connect them by means of a
patch panel;
2. Use a serial wire to connect the PC to the patch panel and set TV set t o off state;
3. Open the software upgrade file holder and double click
FlashUpgraderNT(use under window 2000/XP/NT)
FlashUpgrader(use under window 98),
The following interfaces will show up after running the pr ogr am:
7
Page 10
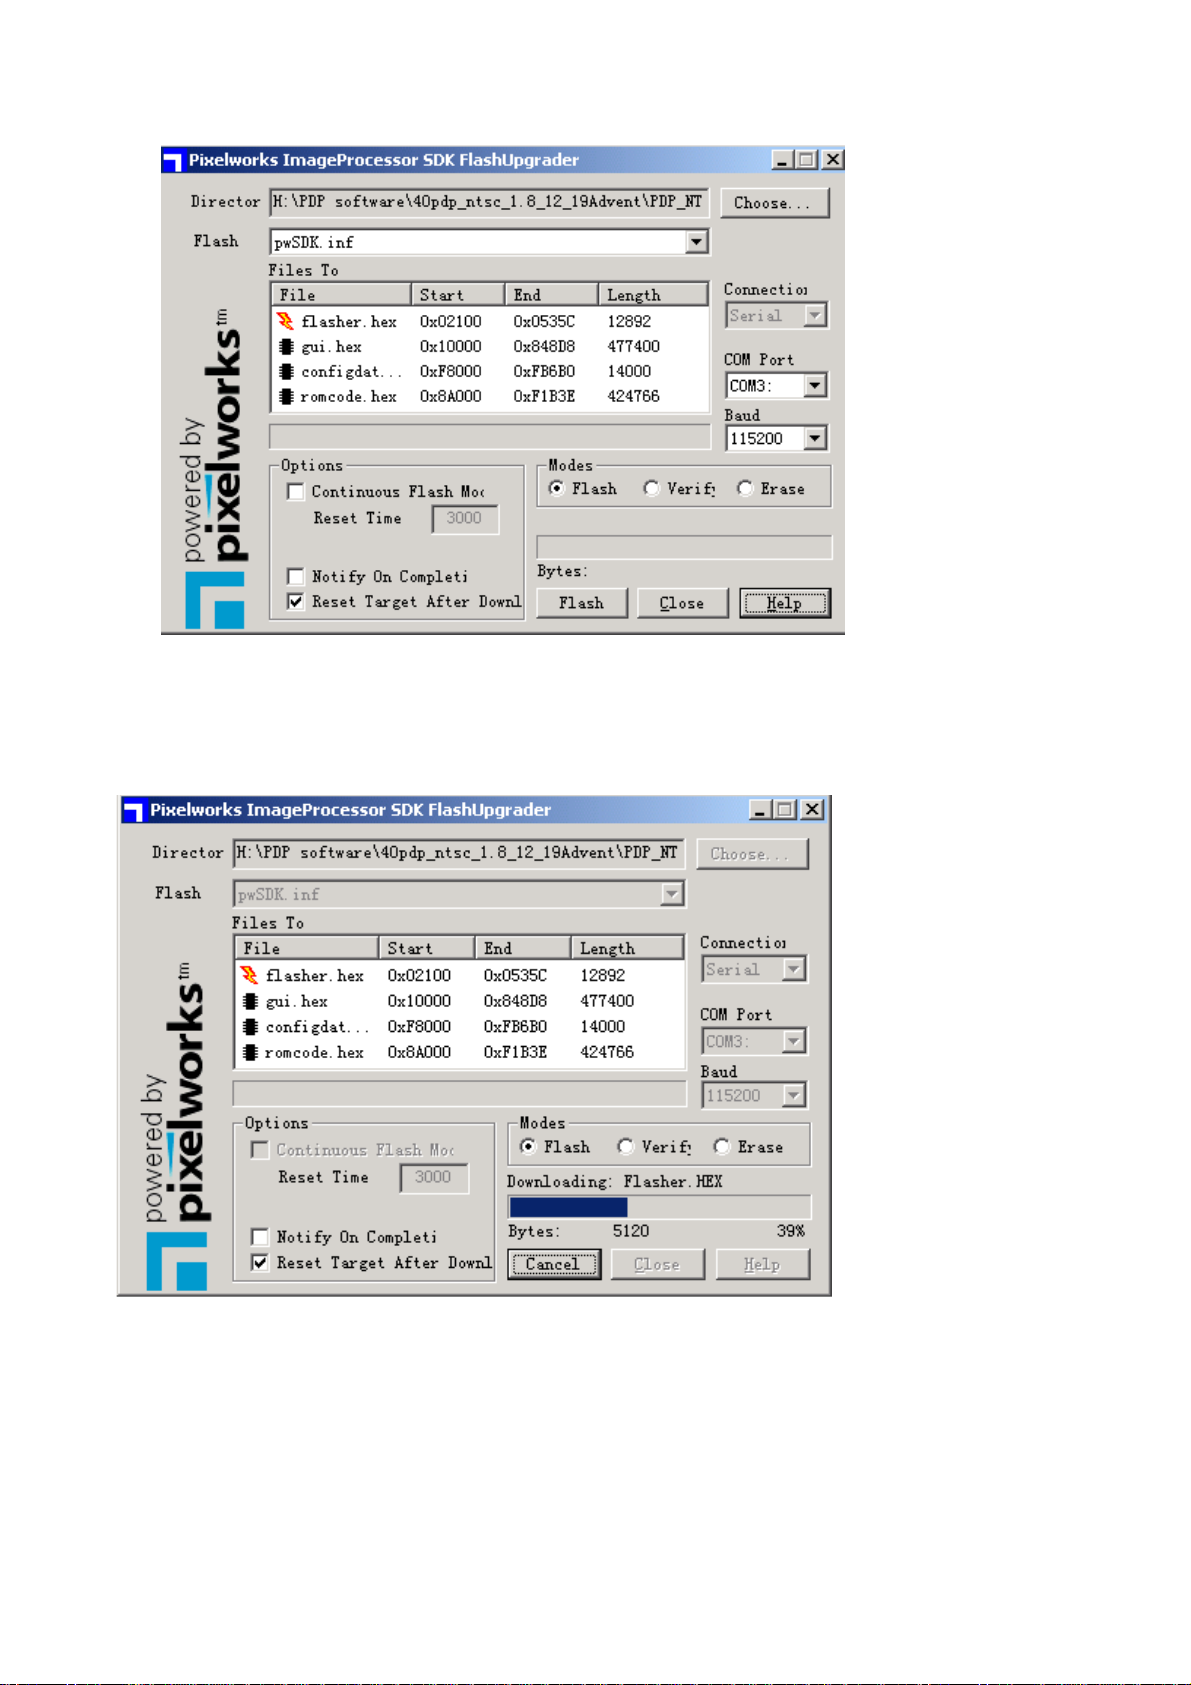
Based on the computer features, set up the serial port(COM Port). Select corresponding serial port
(if it’s unable to FLAS H WRITE, change t o another port) . Baud is se lected to be 115200. Then select
Reset Target After Download. Click FLASH pushbutton, it’s ready to run. For other settings, please
refer to the Fig. Above (already defaulted by the system, normally no need t o change).
4. Switch on TV set the FLASH write program begins to run;
5. After FLASH write is over, push button “cancel” will become flash. Then shut the main power supply
and it’s OK just switch it on again.
Note: Do not shut the power off or turn the TV set on during the FLASH write. Otherwise it may
lead to no way for flash to rewrite.
8
Page 11

Briefing on LC20H15 and its working principle
LC20H15 multi-media liquid crystal TV broadcast and receiving set adopts liquid crystal display
screen of LG 20.1, which is provided with NTSC color system receiving function in addition to AV
input,S-VHS input,high definition signal port for component YPrPb/YcbCr,PC VGA port, earphone
output and other signal ports. For power supply an ext ernally connect ed power adaptor is provided.
The circuitry of LC20H15 is composed of RF module board, video signal board, digital signal picture
processor and AC-DC tr ansformer, and DC-DC circuit board.
The working process is as f ollows. The radio frequency signal undergoes an integrated tuner U1
before a color full vid eo signal is generated. This video signal t hen enters analog board decoder IC N1
VCT3833 Pin19 where it is processed and it’s output as analog signals R, G, B through Pin42, PIN43,
PIN44. Audio frequency signal is processed with sound in IC N1 VCT3833 Pin19 and then output
through MSP3420G Pin28 , Pin27 to SRS for surround sound processing in IC N6 M62494E. Finally it
is subject to power amplification in IC N8 TDA3002D2 before it is output to speaker.
VGA signal/high definition signal is input to personal computer through the main board. The signal
selected by Y/Pb/Pr t hrough 5 way 1/2 swit ches IC(U9 B A7657 F)is sub ject to resel ectio n together w ith
signal TVRAIN, TVG AI N, TVBAI N t hrough 5 w ay 1/ 2 swit ch es I C(U7 B A7657 F). Fi na lly si gna ls R, G, B
are selected and sent to the main processing chip PW1306.
PW1306 is a built-in X86 CPU of the main processing IC,externally connected by 8M Flash(U13)
memory to control the whole system. The input signal of V-port and G-port is subject to internal
arithmetic processing and then out put as R, G, B signals with electric level of 24 bit TT L to sockets JP3
and JP4, where through connection wires the signals are sent to the port of LG liquid crystal screen
and for the realization of picture reproduction.
9
Page 12

(1). BLOCK DIAGRAM
LCD panel
transform
MAIN ROCESS CHIP
C BUS
memory
VIDEO OUT
SPEAKER
CRYSTAL 20.25M
POWER AMP.
C BUS
EARPHONE OUTPUT
C BUS
ANTENNA
c BUS
VIDEO DECODING
sound processing
supply 12V to backlight and power amp.
Supply 12V to LCD panel
TUNER
VGA interface
10
Page 13

Among which:
Video decoder: VCT3833 Picture processing: Pw1306
Audio processing: MSP3420 Sound amplification:TDA3002D2
Signal selection:BA7657F LVDS conversion:DS90C385
FLASH memory:M29LV800TTC-90 SRS sound field:M6294E
(2). Power supply
12 V is input through power supply adaptor and then is transformed through DC-DC into output of
5 V, which after going through various kinds of three terminal stabilizing integrated circuits, is output
as 1.8 V and 2.2 V. U3 is a power supply managing IC, which cuts off the 5 V output in the case of
standby so as to keep low power consumption.
1.U3(ATTINY12L):Power supply manager IC is a small CPU.
This IC is supplied with 5 V that is transformed from 12 V by stabilizer Tube VD102. This CPU only
receives POWER signal;
When its PIN7 outputs high electric level,U1 LM2596 will be in operation and outputs 5V. Then the
whole system starts to work and ensures low power consumption in the case of Standby.
2.U19(IRF7307):double tube MOS switching tube
The voltage of this part V12-STB is for power amplification of sound. Only when LCDON/LVDSON is
of high electric level can the output of Pin7 and Pin8 be low,and the output of Pin5.Pin6 be
12V.When LCDON/LVDSON is of low electric level, output of Pin7 and Pin8 is low,and the output of
Pin5 and Pin6 is 0. This ensures low power consumption when Standby.
3.Other IC
U1(LM2596):with on/off DC-DC stabilizer 5V output.
U2(AS2830):three terminal stabilizer, 3.3V output.
U4 U5(LM1117MPX):three terminal stabilizer, 1.8 V output
(3). Video decoder (VCT3833)
SGND
VIN
CIN
VOUT
4
3
VRT
Video
Front-end
Video
TPU
24 kB ROM
3kB
3kB
OSD
OSD RAM
16 kB
Te xt
RAM
GNDAF
VSUPAF
VCT 38xxA/B
Comb
Filter
DMA
31
Color
Decoder
BE
RDY
VSUPD
Panorama
8
CPU
1kB
CPU RAM
96 kB
CPU ROM
GNDD
Scaler
2
IC
MSync
Color, Prio
VSync
EW
VERT
2 2
Display
Processor
Pict.Improv
2
I
C Master
8-bit PWM
14-bit PWM
15:1 Mux
10-bit ADC
2 Timer
2 CapCom
Watchdog
24 IO Ports
PROT
HOUT
HFLB
SENSE
Back-end
Audio
Oscillator
RSW2GNDM
Video
Reset
Logic
Clock
XREF
VRD
3
RGBOUT
SVM
4
RGBIN
VSUPAB
GNDAB
2
AOUT
3
AIN
2
2
IC
RESQ
TEST
XTAL1
XTAL2
ADB, DB, CB
12
Pxy
GNDP1
VSUPS
VSUPP1
CLK20
11
Page 14

VCT38XXA/B is a single chip TV processing IC for high picture quality. Modular design and
workmanship of sub-micro level enables it to use in all TV equipment. It includes complete display of
video format processing. The video front terminal unit provides an analog interface for all video inputs
and performs analog-digital conversion for the downstream digital video processing.
As many as 8 analog inputs can be connected of which 4 inputs are used for the input of composite
video or S-VHS brightness signal, 2 color inputs can be used to connect the signal of S-VHS carrier
frequency (chroma). For analog YcbCr signal, the input of the brightness that is selected is used
together with the input of CBIN and CRIN. Automatic gain control works in digital manner. In the
mode of YCbCr ,the gain of chroma channel is fixed and is applicable for 0.7Vp-p nominal amplitude.
However, should there appear ADC overflow, an excessive signal scope 1Vp-p can be selected.
Two ADC (analog-digital conversion) are used to digitalized the input signal. The converter has an
analytic degree of 8 digits. Reference voltage required by the converter is produced by an integrated
band-gap circuit. An adaptive comb filter is used to carry out high quality Y/C separation for
PAL/NTSC signal and to improve the resolution of brightness (band width) and reduce the
interference of color contamination and brightness contamination. Proper programmable limit to the
quantity of characteristic Luma Comb improves the uniformity of 2D resolution. This limitation is set
up by the data of CLIM (turning point).
Color decoder
Processing of both brightness and color is shown here. The color decoder also provides the format
of broad band chroma etc. for the use of S-VHS broad band broad chroma. If self-adaptive comb filter
is used to carry out high quality Y/C separation, then the color decoder conducts the processing in SVHS manner. The format of color decoder input is YCrCb 4:2:2. Rear terminal of video frequency
Digital RG B signal can all be converted into analog RGB. It is provided by 3 DAC (digital-analog
conversion), an analog brightness value and another 3 DACs. Its regulation scope is 40% of the
whole RG B.
TV controller
TV controller is composed of CPU,RAM,ROM and some peripheral modules. It includes a memory
module that can access over 64 KB, a pilot installation software allowing for downloading the external
codes into Flash memory. The controller runs a complete set of software required to control TV. The
software includes such control functions as video, OSD and text processing. It also includes the
control for external parts and components such as tuner and stereo decoder. The communication
between the controller and external parts is interfaced by means of I2C bus line(highway) and can
also be connected by the pin at programmable port.
12
Page 15

(3).Audio frequency part
1.MSP3450G
MSP3450G is one of MSP34x0G series. It is a single chip multi-system processor for sound,
which covers global wide analog TV system processing for sound. In the case of NICAM digital
sound system, all the TV sound processing from analog IF signal input to AF-OUT (audio output)
after processing is performed in this single chip.
The sound signal of TV, AV, S-VIDEO, Y.Pb.Pr ,VGA is input through the ports of MSP34x0G (pin
67 for TV),(pins 53,54 for AV1),(pins 56,57 for AV2),(pins 50,51 fir YPBPR),(47,48 pins for VG)and
the present sound form is automatically inspected. Besides, the electric level s of pilot frequency and
identification signal is inspected and measured internally by the sequence switch between
MONO/STEREO/BILINGUAL, and it's unnecessary to be processed through the bus line. The
processed signal is output through pins 27 and 28 and then fed to pins 1 and 2 of N403 M6249 for
SRS treatment.
MSP3450G
Sound IF1
Sound IF2
SCART1
SCART2
SCART3
SCART4
MONO
ADC
2
I
S1
2
I
S2
SCART
DSP
Input
Select
De-
modulator
ADC
Pre-
processing
Prescale
Source Select
Prescale
Loud-
speaker
Sound
Processing
Headphone
Sound
Processing
DAC
DAC
DAC
DAC
SCART
Output
Select
Loudspeaker
Subwoofer
Headphone
2
IS
SCART1
SCART2
13
Page 16

2. M62494SP
SRS technology is incorporated in M62494SP. The full name of SRS is sound retrieval system,
implying a sound system that can reproduced and restore the stereo sound that is taking place at the
site. It is a patented sound technology of SRS Lab USA.
The signal is fed to pins 1 and 2 of M62494 through pins 27 and 28 of MSP34x0. After processing
it is sent to pins 3 and 5 of TPA3002D of N404 where it is amplified and output. From pins 11 and 12
the control signal of stereo and mono sound channel is sent to pin 2 (mono sound) and pin 63
(stereo), where selection is made.
20
REF OUT
19
+
REF
18 17 16 15
-
14
12 11
13
MONO
STEREO
1 2
3 4
5
1
6
4
7 8 9
10
Page 17

3.TPA3002D2
Sound power amplification TPA3002D2:(power amplification of stereo category D with volume
control)
TPA3002D2 is a high efficiency audio frequency amplifier of category D. The gains scope provided
is -40dB to -36dB. Supply voltage is 12V. The input of the amplifier is differential input (any noise at
the two input sides of the channel can be eliminated). The modulation of TPA3002D2 for various
outputs is from 0 to the supply voltage. However out P (positive output) and out N (negative output)
are now at the phase where they have no input to each other. For positive output voltage, the duty
cycle of OUT P is bigger than 50% and that for OUT N is less than 50%. For negative input voltage,
the duty cycle of OUT P is lower than 50% and that for OUT N is higher than 50%. In most of the
period the voltage to the load is 0V, which greatly reduces the switching current thus lowering the
power consumption of the load.
For BTL output (differential output), the voltage at the two output pins is 180 degree out of phase.
Load is connected between the two pins, thus enabling the load to get four times the output power
and reducing the baffle to the DC capacitor (BTL output is equal to balanced output).
TPA3002D2
V2P5
VAROUTR
V2P5
V2P5
Gain
Adj.
Cint2
PVCC
VClamp
Gen
Gate
Drive
VCLAMPR
BSRN
PVCCR(2)
ROUTN(2 )
VREF
VOLUME
VARDIFF
VARMAX
REFGND
ROSC
COSC
AVDDREF
AVDD
MODE
MODE_OUT
RINN
RINP
LINN
LINP
PGNDR
BSRP
PVCCR(2)
ROUTP(2)
PGNDR
AVCC
AGND
VCLAMPL
BSLN
PVCCL(2)
LOUTN(2)
PGNDL
BSLP
PVCCL(2)
LOUTP(2)
PGNDL
Biases
Deglitch &
Modulation
Logic
Gate
Drive
OC
Detect
Startup
PVCC
VClamp
Gen
Deglitch &
Modulation
Logic
Protection
Logic
Gate
Drive
Gate
Drive
&
Thermal
VDDok
VCCok
VDD
AVCC
Gain
Adj.
V2P5
Buffer
To Gain Adj.
Blocks
AVDD
Gain
Adj.
Gain
Control
Gain
Adj.
TTL Input
Mode
Control
V2P5
SD
V2P5
Rfdbk2
Rfdbk2
Rfdbk2
Rfdbk2
Ramp
Generator
5V LDO
Cint2
V2P5
References
Cint2
Cint2
VAROUTL
15
Page 18

(5). Processing of photograph
PW1306 is an optimized graph processing IC used for plane displayer (monitor).
1.U12 74LVC541A is an 8-digit buffer. Its input and output have 3 state functions. When OE1 and
OE2 are both low electric level, Ii and Oi are in on state. Otherwise Qi is three states. Controlled by
RD,CSO signal of PW1306, PW1306 reads the information about the push key and decodes the key
according to the state of D0 \ D7.
2.PW1306 provides three terminals for data of 24 bits,of which one is specialized for input (VG
port) of Video/graphics data, one is specialized for the display of output port (terminal D), another
one is a terminal (DG port) for the data of definable double direction display output/graphics input.
DG port is defined as input mode, which can be independently considered as a VG port or can be
formed, together with the original VG terminal, into an input port for 48 bit 2 picture element/every
clock. Once DG port is defined as output mode, it can be formed, together with D terminal, into a
displayer of 48 bit for double point (double click) screen.
· PW1306 with built in OSD function,in support of transparent and semi-transparent OSD,and with
phased-in and phased-out function.
·PW1306 includes an 80X86 CPU,16 bit micro processor, with interruption port, universal I/O ports,
VART port, IR decoder, PWM output port and timer and a memory port applicable for various
PROM,ROM,FLASH,RAM.
Signal flow direction of PW1306:
1. LG screen(single point screen)display of data output
· DRE[7:0],DGE[7:0],DBE[7:0]
· DCLK ,DEN,DHS, DVS
2.PW1306 FLASH interface
·A(19:1) to the address bus of flash.
·D(15:0) to the data bus of flash.
·ROMWEN write in enable of Flash.
· ROMOEN output enable of Flash.
3. other signals
·Reset signal from small CPU.
·RD,CSO,I/O extension control.
·TXD,RXD universal asynchronous sending and receiving.
· SDA,SCL I2C bus
· IR: infrared signal input from remote controlled receiving board.
· P15V330A P15V330B controls the 5 way 1/2 switch of BA7657F.
· NMI non-screened interruption.(for access to programs)
· RAIN GAIN BAIN R,G,B three base color input
·HSYNC VSYNC input
·PWM OUT: output of modulated pulse width for the control of the brightness of display screen ·
LVDSON:to control the POWER DOWN of the sender of LVDS
·BKLON:control signal for back lights
·LCDON :control signal for the power supply of PANEL ·SDA1,SCL1,ACK,REQ to X603 and the
to analog plate for communication with the analog plate.
·Flash ID: for normal operation when in low electric level and for flash write software when in high
electric level.
16
Page 19

PW1306
HSYNC,
VSYNC
B/Pb
A/DCla mp
G/Y
A/DClamp
R/Pr
A/DCla mp
SOYIN
FILT
Stripper
SOY
Processing
PLL
Sync
ADC
CLK
CSC
HS
VS
GPIO PWM
Im age
Auto
Pow e r On
Reset
RESET
Oscillator
XI XO
Reset
MCLK DCLK UCLK
PLL and
Enhanceme nt
Scaling &
Video
Matrix
Color
OSD
Gai n
and
Memory In Bus
Memory
Buffe r
Memory Out Bus
Processor
Interface
Memory
Decoder
IR
2-Wire
Serial
OSD
Microprocessor Bus
Microprocess or
16-Bit
PW1306 Video ImageProcessor
Processor ROM/
Internal Block Diagram
Lookup
Tab le s
Color
Watchdog and
Timers
Generator
Timing
Expan de r
Display
Space
Color
RAM Inter fac e
Controller
Interrupt
Por tA & D (7 :0)
(19:1)
A
(15:0)
D
(1:0 )
CS
NMI
UART
DERGB (23:0)
DVS, DHS ,
DEN, DCLK
DORGB(2 3:0)
RxDTx D
17
Page 20

WIRING DIAGRAM
18
Page 21

Serial No. of Parts
335-2000-00 Display screen
203-L20H8-01W Parts of main board
302-AD16A-02 adapter
667-L20H8-05 Parts of big key board
667-L20H8-09 Parts of infrared receiving board
667-L22H8-55 Parts of TV board
667-L20H81-05 Parts of small key board
667-L20H8-55 High frequency board
Identification criteria for the bright spot and dark spot of the LCD screen
Category criteria
One single
Bright
spo
t
Dark
spots
Total defected point ≤8 ≤7 ≤5 ≤4 /
Notes:
.1. Definition of defected point (bright spot, dark spot): It is identified as a defected point if its
2. Definition of bright spot: It is identified as a bright spot if it is bright in the state of dark field
3. Definition of dark spot: It is identified as a dark spot if it is dark in the state of white field and
spot
2 neighboring
spots
Total No. ≤5 ≤2 ≤5 ≤2 ≤3
One single
spot
Two
neighboring
spots
Total No. ≤6 ≤7 ≤5 ≤4 ≤10
area exceeds 1/2 of a single picture element (R,G,B).
and its bright size remains unchanged
its dark size remains unchanged
15" 20" 22" 30" 40" 15" 20" 22" 30" 40"
≤5 ≤2 ≤5 ≤2 ≤3
≤2 ≤1 ≤2 ≤1 ≤1
≤6 ≤7 ≤5 ≤4 ≤10
≤2 ≤2 ≤2 ≤1 ≤5
Q’ty allowed Distance between two spots
≥15mm
≥15mm
≥10mm
≥5mm
4. Definition of two neighboring points: Defects of a group of picture elements(RB,RG,GB).
19
Page 22

Troubleshooting guide
No raster
Does the logo appear on the screen
when turning on the set ?
Yes Yes Good
Check whether there is R.G.B
output at X601 on TV board.
No
Replace TV board.
No sound
No No
Check whether the adapter
supply 12V power to Digital Board.
Check U125965V. Check whether FUSE is melted.
Good
Check whether U18 pin 63
is high level.
No
Replace Digital board.
Check whether X101 is
properly inserted.
No
Replace adapter.
Check N8 pin 14, 15, 22, 23, 38,
39, 46,47 (these pins should
have 12V power supply)
Yes
Check N8 pin3, pin 5's input signal.
Yes
Check whether N8 pin 4, 27, 28 are
normal. Pin 4 should be 2.43V,
pin 27 should be 1.46V and
pin 28 should be triangle wave.
No
Replace N8.
No
Check L302, X604 pin 5 and pin 6.
No No
Check N6 pin 5 and
pin 8 signal.
Yes
Check N8's welding
condition.
20
Check N5 pin 27
and pin 28 signal.
No
Check N5 pin 67 signal.
No
Check whether U1 pin 11
have output waveform.
Page 23

TV board troubleshooting
No picture but have raster.
Measure the waveform of
R.G.B Hors, Vers at X7.
No
Check whether N1 has
5V power supply.
Yes
Measure N1 pin 33, pin 35
waveform.
Yes
Measure N1 pin 42, pin 44
waveform.
Yes
Check V105-V107's
output waveform.
No
No
Check whether X9 pin 1, pin 2 have
No
5V power input.
Replace N2
No
Replace V105-V17.
No
Replace N1
21
Page 24

4321
PW130
D
RGBSWITCH
RGBSWITCH.SCH
RXD
TXD
FLASHID
C
POWER
POWER.SCH
LVDSON
LCDON
RESETn
IR
FLASH
FLASH.SCH
IR
B
RESETn
SCL
RAIN
GAIN
BAIN
HSYNC
VSYNC
PI5V330A
PI5V330B
HOLD
POWER
LED
LED
ROMWEn
IR
ROMOEn
A<19:1>
D<15:0>
NMISDA
RESET
PW130.SCH
SDA
SCL
RAIN
GAIN
BAIN
HSYNC
VSYNC
PI5V330A
PI5V330B
FLASHI D
POWER
HOLD
ROMWEn
IR
ROMOEn
A<19:1>
D<15:0>
NMI
RESET
REQ
SDA1
SCL1
BUSY
TXD
RXD
LVDSON
LCDON
DRE<7:0>
DRO<7:0>
DGE<7:0>
DGO<7:0>
DBE<7:0>
DBO<7:0>
DCLK
DVS
DHS
DEN
BLKON
PWM
LVDSOUTPUT
LVDSOUTPUT.SCH
TXD
RXD
TTLOUTPUT
TTLOUTPUT.SCH
DRE<7:0>
DRO<7:0>
DGE<7:0>
DGO<7:0>
DBE<7:0>
DBO<7:0>
DCLK
DVS
DHS
DEN
BKLON
PWM
REQ
SDA1
SCL1
BUSY
LCDVCC
SCL
SDA
SCL
SDA
LCDVCC
RESET
LCDON
LVDSON
D
C
B
A
Title
Number RevisionSize
B
Date: 5-Nov-2003 Sheet of
1 2 3 4
File: F:\temp2\A-USER\PW130V1.prj Drawn By:
18
A
Page 25

4321
VD104
D
LCDON
LVDSON
IN4148
VD105
IN4148
L112
V12
STPB-300
PGND1
C
X101
FUSE
12V
0
PGND4
B
V12
R101
1.5K
VD102
HZ5V1
16V100u
A
C132
C134
0.1u
0.1u
GND
C133
1 2 3 4
R102
1.5K
C119
0.1u
V5-STB
C138
0.1u
16V 2200u
R112
100K
C137
0.1u
V5
C101
STPB-300
R103
10K
GND
R125
20K
PGND1
L103
C102
0.1u
1
PB5
2
PB3
3
PB4
GND4PB0
ATTINY12L
R113
1K
1
2
3
R124
100K
C108
10V 100u
V12
V12
VCC
U3
U19
IRF7307
S1
G1
S2
G24D2a
GND GND GNDGND
1
Vin
C109
0.1u
LM2596
on/off
5
D1b
D1b
D2a
U1
3
8
7
6
5
Feedbad
output
GND
AS2830
Vin
MBRD340
C135
0.1u
U2
VD101
R118
47K
PB2
PB1
V102
BC847
GND
8
7
100
6
100
5
R114
100
R115
R116
R107
4.7K
V12-STB
PGND1
Vout
GND
4
2
C110
0.1u
R109
10K
VDDQ3
L101
33uH
R104
4.7K
R119
10K
POWER
RESETn
16V 470u
IR
HOLD
STBH-102
10V100u
L108
6.8uH
10V100u
C111
10V 100u
C103
R106
4.7K
L107
C121
C123
STBH-181
5V
R117
4.7k
C122
0.1u
GND GND
AVDD
C124
0.1u
L106
C115
10V47u
C116
GND GND GND
0.1u
L102
STPB-300
C104
0.1u
U5
LM1117MPX
Vin
Vout
GND
C127
0.1u
U4
LM1117MPX
Vin
Vout
GND
C106
10V 22uF
V12
V103
R120
10K
BC847
GND
V5
18
C117
0.1u
GND
GND
C128
10V100u
V5
R121
1.8K
GND
C107
0.1u
DVDD1
R122
1.8K
LED
V18
R123
1.8K
V12-STB
C118
10V 47u
L110
22uH
C129
10V100u
C130
10V100uF
PGND1
V5-1
C131
0.1u
X102
Title
A4
Date: 5-Nov-2003 Sheet of
File: F:\temp2\A-USER\POWER.SCH Drawn By:
PGND4
RZ1
0
PGND6
D
C
B
A
Number RevisionSize
38
Page 26

321
4
VDDQ3
R223
GND
V202
BC847
14
13
12
11
10
9
8
1
2
3
4
5
6
V5-1
R245
12k
C227
2n2
VSYNC
HSYNC
3.3K
1OE
1A
1Y
2OE
2A
2Y
GND73Y
U10
74LV126
R240
3K9
R241
1k
1
2
3
4
5
6
7
C222
0.1u
VCC
4OE
4A
4Y
3OE
3A
A1
B1
CLR1
Q1
Q2
C2
R2
GND8A2
AVDD
R231
FLASHID
RXD
TXD
VDDQ3
R222
C212
10V47u
3.3K
1
2
3
4
5
6
7
V5-1
U6
74HC14A
GND
R239
1K
AVDD
R221
3.3K
V5-1
22
L206
X204
PHONE
L212
3.3uH
L211
3.3uH
Y
Pb
Pr
X202
YPbPr
L209
3.3uH
L210
3.3uH
3.3uH
L207
3.3uH
L208
3.3uH
R214
75 R215
X201
VGA
1
2
3
4
5
6
7
8
9
10
11
12
13
14
15
AVDD AVDD
R201
10K
VD201
BAV99
VD202
BAV99
R226
R227
10K
10k
17L
RR
75
L203
121H
R
G
L204
121H
B
L205
121H
C213
68p
C214
68p
C215
68p
R202
10K
VD203
BAV99
R228
R229
10K
10k
R203
2K
VD204
BAV99
L
R216
75
R21175R212
R204
2K
AVDDAVDD
X203
75
X206
TVRAIN
TVGAIN
TVBAIN
TVHSYNC
TVVSYNC
C204
1u
C205
1u
C241
10V22u
C201
0.1u
C240
10V22u
R213
R209
100
75
C237
10V22u
C216
1u
C218
1u
V5-1
R217
100
R218
100
R219
100
R220
10K
R210
100
H
V
C239
10V22u
C202
10V47u
V5
L202
751H
L201
751H
8
7
6
5
10V22u
VCC
WP
SCL
24LC21
C217
1u
10V22u
C238
C235
U11
VSS4SDA
R246
19
TVRAIN
TVGAIN
TVBAIN
TVHSYNC
TVVSYNC
C232
10V47u
C203
C208
1u
1u
R250
1K
1
R1 IN
2
HD DET
3
G1 IN
4
GND
5
B1 IN
6
GND
7
R2 IN
8
GND
9
G2 IN
10
GND
11
B2 IN
VD1 IN12VD2 IN
C234
10V22u
C206
1u
C207
1u
C210
0.1u
1
A0
2
A1
3
A2
GND
C236
10V22u
BA7657F
1
R1 IN
2
HD DET
3
1k
G1 IN
4
GND
5
B1 IN
6
GND
7
R2 IN
8
GND
9
G2 IN
10
GND
11
B2 IN
VD1 IN12VD2 IN
HD OUT
COM IN
COM OUT
VD OUT
U7
BA7657F
HD1 IN
HD2 IN
R OUT
G OUT
B OUT
VCC
CTL
24
23
22
R247
21
100
20
V5-1
R248
19
100
18
17
16
PI5V330B
R249
15
100
14
13
HD1 IN
HD2 IN
HD OUT
R OUT
VCC
G OUT
COM IN
COM OUT
CTL
B OUT
VD OUT
U9
RAIN
GAIN
BAIN
C209
1u
24
23
22
R235
21
100
20
V5-1
19
18
17
16
PI5V330A
15
14
13
C221
22p
R232
2.2K
R236
100
R238
68k
R237
100
V5-1
R230
C211
0.1u
22
C220
22p
R233
2.2K
D
C
B
X205
A
14
13
12
11
10
9
8
R242
10k
C228
39n
CLR2
U20
74LS221
C223
10V 10u
R224
10K
VCC
VDDQ3
R225
8.2K
V201
BC847
GND
VDDQ3
C231
10V22u
C230
GND
0.1u
V5-1
R243
1k
V203
C229
BC847
18n
16
V5-1
15
R1
C1
Q1
Q2
B2
14
13
12
11
10
9
C224
0.1u
V5-1
V5-1
C226
2n2
R244
22k
C225
10V47u
D
C
B
A
Title
Number RevisionSize
B
Date: 5-Nov-2003 Sheet of
1 2 3 4
File: F :\te mp2\A-USER\RGBSWITCH.SCH Drawn By:
48
Page 27

4321
47R
132
133
VDDQ3
DGO<7:0>
DGO0
DGO1
DGO2
DGO3
DGO4
DGO5
DGO6
DGO7
118
DGG2
GND
117
DGG4
DGG3
C314
10V 22u
116
115
DGG5
C313
0.1u
C310
114
DGG6
47n
R330
47RR329
113
DGG7
106
107
108
109
110
111
112
DGB5
DGB4
DGB3
DGB2
DGB1
DGB0
DCLKNEG
C309
C308
47n
1n
DRO0
DRO1
DRO2
DRO3
DRO4
DRO5
DRO6
DRO7
47RR327
R328
47R
119
120
121
122
123
124
125
126
127
128
129
130
131
VSSQ
DGR7
DGR6
DGR5
DGR4
DGR3
DGR2
DGR1
DGR0
RESET_N
GND
V18
L303
22uH
C316
0.1u
C317
0.1u
C312
0.1u
DGG0
VDDQ3
C315
0.1u
DGG1
DCLK
105
VSSQ
52
VDDQ3
DEN
DHS
DVS
DGB6
DGB7
DR0
DR1
VSS
VDD1
DR2
DR3
DR4
DR5
DR6
DR7
DG0
DG1
DG2
DG3
VSSQ
VDDQ3
DG4
DG5
DG6
DG7
DB0
DB1
VSS
VDD1
DB2
DB3
VCLK
DB4
DB5
VSSQ
VDDQ3
DB6
DB7
HSYNC
VSYNC
VYUV0
VYUV1
VYUV2
VYUV3
VYUV4
VYUV5
VYUV6
VYUV7
VPEN
TXD
RXD
AVDD
C307
47n
BAIN
GAIN
RAIN
R331
47R
GND
104
103
102
101
100
99
98
97
96
95
94
93
92
91
90
89
88
87
86
85
84
83
82
81
80
79
78
77
76
75
74
73
72
71
70
69
68
VDDQ3
67
66
65
64
63
62
61
60
59
58
57
56
55
54
53
GND
Title
B
Date: 5-Nov-2003 Sheet of
File: F:\temp2\A-USER\PW130.SCH Drawn By:
V18
V18
R310
3.3K
VDDQ3
VDDQ3
GND
R339
3.3K
HSYNC
VSYNC
POWERON
LCDON
LVDSON
BKLON
HOLD
PI5V330B
PI5V330A
TXD
RXD
C635
10V 100u
Number RevisionSize
R332
R333
C643
10V 100u
VDDQ3
GND
47R
R334
R335
47R
47R
V18
GND
C636
0.1u
DBO0
DBO1
DBO2
DBO3
DBO4
DBO5
DBO6
DBO7
47R
R336
47
C644
0.1u
C637
0.1u
47
47
47
DRE0
DRE1
DRE2
DRE3
DRE4
DRE5
DRE6
DRE7
R337
R338
DVDD1
10V 47u
47R
C645
0.1u
C638
0.1u
C620
DBO<7:0>
DBO<7:0>
DVS
DGE0
DGE1
DGE2
DGE3
DGE4
DGE5
DGE6
DGE7
47R
47R
GND
C646
0.1u
C639
0.1u
DCLK
DEN
DHS
DBE0
DBE1
DBE2
DBE3
DBE4
DBE5
DBE6
DBE7
R315
C621
0.1u
C647
0.1u
C640
0.1u
58
R312
R313
R314
DRE<7:0>
C622
0.1u
C648
0.1u
C641
0.1u
DGE<7:0>
DBE<7:0>
C649
0.1u
C642
0.1u
C623
0.1u
D
C
B
A
DRO<7:0>
D<15:0>
D
157
A6
NMI
ROMOEn
ROMWEn
R323
3.3K
VDDQ3
V18
A15
A14
A13
A12
A11
A10
A9
A8
A7
V18
VDDQ3
R324
3.3K
C626
0.1u
D3
D2
D1
D0
R325
3.3K
C627
0.1u
158
159
160
161
162
163
164
165
166
167
168
169
170
171
172
173
174
175
176
177
178
179
180
181
182
183
184
185
186
187
188
189
190
191
192
193
194
195
196
197
198
199
200
201
202
203
204
205
206
207
208
R326
3.3K
A<19:1>
A19
A18
C304
0.1u
PWM
SCL
SDA
IR
REQ
SCL1
SDA1
FLASHID
C305
10V 22u
Z301
14.318
A1A2A3A4A5
R316 100
R317 100
R318 100
R319 100
R320 100
R321 100
AVDD
A17
A16
C306
0.1u
R308
1.5M
R322
3.3K
C625
0.1u
L301
22uH
V18
L302
22uH
C
VDDQ3
C350
10V 47u
C351
GND
0.1u
VDDQ3
R345
3.3K
BUSY
B
A
1
19
2
3
4
5
6
7
8
9
VD301
IN4148
X301
OE1
VCC
OE2
I0
O0
I1
O1
I2
O2
I3
O3
I4
O4
I5
O5
I6
O6
I7
O7
GND
U12
74LVC541A
1
C303
10V 22u
GND
GND
C302
18p
C301
18p
20
VDDQ3
18
D0
17
D1
16
D2
15
D3
14
D4
13
D5
12
D6
11
D7
10
R307
VDDQ3
3.3K
GND
R306
3.3K
R305
3.3K
R3403.3K
R3043.3K
R303
3.3K
R302
3.3K
POWER
1
C624
GND
10V 100u
D4D5D6D7D8
D9
D10
D11
D12
V18
146
147
148
149
150D9151D8152D7153D6154D5155D4156
D12
D11
D10
VSS
C632
0.1u
C633
0.1u
VDD1
D3
D2
D1
D0
A19
A18
A17
A16
VDDPA2
VSSPA2
VDDPA1
VSSPA1
XI
XO
VDDQ3
VSSQ
VDD1
VSS
A15
A14
A13
A12
A11
A10
A9
A8
A7
VDD1
VSS
VDDQ3
VSSQ
A6
A5
A4
A3
A2
A1
NMI
WR
RD
ROMOE
ROMWE
CS0
CS1
PORTA7
PORTA6
PORTA5
PORTA4
PORTA3
PORTA2
PORTA1
PORTA0
DVDD11DGND12DVDD13DGND14NC5AVDD6NC7NC8AGND9NC10NC11AGND12NC13NC14AGND15NC16NC17AVDD18DGND119DVDD120PGND21PVD22FILT23PVD24PGND25PVD26PGND27ALVDD28ALVDD29ALGND30ALGND31AVDD32AVDD33AGND34AGND35AVDD36RAIN37AGND38AVDD39AGND40AVDD41AGND42GAIN43SOGIN44AGND45AVDD46AGND47AVDD48AGND49BAIN50AGND51AVDD
VDDQ3
GND GND
DVDD1
C628
0.1u
C629
0.1u
AVDD DVDD1
C630
C631
0.1u
0.1u
D13
145
D13
D14
144
D14
D15
143
D15
RESET
142
TRST_N
AVDD
C634
0.1u
R309
3.3K
141
TCK
140
TMS
137
138
139
TDI
TDO
TESTEN
C319
3.9n
V18
VDDQ3
134
135
136
VSS
VSSQ
VDD1
U18
PW130
R311
3.3K
C318
39n
X302
1 2 3 4
Page 28

VDDQ3
654321
R504
1K
A<19:1>
ROMWEn
VDDQ3
R505
3.3K
GND
R515
10K
A17
A16
A15
A14
A13
A12
A11
A10
A9
A19
A18
A8
A7
A6
A5
A4
A3
A2
A1
1
A15
2
A14
3
A13
4
A12
5
A11
6
A10
7
A9
8
A8
9
NC
10
NC
11
WE#
12
RESET#
13
NC
14
NC
15
RY/BY#
16
A18
17
A17
18
A7
19
A6
20
A5
21
A4
22
A3
23
A2
24
A1
U13
AM29LV800BT
A16
BYTE#
DQ15/A-1
DQ7
DQ14
DQ6
DQ13
DQ5
DQ12
DQ4
DQ11
DQ3
DQ10
DQ2
DQ9
DQ1
DQ8
DQ0
OE#
CE#
48
47
46
Vss
45
D15 GND
44
D7
43
D14
42
D6
41
D13
40
D5
39
D12
38
D4
37
Vcc
36
D11
35
D3
34
D10
33
D2
32
D9
31
D1
30
D8
29
D0
28
27
Vss
26
25
A0
VDDQ3
D
1 2
3 4
5 6
7 8
GND
C
VDDQ3
B
HEADER 4X2
V501
BC857
R501
1K
V502
BC847
GND
JP1
C509
0.1u
GND
R502
3.3k
R503
10K
ROMOEn
R506
3.3k
GND
D<15:0>
C501
0.1u
VDDQ3
VDDQ3
A<19:1>
1 2
GND
3 4
5 6
7 8
9 10
11 12
13 14
15 16
17 18
19 20
21 22
23 24
25 26
27 28
29 30
31 32
33 34
35 36
37 38
39 40
41 42
43 44
45 46
47 48
49 50
A1
D0
D1
D2
D3
D12
D13
D14
D15
A15 A16
A13 A14
A11 A12
A9 A10
A19
A8
A6 A7
A4 A5
A2 A3
R507
3.3K
ROMOEn
ROMWEn
VDDQ3
A17
A18
JP2
HEADER 25X2
VDDQ3
8
7
6
SCL
5
SDA
C502
0.1u
GND
C503
0.1u
GND
1
A0
2
A1
3
A2
VSS4SDA
U14
24C16
VCC
WP
SCL
D8
D9
D10
D11
D4
D5
D6
D7
C507
0.1u
D<15:0>
VDDQ3
X501
GND
VD501
IN4148
S1
C506
0.1u
VDDQ3
5
4
3
2
1
C508
10V 47u
VDDQ3
GND
S2
GND
C504
0.1u
V5
LED
C505
10V 47u
R512
30K
GND
IR
V5-STB
100K
R513
200
R514
D
RESET
C
RESETn
NMI
B
A
Title
Number RevisionSize
B
Date: 5-Nov-2003 Sheet of
1 2 3 4 56
File: F:\temp2\A-USER\FLASH.SCH Drawn By:
A
Page 29

4321
D
LCDVCC
PGND2
C608
0.1u
C607
16V 100u
C
B
TXD
RXD
SDA
SCL
R609
R610
51
51
REQ
BUSY
SDA1
SCL1
V5
X602
1
2
3
4
GND
U901
3
X603
1
GND
X604
1
2
3
4
V5
GND
VOL--
S504
VOL+
S505
C902
0.1u
CH--
S506
HWJS538
C901
10V22u
X901
CH+
S507
1
2
GNDGNDGNDGND
BLUE
VD901
R901
330
RED
D
C
B
GND
SOURCE
S502
MENU
X502
S503
X501
GNDGND
GND
1 2 3 4
GND
Title
Number RevisionSize
A4
Date: 5-Nov-2003 Sheet of
File: F:\temp2\A-USER\LVDSOUTPUT.SCH Drawn By:
A
POWER
S501
A
Page 30

4321
GND
R701
3.3K
1
2
3
4 5
R709
NO
C704
0.1u
V701
BC847
R716
10K
GND
LM358
VCC
U16
LT1117
IN
PGND2
U17
OUT
GND
X701
PGND3
C702
16V 22u
V705
2SJ439
1
2
3
4
5
6
PGND2
C701
0.1u
V12
PGND2
C141
V12
GND
R704
0
PGND2
V12
GND
R718
0
R705
C703
10V 100u
R717
10K
0
C142
0.1u
R703
10K
8
7
6
C710
0.1u
R702
1K
16V22u
D
C
B
V5
D
DBO<7:0>
DBE<7:0>
DGO<7:0>
DGE<7:0>
DRO<7:0>
DRE<7:0>
VDDQ3 VDDQ3
JP3
R712
2.2K
V704
BC847
R713
HEADER 20X2
1 2
3 4
5 6
DRE0 DRE1
7 8
DRE2 DRE3
9 10
DRE4 DRE5
11 12
DRE6 DRE7
13 14
DRO0 DRO1
15 16
DRO2 DRO3
17 18
DRO4 DRO5
19 20
C
B
DCLK
PWM
LCDON
BKLON
SCL
LCDVCC
DRO6 DRO7
21 22
23 24
DGE0 DGE1
25 26
DGE2 DGE3
27 28
DGE4 DGE5
29 30
DGE6 DGE7
31 32
DGO0 DGO1
33 34
DGO2 DGO3
35 36
DGO4 DGO5
37 38
DGO6 DGO7
39 40
GND
HEADER 20X2
1 2
DBE0 DBE1
3 4
DBE2 DBE3
5 6
DBE4 DBE5
7 8
DBE6 DBE7
9 10
DBO0 DBO1
11 12
DBO2 DBO3
13 14
DBO4 DBO5
15 16
DBO6 DBO7
17 18
19 20
21 22
23 24
25 26
27 28
29 30
31 32
33 34
35 36
37 38
39 40
GND
GND
JP4
GND
LVDSON
DEN
DHS
DVS
RESET
SDA
IN4148
10V 100u
VD703
C706
GND
V5
VD701
IN4148
R706
100K
3.3K
R707
3.3K
VD702
IN4148
V12
GND
16V 100u
V5
C705
10V 100u
R714
10K
C707
0.1u
C708
GND
R715
10K
V5
R708
2K
V702
BC847
C709
0.1u
PGND2
A
Title
Number RevisionSize
B
Date: 5-Nov-2003 Sheet of
1 2 3 4
File: F:\temp2\A-USER\TTLOUTPUT.SCH Drawn By:
88
A
Page 31

D
C
B
A
C122
16V 22uF
GNDA
D3
LL4148D2LL4148
5V
C118
R122 27
R119 100
C117
R118 27
R115 100
C116
R114 27
R112 100
5V
C125
C126
100n
10V 47u
GNDS
3.3V-1
C143
C144
16V 10u
100n
5V
C151
16V 10u
L109
10uH
MONO
ROUT2
LOUT2
GNDA
AV1/Y1
C1
AV1-RIN
AV1-LIN
1VIN
6
R21
10K
R22
10K
R23
75
GND
JY-3536-01-250
X4
S-402
R26
10K
R27
10K
R28
75
1S-RIN
1S-LIN
2S-LIN
2S-RIN
GND
ROUT
GOUT
BOUT
Hs
Vs
GND
X1
X2
X3
X5
1
R
2
GND
3
L
4
GND
5
L
6
GND
7
R
X6
1
R
2
GND
3
G
4
GND
5
B
6
GND
7
Hs
8
GND
9
Vs
X7
28
D
C
GND
B
A
54321
R125
C121
3.3V-1
4R7
100n
R124
R123
22
1K
V104
2SC1815
C123
R105
16V 47uF
4R7
220p
GNDS
GNDA
V105
2SC1015
GNDS
220p
V106
2SC1015
GNDS
220p
V107
2SC1015
C130
100n
L110
10uH
C132
GNDA
100n
5V
C138
100n
Vin
N11 LT1117
GND
Vout
10V 100u
C141
10V 47u
5V
876
AT24C016-10PC
132
GNDS
C152
100n
GND
14
AF O/P
Vin
N3 LT1117
GND
Vout
C108
C140
10V 100u
R109
13
KIA7027
2
N4
GNDS
GNDS
C142
100n
GNDS
R132
GNDS
2K7
R133
2K7
R1510R150
5
N2
4
R142
270
GNDAF
QSS
C159
10n
R136
100
12
11
10
13
IF
CVBS
+5V IF
SIFOUT
1 2 3 4 56
C124
100n
R121
560
R120
22K
R117
560
R116
22K
R113
560
R111
22K
C131
16V 47u
C139
10V 47u
3.3V
10K
C157 5p
C158
0
R144
470
GND
9
AGC
C133
16V 47u
GNDS
C134
100n
5p
8
NC
L106
100uH
C136
10p
C137
10p
ROUT
SCL1
CVBS
7
AFC
GOUT
R130
10K
C135
16V 47u
G101
20.25MHz
SDA1
6
AS
BOUT
GND
R146 100
R147 100
R148 100
R149 100
IR
LED
SDA1
SCL1
4
5
SDA
3
SCL
N1 VCT3833
33
34
35
36
37
38
39
40
41
42
43
44
45
46
47
48
49
50
51
52
53
54
55
56
57
58
59
60
61
62
63
64
BUSY
C146
16V 10u
GND
1
2
BT
+5V
VERTQ
VERT
EN
SENSE
GNDM
RSW1
RSW2
SVMOUT
ROUT
GOUT
BOUT
VSUPAB
GNDAB
VRD
XREF
AIN3
AIN2
AIN1
AOUT2
AOUT1
VSUPS
GNDS
XTAL1
XTAL2
RESQ
SCL
SDA
P23
P22
P21
P20
V112
BSS138
NC
JS-6ADW-134
SAFETYHFLB
VPROT
VSUPD
CIN2/CRIN
VSUPAF
GNDAF
GNDP1
VSUPP1
C145
100n
U1
FLBIN
GNDD
HOUT
SGND
VOUT
GND
BIN
GIN
RIN
TEST
VIN4
VIN3
VIN2
VIN1
CIN1
CBIN
VRT
P10
P11
P12
P13
P14
P15
P16
P17
32
31
30
29
28
27
26
25
24
23
22
21
20
19
18
17
16
15
14
13
12
11
10
9
8
7
6
5
4
3
2
1
C155
10n
V111
DTC144KEA
5V
L108
10uH
GND
GNDP
GNDD
GND
GNDD
GNDS
GNDS
R106
C127
22n
680n
680n
680n
680n
C153 1n
16V 47u
R101
RESET
C101
100n
V113
BSS138
R139
10K
0
GND
C114
100n
C113
C112
C111
C110
L102
100uH
C106
C104
16V 10u
V101
BC857
100
BUSY
C102
16V 10u
SRS MONO
SRS STEREO
3.3V
R134
100
R126
100
C105
47n
GNDAF
R152
10k
5V
C115
16V 22u
C107
100n
L101
100uH
R127
4K7
CVBS
5V
GND
L105
100uH
GNDAF
5V
R102
100
R108
75
C154
25V 470u
X11
GND
GND
GND
5V
5V
V103
BC847
R135
500
V102
BC847
R128
500
3.3V
R129
30K
AV2-RIN
Vs
C26 16V 10u
GND
QSS
2VIN
1VIN
AV1/Y1
C1
R104
3K3
C27 470p
C28 1n5
5V
10uH
L3
C29 56p
C30 56p
AGND
C31 1.5P
G1
18.432MHz
C32 1.5P
GNDS
GNDD
SCL1
SDA1
V110
BC847
C156
1u
GND
C150
16V 47uF
GND GND
BUSY
REQ
SDA2
SCL2
2
SDA
12V-IN
12V-1
16V 10u
LOUTN LOUT2
16V 10u
12V-1 12V-1
5V
3
6
4
5V
CVO
SCL
Hs
5V
R103
3K3
1
MONO
62
64
65
66
67
68
69
70
71
72
73
74
75
76
77
78
79
80
R3 1K R4
R1 100
R2 100
V108
BC857
D1
LL4148
C61
C62
100n
C63
470n
C64
100n
C66
5
CVO
NC63NC
AVSUP
AVSUP
ANA_IN1 +
ANA_IN1 ANA_IN2 +
TESTEN
XTAL_IN
XTAL_OUT
TP
AUD_CL_OUT
NC
NC
D_CTR_I/O_1
D_CTR_I/O_0
ADR_SEL
STANDBYQ
NC1I2C-CL2I2C-DA3I2S-CL4I2S-WS5I2S-DA-OUT6I2S-DA-IN17ADR-DA8ADR-WS9ADR-CL10DVSUP11DVSUP12DVSUP13DVSS14DVSS15DVSS16I2S-DA-IN217NC18NC19NC20RESETQ21NC22NC23DACA_R
5V
R140
1K
R141
10K
GND
R138
1K
C147
0.1uF
R137
100
GND
13
C59
C60
100n
C65
100n
LOUT1 ROUT1
4
GND
L5
33uH
L6
33uH
BSLN
10n
14
PVCCL
15
PVCCL
16
LOUTN
17
LOUTN
18
PGNDL
19
PGNDL
20
LOUTP
21
LOUTP
22
PVCCL
23
PVCCL
C67
24
BSLP
10n
C68
1uF
1
2
3
R
L
GND
C84 470n
60
AVSS61AVSS
MONO_IN
L1 10uH
GND
R15
1K5
12
GND
VCLPL
25
GND
X10
C25 16V 10u
V109
BC847
GND
AV2-RIN
AV1-RIN
AV2-LIN
AV1-LIN
1S-RIN
2S-RIN
1S-LIN
2S-LIN
47n
47n
47n
C21 47n
C20 47n
C19 47n
C18
C87
C22 47n
C23 47n
C24 100n
58NC59
SC1_IN_L56SC1_IN_R57VREFTOP
C1
16V 10u
R145
100
R14
910
8
10
9
11
VREF
VARDIFF
VOLUME
VARMAX
N8
TPA3002D2
ROSC27COSC28AGND
29
26
120K
R20
C69 220p
C70 100n
AGND
PGND
51
54
52
55
ASG
ASG
SC2_IN_L53SC2_IN_R
N5
MSP3450G
C3
C2
470p
152p
GNDD
R32
R33
10K
10K
GND GND
1uF
1uF
C55
C56
C57 1uF
C58 1uF
6
7
3
5
4
RINP
LINP
V2P5
LINN
AVDDREF
AVCC33MODE34MODE_OUT
VAROUTR32VAROUTL31AGND30AVDD
C71 100n
C72
16V 10u
12V-IN 5V-IN
8
6
GND7GND
C88
46
48
49
ASG
SC3_IN_L50SC3_IN_R
C4 100n
RESET
1uF
C54
2
1
SD
RINN
BSRN
PVCCR
PVCCR
ROUTN
ROUTN
PGNDR
PGNDR
ROUTP
ROUTP
PVCCR
PVCCR
BSRP
VCLPR
36
35
C73
1uF
GND
4
12V512V
44
45
NC
AHVSS43AHVSS
AGNDC
SC4_IN_L47SC4_IN_R
27K
HEADPR
R42
100
C40
R43
100
470p
12V-1
R24
10K
48
C81
10n
47
46
C79
45
10n
44
L10
33uH
43
42
L9
41
33uH
40
39
38
C74
C75
37
10n
100n
GND
2
5V15V
GND3GND
X9
42
SC1_OUT_L
SC1_OUT_R
SC2_OUT_L
SC2_OUT_R
DACM_SUB
24
C89
1n
GND
C39
680n
R93KR10
C49
100n
L4
33uH
C82
16V 1000u
C80
100n
C78
470n
C77
100n
C76
16V 10u
NC41NC
CAPL_M
AHVSUP
CAPL_A
DACM_L
DACM_R
DACA_L
C38
10n
1K5
GND
12V-IN
VREF1
VREF2
9V
X8
AGND
NC
NC
NC
C35
18n
C36
470p
ROUTN
GNDGND
ROUTPLOUTP
16V 10u
40
39
38
37
36
35
34
33
32
31
30
29
28
27
26
25
10
GND
GND
16V 10u
C52
REQ
5
REQ
C16
C15
PS
10K
R41
HW0038
N10
3
SDA2
2
L12 10uH
C85
C86
C10
10n
R722R8
C6
1n8C82n2C710n
HEADPL
C34
C33
20
19
18
17
C44
4n7
16
15
14
13
12
11
876
TLE2412
132
D4
574
21
SCL2
1
SDA2
C17
100n
C14
1n5
5V
10V 22uF
10V 22uF
C11
2n2
3K
R53KR6
22
50V 2u2
50V 2u2
C4716V 10u
C46
100n
C43
220n
C42
100n
GND
R38
10K
N7
GND
IR
R131
0
GND
SCL2
SRS STEREO
SRS MONO
5
4
GND
R36
47K
LOUT1
ROUT1
R37
47K
GND
GND
R13
2K
R12
3K9
C45
10n
C50
16V 47uF
50V 2u2
C91
50V 2u2
C53
16V 47uF
5V-IN 5V
12V-IN
IN OUT
50V 3u3
16V 220u
C12
16V 10u
C83
16V 10u
R34 100
R35 100
C9
1n8
C90
1n
1
RIN
REFOUT
2
LIN
REFIN
3
SRSPR
L+R
4
SRSA
BPF
5
ROUT
HPF
6
SRSNR
LPF
7
SRSNL
8
GND
LOUT
9
STEREO
Vcc
MONO
MUTE
M62494E
N6
9V
R40
10K
C48
R3910K
C51
100n
GND
R16
100
LED
5V
C148
10V 47u
GND
BUSY
3
4
GND
BUSY
AV2-LIN
C13
470p
2VIN
LOUTP
LOUTN
L
R
C92
Title
C
Date: 5-Nov-2003 Sheet of
File: F:\temp2\A-USER\sVER6.0(98).sch Drawn By:
ROUTN
ROUTP
R3075R31
75
GNDGND
GND
ROUT2
HEADPR
HEADPL
L107
33uH
C149
25V 470uF
GND
LM7809
21
N9
3
GND
L18
Y
4GND GND
L15
Y
3GND
2GND
1GND
GND
L16
Y
L17
GND
Y
GND
Number RevisionSize
9V
 Loading...