

Page 1
LCD TV
LC-19KT42
Operating Manual
Before connecting, operating or adjusting this product, please read the manual completely.
Please keep this manual for future reference.
Page 2

Table of Contents
Important Information ......................................................................................................................1
Important Safety Instructions...........................................................................................................2
Important Notice ..............................................................................................................................5
Preparations ......................................................................................................................................6
Identification of Controls ..................................................................................................................8
Connections .....................................................................................................................................11
Basic Operations..............................................................................................................................14
Getting Started ...............................................................................................................................18
Adjusting PICTURE Menu Options
Adjusting AUDIO Menu Options 0
Adjusting SETUP Menu Options 1
Parental Controls.........................................................................................................................22
Closed Caption ............................................................................................................................25
Time & Menu Settings 6
Input Label/Restore Default/Audio Only 7
Adjusting CHANNEL Menu Options
Image Adjustments for VGA (PC) Mode........................................................................................30
Troubleshooting...............................................................................................................................31
Specifications...................................................................................................................................33
.................................................................................................................2
................................................................................................19
...................................................................................................2
...................................................................................................2
....................................................................................2
.............................................................................................28
Assembling the stand and removing the stand column ................................................................34
Page 3
Important Information
WARNING:
CAUTION-To reduce the risk of electric shock, do not
This product utilizes tin-lead solder, and fluorescent lamp containing a small amount of mercury. Disposal of these materials may be
regulated due to environmental considerations. For disposal or recycling information, please contact your local authorities or the
Electronic Industries Alliance: www.eia.org
TO REDUCE THE RISK OF FIRE OR ELECTRIC SHOCK, DO NOT EXPOSE THIS APPARATUS TO RAIN
OR MOISTURE.
The lightning flash with arrowhead symbol,
CAUTION
RISK OF ELECTRIC SHOCK
DO NOT OPEN
perform any servicing other than that contained
in the operating instructions unless you are
qualified to do so.
within an equilateral triangle is intended to
alert the user to the presence of uninsulated
dangerous voltage within the product's
enclosure that may be of sufficient magnitude to
constitute a risk of electric shock to persons.
The exclamation point within an equilateral
triangle is intended to alert the user to the
presence of important operating and
maintenance (servicing) instructions in the
literature accompanying the appliance.
FCC STATEMENT
FCC Notice
LCD TV: A CLASS B digital device
This equipment has been tested and found to comply with the limits for a Class B digital device, pursuant to part 15 of the FCC
Rules. These limits are designed to provide reasonable protection against harmful interference when the equipment is
operated in a commercial environment.
This equipment generates, uses, and can radiate radio frequency energy and, if not installed and used in accordance with the
instruction manual, may cause harmful interference to radio communications. Operation of this equipment in a residential
area is likely to cause harmful interference in which case the user will be required to correct the interference at his own
expense.
FCC CAUTION:
Pursuant to 47CFR, Part 15.21 of the FCC rules, any changes or modifications to this monitor not expressly
approved by the manufacturer could cause harmful interference and would void the user's authority to operate
this device.
WARNING: This is a CLASS B product. In a domestic environment this product may cause radio
interference in which case the user may be required to take adequate measures to
counter interference.
1
Page 4
Important Safety Instructions
Electrical energy can perform many useful functions, but it can also cause personal injuries and property damage if improperly
handled. This product has been engineered and manufactured with the highest priority on safety. But IMPROPER USE CAN
RESULT IN POTENTIAL ELECTRICAL SHOCK OR FIRE HAZARD. In order to prevent potential danger, please observe
the following instructions when installing, operating and cleaning the product. To ensure your safety and prolong the service
life of your TV product, please read the following precautions carefully before using the product.
1. Read these instructions---All operating instructions must be read and understood before the product is operated.
2. Keep these instructions---These safety and operating instructions must be kept in a safe place for future reference.
3. Heed all warnings---All warnings on the product and in the instructions must be observed closely.
4. Follow all instructions---All operating instructions must be followed.
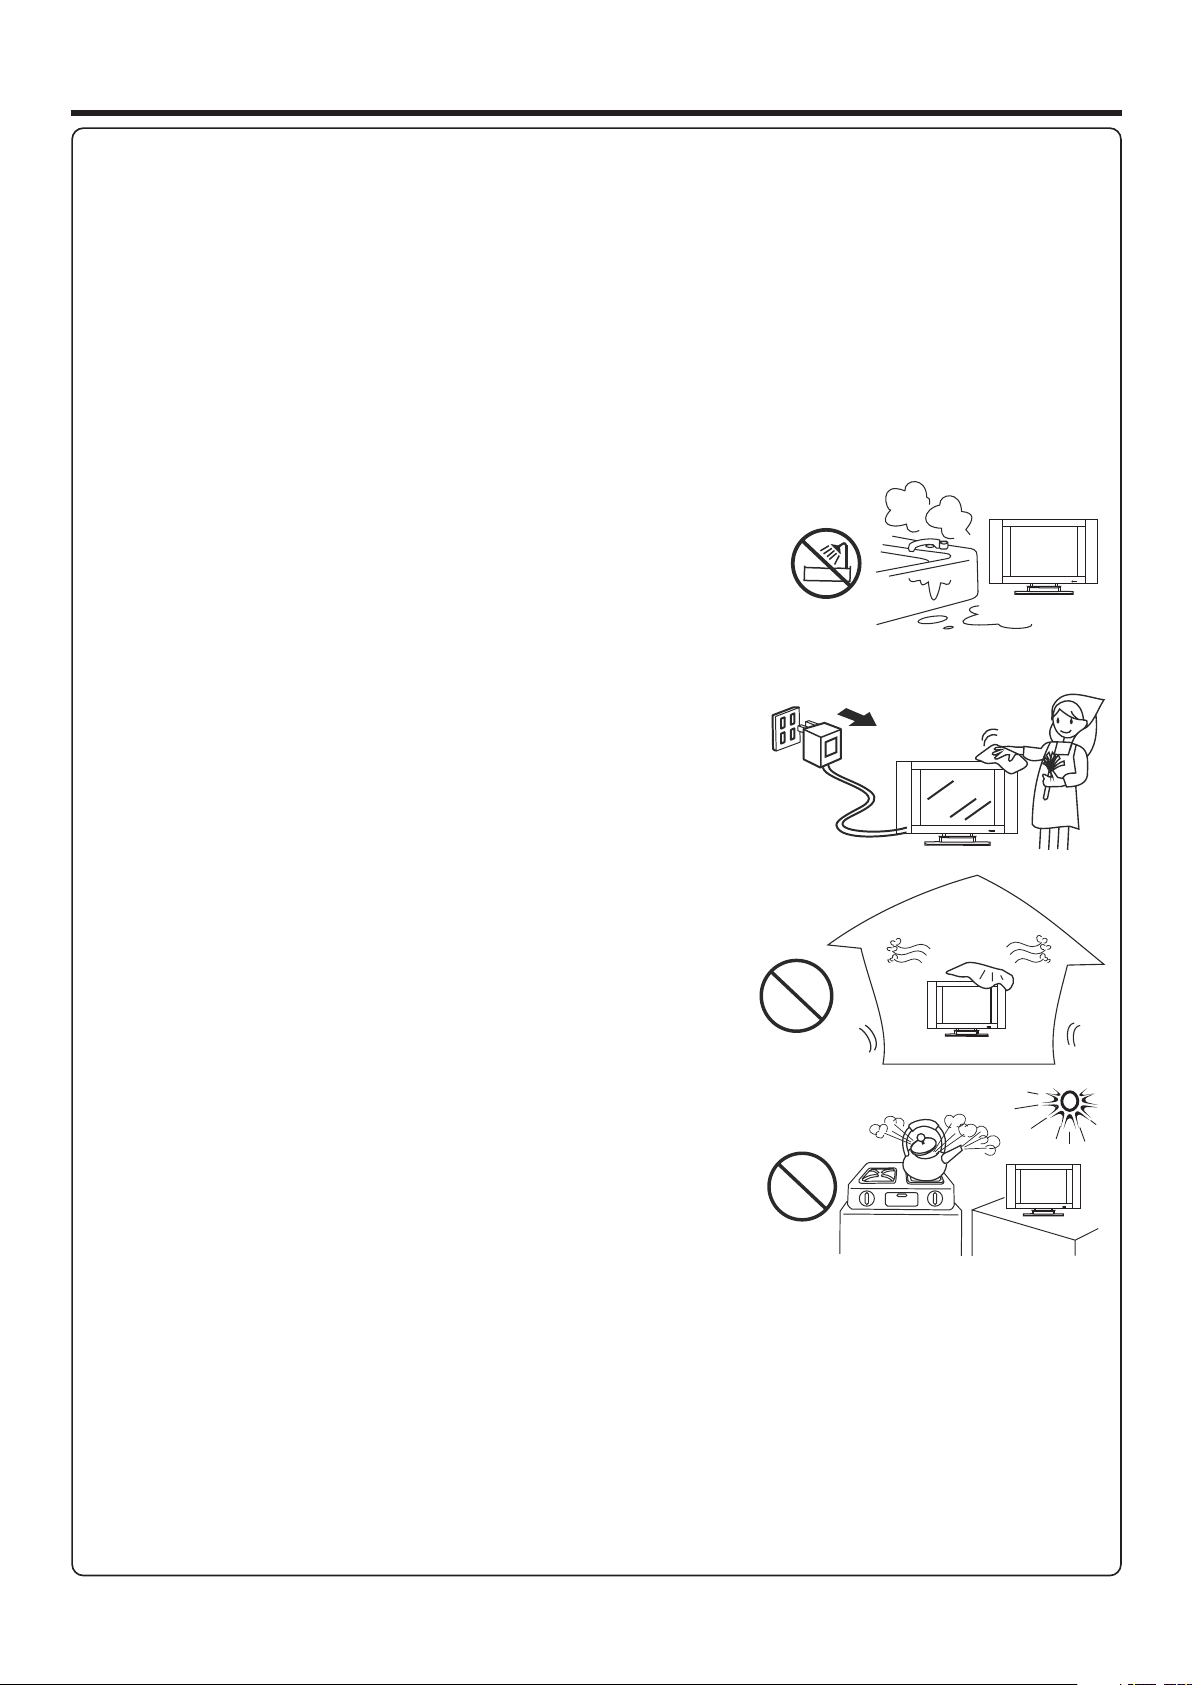
5. Do not use this apparatus near water---for example, near a bathtub,
washbowl, kitchen sink, or laundry tub, in a wet basement, or near a swimming
pool, and the like.
Do not use immediately after moving from a low temperature to high
temperature environment, as this causes condensation, which may result in fire,
electric shock, or other hazards.
The apparatus shall not be exposed to dripping or splashing and that no objects
filled with liquids, such as vases, shall be placed on the apparatus.
6. Clean only with dry cloth---Unplug this product from the wall outlet before
cleaning. Do not use liquid cleaners or aerosol cleaners. Use a damp cloth for
cleaning.
7. Ventilation---Do not block any ventilation openings. Install in accordance
with the manufacturer instructions. The vents and other openings in the cabinet
are designed for ventilation. Do not cover or block these vents and openings
since insufficient ventilation can cause overheating and/or shorten the life of the
product. Do not place the product on a bed, sofa, rug or other similar surface,
since they can block ventilation openings. This product is not designed for builtin installation; do not place the product in an enclosed place such as a bookcase
or rack, unless proper ventilation is provided or the manufacturer’s instructions
are followed.
8.Heat sources---Do not install near any heat sources such as radiators, heat
registers, stoves, or other apparatus (including amplifiers) that produce heat.
9.Grounding or Polarization---Do not defeat the safety purpose of the polarized or grounding-type plug. A polarized plug
has two blades with one wider than the other. A grounding type plug has two blades and a third grounding prong. The wide
blade or the third prong are provided for your safety. If the provided plug does not fit into your outlet, consult an electrician
for replacement of the obsolete outlet.
10.Power cord protection---Protect the power cord from being walked on or pinched particularly at plugs, convenience
receptacles, and the point where they exit from the apparatus.
NOTE: where the mains plug or an appliance coupler is used as the disconnect device, the disconnect device shall remain
readily operable.
11.Attachments---Only use attachments/accessories specified by the manufacturer. Do not use attachments not
recommended by the manufacturer. Use of improper attachments can result in accidents.
2
Page 5
Important Safety Instructions (Continued)
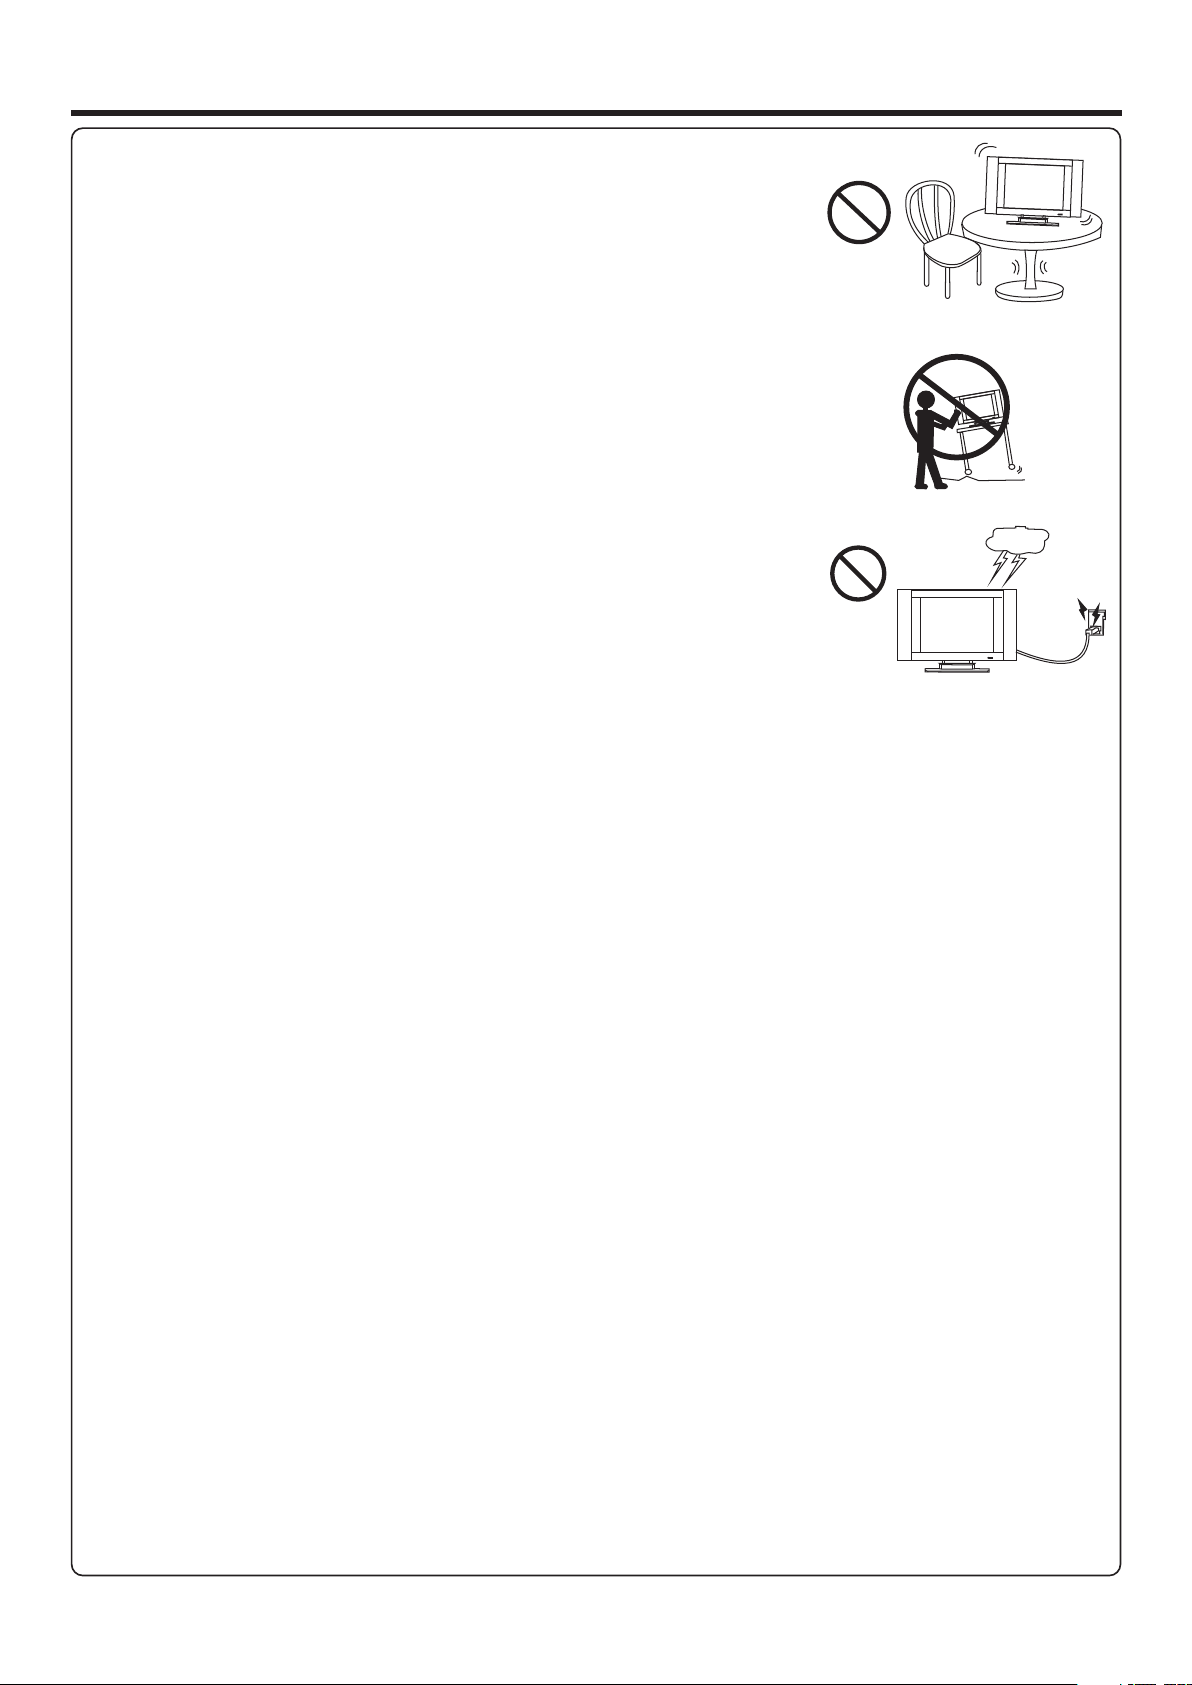
12. Stand---Use only with the cart, stand, tripod, bracket, or table specified by the
manufacturer, or sold with the apparatus. Do not place the product on an unstable
trolley, stand, tripod or table. Placing the product on an unstable base can cause the
product to fall, resulting inserious personal injuries as well as damage to the product.
When mounting the product on a wall, be sure to follow the manufacturer’s instructions.
Use only the mounting hardware recommended by the manufacturer.
13. Move carefully---When a cart is used, use caution when moving the cart/apparatus
combination to avoid injury from tip-over. Sudden stops, excessive force and uneven
floor surfaces can cause the product to fall from the trolley.
Never attempt to move the TV unless the AC power cord has been disconnected.
14. Lightning---Unplug this apparatus during lightning storms or when unused for long
periods of time.
For added protection for this television equipment during a lightning storm, or when it is
left unattended and unused for long periods of time, unplug it from the wall outlet and
disconnect the antenna. This will prevent damage to the equipment due to lightning and
power-line surges.
15. Servicing---Refer all servicing to qualified service personnel. Servicing is required when the apparatus has been damaged
in any way, such as power-supply cord or plug is damaged, liquid has been spilled or objects have fallen into the apparatus, the
apparatus has been exposed to rain or moisture, does not operate normally, or has been dropped.
16. Replacement parts---In case the product needs replacement parts, make sure that the service person uses
replacement parts specified by the manufacturer, or those with the same characteristics and performance as the
original parts. Use of unauthorized parts can result in fire, electric shock and/or other danger.
17.Overloading---Do not overload wall outlets, extension cords, or convenience receptacles on other equipment as this
can result in a risk of fire or electric shock.
18.Entering of objects and liquids---Never insert an object into the product through vents or openings. High voltage flows
in the product, and inserting an object can cause electric shock and/or short internal parts. For the same reason, do not spill
water or liquid on the product.
19.Damage requiring service---If any of the following conditions occurs, unplug the power cord from the AC outlet, and
request a qualified service person to perform repairs.
a. When the power cord or plug is damaged.
b. When a liquid is spilled on the product or when objects have fallen into the product.
c. When the product has been exposed to rain or water.
d. When the product does not operate properly as described in the operating instructions.
Do not touch the controls other than those described in the operating instructions. Improper adjustment of controls not
described in the instructions can cause damage, which often requires extensive adjustment work by a qualified technician.
e. If the product has been dropped or the cabinet has been damaged in any way.
f. When the product displays an abnormal condition or exhibits a distinct change in performance. Any noticeable abnormality
in the product indicates that the product needs servicing.
20.Safety checks---Upon completion of service or repair work, request the service technician to perform safety
checks to ensure that the product is in proper operating condition.
21.Wall or ceiling mounting---When mounting the product on a wall or ceiling, be sure to install the product according to
the method recommended by the manufacturer. This is a safety feature.
3
Page 6

Important Safety Instructions (Continued)
22. Power source---This product is intended to be supplied by a listed power supply indicated on the marking label. If you
are not sure of the type of power supply to your home, consult your product dealer or local power company. For added
protection for this product during a lightning storm, or when it is left unattended and unused for long periods of time, unplug it
from the wall outlet and disconnect the cable system. This will prevent damage to the product due to lightning and power line
surges. When the unit has to be used with another power supply voltage, the power cable must be changed. Consult your
product dealer. The socket outlet should be installed near the equipment and easily accessible. Use only the power cord
designated by our dealer to ensure safety and EMC. When connecting other products such as VCRs and personal computers,
you should turn off the power of the unit for protection against electric shock.
23.Panel protection---The display panel used in this product is made of glass.
Therefore, it can break when the product is dropped or impacted upon by other objects.
Be careful not to be injured by broken glass pieces in case the display panel breaks.
24.Pixel defect---The display panel is a very high technology product, giving you finely detailed pictures. Occasionally, a few
non-active pixels may appear on the screen as a fixed point of blue, green or red. Please note that this does not affect the
performance of your product.
WARNING: For continued safety, apparatus with class I construction shall be connected to a mains socket outlet with a
protective earthing connection.
4
Page 7

Important Notice
About Temperature
About After-Image
Do not use in hot and cold rooms (locations)
! When the unit is used in rooms (locations) with low temperature, the picture may
leave trails or appear slightly delayed. This is not a malfunction, and the unit will
recover when the temperature returns to normal.
! Do not leave the unit in a hot or cold location. Also, do not leave the unit in a location
exposed to direct sunlight or near a heater, as this may cause the cabinet to deform
and the to malfunction.
screen
! Storage temperature: 0°C to +50°C
! Working temperature: 5°C to +40°C
The extended use of fixed image program material can cause a permanent after-image
on the screen.
This background image is viewable on normal programs in the form of a stationary fixed
image. This type of irreversible screen deterioration can be limited by observing the
following steps:
A. Reduce the brightness/contrast setting to a minimum viewing level.
B. Do not display the fixed image for extended periods of time.
C. Turn the power off when not in actual use.
Important Information Regarding Use of Video Games, Computers,
Captions or Other Fixed Image Displays.
! Do not allow a still picture to be displayed for an extended period, as this can cause a
permanent after-image to remain on the screen.
Examples of still pictures include logos, video games, computer images, teletext and
images displayed in 4:3 mode.
Cleaning and
Maintenance
CAUTIONS:
! The permanent after-image on the screen resulting from fixed image use is not an
operating defect and as such is not covered by the warranty.
! This product is not designed to display fixed images for extended periods of time.
Do not let images display in 4:3 mode for extended periods of time.
To clean this unit, wipe with a soft, dry cloth.
If the surfaces are extremely dirty, use a soft cloth dipped in a soap and water solution or
a weak detergent solution.
!
Use eyeglass cleaner to remove stubborn dirt from the screen.
!
Never use alcohol, paint thinner or benzine to clean this unit.
!
Before using a chemically treated cloth, read the instructions that came with the
cloth carefully.
5
Page 8
Preparations
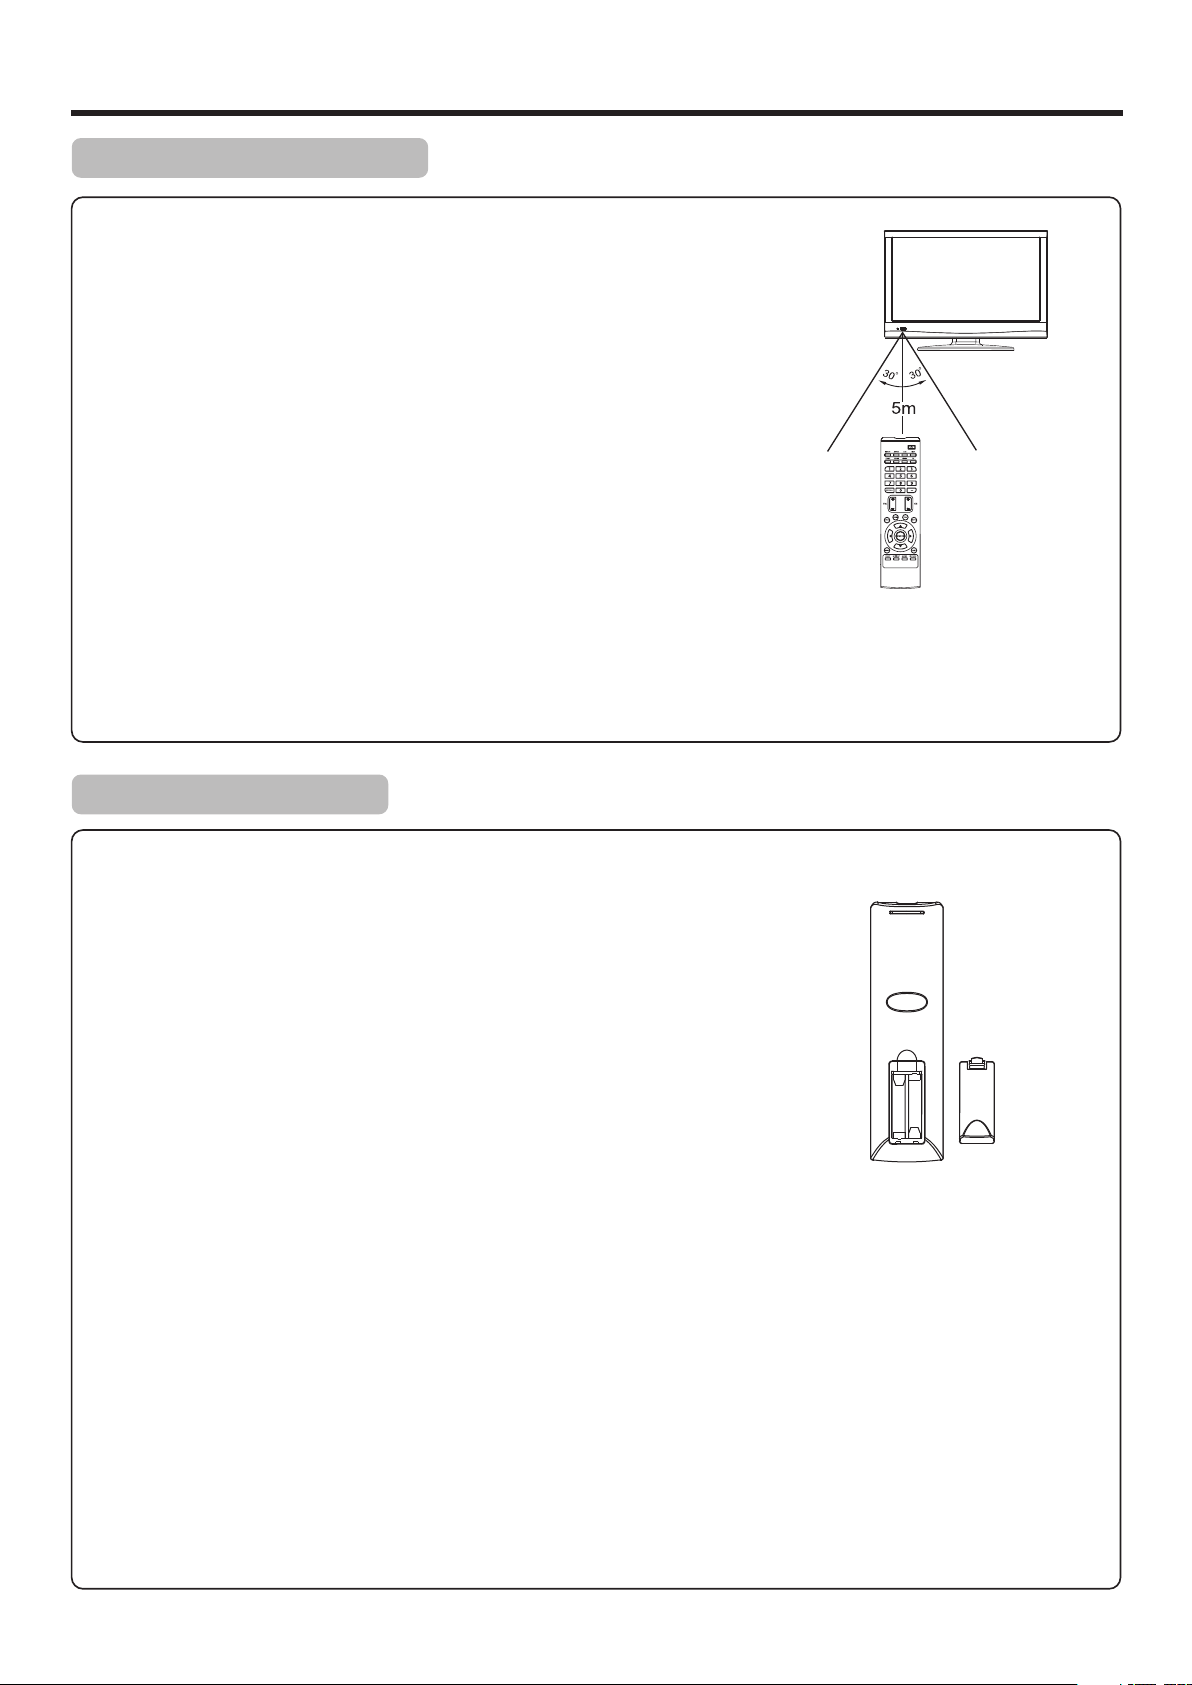
Using the Remote Control
<Use the remote control by pointing it towards the remote sensor window of the
set. Objects between the remote control and sensor window may prevent proper
operation.
Cautions regarding use of remote control
<Do not expose the remote control to shock. In addition, do not expose the remote
control to liquids, and do not place in an area with high humidity.
<Do not install or place the remote control under direct sunlight. The heat may cause deformation of the unit.
<The remote control may not work properly if the remote sensor window of the main unit is under direct sunlight or strong
lighting. In such a case, change the angle of the lighting or the TV set, or operate the remote control closer to the remote
sensor window.
Installing the Batteries
If the remote control fails to operate the TV functions, replace the batteries in the remote control.
1
Open the battery cover.
Insert two size AAA batteries.
2
<(Place the batteries with their terminals corresponding to the (+)
and (–) indications in the battery compartment.)
3
Replace the cover.
Precaution on battery use
! Dispose of batteries in a designated disposal area.
! Batteries should always be disposed of with the environment in mind. Always recycle or dispose of batteries in accordance
with applicable laws and regulations.
! Improper use of batteries can result in a leakage of chemicals and/or explosion. Be sure to follow the instructions below.
1. Place batteries with their terminals corresponding to the (+) and (–) indications.
2. Different types of batteries have different characteristics. Do not mix batteries of different types.
3. Do not mix old and new batteries. Mixing old and new batteries can shorten the life of new batteries and/or cause old batteries
to leak chemicals.
4. Remove batteries as soon as they are non-operable. Chemicals that leak from batteries can cause a rash. If chemical leakage is
found, wipe with a cloth.
5. If the remote control is not used for an extended period of time, remove the batteries from the remote control.
6. The batteries (battery pack of batteries installed) shall not be exposed to excessive heat such as sunshine, fire or the like.
6
Page 9
Preparations (Continued)
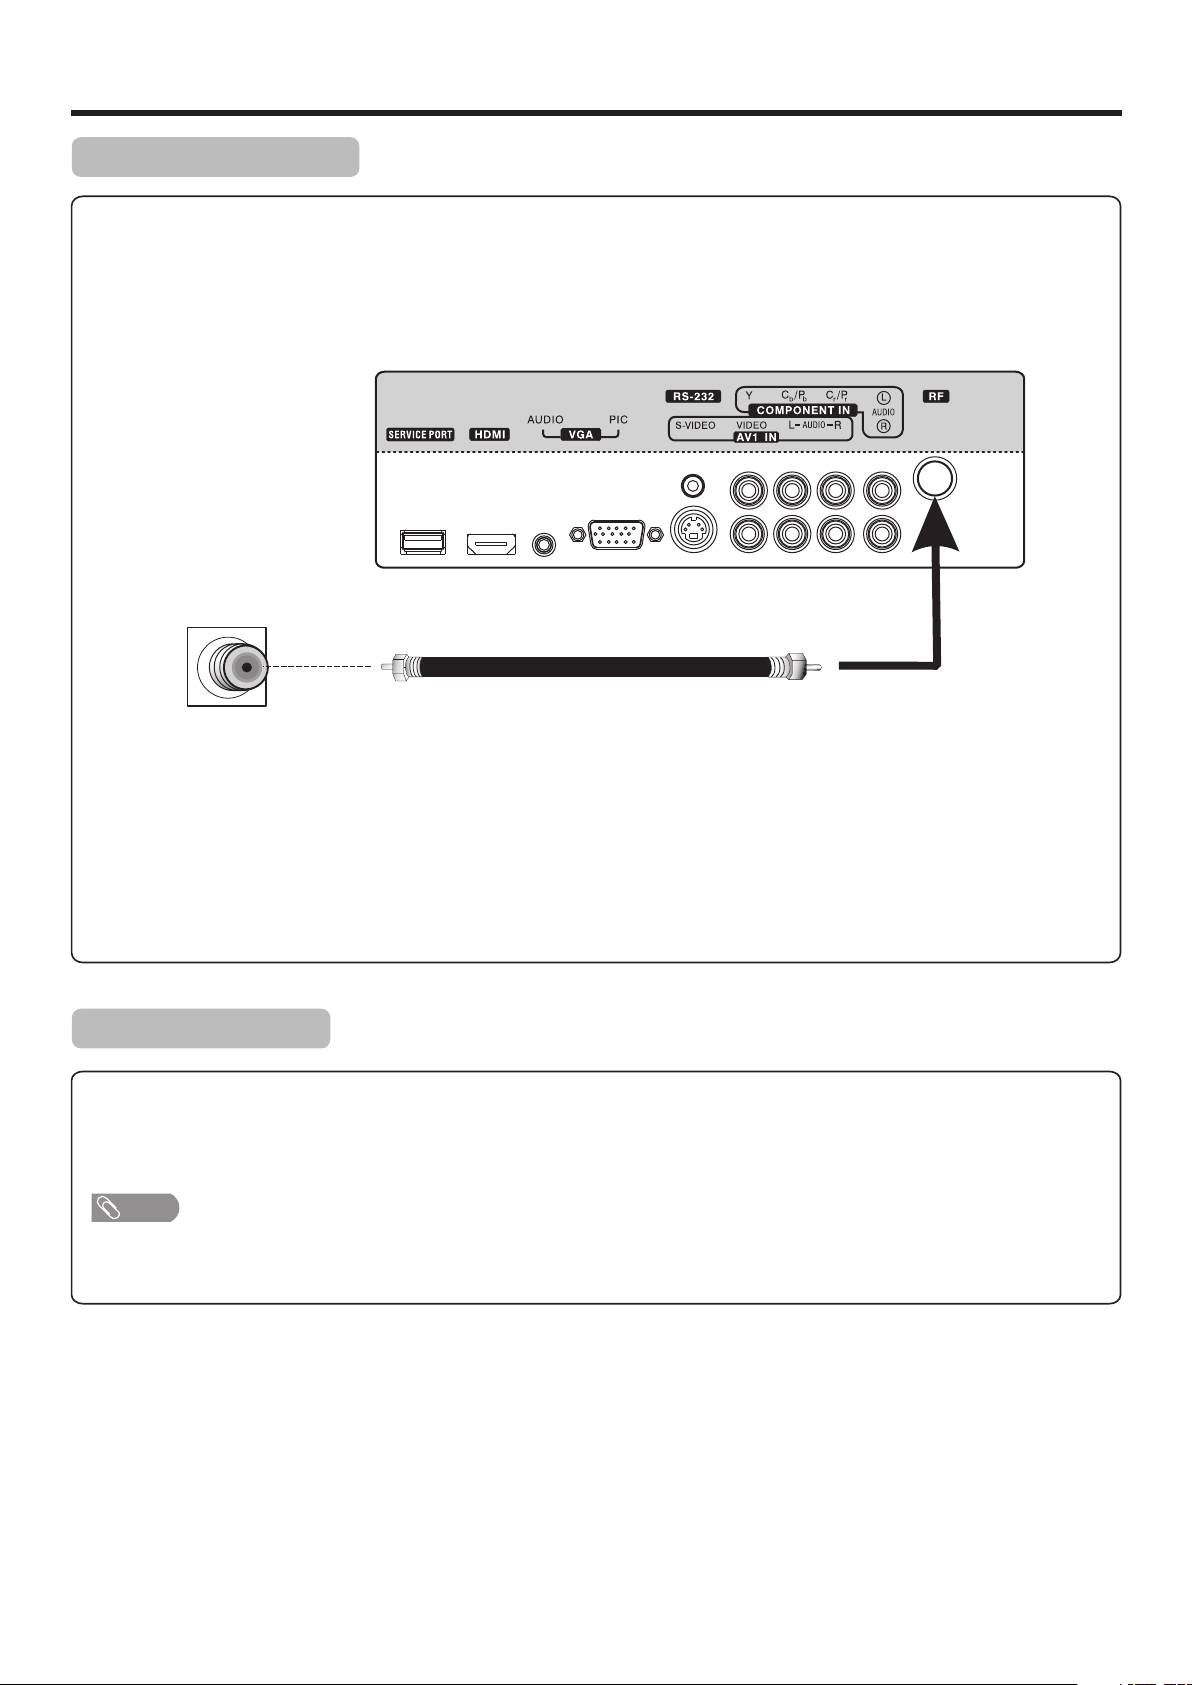
Antenna Connection
INSTALL the unit in a room where direct light will not fall upon the screen. Total darkness or a reflection on the picture
screen may cause eyestrain. Soft and indirect lighting is recommended for comfortable viewing.
Optimum reception of colour requires a good signal and will generally mean that an outdoor antenna must be used.
The exact type and position of the antenna will depend upon your particular area.
Wall Antenna Socket
RF Coaxial Cable(75 ohm)
Note:
=It is recommended that the 75-ohm coaxial cable be used to eliminate interference and noise which may occur due to radio wave
conditions.
=The antenna cable should not be bundled with the power cord and the like.
=If the antenna is not installed properly, contact your dealer for assistance.
Power Connection
Insert the AC plug into a conveniently located AC outlet.
Note
=This product should be operated only from the type of power source indicated on the marking label.
=Always unplug the AC cord from power outlet when not using for a long period of time.
7
Page 10
Identification of Controls
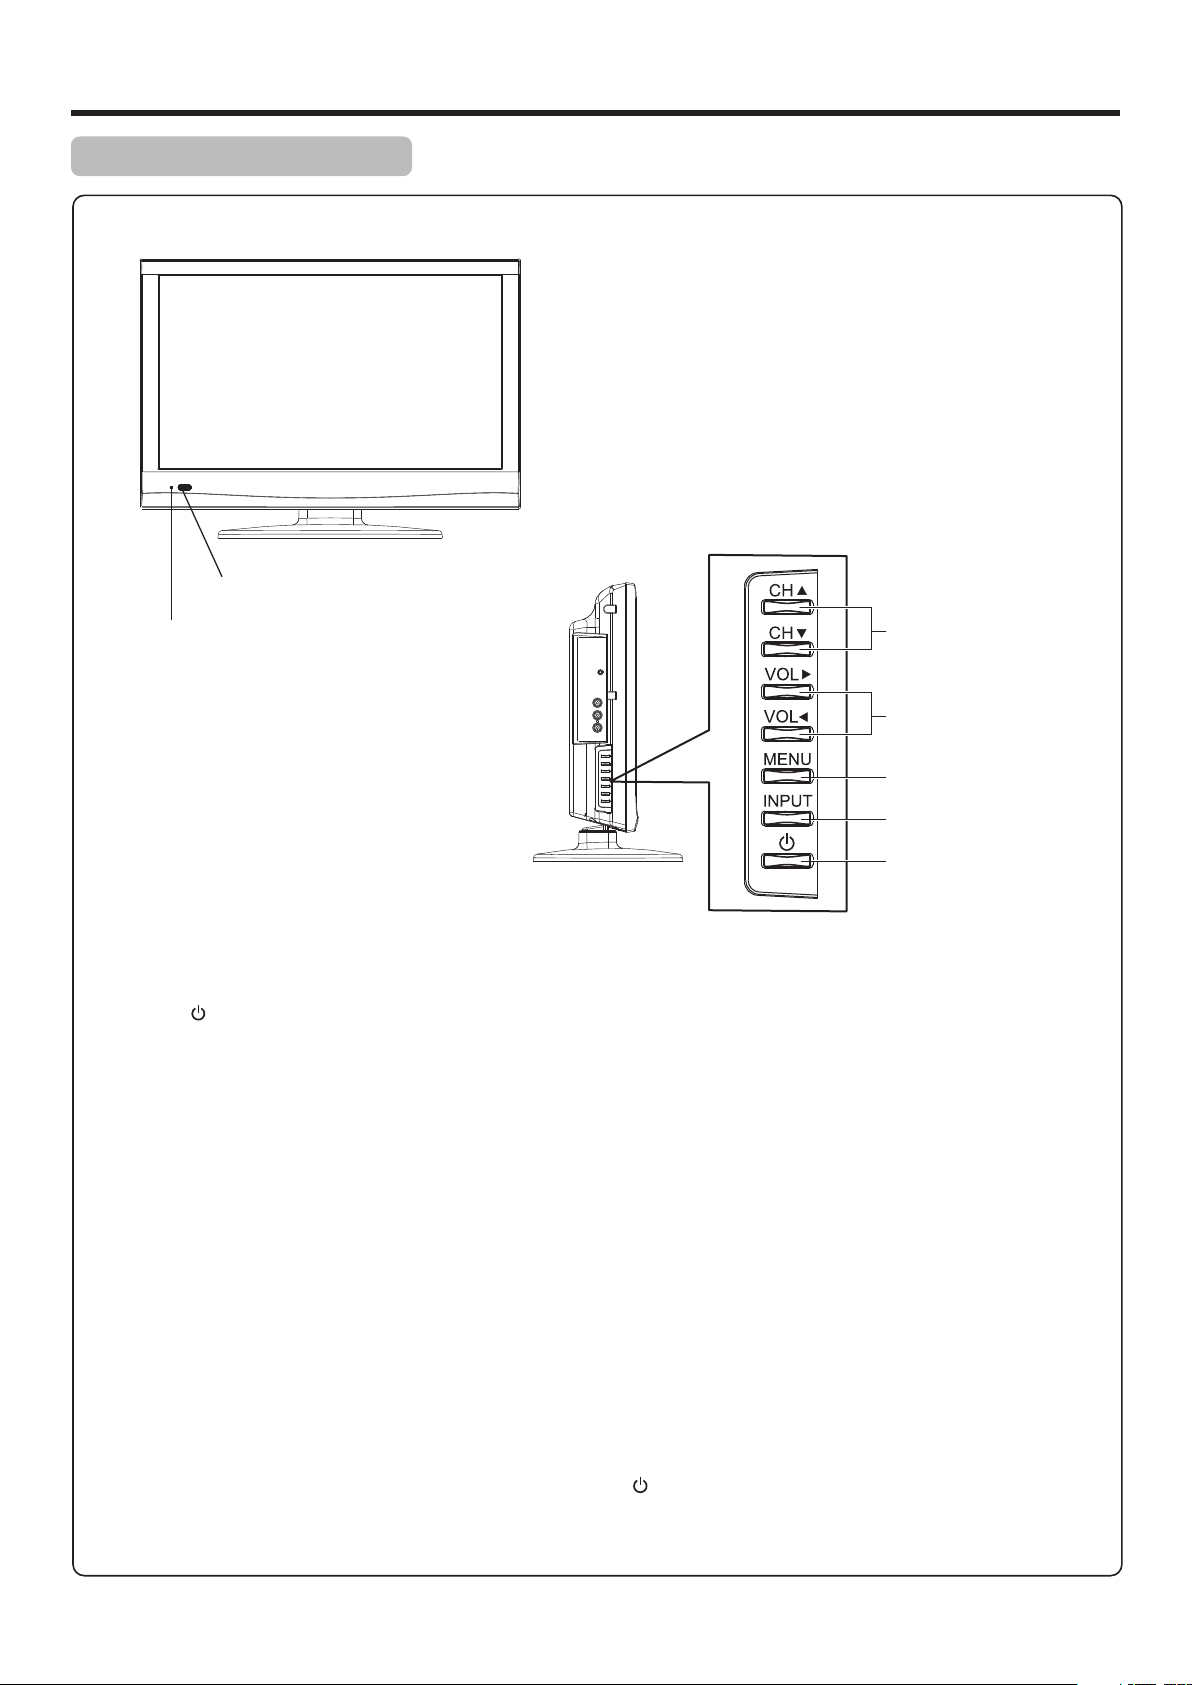
Main Unit (control panel)
Remote Sensor
Power Indicator
1. POWER
Press this button to turn the unit ON from STANDBY mode. Press it again to turn the set back to STANDBY.
2. INPUT
To access INPUT SOURCE menu
3. MENU
Press this button to access the menu main page
4. VOL
Press the VOL or VOL button to directly increase or decrease the sound volume level;
In menu operations, these buttons serve as right/left buttons.
5. CH
Press these two buttons to directly change the TV channel;
In menu operations, these buttons serve as up/down buttons.
3/4
43
5/6
Channel Up/Down
Volume Up/Down
MENU
Input Source Select
Power On / Standby
Note:
Functions of CH5/6, VOL3/4, MENU, INPUT and POWER are also provided to the remote control. This operation
manual provides a description based on operating functions with the remote control.
8
Page 11
Identification of Controls (Continued)
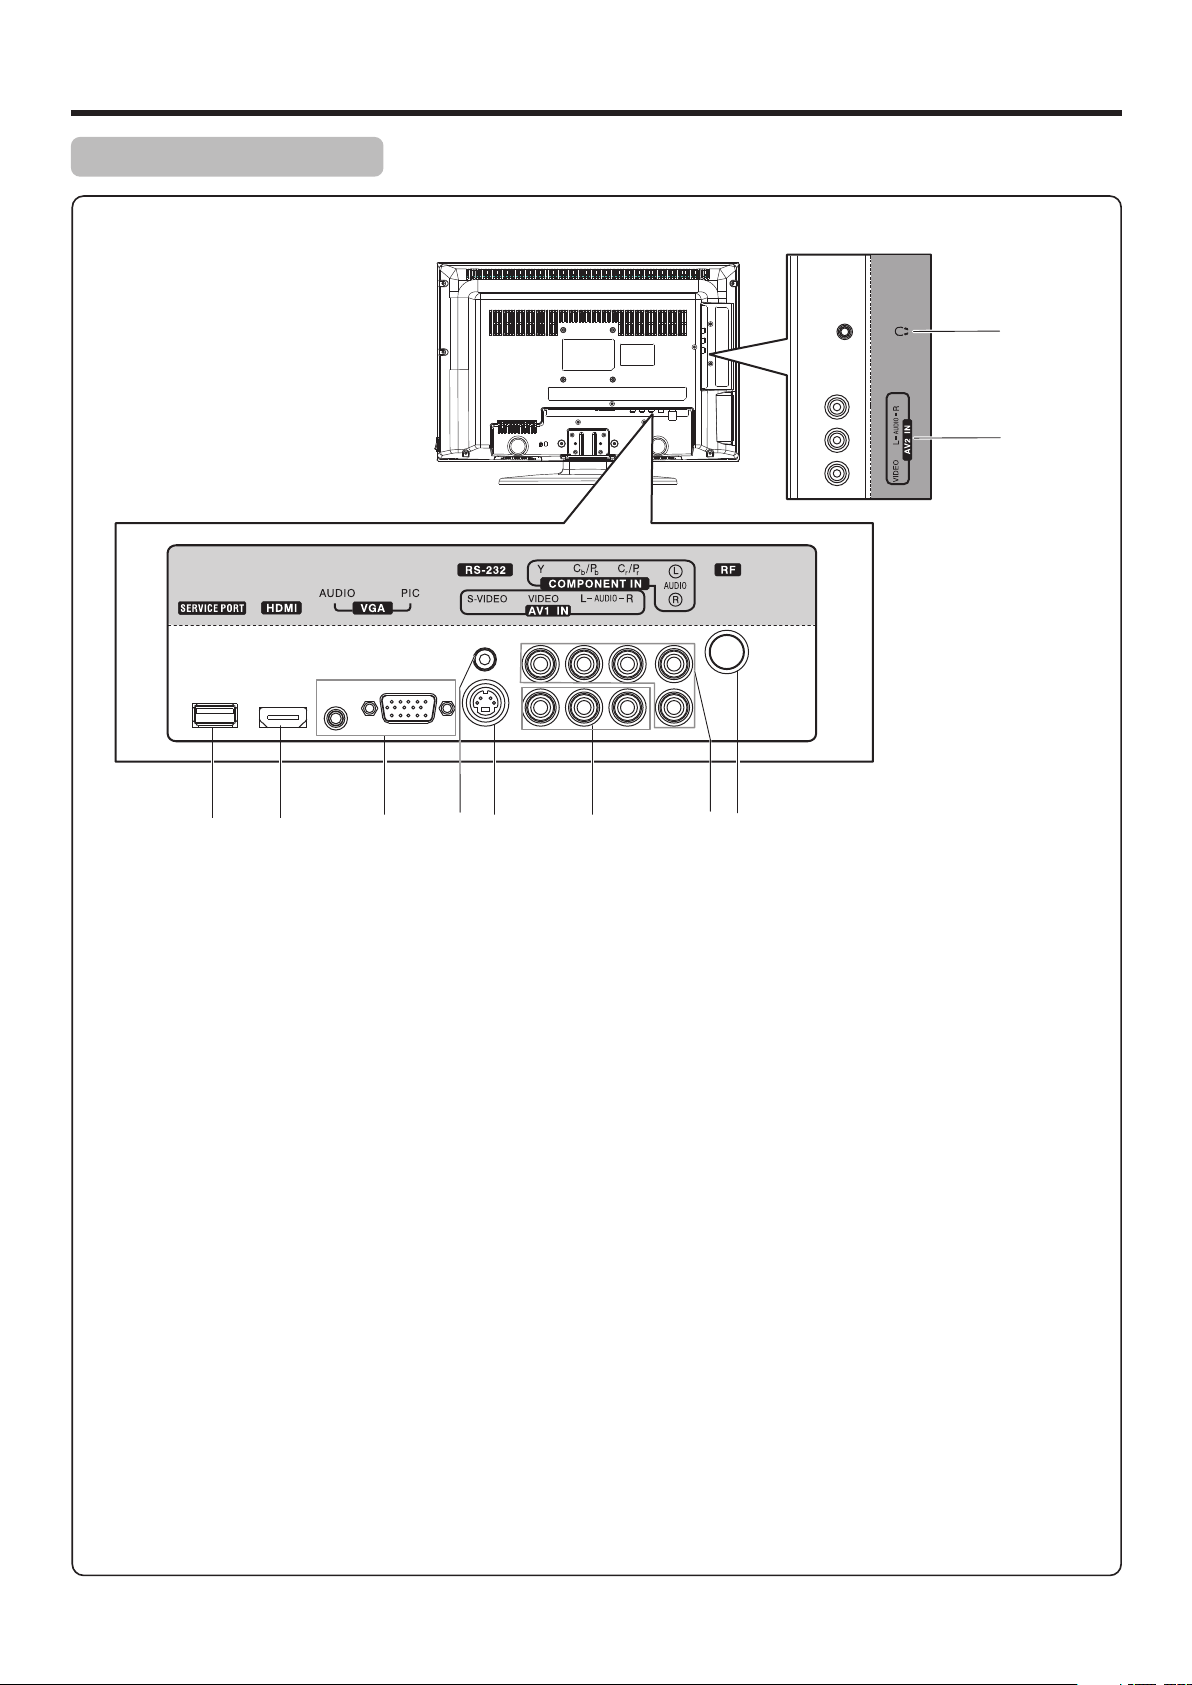
Main Unit (connectors)
10
9
1
SERVICE PORT: For software update only. Do not use.
1
HDMI: HDMI (High-Definition Multimedia Interface) provides an uncompressed, all-digital audio/video interface
2
between this TV and any HDMI-equipped audio/video component, such as a set-top box and DVD player. HDMI
supports enhanced, or high-definition video, plus two-channel digital audio.
3
VGA PIC/AUDIO: Connect a computer to these jacks.
4
RS-232: For service only. Do not use.
5
S-VIDEO: Connect an S-Video device to the jack, then connect the audio to the AV1 IN audio jacks.
6
AV1INPUT: Connect an AV device to these jacks.
7
COMPONENT IN: Connect a component video device to these jacks.
8
RF: Connect an antenna or cable TV to this jack.
9
AV2 INPUT: Connect an AV device to these jacks.
2 43 5 6 7 8
Headphone: Connect headphones to this jack.
10
9
Page 12
Identification of Controls (Continued)
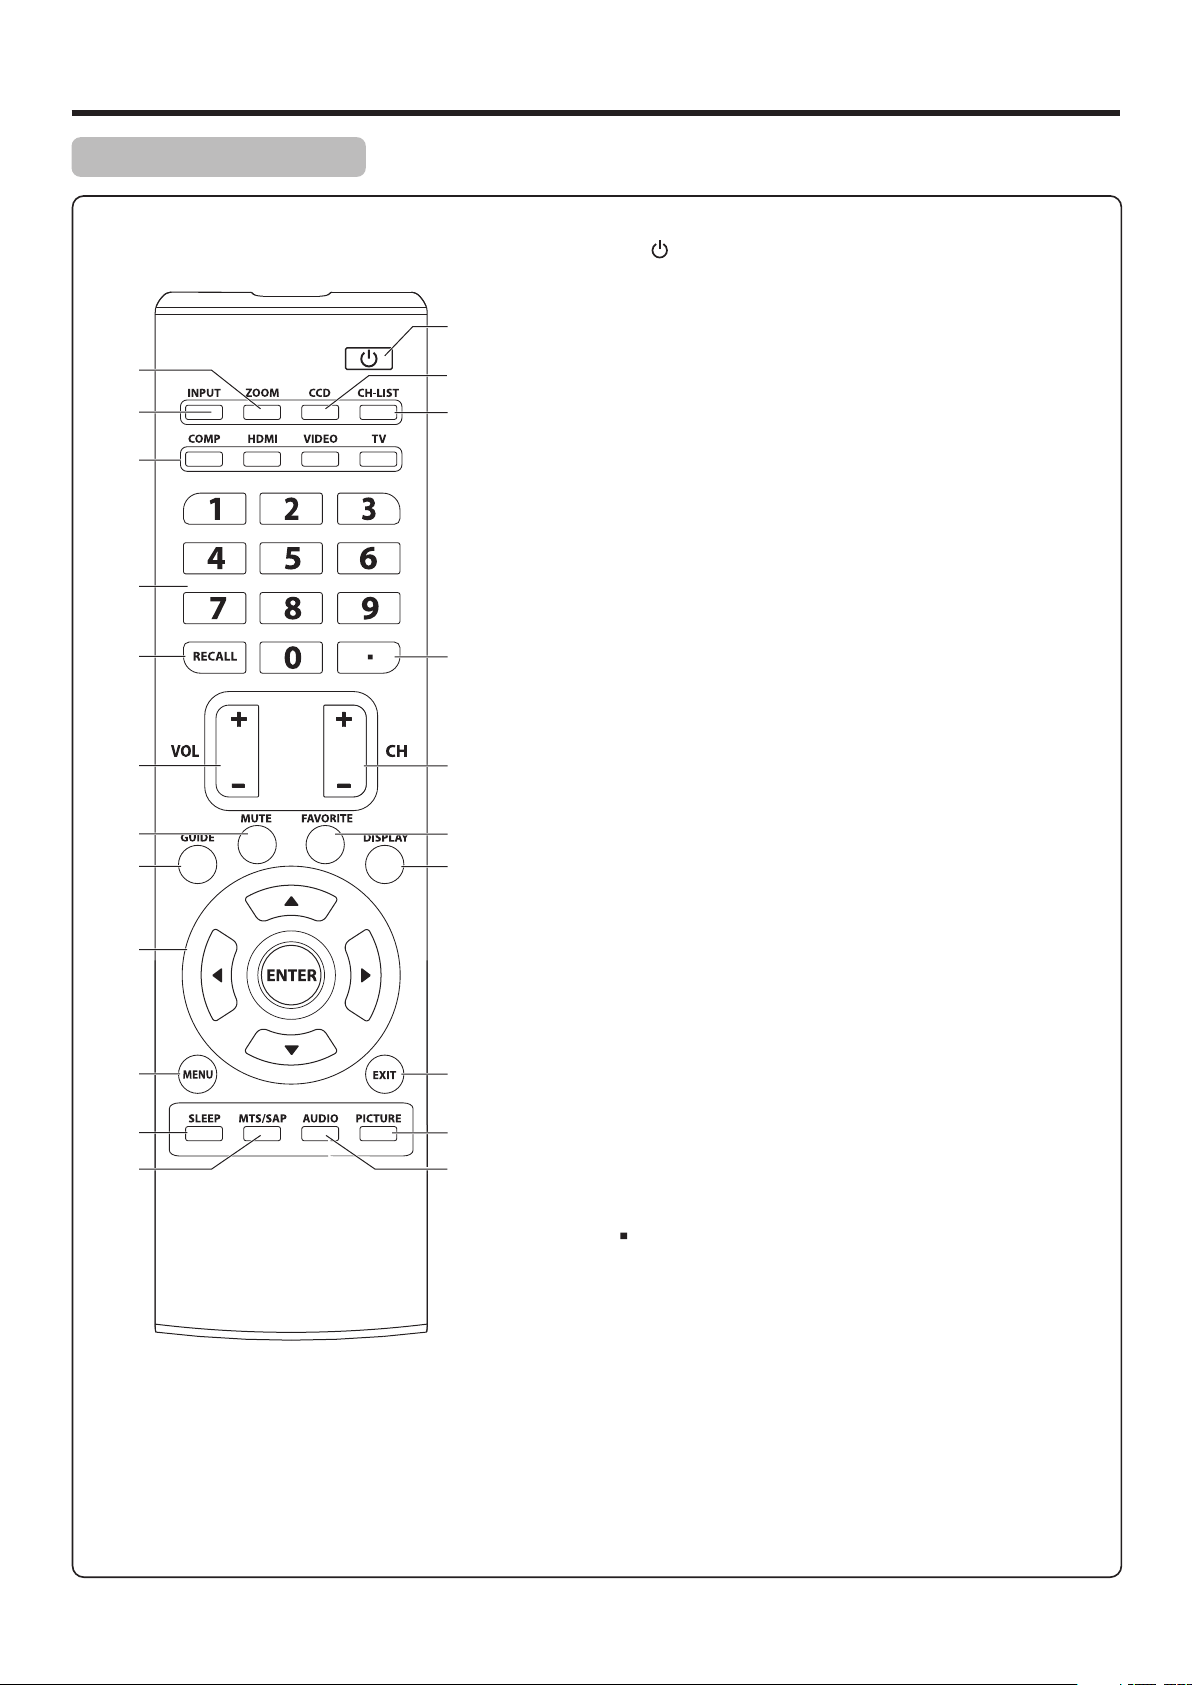
Remote Control Unit
1
POWER : Switches the TV power on or Standby.
2
ZOOM: Selects the screen size.
3
1
2
3
4
5
6
14
15
16
INPUT: Displays input source menu.
4
COMP/HDMI/VIDEO/TV: Direct input source select
COMP: Press to access Component mode.
HDMI: Press to access HDMI mode.
VIDEO: Press once to access AV1 mode, press twice to access
AV2 mode, press the third time to access S-Video mode.
TV: Directly access TV mode.
0 – 9 number buttons: Press to enter channel numbers or
5
input password.
RECALL: Recalls the last viewed channel.
6
VOL+/-: Increases or decreases the volume.
7
MUTE: Mutes the sound.
8
7
8
9
10
11
12
13
17
18
19
20
21
22
GUIDE: Press to display the program guide information (if
9
available) when watching a DTV program. You may be able to
view program broadcasting time and program name from the
guide.
5/6/3/4: Menu navigation buttons.
10
5/6: Press to move up or down in the menu.
3/4: Press to move left or right in the menu or to adjust a
menu setting.
ENTER: Press to confirm a selection and/or enter into a submenu.
MENU: Displays the main menu screen.
11
SLEEP: Sets the sleep timer.
12
MTS/SAP: To select STEREO, SAP or MONO sound in analog
13
TV mode. To select audio track in DTV mode.
CCD: Press to turn closed captioning on or off.
14
CH-LIST: Displays a channel list.
15
Dot ( )button: Press to enter a program number for multiple
16
program channels such as 2-1, or 2-2.
CH+/-: Changes channel up and down.
17
FAVORITE: Displays the favorite program list.
18
19
DISPLAY: Press to display the information banner.
20
EXIT: Press to exit the menu.
PICTURE: Selects picture mode.
21
AUDIO: Selects sound mode.
22
10
Page 13

Connections
Cautions Before Connecting
Carefully check the terminals for position and type before making any connections.
The illustration of the external equipment may be different depending on your model.
Loose connectors can result in image or colour problems. Make sure that all connectors are securely inserted into their
terminals.
Refer to the operating manual of the external device as well.
When connecting an external device, turn the power off to avoid any issues.
Connecting Headphones
Insert the plug of the headphone into the TV’s Headphone jack.
When using headphones, adjust the headphone volume so as to avoid excessive levels, as hearing damage may result.
TV Side
Headphones
Connecting a VCR
TV REAR
Cables are often color-coded
to connectors. Connect red to
red, white to white, etc.
How to connect:
Connect the Audio/Video cables between the Audio (L/R)/Video jacks on the unit and VCR.
Note: For better video, you can use the S-Video terminal if your source supports it.
AV cable
S-VIDEO
cable
VCR
S-VIDEO
To play VCR
1. Turn on your TV, then press INPUT button. The INPUT SOURCE menu opens.
2. Press 5or6to select AV1or S-Video, then press ENTER to confirm.
(Or you can press VIDEO button one or more times to select directly. )
3. Turn on your VCR , insert a videotape and press the Play button.
Note:
· AV1 and S-Video connection share the same audio jacks.
11
Page 14

Connections (Continued)
Connecting a Camcorder
TV Side
Cables are often color-coded
to connectors. Connect red to
red, white to white, etc.
AV cable
How to connect:
Connect the Audio/Video cables between the Audio (L/R)/Video jacks on the unit and camcorder.
To playback Camcorder
1. Turn on your TV, then press INPUT button. The INPUT SOURCE menu opens.
2. Press 5or6to select AV2, then press ENTER to confirm.
(Or you just press VIDEO button twice to go to AV2 mode directly.)
3. Turn on your camcorder and set it to output mode. (For details, refer to your camcorder user manual.)
4. Insert the tape into the camcorder and press Play button.
Camcorder “PlayStation”
or
Note:
The operations of the camcorder may be different and is dependant on your model. Please read the user manual of your
camcorder to confirm operation.
Connecting Component Video
TV REAR
Audio cable
To connect a device using component video:
Connect the Component Video cable between the Y, Cb/Pb, Cr/Pr input jacks on the unit and Y, Cb/Pb, Cr/Pr output jacks
on the device .
Connect the Audio cable between the AUDIO input jacks on the unit and AUDIO output jacks on the device.
Component video cable
Device with component video
Cables are often color-coded
to connectors. Connect red to
red, white to white, etc.
To play component video from an external device:
1. Turn on your TV, then press INPUT button. The INPUT SOURCE menu opens.
2. Press 5or6 to select Component, then press ENTER to confirm.
(Or you just press COMP button on the remote control to select directly)
3. Turn on your external device and set it to the correct mode. See the device’s user guide for more information.
12
Page 15

Connections (Continued)
Connecting an HDMI device
TV REAR
Device with HDMI output
HDMI cable
How to connect a device using HDMI Connection:
Connect the HDMI cable between the HDMI interface on the unit and HDMI output on the device.
To play from the device using HDMI:
1. Turn on your TV, then press INPUT button. The INPUT SOURCE menu opens.
2. Press 5or6to select HDMI, then press ENTER to confirm.
(Or you just press HDMI button to select directly.)
3. Turn on your device and set it to the correct mode. See the device’s user guide for more information.
Note:
If the external device has DVI output only, use a DVI to HDMI adapter cable to connect to the HDMI terminal. Connect the audio
cable to the VGA AUDIO IN jack on the TV rear.
Connecting a Computer
TV REAR
D-Sub cable
(analog RGB)
How to connect:
Connect a VGA cable between the VGA jack on the computer and the VGA input jack on the unit.
Connect an Audio cable between the AUDIO output on the computer and AUDIO input jack on the unit.
To monitor port
(15-pin D-Sub)
To audio output jack
Audio cable
(stereo mini plugs)
To play video from a computer
1. Turn on your TV, then press INPUT button. The INPUT SOURCE menu opens.
2. Press5or6to select VGA, then press ENTER to confirm.
3. Turn on your computer, and adjust the display properties as required.
13
Page 16

Basic Operations
Turning On/Off the Power
Turning On
Insert the power cord into the wall outlet.
Press the Power button on the unit or on the remote control, the unit will be turned on and you will be ready to use its
features.
Turning Off
With the power on, press the Power button on the unit or on the remote control to turn off the unit, and put the unit in
standby mode. To cut off the power completely, please disconnect the AC power cord.
Note: If there is no signal input for a certain time, the TV will auto go to standby mode.
Selecting the Input Signal Source
Press INPUT button.
1
Press 6or 5to select the input source. Options include:
2
! TV — Watch the TV signal.
! AV1 — Watch the signal from the AV 1 input terminals.
! AV2 — Watch the signal from the AV 2 input terminals.
! S-Video — Watch the signal from the S-VIDEO input terminal.
! Component — Watch the signal from the COMPONENT input terminals.
! HDMI — Watch the signal from the HDMI input jack.
! VGA — Watch the signal from the VGA jack.
Press ENTER button to confirm the selection.
3
Note:
On the remote control four direct input source select buttons (VIDEO/COMP/HDMI/TV) are provided.
=
VIDEO button: Press once to select AV1, press twice to select AV2, press three times for S-Video.
=
COMP button: Press to select Component.
=
HDMI button: Press to select HDMI.
=
TV button: Press to select TV.
Parental Controls
On-Screen Menu Language Selection
Press MENU.
1
Press 3or4to select Setup menu, press 6 to access the menu.
2
Press 5 or 6to select Menu Settings item, press ENTER to access.
3
Time
Closed Caption
Menu Settings
VGA Settings
Input Label
Restore Default
Audio Only
Select
INPUT SOURCE
TV
AV1
AV2
S-Video
Component
HDMI
VGA
Audio Channel
SetupPicture
Off
Move
Press ENTER
MENU
Exit
Press 5 or 6to select Menu Language item, press 3or4to select
4
your desired language.
Press EXIT to close the menu.
5
14
Transparency
Menu Language
Select
Audio Channel SetupPicture
25%
English
Move
MENU
Exit
Page 17

Basic Operations (Continued)
Main Menu Overview (TV mode)
Audio Channel SetupPicture
Picture Mode
Contrast
Brightness
Color
Tint
Sharpness
Advanced Video
Select
Sound Mode
Bass
Treble
Balance
Surround
AVC
Audio Language
Select
Custom
70
40
60
0
50
Off
Off
MENU
MENU
Exit
57
50
50
Exit
Move
Audio Channel SetupPicture
Custom
English
Move
List of main menus to help you with operations
Picture menu
Picture Mode
Contrast
Brightness
Color
Tint
Sharpness
Advanced Video (including Color Temp., Mode, Zoom
Noise Reduction, Overscan, items)Adaptive Contrast, Auto Zoom
Audio menu
Sound Mode
Bass
Treble
Balance
Surround
AVC
Audio Language
(Refer to <Adjusting PICTURE Menu
Options> section for details.)
(Refer to <Adjusting AUDIO Menu
Options> section for details.)
Parental Controls
Time
Closed Caption
Menu Settings
VGA Settings
Input Label
Restore Default
Audio Only
Select
Air/Cable
Auto Scan
Favorite
Show/Hide
Channel No.
Channel Label
DTV Signal:
Select
Audio Channel SetupPicture
Audio Channel SetupPicture
Off
Move
Cable
2.1
WGBH-SD
Move
MENU
Good
MENU
Exit
Exit
Setup menu
Parental Controls
Time
Closed Caption
Menu Settings
VGA Settings
Input Label
Restore Default
Audio Only
Channel menu
Air/Cable
Auto Scan
Favorite
Show/Hide
Channel No.
Channel Label
DTV Signal
(Refer to <Adjusting SETUP Menu
Options> section for details.)
(Refer to <Adjusting CHANNEL Menu
Options> section for details.)
Note
=Depending on the signal tuned, you may see different menu options on your screen. The above main menus are illustrated under TV
mode.
=Menu items that are not selectable are grayed out. If without special indication, this manual is described under TV mode.
=The illustrations and on-screen displays in this manual are for explanation purposes (some are enlarged, others cropped) and may vary
slightly from the actual ones.
15
Page 18

Basic Operations (Continued)
Menu Navigation
1.
2.
3.
4.
5.
6.
Press to display the Main menu.
Press to select menu.
Press to enter the menu field.
Press to select menu items.
Press to adjust the selected items or move the on-screen cursor leftward or rightward .
Pressing4also can enter the sub-menu.
Press to confirm your operation, or enter the sub-menu.
Press to return to previous screen.
Press to close the menu.
Note: To clearly introduce the menu operations, this
operation manual provides a description based on
operation with the remote control.
Channel Selection
Digital sub-channels
A digital TV signal transmits more data than an analog signal. This ncrease in data provides a better picture and sound
with less static and interference.
The increased data capacity of a digital signal also lets broadcasters fit several channels into the same bandwidth as an
analog signal. Broadcasters may use these sub-channels to transmit a variety of information, such as weather forecasts,
foreign languages, commercials.
A digital sub-channel is indicated by the main channel number followed by a dot and the sub-channel number. For
example, 5.1 indicates sub channel 1 of the main channel 5.
You can use the following ways to change channels:
! Press CH+ or CH- to go to the next or previous channel in the memorized channel list.
! To select an analog channel, press the number buttons for the channel you want, then wait for the channel to change or
press ENTER to immediately change the channel.
! To select a main digital channel, press the number buttons for the main channel, then wait for the channel to change or
press ENTER to immediately change the channel.
! To select a digital sub-channel, press the number buttons for the main channel, press the dot(.) , then press the number
button for the sub channel. Wait for the channel to change, or press ENTER to immediately change the channel.
Note: Button presses must be within three seconds of each other.
i
! To go to the last channel viewed, press RECALL.
! To select a channel from the memorized channel list, press CH-LIST, press 5 or 6 to select the channel, then press
ENTER.
! To select a favorite channel from the favorite list, press FAVORITE, press 5 or 6 to select the channel, then press
ENTER.
Note: If the list has more than one page, press 3or4to scroll through the pages.
16
Page 19

Basic Operations (Continued)
Adjusting the Volume
Using the volume buttons (VOL+ and VOL – )
Press the VOL + or VOL- to increase or decrease the volume.
Using the Mute
Press the MUTE button to temporarily turn off all sound. To restore the sound, press the MUTE button again.
Displaying the Information Banner
You can press DISPLAY button to display information banner. The information banner will display current program
information such as channel number, or video input source, resolution, etc. To close the banner, press this button again or wait
a few seconds and the banner closes automatically.
In DTV mode, it will display the following information:
- Channel number and station name
- Channel label
- Broadcast program name
- TV rating
- Signal type
- Audio information
- Resolution
- CC mode
- Current time, current program start and end play times
Note:
l Some DTV programs’ information banner may not contain all the above information. It will vary depending on the
broadcaster and your setting.
In analog TV mode, it will display the following information:
- Channel number
- Channel label (if preset)
- Signal type
- Audio information (Stereo or SAP or Mono)
- Resolution
Displaying the DTV Program Guide
In DTV mode, your TV can display a program guide, if available. The guide may show a list of available programs, program
times, and program summaries. The displayed information is provided by the DTV channel.
! Press GUIDE, the program guide opens. If there is additional program information, press this button to display the
information.
! To close the program guide, press this button or wait a few seconds and the banner closes automatically.
17
Page 20

Getting Started
Running Initial Setup
Perform the following steps before you press POWER on the remote control to turn on your TV set.
1. Insert the batteries into the remote control unit.
2. Connect the antenna cable to the TV.
3. Connect the power.
After you finish connecting the TV, you can run the Initial Setup to create a list of available analog and digital channels. Wait some
seconds and the initial Setup Wizard screen appears when you turn on the TV for the first time after purchase. We strongly
recommend you to perform initial setup according to the steps below.
Setup Wizard Operation Procedure
Step 1: Setting Menu Language
Highlight Menu Language item,
press 3or4 to select the desired
menu language.
Setup Wizard
Menu Language English
Time Zone
DST
Air/Cable
Auto Scan
Pacific
Off
Air
Menu Language English
Time Zone Central
DST
Air/Cable
Auto Scan
Setup Wizard
Off
Air
Step 2: Setting Time Zone
Select
Move
MENU
Exit
Press 6 to select Time Zone, press 3or4 to select your viewing area time
zone. Pacific, Alaska, Hawaii, Atlantic, Eastern, Central, Mountain can
be selected.
Step 3: Setting Daylight Saving Time
Press 6 to select DST, press 3or4 to select ON if you want to observe
daylight saving time, or you may select OFF to abandon daylight saving.
Step 4: Setting Air/Cable Option
Press 6 to select Air/Cable, press 3or4 to select Air or Cable according
to what kind of connection is made with your TV .
Step 5: Start Auto Scan...
After you have finished setting the above item, press 6 to select Auto Scan
item, press ENTER or 4 to start auto scan.
Auto Scan may take a while to complete. A progress report is displayed while
available channels are being scanned. If you press MENU to exit the Auto Scan
before all receivable channels are scanned, you need to run Auto Scan at a later
time.
Auto Scan will create a list of receivable channels for the current input . You will
be required to run Auto Scan for RF input to create a list of available channels.
Select
Move
MENU
Setup Wizard
Menu Language English
Time Zone Central
DST On
Air/Cable
Auto Scan
Select
Move
Air
MENU
Setup Wizard
Menu Language English
Time Zone Central
DST On
Air/Cable Cable
Auto Scan
Select
Move
MENU
Setup Wizard
Menu Language English
Time Zone Central
DST On
Air/Cable Cable
Auto Scan
Select
Move
MENU
Exit
Exit
Exit
Exit
Note: When running auto scan, you can interrupt it by pressing MENU button.
18
Page 21

Adjusting PICTURE Menu Options
Adjusting the Picture
Press MENU and the Picture menu appears, . press 6to access
1
Press 5 or 6to select items, press 3or4to adjust the selected
2
items. If the selected item has sub-menu, press ENTER to access.
Press EXIT to close the menu.
3
Option
Picture Mode
Note: To quickly change
the picture mode, press
the PICTURE button
on the remote control
repeatedly.
Contrast
Brightness
Color
Tint
Sharpness
Advanced Video
Description
Selects a desired picture mode. You can select from Vivid,Standard,Sports,Theater, Energy Saving and Custom.
Vivid: Select for a bright and vivid picture.
Standard: Select for a standard picture.
Sports: Select for a dynamic picture.
Theater: Select for a finely detailed picture.
Energy Saving: Select for energy saving, the backlight brightness will be decreased.
Custom: The picture quality you set.
Adjusts image contrast.
Adjusts screen brightness for easier viewing of dark picture such as night scenes and black hair.
Adjusts color saturation.
Adjusts tint for image.
Adjusts image sharpness and displays a sharp image.
Allows you to adjust Color Temperature, Zoom Mode, to turn on/off Noise Reduction, Overscan,
Adaptive Contrast, Auto Zoom. See [Advanced Video Adjustment] section below for more
information.
Picture Mode
Contrast
Brightness
Color
Tint
Sharpness
Advanced Video
Select
Audio Channel SetupPicture
Custom
70
40
60
0
60
Move
MENU
Exit
Advanced Video Adjustment
In Picture menu, p
1
to access.
Press 5 or 6to select items, press 3or4to adjust the selected items.
2
Press EXIT to close the menu.
3
Option
Color Temp.
(Color temperature)
Zoom Mode
Note: You can press the
ZOOM button repeatedly to
select a desired aspect ratio.
Do not let image display in 4:3
mode for extended periods of
time.
Noise Reduction
Overscan
Adaptive Contrast
Auto Zoom
ress 5 or 6to select Advanced Video, press ENTER
Description
Selects one of three automatic color adjustments. Sets to Warm to enhance hotter colors such as red, or
set to Cool to see less intense colors with more blue. You can select from Warm, Cool and Normal.
You can select the picture aspect ratio (display proportions) according to your video signal type or
personal preference. You can select from Auto, Normal, Wide, Zoom and Cinema .
Auto(available only when Auto Zoom is set On): Selects the correct aspect ratio automatically.
Normal: Selects the correct aspect ratio to match the source’s image.(4:3 to 4:3,16:9 to 16:9)
Wide: Displays a full-screen picture.
Zoom: Enlarges the picture, the top and bottom portion of the picture may be cropped.
Cinema: Stretches the picture at the edges while maintaining a good aspect ratio at the center of the screen.
Select from Weak/Middle/Strong to reduce noise in the picture, commonly called snow.
Select Off to turn off this function.
When receiving DVI signals in VIDEO format, you can make use of Overscan item to adjust the
picture’s reproduction rate. (In other mode, this item can not be adjusted)
Select On to optimize the picture display. Picture will become more vivid.
In TV mode, if set Auto Zoom to On, one more option (Auto) can be selected from Zoom Mode.
Audio Channel SetupPicture
Color Temp. Cool
Zoom Mode
Noise Reduction
Overscan
Adaptive Contrast
Auto Zoom Off
Select
Wide
Middle
Off
Off
Move
MENU
Exit
19
Page 22

Adjusting AUDIO Menu Options
Adjusting the Sound
Press MENU, and then use
1
Audio menu.
Press 5 or 6to select items, press 3or4to adjust the selected items.
2
Press EXIT to close the menu.
3
Option
Sound Mode
Note: To quickly change the sound mode, press the AUDIO button repeatedly.
Bass
Treble
Balance
Surround
AVC
(auto volume control)
3or4to highlight Audio, press 6to access
Description
Selects a desired sound mode. You can select from Standard, News, Music, Movie and Custom.
Standard: Select for normal programs.
News: Select for news programs.
Music: Select for a music program.
Movie: Select for a movie program.
Custom: The sound quality you set.
Adjusts Bass (low sounds)
Adjusts Treble (high sounds).
Adjusts volume balance (left and right volumes).
Select On to turn on the surround sound effect. The benefits of surround sound are enormous.
You can be completely enveloped in sound, just as if you were at a concert hall or cinema.
Select Off to turn off surround sound.
Select On to equalize overall volume levels across all channels.
Select Off to turn off the auto volume control.
Sound Mode
Bass
Treble
Balance
Surround
AVC
Audio Language
Select
Audio Channel SetupPicture
Custom
57
50
50
Off
Off
English
Move
MENU
Exit
Audio Language
(Only for digital programs)
Stereo/SAP Broadcasts Setup
Selects an alternate language if the program has more than one language.
(Only for analog programs)
- This TV can receive MTS stereo programs and any SAP (Secondary Audio Program) that accompanies the stereo program;
if the station transmits an additional sound signal as well as the original one.
- Stereo or SAP can be selected only when the TV station transmits these signals.
- Mono sound is automatically received if the broadcast is only in Mono.
- Select Mono if you are having difficulty receiving a stereo signal.
Press MTS/SAP button to select a stereo mode. You can select from [MONO], [STEREO] and [SAP].
MONO: Select for mono reception. Use to reduce noise during weak stereo broadcasts.
STEREO: Select for stereo reception when viewing a program broadcast in stereo.
SAP: Select to automatically switch the TV to second audio programs when this signal is received.
Note: In DTV mode, you can press MTS/SAP button to select audio track (if available).
20
Page 23

Adjusting SETUP Menu Options
Accessing the Setup Menu Options
You may change system settings such as OSD language, menu transparency, etc. by
Parental Controls, timer, closed caption,
making use of Setup menu.
Press MENU, use 3or4to select Setup menu, press 6to access.
1
Press 5 or 6to select items, press 3or4to adjust the selected items. If
2
the selected item has sub-menu, press ENTER to access.
Press EXIT to close the menu.
3
Option
Parental Controls
Description
Your TV lets you control which programs and movies your children can watch based on
Parental Controls
Time
Closed Caption
Menu Settings
VGA Settings
Input Label
Restore Default
Audio Only
Select
Audio Channel SetupPicture
Off
Move
MENU
Exit
industry ratings. To set up Parental Controls, see [Setting Parental Controls] section on the
following pages.
Time
Making use of Time sub-menu to set sleep timer and auto clock which automatically sets the
time based on time information from a digital channel. See [Setting Sleep Timer and Auto
Clock] section for details.
Closed Caption
You can make use of Closed Caption sub-menu to turn on/off Closed Caption, to set Closed
Caption type, etc. See <Closed Caption> section for more instructions.
Menu Settings
VGA Settings
Input Label
Restore Default
Audio Only
Lets you set menu transparency and menu language through the menu.
See [Menu Settings] section for details.
Lets you adjust computer settings such as H-Pos, V-Pos, Clock, Phase, etc. through the menu.
See [Adjusting Computer Settings] section for more instructions.
Lets you label a device connected to input jacks to make the device easier to select.
See [Labeling an Input Source] section for more instructions.
Running this function to reset most settings to its default by following the on-screen instructions.
Lets you turn off the video for a TV broadcast and listen to the audio only.
See [Playing TV Audio Only] section for more instructions.
21
Page 24

Adjusting SETUP Menu Options — Parental Controls
Setting Parental Controls
Parental Control enables parents to prevent their children from watching inappropriate material on TV. Parental Control reads
the ratings for programming (except for news, sports, unedited movies on premium cable and Emergency System signals ),
then denies access to programming if the program's rating meets the limitations you select. In this case, the program will be
blocked.
Before you block channels, you need to set a password. The password controls access to the parental control system.
any blocked channels, the password is also required.
To access
Setting the Parental Password
Press MENU, use 3or4to select Setup menu, press 6to access.
1
Select Parental Controls item, then press ENTER to access. Now a
2
password is required to input.
Press 0 – 9 number buttons to input the password(4-digit, the default
3
password is 0000 and you should change it). Now Parental Controls
menu is opened.
Highlight Change Password item, then press ENTER.
4
Enter the old password using 0 – 9 buttons.
5
Enter the new password using 0 – 9 buttons.
6
Audio Channel SetupPicture
Parental Controls
Time
Closed Caption
Menu Settings
VGA Settings
Input Label
Restore Default
Audio Only
Select
Audio Channel SetupPicture
Enter Password
Audio Channel SetupPicture
Change Password
System Lock
US
Canada
RRT Setting
Reset RRT
Off
Move
Off
MENU
_ _ _ _
Exit
Enter the same password again to confirm.
7
Now the new password has been created successfully.
Note:
! To avoid forgetting the password, write it down and keep it in the safe
place.
! There is a super password (9999) provided for you to access the
Parental Controls menu or access the blocked channel. Make sure
not let children know the super password.
Turning the Parental Lock On or Off
Use password to access Setup-Parental Controls menu.
1
Select System Lock item, then press 3or4to select On or Off.
2
To enable the blocking scheme you set up and to set up the
blocking scheme (otherwise the rating setting can not be
accessed), you should set to ON.
To disable the blocking scheme you set up, please set it to
OFF.
22
Select
Enter Old Password
Enter New Password
Confirm Password
Select
Change Password
System Lock
US
Canada
RRT Setting
Reset RRT
Select
Move
Audio Channel SetupPicture
Move
Audio Channel SetupPicture
Off
Move
MENU
_ _ _ _
_ _ _ _
_ _ _ _
MENU
MENU
Exit
Exit
Exit
Page 25

Adjusting SETUP Menu Options — Parental Controls (Continued)
Setting Parental Controls
Audio Channel SetupPicture
You can set Parental Controls for the U.S. and Canada.
Setting US Ratings
Use password to access Setup-Parental Controls menu.
1
Press 5or6to select US, then press ENTER.
2
Change Password
System Lock
US
Canada
RRT Setting
Reset RRT
On
Select TV if you want to set controls for U.S. TV ratings, select MPAA if
3
you want to set controls for U.S. movie ratings. Then press ENTER to
access.
If in TV RATING screen, press 563or4 to select the rating you want
4
to block, then press ENTER. A lock symbol appears when a rating is
blocked.
If in MPAA RATING screen, just press 5or6 to select the rating. When
you select a rating, that rating and all other higher ratings are locked.
Age-based TV ratings
Use these rating guidelines to prevent your children from watching
certain TV programs, based on the rating limits set.
Rating Description
TV-Y
TV-Y7
TV-G
TV-PG
TV-14
TV-MA
All children.
Directed to children age 7 and older.
General audience.
Parental guidance suggested.
Parents strongly cautioned.
Mature audience only.
(TV ratings)
Content-based TV ratings
Rating Description
FV
V
S
L
D
Fantasy violence.
Violence.
Sexual situations.
Strong language.
Suggestive dialog.
US MPAA (movie) ratings
Prevents children from watching certain movies, based on the rating limits
set. You can set the rating limits by blocking out all the movies with ratings
above a certain level. These ratings apply only to movies, not to TV
programs.
Rating Description
G
PG
PG-13
R
NC-17
X
N/A
All children and general audiences.
Parental guidance suggested.
Parental guidance for children under 13.
Restricted viewing, parental guidance is
suggested for children under 17.
No one 17 and under admitted.
Adult only.
Not rated.
Select
TV
MPAA
Select
: Block Press ENTER to Block or Unblock
Select
G
PG
PG-13
R
NC-17
X
N/A
Select
Move
Audio Channel SetupPicture
Move
Audio Channel SetupPicture
Move
Audio Channel SetupPicture
Move
(MPAA ratings)
MENU
MENU
MENU
MENU
Exit
Exit
Exit
Exit
23
Page 26

Adjusting SETUP Menu Options — Parental Controls (Continued)
Setting Parental Controls
Audio Channel SetupPicture
Setting Canada Ratings
Use password to access Setup-Parental Controls menu.
1
Press 5or6to select Canada, then press ENTER.
2
Change Password
System Lock
US
Canada
RRT Setting
Reset RRT
On
Select Canada English if you want to set controls for Canada English
3
ratings, select Canada French if you want to set controls for Canada
French ratings. Then press ENTER to access.
Now simply press 5or6 to select the rating. When you select a rating,
4
that rating and all other higher ratings are locked.
Press EXIT to close the menu.
5
Canadian English ratings
Rating Description
C
C8+
G
PG
14+
18+
EXEMPT
All children.
Children 8 years and older.
General programming.
Parental guidance.
Viewers 14 and older.
Adult programming.
Exempt programming.
Canadian French ratings
Rating Description
G
8+
13 +
16 +
18 +
EXEMPT
Select
Canada English
Canada French
Select
Move
Audio Channel SetupPicture
Move
MENU
MENU
General programming.
Not recommended for ages under 8.
Not recommended for ages under 13.
Not recommended for ages under 16.
Adult programming.
Exempt programming.
Exit
Exit
Audio Channel SetupPicture Audio Channel SetupPicture
C
C8+
G
PG
14+
18+
EXEMPT
Select
Move
MENU
Exit
G
8ans+
13ans+
16ans+
18ans+
EXEMPT
Select
Move
MENU
Exit
Downloading Rating Information
You can download rating information to use when setting Parental Controls.
Use password to access Setup-Parental Controls menu.
1
Press 5or6to select RRT Setting, then press ENTER.
2
If the program is broadcast with RRT5 rating information, the rating information is downloaded automatically and can be
3
used for Parental Controls.
The actual menu options of this rating vary, depending on the broadcaster.
Note: If you want to clear the downloaded rating information, select Reset RRT. The rating information is cleared. If
rating information is broadcast by another program, your TV downloads the new rating information.
24
Page 27

Adjusting SETUP Menu Options — Closed Caption
Closed Caption
You can turn on/off Closed Caption, to set Closed Caption type, to customize
digital closed captions, etc. through the menu.
Press MENU, use 3or4to select Setup menu, press 6to access.
1
Select Closed Caption item, then press ENTER to open the Closed
2
Caption setting screen.
Press 5 or 6to select items, press 3or4to adjust the selected items.
3
If you want to customize the digital closed captions, please select Option
item, use ENTER to access. Then operate using 6,5,3or4button.
Press EXIT to close the menu.
4
CC Mode
Basic Selection
Advanced Selection
Option
Select
Audio Channel SetupPicture
On
CC1
Service1
Move
MENU
Exit
Option
CC Mode
Description
Allows you to select On, CC on Mute or Off.
On: Turns on the Closed Captions.
CC on Mute: Turns on the Closed Captions when the TV is muted.
Off: Turns off the Closed Captions.
Note: You can press the CCD button to quickly turn on or turn off the Closed Captions.
Basic Selection
Advanced Selection
(Only for digital programs)
Option
(Only for digital programs)
Allows you to select closed caption options.
CC1, CC2,
CC3, CC4
ext /Text
T 1 2
/Text3/Text4
Displays a printed version of the dialog or sound effects of a program. (Should be
set to CC1 for most programs.)
Displays network/station information presented using either half or the whole
screen (if available).
Allows you to select advanced digital closed caption options.
Select from the available options (Service1–Service 6).
You can customize the digital closed captions that appear on your screen by doing the following
steps: Highlight Option item, press ENTER button to access its sub-menu. Set Mode to Custom
and now you can customize the Size, Style, etc. to your preference.
To restore to default settings, just set Mode to Default.
Font Style: Select a style for the words.
Font Size: Set the size the words will appear in.
Font Edge Style: Select an edge style.
Font Edge Color: Select a color for the edges.
FG Color: Select a color for the text.
BG Color: Select a background color.
FG Opacity: Select the opacity for the text.
Mode
Font Style
Font Size
Font Edge Style
Font Edge Color
FG Color
BG Color
FG Opacity
BG Opacity
BG Opacity: Select the opacity for the background color.
Select
Audio Channel SetupPicture
Default
Default
Default
Default
Default
Default
Default
Default
Default
Move
MENU
Exit
25
Page 28

Adjusting SETUP Menu Options — Time & Menu Settings
Setting Sleep Timer and Auto Clock
Audio Channel SetupPicture
Press MENU, use 3or4to select Setup menu, press 6to access.
1
Select Time item, then press ENTER to open the Time setting screen.
2
Press 5 or 6to select items, press 3or4to adjust the selected items.
3
Press EXIT to close the menu.
4
Sleep Timer
Time Zone
DST
Clock
Select
2009/12/31 04:15PM
Off
Pacific
Off
Move
MENU
Exit
Option
Sleep Timer
Description
Sleep timer lets you select the amount of time you want your TV to wait before it automatically turns
off. This setting is cleared when the TV is turned off.
Select this item, then press 3or4 to select the amount of time. To turn off the sleep timer, select Off.
Note: To quickly set the sleep timer, press the SLEEP button repeatedly.
Time Zone
Select your viewing area time zone, you can select from Pacific, Alaska, Hawaii, Atlantic,
Eastern, Central, Mountain.
DST
Clock
Select On to observe daylight saving time.
Shows the current time. (Your TV sets the time based on time information from a digital channel
and does not need to be set manually. Be sure to set Time Zone and DST correctly in
advance.)
Menu Settings
Lets you set menu transparency and menu language through the Menu Settings menu.
Press MENU, use 3or4to select Setup menu, press 6to access.
1
Select Menu Settings item, then press ENTER to open the Menu Settings screen.
2
Press 5 or 6to select items, press 3or4to adjust the selected items.
3
Press EXIT to close the menu.
4
Audio Channel SetupPicture
Parental Controls
Time
Closed Caption
Menu Settings
VGA Settings
Input Label
Restore Default
Audio Only
Option
Transparency
Menu Language
Off
Select
Move
MENU
Exit
Description
Lets you adjust menu transparency. You can select from 0%, 25%, 50%, 75%, 100%.
Selects the on-screen menu language. English, French, Spanish are provided.
Press ENTER
Transparency
Menu Language
Select
Audio Channel SetupPicture
25%
English
Move
MENU
Exit
26
Page 29

Adjusting SETUP Menu Options — Input Label/Restore Default/Audio Only
Labeling an Input Source
Press MENU, use 3or4to select Setup menu, press 6to access.
1
Select Input Label item, press ENTER to open the Input Label screen.
2
Then use6,5,3or4to operate.
Option
Present Label
Description
There are already several preset labels provided (such as
Antenna, Cable, Satellite, DTV, DVD, etc.), you can select
one of them as your current source label. (For example, if
you have a DVD player connected to AV1 IN jacks, you can
select DVD as that source’s label. When you press INPUT,
DVD appears instead of AV1). If you want to customize the
label in your preference, select “Custom” and then you can
edit the label.
Custom Label
Only after you have set “Present Label” to “Custom”, then
this item is editable.
Highlight Custom Label, and then press 4.
1
Press 6or5 to select a character, then press 3or4 to
2
move to a different position. Press MENU to exit.
Reset Label
Running this function to reset current source label to the factory default. Perform this operation by
following the on-screen instructions.
Parental Controls
Time
Closed Caption
Menu Settings
VGA Settings
Input Label
Restore Default
Audio Only
Select
Present Label
Custom Label
Reset Label
Select
Audio Channel SetupPicture
Off
Move
Audio Channel SetupPicture
Custom
T V
Move
MENU
Setup
MENU
Exit
Exit
Restoring Default Settings
Press MENU, use 3or4to select Setup menu, press 6to access.
1
Select Restore Default item, then press ENTER. Now a confirmation
2
box appears.
Use 3or4to highlight Yes and press ENTER to start running the
3
[Restore Default] function. If you want to abandon, highlight No and press
ENTER.
Running this function will reset most settings to its default.
Press EXIT to close the menu.
4
Parental Controls
Time
Closed Caption
Menu Settings
VGA Settings
Input Label
Restore Default
Audio Only
Select
Audio Channel SetupPicture
Off
Move
Playing TV audio only
You can turn off the video for a TV broadcast and listen to the audio only.
Press MENU, use 3or4to select Setup menu, press 6to access.
1
Press 5 or 6to select Audio Only item, then press 3or4to select On.
2
Press EXIT to close the menu. After pressing EXIT, the picture will leave
3
the screen after some seconds.
Parental Controls
Time
Closed Caption
Menu Settings
VGA Settings
Input Label
Restore Default
Audio Only
Select
Notes:
! Audio Only only works when the input source is TV and your TV is receiving a broadcast signal.
! To exit Audio Only mode, press any button.
! When you exit Audio Only mode, the Audio Only option is automatically reset to Off (except radio programs).
Audio Channel SetupPicture
Move
Off
MENU
MENU
Exit
Exit
27
Page 30

Adjusting CHANNEL Menu Options
Accessing the Channel Settings
Press MENU, use . 3or4to select Channel menu, press 6to access
1
Press 5 or 6to select items, press 3or4to adjust the selected items. If
2
the selected item has sub-menu, press ENTER to access. In the sub-menu,
use 6,5,3or4to operate.
Press EXIT to close the menu.
3
Option
Air/Cable
Auto Scan
Description
Before running auto scan, you must specify the type of signal source that is connected to the unit. (i.e.,
an antenna or cable system). Select Air if using VHF/UHF antenna, select Cable if using Cable TV.
Select to automatically search for all channels available and stores them in memory. (After you have
run initial setup, you can perform auto scan to search programs again if necessary.)
In Channel menu, select Auto Scan item, press ENTER to access.
1
Now a confirmation box appears. Use 3or4to highlight Yes and press ENTER to start auto
2
scan. If you want to abandon, highlight No and press ENTER.
Audio Channel SetupPicture
Air/Cable
Auto Scan
Favorite
Show/Hide
Channel No.
Channel Label
DTV Signal:
Select
Cable
2.1
WGBH-SD
Move
Good
MENU
Exit
Press ENTER
Audio Channel SetupPicture
Air/Cable
Auto Scan
Favorite
Show/Hide
Channel No.
Channel Label
DTV Signal:
Select
WGBH-SD
Are you sure?
No Yes
Press “ENTER” Key To Select
RF CH:
Found:
Analog:
Digital:
Cable
2.1
Move
53
Good
MENU
Exit
9
7
2
Favorite
Lets you set up a list of your favorite channels.
In Channel menu, select Favorite item, press ENTER to access.
1
Press 56to select, press ENTER to set the channel as favorite (a check mark appears) or not
2
(the check mark disappears).
Press EXIT to close the menu.
3
To select a channel in the favorite channel list, press FAVORITE, press 5or6to highlight the channel,
then press ENTER.
Air/Cable
Auto Scan
Favorite
Show/Hide
Channel No.
Channel Label
DTV Signal:
Select
Audio Channel SetupPicture
WGBH-SD
Move
Cable
2.1
Good
MENU
Exit
Press ENTER
Channel No. Channel Name Favorite
1.2 Sencore
2.0
2.1 WGBH-SD
2.2 PBS-HD
2.10 WGBH-Dx
6.0
7.0
11.1 MBC DTV
12.0
14.0
Select
Audio Channel SetupPicture
Move
MENU
Exit
28
Page 31

Adjusting CHANNEL Menu Options (Continued)
Option
Show/Hide
Channel No.
Channel Label
Description
Lets you delete channels from the channel list so your TV skips the channels when you press
Channel up/down button. You can still tune to the channel using the number buttons.
In Channel menu, select Show/Hide item, press ENTER to access.
1
Press 56to select, press ENTER to mark the channel. A check mark disappears if the channel
2
is deleted. The check mark appears if you add back the channel.
Audio Channel SetupPicture
Move
MENU
Exit
Air/Cable
Auto Scan
Favorite
Show/Hide
Channel No.
Channel Label
DTV Signal:
Select
Audio Channel SetupPicture
WGBH-SD
Move
Cable
2.1
Good
MENU
Exit
Press ENTER
Channel No. Channel Name Show
1.2 Sencore
2.0
2.1 WGBH-SD
2.2 PBS-HD
2.10 WGBH-Dx
6.0
7.0
11.1 MBC DTV
12.0
14.0
Select
Lets you select current channel through the menu. Simply press 3or4to select.
If a channel is not already labeled, you can label the channel to make it easier to identify. Also
you can rename the channel already labeled.
In Channel menu, select Channel Label item, then press ENTER to open the channel label
1
screen.
DTV Signal
Press 6or5 to enter a character, then press 3or4 to move to the next character. Repeat
2
this step to add more characters.
Press MENU to exit to the previous menu.
3
Air/Cable
Auto Scan
Favorite
Show/Hide
Channel No.
Channel Label
DTV Signal:
Select
Audio Channel SetupPicture
WGBH-SD
Cable
2.1
Move
Good
MENU
Exit
Press ENTER
Select
Audio Channel SetupPicture
A B C –
Move
MENU
Exit
You can check the DTV signal strength to
determine if you need to adjust your antenna or
digital cable input. The higher the signal strength,
the less likely you are to experience picture
degradation.
To check the DTV signal strength, you can open
the Channel menu, and the DTV Signal status
appears at the bottom of the menu.
Air/Cable
Auto Scan
Favorite
Show/Hide
Channel No.
Channel Label
DTV Signal:
Audio Channel SetupPicture
Cable
2.1
WGBH-SD
Good
29
Select
Move
MENU
Exit
Page 32

Image Adjustments for VGA(PC) Mode
Before adjusting the image, make sure that you select the correct source (VGA).
Adjusting Computer Settings
In VGA mode, press MENU and the main menu screen displays.
1
Press 3or4to select Setup menu, press 6 to access the menu.
2
Press 5or6 to select VGA Settings item, then press ENTER to
3
access.
Press 5,6,3,4 to navigate through the options or adjust an
4
option. To confirm, press ENTER.
Press EXIT to close the menu.
5
Option
H-Position
V-Position
Clock
Phase
Auto (Auto adjust)
Description
Moves the image on the screen left or right.
Moves the image on the screen up or down.
Adjusts the sample frequency.
Improves the focusing of a stable image.
Selects and activates to start auto adjustment.
The set automatically adjusts the image
settings, such as position and phase.
Parental Controls
Time
Closed Caption
Menu Settings
VGA Settings
Input Label
Restore Default
Audio Only
Select
H-Position
V-Position
Clock
Phase
Auto
Select
Audio Channel SetupPicture
Off
Move
Audio Channel SetupPicture
Move
MENU
MENU
Exit
70
40
60
50
Exit
30
Page 33

Troubleshooting
If, after reading these operating instructions, you have additional questions related to the use of your television, please call the
services center in your local area.
Before calling service, please check the symptoms and follow suggested solutions.
Remote Control
Problem Possible Solutions
Remote control does not operate
! The batteries could be weak. Replace the batteries.
! Check the orientation of the batteries.
! Make sure the power cord is plugged in.
Video and Audio
Problem Possible Solutions
No picture (screen not lit),
No sound
Dark, poor or no picture
(Screen lit), good sound
No color/dark picture/color
is not correct
Only snow and noise appear
on the screen
Dotted lines or stripes
! Make sure the power cord is plugged in.
! Press POWER on the TV or on the remote control.
! Try another channel; it could be station trouble.
! Select a proper picture mode.
! Adjust the brightness in the video setting.
! Check the antenna/cable connections.
! Adjust the color saturation in the video setting.
! Check the antenna/cable connections.
! Try another channel; it could be station trouble.
! Adjust the antenna.
! Move the TV away from noise sources such as cars, neon signs, or hair dryers.
Double images
Good picture, no sound
! Using a highly directional outdoor antenna or a cable may solve the problem.
! The sound may be muted. Press MUTE again to cancel.
! Make sure the stereo mode is set to stereo or mono.
Audio noise ! Communication problems may occur if infrared communication equipment (e.g.,
infrared cordless headphones) is used near the TV. Move the infrared
communication equipment away from the TV until the noise is eliminated.
31
Page 34

Troubleshooting (Continued)
General
Problem Possible Solutions
One or some channels can’t be
displayed
! These channels may be blocked. Please unblock them (see <Setting Parental
Controls> section).
! These channels may be set hidden. You may set it to show or select them with 0-9
number buttons.
Lost password
Some items can’t be accessed ! If a setting option appears in gray, this indicates that the settings option is unavailable
TV cabinet creaks ! When the TV is in use, there is a natural rise in temperature, causing the cabinet to
Control buttons do not operate
Note:
If your problem is not solved, turn your unit off and then on again.
! You may use the super password (9999)to access the Parental Controls menu and set
a new password. Please remember your new password and keep it carefully.
in current input mode.
expand or contract and may be accompanied by a slight creaking noise. This is not a
malfunction.
! Disconnect the power cord and wait for a few seconds. Then re-plug the power cord
and turn on the unit again.
Cautions:
Never attempt to repair a defective TV yourself.
32
Page 35

Specifications
Type: LCD TV
Panel: 19” TFT LCD
TV system: NTSC-M, ATSC
Receiving Channel: VHF 2-13, UHF 14-69, CATV 1-125, CADTV 1-135, DTV 2-69
Audio multiplex: BTSC System
Audio out: 3W × 2
Power Requirement: AC 120 V, 60 Hz
Power Consumption: 35 W
Dimensions (W x H x D, with stand): 458 ×336 ×180 mm
Weight: 4.2 kg
Terminals:
Composite Video/Audio(L/R): 2
S-video: 1
Component Video/Audio(L/R): 1
IN
HDMI interface: 1
VGA/Audio: 1
Antenna: 1
Headphone jack: 1
OUT
SERVICE PORT: 1
RS-232: 1
CONTROL
Note:
1. Design and specifications are subject to change without notice.
2. Weight and dimensions shown are approximate.
3. Specifications and external appearance may be changed for the sake of improvement.
33
Page 36

Assembling the stand and removing the stand column(Option)
If the stand is provided, please read these instructions thoroughly before attempting this installation.
Safety Precautions:
1.Please read these instructions thoroughly prior to attempting this installation.
2.Be sure to handle this product very carefully when attempting assembly. If you are unsure of your
capability, or the use of tools necessary to complete this activity, refer to a professional installer or
service personnel. The manufacturer is not responsible for any damages or injuries that occur due to
mishandling or improper assembly/installation.
3.When using a table or bench as an aid to assembly, be sure to put a soft cushion or covering to prevent
accidental scratching or damage to the unit's finish.
4.The speaker is not intended to support the weight of this display. Do not move or handle this product
from the speaker; which can cause damage to the display not covered under the manufacturer's
warranty.
Installing the Stand
Place the stand on the table, hold the display upright and aim the bottom stand column toward the
stand groove, then carefully push the display downwards, fully insert the column into the stand until
the lock snaps. Now the stand is assembled.
Push downwards
Stand groove
Stand column
Stand
Adjusting the viewing angle of the TV
Adjust the angle forward up to 5°and backward up to 10°.
Note: When adjusting the angle, use caution to avoid slipping or tipping the TV.
forward
Stand
Stand
5°
backward
10°
34
Page 37

Assembling the stand and removing the stand column(Option)
Detaching the Stand
1.Place carefully the display on its front side with a soft cushion below, shake the stand forward or
backward to adjust angle between the stand and the display, let the angle ≤ 90°.
90
2.Press the two tabs together and push inside properly, and pull out the stand at the same time to
detach the stand.
Pull out the stand
Press together and push inside
Tabs
Detaching the stand column
If wall mounting, please detach the stand column.
Place carefully the display on its front side with a soft cushion below, loosen and remove 4 pcs screws,
detach the stand column.
Stand Column
4 pcs screws
NOTE:
1.Appearance of this product in illustrations may differ from your actual product, and is for
comparative purposes only.
2.Design of this accessory or display products are subject to change without notice.
35
Page 38

2050042997743
SKU 76139041
PRINTED ON
RECYCLED PAPER
Ver.1.0
 Loading...