

Page 1

XOU24WDZAGO
UNIVERSAL 2 ZONE WINE COOLER
I worked really hard
on this manual so please read it.
Page 2

UNDERCOUNTER
When buying any XO appliance
you can be confident you have chosen a
high quality, innovative and stylish product
from a company that cares about you!
If you require service
or have questions,
Help is only a phone call away -
call: 973-403-8900
Talk to one of our undercounter experts.
2
Page 3
where things are
Before You Get Started
Installer Checklist
Find Your Model
Safety Instructions
Electrical and Grounding Instructions
Installation Instructions
S
izes and Installation Dimensions
Reversing the Door Swing
Integrated Panel Dimensions
Optional Stainless Overlay Panel
Leveling Your XO
Operating Instructions
Product Overview
Control System Overview
Setting the Temperature
Functions
Wine and Beverage Storage
Storage Tips
4 - 7
8 - 18
19 - 26
Care and Cleaning
Helpful Hints
Cleaning the Interior / Exterior
Changing the Carbon Air Purification Filter
FAQ’s
Before You Call For Service
Warranty
please read and follow
all safety instructions
25 - 26
27 - 28
It’s for your
own good...
Honest.
3
Page 4
the job isn’t done until
To ensure that the installation process is successfully completed,
here are few things to review...
Is the unit plugged in?
O
Are the controls on? (Panel will illuminate.)
O
Are the controls operating correctly?
O
Has the unit been properly leveled - both side to side and front to back -
O
with all 4 leveling feet securely making contact with the floor?
This is an OVERLAY unit - have the panels been securely attached and properly aligned?
O
After installation, does the door open sufficiently to fully extend the shelves?
O
Is the door sealing properly?
O
Is the handle secure?
O
Have you thoroughly inspected all surfaces for any imperfections?
O
Have you reviewed this manual with the customer and explained the unit’s operation and care?
O
Has the customer received copies of the literature and keys?
O
Have you properly disposed of all packing materials properly (recycle, please)?
O
Is the custo
O
Remove door gaskets, latches, lids, lock and/or doors from unused or discarded appliances,
mer satisfied?
RISK OF CHILD ENTRAPMENT!
An empty refrigerator is a very dangerous attraction to children.
or take other actions to guarantee them harmless.
Always dispose of old appliances in accordance with local laws and regulations.
4
Page 5
this is the model
covered in this
book
WINE COOLER
2
XOU24WDZAGO
ACCOMMODATES
EUROPEAN | ADA | AMERICAN STANDARD
CABINETRY
record your serial number
here in case you need it later
5
Page 6

your safety matters
Please read through completely before using your XO Unit
To prevent damage to the door gasket, the door must be opened all the way before pulling racks out.
The appliance must be positioned so that the plug is accessible.
Empty your XO unit before attempting to move the appliance. Moving while loaded may damage or
distort the frame.
The compressor will get HOT during operation / touching it may cause injury.
During installation follow all safety tips provided in this manual / appropriate safety equipment such as
safety glasses and work gloves should be worn.
Two people should move or lift your XO unit to prevent injury or damage.
Remov
Never cover the bottle racks with foil or other material which will impede internal air circulation.
For maximum efficiency, keep the door tightly shut unless loading or unloading and never overload your
XO unit.
Before installing, allow your XO unit to sit upright for 2 hours at the install site. This will allow the cooling
system to stabilize after transportation. Failure to follow this step may cause problems.
Never store perishable food products such as meat or cheese in your wine cooler.
e all interior and exterior packing materials prior to installation and dispose of properly.
Location
Your XO unit should be located away from direct sunlight and heat sources (stove, heaters, etc.) which may
increase electrical consumption. High or low ambient temperature may cause units to work improperly.
The floor must be strong enough to support your XO unit fully loaded.
Your XO unit must not be installed in areas of where water or e
Your XO unit must not be installed near
where flammable, corrosive or hazardous materials are present.
xcessive moisture are present.
Your XO unit’s final installation must observe the correct minimum air clearances around and behind the
unit to ensure adequate ventilation. In addition, all ventilation openings must be kept clear and free of
obstructions, failure to do so will result in damage to the unit.
WARNING
NEVER use external heat sources to accelerate defrosting
NEVER permit unauthorized service or modifications to your XO unit
NEVER tamper with the sealed refrigerant system - this unit uses R600A Refrigerant which is flammable.
It should never be used in the vicinity of any flammable or explosive ignition sources.
ALWAYS FOLLOW THE ELECTRICAL SAFETY INSTRUCTIONS OUTLINED IN THIS MANUAL.
6
Page 7
electricity - this is serious
Failure To Follow All Electrical Safety Measures May Result in Serious Injury,
Fire Or Death
All electrical work should only be performed by an
experienced, licensed electrician.
All XO units MUST be grounded for safe operation and
come equipped with a
purpose.
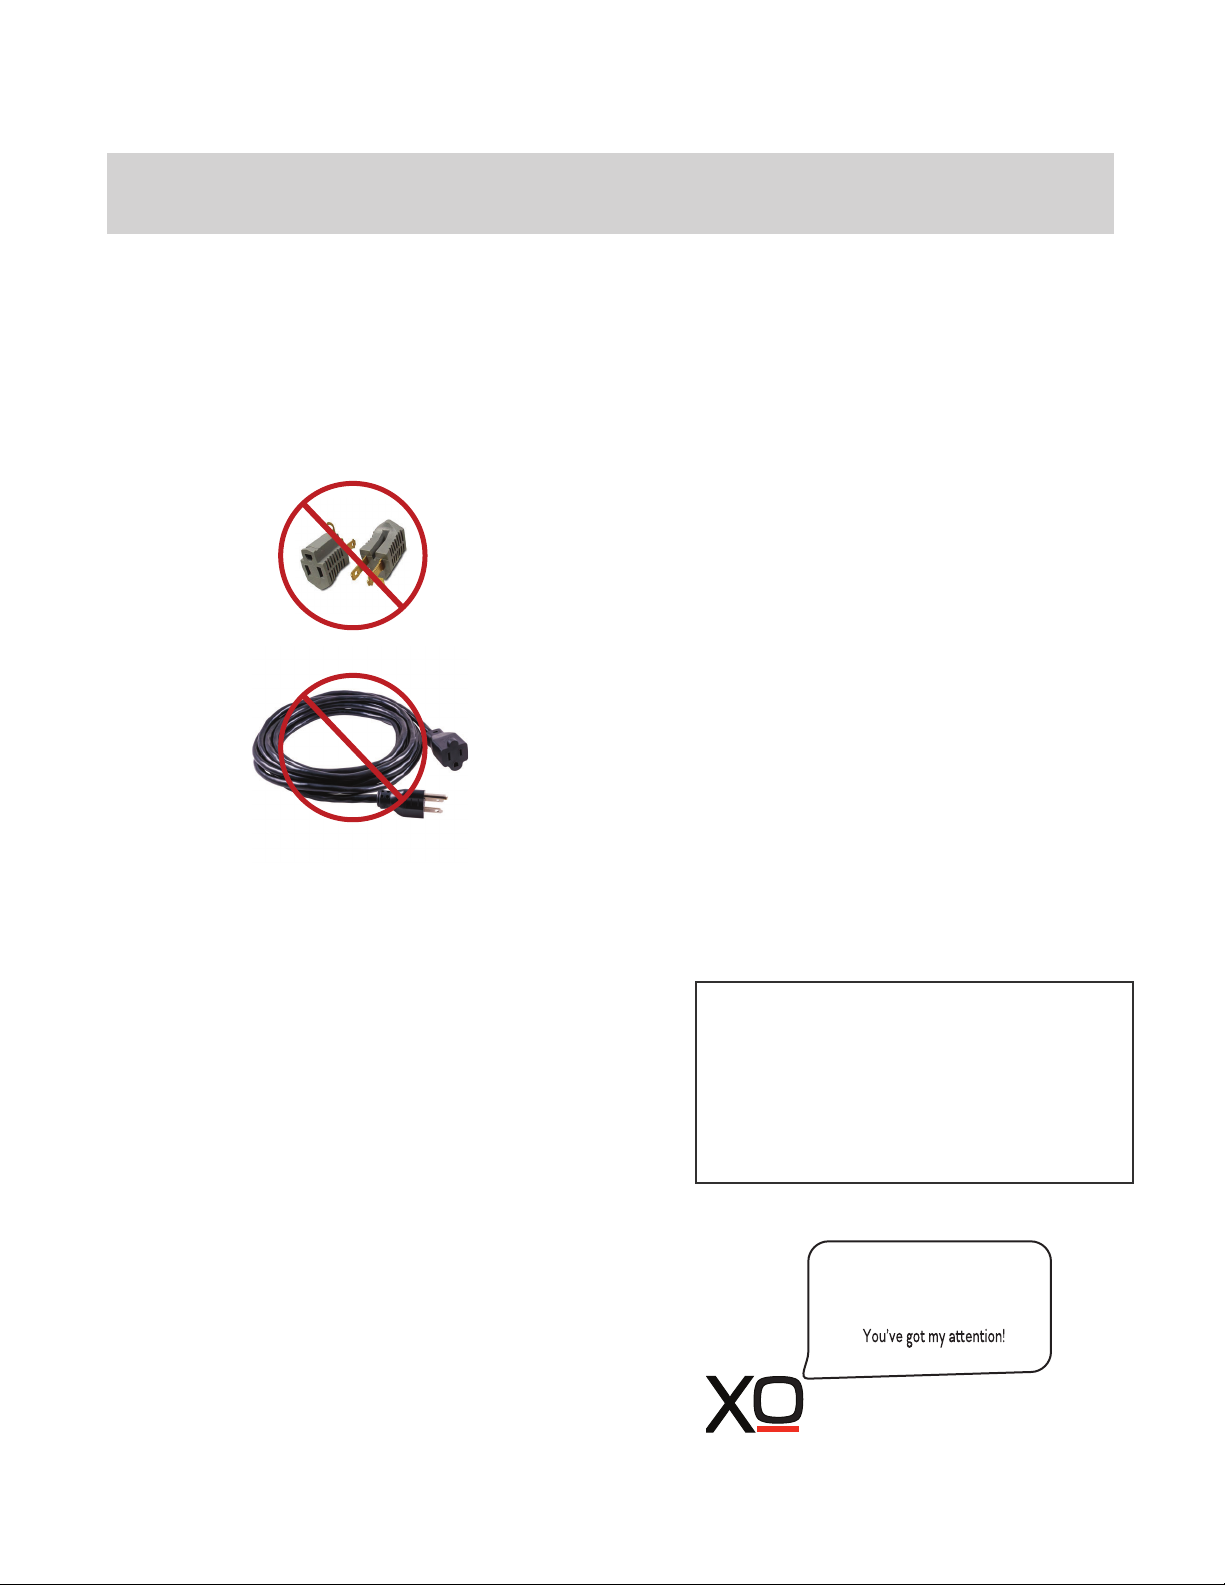
NEVER remove or disable the 3rd prong with an adapter.
NEVER use an extension cord to operate your XO unit.
Your XO unit is built to operate on 115V 60Hz and
should be plugged directly into a dedicated 15 amp
3 prong outlet. If you are uncertain as to the
voltage, amperage capacity or if the 3rd prong is
properly grounded - consult a licensed electrician.
3 Prong molded cord/plug for that
INDOOR USE ONLY:
XO Refrigerators, wine cellars and beverage
centers described in this manual are rated for
indoor use only.
Your XO Unit was designed to operate in a
room temperature ambient condition between
oo
60 F and 90 F.
Use in any area which is not temperature controlled
within that range, such as a garage or porch may
cause your XO unit to fail to function properly.
Use in any uncontrolled area or otherwise exposed
to the elements is hazardous and voids the warranty.
For outdoor installations - consult XO or your local
XO dealer regarding an outdoor rated model.
In regions where high humidity exists condensation
may appear on the glass and/or gasket seals.
For best operation, keeping the unit fully stocked
with product will reduce this.
To maximize the depth of the installation recess your outlet should be mounted flush with the wall.
Your XO unit should not share the circuit with any other
electrical devices as this may cause overloading,
overheating, blown fuses or tripping circuit breakers.
In a worst case this can pose a fire hazard.
NEVER handle your XO unit in wet conditions as this
can pose a severe danger of electric shock.
Exercise care when moving your XO unit to avoid
damage to the electrical cord. If the electrical cord of
your XO unit becomes worn or damaged it must be
replaced immediately by a qualified technician.
NEVER unplug your unit by pulling on the cord.
Unplug by gripping the plug firmly and pull out
straight from the outlet.
7
SERVICE 115V - 60 Hz - 1 phase
AMPS 15 Amp Circuit Breaker
Requires a Dedicated Outlet
GFI required for Outdoor Installations
All electrical work must be performed by
a licensed electrician
Serious injury, fire or death...
Okay -
Page 8
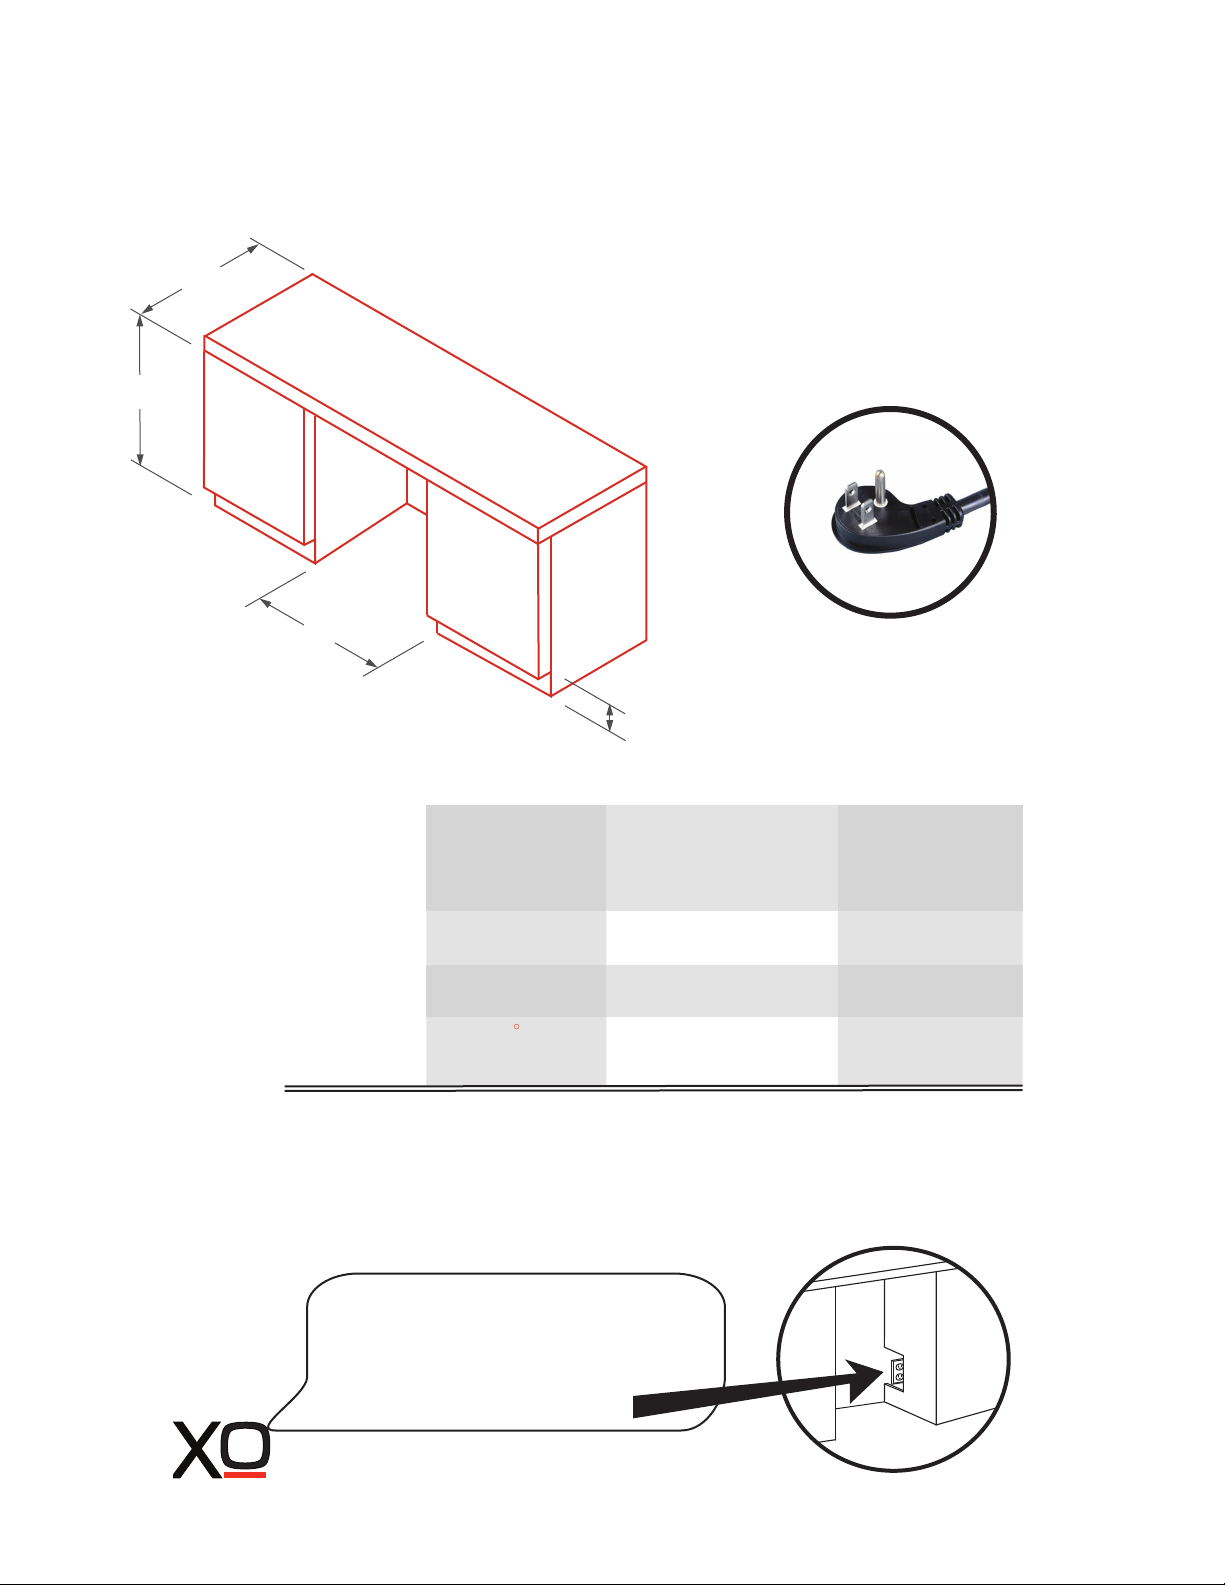
a perfect fit
installation under counter
H
D
W
HEIGHT (H)
Minimum
Maximum
ALL XO UNDERCOUNTER
UNITS ARRIVE PRE-WIRED
WITH LOW PROFILE PLUGS
FOR EASY INSTALLATION
X
ADA EUROPEAN AMERICAN
32-1/2” (min)
35” (max)
825mm (min)
890mm (max)
32-1/2” (min)
35” (max)
WIDTH (W)
DEPTH (D)*
TOE KICK
PLINTH (X)
IF THE DOOR CAN’T OPEN FULLY - YOU CAN’T PULL THE SHELVES OUT.
* Depth dimensions shown include 3/4” (75mm) door panel
If you need a little more space
when installing an overlay door unit,
you might use a recessed outlet or
cut the adjoining cabinet wall to
reach an outlet there...
24”
23”*
4”
8
600mm
583mm*
100mm (min)
150mm (max)
24”
23”*
4” (min)
6” (max)
Page 9
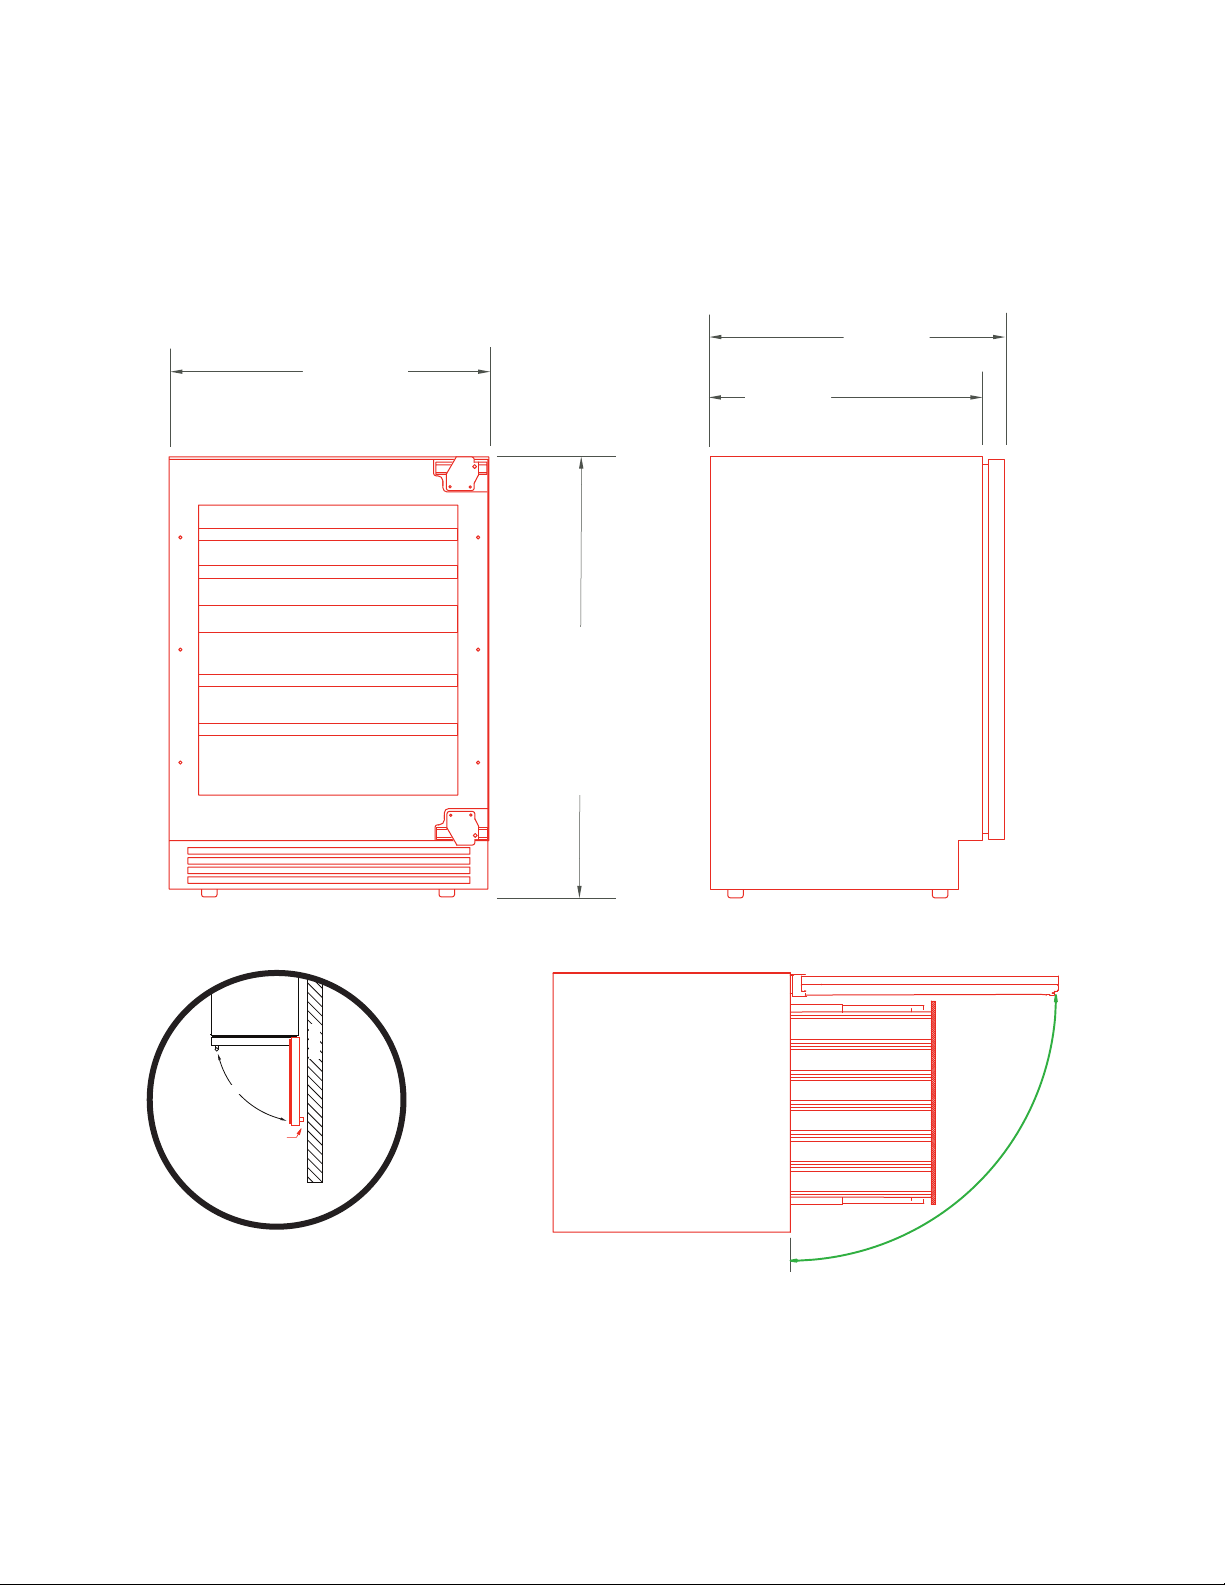
a perfect fit
90°
Door Swing
WALL
Clearance
Gap
your xo is this big (
height, width &
depth
23-7/16”
595mm
XOU24WDZAGO 24” WINE COOLER
or small, as the case would be
19-15/16”
507mm
Minimum
32-1/4”
820mm
Maximum
34-13/16”
885mm
)
21-11/16”
550mm
INSTALLING NEXT TO
A WALL, ENSURE ADEQUITE
CLEARANCE FOR THE HANDLE
CUSTOM OVERLAY PANELS MAY ADD UP TO 3/4” IN OVERALL DEPTH
YOUR CHOICE OF CABIET HANDLES WILL ALSO ADD DEPTH
TOP
VIEW
o
WITH THE DOOR
OPEN AT 90
THE UNIT HAS A
DEPTH OF 46 1/16” (1170mm)
o
90
9
Page 10

right or left
how to change the door opening
Your XO arrives with a right hand hinged door - but it is easily to reverse if you choose.
To reverse the hinge on your unit, follow the directions below:
Fig.A
Fig.C
3
2
1
4
1. Screw hole covers 2. Door 3. Hinge 4. Screws
Fig.B
4
Fig.D
4
1
Open the door and remove the screw hole covers (1) on the left hand side as shown in Fig A.
1.
2. Start screws into these positions as per Fig B, but do not tighten the screws.
3. Remove all screws from both the upper and lower hinge, and then remove the door.
4. Rotate the door 180 degrees, (top to bottom) and place the hinges onto the screws (4) in Fig B.
Slide the slots of the hinge until fully seated against the screws, then tighten the screws to secure
the hinges (Fig D).
5. Place the screw hole covers in the right hand side screw holes as shown in Fig D.
10
Page 11

overlay panel dimensions for ada and european cabinets
23-1/4”
590mm
2-3/8”
60mm
FOR USE WITH 34” HIGH
27-15/16”
710mm
minimum
3-3/4”
95mm
20-7/16”
520mm
ADA COMPLIANT COUNTERS
- OR EUROPEAN CABINETRY
3-3/4”
95mm
USING 6” TOEKICK
(150mm PLINTH)
To ensure that the cabinet panel is completely hiding the door frame, observe the frame dimensions as minimums.
You may decrease the size of the center opening to reveal less glass by increasing the width of the side sections
and/or the height of the top and bottom sections.
You may make the door a solid panel so that the glass window is completely hidden.
THE GAP BETWEEN THE BOTTOM OF THE DOOR AND THE FLOOR MUST BE AT LEAST
3” (75mm) TO ALLOW FOR VENTILATION. NEVER BLOCK THE BOTTOM VENTS.
DOOR PANELS MUST BE FINISHED FRONT AND BACK TO PREVENT WARPING.
AFTER INSTALLATION UNDER COUNTER, OVERLAY DOOR MUST BE ABLE TO OPEN 90 .
PANEL MAXIMUM WEIGHT: 20 lbs.
MAXIMUM PANEL THICKNESS 3/4” (19mm)
11
o
Page 12

overlay panel dimensions - standard height counters
23-7/16”
595mm
2-3/8”
60mm
For panels shorter than 30”
remove equal amounts from
the top and bottom to keep
the center opening centered.
30”
765mm
4-3/4”
122mm
20-1/2”
521mm
4-3/4”
122mm
To ensure that the cabinet panel is completely hiding the door frame, observe the side dimension as minimums
and the center opening height as a maximum.
You may decrease the size of the center opening to reveal less glass by increasing the width of the side sections
and/or the height of the top and bottom sections.
You may make the door a solid panel so that the glass window is completely hidden.
THE GAP BETWEEN THE BOTTOM OF THE DOOR AND THE FLOOR MUST BE AT LEAST
3” (75mm) TO ALLOW FOR VENTILATION. NEVER BLOCK THE BOTTOM VENTS.
DOOR PANELS MUST BE FINISHED FRONT AND BACK TO PREVENT WARPING.
AFTER INSTALLATION UNDER COUNTER, OVERLAY DOOR MUST BE ABLE TO OPEN 90 .
PANEL MAXIMUM WEIGHT: 20 lbs.
MAXIMUM PANEL THICKNESS 3/4” (19mm)
12
o
Page 13

overlay panel dimensions - solid panel
23-1/4”
590mm
27-15/16”
710mm
minimum
30”
762mm
maximum
IMPORTANT:
THE PANEL MUST BE SEALED
FRONT AND BACK TO
PREVENT WARPING AND
CRACKING
To ensure that the cabinet panel is completely hiding the door frame, observe the frame dimensions as minimums.
THE GAP BETWEEN THE BOTTOM OF THE DOOR AND THE FLOOR MUST BE AT LEAST
3” (75mm) TO ALLOW FOR VENTILATION. NEVER BLOCK THE BOTTOM VENTS.
DOOR PANELS MUST BE FINISHED FRONT AND BACK TO PREVENT WARPING.
AFTER INSTALLATION UNDER COUNTER, OVERLAY DOOR MUST BE ABLE TO OPEN 90 .
PANEL MAXIMUM WEIGHT: 20 lbs.
MAXIMUM PANEL THICKNESS 3/4” (19mm)
13
o
Page 14

BEFORE BEGINNING: Attach any handle hardware before mounting the panel to the door frame.
1. Fully open the door and starting at one corner pull the gasket out of the gasket channel.
2. After removing the gasket lay it out on a flat surface to retain its shape.
3. Using clamps to hold it securely in place, position the overlay panel against the door.
4. Using the frame as a guide, drill six (6) pilot holes i1/8” (3mm) in dia. nto the finish panel no
more than 1/2” (12mm) deep taking care not to drill through the panel.
5. Using the ST4-30 self-tapping screws provided, fasten the panel to the door frame.
6. Beginning at one corner, re-install the rubber door gasket into the gasket channel.
Mounting screw holes are located in the gasket channel behind the gasket.
6
SCREW
HOLE
LOCATIONS
S
IMPORTANT NOTE: The back of the panel must be finished to prevent warping and cracking.
14
Page 15

optional stainless steel door panel, p/n:
The stainless door panel mounts in the same fashion as a wooden cabinet door.
23-7/16”
Place the handle (B) over the
2 mounting studs (A) on the
door frame with the set screws
(C) pointing down.
Push the handle tightly against
the door and tighten both of the
2 set screws (C) with the hex
key (D)
27-15/16”
710mm
3-9/16”
90mm
3-9/16”
90mm
595mm
2-3/8”
60mm
The Stainless Steel door panel comes with both the designer stainless bar handle -
and our PRO Style Handle - you get to choose which style to install
Keep the hex key in a safe place for future use.
Two extra set screws are included in the hardware bag.
15
Page 16

on the high side
USING THE FOOT SLIDERS
REAR
2-9/16” 65mm
FRONT
To compensate for different height cabinetry, your XO has leveling legs that
can extend as much as 2-9/16” (65mm).
When installing your XO with the leveling legs extended, use the FOOT
SLIDERS provided under the feet on each side to help avoid catching and
damaging the legs.
16
Page 17

it’s like zen - but cooler
get your level out
DO NOT NEGLECT THIS IMPORTANT STEP
Rotate to raise or lower the LEVELING LEGS located at each of the four corners until all four legs
are seated firmly on the floor and the interior floor of the unit is level both front to back and
side to side.
Failure to follow this important step may cause problems with proper door operation, excessive
condensation, vibration and noise.
17
Page 18

finishing touches
TIE IN BRACKET
With the door open, using
the screws provided connect
the tie in bracket in the upper
corner of the wine cooler
opposite the hinge then screw the flange of the
bracket to the cabinet.
TOE KICK | PLINTH
Your XO comes with a
4” (100mm) toe kick | plinth.
It can accommodate up to a
6” (150mm) toe kick | plinth.
If you are not using the vented toe kick that comes with the unit
you must make provision for ventilation by cutting a slot
2-3/16” H x 19-5/16” W (55mm H x 490mm W)
18
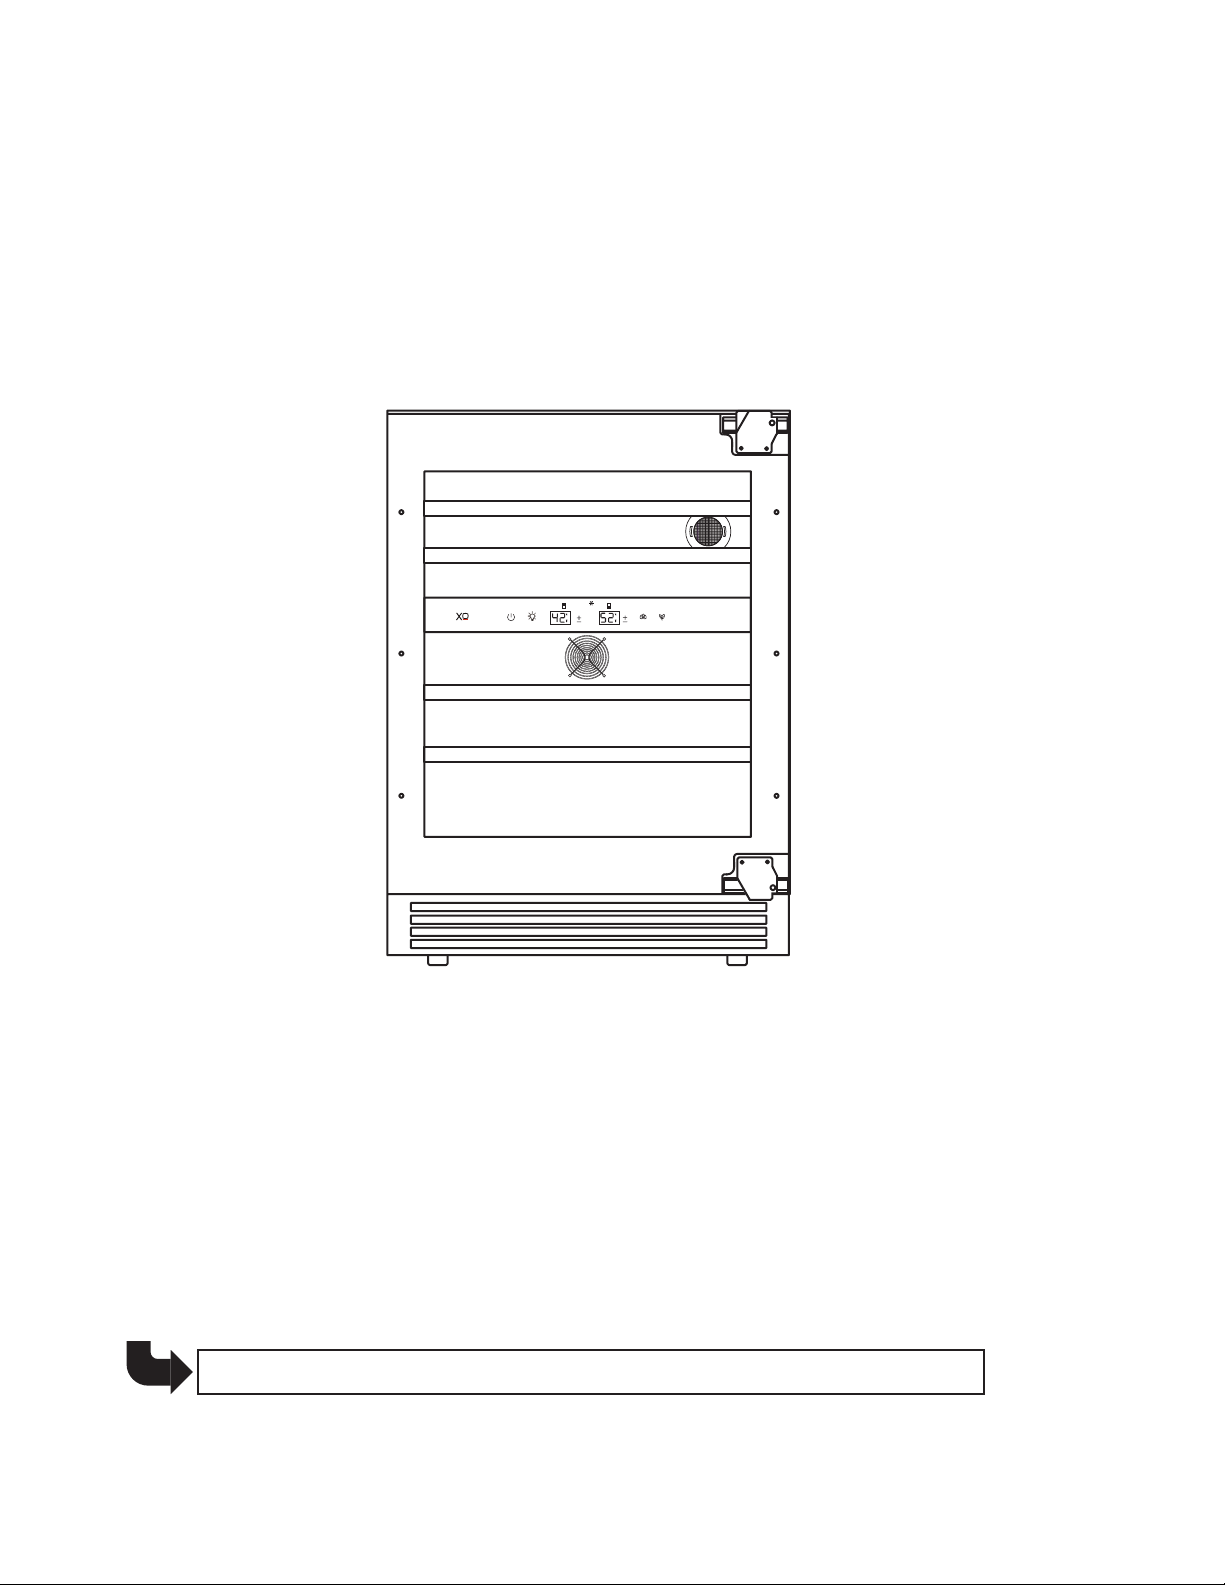
Page 19

meet your xo
WINE COOLER
XOU24WDZAGO_
GLIDE OUT
BOTTLE
R
ACKS
REVERSIBLE
DOOR
HINGE
CARBON FILTER
CARTRIDGE
(replace every 3 to 6 months)
CONTROL PANEL
RECIRCULATION
FAN
REVERSIBLE
DOOR
HINGE
FRONT COOLING VENTS
LEVELING LEGS
19
Page 20

take control
temperature
Dual Zone Wine Coolers maintain two different temperature zones from one control panel.
Dual Zone Wine Cooler Temp. Settings
Adjustable Range: 41 F to 50 F (upper) 50 F to 64 F (lower)
Your Wine Cooler remembers your last temperature settings in the event of a power
failure and automatically adjusts to the previous setting(s) when power is restored.
When the +/- button is pressed, your wine cellar automatically enters set up mode.
The LED Display will begin flashing and display the temperature setting.
oo
oo
Each time you press the + button, the temperature setting will increase 1 Degree.
Each time you press the
Once you have reached the desired temperature setting, the display will continue
to flash for 5 seconds, then revert to showing the compartment temperature.
To view the real time temperature, press and hold the +/- button for 5 seconds.
The interior temperature will flash in the LED Display for 5 seconds.
If you wish to change the display from Fahrenheit to Celsius (or vice versa) press and
hold both “+” and “-” simultaneously for 5 seconds.
led lights
L1: When you turn on your wine cellar, the internal light will switch on when the door is opened,
and off when the door is closed.
L2: Press , the internal light will remain on continuously and dim after 3 minutes.
- button, the temperature setting will decrease 1 Degree.
L3: Press twice, the internal light will remain on for 10 minutes and then shut off.
20
Page 21

take control
nd<é"UHUdH<6:n<O6
When you turn your XO wine cooler on, the interior lights will be
white. Press the icon and the lights will change to midnght blue.
Press the icon again and the lights will change to honey amber.
+"UMU'+
When you turn you XO Unit on, it is set to work in Standard Mode.
Press and ECO Mode is turned on, ECO Mode is an energy saver function.
Press again and ECO Mode is turned off, the unit returns to Standard Mode.
h!!n:MU'+
Sabbath Mode was designed for use on the Jewish Sabbath and Holidays.
The Sabbath Mode feature makes it possible to use your appliance during the
duration of the holiday. The Sabbath Mode overrides typical reactions caused
by interactions with the unit. While in Sabbath Mode your appliance will operate,
however it will not respond to your actions.
To initiate Sabbath Mode: Press and hold both + for 5 seconds.
The display will show either “Sb” or “Sb On” depending on the model you have to indicate
Sabbath Mode is engaged.
To turn Sabbath Mode off and return to Standard Mode, Press and hold both +
f
or 5 seconds again.
'+MUMU'+
Press for 5 seconds, DEMO mode is turned on.
Press for 5 seconds again, DEMO mode is turned off and your XO returns to standard
mode.
21
Page 22

dual zone control
2 zone wine coolers
ON /OFF Button
Press & Hold for 1 Second to turn ON
Press & Hold for 3 Seconds to turn OFF
Press to Silence Alarm
Light Function Button
Toggle Between 3 Light Functions
L1, L2, L3
TEMPERATURE DISPLAYS
UPPER | LOWER
Press to raise temperature
Press to lower temperature
Changes interior light color
UPPER
Indicator Light
Cooling Mode ON
LOWER
Toggles between different
operating modes
Upper compartment:The temperature setting can be adjusted from 41-50°F.
Lower compartment:The temperature setting can be adjusted from 50-64°F.
Your controls are simple and intuitive to operate.
22
Page 23

how many
wine bottles can this hold
Wine bottles come in many shapes and sizes.
The following MAXIMUM capacities are based on two of the most popular types in 750 ml.
MODEL WIDTH ZONES BORDEAUX BURGUNDY
4 Racks
XOU24WDZGO
Shelf capacities
24” 2
of 6 4 Racks of 6
11 in Bottom 11 in Bottom
35 TOTAL
35 TOTAL
24” Wide Wine Cellar Racks
accommodate up to 6 Bottles Each
Store wine in sealed bottles only
Avoid overloading
Storing little or no product can cause excessive condensation
23
Page 24

a few tips
dual zone wine cooler
TEMPERATURE: Your XO Wine Cooler is designed to maintain two different temperature zones.
The upper zone is colder, designed to hold white wines at a “ready to serve” temperature. The
lower section has a slightly higher temperature range designed for your red wines.
Heat and variations in temperature can damage wines. Storage below 45 can create dry
conditions that cause corks to shrink and leak. As a general rule, if you are unsure of what
temperature to store a bottle at, 55 is generally considerd to be ideal for most vintages.
LIGHT: Sunlight, specifically ultraviolet light, can be very damaging to wine. For this reason
your XO Wine Cooler is equipped with double glazed glass that has a UV Blocker. But it is
still a good idea to install your unit in an area out of direct sunlight to limit both UV and heat
exposure.
VIBRATION: Vibration is another element that can harm wine. Your XO Wine Cooler has design
features to aid in limiting the transmission of vibration to the bottles, however it is advisable to
install your wine cooler in an area away from loud speakers, power equipment, heavy floor traffic
and similar noise generators
o
o
HUMIDITY: High or low humidity conditions can do harm to wine. A range of 50 - 80% humidity
usually not an issue. 70% humidity is generally consider ideal.
For all of these reasons, it is a good idea to limit opening and closing any wine cooler frequently.
It is a good idea to keep it well stocked. Storin only a few bottles can cause excess humidity and
condensation to develop. When loading the wine cooler, add bottles gradually rather than in large
quantities which can cause broader temperature variations for what you have stored already.
...and enjoy!
24
Page 25

a little tlc
goes a long way
Cleaning the Inside:
Walls, floor, inside window, and shelves - Some water deposits and dust can be removed with a dry paper
towel, others may require a damp cloth.
Cleaning the Outside:
Outer case - It is important to keep the area clean where the door seals against the cabinet. Clean this area
with a soapy cloth. Rinse with a damp cloth and let dry.
Control Panel and Door - Wipe with a damp cloth and dry thoroughly. Do not use cleaning sprays, large
amounts of soap and water, abrasive, or sharp objects on the panel, they can damage it.
CAUTION: Some paper towels may also scratch the control panel and glass on the door.
Door Surface - Use only mild, non-abrasive detergents applied with a clean sponge or soft cloth.
Rinse well with damp cloth.
NOTE: Do not use cleaners containing ammonia or alcohol on your XO unit. Ammonia or alcohol can
damage the appearance of the appliance.
NOTE: Never use any commercial/abrasive cleaners or sharp objects on any part of the wine cooler.
power failure
Most power failures are corrected within a few hours and should not affect the temperature of your appliance
if you minimize the number of times the door is opened.
If the power is off for a longer period of time, you need to take the proper steps to protect your contents.
vacation
Short vacations: Leave the XO unit operating during vacations of less than three (3) weeks.
Long vacations: If the appliance will not be used for an extended period, remove all items and turn off the
appliance.
Clean and dry the interior thoroughly. To prevent odor and mold growth, leave the door open slightly, blocking
it open if necessary.
ENERGY SAVING TIP
The unit should be located in the coolest area of the room, away from heat producing appliances,
and out of direct sunlight.
moving
Remove all items and securely tape down all loose items (shelves) inside your appliance
Turn the adjustable leveling legs all the way into the base to avoid damage
Tape the door shut and transport the XO unit securely in the upright position
Blanket wrap the exterior to help protect against scratches and other damage
25
Page 26

a breathe of fresh air
for best results change every 3 to 6 months
Your Air Refresh
Charcoal Filter
I
s Located Here
P/N: XOUAIRFILTER
Rotate the filter 1/4 turn
to unlock
Pull straight out to remove
Align the tabs and
insert the new filter
Rotate filter 1/4 turn
to lock in place
26
Page 27

faq’s
There doesn’t appear to be any power to the unit.
Q.
There are 3 easy to check common causes:
A.
(1) Check to see if a fuse has blown or circuit breaker has tripped & replace or reset.
(2) Check to ensure the plug is fully inserted into the outlet.
(3) A power surge may have caused the unit to shut down to protect itself - Unplug the unit,
wait 5 seconds and plug it back in.
The cabinet temperature is too high.
Q.
Check these 5 things:
A.
(1) Check the temperature setting and adjust as needed.
(2) Make certain the door is completely closed and the door gasket is sealing properly.
(3) Avoid opening the door frequently and/or leaving the door open for extended periods.
(4) Did you load a large quantity of warm bottles at once? It is better to add smaller quantities
in several loads.
(5) Make certain nothing is blocking the toe kick vents (including dust behind the vents).
The alarm is beeping and “HI” is displayed on the control panel.
Q.
See the question and answers above - if the door has been tightly closed and you have not
A.
recently added a large quantity of warm bottles, it may be a mechanical issue. Unplug the unit
and call for service.
The alarm is beeping and “LO” is displayed on the control panel.
Q.
This may be a sensor malfunction. Unplug the unit and call for service.
A.
more “q & a”
Why does condensation form on the inside or outside of my XO unit?
Q.
It may be that the door is either opened repeatedly or not closed completely. It may also be
A.
due to an excessive ambient humidity, in which case it will clear when the humidity drops.
There is warm air coming from the bottom of my unit.
Q.
This is normal. Cooling systems must vent the heat they remove from inside the cabinet.
A.
Why does the evaporator fan run all the time?
Q.
It continually recirculates air to ensure cabinet temperatures are consistent.
A.
How do I adjust temperature?
Q.
Refer to Pages 7 & 10.
A.
When does the high temperature alarm sound?
Q.
If internal temperature exceeds 70 F for more than 60 minutes.
A.
If the door hinge is next to a wall, how much clearance do I need to open the door?
Q.
The unit should be at least 2” from the wall to allow the door to open at least 90
A.
°
°.
27
Page 28

we’ve got your back
90 DAY LOVE IT or LEAVE IT. For 90 Days all our products are backed by our unique Love it or Leave it Guarantee.
TWO-YEAR PARTS & LABOR LIMITED WARRANTY. XO warrants to the original purchaser of every new XO refrigerated unit, the
cabinet and all parts thereof, to be free from defects in material or workmanship under normal and proper use and maintenance as
specified by XO and upon proper installation and start-up in accordance with the instruction packet supplied with each XO unit. XO’s
obligation under this warranty is limited to a period of two (2) years from the date of original purchase.
FIVE-YEAR COMPRESSOR LIMITED WARRANTY. XO warrants its compressor to be free from defects in both material and workmanship
under normal and proper use and maintenance service for a period of five (5) years from the date of original purchase. If the compressor
fails during that time period due to a defect in material or workmanship, XO will supply a replacement compressor free of charge. The
consumer will be responsible for all related transporation and labor costs. Product must be registered with XO to qualify for this warranty.
TERMS APPLICABLE TO EACH WARRANTY. Any part covered under the above warranties that is determined by XO to have been
defective within the time frame is limited to the repair or replacement, including labor charges, of defective parts or assemblies. The
labor warranty shall include standard straight time labor charges only and reasonable travel time, as determined by XO.
WARRANTY CLAIMS. All claims for labor or parts must be made directly through XO. All claims should include: model number and
serial number of cabinet, proof of purchase, and date of installation. In case of warranted compressor, the compressor model tag must
be returned to XO along with the above listed information.
WHAT IS NOT COVERED BY THIS WARRANTY. XO’s sole obligation under this warranty is limited to either repair or replacement of
parts, subject to the additional limitations below. This warranty neither assumes nor authorizes any person to assume obligations other
than those expressly covered by this warranty. Open box, factory seconds, scratch and dent, floor models and commercial applications
are excluded from these warranties. Consumer shall be responsible for labor and transportation costs where noted above.
NO CONSEQUENTIAL DAMAGES. XO is not responsible for economic loss, profit loss; or special, indirect or consequential damages,
including without limitation, losses or damages arising from food or product spoilage claims whether or not on account or refrigeration
failure.
WARRANTY IS NOT TRANSFERABLE. This warranty is not assignable and applies only in favor of the original purchaser/user at the
original installation location. Any such assignment or transfer shall void the warranties herein made and shall void all warranties,
express or implied, including any warranty or merchantability or fitness for a particular purpose.
IMPROPER USAGE. XO assumes no liability for parts or labor coverage for component failure or other damages resulting from
improper usage or installation or failure to clean and/or maintain product as set forth in the warranty packet provided with the unit.
ALTERATION OR NEGLECT. XO is not responsible for the repair or replacement of any parts that XO determines have been
subjected after the date of manufacture to alteration, neglect, abuse, misuse, accident, damage during transit or installation, fire, flood,
or act of God.
IMPROPER ELECTRICAL CONNECTIONS. XO is not responsible for the repair or replacement of failed or damaged components
resulting from electrical power failure, high or low voltage, use of extension cords, or improper grounding of the unit.
YOUR RIGHTS UNDER STATE LAW. This warranty gives you specific legal rights and you may have other rights that vary from state to
state. Some states do not allow the exclusion or limitation of consequential damages or a limitation on how long an implied warranty lasts,
so the above exclusion or limitation may not apply to you.
OUTSIDE U.S. This warranty does not apply to, and XO is not responsible for, any warranty claims made on products sold or used outside
the 48 continental United States.
To obtain service:
Call 973-403-8900 |email service@xoappliance.com | or submit a request on our website
www.xoappliance.com
28
25
PARTS + LABOR COMPRESSOR
WARRANTY
YEAR
WARRANTY
XOUBCWCMAN022019
YEAR
 Loading...