

Page 1
Important: This manual contains important safety and operating information. Please read, understand,
and follow the instructions in this manual. Failure to do so could result in personal injury, death, and/or
damage to your SKYFi3, accessories, and/or to your vehicle or property.
XM Satellite Radio Digital Audio Player
with vehicle kit
Page 2

1
This device complies with Part 15 of the FCC Rules.
Operation is subject to the following two conditions:
1. This device may not cause harmful interference, and
2. This device must accept any interference received, including interference
that may cause undesired operation.
The SKYFi3 Satellite Radio Receiver incorporates an FM transmitter and is
therefore classified as an intentional transmitter. Changes or modifications
to the unit not expressly approved by Delphi can void your authority to
operate this equipment.
Warning: The FCC and FAA have not certified the Delphi SKYFi3
Satellite Radio Receiver for use in any aircraft (neither portable nor permanent installation). Therefore, Delphi cannot support this type of application
or installation.
This is the safety alert symbol. It is used to alert you to potential
personal injury hazards. Obey all safety messages that follow
this symbol to avoid possible injury or death
Need help?
Call us at 1.877.GO.DELPHI
Monday through Friday from 8:00 a.m. - 8:00 p.m. Eastern Time
Saturday and Sunday from 10:00 a.m. - 4 :00 p.m Eastern Time
Note: Extended seasonal hours may be available.
Thank you for purchasing a Delphi SKYFi3®. We’ve designed many thoughtful features into this radio to ensure that your level of listening enjoyment is
the very best it can be.
In the event that you have questions or trouble getting started with your
new radio, please do not return to the store. Call us first! We can help.
Please install the latest software update. You may also refer to the Software
Update insert and the Troubleshooting section of the user guide for more
information.
Technical Support is also available at www.shopdelphi.com/skyfi3support
All features and functions are subject to change without notice.
To ensure you have the latest features and satellite service compatibility,
please visit http://fwupdt.xmradio.com/ to check for any updates for the
product. Delphi recommends that you check for any updates before using
the SKYFi3. You will need the Radio ID of your SKYFi3. You can find this number on the bottom of the receiver and on the box.
Page 3
2
3
Activating Your SKYFi
3
1. Set up your player, car cradle, and antenna.
2. Turn the unit on and make sure it is in “Live XM” mode.
3. Use the arrow buttons to find channel 0, then push the Select button to
choose it. You should see an 8-character XM Radio ID on the display (the
XM Radio ID should also be on the bottom of your SKYFi3 and on the
package).
4. Write the XM Radio ID here:
Note: Please check your ID code carefully. There is no “I” (eye), “o” (oh), “S” or “F” used.
You may wish to double-check your ID code on the outside of your tuner box.
5. Activate your XM Satellite Radio service by contacting XM at
http://activate.xmradio.com or by calling 1.800.XM.RADIO
(1.800.967.2346). You will need your XM Radio ID and a major credit
card.
XM will send a signal from the satellites to activate the full channel lineup.
Activation normally takes 10 to 15 minutes, but during busy periods, you
may need to keep your SKYFi3 on for up to an hour to complete your activation process. When you can access the full channel lineup on your SKYFi3,
you’re done.
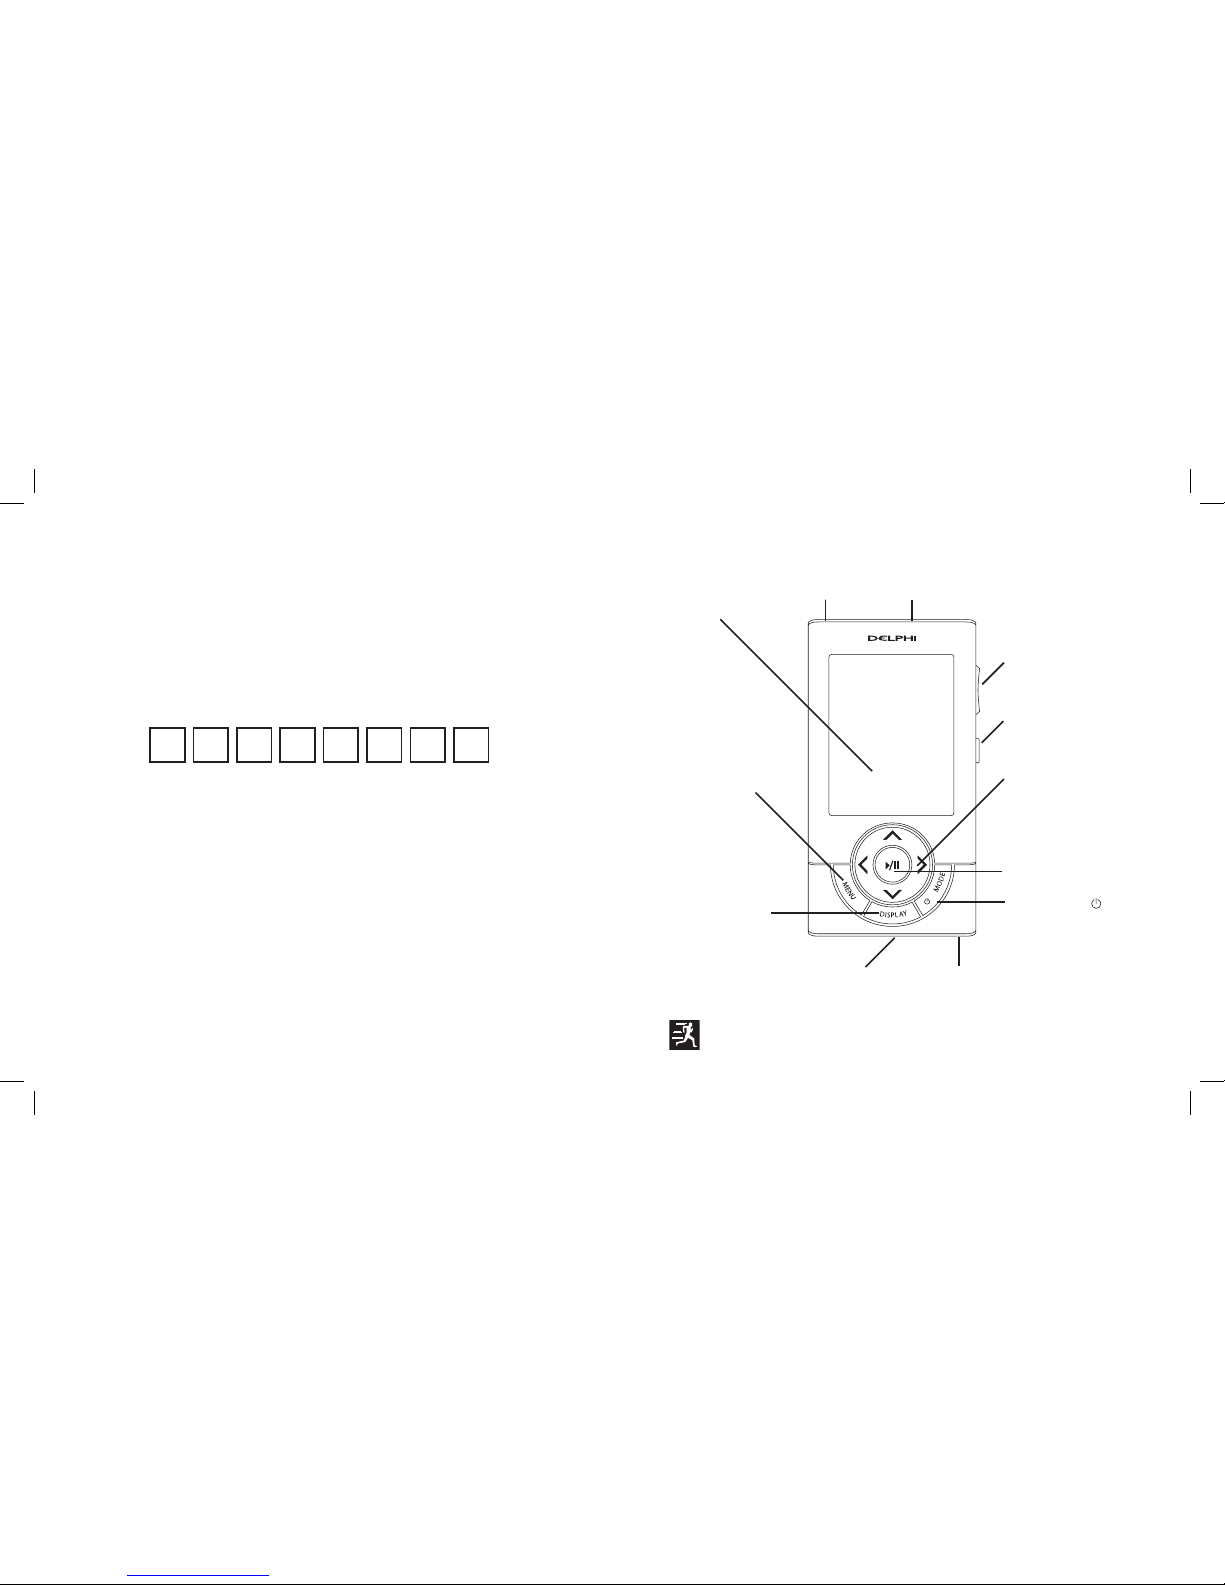
Controls
Display
Earbud
Jack
Volume
Hold
Slide the switch
down to lock the
controls.
Mode/Power
Press to change modes:
Live XM, My Music, and
Aux. Press & Hold to
power on and off.
USB Connector
For connecting SKYFi3 to your PC
Arrow Keys
Select menu entries,
change channels, skip
through songs, change
categories, and more...
Menu
Display the main
menu of functions:
Record, Bookmarks,
Favorites, My
Music, Settings.
Play/Pause
Display
Press to change the
display appearance.
Press & Hold to
change the display
from vertical to horizontal orientation.
MicroSD
Slot
Main Connector
For connecting SKYFi3 to car, home
cradles, and additional accessories.
TO TURN ON THE UNIT: Press & Hold the Mode/Power button.
Use the left arrow key to exit or go to the previous menu.
Page 4

4
Table of Contents
5
Contents
Activating Your SKYFi3 .................................. 2
Controls .........................................................3
About Delphi .................................................6
About XM ......................................................6
Getting Started ............................................. 7
Some Important Reminders......................... 7
Features ......................................................... 8
Controls - SKYFi3 Player ............................. 10
Controls - SKYFi3 in Your Vehicle ................11
Using SKYFi3 in Your Vehicle ...................... 12
Display - Symbols and Icons ..................... 16
Display - Live XM Mode ............................. 17
Display - My Music Mode .......................... 18
Remote Control ........................................... 20
Using Your SKYFi3 with an External
Audio Source .............................................. 21
Updating SKYFi3 Firmware ........................22
The Firmware Update Tool ......................... 22
Listening to Live XM ..................................24
Selecting Channels ..................................... 24
Selecting Channels with the Car Cradle ... 25
Channel Browsing ...................................... 25
Direct Entry .................................................. 26
Favorites ...................................................... 27
Category Browsing ..................................... 28
Playing Live XM .......................................... 29
Replaying XM Content ...............................29
Recording Live XM .....................................31
Recording a Single Song............................ 31
Recording a Channel ..................................32
Scheduling a Recording Session ............... 32
Listening to My Music ................................ 34
Accessing Your Music ................................. 35
Organizing Your Music ................................ 37
Playlists ........................................................ 37
Deleting Songs ............................................ 39
Locking Songs ............................................. 39
Selecting Multiple Songs ........................... 40
Personalizing Your SKYFi3 ..........................41
Making any FM Radio an XM Radio .......... 41
Menu Functions - Quick Reference ............ 42
Display Settings .......................................... 44
Audio Settings............................................. 45
TuneSelect™ ............................................... 46
Info Extras ................................................... 47
Channel Access ........................................... 49
Erase Memory ............................................. 50
Resetting Factory Defaults ......................... 50
Using SKYFi3 and Your PC .......................... 51
System Requirements ................................ 51
Setup ............................................................ 52
Registering For XM+Napster ..................... 54
XM+Napster Features................................. 55
Other Things You Should Know ................. 58
Care .............................................................. 58
Accessories (sold separately) ....................58
Troubleshooting .......................................... 59
Specifications .............................................. 63
Model Numbers .......................................... 64
Contacting Technical Support.....................64
Warranty ...................................................... 65
Delphi Limited Consumer Warranty
United States of America ........................... 65
Delphi Limited Consumer Warranty
Canada ......................................................... 68
The Delphi SKYFi3 is the best XM satellite radio featuring the best combination of performance and safety when used in the vehicle along with portable
listening capabilities. SKYFi3 is best in class in the vehicle—yet completely
portable for stored music listening.
• Plug-n-Play architecture with integrated XM tuner provides live XM listening when docked to a number of compatible Delphi accessories.
• Vehicle-centric design featuring vertical or horizontal orientation and the
largest display among all plug-n-play satellite radios.
• 30 minute pause-replay feature—the first and only XM portable satellite
radio with this feature!
• Stores 10 hours of XM programming and up to 500 songs with optional
MicroSD cards. The fir st and only XM portable satellite radio to offer
MicroSD card compatibility.
• Portable playback mode—listen to stored XM or MicroSD card content
without running out of battery (with flexible recharging capabilities).
• XM+Napster allows XM subscribers to listen to more than 70 XM music
channels on the XM Radio Online service and access Napster’s massive
catalog for on-demand listening, purchasing and downloading.
• Info Extras and Stock Ticker bring you personalized stock information,
sports scores and more!
• TuneSelect™ alerts you when your favorite song is being played on any
XM channel.
Page 5

6
7
Getting Started
About Delphi
Delphi is a world leader in mobile electronics, vehicle components, and
audio technology. Delphi created the first in-dash car radio in 1936 and continues its strong tradition of innovation in the audio industry. Now Delphi
technology has helped make satellite radio a reality, and Delphi continues to
expand its in-vehicle and consumer electronics technologies. With its exciting line of satellite radio products, Delphi offers a broad portfolio of products to answer a wide variety of information and entertainment needs—in
the vehicle, home, office, or virtually anywhere.
About XM
XM Satellite Radio is the nation’s leading provider of satellite radio*. XM
broadcasts over 170 digital channels of totally new music, news, sports
and children’s programming direct to cars and homes via satellite and
its extensive repeater network, which supplements the satellite signal to
ensure seamless transmission. Subscribers pay a monthly fee for the XM
service. Exclusive programming on XM includes Major League Baseball®
games for every team, all season long. XM is broadcast via satellite from
coast to coast, so you can listen to XM continuously as you travel across the
country.
*To receive the XM service, you must subscribe to XM. Available in the continental United States and Canada
only. Satellite radio reception depends on the ability of the antenna to receive a signal. The signal may not be
available in buildings or if obstructed (e.g., by mountains, trees, bridges, etc).
Getting Started
Some Important Reminders
We know you are eager to begin using your SKYFi3. Please take a moment
to review the following:
This product’s software can be updated and all features and functions are
subject to change without notice. Please check for online updates for your
SKYFi3.
SKYFi3 uses a MicroSD card (sold separately) to store digital audio files
(MP3/WMA). Delphi recommends using SanDisk brand SD cards for the
best performance. SKYFi3 accepts MicroSD cards up to 2 GB in capacity.
Please make sure your battery is fully charged (three hours) before using
your SKYFi3 on battery power.
Warning: This manual contains impor-
tant safety and operating information. Please
read, understand, and follow the instructions
in this manual. Failure to do so could result in
personal injury, death, and/or damage to your
SKYFi3, accessories, and/or to your vehicle or
property.
Caution: Use your SKYFi3 only with the
enclosed components or approved accessories.
Do not modify wires or other connectors in
any way; you could cause a malfunction, which
could damage your SKYFi3 and will void your
warranty.
Warning: When using this product it
is always important to keep your eyes on
the road and your hands on the wheel. Not
doing so could result in injury and/or death
to yourself or to others and/or in property
damage. Do not use the earbuds while driving
an automobile or riding a bicycle - it is both
dangerous and against the law.
Caution: Refrain from using food or
drinks near your SKYFi3. Spilling food or drinks
on the unit can damage it. Also, improperly
installing the antenna cable can cause leaks,
which can damage your SKYFi3 and/or your
vehicle.
Page 6
Getting Started
8
9
Getting Started
1
6
2
7
RE
C
3
8
4
9
SET
5
0
F/D
Features
SKYFi3 in Your Vehicle
• Listen to Live XM, recorded XM content and digital audio files
(MP3/WMA).
• Organize and manage your music.
• Use station pre-sets via favorites keys.
• Plug in external audio sources to play through your SKYFi3’s FM
Transmitter.
Line In
Line Out
SKYFi3 Player
• Listen to Live XM when docked in the car or
home cradle (home kit sold separately).
• Organize and manage your music.
• Listen to recorded XM content and digital audio
files (MP3/WMA).
• Portable Live XM with Wearable Live kit (sold
separately).
SKYFi3 and Your PC
• Transfer music to your SKYFi3 player.
• Organize and manage your music
using SKYFi3 or your PC.
• Purchase music from XM+Napster.
Page 7
Getting Started
10
11
Getting Started
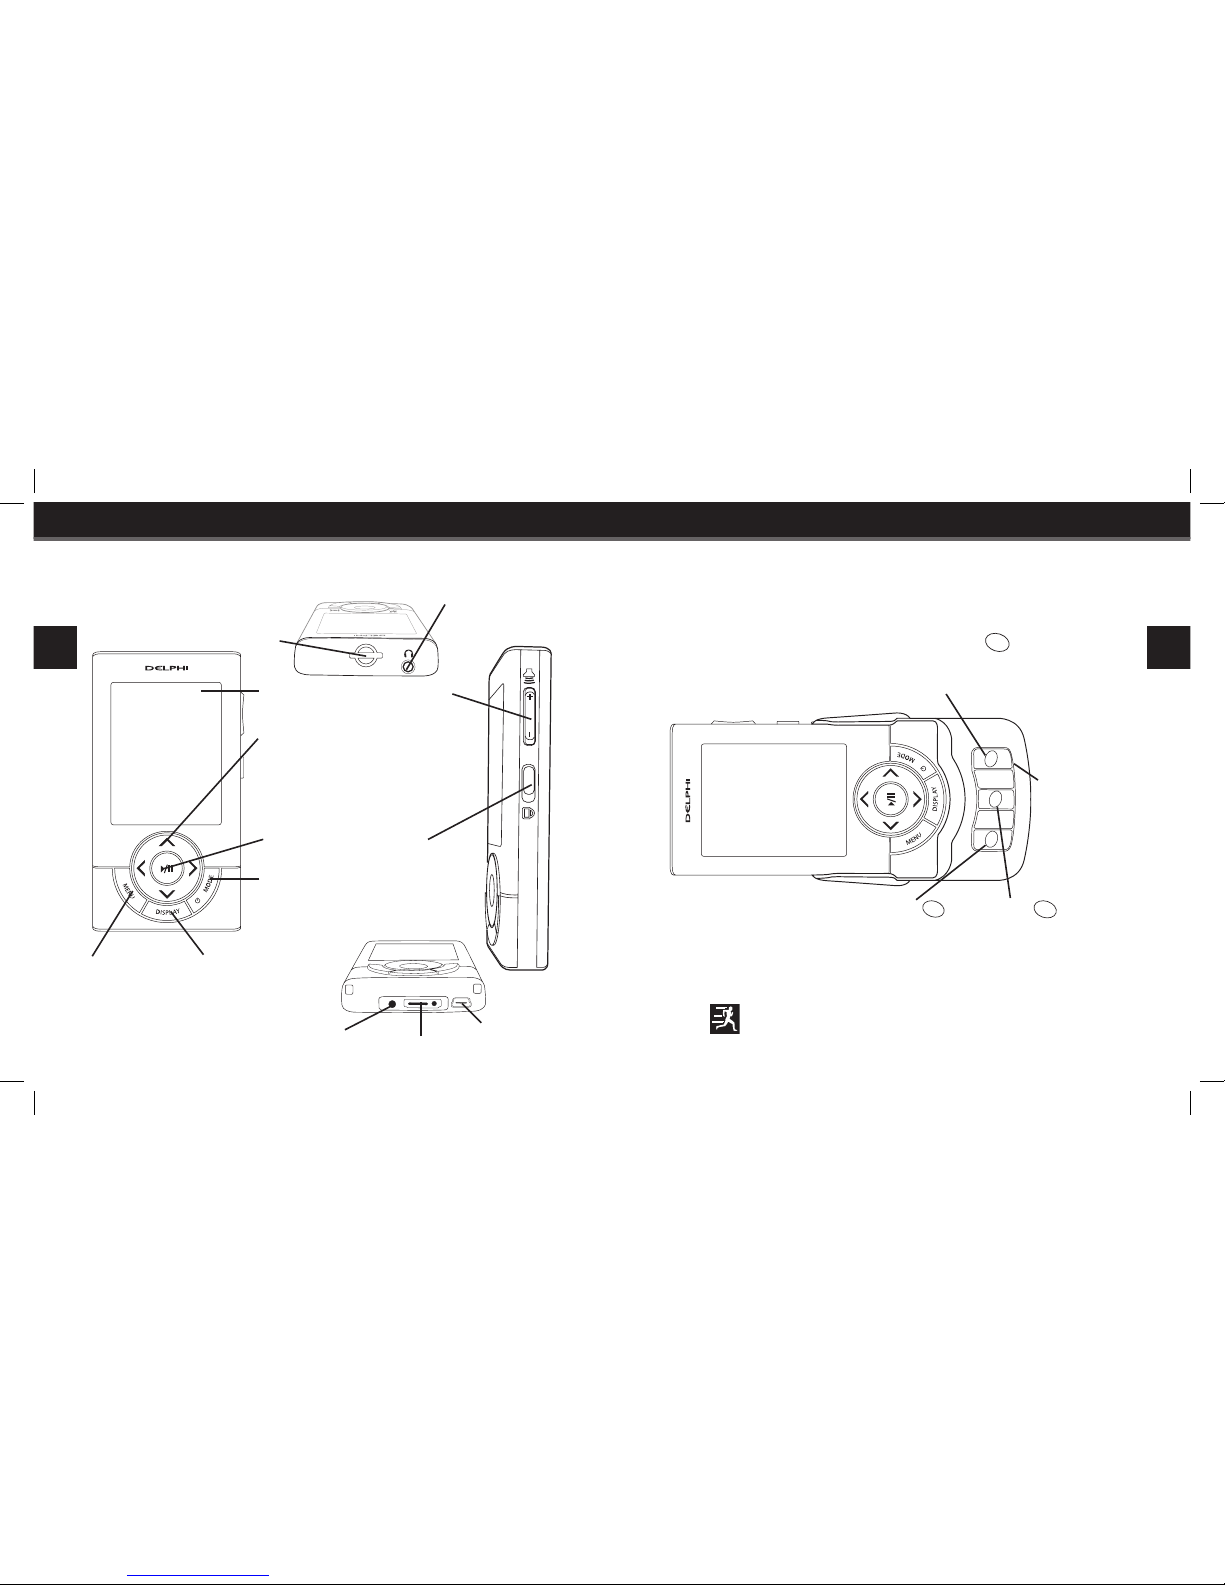
Controls - SKYFi3 Player
Display
Earbud
Jack
Volume
Hold
Slide down to
lock controls.
Mode/Power
Press to change modes:
Live XM, My Music, Aux.
Press & Hold to power on
and off.
USB Connector
Arrow Keys
Select menu entries,
change channels, skip
through songs, change
categories, and more...
Menu
Display the main
menu of functions:
Record, Favorites,
Bookmarks, Settings, My Music.
Play/Pause
Display
Press to change the
display appearance.
Press & Hold to
change from vertical
to horizontal
orientation.
MicroSD
Slot
Power
Main Connector
1
6
2
7
RE
C
3
8
4
9
SET
5
0
F/D
Controls - SKYFi3 in Your Vehicle
Number Keys
Select the number
keys by pushing
the upper or lower
corner of the keys.
Direct or Favorite
F/D
Press the center of this key
to cycle through favorites
or direct mode.
Set
SE
T
Press the center of
this key to save the
current channel as a
favorite.
Record
RE
C
Press the center of
this key to record the
current song.
Press & Hold the Display button to change the display
orientation (portrait and landscape).
Page 8
Getting Started
12
13
Getting Started
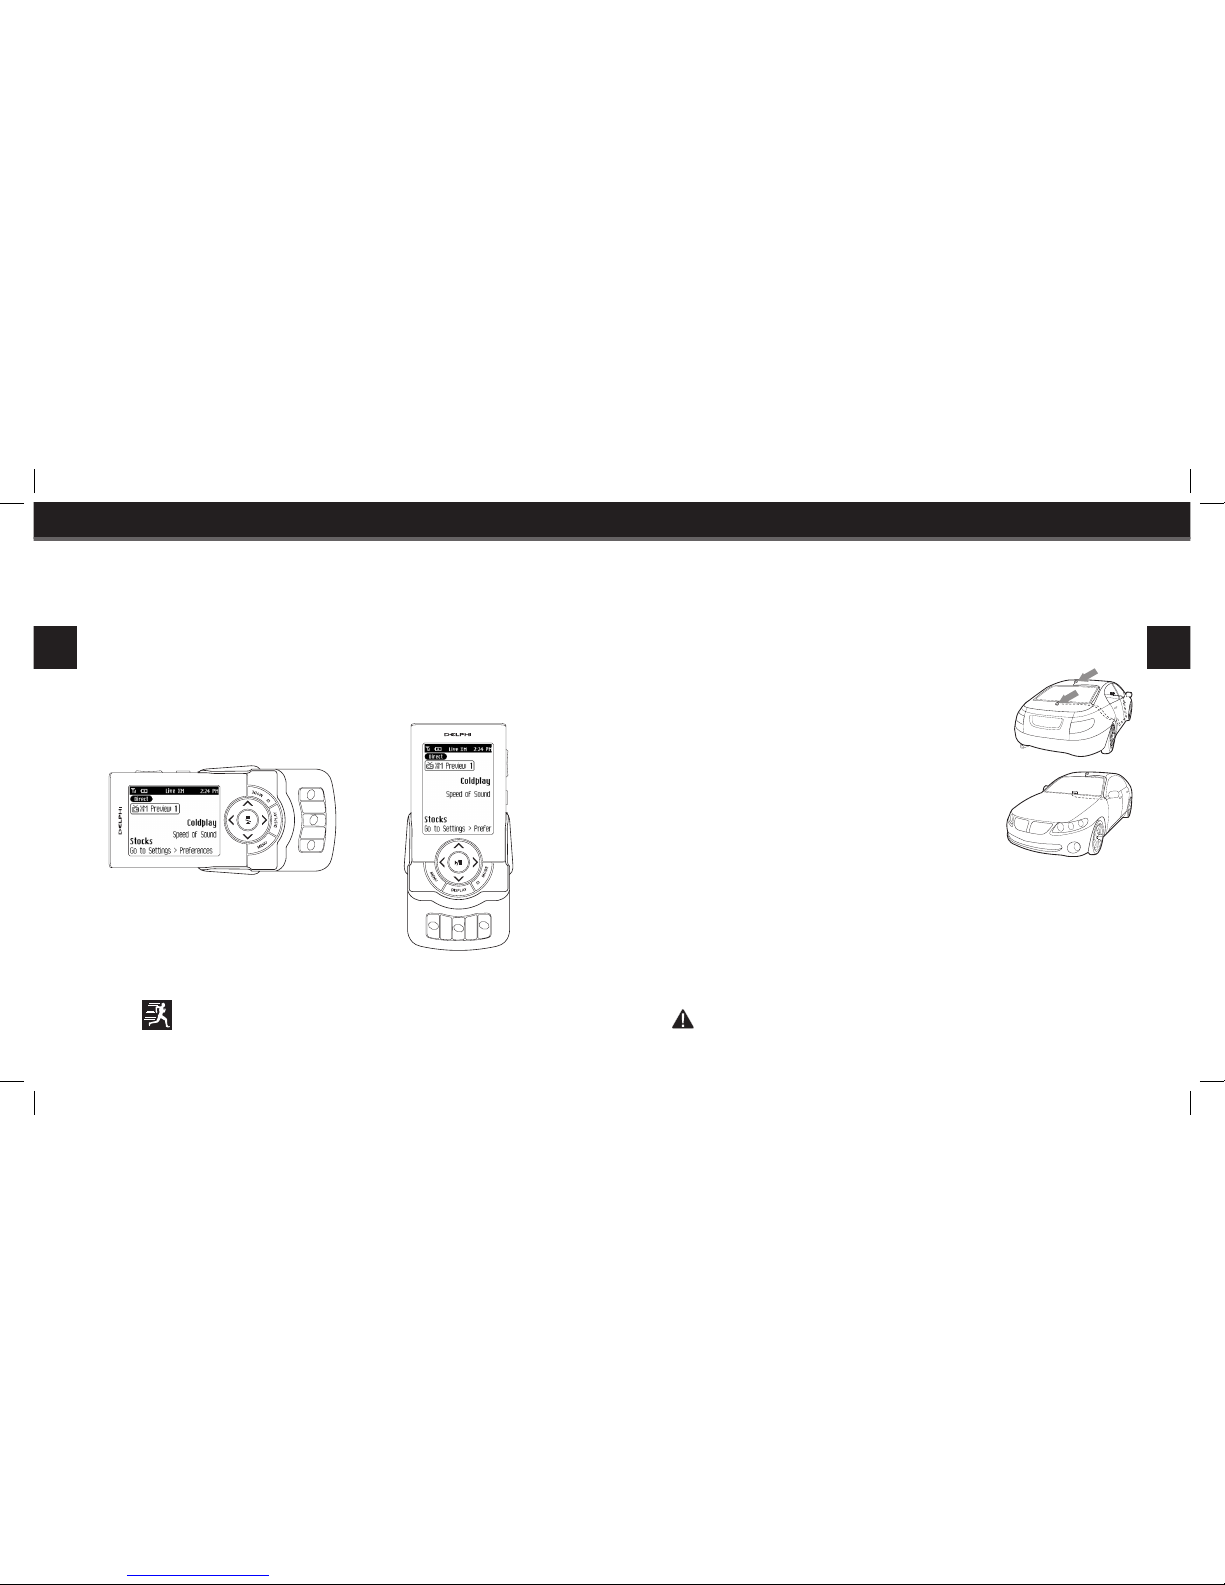
Using SKYFi3 in Your Vehicle
Your SKYFi3 can be mounted in your vehicle in either portrait or landscape
orientation.
Changing Display Orientation
Your SKYFi3 display can be changed from portrait to landscape orientation
by pressing and holding the Display button.
1
6
2
7
RE
C
3
8
4
9
SET
5
0
F/D
1
6
2
7
RE
C
3
8
4
9
SET
5
0
F/D
Your SKYFi3 will default to the last orientation used in the
car cradle.
Landscape orientation
Portrait Orientation
Placing the Antenna
Because all vehicles are different, there are many acceptable methods of
mounting the antenna and routing the cable.
Make sure the antenna is placed on a clean, dry surface
that is free of all debris.
For best reception, place the antenna on the vehicle’s
metallic roof, at least 6” from any window or sun roof.
For safety, do not run the antenna wire across any
metal edges, through windows, or near seat tracks.
Look for foam rubber trunk and door seals for insulation. If crossing a door seal, it is recommended that
this be done at the bottom or low point of the vehicle.
If necessary, use products such as adhesive or cable
tie mounts to control the antenna wire route.
If the car is a soft-top convertible, you may mount the antenna on the metal
trunk lid. It should be at least 4” from the rear window. Ensure that the
antenna and cable don’t interfere with the opening or closing of the
convertible top and trunk.
option
1
option
2
Caution: Use your SKYFi3 only with the enclosed components or approved accessories. Do not modify
wires or other connectors in any way; you could cause a malfunction, which could damage your SKYFi3 and
will void your warranty.
Page 9
Getting Started
14
15
Getting Started
Mounting Your SKYFi
3
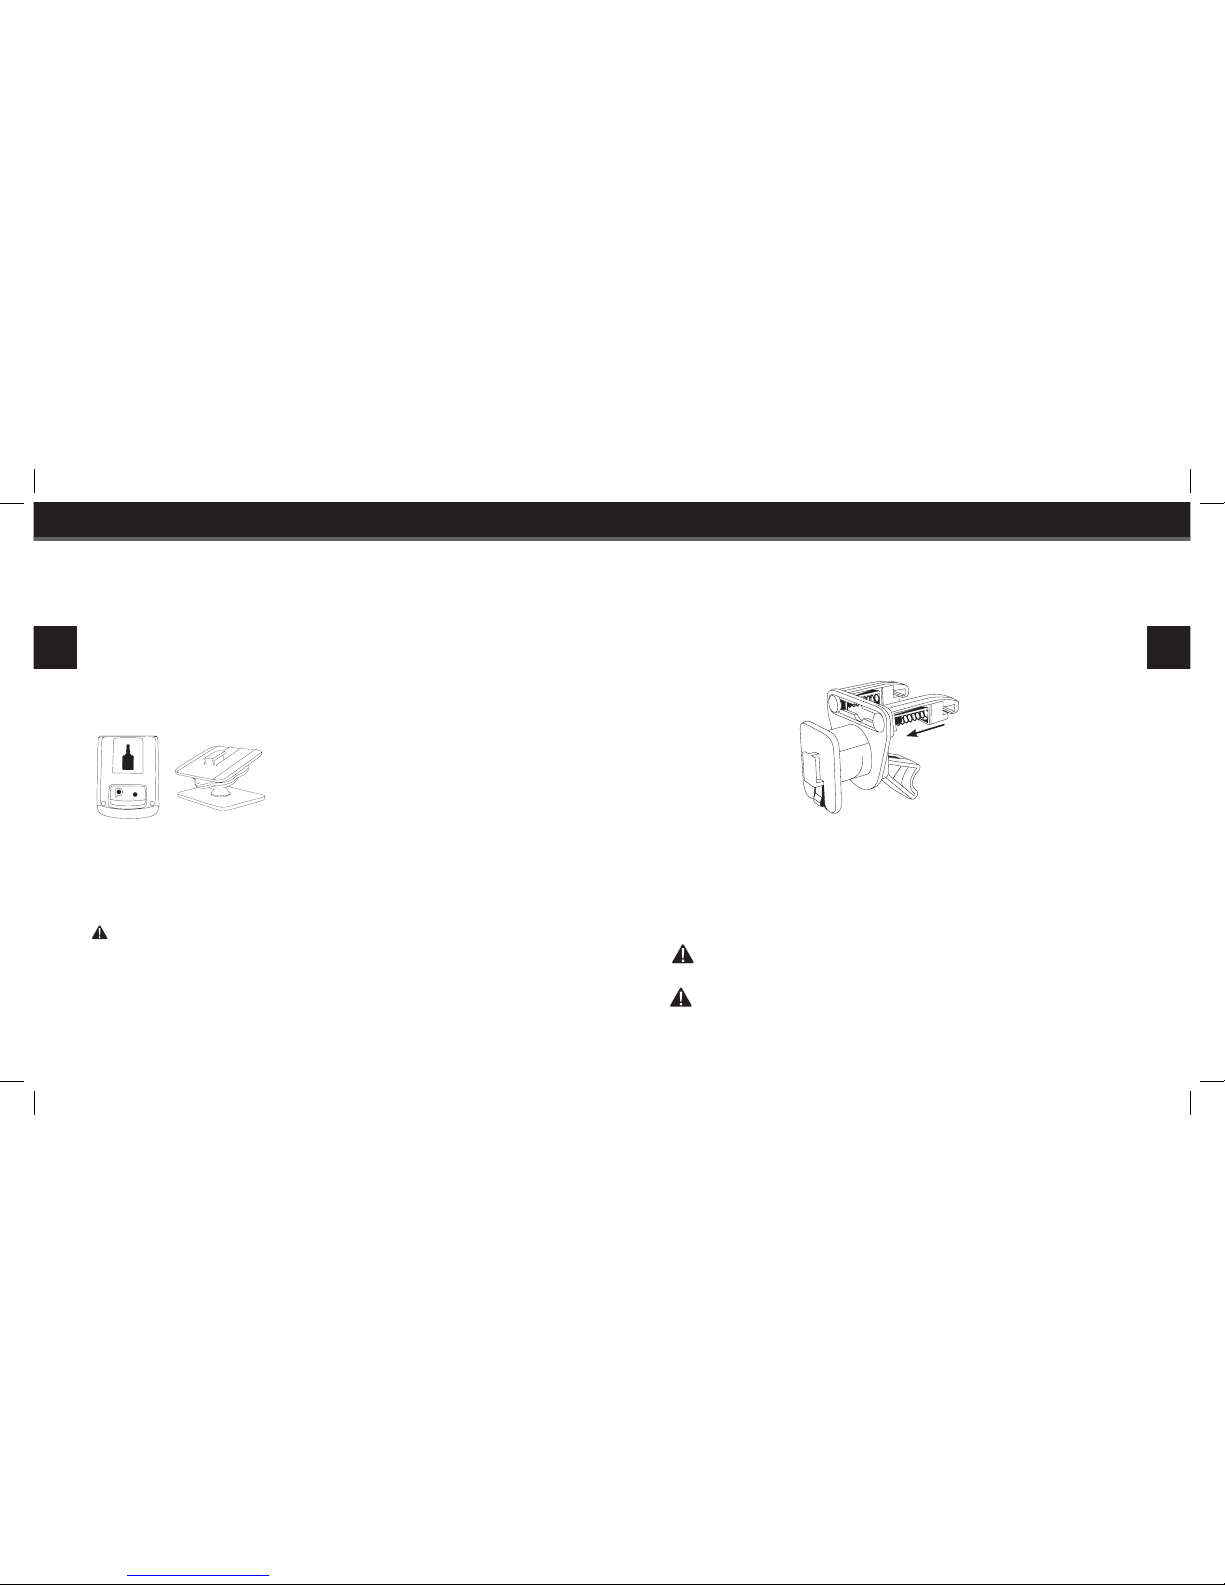
Swivel Mount
Find a suitable location on the dash of your vehicle; the mount uses a
strong adhesive and could be difficult to reposition after installation. Do not
install this mount on a leather surface. Make sure the air temperature is at
least 60°F. Clean the mounting surface with the surface preparation cleaning
kit, following the directions on the package.
Peel away the adhesive liner and firmly
press the swivel mount to the surface for 30
seconds. For best results, do not touch or
apply any pressure to the vehicle mount for
24 hours.
To remove the mount, lift the adhesive pad with your fingers or a spoon.
You may warm it with a hair dryer for 2 to 3 minutes to help soften the
adhesive. Remove any leftover adhesive from the dash surface by rubbing
with your finger, or use a mild cleaner as recommended by your vehicle’s
manufacturer.
Caution: Never use a commercial heat gun or paint-stripping gun. This could result in damage
to the unit or to your vehicle.
You can adjust the tension of the swivel mount by turning the tightening
wheel. The base of mount can be rotated to accommodate vertical and
horizontal surfaces.
ANT
5V DC
Vent Mount
Find an air vent that is strong enough to hold your SKYFi3 and its cradle.
Clip the vent mount on to the vent by pulling back on the spring arms.
To remove the mount, pull back on the spring arms and release the mount’s
hooks from the vent vanes. Carefully extract the mount. The mount can be
installed on horizontal or vertical vanes by turning the mount’s base.
Carefully insert the SKYFi3 player into the cradle. Connect the power and
antenna.
Caution: DO NOT attempt to rotate your SKYFI3 while mounted with the vent mount. Doing so could
damage your vent louvers.
Caution: If your vehicle maintains power to the 12 volt power recepticle after the vehicle is shut off (the
red light on the power adapter stays lit), your SKYFI3 will continue to draw power from the vehicle’s battery.
You can enable the delayed power off feature (found in the “Settings” menu under “Date and Time”) to make
the SKYFI3 turn off after a selected period of time.
Page 10
Getting Started
16
17
Getting Started
Display - Symbols and Icons
Signal Strength
Battery Charging
Battery Full
Battery Low
Channel Access
Channel
Scheduled Recording
Keypad Hold
My Music (MP3/WMA)
Play
Random
Repeat Song
Stored XM Song Locked
Menu Items
Edit Song
EQ Settings
Find
Info Extras
Live XM
My Music
Organize
Playlists
Random
Repeat Song
Settings
TuneSelect
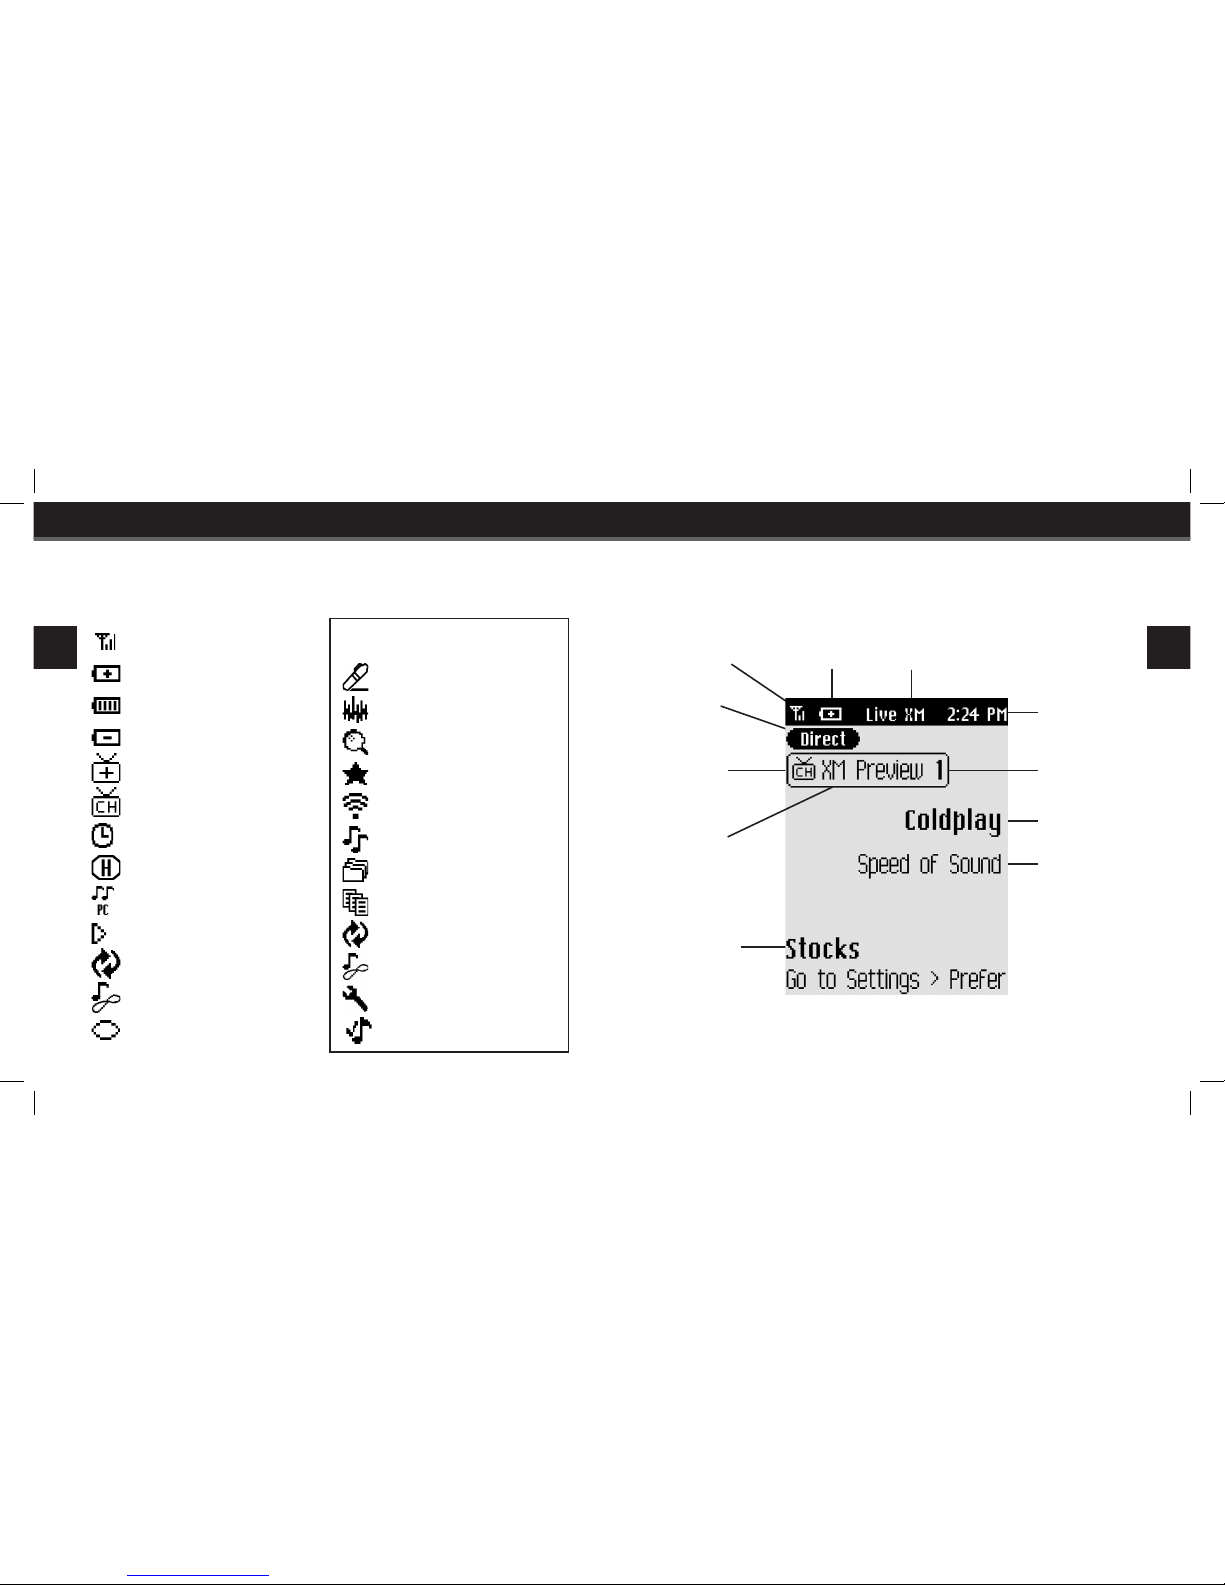
Display - Live XM Mode
Signal Strength
0 to 3 bars
Battery Level
and charging
status
Listening/User
Mode
Clock
Channel
Icon
Channel
Name
Channel
Number
Info Extras
and Stock and
Sports Tickers
Scrolls from
right to left
Song Title
Artist
Name
Direct /
Favorites
Indicator
Page 11

Getting Started
18
19
Getting Started
Display - My Music Mode
Listening/User
Mode
Clock
Available Memory
Black portion indicates amount of
storage available. White portion
indicates amount of storage
taken up by locked XM songs. “!”
indicates that there is less than 3
minutes of storage available.
Battery Level
and charging
status
Artist
Name
Song Title
Title Bar
Shows whether
you are
viewing:
• All Songs
• Artist
• Category
• Channel
• Session
Song Position
Song Length
Changing Display Appearance (Live XM Only)
Pressing the Display button toggles between regular and large font size.
When in large text mode, the artist and title information will scroll. Large
text is only available when in Live XM mode.
Elapsed
Time
Page 12
Getting Started
20
21
Getting Started
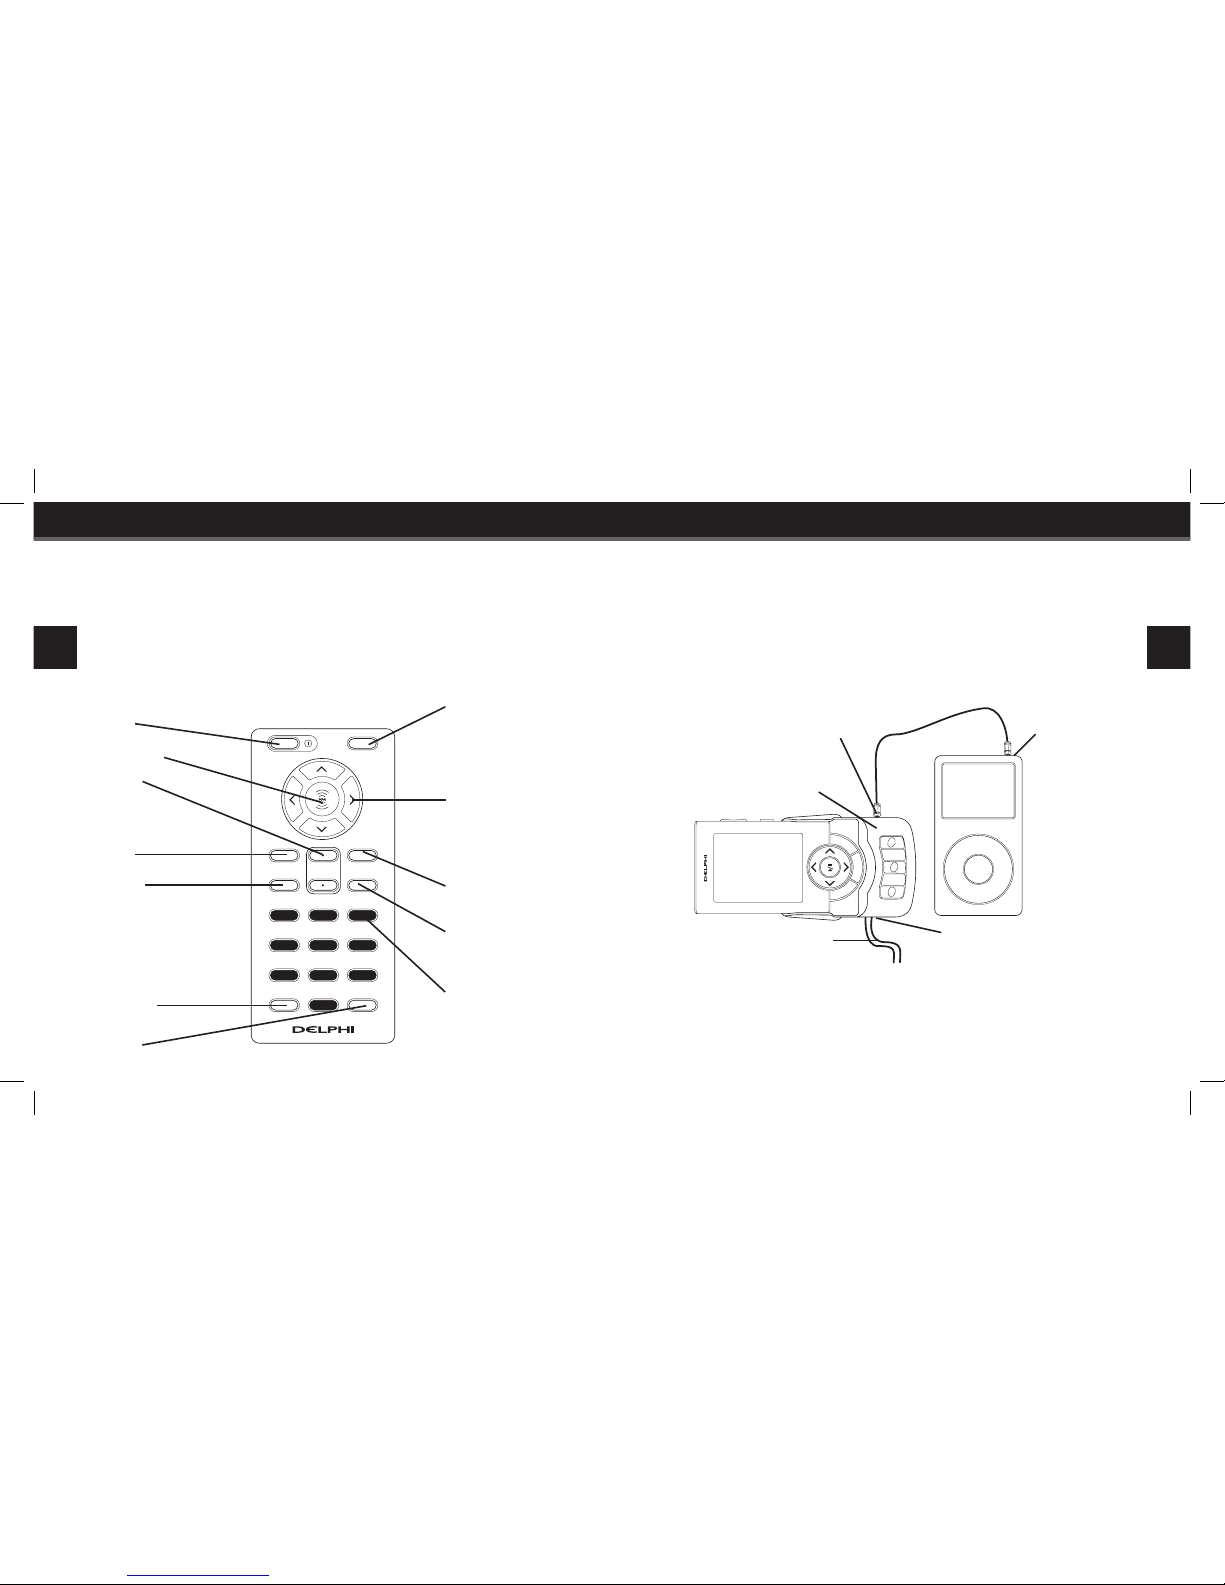
Remote Control
Mode Mute
Menu
Fav/Dir
1 2 3
4 5 6
7 8 9
Disp 0 Rec
Volume
Jump
+
-
Power
Menu
Display the main
menu of functions:
Record, Favorites,
Bookmarks, Settings, My Music.
Mode
Press to change modes:
Live XM, Aux and My
Music
Arrow Keys
Select menu entries,
change channels, skip
through songs, change
categories, and more...
Power
Play/Pause
Volume
Mute
Jump
Return to previous
channel.
Fav/Dir
Select between direct
entry or favorites
Numbers
Enter channels
directly or select
favorites.
Display
Press to change the display appearance. Press &
Hold to change the display
from vertical to horizontal
orientation.
Record
Remember to pull out the clear plastic tab from the battery compartment
before using the remote. To remove the battery from the remote, use your
thumb to press the center of the battery tray and pull it out. Replace the
battery with the equivalent size and voltage, taking care to insert it with the
positive (+) side up.
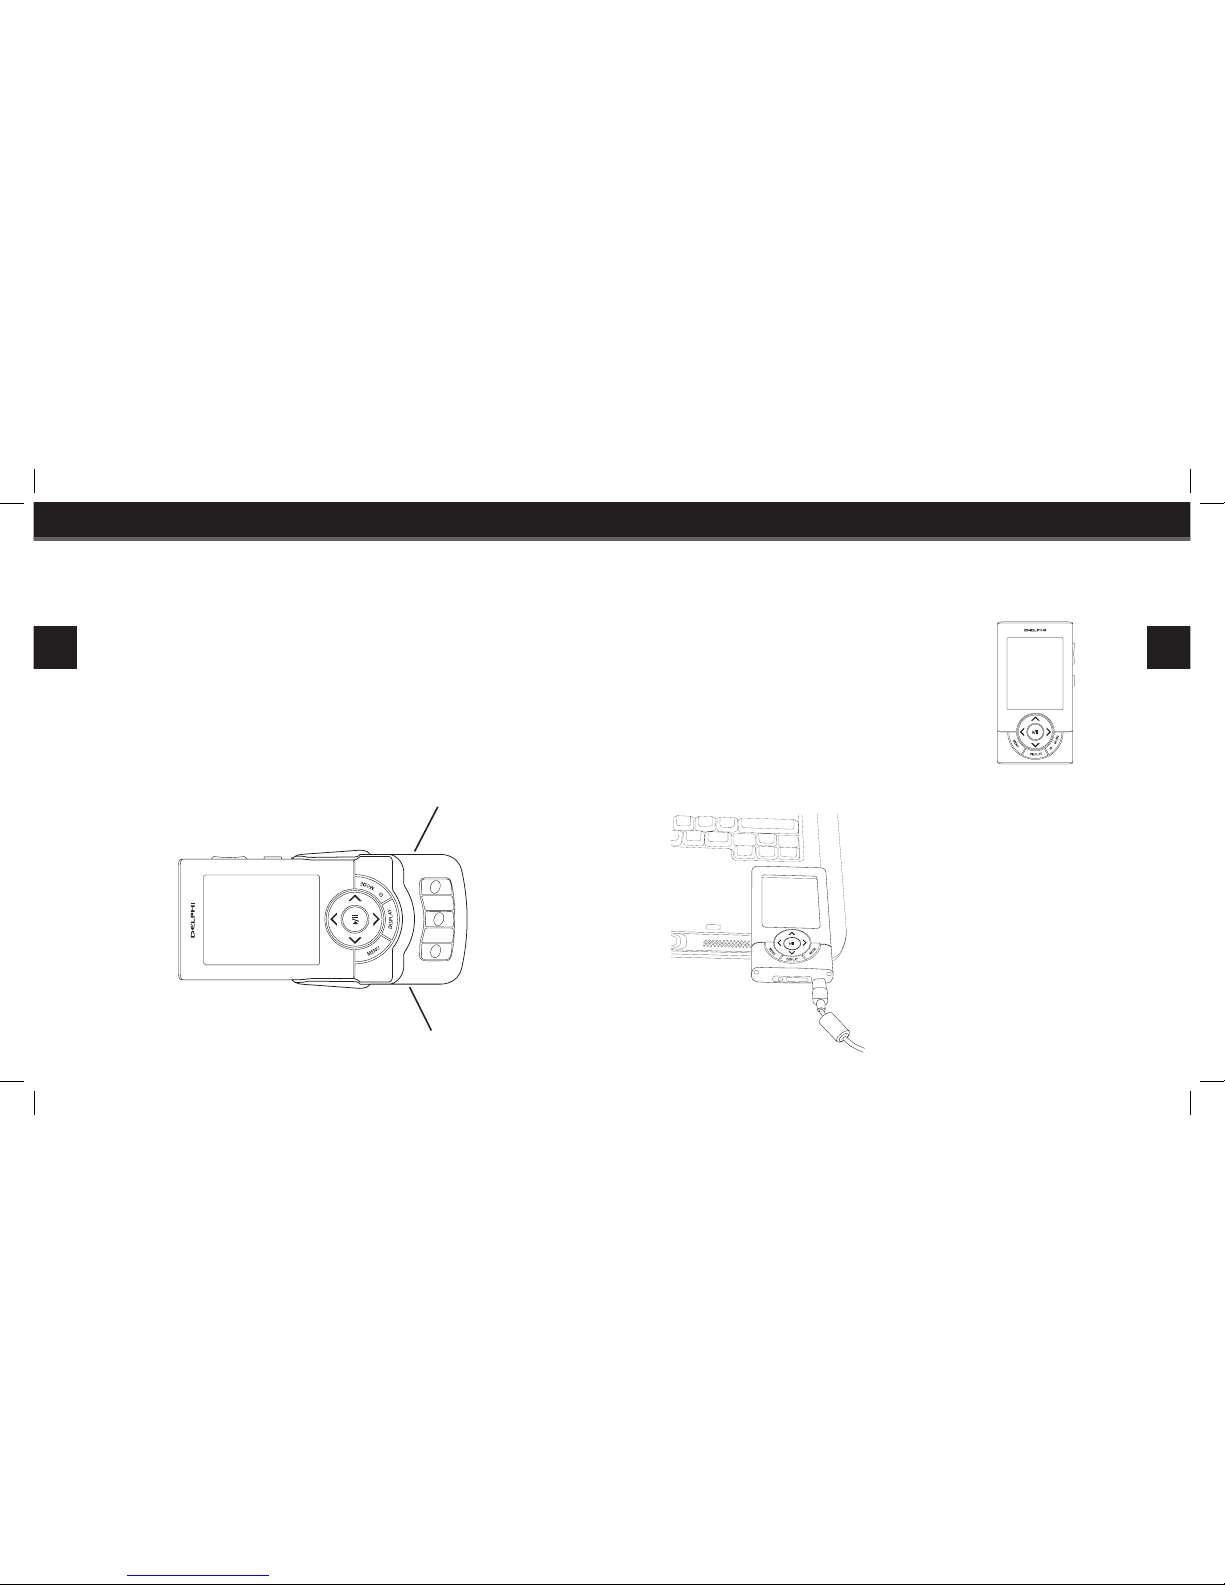
Using Your SKYFi3 with an External Audio Source
You can use your SKYFi3 with an external audio source by attaching it to the
line in jack on the car cradle. Press Mode to switch to “Aux” mode and hear
audio from the external source.
1
6
2
7
REC
3
8
4
9
SE
T
5
0
F/D
Vehicle
Cradle
External
Audio Source
(external
audio source
and cable not
included)
Line In
Antenna
and Power
Line Out
Page 13

22
Updating SKYFi3 Firmware
23
Updating SKYFi3 Firmware
Updating SKYFi3 Firmware
You can check for firmware updates at any time by plugging your device
into your computer and going to http://FWUPDT.xmradio.com. You can also
link to this page by clicking the “XM Firmware Update Client” button on the
CD’s XM+Napster menu. Download the Firmware Update Tool to your PC
Desktop for easy access, then double-click the icon to run the tool. Follow
the onscreen instructions to download the latest firmware to your device.
While you’re running XM+Napster, connect your device to your PC and
XM+Napster will automatically show if a firmware update is available for
your device. If an update is available, follow the onscreen prompts to
download the latest firmware to your device.
NOTE: On the “Install XM+Napster” section of the CD, click on the “XM
Firmware Update Client” button to link to the Firmware Update Tool.
Caution: Please make sure your battery is at least 80% full before updating your firmware.
Page 14

24
Listening to Live XM
25
Listening to Live XM
1
6
2
7
RE
C
3
8
4
9
SET
5
0
F/D
Listening to Live XM
To listen to Live XM content, you must dock your SKYFi3 in either the car or
home cradle (home kit is sold separately), make sure the power adapter is
attached, and the antenna is connected.
Turn on the player. You are currently listening to XM content if you see
“Live XM” on the display. If you do not see “Live XM,” toggle the Mode
button to switch to “Live XM” mode.
Selecting Channels
You can select channels by:
• Channel Browsing - scroll the full list of channels.
• Direct Entry - enter the channel number directly.
• Category Browsing - scroll the list of channel categories from the
channel list.
• Favorites - access your favorite channels.
Channel
Browsing
Favorites and
Category
Browsing from
song list
Channel
Browsing
Direct
Entry
24
Selecting Channels with the Car Cradle
Channel Browsing
Use the up and down arrows to browse through the list of XM channels.
Using the Remote Control
1. Press the Fav/Dir button to toggle to Direct.
2. Press the number keys of the desired channel and press the XM button.
1
6
2
7
RE
C
3
8
4
9
SET
5
0
F/D
Favorites /
Direct Entry
Assigned
Favorites
Keys and
Direct Entry
Keys
Warning: When using this product in the car, it is important to keep your eyes on the road and
your hands on the wheel. Not doing so could result in injury or death to yourself or others and/or in
property damage.
Page 15

26
Listening to Live XM
27
Listening to Live XM
Direct Entry
Using the Display Keypad
1. Press & Hold the left arrow button to access a number pad on the
display.
2. Use the arrow buttons to highlight the digits corresponding to channel
number.
3. Press the Play/Pause button to select each digit. SKYFi3 will tune to the
channel after a two second pause.
Using the Car Dock
1. Press the F/D button to toggle to Direct.
2. Press the number keys of the desired channel, the channel will change
after 2 seconds, or press the Play/Pause button.
26
Listening to Live XM
Favorites
Your favorite channels can be saved in an easily accessible list. Your SKYFi3
has three banks of favorites (A, B, and C). You can save 10 items in each list.
1. Press the Menu button and scroll to “Favorites.”
2. Press the Play/Pause button and scroll to “Add Channel.” Select the
favorites band to save to and press Play/Pause. The channel currently
playing will be added to your favorites.
To remove a channel:
1. Press the Menu button and scroll to “Favorites.”
2. Press the Play/Pause button and scroll to “Delete Channels.”
3. Press the Play/Pause button and scroll to the Favorites band (A, B, or C)
that contains the channel you wish to remove.
4. Press the Play/Pause button, select the channel from the list and press
the Play/Pause button to remove it.
Saving Favorites Using the Car Dock
Your favorite channels can also be saved using the car dock keypad.
1. Tune to the channel you wish to save.
2. Press the F/D button to display the favorites band you wish to save to.
3. Press the SET button to save the current channel.
4. Press the number of the button you wish to save the channel to.
Page 16

28
Listening to Live XM
29
Listening to Live XM
Accessing Your Favorites
Your favorites can be accessed using the SKYFi3 player, the remote control,
or the car dock keys.
Access your favorites lists using the player keys or the remote by pressing
the right arrow button to toggle through the favorites lists. Use the up and
down arrow buttons then the Play/Pause button to select the desired chan-
nel. Access your favorites lists using the car dock keys by pressing the F/D
button to select the desired favorites band. Press a number key to access
the corresponding favorites channel.
Category Browsing
XM channels are organized by category, for example “Rock” or “News.”
1. Press the up or down arrows to display the channel list.
2. Press the right arrow button to scroll through the categories.
3. Press the up and down arrows to select a channel within a category.
4. Press the Play/Pause button to select the channel you want.
Use the left arrow key to exit or go to the previous
menu.
Playing Live XM
Once you select a channel, SKYFi3 will begin playing the content that is
being broadcast on that channel. You can pause Live XM at any time by
pressing the Play/Pause button. Press the Play/Pause button again to
continue playing the content. Content will resume playing from the location
where it was paused, as long as the content was not paused for more than
30 minutes.
It is possible to pause and resume playing content because SKYFi3 can access at least 30 minutes of stored XM content. SKYFi3 stores XM content
as you are listening, so if you have been listening for less than 30 minutes,
there will be less than 30 minutes of content in the buffer. You can access
this “30-minute buffer” at any time.
NOTE: XM Instant Traffic and Weather cannot be replayed.
Replaying XM Content
Press the left arrow button to access the 30-minute buffer. SKYFi3 will
rewind to the beginning of the current song. If the current song has been
playing for less than 5 seconds, SKYFi3 will rewind to the beginning of the
previous song.
Page 17

30
Listening to Live XM
31
Recording Live XM
While in the 30-minute buffer, you can:
• Skip from Song to Song - Press the left and right arrow buttons to skip to
the previous and next songs in the order that they played.
• Rewind - Press & Hold the left arrow button to continuously rewind. Release the button to resume playing.
• Fast Forward - Press & Hold the right arrow button to continuously fast
forward. Release the button to resume playing.
• Quick Rewind and Fast Forward - While rewinding or fast forwarding,
quickly tap the left or right arrow buttons to increase the rewind and fast
forward speed up to four speed levels. Press the Play/Pause button to
resume playing.
Return to live XM by pressing the Menu button, selecting “Live XM,” and
then pressing the Play/Pause button.
Recording Live XM
Your SKYFi3 can record XM content while you are listening to Live XM or
by scheduling a recording session. When listening to Live XM, you can
record the current song or begin recording the current channel. You can
then listen to recorded XM anywhere with your SKYFi3 player and organize
your recorded content into playlists. Recorded XM content is for personal,
non-commercial use only and cannot be downloaded from the SKYFi3
player. To record XM content, you must dock your SKYFi3 in either the car or
home cradle, make sure the power adapter is attached, and the antenna is
connected.
Recording a Single Song
1. While listening to XM, press the Menu button, scroll to “Record” in the
menu and press the Play/Pause button to select it.
2. Scroll to “Record Song” in the menu and press the Play/Pause button to
select it.
Delayed Start Recording
You have 45 seconds from the start of the song to press “Record” and capture all of the song, as long as you have been tuned to that channel for at
least 45 seconds. The amount of time you have to record to the beginning
of the song can increase if you have been listening to the channel longer,
resulting in more content being captured in the replay buffer. SKYFi3 will
stop recording at the end of the song. Alternatively, you can press the Menu
button again to stop recording at any time.
Express - You can also Press & Hold the Menu button
until you see “Recording” on the display.
Page 18

32
Recording Live XM
33
Recording Live XM
Using the Car Dock
To record a song using the keys on the car dock, simply press the REC button. Recording will stop at the end of the song. You can continue recording
the current channel by pressing the REC button again. Press the REC button
a third time to stop recording at any time.
Recording a Channel
1. While listening to XM, press the Menu button, scroll to “Record” in the
menu and press the Play/Pause button to select it.
2. Scroll to “Record Channel” in the menu and press the Play/Pause button
to select it. Press & Hold the Menu button to stop recording.
Using the Car Dock
To record a channel using the keys on the car dock, simply press the REC
button twice quickly. Press the REC button again to stop recording.
Scheduling a Recording Session
To schedule a recording session, your SKYFi3 must be on with an XM signal,
or off and in a powered home or car dock.
1. While listening to XM, press the Menu button, scroll to “Record” in the
menu and press the Play/Pause button to select it.
2. Scroll to “Record Schedule” in the menu and press the Play/Pause but-
ton to select it. Scroll to “New Session” and press the Play/Pause button
to select it.
3. Follow the on-screen instructions using the up and down buttons. Press
the Play/Pause button to accept each entry.
Editing a Session
1. To edit an existing session, press the Menu button, scroll to “Record” in
the menu and press the Play/Pause button to select it.
2. Scroll to “Record Schedule” in the menu and press the Play/Pause but-
ton to select it.
3. You will see a list of sessions. Highlight the session you wish to edit and
press the Play/Pause button.
4. Follow the on-screen instructions using the up and down buttons. Press
the Play/Pause button to accept each entry.
5. To delete a session, highlight the session you wish to delete and press
the Menu button, choose “Cancel Session” and press the Play/Pause
button.
Choose to schedule a session for “Today,”
for “Everyday,” or for a specific date.
Set start and stop times using the up
and down arrow buttons.
Pick the channel you want recorded.
Select “OK” to save the session.
Page 19

34
Listening to My Music
35
Listening to My Music
Listening to My Music
To listen to recorded XM content or other stored music (see “Using SKYFi3
with your PC”), switch your SKYFi3 to My Music mode by pressing the
Mode button.
NOTE: Please make sure your battery is fully charged (three hours) before
using your SKYFi3 on battery power.
1. Press the up and down arrow buttons to scroll through a list of your
songs in the order that they were recorded.
2. Press the Menu button to display the Menu.
3. Scroll to “Play” and press the Play/Pause button to play the selected
song.
Play the selected song.
Displays the Edit Menu,
allowing you to add a song
to a playlist, delete a song,
or lock and unlock a song.
Play songs in random
order.
Repeat the current song.
Express - Press Play/Pause to play a selected song from
the song list, bypassing the Menu.
You can skip forward and backward through your recorded music while listening by pressing the left and right arrow keys to skip to the previous and
next song respectively. Toggle the Play/Pause button while a song is playing
to pause it and resume playing.
Accessing Your Music
In addition to accessing a list of your songs in the order that they were
recorded, you can also access your music by artist, category, channel, and
recording session.
1. While listing to a recorded song, press the Menu button. Scroll to “Find”
and press the Play/Pause button to select it.
2. For this example, scroll to “Artist,” press the Play/Pause button to select
it, then scroll through the list of artists and press the Menu button to
select an artist.
3. Scroll to “Select” and press the Play/Pause button to see a list of songs
for that artist.
Express - You can bypass this “Select/Edit” screen by
pressing the right arrow button or the Play/Pause button
once you have highlighted an artist.
4. Scroll to the song you wish to hear and press the Play/Pause button to
play it.
Page 20

36
Listening to My Music
37
Listening to My Music
Changing Artists
1. Press the Menu button, scroll to “Find” and press the Play/Pause button
to select it.
2. Scroll to “Artists” and press the Play/Pause button to select it.
3. Scroll through the list of artists and press the right arrow button to display the songs for that artist.
4. Scroll to the song you wish to hear and press the Play/Pause button to
play it.
Changing back to “All Songs”
1. Press Menu, scroll to “Find” and press the Play/Pause button to select it.
2. Scroll to “All Songs” and press the Play/Pause button to select it.
3. Scroll to the song you wish to hear and press the Play/Pause button to
play it.
Organizing Your Music
Playlists
Playlists contain a list of songs that are organized to play in a certain sequence. You can add a song to more than one playlist. To add a song to a
playlist, first select a song from any song list.
1. Press the Menu button to display the Menu.
2. Scroll to “Edit Song” and press the Play/Pause button to select it. If “Edit
Song” is not on the menu, select “Find” and press the Menu button to
display the menu with “Edit Song” visible.
3. Scroll to “Add to Playlist” and press the Play/Pause button to select it.
4. To add the song to an existing playlist, scroll to the desired playlist and
press the Play/Pause button to add the song to the playlist.
5. To create a new playlist, scroll to “New Playlist” and press the Play/
Pause button to select it.
6. Enter the playlist name using the on-screen keypad. Highlight “OK” and
press the Play/Pause button to add the song to the playlist.
You can add all songs for an artist, category, channel, or recording session
to playlists by following the above steps from an artist, category, channel,
or recording session list.
Express - While listening to a song, press and hold the
Menu button to display a special menu which allows you
to quickly add the song to a playlist, lock, bookmark, or
delete a stored song.
Page 21

38
Listening to My Music
39
Listening to My Music
Playing Songs in a Playlist
1. To select a playlist to play, press the Menu button, scroll to “Playlists”
and press the Play/Pause button to select it.
2. Scroll to the desired playlist in the list and press the Menu button to
select it.
3. Scroll to “Select” and press the Play/Pause button to see the list of
songs in the playlist.
4. Scroll to the desired song and press the Play/Pause button to play it.
To exit a playlist and return to all songs or other categories, press the Menu
button, scroll to “Find” and press the Play/Pause button.
Removing Playlist Items
1. To remove songs from a playlist, press the Menu button, scroll to
“Playlists” and press the Play/Pause button to select it.
2. Scroll to the desired playlist in the list and press the Menu button to
select it.
3. Scroll to “Edit Playlist” and press the Play/Pause button to select it.
4. Scroll to “Remove Songs” and press the Play/Pause button to see the list
of songs in the playlist.
5. Scroll to the desired song and press the Menu button to select it.
6. Scroll to “Remove Song” and press the Play/Pause button to select it.
SKYFi3 will ask you to confirm that you want to remove the song from
the playlist. Scroll to “Yes” and press the Play/Pause button to confirm.
Please note that removing a song from a playlist does not delete the song
from your SKYFi3.
Deleting Songs
Deleting a song from your SKYFi3 permanently removes it from the unit.
1. From any song list in “Playlist,” “All Songs,” “Artists,” “Categories,” etc.,
highlight the song you want to delete using the up and down arrow
buttons.
2. Press the Menu button, scroll to “Edit Song,” and press the Play/Pause
button to select it.
3. Scroll to “Delete” and press the Play/Pause button to select it.
4. SKYFi3 will ask you to confirm that you want to remove the song from
the playlist. Scroll to “Yes” and press the Play/Pause button to confirm.
Locking Songs
When your SKYFi3’s internal memory is full, subsequent recordings will
replace stored songs in the order they were recorded. You can lock songs to
prevent them from being replaced.
Page 22

40
Listening to My Music
41
Personalizing Your SKYFi
3
1. From any song list in “Playlist,” “All Songs,” “Artists,” “Categories,” etc.,
highlight the song you want to lock using the up and down arrow
buttons.
2. Press the Menu button, scroll to “Edit Song,” and press the Play/Pause
button to select it.
3. Scroll to “Lock Song” and press the Play/Pause button to select it.
Selecting Multiple Songs
Select multiple songs in a list to delete, to lock, or to add to a playlist.
1. Press the Menu button, scroll to “Organize,” and press the Play/Pause
button to select it.
2. Scroll to the list you want and press the Play/Pause button to select it.
3. If you are in any list other that “All Music”, press the Menu button, scroll
to “View Songs” and press the Play/Pause button to select it.
4. Scroll to “All Songs” and press the Play/Pause button to select it.
5. Scroll to the first song you want and press the Menu button, then scroll
to “Select Song” and press the Play/Pause button to highlight the song.
6. Scroll to the next song you wish to select and press the Play/Pause button. Repeat this step for all the songs you wish to select.
7. Press the Menu button, select an action (“Delete, Song” “Add to Playlist,”
or “Lock Song”) and press the Play/Pause button to perform the action.
8. SKYFi3 will ask you to confirm your selection. Scroll to “Yes” and press
the Play/Pause button to select it.
The action you select will be performed on all songs you selected.
Personalizing Your SKYFi
3
You can easily adapt your SKYFi3 to suit your listening habits. Simply
press Menu to see the options you can customize. If you ever
get lost or decide not to change anything, press the left arrow button several
times to return to normal operation. Or just wait about 15 seconds and
SKYFi3 automatically cancels whatever you’re doing.
Making any FM Radio an XM Radio
Your SKYFi3 contains a built-in FM transmitter that sends the XM audio
signal to an FM radio. The FM transmitter is only used in the car dock, and
is disabled when you are using headphones.
1. Find an FM frequency that is not being used by any commercial FM station. Tune your FM radio through the FM band and note which frequency has no FM station or the least amount of interference.
2. Place SKYFi3 in the car cradle.
3. Press Menu, scroll to “Settings” and press Play/Pause to select it.
4. Scroll to “FM Frequency” and press Play/Pause to select it.
5. Using the up and down arrow buttons, select the same FM frequency
and press Play/Pause.
You should now hear XM programming on your FM radio. If the sound
isn’t clear or you hear noise or static, try another FM frequency. If you’re
traveling, you may need to retune periodically; this is due to the differences
in signal strength of local FM stations and is not a problem with
your SKYFi3.
Page 23

42
Personalizing Your SKYFi
3
43
Personalizing Your SKYFi
3
Menu Functions - Quick Reference
Menu functions may be different from the list below based on how your
SKYFi3 is docked and what playing mode is selected.
Live XM Mode
Main Menu
• Record - record a song, record a channel, or schedule a recording session.
• Bookmarks - bookmark the content currently playing for future purchase
from XM+Napster, using the included software.
• Favorites - add a channel or edit channels in a favorites list.
• My Music - switch SKYFi3 to My Music mode.
• Settings - access the Preferences and Set-up Menus.
Preferences (in Settings menu)
• EQ Set - select from a list of equalizer settings for playback.
• Change Display - change the backlight and brightness/contrast settings.
• Info Extras - choose the Info Extras to be displayed.
• TuneSelect - set-up a list of songs or artists that SKYFi3 will alert you of
when one of them is playing on any XM channel.
• Channel Access - turn DirecTune on and off and modify the list of chan-
nels you see in the channel list.
Set-Up (in Settings menu)
• FM Audio Level - adjust the FM output (only if SKYFi3 is in the car cradle).
• Line Out Level - adjust audio line output level (not shown if headphones
are plugged in).
• Antenna Aiming - find the strongest signal with your home antenna (not
shown when docked in the car cradle).
• Set Time - modify date/time settings.
• Erase Memory - erase SKYFi3’s internal memory.
• Set Default - reset SKYFi3 to factory defaults.
Menu Functions - Quick Reference (continued)
My Music Mode
Main Menu
• Playlist - play, add, delete or rename a playlist (not shown if no playlist is
available).
• Find - access your music by artist, category, channel, and recording
session.
• Organize - select multiple songs for deletion, to lock, or to add to a
playlist.
• Live XM - when docked, switch SKYFi3 to Live XM mode (not shown if not
docked).
• Settings - access the Preferences and Set-up Menus.
Preferences (in Settings menu)
• EQ Set - select from a list of equalizer settings for playback of your
recorded content.
• Change Display - change the backlight and brightness/contrast settings.
Set-Up (in Settings menu)
• FM Audio Level - adjust the FM output (only if SKYFi3 is in the car cradle).
• Line Out Level - adjust audio line output level (not shown if headphone is
plugged in.
• Set Time - modify date and time settings. Delayed power off available in
car dock only.
• Erase Memory - erase SKYFi3’s internal memory.
• Set Default - reset SKYFi3 to factory defaults.
Use the left arrow key to exit or go to the previous menu. While your
SKYFI3 is in the car dock, use the Delayed Power Off feature in “Set
Time” to prevent battery drain in your vehicle.
Page 24

44
Personalizing Your SKYFi
3
45
Personalizing Your SKYFi
3
Display Settings
Brightness
1. Press the Menu button, scroll to “Settings” and press the Play/Pause
button to select it.
2. Scroll to “Preferences” and press the Play/Pause button to select it.
3. Scroll to “Change Display” and press the Play/Pause button to select it.
4. Scroll to “Brightness” and press the Play/Pause button to select it.
5. Select “Brightness” or “Contrast” with the up and down arrow buttons
and use the left and right arrow buttons to adjust each.
6. Press the Play/Pause button to confirm your setting.
Backlight Timer
You can change the amount of time that your SKYFi3’s screen backlight
remains lit.
1. Press the Menu button, scroll to “Settings” and press the Play/Pause
button to select it.
2. Scroll to “Preferences” and press the Play/Pause button to select it.
3. Scroll to “Change Display” and press the Play/Pause button to select it.
4. Scroll to “Backlight Timer” and press the Play/Pause button to select it.
5. Use the up and down arrow buttons to select the desired time period
and press the Play/Pause button to confirm your selection.
See the “Getting Started - Display” section (page 7) for additional display
options.
Audio Settings
EQ Set
You can set the tone quality of your SKYFi3 player to match the type of
music you are listening to.
1. Press the Menu button, scroll to “Settings” and press the Play/Pause
button to select it.
2. Scroll to “Preferences” and press the Play/Pause button to select it.
3. Scroll to “EQ Set” and press the Play/Pause button to select it.
4. Use the up and down arrow buttons to select the tone type that you
prefer and press the Play/Pause button to select it.
FM Audio Level/Line Out Level
Use these settings to change the audio output level that SKYFi3 is transmitting to your FM radio, or sending to your stereo when connected to the Line
Out jack.
1. Press the Menu button, scroll to “Settings” and press the Play/Pause
button to select it.
2. Scroll to “Setup” and press the Play/Pause button to select it.
3. Scroll to “FM Audio Level” (car cradle only) or “Line Out Level” (if con-
nected and in the car or home cradle) and press the Play/Pause button to
select it.
4. Use the left and right arrow buttons to decrease and increase the audio
output level and press the Play/Pause button to select it.
Page 25

46
Personalizing Your SKYFi
3
47
Personalizing Your SKYFi
3
TuneSelect™
TuneSelect can alert you whenever one of your favorite songs or artists is
playing on any XM channel.
1. Press the Menu button, scroll to “Settings” and press the Play/Pause
button to select it.
2. Scroll to “Preferences” and press the Play/Pause button to select it.
3. Scroll to “TuneSelect” and press the Play/Pause button to select it.
4. Scroll to “Alerts” and press the Play/Pause button to toggle alerts on and
off.
5. Scroll to “Edit List” and press the Play/Pause button to select it.
6. Scroll to “Add Tune Select” and press the Play/Pause button to select it.
7. Press the Play/Pause button to select “Artist” or “Song” for entry. Once
you have completed your entries, scroll to “Accept” and press the Play/
Pause button.
As you populate the list with entries, you can follow the steps above to
access TuneSelect, select an item from the list, press the Play/Pause button
then select options such as delete or activating alerts.
Saving and Retrieving Favorite Artists/Songs
1. When you hear one of your favorite songs or artists, press the Menu button, scroll to “Bookmark” and press the Play/Pause button. At the next
menu, scroll to either “Tune Select Artist” or “Tune Select Song” and
press the Play/Pause button to confirm.
2. When any song or artist on the TuneSelect list is currently playing on any
XM channel, your SKYFi3 will beep and flash “Artist/Song Found” on the
display. Press the Play/Pause button to switch to that channel.
Info Extras
Stock Ticker
You can track up to 20 stock symbols and see their prices and movements
right on the SKYFi3’s display.*
1. Press the Menu button, scroll to “Settings” and press the Play/Pause
button to select it.
2. Scroll to “Preferences” and press the Play/Pause button to select it.
3. Scroll to “Info Extras” and press the Play/Pause button to select it.
4. Scroll to “Stock Ticker” and press the Play/Pause button to select it.
4. Scroll to “Add Stocks” and press the Play/Pause button to select it.
5. Use the arrow buttons to add each letter of the desired stock symbol.
Press the Play/Pause button after choosing each letter. (Your SKYFi3 has
a list of more than 9,000 stock symbols, and will not only help you complete each entry but prevents you from entering incorrect symbols.)
To view your stocks, press the Display button until you see “Stocks” and a
ticker scrolling across the bottom of the screen.
Erase a Stock Symbol
Follow the same steps above to access the “Stock Ticker.” Scroll to “Erase
Stocks” and press the Play/Pause button to select it. Use the arrow buttons
to select the stocks to be deleted. Press the Play/Pause button to confirm
your selection.
*Quotes are provided by ComStock, Inc. and cover most stocks listed on the NYSE, AMEX, or NASDAQ.
Market information is delayed by approximately 25 minutes.
Page 26

48
Personalizing Your SKYFi
3
49
Personalizing Your SKYFi
3
Other Info Extras
XM Satellite Radio will broadcast information such as sports scores and
other features at various times.
To see what is available and change your Info Extras settings:
1. Press the Menu button, scroll to “Settings” and press the Play/Pause
button to select it.
2. Scroll to “Preferences” and press the Play/Pause button to select it.
3. Scroll to “Info Extras” and press the Play/Pause button to select it.
4. Use the arrow buttons to scroll the list. Items with “+” are items you
have chosen to display; items with “-” are items you have not yet selected. Press the Play/Pause button to change the indicator for an item.
5. Press the Display button until you see the Info Extra items at the bottom
of the screen.
Channel Access
Direct Tune
Normally, as you press the arrow buttons, you can preview what’s playing
on other XM channels before actually selecting a channel. To automatically
tune to a channel without having to press the Play/Pause button:
1. Press the Menu button, scroll to “Settings” and press the Play/Pause
button to select it.
2. Scroll to “Preferences” and press the Play/Pause button to select it.
3. Scroll to “Channel Access” and press the Play/Pause button to select it.
4. Scroll to “Direct Tune,” press the Play/Pause button to select it, scroll to
“Direct Tune On” and press the Play/Pause button to select it.
Channel Skip/Add
To simplify the list of channels you see when you access the channel list:
1. Press the Menu button, scroll to “Settings” and press the Play/Pause
button to select it.
2. Scroll to “Preferences” and press the Play/Pause button to select it.
3. Scroll to “Channel Access” and press the Play/Pause button to select it.
4. Scroll to “Channel Skip/Add” and press the Play/Pause button to select
it. In the list of channels, highlight and press the Play/Pause button to
skip a channel. The channel will appear in reverse type. Press the Play/
Pause button again to add a skipped channel.
Page 27

50
Personalizing Your SKYFi
3
51
Using SKYFi3 and Your PC
Erase Memory
To erase all internal memory on your SKYFi3:
1. Press the Menu button, scroll to “Settings” and press the Play/Pause
button to select it.
2. Scroll to “Setup” and press the Play/Pause button to select it.
3. Scroll to “Erase Memory” and press the Play/Pause button to select it.
4. Scroll to the desired device to format and press the Play/Pause button to
select it.
Resetting Factory Defaults
You can return your SKYFi3 to the state it was shipped from the factory.
Be careful: this will erase all settings, including Stock Ticker, Info Extras,
presets, display options, and audio options.
1. Press the Menu button, scroll to “Settings” and press the Play/Pause
button to select it.
2. Scroll to “Setup” and press the Play/Pause button to select it.
3. Scroll to “Set Defaults” and press the Play/Pause button to select it.
4. Select “Restore Setting Only” to restore to factory settings. Select “Restore and Erase” to restore settings and erase stored information. Press
the Play/Pause button to confirm your selection.
Caution: Depending on your selection, ALL stored XM content and digital
audio files on your SKYFi3 and/or MicroSD card will be erased.
Using SKYFi3 and Your PC
System Requirements
In order to use XM+Napster and the Firmware Update Tool, the minimum
system requirements are:
• Intel® Pentium®-class CPU
• Microsoft® Windows® XP Home SP2, Windows XP Professional SP2, or
Windows 2000 SP4 operating system*
• At least 64 MB of RAM
• At least 13 MB of available hard disk space for XM+Napster application
• Internet Explorer 5.1 or higher
• Windows Media® Player 9 or higher; Windows Media Player 10 recommended for Windows XP
• Active Internet connection; we recommend a broadband (cable, DSL, or
fiber) connection for optimal performance
You may use your SKYFi3 with a Macintosh® computer equipped with a
USB port, however, you will not be able to use XM+Napster to organize
your audio files. You will be able to copy files to your SKYFi3 directly from
the Macintosh Finder. The instructions that follow are for XM+Napster
users.
* Delphi currently does not support the following operating systems: Windows 95, Windows 98, Windows NT,
Windows Me
Intel and Pentium are trademarks or registered trademarks of Intel Corporation or its subsidiaries in the United
States and other countries. Microsoft, Windows and Windows Media are either registered trademarks or
trademarks of Microsoft Corporation in the United States and/or other countries. Macintosh is a trademark of
Apple Computer, Inc., registered in the U.S. and other countries.
Page 28

52
Using SKYFi3 and Your PC
53
Using SKYFi3 and Your PC
Setup
1. Before you install XM+Napster, make sure that your radio is activated
and that you know your Radio ID (page 2). You’ll need it to register for
XM+Napster.
2. Make sure your SKYFi3 is not connected to your PC.
3. Insert the included CD into your computer’s CD drive. Choose the
“XM+Napster Install” option from the main menu to view the installation menu.
3. Start the installation by clicking on the “Install XM+Napster” button. Follow the onscreen directions to complete the process.
4. Once installation is complete, close the
XM+Napster CD window, eject the CD, and
restart your computer. Once your computer
restarts, launch XM+Napster, plug your SKYFi3
into your PC using the USB cable, and you’re
ready to go.
Warning: make sure you use the supplied
USB cable - other cables may not allow your
SKYFi3 to charge or communicate with your PC.
You can connect your SKYFi3 through a powered
USB hub. Do not use an unpowered USB hub.
NOTE: If you are using a Macintosh, your SKYFi3 will mount as an external
drive. You can copy files to your SKYFi3 using the Macintosh Finder. However, you will be unable to use XM+Napster to transfer and organize your
files.
Disconnecting Your SKYFi
3
Before unplugging the USB cable, safely disconnect SKYFi3 from your PC by
using one of the following methods:
1. In Windows, right click on the “Safely Remove Hardware” icon on the
right side of the Windows taskbar. Select “USB Mass Storage Device”
and click Stop.
2. In XM+Napster, click on the “Disconnect Device” icon or
select “File” and “Disconnect Portable Device” from the pull down
menu.
Page 29

54
Using SKYFi3 and Your PC
55
Using SKYFi3 and Your PC
Registering For XM+Napster
Once you install XM+Napster, register for XM+Napster Light or subscription
XM+Napster service.
XM+Napster Light allows you to manage XM content and digital audio files
(MP3/WMA) on your SKYFi3’s MicroSD card, purchase songs and/or albums,
and listen to more than 70 stations on XM Radio Online.
In addition to these features, subscription XM+Napster allows you to download and listen to Napster’s entire music library for a monthly fee.
1. To register, open XM+Napster and click on the File drop-down menu.
Select the “Sign In” option.
2. Click the link next to “Not a Registered Member?”
3. Enter your unique member information, then continue on to the Billing
page. If you’d like to sign up for XM+Napster Light, select I’ll skip my
Free Trial and start Napster Light at the lower right of the Billing page.
(Note: You do not need to enter billing information when you sign up for
XM+Napster Light.)
The next time you use XM+Napster, sign in using your user name and
password.
XM+Napster Features
• Transfer digital audio files between a MicroSD Card in your SKYFi3 and
your PC (MicroSD card not included)
• Manage your music, playlists, and recording sessions on your SKYFi
3
• Search for and purchase music from XM+Napster
• Listen to XM Radio Online
Check out XM+Napster’s Help Menu for more information.
Quickly sort
through all of
the music on
your PC and
your SKYFi3.
Drag and drop tracks or albums to
play them on your PC
View all of your song information
on one big screen for easy
organization.
Transfer content to your SKYFi
3
Go to the Library to view
and manage all of your
content.
Page 30

56
Using SKYFi3 and Your PC
57
Using SKYFi3 and Your PC
Transferring Content
You must have an optional (sold separately) MicroSD card installed into the
SKYFi3 to transfer content.
1. Connect the SKYFI3 to your computer with the included USB Cable.
a. Direct Transfer: Your computer must be compatible with a “Mass
Storage Class USB Device.” To transfer files to the SKYFI3, copy
and paste files from your personal folder on your computer into
the MicroSD card which can be found in “My Computer” for Windows users or on the Desktop for Macintosh users.
b. XM+Napster: You may also transfer your personal music files to
an optional (sold separately) MicroSD card using the XM+Napster
software by dragging and dropping content in the transfer pane.
You can transfer individual tracks or playlists that you have purchased or ripped from audio CDs.
Using an optional (sold separately) MicroSD Card Reader:
Please refer to your MicroSD card reader manual for installation instructions. Your computer must be compatible with a “Mass Storage Class USB
Device.” To transfer files to the SKYFi3, copy and paste files from your personal folder on your computer to the MicroSD card which can be found in
“My Computer” for Windows users or on the Desktop for Macintosh users.
Delphi recommends that you DO NOT create or add songs more then eight
folders (also known as directories) from the root folder of the MicroSD card.
Folder and file names should be limited to a maximum of 128 characters.
Delphi recommends that you keep your songs in the “My Music” Folder.
Using Digital Audio Files from CD
Convert (rip) tracks from an audio CD to your XM+Napster library:
1. Insert an audio CD into your CD drive.
2. Click the “Library” button, then click on the CD listed in the folders pane.
3. You will see a list of the tracks in the main pane. Click the “Rip” button
on the bottom of the main pane.
Import tracks you have converted into your XM+Napster library by clicking
“File” and selecting “Import Tracks to My Library...”
You may also transfer directly to your MicroSD Card through a MicroSD
Card reader (sold separately).
Burn digital audio files to CD or DVD:
1. Insert a recordable CD or DVD in your CD/DVD drive.
2. Click the “Library” button, then expand the Burn pane at the bottom of
the screen.
3. Drag and drop tracks into the Burn pane and click “Burn Disc” when you
are ready.
Software features are subject to change without notice.
Check www.xmradio.com/napster/ for further information.
Listening to XM Radio Online
To access XM Radio Online, click on the “Home” button, select “Radio,” then
select “XM Radio Online.” Choose a channel from the channel list.
Page 31

58
Other Things You Should Know
59
Other Things You Should Know
Other Things You Should Know
Care
You should be able to use your SKYFi3 during most of your daily activities.
However, you should remember:
• If your SKYFi3 does get dirty, wipe the case with a soft cloth (lightly
moistened with water if necessary), then wipe dry with another cloth.
Avoid chemicals such as paint thinner, alcohol, or abrasive cleansers.
• It is best to keep your SKYFi3 out of direct sunlight or other sources of
extreme heat.
Accessories (sold separately)
We’re always developing useful and clever accessories for your SKYFi3 such
as a home kit, signal repeater, live wearable kit, and additional car kit. Visit
our web site www.shopdelphi.com or your favorite electronics retailer to
purchase accessories.
Caution: Refrain from using food or drinks
near your SKYFi3. Spilling food or drinks
on the unit can damage it. Also, improperly
installing the antenna cable can cause leaks,
which can damage your SKYFi3 and/or your
vehicle.
Troubleshooting
Your SKYFi3 should provide you with trouble-free performance without
needing any servicing. If it does not appear to be working properly, first try
to remedy the problem by following these steps:
1. Attach all connections firmly and securely.
2. Ensure the cigarette lighter adaptor or auxiliary power socket is clean
and free of corrosion.
3. Check the adaptor fuse by unscrewing the ribbed end of the adaptor. If
required, replace with a 2-Amp fuse only.
If you are having problems with reception, please check page 13 for antenna
positioning information.
If you see this on the display: You should:
No Signal Something is blocking the XM signal. Move your
docked SKYFi3 away from the obstructed area, e.g. an
underground garage.
Check Antenna Plug the antenna into the home or vehicle cradle.
Make sure the antenna wire is not bent or broken.
Off Air The channel you’ve selected is not currently broadcast-
ing. Tune to another channel.
Loading Your SKYFi3 is acquiring audio or program information
from the XM signal. This message should disappear in
a few seconds in good signal conditions.
Page 32

60
Other Things You Should Know
61
Other Things You Should Know
If you see this on the display: You should:
Updating XM is updating your SKYFi3 with the latest encryption
code. Simply wait a few seconds until the update is
done. – OR – You may be attempting to tune to a channel that is blocked or that you cannot receive with your
subscription package. To receive that channel, contact
XM Satellite Radio at 1.800.967.2346.
--(no artist or title) No program information such as artist name or song
title exists.
Channel You are attempting to tune to a channel that is not
available.
All Recording Features Not
Available
Activate your XM subscription to enable you to store
XM programming on your SKYFi3.
This Channel Not Available for
Recording
Some programming cannot be recorded due to restrictions placed by the content owners.
This Program Not Available for
Recording
Some programming cannot be recorded due to restrictions placed by the content owners.
Connect to XM Antenna Within
## Days to Avoid Interruption in
Listening to XM Recordings
You must dock your SKYFi3 in its cradle, with the
antenna connected, and power it on for at least 8 hours
a month. This authenticates your XM subscription and
ensures that you can continue to enjoy your recorded
XM content and live XM programming.
Please connect to XM Antenna
to Confirm Valid Subscription
Dock your SKYFi3 in its cradle and connect the antenna.
Activation Required for
Playback
Activate your XM service by contacting XM at
http://activate.xmradio.com or calling 1.800.XM.RADIO
(1.800.967.2346).
If this happens: You should:
There is no power or your
SKYFi3 shuts off quickly
Your SKYFi3 battery may be low. Charge the battery by
docking SKYFi3 in the cradle and plugging in the power
adapter.
SKYFi3 shuts off unexpectedly Check whether you set the sleep timer, and set it to
“Off” if desired. SKYFi3 remembers the sleep timer setting even when you turn the player off.
You do not receive all the XM
channels you have subscribed
to
Check that you have not skipped any channels. If you
still do not receive all channels, your SKYFi3 may not be
activated. Contact XM Satellite Radio.
No audio. Check all connections.
No song title or artist name is
displayed
Nothing is wrong with your SKYFi3. That information may be in the process of being updated. Some
channels, such as news and sports, may not have such
information.
No audio when listening to
SKYFi3 through an FM radio
Check that your SKYFi3 and radio are tuned to the same
frequency. Make sure that your SKYFi3 is in the car
cradle. Make sure your headphones are not plugged in.
Audio fades or has static when
listening through an FM radio
You might be hearing interference from another FM
station. Set your SKYFi3 and your radio to a different
FM frequency.
Audio sounds too soft or is
distorted when listening to an
FM radio
Raise or lower the FM Audio Level until the sound
quality improves.
XM Instant Traffic and Weather
channels sound different from
other channels
Nothing is wrong with your SKYFi3. These channels
sound different because they are broadcast in a different audio mode.
Controls do not respond Check whether the power switch is in the ‘hold’ posi-
tion. If so, slide it to the center position to unlock the
controls.
Page 33

62
Other Things You Should Know
63
Other Things You Should Know
If this happens: You should:
The controls still do not
respond, the display does not
change, or the backlight does
not turn on or off
Reset your SKYFi3 by pressing and holding the volume
button and pressing the mode button.
Replay does not work with XM
Instant Traffic and Weather
Nothing is wrong with your SKYFi3. These channels use
a different audio technology than the other XM channels and cannot be recorded in the replay buffer.
Battery level meter doesn’t
match the expected charge or
playback time
Fully charge the battery, then use your SKYFi3 until the
battery is exhausted. This calibrates the battery level
meter.
SKYFi3 does not communicate
with your PC
Check the power and USB connections between the
cradle and your PC. Be sure to use the supplied USB
cable, any others may prevent your SKYFi3 from charging or communicating with your PC. Connect your
SKYFi3 directly to the PC or to a powered USB hub; do
not use an unpowered USB hub. Remove your SKYFi3
from its cradle, then re-insert.
Artist and song title information
does not display correctly
SKYFi3 may not correctly show the artist and song
information (ID3 tags) of certain foreign songs.
Cannot transfer songs that were
downloaded with Napster To
Go™ into SKYFi
3
SKYFi3 is not compatible with Napster To Go’s monthly
subscription service. To transfer songs from your PC to
SKYFi3, you must purchase individual songs or albums
from XM+Napster Light or XM+Napster.
Specifications
SKYFi3 Player:
Dimensions 110mm x 18mm x 62mm
Weight 115g
Storage Capacity 256 MB internal flash, 32 MB internal RAM, 2 GB
MicroSD card (maximum recognizable); Delphi recommends SanDisk brand for maximum performance
Music file formats MP3, WMA, Napster
Audio output variable through 3.5mm jack
Antenna connector (home and
car cradles)
SMB
Battery Lithium Ion
External power 5V DC
Remote
Dimensions 96mm x 43mm x 12mm
Battery Lithium 3V - Maxell cr2032
Headphone
Headphone Type 3.5mm headphone jack
Page 34

64
Other Things You Should Know
65
Warranty
Model Numbers
SKYFi3 Receiver with Car Kit SA10224
SKYFi3 Home Kit SA10227
SKYFi3 Car Kit SA10226
SKYFi3 Wearable Live Kit SA10252
SKYFi3 Wearable Live Kit with Extended Life Battery SA10228
Contacting Technical Support
For additional information regarding your SKYFi3, contact Delphi Technical
Support at 1.877.GO.DELPHI (1.877.463.3574),
8:00 a.m. — 8:00 p.m. Eastern Time, Monday — Friday.
10:00 a.m. — 4:00 p.m. Eastern Time, Saturday and Sunday.
Technical Support is also available at www.shopdelphi.com/skyfi3support
Warranty
Delphi Limited Consumer Warranty - United States of America
Delphi Product and Service Solutions (“Delphi”) warrants all XM Satellite
Radio Products sold by Delphi Automotive Systems (each “Product”) to be
free of defects in material and workmanship, subject to the following conditions:
Subject to express limitations with respect to the battery and ear bud components of any Product, the duration of Delphi’s warranty with respect to
each Product is limited to one (1) year from the date of sale to the original
consumer purchaser. The duration of Delphi’s warranty with respect to the
battery and ear bud components of any Product is limited to thirty (30) days
from the date of sale to the original consumer purchaser.
No other express warranties are made with respect to any Product. All
implied warranties, including warranties of merchantability and fitness
for a particular product are limited to the warranty period set forth above.
This warranty is not transferable and applies only to the original consumer
purchaser of the Product.
Delphi will, as its sole obligation under this warranty, replace or repair, at its
option, any Product that does not conform to this warranty. Products may
be repaired or replaced with new or with refurbished items. This limited
warranty does not cover defects in appearance, cosmetic or decorative
items, including any non-operative parts. Under no circumstances will
Delphi be liable for any incidental or consequential damages under this warranty or any implied warranties.
Page 35

66
Warranty
67
Warranty
These remedies are the customer’s exclusive remedies for
breach of warranty. This limited warranty only extends to
customers who purchase the Products in the United States.
Delphi will not be responsible for damage resulting from any
• (i) deviation of Delphi’s operating instructions as printed in Delphi’s
catalog or on any packaging, labels or other literature provided with a
Product,
• (ii) installation of a Product in a manner which is inconsistent with
Delphi’s written instructions,
• (iii) alteration or modification of a Product,
• (iv) misuse,
• (v) neglect,
• (vi) abuse,
• (vii) accident,
• (viii) normal wear and tear,
• (ix) commercial use,
• (x) improper storage,
• (xi) environmental conditions, including excessive temperature or
humidity,
• (xii) service by anyone other than a Delphi authorized repair facility,
• (xiii) use of the Product in conjunction with any non-Delphi branded accessory,
• (xiv) other improper application, installation or operation of this Product,
or
• (xv) defects or malfunctions of which Delphi is not advised within ten (10)
days of the expiration of the limited warranty period.
How You (the Customer) Can Get Service
To obtain warranty service during the first thirty (30) days after the date of
purchase, you must return the defective Product with the original receipt to
the original place of purchase. To obtain warranty service during the first
thirty (30) days for Products purchased specifically from
www.shopdelphi.com you must contact the E-Store directly at the number
provided on your invoice. For all Products for the remainder of the limited
warranty period, you must contact Delphi by phone at 1.877.GO.DELPHI
(1.877.463.3574). If further clarification or additional information is required
from Delphi, you may call Delphi at 1.877.GO.DELPHI (1.877.463.3574).
If warranty service is needed at any time during the warranty period, the
purchaser will be required to furnish a sales receipt/proof of purchase indication the date of purchase, amount paid and place of purchase. Customers
who fail to provide such proof of purchase will have the Product returned
to them or will be charged for the repair/replacement of any Product. The
customer is responsible for shipping the Product to an authorized Delphi
Warranty Facility.
*You must remove the “Memory Card” from your SKYFi3 before returning
the Product.
How State Law Relates to the Warranty
Some states do not allow limitations on the duration of implied warranties,
or the exclusion or the limitation of incidental or consequential damages.
So the above limitations or exclusions may not apply to you. This warranty
gives you specific legal rights. You may also have other rights that may vary
from state to state. NO PERSON IS AUTHORIZED BY DELPHI TO MODIFY
OR ADD TO THIS LIMITED WARRANTY.
Page 36

68
Warranty
69
Warranty
Delphi Limited Consumer Warranty - Canada
Delphi Product and Service Solutions (“Delphi”) warrants all XM Satellite
Radio Products sold by Delphi (each “Product”) to be free of defects in material and workmanship, subject to the following conditions:
Subject to express the limitations with respect to the battery and ear bud
components of any Product, the duration of Delphi’s warranty with respect
to each Product is limited to one (1) year from the date of sale to the original
consumer purchaser. The duration of Delphi’s warranty with respect to the
battery and ear bud components of any Product is limited to thirty (30) days
from the date of sale to the original consumer purchaser.
Delphi makes no express warranties with respect to any Product except as
set forth herein. All implied conditions and warranties, including the implied
conditions and warranties of merchantable quality and fitness for a particular product are limited to the warranty period set forth above. This warranty
is not transferable and applies only to the original consumer purchaser of
the Product.
Delphi will, as its sole obligation under this warranty, replace or repair, at its
option, any Product that does not conform to this warranty. Products may
be repaired or replaced with new or with refurbished items. This limited
warranty does not cover defects in appearance, cosmetic or decorative
items, including any non-operative parts. Under no circumstances will
Delphi be liable for any loss of revenue, loss of profits or failure to realize
expected savings (collectively, “Economic Loss”) under this warranty or any
implied conditions or warranties. These remedies are the customer’s exclusive remedies for breach of conditions or warranty. This limited warranty
only extends to customers who purchase the Products in Canada.
Delphi will not be responsible for damage resulting from any
• (i) deviation of Delphi’s operating instructions as printed in Delphi’s
catalog or on any packaging, labels or other literature provided with a
Product,
• (ii) installation of a Product in a manner which is inconsistent with
Delphi’s written instructions,
• (iii) alteration or modification of a Product,
• (iv) misuse,
• (v) neglect,
• (vi) abuse,
• (vii) accident,
• (viii) normal wear and tear,
• (ix) commercial use,
• (x) improper storage,
• (xi) environmental conditions, including excessive temperature or humidity,
• (xii) service by anyone other than a Delphi authorized repair facility,
• (xiii) use of the Product in conjunction with any non-Delphi branded accessory,
• (xiv) other improper application, installation or operation of this Product,
or
• (xv) defects or malfunctions of which Delphi is not advised within ten (10)
days of the expiration of the limited warranty period.
Page 37

70
Warranty
How You (the Customer) Can Get Service
To obtain warranty service during the first thirty (30) days after the date of
purchase, you must return the defective Product with the original receipt to
the original place of purchase. To obtain warranty service for all Products for
the remainder of the limited warranty period, you must contact Delphi by
phone at 1.877.GO.DELPHI (1.877.463.3574). If further clarification or additional information is required from Delphi, you may call Delphi at
1.877.GO.DELPHI (1.877.463.3574).
If warranty service is needed at any time during the warranty period, the
purchaser will be required to furnish a sales receipt/proof of purchase indicating the date of purchase, amount paid and place of purchase. Customers
who fail to provide such proof of purchase will have the Product returned to
them or be charged for the repair/replacement of any Product.
*You must remove the “Memory Card” from your SKYFi3 before returning
the product.
How Provincial Law Relates to the Warranty
Some provinces do not allow limitations on the duration of implied conditions or warranties, or the exclusion or the limitation of Economic Loss.
So the above limitations or exclusions may not apply to you. This warranty
gives you specific legal rights. You may also have other rights that may vary
from province to province.
NO PERSON IS AUTHORIZED BY DELPHI TO MODIFY OR ADD TO THIS
LIMITED WARRANTY.
Page 38

Delphi Corporation
1441 West Long Lake Road
Troy, Michigan 48098-5090
U.S.A.
Customer Service: 1.877.GO.DELPHI
www.delphi.com
SKYFi3, The XM name, Tuneselect, and related logos are
trademarks of XM Satellite Radio Inc.
©2006 Delphi Corporation. All rights reserved
DPSS-06-E-092 Version 1.2
 Loading...