

Xmotos XZ 250R, XZ 250RM, XZ 250R V4 Owner's Manual
1
OPERATING INSTRUCTION MANUAL 2011 - 2012
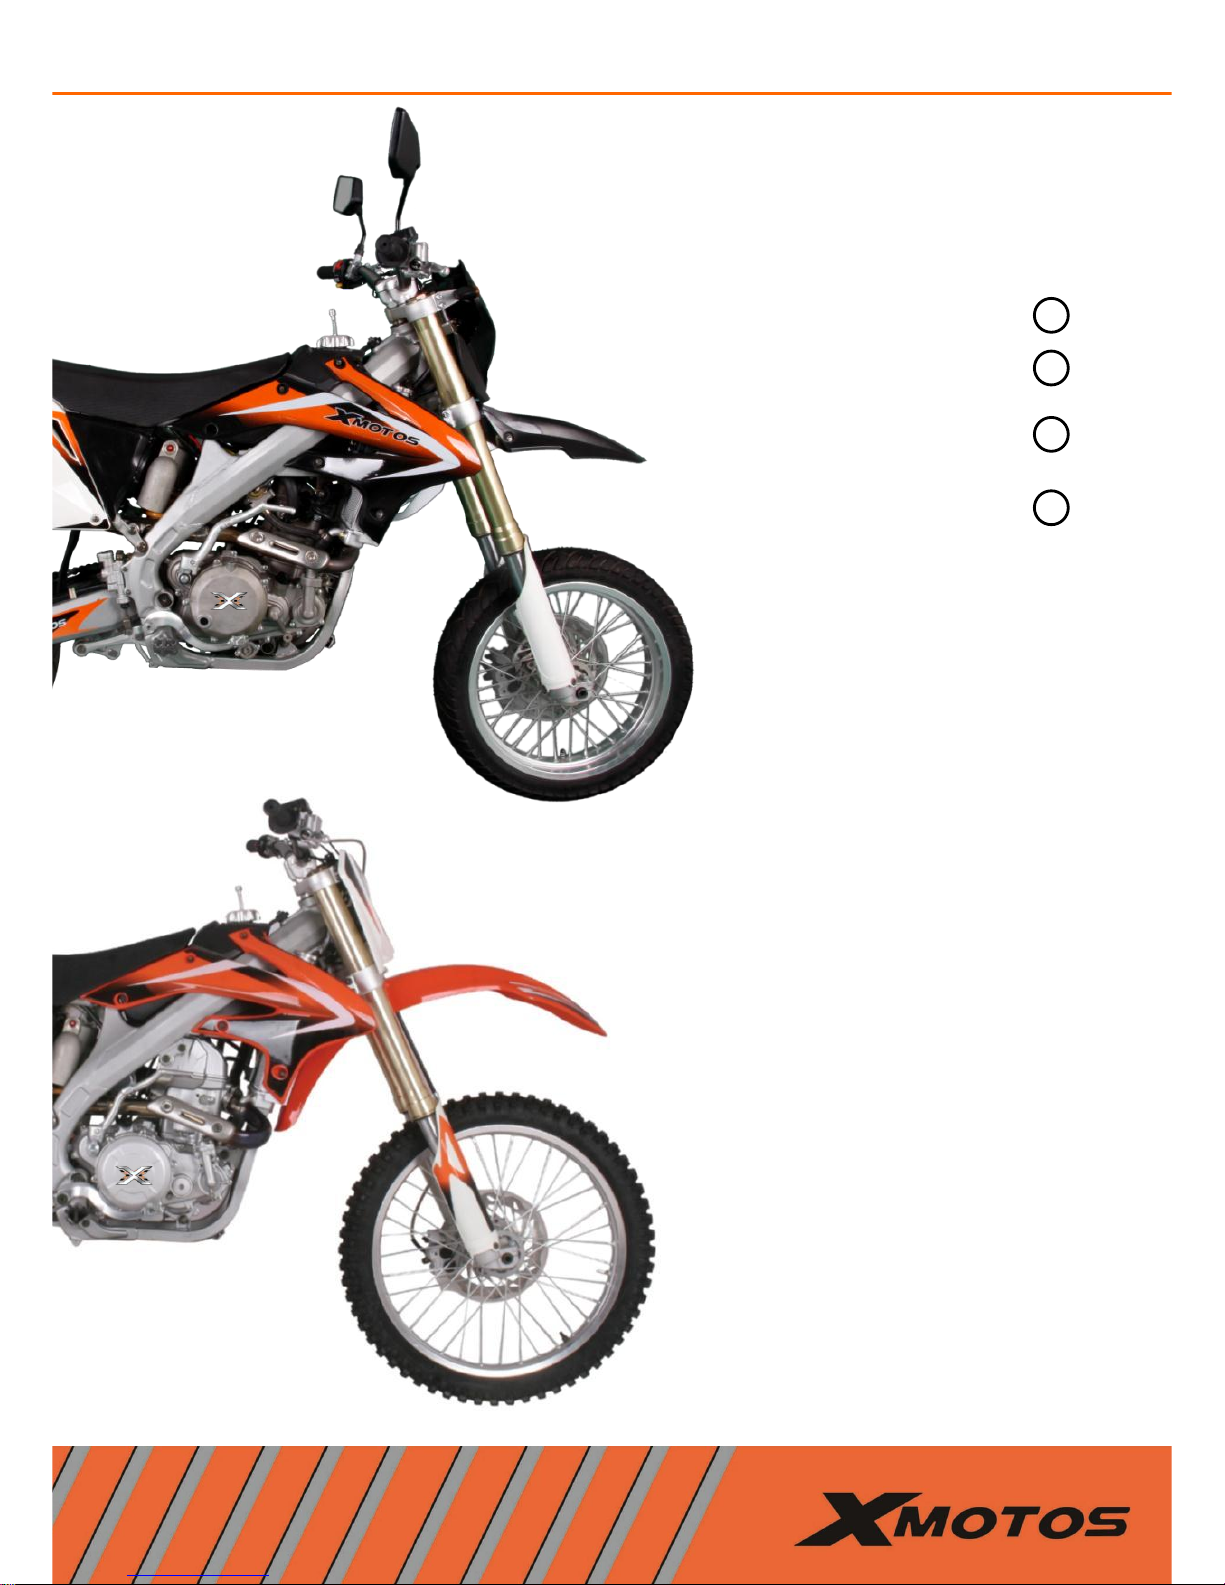
XZ 250R
OWNER’S MANUAL
XZ 250R V4
LC
ZS
MOTOCROSS
DIRT BIKE
MOTARD
XZ 250RM
VER.2 10/2011
2
XZ250R - LC / ZS
XZ250RM
XZ250R V4
Owner’s Manual
This manual should be considered a permanent part of the motorcycle and should
remain if it is resold.
This manual contains the latest product information available before printing.
XGroup Corporation reserves the right to make changes at any time without notice
and without incurring any obligation.
No part of this publication may be reproduced without written permission.
© 2010-2011 XGroup Corporation
3
Please write the serial numbers of your motorcycle in the boxes below
Chassis (VIN) Number
Engine Number
Key Number (If Available)
Dealer Stamp
XGroup Corporation reserves the right to modify any equipment, technical specifications, colors,
materials, services offered and rendered, and the like so as to adapt them to local conditions
without previous announcement and without giving reasons, or to cancel any of the above items
without substituting them with others. It shall be acceptable to stop manufacturing a certain
model without prior notice. In the event of such modifications, please ask your local Xmotos
dealer for information.
IMPORTANT
PLEASE READ THIS MANUAL CAREFULLY AND COMPLETELY BEFORE
GOING ON YOUR FIRST RIDE. IT CONTAINS A GREAT DEAL OF
INFORMATION AND ADVICE WHICH WILL HELP YOU USE AND HANDLE
YOUR BIKE PROPERLY.
CONSUMER INFORMATION FOR UNITED STATES
Tampering with noise & emissions control systems is prohibited
Owners are warned that the law prohibits:
A. The removal or rendering inoperative by any person other than for purposes of maintenance,
repair or replacement, of any device or element of design incorporated into any new vehicle
for the purpose of noise and/or emissions control prior to its sale or delivery to the ultimate
purchaser or while it is in use; and
B. The use of the vehicle after such devise or element of design has been removed or rendered
inoperative by any person.
4
WHAT IS COVERED: XGroup Corporation warrants that this product is free of defects in material and workmanship
for a period of 6 months from the date of purchase, except as limited below. Warranty service and replacement
parts are warranted only for the duration of the warranty on the original product. The warranty coverage is for the
following:
Engine and drive train – 6 Months
Front suspension – 6 Months
Rear suspension – 6 Months
Frame and swing-arm – 1 Year
WHAT IS NOT COVERED: This warranty does not cover any conditions caused by misuse, neglect, negligence,
accident operation in any way contrary to the operating instructions in the owner’s manual, normal wear, alteration,
modification, improper or inadequate maintenance, use of unauthorized replacement parts, or service provided by
anyone other than an authorized Xmotos service center and/or dealer. This warranty does not cover transportation
costs for warranty service. Without limiting the above, this warranty is Voided with respect to any product that has
been used for rental or commercial purposes or that sustained the following damage:
Bent or broken frame or swing-arm due to abuse
Bent or broken wheels due to abuse
Bent or broken plastic shrouds due to abuse
Any sign of impact, accident, spin-outs or roll over not caused by the condition for which the warranty
coverage is sought.
TO GET SERVICE: Contact your nearest Xmotos service center and/or dealer. The cost of transportation of the
product to and from the service center and/or dealer must be paid by the owner.
Xmotos obligation under this warranty is strictly and exclusively limited to the repair or replacement of defective
parts and Xmotos does not assume or authorize anyone to assume for them any other obligation. No service center
and/or dealer is authorized to modify this warranty.
All implied warranties are limited in duration to the stated warranty period, and are hereby expressly disclaimed in
their entirety after the expiration of the stated 6 month warranty period.
LIMITED WARRANTY
5
IMPORTANT WARRANTY INFORMATION
INTRODUCTION
IMPORTANT SAFETY INFORMATION
SAFETY INFORMATION FOR PARENTS
SAFETY LABEL INFORMATION
COMPONENT LOCATIONS
SERIAL NUMBER LOCATIONS
HANDLE BAR LEVER CONTROLS
OPERATING CONTROLS
GUAGES, INDICATORS & DISPLAY
BEFORE RIDING
PROTECTIVE GEAR & APPAREL
IS THE MOTORCYCLE READY TO RIDE
PRE-RIDE INSPECTION
BASIC OPERATION & RIDING
BREAK-IN PERIOD
SAFE RIDE PRECAUTIONS
ENGINE STARTING PROCEDURE
FLOODED ENGINE
STOPPING THE ENGINE
SHIFTING GEARS
BRAKING TECHNIQUE
PARKING & POST RIDE INSPECTION
MAINTAINING YOUR DIRT BIKE
IMPORTANT SAFETY PRECAUTIONS
MAINTENANCE SCHEDULE
BASIC MAINTENANCE PRECEDURES
FUEL, GASOLINE
REFUELING & INSPECTION
COOLING SYSTEM
ENGINE OIL
CHECKING & ADDING OIL
CHANGING OIL & FILTER
CHANGING AIR FILTER
THROTTLE SYSTEM
ENGINE IDLE SPEED
CLUTCH SYSTEM
SPARK PLUG
BRAKING SYSTEM
BRAKE LEVER ADJUSTMENT
BRAKE FLUID CHECK
ADDING BRAKE FLUID
BRAKE PADS
BRAKE SYSTEM BLEEDING
SUSPENSION SYSTEM
FRONT SUSPENSION INSPECTION
FRONT SUSPENSION ADJUSTMENT
REAR SUSPENSION INSPECTION
REAR SUSPENSION ADJUSTMENT
RIMS, TIRES & SPOKES
TIRE AIR PRESSURE
TIRE INSPECTION
TIRE AND TUBE REPLACEMENT
NEW TIRE BREAK-IN PERIOD
DRIVE CHAIN SYSTEM
DRIVE CHAIN INSPECTION
DRIVE SPROCKET INSPECTION
CHAIN ROLLER INSPECTION
CHAIN SLIDER INSPECTION
CHAIN ADJUSTMENT
CHAIN LUBRICATION
CHAIN REMOVAL & REPLACEMENT
TROUBLESHOOTING
RESOLVING THE UNEXPECTED
TORQUE SPECIFICATIONS
SPECIFICATIONS
WIRING SCHEMATICS
MAINTENANCE RECORDS
NOTES
48 - 51
48
48 - 49
49
50, 51
52 - 54
52
53
53
54
54 - 58
54
55
55
56
57
57
58
59 -63
64, 65
66 - 70
71, 72
73 - 75
76
77, 78
04
06
07, 08
09
10, 11
12 - 15
16
17
17 - 21
22
23
23
24
24
25 - 27
25
25
26
27
27
28
29
29
30
30
31 - 33
34 - 58
34
34
35
36
36, 37
38
39
40
41
42, 43
44
45 - 47
45
45
46
47
47
CONTENTS

6
Congratulations on choosing your Xmotos motorcycle.
Your Xmotos motorcycle was designed as a recreational motorcycle for off-road use only by
a single rider. This motorcycle is ideal for riders with basic experience. (Off-Road)
Your Xmotos motorcycle was designed as an on road motorcycle and to be used only by a
single rider. (On-Road)
This manual has information regarding four (4) different types of models. Please read
and understand each section before riding and/or performing maintenance. Each
section and/or picture will have information about the type of model that you have with
a model number or name as LC/ZS/RM/V4. You must be certain that you are following
the instruction(s) and/or information pertaining to the particular model that you own.
Before riding, take plenty of time to get acquainted with your motorcycle and how it works.
To protect your investment, we urge you to keep your motorcycle well maintained. In
addition to regular maintenance, it is just as important to observe and perform all pre-ride
and periodic checks detailed in this manual. We also recommend that you read this manual
before you begin riding. In this manual you will find safety information, facts, instructions,
helpful tips and illustrations. To make it easy to use, the manual contains a table of contents
at the beginning of the manual.
As you read through this manual, you will find information that is preceded by a
symbol. This information is intended to help you avoid damage to your motorcycle and/or
property around you. This manual covers basic maintenance procedures. A detailed parts
diagram manual is available and it can be purchased separately from Xmotos. The parts
manual will be helpful to those with the mechanical skills and tools required to service their
own motorcycle.
Whenever you ride, tread lightly. By staying on established trails and riding in approved areas,
you will help protect the environment and keep off-road riding areas open for future use. (OffRoad)
If you have any questions or you need any special service or repair, remember that your Xmotos
dealer knows your motorcycle best and will be dedicated to your complete satisfaction.
Replacement parts and technical support can be obtained through your Xmotos dealer. Please be
sure to register your motorcycle with Xmotos and report any address changes so that we may
contact you in the future concerning important product information.
INTRODUCTION
7
Your personal safety, and the safety of those around you, is extremely important. Operating this motorcycle
safely is an important responsibility. XGroup Corporation has provided operating procedures and other
information on labels and in this manual to help you make informed decisions about safety. This
information will alert you to potential hazards that could harm you or others.
It is understood that it is not practical or possible to warn you about all possible hazards associated with
operating and maintaining a motorcycle. You must use your own good judgment.
Safety information will come in a variety of different forms, including:
Safety Labels on the Motorcycle.
Safety Messages preceded by a safety symbol and one of these signal words:
Below are the definitions of these three words:
You WILL be KILLED or SERIOUSLY INJURED if you do not follow instructions.
You CAN be KILLED or SERIOUSLY INJURED if you do not follow instructions.
You CAN be INJURED if you do not follow instructions.
Safety Headings such as important safety reminders and/or precautions.
Safety Section such as motorcycle safety.
Instructions how to use the motorcycle safely and correctly.
This entire manual is filled with important safety information - please read it carefully.
IMPORTANT SAFETY INFORMATION
8
A motorcycle can provide many years of service and pleasure, provided you take responsibility for safety,
properly maintain your motorcycle and understand the challenges you may encounter while riding.
Listed below are some of the most important safety measures one should take when riding.
Never Ride Without a Helmet. The following statement is a proven fact: ``Helmets
significantly reduce the number and severity of head injuries.” Never ride your motorcycle without a helmet.
Even a crash at slow speed can result in a fatal head injury if you are not wearing a helmet. Xmotos strongly
recommends wearing helmets that have been certified for safety by helmet testing organizations that are
independent from the helmet manufacturer. We also recommend that you wear eye protection, boots, gloves,
and other protective gear such as riding pants.
Never Carry a Passenger. This motorcycle has been designed for ONE rider only. There are
no passenger pegs, footrests, handles or seat room for a passenger. Riding with a passenger can interfere
with your ability to operate and/or control the motorcycle and may result in serious injury or death.
Ride Off-Road Only. This motorcycle has been designed and manufactured for off-road use
only. The motorcycle is not equipped with lights, turn signals, horn and other features required to drive a
motorcycle on public roads. The tires are not designed for pavement and will make the motorcycle unstable
if it is ridden on pavement. If you have to cross a paved road, dismount and walk the motorcycle across the
road.
Ride Within Your Limits. Never attempt to ride your motorcycle in a manner that is beyond
your skill level. It takes time to learn riding skills. Learn to ride your motorcycle step by step. Start by
practicing in safe areas at slow speeds and gradually build your skill level. Instruction from an experienced
rider(s) is highly recommended. Remember that alcohol, drug use, fatigue and ignorance can reduce your
ability to make good decisions and ride safely.
Be Alert for Hazards. The terrain or road in which you ride can present many hazards.
Always “scan” the terrain or road ahead of you continually. Watch for un-expected turns, drop-offs, ditches,
rocks and other hazards. Always maintain a speed slow enough to allow you enough time to see and react to
hazards.
Do Not Drink and Ride. Even one drink can impair your ability to ride a motorcycle safely.
Each drink afterward will make the impairment worse. Do not drink and ride. Do not let your friend‟s drink
and ride. Remember, in most states throughout the United States, you can be arrested and charged with
Driving Under the Influence (DUI) if you are riding a motorcycle while intoxicated. This applies to off-road
motorcycles as well.
IMPORTANT SAFETY INFORMATION

9
As a parent, your child‟s safety is your first priority. Riding an off-road motorcycle is very fun. However,
just like riding a bicycle, bad decisions can result in injury. As a parent, you can greatly prevent
accidents by making informed decisions about if, when and how your child will ride. Always supervise
your child when he/she is riding.
Before you allow your child to ride, you need to decide if he/she is capable of riding. Riding readiness
can vary tremendously from one person to another. Age and size are not being the only factors that help
determine one‟s riding readiness. There are three other factors that you should also consider before
deciding if your child is ready to ride.
First, consider the physical ability of your child. Riders must be able to hold the motorcycle up, get on,
and sit comfortably with both feet on the ground. The rider must also be able to reach all of the controls
on the handlebars and work the brakes and clutch. Second, consider your child‟s athletic ability. Your
child should be good at riding a bicycle before riding a motorcycle. Determine if your child can judge
speeds and distances while riding a bicycle and react with the proper hand and foot actions. Any person
who does not have good coordination, balance, and agility should not ride this motorcycle.
Finally, determine your child‟s level of mental maturity. It is imperative that you are honest with
yourself when you ask yourself the following questions: Does your child think through problems and
come to logical conclusions? Does your child obey your rules when they ride their bicycle? If your child
makes bad judgments, takes un-warranted risks and/or does not obey your rules, they should not ride this
motorcycle.
If you have decided that your child is ready to ride, please remember the following points and never let
your child ride without a helmet. It is up to you (parent) to ensure your child‟s safety, even if they learn
to ride from another experienced adult. Never push your child to try things faster than they are willing or
capable. Always supervise your child when they are riding and regularly remind them about safety rules.
As a parent it is your responsibility to be sure that the motorcycle is properly maintained and kept in safe
operating condition.
Modifying this motorcycle or using parts not manufactured by Xmotos can make your motorcycle
unsafe. Before you consider making any modifications or adding an accessory, please read the following
information carefully.
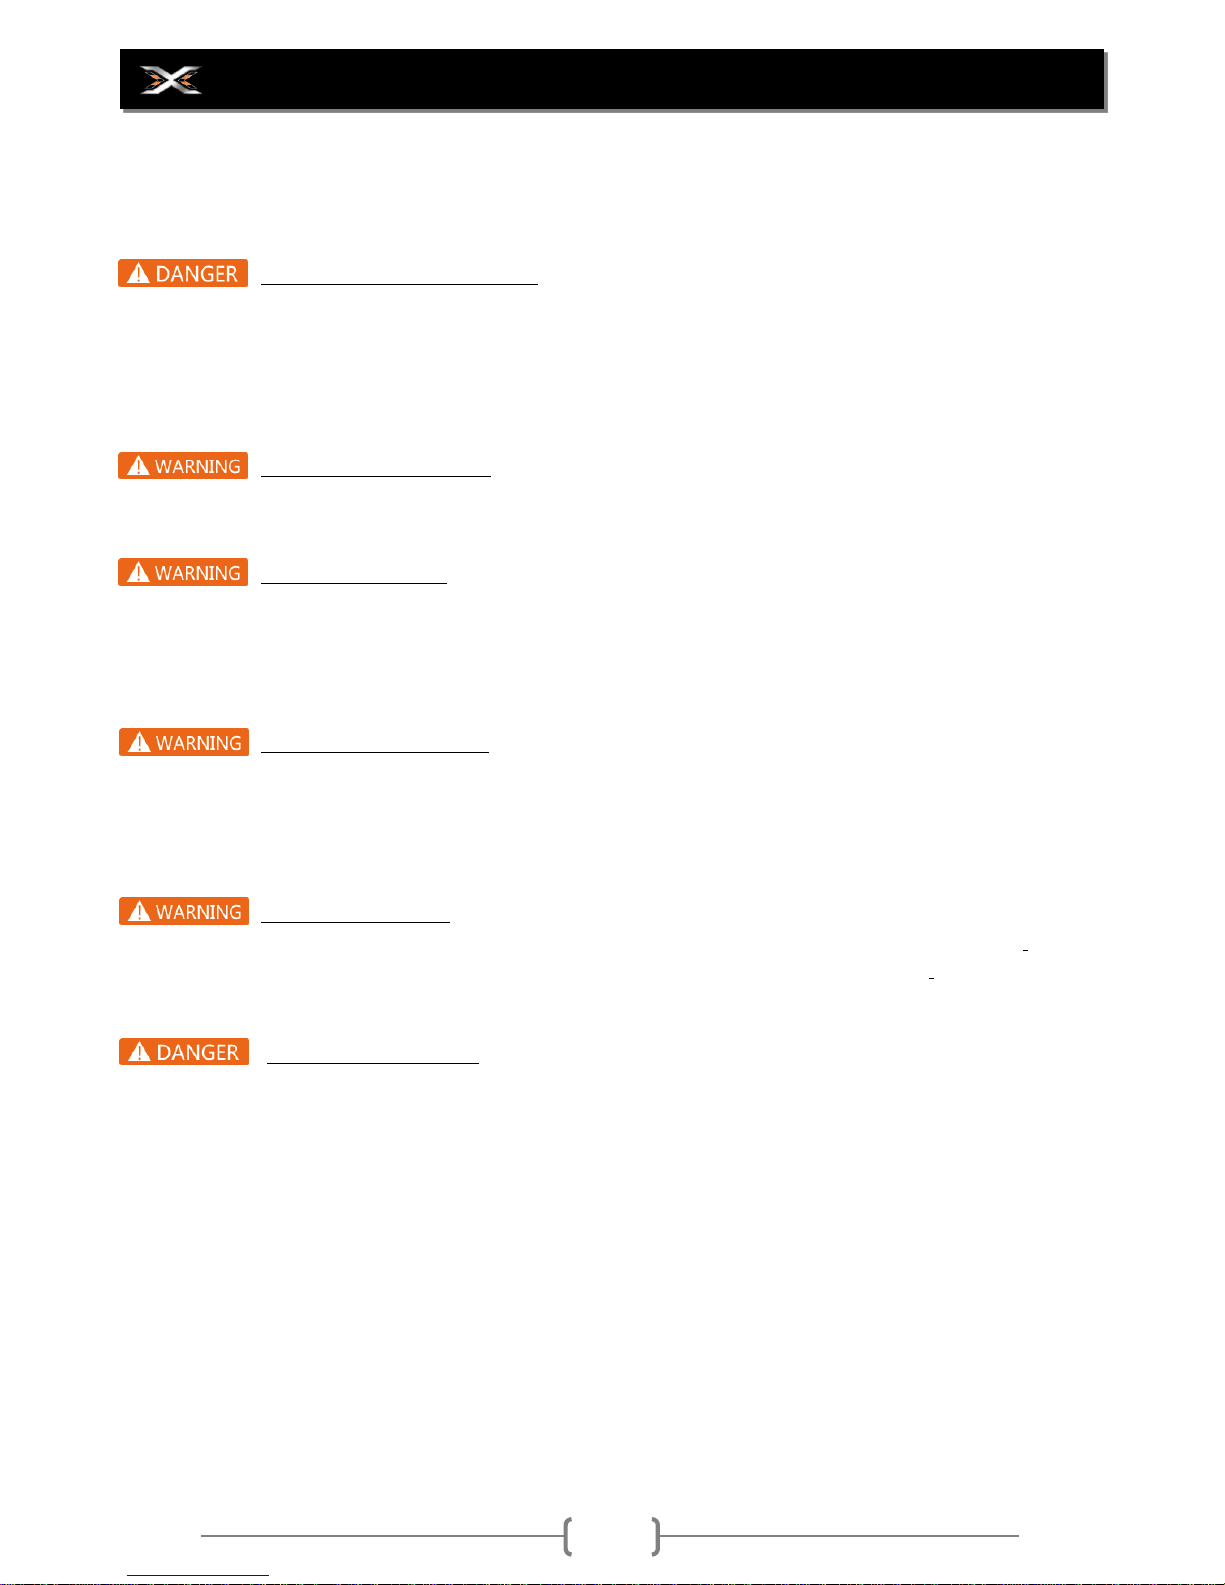
Improper accessories or modifications can cause a crash in which you can be seriously
hurt or killed. Follow all instructions in this owner‟s manual regarding and accessories.
Xmotos strongly recommends that you do not remove any original equipment or modify your
motorcycle in any way that may alter the design and/or operation. Such a change could drastically
impair the stability, handling, acceleration, and braking capabilities of the motorcycle and cause a crash.
We also strongly suggest that you do not make any modifications to the exhaust system, noise control
system or emission control components.
IMPORTANT SAFETY INFORMATION FOR PARENTS
10
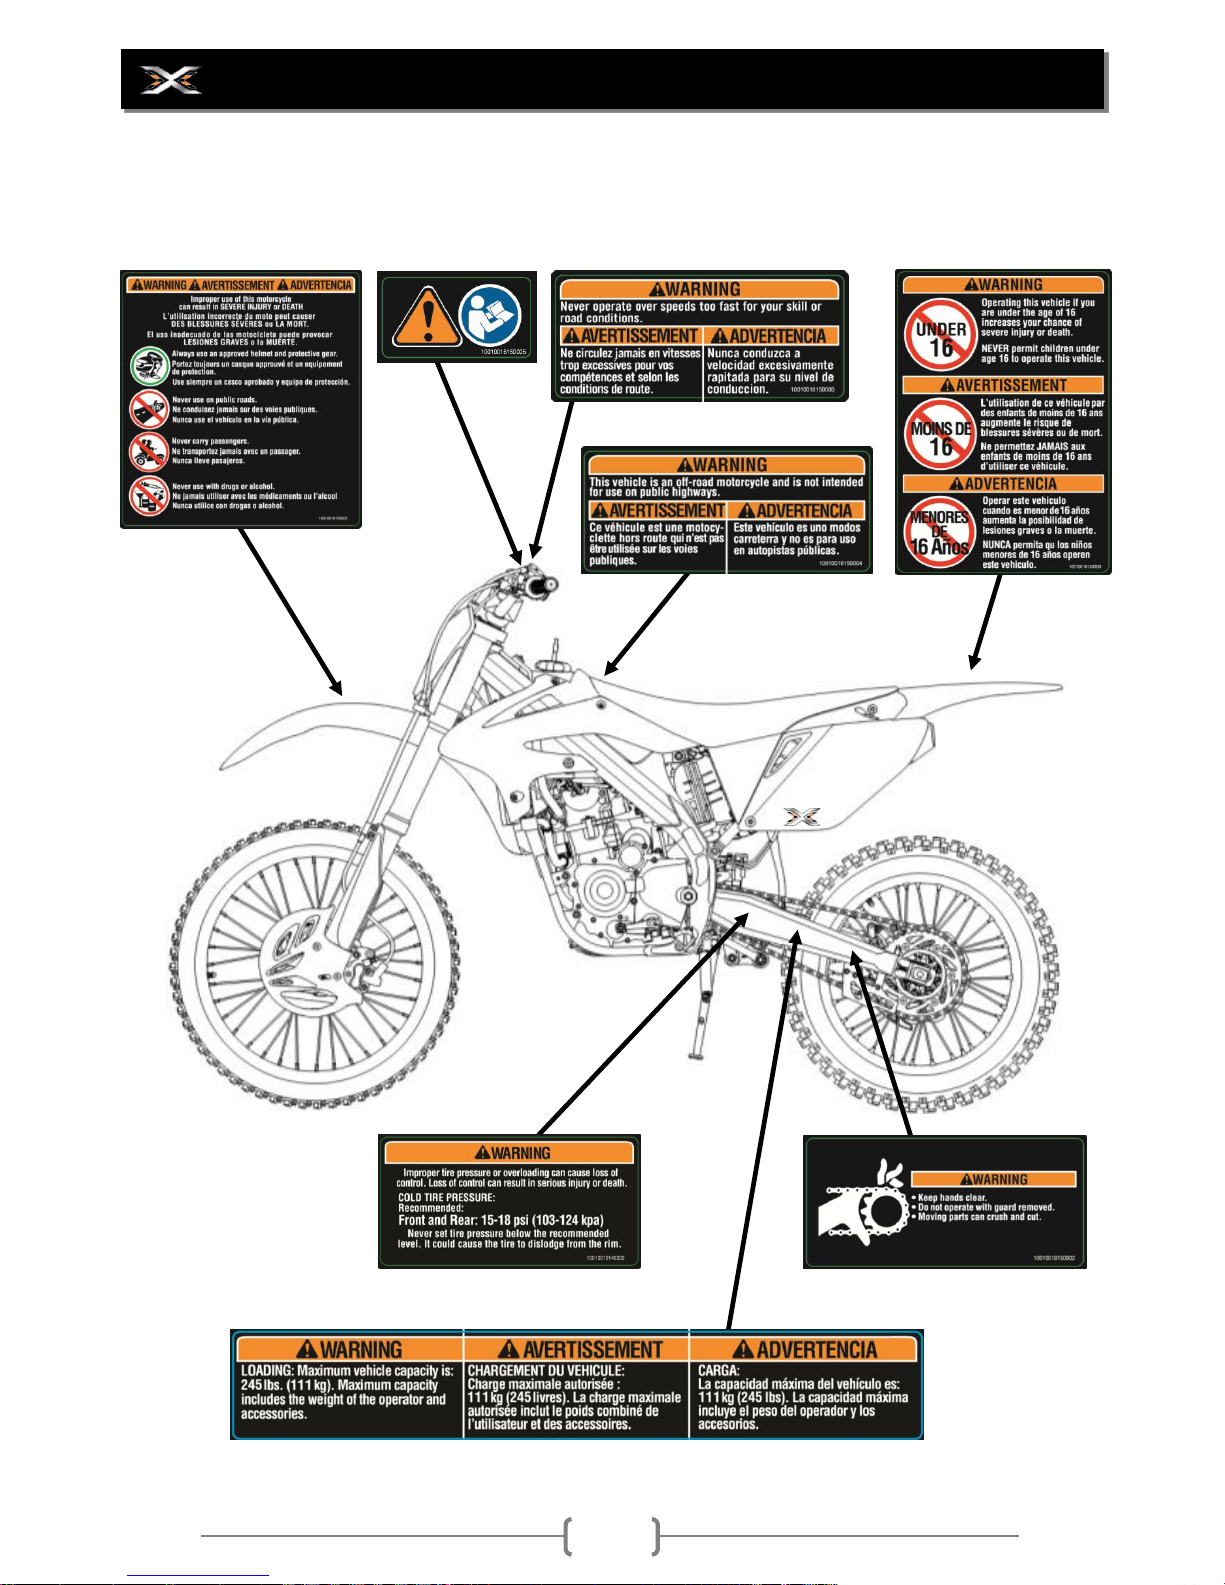
This page will show you where to find the safety labels on your motorcycle. You will find that some
labels warn you of potential hazards. Others will provide important safety and maintenance information.
Please read them carefully and do not remove them. If your label wears off from riding or becomes hard
to read, contact your Xmotos dealer for a replacement.
SAFETY LABEL INFORMATION (LC / ZS / V4)

11
This page will show you where to find the safety labels on your motorcycle. You will find that some
labels warn you of potential hazards. Others will provide important safety and maintenance information.
Please read them carefully and do not remove them. If your label wears off from riding or becomes hard
to read, contact your Xmotos dealer for a replacement.
SAFETY LABEL INFORMATION (RM)
12
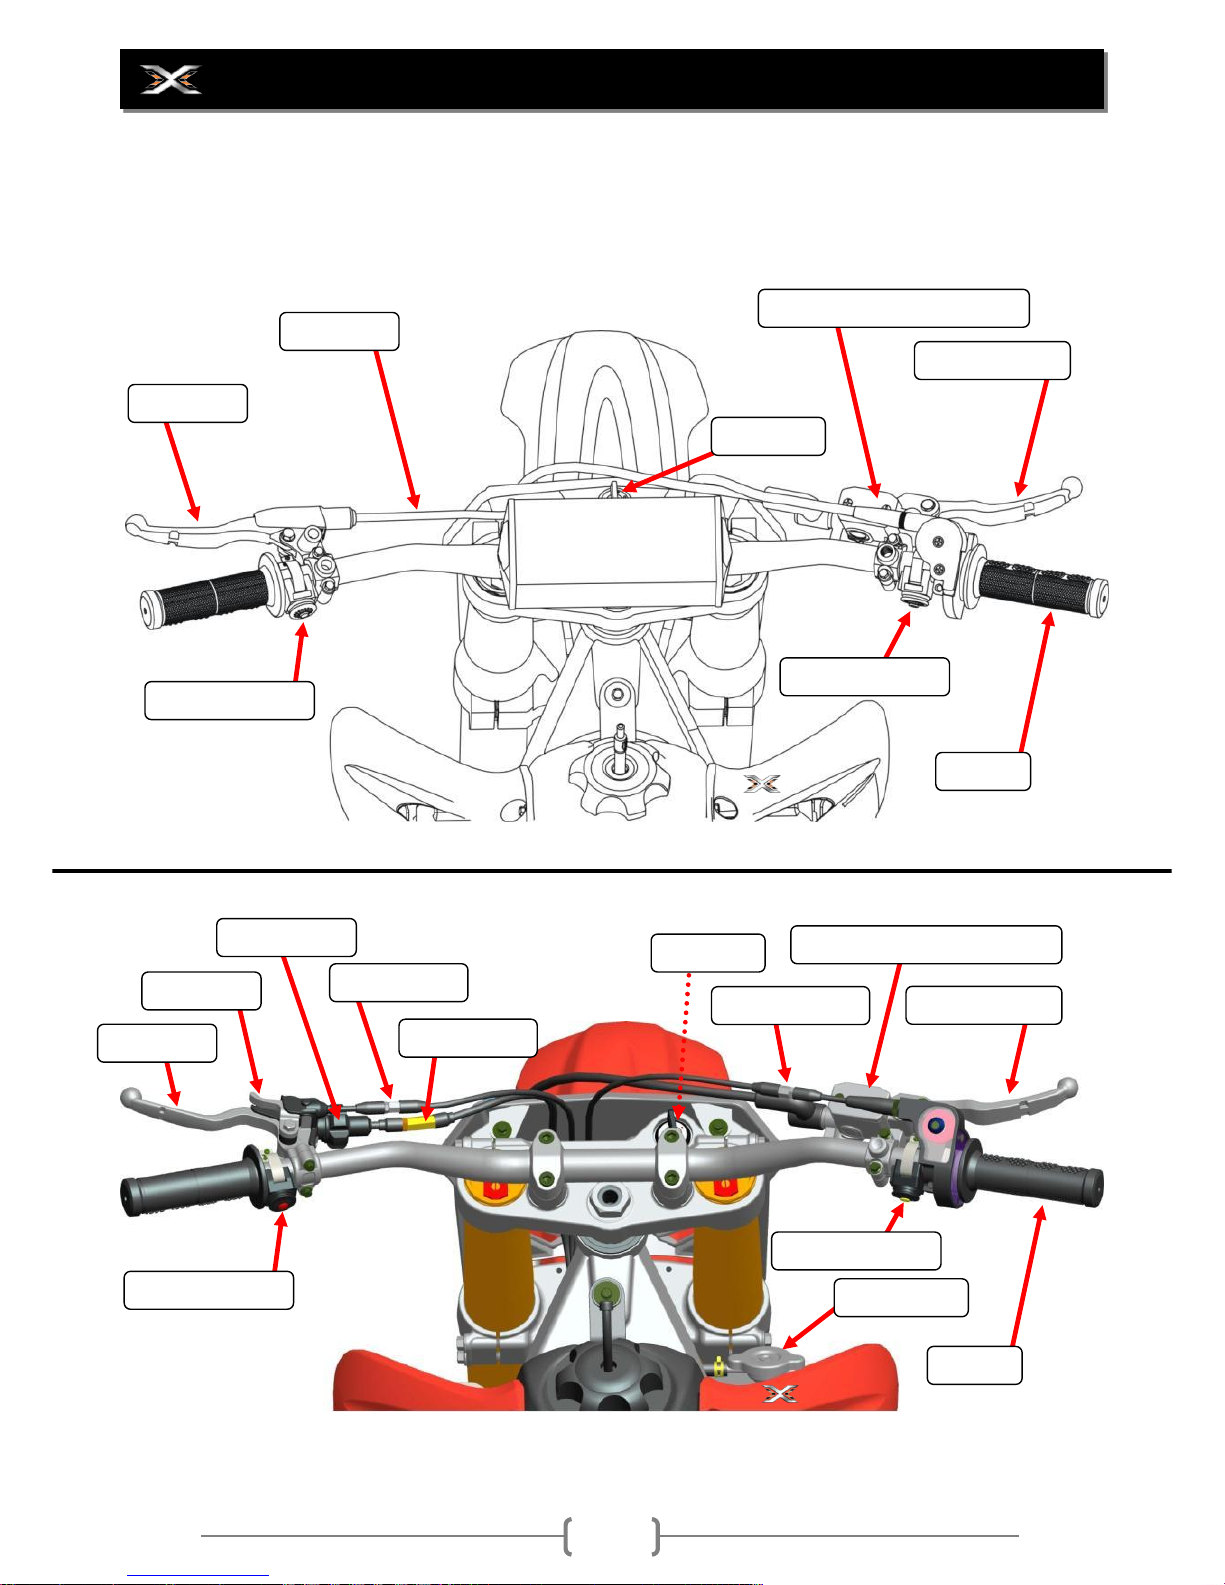
When you ride a motorcycle off-road, you need to be able to operate the throttle, clutch, brakes, and other
controls without stopping to look at them. Please read this section carefully before you ride your motorcycle.
This section of the manual will show the location and operation of all the basic controls of your motorcycle.
COMPONENT LOCATIONS
Engine Stop Switch
Engine Start Switch
Front Master Cylinder & Reservoir
Front Brake Lever
Throttle
Clutch Cable
Clutch Lever
Engine Start Switch
Front Master Cylinder & Reservoir
Front Brake Lever
Throttle
Engine Stop Switch
Choke Lever
Clutch Lever
Clutch Adjuster
Choke Adjuster
Clutch Adjuster
Throttle Adjuster
Ignition Key
Ignition Key
Radiator Cap
LC / ZS Models
V4 Model

13
When you ride a motorcycle on-road, you need to be able to operate the throttle, clutch, brakes, and other
controls without stopping to look at them. Please read this section carefully before you ride your motorcycle.
This section of the manual will show the location and operation of all the basic controls of your motorcycle.
COMPONENT LOCATIONS (RM)
Engine Stop Switch
Engine Start Switch
Front Brake Lever
(Not Visible)
Throttle
Clutch Lever
Horn
Turn Indicator Switch
Ignition Key
(Not Visible)
14
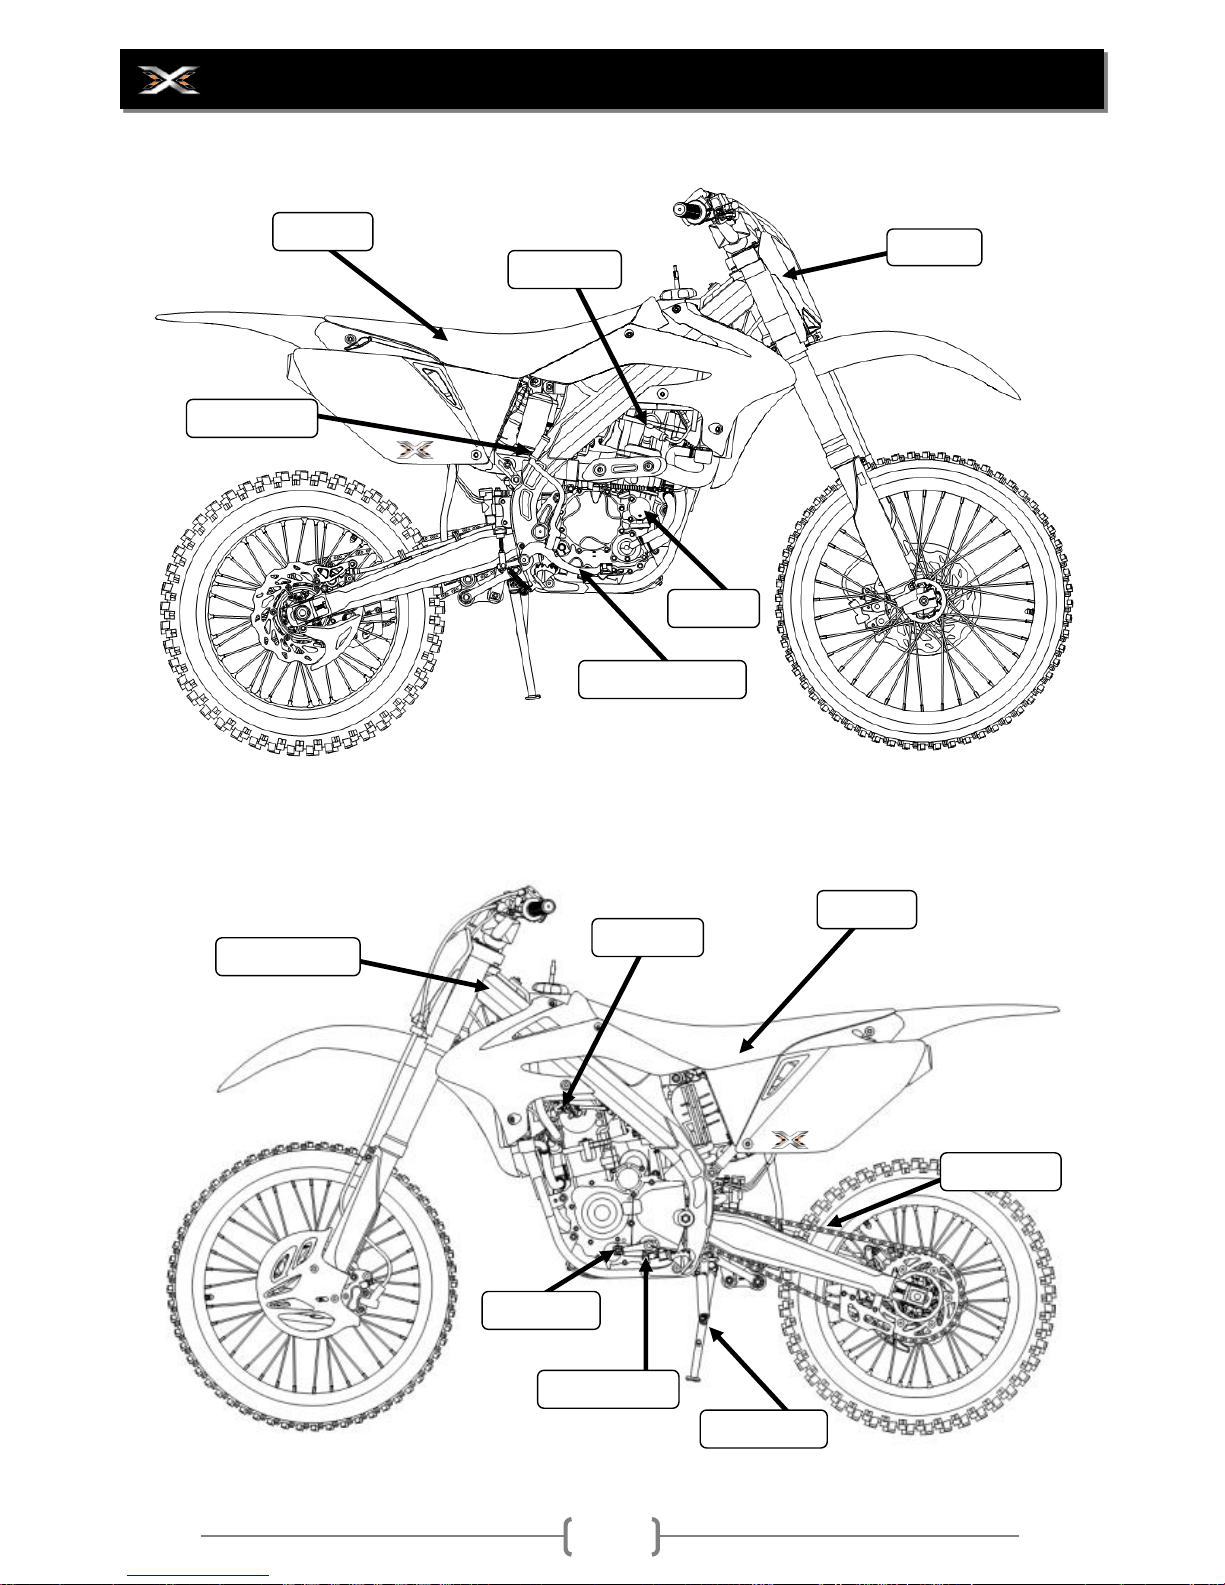
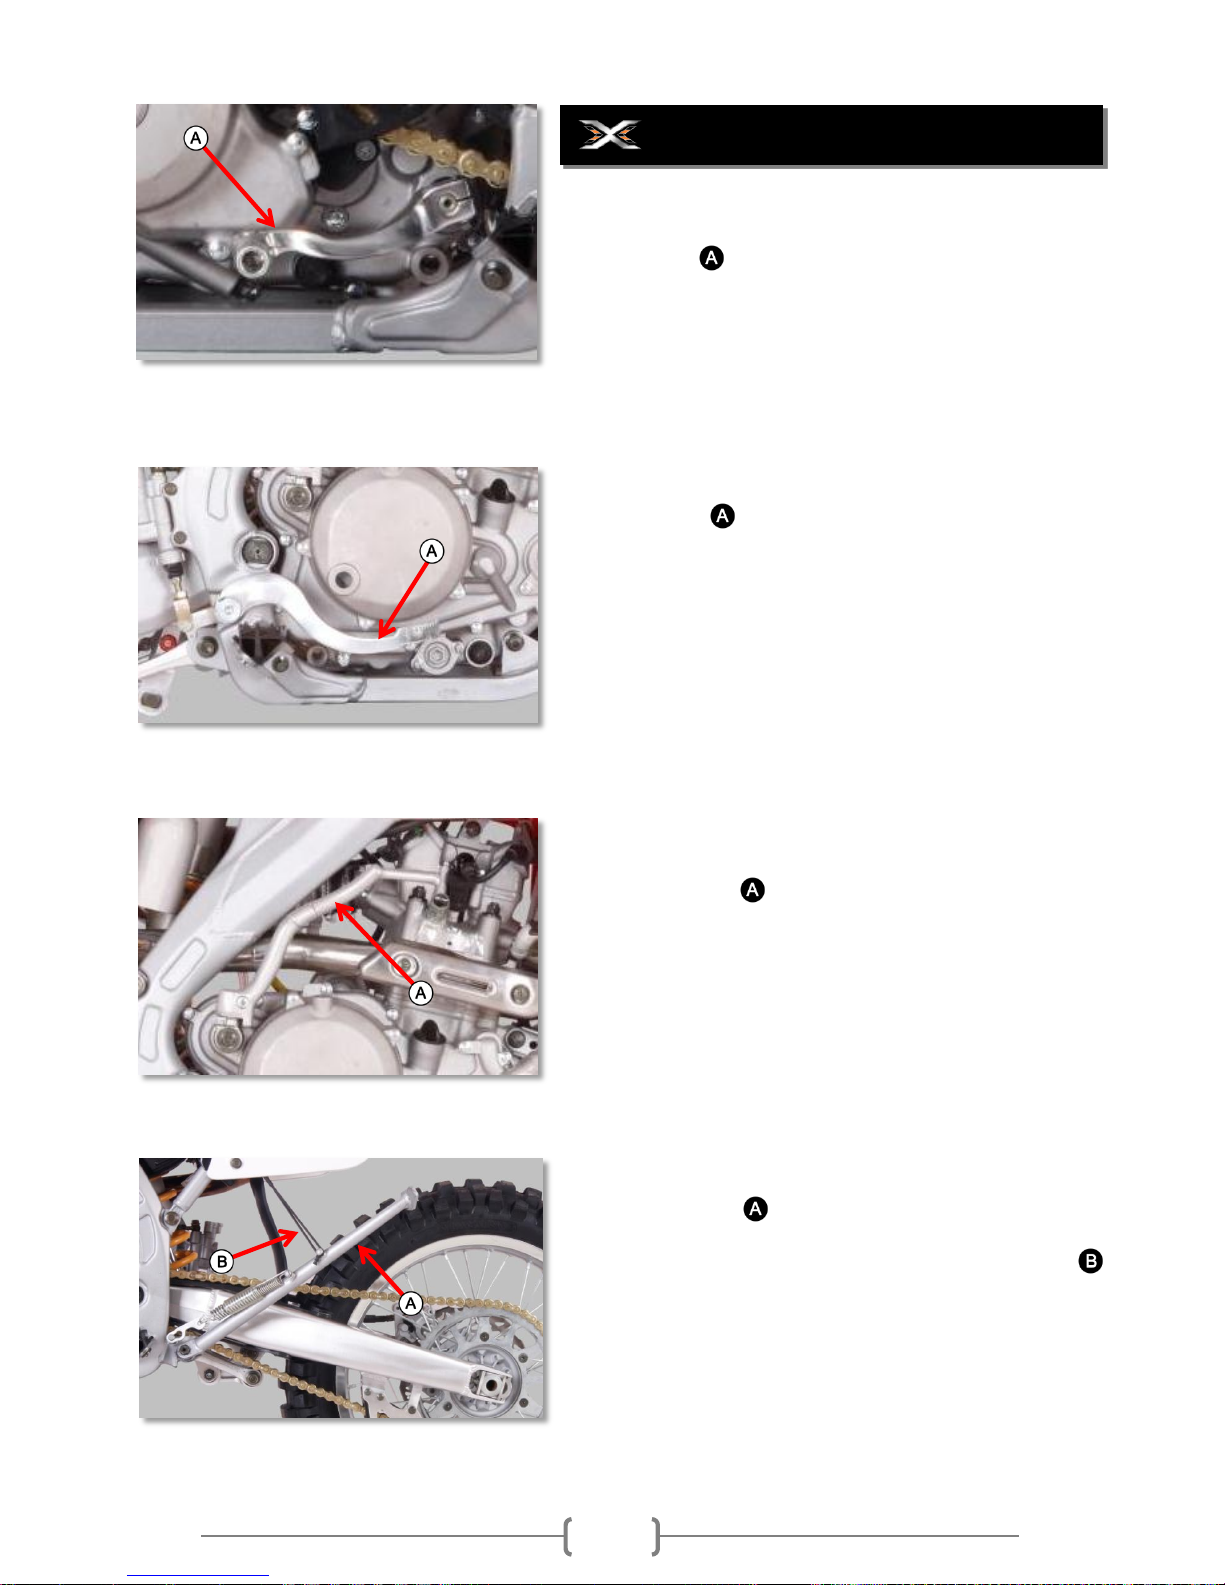
COMPONENT LOCATIONS (OFF-ROAD)
Rear Brake Pedal
Spark Plug
Oil Filter
Kick Starter
Battery
Drive Chain
Fuel Valve
Air Filter
Shift Lever
Engine Number
Chassis Number
Side Stand
CDI Box
15
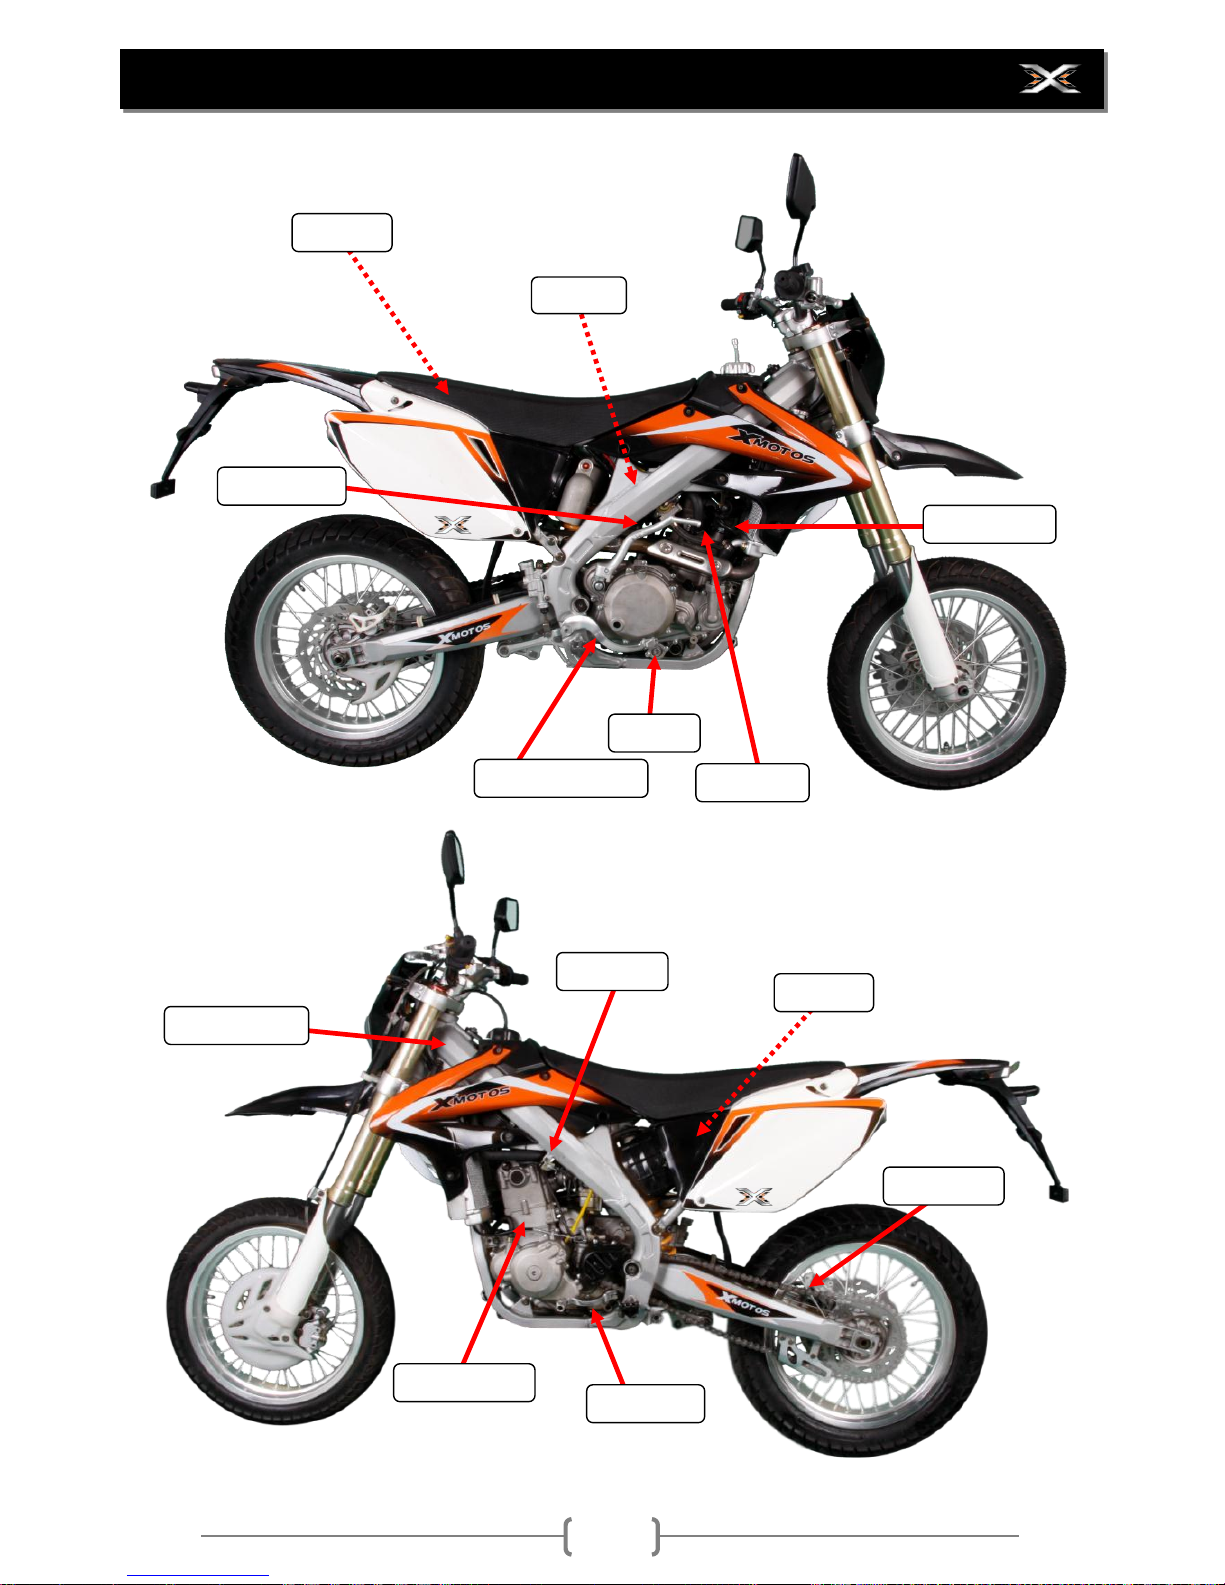
COMPONENT LOCATIONS (ON-ROAD)
Rear Brake Pedal
Oil Filter
Kick Starter
Battery
Drive Chain
Fuel Valve
Air Filter
Shift Lever
Engine Number
Chassis Number
CDI Box
Spark Plug
Ignition Coil
16
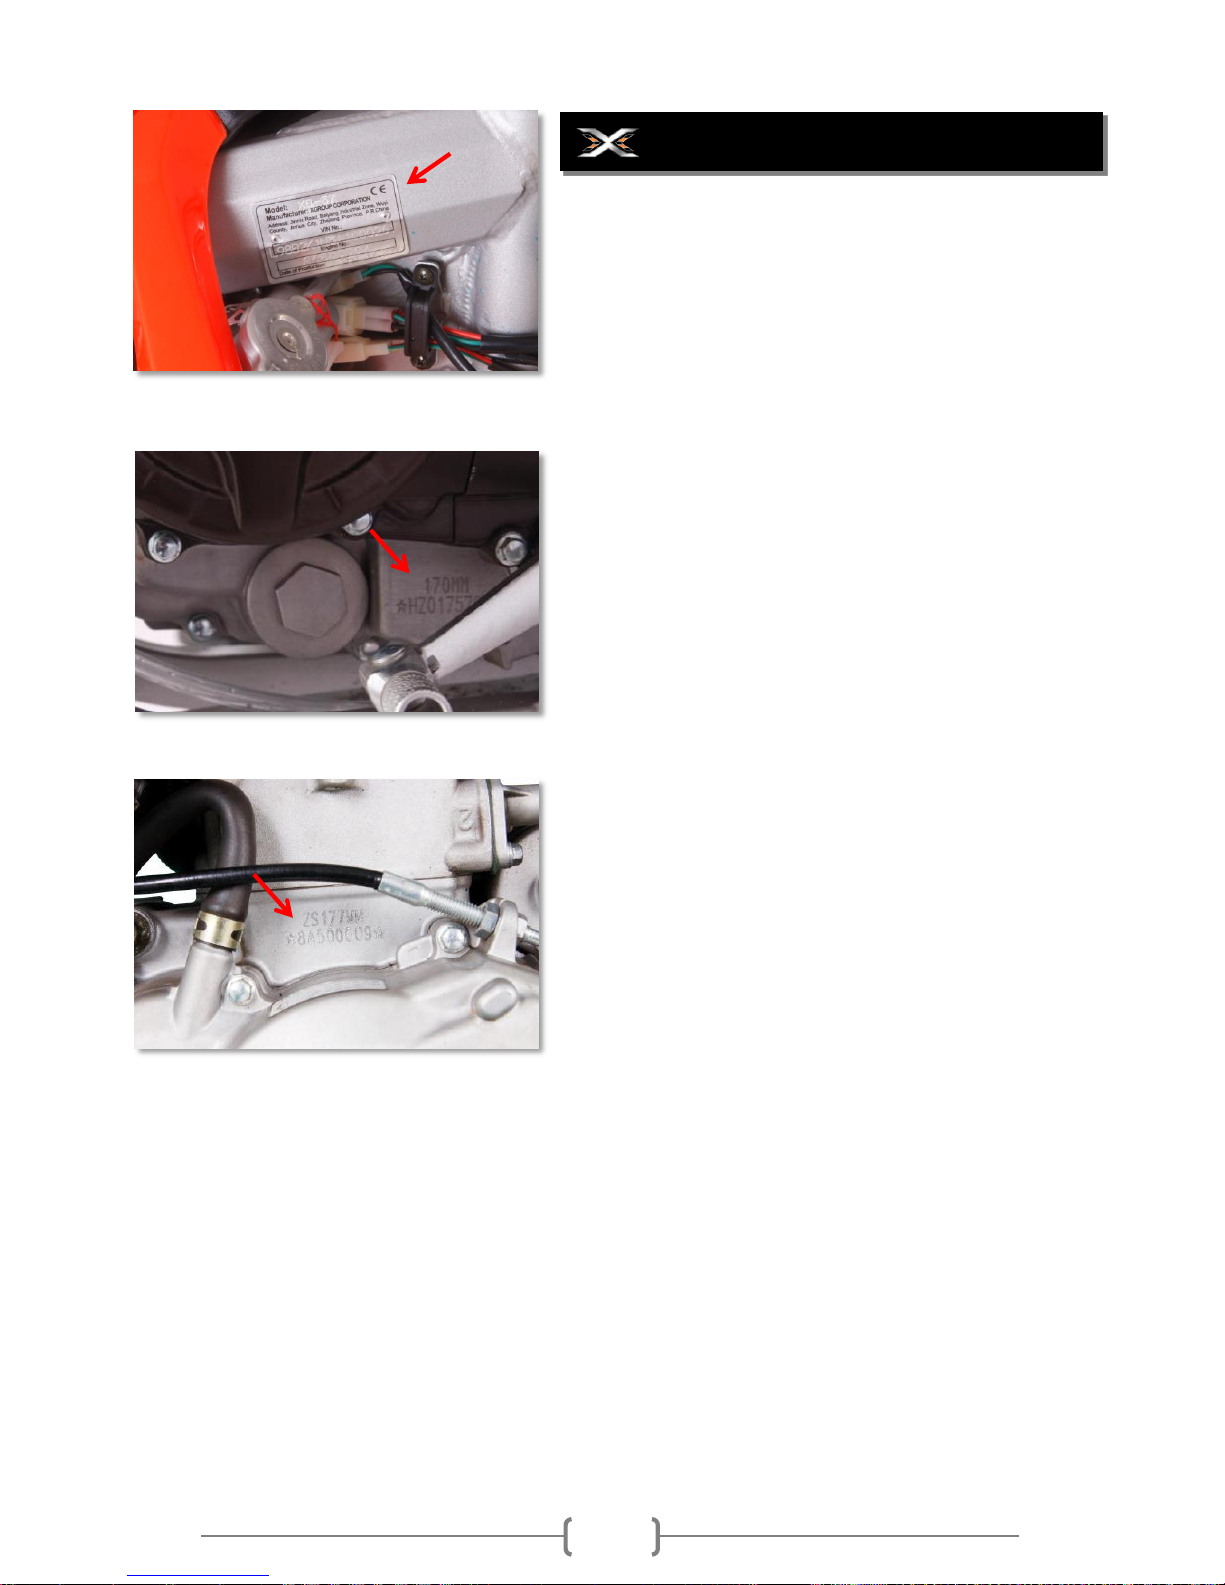
VIN – Chassis Number
The VIN number is located in one of three places on the
chassis.
1. Right Side of frame.
2. Left side of frame.
3. Steering head tube.
Write this number in the VIN box on page 3.
Engine Model & Serial Number
The engine model number and serial number is stamped
on the left side of the engine under the countershaft
sprocket.
Write this number is the Engine Number box on page 3.
SERIAL NUMBER LOCATIONS
LC / ZS
V4 / RM SERIES
17
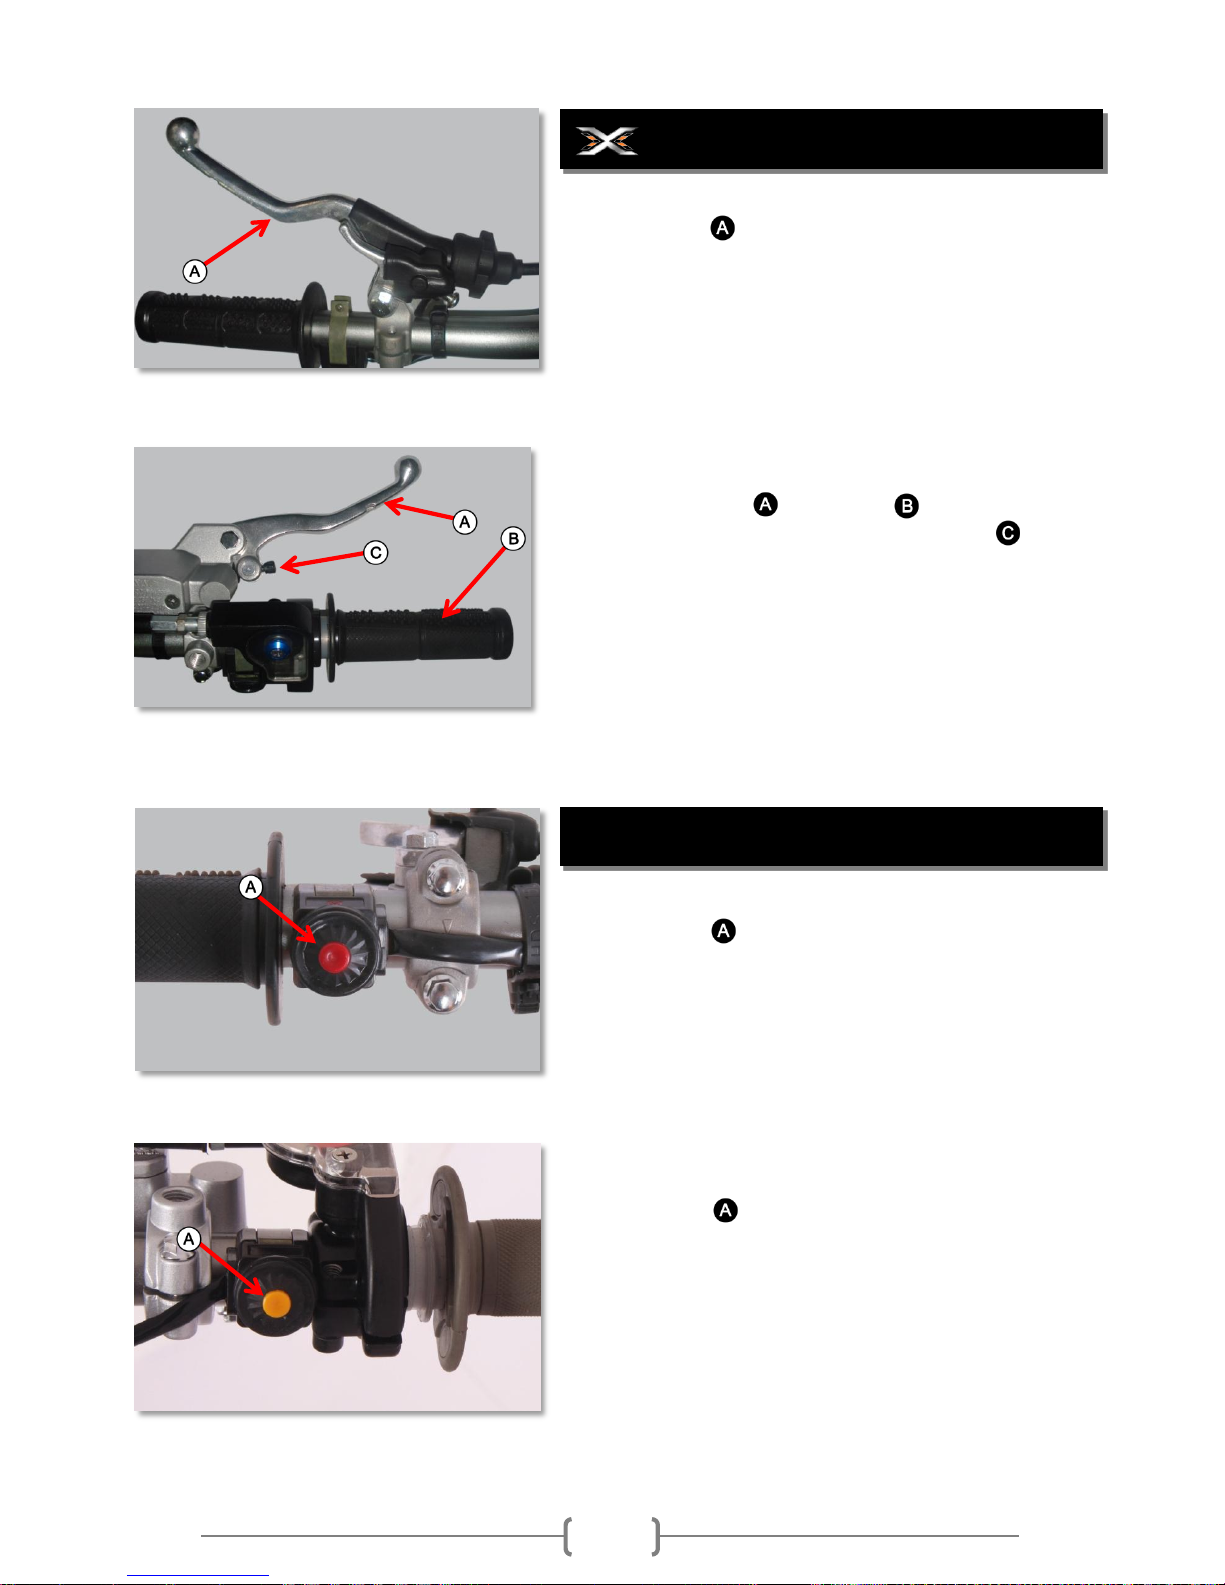
Clutch Lever
The clutch lever is located on the left side of the
handlebar.
Hand Brake Lever & Throttle
The hand brake lever and throttle is mounted on the
right side of the handlebar. The adjusting screw can be
used to change the basic position of the brake lever.
Stop Switch
The stop switch turns off the engine. When this button
is pressed, the ignition circuit is turned off.
Start Switch
The start switch turns on the engine. When this button
is pressed, the engine will start. Once started, release the
button.
HANDLEBAR LEVER CONTROLS
OPERATING CONTROLS (OFF-ROAD)
18
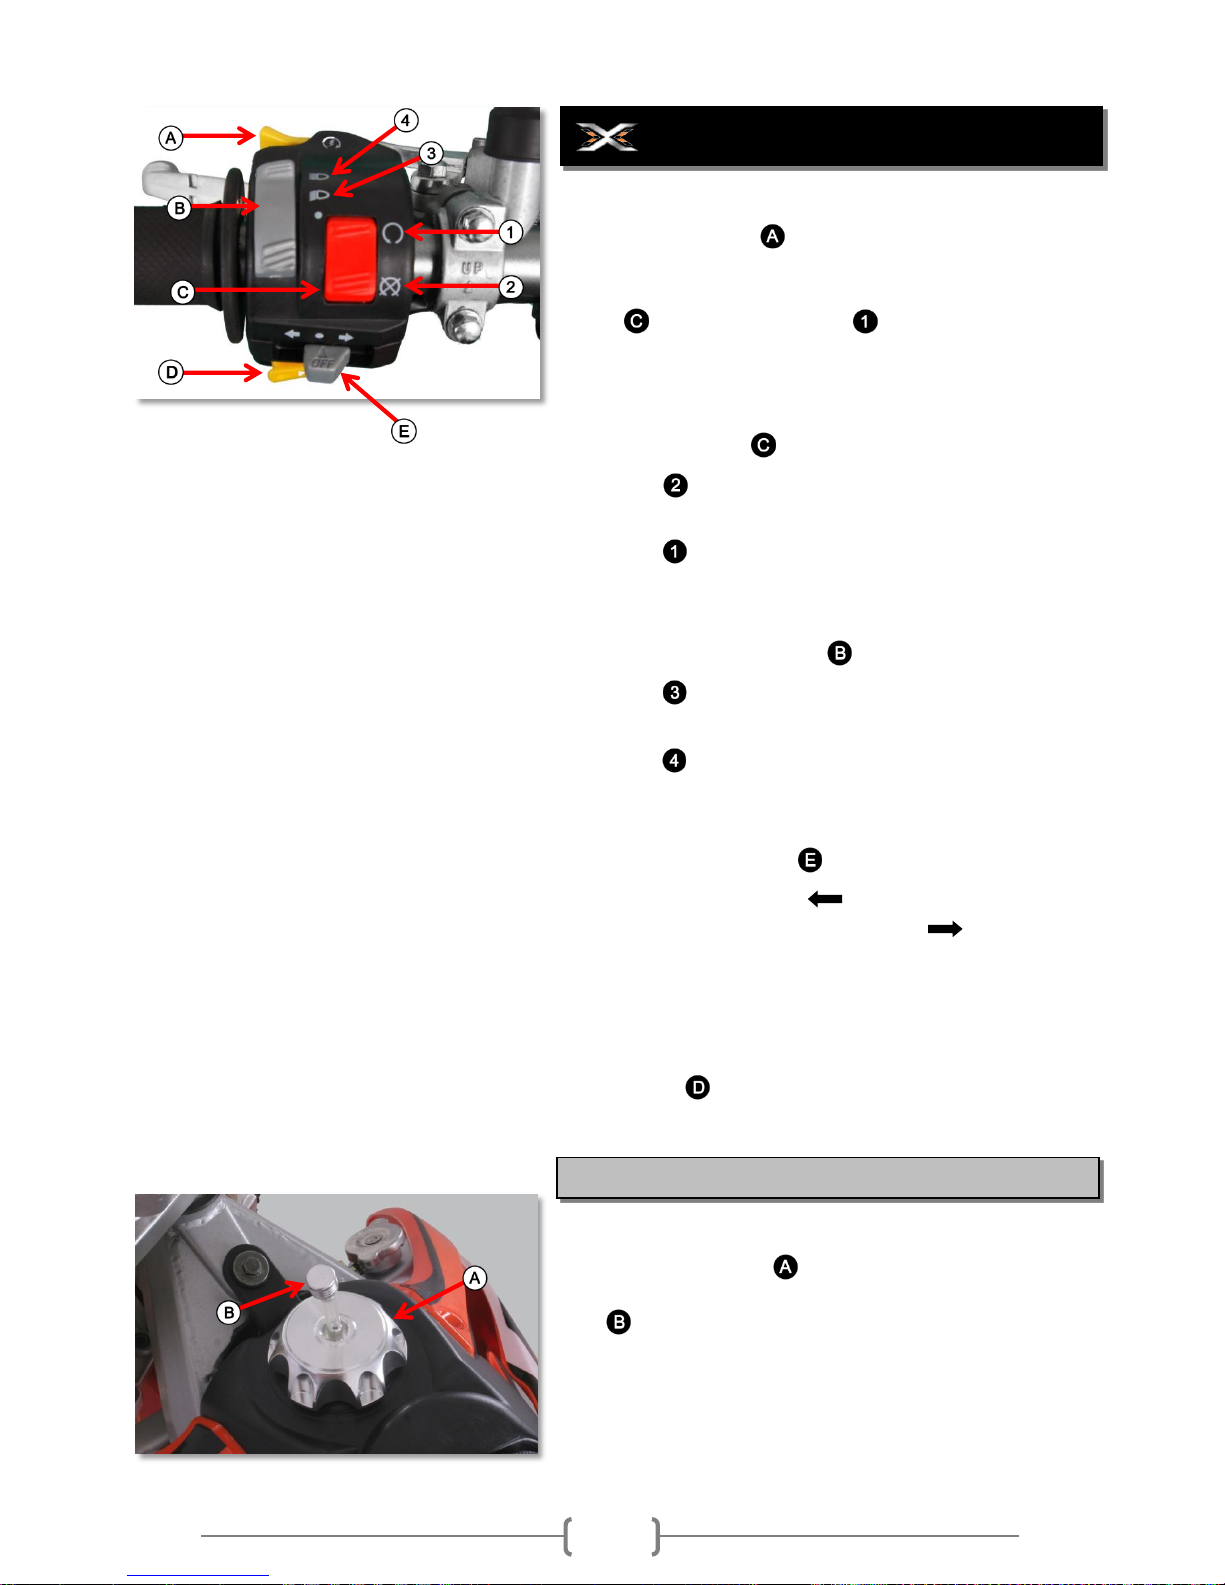
Left Handlebar Switches
Electric Start Button
Use this button to operate the starter motor. With the
key ignition switch in the “ON” position, the engine stop
switch in the “RUN” position , and the transmission
in the neutral position, pull the clutch lever and push the
electric start button to start the engine.
Engine Stop Switch
In position the ignition circuit is off. The engine cannot
start or run.
In position the ignition circuit is on and the engine can
start or run.
Headlight / Dimmer Switch
In position the headlight low beam and tail-light turn
on.
In position the headlight high beam and tail-light turn
on. The high beam indicator light also turn on.
Turn Signal Light Switch
Moving the switch to the “ “ position will flash the left
turn signals. Moving the switch to the “ “ position will
flash the right turn signals. The indicator light will also
flash intermittently. To cancel turn signal operation, push
the switch in.
Horn Switch
Press the horn switch to sound the horn.
Fuel Fill Cap
To Open: Turn the cap counter-clockwise.
To Close: Turn the cap clockwise, make sure the breather
tube is installed.
OPERATING CONTROLS (ON-ROAD)
FUEL FILL CAP
19
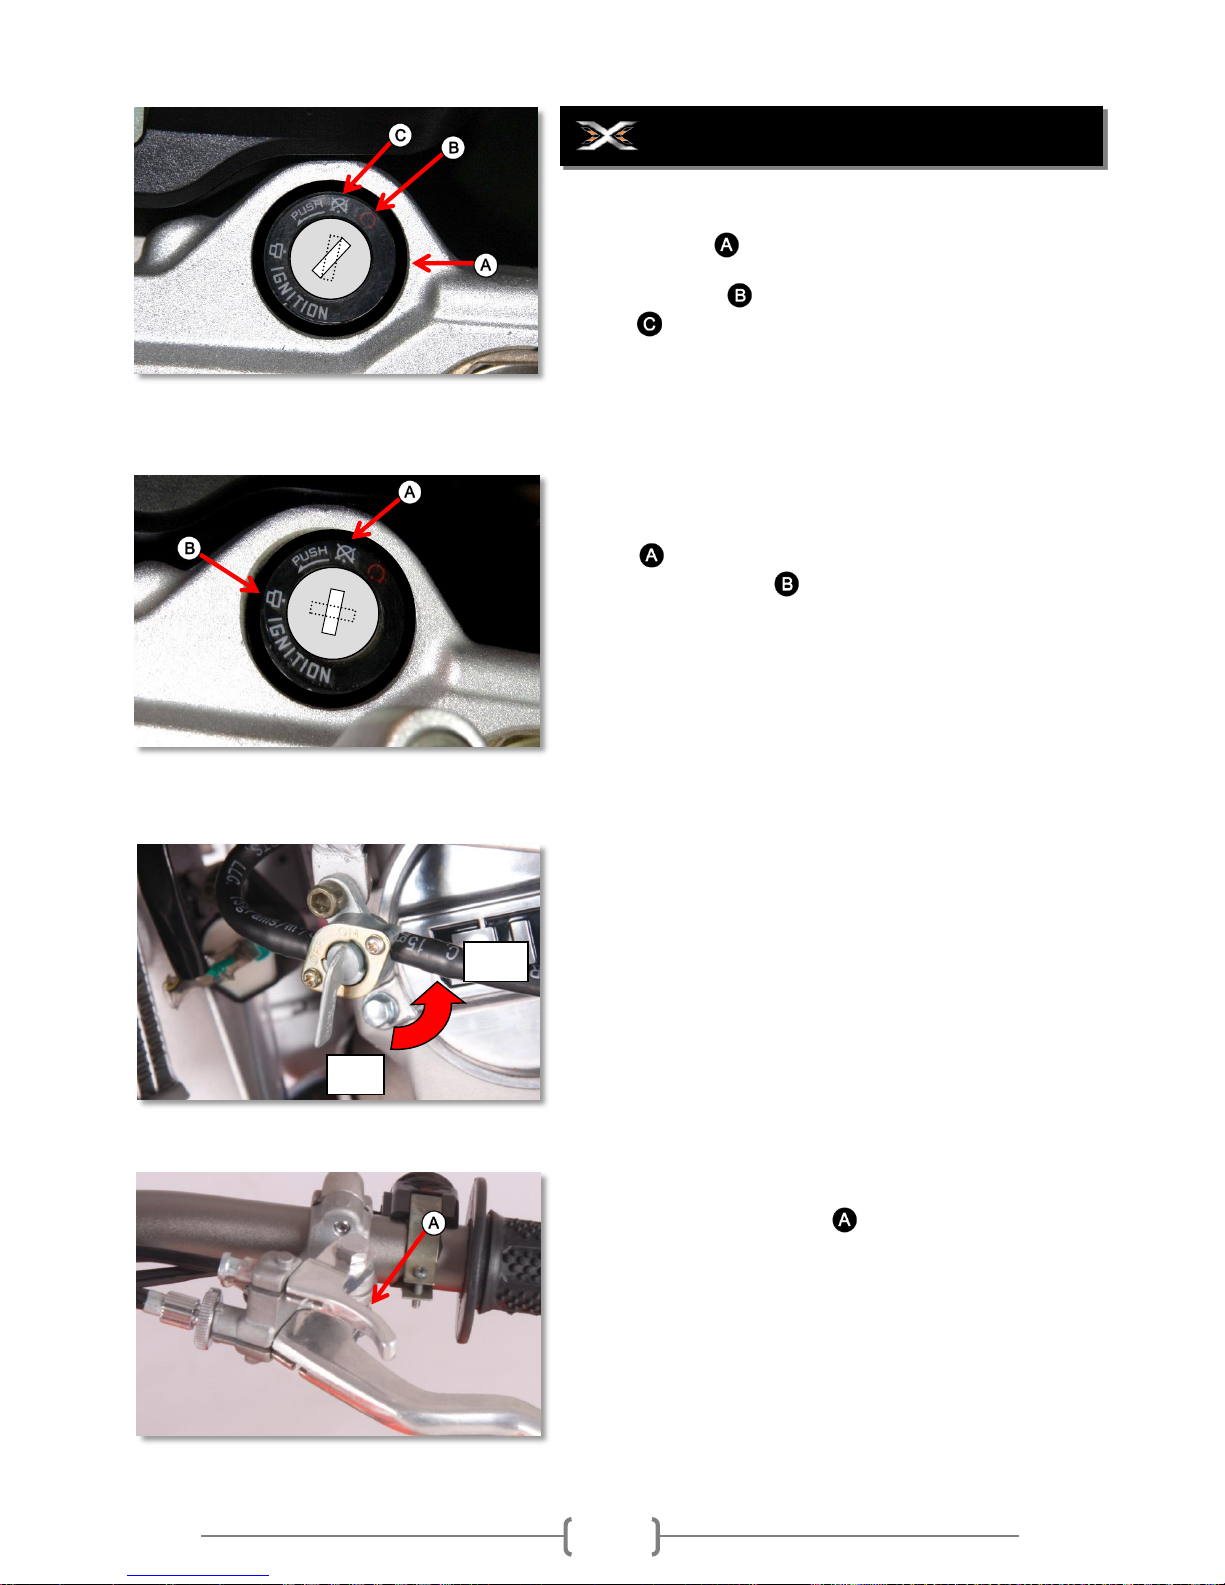
Key Ignition Switch
The ignition key is used to supply power from the
battery to the electrical components of the motorcycle in
the “ON” position . Turn the switch to the “OFF”
position when you are finished riding, or if you wish to
stop the engine.
Steering Lock
To lock the steering system, turn the key to the “OFF”
position , push and release the key, then rotate it to
to the “LOCK” position .
Fuel Tap
OFF - In this position, the fuel tap is closed. No fuel can
flow to the carburetor.
ON - In this position, the fuel tap in open. This means fuel
can flow to the carburetor. With the lever in this
position, the tank will be emptied.
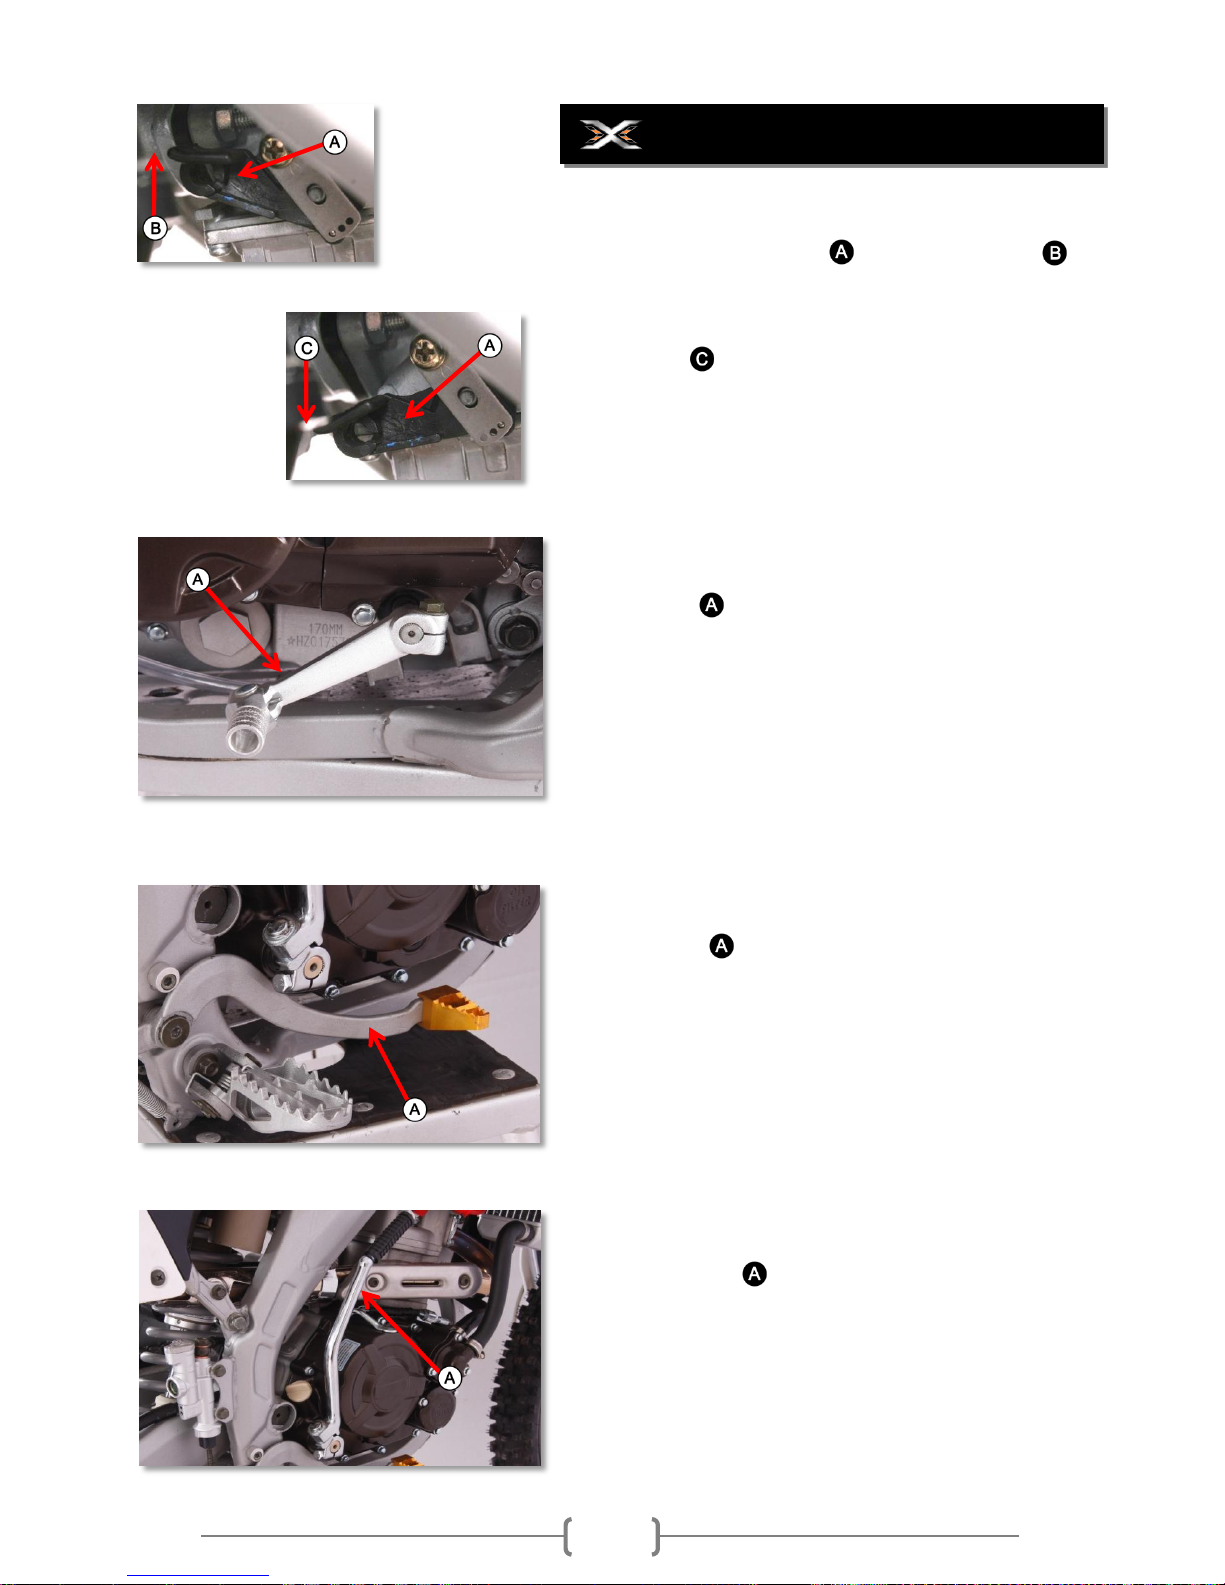
Choke Lever (XZ250R – V4 / RM)
When pulling the choke lever toward you, a cylinder in
the carburetor is opened. Through this cylinder, the engine can
take in additional fuel. This results in a rich fuel and air
mixture, which is needed for a cold start.
When releasing the choke lever, the cylinder is closed again.
ON
OFF
OPERATING CONTROLS
20
Choke Lever (XZ250R – LC / ZS)
When pulling the choke lever fully toward the top , a
cylinder in the carburetor is opened. Through this cylinder,
the engine can take in additional fuel. This results in a rich
fuel and air mixture, which is needed for a cold start. When
pushing down the chock lever, the cylinder is closed
again.
Shift Lever (LC / ZS)
The shift lever is on the left side of the engine. The gear
positions are shown in the illustration on page 28.
Foot Brake Lever (LC / ZS)
The brake lever is located on the right side of the
engine. Its basic operation is to apply the rear brake to
slow or stop the motorcycle.
Kick Start Lever (LC / ZS)
The kick start lever is mounted on the right side of the
engine. It is used to start the engine in case the electrical
starter system is non-functional.
OPERATING CONTROLS
21
Shift Lever (V4 / RM)
The shift lever is on the left side of the engine. The gear
positions are shown in the illustration on page 28.
Foot Brake Lever (V4 / RM)
The brake lever is located on the right side of the
engine. Its basic operation is to apply the rear brake to
slow or stop the motorcycle.
Kick Start Lever (V4 / RM)
The kick start lever is mounted on the right side of the
engine. It is used to start the engine in case the electrical
starter system in non-functional.
Side Stand
Push the side stand to the ground and tilt the
motorcycle to the left. Make sure the bike is on solid
ground and the position is secure. You can use the band
to secure the stand when riding off-road.
OPERATING CONTROLS
22
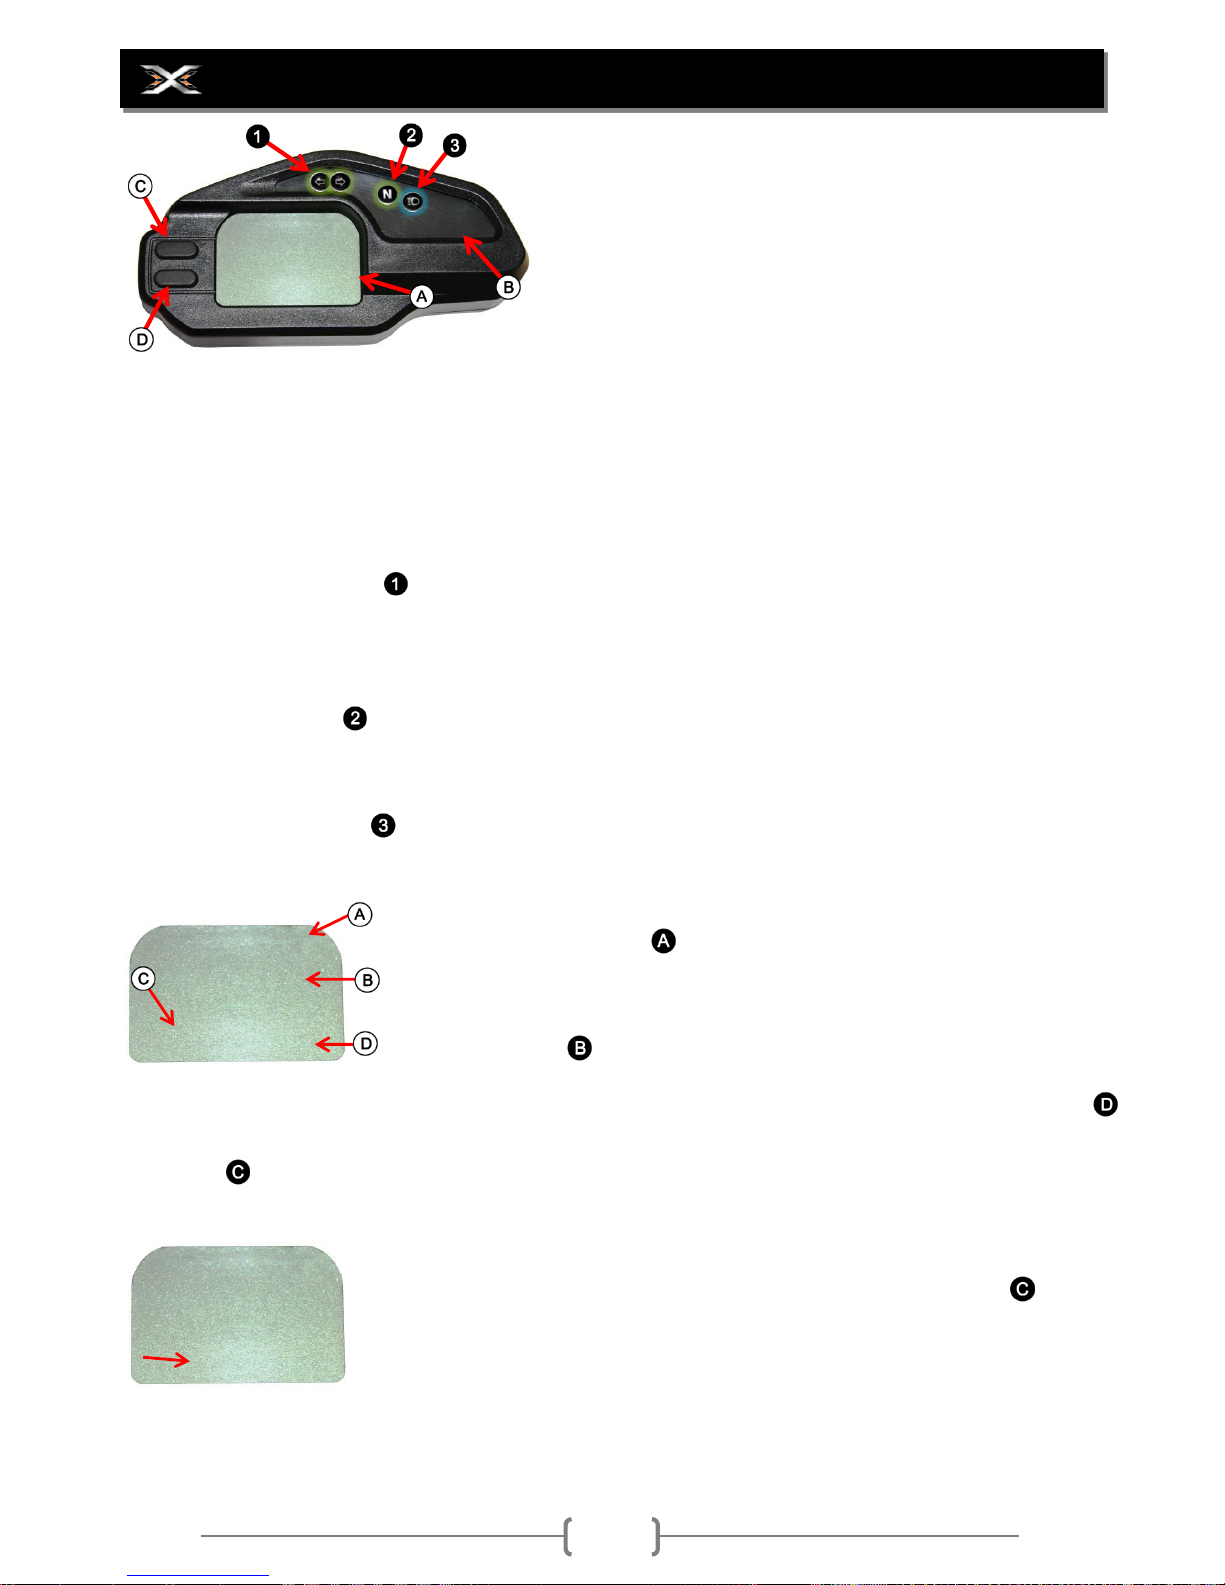
Speedometer and Odometer
The digital speedometer indicates the road speed of the
motorcycle. The read-out displays the motorcycle road
speed in increments of one kilometer (or mile) per hour.
In the speedometer face is the electronic odometer and
one trip meter.
(A) Multi-Function Display (1) Turn Signal Indicator Lights
(B) Indicator Lights (2) Neutral Indicator Light
(C) Odometer/Trip Button (3) High Beam Indicator Light
(D) Mph/Km-h Button
Turn Signal Indicator Lights
When either the right or left turn signals are being operated, the indicator light will flash intermittently.
NOTE: If a turn signal light is not operating properly due to bulb filament or circuit failure, the indicator
light flickers more quickly to notify the rider of the existence of the failure.
Neutral Indicator Light
The green indicator light will come on when the transmission is in neutral. The light will go out when you
shift into any gear other than neutral.
High Beam Indicator Light
This blue indicator light will be lit when the headlight high beam is turned on.
Gear Position Indicator
The gear position indicator displays the gear position. When the
Transmission is in gear, the relevant gear number 1 to 6 will be displayed.
Speedometer
The speedometer indicates the road speed in kilometers per hour and
miles per hour. (Note: Select km/h or mph as appropriate, to comply with traffic regulations. Press button
to switch between km/h or mph.)
Odometer
The odometer registers the total distance that the motorcycle has been ridden.
Trip Meter
To reset the trip meter to zero, push the odometer/trip button
for 3 seconds. The display will show “000.0” after reset.
1 2 3 4 5 6
00
00000.0
MPH
KM/H
GUAGES, INDICATORS & DISPLAY
1 2 3 4 5 6
00
00000.0
MPH
KM/H
1 2 3 4 5 6
00
000.0
MPH
KM/H
23
Before you ride, you must be absolutely sure that you and your motorcycle are ready to ride. To help you
get prepared, this section of the manual will discuss how to evaluate your riding readiness and how to
perform our recommended ore-ride inspection of your motorcycle. If you are a parent, please be sure you
have read the section “Important Safety Information for Parents” on page 9.
Are You Ready to Ride?
Before you ride your motorcycle for the first time, we strongly recommend the following:
1. Completely read this manual.
2. Be sure you have read and understand all the safety messages and labels.
3. You know how to operate all of the motorcycle’s controls.
Before each ride, we strongly recommend that you:
1. Are in good physical and mental condition.
2. Are free of alcohol and other drugs.
3. Are wearing an approved motorcycle helmet with a tight chin strap, eye protection and other
protective clothing.
For your safety, we strongly recommend that you always wear an approved helmet, eye protection, boots,
gloves, long pants and a long sleeved jersey, shirt or jacket whenever you ride. Although complete
protection is not possible, wearing the proper gear can reduce the chance of and severity of injuries when
you ride.
Helmets & Eye Protection – Your helmet is your most important piece of riding gear because it offers the
best protection against head injuries. A good helmet will be approved by a testing organization
independent of the helmet manufacturer and will have a chin strap that can be tightened securely. Openface helmets offer some protection, but a full-face helmet offers the most protection. When purchasing a
helmet, regardless of style, look for DOT (Department of Transportation) sticker (USA only). If the helmet
has been tested by an independent organization such as the Snell Institute, you will usually find their logo
on a tag inside the padding of the helmet.
Additional Riding Gear – In addition to your helmet and eye protection, we also recommend:
1. Sturdy off-road motorcycle boots to help protect your feet, ankles and lower legs.
2. Good quality motorcycle gloves to protect your hands.
3. Riding pants with knee and hip pads, a riding jersey with elbow pads and a chest/shoulder protector.
NOT WEARING A HELMET INCREASES THE CHANCE
OF SERIOUS INJURY OR DEATH IN A CRASH. BE
SURE YOU ALWAYS WEAR YOUR HELMET AND
OTHER PROTECTIVE APPAREL WHEN YOU RIDE.
WARNING
BEFORE RIDING
PROTECTIVE GEAR & APPAREL
24
Before each and every ride you take, it is extremely important that you inspect the motorcycle and make
sure any problems you find are corrected. A pre-ride inspection is a must because off-road riding can be
very tough on a motorcycle and you do not want to have a breakdown for from help.
Check the following items before you get on the motorcycle:
Tires – Use a tire pressure gauge to check the air pressure. Inflate or deflate as needed. Also check for
signs of damage or excessive wear.
Spokes & Rims – Make sure all of the spokes are tight. Inspect the rim to be sure it is not bent.
Leaks – Look under the motorcycle for signs of leaking fluids such as engine oil or gasoline.
Engine Oil – Check the level of engine oil and add if needed.
Fuel – Check the level of fuel in the gas tank. Add if needed. Be sure the gas cap is tightened securely.
Drive Chain – Inspect the drive chain condition and slack. Adjust and lubricate if needed. Also check the
chain guide(s) and roller(s) for wear and replace if and when it is worn. For detailed instructions on drive
chain slack adjustment, see the Servicing section of this manual.
Brake Hoses – Inspect the brake hoses for leaks and replace if needed.
Nuts & Bolts – Inspect all accessible nuts and bolts. Tighten then if it is needed.
Spark Plug & Cap – Check the spark plug for looseness. Tighten if needed. Be sure the cap is pushed on the
spark plug and it is tight properly.
Check the following items after you get on the motorcycle:
Throttle – Check the throttle free-play and adjust if needed. Rotate the throttle to be sure it moves easily
and freely. Make sure that it snaps back to its closed position automatically when you release it in all
steering positions.
Brakes – Step on the rear brake lever and squeeze the front brake lever to be sure the brakes are working
properly.
Remember, be sure to take care of any problems you find or have your Xmotos dealer correct it before you
ride.
Improperly maintaining your motorcycle or failing to
correct a problem before riding can cause a crash in
which you can be seriously hurt or killed. Always
preform a pre-ride inspection before any ride and
correct any problems.
WARNING
If a youngster will be performing any of the following
pre-ride inspection procedures, it is your responsibility
to provide careful supervision and make sure they are
performed safely.
NOTICE TO PARENTS
IS THE MOTORCYCLE READY TO RIDE?
PRE-RIDE INSPECTION
 Loading...