

Page 1

XM1630S Software Reference Manual
No. XM1630S-A00-104 xmodus swiss GmbH 1 / 32
LAN Modem
XM1630S
Software Reference Manual
Version 104
Released 4. January 2010
Page 2

XM1630S Software Reference Manual
No. XM1630S-A00-104 xmodus swiss GmbH 2 / 32
Information provided by xmodus swiss GmbH is believed to be accurate and reliable.
However, no responsibility is assumed by xmodus swiss for its use, nor any
infringement of patents or other rights of third parties which may result from its use.
No license is granted by implication or otherwise under any patent rights of xmodus
other than for circuitry embodied in xmodus products. Xmodus swiss reserves the
right to change circuitry at any time without notice. This document is subject to
change without notice.
Product names or services listed in this publication are for identification purposes
only, and may be trademarks or registered trademarks of their respective companies.
All other marks mentioned herein are the property of their respective owners.
© 2009 xmodus swiss GmbH
Printed in Switzerland
All Rights Reserved
Page 3

XM1630S Software Reference Manual
No. XM1630S-A00-104 xmodus swiss GmbH 3 / 32
TABLE OF CONTENTS
1. INTRODUCTION.............................................................................................4
1.1 OVERVIEW..................................................................................................4
1.2 PRODUCT DESCRIPTION..........................................................................4
2. MANAGEMENT AND CONFIGURATION.......................................................5
2.1 Login with Web Browser...............................................................................5
2.2 Login with Telnet Client................................................................................5
2.3 Login with TTY .............................................................................................6
2.4 General information......................................................................................6
3. WEB BASED CONFIGURATION....................................................................7
3.1 Web based LAN configuration ......................................................................8
3.2 Web based serial configuration....................................................................9
3.3 Web based statistics ..................................................................................10
3.4 Web based I/O configuration......................................................................11
3.5 Web based administration..........................................................................12
4. COMMAND LINE INTERFACE.....................................................................13
4.1 Syntax and procedures ..............................................................................14
4.2 Summary of commands .............................................................................14
4.3 Help screens ..............................................................................................15
4.4 Description of commands...........................................................................18
5. FIRMWARE UPDATE...................................................................................28
6. APPLICATIONS............................................................................................29
6.1 Setting up a Telnet Configuration Session .................................................30
6.2 Start a manual dial-out session in TELNET mode......................................30
6.3 Start a manual dial-out session in RAW mode...........................................30
6.4 Automatic Dial-out......................................................................................31
6.5 Dial-in.........................................................................................................32
Page 4

XM1630S Software Reference Manual
No. XM1630S-A00-104 xmodus swiss GmbH 4 / 32
1. INTRODUCTION
1.1 OVERVIEW
This manual describes the commands and the configuration for the following xmodus
swiss GmbH Socket Modem families:
AL6000SS LAN Socket Modem (5V Version)
AL6000S-3V LAN Socket Modem (3V Version)
The description applies to all these LAN-modems without any differences between
product families noted. Please refer to Modem Firmware Release notes for
commands applicable to the modem firmware.
1.2 PRODUCT DESCRIPTION
The xmodus AL6000S and AL6000S-3V Socket Modem Family provides the OEM
with a complete LAN data modem in a compact socket-mountable module. This
module enables any devices to send and receive data over the Ethernet network. The
IEEE 802.3u interface with auto-negotiation and auto-crossover is supported. The
module is fully approved and homologated and conforms to the CE regulations. This
gives fastest time-to-market to LAN-enable any devices.
The compact size and high level of integration of the Socket Modem minimizes real
estate and cost for motherboard and box modem applications. Its low power
consumption makes it ideal for a wide variety of embedded control applications. The
pin compatibility between the full range of Analog Series Socket Modems, ISDN,
GSM and LAN Socket Modems allows upgrading and production configurability
without hardware changes.
As a data modem, the AL6000S Socket Modem can send and receive data at speeds
up to 230’000 bps in transparent or Telnet modes. Protocols such as TCP/IP, UDP,
ARP, ICMP and DHCP are supported.
The very flexible IP protocol stack allows easy integration of user applications such as
additional bus systems (CAN) or serial protocols for automation systems.
Optional interfaces like SPI, USB or CAN are integrated for future expansion. The
standard modules support configurable I/O ports and ADC ports for monitoring and
control.
Page 5

XM1630S Software Reference Manual
No. XM1630S-A00-104 xmodus swiss GmbH 5 / 32
2. MANAGEMENT AND CONFIGURATION
The modem provides 3 different ways for configuration and management.
2.1 Login with Web Browser
When using the web browser to configure your LAN-modem for the first time, use the
default IP address of the modem: 192.168.1.3
At the login prompt, type: “ADMIN
”
At the password prompt type: “AL6000S
”
(The user name and password are case sensitive)
2.2 Login with Telnet Client
When using Telnet client to configure your LAN-modem for the first time, use the
default IP address of the modem: 192.168.1.3
At the login prompt, type: “ADMIN:AL6000S
”
(The user name and password are case sensitive)
Using
Browser
Configuration
and
Management
Using
Telnet
Using
Page 6

XM1630S Software Reference Manual
No. XM1630S-A00-104 xmodus swiss GmbH 6 / 32
2.3 Login with TTY
When using TTY to configure your LAN-modem, you must configure the serial port to
the default serial configuration of the module.
115200 bps, 8-bit, no parity, 1 stop bit
No authentication needed for TTY configuration.
Press 3 x Enter to arrive at the login prompt.
2.4 General information
- The OK or “#” sign designates the prompt in command mode.
- No prompt is displayed in data mode.
- To end your configuration session type “quit”.
- To display a list of available menus type “help”.
Page 7
XM1630S Software Reference Manual
No. XM1630S-A00-104 xmodus swiss GmbH 7 / 32
3. WEB BASED CONFIGURATION
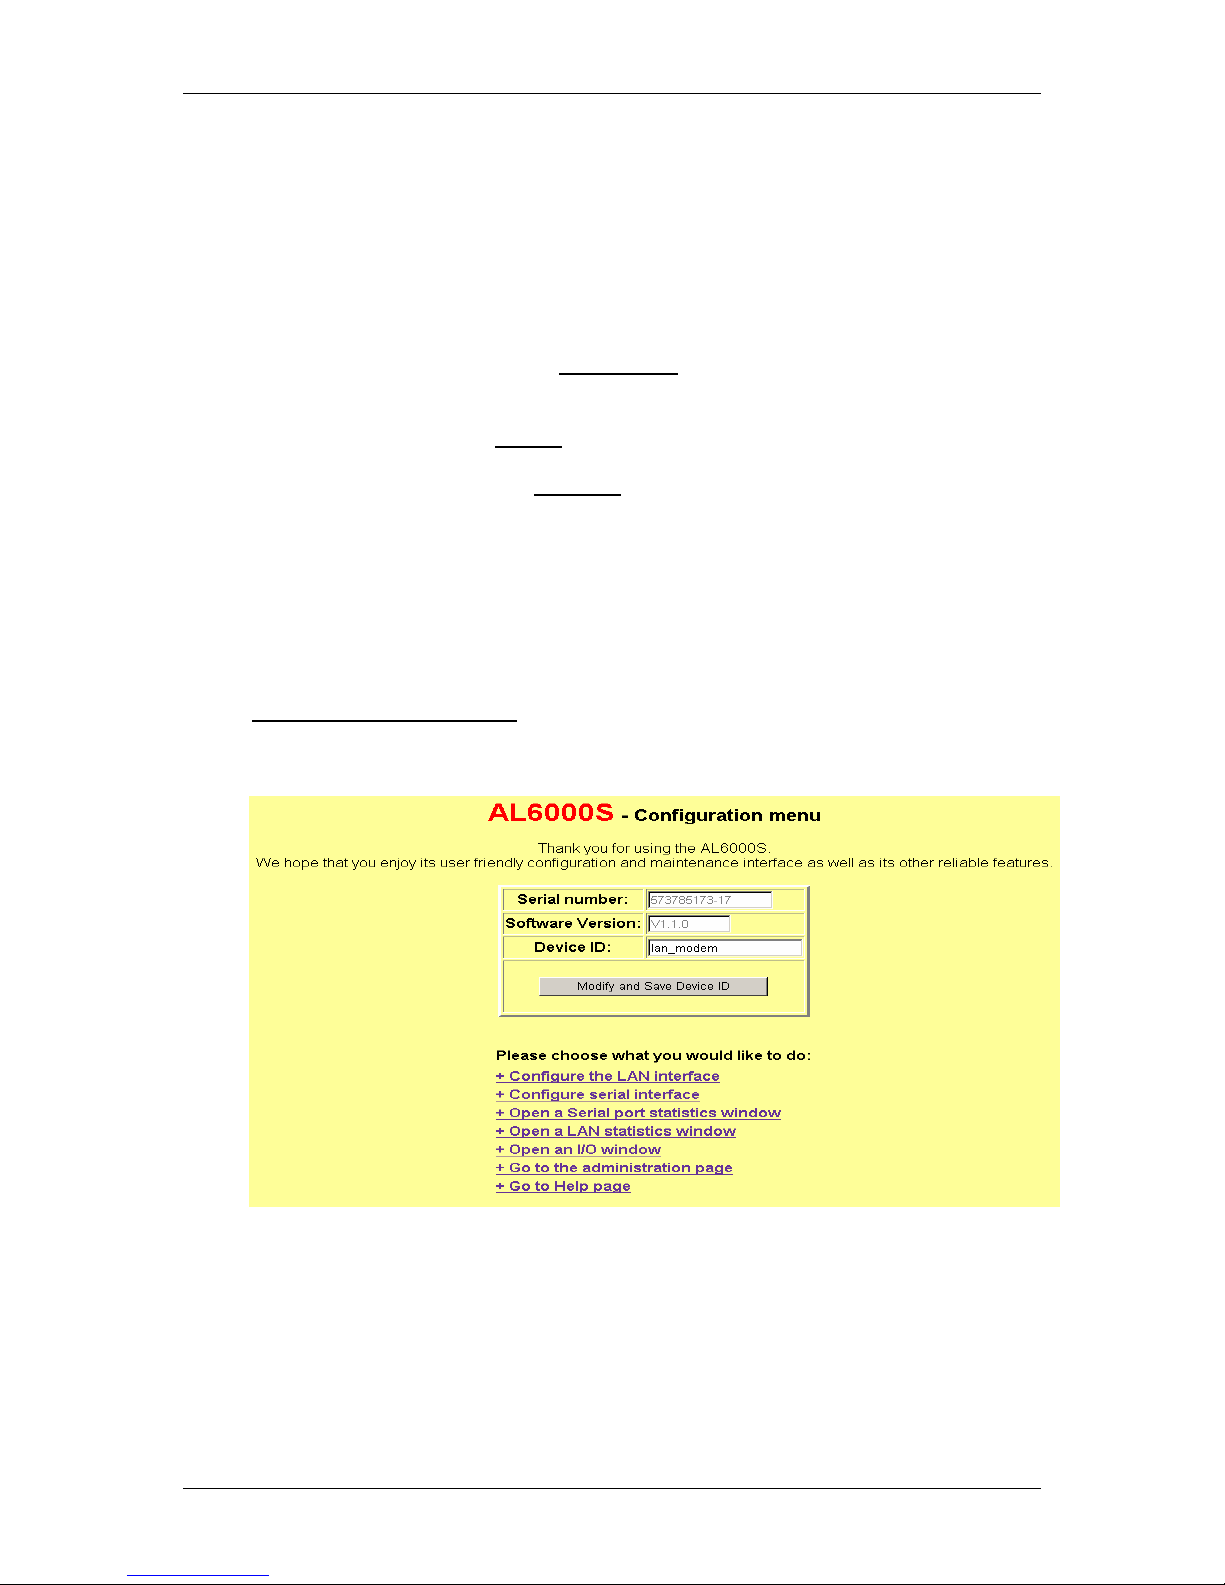
The AL6000S LAN-modem consists of a HTTP Web server, which allows
configuration and monitoring through any common web browser. When using your
web browser to configure your LAN-modem for the first time, use the default IP
address of the modem:
192.168.1.3
At the login prompt, type: “ADMIN
”
At the password prompt type: “AL6000S
”
(The user name and password are case sensitive)
After login, the following entry screen should display:
Main configuration screen:
Page 8
XM1630S Software Reference Manual
No. XM1630S-A00-104 xmodus swiss GmbH 8 / 32
3.1 Web based LAN configuration
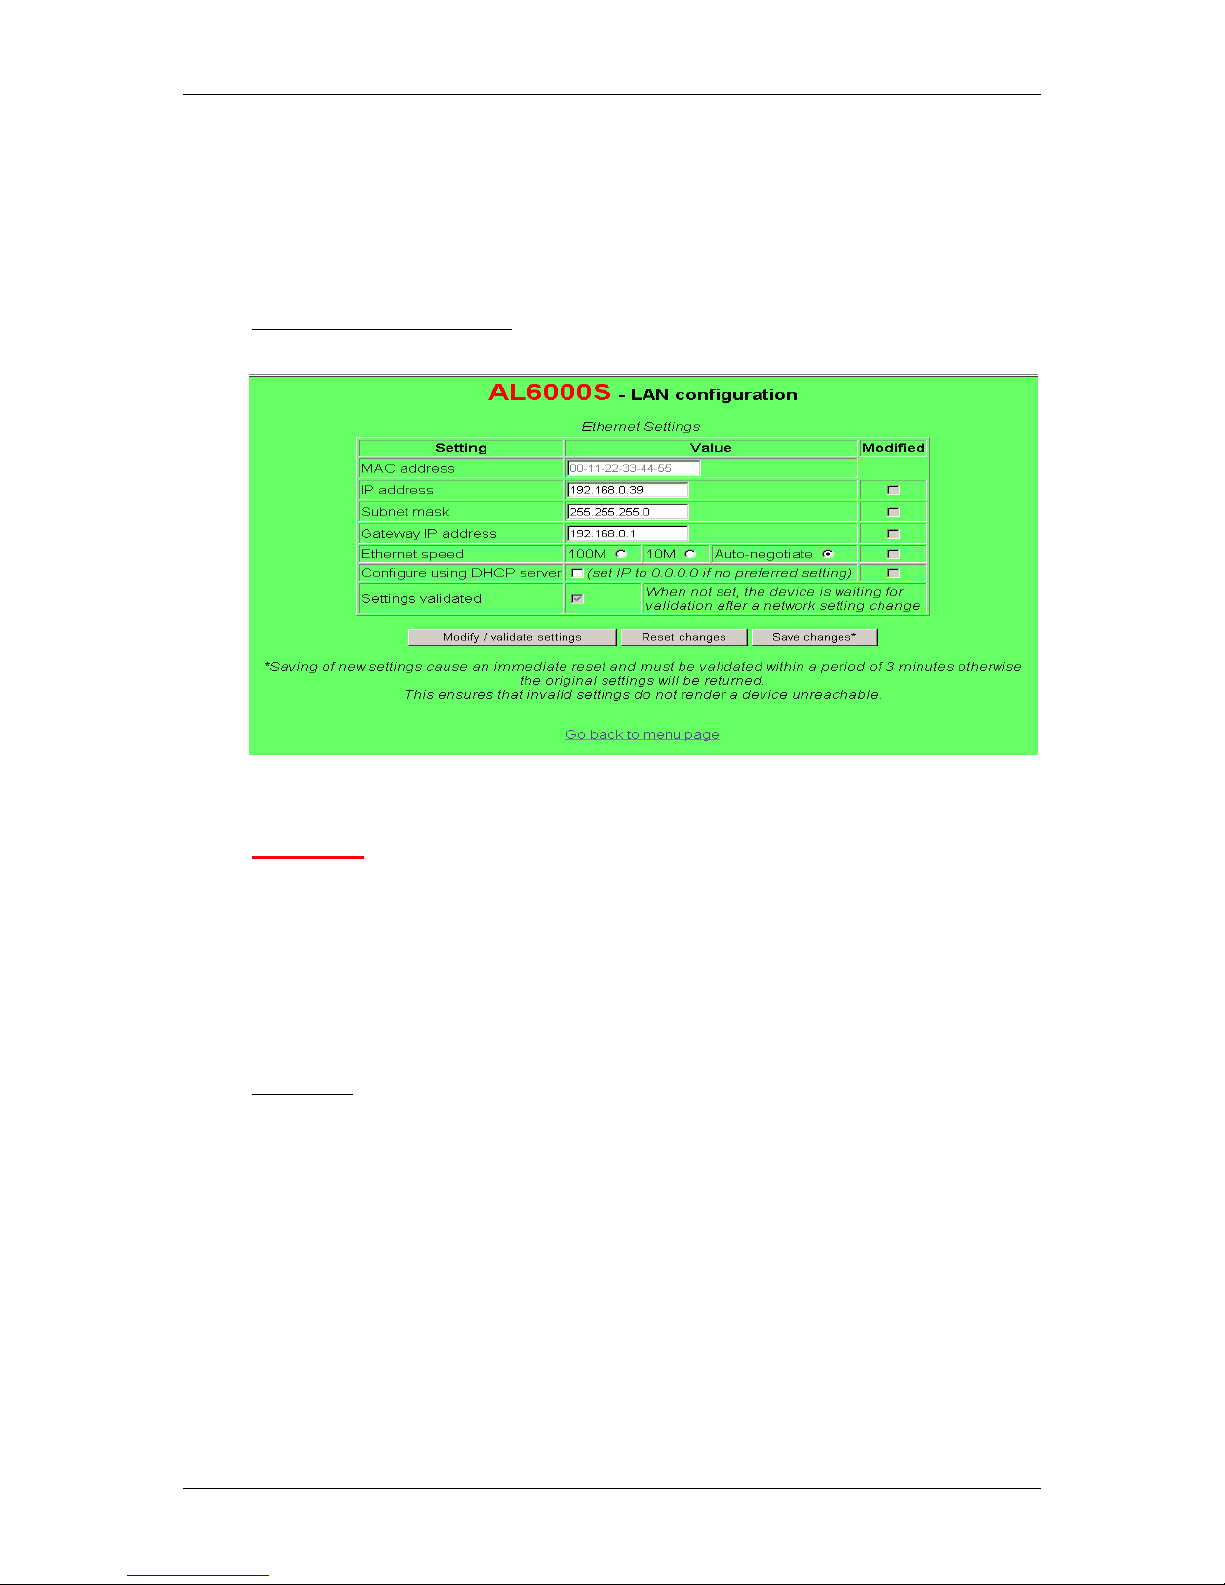
The LAN Configuration Screen allows configuration of all the LAN specific parameters
such as IP address, subnet mask, gateway IP address, Ethernet speed and DHCP
server.
LAN configuration screen:
Important:
The LAN configuration menu contains a validation procedure, which prevents the
storing of incorrect configuration data. After a setting has been changed and saved,
the new configuration must be validated within 3 minutes by reconnecting via the
Browser and clicking on the <Modify / validate settings> button. After this timeout with
no validation, the module returns to the previous configuration so that it cannot be left
in an unreachable condition.
Procedure:
Change settings as desired
Click on <Modify/validate settings> followed by <Save changes*>
The LAN modem will now reboot with its new settings. Reconnect using the
new settings to ensure that it is reachable.
Click on <Modify/validate settings> to validate the new settings so that they are
permanently used.
If after 3 minutes no validation has taken place the previous configuration is
automatically restored.
Page 9
XM1630S Software Reference Manual
No. XM1630S-A00-104 xmodus swiss GmbH 9 / 32
3.2 Web based serial configuration
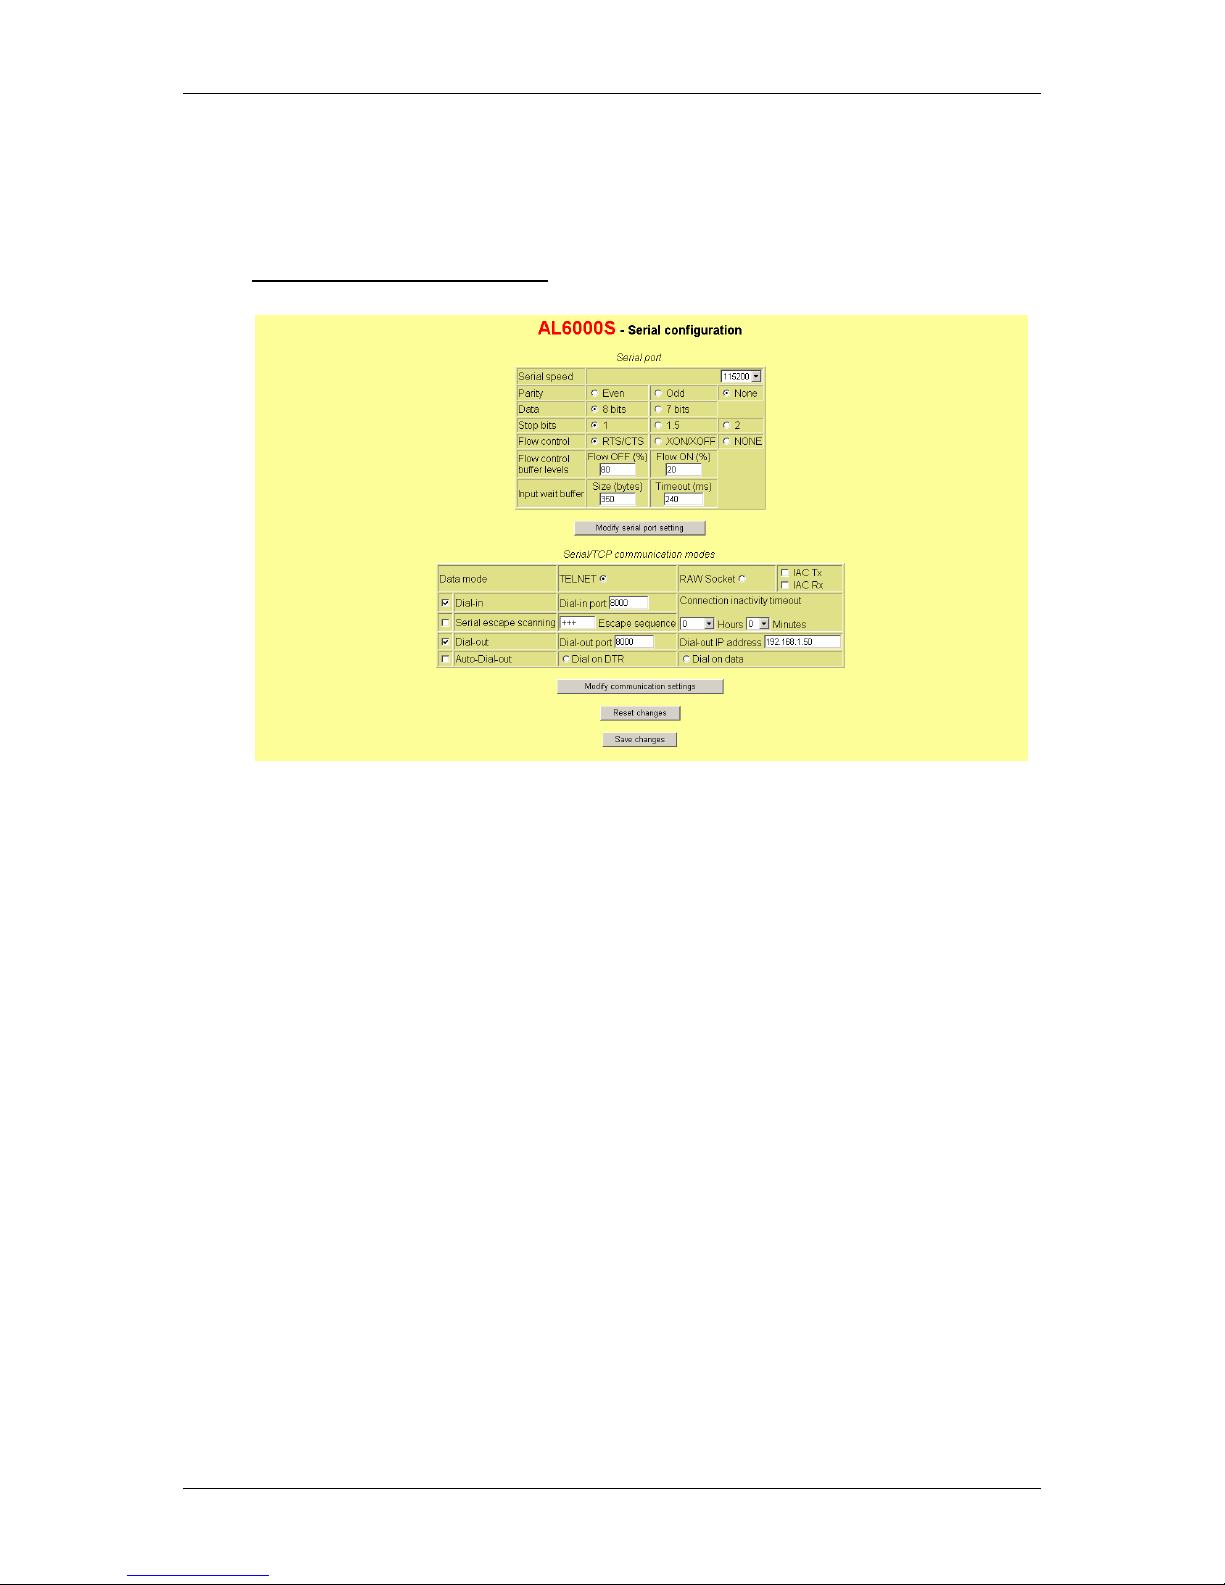
The serial configuration screen provides all the settings for the serial interface and the
serial communication modes.
SERIAL configuration screen:
3.2.1 Serial Port configuration:
Serial Port parameters: setting of baud rate, parity, data-bits, stop-bits and flow-
control.
Flow Control: Selects between RTS/CTS (Hardware) flow control and
XON/XOFF (Software) flow control. The high and low-water marks can also be
modified.
Input wait buffer: specifies the conditions at which the received data is packed in
a TCP/IP frame and sent to the remote side. As default, received data is sent
after 350 bytes (buffer full) or after 240 ms (if less than 350 bytes received).
Modify: To make the settings active press the “Modify serial port” button. The
new setting is immediately valid.
Save changes: Permanently saves the new setting.
3.2.2 Communication modes:
TELNET: The Telnet radio button enables the Telnet protocol for data
communications. Communication is established through the specified port, which
defaults to 8000.
RAW: The RAW radio button enables transparent mode for data communications.
Communication is established through the specified port, which defaults to 8000.
IAC: The IAC-Tx and IAC-Rx radio buttons enables IAC byte-stuffing in the
specified direction when in Raw communication mode.
Modify: To make the settings active press the “Modify communication” button.
Save changes: Permanently saves the new setting.
Page 10

XM1630S Software Reference Manual
No. XM1630S-A00-104 xmodus swiss GmbH 10 / 32
3.2.3 Serial/TCP Communication settings:
Dial-in: The dial-in radio button enables TCP access from remote side to the LAN
modem (incoming calls) and enables the modules Telnet data Server. The dial-in
port specifies the port address of the Telnet data server (8000 default).
Dial-out: The dial-out radio button enables Telnet access from the LAN modem to
the remote side (outgoing calls) and enables the Telnet Client. The dial-out port
specifies the port address of the Telnet client (8000 default) and the dial-out IP
address the address of the server to be contacted.
Auto Dial-out: The Auto dial-out radio button enables automatic Telnet access
from the LAN modem to the remote side (automatic outgoing calls). The
connection is automatically established by either the DTR line (DTR active) or by
presence of data. This is selected by either the “Dial on DTR” or the “Dial on data”
radio buttons.
Modify: To make the settings active press the “Modify communication” button.
Save changes: Permanently saves the new setting.
3.2.4 Serial Escape Scanning:
Serial Escape: The Serial escape scanning radio button enables the escape to
command mode function. The “Escape sequence” field specifies the characters
used to switch from data to command mode.
3.2.5 General:
Reset all changes to default.
Make changes permanent.
Reset changes
Save changes
Page 11
XM1630S Software Reference Manual
No. XM1630S-A00-104 xmodus swiss GmbH 11 / 32
3.3 Web based statistics
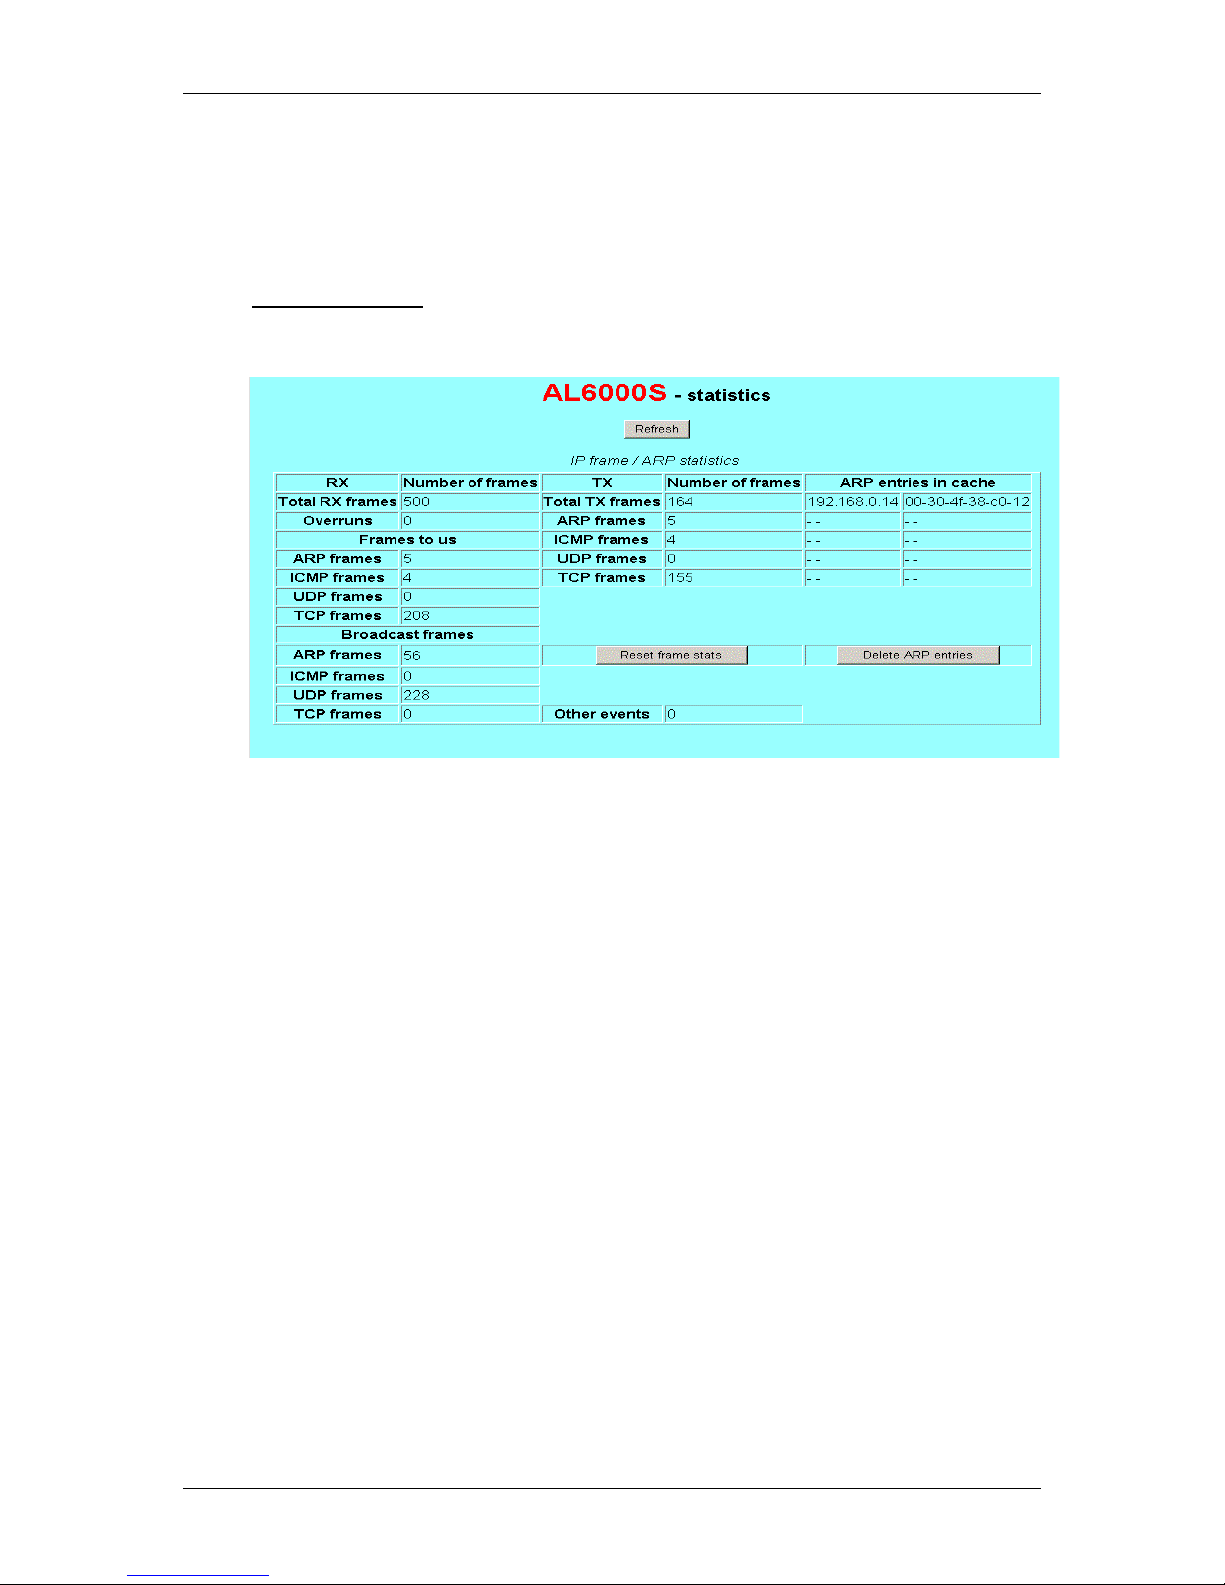
The statistics screen provides all the information regarding the packet (frame)
oriented traffic on the Ethernet port. These statistics can be helpful to trace back
specific processes.
Statistics screen:
Page 12
XM1630S Software Reference Manual
No. XM1630S-A00-104 xmodus swiss GmbH 12 / 32
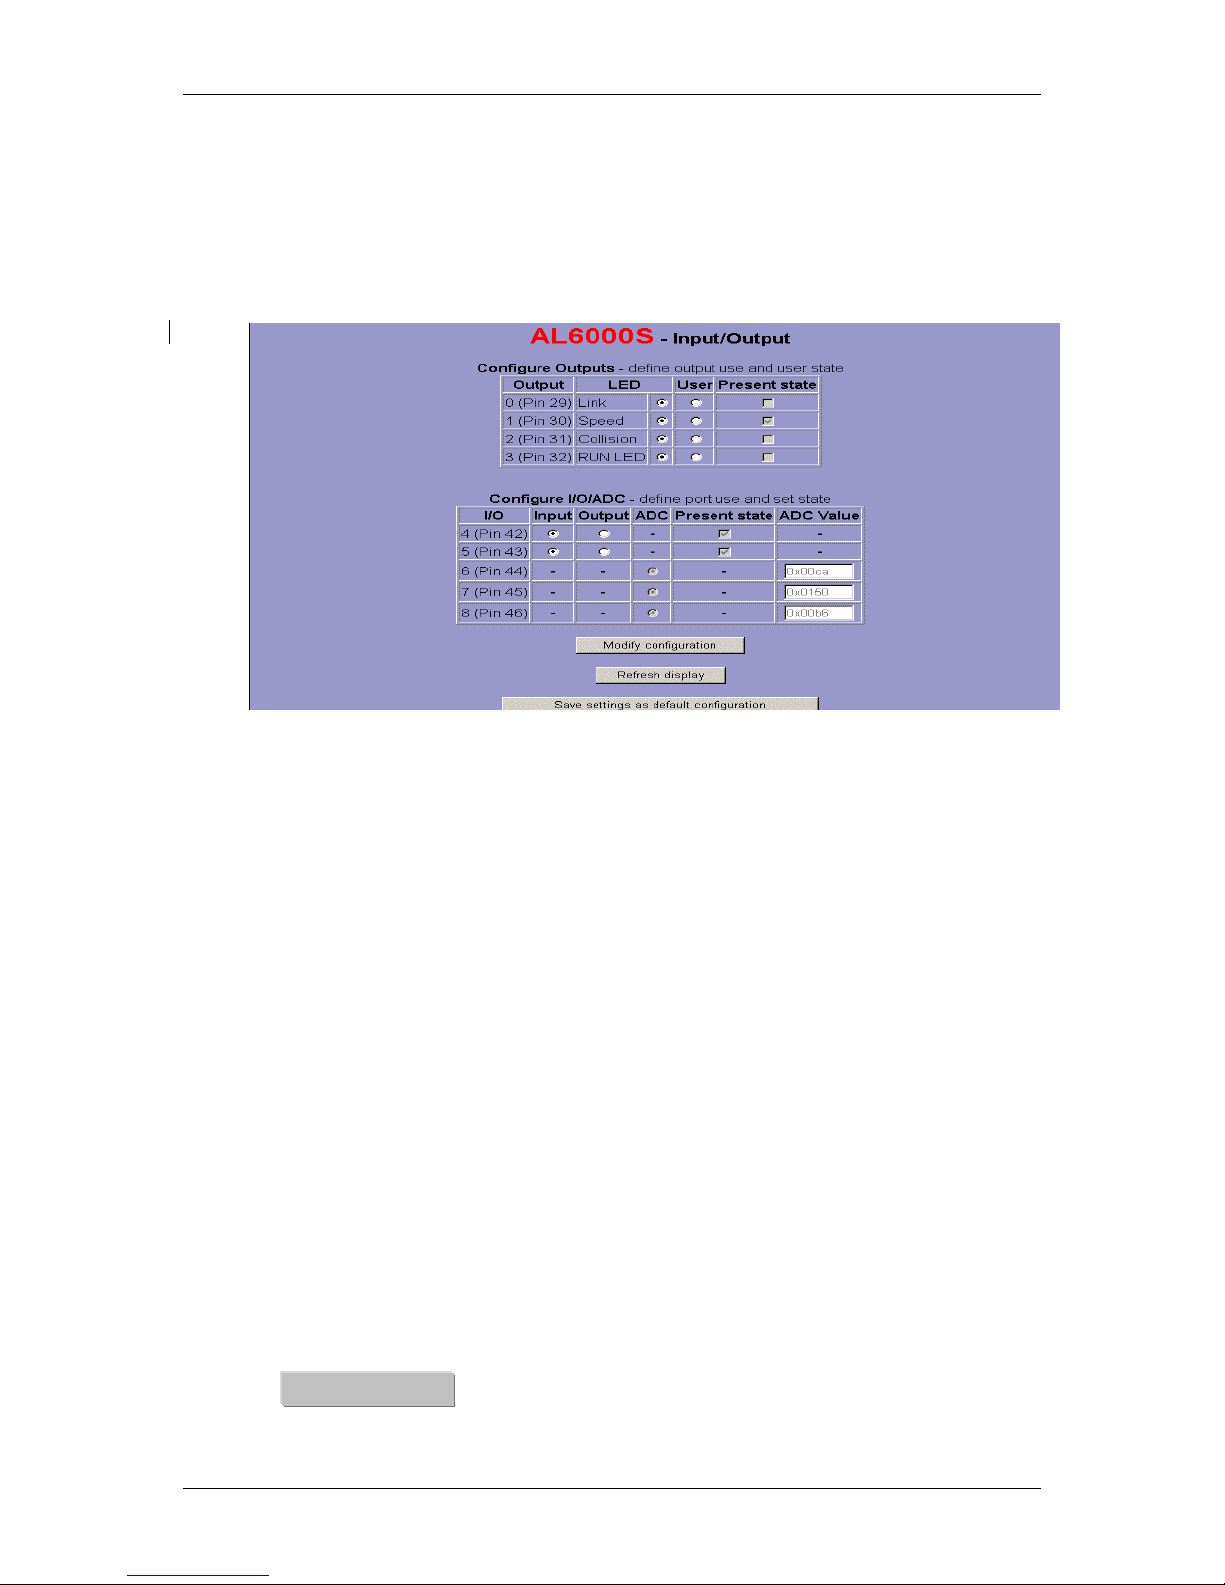
3.4 Web based I/O configuration
The I/O configuration screen provides all the settings to configure the I/O and ADC
ports plus the LED output lines. It allows read and write operations on predefined
hardware ports.
3.4.1 Configure LED outputs:
Port 0: This port is configurable as “Link” LED or user defined output by either the
Link or the User radio button. The “present state” field shows the actual state of
the port.
Port 1: This port is configurable as “Speed” LED or user defined output by either
the Link or the User radio button. The “present state” field shows the actual state
of the port.
Port 2: This port is configurable as “Collision” LED or user defined output by
either the Link or the User radio button. The “present state” field shows the actual
state of the port.
Port 3: This port is configurable as “Run” LED or user defined output by either the
Link or the User radio button. The “present state” field shows the actual state of
the port.
3.4.2 Configure I/O and ADC:
Port 4 – 8: These ports are configurable as Input, Output or ADC ports by either
the “Input”, “Output” or “ADC” radio buttons. The “present state” field shows the
actual state of the port. The “ADC value” files shows the hexadecimal equivalent
of the analog input level.
Read new port values and ADC samples.
Refresh Display
Page 13
XM1630S Software Reference Manual
No. XM1630S-A00-104 xmodus swiss GmbH 13 / 32
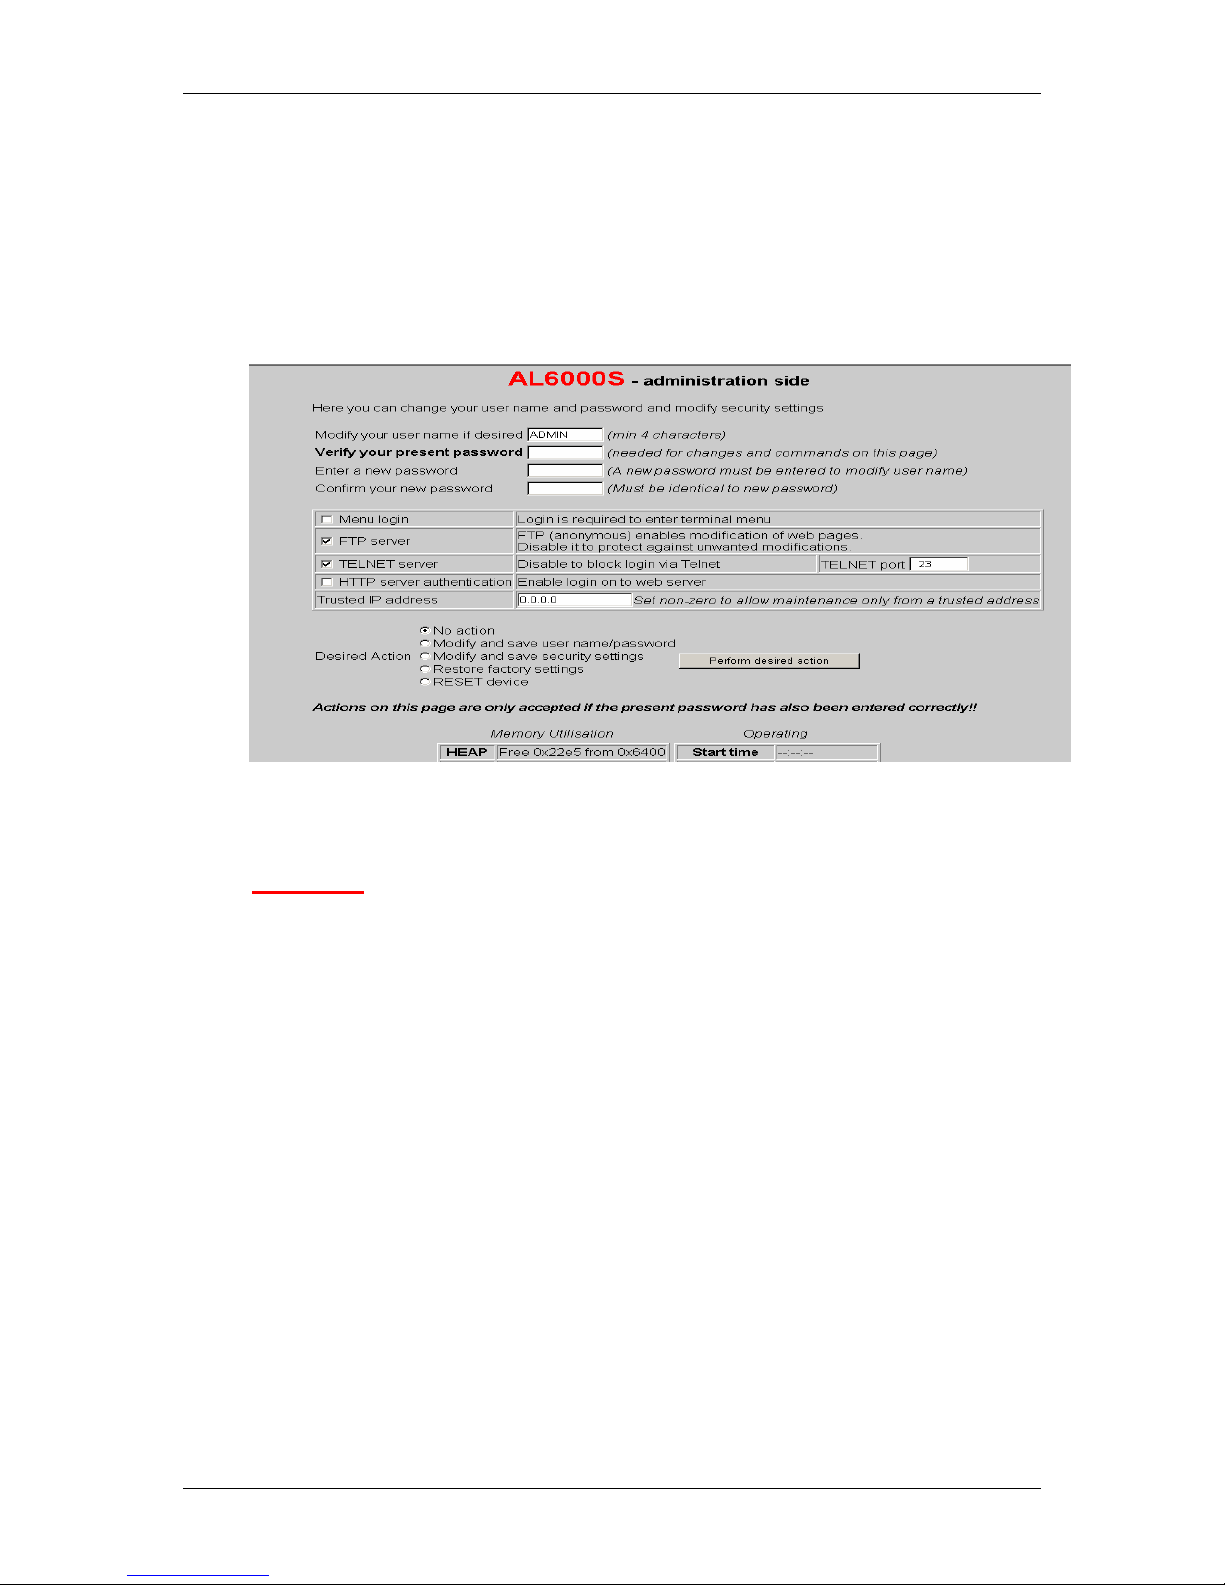
3.5 Web based administration
The administration screen provides the possibility to change the user name and the
password of your module. Furthermore you will be able to configure the FTP,
TELNET and HTTP servers.
Important:
Please pay attention that changes on this page are only accepted if the present
password has been entered in the “Verify your present password” field.
Enter a new password: This field allows entering a new password. It is validated
by the “Confirm your new password” field. These fields must be identical.
Menu Login: Select this radio button if a login is required to enter the terminal
menu from a Telnet connection.
FTP Server: This radio button defines if the FTP server of the module is
accessible from the remote side. The FTP server enables modification of the web
pages. Disable it to protect against unwanted modifications.
Telnet Server: This radio button enables the Telnet server of the module. Disable
it to block login via Telnet from remote site. The field “Telnet port” selects the port
number of the server (default 23 – standard Telnet port number).
HTTP Server Login: This radio button enables authentication so that the web
server requests login on contact.
Trusted IP address: If “Trusted IP address” field is set non-zero, only the
specified IP address (trusted address) is allowed to login on to the module to
perform configuration and monitoring. All other source addresses will be rejected.
Page 14

XM1630S Software Reference Manual
No. XM1630S-A00-104 xmodus swiss GmbH 14 / 32
4. COMMAND LINE INTERFACE
4.1 Syntax and procedures
The T.50 International Alphabet 5 (IA5) is used in this document. Only the low-order
seven bits of each character are significant to the modem; any eight or higher-order
bit(s), if present, are ignored for the purpose of identifying commands and
parameters. Lower-case characters are considered identical for their upper-case
equivalents when received by the modem from the DTE. Result codes from the
modem are in upper-case.
4.1.1 DTE command lines
Words enclosed in <angle brackets> are referenced to syntactical elements. The
brackets are not used when the words appear in a command line. Words enclosed in
[square brackets] represent optional items, which may be omitted from the command
line at the specified point. The square brackets are not used when the words appear
in the command line. Other characters that appear in syntax descriptions must as
included as shown.
4.1.2 Command line editing
The character <BS> is interpreted as a request from the DTE to the modem to delete
the previous character.
4.1.3 Command line echo
The modem may echo characters received from the DTE during command state and
online command state back to the DTE, depending on the setting of the ATEn
command. If so enabled, characters received from the DTE are echoed in the same
format as received.
4.1.4 Factory settings
The parameter settings of the modem are pre-configured by the factory defaults.
These factory defaults can be reloaded at any time by using the “restore” command.
The parameter settings will be changed when using any commands, which affect the
configuration of the modem. This changes can be permanently stored by using the
“save” command.
restore = Restore factory configuration.
save = Store current configuration.
4.1.5 Escape code sequence
When the modem has established a connection and has entered on-line data mode, it
is possible to break into the data transmission in order to issue further commands to
the modem in an on-line command mode. This is achieved by the DTE sending to the
modem a sequence of three ASCII characters specified by set_esc command. The
default character is '+'. The escape characters will be transmitted transparent to the
remote side.
Page 15

XM1630S Software Reference Manual
No. XM1630S-A00-104 xmodus swiss GmbH 15 / 32
4.2 Summary of commands
LAN CONFIGURATION CONFIGURE INPUT/OUTPUT
set_dhcp <enable/disable> DHCP set_user Set output mode of I/O ports
set_ip_add Set IP address get_user Get output mode of I/O ports
set_ip_mask Set IP mask set_ddr Set port type [i,o] of I/O ports
set_ip_gway Set the gateway get_ddr Get data direction of I/O ports
set_eth_speed Set LAN speed (10/100/AUTO) read_port Read status of I/O ports
show_config Show network configuration write_port Set status of I/O ports
show_config_o Show original network config. read_adc Read ADC input value
save Save configuration
validate Validate configuration
ping Ping IP address
arp a Request ARP table
ADMINISTRATION MENU
arp –d Delete ARP table set_pass Define user name and password
help Display menu help set_id Define ID name
quit Leave command mode reject Reset non saved changes
restore Restore factory default
CONFIGURE SERIAL INTERFACE
reset Reset non-saved setting
set_baud Set serial baud rate download Download new firmware
set_stop Set stop bits (1/1.5/2)
set_bits Set data bits (7/8)
set_par Set parity (EVEN/ODD/NONE)
CONFIGURE SECURITY
set_flow Set flow control (XON/HW/None) set_ftp Enable FTP Server
set_high water Set flow stall [1..99%] set_telnet Enable Telnet Server
set_low_water Set flow restart [1..99%] set_web Enable HTTP (web) Server
set_buf_size Set serial input buffer set_web_auth Enable web authorization
set_buf_delay Set serial input buffer delay set_telnet_port Define Telnet port
set_trusted_ip Define trusted IP address
show_config Show configuration
CONFIGURE SERIAL/TCP COMUNICATION
set_raw _socket Defines Telnet / RAW modes
set_iax_rx Enable IAR Rx filtering
AT COMMANDS
set_iac_tx Enable IAC Rx filtering AT Standard AT command
set_socket_tout Set Telnet session timeout ATD Dial out to IP address
set_dialin Enable dial-in (incoming call)
ATON MENU
Resume data session
set_dialin_port Def. dial-in port (incoming call) ATH Terminate connection
set_esc
Enable escape to command
mod.
go AT Go to AT command mode
set_dialin Enable dial-in (incoming call)
set_dialout Enable dial-out (outgoing call)
set_dialout_port Def. dial-out port (outgoing call)
set_dialout_ip Default IP address. for dial-out up Go to menu
set_auto Enable Auto dial-out help Display help
set_auto_hw Defines Auto dial-out trigger quit Leave command mode
Show_config Show serial/TCP configuration
Page 16

XM1630S Software Reference Manual
No. XM1630S-A00-104 xmodus swiss GmbH 16 / 32
4.3 Help screens
4.3.1 help<cr> Display Main menu
AL6000S Main menu
===================
1 Configure LAN interface
2 Configure serial interface
3 Configure serial/TCP communication
4 Go to I/O menu
5 Go to administration menu
6 Configure security
7 Go to overview/statistics menu
8 AT commands
Help Display menu specific help
Quit Leave command mode
4.3.2 1<cr> Display LAN configuration menu
LAN configuration
===================
up go to main menu
set_dhcp <enable/disable> DHCP
set_ip_add Set IP address
set_ip_mask Set IP subnet mask
set_ip_gway Set default gateway
set_eth_speed Set LAN speed (10/100/AUTO)
show_config Show network configuration
show_config_o Show original network configuration
save Save configuration to flash
validate Validate temporary conf. in Flash
ping Ping test IP address
arp –a Request ARP table
arp –d Delete ARP table
help Display menu specific help
quit Leave command mode
4.3.3 2<cr> Display Serial configuration menu
Serial config.
===================
up go to main menu
set_baud Set serial baud rate
set_stop Set stop bits (1/1.5/2)
set_bits Set data bits (7/8)
set_par Set parity (EVEN/ODD/NONE)
set_flow Set flow control (XON/RTS/NONE)
set_high_water Set flow stall (%) [1..99]
set_low_water Set flow restart (%) [1..99]
set_buf_size Set serial input buffer size
set_buf_delay Set serial input buffer delay (ms)
show_config Show serial configuration
save Save configuration to flash
help Display menu specific help
quit Leave command mode
Page 17

XM1630S Software Reference Manual
No. XM1630S-A00-104 xmodus swiss GmbH 17 / 32
4.3.4 3<cr> Display Serial/TCP configuration menu
Serial/TCP
===================
up go to main menu
set_raw_socket <enable/disable> TCP socket is raw, not Telnet
set_iac_rx <enable/disable> IAC rx filtering
set_iac_tx <enable/disable> IAC tx stuffing
set_socket_tout Set Telnet session inactivity timeout (min)
set_dialin <
enable/disable> dial-in (incoming calls)
set_dialin_port Server port number for dial-in
set_esc <
enable/disable> escape sequence scanning
set_str Set scanned escape sequence from serial
set_dialout <enable/disable> dial-out on dial-out IP/port
set_dialout_port Server port number for dial-out
set_dialout_ip Server IP address for dial-out (outgoing calls)
set_auto
<enable/disable> Automatic dial-out
set_auto_hw
<enable/disable> Dial-out on DTR
show_config Show serial configuration
save Save configuration to flash
help Display menu specific help
quit Leave command mode
4.3.5 4<cr> Display Input/Output configuration menu
Input/Output menu
===================
up go to main menu
set_user Set output mode [0..3] [<d>¦<u>]
get_user Get output mode [0..3]
set_ddr Set port type [4..5] [<i>¦<o>]
get_ddr Get data direction
read_port Read port input [0..5]
write_port Set port output [0..5] [0/1]
read_adc Read ADC input [6..8]
save Save port setting as default
help Display menu specific help
quit Leave command mode
4.3.6 5<cr> Display Administration menu
Admin. menu
===================
up go to main menu
set_pass Set user name and password
get_id Set an identification name
show_config Show configuration
save Save configuration to Flash
reject Reset non-saved changes
restore Restore factory settings
reset Reset device
download Prepare download (WARNING – Flash deleted!)
help Display menu specific help
quit Leave command mode
Page 18

XM1630S Software Reference Manual
No. XM1630S-A00-104 xmodus swiss GmbH 18 / 32
4.3.7 6<cr> Display Security menu
Security menu
===================
up go to main menu
set_login <enable/disable> Terminal menu login
set_ftp <enable/disable> FTP server
set_telnet <enable/disable> Telnet service
set_web <enable/disable> WEB server
set_web_auth <enable/disable> WEB server authentication
set_telnet_port Set telnet listener port number
set_trusted_ip Trusted IP address for WEB/TELNET
show_config Show security configuration
save Save configuration to flash
help Display menu specific help
quit Leave command mode
4.3.8 8<cr> Display AT commands menu
AT commands
===================
up go to main menu
AT Test connection / an OK will be returned
ATD Dial [r[trb]/t][IP] [optional Port]
ATO Resume data session
ATH Terminate connection
go AT Go to AT command mode
help Display menu specific help
quit Leave command mode
Page 19

XM1630S Software Reference Manual
No. XM1630S-A00-104 xmodus swiss GmbH 19 / 32
4.4 Description of commands
4.4.1 LAN configuration commands
set_dhcp:
set_dhcp enable = enables DHCP Protocol
set_dhcp disable = disables DHCP Protocol
Note: Before enable the DHCP protocol set IP Address to: 0.0.0.0
set_ip_add:
set_ip_add xxx.xxx.xxx.xxx = sets the IP address
Example: set_ip_add 192.168.0.1 <cr>
set_ip_mask:
set_ip_mask xxx.xxx.xxx.xxx = sets the IP subnet mask
Example: set_ip_mask 255.255.255.0 <cr>
set_ip_gway:
set_ip_gway xxx.xxx.xxx.xxx = sets the Gateway address
Example: set_ip_gway 192.168.0.20 <cr>
set_eth_speed:
set_eth_speed 10 = sets the Ethernet speed to 10Mbit/s
set_eth_speed 100 = sets the Ethernet speed to 100Mbit/s
set_eth_speed AUTO = sets the Ethernet speed to auto detection
Example: set_eth_speed AUTO <cr>
show_config:
show_config = show the actual configuration
show_config_o = show the default network configuration
save:
save = save actual configuration
Page 20

XM1630S Software Reference Manual
No. XM1630S-A00-104 xmodus swiss GmbH 20 / 32
validate:
validate = validates actual configuration
Note:
The LAN configuration menu contains a validation procedure, which prevents the
storing of incorrect configuration data. Saving of new settings cause an immediate
reset and must be validated within a period of 3 minutes. After this timeout with no
validation, the module returns to the previous configuration. This ensures that invalid
settings do not render a device unreachable.
ping:
ping xxx.xxx.xxx.xxx = pings the IP Address entered
Example: ping 192.168.0.1<cr>
arp:
arp –a = show ARP table
arp –d = delete ARP table
4.4.2 Serial interface configuration commands
set_baud:
set_baud 9600 = sets the serial baud rate from 9600 to 230400
…
set_baud 230400 = sets the serial baud rate to 230400
Example: set_baud 9600 <cr>
set_stop:
set_stop 1 = sets 1 stop bits
set_stop 1.5 = sets 1.5 stop bits
set_stop 2 = sets 2 stop bits
Example: set_stop 1 <cr>
set_bits:
set_bits 7 = sets number of data bits to 7
set_bits 8 = sets number of data bits to 8
Example: set_bits 8 <cr>
Page 21

XM1630S Software Reference Manual
No. XM1630S-A00-104 xmodus swiss GmbH 21 / 32
set_par:
set_par EVEN = sets parity to EVEN
set_par ODD = sets parity to ODD
set_par NONE = sets No parity
Example: set_par NONE<cr>
set_flow:
set_flow XON = sets flow control to XON/XOFF
set_flow RTS = sets flow control to RTS/CTS
set_flow NONE = disables flow control
Example: set_flow RTS<cr>
set_high_water:
set_high_water xx = set flow control stall from 1..99 in percent.
Example:
set_high_water 80 <cr> / If input buffer is 80% full, data reception is stopped.
set_low_water:
set_low_water xx = set flow control restart from 1..99 in percent.
Example:
set_low_water 20<cr> / If buffer is reduced down to 20%, data reception is
restarted.
set_buf_size:
set_buf_size [xxx] = sets input buffer packet size in bytes from: 0…4K.
This command is primarily to buffer the data sent from
serial to ethernet.
Example:
set_buff_size 350<cr> / After reception of 350 bytes, data is packed in an IP
frame and send to the remote side.
set_buf_delay:
set_buf_delay [t] = Define input buffer packet timeout in ms from 0..10s.
This command is analogous to the previous command.
The buffering of data shall either wait for the buf_size
configured (in the previous command) or the time t (ms)
Example:
set_buf_delay 100<cr> / After 100mS data is packed in an IP frame and send to
the remote side independent of either the buffer is full or
not.
Page 22

XM1630S Software Reference Manual
No. XM1630S-A00-104 xmodus swiss GmbH 22 / 32
4.4.3 Serial/TCP configuration commands
set_raw_socket:
set_raw_socket enable = Data transmission mode is raw
set_raw_socket disable = Data transmission mode is Telnet
Note:
set_dial_in and set_dialin_port configurations should be issued prior to this command
Example:
set_dial_in enable<cr>
set_dialin_port 8000<cr>
set_raw_socket enable<cr>
set_iac_rx:
set_iac_rx enable = IAC Rx filtering is enabled (Telnet specific command)
set_iac_rx disable = IAC Rx filtering is disabled.
set_iac_tx:
set_iac_tx enable = IAC Tx stuffing is enabled (Telnet specific command)
set_iac_tx disable = IAC Tx stuffing is disabled.
set_socket_tout:
set_socket_tout x = If the Telnet session is inactive for “x” seconds, the
connection is terminated.
set_dialout:
set_dialout enable = Enable dial out (outgoing calls) on dial-out port.
set_dialout disable = Disable dial out.
Note: set_dialout_port should be issued prior to this command
Example:
set_dialout_port 8000<cr> / Defines port 8000 for dial-out (outgoing calls)
set_dialout enable<cr> .
ATD 192.168.1.33<cr> / Dial to a remote IP address
set_dialout_port:
set_dialout_port xxxx = Defines the server port number for dial -out
Example:
set_dialout_port 8000<cr> / Defines port 8000 for dial-out (outgoing calls)
Page 23

XM1630S Software Reference Manual
No. XM1630S-A00-104 xmodus swiss GmbH 23 / 32
set_esc:
set_esc enable = Enable escape to command mode
set_esc disable = Disable escape to command mode
This monitor flag will enable or disable the scanning of
the escape sequence.
set_str:
set_str xxx = Defines the escape string
The Telnet Server scans for this escape sequence and
transfers the control to the command parser. By
default, the Telnet Server scans for “+++”.
Example:
set_str +++<cr> / Defines “+++” as escape string (default).
set_dialin:
set_dialin enable = Dial-in to the LAN modem enabled (incoming calls).
set_dialin disable = Dial-in disabled.
Note:
set_dialin_port must be defined prior to this command
Example:
set_dialin_port 8000<cr> / Defines port 8000 for incoming calls.
set_dialin enable<cr> / Dial-in to the LAN modem enabled. The modem
becomes reachable over port 8000.
set_dialin_port:
set_dialin_port xxxx = Defines server port number for dial-in (incoming calls)
Example:
set_dialin_port 8000<cr> / Defines port 8000 for incoming calls.
set_dialout_ip:
set_dialout_ip xxxx = Defines the default IP address for automatic dial-out
Example:
set_dialout_ip 192.168.1.32<cr> / Defines address for automatic dial-out function.
Page 24

XM1630S Software Reference Manual
No. XM1630S-A00-104 xmodus swiss GmbH 24 / 32
set_auto:
set_auto enable = Enables the automatic dial-out function
set_auto disable = Disables the automatic dial-out function
Note:
The triggering of the automatic dial-out procedure is accomplished with either the
DTR line or with data sent to the modem. This should be defined with the
set_auto_hw command.
The IP address, which is used together with the automatic dial-out procedure, should
be defined with the set_dialout_ip command.
Example:
set_dialout_ip 192.168.1.47<cr> / Defines address for automatic dial-out function.
set_auto_hw enable<cr> / Automatic dial-out triggering with DTR line.
set_auto enable<cr> / Enables the automatic dial-out function
Action: upon activation of the DTR line, the LAN modem automatically initiates a
connection to the IP address 192.168.1.47. After the connection is established, the
DCD line became active and data can be exchanged.
set_auto_hw:
set_auto_hw enable = Automatic dial-out triggering with DTR line.
set_auto_hw disable = Automatic dial-out triggering with data send to modem.
4.4.4 Input / Output configuration commands
set_user:
set_user [0..3] [d/u] = Set mode of I/O ports.
Ports : 0..3
Modes : d=default / u=user
Example:
set_user 0 d<cr> / Port 0 is set for default mode.
get_user:
get_user [0..3] = Read port
Example: get_user 0<cr>
Page 25

XM1630S Software Reference Manual
No. XM1630S-A00-104 xmodus swiss GmbH 25 / 32
set_ddr:
set_ddr [4,5] [i/o] = Set port type of Ports 4,5
Ports: 4,5
Type: i = input / o = output
Example:
set_ddr 4 o<cr> / Port 4 is defined as output
get_ddr:
get_ddr [4,5] = Read type of port 4,5
Example:
get_ddr 4<cr> / Answer: Port direction:INPUT
read_port:
read_port [0..5] = Read input status of ports 0..5.
Example:
read_port 0<cr> / Answer: Port state: 1
write_port :
write_port [0..5][0,1] = Write status of ports 0..5 with 0/1.
Example:
write_port 5 1<cr> = Status of port 5 = 1
set_ddr 5 o<cr> = type of port 5 = output
read_adc:
read_adc [6..8] = Read ADC input of ports 6..8.
Page 26

XM1630S Software Reference Manual
No. XM1630S-A00-104 xmodus swiss GmbH 26 / 32
4.4.5 Administration commands
set_pass:
set_pass = Defines user name and password.
Example:
set_pass<cr>
/ Answer of module:
Please enter new user name (4..8 characters) : ADMIN <cr>
Please enter new password (4..8 characters) : PASSWORD<cr>
Please confirm the new password: PASSWORD<cr>
Answer of module: “New user data set”
set_id:
set_id xxxxxxxx = Defines an identification name of the module.
Example:
set_id MODEM<cr> / Defines “MODEM” as the identification name
reject:
reject = reset non-saved changes
restore:
restore = restore factory settings
reset:
reset = reset device
4.4.6 Security configuration commands
set_login:
set_login enable = enable Terminal menu login
set_login disable = disable Terminal menu login
Example: set_login disable<cr>
Note: This command selects if a login is required to enter the terminal menu from the
serial port.
Page 27

XM1630S Software Reference Manual
No. XM1630S-A00-104 xmodus swiss GmbH 27 / 32
set_ftp:
set_ftp enable = enable FTP Server
set_ftp disable = disable FTP Server
Note: This command selects if the FTP server of the module is accessible from the
remote side. The FTP server enables modification of the web pages. Disable it to
protect against unwanted modifications.
set_telnet:
set_telnet enable = Enable TELNET service
set_telnet disable = Disable TELNET service
Note: This command enables the Telnet server of the module. Disable it to block
login via Telnet from remote side. The command “set_telnet_port” defines the logical
port of the server (default 23). This is a global flag, which will enable/disable the
Telnet Services in the LAN-modem.
set_web:
set_web enable = Enable WEB Server
set_web disable = Disable WEB Server
Note: This command enables the WEB (HTTP) Server of the module. If disabled,
configuration and monitoring of the module through the web browser is inhibited.
set_web_auth:
set_web_auth enable = Enable WEB server authentication
set_web_auth disable = Disable WEB server authentication
Note: This command enables the authentication and login on to the web server of the
module. If disabled, the web server interface is unprotected and accessible without
password entry.
set_telnet_port:
set_telnet_port xx = Defines the Telnet listener port number
Telnet-port corresponds to the port number. By default
the port number is TCP 23. The user is given an option
to change this port number.
Example :
set_telnet_port 23 / Defines 23 as Telnet port number
Page 28

XM1630S Software Reference Manual
No. XM1630S-A00-104 xmodus swiss GmbH 28 / 32
set_trusted_ip:
set_trusted_ip xxx.xxx.xxx.xxx = Defines the trusted IP Address
Example:
set_trusted_ip 192.168.0.39
None: If “Trusted IP address” is set non-zero, only the specified IP address (trusted
address) is allowed to login on to the module and take configuration and monitoring.
4.4.7 AT commands description
AT:
AT = Basic AT command “OK” will be returned
ATD:
ATD [mode] [IP] [Port] = Manual telnet dial-out command (outgoing calls)
Mode : T = Telnet mode / R = RAW mode
IP : IP address
Port : port number (optional)
Example :
ATD T 192.168.0.39 23<cr> / dial-out in Telnet Mode, Port = 23
ATD R 192.168.0.39 8000<cr> / dial-out in RAW Mode, Port = 8000
ATO:
ATO = On telnet dial-out, the control is transferred to the command
parser passing the escape sequence “+++”. Invoking “ATO”
would resume the telnet dial-out exiting the command parser.
ATH:
ATH = Exits the command parser, unlocks the configurations and
terminates the session.
go AT:
go AT = Go to AT command mode (valid only on serial port)
Page 29

XM1630S Software Reference Manual
No. XM1630S-A00-104 xmodus swiss GmbH 29 / 32
5. FIRMWARE UPDATE
The linear flash memory up-loader allows flash memory to be upgraded with revised
modem firmware. This process transfers (uploads) the upgraded modem firmware
(data) from the host computer to the LAN-modem using the serial RS232 interface.
During the upload, the modem transfers the data to the flash memory device.
When the “download” command is issued, the present program in FLASH modem is
deleted and the firmware boot loader is invoked. The user can then load the new
firmware in S-record format.
1. Put the new modem firmware file (i.e. AL6000S_ V1.1.4.a79) in an appropriate
directory on the computer’s hard disk.
2. Connect to the modem via the serial interface and command “download” in the
“admin” menu. This will invalidate the program in FLASH and cause the modem
to reboot. The serial settings will then be 115200, 8N1 and XON/XOFF flow
control so it may be necessary to reconfigure the communications program used
(eg. Hyperterminal or TeraTerm).
3. The following menu will appear when the ENTER key is pressed:
Boot mode (V1.0)
================
Enter “p” to program new code
Enter “q” to quit and re-check
Enter “s” to start program – no checking
4. Now start the flash up-loader by typing “p”. The following message appears upon
issuing the “p” command.
Are you sure ? (y/n)
5. Acknowledge with “y” and the following message will appear:
FLASH deleted, please start S-rec download:
6. Start the upload to the modem, ensuring that the transfer takes place in binary
mode. The upload takes about 15s to complete during which each S-record line
programmed is displayed with a dot on the screen.
After the firmware file has been loaded successfully, the following message
appears and the new software starts automatically.
Download successful. Board restarting
7. Check the new firmware version with show_config (Admin Menu).
8. The original configuration of the modem will normally be retained across a
firmware upgrade
However, in case of a special software version where also parameters may be
reset, it would then be necessary to reconfigure the modem. Check with the
release notes of the new firmware to be sure.
Page 30

XM1630S Software Reference Manual
No. XM1630S-A00-104 xmodus swiss GmbH 30 / 32
6. APPLICATIONS
6.1 Setting up a Telnet Configuration Session
Ensure that the TELNET service is enabled, its port number is known and the IP
address of the modem is known (default 192.168.1.3 port 23). Configure password
protection and trusted IP address as required. (These changes can always be
performed over the local serial interface).
With a Telnet client connect to the LAN module’s IP address and port number.
Afterwards you will see the AL6000S welcome message and you can start your
configuration session over Telnet.
6.2 Start a manual dial-out session in TELNET mode
The following commands should be issued (example):
set_raw_socket disable<cr> / Ensure TCP socket is Telnet
set_dialout_port 8000<cr> / Defines port number 8000
set_dialout_ip 192.168.1.77<cr> / Defines server IP address 192.168.1.77
set_dial_out enable<cr> / Make sure that dial-out is activated
Then start the dial-out procedure with ATD command:
ATD<cr> / Connect to the default Telnet server
The default settings can be overwritten as required by extending the ATD command
(example):
ATD T 192.168.1.37 1499 / Connect to TELNET TCP socket at
192.168.0.37, on port 1499
If the TELNET server supports TELNET binary mode it is possible to perform file
transfers, such as with xmodem and zmodem protocols.
6.3 Start a manual dial-out session in RAW mode
The following commands should be issued (example):
set_raw_socket enable<cr> / Ensure RAW socket is used
set_dialout_port 8000<cr> / Defines port number 8000
set_dialout_ip 192.168.1.77<cr> / Defines server IP address 192.168.1.77
set_dial_out enable<cr> / Make sure that dial-out is activated
Then start the dial-out procedure with ATD command:
ATD<cr> / Connect to the default Telnet server in RAW
mode
Page 31

XM1630S Software Reference Manual
No. XM1630S-A00-104 xmodus swiss GmbH 31 / 32
The default settings can be overwritten as required by extending the ATD command
(example):
ATD R 192.168.1.37 1499 / Connect to RAW TCP socket at 192.168.0.37,
on port 1499
If the TCP socket defines IAC filtering in one particular direction, this can be
configured using the set_iac_rx and set_iac_tx command as appropriate. It can also
be specified in the ATD command as follows:
ATD R R / Connect to RAW TCP socket at default IP
address and port, using IAC filtering on received
data
6.4 Automatic Dial-out
This function allows automatically establishing a dial-out procedure (outgoing call) to
a remote IP address just by triggering with either the DTR line (CT108.2) or by data
send to the modem. The following commands configure this function:
set_auto:
set_auto enable = Enables the automatic dial-out function
set_auto disable = Disables the automatic dial-out function
set_dialout_ip:
set_dialout_ip xxxx = Defines the default IP address for automatic dial-out
Example:
set_dialout_ip 192.168.1.32<cr> / Defines IP address for automatic dial-out
function.
set_auto_hw:
set_auto_hw enable = Automatic dial-out triggering with DTR line.
set_auto_hw disable = Automatic dial-out triggering with data send to modem.
Note:
The triggering of the automatic dial-out procedure is accomplished with either the
DTR line or with data sent to the modem. This should be defined with the
set_auto_hw command.
The IP address that is used together with the automatic dial-out procedure should be
defined with the set_dialout_ip command.
Page 32

XM1630S Software Reference Manual
No. XM1630S-A00-104 xmodus swiss GmbH 32 / 32
Example:
set_raw_socket disable<cr> / Ensure TCP socket is Telnet
set_dialout_ip 192.168.1.47<cr> / Defines address for automatic dial-out function.
set_dialout_port 8000<cr> / Defines port number 8000
set_auto_hw enable<cr> / Automatic dial-out triggering with DTR line.
set_auto enable<cr> / Enables the automatic dial-out function
Action:
Upon activation of the DTR line, the LAN modem automatically initiates a TELNET
connection to the IP address 192.168.1.47, port 8000. After the connection is
established, the DCD line became active and data can be exchanged. The serial
interface must be defined to use RTS/CTS flow control for this mode to operate
correctly.
6.5 Dial-in
In order for dial-in to be supported, the Dial-in mode must be enabled. This can be
performed using:
Set_dialin_port 1499 / Configure the dial-in port to 1499
set_raw_socket disable<cr> / Ensure TCP socket is Telnet
set_dialin enable / enable dial-in
Remote clients can now establish TCP connections to the modem at its IP address,
port 1499.
When a connection exists, data received from the serial port is transferred to the
remote client/server and data received from the remote client/server is sent to the
serial port.
Note also that the default settings can be configured comfortably using the web
interface.
 Loading...