

Page 1

1:16 STARTER KIT USER’S GUIDE
The 6000940 XMODS Starter Kit revs up
your XMODS experience.
Please read this user’s guide before
building and using your new buggy.
PRECISION
CONTROL!
Page 9.
1:16 SCALE
AGE 8+
Page 2

2
Contents
XMODS Custom RC Starter Kit ................................................................................................................. 3
Installing Buggy Batteries ......................................................................................................................... 4
Install the Transmitter Battery ................................................................................................................. 5
Assembling Your XMODS Custom RC ................................................................................................... 6
Assembling the Buggy Chassis ............................................................................................................ 6
Pairing Your Transmitter and the Buggy .......................................................................................... 7
Mounting the Buggy Body on the Chassis ...................................................................................... 8
Recommended Decal Placement ....................................................................................................... 8
Driving Your Buggy and Adjusting Trim ............................................................................................... 9
XMODS Upgrades ......................................................................................................................................10
FCC Information ..........................................................................................................................................11
Limited Warranty ........................................................................................................................................12
Page 3
3
XMODS Custom RC Starter Kit
Thank you for purchasing your XMODS Custom RC Start Kit! Your starter kit features:
• Four-wheel spring suspension to provide improved handling over uneven surfaces.
• Decals to customize the body exterior.
• Multiple frequency bands that allow up to eight people to race.
• Digitally proportional steering for optimal speed, acceleration, and maneuverability.
To really get your motor running, customize your XMODS with optional upgrades for both
performance and looks, available at your local RadioShack store. Check out the line-up of XMODS
upgrades available online at www.RadioShack.com.
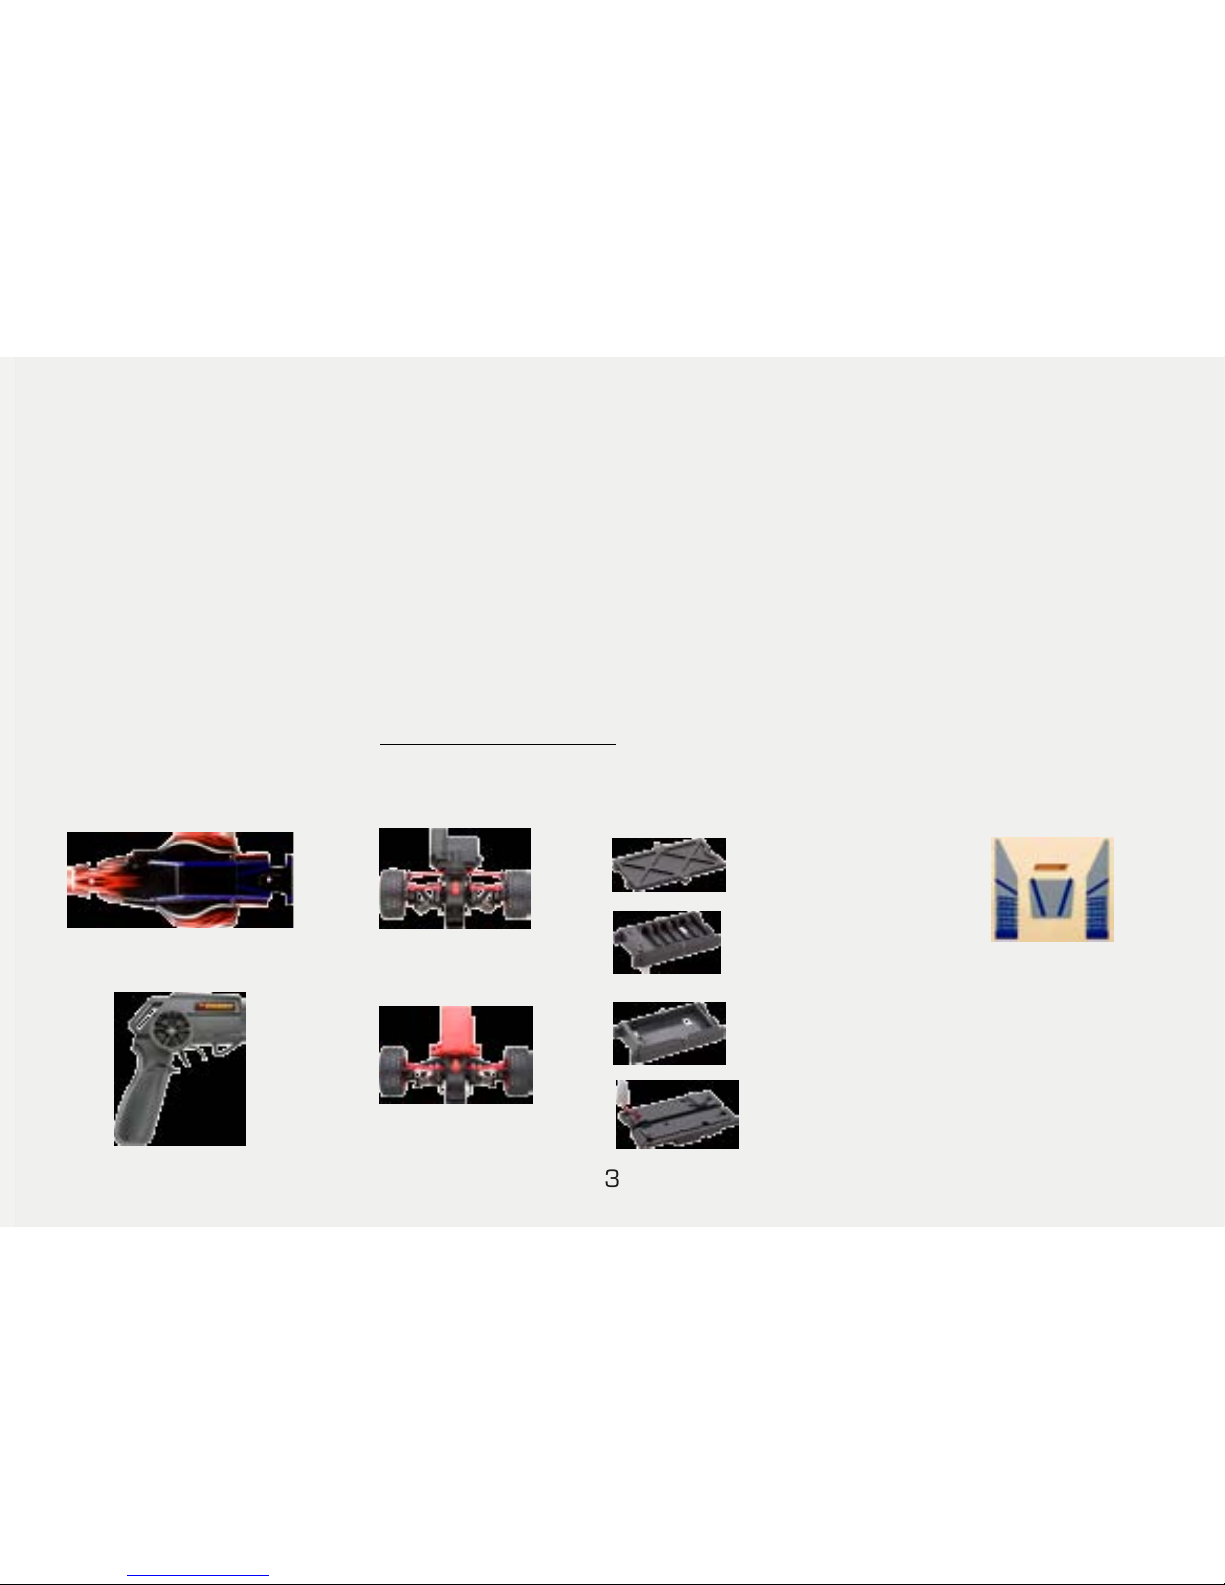
Your Starter Kit Includes
Screw (4)
Body clip (4)
User’s Guide
AA
Battery
Box
Battery
Cover
9.6V
Battery
Box
Main
Control Unit
Transmitter
Buggy Body
Front Unit
Motor Unit
Decal Sheet
Page 4
4
Install Buggy Batteries
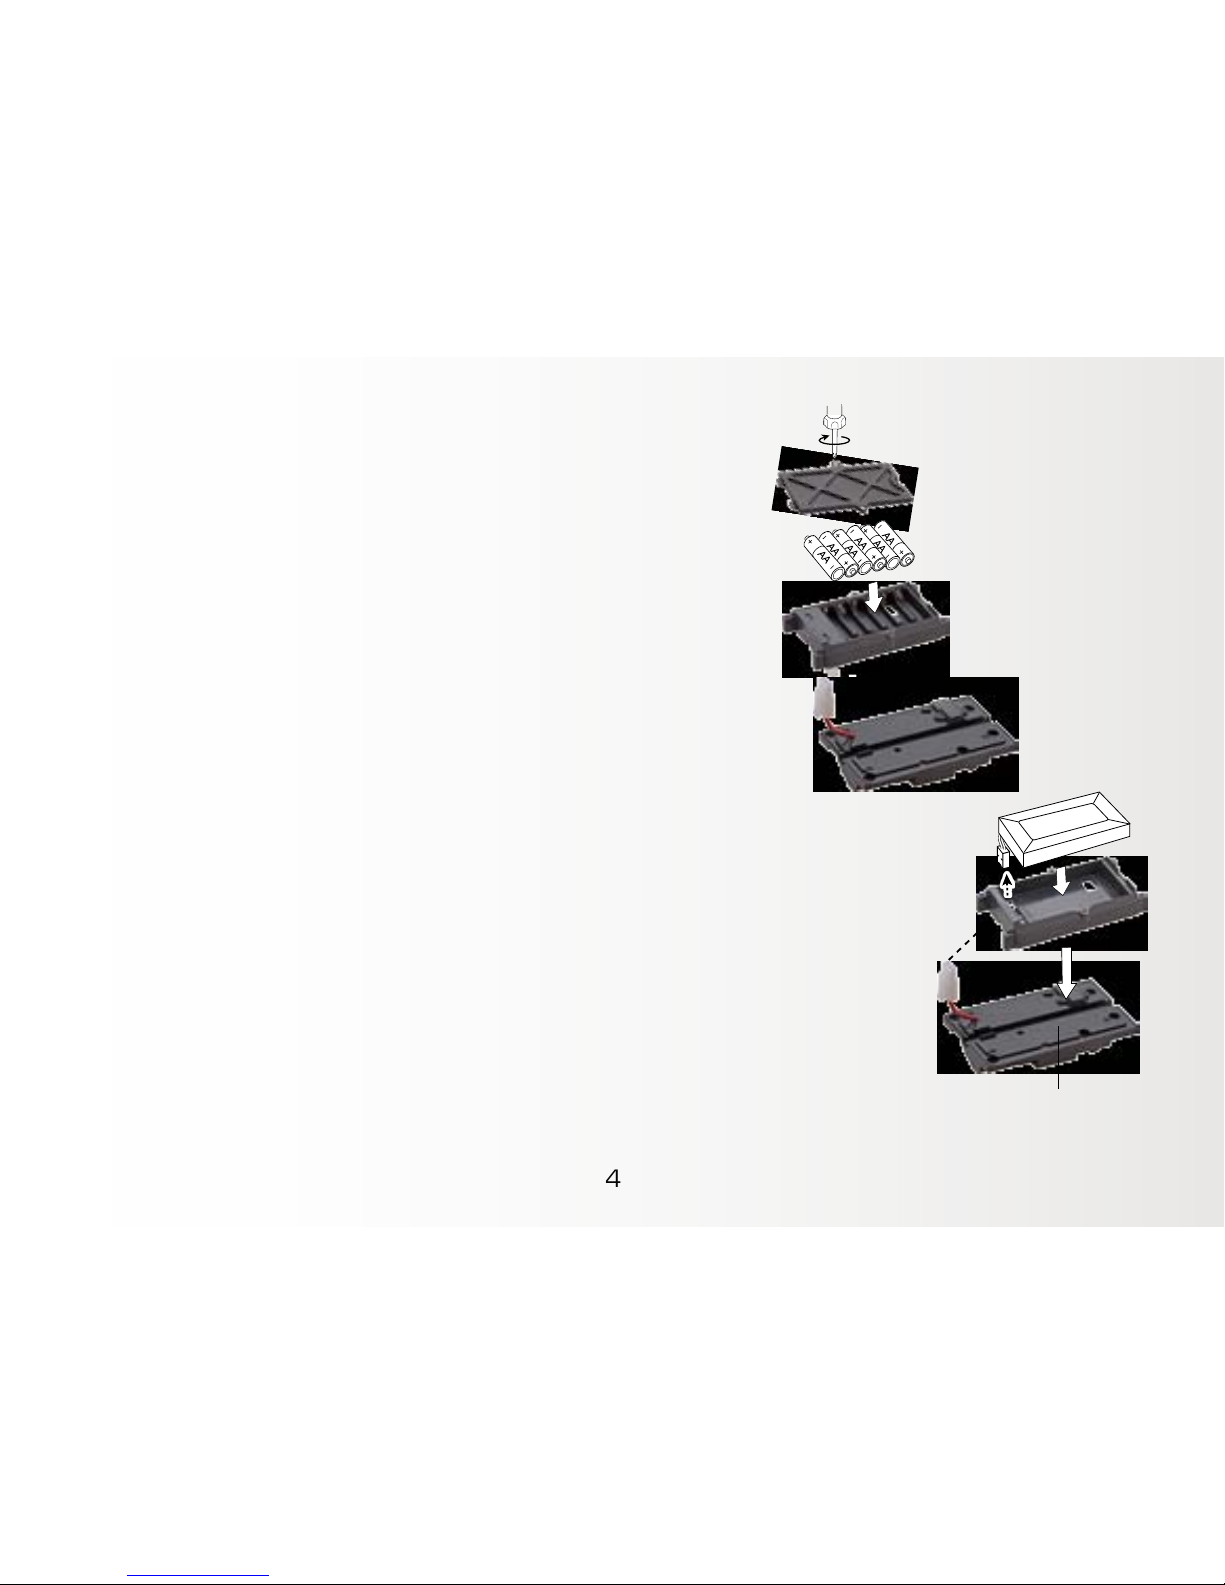
To install AA batteries:
1. Make sure the power switch on the chassis is OFF.
2. Remove the screw on the AA battery box cover. Then
carefully unlatch and remove the cover.
3. Insert 6 AA batteries (not included) in the box, matching the
polarity symbols (+ and –) marked inside.
4. Replace the battery box cover and
secure the latch.
To install a 9.6V Ni-MH battery
1. Be sure that the front and rear units are detached from the main control unit.
2. Remove the 6 screws on the top side of main control unit. Then carefully
unlatch the AA battery box.
3. Place the 9.6V battery box onto the main control unit and attach it using the
screws.
4. Assemble the front and rear unit to main control unit (see “Assembling the
Buggy Chassis” on page 6).
5. Insert the 9.6V Ni-MH battery (not included) into the battery box and connect
the female connector with the male connector of the main control unit.
6. Replace the battery box cover and
secure the latch.
Main control unit
9.6V
Page 5
5
Install the Transmitter Battery
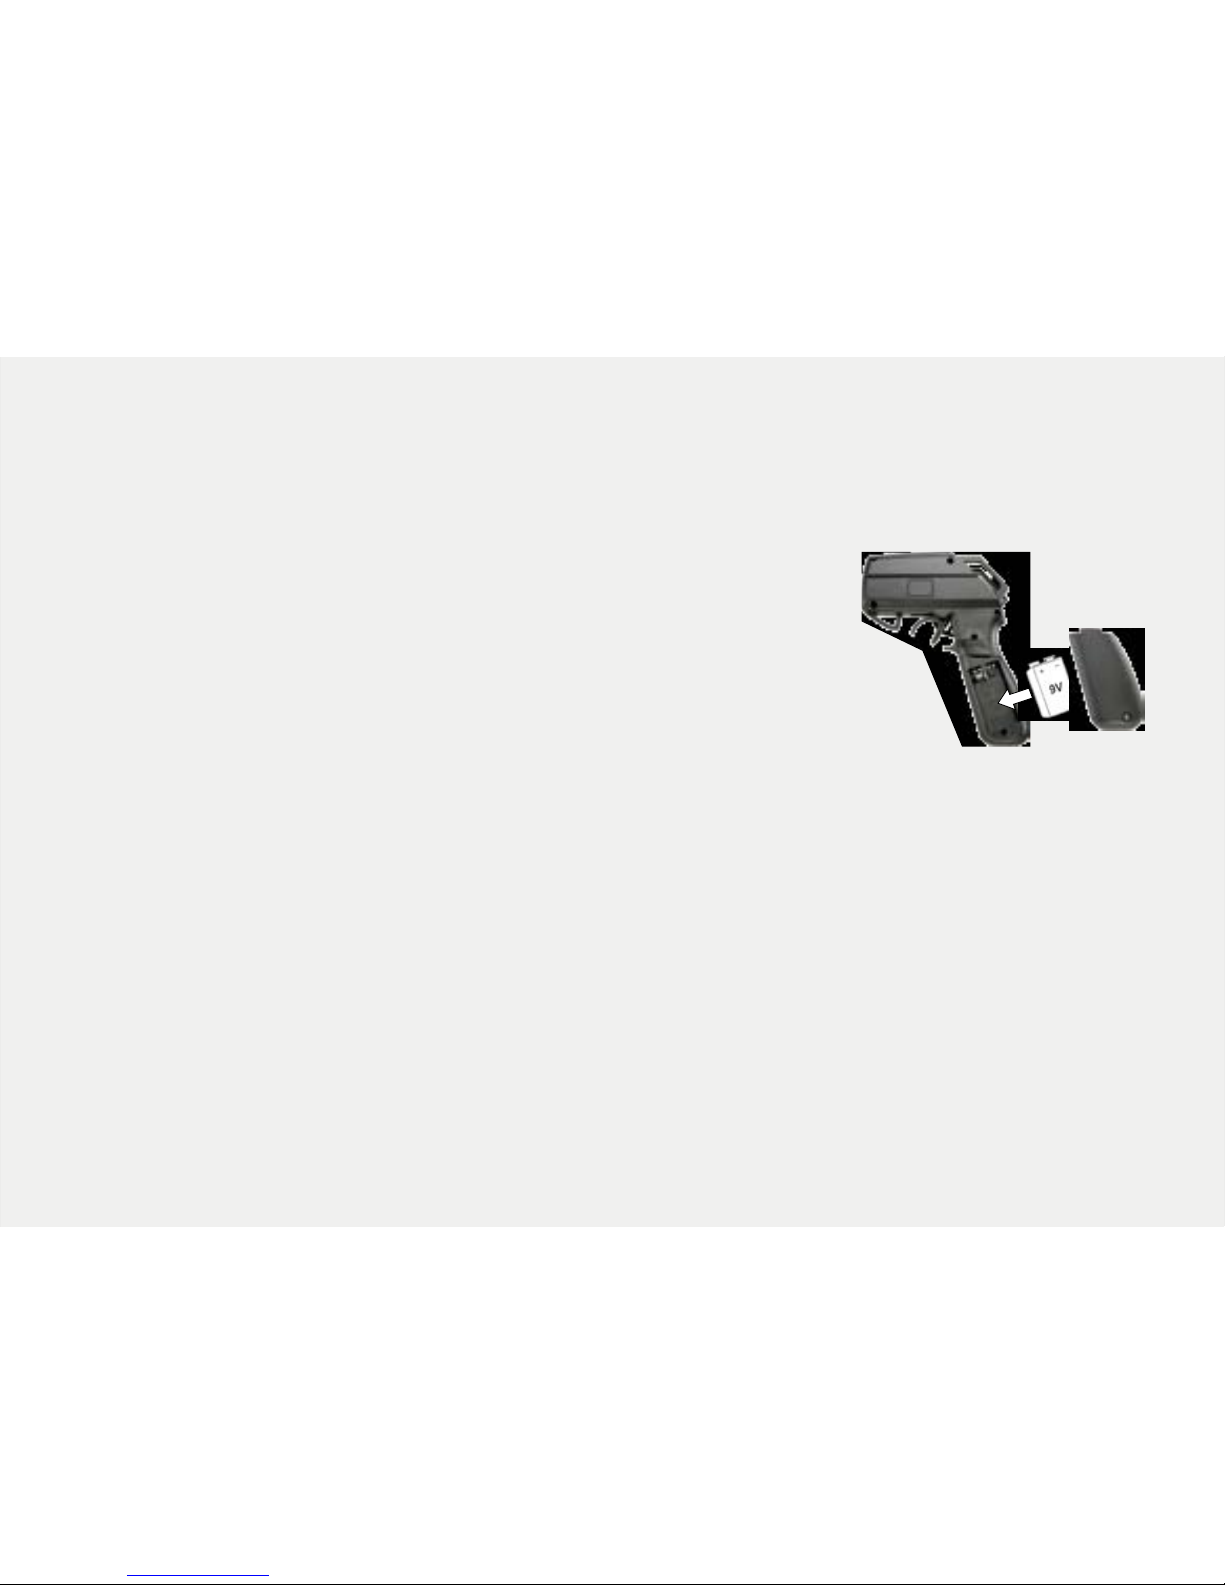
Your transmitter needs a 9V battery (not included). We recommend 9V alkaline batteries
for better performance. If the LED is off or the range of your buggy decreases, replace
the battery.
1. Make sure the power switch is OFF, then remove the screw
on the battery compartment.
2. Insert a 9V battery in the compartment, matching the
polarity symbols (+ and –) marked inside.
3. Snap the cover back in place and replace the screw.
Battery Notes:
• For better performance, use the 9.6V Ni-MH battery pack. Use only a 9.6V Ni-MH battery specified
for remote control (R/C) vehicles and that precisely fits the 9.6V battery box included with this
product.
• Dispose of old batteries promptly and properly. Do not burn or bury batteries.
• Use only fresh batteries of the required size and recommended type.
• Do not mix old and new batteries, different types of batteries (standard, alkaline, or rechargeable),
or rechargeable batteries of different capacities.
• If you do not plan to use the vehicle for several days, remove the batteries. Batteries can leak
chemicals that can destroy electronic parts.
Page 6
6
Assembling Your XMODS Custom RC
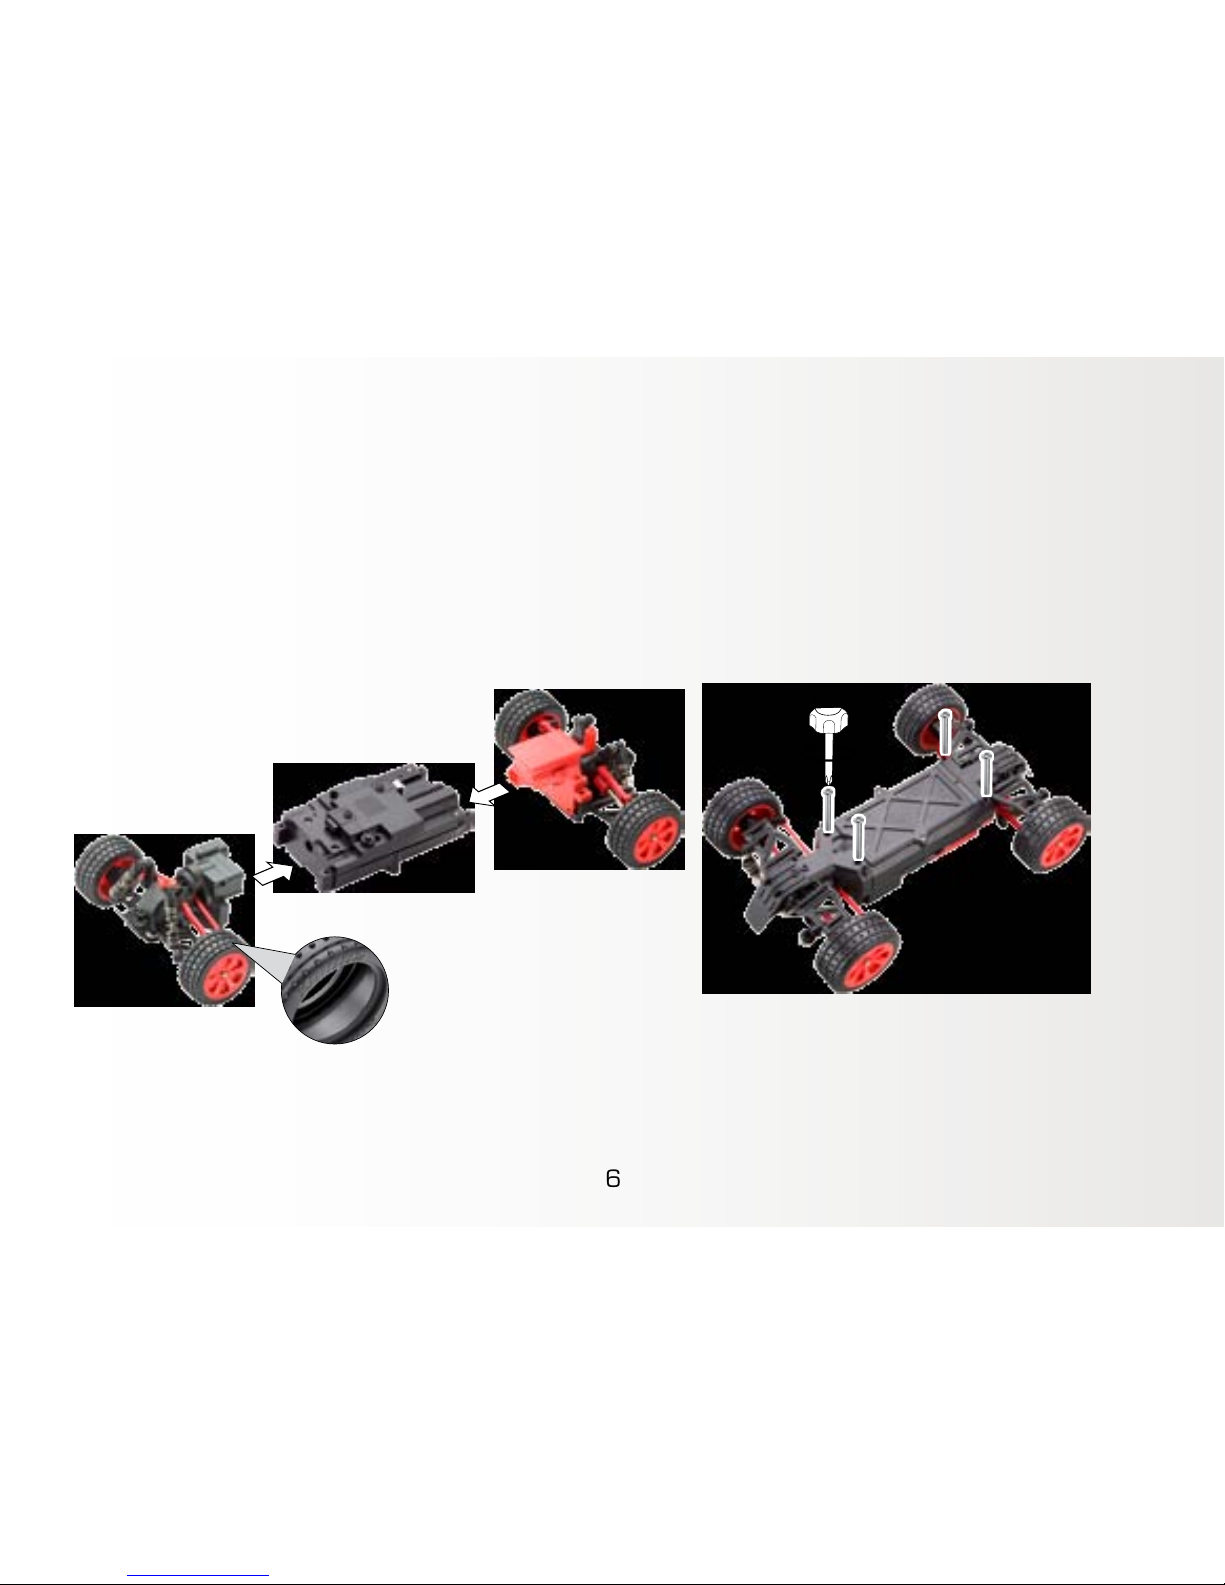
Assembling the Buggy Chassis
1. Connect the terminal of the Front Unit to the terminal of the Main Control Unit, and
secure them with two screws.
2. Connect the terminal of the Rear Unit to the terminal of the Main Control Unit, and
secure them with two screws.
Note: When updating your buggy with new rubber tires, to run smoothly make sure you
fit the tires aligned with the XMODS logo facing on the outside.
Page 7
7
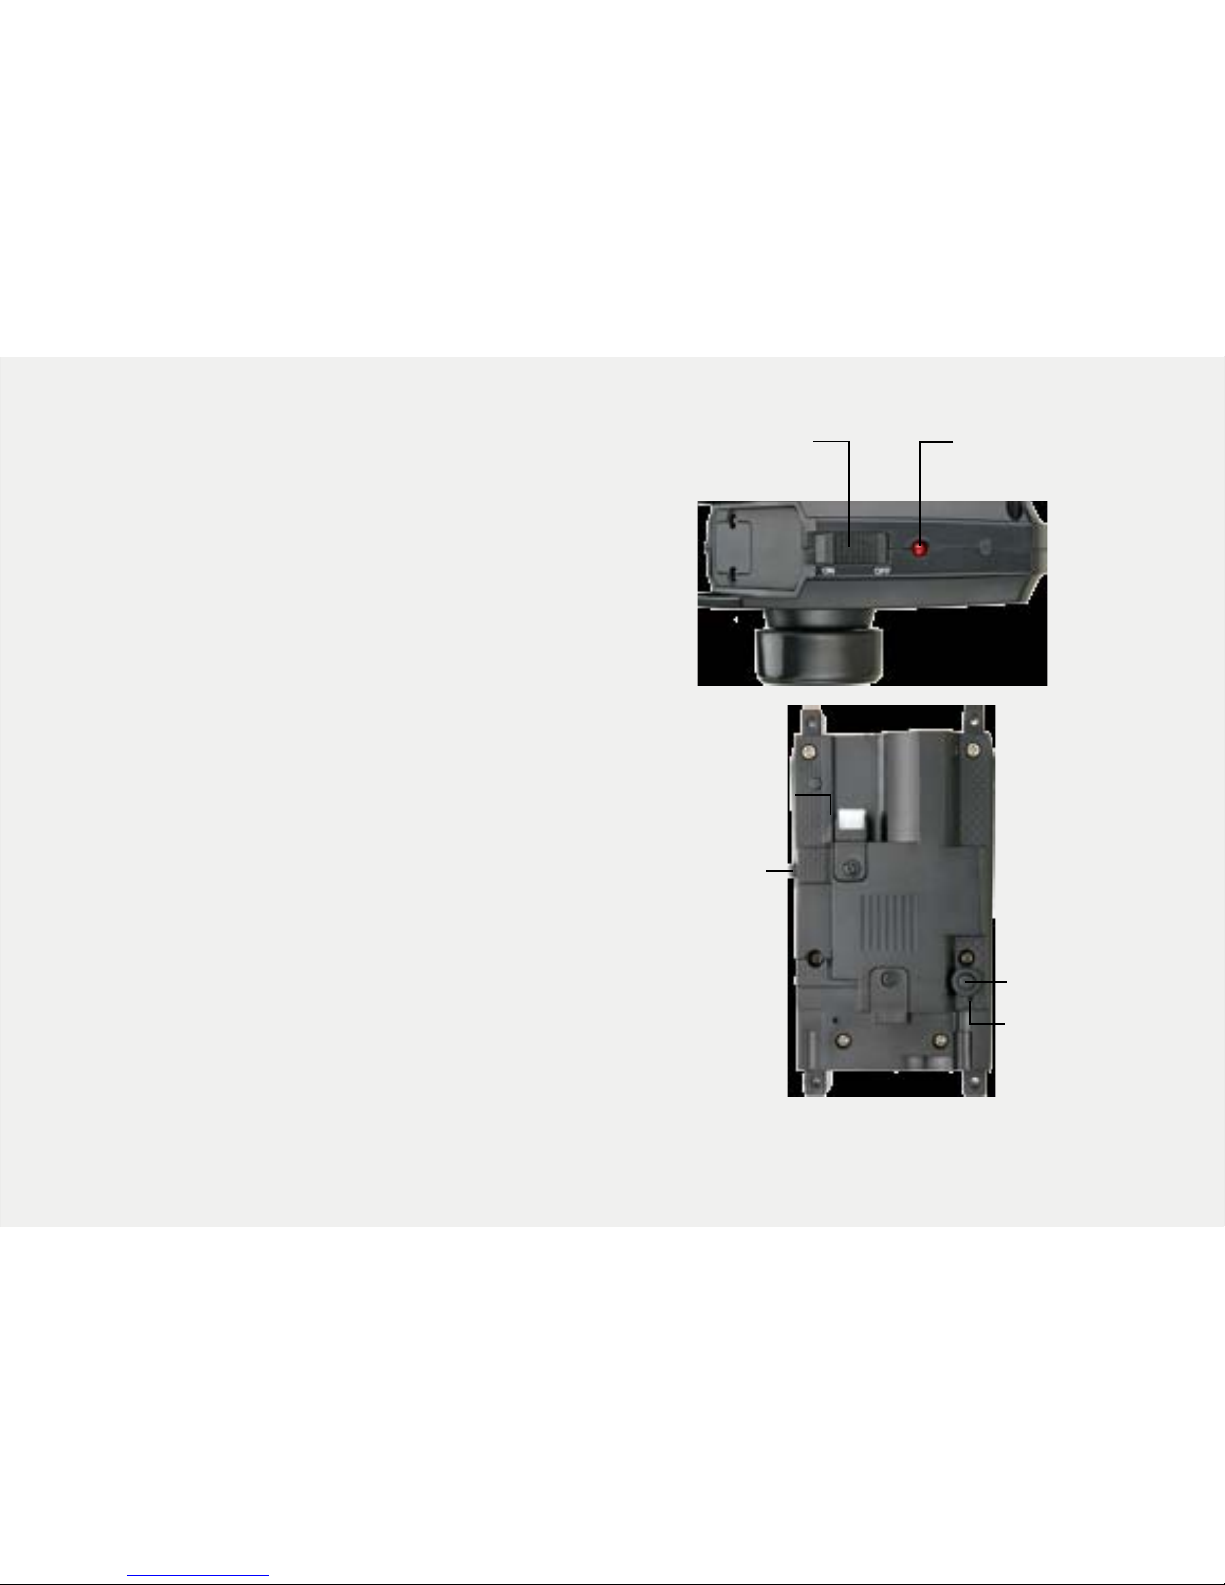
Pairing Your Transmitter and the Buggy
Your XMODS operates at a frequency of 2.4Ghz.
Before driving for the first time, you must pair the
transmitter and buggy. The pairing should be made
before mounting the body.
1. Turn on the transmitter. The LED indicator on
the transmitter flashes slowly.
2. Turn on the buggy.
3. Press and hold the pairing button for 3
seconds; the buggy LED flashes quickly.
When the LED stops flashing, pairing is
complete.
Note:
• Your buggy and transmitter remain paired for
future use, even when batteries are removed
from the transmitter or the buggy.
• If the pairing failed, turn off the transmitter
and the buggy, move closer, and then try
again.
ON/OFF
LED Indicator
ON/OFF
Pairing
Button
LED Indicator
Page 8
8
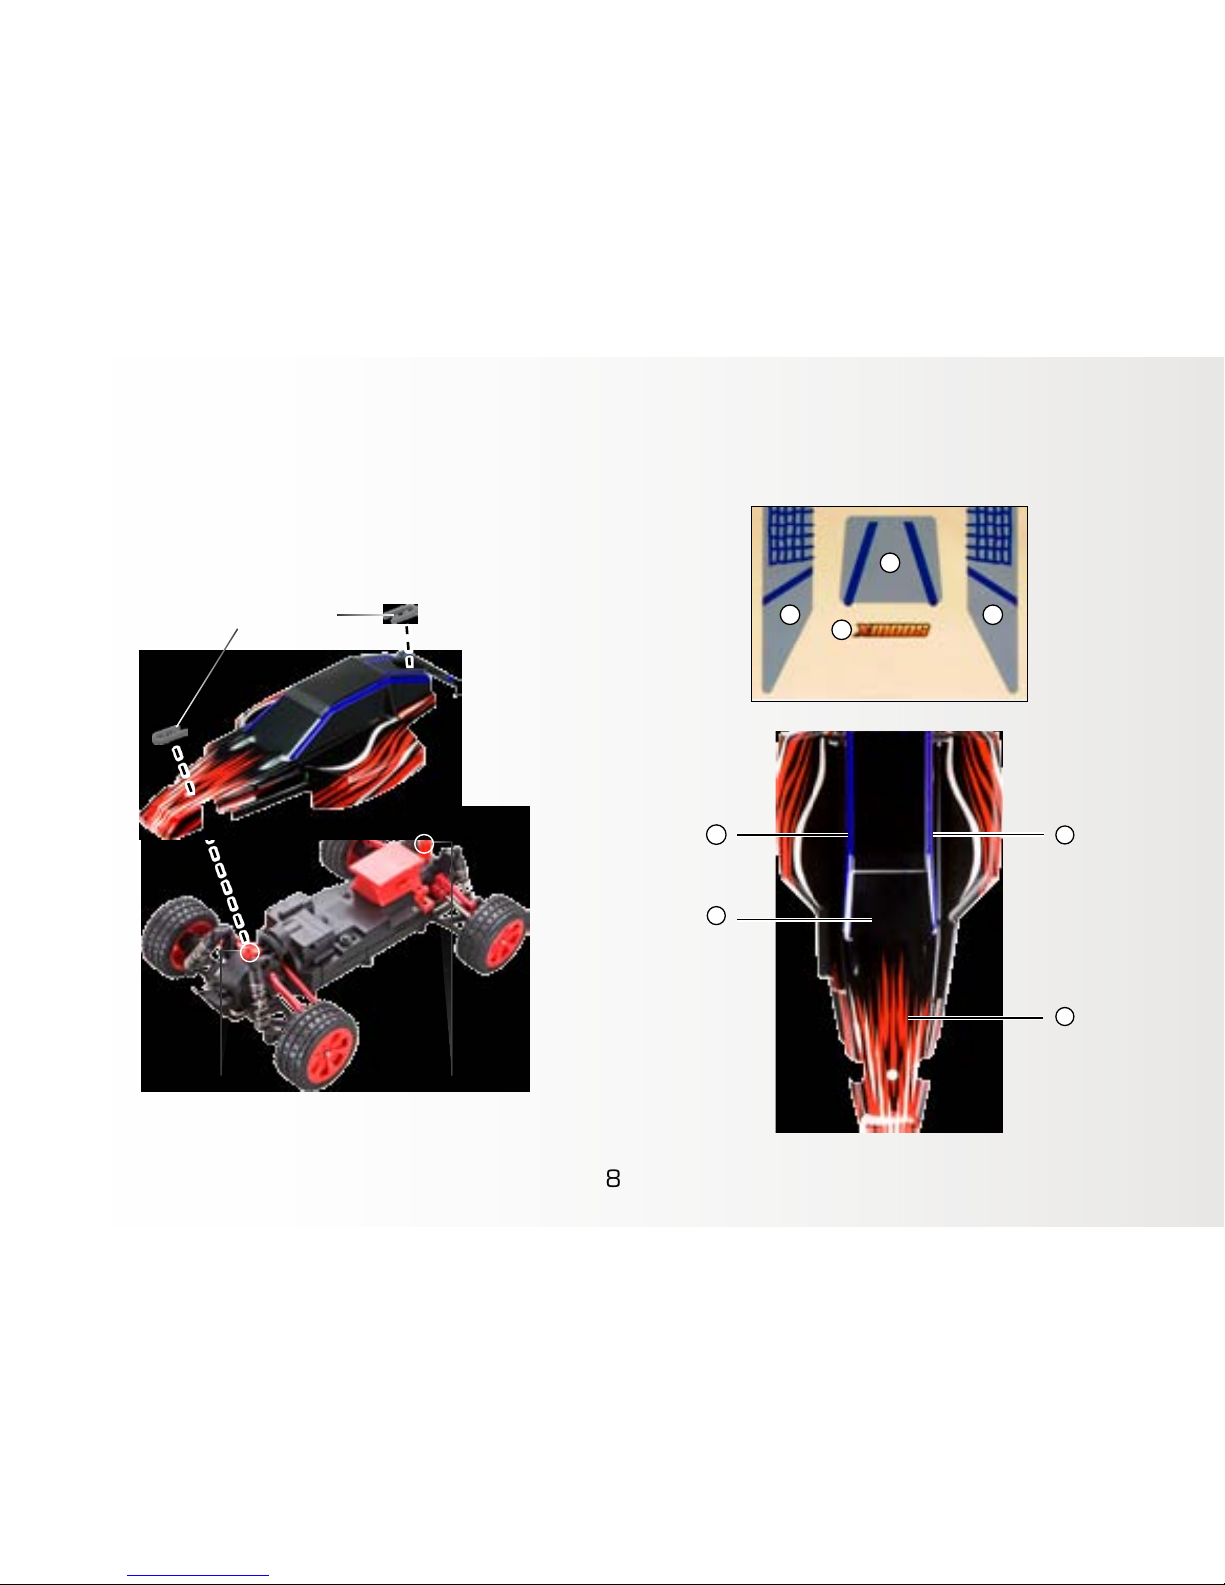
Mounting the Buggy Body on the Chassis
1. Place the buggy body on the chassis so that
the body poles fit through the holes on the
front and rear.
2. Clip the body clips onto the body poles.
Recommended Decal Placement
2
4
1
3
1
2 3
4
Body Pole
Body Clip
Body Pole
Page 9
9
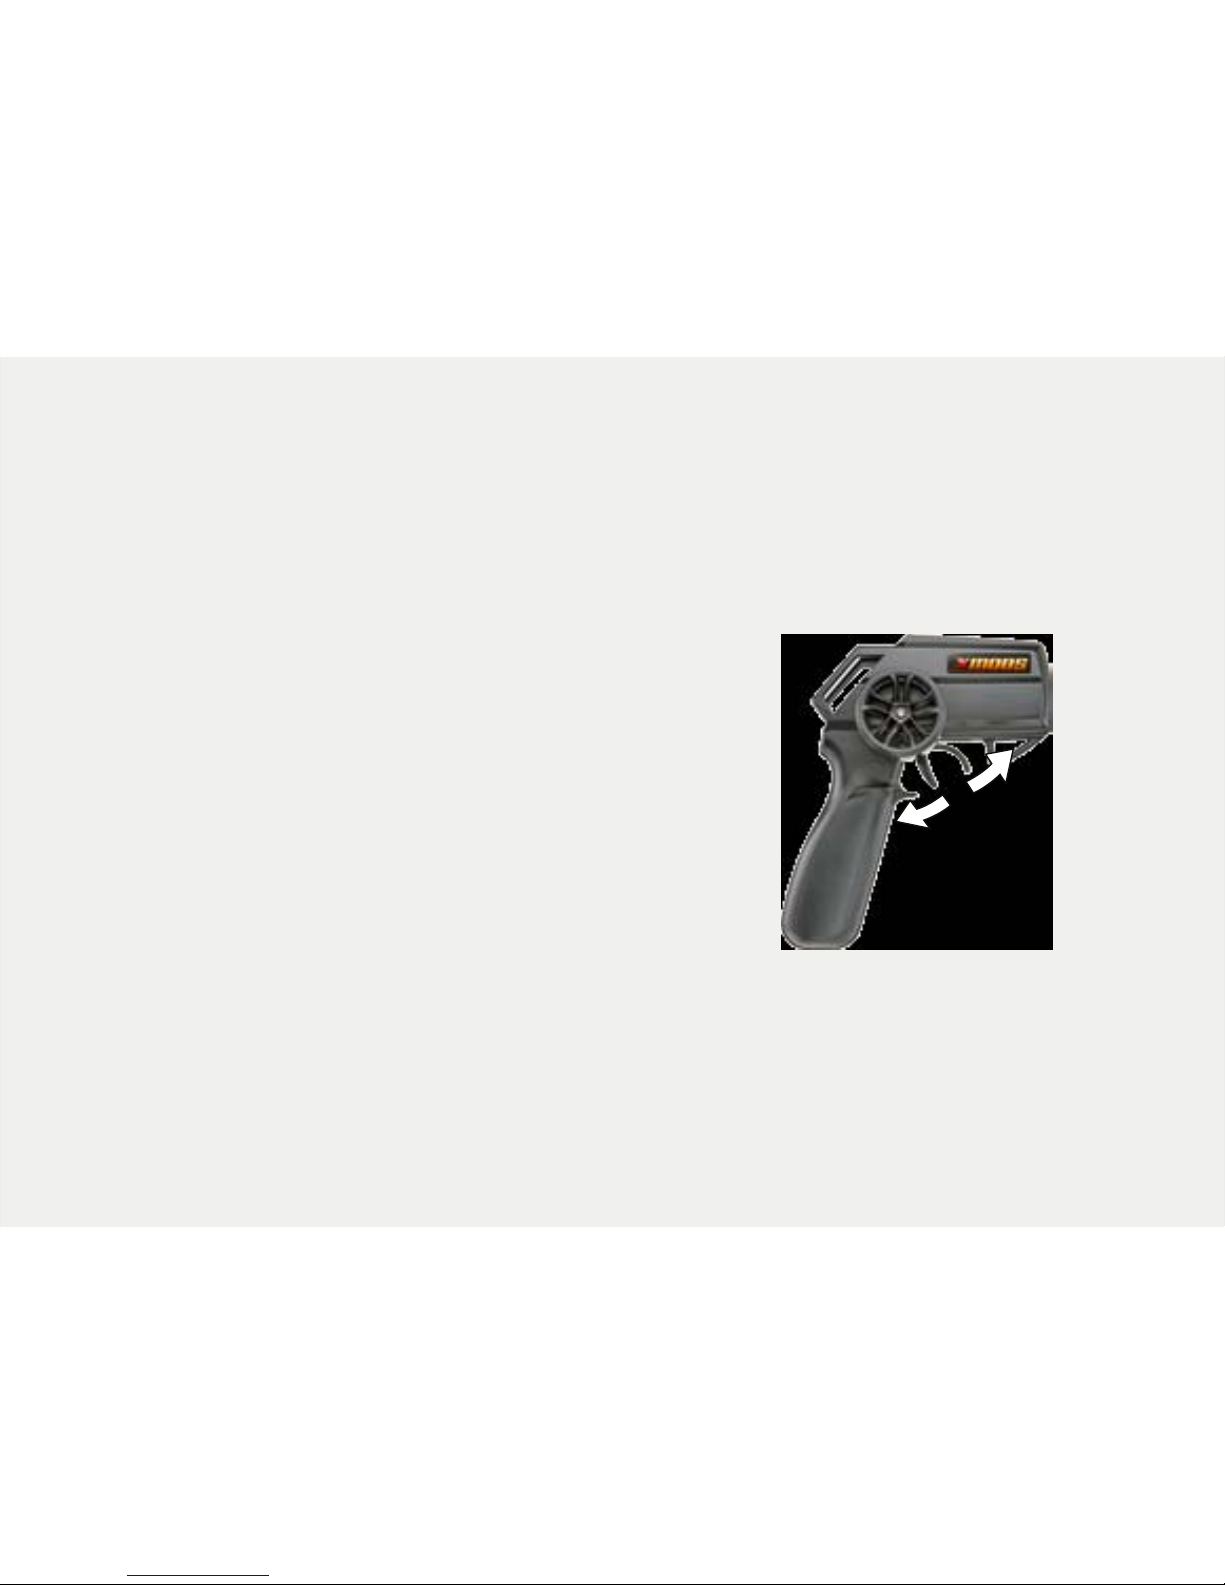
Driving Your Buggy and Adjusting Trim
After you turn on both transmitter and buggy, squeeze the trigger to move forward and
push the trigger away from the handle to go in reverse.
If your buggy does not drive straight when you release the steering wheel, determine if
the buggy steers too far right or left, and then adjust the trim:
1. Turn off the controller, and then pull the controller
trigger to drive position.
2. Turn on the controller; the LED indicator on the
controller flashes.
3. Keep the trigger pulled and turn the wheel to the
right or left to adjust the trim. If the car pulls to the
right, turn the wheel to the left. If the car pulls to the
left, turn the wheel to the right.
4. Release the trigger; the LED indicator stops flashing
and lights steadily.
• To avoid unintentionally adjusting the steering trim, do not operate the trigger or
steering wheel when you turn on the transmitter.
• To drive in reverse after braking, you may need to release the trigger to neutral briefly.
Drive
Reverse
Neutral
Page 10
10
Note:
• Handle your XMODS buggy and transmitter carefully and do not drop them. Keep away from dust
and dirt. Wipe your buggy and transmitter with a damp cloth occasionally to keep them looking new.
• Use and store only in normal temperature environments.
• Running your XMODS continuously for long periods can generate high heat levels. If the buggy
overheats, its overheat protection will stop the buggy. In this case, switch the transmitter and the
vehicle off and allow to cool down before resuming operation.
• If you do not operate either the transmitter or the buggy for 10 minutes, the buggy enters sleep
mode. To resume play, switch off both transmitter and buggy, then turn them on.
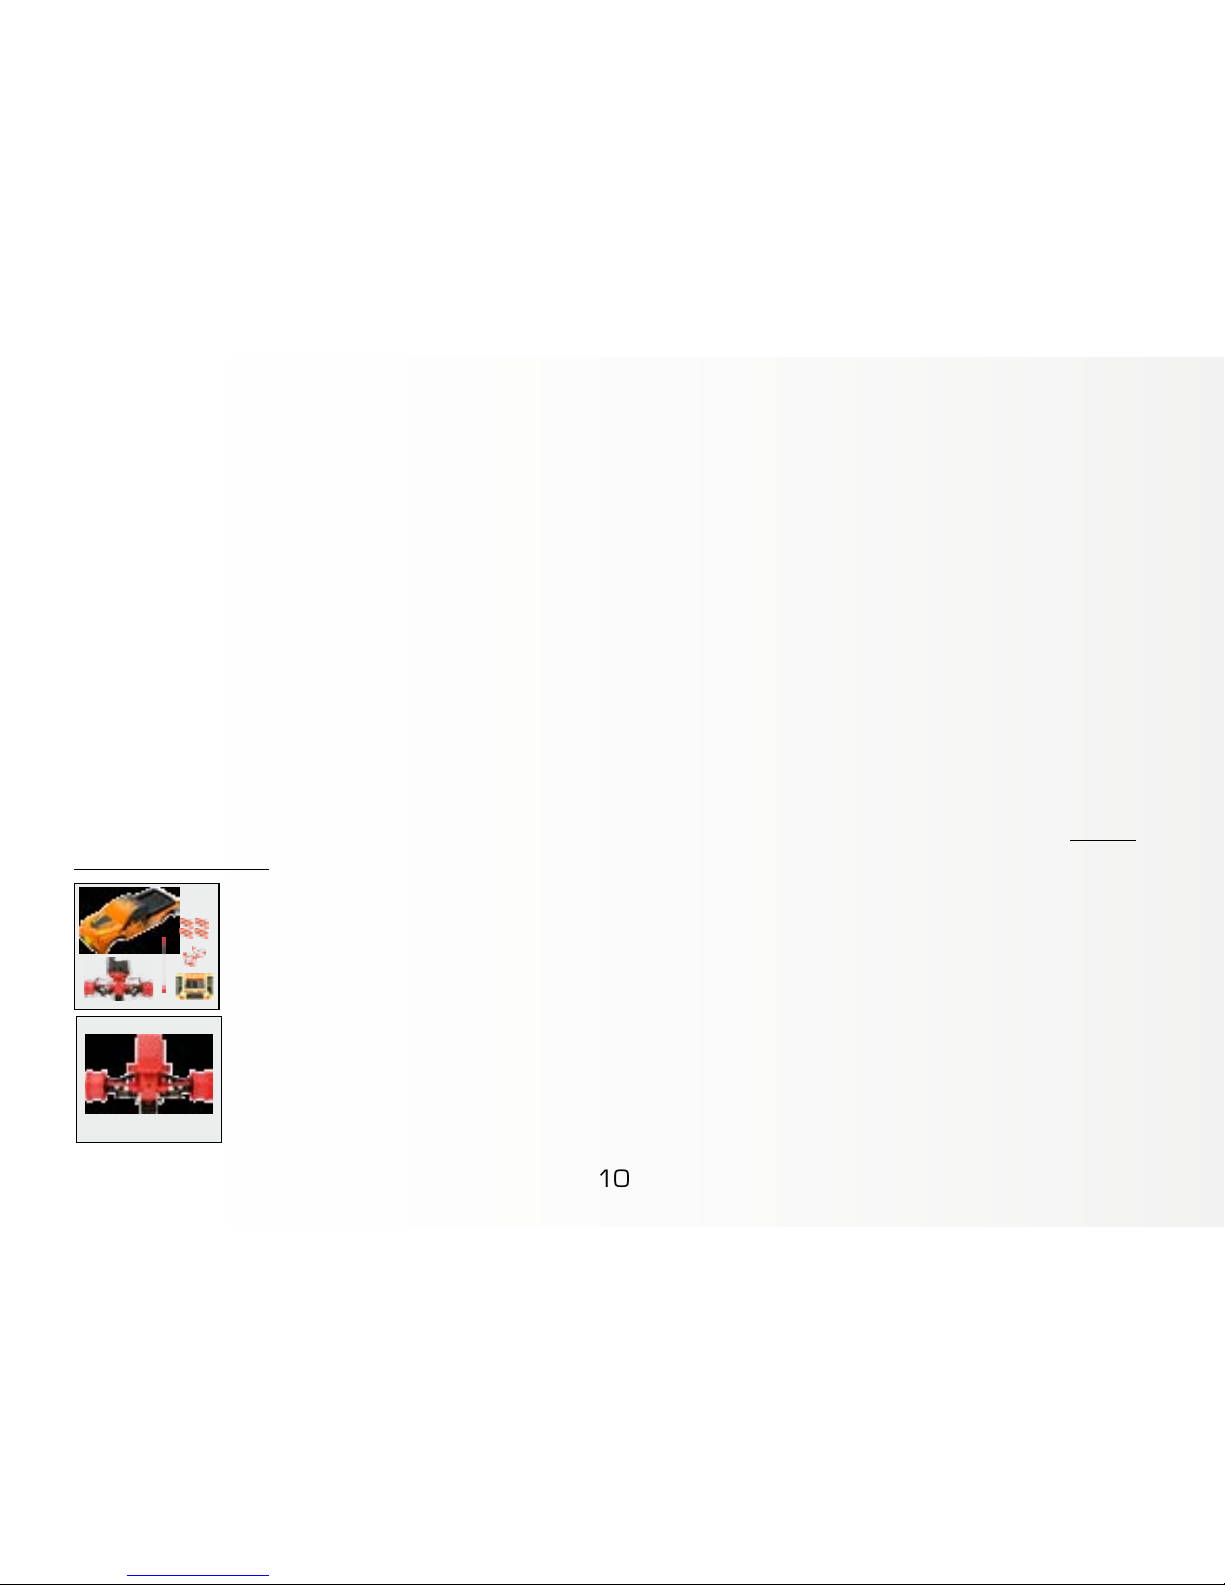
XMODS Upgrades
Modify and personalize your XMODS buggy with these available kits. Check out the
entire line of XMODS upgrades and accessories at your local RadioShack store and www.
RadioShack.com.
Hi-Speed Motor Unit (6000949)
The Hi-Speed Motor Unit is designed to increase the overall speed of your
XMODS vehicle.
Truck Conversion Kit (6000948)
Upgrade your 1:16 buggy (6000938 or 6000940) to a tough 4×4 Truck,
including a new 4 WD Front Unit with spring suspension.
Page 11

11
FCC Information
This equipment has been tested and found to comply with the limits for a Class B digital device,
pursuant to Part 15 of the FCC Rules. These limits are designed to provide reasonable protection
against harmful interference in a residential installation. This equipment generates, uses, and can
radiate radio frequency energy and, if not installed and used in accordance with the instructions, may
cause harmful interference to radio communications. However, there is no guarantee that interference
will not occur in a particular installation. If this equipment does cause harmful interference to radio
or television reception, which can be determined by turning the equipment off and on, the user is
encouraged to try to correct the interference by one or more of the following measures:
• Reorient or relocate the receiving antenna.
• Increase the separation between the equipment and receiver.
• Connect the equipment into an outlet on a circuit different from that to which the receiver is
connected.
• Consult your local RadioShack store or an experienced radio/TV technician for help.
If you cannot eliminate the interference, the FCC requires that you stop using your equipment.
Changes or modifications not expressly approved by the party responsible for compliance could void
the user’s authority to operate the equipment.
This device complies with Part 15 of the FCC rules. Operation is subject to the following two
conditions: (1) This device may not cause harmful interference, and (2) This device must accept any
interference received, including interference that may cause undesired operation.
Page 12

12
Limited Warranty
RadioShack warrants this product against defects in materials and workmanship under normal use
by the original purchaser for ninety (90) days after the date of purchase from a RadioShack-owned
store or an authorized RadioShack franchisee or dealer. RADIOSHACK MAKES NO OTHER EXPRESS
WARRANTIES.
This warranty does not cover: (a) damage or failure caused by or attributable to abuse, misuse, failure
to follow instructions, improper installation or maintenance, alteration, accident, Acts of God (such
as floods or lightning), or excess voltage or current; (b) damage or failure caused by loss of control,
loss of signal between the toy and its controller due to excessive range or low power, impact, violent
contact, collision or rough use; (c) improper or incorrectly performed repairs by persons who are not a
RadioShack Authorized Service Facility; (d) consumables such as fuses or batteries; (e) ordinary wear
and tear or cosmetic damage; (f) transportation, shipping or insurance costs; (g) costs of product
removal, installation, set-up service, adjustment or reinstallation; and (h) claims by persons other than
the original purchaser.
Should a problem occur that is covered by this warranty, take the product and the RadioShack sales
receipt as proof of purchase date to any RadioShack store. RadioShack will, at its option, unless
otherwise provided by law: (a) repair the product without charge for parts and labor; (b) replace the
product with the same or a comparable product; or (c) refund the purchase price. All replaced parts
and products, and products on which a refund is made, become the property of RadioShack. New or
reconditioned parts and products may be used in the performance of warranty service. Repaired or
replaced parts and products are warranted for the remainder of the original warranty period. You will
be charged for repair or replacement of the product made after the expiration of the warranty period.
ALL IMPLIED WARRANTIES, INCLUDING THE IMPLIED WARRANTY OF MERCHANTABILITY AND, IF
APPLICABLE, THE IMPLIED WARRANTY OF FITNESS FOR A PARTICULAR PURPOSE, SHALL EXPIRE
ON THE EXPIRATION OF THE STATED WARRANTY PERIOD.
Page 13

13
EXCEPT AS DESCRIBED ABOVE, RADIOSHACK SHALL HAVE NO LIABILITY OR RESPONSIBILITY
TO THE PURCHASER OF THE PRODUCT OR ANY OTHER PERSON OR ENTITY WITH RESPECT
TO ANY LIABILITY, LOSS OR DAMAGE CAUSED DIRECTLY OR INDIRECTLY BY USE OR
PERFORMANCE OF THE PRODUCT OR ARISING OUT OF ANY BREACH OF THIS WARRANTY,
INCLUDING, BUT NOT LIMITED TO, ANY DAMAGES RESULTING FROM INCONVENIENCE AND
ANY LOSS OF TIME, DATA, PROPERTY, REVENUE, OR PROFIT AND ANY INDIRECT, SPECIAL,
INCIDENTAL, OR CONSEQUENTIAL DAMAGES, EVEN IF RADIOSHACK HAS BEEN ADVISED OF
THE POSSIBILITY OF SUCH DAMAGES.
Some states do not allow limitations on how long an implied warranty lasts or the exclusion or
limitation of incidental or consequential damages, so the above limitations or exclusions may not
apply to you. This warranty gives you specific legal rights, and you may also have other rights which
vary from state to state. You may contact RadioShack at:
RadioShack Customer Relations
300 RadioShack Circle
Fort Worth, TX 76102 04/08
www.RadioShack.com
Page 14

09A13
6000940
Printed in China
XMODS is a trademark used by RadioShack Corporation.
Complies with the European Union’s “Restriction of Hazardous Substances Directive,”
which protects the environment by restricting specific hazardous materials and
products.
©2013. RadioShack Corporation. All rights reserved.
RadioShack is a registered trademark used by RadioShack Corporation.
 Loading...