

Page 1

WLAN 11b Access Point
User’s Manual
Page 2

USER’S MANUAL OF X-Micro WLAN 11b ACCESS POINT Version: 2.0
Terminology
ANSI American National Standards Institute
AP Access Point
CCK
Complementary Code Keying
CSMA/CA Carrier Sense Multiple Access/ Collision Avoidance
CSMA/CD Carrier Sense Multiple Access/ Collision Detection
DHCP Dynamic Host Configuration Protocol
DSSS Direct Sequence Spread Spectrum
FCC Federal Communications Commission
FTP File Transfer Protocol
IEEE Institute of Electrical and Electronic Engineers
IP Internet Protocol
ISM Industrial, Scientific and Medical
LAN Local Area Network
MAC Media Access Control
NAT Network Address Translation
NT Network Termination
PSD Power Spectral Density
RF Radio Frequency
SNR Signal to Noise Ratio
SSID Service Set Identification
TCP Transmission Control Protocol
TFTP Trivial File Transfer Protocol
WEP Wired Equivalent Privacy
WLAN Wireless Local Area Network
i
Page 3

USER’S MANUAL OF X-Micro WLAN 11b ACCESS POINT Version: 2.0
INFORMATION TO USER
Product Name:
Model Name:
X-Micro WLAN 11b Access Point
XWL-11BARG
1.1 FCC INFORMATION
FCC Radiation Exposure Statement
This equipment complies with FCC radiation exposure limits set forth for an
uncontrolled environment.
This equipment should be installed and operated with minimum distance 20cm
between the radiator & your body.
This transmitter must not be co-located or operating in conjunction with any other
antenna or transmitter.
The equipment has been tested and found to comply with the limits for a Class B
Digital Device, pursuant to part 15 of the FCC Rules. These limits are designed to provide
reasonable protection against harmful interference in a residential installation.
This equipment generates, uses and can radiate radio frequency energy and, if not
installed and used in accordance with the instruction, may cause harmful interference to
radio communication. However, there is no grantee that interference will not occur in a
particular installation. If this equipment dose cause harmful interference to radio or
television reception, which can be determined by turning the equipment off and on, the
user is encouraged to try to correct the interference by one or more of the following
measures:
--Reorient or relocate the receiving antenna.
--Increase the separation between the equipment and receiver.
--Connect the equipment into an outlet on a circuit different from that to which the receiver
is connected.
--Consult the dealer or an experienced radio/TV technician for help.
ii
Page 4

USER’S MANUAL OF X-Micro WLAN 11b ACCESS POINT Version: 2.0
Notice: The Part 15 radio device operates on a non-interference basis with other devices
operating at this frequency. Any changes or modification not expressly approved by the
party responsible could void the user’s authority to operate the device.
1.2 REGULATORY INFORMATION
X-Micro WLAN Access Point must be installed and used in strict accordance with the
manufacturer’s instructions. This device complies with the following radio frequency and
safety standards.
USA - Federal Communications Commission (FCC)
This device complies with Part 15 of FCC Rules. Operation is subject to the following two
conditions:
1. This device may not cause harmful interference.
2. This device must accept any interference that may cause undesired operation.
Europe - R&TTE Directive
This device complies with the specifications listed below
• ETS 300-826 General EMC requirements for Radio equipment.
• ETS 300-328 Technical requirements for Radio equipment.
• EN60950 SAFETY REQUIREMENTS FOR RADIO EQUIPMENT
The channel identifiers, channel center frequencies, and regulatory domains of each
22-MHz-wide channel are shown in following Table.
iii
Page 5

USER’S MANUAL OF X-Micro WLAN 11b ACCESS POINT Version: 2.0
MAX. OUT POWER
COUNTRY CHANNELS
Spain
France
France
Italy
UK
Netherlands
Germany
Austria
Belgium
Switzerland
Luxemburg
INDOOR OUTDOOR
2400-2483.5 MHz 1-13 < 100 mW EIRP < 100 mW EIRP
2400-2454 MHz 1-8 < 100 mW EIRP < 100 mW EIRP
2454-2483.5 MHz 9-13 < 100 mW EIRP < 10 mW EIRP
2400-2483.5 MHz 1-13 < 100 mW EIRP < 100 mW EIRP
2400-2483.5 MHz 1-13 < 100 mW EIRP < 100 mW EIRP
2400-2483.5 MHz 1-13 < 100 mW EIRP < 100 mW EIRP
2400-2483.5 MHz 1-13 < 100 mW EIRP < 100 mW EIRP
2400-2483.5 MHz 1-13 < 100 mW EIRP < 100 mW EIRP
2400-2483.5 MHz 1-13 < 100 mW EIRP < 100 mW EIRP
2400-2483.5 MHz 1-13 < 100 mW EIRP < 100 mW EIRP
2400-2483.5 MHz 1-13 < 100 mW EIRP < 100 mW EIRP
Russia
Ireland
Portugal
Norway
Denmark
Finland
Iceland
Greece
Lichtenstein
Sweden
2400-2483.5 MHz 1-13 <10 mW EIRP <10 mW EIRP
2400-2483.5 MHz 1-13 < 100 mW EIRP < 100 mW EIRP
2400-2483.5 MHz 1-13 < 100 mW EIRP < 100 mW EIRP
2400-2483.5 MHz 1-13 < 100 mW EIRP < 100 mW EIRP
2400-2483.5 MHz 1-13 < 100 mW EIRP < 100 mW EIRP
2400-2483.5 MHz 1-13 < 100 mW EIRP < 100 mW EIRP
2400-2483.5 MHz 1-13 < 100 mW EIRP < 100 mW EIRP
2400-2483.5 MHz 1-13 < 100 mW EIRP < 100 mW EIRP
2400-2483.5 MHz 1-13 < 100 mW EIRP < 100 mW EIRP
2400-2483.5 MHz 1-13 < 100 mW EIRP < 100 mW EIRP
iv
Page 6

USER’S MANUAL OF X-Micro WLAN 11b ACCESS POINT Version: 2.0
Table of Contents
TERMINOLOGY .............................................................................................................................I
1 INTRODUCTION....................................................................................................................1
1.1 PACKAGE CONTENTS ........................................................................................................... 1
1.2 PRODUCT SPECIFICATIONS .................................................................................................. 1
1.3 PRODUCT FEATURES ........................................................................................................... 2
1.4 TOP PANEL DESCRIPTION .................................................................................................... 2
1.5 REAR PANEL DESCRIPTION.................................................................................................. 3
2 INSTALLATION ..................................................................................................................... 4
2.1 HARDWARE INSTALLATION ................................................................................................. 4
2.2 SOFTWARE INSTALLATION................................................................................................... 4
3 SOFTWARE CONFIGURATION ......................................................................................... 5
3.1 PREPARE YOUR PC TO CONFIGURE X-MICRO WLAN 11B ACCESS POINT........................... 5
3.2 CONNECT TO X-MICRO WLAN 11B ACCESS POINT............................................................ 7
3.3 MANAGEMENT AND CONFIGURATION ON X-MICRO WLAN 11B ACCESS POINT ................. 7
3.3.1 STATU S............................................................................................................................ 7
3.3.2 WIRELESS BASIC SETTINGS ............................................................................................ 8
3.3.3 W
IRELESS ADVANCED SETTINGS .................................................................................... 9
3.3.4 WIRELESS SECURITY SETUP.......................................................................................... 11
3.3.5 WIRELESS ACCESS CONTROL........................................................................................ 12
3.3.6 LAN INTERFACE SETUP ................................................................................................ 14
3.3.7 STATI ST IC S .................................................................................................................... 15
3.3.8 U
PGRADE FIRMWARE .................................................................................................... 16
3.3.9 SAV E /RELOAD SETTINGS.............................................................................................. 17
3.3.10 PASSWORD SETUP ......................................................................................................... 17
4 FREQUENTLY ASKED QUESTIONS (FAQ).................................................................... 19
4.1 W
HAT AND HOW TO FIND MY PC’S IP AND MAC ADDRESS? ............................................. 19
4.2 WHAT IS WIRELESS LAN? ................................................................................................ 19
4.3 WHAT ARE ISM BANDS? ................................................................................................... 19
4.4 HOW DOES WIRELESS NETWORKING WORK?...................................................................... 19
4.5 W
v
HAT IS BSSID? .............................................................................................................. 20
Page 7

USER’S MANUAL OF X-Micro WLAN 11b ACCESS POINT Version: 2.0
4.6 WHAT IS ESSID? .............................................................................................................. 20
4.7 WHAT ARE POTENTIAL FACTORS THAT MAY CAUSES INTERFERENCE? ................................ 21
4.8 WHAT ARE THE OPEN SYSTEM AND SHARED KEY AUTHENTICATIONS? ............................. 21
4.9 WHAT IS WEP? ................................................................................................................. 21
4.10 WHAT IS FRAGMENT THRESHOLD?.................................................................................... 21
4.11 WHAT IS RTS (REQUEST TO SEND) THRESHOLD?............................................................. 22
4.12 WHAT IS BEACON INTERVAL?............................................................................................ 22
4.13 WHAT IS PREAMBLE TYPE? ............................................................................................... 23
4.14 WHAT IS SSID BROADCAST? ............................................................................................ 23
5 CONFIGURATION EXAMPLES........................................................................................ 24
5.1 EXAMPLE ONE – DHCP ON THE LAN .............................................................................. 24
5.2 EXAMPLE TWO – FIXED IP ON THE LAN .......................................................................... 26
vi
Page 8

USER’S MANUAL OF X-Micro WLAN 11b ACCESS POINT Version: 2.0
1. Introduction
X-Micro WLAN 11b Access Point is a portal that can act as the connection point between the
Ethernet CSMA/CD protocol and the wireless CSMA/CA protocol. The Access Point can be
easily integrated into your existing wireless network. In large installations, the roaming
functionality provided by multiple Access Points allows wireless users to move freely
throughout the facility while maintaining seamless, uninterrupted access to the network.
This document describes the steps required for the initial IP address assign and other AP
configuration. The description includes the implementation of the above steps.
Notice: It will take about 25 seconds to complete the boot up sequence after powered on
X-Micro WLAN 11b Access Point; all LEDs are blank while booting except the
Power LED, and after that the WLAN Activity LED will be flashing to show the
WLAN interface is enabled and working now.
1.1 Package contents
The package of X-Micro WLAN 11b Access Point includes the following items,
X-Micro WLAN 11b Access Point
The AC to DC power adapter
The Documentation CD
1.2 Product Specifications
Product Name X-Micro WLAN 11b Access Point
Standard 802.11b(Wireless), 802.3(10BaseT), 802.3u(100BaseT)
Data Transfer Rate 11Mbps(Wireless), 100Mbps(Ethernet)
Modulation Method DBPSK/ DQPSK/ CCK
Frequency Band 2.4GHz – 2.497GHz ISM Band, DSSS
RF Output Power < 17 dBm
Receiver Sensitivity 11Mbps better than 8% PER @ -78 dBm
Operation Range 30 to 300 meters (depend on surrounding)
Antenna External Antenna
LED Power, Active (WLAN), Act/Link (Ethernet)
Security 64 bit/ 128 bit WEP, MAC address filtering
LAN interface One 10/100BaseT with RJ45 connector
Power Consumption 7.5V DC Power Adapter
1
Page 9

USER’S MANUAL OF X-Micro WLAN 11b ACCESS POINT Version: 2.0
Dimension 120 * 75 * 34 mm
Operating Temperature 0 – 50oC ambient temperature
Storage Temperature -20 - 70oC ambient temperature
Humidity 5 to 90 % maximum (non-condensing)
1.3 Product Features
Complies with IEEE 802.11b standard for 2.4GHz Wireless LAN.
Supports 11Mbps data transfer rate with automatic fallback to 5.5M, 2M and
1Mbps.
Supports bridging function between wireless and wired Ethernet interfaces.
Supports 64-bit and 128-bit WEP encryption/decryption function to protect the
wireless data transmission.
Supports IEEE 802.3x full duplex flow control on 10/100M Ethernet interface.
Supports DHCP client for Ethernet LAN interface auto IP address assignment.
Supports clone MAC address function.
Supports WEB based management and configuration.
1.4 Top Panel Description
Figure 1 –X-Micro WLAN 11b Access Point Top Panel
LED Indicator State Description
Power LED
WLAN LED
LAN LED
1. Power LED
2. WLAN Activity LED Flashing Data is transmitting or receiving on the antenna.
3. LAN LINK/ACT LED Flashing Data is transmitting or receiving on the LAN interface.
2
On X-Micro WLAN 11b AP is powered on.
Off X-Micro WLAN 11b AP is powered off.
Off No data is transmitting or receiving on the antenna.
Off No connection is established on LAN interface.
Page 10
USER’S MANUAL OF X-Micro WLAN 11b ACCESS POINT Version: 2.0
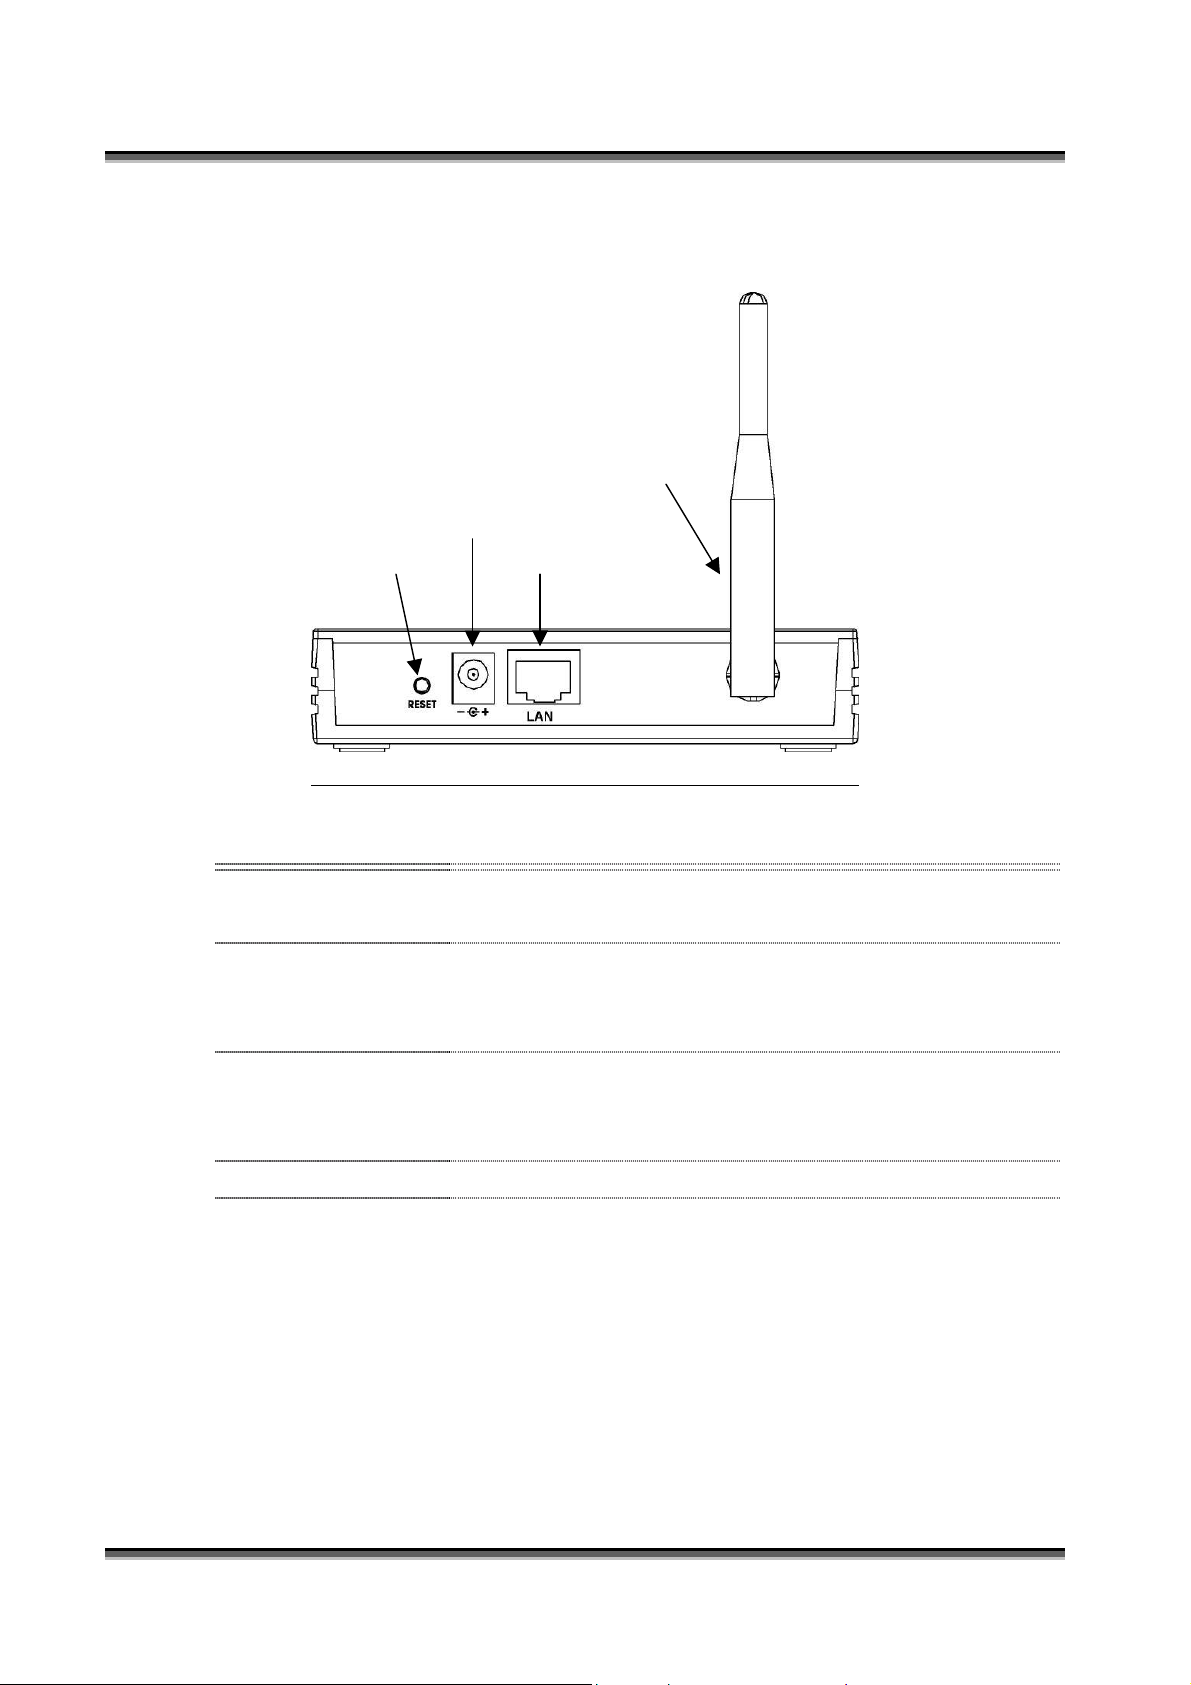
1.5 Rear Panel Description
Antenna
Power
Reset LAN
Figure 2 – X-Micro WLAN 11b Access Point Rear Panel
Interfaces Description
1. Reset Push continually the reset button 5 seconds to reset the configuration
parameters to factory defaults.
2. Power The power jack allows an external DC +7.5 V power supply connection.
The external AC to DC adaptor provide adaptive power requirement to the
WLAN AP.
3. LAN The RJ-45 socket allows LAN connection through a Category 5 cable.
Support auto-sensing on 10/100M speed and half/ full duplex; comply with
IEEE 802.3/ 802.3u respectively.
4. Antenna The Wireless LAN Antenna.
3
Page 11

USER’S MANUAL OF X-Micro WLAN 11b ACCESS POINT Version: 2.0
2 Installation
2.1 Hardware Installation
Step One: Place X-Micro WLAN 11b Access Point to the best optimum transmission
location.
The best transmission location for your X-Micro WLAN 11b Access Point is
usually at the geographic center of your wireless network, with line of sign to all of
your mobile stations.
Step Two: Connect X-Micro WLAN 11b Access Point to your wired network.
Connect X-Micro WLAN 11b Access Point by category 5 Ethernet cable to your
switch/ hub/ router/ xDSL modem or cable modem. A straight-through Ethernet
cable with appropriate cable length is needed.
Step Three: Supply DC power to X-Micro WLAN 11b Access Point.
Use only the AC/DC power adapter supplied with X-Micro WLAN 11b Access
Point; it may occur damage by using a different type of power adapter.
The hardware installation finished.
2.2 Software Installation
There are no software drivers, patches or utilities installation needed, but only the
configuration setting. Please refer to chapter 3 for software configuration.
4
Page 12

USER’S MANUAL OF X-Micro WLAN 11b ACCESS POINT Version: 2.0
3 Software configuration
There are web based management and configuration functions allowing you to have the jobs
done easily.
X-Micro WLAN 11b Access Point is delivered with the following factory default parameters.
Default IP Address: 192.168.1.254
Default IP subnet mask: 255.255.255.0
WEB login User Name: <empty>
WEB login Password: <empty>
3.1 Prepare your PC to configure X-Micro WLAN 11b Access Point
For OS of Microsoft Windows 95/ 98/ Me:
1. Click the Start button and select Settings, then click Control Panel. The Control
Panel window will appear.
Note: Windows Me users may not see the Network control panel. If so, select View
all Control Panel options on the left side of the window
2. Move mouse and double-click the right button on Network icon. The Network
window will appear.
3. Check the installed list of Network Components. If TCP/IP is not installed, click the
Add button to install it; otherwise go to step 6.
4. Select Protocol in the Network Component Type dialog box and click Add button.
5. Select TCP/IP in Microsoft of Select Network Protocol dialog box then click OK
button to install the TCP/IP protocol, it may need the Microsoft Windows CD to
complete the installation. Close and go back to Network dialog box after the TCP/IP
installation.
6. Select TCP/IP and click the properties button on the Network dialog box.
7. Select Specify an IP address and type in values as following example.
IP Address: 192.168.1.1, any IP address within 192.168.1.1 to 192.168.1.253 is
good to connect the Wireless LAN Access Point.
IP Subnet Mask: 255.255.255.0
8. Click OK and reboot your PC after completes the IP parameters setting.
For OS of Microsoft Windows 2000, XP:
1. Click the Start button and select Settings, then click Control Panel. The Control
Panel window will appear.
2. Move mouse and double-click the right button on Network and Dial-up Connections
5
Page 13

USER’S MANUAL OF X-Micro WLAN 11b ACCESS POINT Version: 2.0
icon. Move mouse and double-click the Local Area Connection icon. The Local Area
Connection window will appear. Click Properties button in the Local Area
Connection window.
3. Check the installed list of Network Components. If TCP/IP is not installed, click the
Add button to install it; otherwise go to step 6.
4. Select Protocol in the Network Component Type dialog box and click Add button.
5. Select TCP/IP in Microsoft of Select Network Protocol dialog box then click OK
button to install the TCP/IP protocol, it may need the Microsoft Windows CD to
complete the installation. Close and go back to Network dialog box after the TCP/IP
installation.
6. Select TCP/IP and click the properties button on the Network dialog box.
7. Select Specify an IP address and type in values as following example.
IP Address: 192.168.1.1, any IP address within 192.168.1.1 to 192.168.1.253 is
good to connect the Wireless LAN Access Point.
IP Subnet Mask: 255.255.255.0
8. Click OK to completes the IP parameters setting.
For OS of Microsoft Windows NT:
1. Click the Start button and select Settings, then click Control Panel. The Control
Panel window will appear.
2. Move mouse and double-click the right button on Network icon. The Network
window will appear. Click Protocol tab from the Network window.
3. Check the installed list of Network Protocol window. If TCP/IP is not installed, click
the Add button to install it; otherwise go to step 6.
4. Select Protocol in the Network Component Type dialog box and click Add button.
5. Select TCP/IP in Microsoft of Select Network Protocol dialog box then click OK
button to install the TCP/IP protocol, it may need the Microsoft Windows CD to
complete the installation. Close and go back to Network dialog box after the TCP/IP
installation.
6. Select TCP/IP and click the properties button on the Network dialog box.
7. Select Specify an IP address and type in values as following example.
IP Address: 192.168.1.1, any IP address within 192.168.1.1 to 192.168.1.253 is
good to connect the Wireless LAN Access Point.
IP Subnet Mask: 255.255.255.0
8. Click OK to completes the IP parameters setting.
6
Page 14

USER’S MANUAL OF X-Micro WLAN 11b ACCESS POINT Version: 2.0
3.2 Connect to X-Micro WLAN 11b Access Point
Open a WEB browser, i.e. Microsoft Internet Explore, then enter 192.168.1.254 on the
URL to connect X-Micro WLAN 11b Access Point.
3.3 Management and configuration on X-Micro WLAN 11b Access Point
3.3.1 Status
This page shows the current status and some basic settings of the device, includes
system, wireless and TCP/IP configuration information.
Screenshot – Status
Item Description
System
Alias Name
It shows the alias name of X-Micro WLAN 11b Access
Point.
Uptime
It shows the duration since X-Micro WLAN 11b Access
Point is powered on.
Firmware version
It shows the firmware version of X-Micro WLAN 11b
Access Point.
Wireless configuration
SSID
7
It shows the SSID of X-Micro WLAN 11b Access Point.
Page 15

USER’S MANUAL OF X-Micro WLAN 11b ACCESS POINT Version: 2.0
The SSID is the unique name of X-Micro WLAN 11b
Access Point and shared among its service area, so all
devices attempts to join the same wireless network can
identify it.
Channel Number
WEP
Associated Clients
BSSID
LAN configuration
Attain IP Protocol
IP Address
Subnet Mask
Default Gateway
It shows the wireless channel connected currently.
It shows the status of WEP encryption function.
It shows the number of connected clients (or stations,
PCs).
It shows the BSSID address of X-Micro WLAN Access
Point.
BSSID is a six-byte address.
It shows how X-Micro WLAN 11b Access Point gets the
IP address. The IP address can be set manually to a fixed
one or set dynamically by DHCP server.
It shows the IP address of X-Micro WLAN 11b Access
Point.
It shows the IP subnet mask of X-Micro WLAN 11b
Access Point.
It shows the default gateway setting for the outgoing data
packets.
MAC Address
It shows the MAC address of X-Micro WLAN 11b
Access Point.
3.3.2 Wireless Basic Settings
This page is used to configure the parameters for wireless LAN clients that may
connect to your Access Point. Here you may change wireless encryption settings
as well as wireless network parameters.
8
Page 16

USER’S MANUAL OF X-Micro WLAN 11b ACCESS POINT Version: 2.0
Screenshot – Wireless Basic Settings
Item Description
Alias Name
It is the alias name of X-Micro WLAN 11b Access Point.
The alias name can be 32 characters long.
Disable Wireless LAN
Tick on to disable the wireless LAN data transmission.
Interface
SSID
It is the wireless network name. The SSID can be 32
bytes long.
Channel Number
Select the wireless communication channel from
pull-down menu.
Associated Clients
Click the Show Active Clients button to open Active
Wireless Client Table that shows the MAC address,
transmit-packet, receive-packet and transmission-rate for
each associated wireless client.
Apply Changes
Click the Apply Changes button to complete the new
configuration setting.
Reset
Click the Reset button to abort change and recover the
previous configuration setting.
3.3.3 Wireless Advanced Settings
These settings are only for more technically advanced users who have a sufficient
9
Page 17

USER’S MANUAL OF X-Micro WLAN 11b ACCESS POINT Version: 2.0
knowledge about wireless LAN. These settings should not be changed unless you
know what effect the changes will have on your Access Point.
Screenshot – Wireless Advanced Settings
Item Description
Authentication Type
Click to select the authentication type in Open System,
Shared Key or Auto selection.
Fragment Threshold
Set the data packet fragmentation threshold, value can be
written between 256 and 2346 bytes. Refer to 4.10 What
is Fragment Threshold?
RTS Threshold
Set the RTS Threshold, value can be written between 0
and 2347 bytes. Refer to 4.11 What is RTS (Request To
Send) Threshold?
Beacon Interval
Set the Beacon Interval, value can be written between 20
and 1024 ms.
Refer to 4.12 What is Beacon Interval?
Data Rate
Select the transmission data rate from pull-down menu.
Data rate can be auto-select, 11M, 5.5M, 2M or 1Mbps.
Preamble Type
Click to select the Long Preamble or Short Preamble
support on the wireless data packet transmission. Refer to
10
Page 18

USER’S MANUAL OF X-Micro WLAN 11b ACCESS POINT Version: 2.0
4.13 What is Preamble Type?
Broadcast SSID
Click to enable or disable the SSID broadcast function.
Refer to 4.14 What is SSID Broadcast?
Apply Changes
Click the Apply Changes button to complete the new
configuration setting.
Reset
Click the Reset button to abort change and recover the
previous configuration setting.
3.3.4 Wireless Security Setup
This page allows you setup the WEP security. Turn on WEP by using encryption
keys could prevent any unauthorized access to your wireless network.
Screenshot – Wireless Security Setup
Item Description
Enable WEP Security
Key Length
Click the check box to enable WEP security function.
Refer to 4.9 What is WEP?
Select the WEP shared secret key length from pull-down
menu. The length can be chose between 64-bit and
128-bit (known as “WEP2”) keys.
The WEP key is composed of initialization vector (24
11
Page 19
USER’S MANUAL OF X-Micro WLAN 11b ACCESS POINT Version: 2.0
bits) and secret key (40-bit or 104-bit).
Key Format
Select the WEP shared secret key format from pull-down
menu. The format can be chose between plant text
(ASCII) and hexadecimal (HEX) code.
Default Tx Key
Set the default secret key for WEP security function.
Value can be chose between 1 and 4.
Encryption Key 1
Encryption Key 2
Encryption Key 3
Encryption Key 4
Apply Changes
Secret key 1 of WEP security encryption function.
Secret key 2 of WEP security encryption function.
Secret key 3 of WEP security encryption function.
Secret key 4 of WEP security encryption function.
Click the Apply Changes button to complete the new
configuration setting.
Reset
Click the Reset button to abort change and recover the
previous configuration setting.
WEP encryption key (secret key) length:
Length
Format
64-bit 128-bit
ASCII 5 characters 13 characters
HEX 10 hexadecimal codes 26 hexadecimal codes
3.3.5 Wireless Access Control
If you enable wireless access control, only those clients whose wireless MAC
addresses are in the access control list will be able to connect to your Access Point.
When this option is enabled, no wireless clients will be able to connect if the list
contains no entries.
12
Page 20

USER’S MANUAL OF X-Micro WLAN 11b ACCESS POINT Version: 2.0
Screenshot – Wireless Access Control
Item Description
Enable WEP Security
Click the check box to enable wireless access control.
This is a security control function; only those clients
registered in the access control list can link to X-Micro
WLAN 11b Access Point.
MAC Address
Fill in the MAC address of client to register X-Micro
WLAN 11b Access Point access capability.
Comment
Apply Changes
Fill in the comments for the registered client.
Click the Apply Changes button to register the client to
new configuration setting.
Reset
Click the Reset button to abort change and recover the
previous configuration setting.
Current Access
It shows the registered clients that are allowed to link to
Control List
Delete Selected
X-Micro WLAN 11b Access Point.
Click to delete the selected clients that will be access
right removed from X-Micro WLAN 11b Access Point.
Delete All
Click to delete all the registered clients from the access
allowed list.
Reset
13
Click the Reset button to abort change and recover the
Page 21

USER’S MANUAL OF X-Micro WLAN 11b ACCESS POINT Version: 2.0
previous configuration setting.
3.3.6 LAN Interface Setup
This page is used to configure the parameters for local area network that connects
to the LAN port of your Access Point. Here you may change the setting for IP
address, subnet mask, DHCP, etc.
Screenshot – LAN Interface Setup
Item Description
IP Address
If the DHCP Client function is disabled, fill in the IP
address of X-Micro WLAN 11b Access Point.
Subnet Mask
If the DHCP Client function is disabled, fill in the subnet
mask of X-Micro WLAN 11b Access Point.
Default Gateway
If the DHCP Client function is disabled, fill in the default
gateway for out going data packets.
DHCP Client
Select to enable or disable the DHCP client function from
pull-down menu.
802.1d Spanning Tree
Select to enable or disable the IEEE 802.1d Spanning
Tree function from pull-down menu.
Clone MAC Address
Fill in the MAC address that is the MAC address to be
14
Page 22

USER’S MANUAL OF X-Micro WLAN 11b ACCESS POINT Version: 2.0
cloned.
Clone MAC address is designed for your special
application that request the clients to register to a server
machine with one identified MAC address.
Since that all the clients will communicate outside world
through X-Micro WLAN 11b Access Point, so have the
cloned MAC address set on the wireless LAN access
point will solve the issue.
Apply Changes
Reset
3.3.7 Statistics
This page shows the packet counters for transmission and reception regarding to
wireless and Ethernet networks.
Click the Apply Changes button to complete the new
configuration setting.
Click the Reset button to abort change and recover the
previous configuration setting.
Screenshot – Statistics
Item Description
Wireless LAN
Sent Packets
15
It shows the statistic count of sent packets on the wireless
LAN interface.
Page 23
USER’S MANUAL OF X-Micro WLAN 11b ACCESS POINT Version: 2.0
Wireless LAN
Received Packets
Ethernet LAN
Sent Packets
Ethernet LAN
Received Packets
Refresh
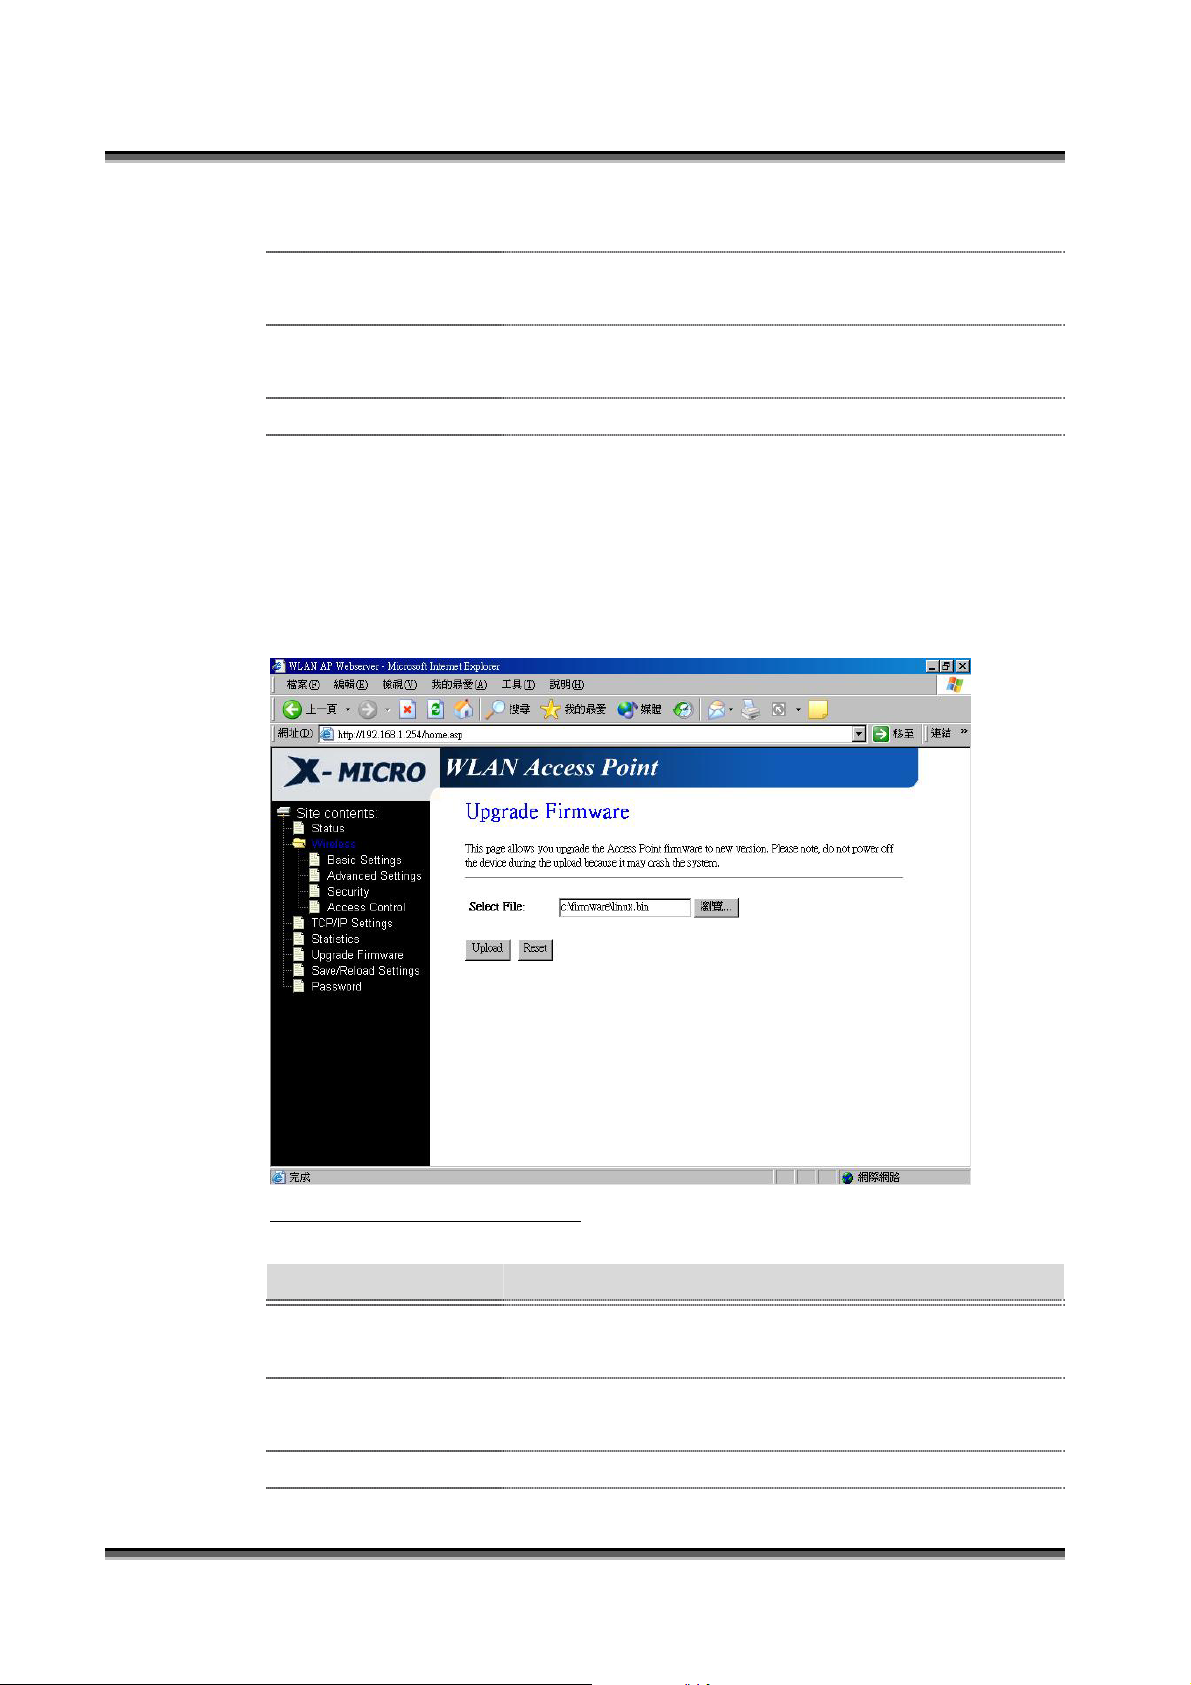
3.3.8 Upgrade Firmware
This page allows you upgrade the Access Point firmware to new version. Please
note, do not power off the device during the upload because it may crash the
system.
It shows the statistic count of received packets on the
wireless LAN interface.
It shows the statistic count of sent packets on the
Ethernet LAN interface.
It shows the statistic count of received packets on the
Ethernet LAN interface.
Click the refresh the statistic counters on the screen.
Screenshot – Upgrade Firmware
Item Description
Select File
Click the Browse button to select the new version of web
firmware image file.
Upload
Click the Upload button to update the selected web
firmware image to X-Micro WLAN 11b Access Point.
Reset
16
Click the Reset button to abort change and recover the
Page 24

USER’S MANUAL OF X-Micro WLAN 11b ACCESS POINT Version: 2.0
previous configuration setting.
3.3.9 Save /Reload Settings
This page allows you save current settings to a file or reload the settings from the
file that was saved previously. Besides, you could reset the current configuration
to factory default.
Screenshot – Save/Reload Settings
Item Description
Save Settings to File
Load Settings from
File
Reset Settings to
Default
3.3.10 Password Setup
This page is used to set the account to access the web server of Access Point.
Empty user name and password will disable the protection.
Click the Save button to download the configuration
parameters to your personal computer.
Click the Browse button to select the configuration files
then click the Upload button to update the selected
configuration to X-Micro WLAN 11b Access Point.
Click the Reset button to reset the configuration
parameter to factory defaults.
17
Page 25

USER’S MANUAL OF X-Micro WLAN 11b ACCESS POINT Version: 2.0
Screenshot – Password Setup
Item Description
User Name
New Password
Confirmed Password
Fill in the user name for web management login control.
Fill in the password for web management login control.
Because the password input is invisible, so please fill in
the password again for confirmation purpose.
Apply Changes
Clear the User Name and Password fields to empty,
means to apply no web management login control.
Click the Apply Changes button to complete the new
configuration setting.
Reset
Click the Reset button to abort change and recover the
previous configuration setting.
18
 Loading...