

Page 1

Bluetooth
Compact Flash Card
User’s Manual
Version 1.1
i
Page 2

REGULATORY INFORMATION
Federal Communications Commission Interference Statement
The equipment has been tested and found to comply with the limits for a Class B digital
device, pursuant to part 15 of the FCC Rules. These limits are designed to provide
reasonable protection against harmful interference in a residential installation. This
equipment generates, uses and can radiate radio frequency energy and, if not installed and
used in accordance with the instruction, may cause harmful interference to radio
communication. However, there is no guarantee that interference will not occur in a
particular installation. If this equipment dose cause harmful interference to radio or
television reception, which can be determined by turning the equipment off and on, the
user is encouraged to try to correct the interference by one of the following measures:
● Reorient or relocate the receiving antenna.
● Increase the separation between the equipment and receiver.
● Connect the equipment into an outlet on a circuit different from that to which the
receiver is connected.
● Consult the dealer or an experienced radio/TV technician for help.
FCC Caution: To assure continued compliance, (example – use only shielded interface
cables when connecting to computer or peripheral devices). Any changes or modification
not expressly approved by the party responsible for compliance could void the user’s
authority to operate this equipment.
This device complies with Part 15 of FCC Rules. Operation is subject to the following
two conditions: (1) This device may not cause harmful interference, and (2) this device
must accept any interference received, including interference that may cause undesired
operation.
IMPORTANT NOTE:
FCC Radiation Exposure Statement:
This equipment complies with FCC radiation exposure limits set forth for an uncontrolled
environment. This equipment should be installed and operated with minimum distance
2.5 cm between the radiator & your body.
This transmitter must not be co-located or operating in conjunction with any other
antenna or transmitter.
EUROPEAN COMMUNITY CE NOTICE
Marking by the symbol CE indicates compliance of this equipment to the R&TTE
Directive 1999/5/CE. Such marking is indicative that this equipment meets or exceeds the
following technical standards:
● EN 300 328
● EN 301 489 -1, EN 301 489 -17
● EN 60950
ii
Page 3

LICENSED SOFTWARE
© Copyright 2000 – 2002, WIDCOMM, Inc. (“WIDCOMM”). All rights reserved.
WARNING: This software and accompanying documentation are protected by copyright law and
international treaties. Unauthorized reproduction or distribution of this software, or any portion of it, may
result in severe civil and criminal penalties, and will be prosecuted to the maximum extent possible under
the law.
Use of this software is governed by the terms of the end user license agreement that accompanies or is
included with such software. Unless otherwise noted in the end user license agreement, or herein, no part of
the documentation accompanying this software, whether provided in printed or electronic form may be
reproduced in any form, or stored in a database or retrieval system, or transmitted in any form or by any
means, or used to make any derivative work (such as translation, transformation, or adaptation) without the
express, prior written consent of WIDCOMM.
Registered Trademark(s) ®, Trademark(s)™, and Service Mark(s)
SM
WIDCOMM, and the WIDCOMM logo are trademarks of WIDCOMM, Inc.
Bluetooth and the Bluetooth logos are trademarks of the Bluetooth SIG, Inc., U.S.A. and licensed to
WIDCOMM, Inc.
Compaq and iPAQ are trademarks of Compaq Information Technologies Group, L.P.
Microsoft, Windows, Outlook, ActiveSync, and the Windows CE logo (graphic only) are either registered
trademarks or trademarks of Microsoft Corporation in the United States and/or other countries.
Other brand and product names may be registered trademarks, service marks, or trademarks of their
respective holders.
iii
Page 4

Bluetooth Compact Flash Card User’s Manual List of Figures
Table of Contents
Federal Communications Commission Interference Statement............................ ii
1 INTRODUCTION TO BTW-CE.........................................................................................................1
1.1 BLUETOOTH ICON................................................................................................................ 1
1.2 APPLY POWER TO THE BLUETOOTH HARDWARE ...................................................................... 1
1.3 INSTALLATION .................................................................................................................... 2
1.3.1 Requirements ........................................................................................................... 2
1.3.2 Installation Process................................................................................................... 2
1.4 UNINSTALL A PRIOR VERSION OF BTW-CE............................................................................. 4
2 BLUETOOTH CONTROL PANEL: CONFIGURING BTW-CE...................................................5
2.1 GENERAL TAB..................................................................................................................... 7
2.1.1 Profiles …………………………………………………………………………………9
2.1.1.1 Create A New Profile ................................................................................9
2.1.1.2 Rename or Delete a Profile ........................................................................ 9
2.1.1.3 Save Configuration Settings In A Profile................................................... 10
2.2 ACCESSIBILITY TAB ........................................................................................................... 11
2.3 BTW-CE SERVICE TABS .................................................................................................... 12
2.3.1 Common Options ................................................................................................... 13
2.3.2 File Transfer Tab.................................................................................................... 14
2.3.3 Information Exchange Tab ......................................................................................15
2.3.4 Serial Port Tab ....................................................................................................... 16
2.3.5 Dial-up Networking Tab ......................................................................................... 17
2.4 ABOUT TAB ...................................................................................................................... 18
3 BLUETOOTH MANAGER: USING BTW-CE...............................................................................19
3.1 TABS …………………………………………………………………………………………...21
3.1.1 My Shortcuts.......................................................................................................... 21
3.1.1.1 Connection Open—Context Sensitive Menu Options .................................22
3.1.1.2 Connection Status Screen ........................................................................22
3.1.1.3 Connection Inactive—Context Sensitive Menu Options ............................. 23
3.1.1.4 Connection Properties Screen................................................................... 24
3.1.2 Active Connections Tab .......................................................................................... 25
3.2 MENUS ............................................................................................................................. 26
3.2.1 New ………………………………………………………………………………..26
3.2.2 Tools ………………………………………………………………………………..26
3.2.2.1 Paired devices......................................................................................... 27
3.2.2.2 Business Card Exchange ................................................................................... 28
3.2.3 View ………………………………………………………………………………..28
3.3 ICONS …………………………………………………………………………………………...28
4 BLUETOOTH BROWSER ...............................................................................................................29
5 USING REMOTE DEVICE SERVICES..........................................................................................31
5.1 SERIAL PORT..................................................................................................................... 31
5.2 DIAL-UP NETWORKING: CONNECT TO A REMOTE COMPUTER................................................. 31
5.3 BLUETOOTH FILE EXPLORER .............................................................................................. 33
5.3.1 Change the Remote Device Folder ........................................................................... 35
5.3.2 File Menu ………………………………………………………………………………..35
5.3.2.1 Send a File to the Remote Device............................................................. 35
5.3.2.2 Create a Folder on the Remote Device ...................................................... 35
5.3.2.3 Get a File From the Remote Device.......................................................... 35
5.3.2.4 Delete a File on the Remote Device .......................................................... 35
5.3.3 Tools Menu............................................................................................................ 36
5.3.3.1 Set Local Folder......................................................................................36
5.3.3.2 Refresh ..................................................................................................36
5.4 SEND VIA BLUETOOTH ....................................................................................................... 36
iv
Page 5

Bluetooth Compact Flash Card User’s Manual List of Figures
List of Figures
Figure 1: The Welcome screen shown on the PocketPC following a successful installation 3
Figure 2: ActiveSync's Tools > Add/Remove Programs... dialog box ................................. 4
Figure 3: Control Panel tabs scroll arrows ........................................................................ 5
Figure 4: Configuration overview ..................................................................................... 6
Figure 5: Control Panel, General tab, integrated hardware............................................... 7
Figure 6: Control Panel, General tab, external hardware.................................................. 8
Figure 7: Control Panel, Accessibility tab ....................................................................... 11
Figure 8: Bluetooth Passkey screen ................................................................................. 13
Figure 9: Control Panel, File Transfer tab ...................................................................... 14
Figure 10: Control Panel, Information Exchange tab ............................................. 15
Figure 11: Control Panel, Serial Port tab ............................................................... 16
Figure 12: Control Panel, Dial-up Networking tab .................................................17
Figure 13: Control Panel, About tab....................................................................... 18
Figure 14: Bluetooth Manager Menu/Toolbar ........................................................ 20
Figure 15: Connection status displayed by icon color.............................................. 21
Figure 16: Connection Status screen....................................................................... 22
Figure 17: Connection Properties screen ................................................................ 24
Figure 18: Active Connections screen, signal strength indicator .............................25
Figure 19: Connection Wizard, specific service chosen, last screen ......................... 26
Figure 20: A screen example where you are required to select a device................... 29
Figure 21: The Bluetooth Browser window allows you to select a Bluetooth device .29
Figure 22: Bottom of the Select a device wizard screen (composite overview) ......... 30
Figure 23: Dial-up Networking overview................................................................ 31
Figure 24: Dial-up Networking, overview (composite screenshot)........................... 32
Figure 25: Bluetooth File Explorer overview (composite screenshot) ...................... 34
Figure 26: Send via Bluetooth menus ..................................................................... 36
v
Page 6

Bluetooth Compact Flash Card User’s Manual Introduction
1 Introduction To BTW-CE
BTW-CE is the solution for the seamless integration of Bluetooth technology into devices
that use the Pocket PC operating system. It provides Pocket PCs with the means to:
• Locate other Bluetooth devices in the immediate vicinity (inquiry)
• Discover the services that those devices offer (discovery)
• Connect to, use, and disconnect from those services
• Enable/disable individual services
• Security features, on a service-by-service basis, including:
Authentication
Authorization
Encryption.
This User’s Guide is divided into four major sections:
• Introduction
• Configuring BTW-CE—see the sections on the Bluetooth Control Panel
• Using BTW-CE—see the sections on the Bluetooth Manager
• Using Remote Device Services—an overview of how to use services provided by
remote Bluetooth devices.
1.1 BLUETOOTH ICON
The Bluetooth icon in the lower-right corner of the Today screen provides quick access to
the Bluetooth Control Panel.
It also provides visual feedback about whether Bluetooth is “on” or “off”:
• When BTW-CE is active (“on”) the Bluetooth icon is blue
• If BTW-CE is disabled (“off”) the icon appears grayed with a red X in the lower
right corner
.
1.2 APPLY POWER TO THE BLUETOOTH HARDWARE
If the Bluetooth hardware is an integral part of the device (built-in), the first screen of the
Bluetooth Control Panel has ON/OFF buttons to apply/remove power to the hardware
(Figure 5). To Access the Bluetooth Control Panel, tap the Bluetooth icon , which is
located in the lower-right corner of the screen.
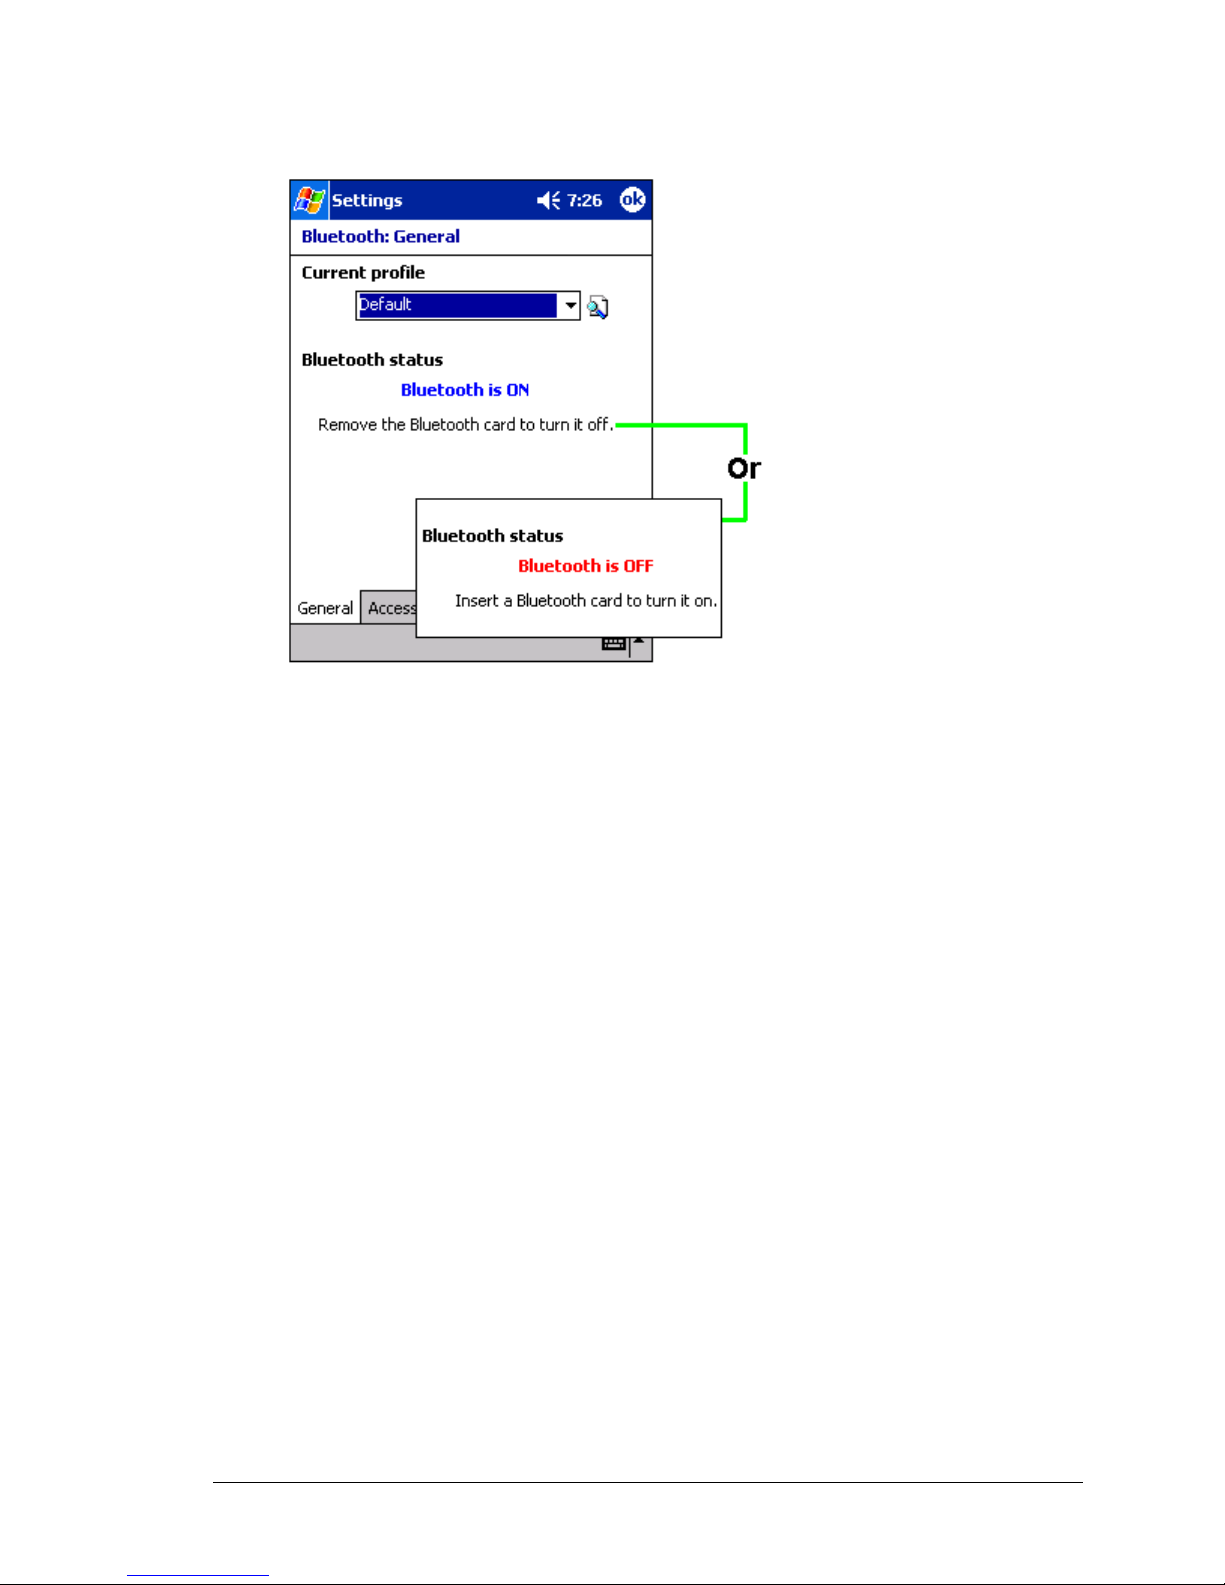
When the Bluetooth hardware is an expansion device, power is applied/removed by
inserting/removing the card (Figure 6).
.
1
Page 7

Bluetooth Compact Flash Card User’s Manual Introduction
1.3 INSTALLATION
If a prior version of BTW-CE is installed on the handheld computer it must be uninstalled
before proceeding. See Section 1.4 for uninstall instructions.
1.3.1 Requirements
1. A desktop computer with:
Microsoft Windows 98SE, Me, 2000 or XP operating system
CD-ROM drive
Microsoft ActiveSync, version 3.0 or greater.
2. A handheld computer that has built-in Bluetooth capabilities or is capable of
accepting a CompactFlash card. The Bluetooth CompactFlash cards that are
supported are:
Brainboxes
Samsung
Sharp
Philips
CC&C
1.3.2 Installation Process
1. On the PocketPC:
a) External hardware: Insert the Bluetooth CompactFlash card into the handheld
device.
b) Built-in Bluetooth hardware: tap the Bluetooth icon in the lower-right corner
of the screen, tap the ON button on the General Tab of the Bluetooth Control
Panel, and tap OK. Connect the PocketPC to the desktop computer.
Microsoft ActiveSync will automatically establish a connection.
2. On the desktop computer:
a) Insert the BTW-CE compact disc into the CD-ROM drive.
b) When the Welcome screen appears, Click Next to continue.
c) Click Yes to accept the License Agreement and install the software on the
desktop computer.
NOTE: If the connection between the handheld and the desktop computers is not open, an error
message appears: “On the next PDA connection, the installed applications will be
downloaded to the device.” Installation will resume when ActiveSync detects a
connection to handheld device.
3. On the handheld device: tap Yes to accept the default directory and install the
software.
4. On the desktop computer: Click OK to close the Download Complete dialog box,
and then click Finish.
5. On the handheld device:
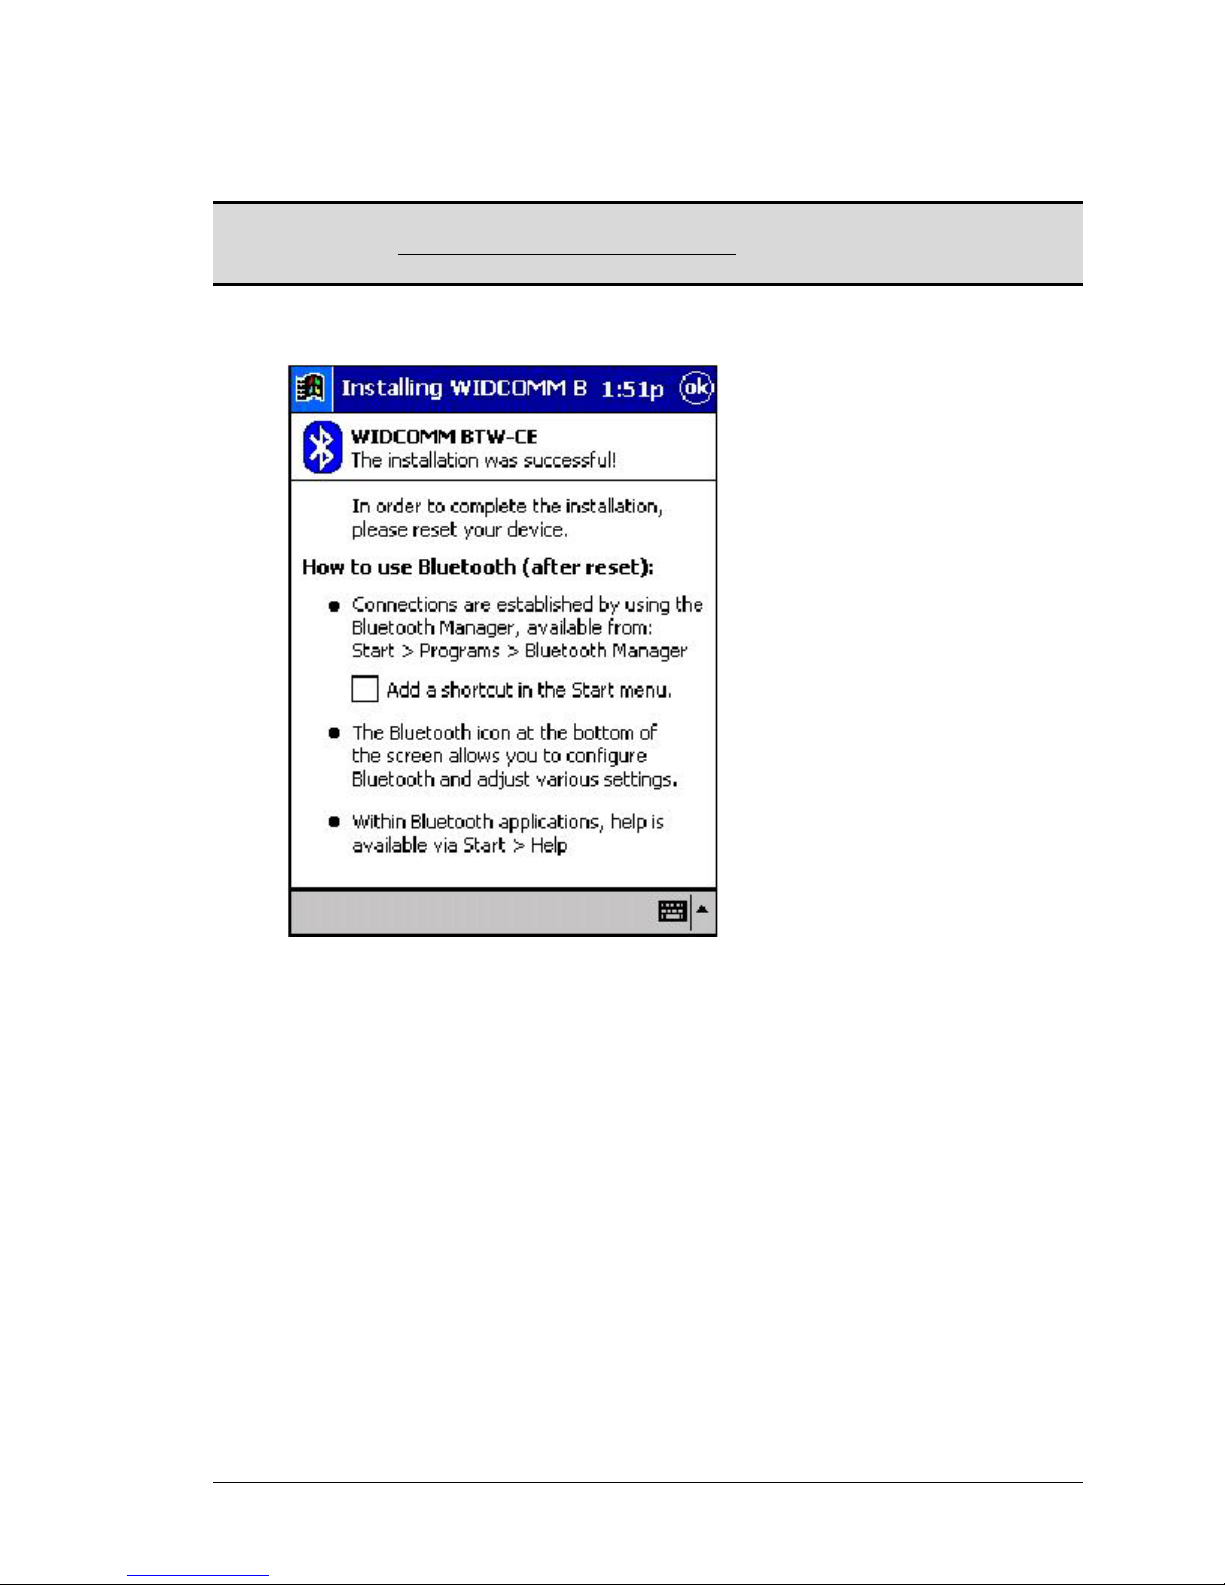
a) A welcome screen will be shown with basic instructions to use BTW-CE(see
Figure 1).
b) Check off ADD a shortcut in the Start menu in order to have access to the
Bluetooth Manager from the Start menu (otherwise, the Bluetooth
Manager will be accessible from Start > Programs).
2
Page 8
Bluetooth Compact Flash Card User’s Manual Introduction
c) Perform a “soft” reset of the handheld computer. Refer to your device’s
documentation for the exact procedure.
NOTE: A soft reset leaves installed applications and stored data intact.
A hard reset deletes ALL downloaded applications on the handheld.
See the handheld computer’s documentation for additional information.
Figure 1: The Welcome screen shown on the PocketPC following a successful installation
3
Page 9
Bluetooth Compact Flash Card User’s Manual Introduction
1.4 UNINSTALL A PRIOR VERSION OF BTW-CE
If you have a version of BTW-CE prior to vesion 1.2.0 , it must be uninstalled before
installing version 1.2.0 or later. For versions 1.2.0 and later this step is not necessary. To
uninstall BTW-CE:
1. Connect the handheld computer, via its cradle and Microsoft ActiveSync, to the
desktop computer.
2. On the desktop computer, in the system tray, double-click the ActiveSync icon.
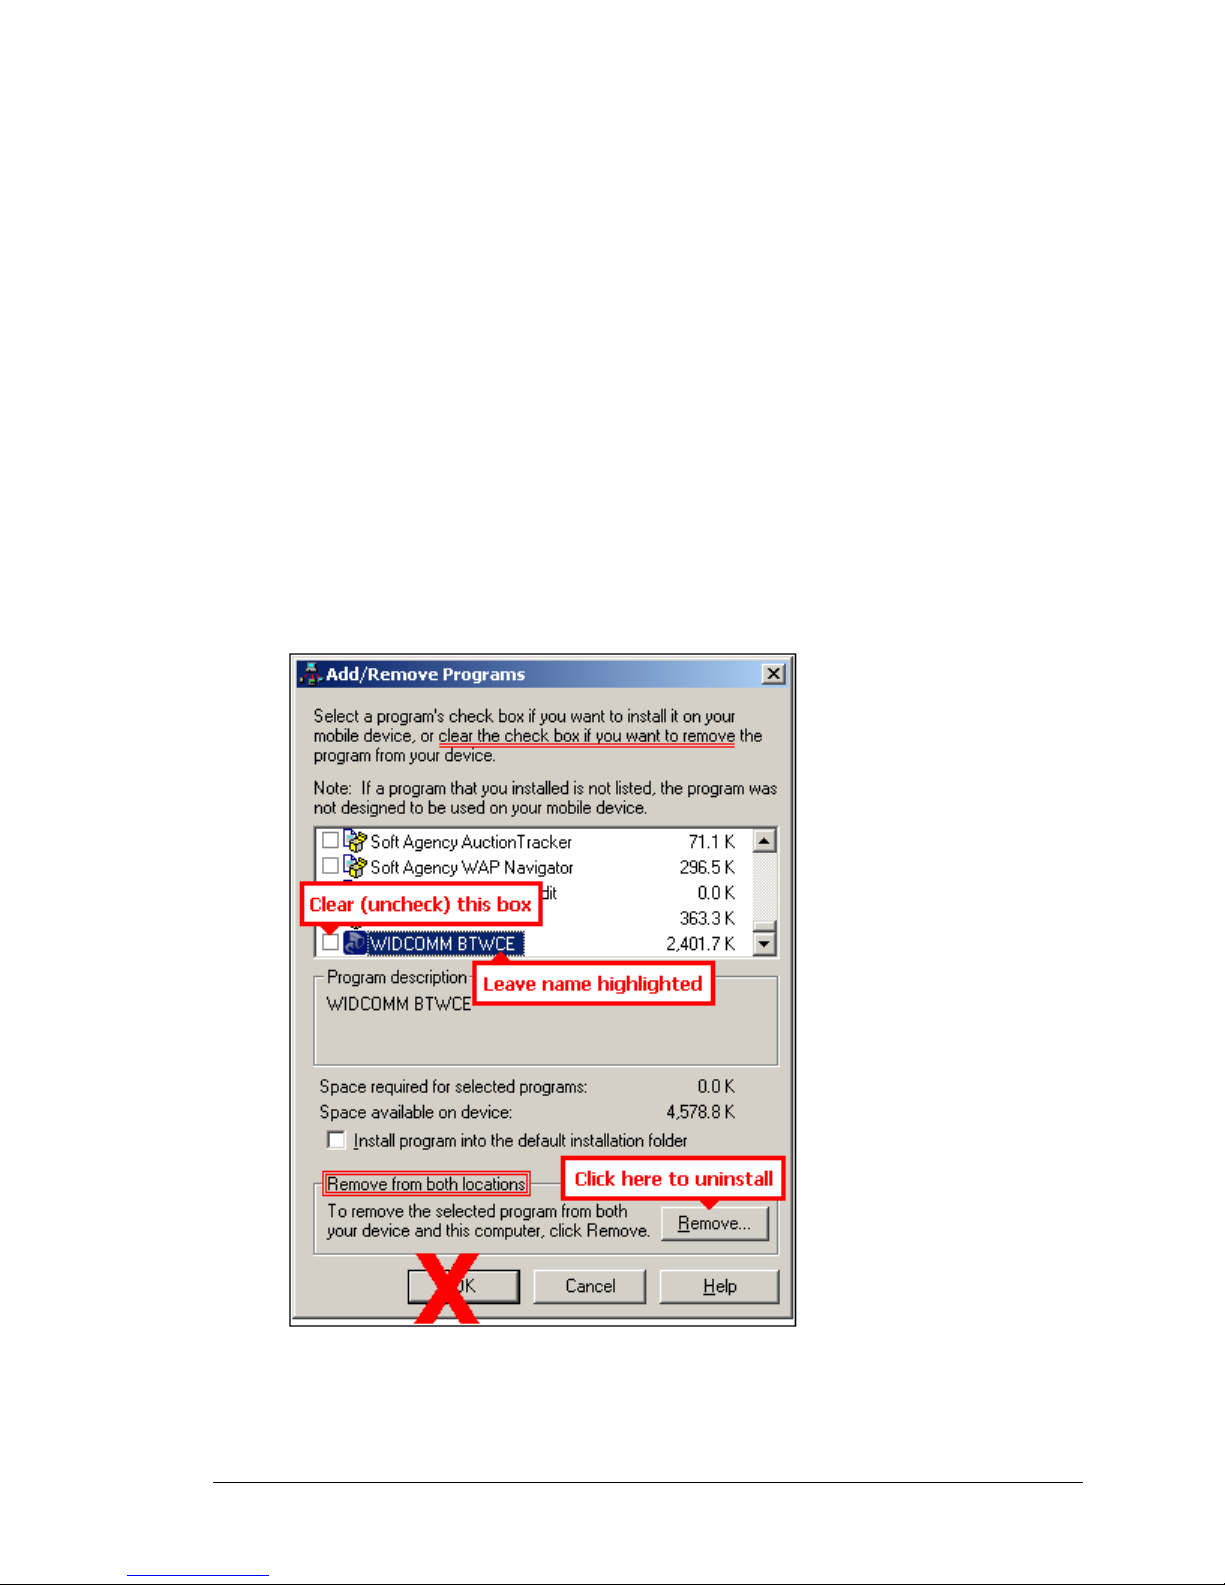
3. From the ActiveSync Tools menu, click Add/Remove Programs…
4. In the list of applications installed on the handheld computer, clear (un-check)
WIDCOMM BTW-CE. Verify that WIDCOMM BTW-CE is still highlighted
(see Figure 2 ).
5. Click the Remove button (DO NOT click the OK button, see Figure 2).
6. Click OK to acknowledge the Remove Application notification.
The prior version of BTW-CE will be uninstalled on both the handheld and desktop
computers (follow any additional on-screen instructions that may appear on the desktop
computer to complete the uninstall process).
Figure 2: ActiveSync's Tools > Add/Remove Programs... dialog box
4
Page 10
Bluetooth Compact Flash Card User’s Manual Control Panel
2 Bluetooth Control Panel: Configuring BTW-CE
BTW-CE provides a Control Panel to adjust Bluetooth settings.
To access the Control Panel, in the lower-right corner of the Today screen, tap the
Bluetooth icon
BTW-CE can have multiple saved configurations. Individual configuration sets are saved
in profiles, which can be quickly loaded to meet the appropriate situation. See
Section 2.1.1 for more information about profiles.
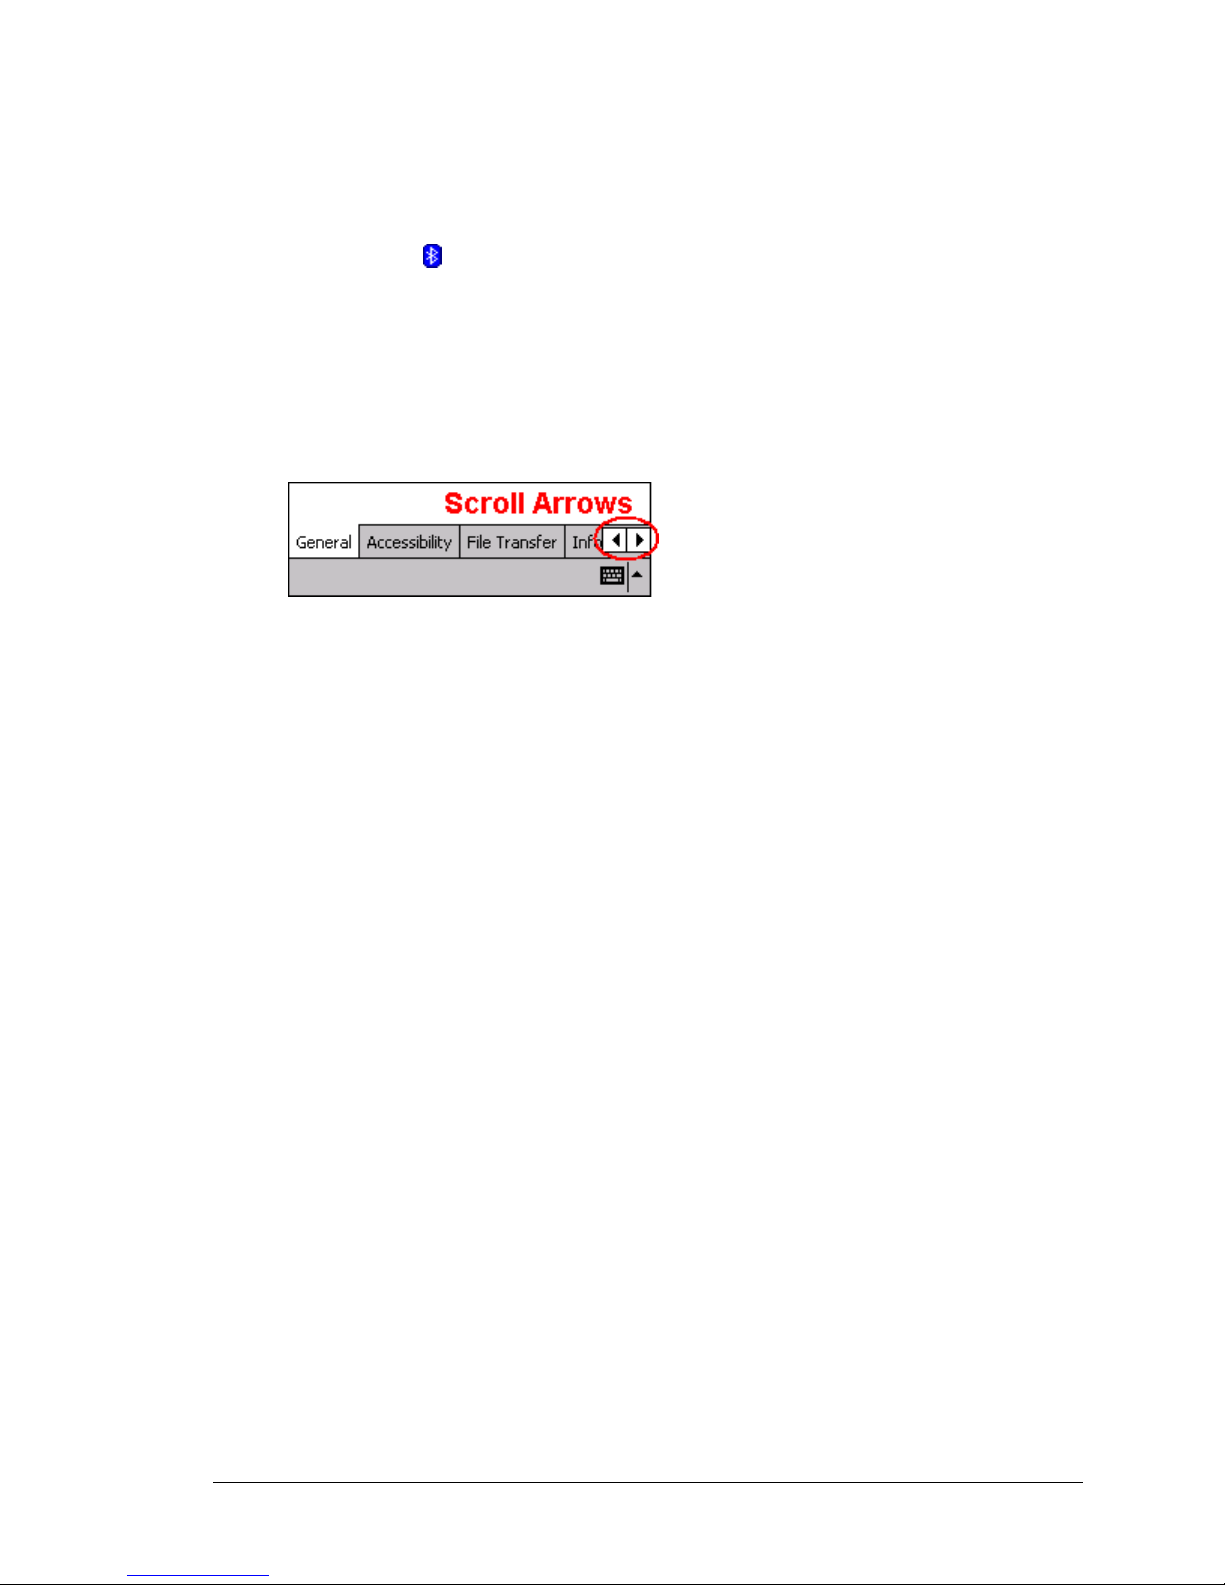
The Control Panel has seven tabs. All tabs are not visible on the screen at the same time;
use the arrows (Figure 3) to the right of the tab names to scroll back-and-forth and expose
the different tabs.
Figure 3: Control Panel tabs scroll arrows
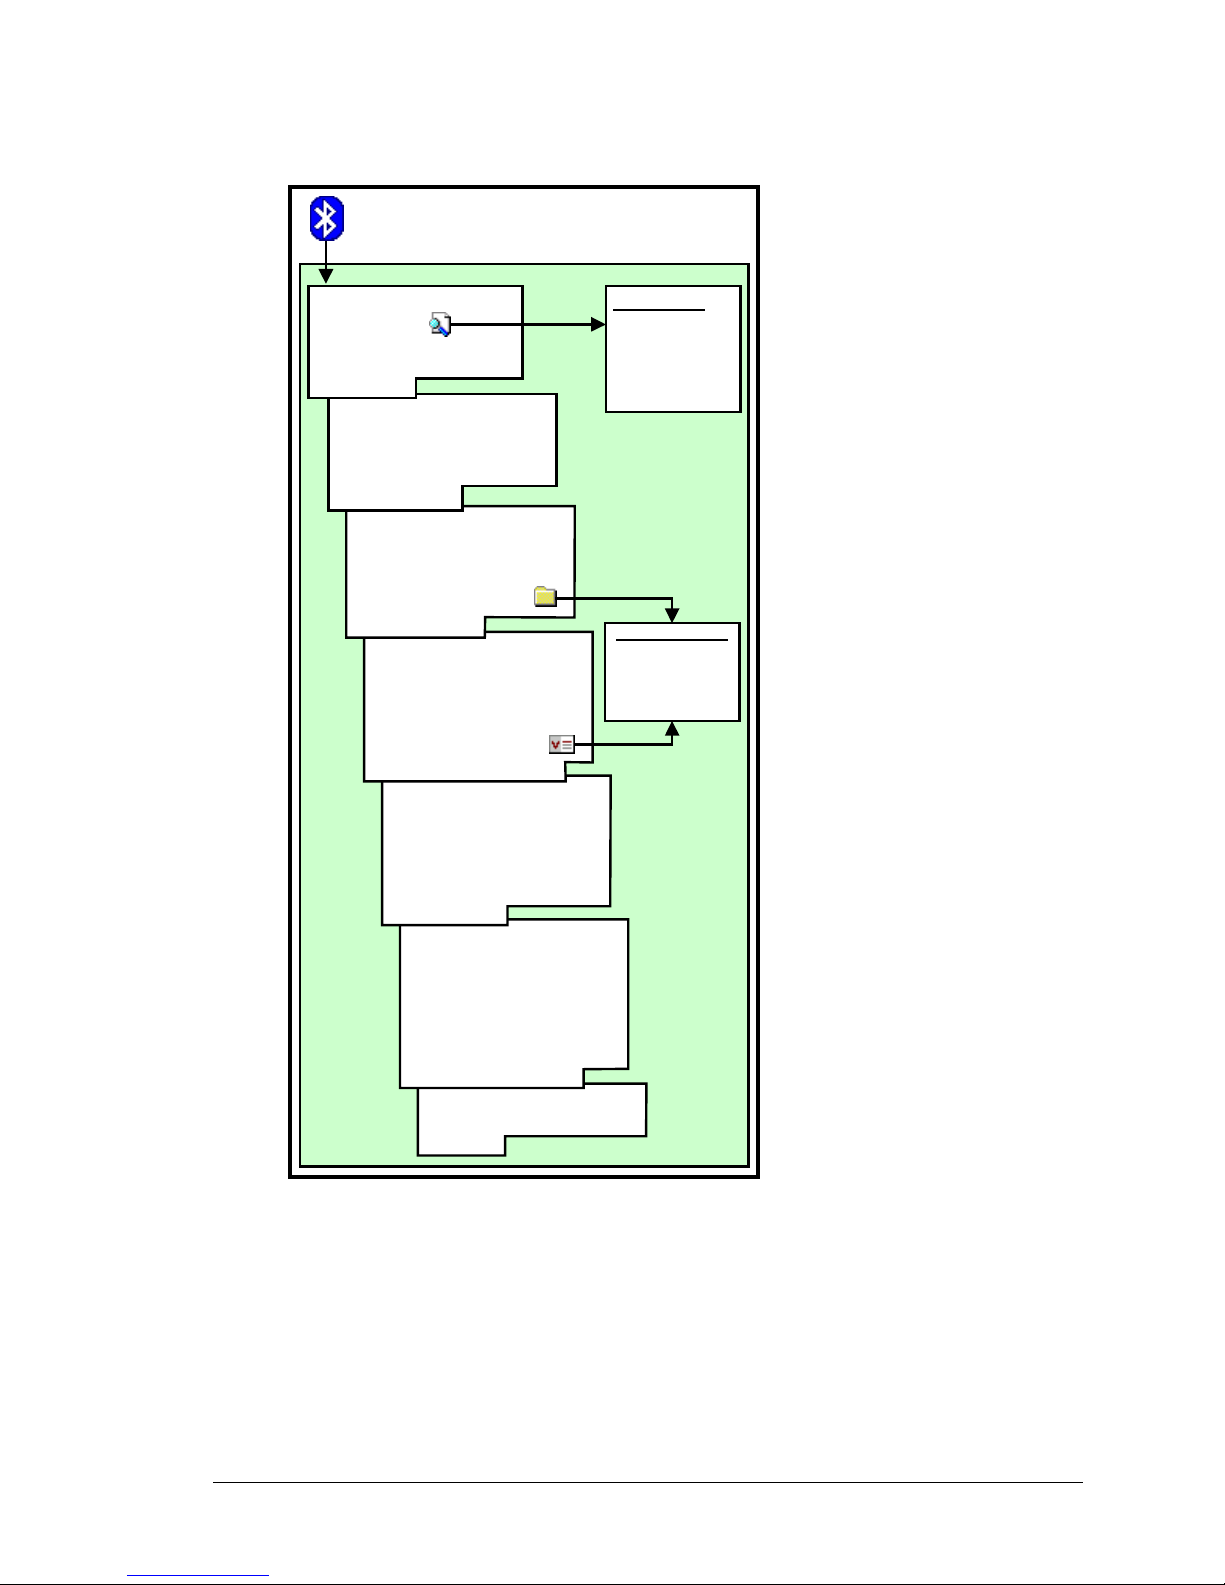
The Control Panel’s tabs are (see Figure 4):
• General
User profile selection
Bluetooth status (ON/OFF) indicator
Hardware power control (ON/OFF).
Shortcut to the Bluetooth Manager.
• Accessibility
Set the device name
The device’s Bluetooth Device Address (BDA)
Determine which remote devices are allowed to connect
Determine whether remote devices can “see” this Pocket PC.
• Service tabs—BTW-CE can provide four services. They are:
File Transfer—set the highest-level directory on this Pocket PC that remote
Information Exchange—Set the default business card (Pocket Outlook
Serial Port—Bluetooth serial port information
Dial-up Networking—configure the COM port, baud rate and flow control.
• About—there are no configurable options on this tab.
Software version information
Copyright information
Website and Technical Support links.
Each of these tabs is explained in detail in the remainder of this section.
.
devices will be able to access.
contact entry)
5
Page 11
Bluetooth Compact Flash Card User’s Manual Control Panel
Figure 4: Configuration overview
Bluetooth Control Panel
Tap the Bluetooth icon on the Today page
(Default tab)
Select: Profile
Set: Bluetooth ON/OFF
Display: Status ON/OFF
General
Set: Device name
Devices with access
Discoverability
Display: BDA
Accessibility
Enable: This Service
Authorization
Authentication
Encryption
Set: My shared folder
File Transfer
Enable: This Service
Authorization
Authentication
Encryption
Set & Display:
My bus. card
Information Exchange
Enable: This Service
Authorization
Authentication
Encryption
Display: Inbound COM port
Outbound COM port
Serial Port
Enable: This Service
Authorization
Authentication
Encryption
Set: COM port
Baud rate
Flow control
Dial-up Networking
Display:
Software Version Data
About
Profile page
Profile
functions:
New
Rename
Delete
Browse Dialog
Locate & Set
Directory
or
Contact
6
Page 12
Bluetooth Compact Flash Card User’s Manual Control Panel
2.1 GENERAL TAB
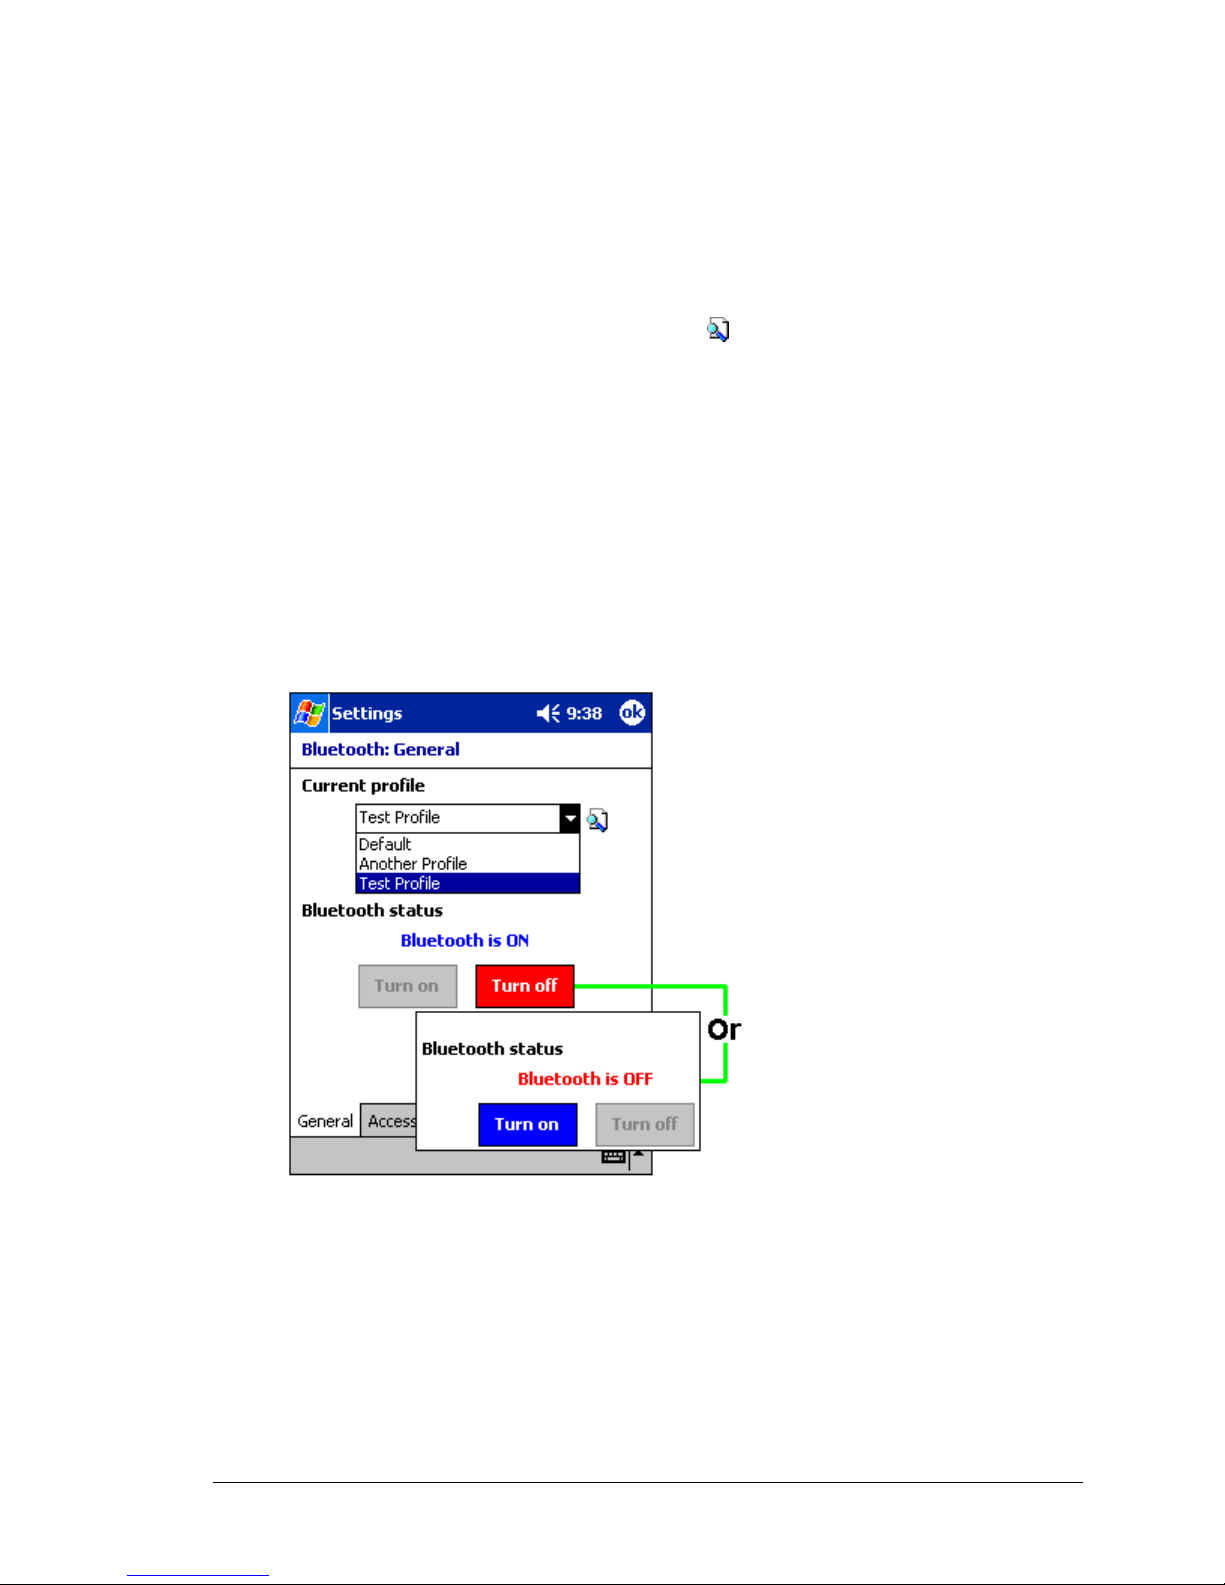
There are three options on this screen:
• Current Profile: to change the active profile, tap the down-arrow in the
“Current profile:” field and select the new profile from the drop-down list. The
current profile will be saved, and the settings from the selected profile will be
loaded.
To add, delete, or rename a profile, tap
• Bluetooth Status:
Integrated Bluetooth hardware (see Figure 5)
External Bluetooth hardware (CompactFlash or PC expansion card) (see
Figure 6 on the next page).
• Bluetooth Manager:
Tapping on this shortcut starts the Bluetooth Manager.
When Bluetooth is OFF, no connections, incoming or outgoing, are possible.
When Bluetooth is ON, Bluetooth is always “up” and battery drain is significantly greater
than when Bluetooth is disabled. To conserve battery power, do not enable Bluetooth
when it is not being used.
(see Section 2.1.1).
Figure 5: Control Panel, General tab, integrated hardware
7
Page 13
Bluetooth Compact Flash Card User’s Manual Control Panel
Figure 6: Control Panel, General tab, external hardware
8
Page 14

Bluetooth Compact Flash Card User’s Manual Control Panel
2.1.1 Profiles
Profiles are accessed and managed from the Control Panel, General Tab. They allow:
• Different users to quickly re-configure a Pocket PC to their personal preferences.
For example, if Joe and Mary both use the same Pocket PC, but each uses it for a
different purpose, selecting a pre-configured profile will alter the settings to those
of the appropriate user.
• A single user to quickly re-configure a Pocket PC for a different environment. If
Joe uses his device primarily at the office, but also uses it when traveling, he can
easily switch to a pre-configured profile, which has more secure settings for hotel,
airport and similar “public” environments.
All Bluetooth settings are saved in the active profile. A profile named “Office,” for
example, may include Bluetooth Authentication and Encryption settings, and connection
shortcuts to specific services on work-related Bluetooth devices. A profile named
“Public” on the same device may only allow the owner’s laptop computer to connect to
the Pocket PC. When the “Public” profile is selected, only the Bluetooth settings related
to that profile are active, the “Office” profile settings have no affect.
When the Pocket PC is turned off, BTW-CE saves the last-used profile and reloads that
profile the next time the device is turned on.
The Profile options (available from the Control Panel, General Tab) are:
• A list of existing profiles—when BTW-CE is started for the first time the only
profile listed will be “Default.” To enable a profile, tap it.
accesses a screen from which you can:
•
Add a profile
Rename a profile
Delete a profile.
2.1.1.1 Create A New Profile
1. From the Today screen, tap the Bluetooth icon .
2. From the General tab, tap .
3. From the Add/Delete Profiles screen:
a) Tap the New button
b) Enter a descriptive name for the new profile, for example, “Office.”
c) Select an existing profile on which to base the new profile.
4. Tap the OK button.
The new profile does NOT automatically become the active profile; to activate the new
profile, select it from the “Current Profile” field on the General Tab.
2.1.1.2 Rename or Delete a Profile
1. From the Today screen, tap the Bluetooth icon .
2. From the Bluetooth Control Panel, General tab, tap
3. From the Add/Delete Profiles screen:
a) Tap a profile name, then the Rename button and enter the new name.
Or
b) Tap a profile name, then the Delete button.
.
9
Page 15
Bluetooth Compact Flash Card User’s Manual Control Panel
2.1.1.3 Save Configuration Settings In A Profile
When you make changes to the Pocket PC’s configuration, those changes are
automatically saved when you select a different profile, turn Bluetooth off, or shut down
the Pocket PC.
To save a specific configuration:
1. Select (or create and then select, see Section 2.1.1.1) the desired profile (for
example “Travel”) from the Current Profile field on the General Tab.
2. Setup the Pocket PC (see Section 2) so that it behaves in the desired manner.
3. Tap OK
4. Close the Control Panel; the changes are saved automatically.
To use the Travel profile and its associated configuration in the future, from the Control
Panel, General Tab, select “Travel” from Current Profile drop-down list.
To avoid saving unwanted changes to a regularly used profile, create a new profile that is
based on the profile currently in use (see Section 2.1.1.1), select the new profile, and then
make the changes while the new profile is active.
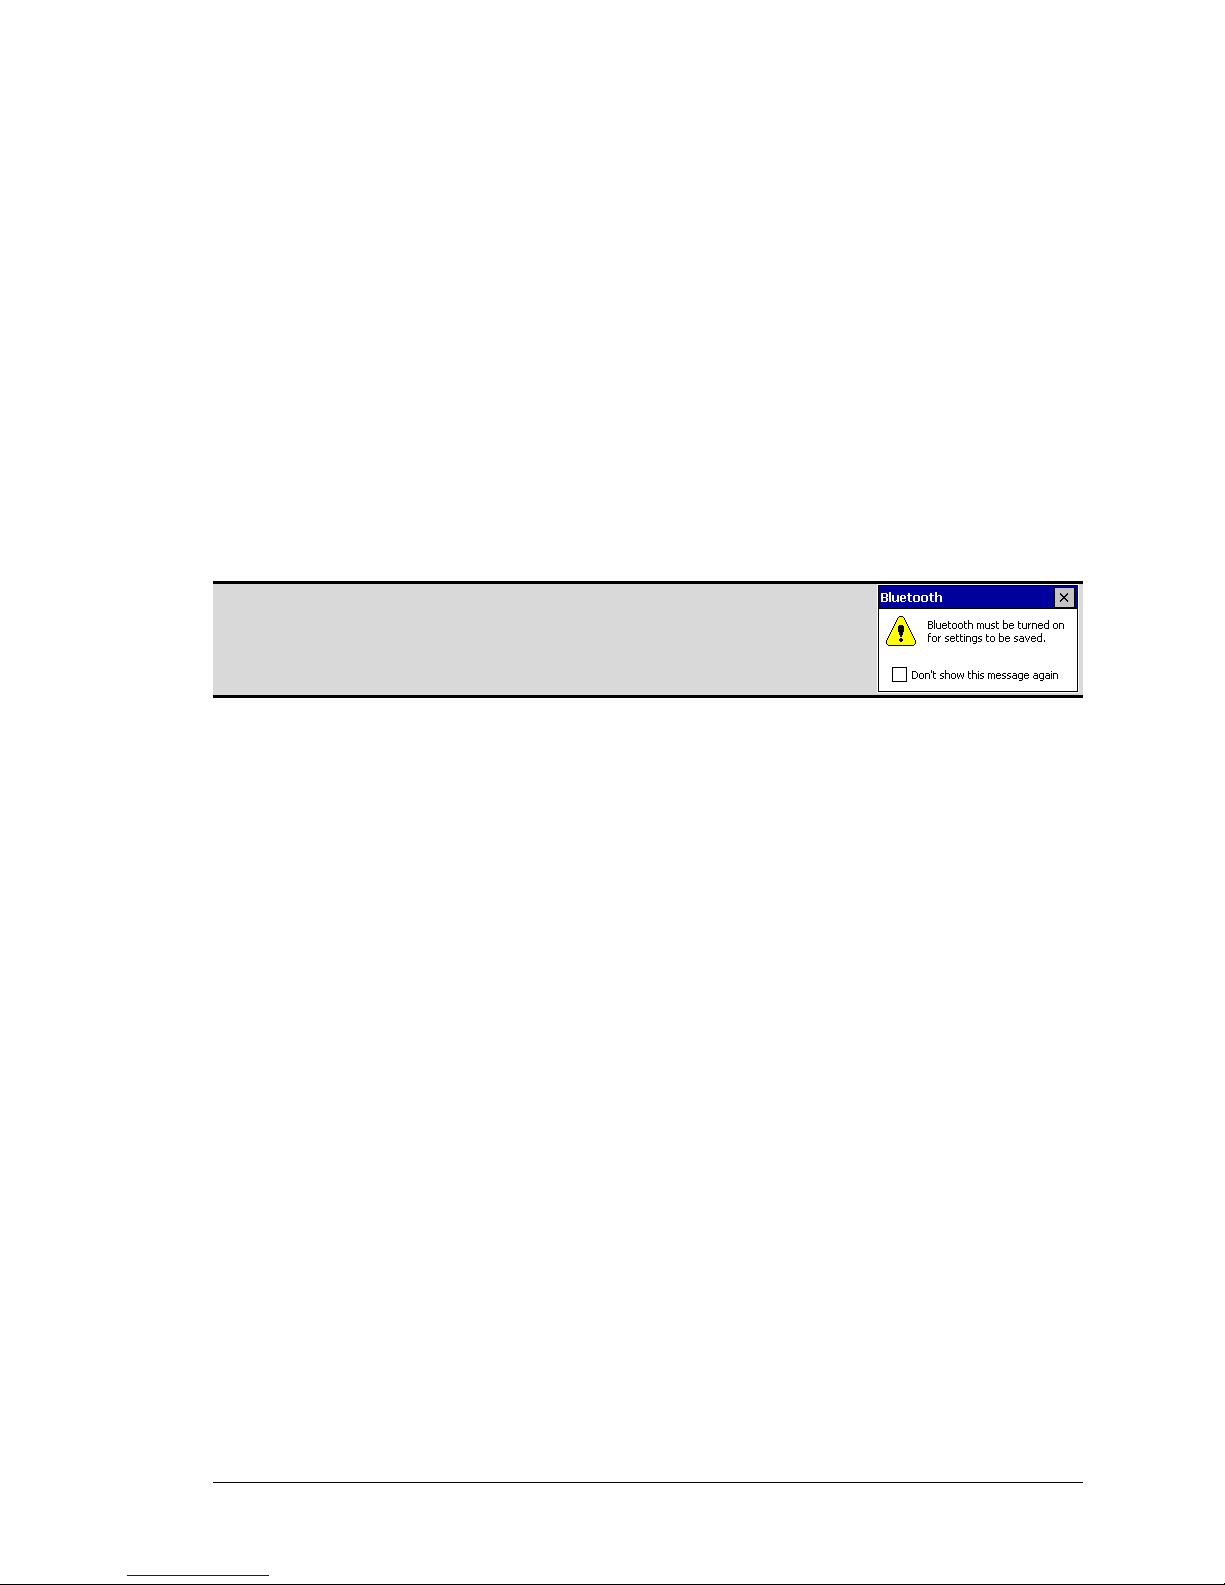
NOTE: If Bluetooth is OFF, changes will not be saved. The error box
to the right appears unless Don’t show this message again has
been selected.
10
Page 16
Bluetooth Compact Flash Card User’s Manual Control Panel
2.2 ACCESSIBILITY TAB
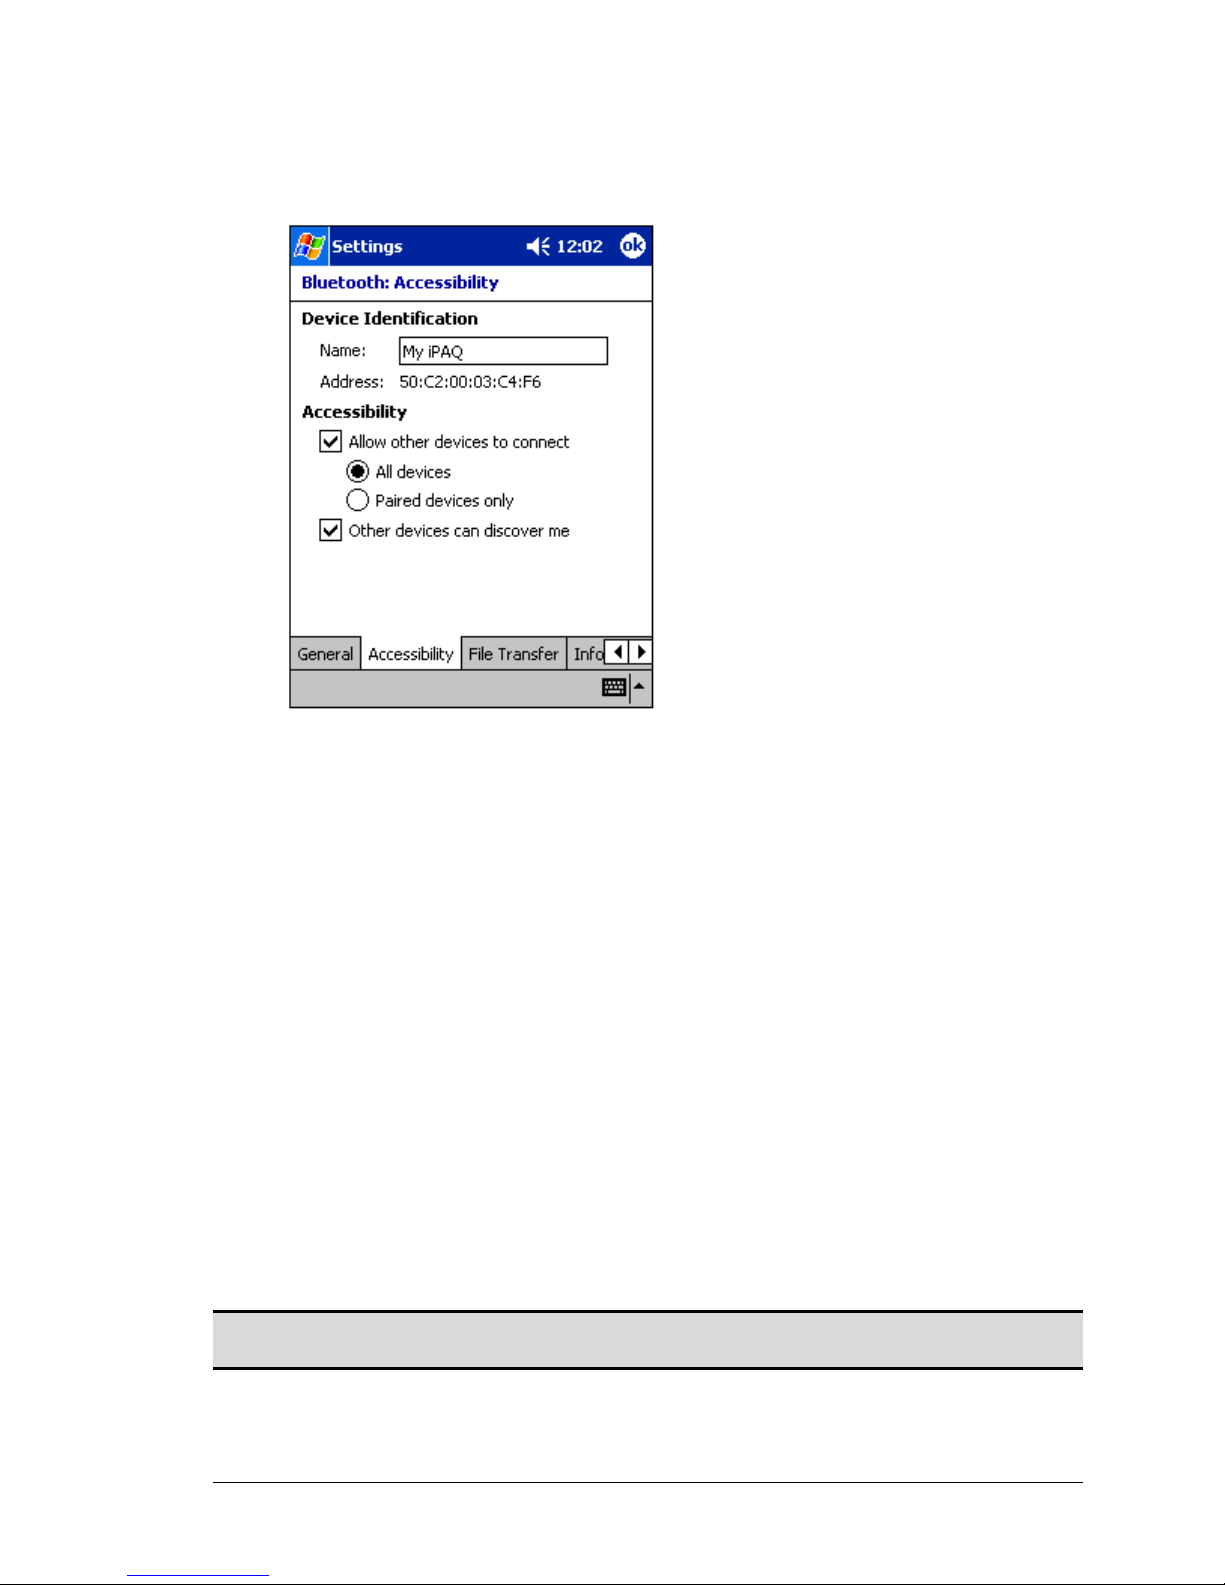
Figure 7: Control Panel, Accessibility tab
All information on this tab is saved with the active profile, including the device name.
The options on the Accessibility tab are:
• Device Identification:
Name—the name of this device, as displayed to remote devices when the
associated profile is active. To change the device name associated with this
profile, highlight the name and enter the new name.
Address—the Bluetooth Device Address (BDA) of this device. This
information is permanently associated with the Bluetooth hardware during
the manufacturing process and cannot be changed.
• Accessibility:
Allow other devices to connect—when this option is enabled, other devices
are permitted to connect to this device. Two mutually exclusive sub-options
provide additional refinement. They are:
All devices—select this option to allow all devices to connect.
Paired devices only—select this option to allow only devices that have a
paired relationship (see Section 3.2.2) with this device to connect.
Other devices can discover me—when this option is enabled, other Bluetooth
devices can see and report this device.
Even though remote devices cannot discover this device unless this option is
checked, if a remote device has this device’s Bluetooth Device Address, that
device may still be able to connect to this device (see Note below).
NOTE: The ability of remote devices to connect is also subject to security restrictions and
whether Bluetooth is enabled on this device.
11
Page 17

Bluetooth Compact Flash Card User’s Manual Control Panel
2.3 BTW-CE SERVICE TABS
The functions that a Pocket PC can provide to other devices are called “Services.”
The services that this Pocket PC is capable of providing are:
• File Transfer—file-related operations such as get a file/use a file/delete a file, etc.
• Information Exchange—Send the default business card (Pocket Outlook contact)
on request.
• Serial Port—Bluetooth serial port operations. Bluetooth serial ports are used as a
replacement for a physical cable between devices.
• Dial-up Networking—provide access, via a phone line or other access system, to
a remote computer network such as an Internet service.
Each of these tabs is explained in detail in the remainder of this section.
12
Page 18
Bluetooth Compact Flash Card User’s Manual Control Panel
2.3.1 Common Options
All of the services have some common settings. Even though the options are the same, in
each case they are specific to the service being configured on the individual tabs.
The common options are listed under the About this service heading on each individual
service tab. They are:
• Enable service: check this option to have the service start when BTW-CE
initializes. When this option is enabled the service is enabled and “listening” for
connection attempts when Bluetooth is enabled.
• Authorization required: check this option to require that each attempt to
establish a connection be individually authorized. When Authorization is enabled
and a remote device attempts to connect to this service, BTW-CE asks if the
connection should be permitted.
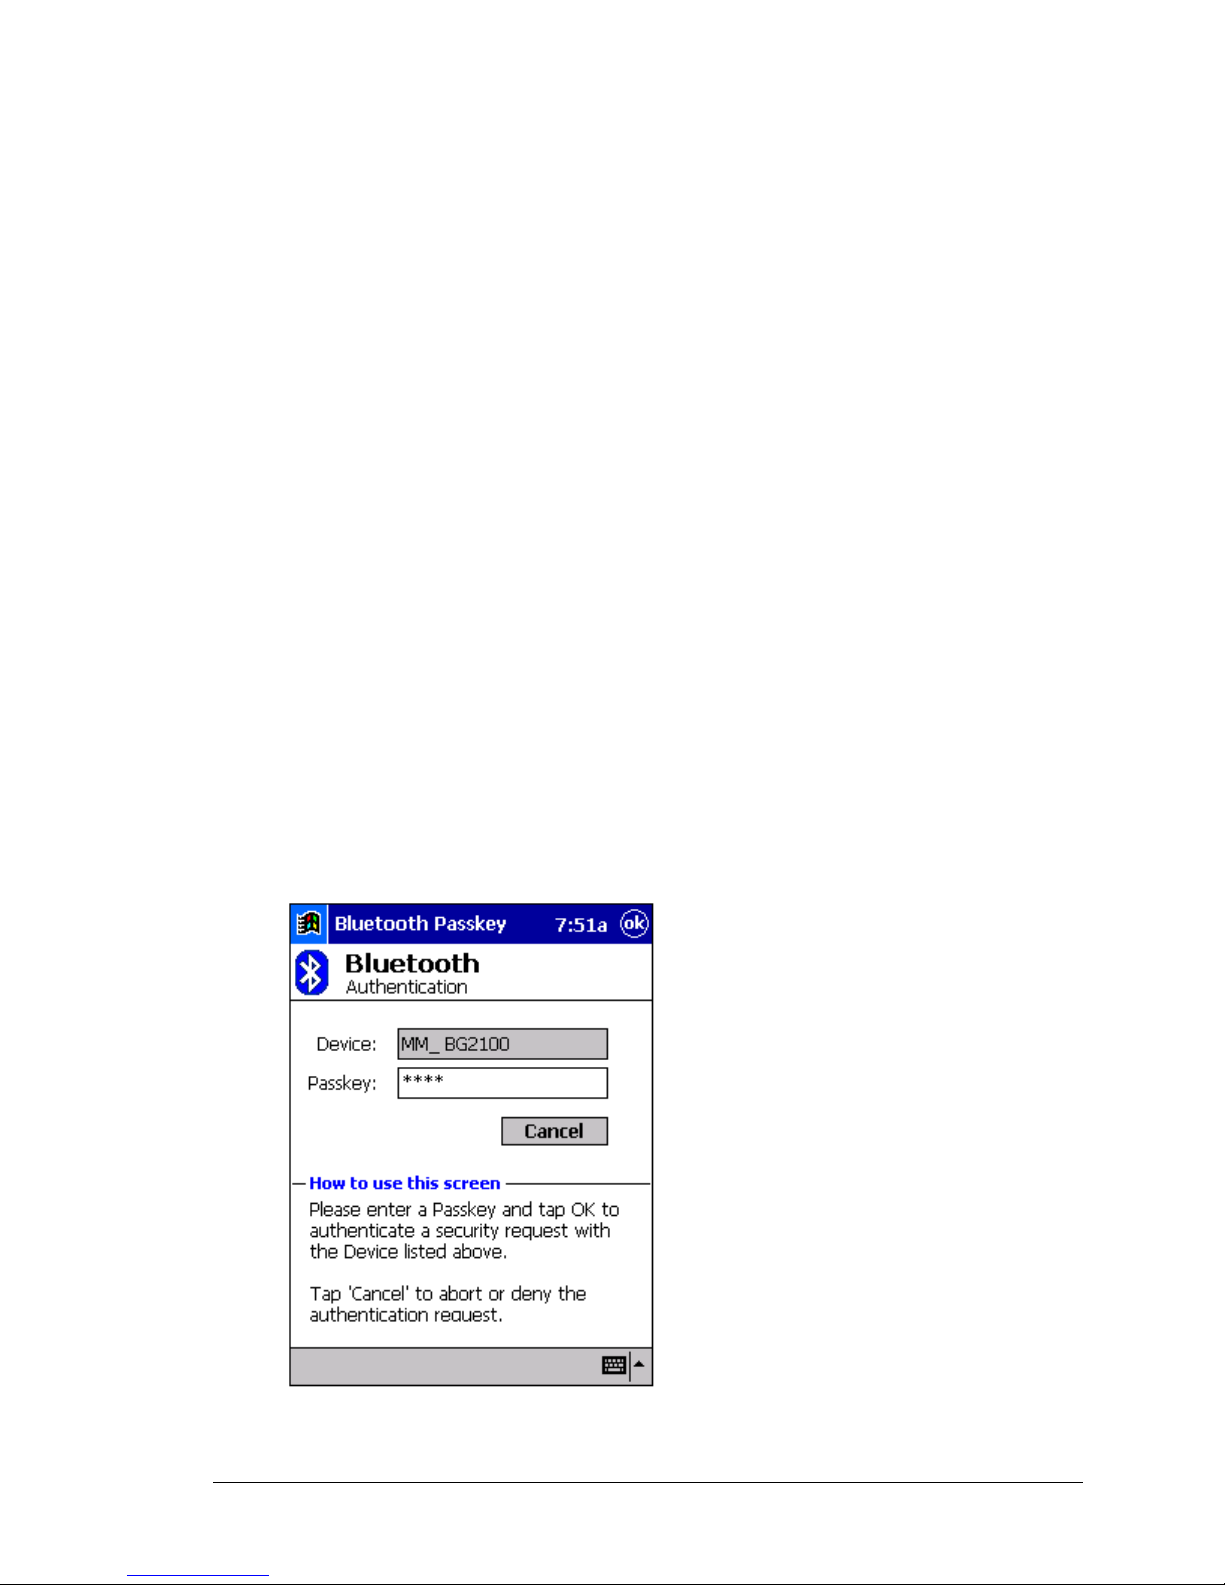
• Authentication (Passkey) required: check this option to require a passkey or a
Link Key from the remote device before allowing the connection. When this
option is enabled and a remote device attempts to establish a connection, the
Bluetooth Passkey screen (Figure 8) appears. Enter the passkey to allow the
connection to proceed, or tap the OK button to deny permission for the
connection. If the notification is ignored, the connection attempt will time out
(fail).
• Encryption required: check this option to require that all the data exchanged
between this device and the remote Bluetooth device be encrypted.
Encryption depends on the key that is used for Authentication; if Authentication
is not enabled, Encryption will not be available.
Only the data exchanged by the Bluetooth devices is encrypted.
The individual services, and their unique options, are explained in the remainder of this
section.
Figure 8: Bluetooth Passkey screen
13
Page 19
Bluetooth Compact Flash Card User’s Manual Control Panel
2.3.2 File Transfer Tab
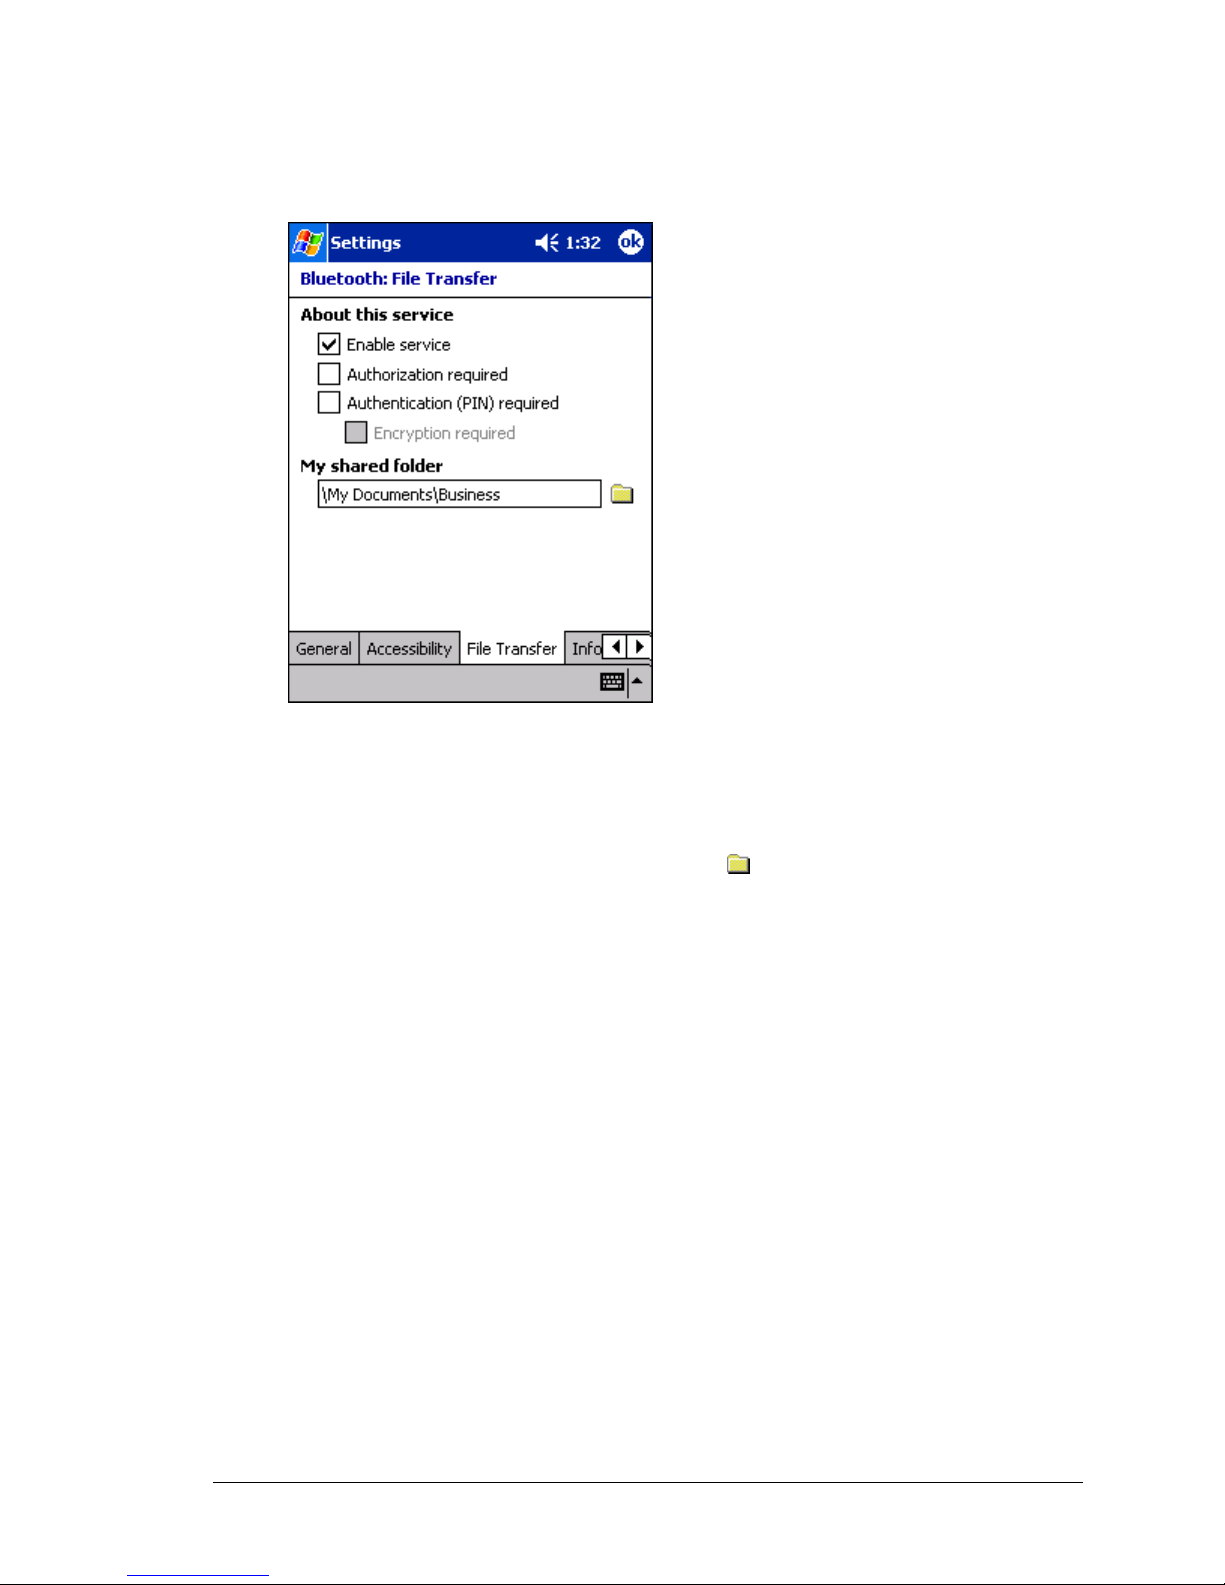
Figure 9: Control Panel, File Transfer tab
The options on this tab only affect incoming File Transfer connections.
All of the Common Options (see Section 2.3.1) are available.
There is one additional configurable item: “My shared folder,” which allows you to
specify the default File Transfer directory, the highest level directory on this Pocket PC
that remote devices have access to.
To change the default File Transfer directory, tap
, navigate to the desired directory,
and then tap the OK button.
14
Page 20
Bluetooth Compact Flash Card User’s Manual Control Panel
2.3.3 Information Exchange Tab
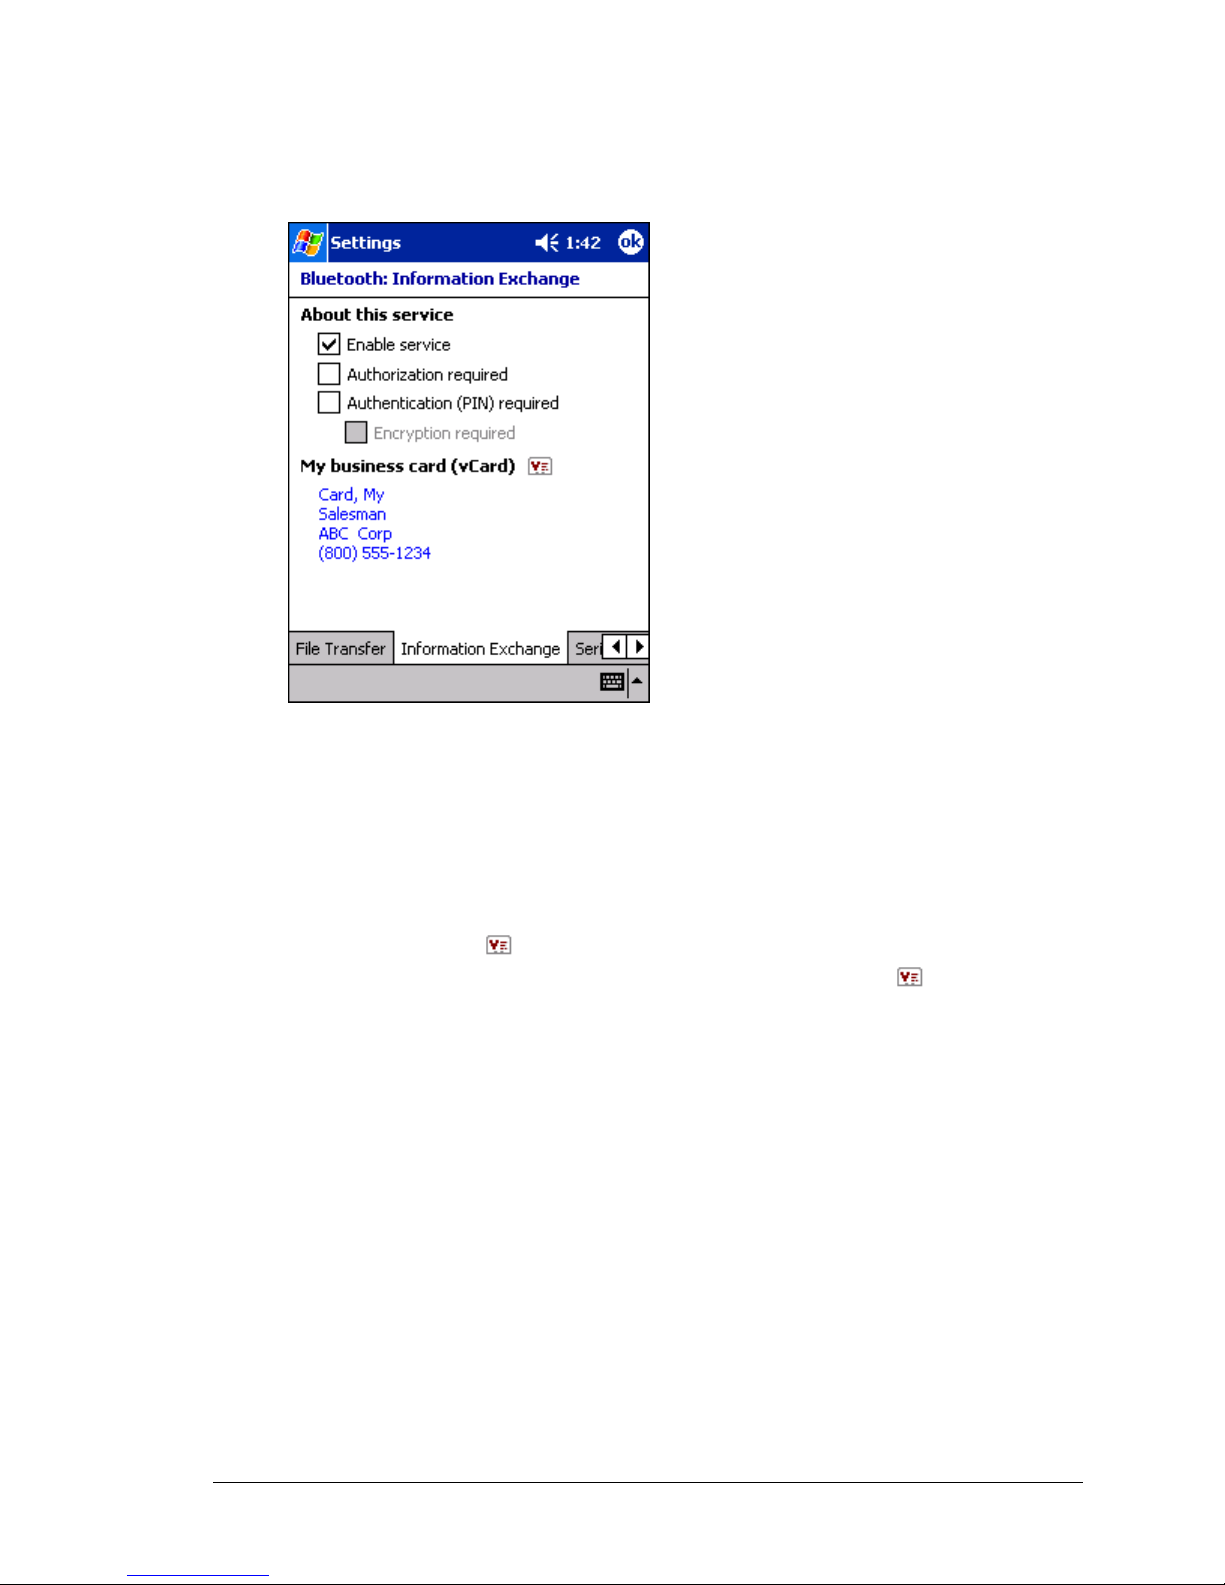
Figure 10: Control Panel, Information Exchange tab
The Common Options (see Section 2.3.1) on this tab only affect incoming Information
Exchange connections.
There is one additional configurable item: “My business card (vCard)”.
The “My business card” information comes from a selected record in the Contacts list of
Pocket Outlook. Information from the selected record is sent to remote devices on request.
It is also the contact information that is sent when you select “Send your business card to
one or more recipients” while using Business Card Exchange.
The default selection is “none” (no information).
To select a vCard, tap
To discontinue sending contact information when it is requested, tap
, choose a contact from the list, and then tap OK.
, choose “(none)”
from the list, and then tap OK.
If you reach the contacts list by mistake, tap OK to return to the previous screen.
15
Page 21
Bluetooth Compact Flash Card User’s Manual Control Panel
2.3.4 Serial Port Tab
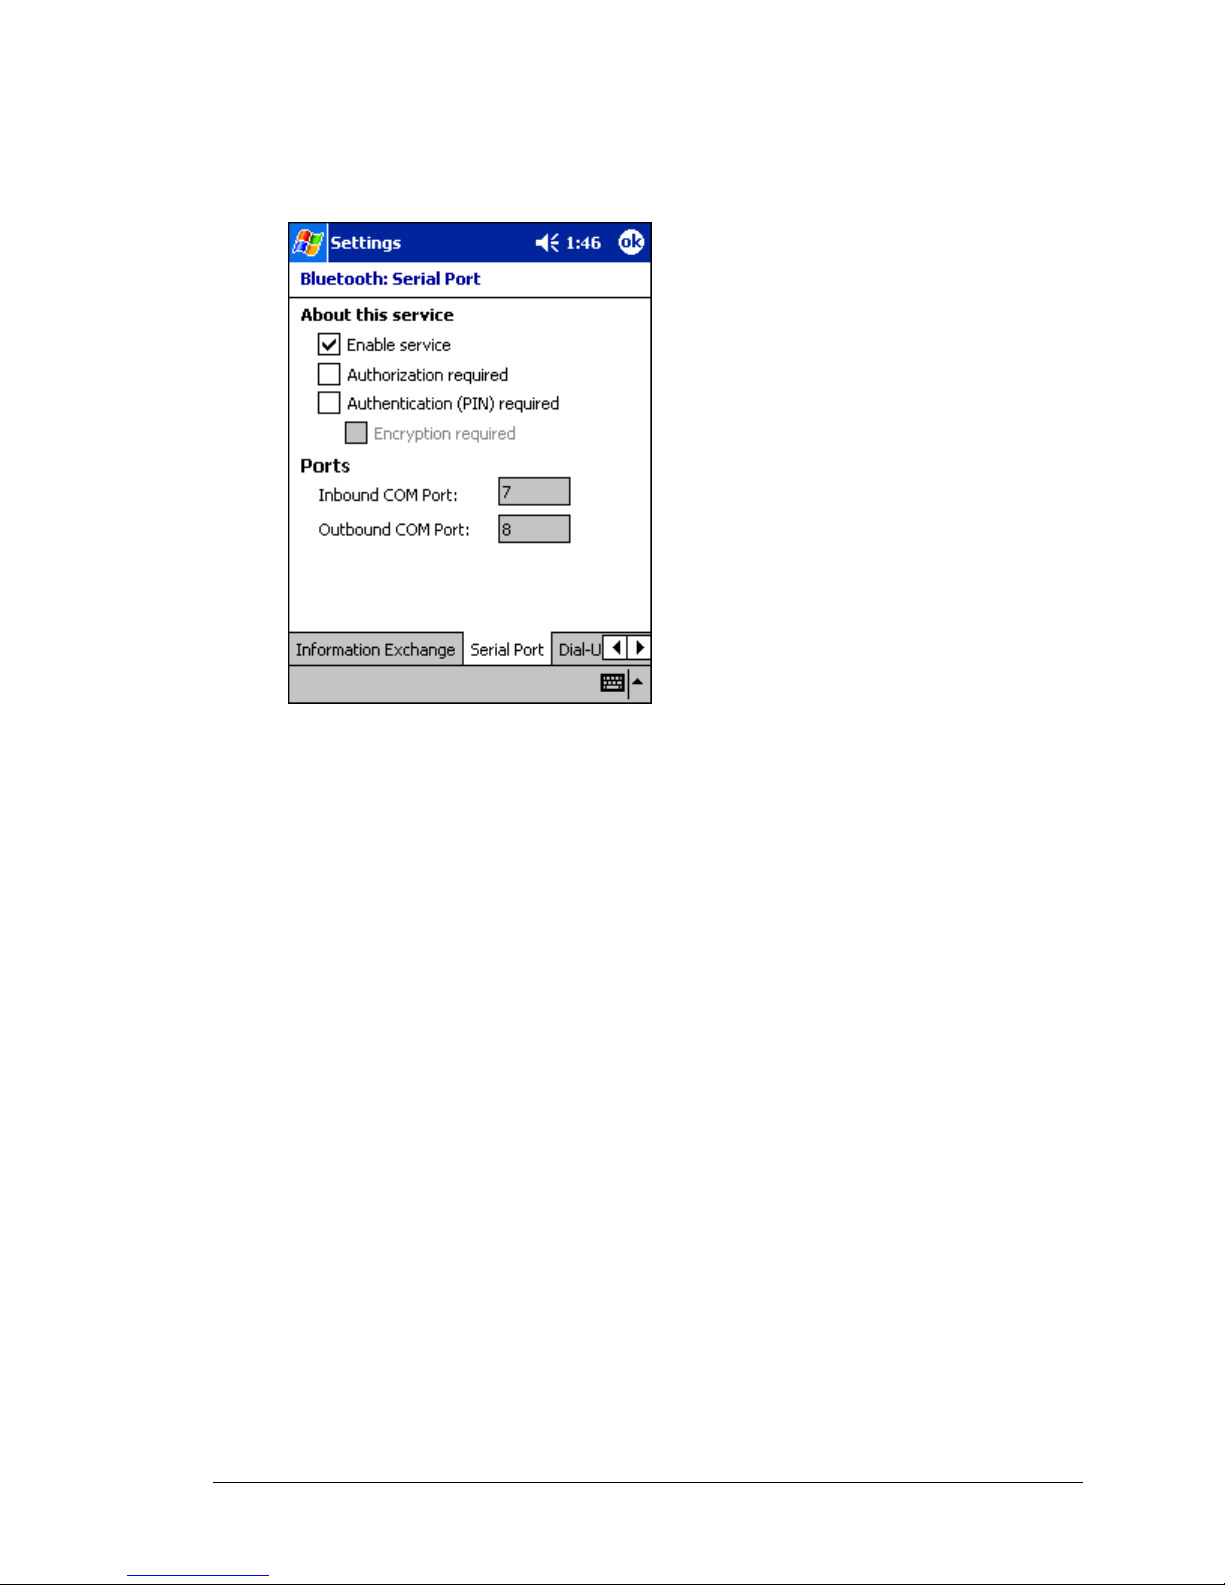
Figure 11: Control Panel, Serial Port tab
The options on this tab only affect incoming Serial Port connections.
All of the Common Options (see Section 2.3.1) are available.
There are two additional, non-configurable items:
• Inbound COM Port: the local communications port that is used for inbound
serial connections.
• Outbound COM Port: the local communications port that is used for
outbound serial connections.
The Inbound and Outbound COM ports are permanently assigned and cannot be changed.
16
Page 22
Bluetooth Compact Flash Card User’s Manual Control Panel
2.3.5 Dial-up Networking Tab
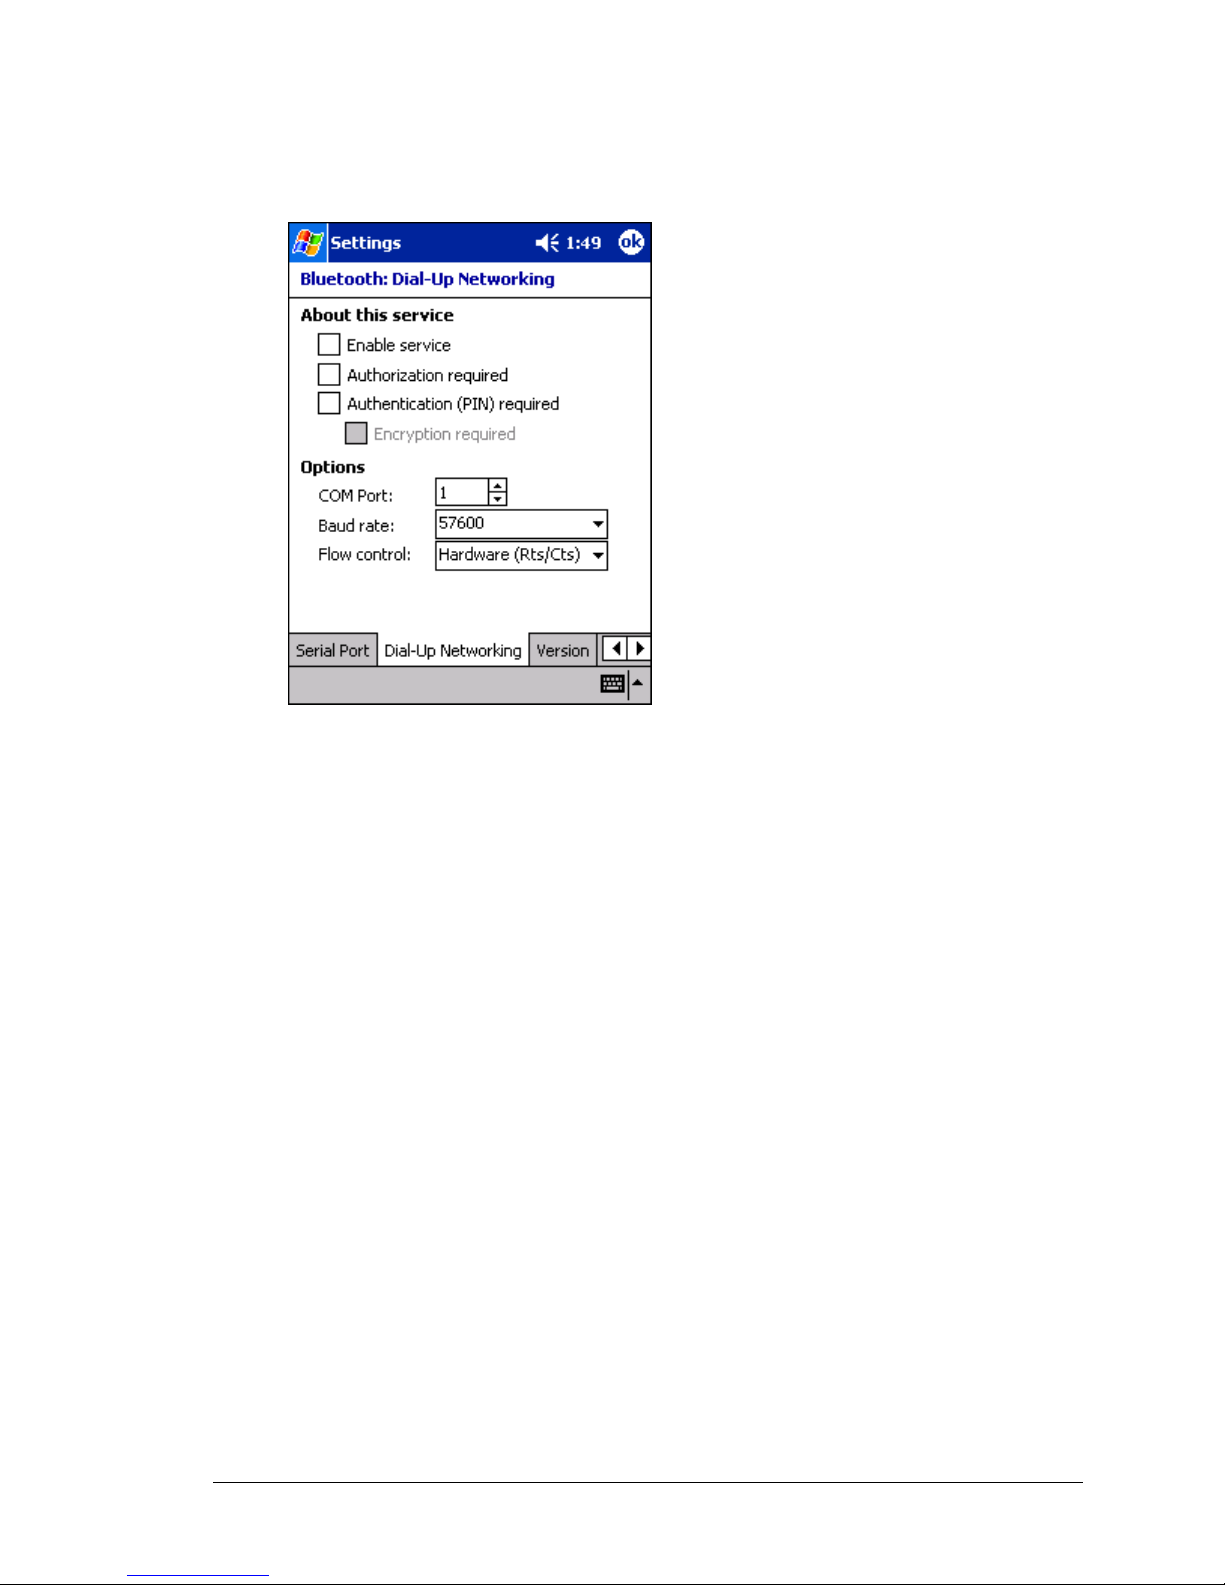
Figure 12: Control Panel, Dial-up Networking tab
The options on this tab only affect incoming Dial-up Networking connections.
All of the Common Options (see Section 2.3.1) are available.
There are three additional items:
• COM Port: select the communications port to be used.
• Baud rate: tap the down-arrow and select a baud rate from the drop-down list.
The options range from 1,200 to 115,200 baud, in nine steps.
• Flow control: tap the down-arrow and select the type of flow control to be used
from the drop-down list. The options are:
Off
Hardware (Rts/Cts).
17
Page 23
Bluetooth Compact Flash Card User’s Manual Control Panel
2.4 ABOUT TAB
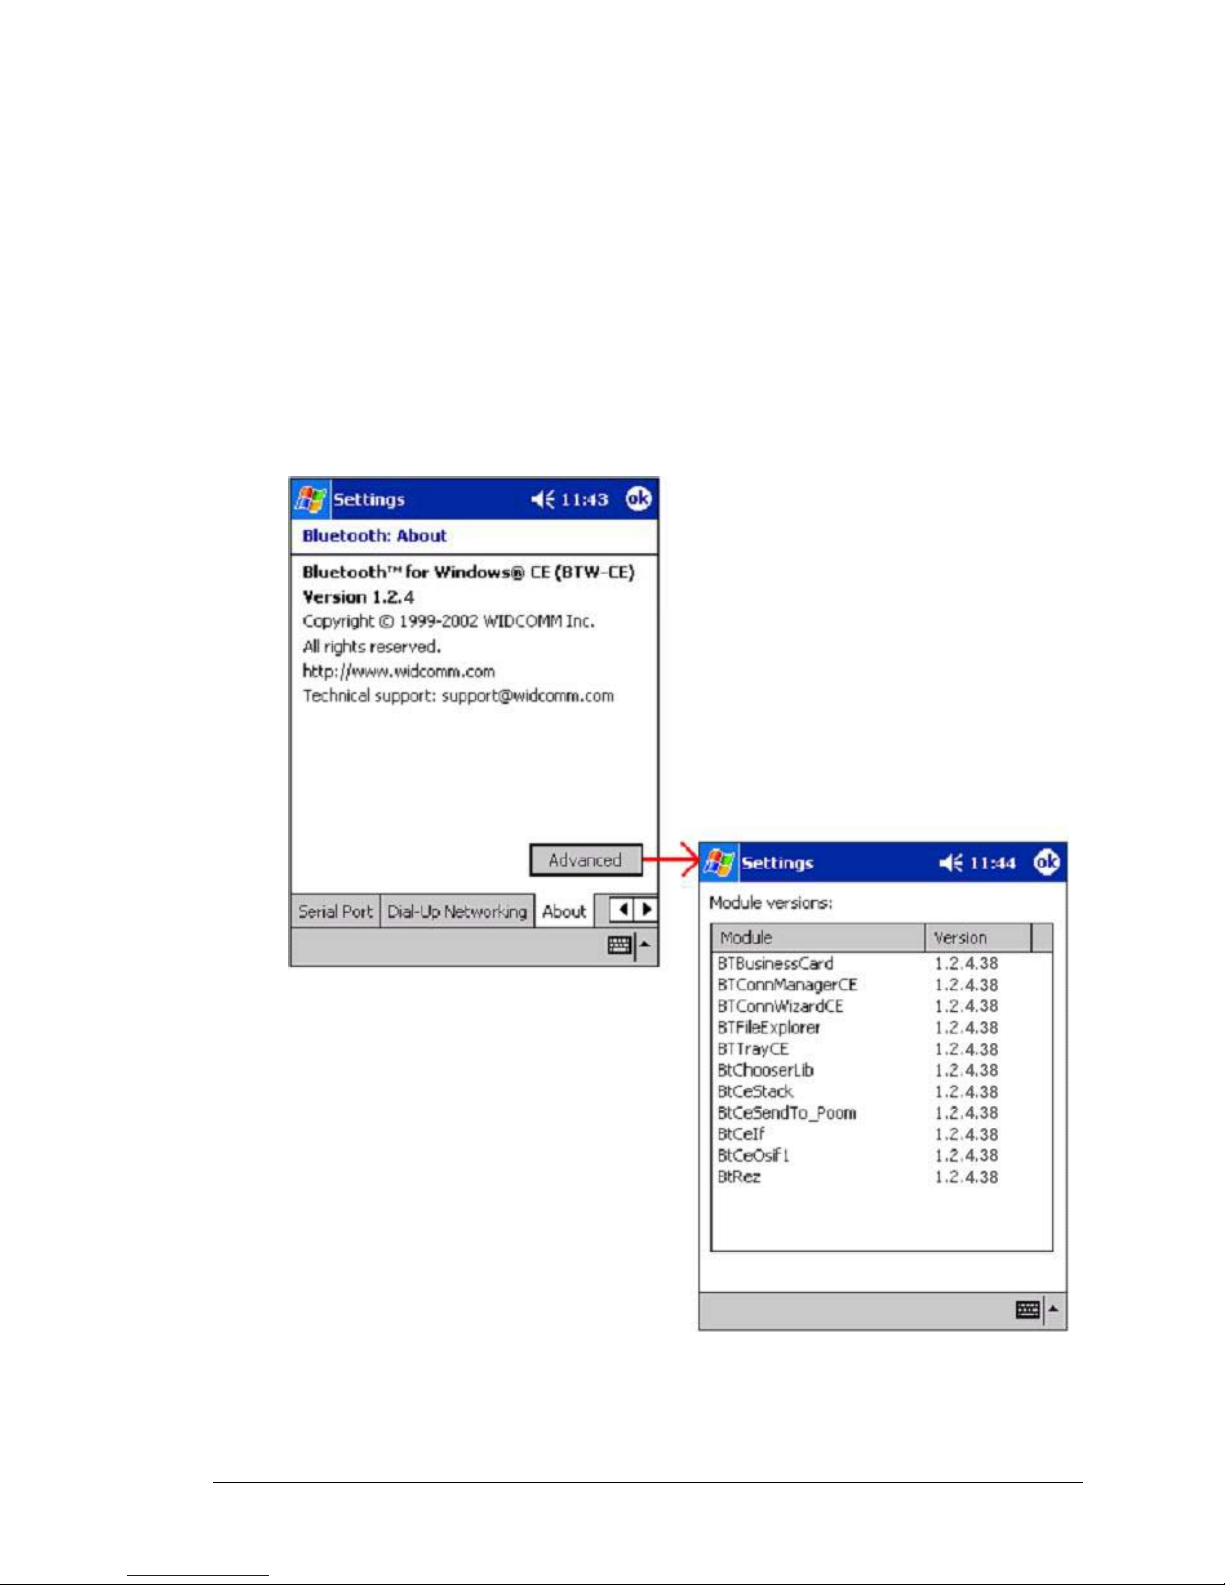
This tab provides:
• Release Version information
• Copyright notice
• Website address
• Technical support email contact address
• An Advanced Button, which displays a screen that contains version information
about the individual software modules that make up BTW-CE.
There are no configurable options on this tab.
Figure 13: Control Panel, About tab
18
Page 24

Bluetooth Compact Flash Card User’s Manual Bluetooth Manager
3 Bluetooth Manager: Using BTW-CE
The Bluetooth Manager allows you to setup connections and communicate with remote
devices over Bluetooth. The Bluetooth Manager is accessed as follows:
1. From the Today screen, tap
> Programs > Bluetooth Manager.
- or -
2. From the Today screen, tap
> Bluetooth Manager. This option is available if you
checked off Add a shortcut in the Start menu when you installed BTW-CE.
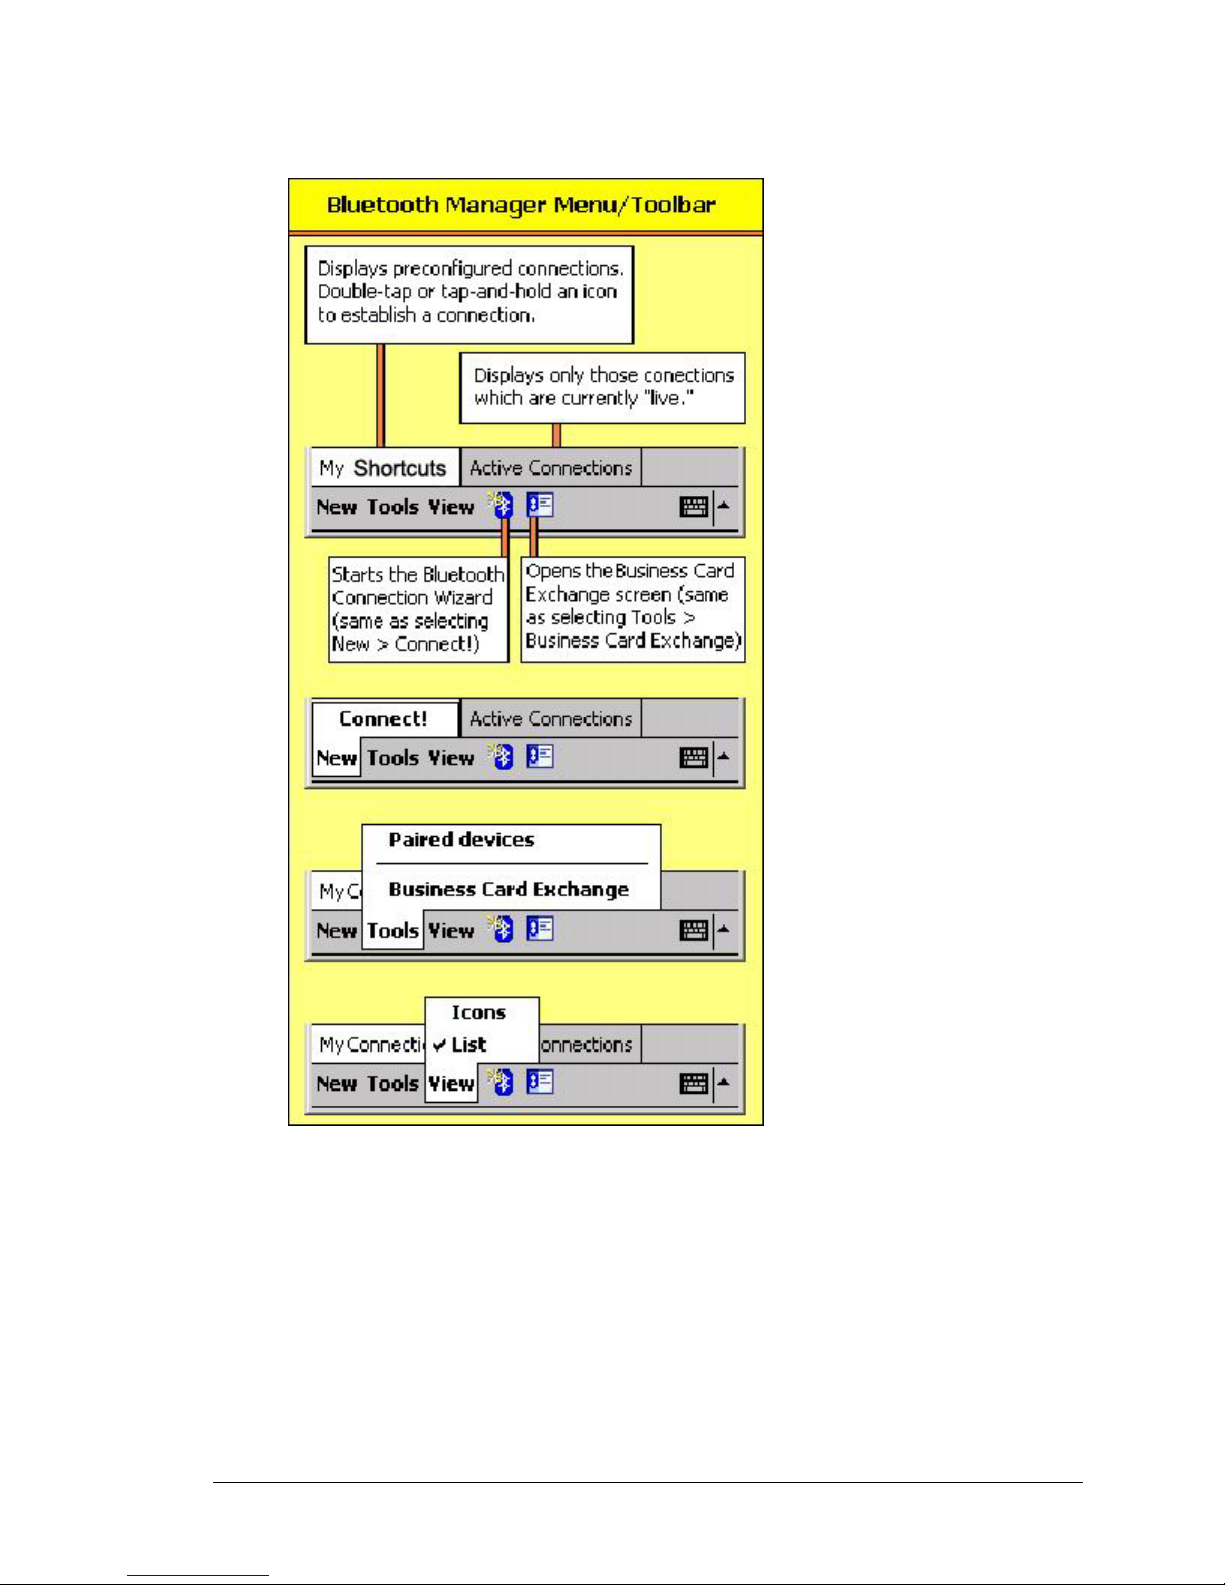
The Bluetooth Manager has (see Figure 14):
• Two tabs:
My Shortcuts—displays shortcuts and establishes connections
Active Connections—displays active incoming and outgoing connections
• Three menus:
New
Connect!—create a new connection shortcut using the Bluetooth
Connection Wizard
Tools
Paired devices—pair/un-pair with other devices
Business Card Exchange—open the Business Card Exchange.
View—controls the on-screen display (icons or list).
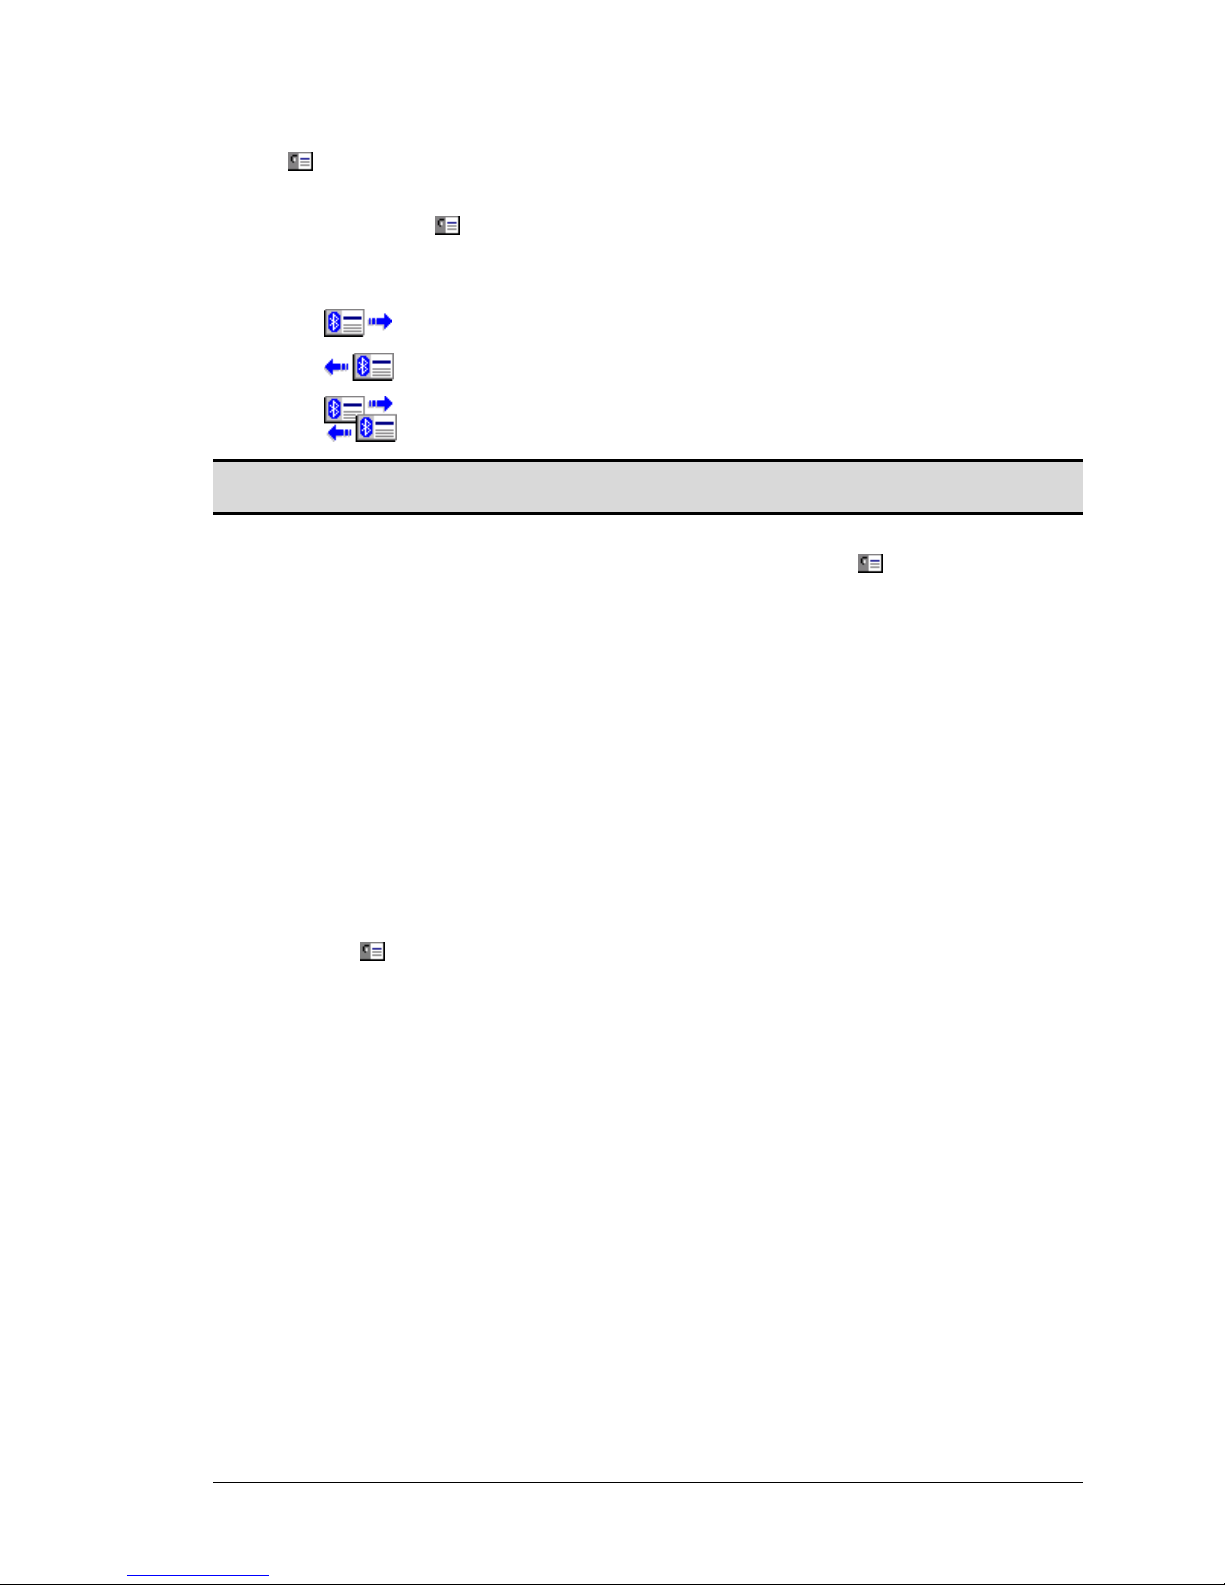
• Two icons:
Accesses the Bluetooth Connection Wizard, which helps you setup
connections with remote Bluetooth devices. This icon is a shortcut to the
New > Connect! menu item.
Accesses the Bluetooth Business Card Exchange screen. This icon is a
shortcut to the Tools > Business Card Exchange menu item. It allows you to:
Get a business card from a remote device
Send your business card to a remote device
Exchange business cards with a remote Bluetooth device.
These options are explained in detail in the remainder of this section.
19
Page 25
Bluetooth Compact Flash Card User’s Manual Bluetooth Manager
Figure 14: Bluetooth Manager Menu/Toolbar
20
Page 26
Bluetooth Compact Flash Card User’s Manual Bluetooth Manager
3.1 TABS
The two tabs at the bottom of the Bluetooth Manager screen are:
• My Shortcuts
• Active Connections
3.1.1 My Shortcuts
The default tab on the Bluetooth Manager is My Shortcuts. This screen displays the
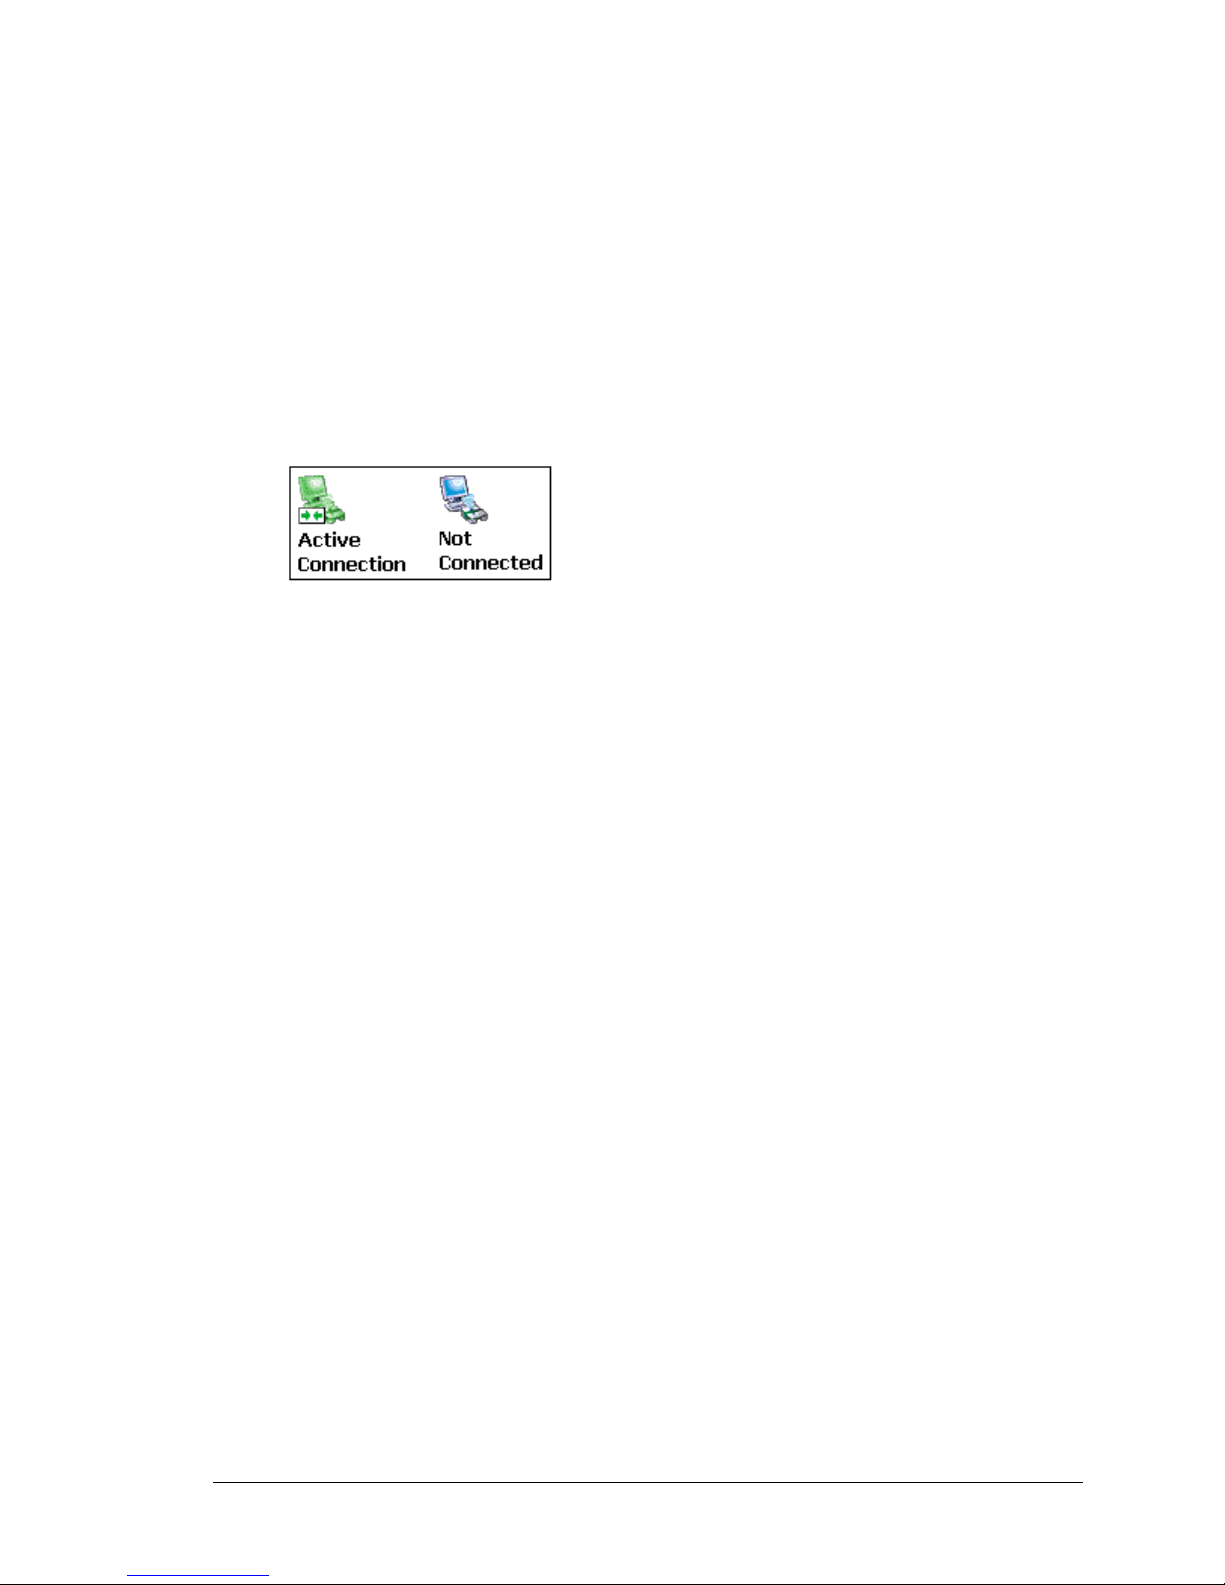
shortcuts that have been created for connections to other devices. The icons provide
visual feedback about the status of the connection to which they are linked (see Figure
15).
Figure 15: Connection status displayed by icon color
The double-tap is context sensitive:
• If the connection is not open—double-tap its icon to establish a connection
• If the connection is open—double-tap its icon to display the connection Status
screen (Figure 16).
Connections can also be opened/closed, and other options accessed, using the
tap-and-hold technique. If you tap a connection icon and hold the stylus in place for a few
seconds, a context sensitive menu appears.
The options on the context sensitive menu are dependant on the state of the connection:
• Connection open
• Connection not open.
21
Page 27
Bluetooth Compact Flash Card User’s Manual Bluetooth Manager
3.1.1.1 Connection Open—Context Sensitive Menu Options
From the My Shortcuts screen, tap-and-hold a connection shortcut that is associated with
an OPEN connection to access the context sensitive menu.
The Menu options are:
• Disconnect—close the open connection
• Status—select this option to display the Connection Status screen (Figure 16)
(double-tap default)
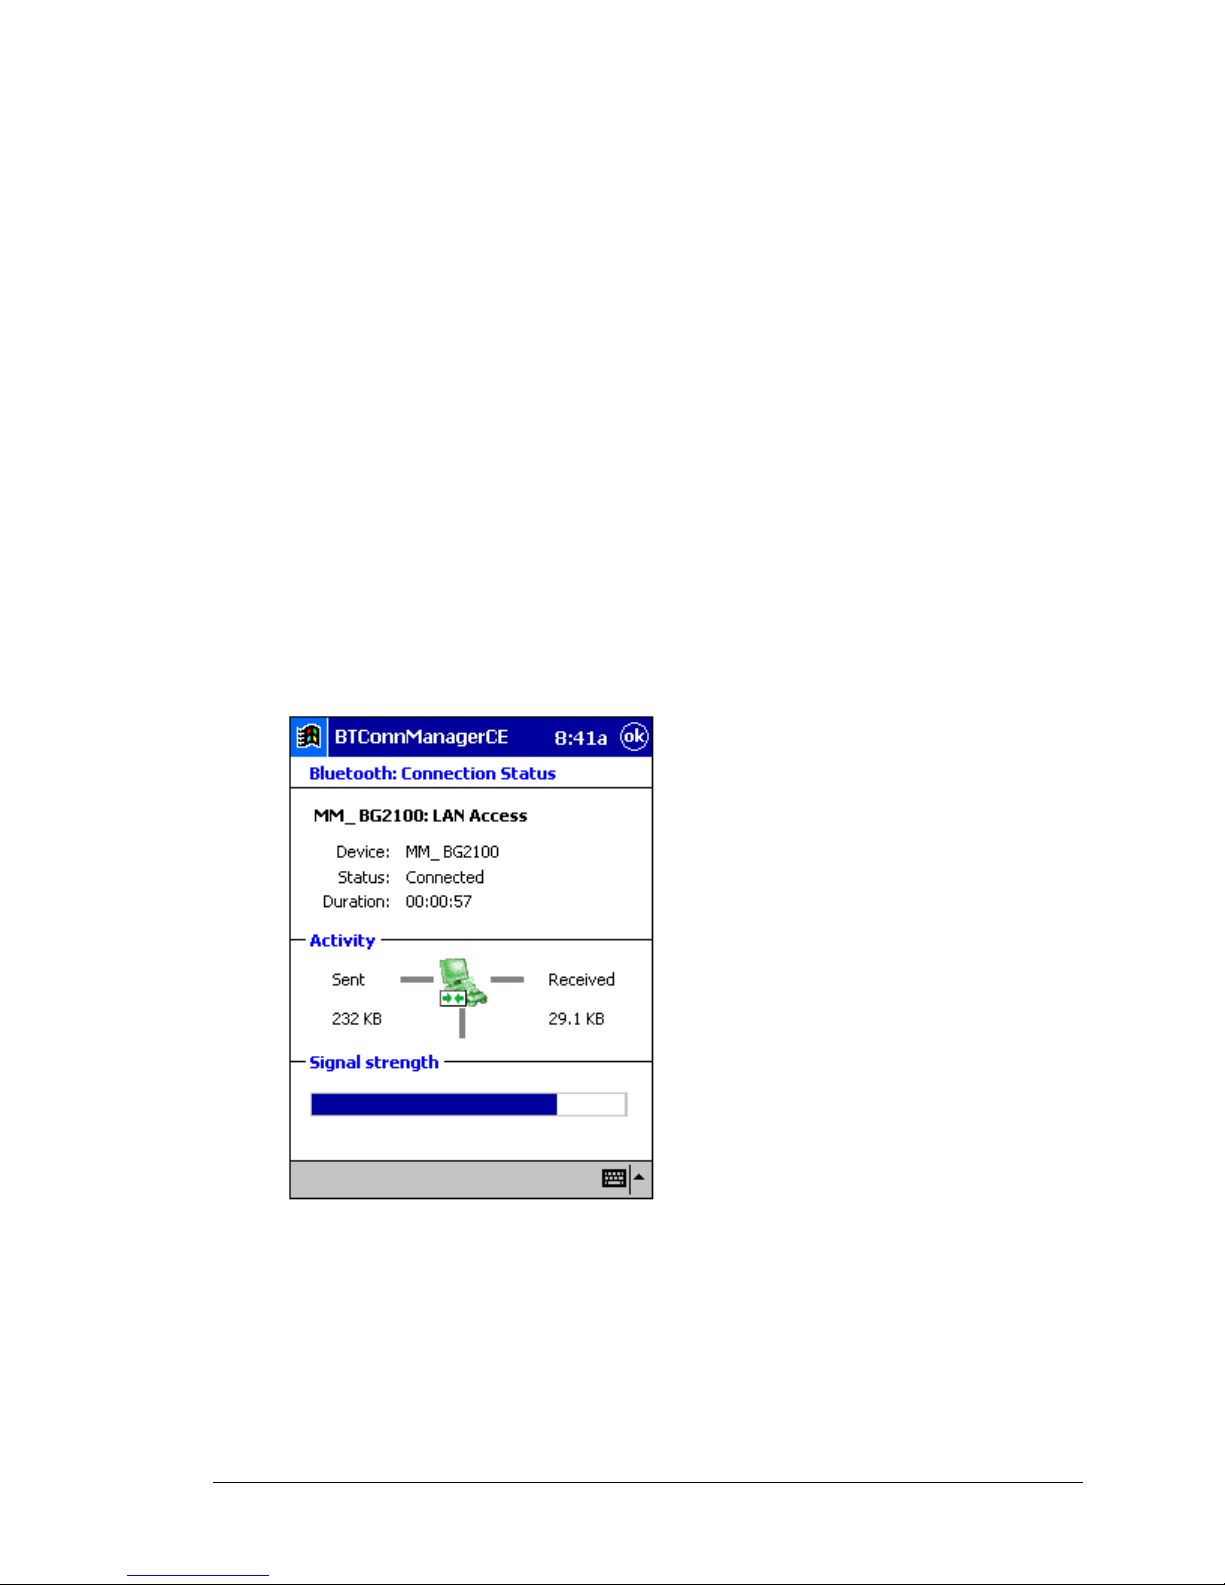
3.1.1.2 Connection Status Screen
This screen displays:
The connection’s name
The remote device’s name
The connection status: Connected/Not Connected
The length of time the connection has been active
Activity information:
The amount of data Sent
The amount of data Received
A graphic signal strength indicator.
Figure 16: Connection Status screen
22
Page 28

Bluetooth Compact Flash Card User’s Manual Bluetooth Manager
3.1.1.3 Connection Inactive—Context Sensitive Menu Options
From the My Shortcuts screen, tap-and-hold a connection shortcut that is associated with
an INACTIVE connection to access the context sensitive menu.
The menu options are:
• Connect—select this option to establish a connection (double-tap default).
• Rename—select this option to rename the connection shortcut. This option is
often used to rename shortcuts that were created in a group (see Section 1.1.1.1
for information about creating shortcuts); when multiple connection shortcuts are
created at the same time they are given default names and no option is provided
at that point to change the default.
• Delete—select this option to permanently delete the connection shortcut.
• Properties—select this option to display the Connection Properties screen
(Figure 17).
23
Page 29
Bluetooth Compact Flash Card User’s Manual Bluetooth Manager
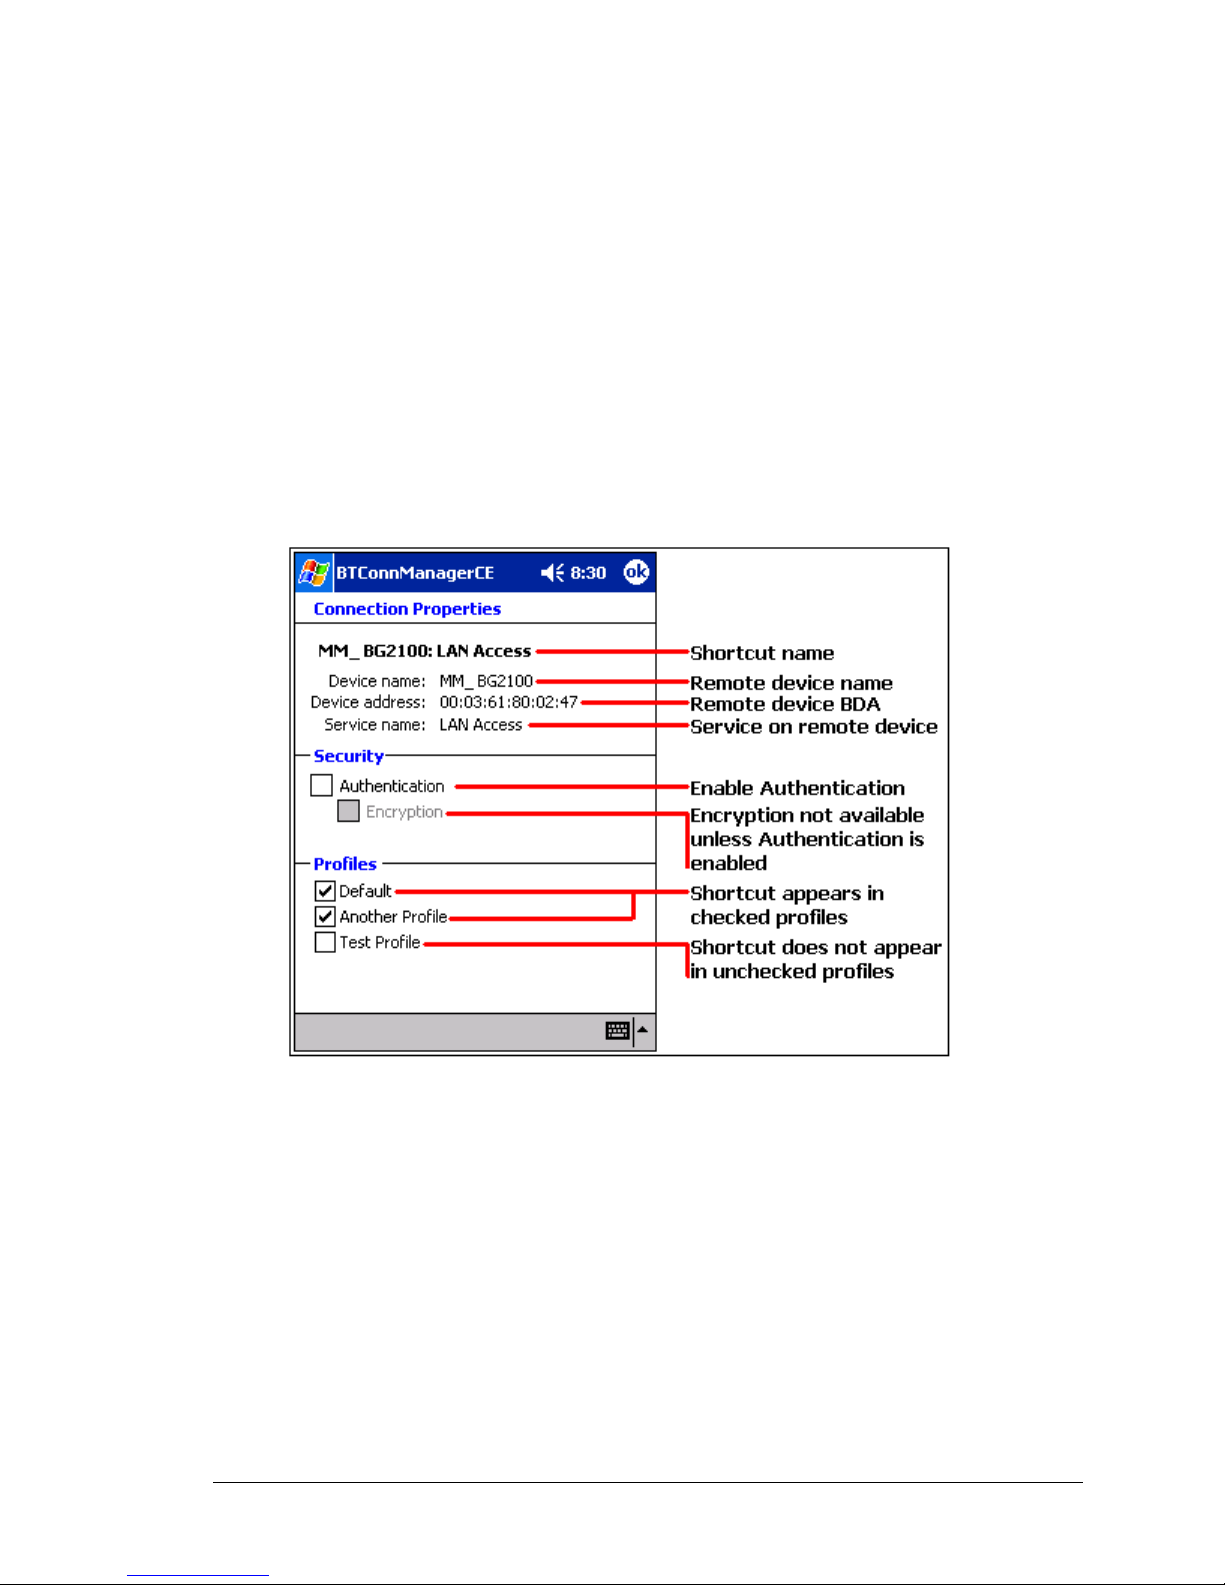
3.1.1.4 Connection Properties Screen
This screen displays:
The connection’s name
Connection Properties—non-configurable information about the remote
device, including:
The remote device name
The remote device Bluetooth Device Address (BDA)
The name of the service on the remote device that this shortcut accesses.
Security—enable/disable Authentication and Encryption.
Profiles—a list of the available profiles on this device. To assign, or remove,
this connection shortcut to/from a profile, select or clear the profile’s
associated check box.
Figure 17: Connection Properties screen
24
Page 30
Bluetooth Compact Flash Card User’s Manual Bluetooth Manager
3.1.2 Active Connections Tab
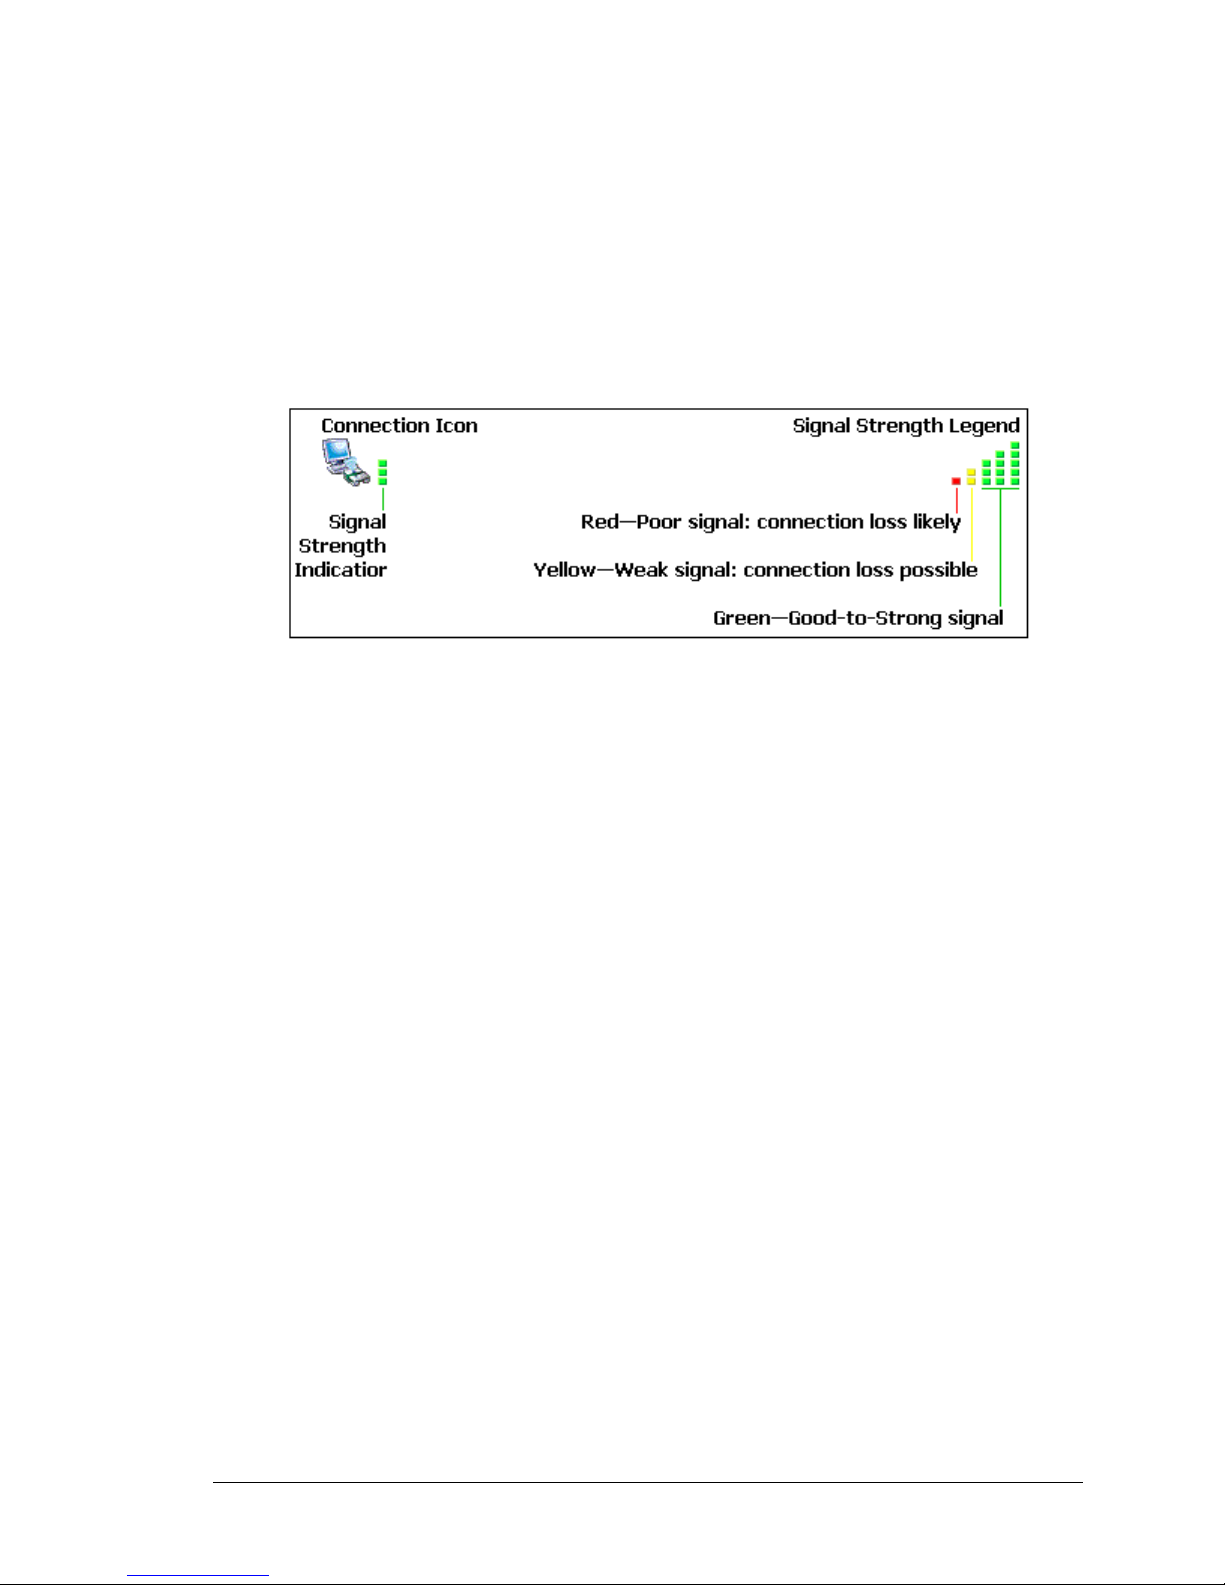
This tab displays the currently active Outgoing and Incoming Connections on the
Pocket PC.
To the right of each active connection icon is a signal strength indicator (Figure 18).
Tap-and-hold a connection to access a context sensitive menu. The menu options are:
• Disconnect—close this connection
• Status—display the connection Status screen (Section 3.1.1.2 and Figure 16).
Figure 18: Active Connections screen, signal strength indicator
25
Page 31
Bluetooth Compact Flash Card User’s Manual Bluetooth Manager
3.2 MENUS
There are three menus on the bottom of the Bluetooth Manager. They are:
• New
• Tools
• View.
3.2.1 New
The New menu has only one option; Connect!
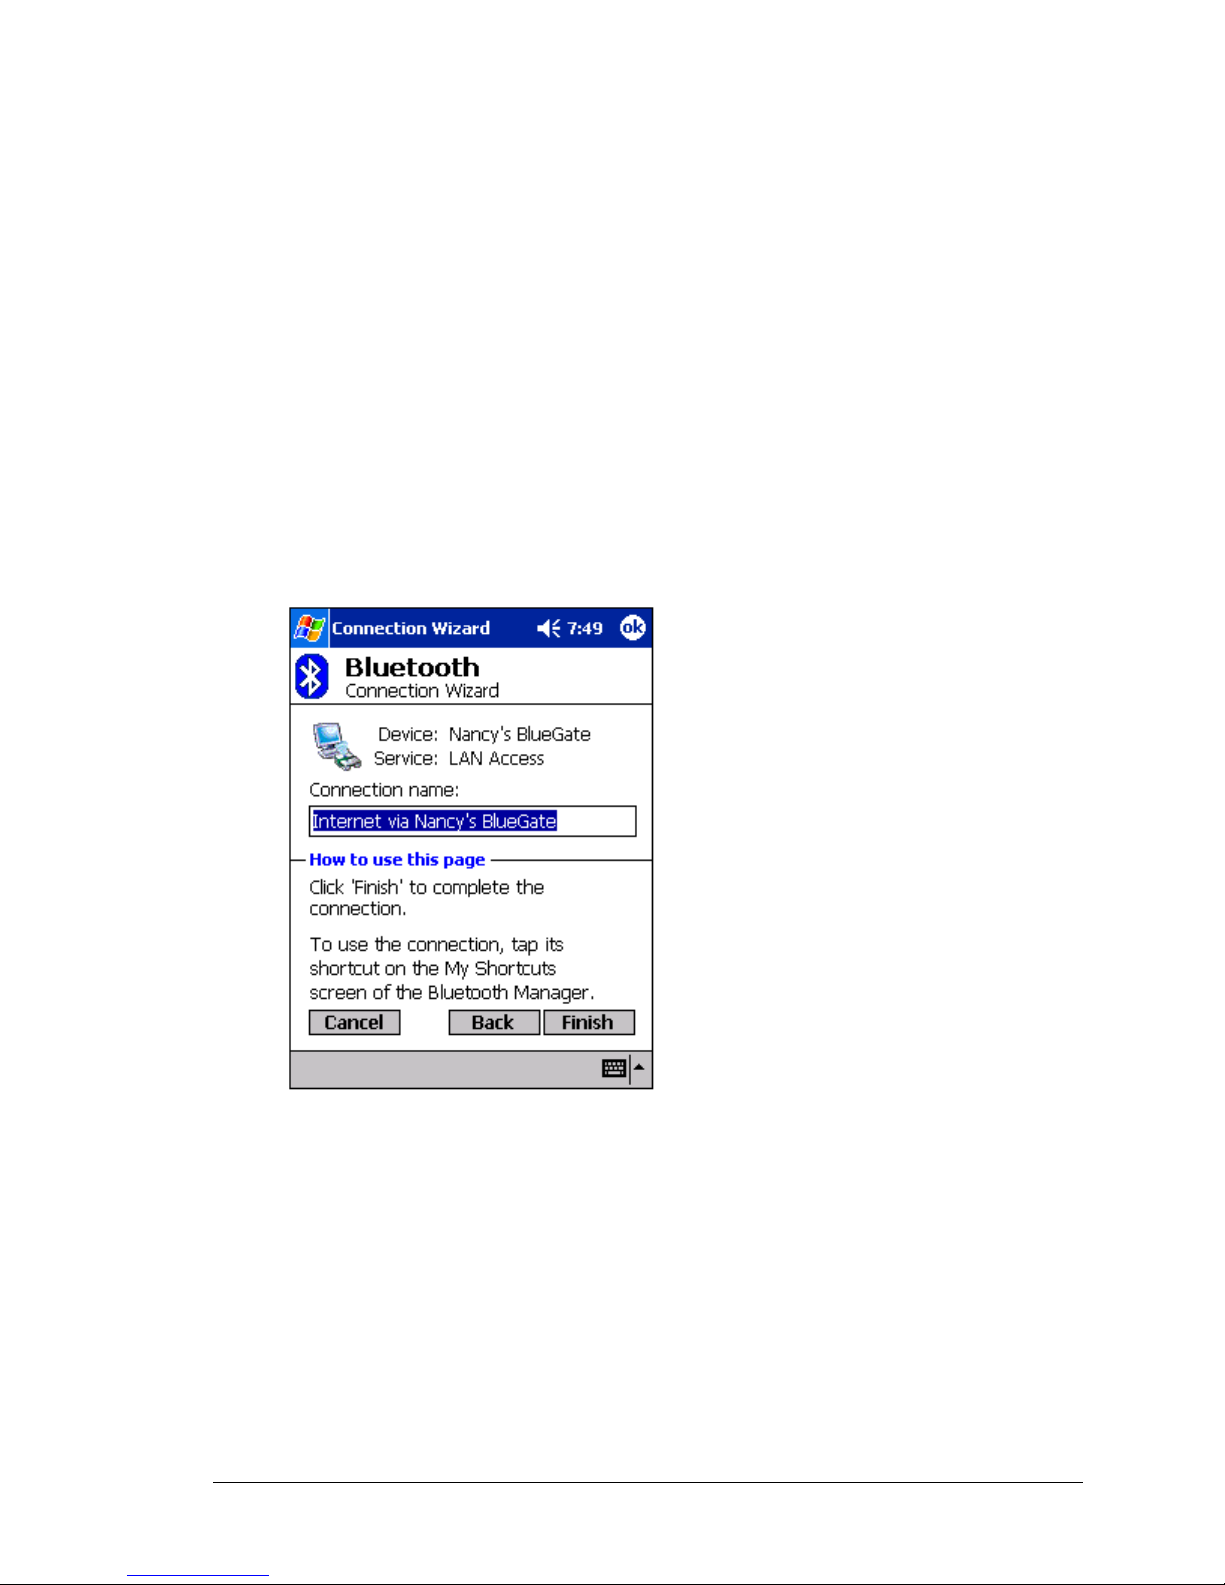
Connect! starts the Bluetooth Connection Wizard, which walks you through the process
of creating a connection. The first screen lists several types of connections you can create
(see Figure 19). Choose the type of connection and the Next. The next pages(s) will
guide you through establishing the parameters of the desired connection. The exact
content of the page(s) depends on the type of connection being created. On any given
page, where applicable, choose Next to move to the next page, or Back to return to the
previous page.
Figure 19: Connection Wizard, specific service chosen, last screen
3.2.2 Tools
The Tools menu has two options. They are:
• Paired devices
• Business Card Exchange
26
Page 32

Bluetooth Compact Flash Card User’s Manual Bluetooth Manager
3.2.2.1 Paired devices
When two devices are paired , they share, and exchange prior to each connection, an
internally generated security key. This security key, called a Link Key, is based on a
unique Bluetooth Device Address, a random number, and a user-defined password.
To pair with another device:
1. From the Bluetooth Manager, Tools menu, select “Paired devices”
2. On the Paired devices screen, tap Add
3. On the Device Pairing screen:
a) Tap
b) Tap a device on the “Select a Bluetooth device” screen to return to the prior
screen and populate the “Device:” field.
c) Enter the correct password in the “Passkey:” field
4. Tap OK.
To Break (Remove) a Paired Relationship
1. From the Bluetooth Manager, Security menu, select “Paired devices”
2. Tap a device name to select it
3. Tap the Remove button, and then tap Yes in the confirmation dialog.
27
Page 33
Bluetooth Compact Flash Card User’s Manual Bluetooth Manager
3.2.2.2 Business Card Exchange
Business Card Exchange is accessible from:
• An icon
on the Bluetooth Manager’s menu bar
• From Tools > Business Card Exchange
Business Card Exchange allows you to:
Send your business card to one or more remote devices.
Request a business card from one or more remote devices.
Exchange business cards with one or more remote devices.
NOTE: To Send or Exchange business card(s) you must first specify your default business card in the
Bluetooth Control Panel, Information Exchange tab (see Section 2.3.3).
To Send, Request or Exchange Business Cards
1. From the Bluetooth Manager, tap the business card icon
.
2. Tap the Send, Request or Exchange icon, as appropriate.
3. From the Bluetooth Browser screen, tap the name of the remote device and then
tap OK.
3.2.3 View
The View menu has two options. They are:
• Icons—select this option to view the on-screen shortcuts as large icons
• List—select this option to view the on-screen shortcut in list format.
3.3 ICONS
There are two icon shortcuts on the bottom the Bluetooth Manager screen. They are:
• New Connection―a shortcut to the New > Connect! menu item. See Section
•
3.2.1 for information on how to create a new connection.
Business Card Exchange―a shortcut to the Business Card Exchange menu
item. See Section 3.2.2.2 for information on how to use Business Card Exchange.
28
Page 34
Bluetooth Compact Flash Card User’s Manual Using Remote Services
4 Bluetooth Browser
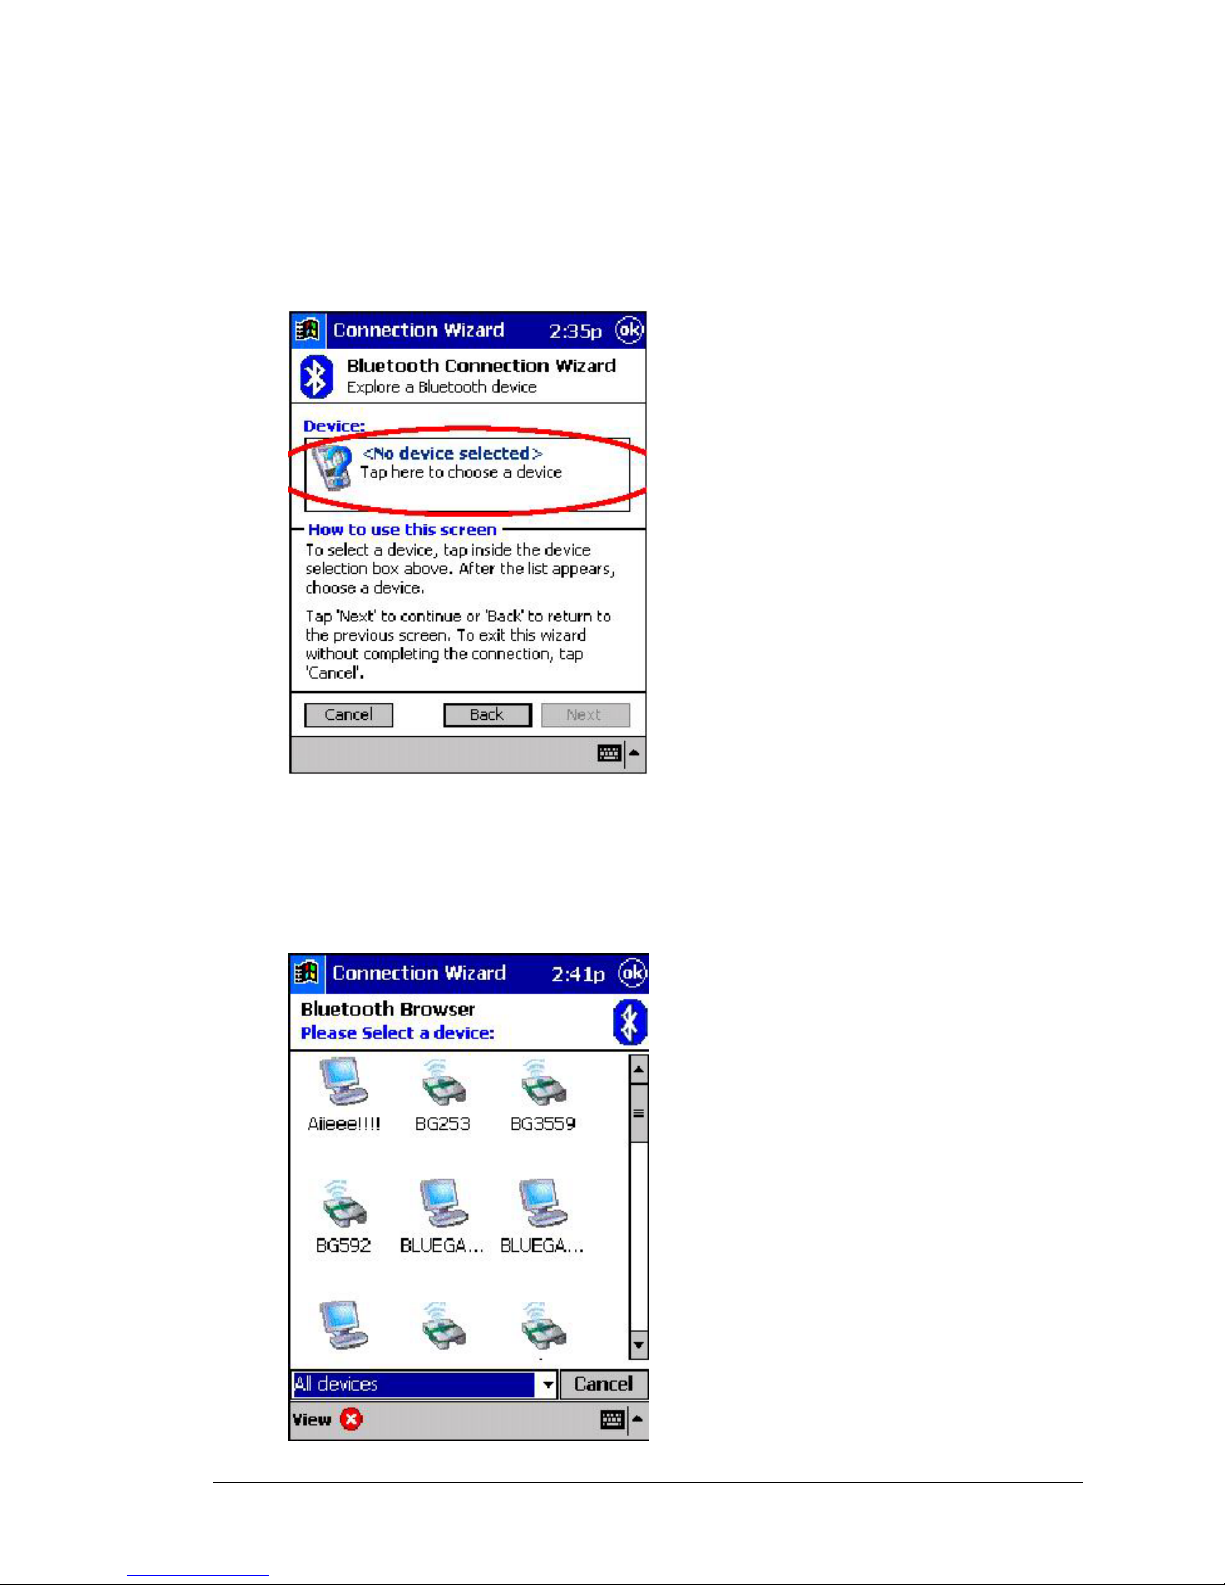
Various BTW-CE applications require you to select the device you want to connect to.
For instance, from the Bluetooth Manager, when creating a connection to explore a
Bluetooth device, you must select the device to connect to (See Figure 20).
Figure 20: A screen example where you are required to select a device
Whenever you are required to select a device, the Bluetooth Browser window
automatically shows up and starts searching for other Bluetooth devices (see Figure 21).
As the search progresses, devices will gradually be listed in the window. To select a
particular device, simply tap on it (whether the search is ongoing or stopped). This will
close the window and return to the previous screen.
Figure 21: The Bluetooth Browser window allows you to select a Bluetooth device
29
Page 35
Bluetooth Compact Flash Card User’s Manual Using Remote Services
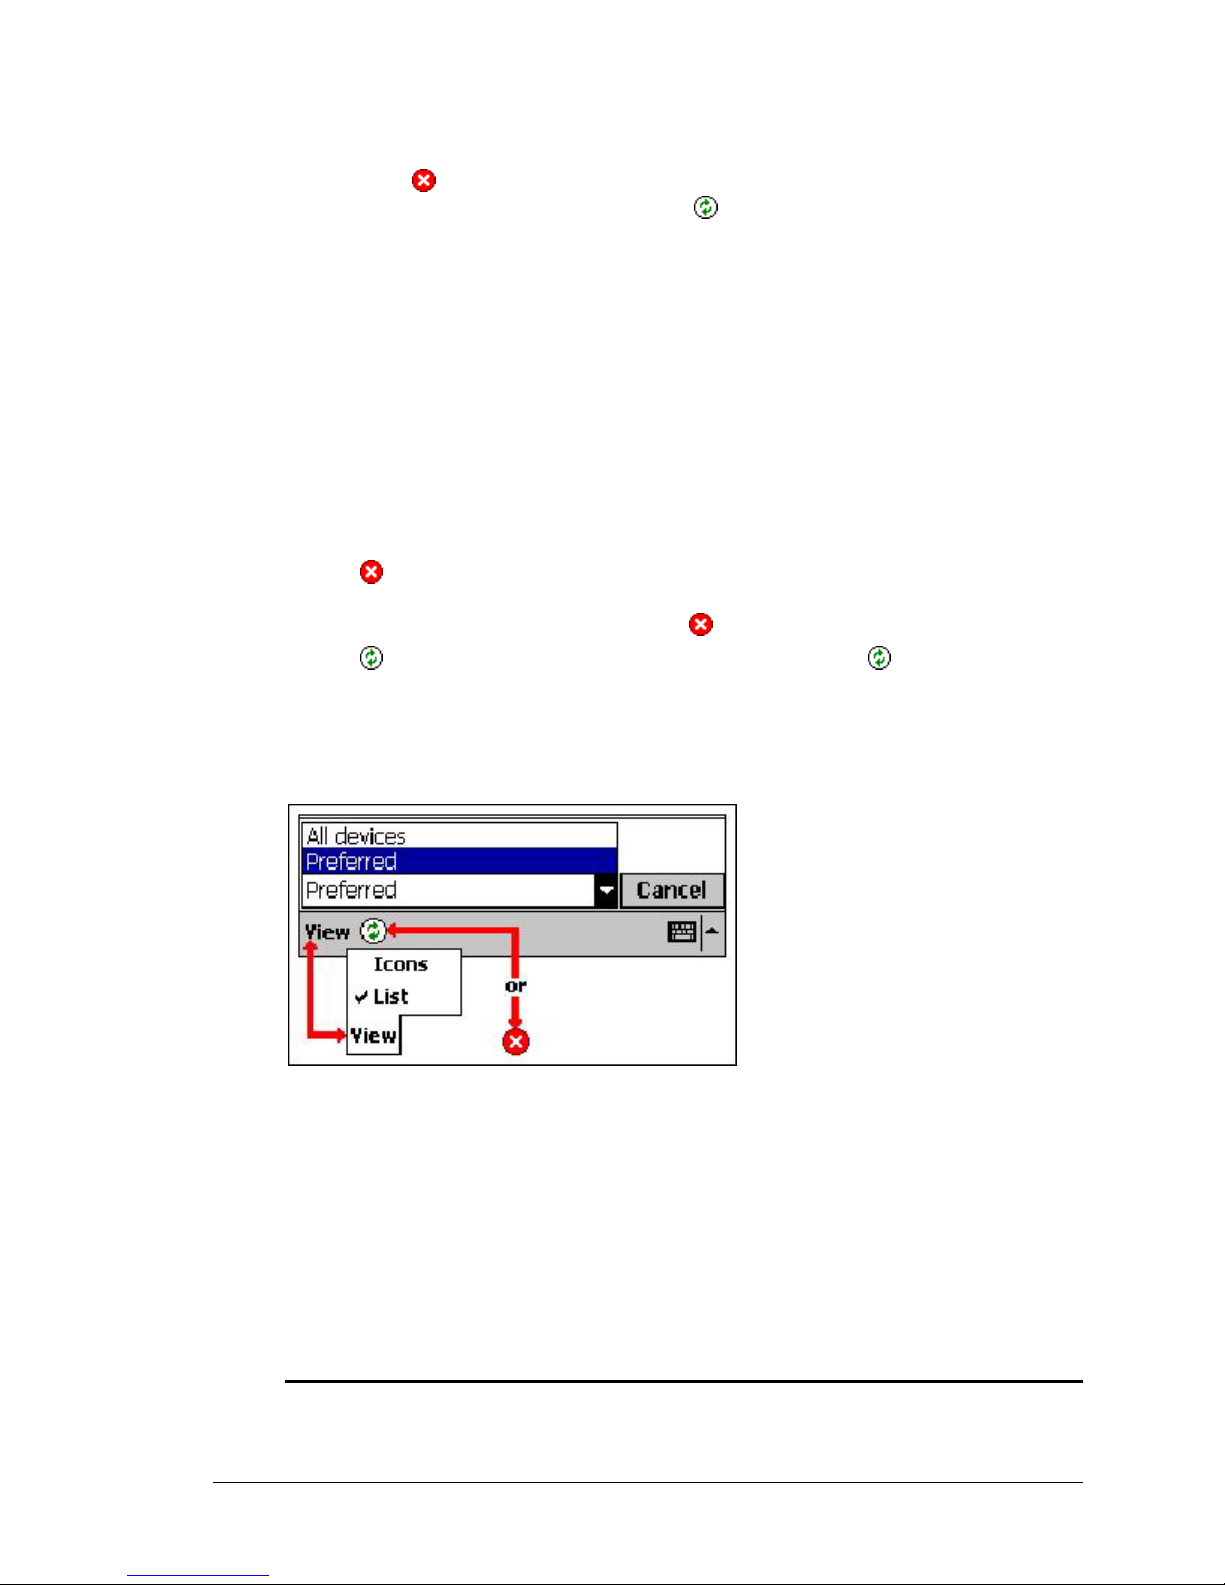
The search automatically terminates after a few seconds. You can interrupt it by tapping
the Stop icon at the bottom of the screen. Once stopped, you may restart the search(i.e.
refresh the list )by tapping the Refresh icon
. Note that in some instances, it may be
necessary to refresh the list once or twice to “find” all Bluetooth devices around.
Located at the bottom of this wizard screen (Figure 22) are:
• A optional
Preferred
1
drop-down menu with two options:
2
—when this option is selected , the wizard attempts to display only
those devices that offer the desired service.
All devices—select this option to have the wizard display all devices in the
vicinity, without regard to the type of service(s) they offer.
• The View menu, which has two options:
Icons—displays the found devices as large icons
List—displays the found devices in a list.
• An icon—the icon that is displayed is determined by what the wizard is doing:
The wizard is searching for devices. When the desired device appears on the
screen, tap the device to select it and stop the search.
To stop an in-process search, tap
.
The wizard has completed its search for devices. Tap to search again or
refresh the screen.
• Cancel button—tap this button to close the “Select a device:” screen and return to
the previous screen without changing the selected device.
Figure 22: Bottom of the Select a device wizard screen (composite overview)
1
In some cases, the drop-down menu is not shown when only type of devices is shown.
2
Another term may be used when applicable(.e.g”Phones”).
30
Page 36
Bluetooth Compact Flash Card User’s Manual Using Remote Services
5 Using Remote Device Services
This section provides overview instructions for using services provided by other devices.
5.1 SERIAL PORT
The use of a Bluetooth wireless serial port connection is identical to the use of a physical
cable serial port connection between two devices.
As with a physical connection, the application that will use the connection must be
configured to use the correct serial port.
To determine the communications port assigned to the Bluetooth serial port:
1. From the Today Screen, tap the Bluetooth icon to open the Bluetooth Control
Panel.
2. Use the scroll arrows at the bottom-right of the screen to expose the Serial Port
tab, and then select the Serial Port tab.
The Outbound COM Port is listed in the lower portion of the screen.
Configure the application that will use the Bluetooth Serial Port to send data to
this port.
NOTE: For information about configuring your application’s outbound COM port, refer to the
application’s documentation.
3. From Bluetooth Manager’s My Connections screen open the Bluetooth serial port
connection to the remote device.
4. Send/Receive data from the application.
5.2 DIAL-UP NETWORKING: CONNECT TO A REMOTE COMPUTER
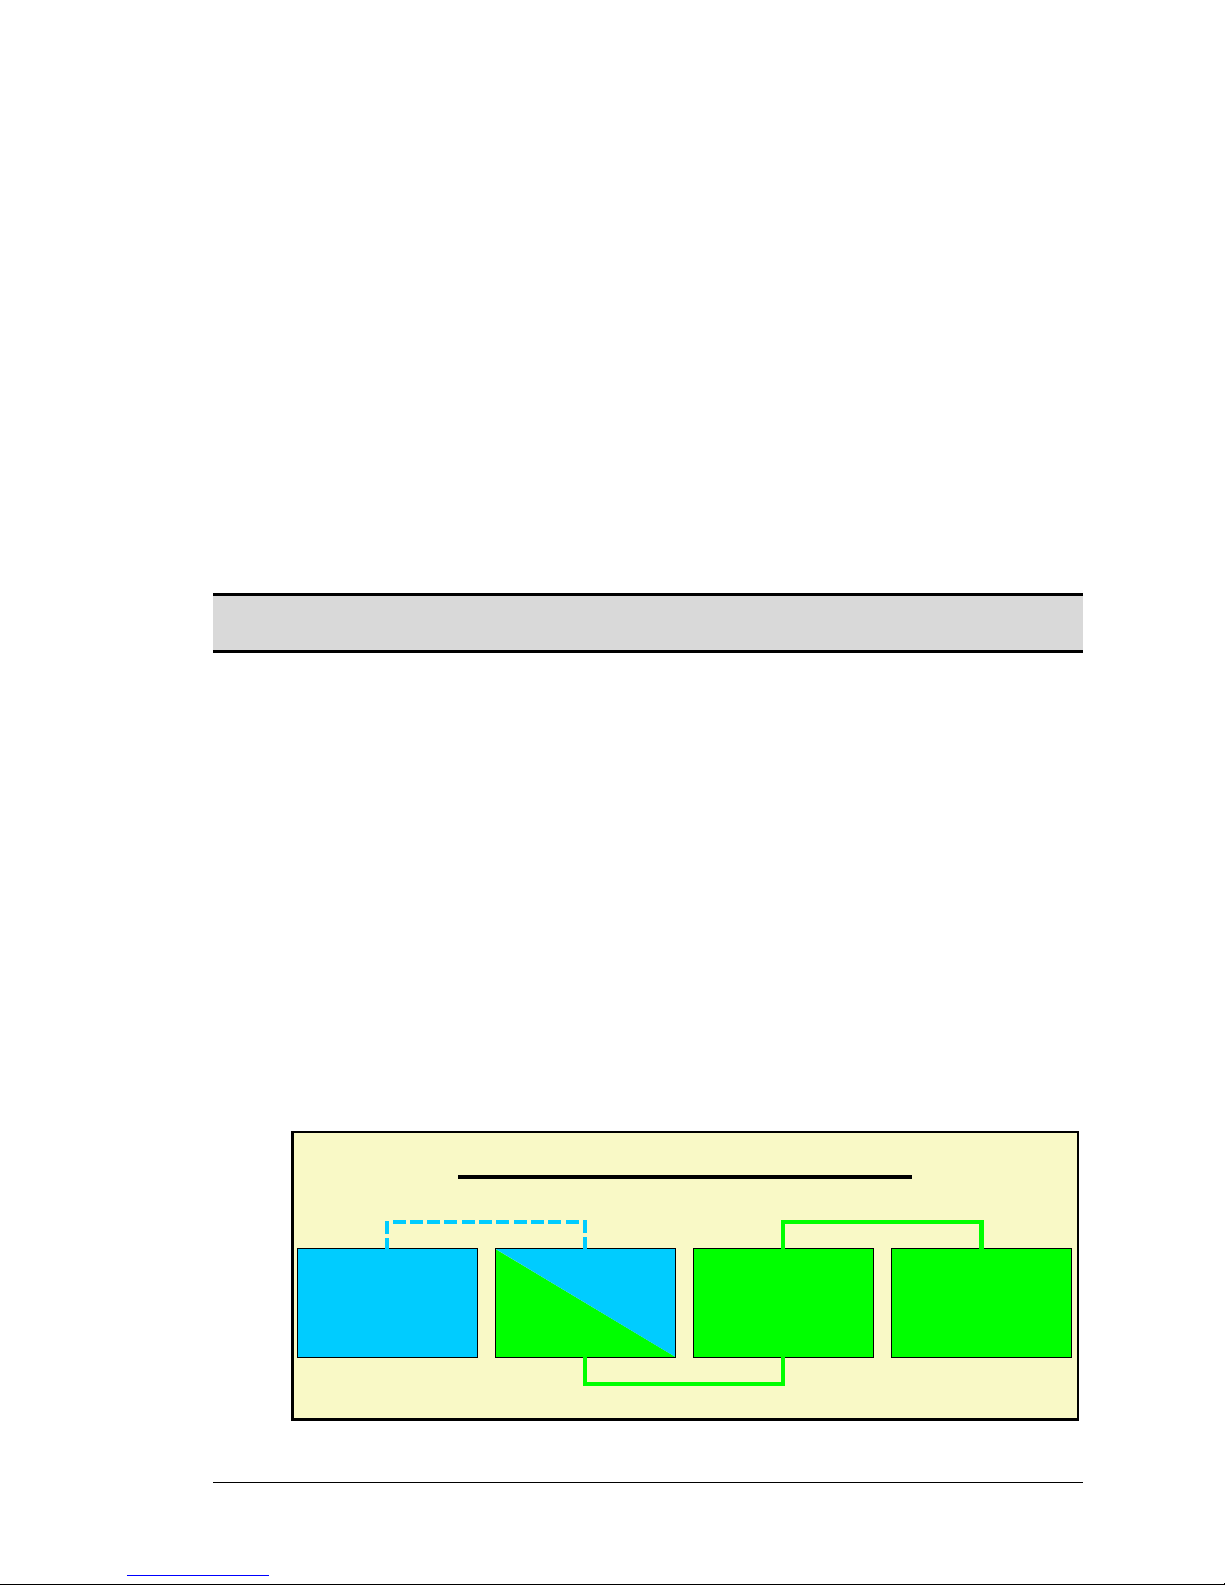
Dial-up Networking allows you to connect to a remote computer via a phone line. Once
connected, you can browse the Internet, check your email, etc.
The remote Bluetooth device that will provide the Dial-up Networking service must have
access to a telephone system (either a physical or cellular connection).
Devices that might provide the Dial-up Networking service include:
• Bluetooth-enabled cellular telephones
• Bluetooth-enabled desktop computers that are attached to a telephone system
• Bluetooth modems.
The remote computer to which you are connecting must also be attached to the phone
system and capable of answering a call.
Figure 23: Dial-up Networking overview
Bluetooth Dial-up Networking Overview
Bluetooth "over-the-air" connection
Cellular or Physical connection
Bluetooth Pocket PC
Device that provides
Telepone access
(Bluetooth Cell Phone,
Bluetooth Modem...)
Cellular or Physical connection
31
Telephone system
Remote Computer
Page 37
Bluetooth Compact Flash Card User’s Manual Using Remote Services
To use Dial-up Networking:
1. Create a shortcut to the device that will provide telephone access (see
Section 3.2.1).
2. From the Bluetooth Manager, My Connections tab, tap-and-hold the Dial-up
Networking connection shortcut, and then select Connect from the pop-up
menu.
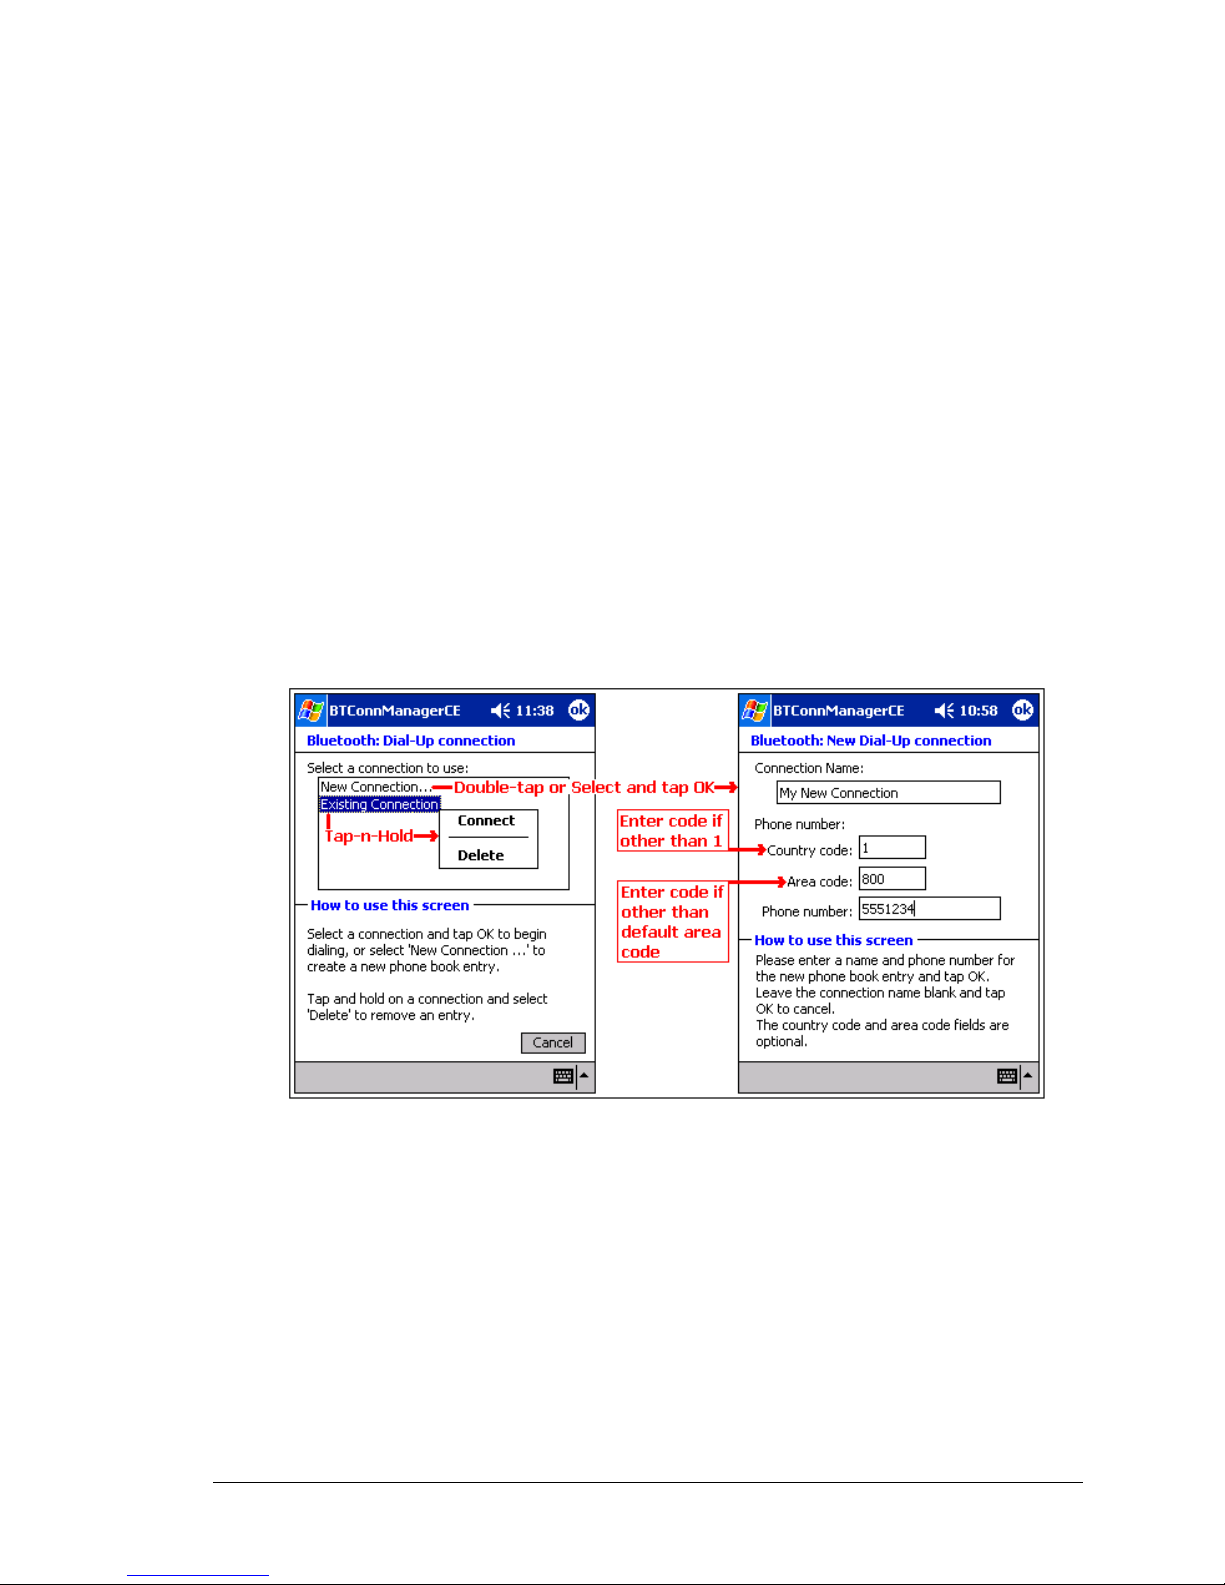
3. On the first Bluetooth: New Dial-up Connection screen (Figure 24, left),
double-tap New Connection…
4. On the second Bluetooth: New Dial-up Connection screen (Figure 24, right):
a) Enter a name for the connection
b) If dialing outside of the default country setting, enter the country code
c) If dialing outside of the default area code setting, enter the area code
d) Enter the phone number to be dialed.
5. Tap OK
To proceed with the connection, you must complete the PocketPC screen(s) that follow(s).
Refer to the Windows CE documentation for assistance.
After the connection is active, open a web browser on the Pocket PC.
Figure 24: Dial-up Networking, overview (composite screenshot)
32
Page 38

Bluetooth Compact Flash Card User’s Manual Using Remote Services
5.3 BLUETOOTH FILE EXPLORER
Bluetooth File Explorer appears automatically when a File Transfer connection is
established. It allows you to:
• Navigate the directory structure of the remote device
• View files and folders on the remote device
• Create new folders on the remote device
• Send files to, and Get files from the remote device
• Delete and rename files on the remote device.
NOTE: File operations on the remote device are limited to the remote device’s configured FTP
root directory and its sub-directories.
Bluetooth File Explorer also allows you to set the folder on your Pocket PC that will
receive inbound files. This folder is configurable on an individual basis for each
connection shortcut.
Bluetooth File Explorer has two menus:
• File:
Get
Rename
Delete
Send a File…
.Create a Folder
• Tools:
Set Local Folder
Refresh.
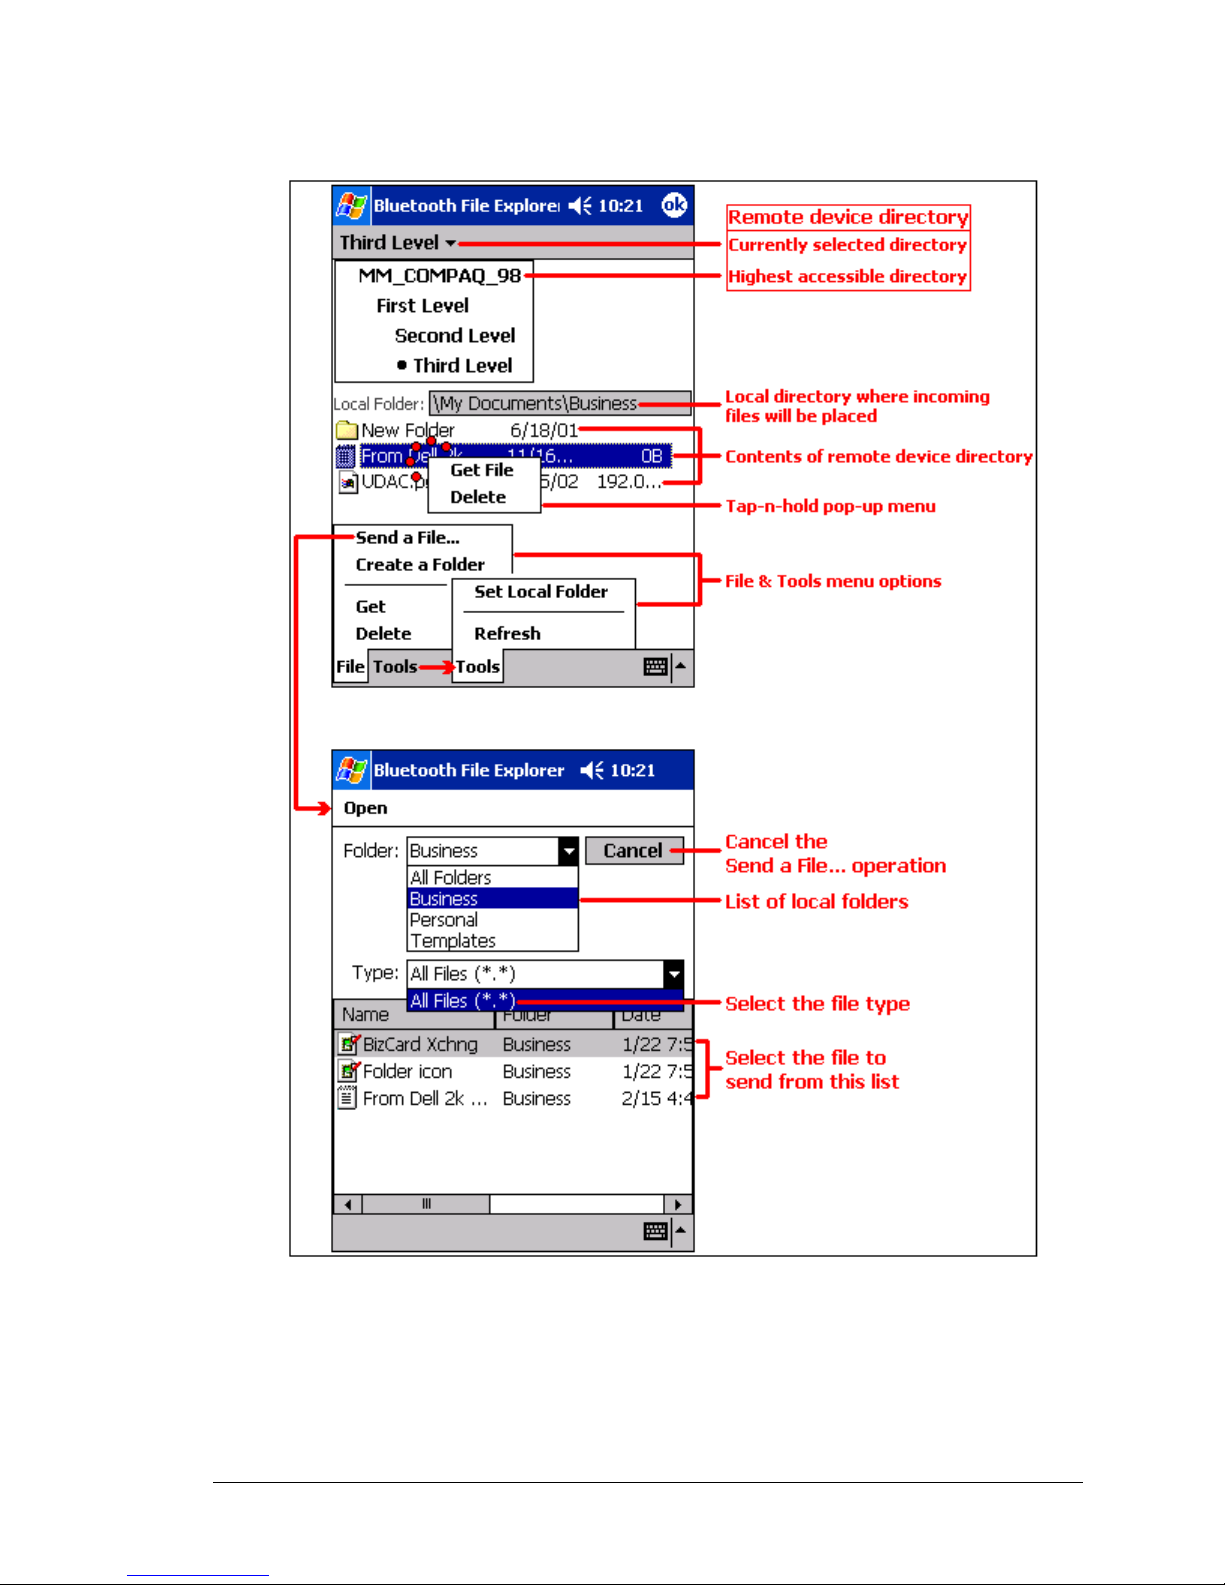
Figure 25 on the next page is an overview of Bluetooth File Explorer.
33
Page 39
Bluetooth Compact Flash Card User’s Manual Using Remote Services
Figure 25: Bluetooth File Explorer overview (composite screenshot)
34
Page 40

Bluetooth Compact Flash Card User’s Manual Using Remote Services
5.3.1 Change the Remote Device Folder
To move down in the directory structure of the remote device, tap the new folder in the
main portion of the Bluetooth File Explorer window.
To move up in the directory structure of the remote device, tap the down-arrow to the
right of the currently selected folder and select the new folder from the drop-down list.
5.3.2 File Menu
All of the instructions in the subsections that follow assume that there is an open File
Transfer connection with a remote device.
5.3.2.1 Send a File to the Remote Device
To send a file to the remote device, from the File menu, tap Send a File… to display the
Open screen.
The options on the Open screen are:
• Folder—tap the down-arrow and select the folder that contains the file to be sent.
• Type—the only option is “All Files (*. *)
• A list of files in the selected folder; tap the file to be sent
• Cancel button—aborts the Send a File… operation.
The selected file is sent automatically when it is tapped, without further intervention, and
the Bluetooth File Explorer main screen reappears.
5.3.2.2 Create a Folder on the Remote Device
To create a folder on the remote device, navigate to the folder in which the new folder
will be placed, and then, from the File menu, tap Create a Folder. Enter a name for the
new folder while the default name (New Folder) is highlighted.
5.3.2.3 Get a File From the Remote Device
To get a file from the remote device:
1. Navigate to the folder on the remote device that contains the file
2. Tap the desired file to highlight it
3. From the File menu, tap Get.
The file is copied to the local folder listed in the Local Folder field near the top of the
screen.
This operation can also be performed using the tap-and-hold technique: tap-and-hold the
desired file and select Get from the pop-up menu.
5.3.2.4 Delete a File on the Remote Device
To delete a file on the remote device: tap the file to be deleted to highlight it, then, from
the File menu, tap delete. Tap OK in the confirmation dialog box.
This operation can also be performed using the tap-and-hold technique: tap-and-hold the
desired file and select Delete from the pop-up menu. Tap OK in the confirmation dialog
box.
35
Page 41
Bluetooth Compact Flash Card User’s Manual Using Remote Services
5.3.3 Tools Menu
5.3.3.1 Set Local Folder
The local folder, i.e. the folder on the Pocket PC where incoming files are placed, can be
configured on an individual basis for each connection shortcut.
To configure the local folder:
1. From the Tools menu, tap Set Local Folder.
2. Use the drop-down menu at the top of the screen to navigate to the desired folder.
3. Tap OK to return to the Bluetooth File Explorer main screen.
The Local Folder field is updated to reflect the new folder selection..
NOTE: The Local Folder information is associated with the shortcut to the connection that is
open and is saved with the active profile. A different Local Folder can be associated with
each File Transfer shortcut.
5.3.3.2 Refresh
To refresh the list of displayed files and folders on the remote device, from the Tools
menu, tap Refresh.
5.4 SEND VIA BLUETOOTH
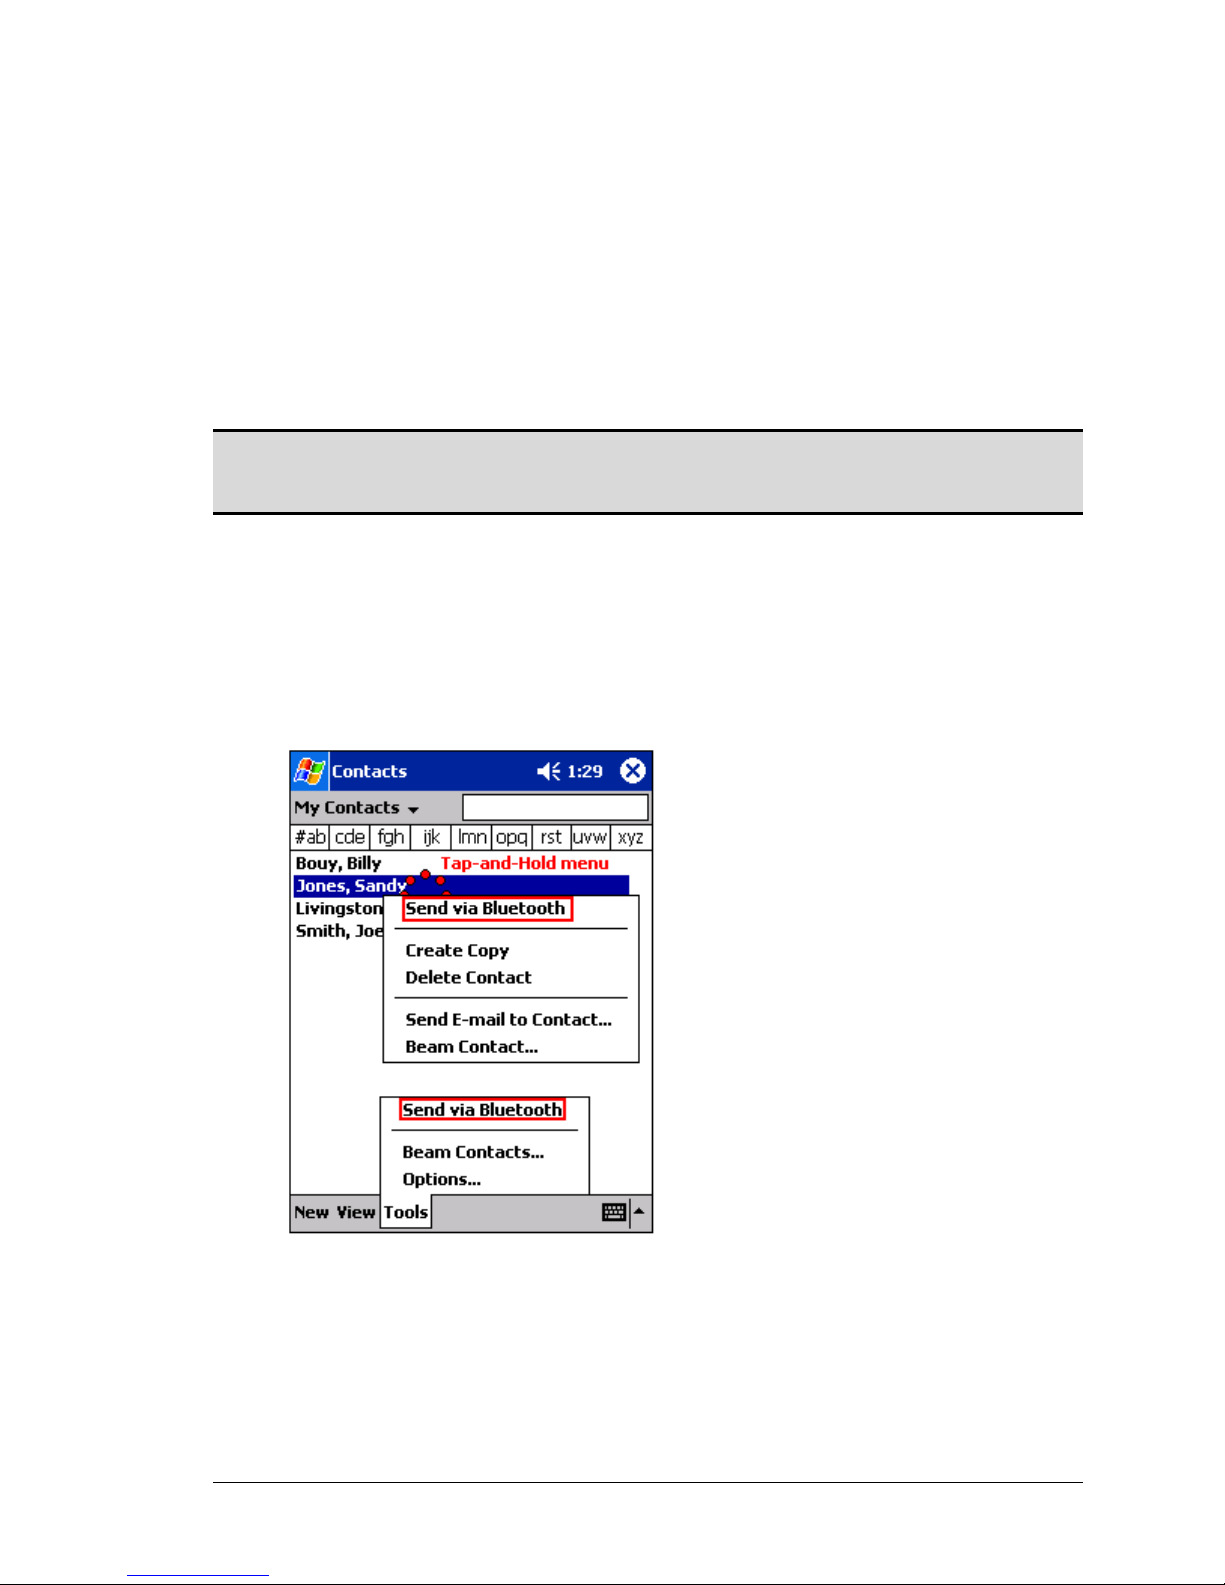
Pocket Outlook contacts, calendar items, and tasks can be sent individually or
collectively to a remote device.
Figure 26: Send via Bluetooth menus
To send data via Bluetooth transfer:
1. From the Start menu, Programs, open Calendar, Contacts or Tasks
2. Highlight the item(s) to be sent
3. Tap-and-hold the item(s), and from the pop-up menu, tap Send via Bluetooth.
4. On the Select a Bluetooth device screen, tap the name of the destination device,
and then tap OK.
36
 Loading...