

Page 1

MusePod
User Manual
Page 2

Copyright
Copyright 2004 by X-Micro Technology Corp., All rights reserved. No part of this
publication may be reproduced, transmitted, transcribed, stored in a retrieval
system, or translated into any language or computer language, in any form or
by any means, electronic, mechanical, magnetic, optical, chemical, manual or
otherwise, without the prior written permission of X-Micro Technology Corp.
Disclaimer
X-Micro Technology Corp. makes no representations or warranties, either
expressed or implied, with respect to the contents hereof and specifically
disclaims any warranties, merchantability or fitness for any particular purpose.
Any software described in this manual is sold or licensed "as is". Should the
programs prove defective following their purchase, the buyer (and not this
company, its distributor, or its dealer) assumes the entire cost of all necessary
servicing, repair, and any incidental or consequential damages resulting from
any defect in the software. Further, X-Micro Technology Corp., reserves the
right to revise this publication and to make changes from time to time in the
contents hereof without obligation to notify any person of such revision or
change.
All brand and product names mentioned in this manual are trademarks and/or
registered trademarks of their respective holders.
Page 3

MusePod
1
Unique Features
Mass Portable Storage Player
1.This player can be used as the portable hard disk (the
capacity is 20G). No driver is necessary under
WinMe/2000/XP.
2.Unique USB Host Functions
Hard disk player can read the file from the other
standard USB Device
3.High speed transfer, USB2.0 standard interface,
compatible with USB1.1
Hard disk player supports USB2.0 with the highest
rate of transmission up to 20Mbyte/s.
4.Large screen LCD with high resolution - 128 X 128
Dot Matrix 4 Gray With Backlight
5.Support multi music formats:
including MP3 (MP3 of VBR format supported)
and WMA
6.Convenient firmware upgrade
The latest functions can be acquired through the
firmware upgrade.
New formats will be supported through the simple
upgrading; meanwhile, the other functions will be
provided constantly.
7.Support multi-languages display of ID3
Support various languages of ID3, including
Page 4

English Manual
2
simplified Chinese, traditional Chinese, Japanese,
Korean and English
8.FM radio (87.5MHz~108.0MHz)
Auto-scan and memorize desired channels are more
convenient to listen to the FM radio.
9.Provide five types of equalizer (EQ):
Normal, Classic, Jazz, Rock and user EQ, making
music more abundant.
10.Supporting 3D effect, 15-level Bass Boost and
15-level Treble Boost, making music more colorful
11.Easy to use file navigation
12.Treeview navigation menu enables you to find the
music conveniently
13.Up to 2000 folders and 9999 files can be recognized
14.Graphical User Interface
15.Recording by Mic or Line_In
16.Supporting Bookmark Function
17.Supporting PlayList Function
18.Supporting TXT file navigation, namely, the e-book
function
Page 5

MusePod
3
Contents
Front Part and Side Part........................................4-5
Top/Bottom Part and LCD ........................................ 6
Using the AC adapter ..........................................7-11
Charging................................................................7-8
Software Installation ..............................................8-9
Connecting to the computer .............................. 10-11
Disconnecting to the Computer .............................. 11
Operations.........................................................12-13
Playing Music.....................................................14-16
Section Repeat..................................................16-17
Browsing................................................................. 18
Mode Switch......................................................18-21
Receive FM Radio.............................................22-23
Record...............................................................24-25
Menu Function...................................................26-35
USB Host Function............................................36-38
Cautions.................................................................. 39
Troubleshooting.................................................40-43
Accessory............................................................... 44
Specification........................................................... 45
Page 6
English Manual
4
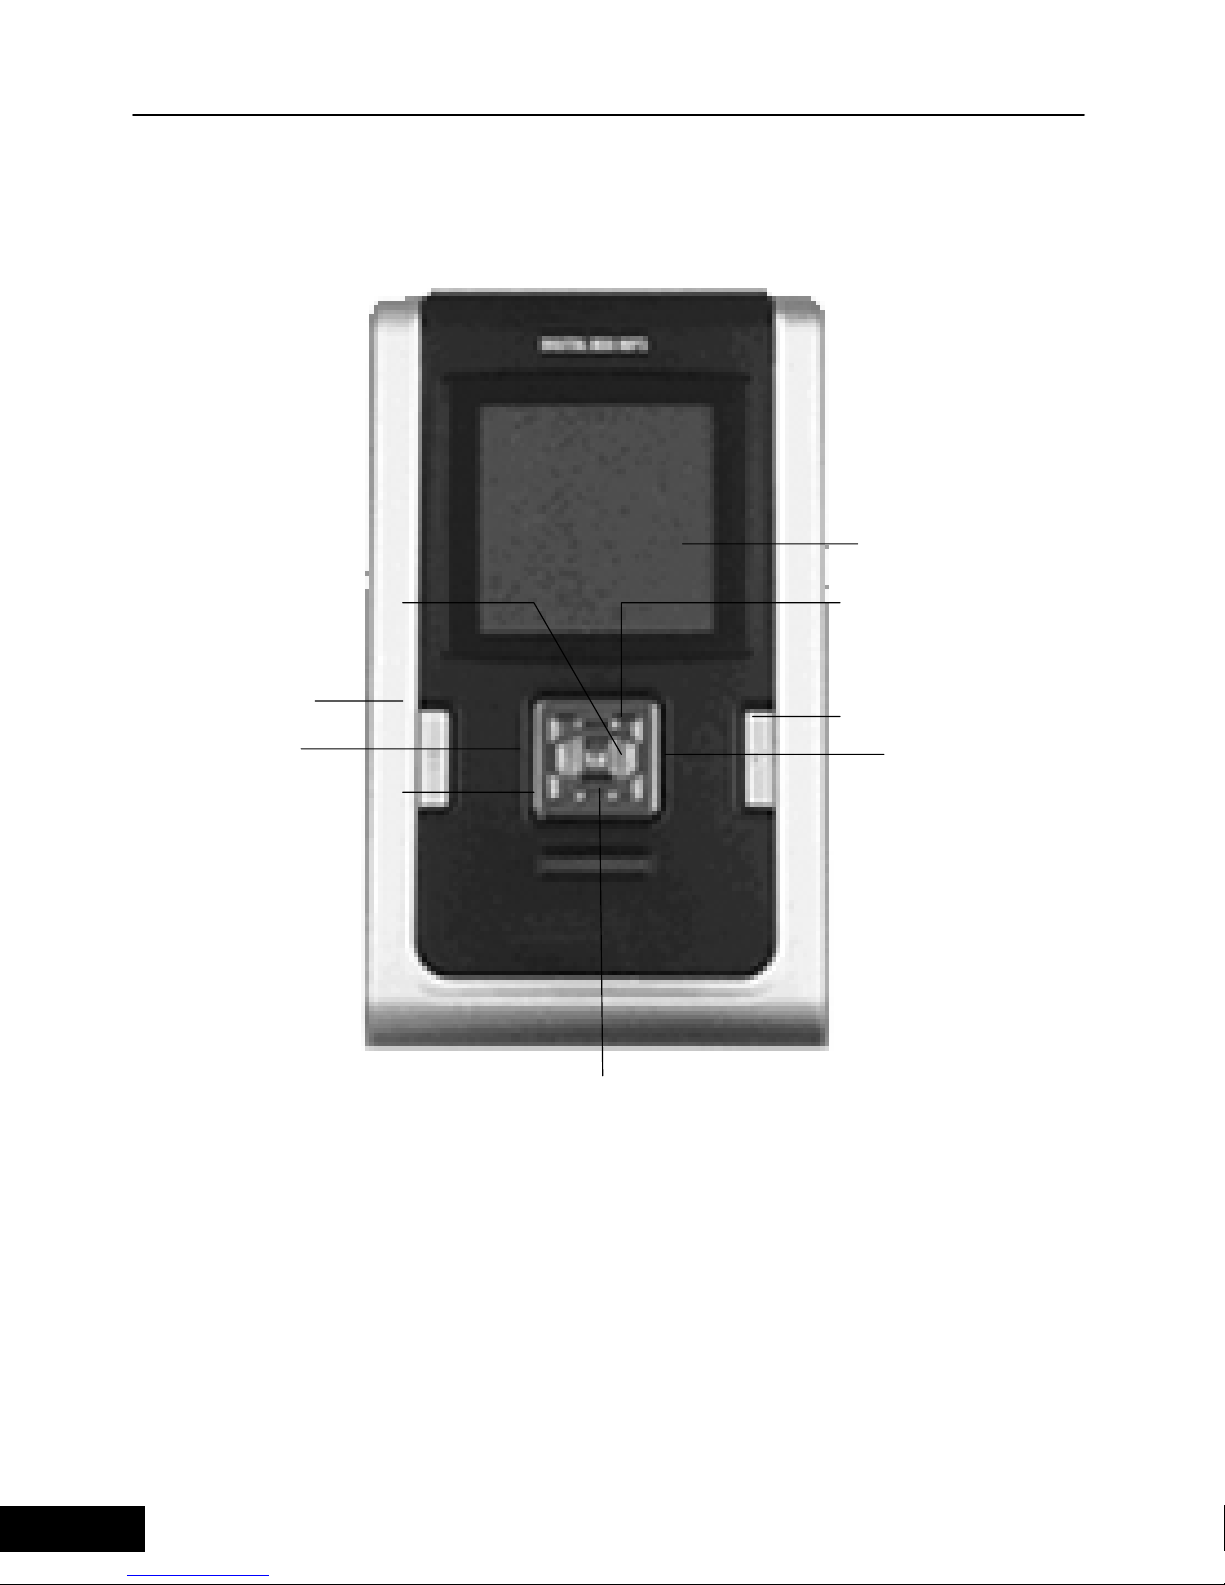
Front Part
LCD
Menu
Stop/Power Off
Right
Play/Pause/
Power On
Left
Volume+
Volume-
Page 7
MusePod
5
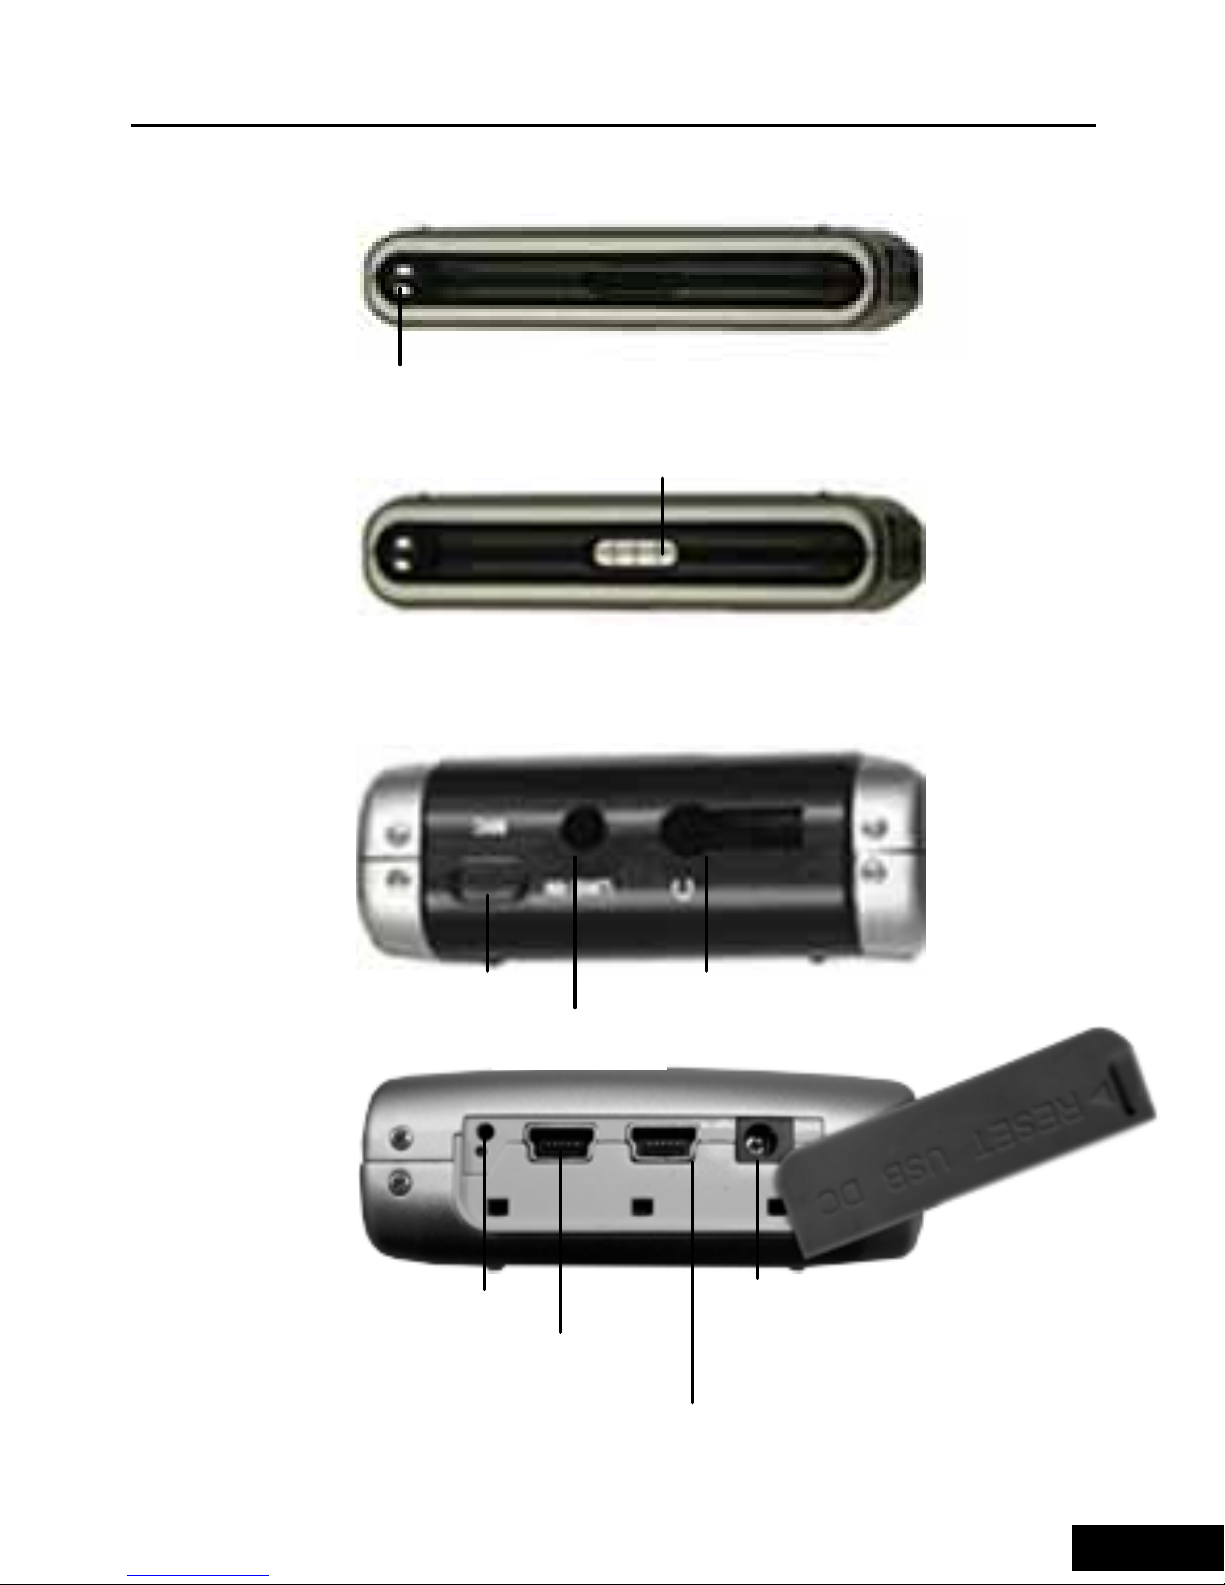
Side Part
LCD
A-B/Rec
SRS/Mode
Hold
CHARGE LED
MIC Hole
Line-In
USB Port
Reset Hole
USB Host Portne
DC-IN
Earpho
Page 8
English Manual
6
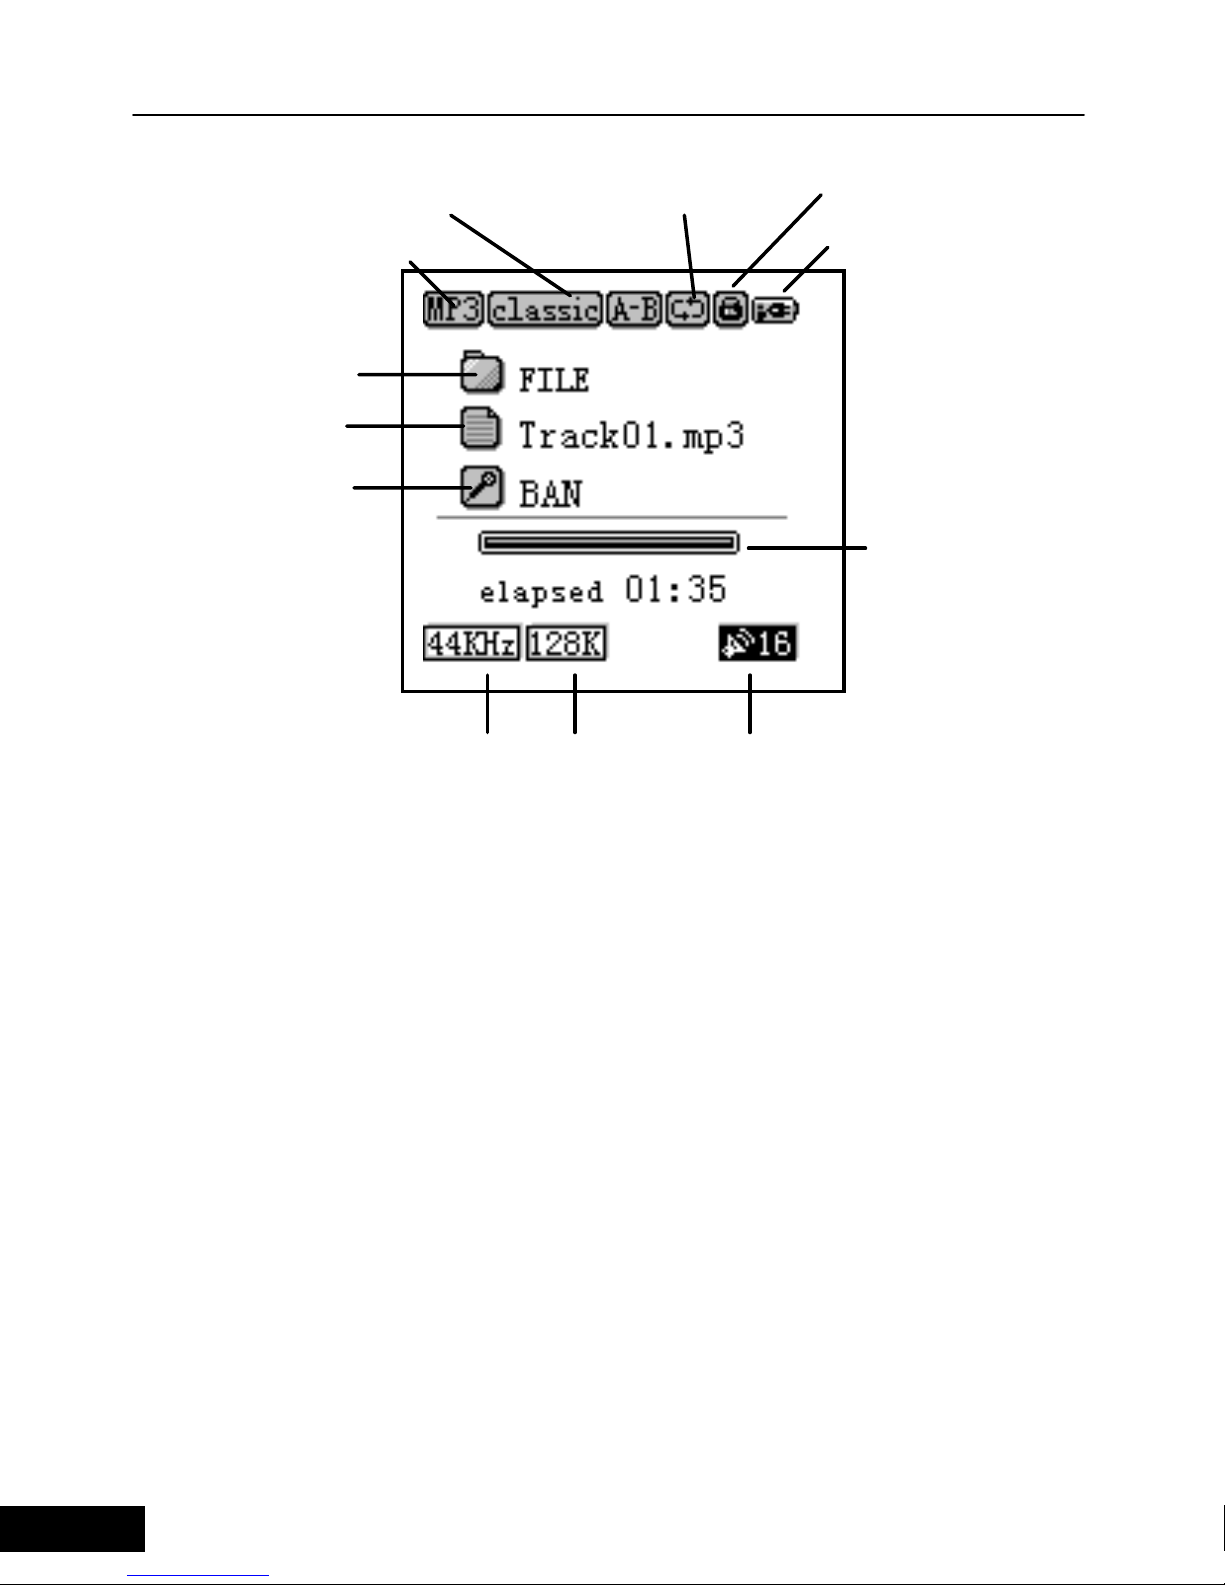
Current Mode
EQ
Repeat Mode
Hold
Batter
y
Indicato
r
Current Folde
r
File Name
ID3 Artist
Track Playing
Progress
Samplin
g
Rate Bitrate Volume
Page 9

MusePod
7
Using the AC adapter
1. The AC adapter supplied with the player can be
used only.
Working voltage of the AC adapter of the player is
100/240V, 50/60Hz.
2. Connect the adapter to the DC jacks of the AC
power and the player
Charging
1. When the player is powered on, the status of the
battery indicator shows the battery capacity of the
player. When the battery is low, the icon will be
twinkling. After twinkling for a while the system will
be shutdown automatically. The battery must be
charged immediately, otherwise the player cannot
continue to work. Before connecting the player to
the computer, please make sure that it is in low
voltage, or the connection to the PC will fail.
2. Charging will start automatically after the adapter is
connected to the power. In the power-on status, th e
power-connecting icon is shown in the position of
the original battery indicator icon. It shows that the
battery is being charged and the red LED is always
on. When charging in the power-off status, the red
LED is always on.
Page 10

English Manual
8
3. When the battery is fully charged, the battery
indicator is fully filled in and the red LED will be off.
Charging time: about 3 hours (after the battery is
fully discharged)
Discharging time (playing time): about 12 hours
(the longest playing time after the battery is fully
charged)
Playing time is measured during playing 128Kbps
Mp3 files in the fully charged status. (It is practically
measured without any operations)
Software Installation
Windows 2000 and Windows XP themselves can
support USB2.0 storage device (PC must be with
USB2.0 port, otherwise it will be transmitted by the
USB1.1 standard), but Windows 98 requires the
driver to be installed. We supply you with the
manager software of the hard-disk player and the
driver. After the installation is completed, you can
now operate the player.
Please plug CD to CD-ROM, then it will install
software automatically if you did not close
CD-ROM Auto function. Then execute Next step
one by one, you can finish installing. During
installing, if you use Win98 operation
system, it
Page 11

MusePod
9
will setup Win98 driver for HDD player
automatically.How to Use Software Managerment
How to Use Software Managerment
If you install software managerment, you can use it
to manager your HDD player.
1.Turn on your pl ayer, then connect it to PC, while
PC find device, please execute managerment
software.
2.You can use this software to edit playlist function.
3.You can use this software to change language.
4.You can use this software to download file and
upload file to HDD player.
You can refer to online help in the software to use
this software.
Page 12

English Manual
10
Connecting to the Computer
1. Press and hold the “Play” button to turn on the
player. (Warning: please make sure whether the
battery of the player is sufficient. If it is not enough,
please connect the adapter to the power to
guarantee enough battery)
2. Connect the player and the computer properly with
the USB cable. The big end of the USB cable should
be connected to the USB port of the computer, and
the other end should be connected to the USB Slave
port of the player.
The LCD of the player shows:
3. The “Device connected” icon will be shown on
system bar under Windows 2000 and Windows XP.
(Under Windows 98, it can be connected properly
only after the installation of the driver is finished.)
Page 13

MusePod
11
4. After the installation is completed, a portable hard
disk will be added in My Computer/Explorer. The
files in the hard-disk player can be operated by the
Explorer or the Manager software we supply. The
hard-disk player can be used as a normal hard disk,
and the files can be copied, deleted, etc.
When the hard-disk player is to be connected to the
computer for a long time, please connect the AC
adapter. The low battery will cause improper working of
the player. (When connecting to the PC, if the battery is
too low, the player cannot connect successfully)
Disconnecting to the Computer
Use “Safety Remove” to disconnect the player to the
computer, namely, double-click the right corner of the
task bar on PC, select “Safety Remove”. After the
system displays “Removed Hardware Safely”, the USB
cable connected the player to the computer can be
removed.
Warning:
Do not disconnect the player to the computer when the
player is working.
The player can be disconnected only after the
file copying is completed.
Page 14

English Manual
12
Operations
Operations:
Basic Operations
2. Power On Press and hold the
“Play/Pause/Power On” button
3. Play/Pause In the playing status, press the
“Play/Pause/Power On” button.
4. Stop Playing Press the “Stop/Power OFF”
button.
5. Fast Forward In Music playing status, press
and hold the “Right” button.
6. Fast Reverse In Music playing status, press
and hold the “Left” button.
7. Play Previous Track In Music playing status,
press the “Right” button.
8. Play Next Track In Music playing status, press
the “Left” button.
9. Power Off Press and hold the “Stop/Power
OFF” button.
10. Volume Adjustment In Music playing or FM
status, press the “+/-” button.
11. File Selection In the file navigation status,
press the “Right/Left/+/-/ Menu”
Page 15

MusePod
13
button. Press the “Menu” button
to enter the file navigation
interface, press the “Right”
button to enter a folder or select
a file, press the “Left” button to
exit the current directory, press
the “+/-” button to select the
different file or folder, and press
the “Menu” button to confirm.
12. Mode Switch Press and hold the “Mode”
button to enter the mode switch.
13. Section Definition Press the “A-B” button.
14. Recording Press and hold the “A-B”
button.
15. Menu Display Press and hold the “Menu”
button.
16. Hold button On/Off
10
Page 16
English Manual
14
Playing Music
1. Connect the earphone
2. Unlock Hold
3. Press and hold the “Play/Pause/Power On” button
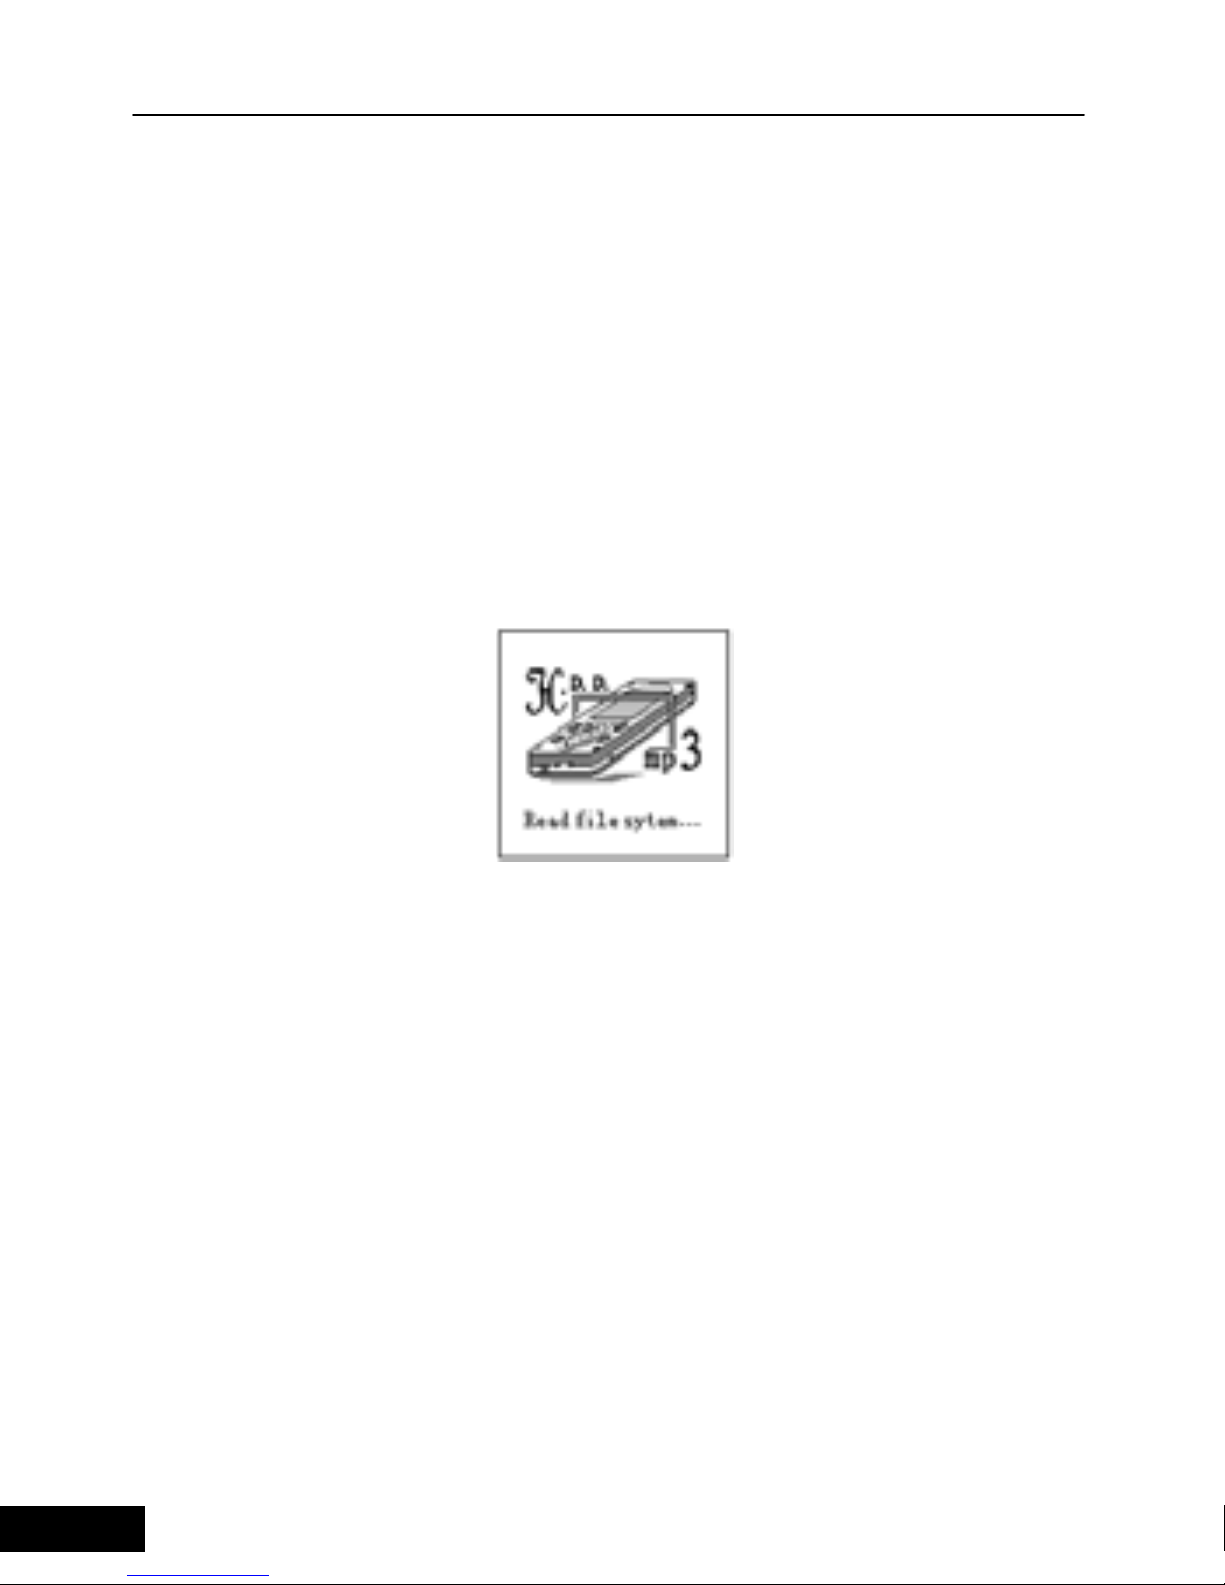
for 2 seconds to turn on the player, and the
power-on picture displays. After the system
information is read, it will enter the file list. (This
procedure needs some times because the speed of
scanning hard disk is much slower.)
4. Track selection: Press the “Menu” button to enter the
file navigation status, and select different folders or
files by pressing the “Right/Left/+/-” button, then
press the “Menu” to enter a folder or select a file to
play. In the file navigation status, the definitions of
buttons are: “Right” – select the function, “Left” – exit
the current folder, “+” – select upward, “-” – select
downward, “Menu” – confirm the function.
Page 17
MusePod
15
It begins to play after the track is selected. Press the
“Play/Pause/Power On” button to pause, and then
press it again to continue playing. The playing interface
displays the information of current track. In the playing
status, the information is shown: the first line shows the
folder which the current song file is in; the second line
shows the name of the song (If this song has ID3
information, the title of the ID3 will display after
displaying the song name once); and the third line
shows the Artist of the ID3 (Refer to the LCD)
5. Volume Adjustment: Press the “+” button to increase
the volume and the “-“ button to decrease the
volume. The digital number of the icon at the right
corner shows the current volume.
6. During the playing, press and hold the “Right” button
Folder name
Song name or ID3 Title
Song ID3 Artist
Playing progress
Page 18
English Manual
16
to make fast forward, while press the “Right” button
to switch to the next track; press and hold the “Left”
button to make fast reverse, while press the “Left”
button to switch to the previous track.
7. Press the “Stop” button to stop playing, and return to
the file list.
8. Press and hold the “Stop” button to shut down the
player, and then the shutdown picture will show.
When “Hold” is on, the icon appears, and buttons on
the player are invalid.
In the stop status, you can set the “Auto Off” time in the
setting menu, the player will be shut down
automatically according to the setting time.
Page 19
MusePod
17
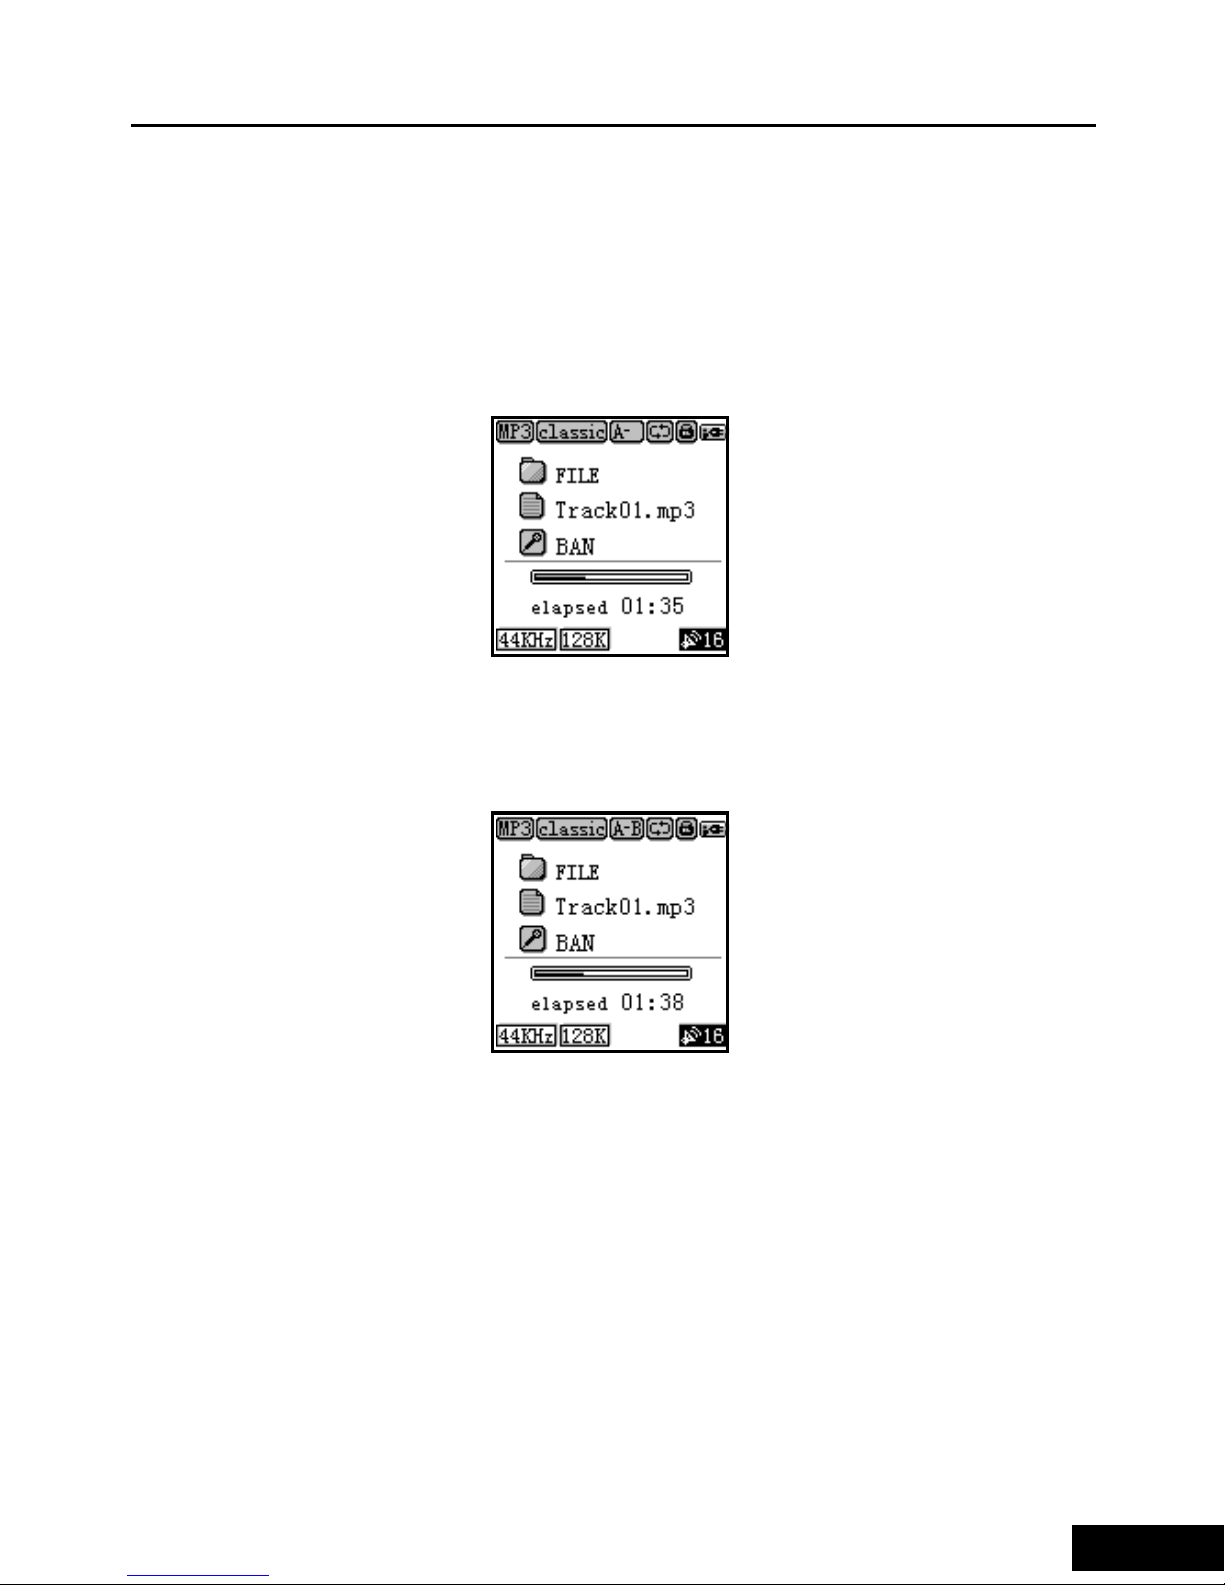
Section Repeat
When the player is playing, you can use section repeat
function to repeat one section of the music. In the
playing status, press the “A-B” button to select the start
position (A point).
During the playing, press the “A-B” button again to
select the end position (B point).
The player will repeat the section from A to B.
Page 20
English Manual
18
Browsing
After pressing the “Menu” button, use “Right/Left/+/ -”
button to find and select the track. If the audio file is
selected, the player will enter the playing interface. If
the non-audio file is selected, the player will not
respond.
Press the “Menu” or “Right” button to enter the lower
folder. Press the “Left” button to return to the upper
folder. When the root directory is reached, it will stop.
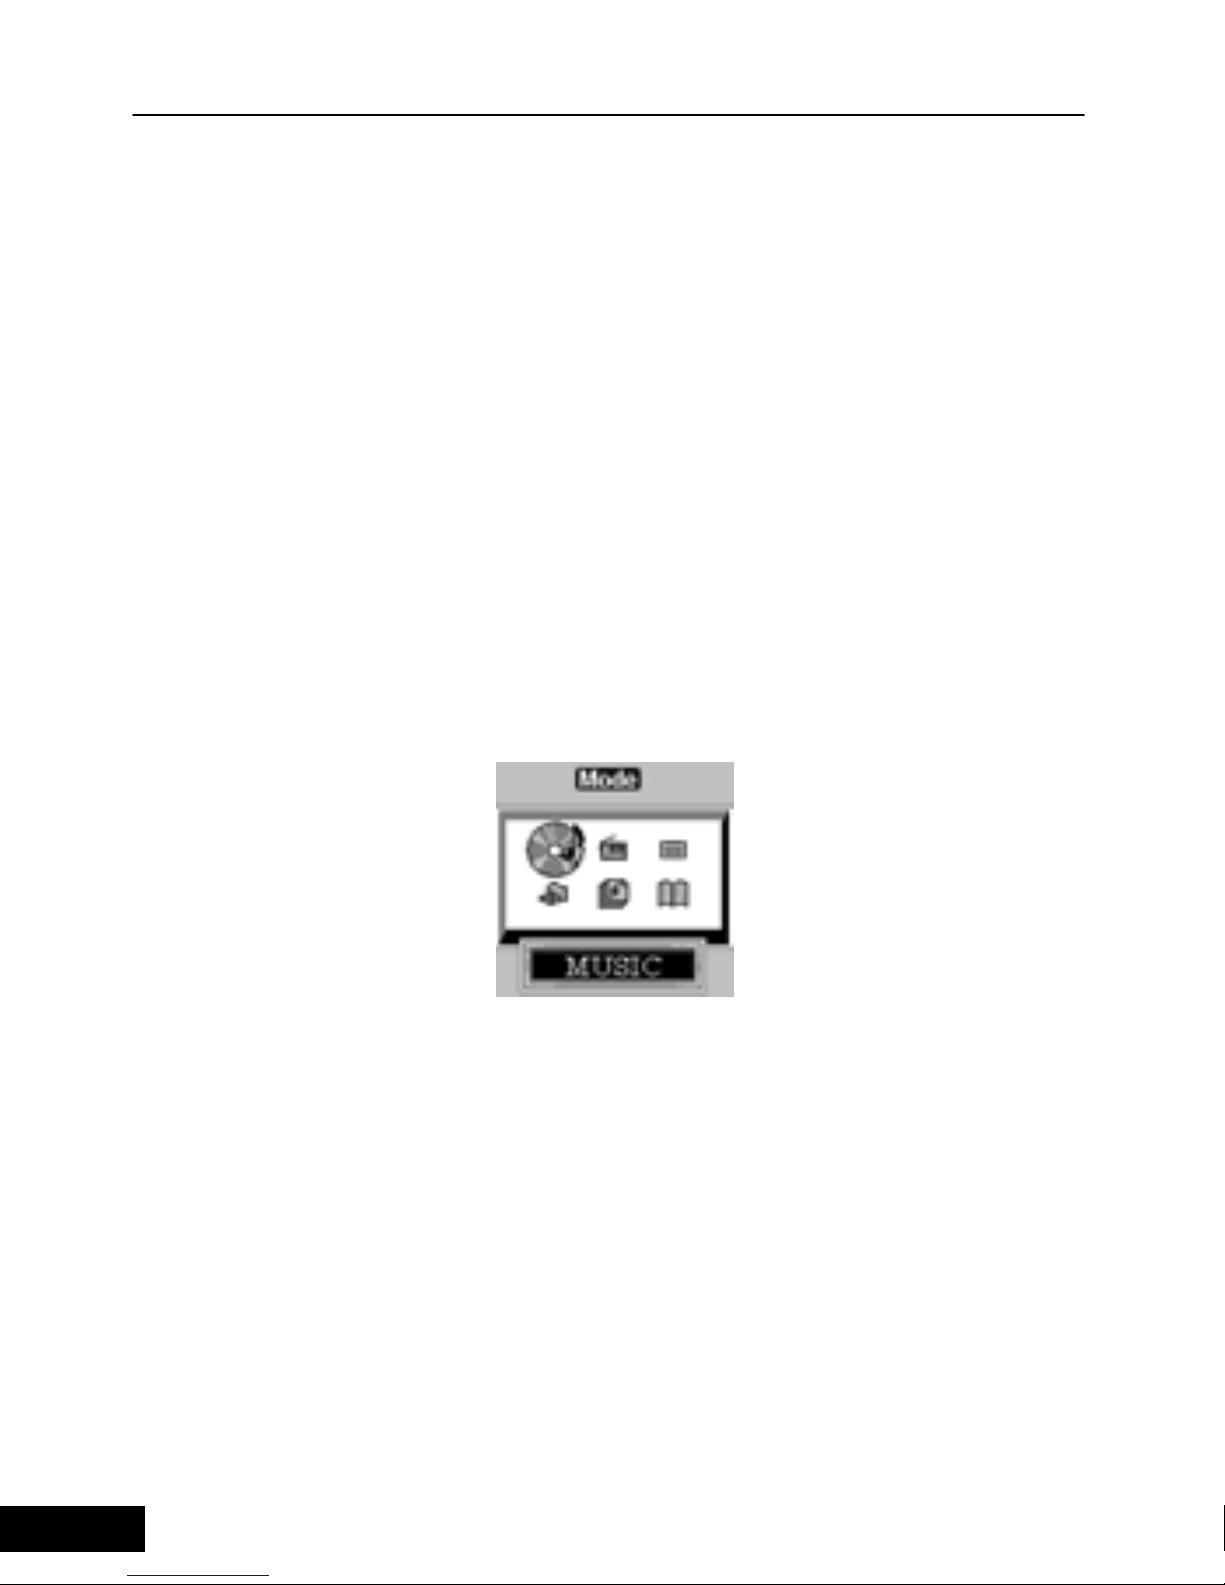
Mode Switch
Press and hold the “Mode” button or use the menu to
enter Mode Switch.
Press the “+/-” button to switch among the six modes
such as MP3 status, FM status, Recording status, Data
Backup Browsing status, Playlist status and e-book.
Press the “Left” button to exit the mode interface. After
selecting the corresponding mode, press the “Menu” or
“Right” button to confirm the mode switch. Press the
Page 21

MusePod
19
“Stop” button to exit the mode and return to the file list.
USBDATA Data Browsing Mode:
After entering the Backup Data mode, you can see the
files in the USBData directory, which come from the
Device connected to the USB Host. If you backup the
peripheral USB Device by USB Host function, you can
view the backup USB Data by selecting this option.
Refer to the below figure: (Note: At present it only
supports the connection to standard Mass Storage USB
devices which must use FAT or FAT16 file storage
format, otherwise the system will display “Device
Error”).
Page 22
English Manual
20
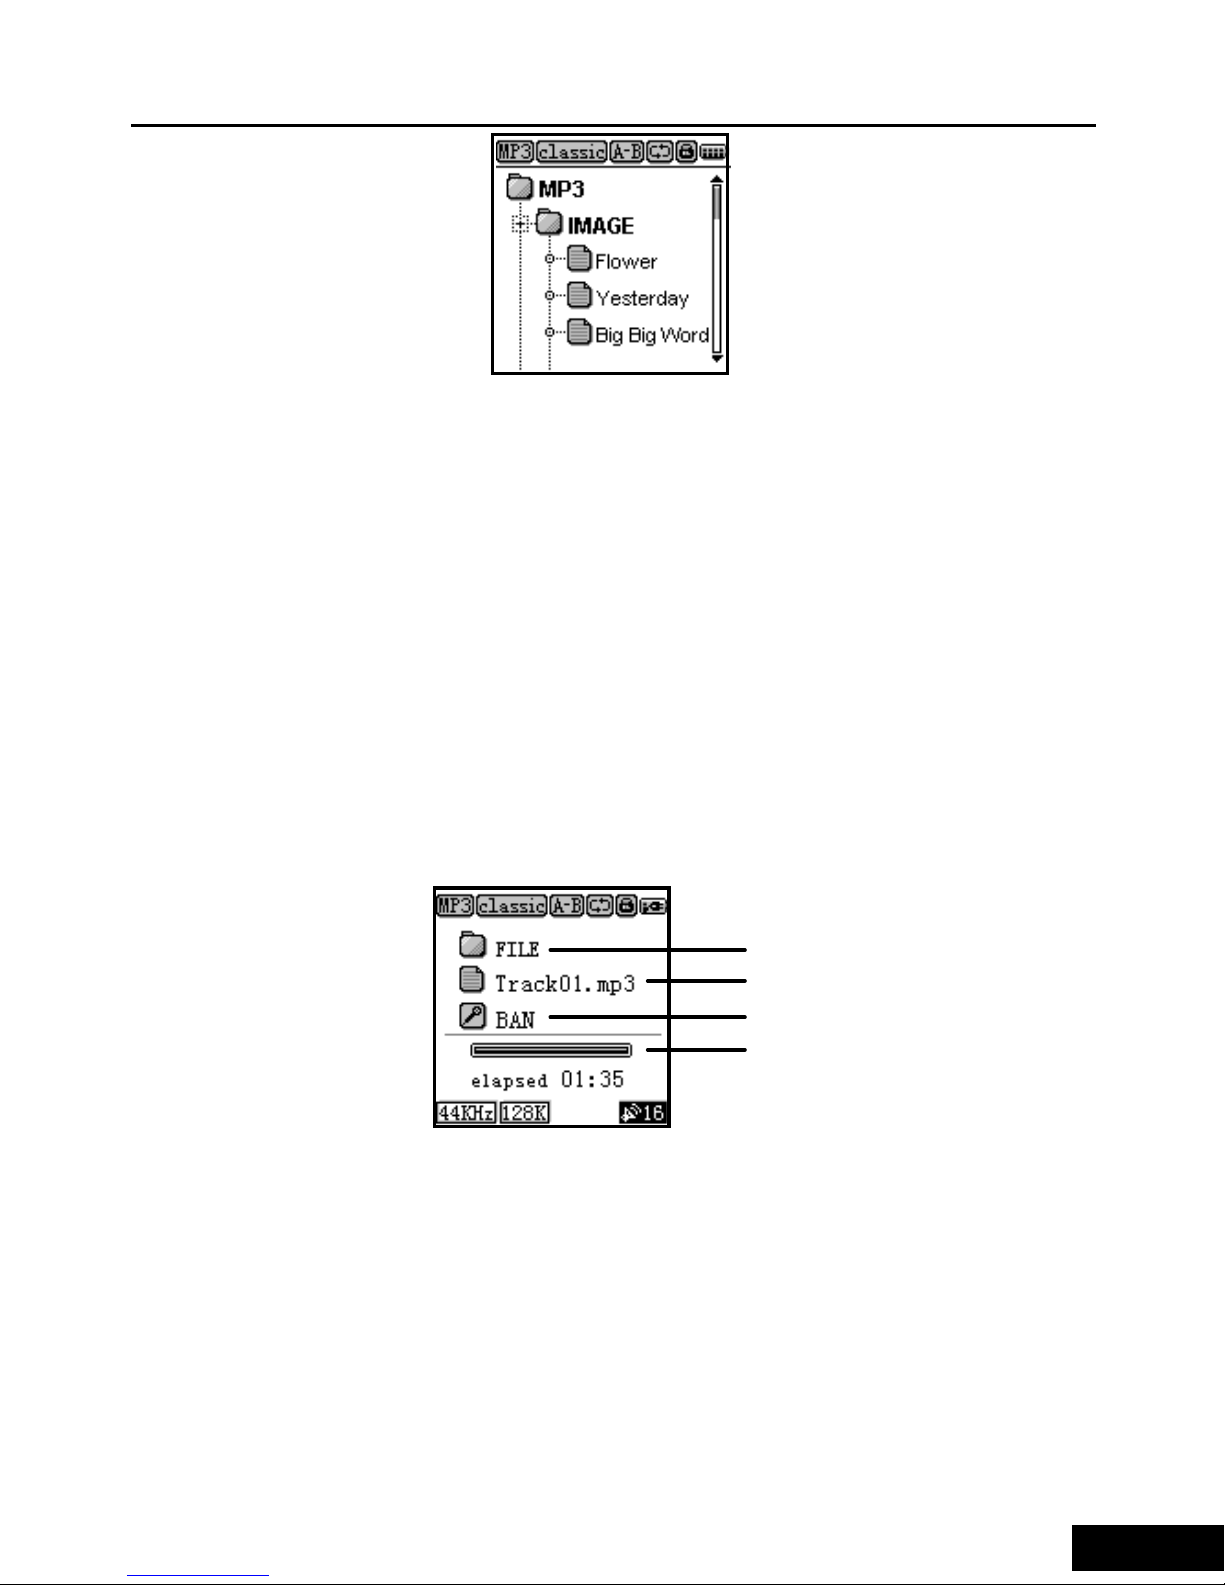
Playlist Function:
You can select your favorite songs to play, which
means the player can support Playlist function. Select
the Playlist option in Mode status to enter the list of
Playlists and see the corresponding Playlist, then you
may select to play the Playlist.
How to add and delete songs in BMK list of Playlist
You can edit Playlist files by the manager software, and
the files can be put in the Playlist folder in the hard disk
so that you can manage these playlists. Also, you can
set Playlist function in the player port, namely, there is
one default Playlist (BMK List) in the player. In the file
navigation status (press the “Menu” button to enter File
Navi mode), you can select the song to be added to
BMK List, and press and hold the “Play” button to finish.
The song added to Playlist will be shown as below:
Page 23
MusePod
21
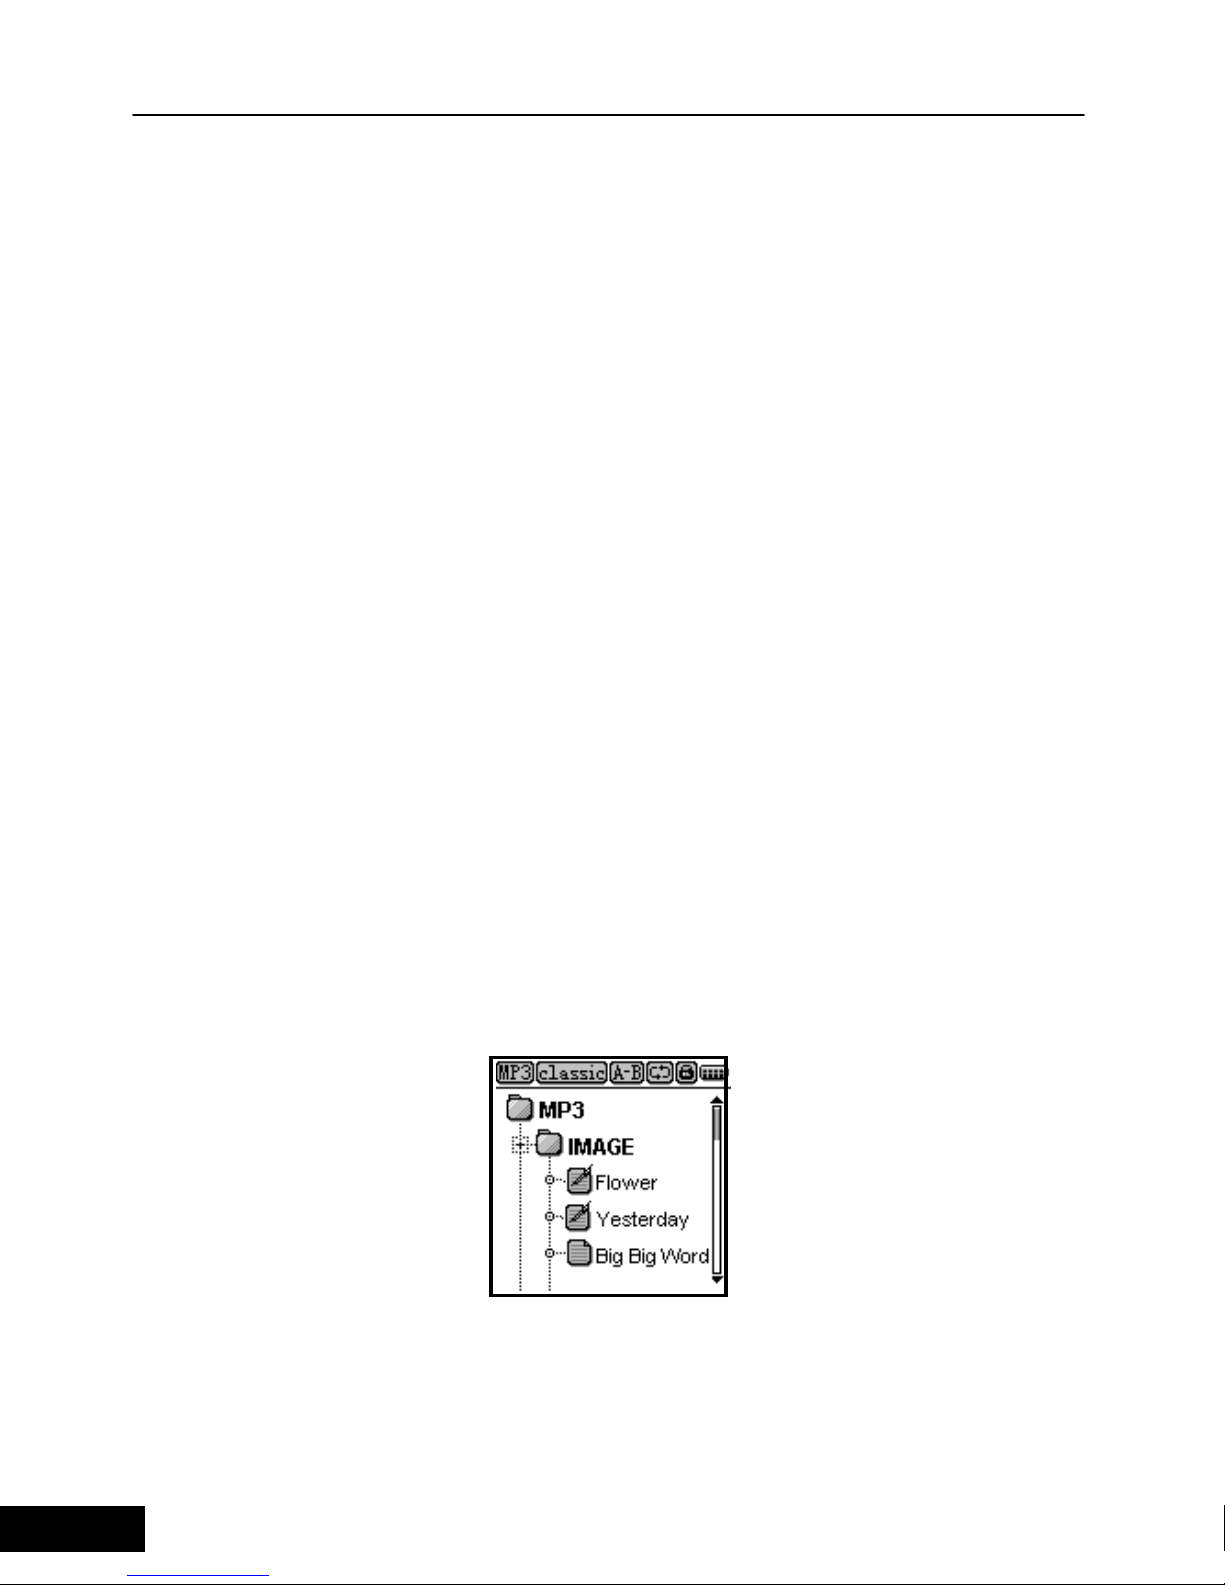
As the above figure, ICON shows the two songs Flower
and Yesterday are added to PlayList. You can also
delete the song from Playlist: select a song which is
added to the playlist, and then press and hold the
“Play” button to delete it from Playlist. Now if you enter
the Playlist mode and select one Playlist to play, then
the songs in this Playlist will always play.
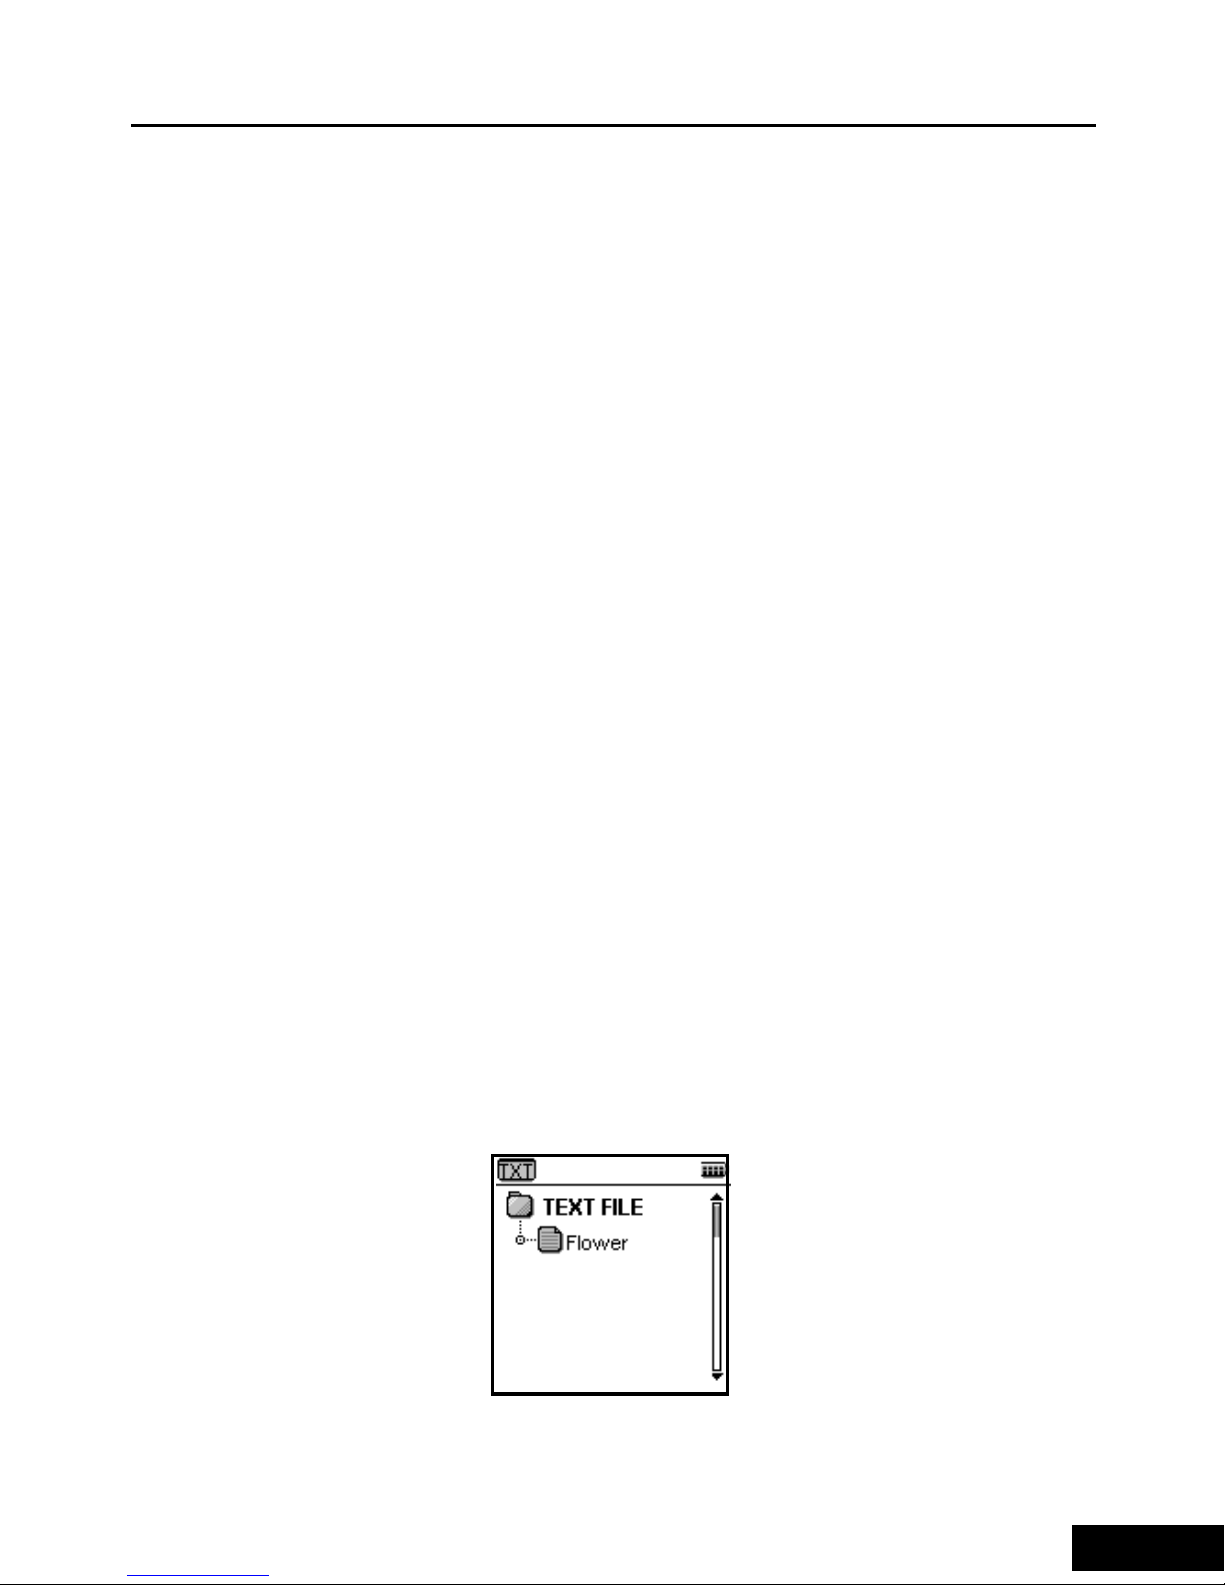
E-Book Function:
You can save the TXT files in the TEXTFILE folder in
the root directory of hard disk, then you may read the
e-book by selecting “Text viewer” option (Note: the
e-book can be directly copied to the TextFile directory
in HDD, but the capacity should not be more t han 64K
bytes). After entering the Mode, you can select the
“Text Viewer” mode, then press the “+/-” to select the
Text document you want to read, press the “Menu”
button to enter the Browse status, and press the
“+/-/Right/Left” button to page up or page down the
e-book. To return to the Text document browse status,
press the “Menu” button.
Page 24
English Manual
22
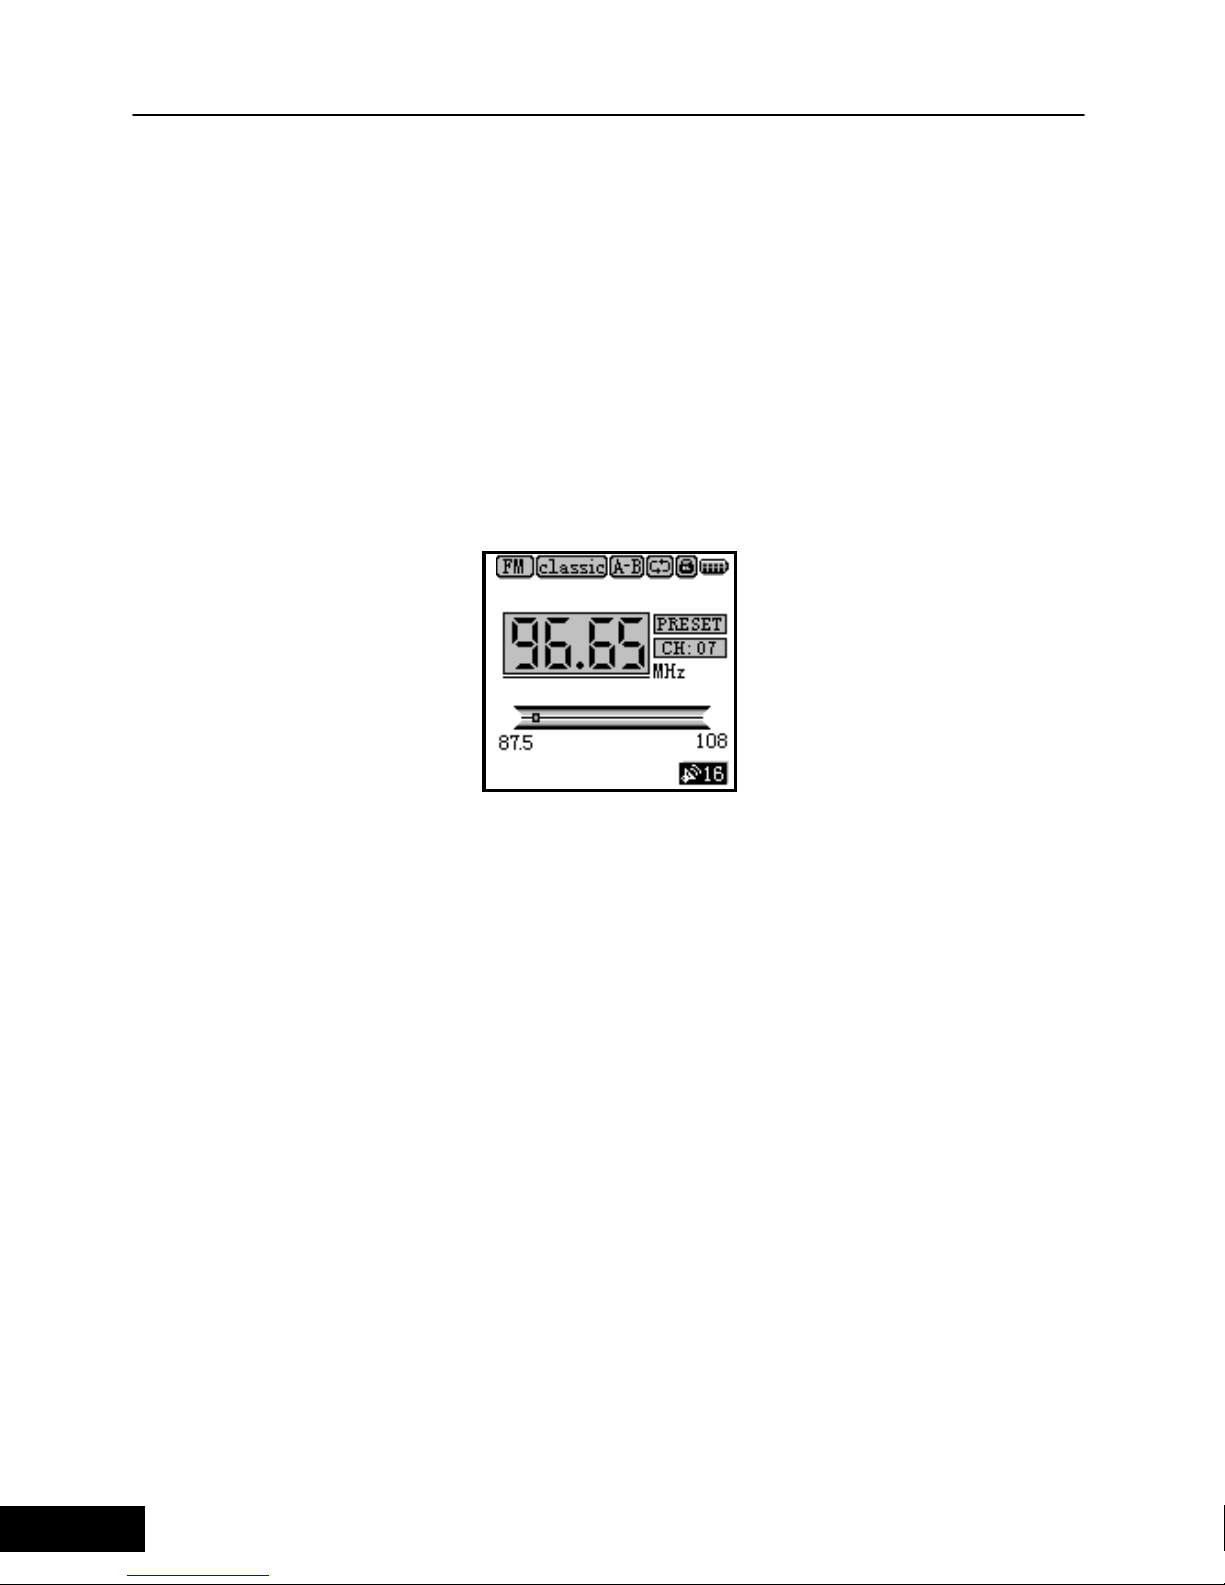
Receive FM Radio
Enter FM status through the mode switch:
1. When the “Preset” button is invalid, press the
“Right/Left” button to adjust the current channel in 0.05
MHz step. Press the “+/-” button to adjust the volume.
Press and hold the “Right/Left” button will automatically
search the next valid channel.
2. When the “Preset” button is valid, press the “Right/
Left” button to switch to the next/previous stored
channel.
3. Auto scan function: Press and hold the “Pla y” butt on
in FM status to enter the Auto Scan mode, the player
will automatically save the top 20 channels as CH01 to
CH20. “PRESET” tag will change to “Auto Scan” tag
and the channels will scroll automatically. After the
scan is over, “Auto Scan” tag will automatically switch
to “PRESET” tag. (Please plug the earphone when
automatically scanning the channels. The earphone
works as the antenna in FM status.)
Page 25
MusePod
23
4. Press the “Menu” button to switch between the
Preset mode and Manual Scan mode. The user can set
some channels as needed or delete some disliked
channels. After switching to Manual Scan mode, the
“PRESET” tag will disappear.
5. Under Manual Scan mode, press the “Right/Left”
button to increase/decrease 0.05MHz. Press and hold
the “Right/Left” button to automatically scan the
adjacent channels. If the channel that is found has not
been saved, you can press the “Mode” button to save
the channel. In this case, after pressing “Mode” button,
“Memory” tag will show at the location of “Preset” tag,
and then press the “Right/Left” button to select the
saved destination, such as CH01 to CH20. Press the
“Mode” button to finally confirm. “Memory” tag then
disappears and the saving process is completed.
In the FM status, you can press and hold the “A-B”
button to record the FM radio. The screen shows as
below.
To stop the record, press the “Stop” button
and return to the FM status.
Page 26

English Manual
24
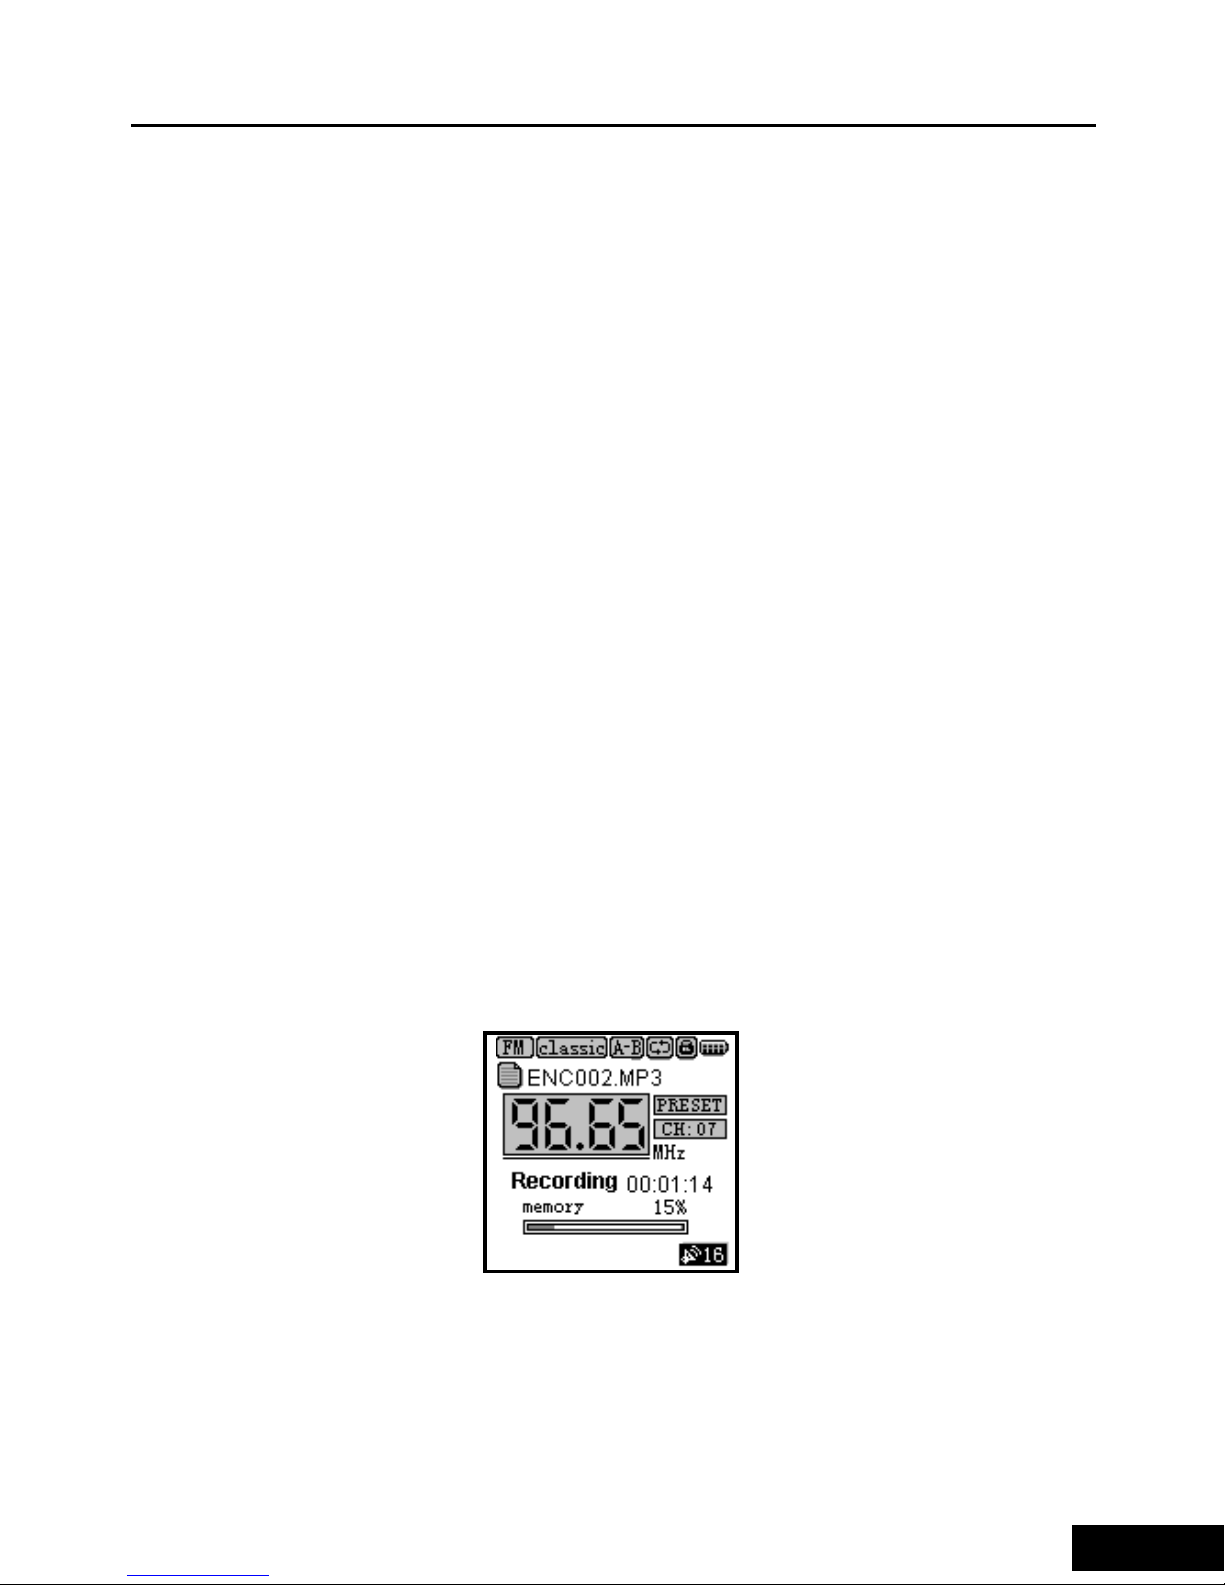
Record
Enter the record screen through mode switch or
pressing and holding the “A-B” button. The screen
shows as below.
1. Press and hold the “A-B” button to enter the record
screen directly. (In this case, if “Line-In” is connected,
then the “Line-In” content will be recorded as MP3
sound files, otherwise the sound source will be the
MIC). Press the “Rec” button to halt the record, press
again to resume the record. Press the “Stop” butt on to
stop the record, and the screen will display “Waiting…”
and the player is generating the recorded file. After
returning to the file list, the current recorded file will be
displayed. If the recorded file is in MP3 format, the
recorded file will be saved under the directory of
“RECORD\ENCODE”. If the recorded file is in WAV
format, the recorded file will be saved under the
directory of “RECORD\VOICERECORD”.
2. The operation of playing recorded file is the same as
that of playing music file. Change to “REC” mode
through mode switch, and select the specific recorded
file or music file to play.
3. In the FM status, press and hold the “A-B/Rec”
button to enter the record mode. Then the current FM
radio program can be recorded. Press the “Stop” button
to return to the FM status.
Page 27

MusePod
25
4. To record from other sources, connect the LINE_IN
jack with the LINE_OUT jack or earphone jack of the
external sound source by using the auxiliary
input/output cable supplied with the player, press and
hold the “A-B” button to start the recording. If the
“Synchronous” is set to “On” in the “Rec Setting”, then 2
successive songs will be separated automatically in
between when recording them in MP3 files.
Before the recording starts, the player will check if the
left space is enough. If not, the player will display “No
Enough Space”. When the “Memory” displays as
“100%”, the recording will not be available.
Please refer to the “Rec Setting” item of the menu for
the detailed recording settings.
Through the LINE_IN interface, you can
record from the CD or MP3 player. Please
make sure the external audio source is in
playback mode before the record starts. (It is
recommended to use the maximum volume
when making the record.)
Menu Function
Current Folde
r
File Name
Record Time
Ca
p
acity Utilization
Sampling rate, Bitrate and Output
File Format (MP3, VOC)
Page 28
English Manual
26
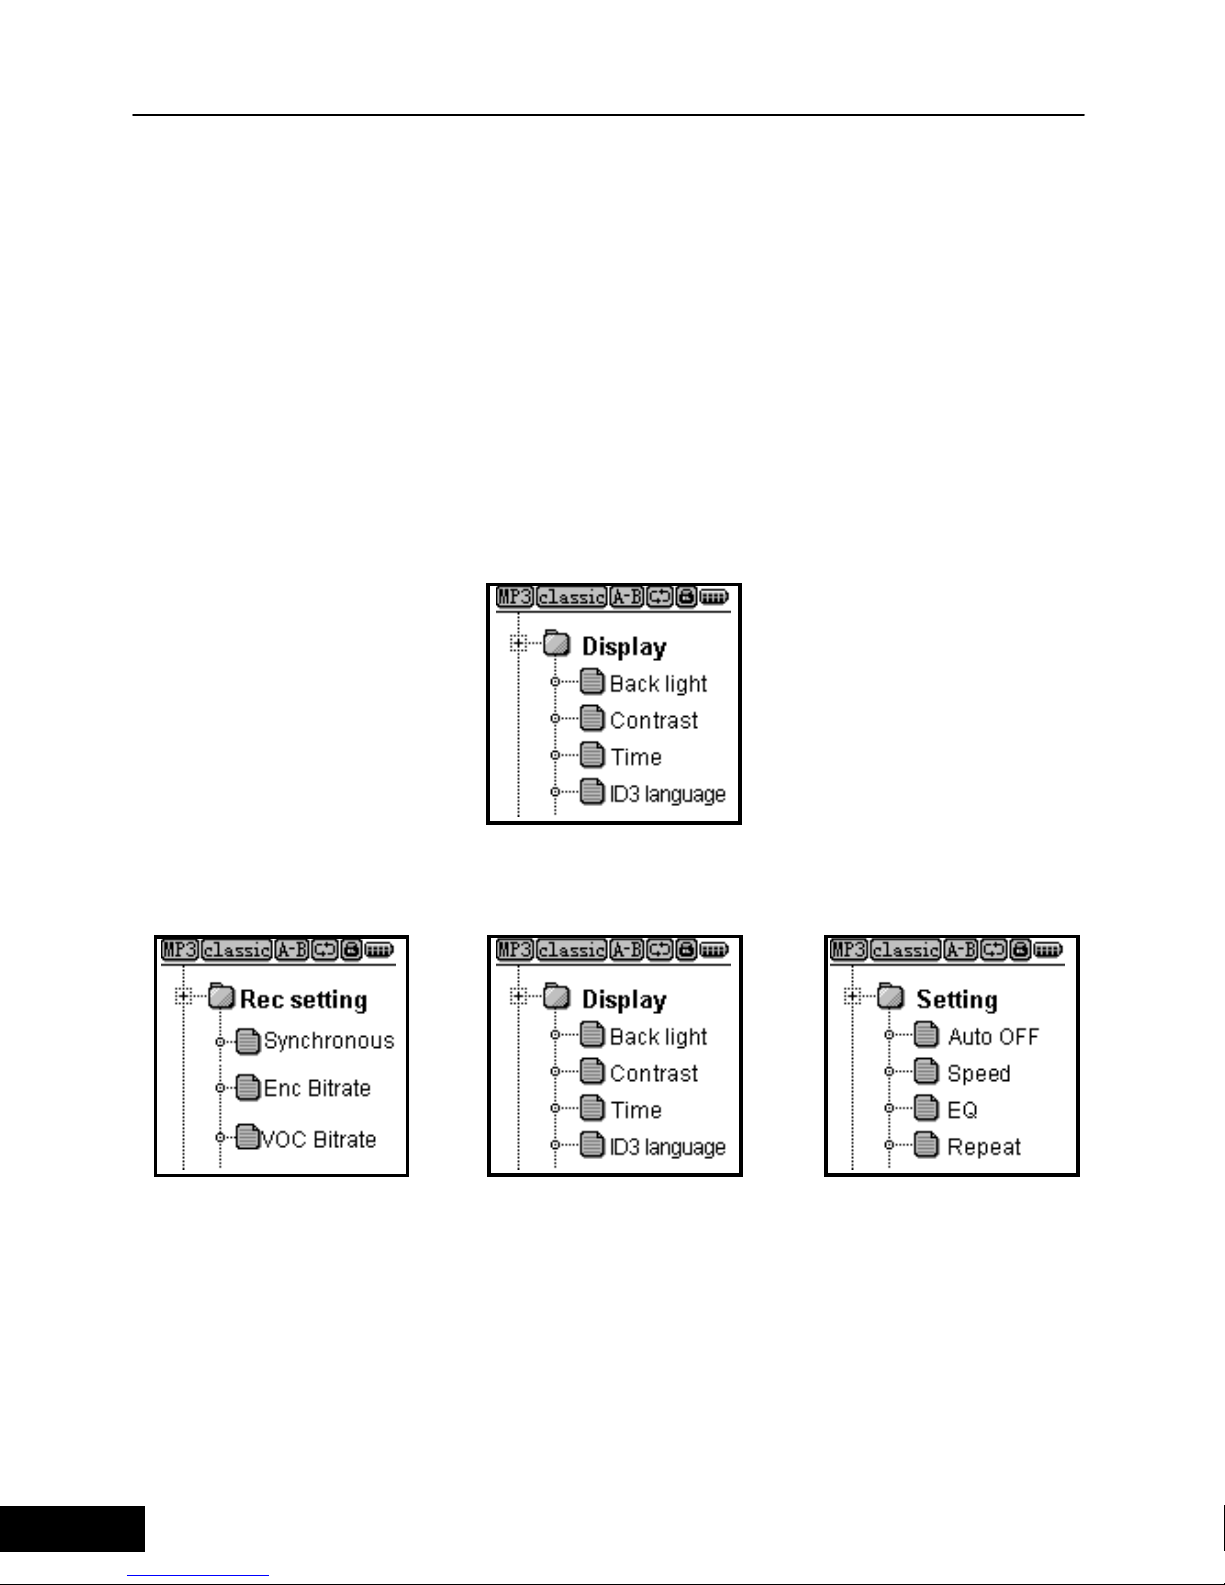
Press and hold the “Menu” button to enter the menu.
There are 5 main menus and 3 sub menus. Press the
“+/-” button to shift among the menu items. Press the
“Right” or “Menu” button to select or enter the sub
menu. Press the “Left” button to return to the upper
menu and press the “Stop” button to exit the menu
operation. You can make the settings after entering the
menu.
Main menu
Sub menu
The menu items of “Mode” are the same as that after
pressing and holding the “Mode” button. Please refer to
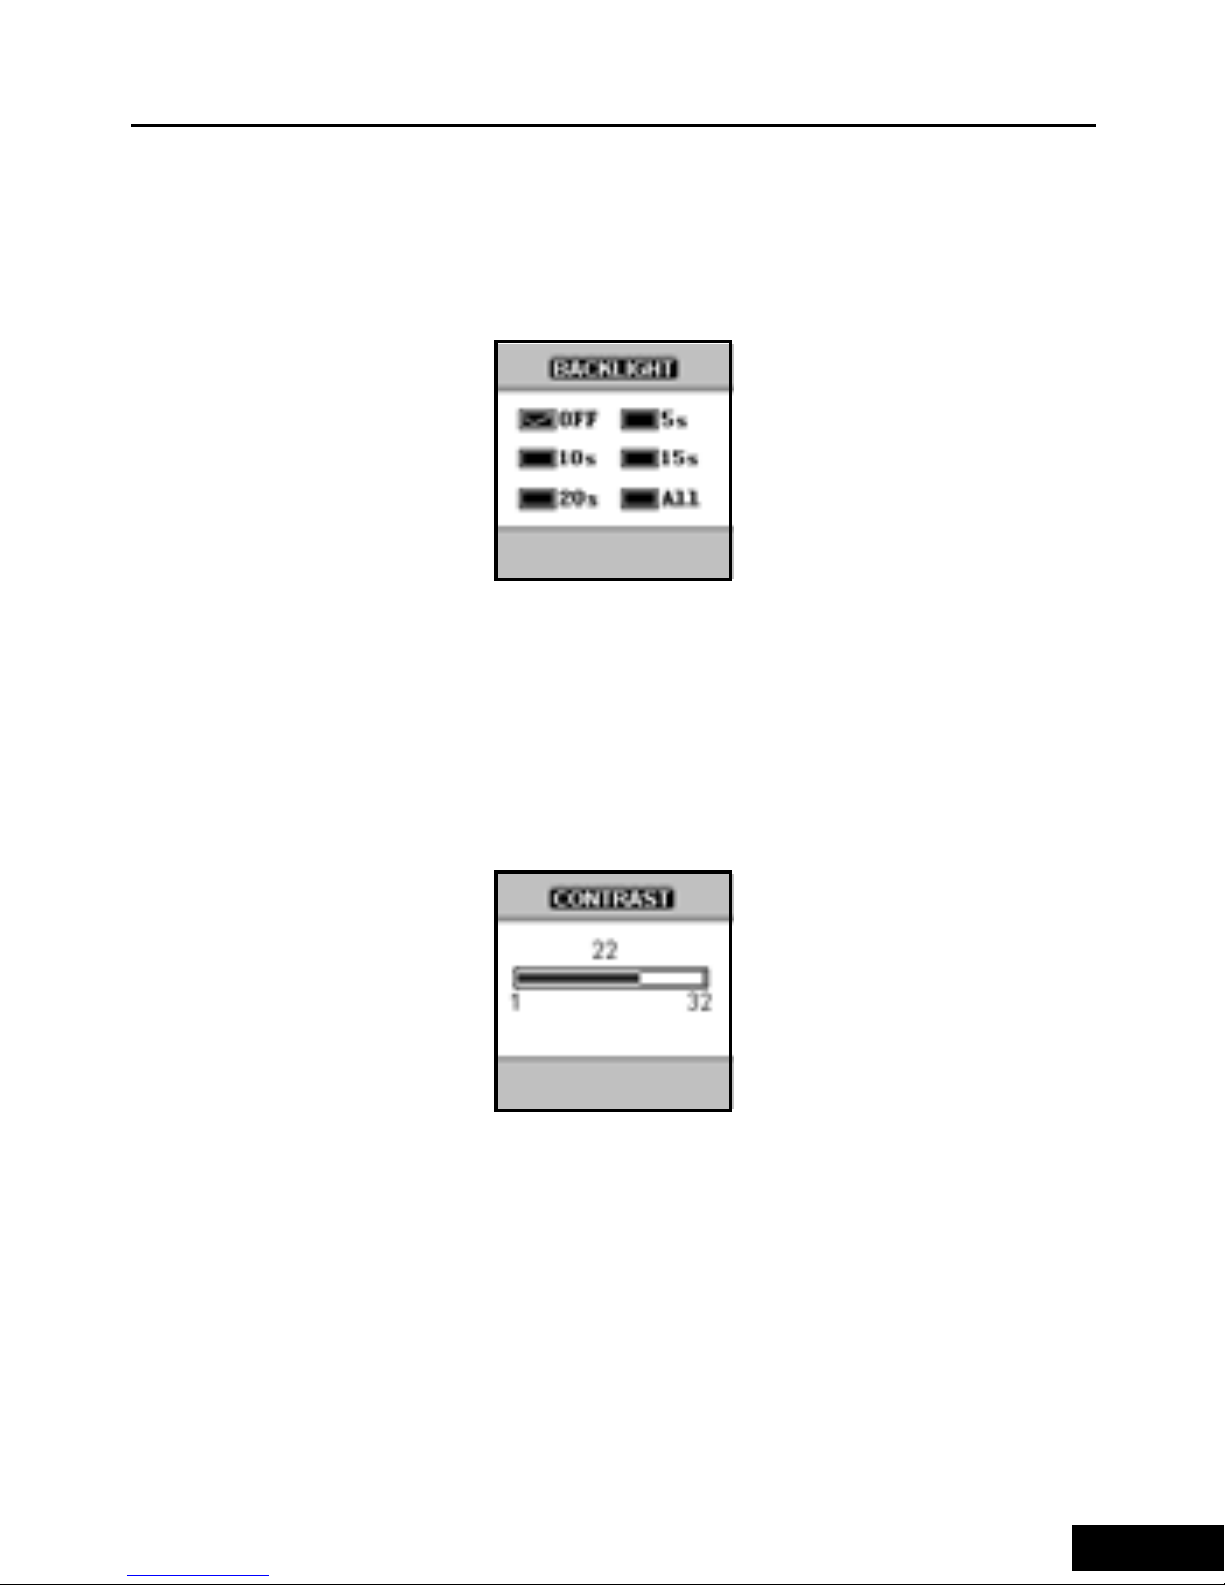
the mode switch as above. Use “Display/Backlight” to
set the backlight on time. When the player is idle, the
backlight will be off after the preset time duration. Press
Page 29
MusePod
27
the “Left/Right” button to select among “off/5 sec/10
sec/15 sec/20 sec/all”. “Off” means backlight off, all
means backlight always on. Press the “Menu” button to
confirm and return to the main menu.
Use “Display/Contrast” to set the contrast of the LCD
screen. Use the scroll bar to display the current value,
which is between 0 and 32. Press the “Left/Right”
button to increase or decrease the value. Press the
“Menu” button to confirm and return to the main menu.
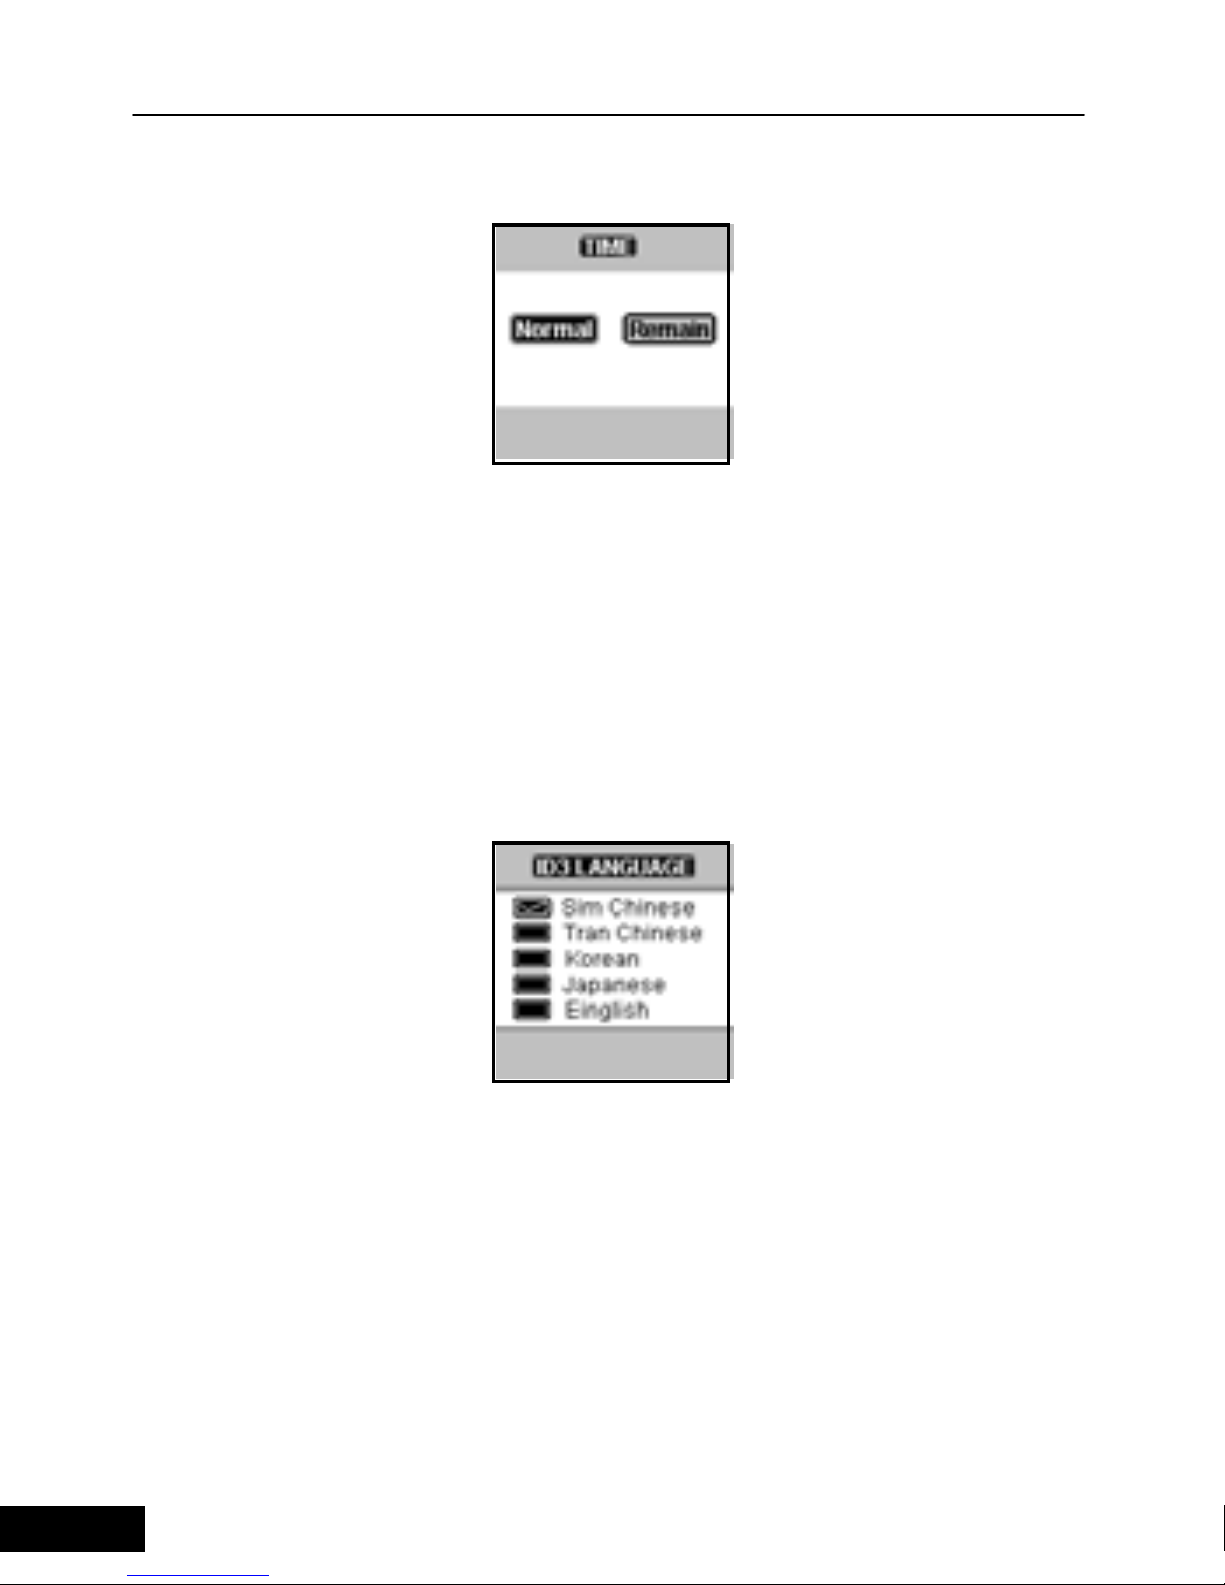
Use “Display/Time” to set the display method of the
playback time of the playback interface. “Normal”
means the time duration that has already elapsed in
playback. “Remain” means the remaining time in
playback. Press the “Left/Right” button to select. Press
the “Menu” button to confirm and return to the main
Page 30
English Manual
28
menu.
Use “Display/ID3 language” to set the display language
of ID3, which can be specified to simplified Chinese,
traditional Chinese, Japanese, Korean and English.
Press “Left/Right” button to make the selection,
press ”Menu” button to confirm and return to the main
menu. If you select Sim Chinese, the user interface will
change to Sim Chinese, others will not change.
Use “Setting/Auto Off” to set the auto off time whe n the
player is idle. Press the “Left/Right” button to select
among “OFF/1 min/2 min/5 min/10 min”. When “OFF” is
selected, the player will never be automatically turned
off. “1 min/2 min/5 min/10 min” means the player will be
automatically turned off after 1 min/2 min/5 min/10 min
when the player is in “Stop” or “Pause” status. Press
Page 31

MusePod
29
the “Menu” button to confirm and return to the main
menu.
Use “Setting/Speed” to set the ID3 scroll display speed.
Press the “Left/Right” button to select among
“1x/2x/3x/4x”. If the length of the ID3 information of a
music file exceeds the LCD screen display, then it will
be scrolled and displayed in 1x/2x/3x/4x. Press the
“Menu” button to confirm and return to the main menu.
Use “Setting/Fast Charge” to set fast charge or normal
charge. Press the “Right/Left” to turn the fast charge
on/off after entering the setting interface. When the fast
charge is selected, the battery can achieve 80%
capacity after 1-hour charge. Please refer to the
picture.
24
Page 32

English Manual
30
Use “Setting/EQ” to set the EQ mode. Press the
“Left/Right” to select among
“Normal/Rock/Classic/Jazz/User EQ”. When the User
EQ is selected, the vertical scroll bar at the bottom will
be highlighted in 1~5 parts. Press the “Left/Right”
button to switch among different diapason. Press the
“+/-” button to adjust the value of different diapason.
Press the “Menu” button to confirm and return to the
main menu. The user can set the playback EQ
according to the music type or your preference. 5
Page 33

MusePod
31
Use “Setting/Repeat” to set the playback repeat m ode.
There are following 9 types of repeat mode.
In Normal mode, “One Song” means to stop after
playing one song. The icon is
;
In Normal mode, “One Folder” means to stop after
playing all songs under one folder. The icon is
;
In Normal mode, “All Songs” means to stop after
playing all songs in the disk (by default). The icon is
;
In All mode, “One Song” means to play one song
repeatedly. The icon is
;
In All mode, “One Folder” means to play all songs
under one directory repeatedly. The icon is
;
In All mode, “All Songs” means to play all songs in the
disk repeatedly. The icon is
;
In Shuffle mode, “One Song” means to stop after
playing one song at random. The icon is
;
In Shuffle mode, “One Folder” means to stop after
playing all songs at random under one directory. The
icon is
;
In Shuffle mode, “All Songs” means to stop after
playing all songs at random in the disk. The icon is
;
Press the “Left/Right” button to switch among
Page 34

English Manual
32
“Normal/All/Shuffle”. Press the “+/-“ button to switch
among “One Song/One Folder/All Songs”. Different
icon displays when different playback mode is set,
press the “Menu” button to confirm and return to the
main menu.
26
Use “Setting/Bass Boost” to set the bass boost, which
is classified into 15 levels. After entering the setting
menu, press the “Right/Left” button to adjust the bass
boost level. Press the “Menu” button to confirm and exit
the setting menu.
Use “Setting/Treble Boost” to set the treble boost,
which is classified into 15 levels. After entering the
Page 35

MusePod
33
setting menu, press the “Right/Left” button to adjust the
treble boost level. Press the “Menu” button to confirm
and exit the setting menu.
27
Use “Setting/3D Effect” to set the 3D surrounding
effects. After entering the setting menu, press the
“Right/Left” button to set the surrounding or cancel.
Press the “Menu” button to confirm and exit the setting
menu
.
Use “Rec Setting/Enc Bitrate” to set the bitrate of
encoding, which ranges from 64Kpbs to 320Kbps and
is displayed by scroll bar. Press the “Left/Right” button
Page 36

English Manual
34
to increase and decrease. Press the “Menu” button to
confirm and return to the main menu.
Use “Rec Setting/Voc Bitrate” to set the sampling rate
of recording, which ranges from 32Kpbs to 128Kbps
and is displayed by scroll bar. Press the “Left/Right”
button to increase and decrease. Press the “Menu”
button to confirm and return to the main menu.
Rec Setting/Synchonrous
Use “Rec Setting/Synchronous” to set the synchronous.
After entering the setting menu, press the “Left/Right”
button to select to turn the Sync function on or off. If
Page 37

MusePod
35
“ON” is selected, then different songs will be recorded
to different files when using Line-In. If “OFF” is selected,
then all songs will be recorded to one file.
Use “Information” to display the information of the hard
drive, such as the total disk capacity, used space,
remaining space and the version of player. Press the
“Left” button to return to the main menu.
USB Host Function
With USB Host function, you can use the HDD MP3
player to read the files in other USB devices. When
using the USB Host cable to connect other device, the
message “Try to get device. Please Wait……” will
display. At the same time, the file that is currently being
played will be closed and enter the connection mode.
29
Page 38

English Manual
36
After the connection is established, the player will
display the file lists of the external USB Device. In the
first line, “Host” will display to replace the previous MP3
(REC, FM). In the list, the first line sho ws the name of
the device, followed by the directory and files in the
device. Press the “Left/Right” button to enter or exit the
directory. Press the “+/-” button to select the directory
or files under the current directory. Press and hold the
“Play” button after selecting an audio file will copy it to
the USB Data directory (this directory will be generated
by the player automatically). Press and hold the “A-B”
button will copy all files in the external USB Device to
the USBData directory. Different directories will be
created to contain the files in different devices. All files
in one device will be stored in one directory, as shown
below:
When copying files, the whole directory will be copied if
the folder is selected and switch to the copy screen.
Page 39

MusePod
37
After the copy is completed, it will return to the file list.
Before the copy starts, the player will check if the
remaining space is enough to contain the files to be
copied. If not, then “No Enough Space” will display. If
the player finds the folder to be copied is blank, then
“Error, No File” will display for 2 seconds and then
disappear. If there is a file with the same name in the
player, then “Overwrite? Yes No” will display. Use the
“Vol+/Vol-“ button to select “Yes/No”. Press the “Menu”
button to confirm and exit. After disconnecting and
returning to the file list of the player, the USBData
folder will display by default. At the same time, the Host
icon changes to MP3 icon.
Page 40

English Manual
38
Cautions
Avoid using the player in the following condition:
Excessive heat (above 40Degree);
Direct sunlight or heating appliances;
Humid environment such as bathroom;
Environment with too much dust;
Protection of the player:
Avoid falling off or shock;
The player can be used when you are walking or
running. However, falling off or shocking may cause
damage to the player.
Do not disassemble the player.
Hardware damage may be caused.
Do not plug into any foreign objects.
Short circuit may be caused to damage the player.
Use of earphone:
Excessive high volume may damage your hearing.
Please avoid continuous long-time playback in high
volume. If you feel any uncommon noise in you ear,
please lower the volume or take a rest.
Please do not wear the earphone when driving or
Page 41

MusePod
39
riding a bike. Accident may be caused. Stay
cautious or stop using the player in the danger
condition.
Troubleshooting
1. Buttons don’t work
Check if the “Hold” button is “On”. If yes, switch to
“Off” and try again.
2. LCD display error
Check if the proper language is selected in the “ID3
Language”.
3. Files cannot be downloaded after the player
connects to computer.
Check if the computer mainboard supports USB2.0
device. System upgrade may be needed.
If you are using Window 98 operation system, you
need to install the driver first.
Check if the player has free memory
4. The player cannot be charged.
Check if the AC adapter is properly connected.
The fully charged battery cannot be further charged.
Page 42

English Manual
40
5. The player cannot be powered on.
Check if the batter is charged.
6. There is noise in playback
Plug the earphone firmly. Check if the earphone pin
is dirty (clean with soft dry cloth). Or the MP3 file is
damaged.
7. File transfer to the player fails
Check the connection between the player and PC
Check the battery capacity.
8. The PC doesn’t work well sometimes when
connecting and disconnecting the player.
It’s mainly caused by plugging and unplugging the
USB port when in the file transmission. Therefore, it
is recommended not to disconnect the device during
the file transmission, to avoid any abnormality in the
PC end. Use the safe removal of device in the PC
end.
9. Some MP3 files cannot be played in the player.
As there are various compression format and
compression rate available, some music file formats
are not supported by the player. Usually the player
will skip these files. When you encounter files format
Page 43

MusePod
41
that are not supported, please take one of the
following two measures:
Delete the music files that are not supported.
Select the MPEG Layer 3 coding when
compressing.
10. “USB Device Error” displays when the USB Host
connects to USB device sometimes.
Currently, the USB Host function only supports the
standard USB Mass Storage devices. More
specifically, only the FAT/FAT16 Mass Storage
devices are supported. Otherwise, the system
will display the error message.
11. The hard drive MP3 player contains a 1.8 inch hard
drive. As the hard drive cannot be shocked,
therefore, please protect the hard drive from falling
off when in use.
12. When we encode MP3 file from other sound device,
why looks like pausing in recording?
Now if the other sound device did not have some
content or sounds, the HDD player will looks it
invalid sound source, it will work until it wait valid
sound.
13. How to deal with so many folder in the Hard disk?
Please do not copy different file to the default
Page 44

English Manual
42
folder, now there is 6 folders in default and also the
folder can not delete(if you delete, it will create
aumotically next times.)
Firmware folder is for existing firmware when you
want to update your player.
ENCODE folder for existing Encoding file from Line
In or FM radio.
Playlist folder for existing Playlist file.
USBDATA folder for existing USB host copying file.
VOISE RECORD folder for existing recording file
by MIC.
TEXTFILE folder for exsiting TXT file to view
e-book.
Page 45

MusePod
43
Accessory
Installation CD
User manual
Standard earphone
AC adapter
Line_IN cable USB cable
USB Device adapter USB adapter for
connecting to computer
Page 46

English Manual
44
Specification
Memory capacity 20G 1.8 inch Toshiba hard
drive (built-in)
Battery 1300 MAH/3.7 V
rechargeable lithium battery
LCD 128*128 4 gray scale display
with blue backlight
USB port USB2.0 high speed transfe
r
(16 Mbyte/s)
USB Host USB1.1 port (USB2.0 device
compatible)
FM channel range 87.5MHz-108.0MHz
Charge time Battery charge time:3 hours
(achieve 80% battery afte
r
1-hour fast charge)
Play time 12Hours playback only
SN rate 90Bb
Earphone output power 5MW+5MW
Output frequency range 20Hz-20KHz
Record bit rate 32Kbps-320Kbps
Music file format MP3,WMA
Record file format VOC,MP3
Support ID3 language of
the music file
Simplified Chinese,
traditional Chinese,Korean
Japanese,English
Support compression 8Kbps-320Kbps(MP3)/VBR
Page 47

MusePod
Wichtigste Produkteigenschaften
Mobiler Massenspeicher und Player
1.Dieser Player kann auch als mobile Festplatte verwendet werden (die
Speicherkapazität beträgt 20 GB). Unter WinMe/
2000/XP oder höher wird kein Treiber benötigt.
2.Einzigartige USB-Host-Funktionen
Der Festplatten-Player kann Dateien von anderen Standard-USB-Geräten
lesen
3.Hochgeschwindigkeitsdatenübertragung über USB 2.0
Standardschnittstelle, kompatibel mit USB 1.1
Der Festplatten-Player unterstützt USB 2.0 mit einer Datenübertragungsrate
von bis zu 20 Mbyte/Sek.
4.Großer LCD-Bildschirm mit hoher Auflösung - 128 x 128 Punktmatrix 4
Graustufen mit Hinterlicht
5.Unterstützt mehrere Musikformate:
MP3 (MP3 im VBR-Format unterstützt) und WMA (WMA im VBR-Format)
Praktische
6.Firmware-Aktualisierung
Über eine Firmware-Aktualisierung können die aktuellsten Funktionen
eingespielt werden.
Durch einen einfachen Aktualisierungsvorgang werden beispielsweise
neue Formate unterstützt; alle sonstigen Funktionen stehen permanent zur
Verfügung.
1
1
Page 48

German Manual
7.Unterstützt mehrsprachige ID3-Anzeige
Unerstützt verschiedene ID3-Sprachen, einschließlich vereinfachtes
Chinesisch, traditionelles Chinesisch, Japanisch, Koreanisch und Englisch
(auch für Westeuropa)
8.FM-Radio (87,5 MHz ~ 108,0 MHz)
Auto-Suchlauf und Speicherung bevorzugter Kanäle für benutzerfreundlichen
FM-Radioempfang.
10.Fünf Equalizer-Modi (EQ):
Normal, Klassik, Jazz, Rock und Benutzer-EQ zum Verbessern des
Musikerlebnisses.
11.Unterstützt 3D-Surround-Effekt, 15-stufige Tiefenverstärkung und 15-stufige
Höhenverstärkung für ein optimales Klangerlebnis
12.Einfache Dateinavigation
13.Die Verzeichnisbaumstruktur vereinfacht das Auffinden von Musikdateien
14.Bis zu 2000 Ordner und 9999 Dateien werden erkannt
15.Grafische Benutzeroberfläche
16.Aufnahme über Mikrofon oder Line_In
17.Lesezeichen-Funktion
18.Wiedergabelisten-Funktion
19.Unterstützt TXT-Dateinavigation über E-Book-Funktion
2
2
Page 49

MusePod
Inhaltsverzeichnis
Vorderansicht und Seitenansicht................................................................4-5
Ansicht von oben/unte n un d LCD... .... ............................ .... ..... .... ................5-6
Verwendung des Netzgeräts.....................................................................7-10
Laden..........................................................................................................7-8
Software-Installation......................................................................................8
Anschluss an einen Computer..................................................................9-10
Abschließen von einem Computer...............................................................10
Betrieb......................................................................................................1-12
Wiedergabe von Musik...........................................................................13-15
Abschnittswiederholung...............................................................................16
Navigieren....................................................................................................17
Moduswechsel.......................................................................................17-20
FM-Radioempfang.................................................................................21-22
Aufnahme...............................................................................................23-24
Menüfunktion..........................................................................................25-34
Verwendung der USB-Host-Funktion.....................................................34-36
Sicherheitshinweise................................................................................37-41
Problembehebung....................................................... ...........................38-40
Zubehör.......................................................................................................41
Technische Daten.......................................................................................42
3
3
Page 50

German Manual
Vorderansicht
4
4
Links
Menü
Stop/Aus
Wiedergabe/Pause
Ein
Rechts
LCD
Volume+
LADE-LED HDD-LED
Volume-
Down
Page 51

MusePod
5
5
Line-Eingang
Mikrofon-Anschluss
Kopfhöre
r
Netz-Eingang
USB-Host-Anschluss
Rücksetzloch
USB-Anschluss
A
-B/Aufnahme
SRS/Modus
Sperren
Page 52

German Manual
6
EQ-Lesezeichen
A
ktueller Modus
A
ktueller Ordne
r
Dateiname/ID3-Titel
ID3-Interpret
Abtastfre
q
uenz
Bitrate
Lautstärke
Wiedergabe -
fortschritt
A
kkuanzei
g
e
Lesezeichen
Wiederholungsmodus
Gesperrt
6
Page 53

MusePod
Verwendung des Netzgeräts
1.Es kann nur das mit dem Player mitgelieferte Netzgerät verwendet
werden.
Die Betriebsspannung des Netzgeräts beträgt 100/240 V, 50/60 Hz.
2.Schließen Sie das Netzgerät an die Buchse DC des Players und an eine
Steckdose an.
Aufladen
1.Bei eingeschaltetem Player zeigt die Akkuanzeige den Akkuladestand
des Players an. Ist der Ladestand gering, blinkt das Symbol. Nach einer
gewissen Blinkdauer schaltet das Gerät sich automatisch aus . Der Akku muss
umgehend gelad en werden, andernfalls ka nn der Play er nicht wei ter betrieben
werden. Bitte vergewissern Sie sich, dass der Akku ausreichend geladen ist,
bevor Sie den Player an ei nen C o mp uter anschließen, a ndernfalls kann keine
Verbindung zum Computer hergestellt werden.
2.Das Laden beginnt automatisch, sobald das Netzgerät an eine
Steckdose angeschlossen wird. Bei eingeschaltetem Gerät wird statt des
ursprünglichen Akkuanzeigesymbols das Netzanschlusssymbol angezeigt.
Das Symbol weist darauf hin, dass der Akku gerade geladen wird. Die rote
LED leuchtet konstant. Wird bei ausgeschaltetem Gerät geladen, leuchtet die
rote LED konstant. Ist der Akku vollständig geladen, erlischt die rote LED.
3.Sobald der Akku vollständig geladen ist, wird die Akkuanzeige als
ausgefülltes Symbol dargestellt, und die rote LED erlischt.
Ladezeit: etwa 3 Stunden (bei vollständig entleertem Akku)
7
7
Page 54

German Manual
Entladezeit (Wiedergabezeit): etwa 12 Stunden (maximale Wiedergabezeit
bei vollständig geladenem Akku)
Die angegebene Wiedergabezeit gilt für die Wiedergabe von MP3-Dateien mit
128 Kbps bei vollständig geladenem Akku (ohne andere Vorgänge).
Software-Installation
Windows 2000 und Windows XP unterstütz en USB 2.0 Spei chergeräte ( der PC
muss über einen USB 2.0 Anschluss verfügen, andernfalls wird mit USB 1.1
Standard übertragen), bei Windows 98 jedoch muss ein Treiber installiert werden.
Die Verwaltungssoftware für den Festplatten-Player und der Treiber sind
mitgeliefert. Nach abgeschlossener Installation können Sie den Player in Betrieb
nehmen.
Bitte legen Sie die CD in das CD-ROM-Laufwerk Ihres Computers ein. Sofern
Sie die Autostart-Funktion Ihres CD-ROM-Laufwerks nicht deaktiviert haben,
beginnt der Installationsvorgang automatisch. Befolgen Sie die
Bildschirmanweisungen, um die Installation abzuschließen. Falls Sie Win98 als
Betriebssystem verwenden, wird der Win98-Treiber für den Festplatten-Player
während der Installation automatisch eingerichtet.
Anschluss an den Computer
1.Halten Sie die Taste “Wiedergabe” gedrückt, um den Player einzuschalten.
(Achtung: Bitte vergewissern Sie sich, dass der Akku des Players ausreichend
geladen ist. Ist dies nicht der Fall, schließen Sie bitte das Netzgerät an, um die
Stromversorgung zu gewährleisten.)
2.Schließen Sie den Player mit dem USB-Kabel
8
8
Page 55

MusePod
ordnungsgemäß an den Computer an. Das größere Ende des USB-Kabels
sollte an den USB-Anschluss des Computers angeschlossen werden, das
andere Ende an den USB-Anschluss des Players.
Auf dem LCD-Bildschirm des Players erscheint folgende Anzeige:
3.Das Symbol “Gerät verbunden” wird unter Windows 2000 und Windows
XP in der Systemleiste angezeigt. (Unter Windows 98 ist eine
ordnungsgemäße Verbindung erst nach Installation des Treibers möglich.)
4.Nach erfolgter Installation wird unter Arbeitsplatz/Explorer ein
Wechsellaufwerk angezeigt. Die Dateien auf dem Festplatten-Player können
mittels Explor er oder der mitg elieferten Ver waltungssoftw are verwal tet werden.
Der Festplatten-Play er kann auch also nor ma l e Festpl a tte verwendet wer den,
d. h. Dateien können kopiert, gelöscht usw. werden.
Falls der Festplatten-Player längere Zeit an den Computer angeschlossen
bleiben soll, schließen Sie bitte das Netzgerät an. Bei zu geringem
Akkuladestand funktioniert der Player nicht ordnungsgemäß.
(Ist der Akkustand beim Anschließen an einen PC zu gering, kann der
Player keine erfolgreiche Verbindung herstellen.)
9
9
Page 56

German Manual
Verwendung der Verwaltungssoftware
Wenn Sie die Verwaltungssoftware installieren, können Sie sie verwenden, um
Ihren Festplatten-Player zu verwalten.
1.Schalten Sie den Player ein und schließen Sie ihn an den PC an. Bitte
starten Sie die Verwaltungssoftware, nachdem der PC das Gerät gefunden hat.
2.Sie können die S oftware v erwenden, u m die Wiedergabeliste z u bearbei ten.
3.Sie können die Software verwenden, um die Spracheinstellung zu ändern.
4.Sie können die Software verwenden, um Dateien an und von Ihrem
Festplatten-Player zu übertragen.
Die Software verfügt über eine Online-Hilfe, die Ihnen die Verwendung der
Software erläutert.
Abschließen vom Computer
Verwenden Sie die Funktion “Sicheres Entfernen von Hardware”, um den
Player vom Computer abzuschließen, indem Sie auf das Symbol rechts unten in
der Symbolleiste des PCs doppelklicken und “Hardware sicher entfernen”
auswählen. Sobald das System die Meldung “Hardware sicher entfernt” anzeigt,
kann das USB-Kabel des Players vom Computer abgeschlossen werden.
Achtung:
Schließen Sie den Player nicht vom Computer ab, wenn der Player gerade
arbeitet.
Der Player sollte erst abgeschlossen werden, nachdem das Übertragen von
Dateien abgeschlossen ist.
10
10
Page 57

MusePod
Betrieb
Betrieb:
Basisfunktionen
1.Einschalten Halten Sie die Taste
"Wiedergabe/Pause/Ein" gedrückt
2.Wiedergabe/Pause Drücken Sie im Wiedergabemodus die
Taste “Wiedergabe/Pause/Ein”.
3.Wiedergabe beenden Drücken Sie die Taste “Stop/AUS”.
4.Schnellvorlauf Halten Sie im Musikwiedergabemodus
die Taste “Rechts” gedrückt.
5.Schnellrücklauf Halten Sie im Musikwiedergabemodus
die Taste “Links” gedrückt.
6.Vorigen Titel wiedergeben Drücken Sie im Musikwiedergabemodus
die Taste “Rechts”.
7.Nächsten Titel wiedergeben
Drücken Sie im Musikwiedergabemodus
die
Taste “Links”.
8.Ausschalten
Halten Sie die Taste “Stop/AUS ”
gedrückt.
9.Lautstärkeregelung
Drücken Sie im Musikwiedergabe- oder
FM-
Modus die Taste “+/-”.
10.Dateiauswahl
Drücken Sie im Dateinavigationsmodus
die Tasten “Rechts/Links/+/-/ Menü”
11
11
Page 58

German Manual
Drücken Sie die Taste “Menü”, um in den
Dateinavigationsbildschirm zu gelangen.
Drücken Sie die Taste “Rechts”, um einen
Ordner zu öffnen oder eine Datei auszuwählen.
Drücken Sie die Taste “Links”, um das aktuelle
Verzeichnis zu ver lassen. Drücken Sie die Taste
“+/-”, um eine andere Datei oder einen anderen
Ordner auszuwählen und drücken Sie die Taste
“Menü”, um Ihre Auswahl zu bestätigen.
1.Moduswechsel Halten Sie die Taste “Modus” gedrückt, um
den Moduswechsel aufzurufen.
2.Abschnittsdefinition Drücken Sie die Taste “A-B”.
3.Aufnahme Halten Sie die Taste “A-B” gedrückt.
4.Menüanzeige Halten Sie die Taste “Menü” gedrückt.
5.Sperrtaste Ein/Aus
12
12
Page 59

MusePod
Wiedergabe von Musik
1.Schließen Sie den Kopfhörer an.
2.Lösen Sie die Sperrtaste
3.Halten Sie die Taste “Wiedergabe/Pause/Ein” 2 Sekunden lang
gedrückt, um den Player einzuschalten. Der Begrüßungsbildschirm wird
angezeigt. Nach dem Einlesen der Systeminfo rmationen wird die Dateiliste
angezeigt. (Au fgr und d es D ur chsuchens der Festpl at te kann dieser Vor g ang
einige Zeit in Anspruch nehmen.)
4.Titelauswahl: Drücken Sie die Taste “Menü”, um den
Dateinavigationsmodus aufzurufen. Wählen Sie Ordner oder Dateien durch
Drücken der Taste “R echts/Links /+/-” aus un d drücken Sie die Tas te “Menü” ,
um einen Ordn er zu öff nen oder ei ne Datei zur Wiedergabe ausz uwählen. I m
Dateinavigationsmodus erfüllen die Tasten folgende Aufgaben:
“Rechts”-Auswahl der Funktion, “Links” -Verlassen des aktuellen Ordners,
“+”- Auswahl na ch oben, “-” - A uswahl nach unten, “Menü” - B estätigen de r
Funktion.
13
13
Page 60

German Manual
Nach Auswahl eines Titels beg innt di e Wiedergabe des Titels. Drücken Sie
die Taste “Wiedergabe/Paus e/Ein”, um die Wiedergabe anz uhalten. Drücken Sie
die Taste erneut, um die Wiedergabe fortzusetzen. Auf dem
Wiedergabebildsc hi r m w er den Infor mati on en über den aktuellen Titel angezeigt.
Folgende Informati one n w erden i m Wiederg abemod us angez eig t: die erst e Zeile
zeigt den Ordner, in dem der aktuelle Titel sich befindet; die zweite Zeile zeigt
den Namen des Titels (Falls der Titel über ID3-Informationen verfügt, wird
zunächst einmal der Titelname, danach der ID3-Titel angezeigt); die dritte Zeile
zeigt den ID3-Interpreten an (Siehe LCD)
Ordnername
Titelname oder ID3-Titel
ID3-Interpret des Titels
Wiedergabefortschritt
5.Lautstärkeregelung: Drücken Sie die Taste “+”, um die Lautstärke zu
erhöhen bzw. die Taste “-”, um die Lautstärke zu verringern. Der Wert in dem
Symbol rechts zeigt die aktuelle Lautstärke an.
14
14
Page 61

MusePod
6.Halten Sie während der Wiedergabe di e Taste “ R echts” gedrückt, um
den schnellen Vorl auf zu aktiv ieren. Drücken Sie die Taste “Rechts” , um zum
nächsten Titel zu wechseln. Halten Sie die Taste “Links” gedrückt, um den
schnellen Rücklauf zu aktivieren und drücken Sie die Taste “Links”, um zum
vorigen Titel zu wechseln.
7.Drücken Sie die Taste “Stop”, um die Wiedergabe zu beenden und
zur Dateiliste zurückzukehren.
8.Halten Sie die Taste “Stop” gedrückt, um den Player auszuschalten.
Der Ausschaltebildschirm wird angezeigt.
Ist die Taste “Sperren” aktiviert, wird das entsprechende Symbol
angezeigt, und sämtliche Tasten des Players sind deaktiviert.
Im Stopmodus können Sie im Einstellungsmenü die Zeit für das
automatische Abschalten bestimmen. Der Player schaltet sich nach Ablauf
der eingestellten Zeit automatisch aus.
15
15
Page 62

German Manual
Abschnittswiederholung
Sie können während der Wiedergabe die Abschnittswiederholfunktion
verwenden, um einen bestimmten Abschnitt des Titels zu wiederholen. Drücken
Sie im Wiedergabemodus die Taste “A-B”, um den Startpunkt festzulegen (Punkt
A).
Drücken Sie während der Wiedergabe die Taste “A-B” erneut, um den
Endpunkt festzulegen (Punkt B).
Der Player wiederholt den Abschnitt zwischen den Punkten A und B.
16
16
Page 63

MusePod
Navigieren
Drücken Sie zunächst die Taste “Menü” und verwenden Sie anschließend
die Taste “Rechts/Li nks/+/ -”, um einen Titel zu such en und auszuw ählen. Sobald
eine Audiodatei ausgewähl t wurde, ruft der Pl ayer den Wiedergabebi ldschirm auf.
Dateien, die keine Audiodateien sind, werden auf dem LCD-Bildschirm nicht
angezeigt.
Drücken Sie die Taste “Menü” oder “Rechts” , um einen Unterordner zu
öffnen. Drücken Sie die Taste “Links”, um in den übergeordneten Ordner
zurückzukehren. Sobald das Stammverzeichnis erreicht ist, geht es nicht
mehr weiter.
3. Moduswechsel
Halten Sie die Taste “Modus” gedrückt oder verwenden Sie das Menü,
um den Moduswechsel aufzurufen.
Drücken Sie die Taste “+/-”, um zwischen den sechs Modi MP3, FM,
Aufnahme, Datensicherung, Wiedergabeliste und E-Book zu wechseln.
Drücken Sie die Taste “Links”, um den Modusbildschirm zu verlassen.
Drücken Sie
17
17
Page 64

German Manual
nach Auswahl des entsprechenden Modus die Tasten “Menü” oder “Rechts”, um
den Moduswechsel z u bestätigen. Drücken Si e die Taste “Stop”, um den Modus zu
verlassen und zur Dateiliste zurückzukehren.
2.USB-Daten-Navigationsmodus:
Wenn Sie den Modus Datensicherung aufrufen, sehen Sie die Dateien im
Verzeichnis USB Data, die von einem mi t de m U SB- H ost-Anschluss verbunde nen
Gerät stammen. Wenn Sie das angeschlossene USB-Gerät mit Hilfe der
USB-Host-Funktion sichern, können Sie die gesicherten USB-Daten durch
Auswahl dieser Opti on anzeig en. Siehe nach folgende Abbil dung. (Hinw eis: Derzeit
wird nur die Verbindung mit USB-Massenspeichergeräten unterstützt, die als
Speicherformat FAT oder FAT16 aufweisen. Andernfalls zeigt das System
“ Gerätef ehler” an.)
18
18
Page 65

MusePod
Wiedergabeliste:
Der Player bietet eine Wiedergabelistenfunktion, d. H. Sie können für die
Wiedergabe eine Liste Ihrer Lieblingslieder zusammenstellen. Wählen Sie den
Modus Wiedergabeliste, um eine Übersicht der Wiedergabelisten aufzurufen,
eine Wiedergabeliste auszuwählen und diese wiederzugeben.
Hinzufügen und Löschen von Titeln in die BMK-Liste oder Wiedergabeliste
Sie können Wiedergabelistendateien mit W inamp oder W inrip bearbeiten.
Die Dateien können in den Wiedergabelistenordner auf der Festeplatte abgelegt
werden, damit Sie die Wiedergabelisten verwenden können. Sie können die
Wiedergabelistenfunktion auch auf dem Player bearbeiten. Es steht eine
Standard-Wiedergabeliste (BMK-Liste) auf dem Player zur Verfügung. Sie
können im Navigationsmodus (drücken Sie die Taste “Menü”, um den
Dateinavigationsmodus aufzurufen) Titel auswählen, die der BMK-Liste
hinzugefügt werden sollen. Halten Sie die Taste “Wiedergabe” gedrückt, um die
Auswahl abzuschließen. Der in die Wiedergabelist aufgenommene Titel wird wie
unten dargestellt angezeigt:
19
19
Page 66

German Manual
In der obigen Abbi ld ung zeigen die SY M BOL E an, dass die Titel Fl o wer und
Yesterday der Wiedergabeliste hinzugefügt wurden. Sie können Titel auch aus
der Wiedergabeliste löschen, indem Sie den entsprechenden Titel der
Wiedergabelist auswählen und die Taste “Play” gedrückt halten, um ihn aus der
Wiedergabeliste z u entfernen. Wenn Sie nun den Modus Wiedergab elist aufrufen
und eine Wiedergabeliste auswählen, werden stets alle Titel in der
Wiedergabeliste wiedergegeben.
E-Book-Funktion:
Sie können TXT-Dateien in den Ordner TEXTFILE des
Stammverzeichnisses der Festplatte speichern und anschließend ein E-Book
anzeigen, indem Sie die Option “Text viewer [Textbetrachter]” auswählen
(Hinweis: Ein E-Book kann direkt in den Ordner TextFile kopiert werden, jedoch
sollte die Größe 64 Kbytes nicht übersteigen). Nach Aufruf des Moduswechsels
können Sie den Modus “Text Viewer [Textbetrachter]” auswählen. Drücken Sie
die Taste “+/-”, um die Textdatei auszuwählen, die Sie lesen möchten. Drücken
Sie die Taste “Menü”, um den Navigationsmodus aufzurufen. Drücken Sie die
Tasten “+/-/Rechts/Links”, um im E-Book aufwärts oder abwärts zu blättern. Um
in den Navigationsmod us für Textdatei en zurückzukehren, dr ücken Sie die Taste
“Menü”.
20
20
Page 67

MusePod
FM-Radioempfang
Rufen Sie den Modus FM über den Moduswechsel auf:
3. Sollte die Voreinstellung ungültig sein, können Sie die Tasten
“Rechts/Links” drücken , um den aktuelle n Kanal in Schritt en von 0,05
MHz anzupassen. Drücken Sie die Taste “+/-”, um die Lautstärke
einzustellen. Halten Sie die Taste “Rechts/Links” gedrückt, um
automatisch nach dem nächsten gültigen Kanal zu suchen.
2.Sollte die Voreinstellung ungültig sein, können Sie die Tasten
“Rechts/Links” drücken, um zum nächsten/vorigen gespeicherten Kanal zu
wechseln.
3.Funktion Auto-Suchlauf: Halten Sie die Taste “Wiedergabe” im
FM-Modus gedrückt, um den Auto-Suchlauf zu aktivieren. Der Player
speichert die ersten 2 0 Ka näle auto matisch al s CH01 bis CH20. Die Anz eig e
“ VOREINSTELLUNG” wechselt zu “Auto-Suchlauf”, und die Kanäle werden
automatisch durchsucht. Nach Ende des Suchlaufs wechselt die Anzeige
“ Auto-Suchlauf” automatisch zurück zu “ VOREINSTELLUNG”. (Bitte
schließen Sie den Kopfhörer an, wenn Sie automatisch nach Kanälen
suchen. Im FM-Modus fungiert der Kopfhörer als Antenne.)
21
21
Page 68

German Manual
4.Drücken Sie die Taste “Menü”, um zwischen den Modi Voreinstellung und
manueller Suc hlauf zu w echseln. Sie können Kanäle nach Belieben einstel len oder
nicht gewünschte Kanäle löschen. Nach Wechseln in den manuellen Suchlauf,
verschwindet die Anzeige “PRESET [VOREINSTELLUNG]”.
5.Drücken Sie im man uellen Suchlau fmodus die Taste “R echts/Links”, um i n
Schritten zu 0,0 5 M Hz vorwärts bzw. R ückwärts zu suchen. Halten Si e di e Taste
“Rechts/Links” gedrückt, um automatisch zum nächsten Kanal zu gelangen. Ist
ein gefundener Kanal noch nicht gespeichert, können Sie die Taste “Modus”
drücken, um den K anal zu speichern. In diesem Fall er scheint nach dem Drücken
der Taste “Modus” die Anz eige “Memory [Speicher]” anstelle der Anz eige “Preset
[Voreinstellung]”. Drücken Sie die Tasten “Rechts/Links”, um den Speicherort
von CH01 bis CH20 auszuwählen. Drücken Sie die Taste “Modus”, um Ihre
Auswahl zu bestätigen. Die Anzeige “Memory [Speicher]” verschwindet, und der
Speichervorgang ist abgeschlossen.
Wenn Sie im FM-Modus die Taste “A-B” gedrückt hallten, können Sie
FM-Radio aufzeichnen. Der folgende Bildschirm wird angezeigt. Wenn Sie die
Taste A-B erneut drücken, können Sie die Aufnahme anhalten.
Um die Aufnahme zu beenden, drücken Sie die Taste “Stop”, wodurch Sie in
den FM-Modus zurückkehren.
22
22
Page 69

MusePod
Aufnahme
Rufen Sie den Aufnah mebildschi rm über de n Modusw echsel oder d urch
Gedrückthalten der Ta ste “ A- B” auf. Der folgende Bi ldschi r m wird angezeig t.
3. Halten Sie die Taste “A -B” gedr ückt, um de n Au fnahmebildsc hirm
direkt aufzurufen. (Ist am Anschluss “Line-In” ein anderes
Wiedergabegerät angeschlossen, wird das Signal dieses
Anschlusses als MP3-Datei aufgezeichnet. Andernfalls wird als
Eingangsquelle der Anschluss MIC herangezogen). Drücken Sie
die Taste “Aufnahme”, um die Aufnahme anzuhalten. Drücken
Sie die Taste erneut, um di e Aufnahme fortz usetzen. Drücken Sie
die Taste “Stop”, um die Aufnahme zu beenden. Auf dem
Bildschirm wird “Waiting [Bitte warten]” angezeigt, während der
Player die aufgezeichnete Datei erstellt. Wenn Sie anschließend
in die Dateiliste zurückkehren, wird darin die soeben
aufgezeichnete Datei angezeigt. Wird eine Datei im MP3-Format
aufgezeichnet, wird Sie in das Verzeichnis “RECORD\ENCODE”
gespeichert. Wird eine Datei im VOC- For mat aufgez eichnet, w ird
die Datei in das Verzeichnis “RECORD\VOICERECORD”
gespeichert.
2.Die Wiedergabe aufgezeichneter Dateien erfolgt wie die Wiedergabe
gewöhnlicher Musiktitel. Schalten Sie über den Moduswechseln in den
Modus “AUFNAHME” und wählen Sie die aufgezeichnete Datei oder
Musikdatei aus, die wiedergegeben werden soll.
3Halten Sie im FM-Modus die Taste “A-B/Aufnahme” gedrückt, um den
Aufnahmemodus aufzurufen. Danach können Sie das aktuelle
FM-Radioprogramm aufzeichnen. Drücken Sie die Taste “Stop”, um
23
Page 70

German Manual
in den FM-Modus zurückzukehren.
4.Um von anderen Quellen aufzuzeichnen, verbinden Sie bitte die Buchse
LINE_IN mit der Buchse LINE_OUT oder dem Kopfhöreranschluss des externen
Geräts, indem Sie die mitgel ieferten Anschl usskabel verw enden und h alten Sie di e
Taste “A-B” gedrückt, um mit der Aufnahme zu beginnen. Ist die Option
“Synchronous [Synchron]” unter “Rec Setting [Aufnahmeeinstellungen]” auf “On
[Ein]” eingestellt, werden zwei aufeinanderfolgende Titel automatisch getrennt,
während sie als MP3-Dateien aufgenommen werden.
Vor Beginn der Aufnahme prüft der Player, ob genug freier Speicherplatz
vorhanden ist. Sollte dies nicht der Fall sein, zeigt der Player “No Enough Space
[Zu wenig Speicher]” an. Wird unter “Memory [Speicher]” “100%” angezeigt, steht
die Aufnahmefunktion nicht zur Verfügung.
Siehe “Rec Setting [Aufnahmeeinstellungen]” des Menüs für detaillierte
Aufnahmeeinstellungen.
Über die Schnittstelle LINE_IN können Sie von einem CD- oder MP3-Player
aufnehmen. Bitte vergewissern Sie sich, dass das externe Gerät im
Wiedergabemodus i st, bevor die Aufnahm e b eg innt. ( Es wird empfohlen, w ähr en d
der Aufnahme auf volle Lautstärke zu drehen.)
24
A
btastfrequenz, Bitrate und
A
usgabe-Dateiformat (MP3, VOC)
Speichernutzun
g
A
ktueller Ordne
r
Dateiname
A
ufnahmezeit
24
Page 71

MusePod
3.Menüfunktion
Halten Sie die Taste “Menü” gedrückt, um das Menü aufzurufen. Es gibt 5
Hauptmenüs und 3 Untermenüs. Drücken Sie die Taste “+/-”, um zwischen den
Menüpunkten z u w echsel n. D rücken Sie die Taste “Rechts” oder “ M enü” , u m ei n
Untermenü auszuwählen oder aufzurufen. Drücken Sie die Taste “Links”, um
zum übergeordnet en Menü z urückz ukehren bzw . die Taste “Sto p”, um d as Menü
zu verlassen. Nach Aufrufen des Menüs können Sie Einstellungen vornehmen.
Hauptmenü
Untermenüs
Die Menüpunkte unt er “Modus” sind dieselbe n wie durch Gedrückthal ten
der Taste “Modus”. Bitte lesen Sie hierzu oben unter Moduswechsel nach.
25
25
Page 72

German Manual
Verwenden Sie “D ispla y/Backlig ht [Anzeig e/Hinterli cht]”, um die Hint erlic htzeit
einzustellen. Ist der Player untätig, wird das Hinterlicht nach der voreingestellten
Zeit ausgeschaltet. Drücken Sie die Tasten “Links/Rechts”, um zwischen “Off
[Aus]/5 sec [5 Sek]/10 sec [10 Sek]/15 sec [15 Sek]/20 sec [Sek]/All [Immer ein]”
auszuwählen. “Off [Aus]” bedeutet, das Hinterlicht ist immer ausgeschaltet, "All
[Immer ein]" bedeutet, das Hinterlicht bleibt immer eingeschaltet. Drücken Sie die
Taste “Menü”, um Ihre Auswahl zu bestätigen und ins Hauptmenü
zurückzukehren.
Verwenden Sie “Display/Contrast [Anzeige/Kontrast]”, um den Kontrast des
LCD-Bildschirms einzustellen. Verwenden Sie die Scrollleiste, um einen Wert
zwischen 0 und 32 einzustellen. Drücken Sie die Tasten “Links/Rechts”, um den
Wert zu erhöhen bzw. zu verringern. Drücken Sie die Taste “Menü”, um Ihre
Auswahl zu bestätigen und ins Hauptmenü zurückzukehren.
Verwenden Sie “Display/Time [Anzeige/Zeit]”, um den Anzeigemodus der
Wiedergabezeit auf dem Wiedergabebildschirm einzustellen. “Normal” steht für
26
Page 73

MusePod
für die Anzeig e der bereits v erstrichenen Wiedergabezei t. “ Verbleibend” steht für
die Anzeige der verbleibenden Wiedergabezeit. Drücken Sie die Taste “+/-”, um
Ihre Auswahl vorzunehmen. Drücken Sie die Taste “Menü”, um Ihre Auswahl zu
bestätigen und ins Hauptmenü zurückzukehren.
Verwenden Sie “Display/ID3 language [Anzeige/ID3-Sprache]”, um die
ID3-Anzeigesprache einzustellen. Es kann zwischen vereinfachtem
Chinesisch, traditionellem Chinesisch, Japanisch, Koreanisch und Englisch
gewählt werden. Drücken Sie die Taste “Links/Rechts”, um Ihre Auswahl zu
treffen und anschließend die Taste “Menü”, um Ihre Auswahl zu bestätigen
und ins Hauptmenü zurückzukehren. Diese Einstellung ist überwiegend für
die ID3-Anzeige vorgesehen. (Wenn Sie beispielsweise vereinfachtes
Chinesisch einstellen, wechselt die Benutzeroberfläche in vereinfachtes
Chinesisch, andere Auswahlmöglichkeiten ändern sich nicht.)
27
27
Page 74

German Manual
Verwenden Sie “Setting/Auto Off [Einstellungen/Autom. Aus]”, um die
automatische Ausschaltzeit bei Untätigkeit des Players einzustellen. Drücken Sie
die Tasten “Links/Rechts”, um zwischen “OFF [AUS]/1 min [1 Min]/2 min [2 Min]/5
min [5 Min]/10 min [10 M i n]” ausz uw ähl en. Wird “OFF [AUS]” gewählt, schalte t der
Player sich nie automatisch aus. “1 min [1 Min]/2 min [2 Min]/5 min [5 Min]/10 min
[10 Min]” bedeutet, dass der Player sich automatisch abschaltet, wenn er 1 Min/2
Min/5 Min/10 Min im Modus “Stop” oder “Pause” war. Drücken Sie die Taste
“Menü”, um Ihre Auswahl zu bestätigen und ins Hauptmenü zurückzukehren.
Verwenden Sie “Setting/Speed [Einstellungen/Geschwindigkeit]”, um die
ID3-Scrollgeschw indigkeit einzustel len. Drücken Sie die Tasten “Links/Rechts”, um
unter “1x/2x/4x/8x” auszuwählen. Überschreitet die ID3-Information einer
Musikdatei die LCD-Bildschirmgröße, wird sie gescrollt und in1x/2x/4x/8x
Geschwindigkeit angezeigt. Drücken Sie die Taste “Menü”, um Ihre Auswahl zu
bestätigen und ins Hauptmenü zurückzukehren.
Verwenden Sie “Setting/Fast Charge [Einstellungen/Schnellladen]”, um
28
28
Page 75

MusePod
schnelles oder normales Laden des Akkus einzustellen. Drücken Sie nach dem
Aufrufen des Einstellungsbildschirms die Tasten “Rechts/Links”, um die
Schnellladefunktion ein- oder auszuschalten. Wenn die Schnellladefunktion
aktiviert ist, kann der Akku mit 1 Stunde Ladezeit zu 80 % Kapazität geladen
werden. Siehe Abbildung.
Verwenden Sie “Setting/EQ [Einstellungen/EQ]”, um den EQ-Modus
einzustellen. Drücken Sie die Tasten “Links/ Rechts”, um zwischen
“Normal/Rock/Classic [Klassik]/ Jazz/User EQ [Benutzer-EQ]” auszuwählen.
Wird User EQ [Benutzer-EQ[ ausgewählt, werden im unteren Bildschirmteil
die Regler 1 - 5 angezeigt. Drücken Sie die Taste “Links/Rechts”, um
zwischen den verschiedenen Reglern zu wechseln. Drücken Sie die Taste
“+/-”, um den Wert des entsprechenden Reglers anzupassen. Drücken Sie
die Taste “Menü”, um Ihre Auswahl zu bestätigen und ins Hauptmenü
zurückzukehren. Sie können den Wiedergabe-EQ je nach Musikstil oder
Ihren persönlichen Vorlieben einstellen.
29
29
Page 76

German Manual
Verwenden Sie “ Einstellungen/Wiederholung”, um den W iederholungsmodus
für die Wiedergabe einzustellen. Die folgenden 9 Wiederholmodi stehen zur
Auswahl.
Im Modus Norm al bedeutet “ Ein Lied”, dass nach der Wiedergabe ei nes Liedes
angehalten wird. Das Symbol ist ;
Im Modus Normal bedeutet “ Ein Ordner”, dass nach der W iedergabe aller
Lieder eines Ordners angehalten wird. Das Symbol ist ;
Im Modus Normal bedeutet “All Songs [Alle Lieder]”, dass nach der
Wiedergabe aller Lieder auf der Festpl att e angehalten wir d (S tand ar deinstellung).
Das Symbol ist ;
Im Modus Alle bedeutet “ Ein Lied”, dass ein Lied wiederholt wiedergegeben
wird. Das Symbol ist ;
Im Modus Alle bedeutet “ Ein Ordner”, dass alle Lieder eines Ordners
wiederholt wiedergegeben werden. Das Symbol ist ;
Im Modus Alle bedeutet “ Alle Lieder”, dass alle Lieder auf der Festplatte
wiederholt wiedergegeben werden. Das Symbol ist ;
Im Modus Zufall bedeutet “ Ein Lied”, dass nach der Wiedergabe eines zufällig
gewählten Liedes angehalten wird. Das Symbol ist ;
Im Modus Zufall bedeu tet “ Ein Ordner ”, dass nach der Wiedergabe all er Lieder
eines Ordners in zufälliger Reihenfolge angehalten wird. Das Symbol ist ;
Im Modus Zufall bedeu tet “ All e Lieder” , dass nach der Wiedergabe aller Lied er
auf der Festplatte in zufälliger Reihenfolge angehalten wird. Das Symbol ist ;
Drücken Sie die Tasten “Links/Rechts”, um zwischen “Nor-
30
30
Page 77

MusePod
mal/ Alle/ Zufall” zu wechseln. Drücken Sie die Taste “+/-”, um zwischen
“ Ein Lied/ Ein Ordner/ Alle Lieder” zu wechseln. Die verschiedenen Symbole
zeigen an, welcher Wiedergabemodus eingestellt ist. Drücken Sie die Taste
“Menü”, um Ihre Auswahl zu bestätigen und ins Hauptmenü zurückzukehren.
Verwenden Sie “Setting/ Einstellungen/Tiefenverstärkung”, um die
Tiefenverstärkung i n 15 Stufen einzustell en. Drücken Si e nach de m Aufrufen d es
Einstellungsmenüs die Tasten “Rechts/Links”, um die Tiefenverstärkungsstufe
einzustellen. Drücken Sie die Taste “Menü”, um Ihre Auswahl zu bestätigen und
das Einstellungsmenü zu verlassen.
Verwenden Sie “Setting/Treble Boos t [Ei nstellungen/Höhenverstärkung]”, um
die Höhenverstärkung in 15 Stu fen einz ustell en. Drück en Si e n ach dem Au fru fen
des Einstellungsmenüs die Tasten “Rechts/Links”, um die
31
31
Page 78

German Manual
Höhenverstärkungsstufe einzustellen. Drücken Sie die Taste “Menü”, um Ihre
Auswahl zu bestätigen und das Einstellungsmenü zu verlassen.
Verwenden Sie “ Einstellungen/3D-Effekt”, um 3D-Surround-Effekte
einzustellen. Drücken Sie nach dem Aufrufen des Einstellungsmenüs die
Tasten “Rechts/ Links”, um den Surround-Effekt zu aktivieren oder um
abzubrechen. Drücken Sie die Taste “Menü”, um Ihre Auswahl zu bestätigen
und das Einstellungsmenü zu verlassen.
Verwenden Sie “ Aufnahmeeinstellungen/Codier-Bitrate”, um die Bitrate
für das Codieren einzustellen, die von 64 Kbps bis 320 Kbps reicht und als
Scrollleiste angezeigt wird. Drücken Sie die Tasten “Links/Rechts”, um den
Wert zu erhöhen oder zu verringern. Drücken Sie die Taste “Menü”, um Ihre
Einstellung zu bestätigen und ins Hauptmenü zurückzukehren.
32
32
Page 79

MusePod
Verwenden Sie “ Aufnahme einstellung en/Voc-Bi trate”, um die Abtastr ate für
die Aufnahme einzustellen, die von 32 Kbps bis 128 Kbps reicht und als
Scrollleiste angezeigt wird. Drücken Sie die Tasten “Links/Rechts”, um den Wert
zu erhöhen oder zu verringern. Drücken Sie die Taste “Menü”, um Ihre Auswahl
zu bestätigen und ins Hauptmenü zurückzukehren.
Aufnahmeeinstellungen/Synchron
Verwenden Sie “ Aufnahmeeinstellungen/Synchron”, um die Synchronität
einzustellen. Drücken Sie nach dem Aufrufen des Einstellungsmenüs die Tasten
“Links/Rechts”, um die Sync-Funktion ein- oder auszuschalten. Wird “ EIN”
werden verschiedene Titel in ver schieden e Datei en au fgez eichnet, w enn Sie d en
Anschluss Line-In verwenden. Wird “ AUS” gewählt, werden alle Titel in eine
Datei aufgezeichnet.
33
33
Page 80

German Manual
Verwenden Sie “Information [Informationen]”, um Informationen über die
Festplatte anzuzeigen wie beispielsweise Gesamtkapazität, belegter Speicher,
freier Speicher und die Version des Players. Drücken Sie die Taste “Links”, um
ins Hauptmenü zurückzukehren.
Verwendung der USB-Host-Funktion
Mit der USB-Host-Funktion können Sie denn Festplatten-MP3-Player
verwenden, um die Dateien anderer USB-Geräte zu lesen. Wenn Sie das
USB-Host-Kabel verwenden, um eine Verbindung zu einem anderen Gerät
herzustellen, wird die Meldung “ Versuche zu verbinden. Bitte warten.....”
angezeigt. Gleichzeitig werden die aktuell wiedergegebene Datei geschlossen
und der Verbindungsmodus aufgerufen.
34
34
Page 81

MusePod
Nach dem Herstellen der Verbindung zeigt der Player die Dateilisten des
externen USB-Ger äts an. In der ersten Zeile ersetz t “Host” di e vor herige Anz eige
(AUFNAHME, FM). In der Liste zeigt die erste Zeile den Namen des Geräts,
gefolgt von den Verz eichnissen und Datei en des Geräts. Drücke n Si e die Taste n
“Links/Rechts”, um ein Verz eichni s zu öffnen bzw . zu ver lassen. Dr ücken Sie di e
Taste “+/-”, um ein Verzeichnis oder Dateien im aktuellen Verzeichnis
auszuwählen. Halten Sie die Taste “Wiedergabe” gedrückt, nachdem Sie eine
Audiodatei ausgewählt haben, um diese in das Verzeichnis USB Data zu
kopieren (das Verz eichnis wir d vom Player automa tisch angeleg t). Halten Sie di e
Taste “A-B” gedrückt, um alle Dateien des externen USB-Geräts in das
Verzeichnis USB Data zu kopieren. Für die Dateien verschiedener Geräte
werden verschiedene Verz eichni sse angelegt. Alle Dateien ei nes Ger äts w erden
in ein Verzeichnis gespeichert, wie nachstehend abgebildet:
Wird ein Ordner ausgewählt, wird das gesamte Verzeichnis kopiert,
danach kehrt die Anzeige in den Kopierbildschirm zurück.
35
35
Page 82

German Manual
Nach Ende des Kopiervorgangs wird wieder die Dateiliste angezeigt. Vor
Beginn des Kopierv or g ang s pr ü ft d er Pl ayer, ob genug freier Spei cherplatz für die
zu kopierenden Dateien vorhanden ist. Falls nicht, wird “ Zu wenig Speicher”
angezeigt. Stellt der Player fest, dass der zu kopierende Ordner leer ist, wird 2
Sekunden lang “ Fehler, keine Datei” angezeigt. Ist bereits eine Datei mit einem
identischen Namen auf dem Player vorhanden, wird “Überschreiben? Ja Nein”
angezeigt. Verwenden Sie die Taste “Lautstärke+/Lautstärke-”, um zwischen
“ Ja/Nein” auszuwählen. Drücken Sie die Taste “Menü”, um Ihre Auswahl zu
bestätigen. Nach Abschließe n des externen Geräts und Rückkehr zur Dateiliste
des Players wird standardmäßig der Ordner USB Data angezeigt. Gleichzeitig
wechselt das Host-Symbol zum MP3-Symbol.
36
36
Page 83

MusePod
Sicherheitshinweise
Verwenden Sie den Player nicht in folgenden Umgebungen:
Übermäßige Wärme (über 40 ° C);
direkte Sonneneinstrahlung oder Heizgeräte;
feuchte Umgebungen wie Badezimmer;
Umgebungen mit übermäßiger Staubentwicklung;
Schutz des Players:
Lassen Sie den Player nicht fallen und setz en Si e ihn kei nen Stößen aus;
Selbstverständlich können Sie den Player beim Spazierengehen oder
Laufen verwenden. Durch Fallenlassen oder Stoßeinwirkungen jedoch kann
der Player beschädigt werden.
Zerlegen Sie den Player nicht. Dies könnte
zu Schäden an der Hardware führen.
Führen Sie keine Fremdgegenstände in den Player ein.
Es könnte zu einem Kurzschluss und zur Beschädigung des
Players kommen. Verwendung des Kopfhörers:
Übermäßige Lautstärke kann zu Gehörschäden führen. Bitte hören Sie
nicht über längere Zeit mit hoher Lautstärke. Sollten Sie ungewöhnliche
Geräusche im Ohr wahrnehmen, verringern Sie bitte die Lautstärke oder
nehmen Sie die Kopfhörer eine Weile ab.
Bitte verwenden Sie di e Kopfhörer nicht bei m Lenken eines Fahrz eugs oder
beim Radfahren, um Unfälle zu vermeiden. Verwenden Sie den Player nicht in
Gefahrensituationen.
37
37
Page 84

German Manual
Problembehebung
1.Die Tasten funktionieren nicht.
Prüfen Sie, ob die Sperrtaste “Hold” aktiviert ist. Falls ja, stellen Sie diese
auf die Position
“ Aus” und versuchen Sie es erneut.
2.LCD-Anzeigefehler
Prüfen Sie, ob unter “ ID3-Sprache” die richtige Sprache eingestellt ist.
3.Dateien können nac h dem Anschluss an ein en Computer nicht ü bertragen
werden.
Prüfen Sie, ob das Mai nboard des Co mputers USB 2.0 G eräte unter stützt.
Unter Umständen ist eine Systemaktualisierung erforderlich.
Falls Sie als Betriebssystem Windows 98 verwenden, müssen Sie zuerst
den Treiber installieren.
Prüfen Sie, ob auf dem Player freier Speicherplatz vorhanden ist.
4.Der Akku des Players kann nicht geladen werden.
Prüfen Sie, ob das Netzgerät ordnungsgemäß angeschlossen ist.
Auch ein vollständig geladener Akku kann nicht weiter geladen werden.
5.Der Player lässt sich nicht einschalten. Prüfen Sie,
ob der Akku geladen ist.
6.Bei der Wiedergabe treten Störgeräusche auf.
Schließen Sie den Kopfhörer or dnungsgemäß an der Buchse a n. Prüfen Sie,
ob der Kopfhörerstecker verschmutzt ist (reinigen Sie ihn gegebenenfalls mit
einem weichen, sauberen Tuch). Unter Umständen ist die MP3-Datei auch
beschädigt.
7.Datenübertragung an den Player funktioniert nicht
Prüfen Sie die Verbindung zwischen dem Player und dem PC. Prüfen
Sie den Akkuladestand.
38
38
Page 85

MusePod
8.Der PC funktioniert nach dem An- und Abschließen des Players
manchmal nicht richtig.
Dies tritt überwiegend auf, wenn das Kabel während dem Übertragen von
Dateien abgeschlosse n w ird. Es wi rd daher e mpfohle n, das Ger ät ni cht w ährend
dem Übertragen von Dateien abzuschließen, um Störungen am PC zu
vermeiden. Verw enden Sie di e Funktion für sicheres E ntfernen der Hardw are am
PC.
9.Manche MP3-Dateien können vom Player nicht wiedergegeben werden.
Da es verschiedenste Kompressionsformate und Kompressionsraten gibt,
werden einige Musikdateiformate vom Player nicht unterstützt. Für gewöhnlich
überspringt der Player solche Dateien. Falls Sie auf Dateiformate stoßen, die
nicht unterstützt werden, ergreifen Sie bitte eine der beiden folgenden
Maßnahmen:
Löschen Sie die nicht unterstützten Musikdateien.
Wählen Sie beim Komprimieren die Codierung MPEG Layer3.
10.“USB Device Error [USB-Gerätefehler]” wird manchmal angezeigt,
wenn der USB-Host eine Verbindung zu einem USB-Gerät herzustellen
versucht.
Derzeit unterstützt die USB-Host-Funktion nur
Standard-USB-Massenspeichergeräte. Insbesondere werden nur
Massenspeichergeräte mit FAT/FAT16 unterstützt. Andernfalls zeigt das Gerät
diese Fehlermeldung an.
11.Der MP3-Player enthält eine 1,8"-Festplatte. Da Festplatten keinen
Stoßeinwirkungen ausgesetzt werden sollten, achten Sie bitte darauf, das Gerät
nicht fallen zu lassen, wenn Sie es verwenden oder an einen Computer
anschließen.
12.Warum scheint die Aufnahme beim Codieren von MP3-Dateien von
einer anderen Wiedergabequelle zu stocken?
Wenn das andere W iedergabegerät über keinen Inhalt verfügt oder keine
Tonsignale liefert, betrachtet der Festplatten-Player es als ungültige Quelle und
wartet, bis er gültige Tonsignale empfängt.
39
39
Page 86

German Manual
13.Wie verwaltet man die zahlreichen Ordner auf der Festplatte?
Bitte kopieren Sie Dateien nur in Standardordner. Es sind Standardordner
vorgegeben, die nicht dauerhaft gelöscht werden können (Falls Sie einen löschen,
wird er beim nächsten Mal automatisch wieder angelegt.).
Der Ordner Firmware enthält die aktuelle Firmware und sollte verwendet
werden, wenn Sie die Firmware Ihres Players aktualisieren möchten.
Der Ordner ENCODE ist für Dateien, die aus den Quellen Line
In oder FM-Radio codiert werden.
Der Ordner Playlist ist für Wiedergabenlistendateien vorgesehen.
Der Ordner USBDATA ist für das Kopieren von Dateien mittels der Funktion
USB-Host vorgesehen. Der Ordner VOICE RECORD ist für die Aufnahme von
Dateien aus der Quelle Mikrofon.
Der Ordner TEXTFILE ist für TXT-Dateien, die mit der Funktion E-Book
angezeigt werden können.
14.Warum wird beim Einschalten des Players die Meldung “ Zu wenig freier
Speicher” angezeigt?
Für das Einschalten des Geräts müssen 32 MB freier Speicherplatz
vorhanden sein. Ist der freie Speicherplatz geringer, lässt das Gerät sich nicht
einschalten. Sie müssen es in einem solchen Fall an einen PC anschließen und
einige Dateien löschen, um 32 MB freien Speicherplatz zu schaffen. Danach kann
das Gerät wieder eingeschaltet werden.
15.Manchmal dauert das Einschalten des Players mehrere Sekunden.
Je mehr Dateien auf der Festplatte vorhanden sind, desto länger dauert das
Einschalten des Geräts.
40
40
Page 87

MusePod
Zubehör
Installations-CD Benutzerhandbuch
Standard-Kopfhörer Netzgerät
Line_IN-Kabel USB-Kabel
USB-Geräteadapter USB-Adapter für
Anschluss an einen
Computer
41
41
Page 88

German Manual
Technische Daten
Speicherkapazität 20 GB 1,8" Toshiba-Festplatte
(eingebaut)
Akku 1350 MAH/3,7 V Lithium-Akku
LCD 128 x 128 4 Graustufenanzeige mit blauem
Hinterlicht
Abmessungen 100 mm x 62 mm x 22 mm
USB-Anschluss
USB 2.0 Hochgeschwindigkeitsübertragung
(20 Mbyte/Sek)
USB-Host USB 1.1 Anschluss (USB 2.0 kompatibel)
FM-Frequenzbereich 87,5 MHz ~ 108,0 MHz
Ladezeit Akkuladezeit: 3 Stunden (80 % Ladestand
nach 1 Stunde Ladezeit mit
Schnellladefunktion)
Wiedergabezeit 14 Stunden (Standard-MP3-Wiedergabe)
Signal-Rauschabstand 90 dB
Kopfhörerausgangsleistung 5MW+5MW
Ausgangsfrequenzbereich 20 Hz - 20 KHz
Aufnahme-Bitrate 32 Kbps~320 Kbps
Musikdateiformat MP3, WMA
Aufnahme-Dateiformat VOC, MP3
Unterstützte ID3-Sprachen
von Musiktiteln
Vereinfachtes Chinesisch, traditionelles
Chinesisch, Koreanisch, Japanisch, Englisch
Unterstützte
Kompressionsraten
8 Kbps - 320 Kbps (MP3)/VBR
8 Kbps - 192 Kbps (WMA)/VBR
42
42
Page 89

MusePod
Fonctions exclusives
Lecteur portatif à stockage de masse
Ce lecteur peut être utilise comme disque dur
portable (la capacité est de 20GB). Aucun pilote n’est nécessaire sous
WinMe/2000/XP et suivants.
1. Fonctions d'hôte d'USB exclusives
Le lecteur de disque dur peut lire les fichiers d'autre équipement à
la norme USB
2. Transfert à haute vitesse, interface standard
USB2.0, compatible avec USB1.1
Le lecteur de disque dur supporte l’USB2.0 avec un taux de
transmission jusqu'à 20Mbyte/s.
3. Grand écran à cristaux liquides haute
résolution - 128X128.Matriciel de points à 4 niveaux de gris rétro éclairé
4. Supporte les formats de musique multiples:
Y compris le MP3 (MP3 au format VBR supporté) et WMA (WMA au
format VBR)
5. Mise à niveau pratique du.mi croprogramme (firmware)
Les dernières fonctions peuvent être obtenus via mise à niveau du
firmware.
De nouveaux formats seront soutenus par simple mise à
niveau ; en attendant, les autres fonctions seront constamment fournies.
1
Page 90

French Manual
6. Supporte l’affichage multilingue des ID3
Supporte les ID3 en diverse langues,y compris le
Chinois simplifié, le Chinois traditionnel, le japonais, le
coréen et l’anglais
(Inclut l'Europe de l’ouest)
7. Radio FM (87.5MHz~108.0MHz)
Le balayage automatique et la mémorisation des stations souhaitées sont
plus pratiques pour écouter la radio FM.
8. Fournit cinq types d'égaliseurs (EQ):
EQ Normal, Classique, Jazz, Rock et Personnalisé,
rendant la musique plus abondante.
9. Supporte les effets 3D, le renforcement des basses
sur 15 niveaux et le renforcement des aigues sur 15 niveaux, rendant la
musique plus colorée
10. Navigation entre les f ichiers facile à u tiliser
11. Le menu de navigation en arborescence
vous permet de retrouver la musique de façon pratique
1.Jusqu'à 2000 dossiers et 9999 fichiers peuvent être reconnus
2.Interface utilisateur graphique
3.d’enregistrement par Mic ou Line_In
4.Supporte la fonction de Signet
5.Supporte la fonction de liste de sélection
6.Supporte la navigation dans les fichiers TXT, à savoir la fonction e-book
2
Page 91

MusePod
Contenu
Partie avant et partie latérale........................................4-5
Parties supérieure et inférieure et LCD...............5-6
Utilisation de l'adaptateur AC .............................7-10
Chargement ........................................................7-8
Installation logicielle................................................8
Branchement à l’ordinateur ................................9-10
Débranchement de l’ordinateur ............................10
Fonctionnement .................................................1-12
Écoute de musique ............................................13-15
Répétition de sections ..........................................16
Parcourir ...............................................................17
Changement de mode .......................................17-20
Réception Radio FM ..........................................21-22
Enregistrement ..................................................23-24
Fonction Menu ...................................................25-34
Comment utiliser la fonction hôte USB ..............34-36
Avertissements ..................................................37-41
Dépannage ........................................................38-40
Accessoires ..........................................................41
Spécification .........................................................42
3
Page 92

French Manual
Volume+
Partie avant
4
Gauche
LCD
Droit
A
rrêt/Extinction
Right
Lecture/pause/Mise
sous tension Marche
Menu
CHARGE LED
HDD LED
Volume-
Page 93

MusePod
Parties latérales
Parties supérieure et inférieure
5
Line-In
Trou Mic Casque à écouteurs
DC-IN
Reiniciar
Port USB
Port hôte USB
A
-B/Rec
SRS/Mode
Maintien
Hold
Page 94

French Manual
LCD
LCD
Mode répétition
Signet
Indicateur
maintien batterie
Signet EQ
Mode Actuel
Dossier Actuel
Nom de fichier/Titre ID3
A
rtiste ID3
Taux d'échantillonnage
Débit en bits Volume
Lecture de morceau
A
vancement
6
Page 95

MusePod
Utilisation de l’adaptateur AC
1. Seul l'adaptateur AC fourni avec le lecteur peut être utilisé.
La tension de fonctionnement de l'adaptateur AC du lecteur est 100/240V,
50/60Hz.
2. Connecter l'adaptateur au jack DC d'alimentation AC et le lecteur
se recharge
1.Lorsque le lecteur est en marche, l'état de l’indicateur batterie montre la
capacité de la batterie du lecteur. Lorsque la batterie est faible, l’icône clignote.
Après avoir clignoté pendant un moment, le système s’arrête automatiquement.
La batterie doit être rechargée i mmédiatement sinon le lecteur ne peut plus
fonctionner. Avant de relier le lecteur à l’ordinateur, veuillez vous assurer qu’il est
en basse tension, sinon la connexion PC échoue.
2.La charge commence automatiquement une fois l’adaptateur relié au
secteur. En état de mise sous tension, l’icône de branchement à l’alimentation
est affichée dans la pos i t ion d ' o r igin e d e l 'icô n e d ' indi c a t i on de batt e r i e . Ceci montre
que la batterie est en cours de chargement et la LED rouge reste allumée.
Lorsqu'on recharge en mode hors tension, la LED rouge est toujours al l umée. Si
la batterie est complètement rechargée, la LED rouge s’éteint.
3.Quand la batterie est entièrement chargée, l’indicateur de batterie est
complètement plein et la LED rouge est éteinte.
Temps de charge : Environ 3 heures (apr ès que la batteri e soit entièrement
déchargée)
7
7
Page 96

French Manual
Temps de décharge (temps de lecture) : Envi ron 12 heures (durée de lecture la
plus longue une fois la batterie entièrement chargée)
Le temps de lecture est mesuré sur la base de fichier Mp3 128Kbps dans un
état de charge complet. (Il est mesuré pratiquement sans opérations)
1.Installation logiciel
Windows 2000 et Windows XP eux-mêmes peuvent suppor ter les périphérique
de stockage sur port USB2.0 (le PC doi t avoir un port USB2.0, autrement la transmission se
fait selon la norme USB1.1), mais Windows 98 exige l’installation d’un pilote.
Nous vous fournissons le logiciel de gestion du lecteur de disque dur et le pilote.
Après que l'installation est achevée, vous pouvez alors faire fonctionner le
lecteur.
Veuillez insérer le CD dans le CD-ROM, pour installer le logiciel automatiquement,
si vous n’avez pas désactivé la fonction CD-ROM Auto. Accomplissez alors les
étapes Suivantes une par une pour terminer l’installation. Pendant l’installation, si
vous utilisez le système d’exploitation Win98, l’installation du pilote de disque dur
pour Win98 se fait automatiquement.
Branchement à l’ordinateur
1.Appuyez et maintenez le bouton de "Lecture" pour allumer le lecteur.
(Avertissement : veuillez vous assurer que l’état de la batterie du lecteu r so it
suffisant. S’il est insuffisant, veuillez brancher l’adaptateur sur le secteur pour
assurer assez de batterie)
2.Relier le lecteur et l’ordinateur correctement avec
8
8
Page 97

MusePod
le câble USB. La grosse extrémité du câble USB devrait être connectée
au port USB de l’ordinateur et l'autre extrémité devrait être connectée au
port Esclave USB du lecteur.
L'écran LCD du lecteur affiche :
3.L’icône "périphériq ue connecté" s’affiche dans la barre système sous
Windows 2000 et Windows XP. (Sous Windows 98, il ne peut être
connecté correctement que lorsque l'installation du driver est terminée.
4.Après avoir terminé l’installation, un disque dur p ortable est ajouté à
Poste de travail/Explorateur. Les fichiers du lecteur de disque dur peuvent
être manipulés par l’Explorateur ou le logiciel de gestion de fichiers que nous
fournissons. Le lecteur de disque dur peut être utilisé comme un disque dur
normal, et les fichiers peuvent être copiés, effacés etc.
Lorsque le disque dur doit être relié à un ordinateur pour une période
prolongée, veuillez brancher l’adaptateur AC. Une batterie trop faible
provoquerait un fonctionnement incorrect du lecteur. (Lors de la connexion
au PC, si la batterie est trop faible, le lecteur ne peut pas se connecter
avec succès)
9
9
Page 98

French Manual
Comment Utiliser le Lo giciel de Gestion
Si vous installez le logiciel de gestion, vous pouvez l'utiliser pour gérer
votre lecteur HDD.
1.Allumer votre lecteur, connectez-le ensuite au PC ; tandis que le PC trouve
l'équipement, veuillez lance r le logiciel de gestion.
2.Vous pouvez utiliser ce logiciel pour éditer la fonction liste de
sélection.
3.Vous pouvez utiliser ce logiciel pour changer la langue.
4.Vous pouvez utiliser ce logiciel pour télécharger des fichiers de et vers
le lecteur HDD.
Vous pouvez vous référer à l'aide en ligne du logiciel pour utiliser ce logiciel.
2.. Débranchement de l’ordinateur
Utilisez "Débrancher en toute sécurité" pour déconnecter le lecteur de
l’ordinateur, à savoir double cliquer sur le coin droit de la barr e de tâches, sélectionnez
"Débrancher en toute sécurité". Une fois que le système affiche "Matériel
débranché en toute sécurité", le câble USB reliant le lecteur à l'ordinateur peut
être enlevé.
Avertissement:
Ne débranchez pas le lecteur de l’ordinateur quand le lecteur travaille.
Le lecteur peut être débranché seulement après que la copie du fichier
est achevée.
10
10
Page 99

MusePod
Fonctionnement
Fonctionnement :
Opérations de Base
1.Mise sous tension appuyez et maintenez le bouton "Lecture
/Pause/Mise sous tension"
2.Lecture/Pause Dans le mode de lecture, appuyez sur le bouton
de "Lecture / Pause/ Mise sous tension"."
3.Arrêt de lecture Appuyez sur le bouton de "Stop/ Extinction".
4.Avance rapide Dans le mode de lecture, appuyez et maintenez le
bouton "Droit".
5.Retour rapide Dans le mode de lecture, appuyez et maintenez le
bouton "Gauche".
6.Lire piste précédente En mode lecture de liste de sélection, appuyez sur
le bouton "Droit".
7.Lire piste suivante En mode lecture de liste de sélection,appuyez sur le
bouton "Gauche".
8.Mise hors tension Appuyez et maintenez le bouton "Stop/Extinction".
9.Réglage de Volume Dans le mode de lecture de musique ou le mode FM
Appuyez sur les boutons "+/-".
10.Sélection de fichier Dans le mode de navigation entre les fichiers,
appuyez sur le bouton "Dr oit/Gauche / +/-/Menu"
11
11
Page 100

French Manual
Appuyez sur le bouton "Menu" pour entrer dans
l'interface de navigation de fichiers, appuyez sur le
bouton "Droit" pour entrer dans un dossier ou
sélectionner un fichier, appuyez sur le bouton
"Gauche" pour quitter le répertoire actuel, appuyez
sur le bouton "+/-" pour sélectionner un fichier ou un
dossier différent et appuyez sur le bouton "menu"
pour confirmer.
1.Commutateur de Mode Appuyez et maintenez le bouton "Mode" pour
entrer dans le commutateur de mode.
2
.Définition de Section Appuyez sur le bouton "A-B".
3.Enregistrement Appuyez et maintenez le bouton "A-B".
4
.Affichage du Menu Appuyez et maintenez le bouton de "Menu".
5.Maintenez le bouton Marche/Arrêt
12
12
 Loading...