

SkyDock
™
Installation and User Guide

2
Table of Contents

3
FM Settings . . . . . . . . . . . . . . . . . . . . 47
Alert Options . . . . . . . . . . . . . . . . . . . 50
Ticker Options . . . . . . . . . . . . . . . . . . 50
Sports . . . . . . . . . . . . . . . . . . . . . . . . . . 51
Stocks . . . . . . . . . . . . . . . . . . . . . . . . . 53
Traf fi c & Weather . . . . . . . . . . . . . . . . 55
Preview Cards . . . . . . . . . . . . . . . . . . 56
Parental Controls . . . . . . . . . . . . . . . . 57
Sounds. . . . . . . . . . . . . . . . . . . . . . . . . 60
Disable Auto-Lock . . . . . . . . . . . . . . . 6 1
Appendix . . . . . . . . . . . . . . . . . . . . 62
Miscellaneous Pop-Up Alerts . . . . . . 63
Incoming Phone Cal Behavior . . . . . 64
Specifi cations . . . . . . . . . . . . . . . . . . . 65
Patent Information . . . . . . . . . . . . . . 66
Environmental Information . . . . . . . 66
FCC Statement . . . . . . . . . . . . . . . . . . 67
Copyrights and Trademarks . . . . . . . 68
Owner’s Record . . . . . . . . . . . . . . . . . 69
Introduction . . . . . . . . . . . . . . . . . . .4
Features . . . . . . . . . . . . . . . . . . . . . . . . . 5
About XM Radio . . . . . . . . . . . . . . . . . . .6
Safety and Care information . . . . . . . .7
What’s in the box? . . . . . . . . . . . . . . . . . 9
SkyDock Features and Controls . . . . . 10
SkyDock Features and Connections
. . .11
Vehicle Installation . . . . . . . . . . . . 12
Installing SkyDock in Your Vehicle . . . . .13
Docking the iPhone in the SkyDock
. . . . .18
Downloading the XM SkyDock App
. . . . 22
Launching the XM SkyDock App
for the First Time . . . . . . . . . . . . . . .23
Activating Your XM Subscription. . . .24
Setting-up the FM Transmitter . . . . .26
Using Your SkyDock . . . . . . . . . . .28
Display Screen Information . . . . . . . .29
Channel List Screen . . . . . . . . . . . . . .3 1
Category List Screen . . . . . . . . . . . . .32
Direct Tuning . . . . . . . . . . . . . . . . . . . 34
Setting Your Favorite Channels . . . . 35
Song Tagging . . . . . . . . . . . . . . . . . . . .38
Sports Tagging . . . . . . . . . . . . . . . . . . 40
Displaying the Sports and
Stock Ticker . . . . . . . . . . . . . . . . . . 42
Setting up Your SkyDock
. . . . . . . . . 44
The Settings Menu . . . . . . . . . . . . . . . 45
My Account . . . . . . . . . . . . . . . . . . . . . 46
Table of Contents

4
Introduction

5
Introduction
Features
Congratulations on your purchase of the SkyDock!
The SkyDock™ has these exciting features to enhance your listening experience:
• Specialized Dock with built-in XM Radio tuner
• Compatible with iPhone and iPod touch (see page 6 for specific models)
• Controlled by XM SkyDock Application (downloadable free from App Store)
• Charges iPhone/iPod touch while docked
• All-in-one design allows for easy installation
• Rotates to view in portrait or landscape modes (automatic image orientation)
• Incorporates PowerConnect FM transmitter
• Audio Out connection (for AUX-IN ready vehicle audio systems)
• iTunes Song Tagging
• Artist/Song Alerts
• Game Alerts
• Stock and Sports Ticker
To get the most from your new SkyDock, please read this entire user guide.
6
Introduction
Compatibility
Your SkyDock will work with the following iPhone and iPod models
that have
OS 3.0 or higher
:
iPod is a trademark of Apple Inc., registered in the U.S. and other countries. iPhone
is a trademark of Apple, Inc. Apple is not responsible for the operation of this device,
or its compliance with safety and regulatory standards.
7
Safety and Care Information
IMPORTANT: Always read and understand all the instructions to avoid injury
to yourself and/or damage to your radio. XM Radio claims no responsibility for
damage from data loss due to breakdown, repair, or other causes.
• Do not expose to extreme temperatures (above 140°F or below -4°F, or above
60°C or below -20°C).
• Do not expose to moisture. Do not use device near or in water.
• Do not let any foreign matter spill into device.
• Do not store in dusty areas.
• Do not expose to chemicals such as benzene and thinners. Do not use liquid or
aerosol cleaners. Clean with a soft damp cloth only.
• Do not expose to direct sunlight, fi re, fl ame or other heat sources for a
prolonged period.
• Do not try to disassemble and/or repair the device yourself.
• Do not drop the device or subject it to severe impact.
• Do not place heavy objects on the device.
• Do not subject the device to excessive pressure.
8
Introduction
WARNING
• Opening the case may result in electric shock.
• The uninsulated parts inside the SkyDock may cause electric shock or fire. For
your safety, please do not open the SkyDock. Do not let metallic objects, such
as necklaces or coins, come into contact with the SkyDock plug.
• To avoid electric shock, use the SkyDock only with a power outlet that matches
the shape of its plug.
• Make sure that you insert the SkyDock all the way into the power socket.
• Do not plug several devices into the same power outlet.
• Use the SkyDock away from water sources to avoid fire or electric shock.
• Do not touch the device with wet hands.
When using this product it is always important to keep your eyes on the road and
hands on the wheel. Not doing so could result in personal injury, death, and/or
damage to your device, accessories, and/or to your vehicle or other property.
Your device should be placed in your vehicle where it will not interfere with the
function of safety features, e.g., deployment of airbags. Failure to correctly
place this device may result in injury to you or others if the unit becomes
detached during an accident and/or obstructs the deployment of an airbag.

9
What’s in the Box?
SkyDock
(with Spacer 2
Attached)
Spacer 2
(shipped attached
to SkyDock)
Spacer 1 Spacer 3
Magnetic
Vehicle Antenna
Audio Cable
10
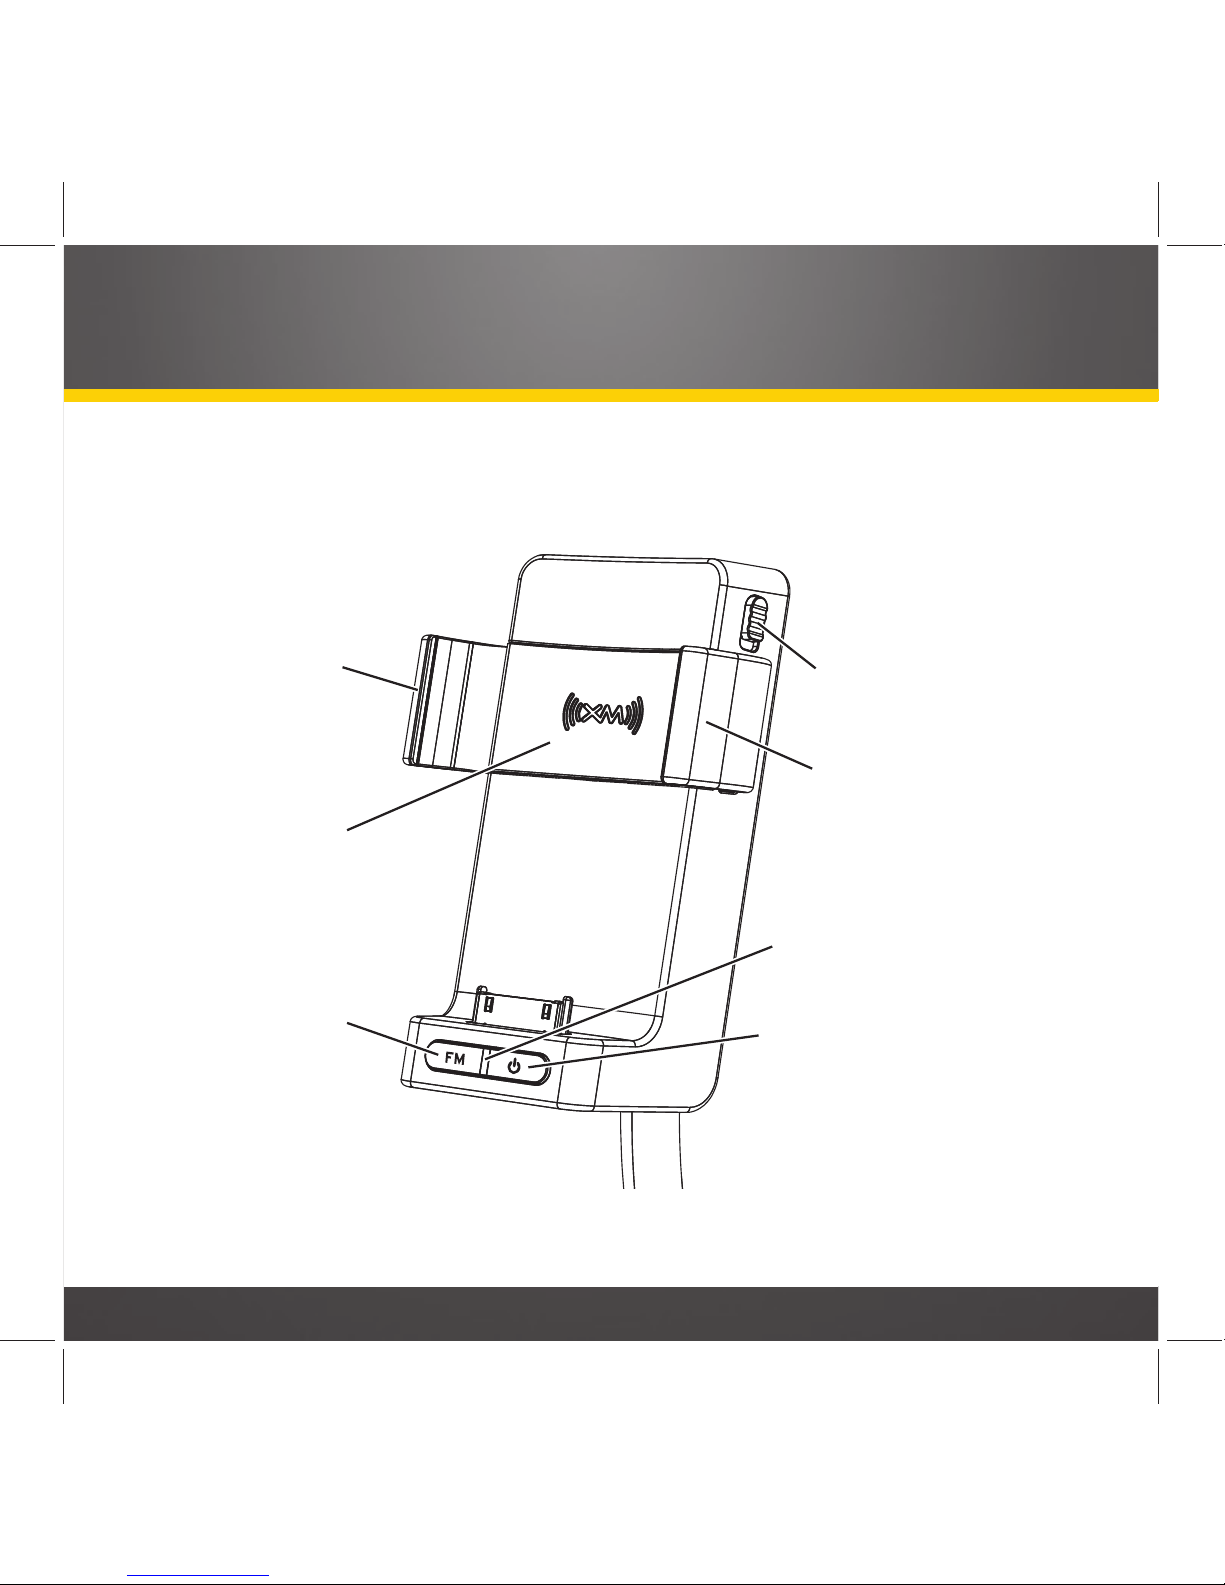
SkyDock Features and Controls
Introduction
Side Grip
Power Button
Power Indicator
Side Grip
Replaceable
Spacer
FM Button
Side Grip
Release Lever
11
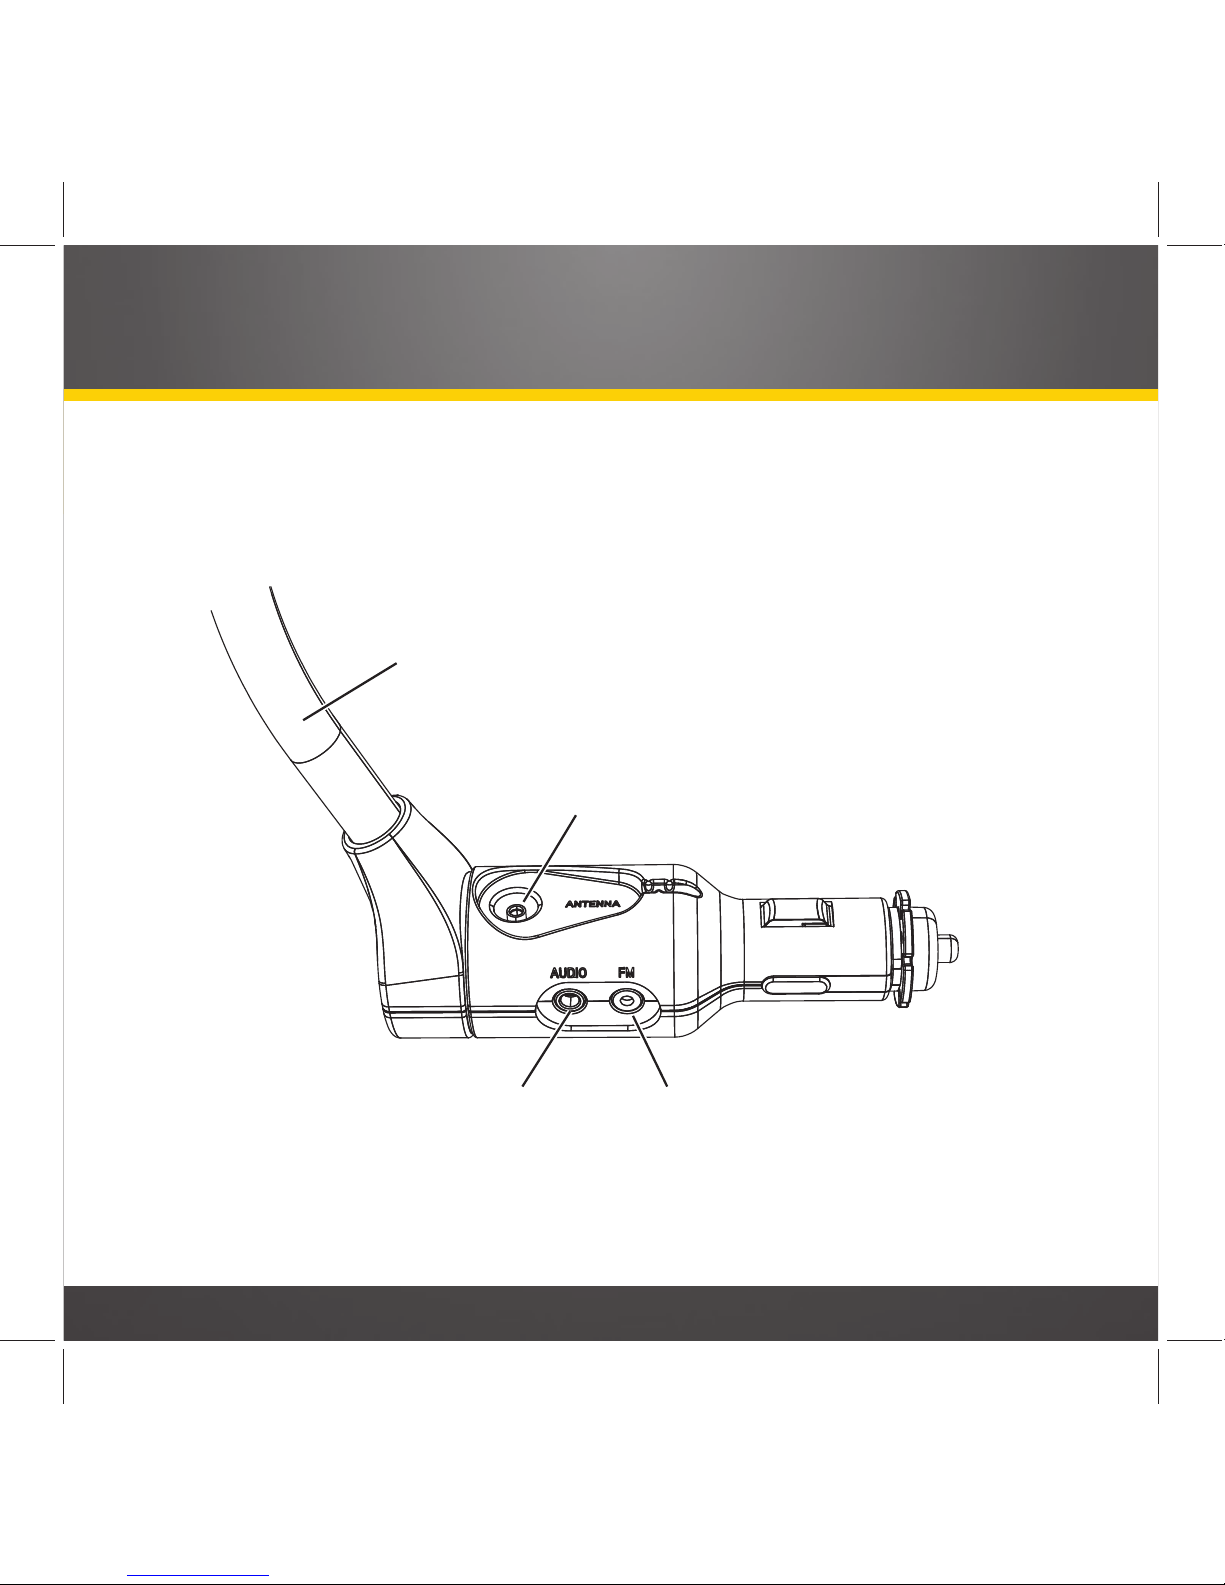
SkyDock Features and Connections
Antenna Connector
Flexible Stalk
FM Out ConnectorAudio Connector

12
Vehicle Installation

13
Vehicle Installation
NOTE: ALL
REFERENCES TO
iPhone IN
THIS MANUAL ALSO APPLY TO THE
iPod touch
UNLESS OTHERWISE NOTED
.
Installing the SkyDock in Your Vehicle
Step 1: Finding a Location for the SkyDock
The SkyDock mounts into your vehicle’s cigarette lighter or 12V power socket.
If your vehicle has more than one 12V power socket, be sure to choose one that doesn’t
interfere with the driver’s vision or access to driving controls, doesn’t interfere
with the deployment of airbags or other safety equipment, and makes the iPhone
easily accessible for operation. Please see the safety warnings on page 8.
It will be easier to make connections to your SkyDock before you plug it into the power
socket, so we recommend completing
Step 2
and
Step 3
first.
Step 2: Mounting the Antenna and Routing the Cable
IMPORTANT: THE SKYD
OCK USES A UNIQUE ANTENNA
. DO
NOT SUBSTITUTE AN ANTENNA FROM
ANY OTHER
XM
RADIO FOR THE SKYDOCK ANTENNA
. R
EPLACEMENT SKYDOCK ANTENNAS ARE
AVAILABLE FROM WWW.XMRADIO.COM
.
a) Mount the antenna on the outside of your vehicle, on a
horizontal surface that will always face the sky. The
antenna contains a strong magnet that will stick to
any metal part of your vehicle. Leave at least 3” of
metal around at least three sides of the antenna.
Magnet

14
Vehicle Installation
For most vehicles the best location is on the roof towards the front of the cab, above
the front windshield, as close to centered between the left and right sides as the
cable length will allow. For convertibles, locate the antenna on the trunk lid, at least
3” from any edge. (If the cable does not reach, locate the antenna on top of the front
windshield frame.)
Recommended Antenna Locations
Sedans and Coupes Pickups and SUVs
Convertibles*
* If the antenna will not reach the
trunk lid, mount it on the top of
the front windshield frame.

15
b) Route the antenna wire under the rubber molding around the front
windshield to the nearest corner. Then route the cable out of the windshield
molding and into the rubber weather stripping around the door opening. Lift the
weather stripping from the opening and tuck the cable inside it,
then replace the weather stripping. Run the cable inside of the
weather stripping to the bottom
of the door opening.
c) Recommended: Hide the antenna
wire inside the cabin. Pull the
cable out of the weather stripping at the bottom of the door
opening and route it under the
carpet toward the 12V power
socket. Coil any excess cable in a
hidden location, such as under the
carpet, keeping it away from any
vehicle pedals or controls. Secure
the excess cable with wire ties.
TIP! Always be careful to include enough slack in your routing to accommodate open doors
or trunk lids. Use electrical tape to secure the cable in areas so that hinges do not pinch the
cable with the door.
Place Antenna
Closer to A-Pillar
if Cable Doesn’t Reach
Center of Roof
12V
Power Socket
Location

16
3. Connect the SkyDock to Your Audio System
a) Plug the Antenna into the
SkyDock’s ANTENNA CONNECTOR.
The antenna plug and cable will fit
into the recess on the top of the
SkyDock base.
b) If your vehicle’s audio system
has an audio input (for MP3
players, etc), connect the included
Audio Cable between it and the
SkyDock’s AUDIO CONNECTOR. This is
the best quality and easiest audio
connection for your SkyDock.
Vehicle Installation
Antenna
Connector
Antenna
Plug
Connecting the Antenna
Connecting the Audio Cable
Audio
Cable
Audio
Connector
Audio
Cable
Plug

17
c) If your vehicle’s audio system does not have an audio input, your SkyDock
incorporates a special FM transmitter called PowerConnect that will ‘broadcast’ its
audio to your vehicle’s FM radio through your vehicle’s power system. See
Setting-
Up the FM Transmitter
, on page 26, for details.
4. Plug the SkyDock Into the Vehicle’s 12V Power Socket
Make sure the SkyDock is inserted all the way into the power
socket.
NOTE: A
FTER PLUGGING THE
SKYD
OCK INTO THE POWER
SOCKET, ALIGN THE CABLES
SO THEY DO NOT INTERFERE
WITH THE SAFE OPERATION OF
THE VEHICLE
.
12V Power
Socket

18
Vehicle Installation
Docking the iPhone in the SkyDock
Inserting the Spacers
Your SkyDock comes with three numbered urethane spacers that assure a proper fit with
different iPhone and iPod touch models, with and without aftermarket skins (thin cases
that surround and protect the iPhone or iPod touch).
IMPORTANT: THE SKYD
OCK WILL NOT ACCOMMODATE ALL
TYPES OF AFTERMARKET SKINS
. C
OMPATIBLE SKINS MUST
NOT BE THICKER THAN 2MM IN ANY DIRECTION AND MUST
HAVE A LARGE ENOUGH OPEN AREA AROUND THE CONNECTOR
AT THE BOTTOM OF THE
iPhone/iPod touch TO
ALLOW IT
TO SEAT PROPERLY IN THE SKYDOCK
.
Spacer 1: For iPhone with compatible skin
Spacer 2: For iPhone without skin; for iPod
touch with compatible skin
Spacer 3: For iPod touch without skin
Install the appropriate Spacer by inserting it all
the way into the recess in the SkyDock (
top
).
Removing the Spacers
1. Use one finger to apply sliding pressure on the
Spacer towards one of the Side Grip arms.
2. Using another finger, pry up under the edge of
the Spacer to release it (
bottom
).
Recess
Spacer
1. Press Spacer &
Slide Towards
Side Grip
2. Pry Spacer Up
and Remove

19
Inserting and Removing the iPhone
To insert the iPhone in the SkyDock: Insert the bottom of the iPhone straight down
onto the connector, making sure that the connection is solid. Gently squeeze the side
grips against the iPhone to secure it. Squeeze towards the rear of both side grips, as
shown in the diagram below.
1. Press iPhone
Down Onto
Connector
TO INSERT
iPHONE
2. Squeeze Grips
to Close
Squeeze
Grips
Here
DO NOT
Squeeze
Here

20
Vehicle Installation
To remove the iPhone: Slide the Side Grip Release Lever DOWN to spread the grips
apart. Then lift the iPhone off the connector and pull it straight up and out of the
SkyDock.
1. Slide Release
Lever Down
2. Lift iPhone Off
of Connector and
Out of SkyDock
TO REMOVE
iPHONE
Slide Lever
DOWN
Grips Will
Spread Apart

21
Adjusting the Flexible Stalk
The SkyDock’s flexible stalk gives
you lots of freedom to position
the iPhone so it is convenient
for you to use. You can twist the
stalk up to 90° in either direction
(see illustration), and bend it to be
clear of controls or other items.
CAUTION: DO
NOT OVER-ROTATE
THE STALK
—
DOING SO COULD DAM
-
AGE IT
.
Rotating the SkyDock
You can rotate the SkyDock up to 100° in either direction so that the
iPhone is landscape-oriented
instead of portrait oriented.
The XM SkyDock app will
automatically orient the screen
image to match the SkyDock’s
orientation.
CAUTION: DO
NOT OVER-ROTATE
PAST THE STOPPING POINT
—
DOING
SO COULD DAMAGE THE SKYDOCK
.
N
OTE
: E
NSURE THAT THE SKYDOCK AND IPHONE WILL NOT BLOCK AIRBAGS AS THEY DEPLOY, OR
BLOCK ANY CONTROLS NEEDED FOR OPERATING THE VEHICLE
.

22
Vehicle Installation
Downloading the XM SkyDock Application
There are several ways to download the XM SkyDock app into your iPhone:
A) You can use your iPhone to download the app directly from the app store.
B) You can go to www.xmradio.com/skydock and download the app into your com-
puter. You will then need to synchronize your iPhone with iTunes to download the
app to your iPhone.
C) You can download the app directly from iTunes
into your computer. You will then need to
synchronize your iPhone with iTunes to
download the app to your iPhone.
Once the XM SkyDock app has been successfully
downloaded into your iPhone the Home Screen
will display the XM SkyDock icon shown in the
illustration. Tap the icon to launch the XM SkyDock
app.
23
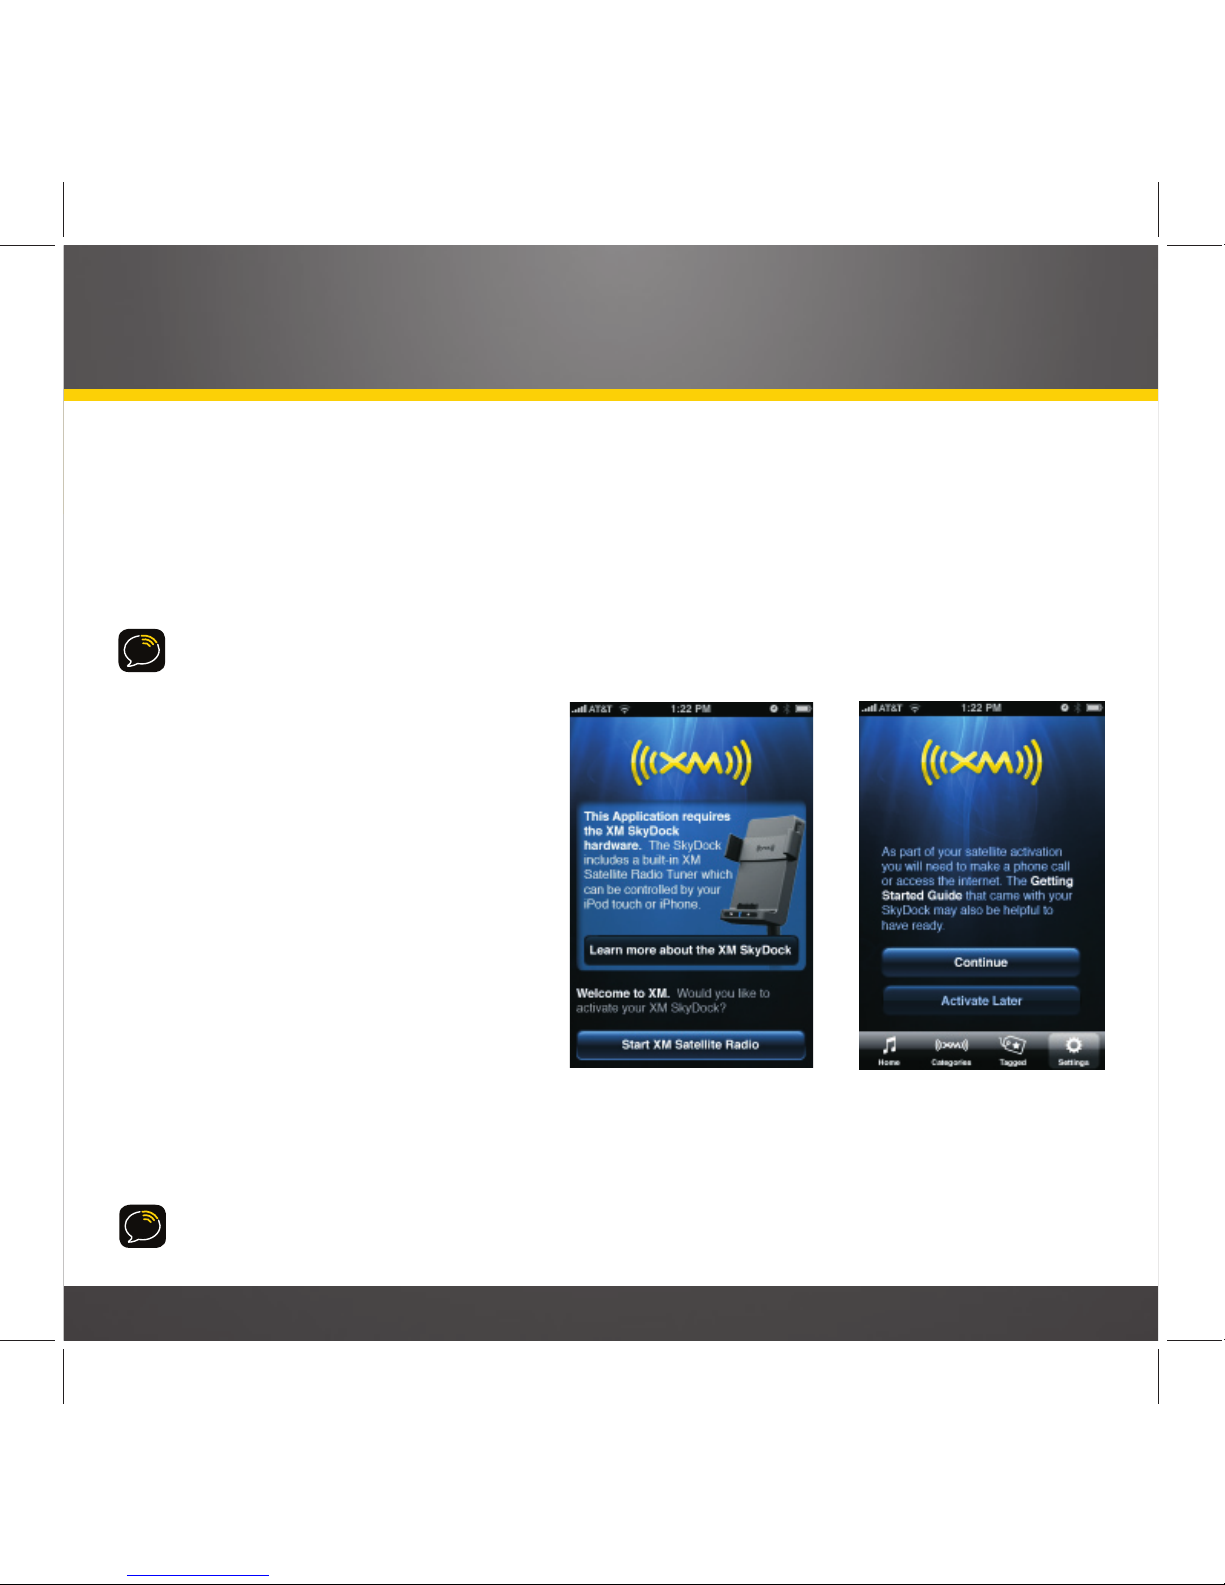
Launching the XM SkyDock App for the First Time
1. Be sure that your SkyDock is correctly connected and installed, that the antenna is
oriented to receive the XM signal, and that your iPhone is properly inserted in the
SkyDock.
N
OTE
: THE SKYD
OCK AUTOMATICALLY TURNS
ON
WHENEVER THE
iPhone IS
INSERTED, AND
AUTOMATICALLY TURNS
OFF
WHENEVER THE
iPhone IS
REMOVED
.
2. Launch the XM SkyDock app.
The iPhone will display the
Welcome
screen.
3. Select
Start Satellite Radio
. The
iPhone will display the
Continue/
Activate Later
screen.
N
OTE
: S
ELECTING
LEARN MORE ABOUT
THE XM SKYDOCK
WILL LAUNCH THE
S
AFARI BROWSER AND TAKE YOU TO
WWW.XMRADIO.COM/SKYDOCK
.
4. Select
Continue
. The iPhone will
begin the activation process.
5. Have your credit card handy
and proceed to
Activating Your
XM Subscription
, on page 24.
N
OTE
: THE XM SKYD
OCK APP WILL REMAIN ACTIVE ON YOUR
iPhone
UNTIL YOU PRESS THE
iPhone’s
HOME
BUTTON
.
Welcome
Screen
Continue/Activate
Later
Screen

24
Activating your XM Subscription
N
OTE
: THE
ACTIVATION PROCEDURE SCREENS ARE ONLY DISPLAYED IN PORTRAIT
ORIENTATION
.
1. If you’re activating directly after
launching the XM SkyDock app
for the first time, your iPhone
should be displaying either the
Acquiring Signal
screen or the
Signal Found
screen.
• If the
Acquiring Signal
screen
remains displayed, make sure
that the antenna is properly
connected to the SkyDock,
and that it is properly mounted
and has a clear view of the sky.
See pages 13 – 16.
2. Once the
Signal Found
screen is
displayed, tap
Continue
. The
To
Complete Activation
screen will be displayed (next page).
Acquiring Signal
Screen
Signal Found
Screen
Vehicle Installation

25
3. Call the number or visit the URL displayed on the
To Complete Activation
screen to
complete the activation process.
4. During the activation process the iPhone will display the
Activating Radio
screen.
5. Once the activation process is completed, tap the
Close
button. The iPhone will
display the Home screen (tuned to
XM Preview
channel #1). You can now tune to
any XM channel and enjoy XM Satellite Radio on your iPhone.
To Complete
Activation
Screen
Activating Radio
Screen
Home Screen
(on XM Preview
Channel)

26
Setting-up the FM Transmitter
Your SkyDock has a PowerConnect FM transmitter
that will ‘broadcast’ its audio to your vehicle’s
FM radio if you have not used the included audio
cable to connect the SkyDock to your vehicle’s
audio system.
N
OTE
: FOR
COMPLETE DETAILS ABOUT SETTING THE
FM
TRANSMITTER, SEE
FM TRANSMITTER
, ON
PAGE
48.
1. Press-and-hold the SkyDock’s FM button. The
FM Settings
screen will appear. Tap the
On/Off
button to turn the FM transmitter OFF.
2. Tune through your vehicle radio’s FM channels
to find an FM channel (between 87.9MHz and
107.9MHz) that is not broadcasting in your
area. (If you use an FM channel that is being
used by a local broadcaster, it will interfere
with your SkyDock’s performance.)
3. Once you have located an FM channel that
is not broadcasting in your area, save it as a
preset on your vehicle radio. This will become
your SkyDock preset.
4. Tap the
On/Off
button on the SkyDock’s
FM Settings
screen again to turn the
FM transmitter ON. The first preset (factory-set to 88.1MHz) will be highlighted.
This may not be the best frequency for your area.
FM Settings
Screen
Vehicle Installation
Press
and Hold
FM Button
SkyDock FM Button

27
5. Press-and-hold anywhere on the screen for 2 seconds. The
FM Settings
screen
will change to the Edit Mode.
6. Tap the
Edit
button beneath the 88.1
preset. The
Set FM Preset
screen appears.
7. Tap the arrow buttons to select the FM frequency that matches the channel that you
preset on your vehicle radio to in
Step 3
.
8. Tap the
Back
button to return to the
FM
Settings
screen with the new FM preset
frequency stored. To exit, tap the
Home
button.
To listen to your SkyDock, turn your vehicle’s FM radio ON and press the
SkyDock preset you set in
Step 3
on page 26.
New FM Preset Stored
Set FM Preset
Screen
FM Settings
Screen Edit Mode

28
Using Your SkyDock

29
Using Your SkyDock
Getting Around the XM SkyDock
Screens
You will be using the following basic actions to
navigate all of the XM SkyDock app screens:
Tap: A touch of your fingertip on a button or
item to select it.
Press-and-Hold: Holding your fingertip on
a button or item for two seconds or longer,
usually to enter a different screen mode.
Swipe (up and down): Sliding your finger up or
down on the screen, to scroll-through a list or
column.
Sweep (side-to-side): Sliding your finger across
the screen, to change to different screns.
Swiping Up/Down to
Scroll-Through a List
Sweeping Sideways to
Change Preview Cards

30
Using Your SkyDock
Home Screen Information
When using the XM SkyDock app your iPhone’s screen will display items such as the
currently-tuned channel, the song or show being played, the artist’s name, and other
information. This screen is referred to as the
Home Screen
in this manual.
Whenever you launch the XM SkyDock app, the channel that was previously selected
will automatically begin playing, and the currently-playing artist name and song or
program title will be displayed.
Channel Number
Arrow Button
Channel Logo
Arrow Button
Tag This
Button
Currently-
Playing Artist
Currently-
Playing Song
or Program
Signal
Strength
Tagged Songs
Button
Traffic &
Weather
Button
Show Favorites
Button
Categories
Button
Home
Button
Settings
Button

31
Channel Number Arrow Button: Shows the number of the currently-playing XM channel.
Tap the arrow to enter channel numbers for Direct Tuning. For details see page 34.
Channel Logo Arrow Button: Shows the name of the currently-playing XM channel.
Tap the arrow to display the Channel List screen for the current category. Also lets
you change channels or categories. For details see page 32.
Traffic and Weather Button: Tap to tune to your pre-selected traffic and weather
channel; tap again to return to your original channel. Press-and-hold to set or change
your traffic and weather channel. For details about setting the traffic & weather
channel see page 55.
Tag This
Button: Tap to tag the current song and artist (or sports teams, if you’re
listening to a sporting event). This places the song and artist or sports teams in the
SkyDock’s memory and gives you an opportunity to purchase the song from iTunes.
The XM SkyDock app continuously scans all available channels, and if a tagged song,
artist, or sports team is playing on another channel, the screen will display an alert,
giving you an opportunity to tune to that channel. For details on Tagging see page
38. For details on Sports Tagging see page 40.
Show Favorites
Button: Tap to display the preset buttons for up to 12 of your Favorite
channels. For details about setting your Favorites see page 35.
Home
Button: Returns to the Home Screen.
Categories
Button: Tap to display the Category List screen. See page 33 for details.
Tagged Songs Button: Tap to display and edit your tagged song list. For details see
page 39.
Settings
Button: Tap to open the Settings menu. For details see page 45.

32
Using Your SkyDock
Channel List Screen
Tapping the Channel Logo on the Home Screen (see page 30) displays the channel list
for the current category .
To select a channel: Tap the channel you want to listen to.
To see more channels: Sweep your finger up or down on the channel list to scroll
through the list of available channels.
To change to a new category: Swipe your finger left or right across the channel list.
The screen will change to a channel list in the next or previous category. You can also
tap the left and right arrows to change to the next or previous category.
Channel
Number
Channel
Name
Categories
Button
Category
Name
Left
Arrow
Right
Arrow
Song or
Program
Artist

33
Category List Screen
Tapping the
Categories
button on the
Home Screen (see page 30) will display the
Categories
screen, containing a list of all
categories (
top
).
To scroll through the list of categories:
Swipe your finger up or down on the
screen.
To see a category’s channel list: Tap the
category’s arrow button. The screen will
display a channel list in the new category.
Tap a channel to listen to it.
To scroll-through the list of channels:
Sweep your finger up or down on the
channel list. Tap the channel you want to
listen to.
To change to a different category: Sweep
your finger across the channel list or
tap the left or right arrows. The next
category’s channel list will appear.
Categories
Screen, with
Arrow Button Highlighted
Category Channel List Screen, with
Left and Right Arrows Highlighted

34
Using Your SkyDock
Direct Tuning
1 On the Home Screen, tap the channel number awwor button (A, below). The Direct
Tuning keypad is displayed (B, below).
2 Use the keypad to enter a channel number (C, below).
3 When you finish entering the number you can tap the OK button or wait for
SkyDock to automatically tune to the channel (D, below).
Tap Channel Number Arrow
Enter New Channel Number
Keypad is Displayed
New Channel is Tuned
A
C
B
D

35
Setting your Favorite Channels
You can save up to 12 of your favorite
channels to Favorites buttons so you can
quickly access them.
To Save the Current Channel as a
Favorite:
1. Tap the
Show Favorites
button on
the Home Screen (see page 30). The
Favorites panel will appear. (Note that
when the Favorites panel appears for
the very first time there will be no
Favorites saved.)
N
OTE
: THE F
AVORITES VIEW WILL STAY OPEN
UNTIL YOU A) PRESS THE
HIDE FAVORITES
BUTTON
, B)
PRESS THE
CATEGORY
BUTTON
TO FIND A NEW CATEGORY OR CHANNEL, OR
C)
SWEEP ON THE ARTIST/SONG TITLE TO
TUNE TO A NEW CHANNEL
2. Tap the “+” to add the current
channel to the list. The channel name
and number will appear in the button
and the next empty button will be
indicated by the “+”.
3. You can repeat Steps 1 – 2 to save up to 12 Favorite channels.
Favorites Panel (none saved)
Favorites Panel
(current channel saved)

36
To Listen to a Favorite:
1. Tap the
Show Favorites
button on
the Home Screen to display the
Favorites panel.
2. Tap the Favorite button where you assigned the desired channel. The selected
Favorite will be highlighted.
To Edit Your Favorites: Press-and-hold anywhere in the Favorites panel. The panel will
enter the Favorites edit mode:
• You can change the Favorites order by
dragging them from one location to another in the list.
• You can delete a Favorite by tapping its
“X”. A pop-up will appear, asking you to
confirm the deletion. You can now save a
new channel in the empty Favorite.
N
OTE
: YOU
CANNOT DIRECTLY REPLACE
A FAVORITE
—
YOU MUST DELETE IT AND
CREATE A NEW ONE
.
Tap the
Done
button to return to the
Favorites panel.
To hide the Favorites panel, tap the
Hide Favorites
button. The Home Screen will
return.
Using Your SkyDock
Tap a Favorite Button to Listen
Favorites Panel Edit Mode
 Loading...