

Page 1
1 2
4 5
3
6
7
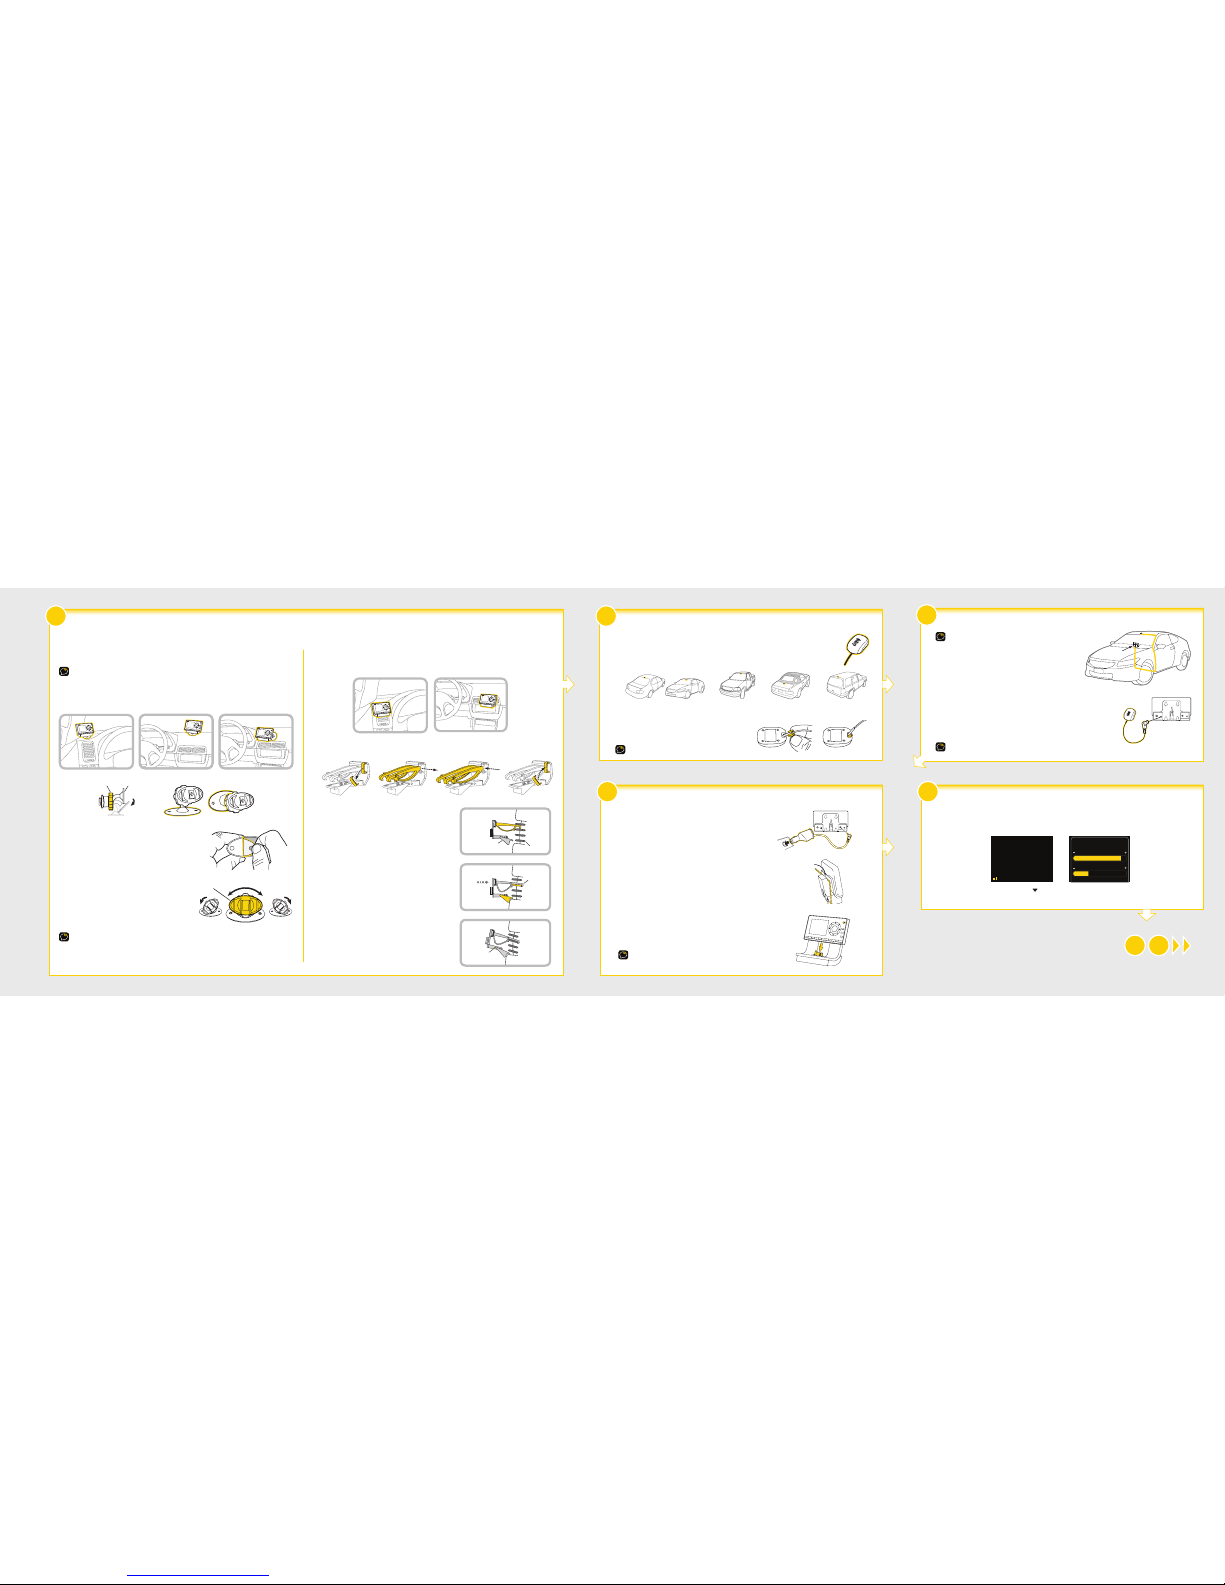
A. Be sure the vehicle is outside and the antenna has a clear view of the sky.
B. Verify that you are receiving the XM signal. The radio should be tuned to channel 1, the XM Preview channel. There
should at least be one bar on the lower left corner of the screen that denotes antenna signal strength.
C. You can also press menu and then press to scroll to and highlight Signal Indicator. Press the Select button. The
Satellite and Terrestrial bars show the strength of the signal being received. If the signal reception is good, press
and hold menu to return to channel 1, the XM Preview channel.
Verify Signal Reception
Signal Indicator
S
ATELLIT
E
TERRESTRIA
L
800-643-2112
siriusxm.com
1 XM Preview
Find a Location for OnyX and Mount it
Dash Mount Method:
IMPORTANT: The air temperature needs to be at least 60û F to install the Dash Mount. If needed, turn on the heater
in your vehicle.
A. Select a flat surface for the Dash Mount with ample room for OnyX. Avoid mounting on leather
surfaces.
B. Orient the adhesive foot so that OnyX is easily accessible. Loosen the knob and adjust the adhesive
foot to position 1 or 2, and then tighten it.
C. Clean the surface with the alcohol preparation pad.
D. Once the surface is dry, remove the adhesive liner. Press
and hold the Dash Mount in place for 30 seconds. Allow the
adhesive cure for 2-4 hours.
E. You can tilt the dock mounting plate in your preferred
direction.
TIP: Choose a location that doesn’t interfere with the driver’s vision or access to driving controls, won’t interfere with
the deployment of airbags or other safety equipment, and makes OnyX easily accessible for operation.
jump
FM
menu
2
3
4
5
6
7
8
9
0
direct
1
1
2
3
4
5
6
7
8
9
0
direct
jump
FM
menu
1
2
2
3
4
5
6
7
8
9
0
direct
jump
FM
menu
1
1
Dock Mounting Plate
1 2
Knob Adhesive Foot
Vent Mount Method:
A. Select a vent with ample room for OnyX.
B. Some vents have recessed louvers. If yours are recessed, remove the regular vent clamps and install the
extended vent clamps.
C. Install the Vent Mount onto the vehicle vent:
i. Insert the vent mount into the vent opening.
ii. Push until hooked on the rear of the vent louver. Rest
the foot against the bottom of the vent.
iii. If necessary, adjust the tilt of the Vent Mount by
repositioning the foot to a different tilt adjustment hole.
PUSH
Dash
Vent
Louver
Foot
Vent
Vent
Dash
Dash
HOOKED
TILT
ADJUSTMENT
HOLES
2
3
4
5
6
7
8
9
0
direct
jump
FM
menu
1
jump
FM
menu
2
3
4
5
6
7
8
9
0
direct
1
Select either the Dash Mount method or the Vent Mount method for your OnyX. Do not attach the PowerConnect Vehicle Dock to the mount. Wait until after you have connected all the cables to the dock.
A. Mount the Magnetic Mount Antenna outside your vehicle, on a clean and dry horizontal surface that
will always face the sky.
B. Choose the location for the antenna according to your type of vehicle. Center it between the left and
right sides, and away from other antennas.
C. Install the Cable Routing Adapter to direct the antenna
cable downward, if mounting on an edge.
TIP: Use the Alcohol Prep Pad to clean the surface.
Sedans and Coupes
(above front windshield or rear window)
Pickups
(above front windshield)
SUVs
(rear of roof)
Convertibles
(leading edge of trunk)
Route the Antenna Cable
NOTE: These instructions are for a sedan or coupe where the antenna
is mounted above the front windshield. The User Guide has detailed
antenna cable routing instructions for all types of vehicles, beginning
on page 26.
A. Tuck the antenna cable under the windshield rubber molding
and run it to the nearest corner.
B. Route the cable out of the molding and into the rubber weather
stripping around the door opening.
C. Lift the weather stripping. Tuck and run the cable inside it to
the bottom of the door opening. Replace the weather stripping.
D. Pull the cable out and route it to OnyX .
E. Plug the Magnetic Mount Antenna connector into the silver ANT connector at the
rear the PowerConnect Vehicle Dock.
TIP: Include enough slack in your routing to accommodate open doors or the hood lid. Coil
any excess cable in a hidden location and keep it away from any vehicle pedals or controls.
OnyX
Location
AUDIO ANT PWR FM
A. Insert the PowerConnect Power Adapter into your vehicle’s
cigarette lighter or power adapter socket. Plug the other end into
the red PWR connector on the rear of the PowerConnect Vehicle
Dock.
B. Use the wire guide on the top of the dock to organize the wires
connected to the dock.
C. Place OnyX into the dock and press the Power button.
IMPORTANT! Don’t attach the dock to the mount just yet.
Wire Guide
2
3
4
5
6
7
8
9
0
direct
jump
FM
menu
1
AUDIO ANT PWR FM
Mount the Magnetic Mount Antenna
Connect the PowerConnect Power Adapter
Start Here
Page 2
6 ?
What’s in the Box?
7
siriusxm.com
Sirius XM Radio Inc.
1221 Avenue of the Americas
New York, NY 10020
1.800.967.2346
© 2011 Sirius XM Radio Inc.
XDNX1VKQSG 032311a
Self installation instructions and tips are provided for your convenience. It is your
responsibility to determine if you have the knowledge, skills and physical ability
required to properly perform an installation. SiriusXM shall have no liability for
damage or injury resulting from the installation or use of any SiriusXM or third
party products. It is your responsibility to ensure that all products are installed in
adherence with local laws and regulations and in such a manner as to allow a vehicle
to be operated safely and without distraction. SiriusXM product warranties do not
cover the installation, removal or reinstallation of any product.
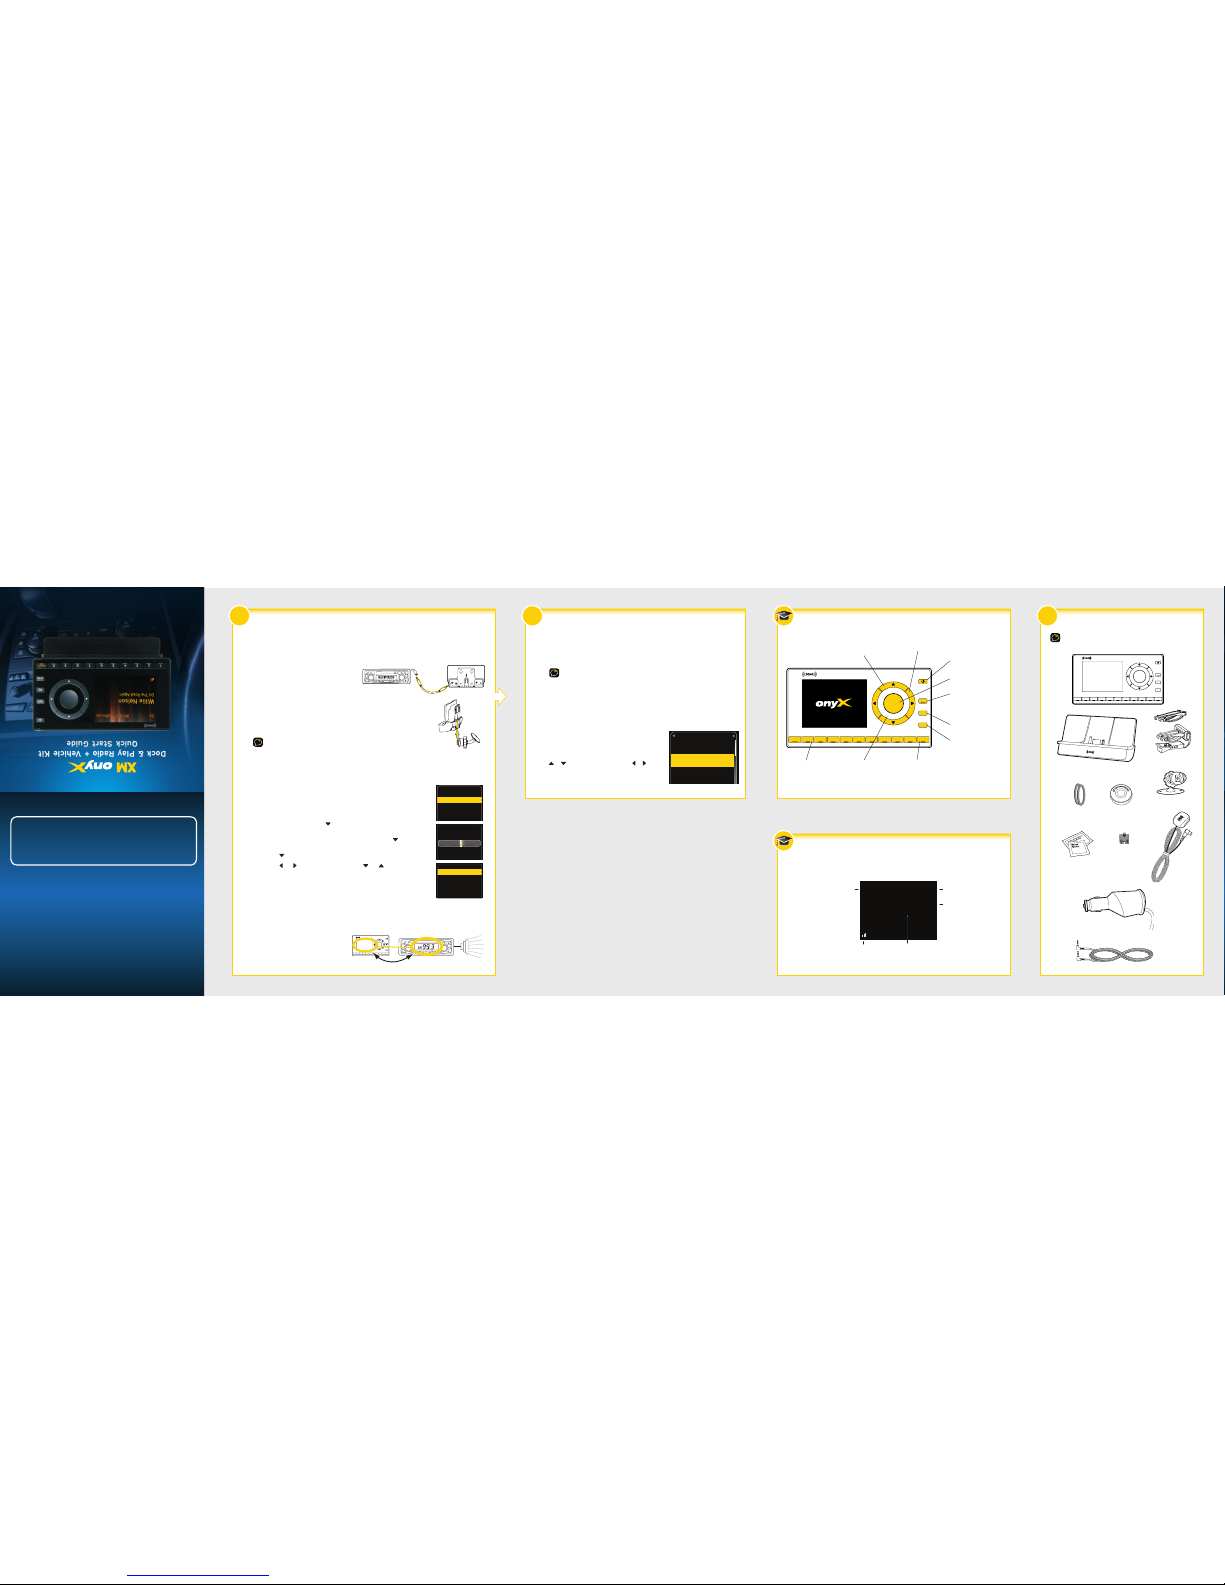
Decide on one of the following in-box audio connection options. Refer to “Connect the Audio” on page 41 of the
User Guide for details including other connection options.
Option 1: Best: Use the provided Aux In Cable, if your vehicle’s stereo system has an auxiliary input jack.
A. Plug one end of the cable into the green
AUDIO connector on the PowerConnect
Vehicle Dock and the other end into the
auxiliary input jack on the vehicle’s stereo
system.
B. Turn on your vehicle’s stereo system and set
it to play from the auxiliary input source.
C. You should now hear the XM channel 1.
D. Attach the dock to the mount and place the wires into the wire guide. The
installation is complete.
TIP! Refer to your vehicle’s owner’s manual to find the location of the auxiliary input jack,
or consult the vehicle dealer.
Option 2: Good: Use the PowerConnect™ feature of OnyX. PowerConnect plays the XM audio through your
vehicle’s FM radio.
A. Find and make a list of all available FM channels in your area that are not being used by an FM radio
station.
B. Pick the first FM channel on your list. Tune your vehicle’s FM radio to this FM
channel.
C. Set your OnyX to transmit on the same FM channel that you have selected on
your vehicle’s FM radio:
i. Press menu and then press to scroll to and highlight FM Settings. Press
the Select button.
ii.
FM Channels will be highlighted. If it is not highlighted, press to scroll to and
highlight FM Channels. Press the Select button.
iii. Press
to scroll to and highlight FM2. Press the Select button.
iv. Press and to tune in steps of .2, or press and to tune in steps of 1 to
select the available FM channel you have chosen. Press the Select button to
select the FM channel.
v. Start Using will be highlighted. P
ress the Select button.
vi. The selected FM channel will be confirmed on the display screen.
D. You should hear XM channel 1 through your vehicle’s FM radio. If you are satisfied with the sound quality,
the installation is complete.
E. If you are not satisfied, move to the next FM channel on your list and repeat the process. Continue until
you have found an FM channel with
which you are satisfied.
F. Attach the dock to the mount and place
the wires into the wire guide.
AUDIO ANT PWR FM
2
3 4 5 6 7 8 9 0
direct
jump
FM
menu
1
99.3
MATCH FM CHANNELS
2
3
4
5
6
7
8
9
0
direct
jump
FM
menu
1
Edit FM Channel 2
99.3 FM
and Select to confirm
Press arrow keys to tune
FM Channel 2
Start Using
Edit Channel
FM Channels
current
FM 1
FM 2
FM 3
FM 4
FM 5
97.9
_ _ _
_ _ _
_ _ _
_ _ _
Connect the Audio
CAUTION: Do not attempt to install, activate, or adjust any of the
setting options described in this Quick Start Guide unless your vehicle
is parked in a safe location.
2
3 4 5 6 7 8 9 0
direct
jump
FM
menu
1
OnyX Radio
PowerConnect Vehicle Dock
Magnetic Mount
Antenna
Antenna & Dash Mount
Alcohol Preparation Pads
PowerConnect Power Adapter
Aux In Cable
Dash Mount
Trim Rings
Vent Mount
and Extended
Vent Clamps
Trim Ring Removal Tool
Cable
Routing Adapter
Direct Button
Press first before
entering the channel
number, to directly
tune to a channel.
2
3 4 5 6 7 8 9 0
direct
jump
FM
menu
1
Power Button
Press to turn Radio on
and off.
Left and Right Buttons
Press to search for
channels by category.
Up and Down Buttons
Press to preview and tune
to channels through the
channel lineup; also press
to scroll through lists and
highlight menu items.
Menu Button
Press to access advanced
features and configuration
options; in configuration
options, press and hold
to return to main display
screen.
Select Button
Press to confirm
selection of highlighted
items in a menu or list.
FM Button
Press to access and cycle
through FM presets.
Jump Button
Press to directly access
traffic and weather for
the city of your choice;
or press it to go back to
the previous channel to
which you were listening.
Number Buttons
Press to tune to a stored
favorite channel, press
and hold to store a
favorite channel; also
enter a channel number.
Trim Ring
Changeable
decorative
Trim Ring.
Tom Petty
I Should Have Known It
28 The Spectrum
Antenna Signal
Strength
Channel Number
Channel Name
Artist Name
or Talk Show Host
or Sports Teams/Score
Song/Program Title
or Talk Show Schedule
or Game Time/Game Details
When listening to a channel, information about the channel and what is currently playing is displayed.
OnyX Button Functions
OnyX Main Display
Subscribe
A. Make sure your OnyX is turned on, and receiving the XM signal so that you can hear the
XM audio.
B. Make a note of your XM Radio ID. You can find it by selecting Radio ID in menu items, by
tuning to channel 0, on a label on the bottom of the gift box, and on the label on the back
of your OnyX.
NOTE! The XM Radio ID does not use the letters I, O, S, or F.
C. To subscribe:
•Online: Go to www.siriusxm.com and click on “How Do I Activate a Radio?” and
then click on the “Activate my radio” button to subscribe
OR
•By phone: Call 1-800-XM-RADIO (1-800-967-2346)
Activation usually takes 10 to 15 minutes after you have
completed the subscription process, but may take up to
an hour. We recommend that your Radio remain on until
subscribed. Once subscribed, the Radio will receive and you
can tune to channels in your subscription plan.
Press or to tune to other channels, and or to
browse the different categories of channels. Learn what all
the buttons do on the opposite side of this Quick Start
Guide.
Rock
22
23
24
Pearl Jam Radio
Pearl Jam/Better Man
Grateful Dead/Truckin’
Jimmy Buffett/Fins
Grateful Dead
Margaritaville
Dock & Play Radio + Vehicle Kit
Quick Start Guide
 Loading...