

Page 1
LAMPA
PIERŚCIENIOWA
SF401
Instrukcja obsługi
iwarunki gwarancji
SF401
RING LIGHT
Operating Manual
& Warranty Terms
Page 2

WARUNKI BEZPIECZEŃSTWA IZAGROŻENIA
1. Niniejszy sprzęt może być użytkowany przez dzieci wwieku co
najmniej 8 lat iprzez osoby oobniżonych możliwościach fizycznych,
umysłowych iosoby obraku doświadczenia iznajomości sprzętu,
jeżeli zapewniony zostanie nadzór lub instruktaż odnośnie
użytkowania sprzętu wbezpieczny sposób izrozumiałe związane
ztym zagrożenia. Dzieci nie powinny bawić się sprzętem. Nie
powinno być wykonywane czyszczenie ikonserwacja sprzętu
przez dzieci bez nadzoru.
2. Nie zanurzać urządzenia wwodzie ani innym płynie.
3. Urządzenie jest przeznaczone doużytku domowego.
4. Nie należy przenosić urządzenia chwytając za przewód.
5.
Nie narażać urządzenia naszkodliwe warunki atmosferyczne,
nadmierne nasłonecznienie, wilgoć.
6. Nie należy obsługiwać urządzenia mokrymi dłońmi.
7.
Nie należy uruchamiać urządzenia, gdy nie jest kompletnie
zmontowane.
8.
Nie należy używać uszkodzonego urządzenia lub urządzenia
z uszkodzonymi elementami.
9.
Nie należy umieszczać urządzenia wpobliżu otwartego ognia,
grzejników, urządzeń grzewczych lub innych urządzeń wytwarzających ciepło.
10.
Nie należy ingerować we wnętrzu urządzenia izmieniać jego
konstrukcji.
11. Należy odłączyć wtyczkę USB zgniazda zasilania, jeżeli produkt
nie będzie używany dłuższy czas.
12. Należy wkładać baterię dopilota według wskazań (+ i-) znajdujących się wschowku nabaterie.
13. Należy wyjąć baterię zpilota, jeżeli nie będzie używany dłuższy
czas.
2
Page 3
14.
Należy upewnić się, że baterie pilota zdalnego sterowania nie
znajdują się wzasięgu dzieci inie mają one doniego dostępu.
15.
Wprzypadku połknięcia baterii, natychmiast należy skonsultować
się zlekarzem.
16. Nigdy nie wrzucać baterii doognia.
OSTRZEŻENIE! PRODUKT TEN PRZEZNACZONY JEST DO UŻYTKU W CELU
REJESTROWANIA MATERIAŁU FOTOGRAFICZNEGO / VIDEO I NIE JEST
PRZEZNACZONY DO INNYCH ZASTOSOWAŃ.
WPROWADZENIE
Dziękujemy zazaufanie, jakim nas Państwo obdarzyli, dokonując zakupu urządzenia marki X-Line.
Jesteśmy przekonani, że tobardzo dobrej jakości urządzenie zapewni Państwu dużo radości isatysfakcji
zjego użytkowania.
NALEŻY DOKŁADNIE PRZECZYTAĆ INSTRUKCJĘ OBSŁUGI IJEJ PRZESTRZEGAĆ!
Tourządzenie jest przeznaczone doużytku domowego lub podobnego, niedotyczącego celów komercyjnych.
Producent nie ponosi odpowiedzialności zaszkody powstałe wwyniku użytkowania niewłaściwego lub
niezgodnego zprzeznaczeniem.
DANE TECHNICZNE
Model SF401
Napięcie iprąd zasilania 5.0V 2.0A
Moc znamionowa 12W
Użyteczny strumień świetlny 1200lm
Zakres temperatury barwowej 3000-6500K
Znamionowy okres trwałości 40000 godzin
Źródło światła 120 sztuk LED 2835 +30 sztuk RGB LED
Wymiary Średnica lampy 26 cm
Wyposażenie
Lampa, statyw zregulatorem kąta, pilot, uchwyt
natelefon, instrukcja
3
Page 4
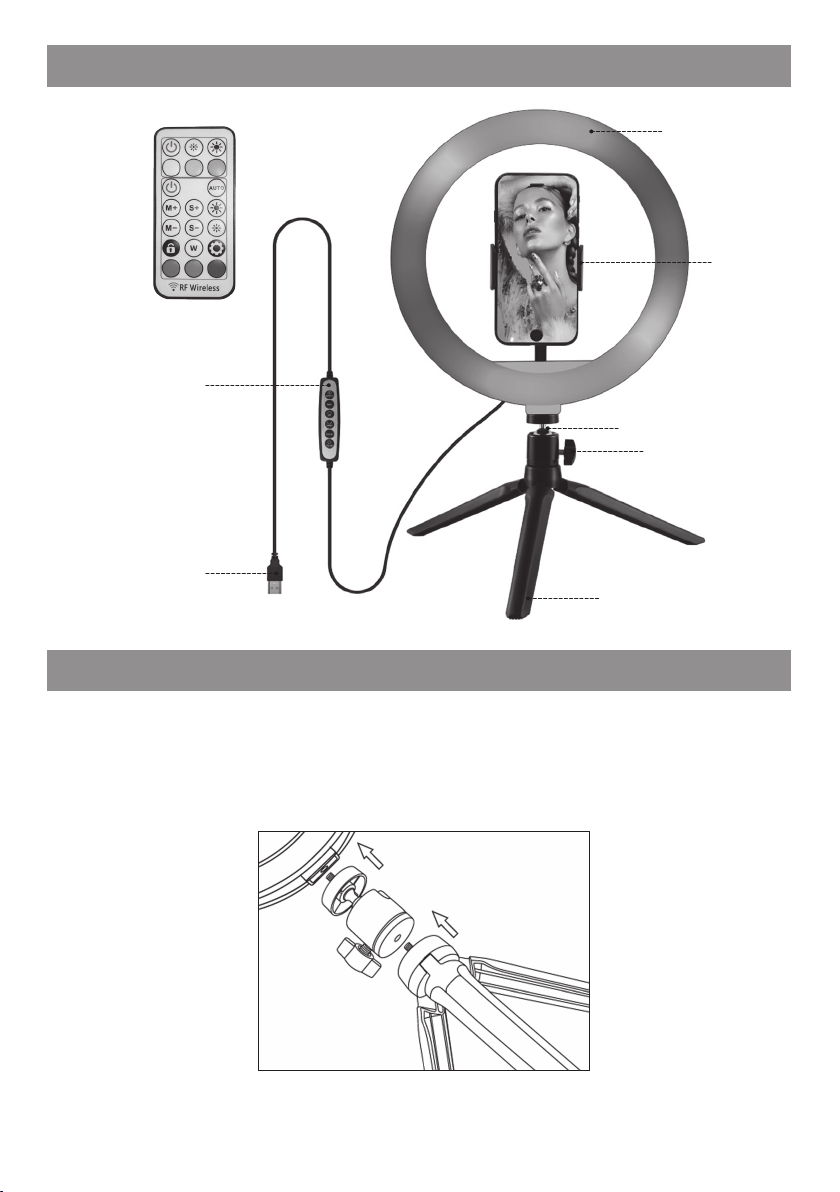
Pilot IR
Kontroler światła
Wtyczka zasilająca USB
OPIS URZĄDZENIA
Lampa
pierścieniowa
Uchwyt na
telefon
Regulator kąta nachylenia
Pokrętło regulatora
nachylenia
Statyw
MONTAŻ URZĄDZENIA
1.
Rozpakuj urządzenie, zdejmij wszelkie zabezpieczenia inaklejki następnie sprawdź, czy urządzenie ijego
przewód zasilający nie są uszkodzone. Wrazie uszkodzeń nie należy uruchamiać urządzenia.
2. Wkręć gwint regulatora nachylenia wotwór wlampie pierścieniowej.
3. Wkręć gwint statywu wotwór wspodzie regulatora nachylenia:
4
Page 5
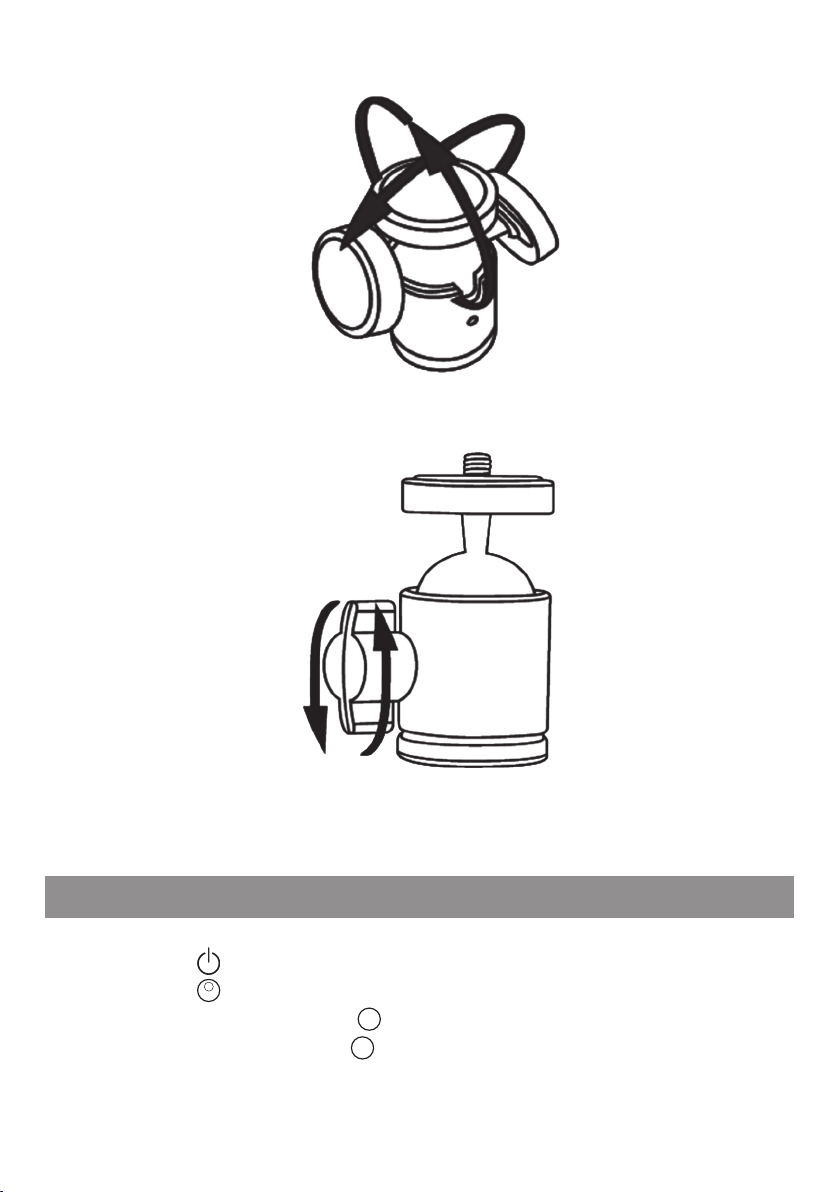
4. Postaw lampę nastatywie, odkręć pokrętło regulatora iustaw odpowiedni kąt za pomocą regulatora
nachylenia:
Następnie dokręć pokrętło regulatora nachylenia aby zablokować lampę wustawionej pozycji:
5.
Wkręć gwint uchwytu natelefon wotwór wwewnętrznej stronie lampy. Rozszerz uchwyt izamocuj
wnim telefon.
URUCHOMIENIE IOBSŁUGA
1. Podłącz wtyczkę USB doportu zasilania onapięciu DC 5V: komputera, zasilacza, power banka.
2. Naciśnij przycisk , aby włączyć lub wyłączyć urządzenie.
3. Naciśnij przycisk
4. Ustaw kolor światła naciskając przycisk
5. Ustaw tryb światła naciskając przycisk
UWAGA! LAMPĘ NALEŻY PODŁĄCZAĆ DO STABILNEGO ŹRÓDŁA ZASILANIA, ZGODNIE ZPARAMETRAMI
PODANYMI WDANYCH TECHNICZNYCH INA TABLICZCE ZNAMIONOWEJ.
3
Colour
, aby zmienić barwę światła.
MODE
RGB
.
.
5
Page 6
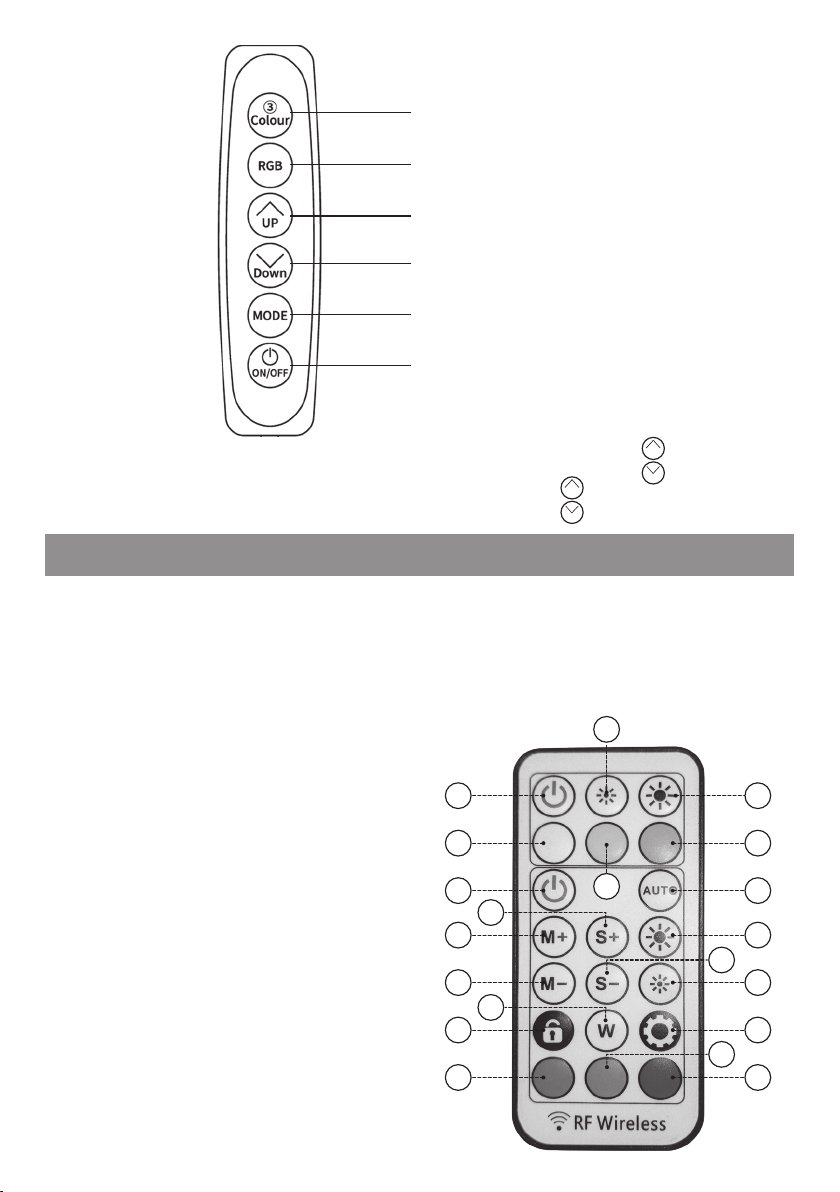
Wybór barwy światła
Wybór koloru
Zwiększenie mocy światła, prędkości trybów
Zmniejszenie mocy światła, prędkości trybów
Wybór trybu światła
Przycisk włącz/wyłącz
6. Wcelu zmiany prędkości trybu światła naciśnij iprzytrzymaj jeden zprzycisków
7. Wcelu zmiany mocy światła naciśnij kilkukrotnie jeden zprzycisków
UP
.
Down
UP
.
Down
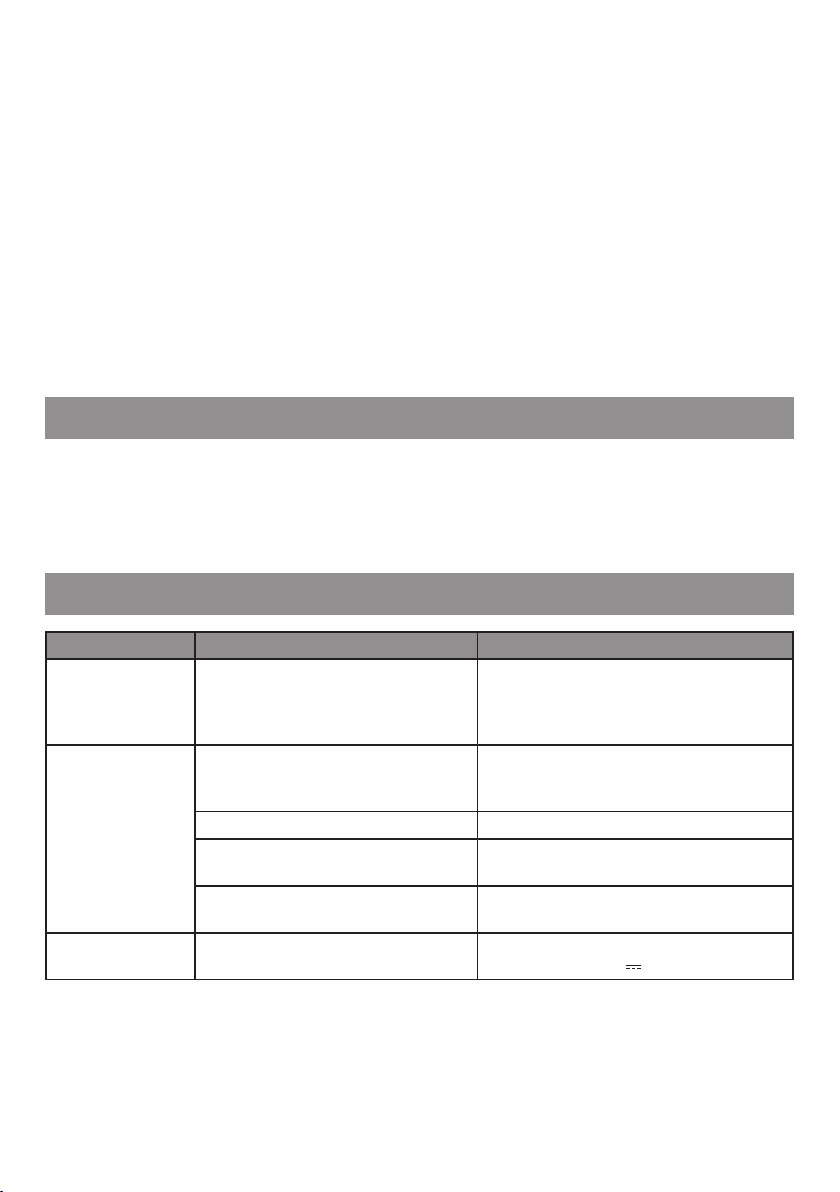
OBSŁUGA PILOTA ZDALNEGO STEROWANIA
UWAGA! W CELU KORZYSTANIA Z PILOTA ZDALNEGO STEROWANIA, NALEŻY UPRZEDNIO WYJĄĆ BLISTER
ZABEZPIECZAJĄCY BATERIE ZASILAJĄCĄ
1. Włącz/Wyłącz sterowanie barwą
2. Moc światła +
3. Moc światła –
4. Barwa światła zimna
5. Barwa światła naturalna
6. Barwa światła ciepła
7. Włącz/Wyłącz sterowanie RGB
8. Automatyczna zmiana kolorów itrybów
9. Zmiana trybu +
10. Zmiana szybkości +
11. Moc światła +
12. Zmiana trybu –
13. Zmiana szybkości –
14. Moc światła –
15. Blokada sterowania
16. Tryb zimnego światła
17. Parowanie pilota zlampą
18. Tryb światła (Czerwony)
19. Tryb światła (Zielony)
20. Tryb światła (Niebieski)
3
1 2
4 6
7
5
10
9
12
16
15
18
8
11
13
14
17
19
20
6
Page 7
Po każdym odłączeniu lampy od zasilania urządzenie przejdzie doustawień domyślnych. Wcelu sparowania
pilota zlampą ipamięci ustawień światła, należy sparować pilot zlampą:
- podłącz urządzenie dozasilania,
- naciśnij iprzytrzymaj przycisk „Parowania pilota zlampą (17)”, następnie naciśnij przycisk „Włącz/Wyłącz”
sterowanie RGB (7).
UWAGA! UŻYWAJĄC PILOTA NALEŻY KIEROWAĆ GO WKIERUNKU LAMPY PIERŚCIENIOWEJ. ZASIĘG PILOTA
WYNOSI OKOŁO METRÓW.
WYMIANA BATERII WPILOCIE
Wcelu wymiany baterii nanową postępuj zgodnie zinstrukcją naobudowie pilota:
- dociśnij przycisk zwolnienia wstronę szufladki, następnie ją wyjmij,
- wymień baterię CR2025 wkładając ją zawsze biegunem „+” skierowanym dogóry,
- wsuń szufladkę zbaterią izablokuj we wnęce.
CZYSZCZENIE
UWAGA! PRZED CZYSZCZENIEM WYŁĄCZ URZĄDZENIE IPOCZEKAJ AŻ OSTYGNIE
1. Przetrzyj klosz lampy oraz akcesoria za pomocą suchej ściereczki.
UWAGA! NE MYJ URZĄDZENIA WODĄ, NIE UŻYWAJ ŚRODKÓW CHEMICZNYCH , PONIEWAŻ MOGĄ ONE
POWODOWAĆ ODBARWIENIA.
PROBLEMY IROZWIĄZANIA
PROBLEM MOŻLIWA PRZYCZYNA ROZWIĄZANIE
Urządzenie nie
uruchamia się.
Pilot zdalnego
sterowania nie działa.
Lampa gaśnie w
trakcie pracy.
Urządzenie nie zostało podłączone
do zasilania lub zostało podłączone
nieprawidłowo.
Pilot znajduje się zbyt daleko od odbiornika
podczerwieni lub kierowany jest pod zbyt
dużym kątem.
Słaba bateria. Wymień baterię wpilocie.
Pilot nie został włączony. Włącz pilot naciskając przycisk Wł./Wył.
Sterowanie zostało zablokowane. Naciśnij przycisk blokady sterowania iodblokuj
Moc zasilania jest zbyt niska. Użyj zasilacza o minimalnej mocy 10W,
7
Podłącz wtyczkę USB przewodu zasilającego
do gniazda USB wkomputerze, notebooku,
ładowarce sieciowej lub power banku onapięciu
wyjściowym DC 5V.
Podejdź bliżej odbiornika, zmniejsz kąt sterowania
sterowania barwą światła lub RGB.
funkcję sterowania pilotem.
pilotem.
5.0V 2.0A,
Page 8
EKOLOGICZNA IPRZYJAZNA DLA ŚRODOWISKA UTYLIZACJA
Tourządzenie jest oznaczone, zgodnie zDyrektywą Parlamentu Europejskiego iRady 2012/19/UE zdnia
4 lipca 2012r. wsprawie zużytego sprzętu elektrycznego ielektronicznego (WEEE) symbolem przekreślonego
kontenera naodpady:
Nie należy wyrzucać urządzeń oznaczonych tym symbolem, razem zodpadami domowymi.
Urządzenie należy zwrócić dolokalnego punktu przetwarzania iutylizacji odpadów lubskontaktować się
zwładzami miejskimi.
MOŻESZ POMÓC CHRONIĆ ŚRODOWISKO!
Właściwe postępowanie zezużytym sprzętem elektrycznym ielektronicznym przyczynia się douniknięcia
szkodliwych dla zdrowia ludzi iśrodowiska naturalnego konsekwencji, wynikających zobecności składników
niebezpiecznych oraz niewłaściwego składowania iprzetwarzania takiego sprzętu.
WARUNKI GWARANCJI DOTYCZĄCE LAMPY
1. ART-DOM Sp. zo.o. zsiedzibą wŁodzi (92-402) przy ul. Zakładowej 90/92 Numer Krajowego Rejestru
Sądowego 0000354059 (Gwarant) gwarantuje, że zakupione urządzenie jest wolne od wad fizycznych.
Gwarancja obejmuje tylko wady wynikające zprzyczyn tkwiących wrzeczy sprzedanej (wady fabryczne).
2. Ujawniona wada zostanie usunięta nakoszt Gwaranta wciągu 14 dni od daty zgłoszenia uszkodzenia
doserwisu autoryzowanego lub punktu sprzedaży.
3.
Wwyjątkowych przypadkach, np. konieczności sprowadzenia części zamiennych od producenta, termin
naprawy może zostać wydłużony do30 dni.
4. Okres gwarancji dla użytkownika wynosi 24 miesiące od daty wydania towaru.
5.
Towar przeznaczony jest doużywania wyłącznie wwarunkach indywidualnego gospodarstwa domowego.
6. Gwarancja nie obejmuje:
a. uszkodzeń powstałych naskutek używania urządzenia niezgodnie zinstrukcją obsługi,
b. uszkodzeń mechanicznych, chemicznych lub termicznych,
c. napraw imodyfikacji dokonanych przez firmy lub osoby nieposiadające autoryzacji producenta,
d. części znatury łatwo zużywalnych lub materiałów eksploatacyjnych takich jak: baterie, żarówki,
bezpieczniki, filtry, pokrętła, półki, akcesoria,
e. instalacji, konserwacji, przeglądów, czyszczenia, odblokowania, usunięcia zanieczyszczeń oraz
instruktażu.
7.
Osposobie usunięcia wady decyduje Gwarant. Usunięcie potwierdzonej wady urządzenia nastąpi
poprzez wykonanie naprawy gwarancyjnej lub wymianę urządzenia. Gwarant może dokonać naprawy,
gdy kupujący żąda wymiany lub Gwarant może dokonać wymiany, gdy kupujący żąda naprawy, jeżeli
doprowadzenie dozgodności towaru (urządzenia) zgodnie zudzieloną gwarancją wsposób wybrany
przez kupującego jest niemożliwe albo wymagałoby nadmiernych kosztów dla Gwaranta. Wszczególnie
uzasadnionych wypadkach, jeżeli naprawa iwymiana są niemożliwe lub wymagałyby nadmiernych
kosztów dla Gwaranta może on odmówić doprowadzenia towaru dozgodności zudzieloną gwarancją
izaproponować inny sposób załatwienia reklamacji z gwarancji.
8
Page 9

8.
Wymiany towaru dokonuje punkt sprzedaży, wktórym towar został zakupiony (wymiana lub zwrot
gotówki) lub autoryzowany punkt serwisowy, jeżeli dysponuje taką możliwością (wymiana). Zwracane
urządzenie musi być kompletne, bez uszkodzeń mechanicznych. Niespełnienie tych warunków może
spowodować nieuznanie gwarancji.
9.
Wprzypadku braku zgodności towaru zumową sprzedaży, kupującemu zmocy prawa przysługują środki
ochrony prawnej ze strony inakoszt sprzedawcy, agwarancja nie ma wpływu nate środki ochrony prawnej.
10. Niniejsza gwarancja obowiązuje naterytorium Polski.
11.
Warunkiem dokonania naprawy lub wymiany urządzenia wramach gwarancji jest przedstawienie dowodu
zakupu oraz użytkowanie towaru zgodnie zinformacjami zawartymi winstrukcji obsługi.
UWAGA!
Uszkodzenie lub usunięcie tabliczki znamionowej zurządzenia może spowodować nieuznanie gwarancji.
Cały czas udoskonalamy nasze produkty, dlatego mogą się one nieznacznie różnić od zdjęć przedstawionych na opakowaniu oraz w instrukcji obsługi.
Przed przystąpieniem do użytkowania urządzenia przeczytaj instrukcję obsługi.
ART-DOM Sp. z o.o., ul. Zakładowa 90/92, 92-402 Łódź, info@ar tdom.net.pl. Numer Krajowego Rejestru Sądowego 0000354 059.
9
v. 1
Page 10

SAFETY AND HAZARD PRECAUTIONS
1. This product may only be operated by children aged 8ormore,
by mentally and/or physically deficient persons, and by persons
without knowledge of or experience in operating this appliance
provided that they are supervised and/or have been instructed
in its safe operation, and as aresult have clear understanding
of all related risks. Children should not play with the device.
Unsupervised children should not carry out maintenance and
cleaning of the device.
2. Do not immerse the device in water or in any other liquid.
3. The device is designed for domestic use.
4. Do not carry the device by holding the power cord.
5.
One shall not expose the device to harmful atmospheric conditions,
excessive sunlight, moisture.
6. Do not operate the device with wet hands.
7. Do not start the device until it is fully assembled.
8.
Do not use a damaged device or one with damaged components.
9.
Do not place the device near open flames, heaters, heating
appliances or other heat generating appliances.
10.
Do not interfere with the interior of the device nor alter its design.
11. Disconnect the USB plug from the power socket if the product
will not be used for a long time.
12.
Insert the battery into the remote control according to the
indications (+ and -) in the battery compartment.
13. Remove the battery from the remote control if it will not be used
for a longer time.
14. Make sure that the batteries of the remote control are not within
the reach of children and they do not have access to it.
15. If a battery is swallowed, immediately seek medical assistance.
16. Never throw batteries into a fire.
10
Page 11
INTRODUCTION
Thank you for the trust you have placed in us when you purchased your X-Line brand device.
We are convinced that this high quality device will provide you with a lot of joy and satisfaction during its use.
PLEASE CAREFULLY READ AND FOLLOW THE OPERATING MANUAL!
This device is intended for domestic or similar, non-commercial use.
The manufacturer will not be held liable for damages resulting from improper or non-compliant use..
TECHNICAL DATA
Model SF401
Supply voltage and current 5.0V 2.0A
Rated power 12W
Useful luminous flux 1200lm
Colour temperature range 3000-6500K
Rated service life 40000 hours
Light source 120pcs 2835 LEDs +30pcs RGB LED
Dimensions Light diameter 26 cm
Accessories
Lamp, tripod with angle adjuster, remote control, phone
holder, manual
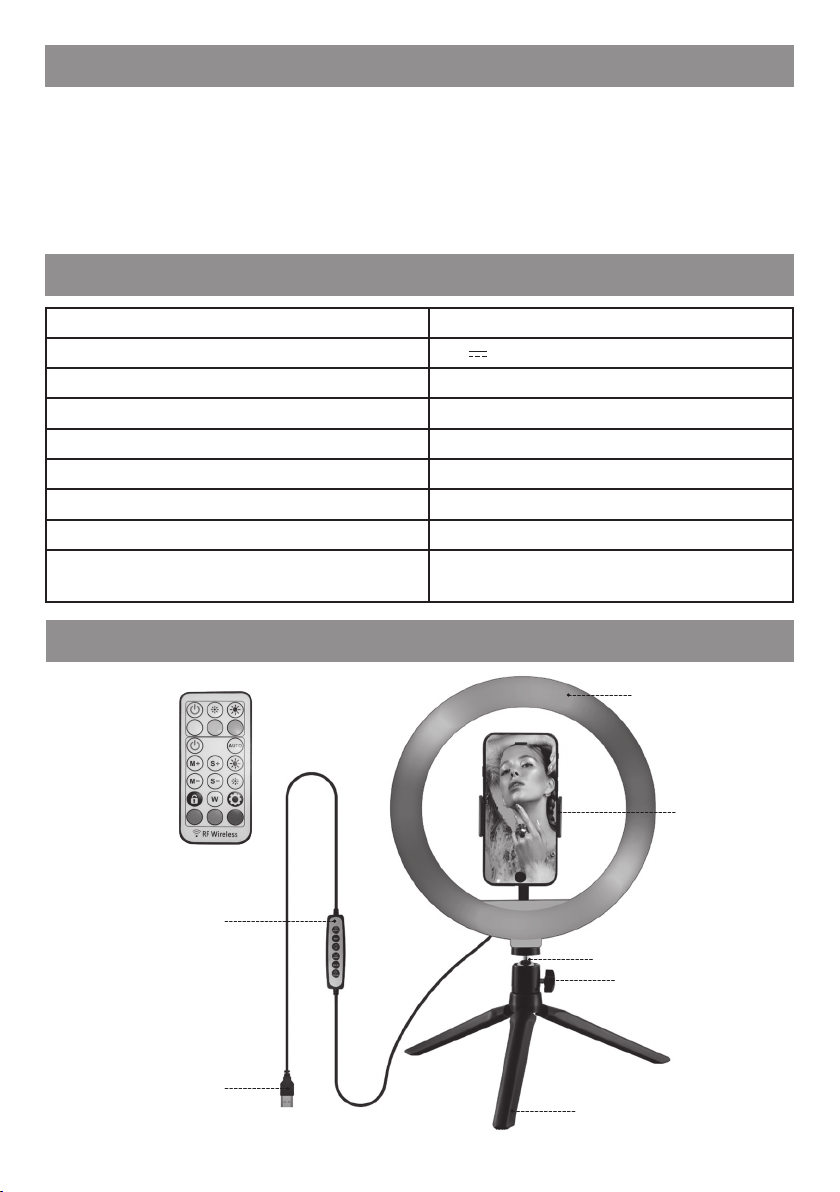
DEVICE DESCRIPTION
IR Remote
Light controller
USB supply plug
Ring light
Phone holder
Tilt angle adjuster
Tilt adjuster knob
Stand
11
Page 12
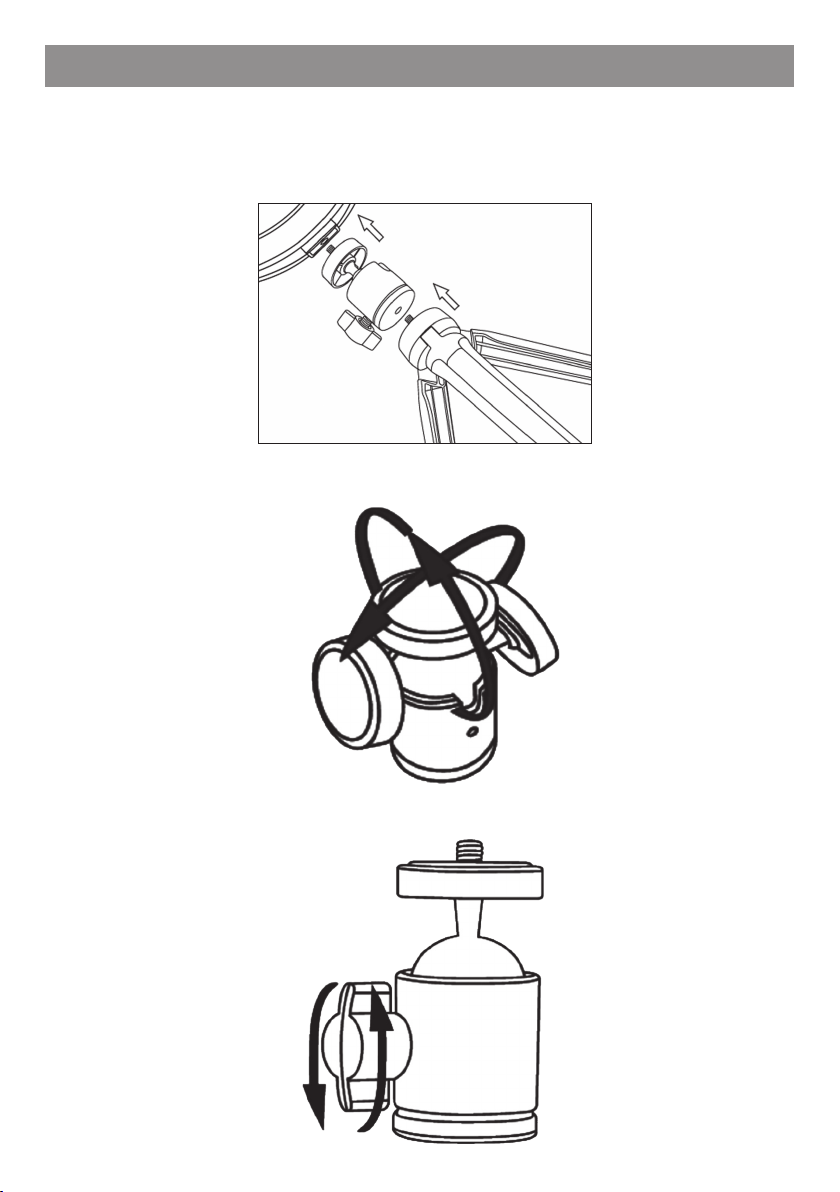
INSTALLATION OF THE DEVICE
1. Unpack the device, remove all protections and stickers, then check that the device and its power cord
are not damaged. If damaged, do not start the device.
2. Screw the thread of the angle adjuster into the hole in the ring light.
3. Screw the stand thread into the hole at the bottom of the angle adjuster:
4.
Place the light on the stand, unscrew the adjuster knob and set the correct angle with the angle adjuster:
Tighten the angle adjuster knob to lock the light in position:
12
Page 13
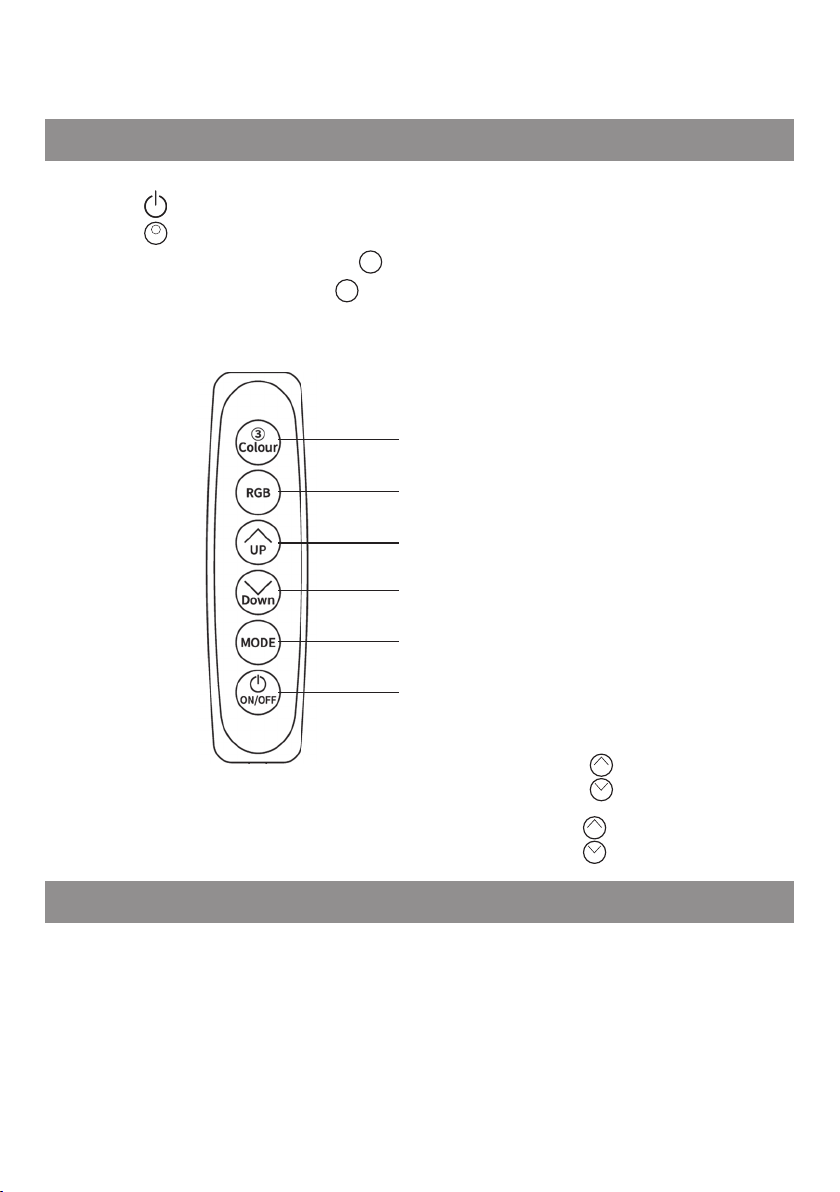
5. Screw the phone holder thread into the hole on the inside of the light. Extend the handle and attach
phone to it.
INITIAL STARTUP AND OPERATION
1. Connect the USB plug to the DC 5V power port of: computer, power supply, power bank.
2. Press the button, to turn on or o the device.
3. Press the
4. Set the color of the light by pressing the
5. 5. Set the light mode by pressing the
CAUTION! THE LIGHT SHOULD BE CONNECTED TO A STABLE POWER SOURCE, IN ACCORDANCE WITH THE
PARAMETERS GIVEN IN THE TECHNICAL DATA AND ON THE NAMEPLATE.
3
Colour
button, to change the colour of the light.
RGB
button.
MODE
button.
Light colour selection
Colour selection
Increase light intensity, speed and mode Decrease
light intensity, mode speed
Light mode selection
ON/OFF Button
6. To change the speed of the light mode, press and hold one of the buttons
7. To change the power of the light, press one of the buttons several times.
UP
.
Down
UP
.
Down
OPERATING THE REMOTE
CAUTION! BEDORE USING THE REMOTE PLEASE REMOVE THE BATTERY PROTECTING BLISTER
1. Enable/Disable Hue Control
2. Light power+
3. Light power-
4. Cold light colour
5. Natural light colour
6. Warm light colour
7. RGB control ON/OFF
8. Automatic colour and mode change
9. Mode change +
10. Speed change +
11. Light power +
12. Mode change –
13
Page 14
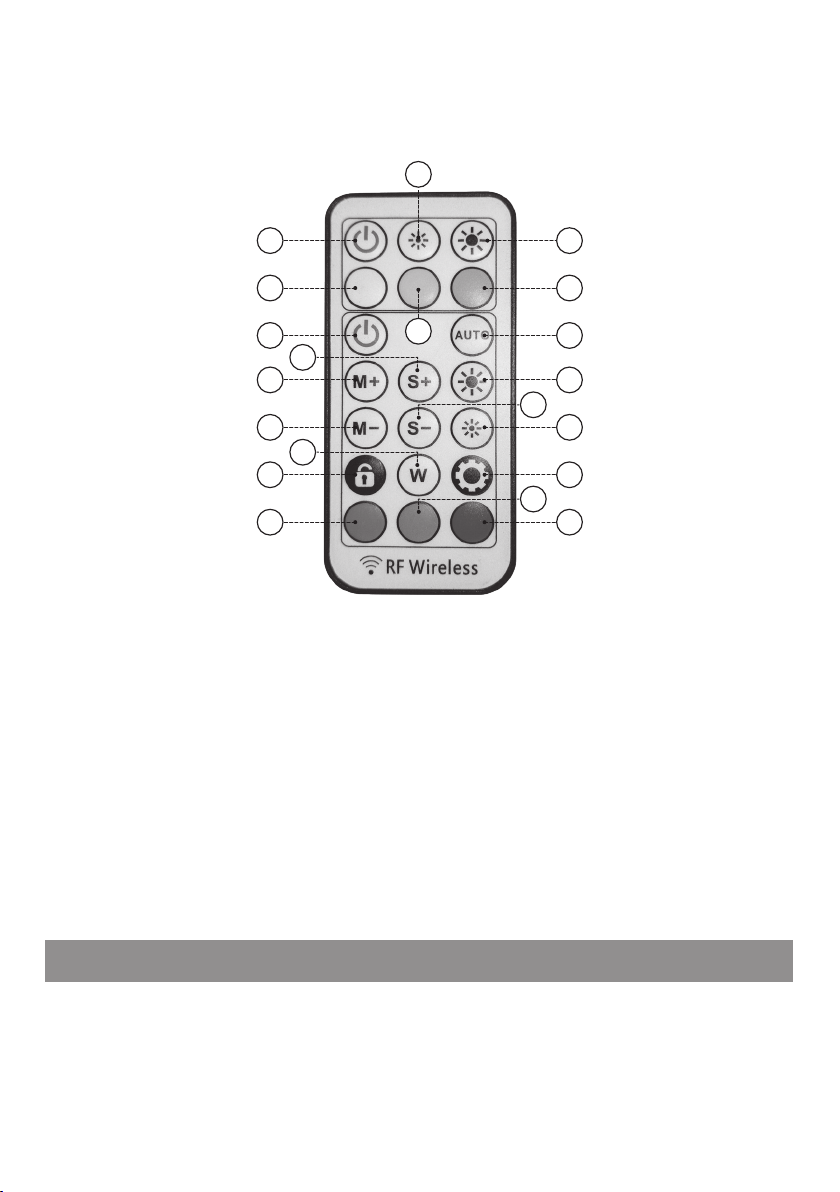
13. Speed change –
14. Light power-
15. Control interlock
16. Cold light mode
17. Pairing the remote with the light
18. Light mode (Red)
19. Light mode (Green)
20. Light mode (Blue)
3
1 2
4 6
7
5
8
10
9
11
13
12
14
16
15
17
19
18
Each time the light is disconnected from the power supply, the device will return to the default settings. To
pair the remote with the light and the light settings memory, pair the remote:
- connect the device to power source,
- press and hold the „Pairing the remote control with the lamp (17)”, then press the RGB control „On/O” button (7).
CAUTION! WHEN USING THE REMOTE, POINT IT TOWARDS THE LIGHT. THE RANGE OF THE REMOTE
CONTROL IS CA. METERS.
REPLACING THE REMOTE BATTERY
To replace the battery with a new one, follow the instructions on the remote control housing:
- press the release button towards the drawer, then remove it,
- replace the CR2025 battery by always inserting it with the „+” pole facing up,
- slide the battery drawer back in and lock it in the recess..
20
CLEANING
CAUTION! BEFORE CLEANING, TURN OFF THE DEVICE AND WAIT FOR IT TO COOL DOWN
1. Wipe the lampshade and accessories using a dry cloth.
CAUTION! DO NOT ATTEMPT TO WASH THE DEVICE WITH WATER, DO NOT USE CHEMICALS AS THEY MAY
CAUSE DISCOLOURATION.
14
Page 15
TROUBLESHOOTING
PROBLEM POSSIBLE CAUSE SOLUTION
The device does not
start.
Remote doesn’t work. The remote control is too far from the
The light goes out
during operation.
The device has not been connected to
the power supply or has been connected
incorrectly.
infrared receiver or at excessive angles.
Low battery. Replace the battery in the remote.
The remote has not been turned on. Turn on the remote control by pressing the Light
The control has been locked. Push the control lock button and unlock the
Insuicient power supply. Use a power supply with a minimum power of
Connect the USB plug of the power cable to the
USB socket on a computer, notebook, mains
charger or power bank with an output voltage of
DC 5V.
Come closer to the receiver, reduce the remote control
angle.
colour or RGB ON/OFF control button.
remote control function.
10W, 5.0V 2.0A,
ECOFRIENDLY AND ENVIRONMENTALLY FRIENDLY DISPOSAL
This device is marked, in accordance with Directive 2012/19/EU of the European Parliament and of the Council
of 4 July 2012 on waste electrical and electronic equipment (WEEE), with the symbol of a crossed-out waste
container:
Do not dispose of the device marked with this symbol together with household waste.
For disposal return the device to your local waste treatment and disposal facility or contact your local authorities.
YOU CAN HELP PROTECT THE ENVIRONMENT!
Właściwe postępowanie zezużytym sprzętem elektrycznym ielekProper handling of waste electrical and
electronic equipment contributes to avoiding harmful consequences for human health and the environment
resulting from the presence of hazardous components and improper storage and processing of such equipment .
WARRANTY CONDITIONS FOR RING LIGHT
1. ART-DOM Sp. z o.o. with its registered oice in Łódź (92-402) at ul. Zakładowa90/92 National Court Register
Number 0000354059 (Guarantor) guarantees that the purchased device is free from physical defects. The
warranty covers only defects resulting from the causes inherent in the item sold (manufac turing defects).
2. A disclosed defect will be removed at the Guarantor’s expense within 14 days from the date of reporting the
damage to the authorized service or point of sale.
3. In exceptional cases, e.g. the need to import spare parts from their manufac turer, the repair period may be
extended up to 30 days.
4. The warranty period for the user is 24 months from the date of delivery of the goods.
5. The goods are intended for use only in the conditions of an individual household.
6. The present warranty does not cover:
15
Page 16

a. damage caused by using the device in a manner inconsistent with the user manual,
b. mechanical, chemical or thermal damage,
c. repairs and modifications made by companies or persons that were not authorized to do so by the
manufacturer,
d. parts that are inherently easy to wear or consumables such as: batteries, bulbs, fuses, filters,
knobs, shelves, accessories,
e. installation, maintenance, inspection, cleaning, unlocking, removal of contaminants and
instruction.
7. The Guarantor will select the mode of defect removal at its own discretion.Removal of a confirmed defect of
the device will take place through warranty repair or replacement of the device. The Guarantor may perform
repairs when the buyer requests replacement or the Guarantor may perform replacements when the buyer
requests repair, if bringing the goods (device) into conformity in accordance with the granted warranty in
the manner selected by the buyer is impossible or would require excessive costs at the part of Guarantor. In
particularly justified cases, if both repair and replacement are impossible or would require excessive costs for
the Guarantor, the Guarantor may refuse to bring the goods into compliance with the granted warranty and
propose another way to settle the warranty claim.
8.
The exchange of goods is made at the point of sale at which the goods werepurchased (replacement or refund) or
an authorized service point , if it oer such service (replacement). The returned device must be complete, without
mechanical damage. Failure to comply with these conditions may result in failure to accept the warranty claim.
9.
In the event of non-compliance of the goods with the sales contract , the buyer is entitled by law to legal protection
measures on the part and at the expense of the seller, and the warranty does not aect these remedies.
10. The present warranty is valid in Poland.
11. The condition for the warranty repair or replacement of the device is the presentation of proof of purchase and
the use of the goods in accordance with the information contained in the operating manual.
CAUTION!
Damage or removal of the rating plate from the device may result in warranty being deemed void.
We are constantly improving our products, so they may dier slightly from the image shown on the packaging. Please read the operating
manual before operating the device.
ART-DOM Sp. z o.o., ul. Zakładowa 90/92, 92-402 Łódź, [email protected]. National Court Register Number 0000354059.
16
v. 1
 Loading...