

X-laser SkyWriter HPX M-5 Product Manual And User Manual

Product Manual and User Guide
For Professional Use Only - FDA Variance Required in the United States
X-Laser strongly recommends keeping this manual with your laser projector at all times as a field
reference.

2
Review the safety and legal notices in this manual carefully before use.
If you have any questions about any of the content of this manual or
the safe operation of your new laser projector, please do not hesitate
to contact your dealer or X-Laser directly.
301-543-1981
866-702-7768
Sales – Dial 1
Support – Dial 2
General Information – Dial 0
support@x-laser.com
www.x-laser.com
info@x-laser.com
9125A Whiskey Bottom Road, Laurel, MD 20723 USA

3
Table of Contents
Introduction .................................................................................................................................................. 5
A note on Mercury equipped projectors ...................................................................................................... 5
Product Labeling ........................................................................................................................................... 6
Safety Notices ............................................................................................................................................... 7
Legal Notice ................................................................................................................................................... 8
Unpacking Your Laser Projector .................................................................................................................... 8
Projector Layout and Functions .................................................................................................................... 9
Mercury Interface layout and functions ..................................................................................................... 10
Power Variations ..................................................................................................................................... 11
General Guidelines for Safe Laser Use ........................................................................................................ 11
General Guidelines for Proper Usage ......................................................................................................... 13
Installation .................................................................................................................................................. 14
Safe Beam and Projection Height ........................................................................................................... 14
Physical beam blocks .............................................................................................................................. 15
Operation .................................................................................................................................................... 16
Before Powering up Your Projector ........................................................................................................ 16
Duty Cycle ............................................................................................................................................... 16
Laser Startup ........................................................................................................................................... 16
The etherStop system ............................................................................................................................. 17
etherStop terminator .......................................................................................................................... 17
etherStop Pendant .............................................................................................................................. 18
The Mercury Menu system ......................................................................................................................... 22
System Status Display ............................................................................................................................. 22
System Menu .......................................................................................................................................... 23
DMX Menu .............................................................................................................................................. 24
Network Menu ........................................................................................................................................ 24
Art-Net Menu .......................................................................................................................................... 24
X/Y Menu ................................................................................................................................................ 25
Colors Menu ............................................................................................................................................ 26
Display Menu .......................................................................................................................................... 26
Manual Operation Menu ........................................................................................................................ 27
Mercury Menu ........................................................................................................................................ 27

4
Content Menu ......................................................................................................................................... 27
Restoring settings ................................................................................................................................... 27
System Update Menu ............................................................................................................................. 28
Controlling your laser projector .................................................................................................................. 29
Master and builders ................................................................................................................................ 29
DMX/Art-Net Control .............................................................................................................................. 31
Personalities ........................................................................................................................................ 31
Control Groups .................................................................................................................................... 32
Correlation with moving lights ............................................................................................................ 33
DMX Parameters ................................................................................................................................. 34
Gobo Guide ......................................................................................................................................... 48
Prism Modes ....................................................................................................................................... 52
Basic builder color presets .................................................................................................................. 53
Basic builder motion presets .............................................................................................................. 54
ILDA Control ............................................................................................................................................ 55
ILDA Settings ....................................................................................................................................... 56
Troubleshooting .......................................................................................................................................... 57
Repair and Return Information ................................................................................................................... 61
Product Registration ............................................................................................................................... 61
Return Material Authorization (RMA) and Shipping ............................................................................... 61
Shipping within Continental USA ........................................................................................................ 61
Shipping outside Continental USA ...................................................................................................... 61
Out of Warranty Repairs ......................................................................................................................... 61
General Notification ................................................................................................................................ 61
Manufacturer’s Limited Warranty .............................................................................................................. 62
Limitation of Liability .............................................................................................................................. 62
Return Policy ........................................................................................................................................... 62
Sample Laser Operator Show Checklist ...................................................................................................... 63
Sample Laser Signage .................................................................................................................................. 64
Questions? Feedback? ................................................................................................................................ 65

5
Introduction
Thank you for purchasing an X-Laser product! You now own one of the most powerful and best crafted
aerial laser display systems ever created for the entertainment industry.
Before leaving our factory, every projector is carefully checked in a comprehensive quality assurance
process to ensure proper and safe operation. In many cases, the quality assurance process is repeated to
ensure that the data from the first quality check remains consistent. With this level of attention to
detail, you can be sure that your new X-Laser has left our factory in absolutely perfect working order.
Please check your laser immediately upon receipt to ensure that it was not damaged in shipping, which
can happen with sensitive optical components.
Your new X-Laser projector is capable of producing absolutely stunning aerial laser effects over
audiences in nearly any performance application with the convenience and flexibility of DMX control.
With the power of X-Laser fixtures also comes a responsibility for safety so we strongly encourage you
to read and follow all of the notices throughout this manual.
Please note that this User Guide is NOT exhaustive. For clients in the United States, Federal law requires
that you use your X-Laser equipment only in compliance with the terms of your FDA variance. We also
recommend that all of our clients, especially those who may be new to high powered laser, seek advice
and further training from experienced laserists and laser safety officers. Light shows of any kind are
always at their best when the designer understands the strengths and weakness of the medium and the
equipment. This is especially true for laser, as the value of experience and training cannot be overstated
when it comes to safely crafting the best possible laser display. If you have any questions about proper
use of your laser system, laser safety, troubleshooting or anything else, visit us on the web 24/7 at
www.x-laser.com so that we can best assist you!
A note on Mercury equipped projectors
Our laser control system, Mercury, was designed from the ground up specifically for use with modern
production grade stage lighting control. There are sometimes substantial differences in the ways these
control systems present the features of the Mercury system. To help you get started, we have created a
series of video tutorials to show you all the basics of the system to help you get up and running on a
wide range of different platforms. Often these videos are the fastest way to learn how to work with
Mercury and we encourage you to check them out.
Please check these videos out on our website at
www.x-laser.com/mercury-tutorials
6
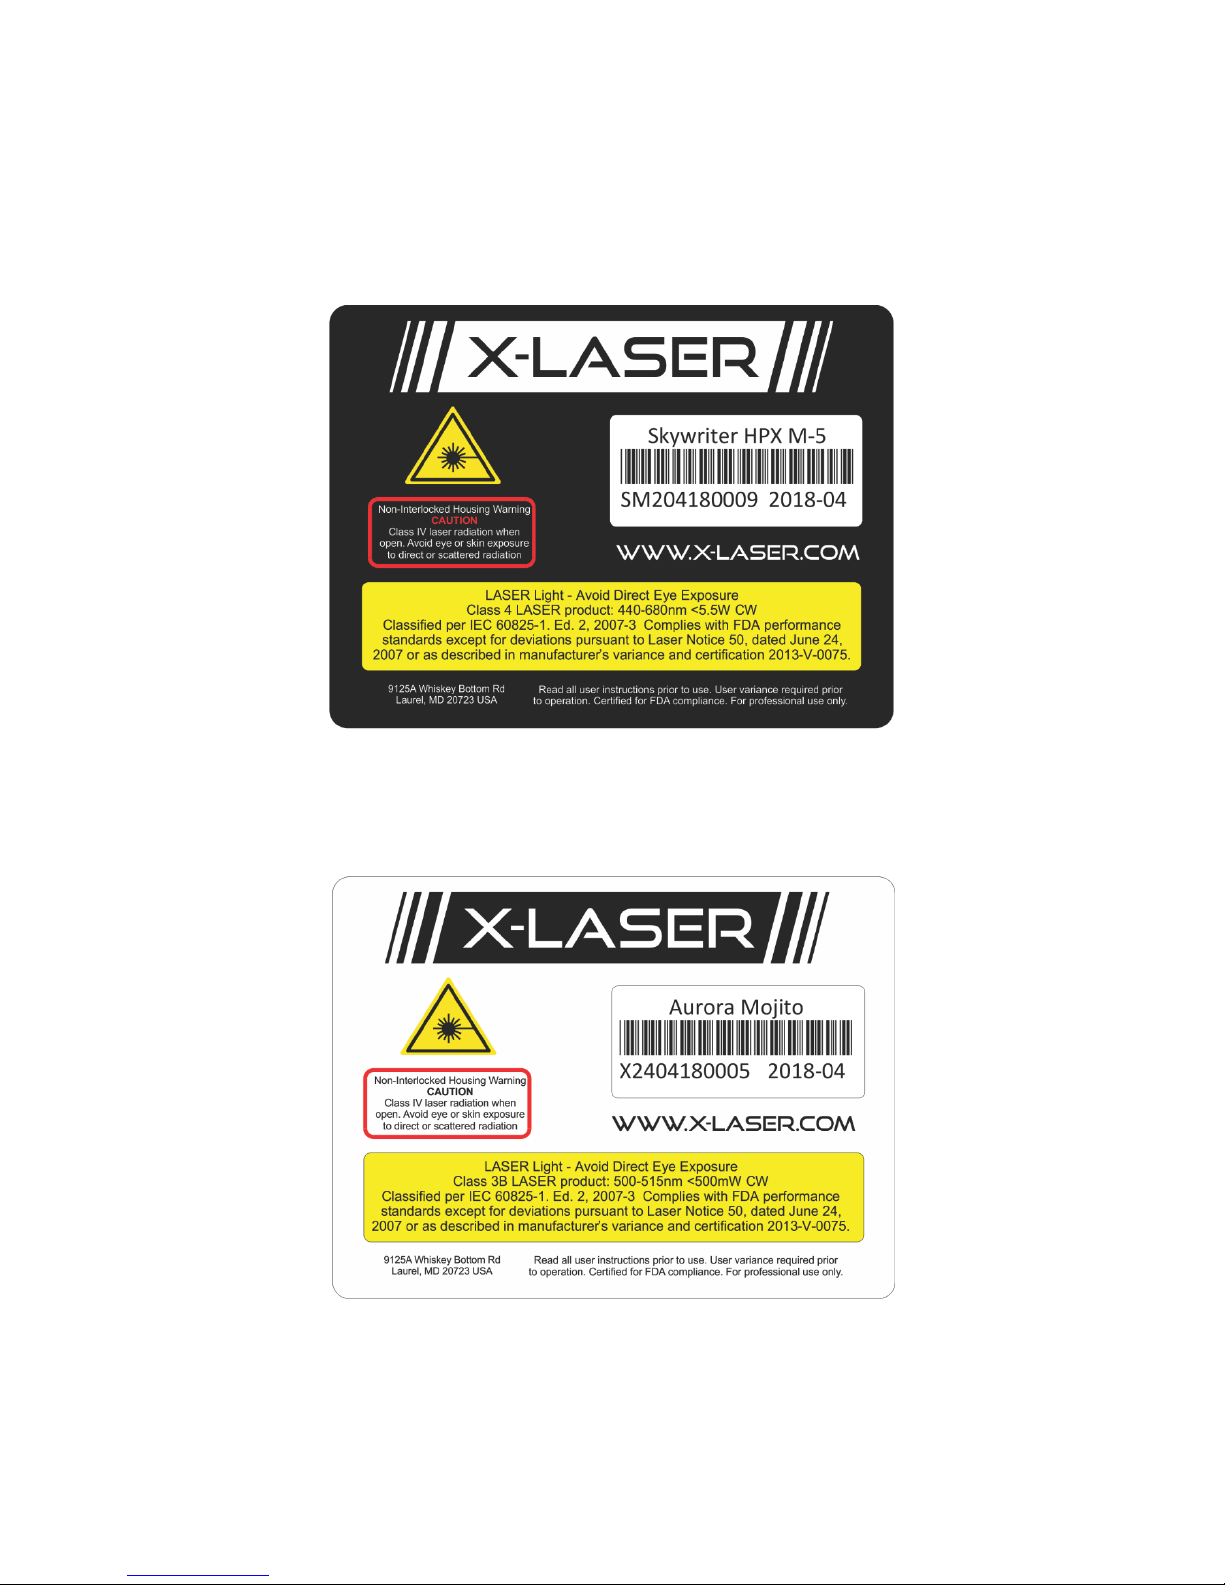
Product Labeling
The following label is affixed to the top of your laser projector; if at any point the label becomes illegible,
please contact X-Laser for a replacement.
Caution--use of controls or adjustments or performance of procedures other than those
specified herein may result in hazardous radiation exposure.

7
Safety Notices
Failure to follow the above precautions and other precautions contained in this user manual, particularly
with regard to human exposure to laser radiation and electrical safety, may result in serious injury, loss
of vision, electric shock, skin damage, and death. Please refer to the section on safe laser projector
usage later in this manual for more detailed operation guidelines. Always be mindful that Class 3B and 4
lasers shoot potentially hazardous radiation at the speed of light. They should be handled and operated
with care and caution.
1. This equipment should only be set up and operated by qualified personnel and under the
supervision of a qualified Laser Safety Officer.
2. Do not expose the human eye directly or indirectly to focused or scattered laser radiation as
loss of vision, complete blindness, and/or other serious injuries may result. Lasers are capable
of starting fires at great distances. Do not use around flammable materials.
3. This fixture is NOT intended for audience scanning effects. Operators must ensure that the
primary laser beam and any reflected beams remain in designated safe areas only. Please refer
to the terms of your specific FDA variance for vertical and lateral separation requirements. In
most cases, to prevent human access to the laser beam all beams are required to pass no closer
than 3m (10ft.) above any surface upon which someone can stand.
4. Always ensure that the fixture is mounted securely to prevent accidental beam shifts.
5. Always ensure that the main power supply is properly grounded before use. Do not use an
ungrounded power cable with this fixture.
6. Always provide both a primary and backup means of instantly terminating laser emissions.
7. Always test your means of termination before every performance.
8. DO NOT USE this fixture if you suspect that it contains a defect of any kind due to
manufacturing, damage, general wear or if the fixture has a broken manufacturer’s seal. Return
the fixture to the factory for service and/or maintenance immediately.
9. DO NOT EVER allow lasers to enter airspace or hit aircraft.
10. This unit should never be left unattended while operational and should always be disconnected
from both signal and power while being transported, rigged, de-rigged, cleaned, or when a
qualified operator is not present. We also recommend removing the key from your etherStop
pendant to prevent unwanted activation by untrained users.
11. Do not stand in front of the laser while active. All persons should wear protective eyewear while
rigging, maintaining, or otherwise working with the laser.
12. There are NO user serviceable parts inside of the fixture. Opening the outer casing may result in
radiation exposure. Any modifications to the fixture are prohibited, may be dangerous, and
require recertification by the manufacturer to maintain compliance with US Federal regulations.
13. Service operations other than those described in this manual must be carried out only by a
qualified technician in accordance with manufacturer’s specified procedures.

8
Legal Notice
1. Before using this product, it is the responsibility of the user to be familiar with all Federal and
State reporting and usage requirements for high powered laser demonstration equipment. Laws
vary by state. Refer to the included user USB drive for more information.
2. In the United States, federal law requires that this product be operated by an FDA variance
holder or an authorized and adequately trained employee under the supervision of an FDA
variance holder. In all cases, this product should only be operated by qualified personnel and
should be kept inaccessible to unauthorized persons before, during, and after use. Keep away
from minors.
3. The labels and emission indicator on this product are required for compliance with US Federal
law and international standards and must be kept on the unit, visible, and in legible condition at
all times. Do remove any labels and do not cover the emission indicator or laser aperture label
under any circumstances. If any labels become damaged, contact X-Laser for replacement.
4. This product must be certified by the manufacturer to comply with US Federal requirements for
laser demonstration equipment after manufacturing, modification, or alteration. The use of
laser demonstration equipment that has not been recertified by the manufacture after any
alteration or modification is a violation of US Federal Regulations.
5. To maintain compliance with US Federal requirements, this product must only be operated and
serviced in accordance with the manufacturer’s specified procedures, including the procedures
described in this manual.
Failure to comply with federal, state, or other applicable laws, codes, and/or standards of practice
when using this product may cause serious and permanent injury and may result in civil or
criminal penalties including fines and jailtime. Such failures to comply may be grounds for
cancellation of liability or other insurance policies and increase the liability exposure of the user.
Unpacking Your Laser Projector
Your new X-Laser Skywriter HPX laser projector box should contain the following items:
1. X-Laser Skywriter HPX M-5 laser projector
2. A grounded powercon True1 cable
3. Laser projector key
4. etherStop terminator
5. “Black wrap” beam blocking foil
6. A USB key containing this manual, letters, forms, and a wealth of other information about this
product and laser safety in general
9
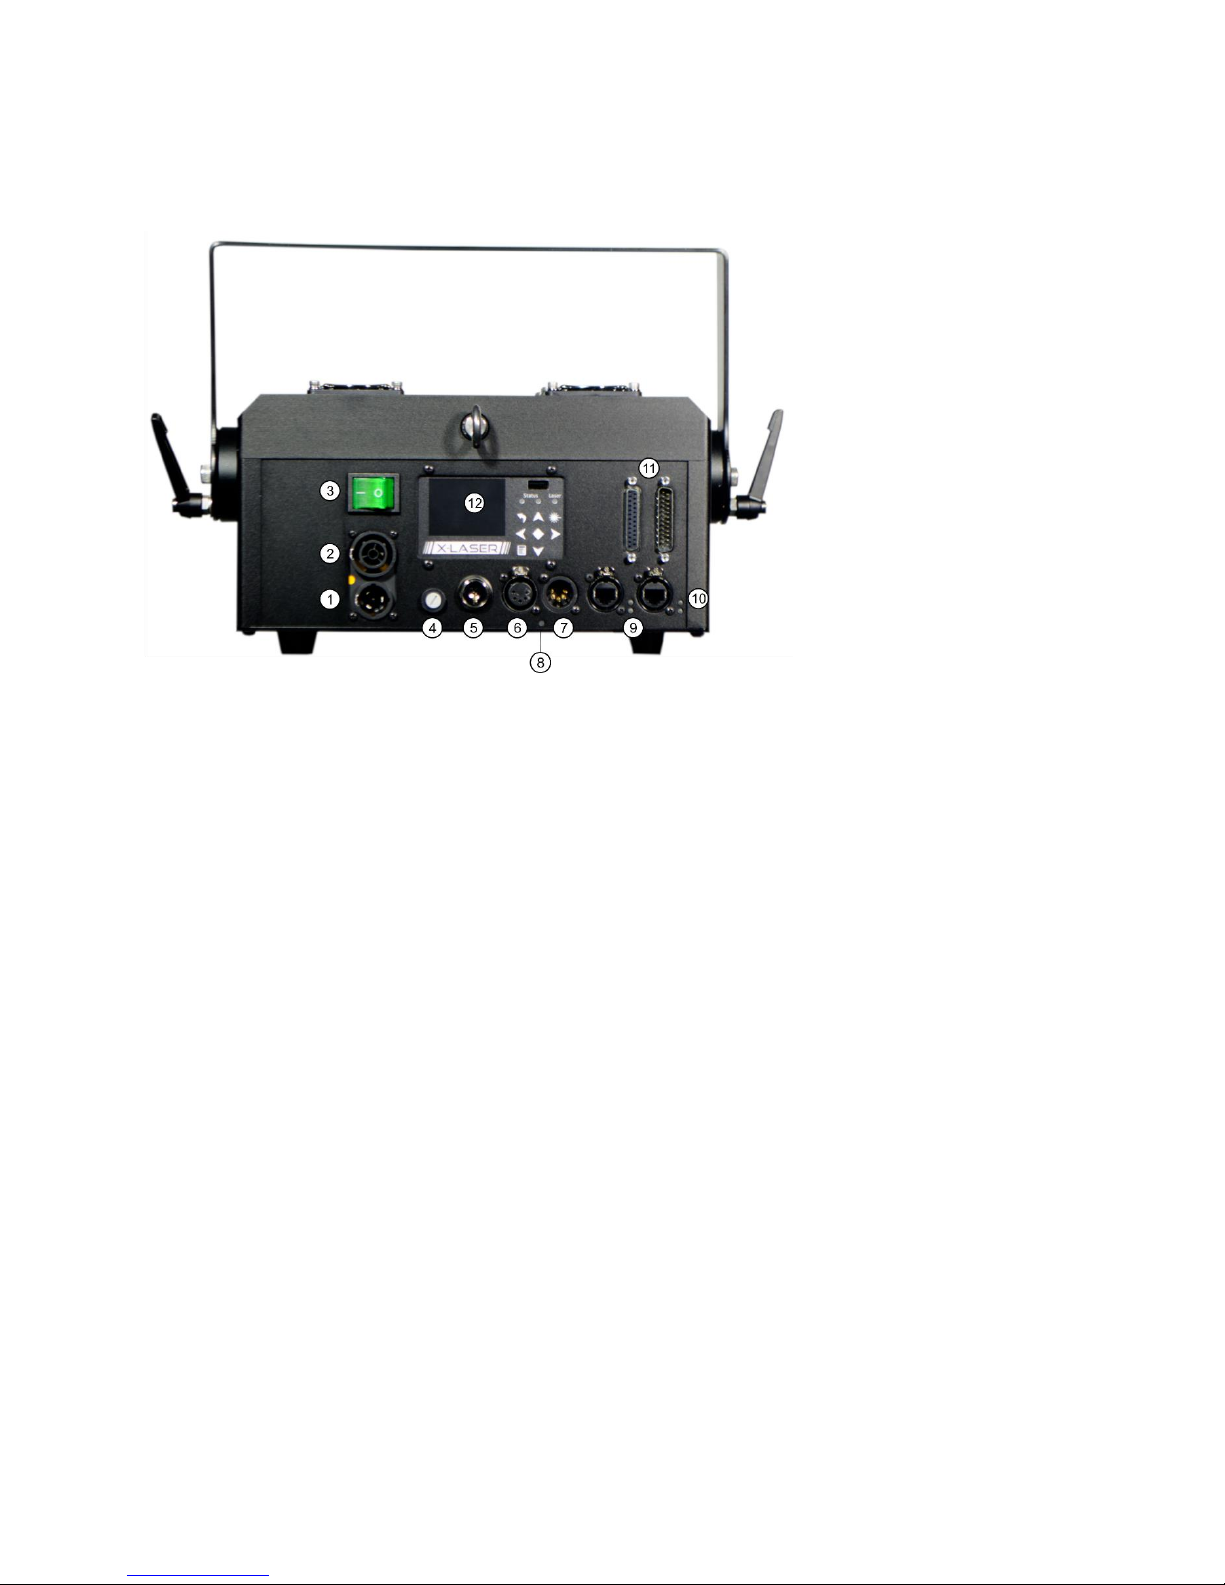
Projector Layout and Functions
1. PowerCON True One inlet
2. PowerCON True One outlet
3. Power Switch
4. Fuse holder
5. Key Switch
6. 5 pin DMX Through
7. 5 pin DMX Input
8. DMX status indicator
9. etherStop ports
10. etherStop indicators
11. ILDA input/through
12. Mercury interface
10
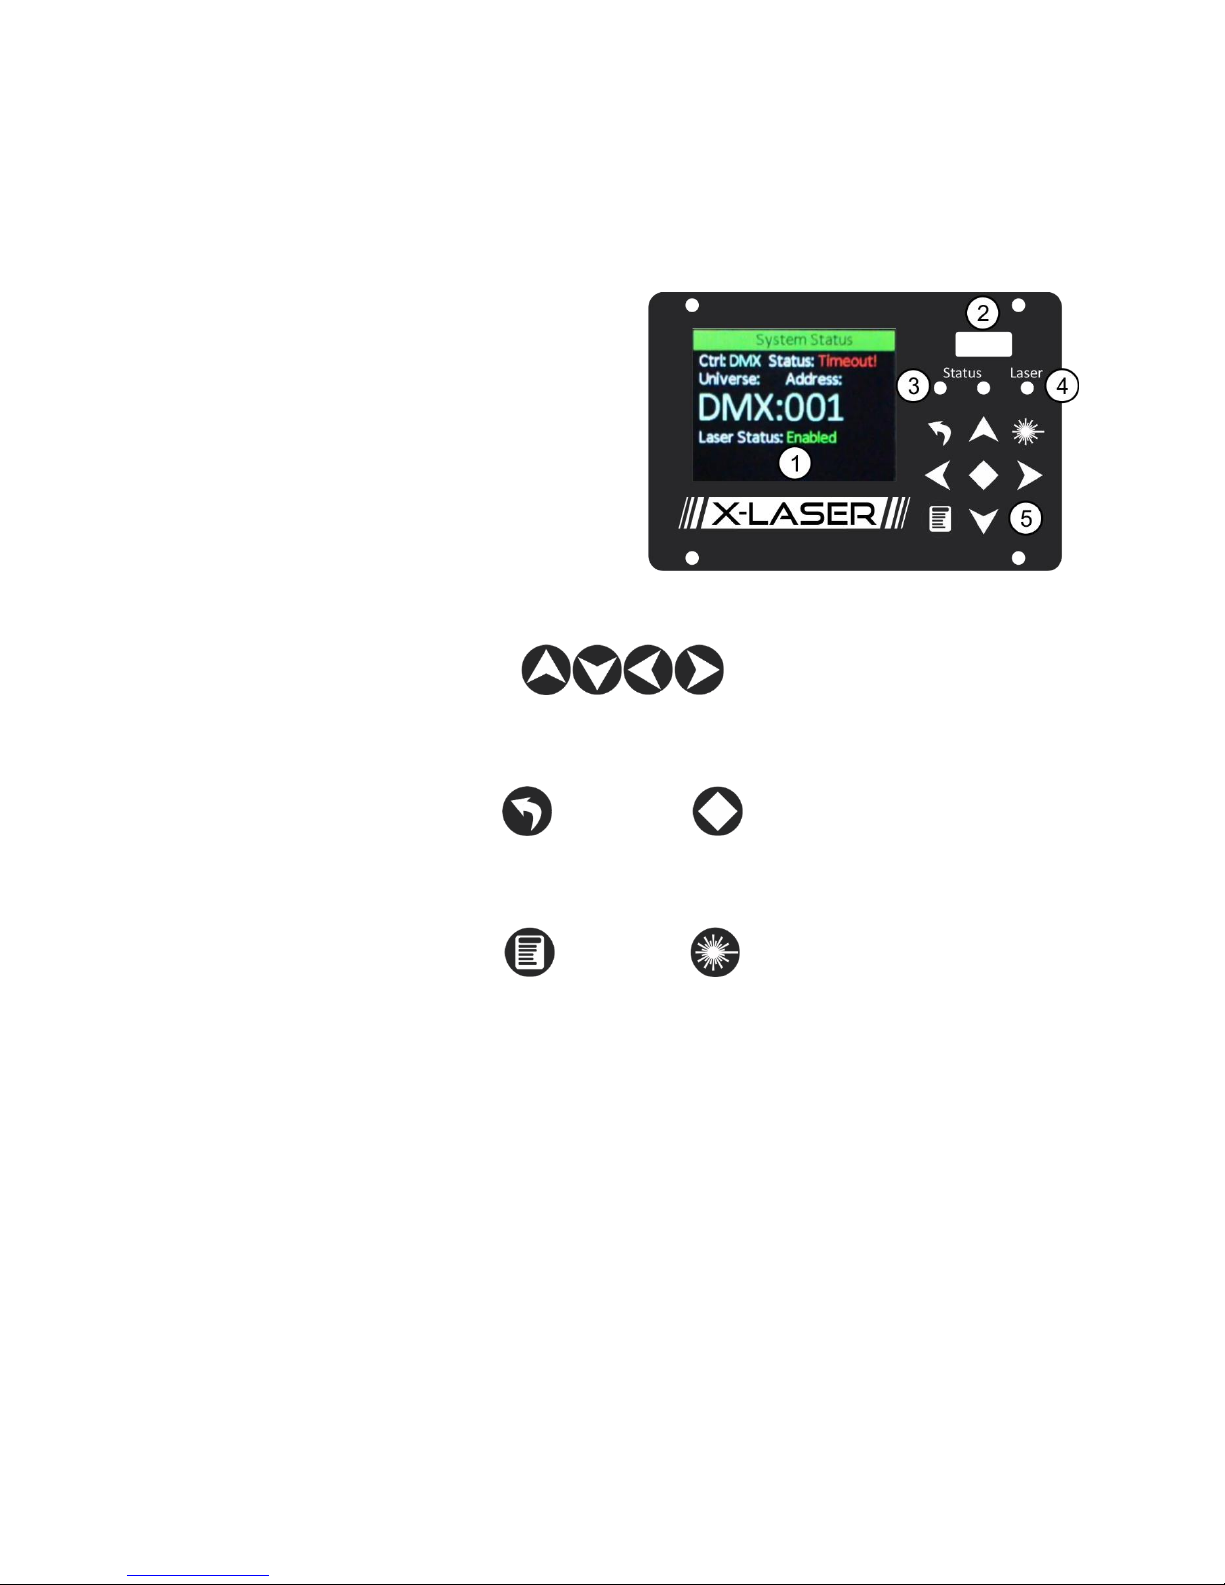
Mercury Interface layout and functions
1. LCD Screen
2. USB Port for firmware and content updates
3. Signal status indicators
4. Laser emission indicator
5. Keypad
Directional buttons
Back button Enter button
Menu button Laser button

11
Power Variations
Laser systems often exhibit minor variations in power level between units, especially between systems
of different ages. X-Laser systems are built to match from unit to unit within a small tolerance that is
usually not noticeable. Variations within that tolerance are not considered a defect, even if they may be
noticeable in certain applications. Contact X-Laser before purchasing if you require more closely
matched systems.
General Guidelines for Safe Laser Use
This product is a powerful laser device intended to be operated by professionals. The major concern
with professional laser systems is to avoid human contact with the laser beam and to create a safe area
where patrons and staff can enjoy your light show. Please observe the following guidelines when using
your X-Laser product:
Safe Zoning
Laser effects should only be projected in areas away from people and flammable materials and free of
surfaces that may reflect laser beams towards people. People should be prevented from entering those
projection zones at all times. If at any point a person enters the projection zone or for any reason any
laser leaves the projection zone the laser display should be immediate terminated.
Prevent Mishaps
As a laser light show operator you have a responsibility to reasonably foresee circumstances where
conditions could present a safety risk to people. This means that you must make sure all laser units are
properly aimed via your show programming and securely mounted to prevent shifting during operation,
physically blocked to prevent radiation spill or reflection into safe areas, and securely mounted. To
ensure that these conditions are met properly, trained employees should be the only ones rigging or
operating X-Laser products.
Means of Termination
Always provide primary and backup means of terminating the laser output in case of emergency. For
example, DMX control as well as a remote etherStop pendant for the Skywriter HPX series. Always test
both primary and backup means of termination before every performance.
Warning: DMX distribution or network control equipment that implements a “last look hold” feature
is not a reliable means of termination. Such equipment may continue to provide a control signal that
causes laser emission after a termination command from or even the total failure of the main control
system.
Service and Maintenance
Because there are no user serviceable parts inside of this product, the outer case should never be
opened by the user. To ensure proper safe operation in demonstrations and performances, immediately
discontinue use of this product if you notice or suspect that any part of the laser is not functioning
properly. After any repair, service, or modification, this product must be certified by the manufacturer
to comply with US Federal requirements for laser demonstration equipment. In case of any malfunction,

12
contact X-Laser or your dealer for an RMA number and we will repair the unit to bring it back into
working operation and US Federal compliance.
Training and Qualification
In the United States, Class 3B and 4 laser products may only be used by a person or employees of an
organization which holds a Laser Light Show Variance. All such persons must have adequate and
appropriate laser operation and safety training, keep a copy of their variance with them at all
performances, and keep appropriate safety logs and checklists. The variance holder must also file annual
reports as required by the CDRH (FDA) and ensure that their variance is renewed prior to expiration.
Copies of these forms, introductory training materials, and more may be found on the USB DRIVE
enclosed with this product.
We strongly recommend that each user of an X-Laser product read “Safe Laser Display” literature
published as ANSI Z136.1 and Z136.10. These and a wealth of laser safety information are available from
www.rli.com and the Laser Institute of America. We also strongly recommend that proper safety
equipment such as wavelength specific laser safety glasses be used during any times in which a
technician or others could be exposed to laser radiation.
Excellent laser training is available from a number of private institutions such as RLI and we recommend
that all of our users undertake it. Basic safety training is provided with this product but is NOT meant to
be comprehensive. Please follow the enclosed instructions on the user USB drive.
Special Considerations for Outdoor Use
Do not ever, under any circumstances, allow laser beams to enter airspace except under conditions
specifically approved by the FAA and any other applicable authorities. FAA approval is only ever granted
for a specific case and under specific conditions for the specific timeframe outlined in an application
filed by the operator. Contact X-Laser or a qualified Laser Safety Officer for guidance on performing
unterminated outdoor laser shows safely and legally. Striking an aircraft with a laser beam, even if
accidental, is dangerous and is a felony punishable by fines and jail time.
We want you to have a wonderful experience with our products so that you can bring the thrill of
professional laser light shows to your audiences. The safety procedures outlined in this manual should
be easy to successfully implement in your shows and provide you with years of safe and profitable laser
displays. Please contact us if you have any questions about how to safely and effectively use X-Laser
products.

13
General Guidelines for Proper Usage
1. Always treat your laser with great care as some components are very fragile. While this product is
designed to withstand the normal rigors of production use, drops or other severe impacts may cause
internal misalignments requiring factory service or other serious internal damage. Care for it as you
would a video projector.
2. Mercury-equipped X-Laser systems including the Skywriter HPX M-series are designed to work well
with professional production lighting control systems. More basic control systems may not be able
to present the capabilities of the Mercury control system in an intuitive or easy to use manner
leading to a frustrating experience. If you need a control solution, we highly recommend Avolites
Titan software.
3. Always keep all factory supplied labels on the unit and visible. Never cover or disable the emission
indicator on the front of the unit. The labels and indicators are all required for legal compliance.
4. The unit is supplied with black wrap foil to be used as beam blocks to prevent the laser from
accidentally scanning into the audience area. This is provided separate from the fixture so that it can
be applied, adjusted, and removed easily for mobile entertainment applications.
5. If this unit is to be permanently installed, you may permanently apply the foil to the outside of the
unit. To apply, simply use thin strips of gaffer’s tape or a heat safe glue for permanent installation.
Using this foil is required for maximum safety and we recommend replacing the foil and/or tape at
the first signs of wear. Replacement foil strips can be obtained very inexpensively through your XLaser dealer.
6. Always maintain open space around all sides of the laser to facilitate airflow.
7. Always operate the laser in an ambient temperature of 50-90°F. Operation outside of this
temperature range may result in failure or diminished operating life. Such failures are NOT covered
under our manufacturer’s warranty.
8. This unit is primarily intended for indoor use, but occasional outdoor use is acceptable. Treat this
fixture like you would a video projector when using outdoors. Do not expose this fixture to rain or
temperatures outside of a normal working range of 50-90°F/10-32°C, or direct sunlight. Do not store
this product outdoors. While the Skywriter series is not fully weatherproof, the fixture is weather
resistant, so outdoor use is acceptable. If the fixture will be used outdoors, we recommend that the
fixture be covered, specifically over the back panel and top panel to protect the wired connections
14
Installation
You may hang or otherwise mount your new X-Laser product in any suitable orientation provided the
requirements of this guide and all other applicable rules and regulations are observed. Before every
show, verify that the programming and hard beam blocks are suitable for the application, especially if
you have changed the orientation of the laser or if you are operating it in a new environment.
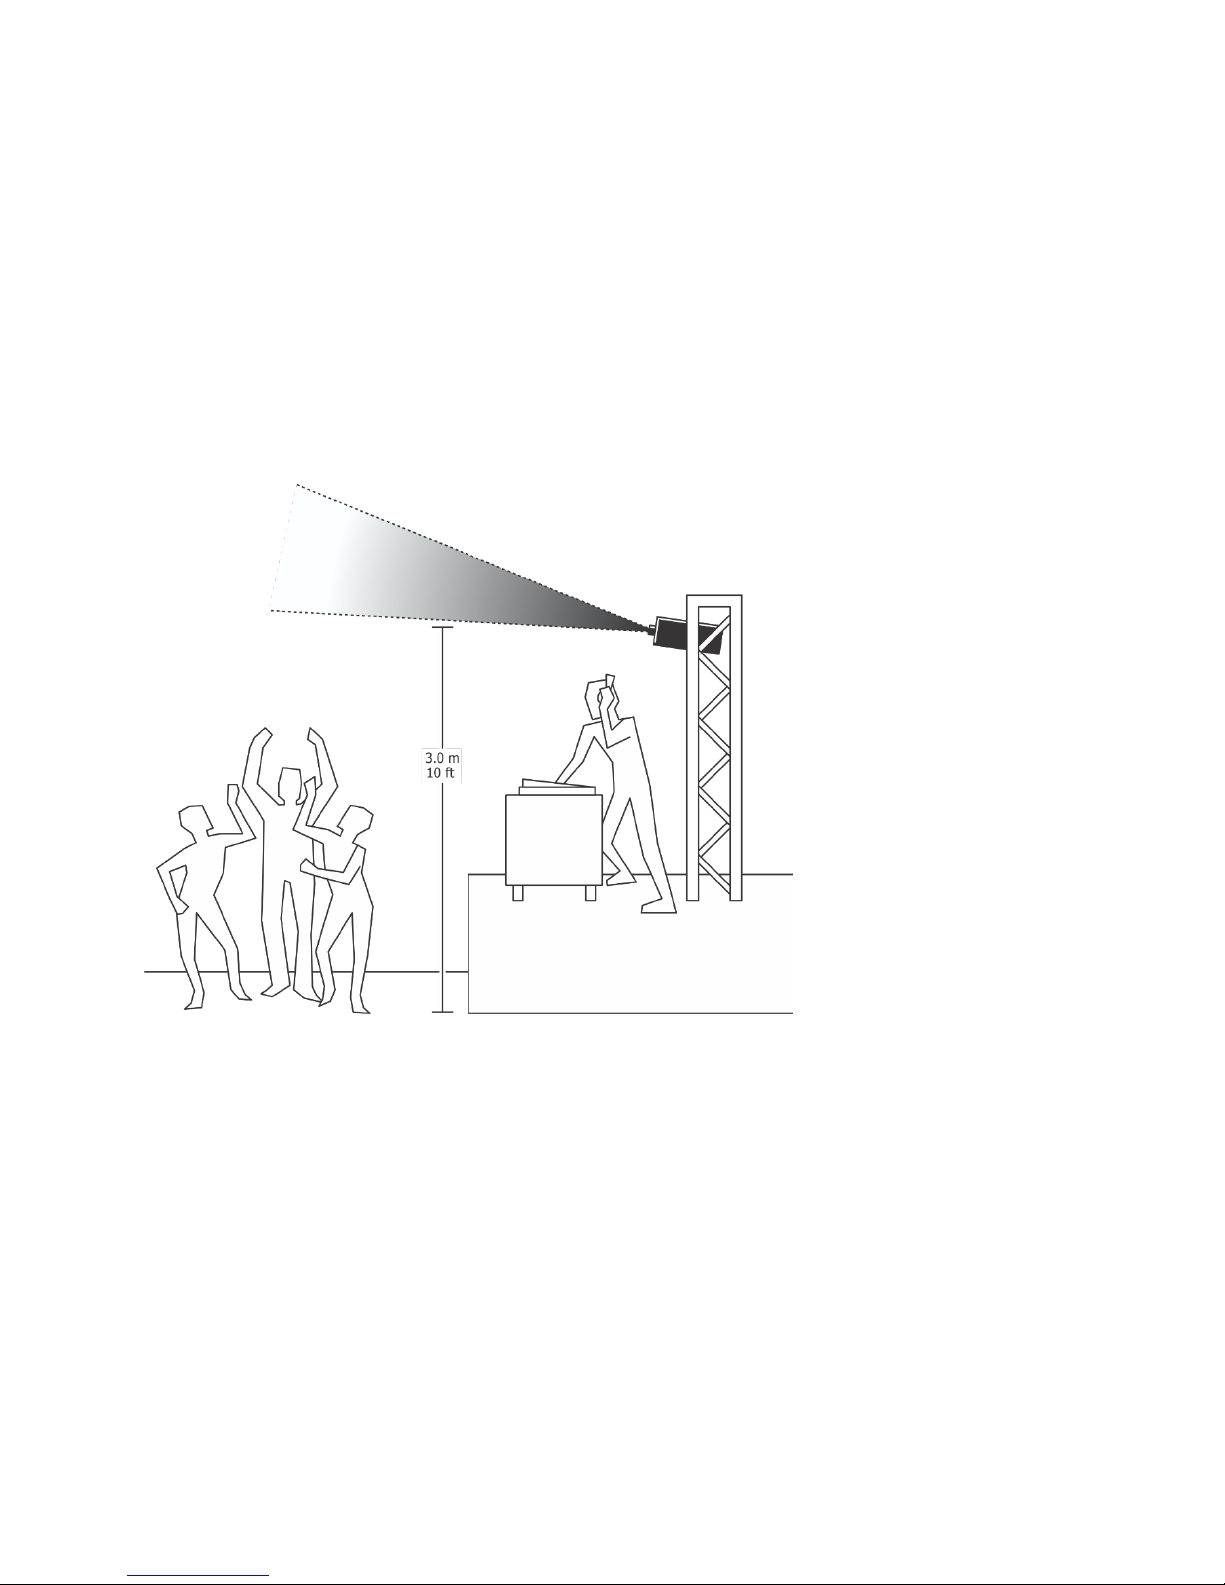
Safe Beam and Projection Height
Most US FDA variances require that all beams be kept at least 3 meters (10 feet) above any surface upon
which your audience can stand. Refer to your variance for required vertical and lateral safety distances.
Performers and trained personal MAY be exempt from these safety distances at the discretion of a
qualified Laser Safety Officer who may be able to implement an alternative radiation safety plan.
Example of a safe projection, 3 meters above the dance floor

15
Physical beam blocks
After your projection area has been set up in your laser controller, make sure to block off the laser
aperture to make sure the projection area remains safe, even in the event of a laser or controller
malfunction. You can do this using the physical block attached of the front of the laser (if equipped) as
well as with “black wrap” cinefoil or black aluminum foil tape.

16
Operation
Before Powering up Your Projector
Laser beams may shoot in unexpected places during setup, so be sure that all areas which may be within
the projection field of the laser are clear of people and flammable materials. Be prepared to
immediately terminate the laser output if any laser is emitted in an unsafe direction.
Be sure the laser projector is safely and securely rigged, and not likely to be moved or dislodged by
vibration or collision with any moving scenery, equipment, people, animals, etc.
Be sure you have at least one, but preferably two, reliable means of attenuating the laser beam such as
an etherStop pendant, functioning DMX/Art-Net control, or the ability to quickly cut power to the
projector. Mains power termination should only be considered a secondary safety system, not the
primary means of attenuation.
Duty Cycle
The laser may be left powered on without projecting any laser content indefinitely, however over time
this will result in the cooling fans, filters, and external heatsinks needing more frequent cleaning. For
optimal maintenance intervals, power off the system when it will not be used for more than an hour or
two. When operated within the specified temperature range, the laser may be operated continuously
for up to four hours with no ill effect.
Laser Startup
To provide safe and reliable operation and meet the requirements of US Federal regulations and
international standards, X-laser projectors generally require a multi-step startup procedure:
1. After power on, the laser starts in the “Startup” state.
2. If any key switches are not in the enabled position or any remote interlocks are open, the laser
will enter the “Not Ready” state. The laser’s display will indicate the required action, for
example “Turn Key” or “Interlock Open”
3. All key switches must be switched to the enabled position, all remote interlocks must be closed,
and if the if the reset input is initially asserted, it must be released.
4. When these conditions are met, the laser will enter the “Ready” state and the emission indicator
will flash briefly once every three seconds.
5. The reset input must be asserted, either by pressing the reset button on a remote pendant or by
pressing the laser button on the projector.
6. The laser will test its local emission indicator and then enter the “Emission Delay” state. The
emission indicator will flash once per second during this time.
7. If all key switches and remote interlocks are kept in the closed state, the laser will enter the
“Enabled” state after the emission delay time has expired. The emission indicator will be on
continuously, and the laser will be ready to emit if a suitable control signal is applied.
8. If at any point a key switch or remote interlock is opened, the laser will immediately return to
the “Not Ready” state.
17
The etherStop system
X-Laser’s etherStop control interface combines network-based control (such as Art-net) and a remote Estop interface into a single cable. The interface includes 10/100Mb Ethernet, a remote interlock loop,
an emission signal, and a reset signal, all in a single CAT5 or CAT6 network cable. We recommend
etherCON connectors and rugged CAT5 or better cables for best durability, but standard networking
cables can be used for less demanding setups.
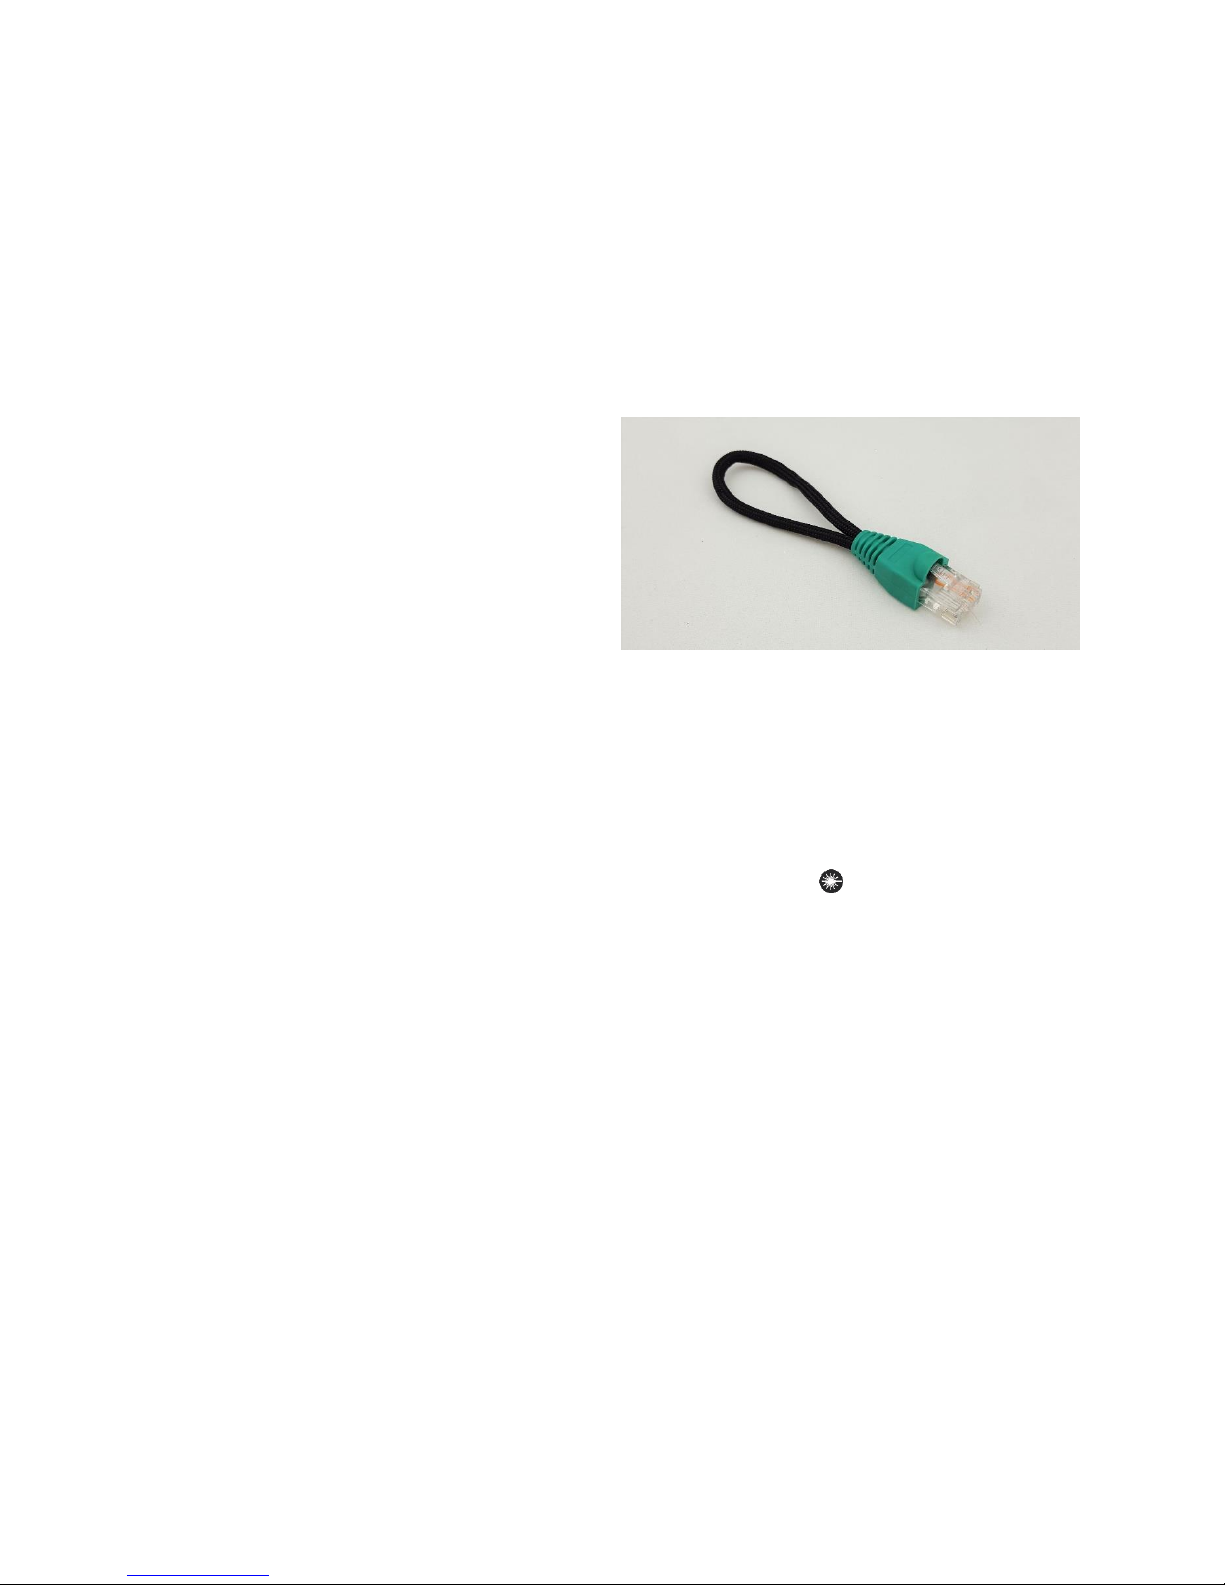
etherStop terminator
Every etherStop compatible laser projector ships
with an etherStop terminator that may be used as
a service plug. This terminator closes the etherStop
interlock loop, but does not provide a reset signal.
The service plug is intended to be used during
testing only and does not meet US federal
requirements for a means of remote termination
of laser output per 21CFR1040.10. When using the
terminator as a service plug, physical access to the laser is required to reset the laser to initiate laser
emission.
In almost all cases, the we recommend that etherStop-equipped projectors be used with an etherStop
pendant or a Nexus etherStop switch system (sold separately).
To use the terminator as a service plug for bench testing, connect the terminator to one of the two
etherStop ports on the back of the laser. This will close the interlock loop. With the terminator
installed, and the key switch in the enabled position, press the laser button next to the LCD to reset
the projector and enable laser emission.
Do NOT install the terminator in the laser when using an etherStop pendant or other remote stop
system.
18
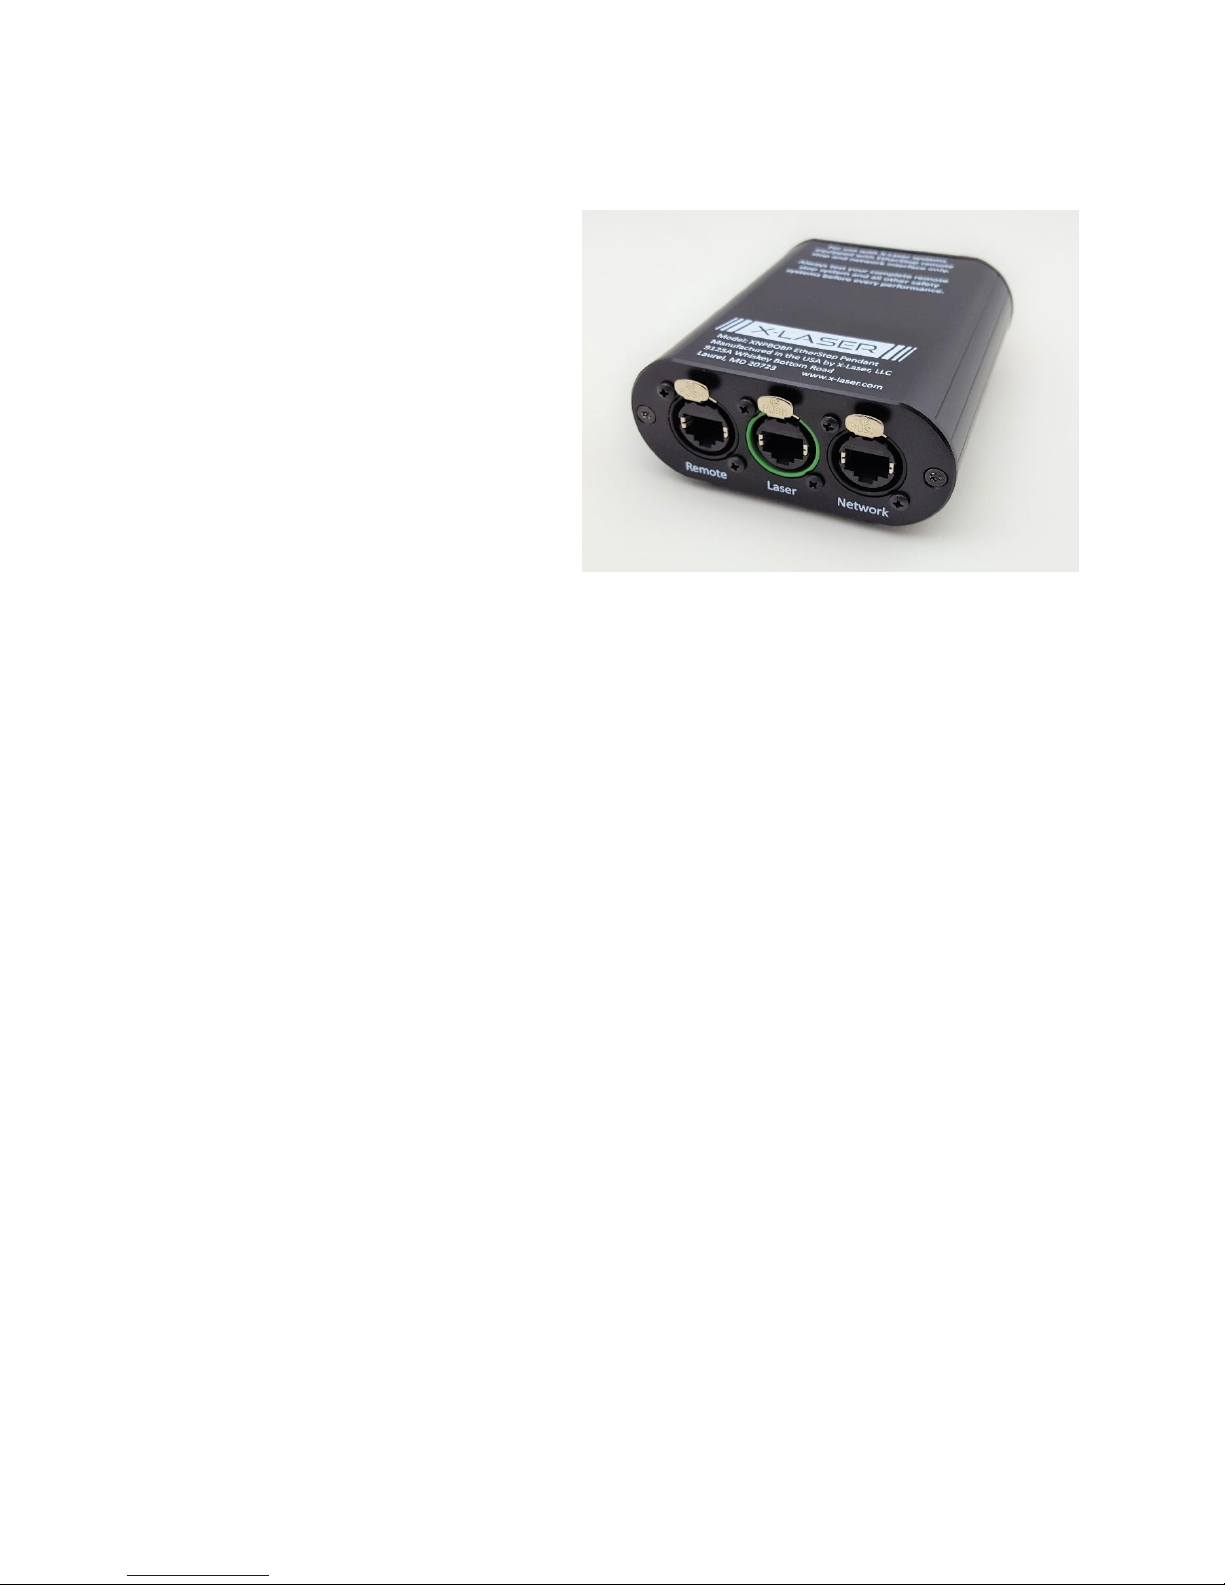
etherStop Pendant
etherStop connections
The etherStop pendant has 3 etherCon
connectors. These provide connections for:
1. Network – this connector is for data
input (Art-Net or SACN) from your
control source
2. Laser - etherStop LASER control out
(green connector). This connector
carries the combined emergency stop
signal, reset signal from the pendant
itself and the Remote connector and
the data injected from the Network
connector. If the laser is being
controlled through DMX or ILDA only and not using network data for laser control this will only
carry the emergency stop and reset signals
3. Remote – this connector provides expansion to a secondary control location for additional
safety if the show requires it. If no secondary control location is required, insert the etherStop
terminator into this port. Otherwise, connect this port to the Laser port of the secondary
control, and insert the terminator in the Remote port of the secondary control. A total of up to
five pendants, including the primary pendant may be daisy chained in this manner.
Do NOT connect more than one pendant directly to a laser projector. When using more than one
pendant, ALWAYS connect the second pendant to the Remote port of the first pendant.
19
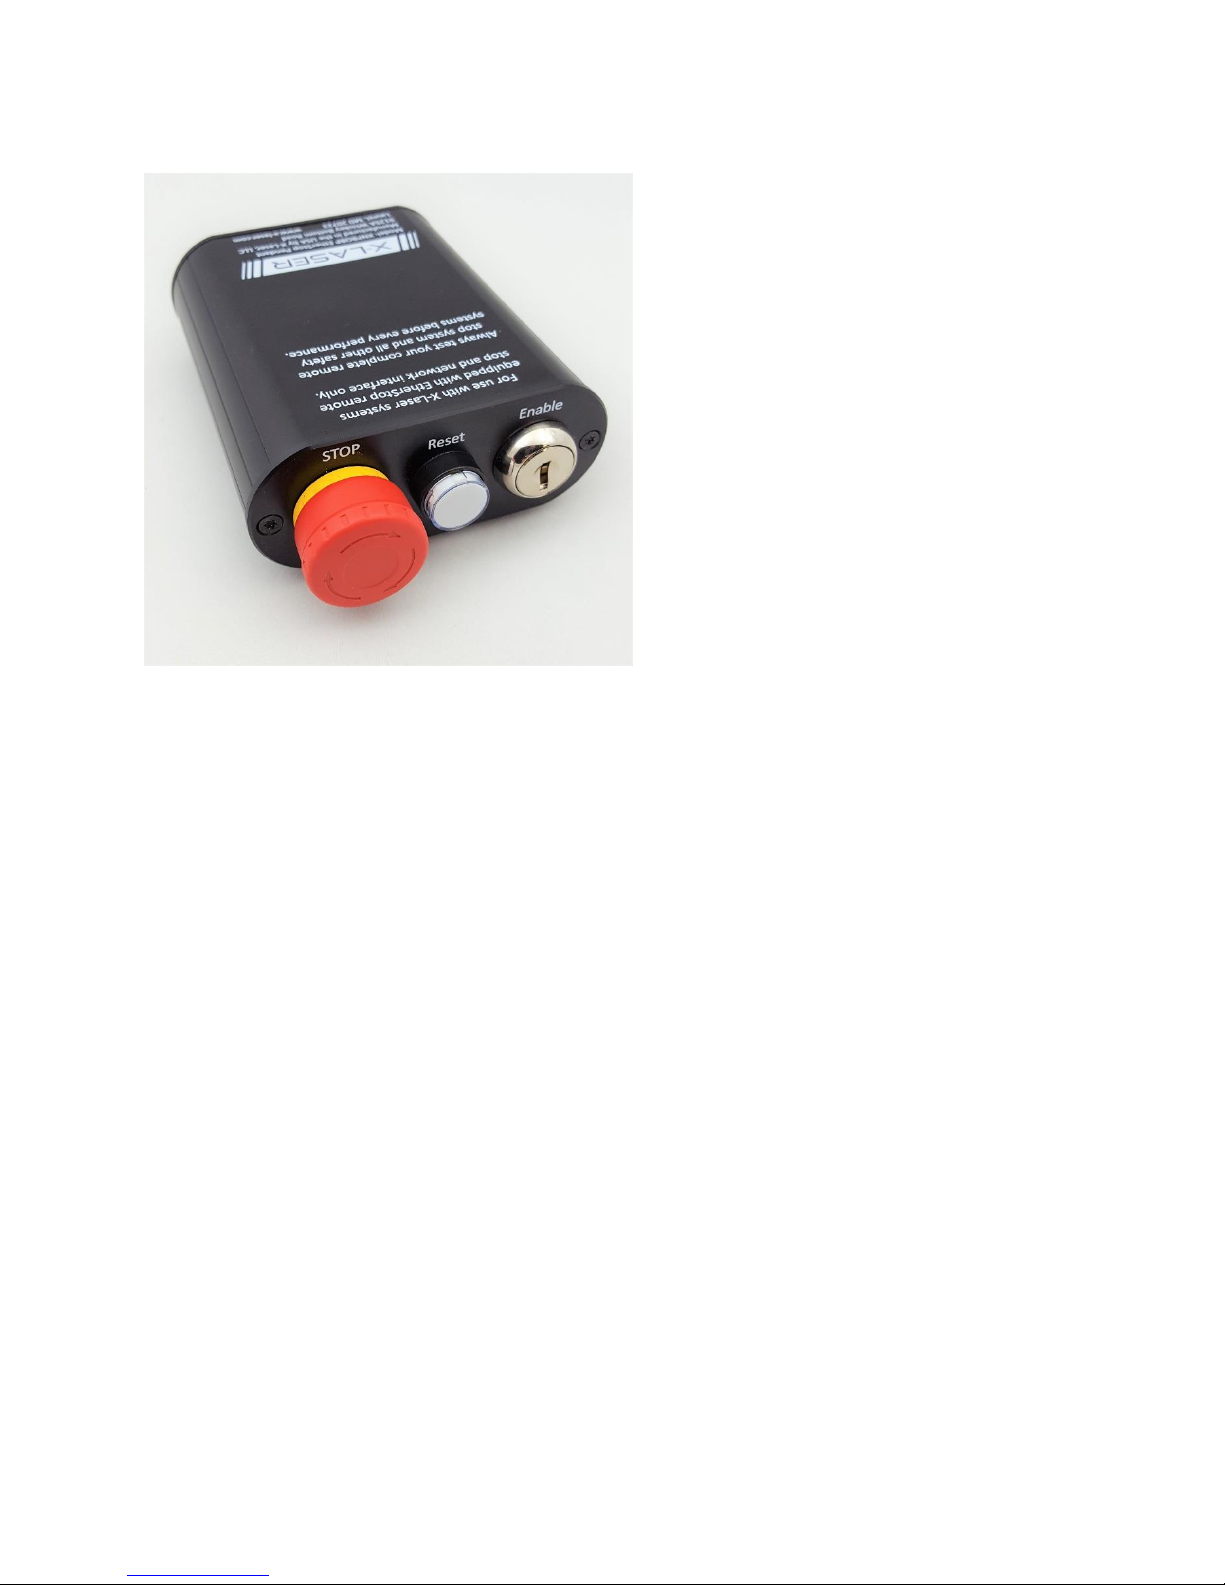
etherStop interface
The front of the etherStop interface contains:
1. BIG RED BUTTON – Depress this button
to emergency stop your laser. The button will
latch in the down position when pressed, twist
it clockwise to reset the switch.
2. Reset button/Emission indicator – The
laser requires a reset signal to begin laser
emission after startup or after an interlock has
been opened. The emission indicator will
illuminate or flash to indicate the state of the
laser system. Refer to the “Laser Startup”
section above for details on the startup
sequence.
3. Key switch - This key switch is part of
the remote interlock loop and must be
actuated to permit emission from your laser.
Remove this key to prevent unauthorized operation if the control station must be left
unattended.
The etherStop interface is only part of the laser projector’s interlock and safety system. In order to
close the remote interlock loop and permit laser output, the following conditions must be met:
1. The key switch must be turned to the enabled position, if you cannot pull the key out of the
switch it is in the enabled position.
2. The BIG RED BUTTON must be in the “up” position on all connected pendants.
3. The Laser port (green) on the etherStop pendant must be connected to the laser via either
etherStop port on the laser.
4. The last pendant in the daisy chain must have an etherStop terminator installed in the Remote
port
5. Once these conditions are met, the emission indicator will flash once every three seconds.
Pressing the reset button will then cause the system to enter the Emission Delay state, and the
emission indicator will flash once per second.
6. At the end of the Emission Delay period, if all interlocks remain satisfied, the emission indicator
will illuminate solidly, and the system will be ready to emit when an appropriate control signal is
provided.
The etherStop system can control up to 10 lasers “daisy chained” together. For larger systems or
systems where chaining is not desirable, please contact us for more information on our Nexus line of
etherStop hubs.

20
etherStop system examples
 Loading...