


Xitrix TravelPro Systems
Installation and
Troubleshooting Guide
TravelPro SR-200 Series
www.xitrix.com | support.xitrix.com
i


Preface
©Copyright 2007
All Rights Reserved.
The information in this document is subject to change without prior
notice in order to improve reliability, design and function and does
not represent a commitment on the part of the manufacturer.
In no event will the manufacturer be liable for direct, indirect,
special, incidental, or consequential damages arising out of the
use or inability to use the product or documentation, even if
advised of the possibility of such damages.
This document contains proprietary information protected by
copyright. All rights are reserved. No part of this manual may be
reproduced by any mechanical, electronic, or other means in any
form without prior written permission of the manufacturer.
Limitation of Liability
While reasonable efforts have been made to ensure the accuracy
of this manual, the manufacturer and distributor assume no liability
resulting from errors or omissions in this manual, or from the use of
the information contained herein.
Notices
Federal Communications Commission Radio Frequency
Interference Statement
This equipment has been tested and
found to comply with the limits for a Class B digital device,
pursuant to Part 15 of the FCC Rules. These limits are
designed to provide reasonable protection against harmful
interference in a residential installation. This equipment
generates, uses, and can radiate radio frequency energy and
if not installed and used in accordance with the instruction
manual may cause harmful interference to radio
communications. However, there is no guarantee that
interference will not occur in a particular installation. If this
equipment does cause harmful interference to radio or
television reception, which can be determined by turning the
equipment off and on, the user is encouraged to try to correct
the interference by one or more of the following measures:
i

• Reorient or relocate the receiving antenna
• Increase the separation between the equipment and receiver
• Connect the equipment into an outlet on a circuit different from
that to which the receiver is connected
Consult the dealer or an experienced radio TV technician for help
This device complies with Part 15 of the FCC Rules. Operation is
subject to the following two conditions: (1) This device may not
cause harmful interference, and (2) this device must accept any
interference received, including interference that may cause
undesired operation.
FCC Caution: Any changes or modifications not expressly
approved by the party responsible for compliance could void the
user's authority to operate this equipment.
Notice:
Changes or modifications not expressly approved by the party
responsible for compliance could void the user’s authority to
operate the equipment. Shielded interface cables and a nonshielded AC power cord must be used in order to comply with
emission limits.
This equipment is to be used with power supply:
65W
There is no internal power supply.
ii

Table of Content
C
HAPTER
LET YOUR COMPUTER ACCLIMATE ITSELF ..........................................................8
H
S
HAPTER 2: INTRODUCTION ..............................................................................11
C
O
F
LED S
LEFT VIEWS ....................................................................................................14
R
B
HAPTER 3: GETTING START ED .......................................................................17
C
C
T
T
HAPTER 4: USING THE NOTEBOOK COMPUTER ............................................21
C
LCD C
E
F
T
F
P
L
T
A
B
B
S
HELP WINDOWS ...........................................................................................28
D
C
HAPTER
T
1: B
EFORE YOU START
EAT, COLD, H
UITABLE PLACE TO WORK ................................................................................9
PENING THE LCD PANEL ..............................................................................11
RONT VIEW ...................................................................................................12
IGHT VIEW ...................................................................................................15
OTTOM VIEW................................................................................................16
ONNECTING THE AC ADAPTER.....................................................................17
O REMOVE THE BATTERY PACK: ..................................................................19
O INSTALL THE BATTERY PACK:...................................................................19
XTERNAL CRT DISPLAY..............................................................................21
UNCTION KEYS (QUICK KEYS).....................................................................22
OUCHPAD PRECAUTIONS..............................................................................22
EATURES OF THE DVD DUAL/SUPERMULTI.................................................23
RECAUTIONS FOR HANDLING CD DISCS ......................................................23
OADING A DISC ...........................................................................................23
HE BATTERY POWER SYSTEM .....................................................................24
UTOMATIC BATTERY PACK CHARGING FUNCTION......................................25
ATTERY STATUS..........................................................................................26
ATTERY LOW WARNING .............................................................................26
MALL BATTERY FOR THE REAL TIME CLOCK...............................................26
ESKTOP
HE
M
UMIDITY
, AND GLARE ................................................................8
TATUS INDICATOR.................................................................................13
ARE.....................................................................................................21
...........................................................................................28
5: D
ESKTOP OPERATION
ULTIMEDIA
S
OUND SYSTEM
............................................................1
.......................................................33
......................................................33
iii

A
UDIO VOLUME CONTROL
..................................................................34
AUDIO SOFTWARE..........................................................................................34
S
OUND RECORDING .......................................................................................34
LAYING SOUND FILES .................................................................................34
P
XTERNAL SPEAKERS AND MICROPHONE ......................................................34
E
C
HAPTER 6: INTERNET CONN ECTION ..............................................................35
HAPTER 7: RUNNING BIOS SETUP ................................................................39
C
M
AIN SETUP ..................................................................................................40
I
NFO SETUP ....................................................................................................41
DVANCED SETUP..........................................................................................41
A
ECURITY .......................................................................................................42
S
B
OOT SETUP....................................................................................................42
XIT SETUP .....................................................................................................43
E
HAPTER 8: VGA UTILITIES.............................................................................45
C
D
ISPLAY DEVICES ..........................................................................................48
ISPLAY SETTINGS.........................................................................................48
D
C
OLOR CORRECTION......................................................................................49
HOT KEYS......................................................................................................49
AUNCH ZOOM ..............................................................................................50
L
HAPTER 9: VIDEO CONFERENCING ...............................................................51
C
T
HE FILE MENU C
HE DEVICE MENU C
T
T
HE OPTIONS MENU COMMANDS .................................................................52
APTURE MENU C
C
HAPTER 10: TROUBLESHOOTING...................................................................57
C
OMMANDS AND
OMMANDS AND
OMMANDS AND
BUTTONS ....................................................52
BUTTONS ...............................................52
BUTTONS ...................................................56
NO SPEAKER OUTPUT - ..................................................................................58
S
OUND CANNOT BE RECORDED - ...................................................................58
HE HARD DISK DRIVE DOES NOT WORK OR IS NOT RECOGNIZABLE ................59
T
HE HARD DRIVE IS MAKING ABNORMAL WHINING NOISES ............................59
T
HE HARD DISK DRIVE HAS REACHED ITS CAPACITY ......................................59
T
T
HE HARD DISK TAKES LONGER TO READ A FILE............................................60
HE FILES ARE CORRUPTED ...........................................................................60
T
HE OPTICAL DRIVE DOES NOT WORK ............................................................60
T
T
HE DRIVE DOSE NOT READ ANY DISKS .........................................................60
iv

T
HE DISK CANNOT BE EJECTED
...........................................................60
THE COMBO OR DVD RW DRIVE (OPTIONAL DEVICE) CANNOT RECORD ………60
HE DISPLAY PANEL IS BLANK WHEN THE SYSTEM IS TURNED ON ....................61
T
T
HE SCREEN IS DIFFICULT TO READ - ...............................................................61
HE SCREEN FLICKERS - .................................................................................61
T
HE BUILT-IN TOUCH PAD PERFORMS ERRATICALLY - .....................................61
T
T
HE BUILT-IN KEYBOARD ACCEPTS NO INPUT -................................................61
THE CHARACTERS ON THE SCREEN REPEAT WHILE I TYPE. ..............................61
A
MESSAGE
BOOTING PROCESS OR THE TIME (CLOCK) RESETS WHEN BOOTING ..................62
T
HE
YOU HAVE ALREADY INSTALLED ADDITIONAL MEMORY
T
HE
OPERATION ....................................................................................................62
“CMOS C
POST
DOES NOT SHOW AN INCREASED MEMORY CAPACITY WHEN
HECKSUM FAILURE” DISPLAYS DURING THE
...............................62
O/S
ISSUES AN INSUFFICIENT MEMORY ERROR MESSAGE DURING
PC CARDS DO NOT FUNCTION-........................................................................62
THE PC CARD CANNOT BE RECOGNIZED - .......................................................63
W
INDOWS CRASHES OR FREEZES WHEN YOU REMOVE THE PC CARD- ……….63
HE COMPUTER BECOMES HOT - .....................................................................63
T
HE PROGRAM APPEARS STOPPED OR RUNS VERY SLOWLY - ...........................63
T
T
HE USB DEVICE DOES NOT WORK - .............................................................64
PPENDIX A: SPECIFICATION ........................................................................65
A
v


Before you Start
Conventions of This Manual
Use this manual will help you get the most from your Xitrix TravelPro
Notebook.
• If you are an experienced user of computers and/or Microsoft’s
Windows operating systems, you might find it useful to read the
Quick Start Guide that comes along with your accessories.
• If you are a less experienced user, you should through the
manual carefully before using your system.
Whether or not you are an experienced user, you should consult
on the Troubleshooting Chapter if you encounter any problems
with your notebook.
Safety Precautions
This section is designed to assist you in identifying potentially
unsafe conditions while working with this product. Required safety
features have been installed in the computer to protect you from
injury. However, you should use good judgment to identify potential
safety hazards:
1. Please read these safety instructions carefully.
2. Please keep this User's Manual for later reference.
3. Please disconnect this equipment from AC outlet before
cleaning. Don't use liquid or sprayed detergent for cleaning.
Use moisture sheet or cloth for cleaning.
4. For pluggable equipment, that the socket-outlet shall be
installed near the equipment and shall be easily accessible.
5. Please keep this equipment from humidity.
6. Lay this equipment on a reliable surface when installed. A
drop or fall could cause injury.
1

7. Make sure to use the right voltage for the power source when
connecting the equipment to the power outlet.
8. Place the power cord in such a way that people can not step
on it. Do not place anything on top of the power cord.
9. All cautions and warnings on the equipment should be noted.
10. If the equipment is not use for a long time, disconnect the
equipment from the main power outlet to avoid being damaged
by transient overvoltage.
11. Never pour any liquid into the opening, this could cause fire or
electrical shock.
12. Never open the equipment. For safety reason, the equipment
should only be opened by a qualified service personnel.
13. If on the following situations arises, get the equipment
checked by a service personnel:
a. The Power cord or plug is damaged.
b. Liquid has penetrated into the equipment.
c. The equipment has been exposed to moisture.
d. The equipment has not worked well or you cannot get it
work according to the user's manual.
e. The equipment has dropped and damaged.
f. If the equipment has obvious sign of breakage.
14. Do not leave this equipment in an environment unconditioned,
storage temperature above 60°C (140°f), it may damage the
equipment.
15. The unit can be operated at an ambient temperature of max.
35°C.
16. The sound pressure level at the operators position according
to IEC 704-1: 1982 is equal or less than 70 dB(A).
17. Power Cord Requirements
The power cord set used with the AC adaptor must meet the
requirements of the country where you use the AC adaptor,
whether it is 100-120 or 200-240 Vac. The following
information explains the requirements for power cord set
selection.
The cord set must be approved for the country in
which it is used.
The appliance coupler must have a configuration
for mating with a CEE22/EN6032/IEC 320
appliance inlet.
A. For U.S. and Canada:
The cord set must be UL Listed and CSA Certified.
2

The minimum specifications for the flexible cord
are No. (1)18 AWG, (2) Type SJ, and (3) 3conductor.
B. For Japan:
All components of the cord set must bear a “PSE”
or “ T ” mark and registration number in
accordance with the Japanese Dentori Law.
The minimum specifications for the flexible cord
are: (1) .75m ㎡ conductors, (2) Type VCT or
VCTF, and (3) 3-conductor.
The cord set must have minimum rated current
capacity of 7 A.
The attachment plug must be a two-pole, grounded
type with a Japanese Industrial Standard C8303
(15 A, 125 VAC) configuration.
C. For Other Countries:
The cord set fittings must bear the certification
mark of the agency responsible for evaluation in a
specific country.
The flexible cord must be of a HAR (harmonized)
type H03VV-F.
The cord set must have a current capacity of a
least 2.5 Amperes and voltage rating of 125 or 250
Vac.
CAUTION: MODEL XPN-SR200 IS DESIGNED TO USE
WITH THE FOLLOWING AC ADAPTER MODEL ONLY
Model: 0335C2065 (65W)
Model: ADP-65HB AD (65W)
Model: HP-OK065E03 (65W)
* Contact Xitrix if you need to replace your AC Adapter
18. When using your telephone equipment, basic safety
precautions should always be followed to reduce the risk of
fire, electric shock and injury to persons. These precautions
includes the following:
Do not use this product near water, for example, near a
bathtub, washbowl, kitchen sink or laundry tub, in a wet
basement or near a swimming pool.
3

Avoid using a telephone (other than a cordless type)
during an electrical storm. There may be a remote risk
of electric shock from lightning.
Do not use the telephone to report a gas leak in the
vicinity of the leak.
Use only the power cord indicated in this manual.
19. Do not use the AC adapter near open water or other liquids.
Never spill liquid into the AC adapter.
20. Laser Warning: Laser Class I Product Caution - Invisible laser
radiation when open avoid exposure to beam.
21. The optical drive used with this computer is certified as a
Class1 laser device according to the U.S. Department of
Health and Human Services (DHHS) Radiation Performance
Standard and International Standards IEC 60825-1 (EN60825-
1). The device is not considered harmful, but the following
precautions are recommended:
Do not open the unit.
Avoid direct exposure to the laser beam.
If the unit requires service, contact an authorized
service center.
Ensure proper use by reading and following the
instructions carefully.
Do not attempt to make any adjustment of the unit.
Class 1 Laser Product
Appareil A Laser De Classe 1
Laserschutzklasse 1 Produkt
Do not attempt to disassemble
the cabinet containing the laser. The laser beam used in this
product is harmful to the eyes. The use of optical instruments,
such as magnifying lenses, with this product increase the
potential hazard to your eyes. For your safety, have this
equipment serviced only by an authorized service provider.
22. Danger of explosion if battery is incorrectly replaced. Replace
only with the same or equivalent type recommended by the
manufacturer. Dispose of used batteries according to the
manufacturer's instructions. Never remove the battery pack
while the power is on as this may result in data loss when the
system loses power.
4

23. The input receptacle is used as the main disconnecting device.
24. Note to CATV System Installer – This reminder provided to
call the CATV system installer’s attention to Section 820-93 of
the National Electric Code which provide guidelines for proper
grounding and in particular, specify that the Coaxial cable
shield shall be connected to the grounding system of the
building, as close to the point of cable entry as practical
This part is hot. Be careful.
Diese Flachewird sehr heiss.
When you see this symbol, be careful as this spot may be
very hot.
Wichtige Sicherheitshinweise
1. Bitte lesen Sie diese Hinweis sorgfältig durch.
2. Heben Sie dirse Anleitung für den späteren Gebrauch auf.
3. Vor jedem Reinigen ist das Gerät vom Stromnetz zu trennen.
Versenden Sie Keine Flüssig- oder Aerosolreiniger. Am
besten eignet sich ein angefeuchtetes Tuch zur Reinigung.
4. Die Netzanschluβsteckdose soll nahe dem Gerät angebracht
und leicht zugänglich sein.
5. Das Gerät ist vor Feuchtigkeit zu schützen.
6. Bei der Aufstellung des Gerätes ist auf sicheren Stand zu
achten. Ein Kippen oder Fallen könnte Beschädigungen
hervorrufen.
7. Beachten Sie beim Anschluß an das Stromnet die
Anschlußwerte.
8. Verlegen Sie die Netzanschlußleitung so, daß niemand
darüber fallen kann. Es sollte auch nichts auf der Leitun
abgestellt werden.
9. Alle Hinweise und Warnungen, die sich am Gerät befinden,
sind zu beachten.
10. Wird das Gerät üeinen längeren Zeitraum nicht benutzt,
sollten Sie es vom Stromnetz trennen. Somit wird im Falle
einer Überspannung eine Beschädigung vermieden.
11. Durch die Lüftungsöffnungen dürfen niemals Gegenstände
oder Flüssigkeien in das Gerät gelangen. Dies könne einen
Brand bzw. Elektrischen Schlag auslösen.
5

12. Öffnen Sie niemals das Gerät. Das Gerät darf aus Gründen
der elektrischen Sicherheit nur von authorisiertem
Servicepersonal geöffnet werden.
13. Wenn folgende Situationen auftreten ist das Gerät vom
Stromnetz zu trennen und von einer qualifizierten Servicestelle
zu Überprüfung.:
a. Netzlabel oder Netzstecker sind beschädigt.
b. Flüssigkeit ist in das Gerät eingedrungen.
c. Das Gerät war Feuchtigkeit ausgesetzt.
d. Wenn das Gerät nicht der Bedienungsanleitung entsprechend
funktioniert oder Sie mit Hilfe dieser Anleitung keine
Verbesserung erzielen.
e. Das Gerät ist gefallen und/oder das Gehäuse ist beschädigt.
f. Wenn das Gerät deutliche Anzeichen eines Defektes aufweist.
14. VORSICHT: Explosiongsgetahr bei unsachgemäßen
Austausch der Batterie. Ersatz nur durch denselben oder
einem vom Hersteller empfohlenem ähnlichen Typ.
Entsorgung gebrauchter Batterien nach Angaben des
Herstellers.
15. Dieses Schaltnetzteil kann bis zu einer Außentemperatur von
maximal 35ºC.
16. Die Ausgangswerte dürfen nicht die auf dem Label
angegebenen Werte überschreiten.
17. Anforderungen an das Stromkabel
Das Kabel-Set, das an das Netzteil angeschlossen wird, muss
den Anforderungen des Landes, in dem Sie das Netzteil
einsetzen, genügen, je nachdem, ob die Netzspannung 100120 oder 200-240V Wechselspannung beträgt.
Das Kabel-Set muss für das Land, in dem es
eingesetzt wird, zugelassen sein.
Der Gerätestecker des Kabels muss in eine
CEE22/ EN603/IEC 320 Buchse passen.
A. Für die USA und Kanada:
Das Kabel-Set muss UL-gelistet und CSA
zertifiziert sein.
Die Minimalanforderungen für das Kabel
entsprechen No. 18 AWG.
B. Für Japan:
Alle Teile des Kabel-Sets müssen entsprechend
dem japanischen Dentori Law mit einem „PSE“ or
„T”-Symbol markiert sein
6

Die Minimalanforderungen für das Kabel sind .75m
㎡ Leiter.
C. Für andere Länder:
Die Zubehörteile des Kabel-Sets müssen das
Prüfsiegel derjenigen Stelle, die in dem jeweiligen
Land für die Sicherheitsprüfung zuständig ist,
tragen.
Das Kabel muss vom HAR (harmonisierten) Typ
H03VV-F sein.
Das Kabel-Set muss eine Stromkapazität von
mindestens 2,5 Ampere haben und Spannungen
von 125 oder 250 V Wechselstrom gestatten.
18. Bei der Benutzung Ihres Telefongerätes sollten Sie immer die
grundlegenden Sicherheitsmaßnahmen beachten, um das
Risiko von Feuer, Stromschlägen und Verletzungen zu
minimieren. Zu beachten sind u.a. folgende Punkte:
Benutzen Sie das Gerät nicht in der Nähe von Wasser,
wie zum Beispiel Badewanne, Waschbecken,
Spülbecken, Waschbottich, in feuchten Kellerräumen
oder in der Nähe von Schwimmbecken.
Benutzen Sie kein Telefon (ausgenommen schnurlose
Modelle) während eines Gewitters. Es besteht das
geringe Restrisiko eines Blitzschlages.
Benutzen Sie das Telefon nicht um ein Gasleck zu
melden, falls es sich in der Nähe des Lecks befindet.
Benutzen Sie nur solch ein Stromkabel, wie in dieser
Anleitung beschrieben.
19. Benutzen Sie das Netzteil nicht in unmittelbarer Nähe zu
Wasser oder anderen Flüssigkeiten. Gießen Sie nie
Flüssigkeiten über das Netzteil.
20. Achtung Laser: Laser Produkt der Klasse I. Achtung -
Unsichtbarer Laserstrahl, vermeiden Sie Kontakt mit dem
Strahl bei offenem Gehäuse.
21. Es besteht Explosionsgefahr, wenn der Akku nicht
ordnungsgemäß ersetzt wird. Ersetzen Sie den Akku nur
durch einen Akku gleichen oder äquivalenten Typs, der vom
Hersteller empfohlen wird. Entsorgen Sie Akkus entsprechend
den Anweisungen des Herstellers. Entfernen Sie den Akku auf
keinen Fall bei eingeschaltetem Notebook, da hierdurch Daten
verloren gehen könnten.
7

22. Der Netzeingabeanschluss dient als Hauptschalter des Geräts.
23. Hinweis für die CATV-Systeminstallation: Dieser Hinweis dient
dazu, die Aufmerksamkeit der CATV-Systemmonteure auf
Abschnitt 820-93 des National Electrical Code zu richten, der
Richtlinien für die korrekte Erdung enthält und im Besonderen
festlegt, dass der Schirm des Koaxialkabels an das
Erdungssystem des Gebäudes angeschlossen werden muss,
und zwar so nahe wie möglich am Ort des Kabeleingangs
Things you must remember before working on your
computer
Let your computer acclimate itself
Your notebook can easily stand temperature extremes but it
doesn’t like rapid changes in temperature, like going from the cold
outdoors to a warm office.
Rapid changes in temperature can cause water droplets to
condense inside your case, threatening to damage the electronic
parts inside.
After receiving your notebook when it’s hot or cold outside, try not
to power up the computer immediately, let the computer adjust to
the room temperature gradually at least for three to four hours.
weather, do not apply power to the computer or monitor until
they have been allowed to come to room temperature.
Heat, Cold, Humidity, and Glare
If your system arrives in cold
Find a suitable place for your computer that’s not too hot, too cold,
too dark, or too bright. Glare can make it hard to read the screen.
• Try to avoid the computer components from being destroyed if
it is over heated, so try to allow plenty of room for air to
circulate around the case.
• Do not block the ventilation opening.
• Do not place your computer in direct sunlight.
8

Suitable place to work
Your computer will run well wherever you’re comfortable but
extremes of temperature and humidity can be challenging to your
system’s parts. There are some things you can tolerate that the
computer can’t – things like static electricity, dust, water, steam
and oil. In case you decide to pull over for roadside computing, try
to choose a clean, comfortable work area for your system.
A lithium-ion battery pack will be available when you are traveling.
If you are running your system for the first time on battery power,
remove the battery from the package, install it into the system and
recharge the battery to fully prepare for service.
9

10

Introduction
Welcome to the Xitrix TravelPro SR-200
Congratulations on your purchase of the Xitrix TravelPro SR-200. Your
Notebook features the latest advances in portable computing
technology. The Notebook’s modular design provides maximum
expandability without compromising portability.
Getting to Know Your Computer
Opening the LCD Panel
11
To avoid damage to the display
panel:
1. Try not to slam the display upon closing it.
2. Try not to place any object on top when it is closed or open.
3. Be sure the system is turned off or in suspend mode before
you close the display panel.
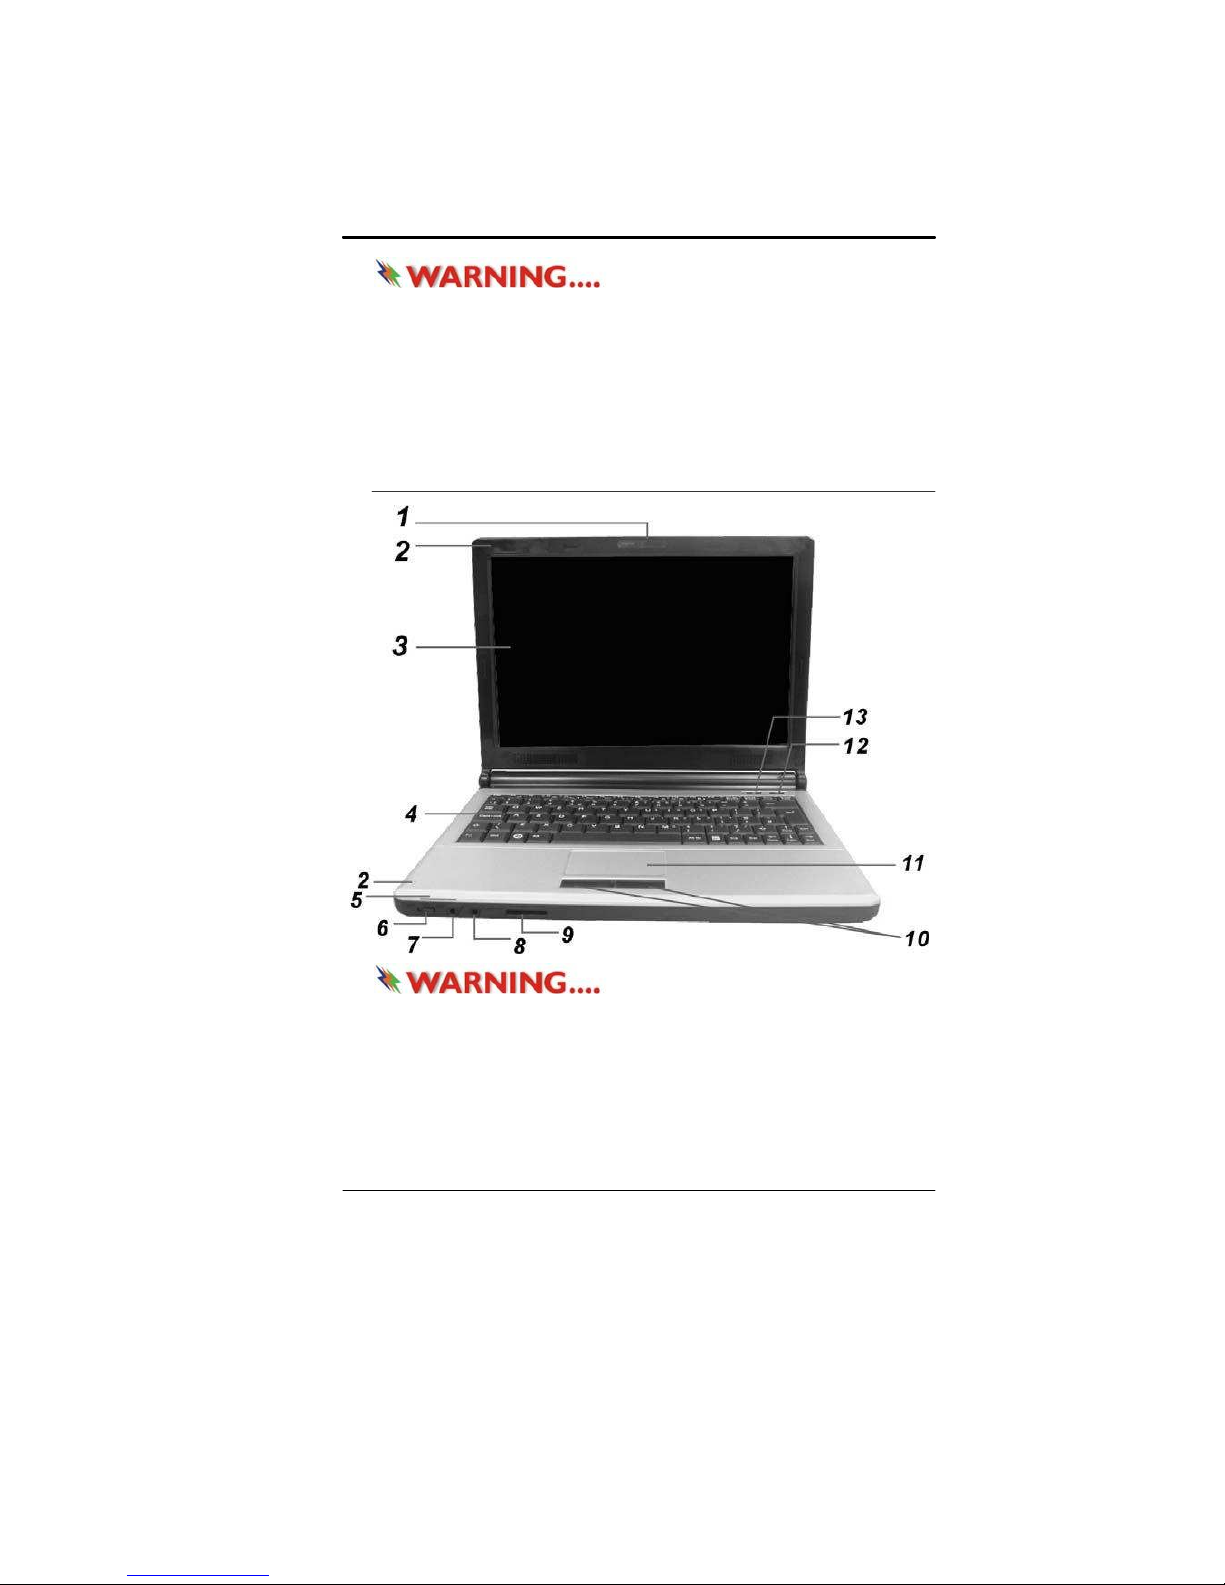
With the LCD screen open, you will see several features important
for operating your Notebook computer.
Front View
on the top of notebook. This may damage the display
1. CCD Camera (optional)
2. Built-in Microphone
3. LCD Display
4. Keyboard
5. LED Status Indicator
Do not place any heavy objects
12

LED Status Indicator
System & Power Status Indicators
LED Graphic
Symbol
Blue light indicates the WLAN module is active.
Persistent green light indicates the Silent mode is
enabled.
Blinking green light indicates the Suspend Mode is
enabled.
Blinking orange light indicates the battery is being
charged.
Blinking red light indicates the battery power is low when
the system is turned ON.
Persistent green light indicates the Power is ON.
Green light indicates the hard drive and/or optical drive is
being accessed.
Indication
6. Wireless On/Off Switch
7. Microphone/Audio Line-in Jack
8. Stereo Headphone/SPDIF-out Jack
9. 4-in-1 Card Reader
The 4-in-1 Card Reader supports SD Card, MMC Card, MS and
MS-Pro Card.
10. Touchpad Buttons
11. Touch Pad
12. Power / Suspend Button
Press momentarily to turn on the system.
Press and hold for at least 4 seconds to turn off the
system.
Press the power / suspend button again to return from
the suspend mode.
Persistent green light indicates the Power is ON
13. Silent Mode Button
Pressing the key enables the system to lower its power usage;
therefore the fan speed is reduced to achieve lowest operating
noise. Persistent green light indicates the silent mode.
13
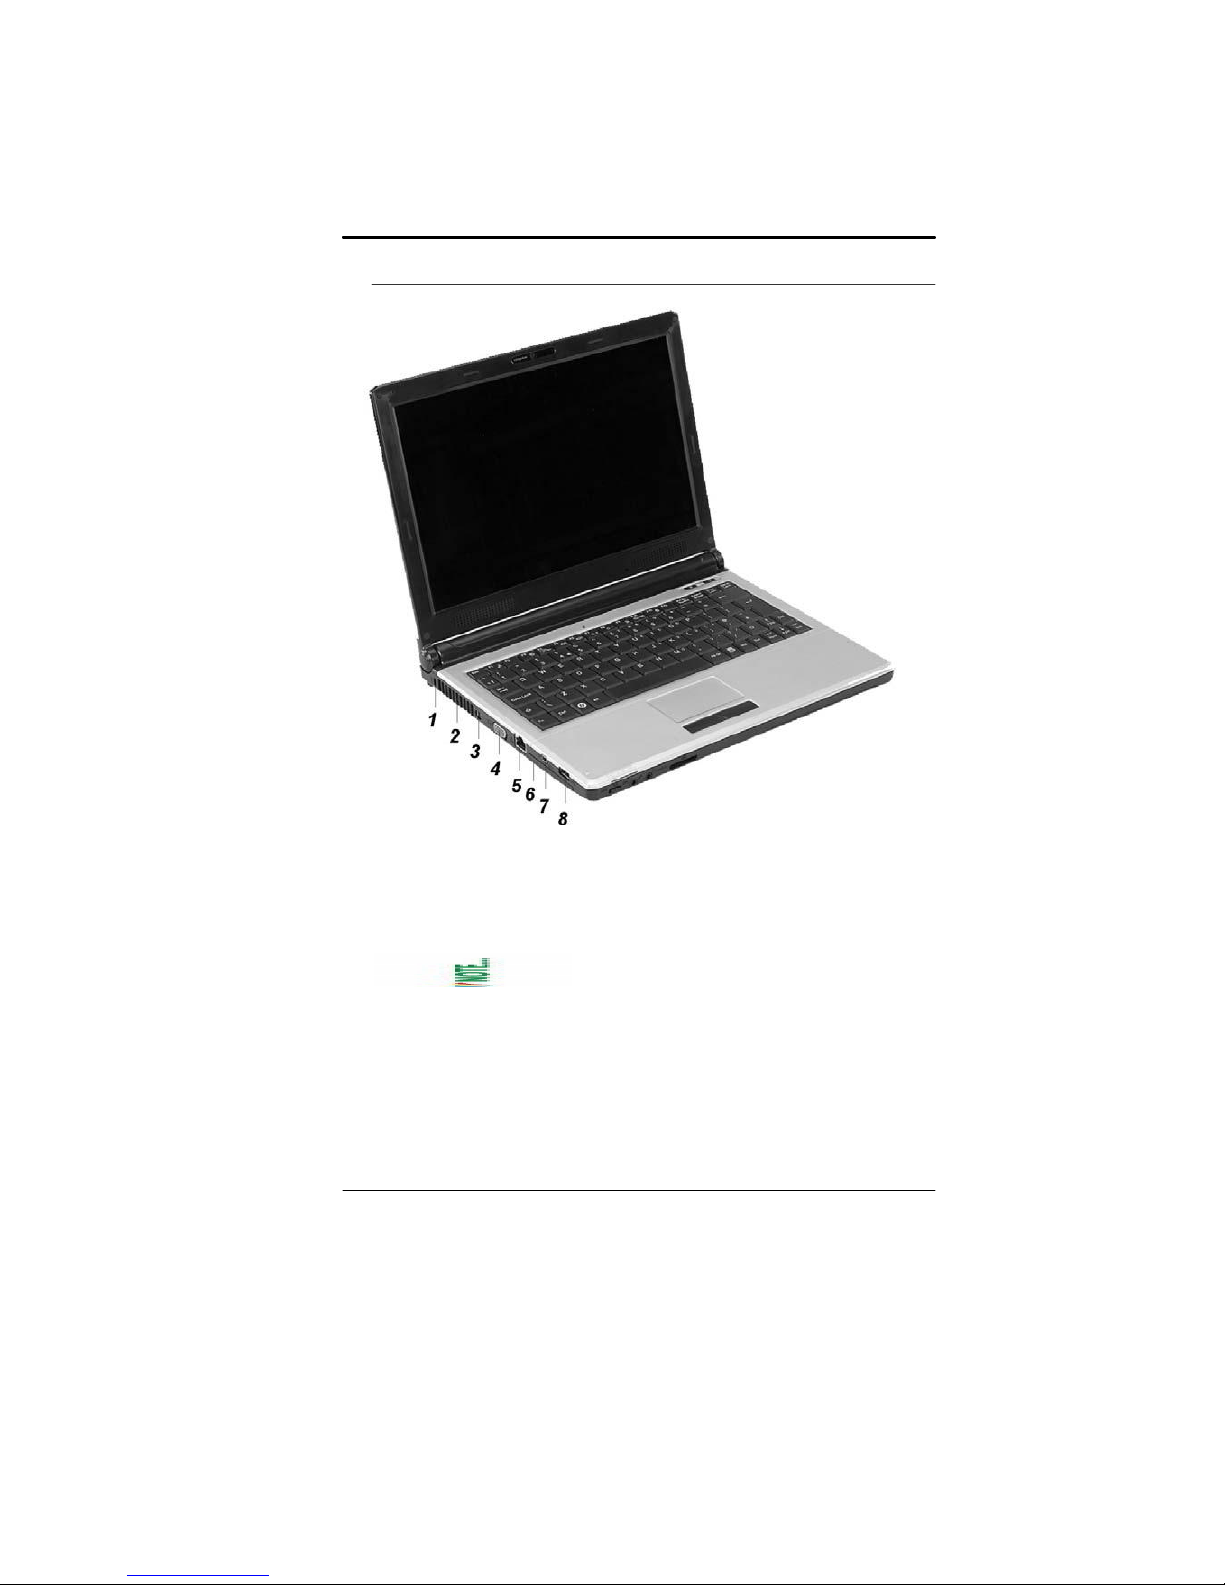
Left Views
1. Kensington Lock
2. Ventilation Grill
3. Power Jack (DC-in)
4. CRT Port
5. Ethernet / LAN Port
Shielding Cable to minimize an inteference when transmitting.
6. ExpressCard (New Card) Slot
The slot is where Express Card (Type 54) is inserted. ExpressCard
Type 54 allows insertion of 54mm and 34mm cards. ExpressCard
integrates both the PCI-Express bus technology and USB2.0
standards.
7. 1394A port
When using a LAN, please use an EMI
14
8. USB 2.0 Port
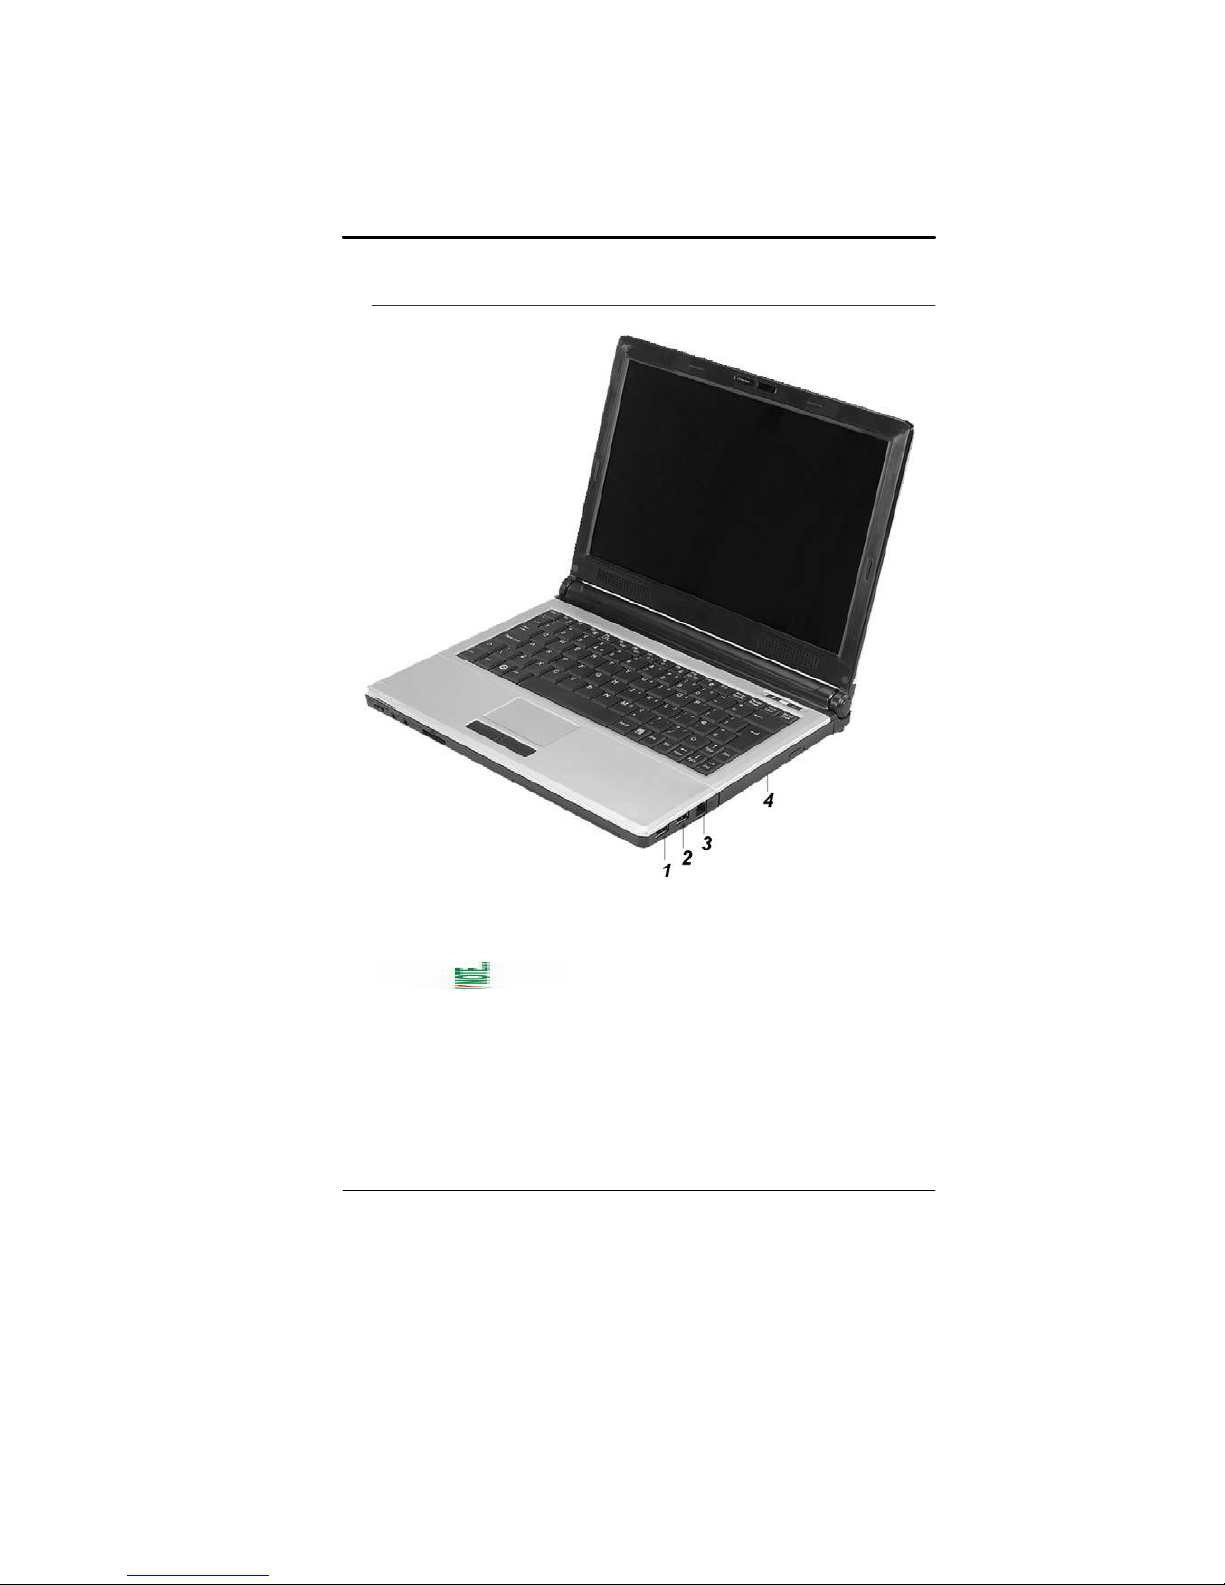
Right View
1. USB 2.0 Ports
2. USB 2.0 Ports
3. Modem Port (optional)
Always disconnect all telephone lines
from the wall outlet before servicing or disassembling this
equipment. To reduce the risk of fire use only No. 26 AWG or
larger telecommunication line cord.
4. Optical Drive and Disk Eject Button and Manual Eject Key
Hole
15
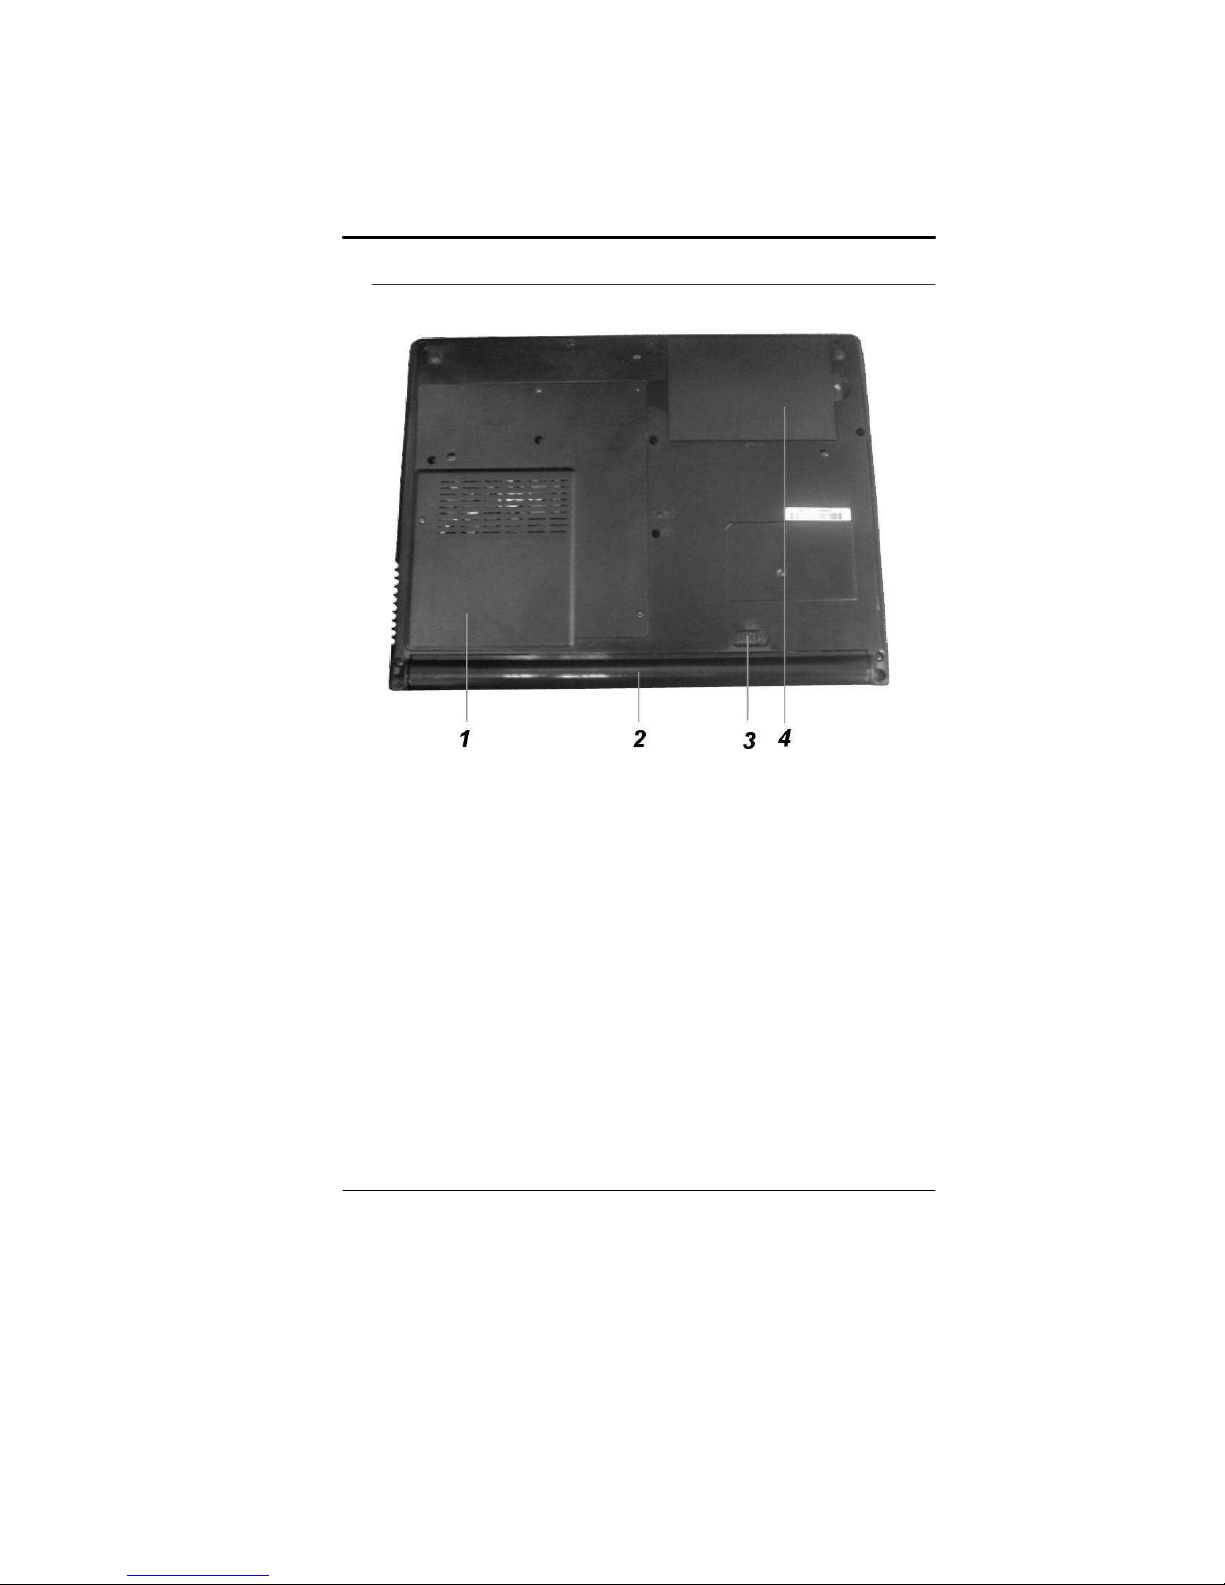
Bottom View
1. Expansion Compartment
2. Battery Compartment
3. Battery Release Latch
4. Hard Disk Drive
16
 Loading...