

Page 1
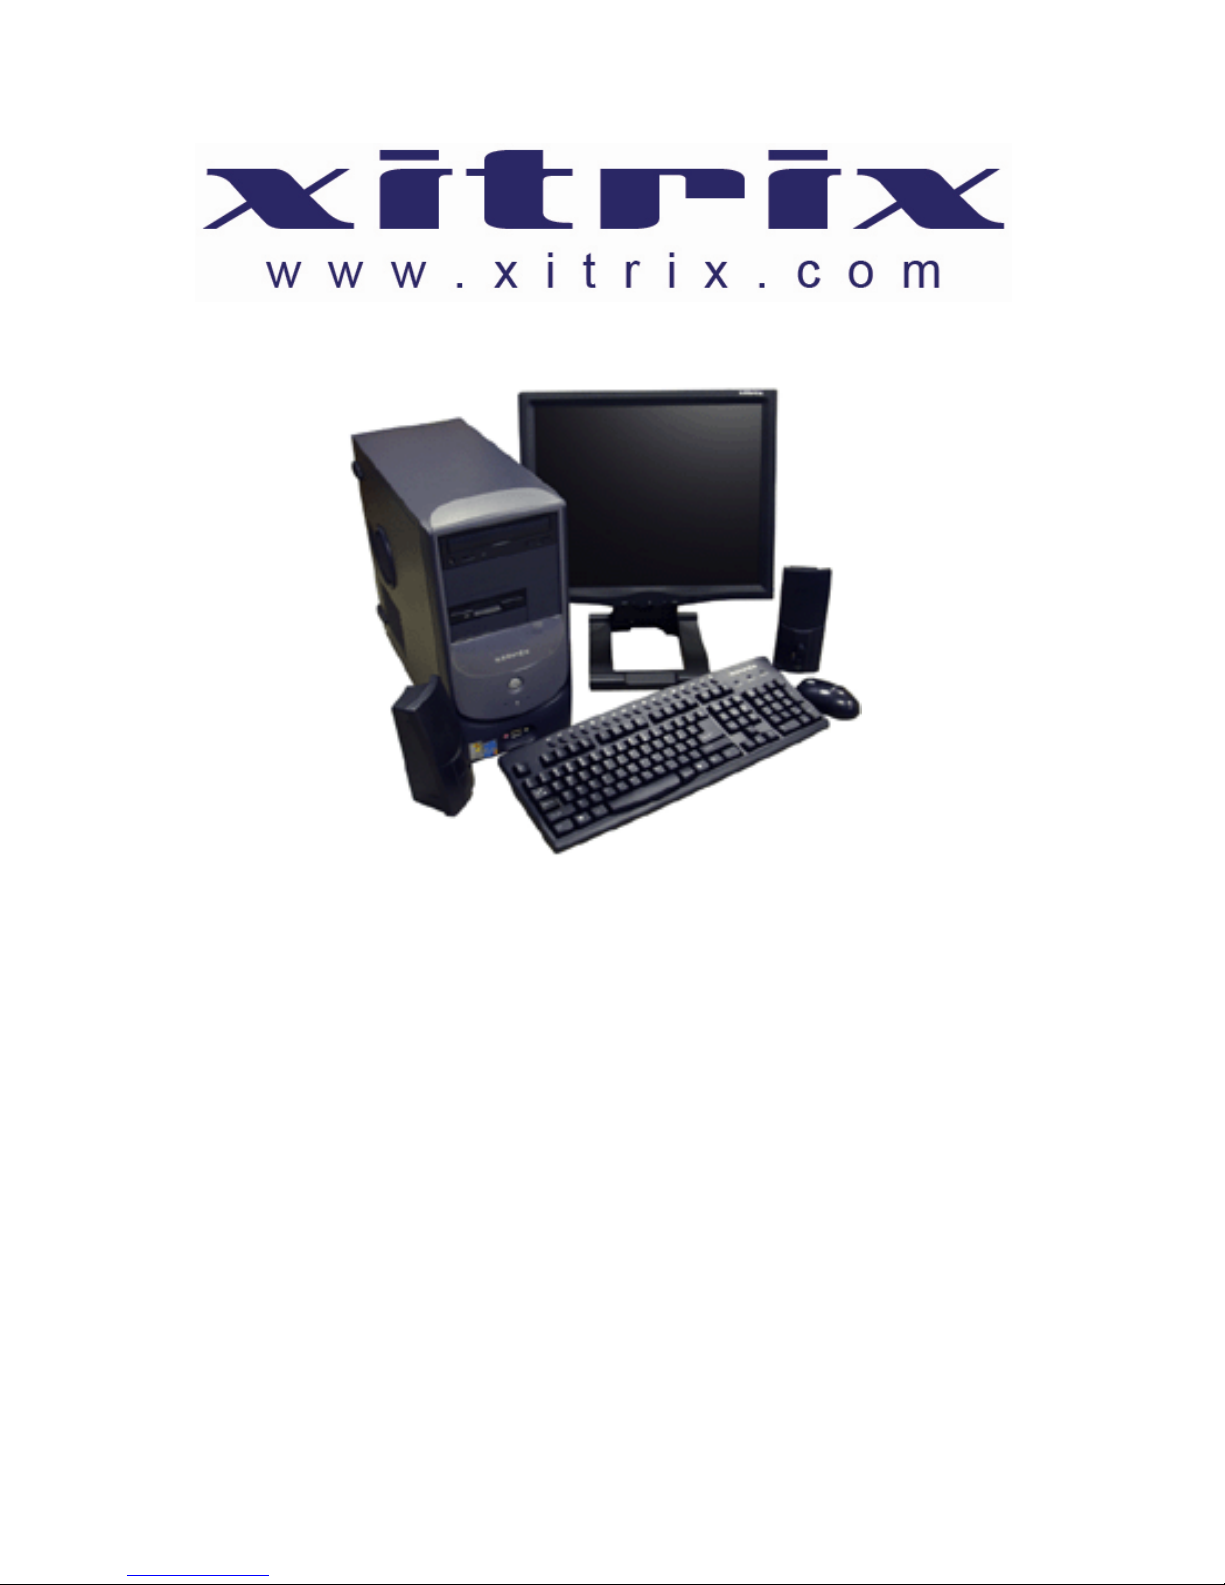
Desktop PC
User Guide
Page 2

- ii -
Page 3

Contents
1 Getting Help . . . . . . . . . . . . . . . . . . . . . . . . . . . . .
Xitrix Web site . . . . . . . . . . . . . . . . . . . . . . . . . . . . . . . . . . . . . 3
Help and Support . . . . . . . . . . . . . . . . . . . . . . . . . . . . . . . . . . . . 3
Searching for a topic . . . . . . . . . . . . . . . . . . . . . . . . . . . . . . . . 4
Bigfix . . . . . . . . . . . . . . . . . . . . . . . . . . . . . . . . . . . . . . . . . . . . . 4
Online help . . . . . . . . . . . . . . . . . . . . . . . . . . . . . . . . . . . . . . . . . 5
Xitrix online information . . . . . . . . . . . . . . . . . . . . . . . . . . . . . . . 6
2 Checking Out Your Xitrix Computer . . . . . . . . . . . . .
Desktop PC Front . . . . . . . . . . . . . . . . . . . . . . . . . . . . . . . . . . . . . 8
Desktop PC Back . . . . . . . . . . . . . . . . . . . . . . . . . . . . . . . . . . . . . . 10
Identifying your model . . . . . . . . . . . . . . . . . . . . . . . . . . . . . . . . . . 13
Xitrix model and serial number . . . . . . . . . . . . . . . . . . . . . . . . . . 13
Microsoft Certificate of Authenticity . . . . . . . . . . . . . . . . . . . . . 13
1
7
3 Getting Started . . . . . . . . . . . . . . . . . . . . . . . . . . . .
Working safely . . . . . . . . . . . . . . . . . . . . . . . . . . . . . . . . . . . . . . . . 16
Reducing eye strain . . . . . . . . . . . . . . . . . . . . . . . . . . . . . . . . . . 16
Setting up your computer desk and chair . . . . . . . . . . . . . . . . . . 16
Setting up your computer and computer accessories . . . . .... . . . . 17
Sitting at your computer . . . . . . . . . . . . . . . . . . . . . . . . . . . . . . 17
Avoiding discomfort and injury from repetitive strain . . . . . . . . . 17
Protecting from power source problems . . . . . . . . . . . . . . . . . . . 18
Checking the voltage selection . . . . . . . . . . . . . . . . . . . . . . . . . . 18
Starting your computer . . . . . . . . . . . . . . . . . . . . . . . . . . . . . . . . . 19
Waking up your computer . . . . . . . . . . . . . . . . . . . . . . . . . . . . . . 20
Turning off your computer . . . . . . . . . . . . . . . . . . . . . .. . . . . . . . . . 20
Restarting (rebooting) your computer . . . . . . . . . . . .. . . . . . . . . . . 21
Adjusting the volume . . . . . . . . . . . . . . . . . . . . . . . . .. . . . . . . . . . 21
Using the keyboard . . . . . . . . . . . . . . . . . . . . . . . . . . .. . . . . . . . . 22
Enhanced keyboard . . . . . . . . . . . . . . . . . . . . . . . . . . . . . . . . . . 22
15
- iii -
Page 4

Standard keyboard . . . . . . . . . . . . . . . . . . . . . . . . . . . . . . . . . . 22
Keyboard features . . . . . . . . . . . . . . . . . . . . . . . . . . . . . . . . . . 23
Using the mouse . . . . . . . . . . . . . . . . . . . . . . . . . . . .. . . . . . . . . . 24
Connecting the modem . . . . . . . . . . . . . . . . . . . . . . . . . . . . . . . . . . 26
Connecting to a wired Ethernet network . . . . . . . . . . . . . . . . . . . . . 27
Installing a printer, scanner, or other peripheral device . . . . . . . . . . 28
4 Using Drives and Ports . . . . . . . . . . . . . . . . . . . . . . .
Using the diskette drive . . . . . . . . . . . . . . . . . . . . . . . . . . . . . . . . . 30
Using the memory card reader . . . . . . . . . . . . . . . . . . . . . . . . . . . . . 31
Memory card types . . . . . . . . . . . . . . . . . . . . . . . . . . . . . . . . . . 31
Inserting a memory card . . . . . . . . . . . . . . . . . . . . . . . . . . . . . . . 32
Using the CD or DVD drive . . . . . . . . . . . . . . . . . . . . . . . . . . . . . . . . 33
Identifying drive types . . . . . . . . . . . . . . . . . . . . . . . . . . . . . . . . 33
Inserting a CD or DVD . . . . . . . . . . . . . . . . . . . . . . . . . . . . . . . . 34
Playing a CD . . . . . . . . . . . . . . . . . . . . . . . . . . . . . . . . . . . . . . . 35
Playing a DVD . . . . . . . . . . . . . . . . . . . . . . . . . . . . . . . . . . . . . . 35
Creating CDs or DVDs . . . . . . . . . . . . . . . . . . . . . . . . . . . . . . . . 35
5 Maintaining Your Computer . . . . . . . . . . . . . . . . . . .
Caring for your computer . . . . . . . . . . . . . . . . . . . . . . . . . . . . . . . . 38
Updating Windows . . . . . . . . . . . . . . . . . . . . . . . . . . . . . . . . . . . . . 38
29
37
Protecting your computer from viruses . . . . . . . . . . . . . . . . . . . . . . 39
Cleaning your computer . . . . . . . . . . . . . . . . . . . . . . . . . . . . . . . . . 41
Cleaning the exterior . . . . . . . . . . . . . . . . . . . . . . . . . . . . . . . . . 41
Cleaning the keyboard . . . . . . . . . . . . . . . . . . . . . . . . . . . . . . . . 42
Cleaning the computer display . . . . . . . . . . . . . . . . . . . . . . . . . . . 42
Cleaning the mouse . . . . . . . . . . . . . . . . . . . . . . . . . . . . . . . . . . . 42
Cleaning CDs or DVDs . . . . . . . . . . . . . . . . . . . . . . . . . . . . . . . . . . 44
Restoring your system . . . . . . . . . . . . . . . . . . . . . . . . . . . . . . . . . . 44
Preventing static electricity discharge . . . . . . . . . . . . . . . . . . . . . . 45
Opening the case . . . . . . . . . . . . . . . . . . . . . . . . . . . . . . . . . . . . . . 46
Removing the side panel . . . . . . . . . . . . . . . . . . . . . . . . . . . . . . . 46
Removing the front bezel . . . . . . . . . . . . . . . . . . . . . . . . . . . . . . 47
Closing the case . . . . . . . . . . . . . . . . . . . . . . . . . . . . . . . . . . . . . . 48
- iv -
Page 5

Replacing the side panel . . . . . . . . . . . . . . . . . . . . . . . . . . . . . . . 48
Replacing the front bezel . . . . . . . . . . . . . . . . . . . . . . . . . . . . . . 49
Installing memory . . . . . . . . . . . . . . . . . . . . . . . . . . . . . . . . . . . . . 50
Replacing the system battery . . . . . . . . . . . . . . . . . . . . . . . . . . . . . 52
6 Troubleshooting. . . . . . . . . . . . . . . . . . . . . . . . . . . .
Safety guidelines . . . . . . . . . . . . . . . . . . . . . . . . . . . . . . . . . . . . . . 56
First steps . . . . . . . . . . . . . . . . . . . . . . . . . . . . . . . . . . . . . . . . . . 56
Troubleshooting . . . . . . . . . . . . . . . . . . . . . . . . . . . . . . . . . . . . . . 57
Add-in cards . . . . . . . . . . . . . . . . . . . . . . . . . . . . . . . . . . . . . . 57
Audio . . . . . . . . . . . . . . . . . . . . . . . . . . . . . . . . . . . . . . . . . . . 57
Battery . . . . . . . . . . . . . . . . . . . . . . . . . . . . . . . . . . . . . . . . . 57
CD or DVD drives . . . . . . . . . . . . . . . . . . . . . . . . . . . . . . . . . . . 57
Computer . . . . . . . . . . . . . . . . . . . . . . . . . . . . . . . . . . . . . . . . . 59
Diskette drive . . . . . . . . . . . . . . . . . . . . . . . . . . . . . . . . . . . . . 59
DVD drives . . . . . . . . . . . . . . . . . . . . . . . . . . . . . . . . . . . . . . . . 60
File management . . . . . . . . . . . . . . . . . . . . . . . . . . . . . . . . . . . . 60
Hard drive . . . . . . . . . . . . . . . . . . . . . . . . . . . . . . . . . . . . . . . . 61
Internet . . . . . . . . . . . . . . . . . . . . . . . . . . . . . . . . . . . . . . . . . . 62
Keyboard . . . . . . . . . . . . . . . . . . . . . . . . . . . . . . . . . . . . . . . . . 63
Memory . . . . . . . . . . . . . . . . . . . . . . . . . . . . . . . . . . . . . . . . . . 64
55
Memory card reader . . . . . . . . . . . . . . . . . . . . . . . . . . . . . . . . . 64
Modem (dial-up) . . . . . . . . . . . . . . . . . . . . . . . . . . . . . . . . . . . . . 64
Monitor . . . . . . . . . . . . . . . . . . . . . . . . . . . . . . . . . . . . . . . . . . . 68
Mouse . . . . . . . . . . . . . . . . . . . . . . . . . . . . . . . . . . . . . . . . . . . . 69
Networks . . . . . . . . . . . . . . . . . . . . . . . . . . . . . . . . . . . . . . . . . . 70
Passwords . . . . . . . . . . . . . . . . . . . . . . . . . . . . . . . . . . . . . . . . . 70
Power . . . . . . . . . . . . . . . . . . . . . . . . . . . . . . . . . . . . . . . . . . . 70
Printer . . . . . . . . . . . . . . . . . . . . . . . . . . . . . . . . . . . . . . . . . . . 70
Sound . . . . . . . . . . . . . . . . . . . . . . . . . . . . . . . . . . . . . . . . . . . . 72
Telephone support . . . . . . . . . . . . . . . . . . . . . . . . . . . . . . . . . . . . . . 73
Before calling Xitrix Customer Care . . . . . . . . . . . . . . . . . . . 73
Telephone numbers . . . . . . . . . . . . . . . . . . . . . . . . . . . . . . . . . . 74
Self-help . . . . . . . . . . . . . . . . . . . . . . . . . . . . . . . . . . . . . . . . . . 74
- v -
Page 6

A Safety, Regulatory, and Legal Information . . . . . . . . .
Index . . . . . . . . . . . . . . . . . . . . . . . . . . . . . . . . . . . . .
75
83
- vi -
Page 7

Chapter 1
Getting Help
• Using the Xitrix Website
• Using Help and Support
• Using big fix
• Using On-line help
• Contacting Xitrix
- 1 -
Page 8

Chapter 1: Getting Help
Thank you for purchasing our computer!
You have made an excellent decision choosing Xitrix. We are sure that you will be
pleased with the outstanding quality, reliability, and performance of your new
computer. Each and every Xitrix computer uses the latest technology and passes through
the most stringent quality control tests to ensure that you are provided with the best
product possible.
Please read this manual carefully to familiarize you with our range of services and
support. We have highlighted some basic care and safety information to help you keep
your computer in good operating condition.
Xitrix stands behind our value proposition to our customers — to provide best-of-class
service and support in addition to high-quality, brand-name components at affordable
prices. If you ever have a problem, our knowledgeable, dedicated customer service
department will provide you with fast, considerate service.
We sincerely hope that you will receive the utmost satisfaction and enjoyment from
your new Xitrix computer for years to come.
Thanks again, from all of us at Xitrix.
- 2 -
Page 9
Xitrix Web site
Xitrix' online support is available 24 hours per day, 7 days per week and provides the
most current drivers, product specifications, and information about your computer. Visit
the Xitrix Customer Care Web site at xitrix.com/support/.
Help and Support
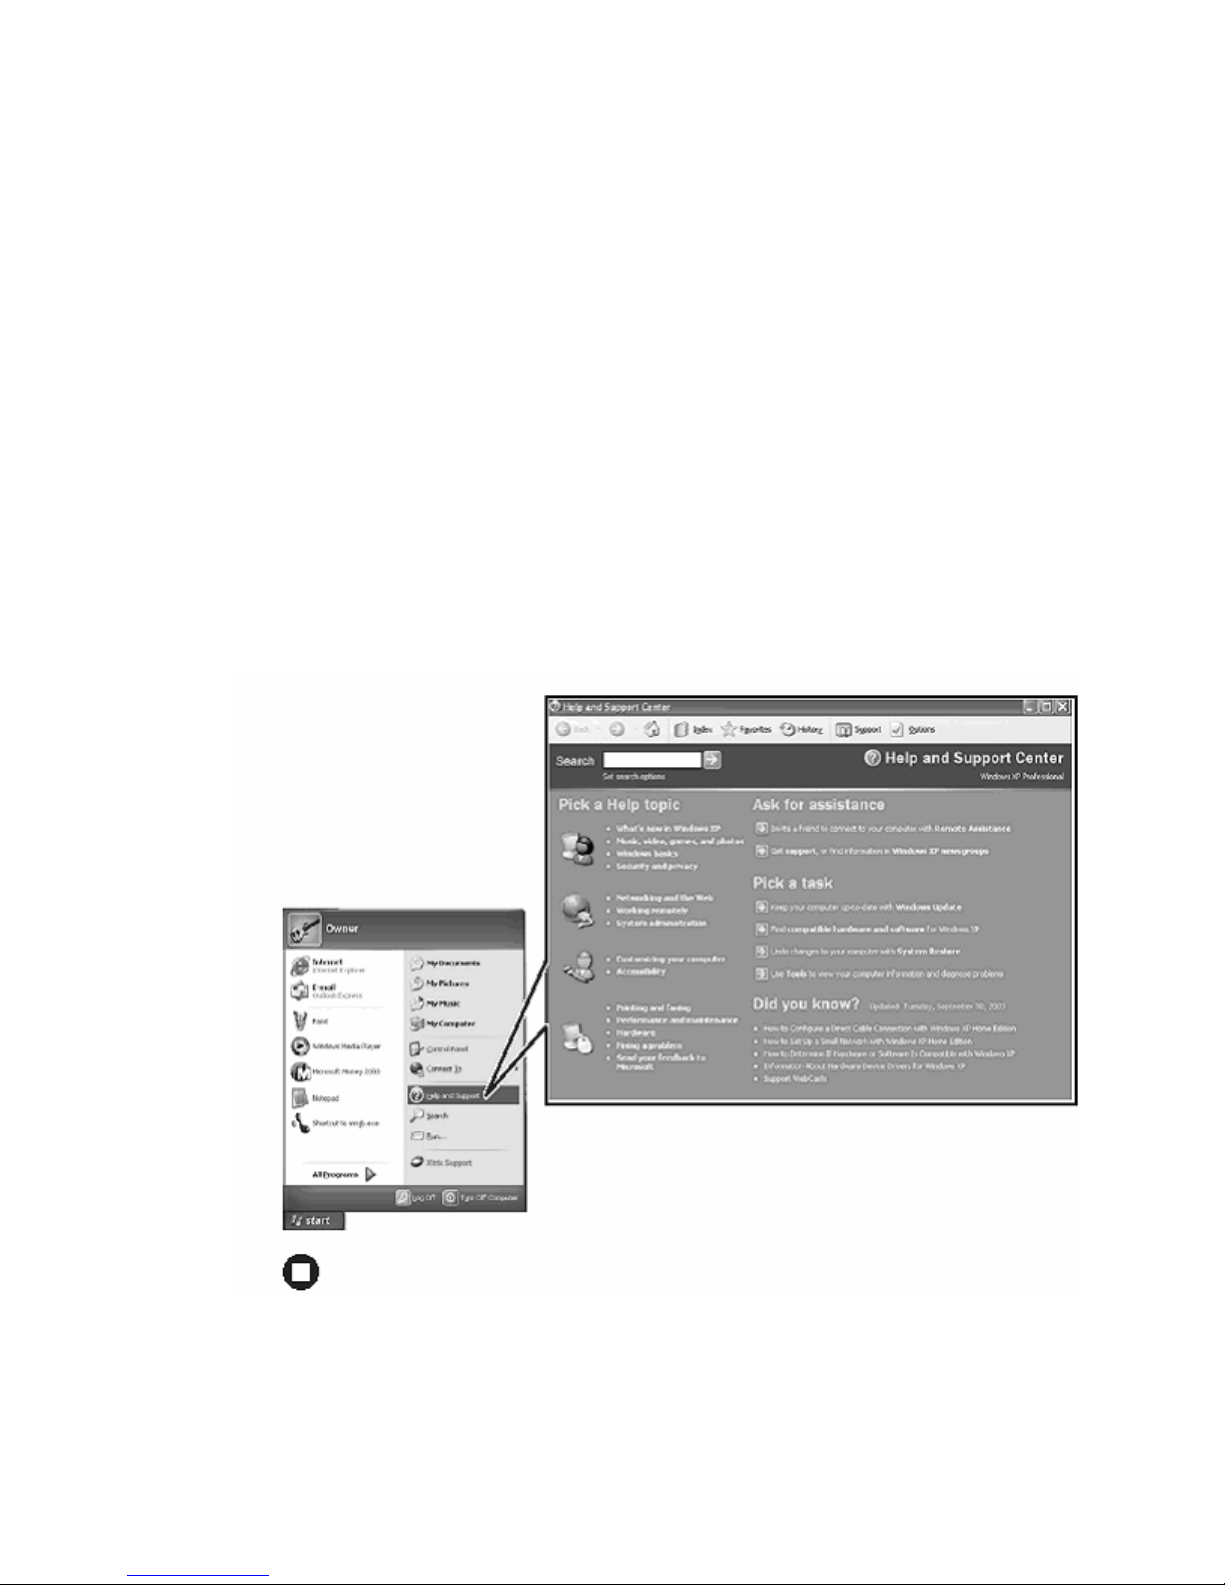
Your computer includes Help and Support, an easily accessible collection of help
information, troubleshooters, and automated support. Use Help and Support to answer
questions about Windows and to help you quickly discover and use the many features of
your Xitrix computer.
⇒ To start Help and Support:
Click Start, then click Help and Support. Help and Support opens.
Xitrix Web site
You can find help information by clicking a link, performing a search, or browsing the index.
- 3 -
Page 10

Chapter 1: Getting Help
Searching for a topic
To search for a topic in Help and Support, type a word or phrase (keyword) in the
Search box located at the top of any Help and Support screen, then click the arrow
button.
For each search, you receive the following search result types:
Suggested Topics - These topics are located in Help and Support and are relevant
to your search topic.
Full-text Search Matches - These topics are located in Help and Support and
contain the words you entered in the Search box.
Microsoft Knowledge Base - These topics are located on the Microsoft Web site
and contain the words you entered in the Search box. You must be connected to
the Internet to search for and access these topics.
To view a list of your search results, click the results header for the type of results you
want to view.
To view a topic, click the topic name in the Search Results list.
BigFix
BigFix monitors your computer for problems and conflicts. It automatically gathers
information about the latest bugs, security alerts, and updates from BigFix sites on the
Internet. Whenever BigFix detects problem, it alerts you by flashing the blue taskbar
icon.
To fix the problem, click on that icon to open BigFix.
 To start BigFix:
Click Start, All Programs, Accessories, System Tools, then click BigFix.
 To learn more about using BigFix:
From the BigFix program, click Help, then click Tutorial.
- 4 -
Page 11
Online help
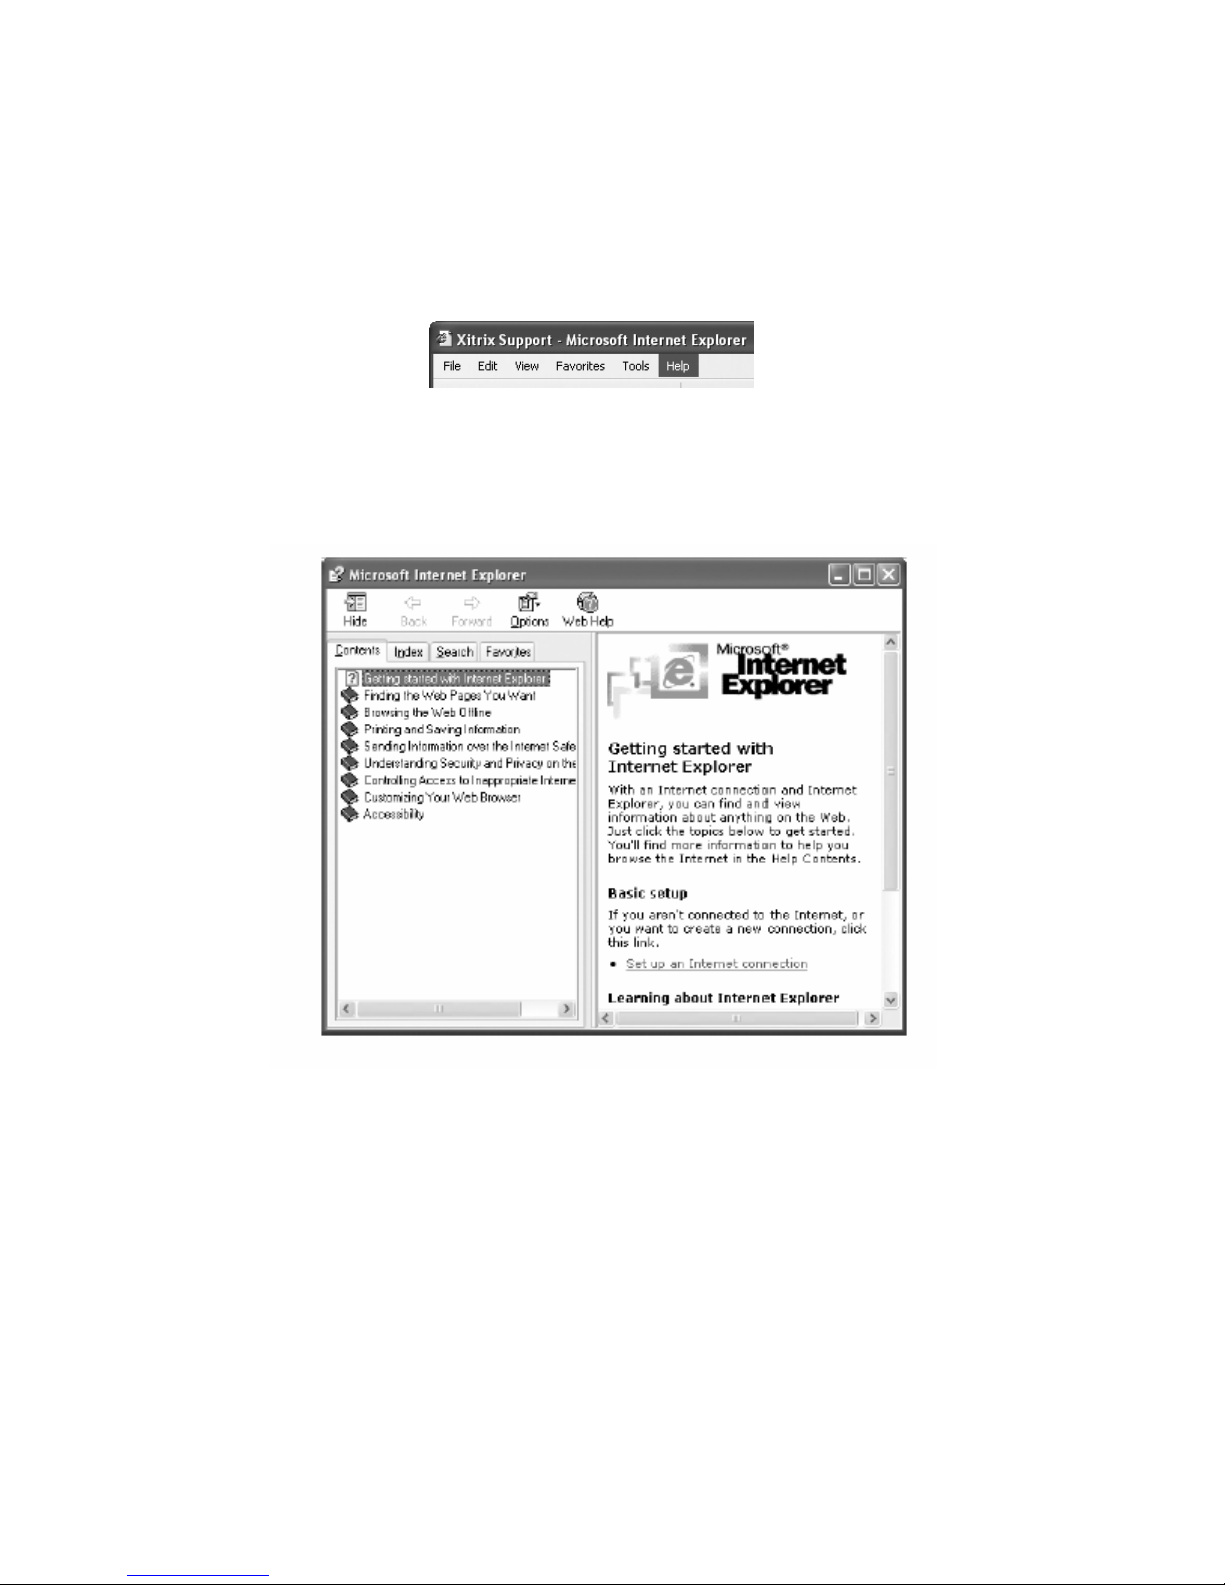
Many programs provide information online so you can research a topic or learn how to
perform a task while you are using the program. You can access most online help
information by selecting a topic from Help menu or by clicking a Help button.
You can search for information by viewing the help contents, checking the index,
searching for a topic or keyword, or browsing through the online help.
- 5 -
Page 12
Chapter 1: Getting Help
Xitrix contact information
To help you locate Xitrix contact information, you can find the Xitrix Web site, Online
Support, and technical support contact information, Click on the Start menu button,
right-click on My Computer and select Properties, then Click the Support Information
button.
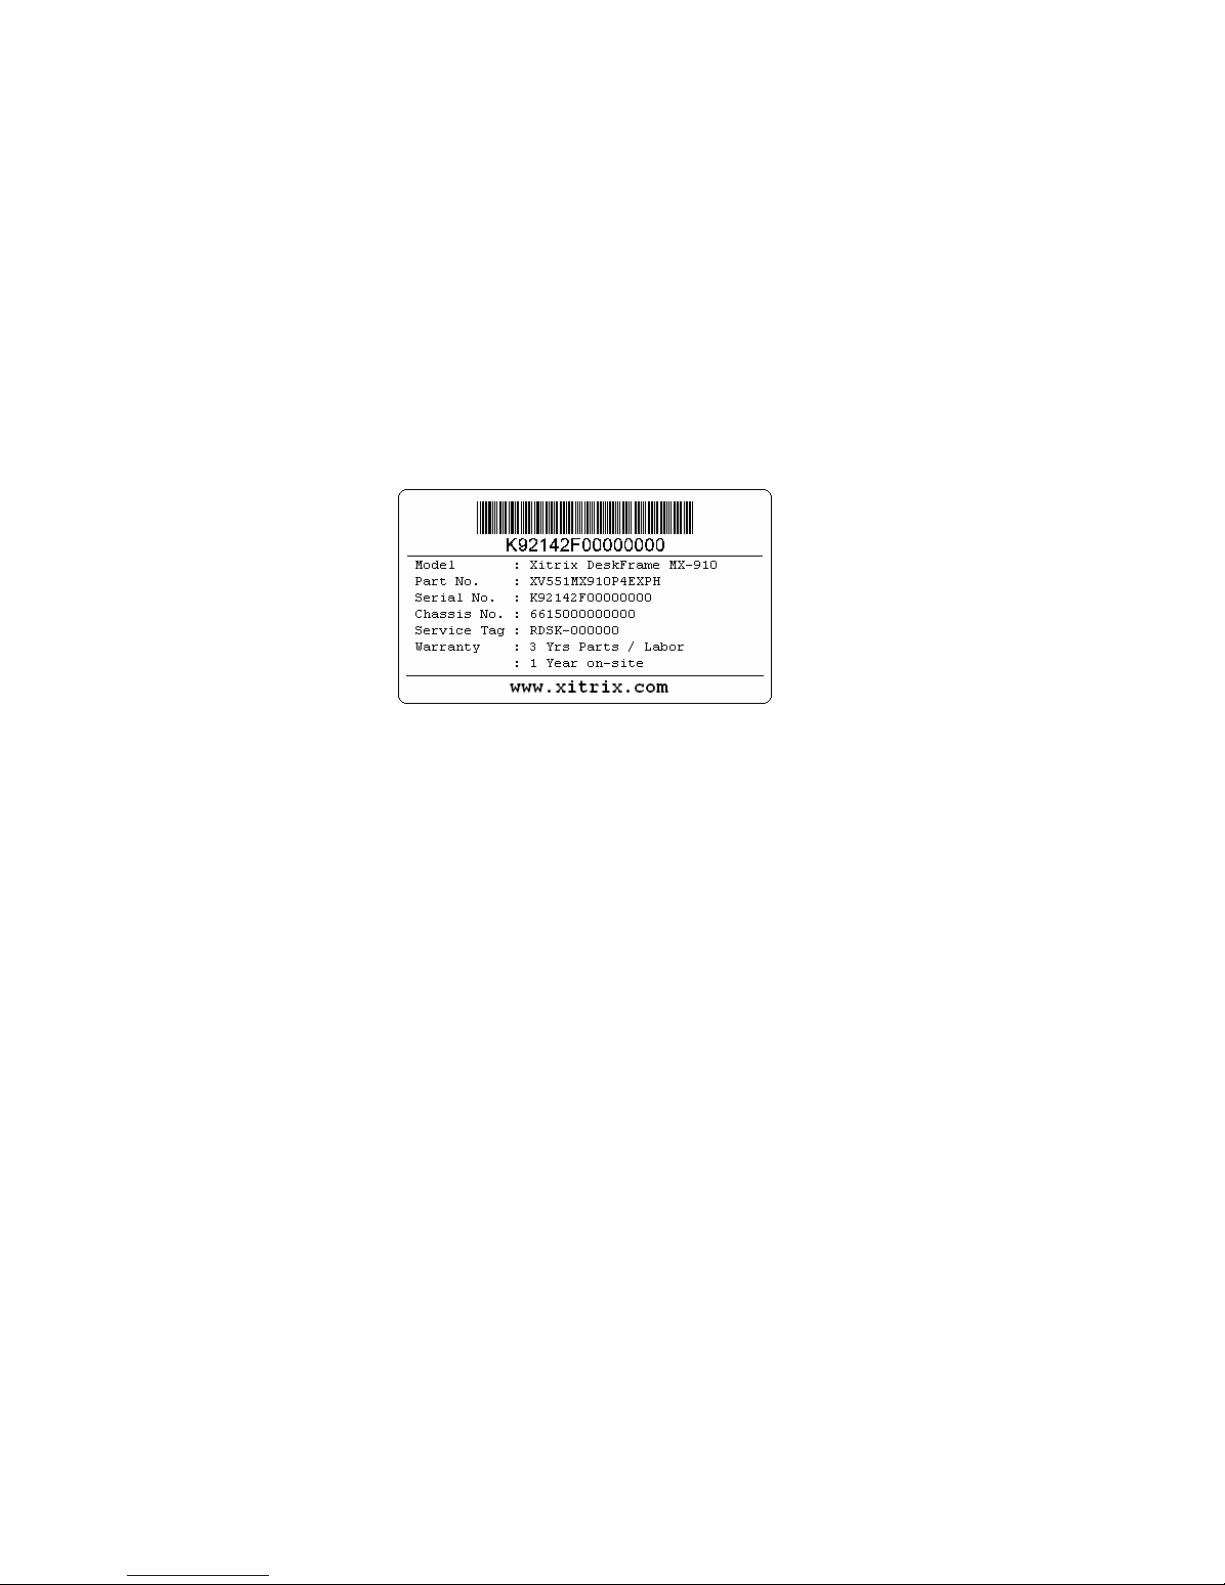
We may request your Service Tag when you call Xitrix Customer Care. Your Service Tag
is attached on the side panel of your Xitrix PC.
- 6 -
Page 13

Chapter 2
Checking Out Your
Xitrix Computer
• Identifying features
• Locating your computer model and serial
number
• Locating the Microsoft Certificate of
Authenticity
- 7 -
• Locating the specifications for your
computer
• Purchasing accessories
Page 14

k
Chapter 2: Checking Out Your Xitrix Computer
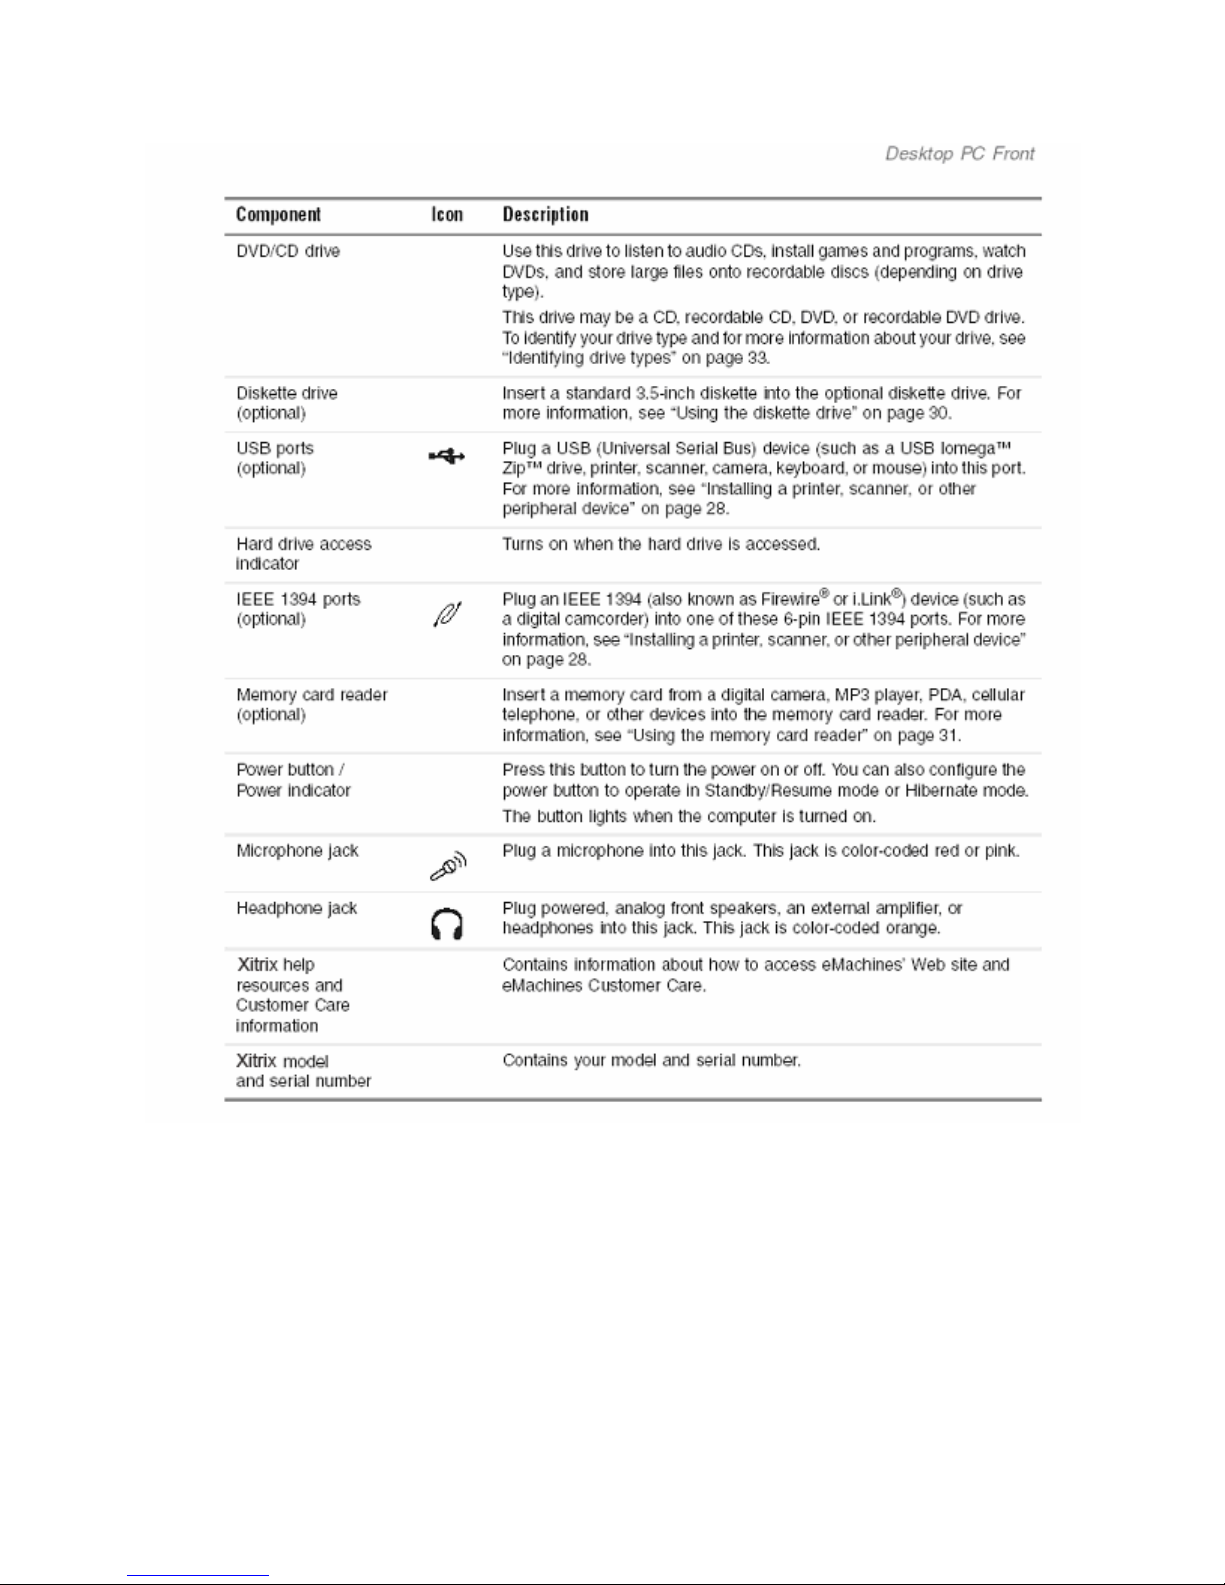
Desktop PC Front
Your computer includes the following components.
DVD/CD Drive
DVD/CD Drive
(Optional)
Floppy Drive
Power Button/
(Power Indicator)
Hard Drive Access Indicator
USB ports
Microphone Jac
Headphone Jack
- 8 -
Page 15
- 9 -
Page 16
- 10 -
Page 17
- 11 -
Page 18
- 12 -
Page 19
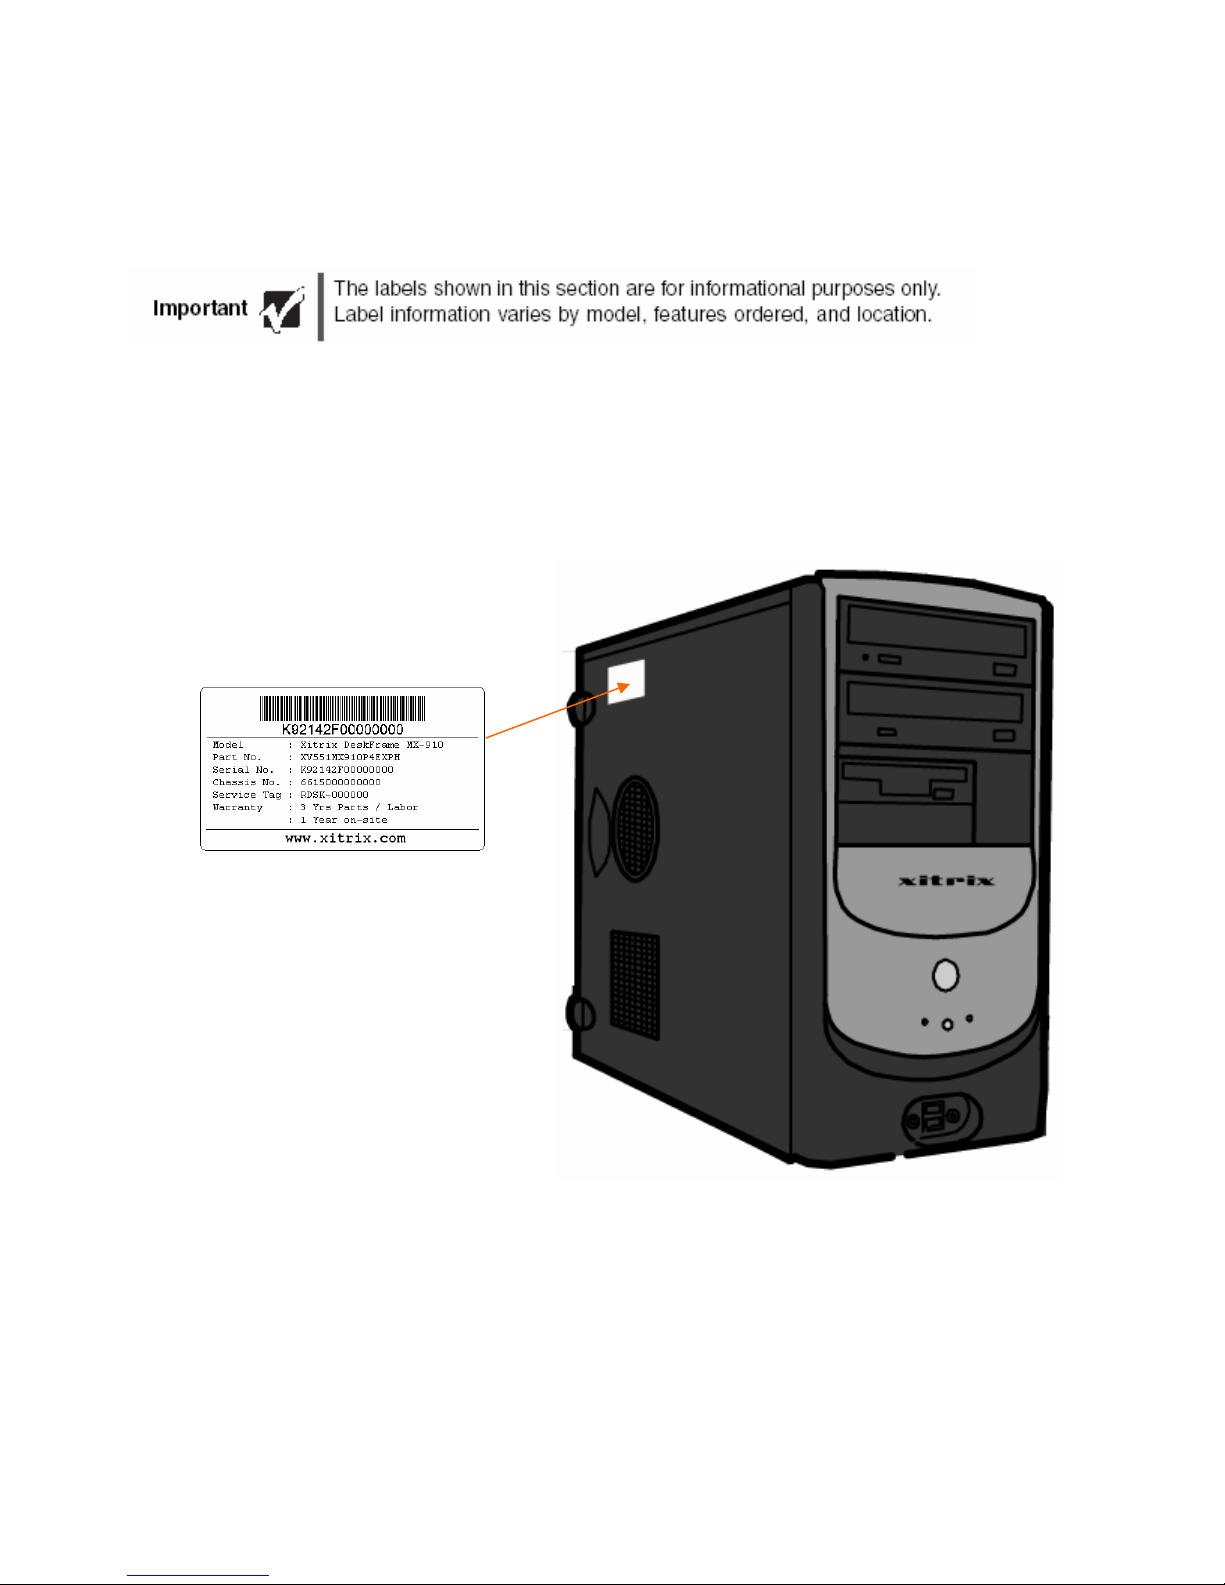
Identifying your model
Xitrix model and serial number
The label on the side of your computer case contains information that identifies your
computer model and serial number. Xitrix Customer Care will need this information if
you call for assistance.
Identifying your model
- 13 -
Page 20
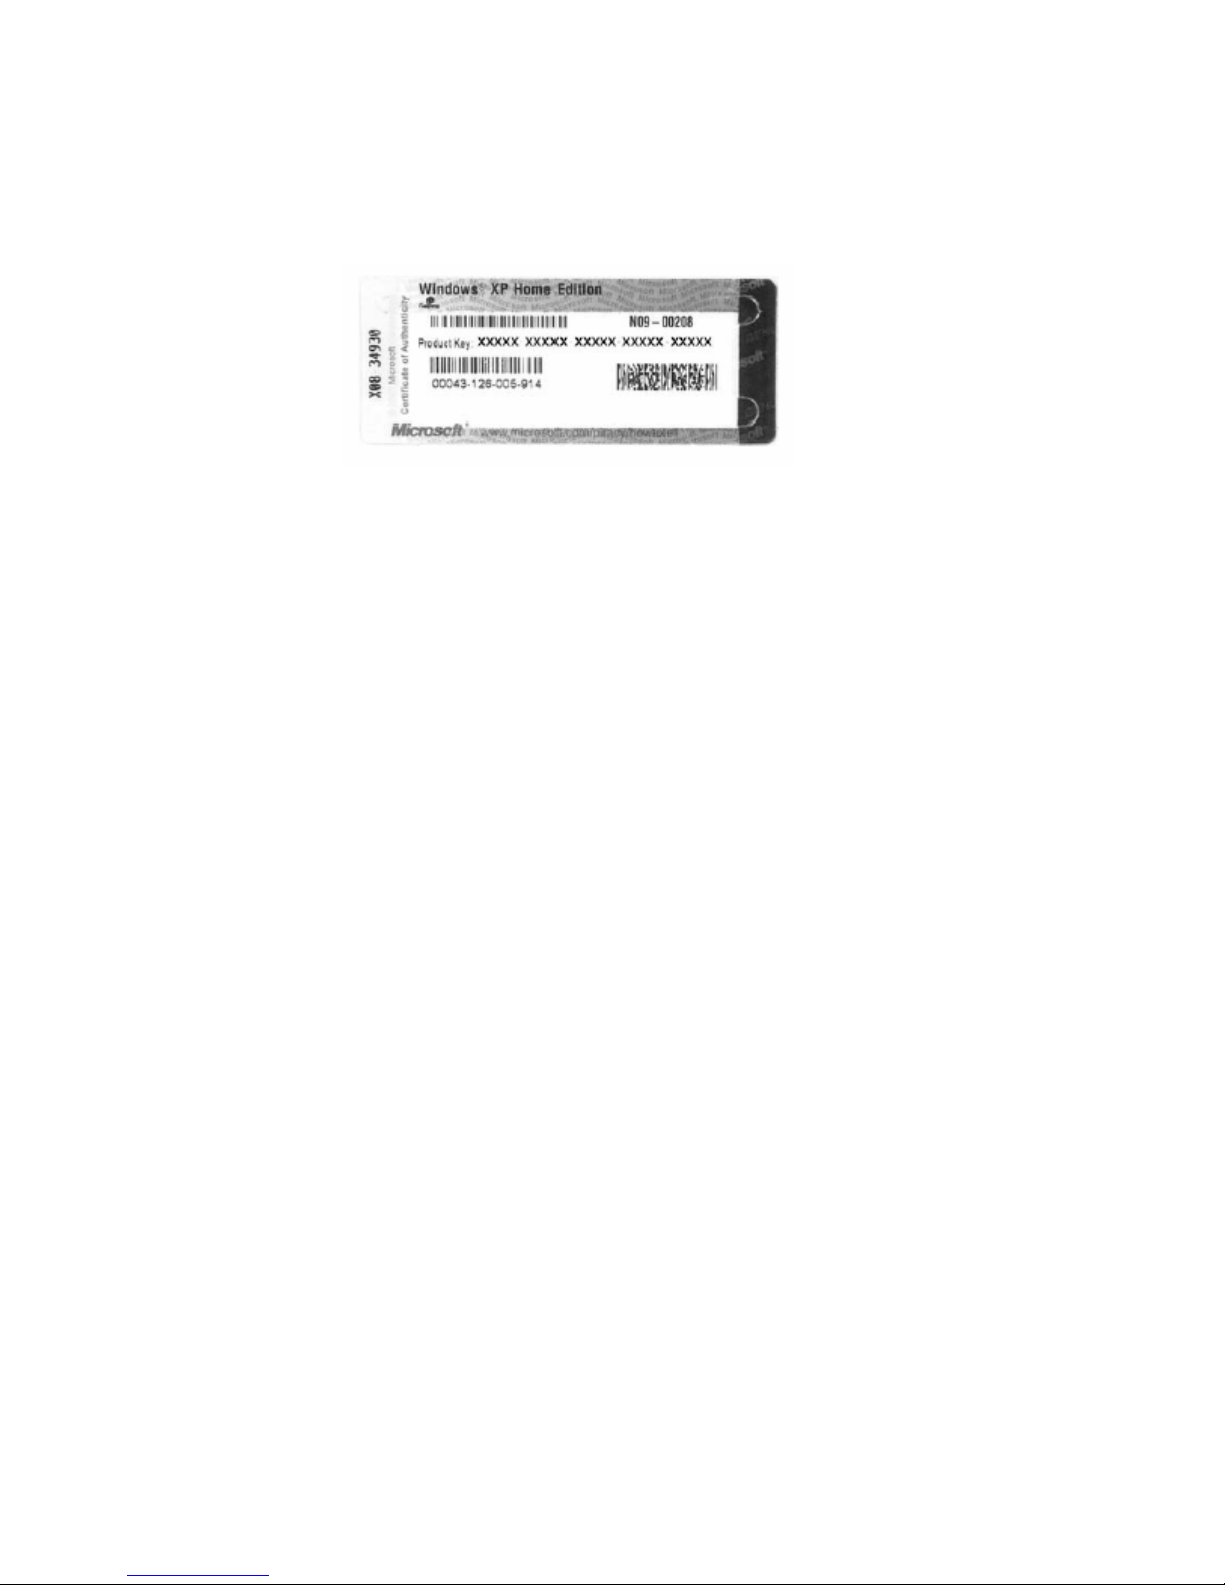
Microsoft Certificate of Authenticity
The Microsoft Certificate of Authenticity label found on the back or side of your
computer includes the product key code for your operating system.
Chapter 2: Checking Out Your Xitrix Computer
- 14 -
Page 21

Chapter 3
Getting Started
• Using your computer safely
• Protecting your computer from power source
problem
• Turning your computer on and off
• Adjusting the volume
• Using the keyboard and the mouse
• Using the computer display
• Installing peripheral devices
- 15 -
Page 22
Chapter 3: Getting Started
Working Safely
Before using your computer, read the following recommendations for setting up a safe
and comfortable work area and avoiding discomfort and strain
Reducing eye strain
Sunlight or bright indoor lighting should not reflect on the monitor screen or shine
directly into your eyes.
Position the computer desk and monitor so you can avoid glare on your screen and
light shining directly into your eyes. Reduce glare by installing shades or curtains on
windows, and by installing a glare screen filter on your monitor.
Use soft, indirect lighting in your work area. Do not use your computer in a dark
room.
Avoid focusing your eyes on your computer screen for a long period of time. Look
away from your computer occasionally, and try to focus on distant objects.
Setting up your computer desk and chair
When you are setting up your computer desk and chair, make sure that the desk is the
appropriate height and the chair helps you maintain good posture.
Select a flat surface for your computer desk
- 16 -
Page 23

Working safely
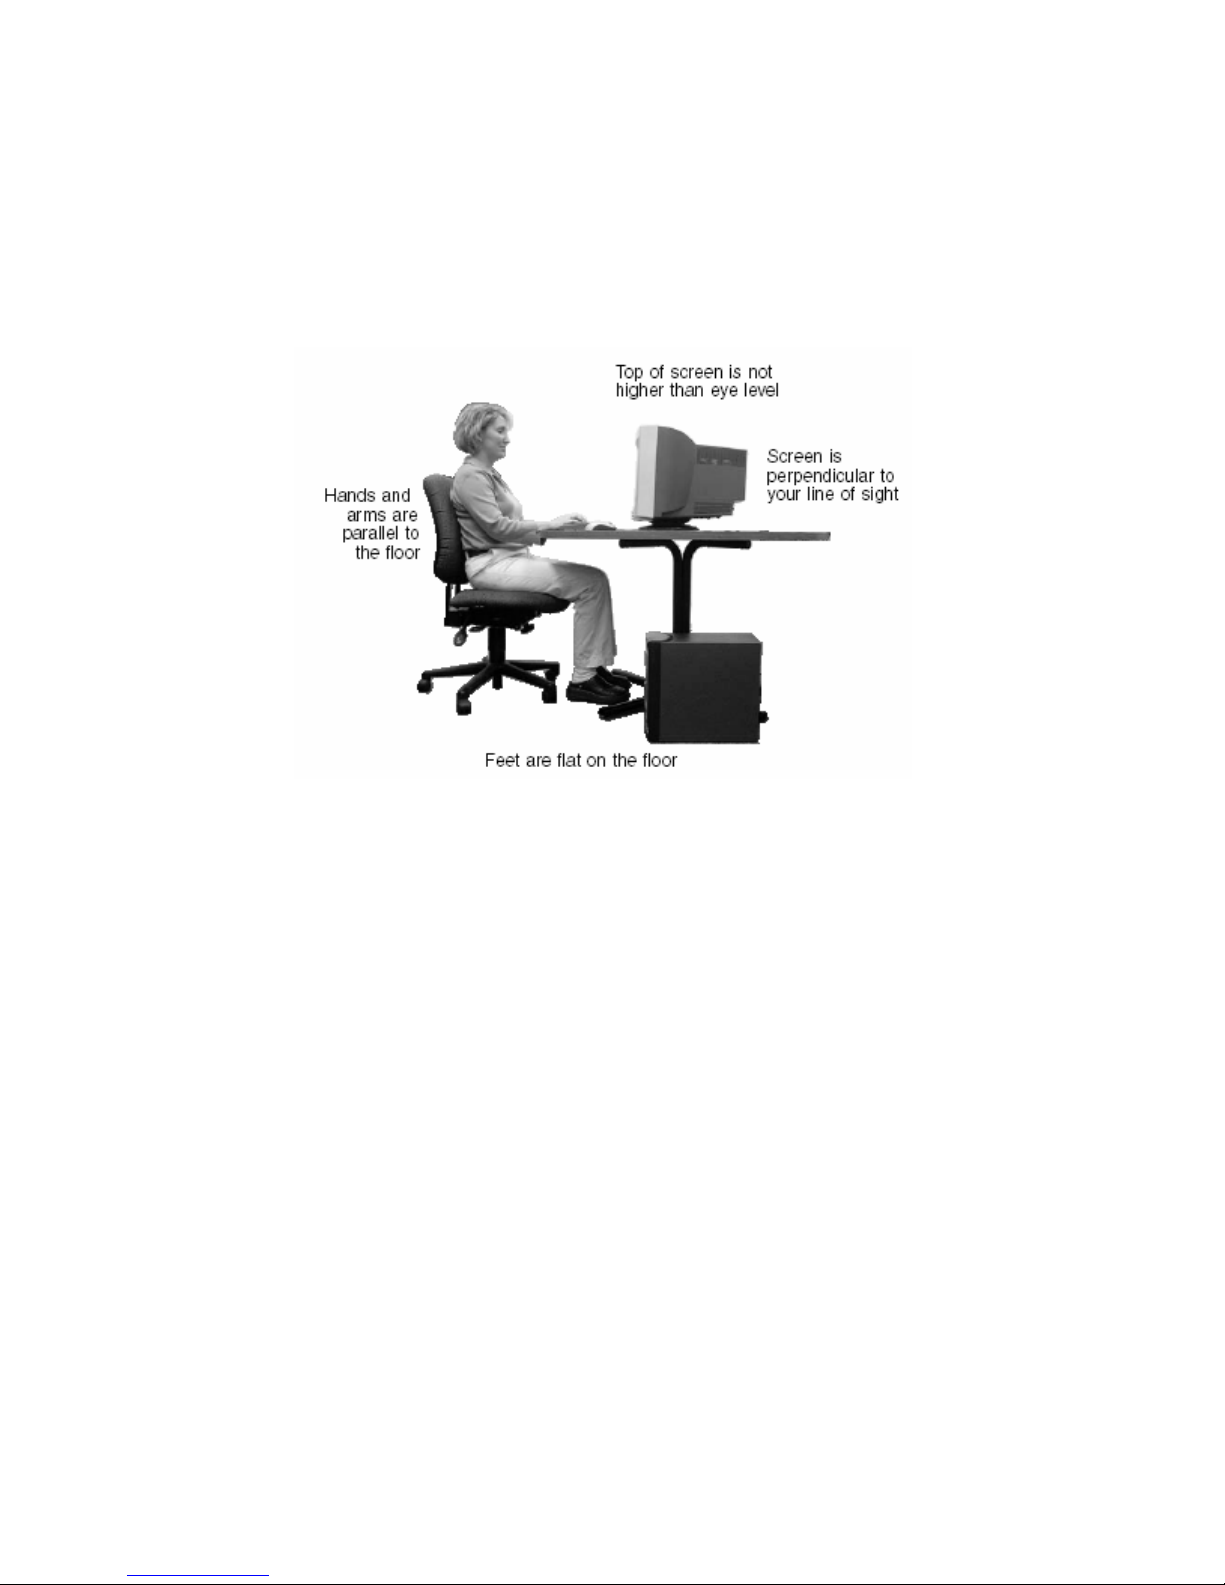
Adjust the height of the computer desk so your hands and arms are positioned
parallel to the floor when you use the keyboard and mouse. If the desk is not
adjustable or is too tall, consider using a keyboard drawer.
Use an adjustable chair that is comfortable, distributes your weight evenly, and
keeps your body relaxed.
Position your chair so the keyboard is at or slightly below the level of your elbow.
This position lets your shoulders relax while you type.
Adjust the chair height, adjust the forward tilt of the seat, or use a footrest to
distribute your weight evenly on the chair and relieve pressure on the back of your
thighs.
Adjust the back of the chair so it supports the lower curve of your spine. You can use
a pillow or cushion to provide extra back support.
Setting up your computer and computer accessories
Set up the monitor so the top is no higher than eye level, the monitor controls are
within reach, and the screen is tilted to be perpendicular to your line of sight.
Place your keyboard and mouse at a comfortable distance. You should be able to reach
them without stretching.
Set paper holders at the same height and distance as the monitor.
Sitting at your computer
Avoid bending, arching, or angling your wrists. Make sure that they are in a relaxed
position when you type.
Do not slouch forward or lean far back. Sit with your back straight so your knees, hips,
and elbows form right angles when you work.
Take breaks to stand and stretch your legs.
Avoid twisting your torso or neck.
Avoiding discomfort and injury from repetitive strain
Vary your activities to avoid excessive repetition.
Take breaks to change your position, stretch your muscles, and relieve your eyes.
Find ways to break up the work day, and schedule a variety of tasks.
- 17 -
Page 24
Chapter 3: Getting Started
Protecting from power source problems
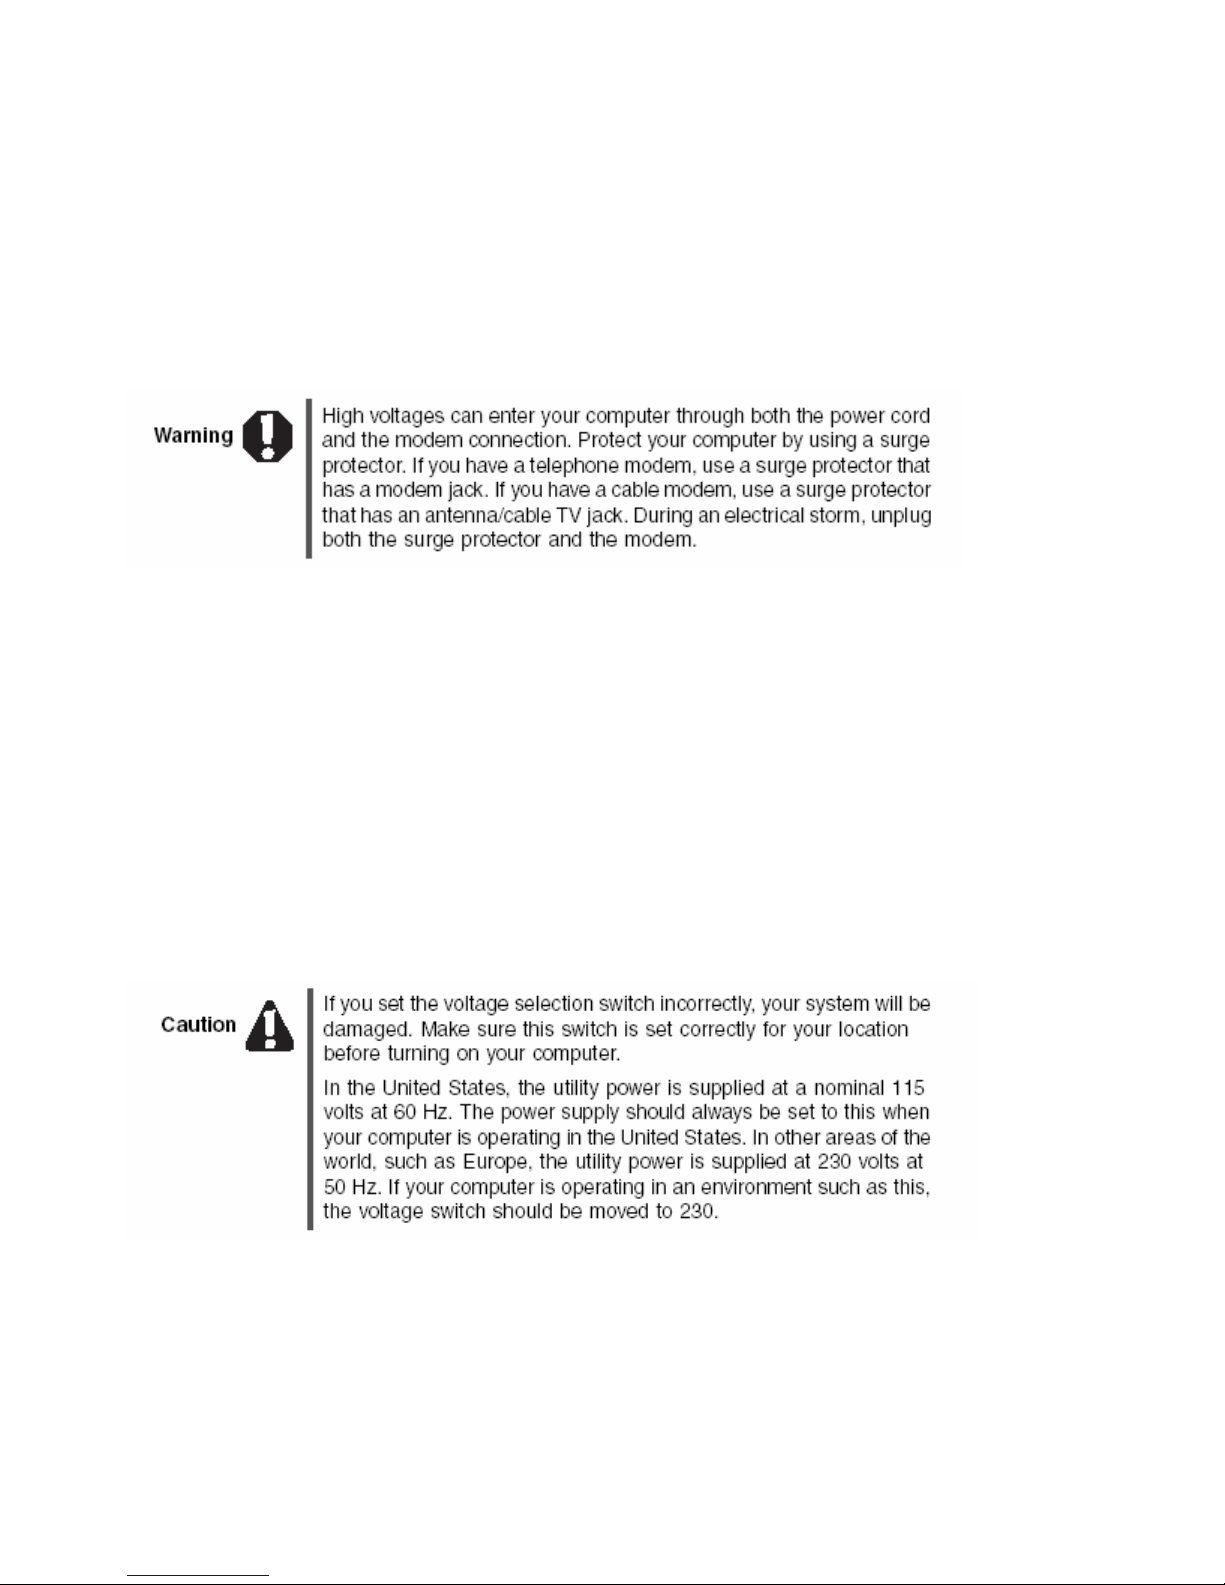
During a power surge, the voltage level of electricity coming into your computer can
increase to far above normal levels and cause data loss or system damage. Protect your
computer and peripheral devices by connecting them to a surge protector, which
absorbs voltage surges and prevents them from reaching your computer.
An uninterruptible power supply (UPS) supplies battery power to your computer during a power
failure. Although you cannot run your computer for an extended period of time with a UPS, a UPS
lets you run your computer long enough to save your work and shut down your computer
normally.
Checking the voltage selection
A power supply is integrated into your computer to provide power to the system board,
add-in cards, and peripheral devices. The voltage selection for your location is typically
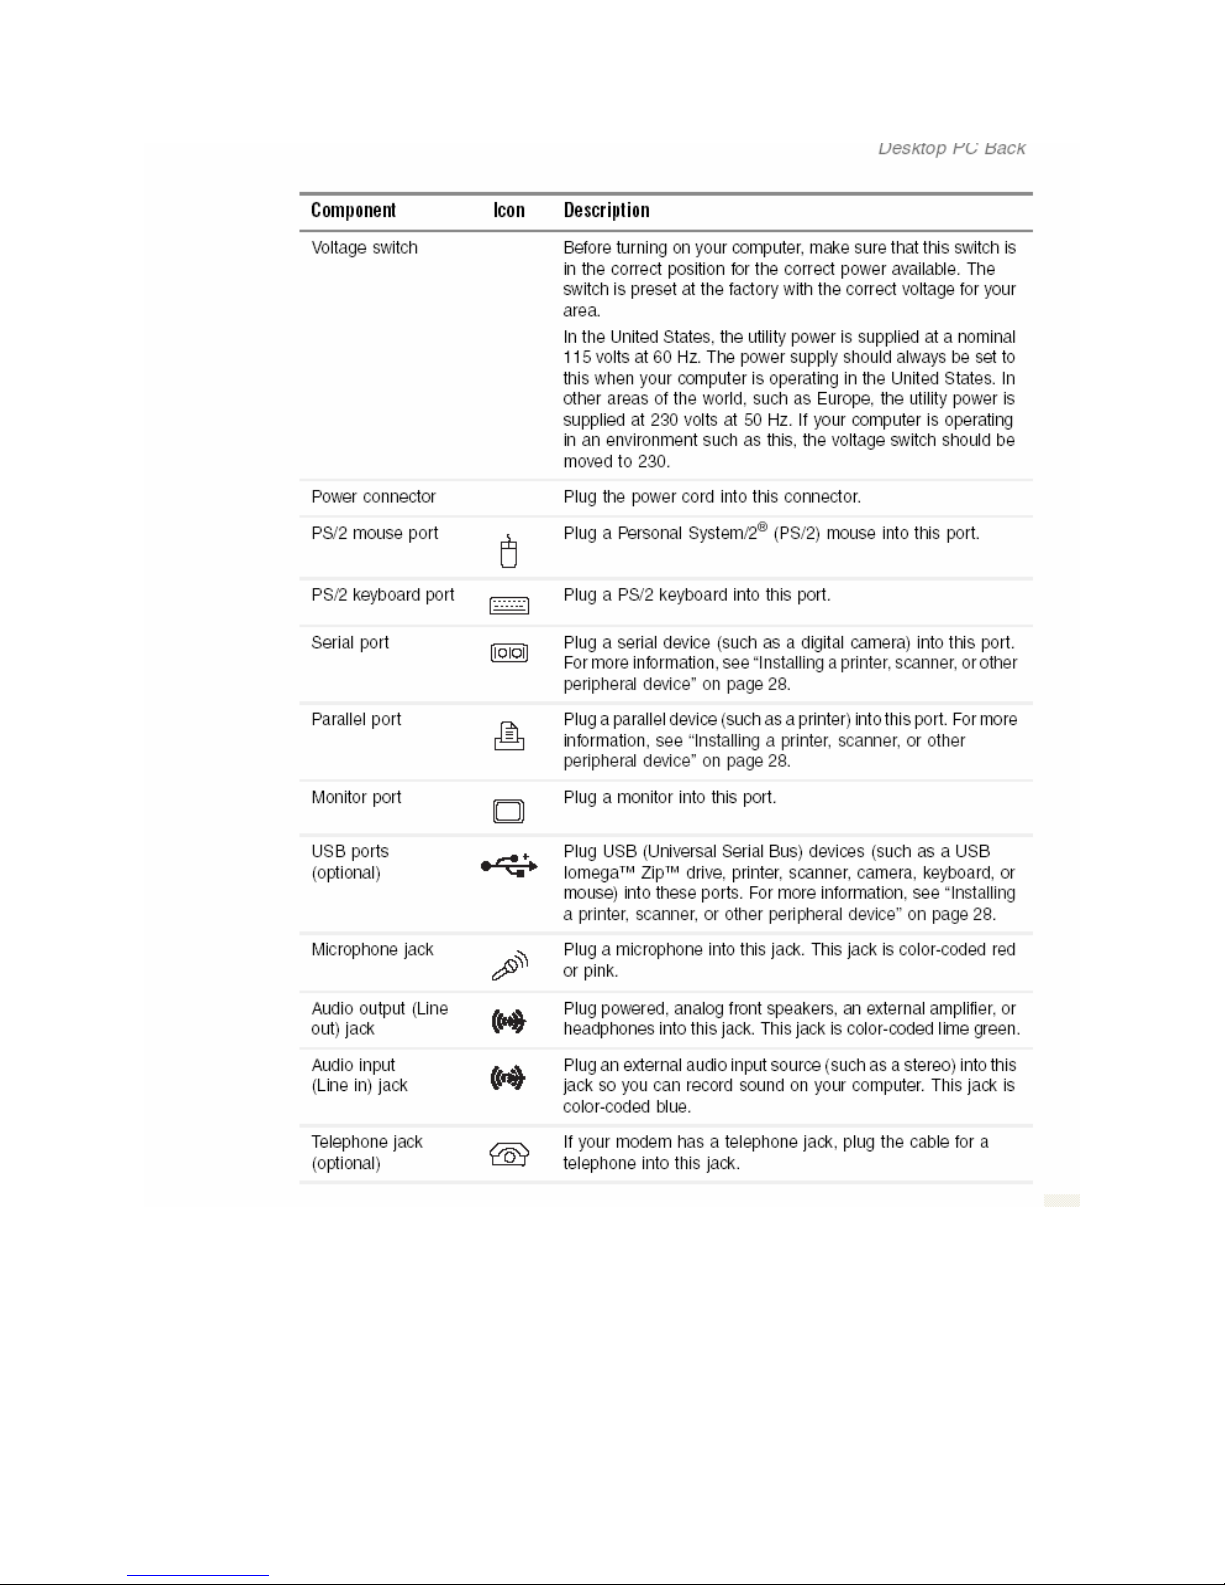
set at the factory. Use the power selection switch on the back of your computer to set
the power supply to 115V or 230V. To verify that your system has the correct setting for
your environment, check the voltage selection switch.
- 18 -
Page 25
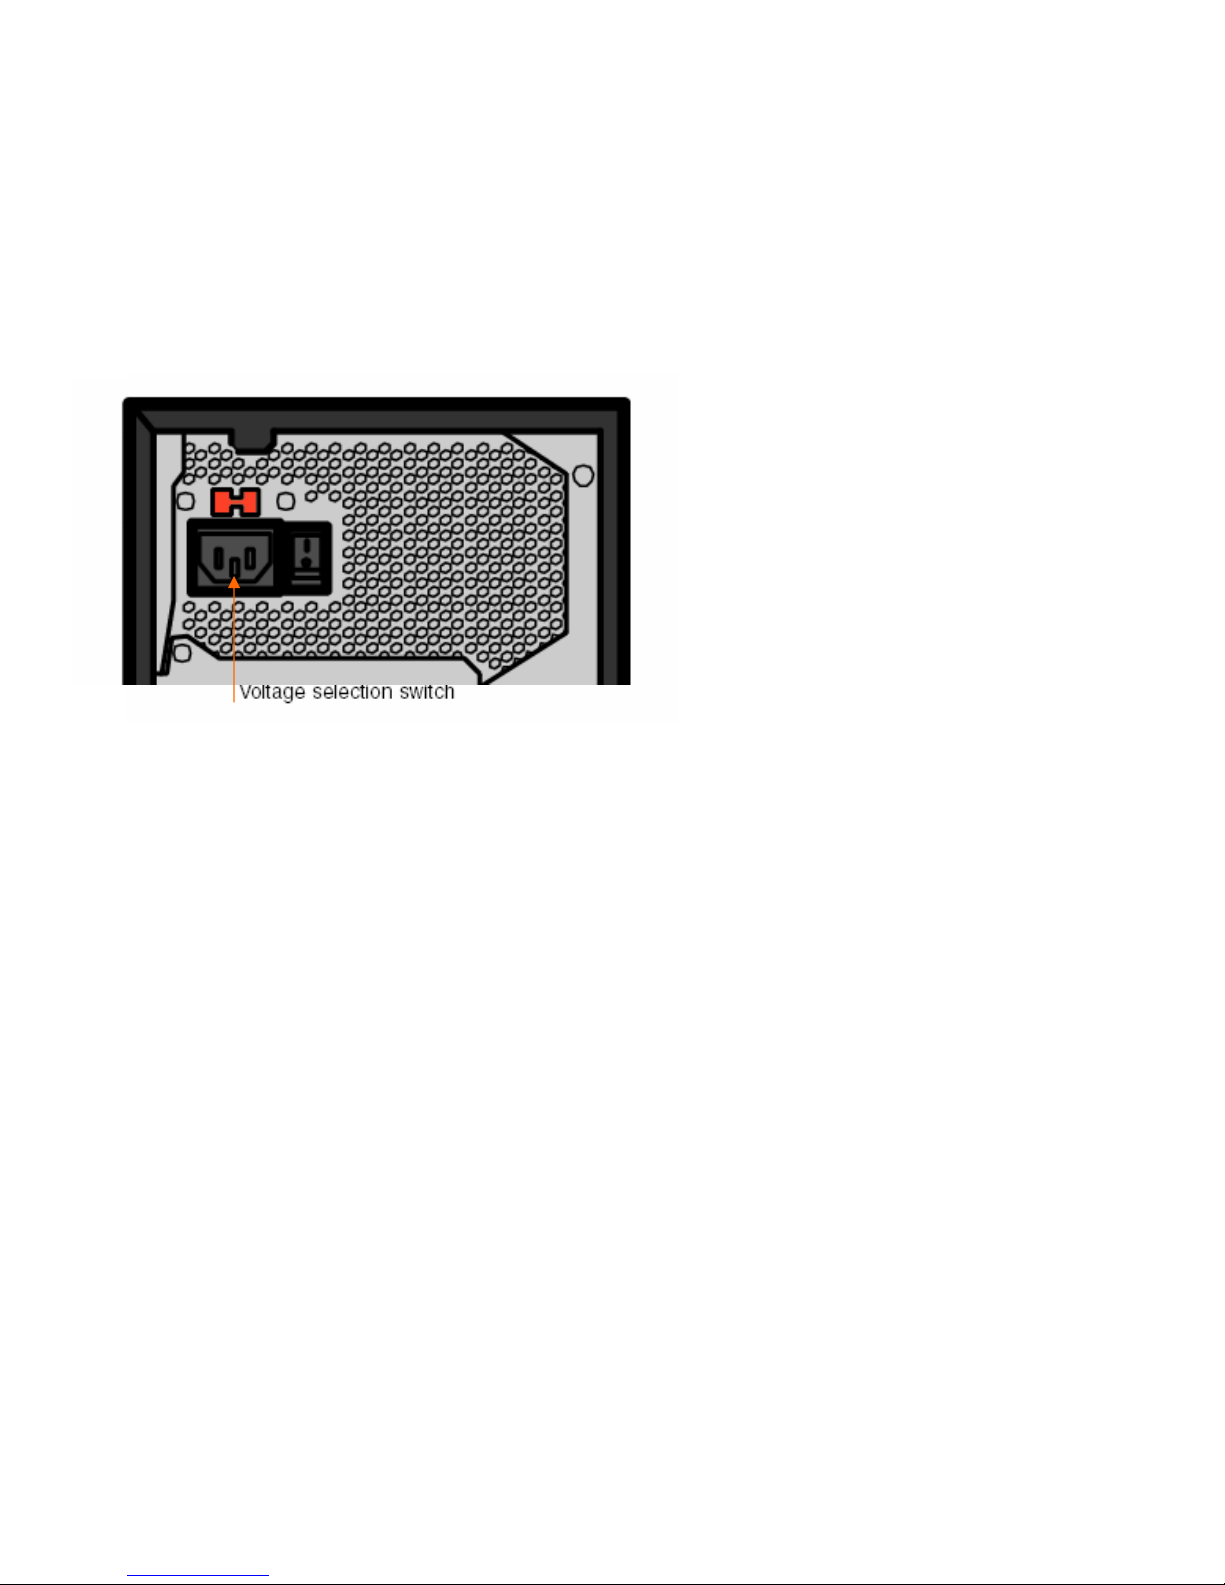
 To set the voltage selection switch:
Use a tool such as an opened paper clip to slide the voltage selection switch to
the correct voltage position.
Starting your computer
Starting your computer
 To start your computer:
1. Connect the cables to your computer. See the setup poster.
2. Turn on your computer.
3. If you are starting your computer for the first time, follow the on-screen
instructions to set up your computer.
4. Turn on any peripheral devices, such as printers or scanners, and see the
documentation that came with the device for setup instructions.
- 19 -
Page 26
Chapter 3: Getting Started
Waking up your computer
When you have not used your computer for several minutes or have not turned off your
computer, it may enter a power-saving mode called Standby. While in Standby, the
power indicator flashes.
If your computer is in Standby mode, move the mouse or press the power button to
“wake
” it up.
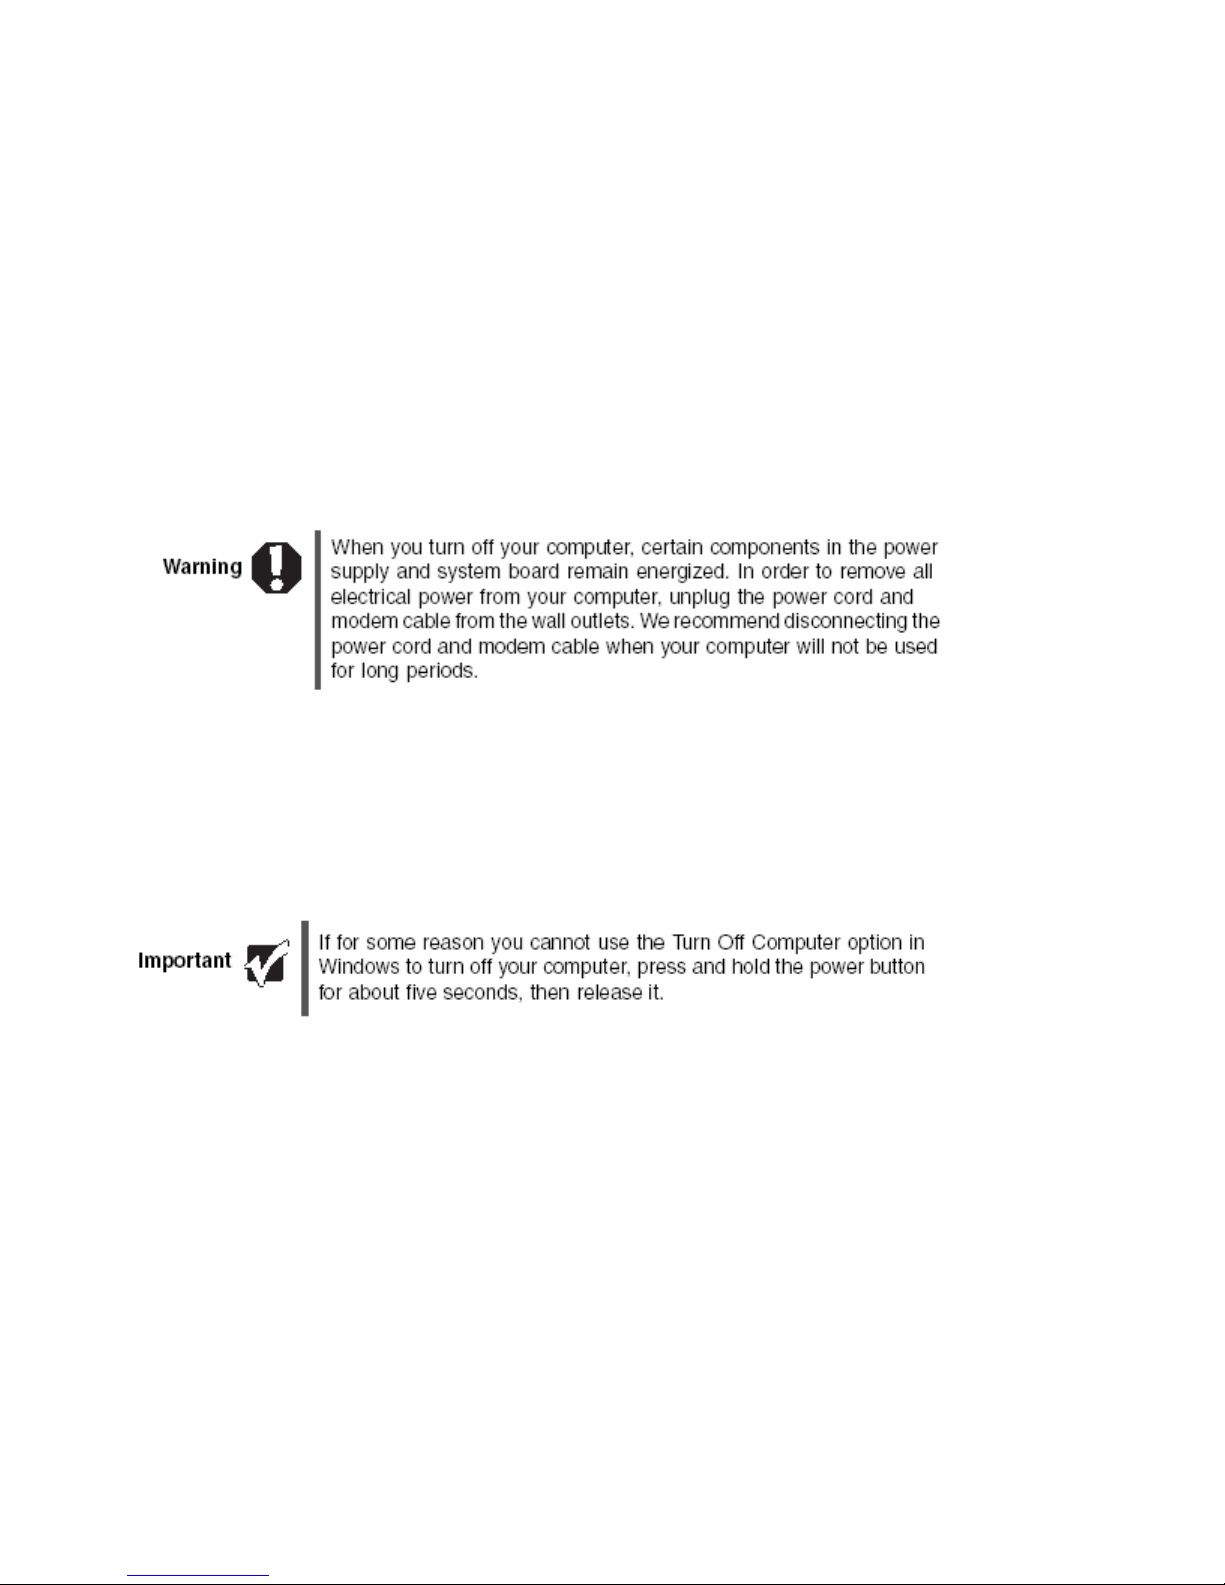
Turning off your computer
 To turn off your computer:
1. Click Start, then click Turn Off Computer. The Turn Off Computer dialog box opens.
2. Click Turn Off. Windows shuts down and turns off your computer.
- 20 -
Page 27
Restarting (rebooting) your computer
Restarting (rebooting) your computer
If your computer does not respond to keyboard or mouse input, you may have to close
programs that are not responding. If closing unresponsive programs does not restore
your computer to normal operation, you may have to restart (reboot) your computer.
 To close unresponsive programs and restart your computer:
1. Press CTRL+ALT+DEL. The Task Manager window opens.
2. Click the Applications tab, then click the program that is not responding.
3. Click End Task.
4. Click X in the top-right corner of the Windows Task Manager dialog box.
5. If your computer does not respond, turn it off, wait ten seconds, then turn it on
again.
As a part of the regular startup process, a program to check the disk status runs
automatically. When the checks are finished, Windows starts.
Adjusting the volume
You can use the volume controls to adjust the overall volume and the volume of specific
sound devices in your computer.
 To adjust the overall volume level using hardware controls:
If you are using external speakers, turn the knob on the front of the speakers.
-OR-
If you have an enhanced keyboard, use the mute and volume control buttons on
the keyboard. For more information, for more information see “Enhanced
keyboard” on page 22.
- 21 -
Page 28
Chapter 3: Getting Started
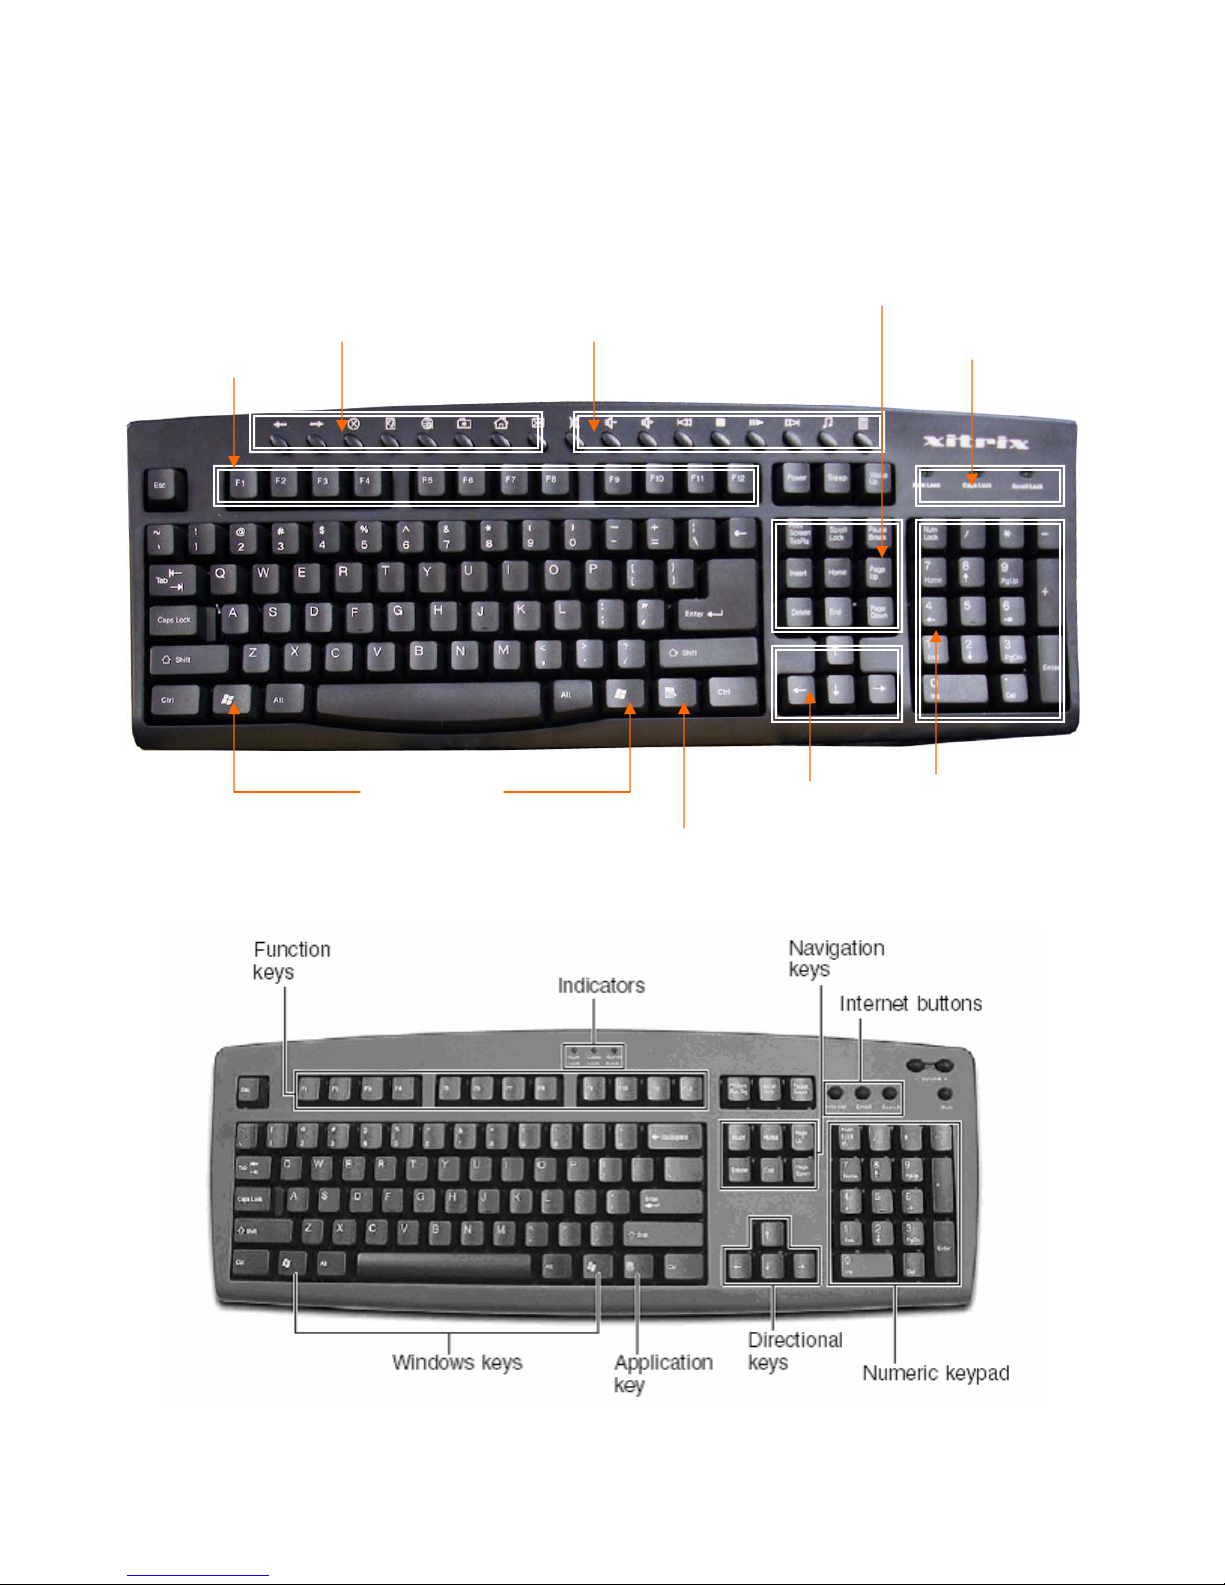
Using the keyboard
Multimedia keyboard
Function
Keys
Internet Buttons
Audio Playback
Buttons
Audio Playback
Buttons
Indicators
Windows Key
Keys
Application Key
Standard keyboard
Numeric Keypad Directional
- 22 -
Page 29
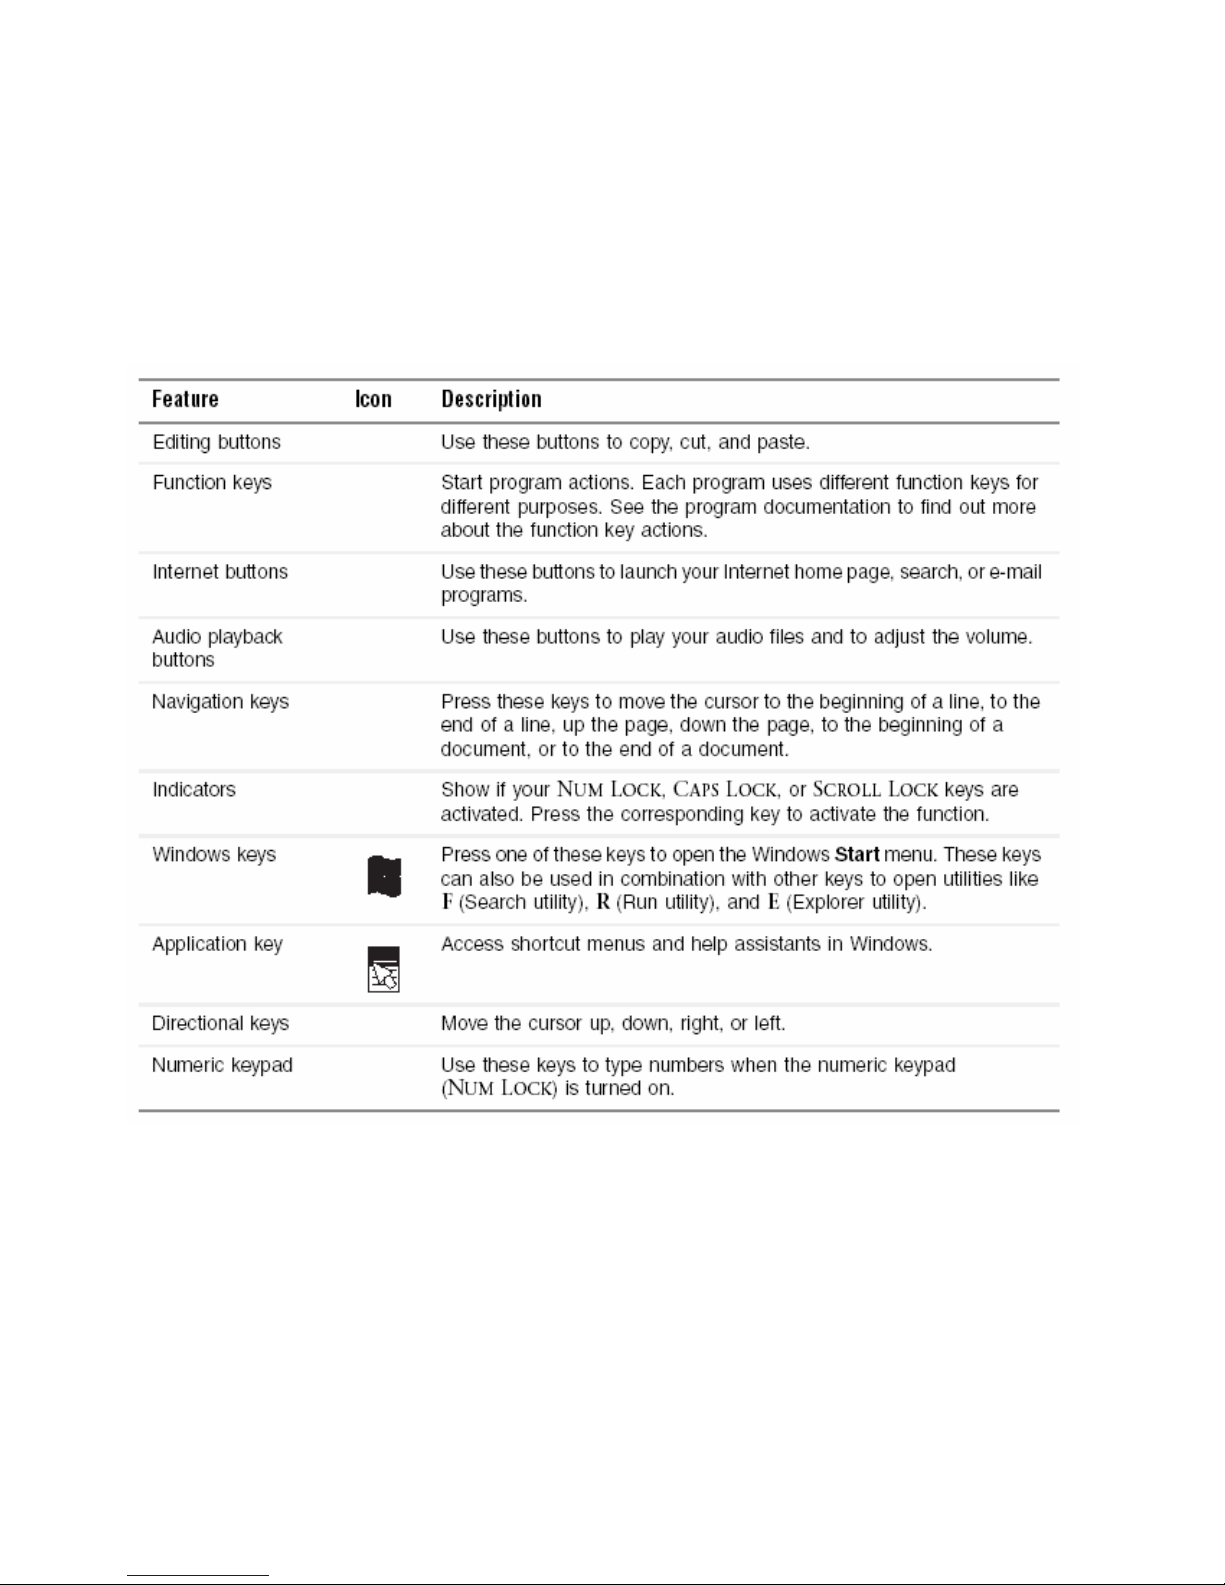
Keyboard features
The keyboard has several different types of keys and buttons. Your keyboard also has
status indicators that show which keyboard feature is active.
Using the keyboard
- 23 -
Page 30
Chapter 3: Getting Started
Using the mouse
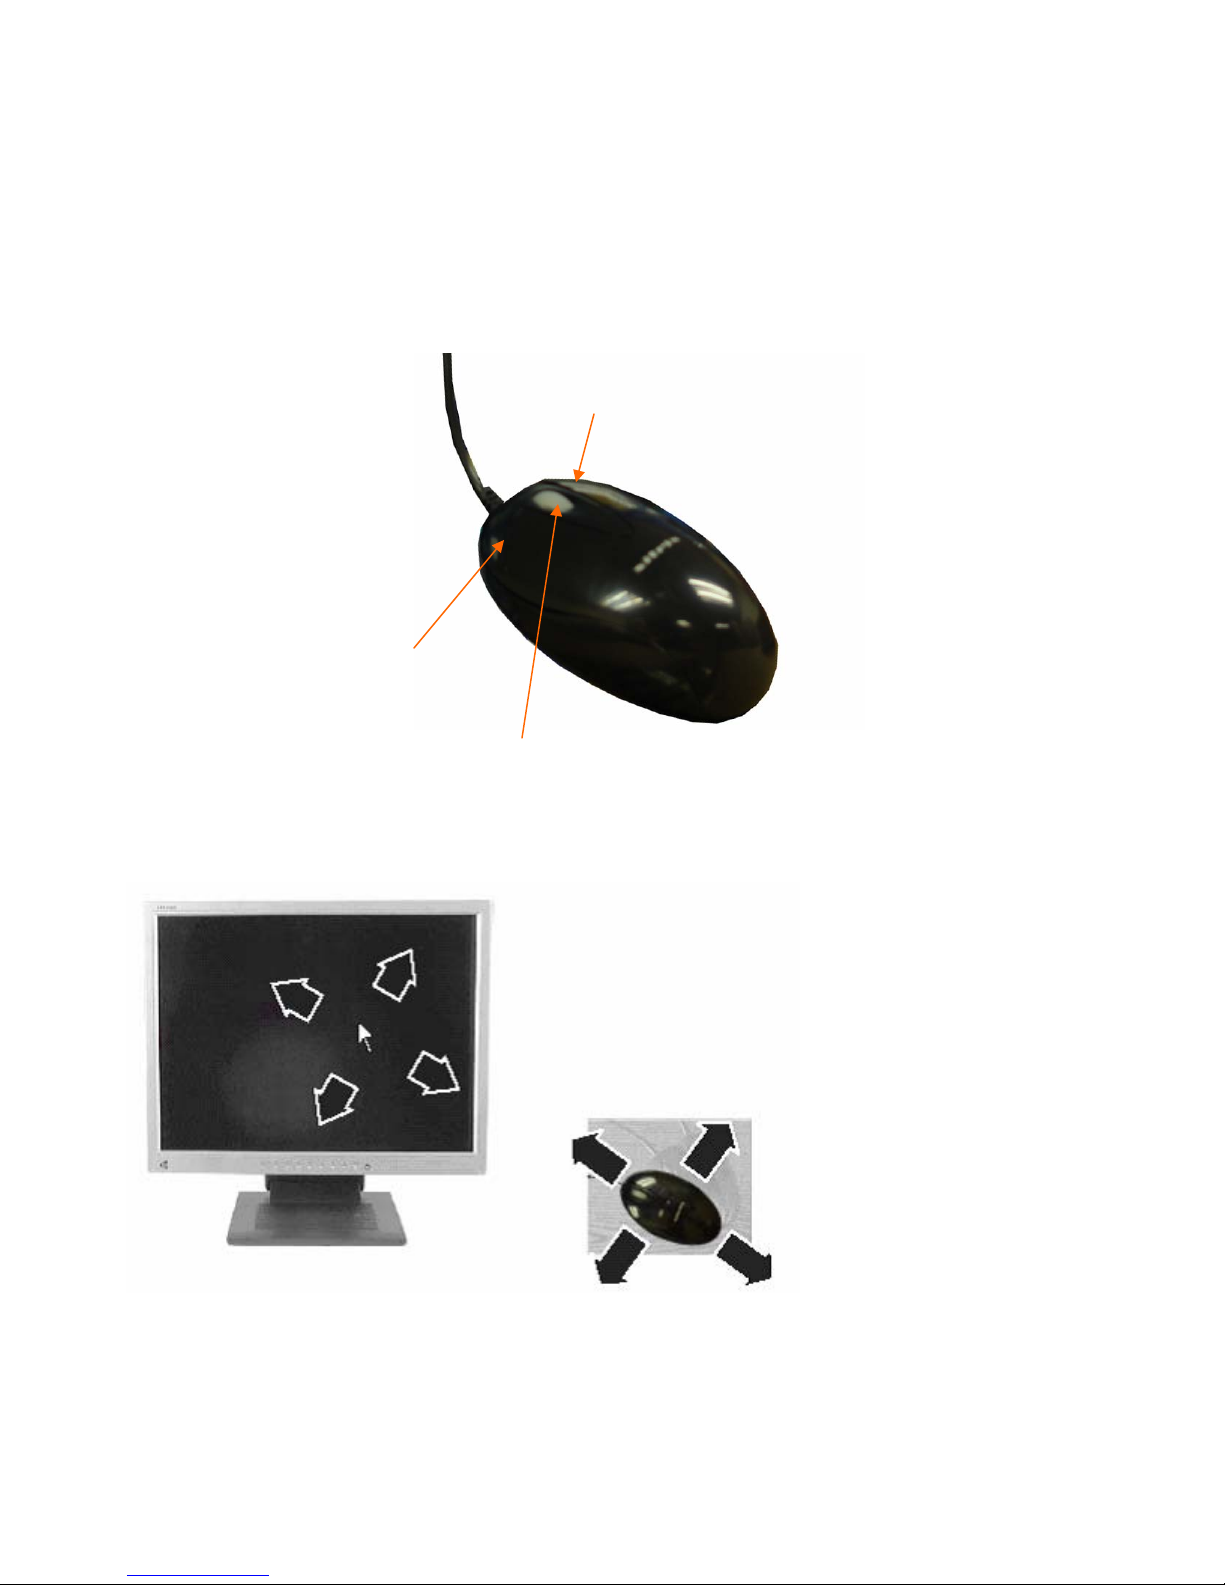
The mouse is a device that controls the pointer movement on the computer display. This
illustration shows the standard mouse.
Left button
Right button
As you move the mouse, the pointer (arrow) on the display moves in the same direction.
You can use the left and right buttons on the mouse to select objects on the display.
You can use the scroll wheel on the mouse to move through a document. This feature is not
available in all programs.
Scroll wheel
- 24 -
Page 31
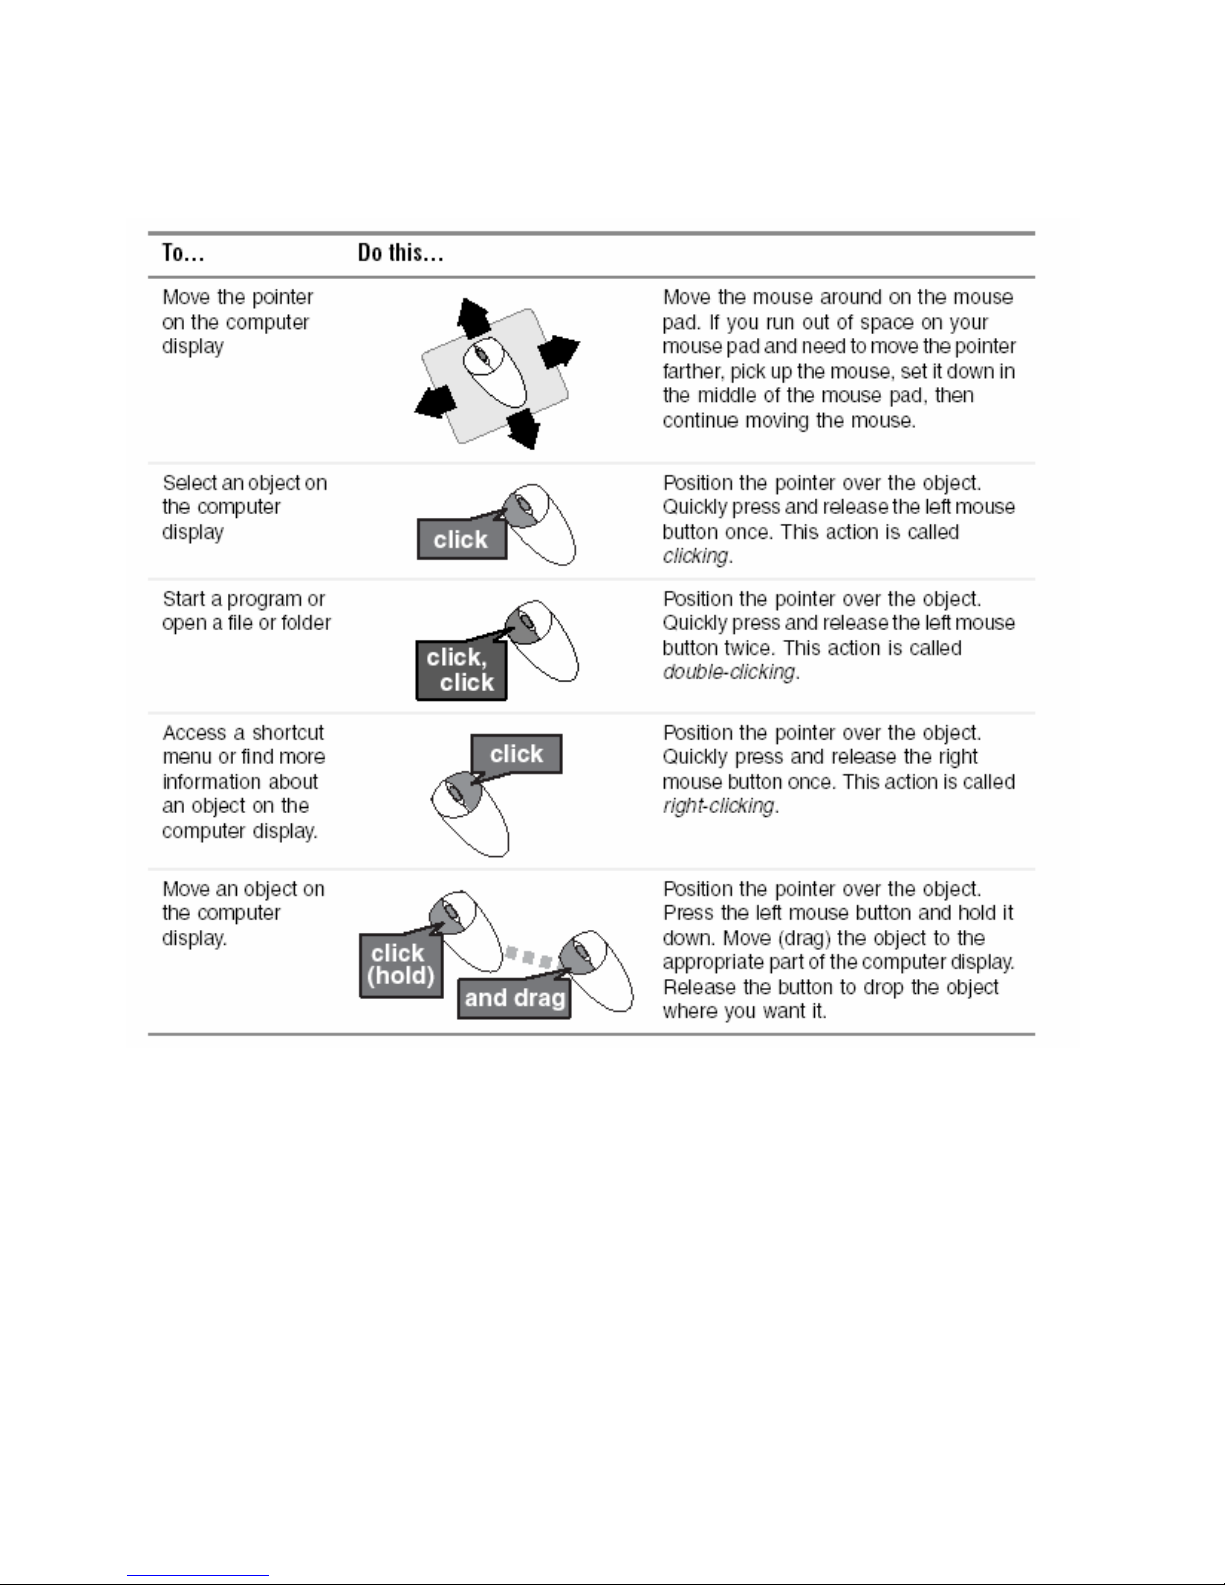
Using the mouse
For instructions on how to clean the mouse, see “Cleaning the mouse” on page 42.
- 25 -
Page 32
Chapter 3: Getting Started
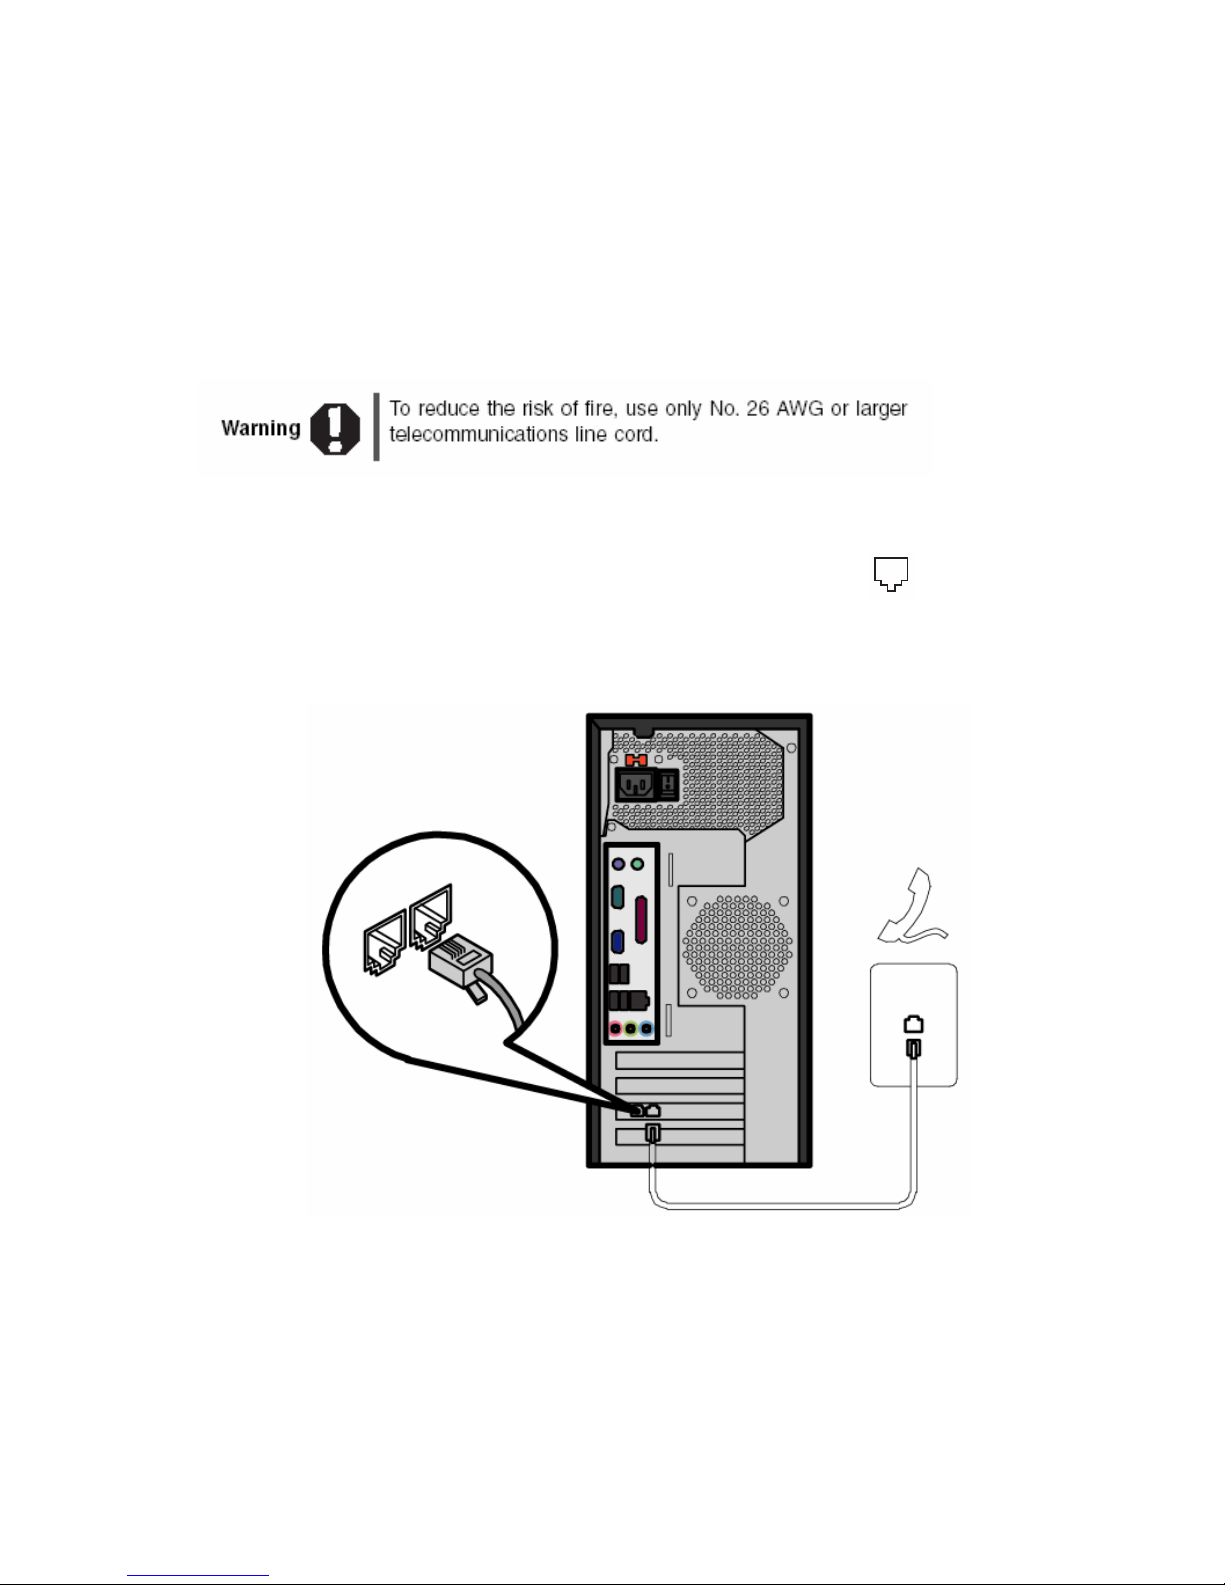
Connecting the modem
Your computer has a built-in 56K modem that you can use to connect to a standard
telephone line.
 To connect the modem:
1. Insert one end of the modem cable into the modem jack
your computer.
on the back of
2. Insert the other end of the modem cable into a telephone wall jack. The modem
will not work with digital or PBX telephone lines.
3. Start your computer, then start your communications program.
- 26 -
Page 33
Connecting to a wired Ethernet network
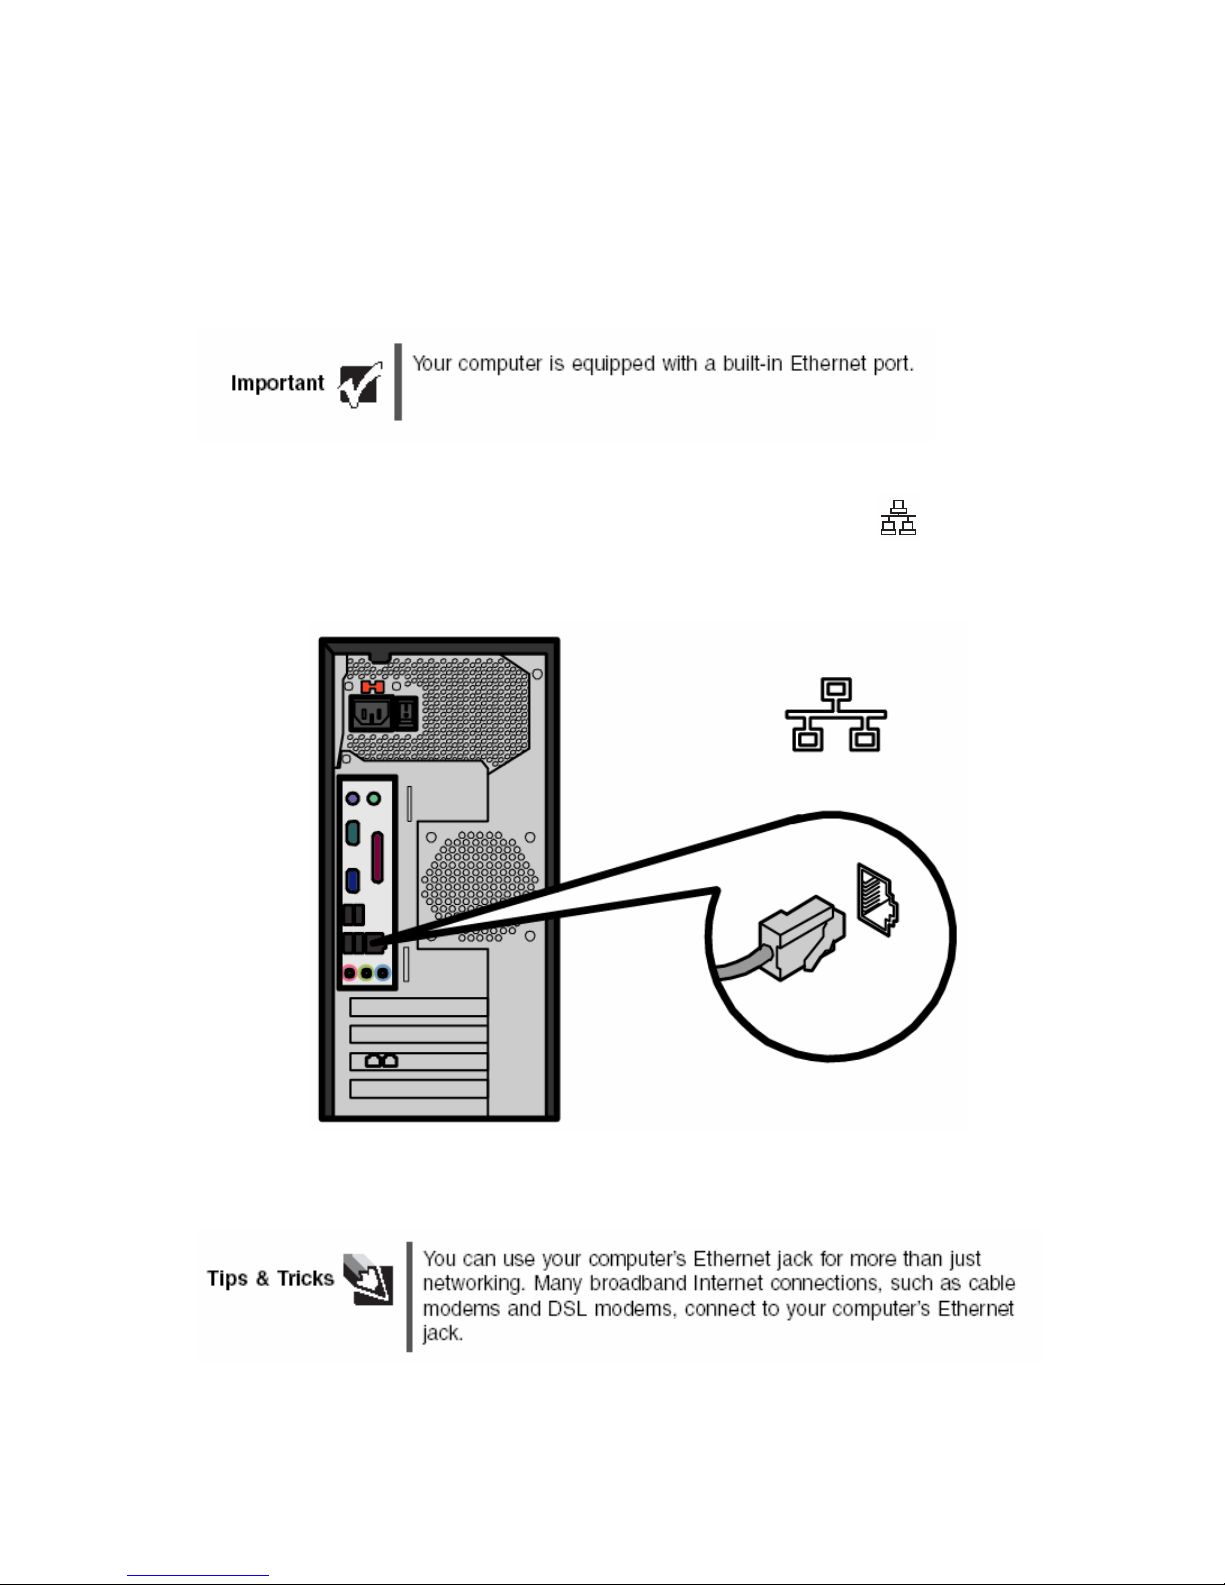
Connecting to a wired Ethernet network
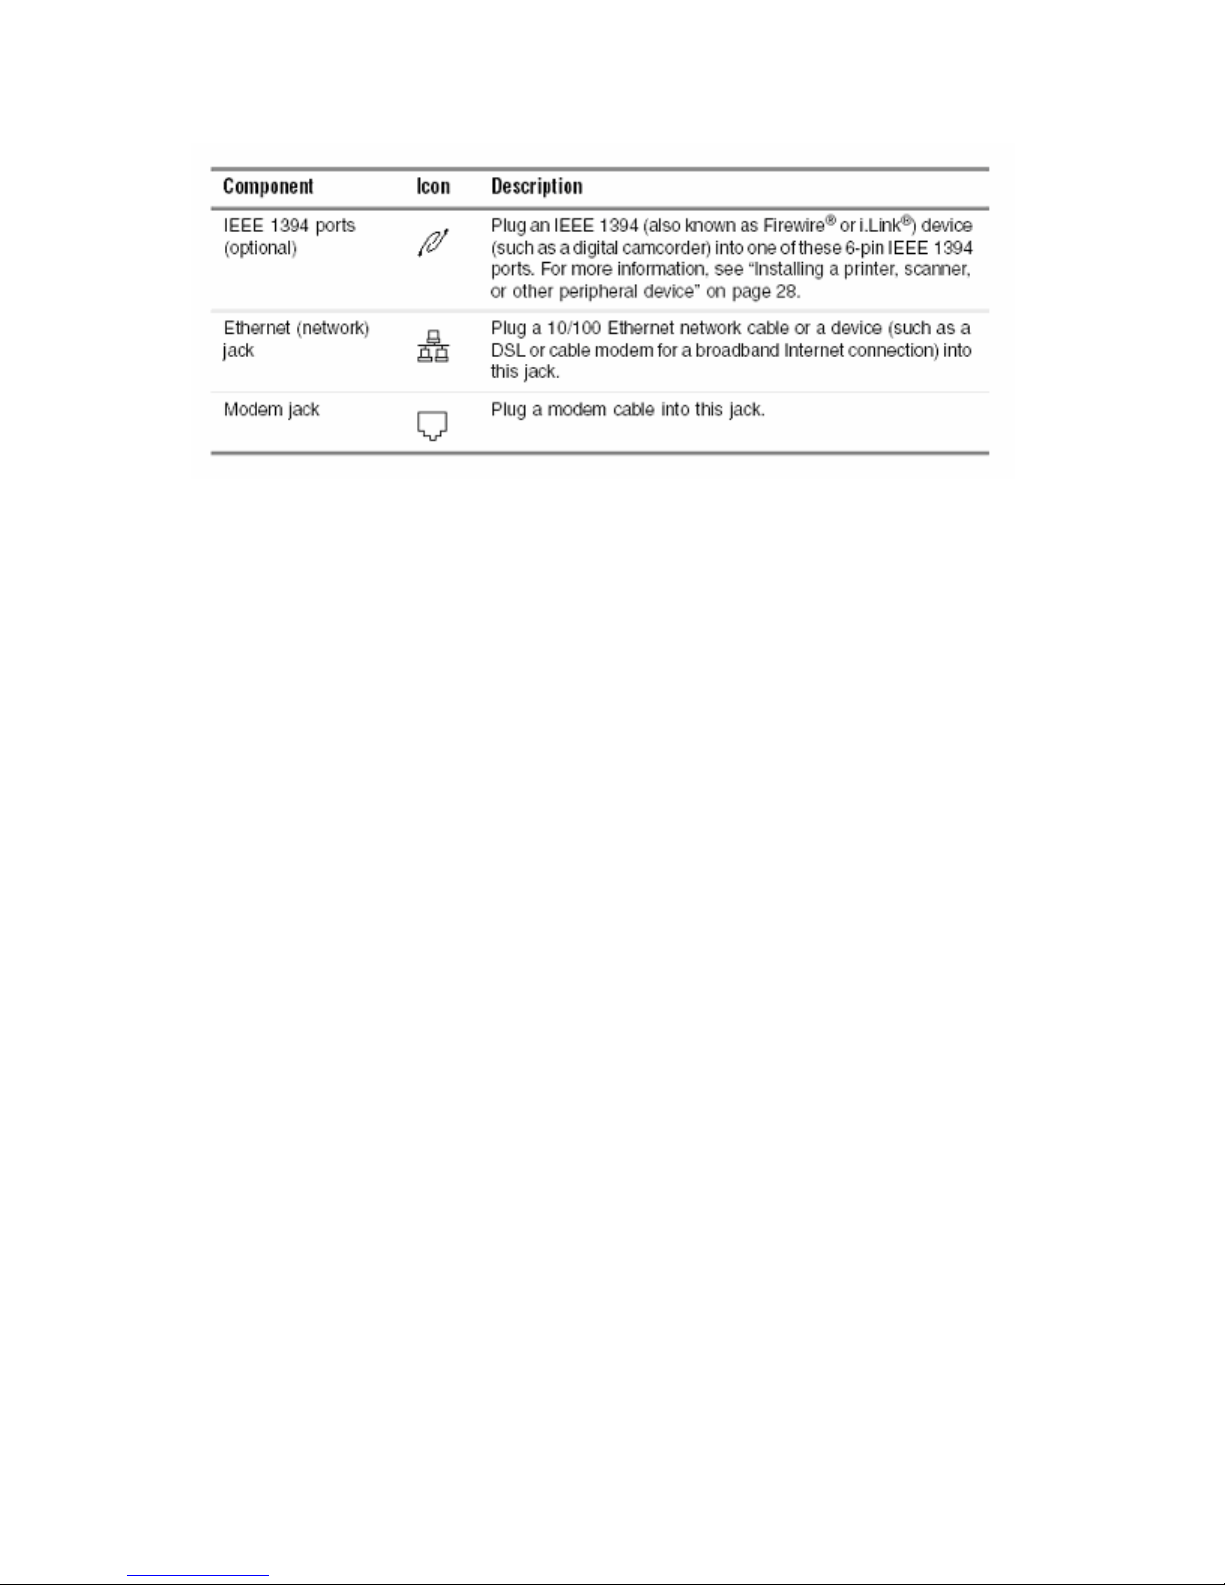
Your computer has a network jack that you can use to connect to a 10/100 wired
Ethernet network.
 To connect to a wired Ethernet network:
1. Insert one end of the network cable into the network jack
your computer.
on the back of
2. Insert the other end of the network cable into a network jack.
- 27 -
Page 34
Chapter 3: Getting Started
Installing a printer, scanner, or other
peripheral device
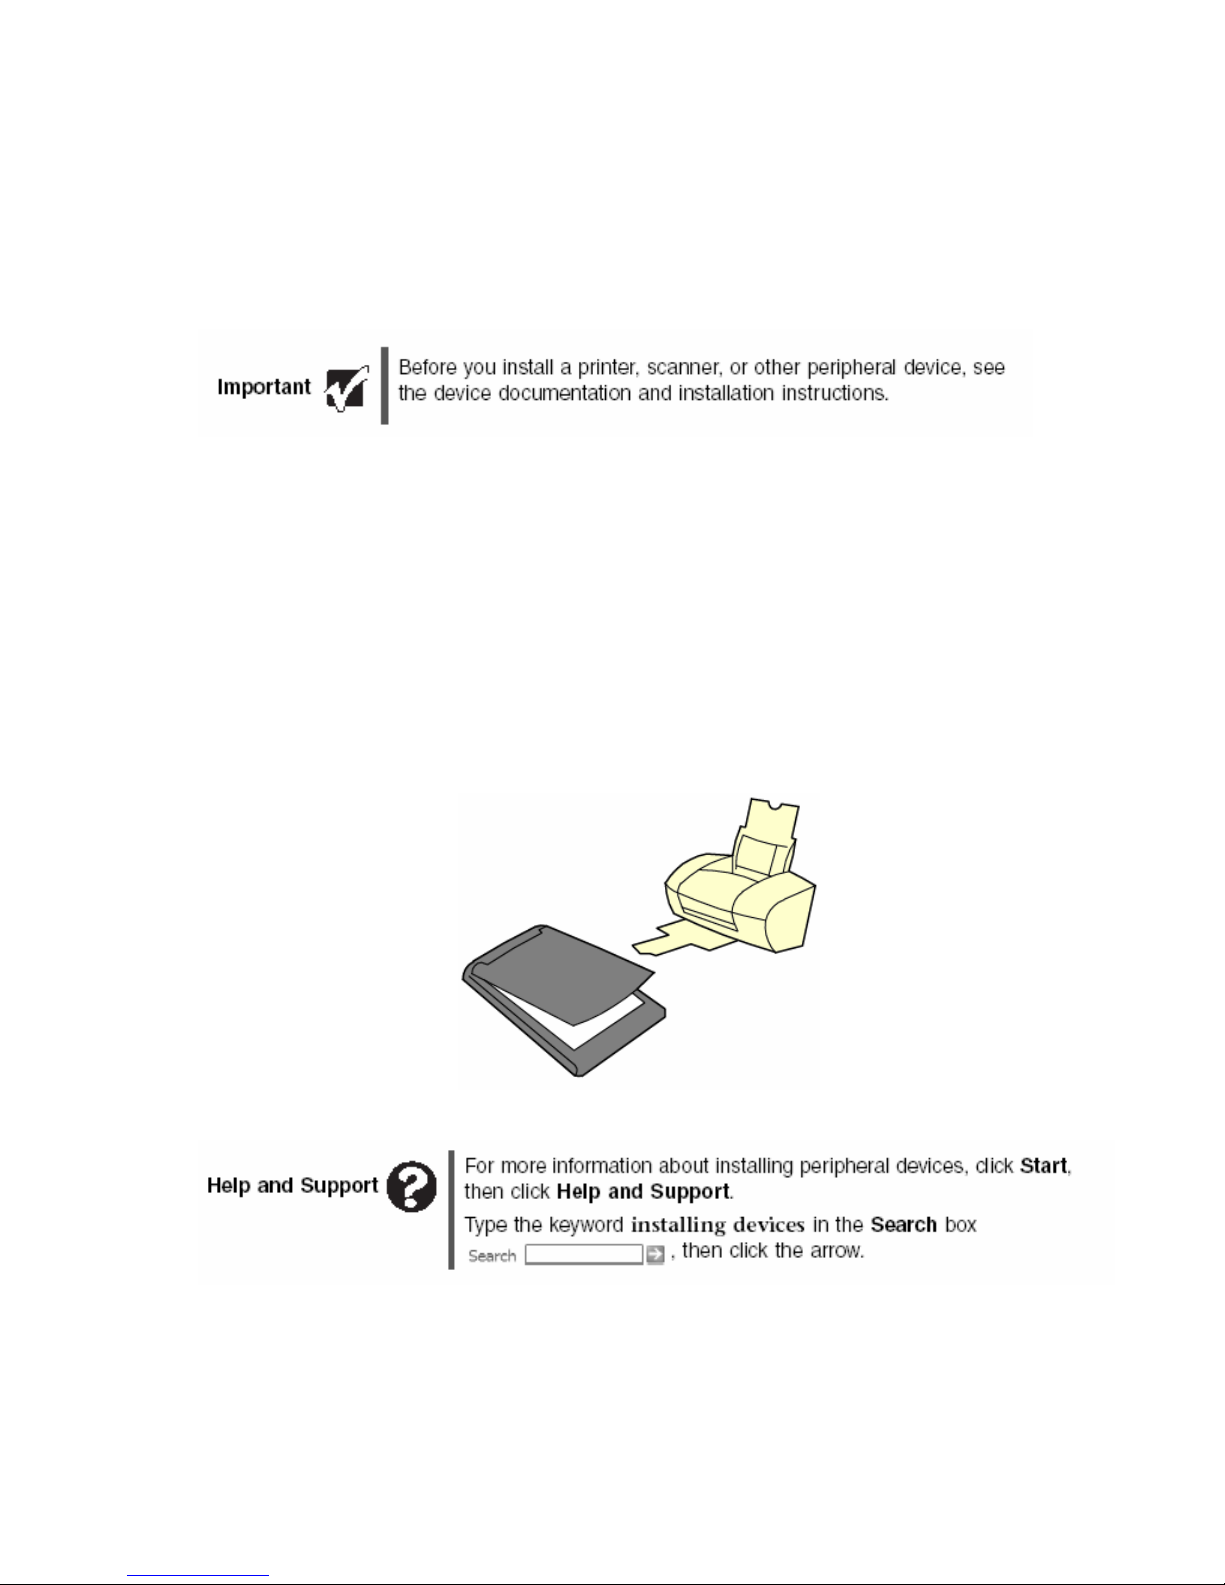
Your computer has one or more of the following ports: IEEE 1394 (also known as
Firewire® or i.Link®), Universal Serial Bus (USB), serial, and parallel. You use these
ports to connect peripheral devices such as printers, scanners, and digital cameras to
your computer. For more information about port locations, “Checking Out Your Xitrix
Computer” on page 7.
IEEE 1394 and USB ports support plug-and-play and hot-swapping, which means that
your computer will usually recognize such a device whenever you plug it into the
appropriate port. When you use an IEEE 1394 or USB device for the first time, your
computer will prompt you to install any software the device needs. After doing this, you
can disconnect and reconnect the device at any time.
Parallel and serial port devices are not plug-and-play. See the device documentation for
detailed information and installation instructions.
- 28 -
Page 35

Chapter 4
Using Drives and Ports
• Using the diskette drive
• Using the memory card reader
• Using CD or DVD drives
- 29 -
Page 36
Chapter 4: Using Drives and Ports
Using the diskette drive
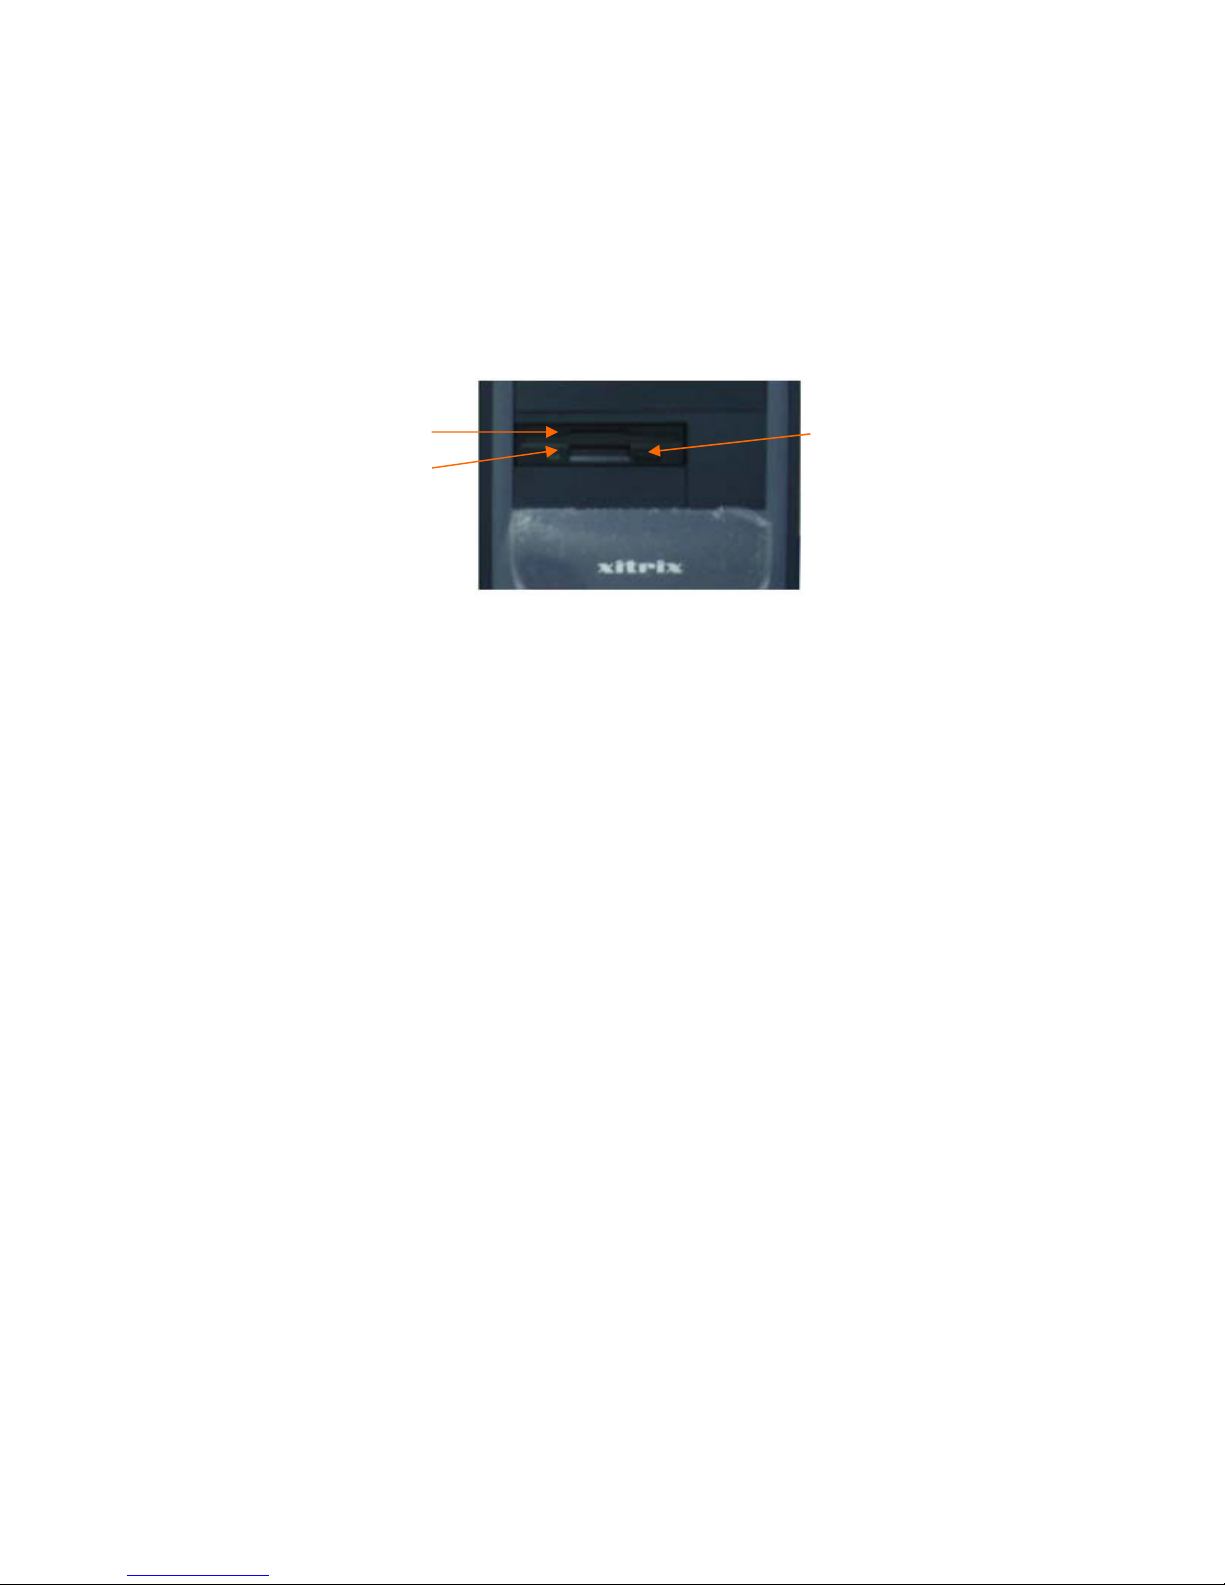
The optional diskette drive uses 3.5-inch diskettes (sometimes called floppy disks).
Diskettes are useful for storing files or transferring files to another computer.
Floppy Disk Drive
Activity Indicator
 To use a diskette:
1. Insert the diskette into the diskette drive with the label facing up.
2. To access a file on the diskette, click Start, then click My Computer. Double-click
the diskette drive letter (for example, the A: drive), then double-click the file
name.
3. To remove the diskette, make sure that the drive activity light is off, then press the
diskette eject button.
Eject Button
- 30 -
Page 37
Using the memory card reader
Using the memory card reader
You can use the optional memory card reader to transfer pictures from a digital camera
to your computer. You can also use the memory card reader to transfer data between
your computer and a device that uses memory cards, such as a PDA, MP3 player, or
cellular phone.
Memory card types
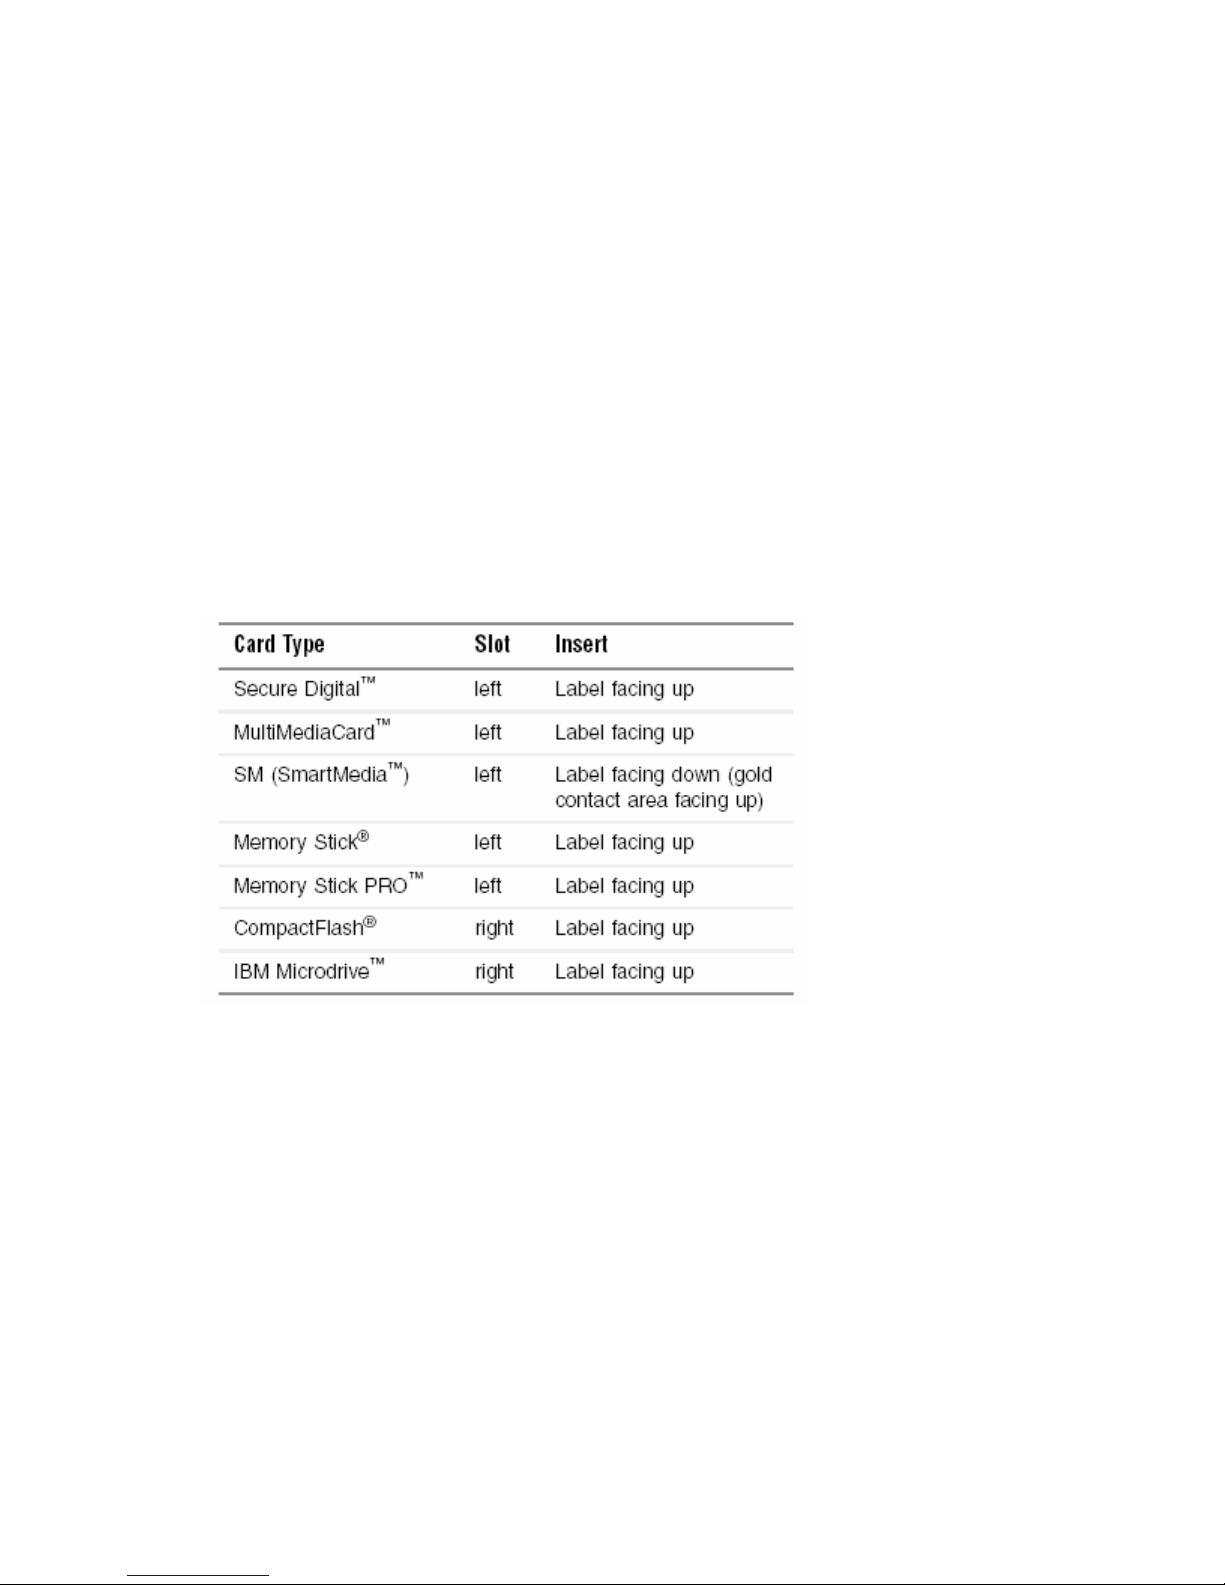
The memory card reader supports the following card types:
Each slot is assigned a different drive letter (for example, the E: and F: drives) so data
can be transferred from one media type to another.
- 31 -
Page 38
Chapter 4: Using Drives and Ports
Inserting a memory card
 To use a memory card:
1. Insert the memory card into the memory card slot as indicated in the previous table.
2. To access a file on the memory card, click Start, then click My Computer. Double-
click the drive letter (for example, the E: drive), then double-click the file name.
 To remove a memory card:
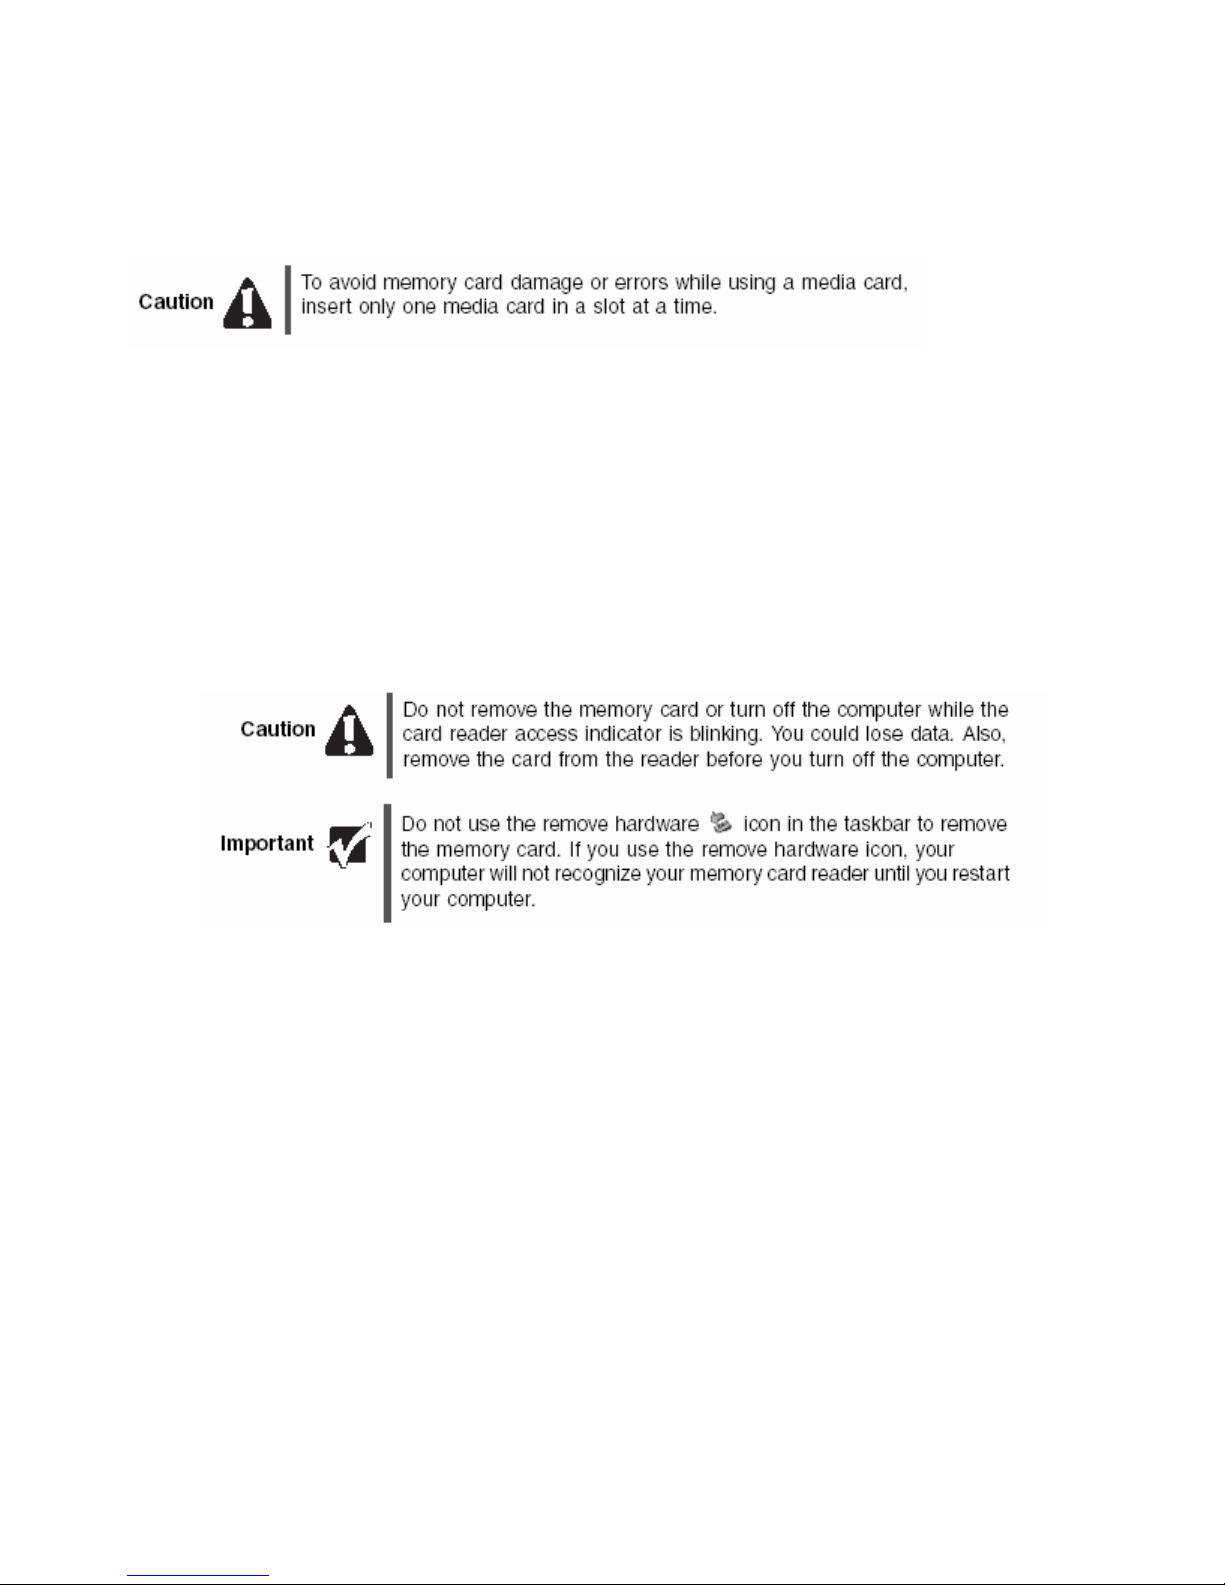
Wait for the media reader access indicator to stop blinking, then pull the media
out of the slot.
- 32 -
Page 39
Using the CD or DVD drive
You can use your computer to enjoy a wide variety of multimedia features.
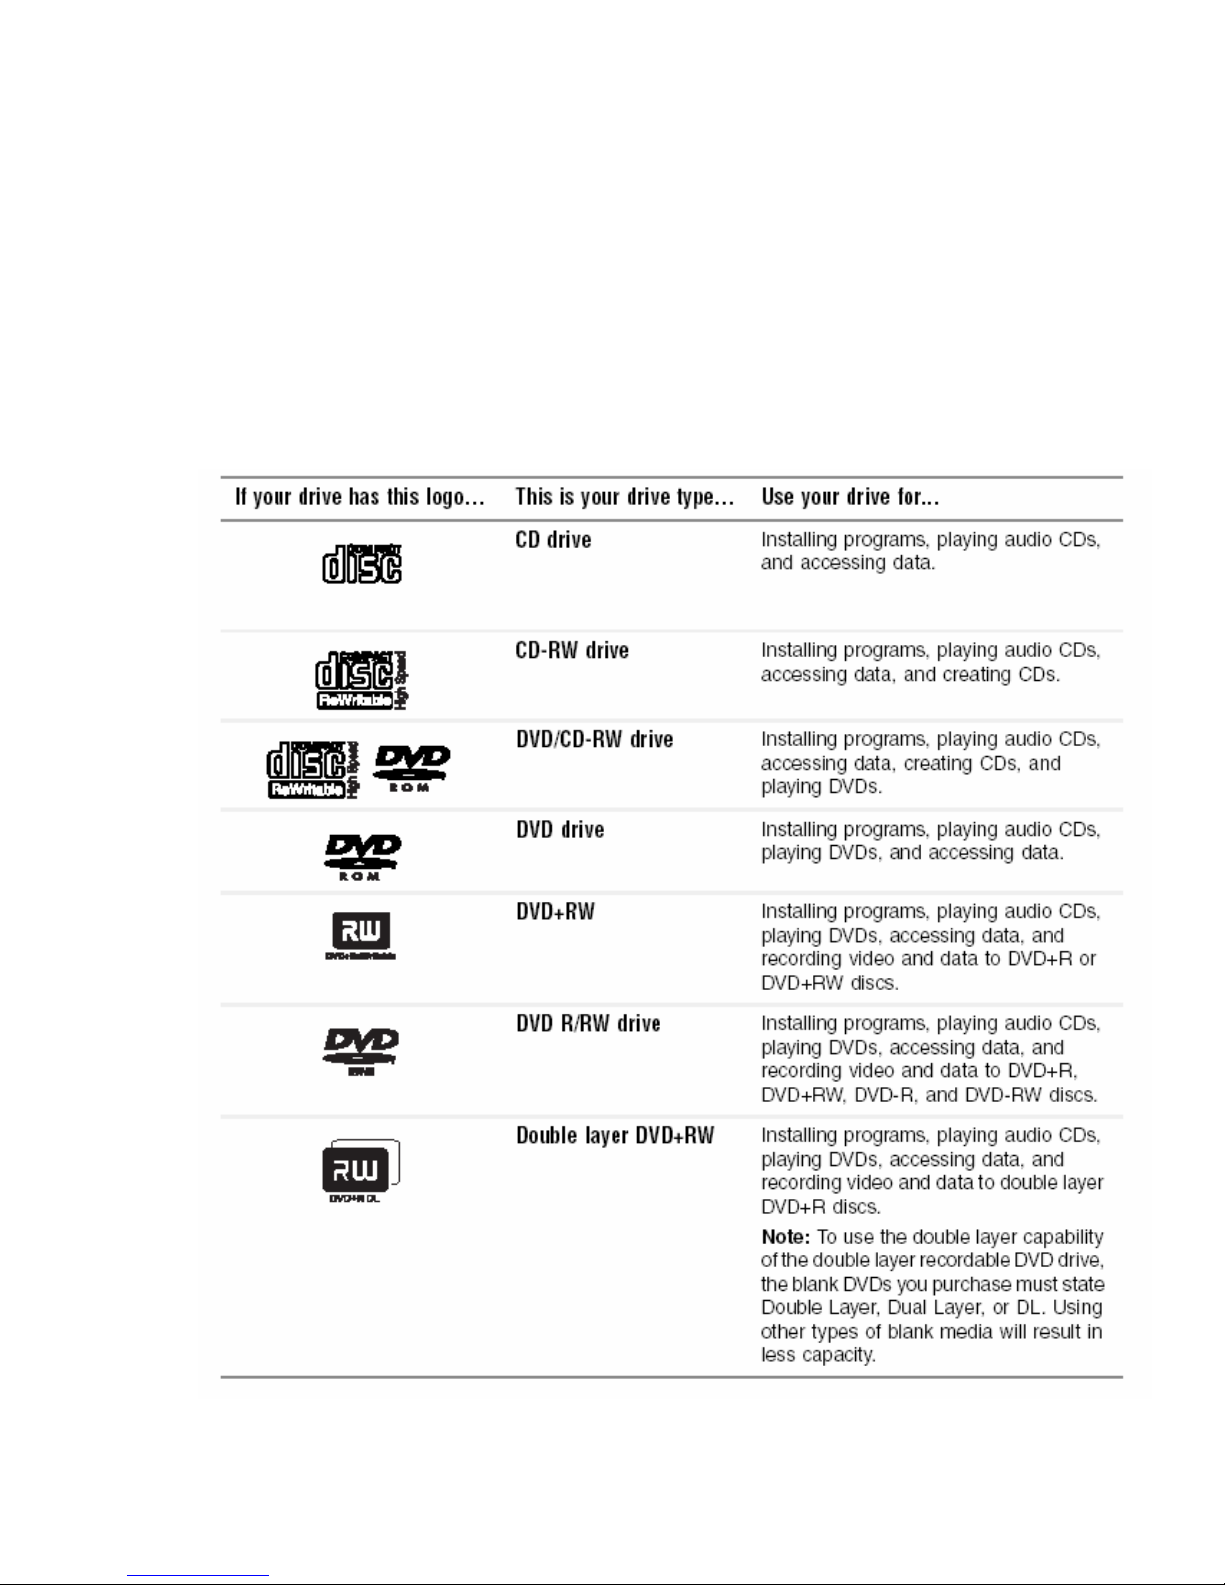
Identifying drive types
Your computer may contain one of the following drive types. Look on the front of the
drive for one or more of the following logos:
Using the CD or DVD drive
- 33 -
Page 40
Chapter 4: Using Drives and Ports
Inserting a CD or DVD
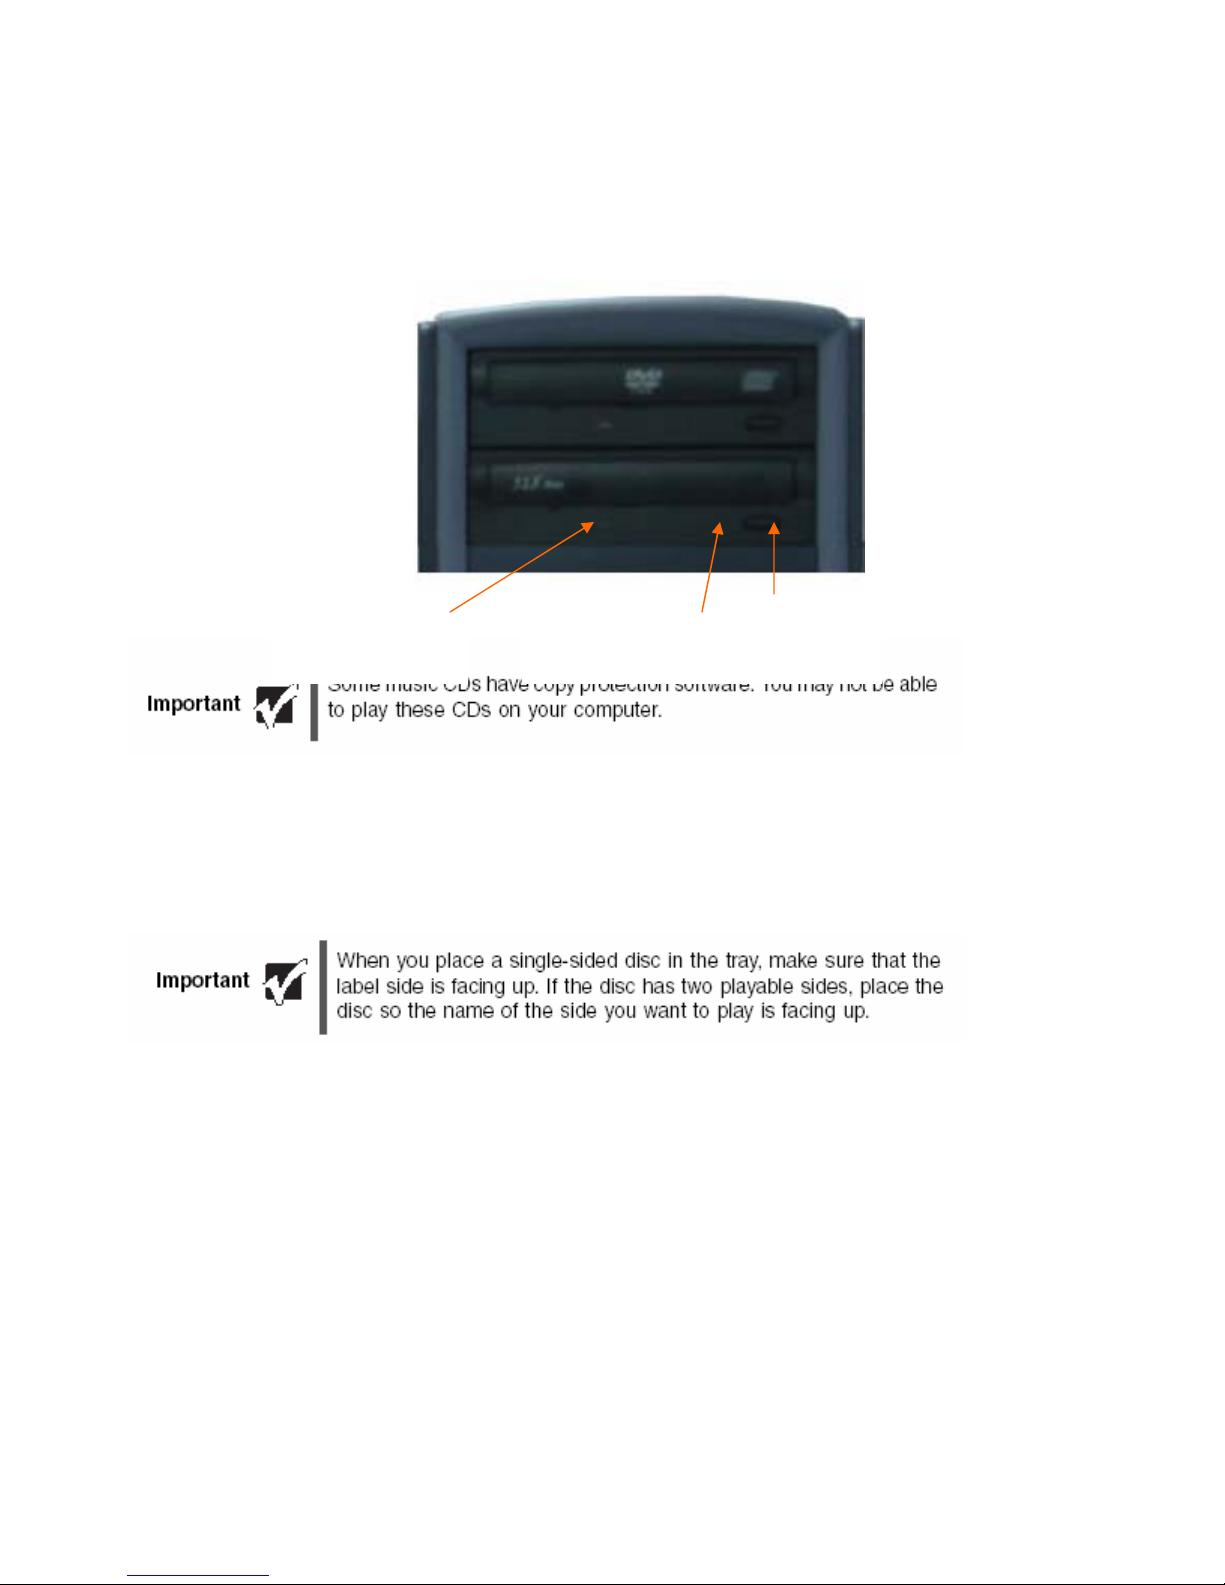
Activity Indicator
(Location varies)
 To insert a CD or DVD:
1. Press the eject button on the CD or DVD drive.
2. Place the disc in the tray with the label facing up.
3. Press the eject button to close the tray.
Manual Eject Hole
(Location varies)
Eject Button
- 34 -
Page 41

Playing a CD
Use the music program or Windows Media Player on your computer to:
Play music CDs
Create MP3 music files from your music CDs
Edit music track information
Use your music files to build a music library
Listen to Internet Radio
Playing a DVD
A Digital Versatile Disc (DVD) is similar to a standard CD but has greater data capacity.
Because of this increased capacity, full-length movies, several albums of music, or
several gigabytes of data can fit on a single disc. You can play DVDs with the DVD
program or Windows Media Player on your computer.
Using the CD or DVD drive
Creating CDs or DVDs
You can use the CD or DVD burning program on your computer to copy tracks from a
music CD to your hard drive, copy or create data CDs and DVDs, create music CDs,
create video DVDs, and more.
- 35 -
Page 42

Chapter 4: Using Drives and Ports
- 36 -
Page 43

Chapter 5
Maintaining your
Computer
• Caring for your computer
• Updating Windows
• Protecting your computer from viruses
- 37 -
• Cleaning your computer
• Restoring your system
• Opening the computer case
• Adding memory and replacing the battery
Page 44

Chapter 5: Maintaining Your Computer
Caring for your computer
To extend the life of your computer:
When transporting your computer, we recommend that you put it in the original
packaging materials.
Keep diskettes and your computer away from magnetic fields. Magnetic fields can erase
data on both diskettes and hard drives.
Avoid subjecting your computer to extreme temperature changes.
Keep all liquids away from your computer. When spilled onto computer components,
almost any liquid can result in extremely expensive repairs that are not covered under
your warranty.
Avoid dusty or dirty work environments. Dust and dirt can clog the internal mechanisms.
Do not block the ventilation fan. When storing your computer for an extended period of
time, unplug AC power.
Updating Windows
Windows Update is the online extension of Windows that helps you to keep your
computer up-to-date. Use Windows Update to choose updates for your computer’s
operating system, software, and hardware. New content is added to the site regularly,
so you can always get the most recent updates and fixes to protect your computer and
keep it running smoothly.
Windows Update scans your computer and provides you with a tailored selection of
updates that apply only to the software and hardware on your computer.
 To run Windows Update:
1. Connect to the Internet.
2. Click Start, All Programs, then click Windows Update.
3. Click Scan for Available Updates.
- 38 -
Page 45
Protecting your computer from viruses
Protecting your computer from viruses
A virus is a program that attaches itself to a file on a computer, then spreads from one
computer to another. Viruses can damage data or cause your computer to malfunction.
Some viruses go undetected for a period of time because they are activated on a certain
date.
Protect your computer from a virus by:
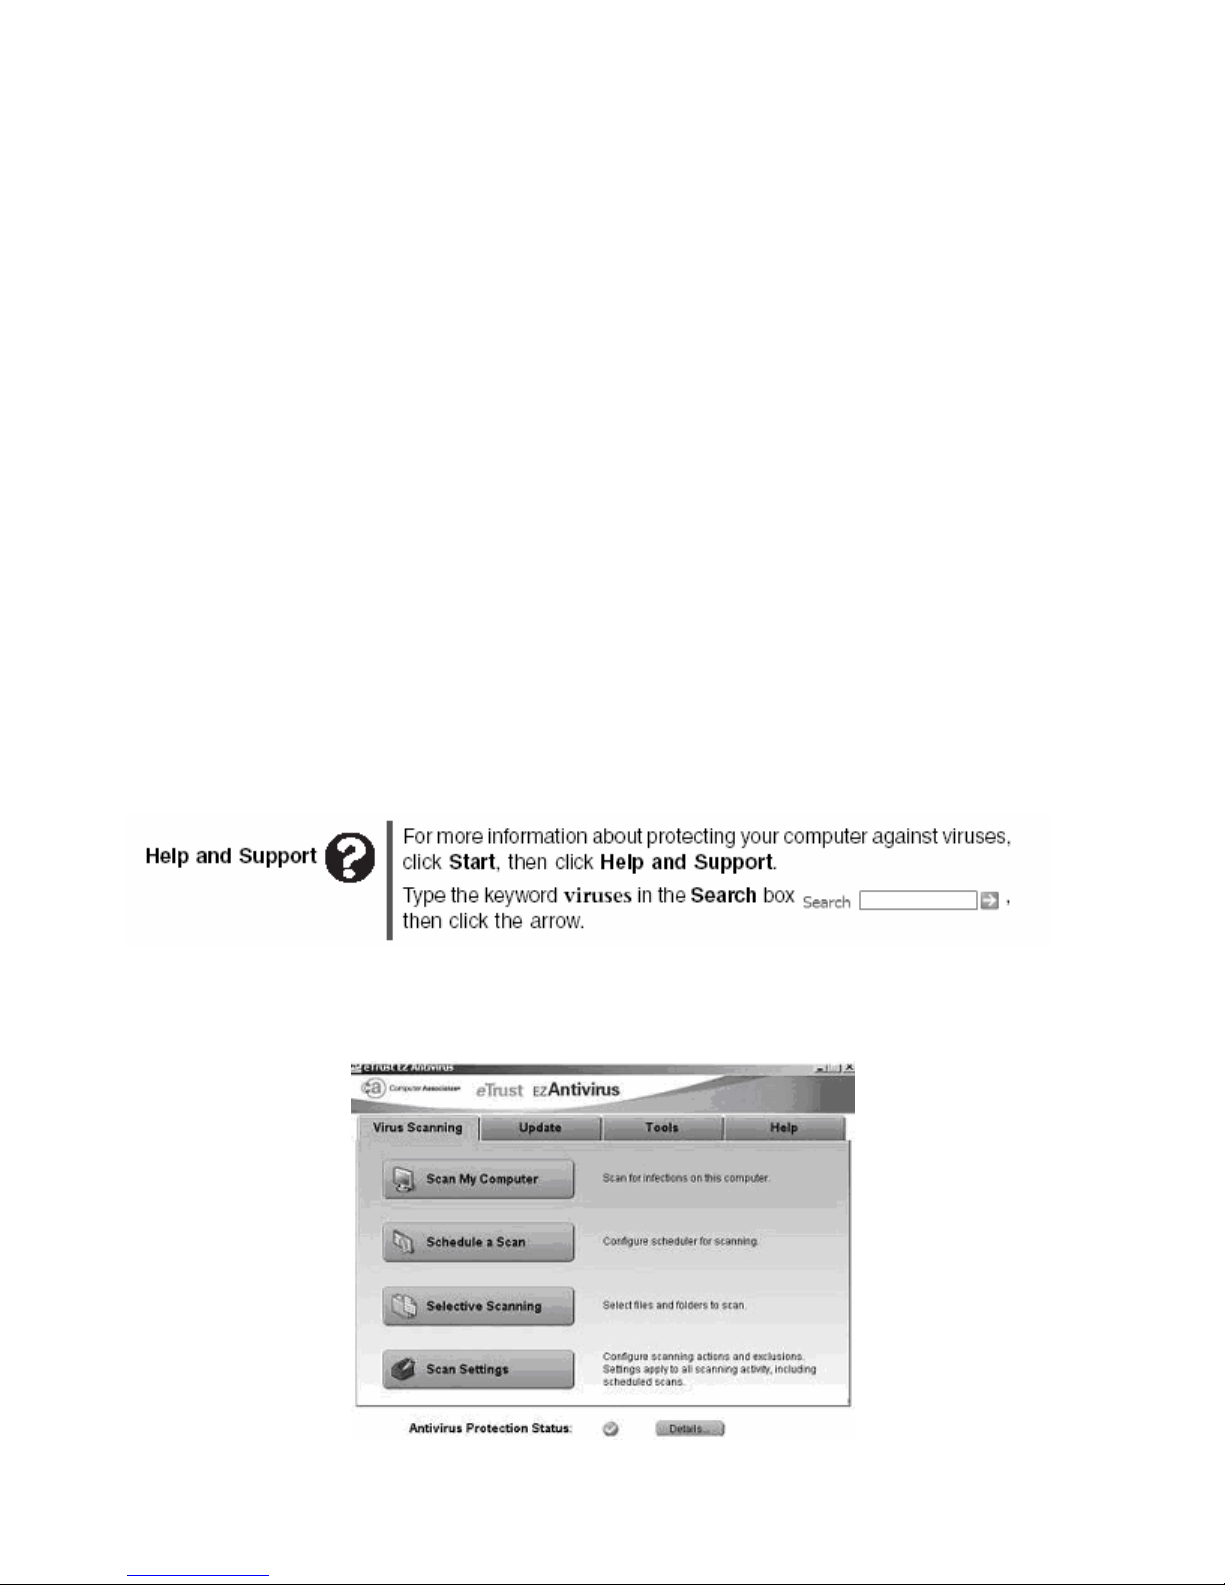
Registering and subscribing to Computer Associate eTrust EZ AntiVirus. You received a
free, limited-time subscription to the EZ AntiVirus service when you purchased your
computer.
Using the Computer Associate eTrust EZ AntiVirus program to check files and programs
that are on diskettes, attached to e-mail messages, or downloaded from the Internet.
Checking all programs for viruses before installing them.
Disabling macros on suspicious Microsoft Word and Excel files. These programs will warn
you if a document that you are opening contains a macro that might have a virus.
Periodically updating the Computer Associate eTrust EZ AntiVirus program to protect
against the latest viruses.
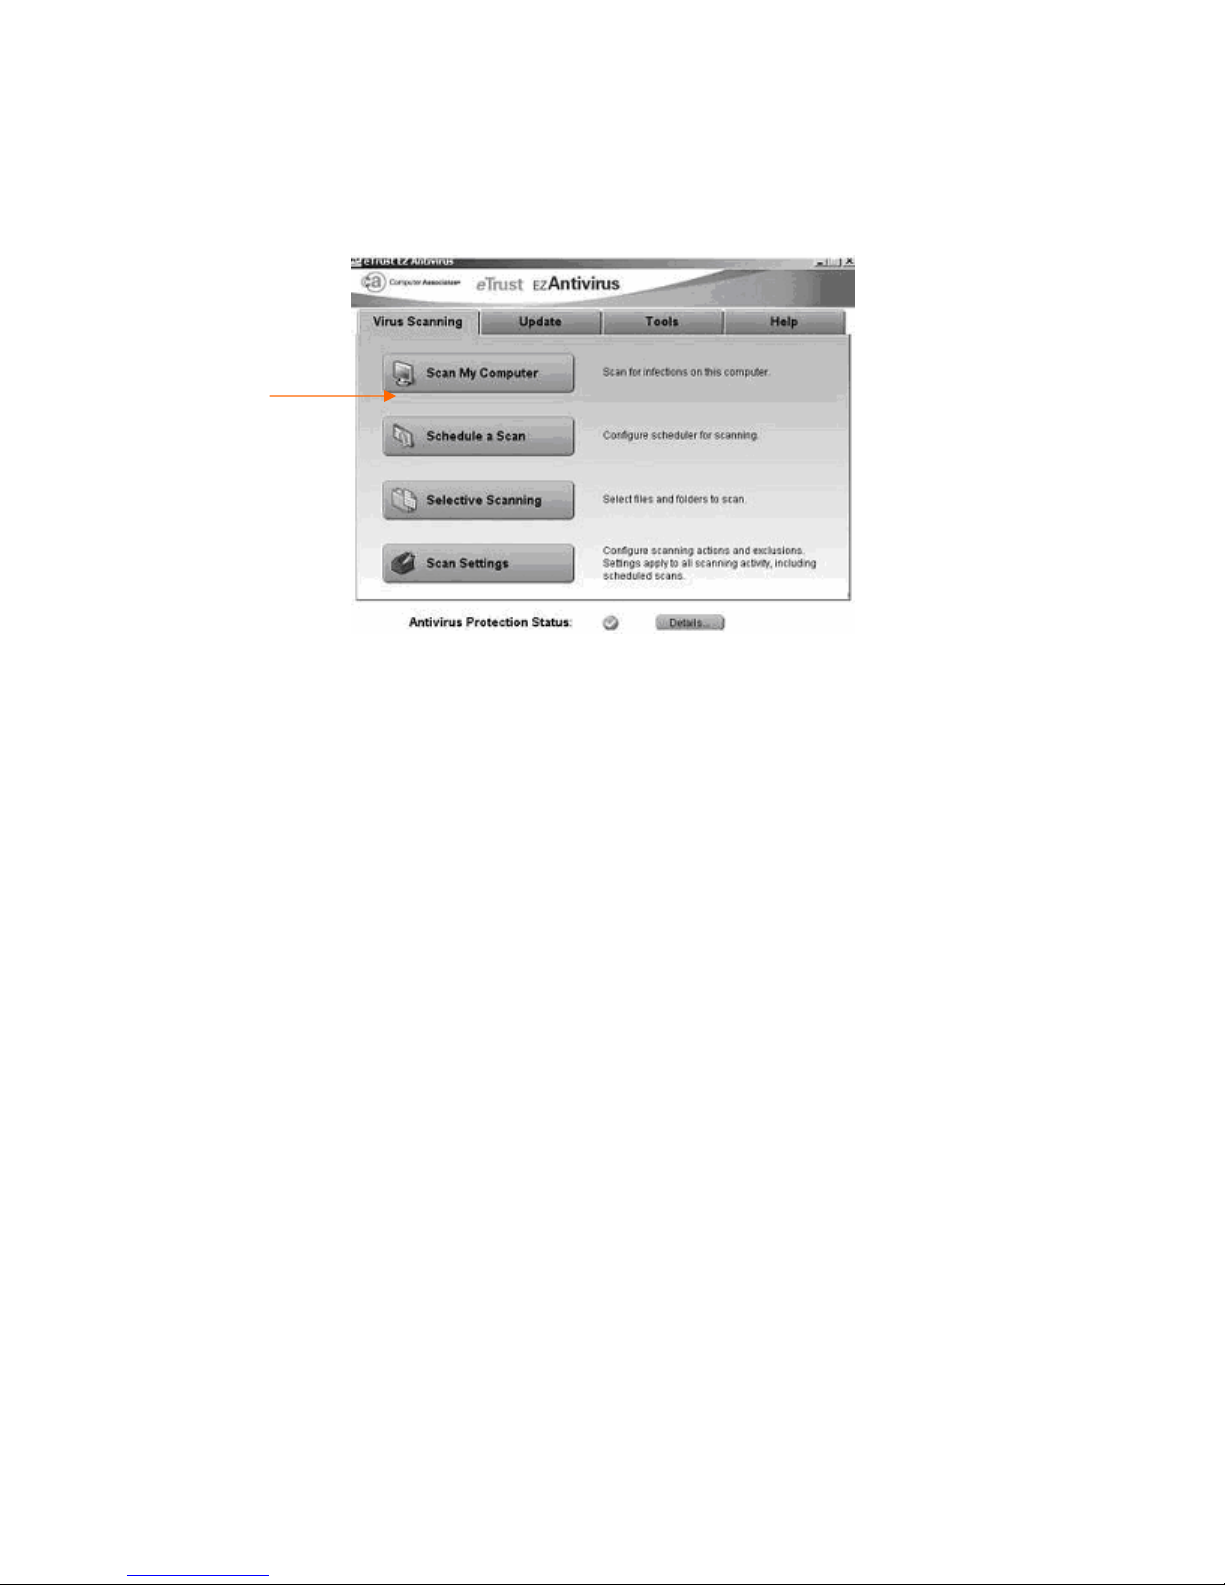
 To scan for viruses:
1. Click Start, All Programs, Computer Associates eTrust AntiVirus, then click eTrust
EZ Antivirus.
- 39 -
Page 46
Chapter 5: Maintaining Your Computer
2. Click Scan for Viruses.
SCAN
3. Click the type of scan you want to make in the Scan for Viruses area, then under
Actions, click Scan.
 To remove a virus:
1. If EZ AntiVirus finds a virus, follow all on-screen instructions to
remove the virus.
2. Turn off your computer and leave it off for at least 30 seconds.
3. Turn on your computer and rescan for the virus.
- 40 -
Page 47

 To update eTrust EZ AntiVirus:
Tips & Tricks
You received a free, limited-time subscription to the eTrust EZ
AntiVirus service when you purchased your computer. To update
eTrust EZ AntiVirus after the free subscription period, you must
extend your subscription.
1. Make sure that you are connected to the Internet.
2. Launch eTrust EZ AntiVirus, then click Update. The Update wizard opens.
3. Follow the on-screen instructions to update your eTrust EZ AntiVirus program
with the latest virus protection files.
4. When the program has finished, click Finish.
Cleaning your computer
Cleaning your computer
Keeping your computer clean and the vents free from dust helps keep your computer
performing at its best. You may want to gather these items and put together a computer
cleaning kit:
A soft, lint-free cloth
An aerosol can of air that has a narrow, straw-like extension
Cotton swabs
A CD or DVD drive cleaning kit
Cleaning the exterior
Warning
! When you shut down your computer, the power turns off, but some
electrical current still flows through your computer. To avoid possible
injury from electrical shock, unplug the power cord and modem cable
from the wall outlets.
Always turn off your computer and other peripherals before cleaning any components.
Use a damp, lint-free cloth to clean your computer and other parts of your system. Do
not use abrasive or solvent cleaners because they can damage the finish on components.
- 41 -
Page 48

Chapter 5: Maintaining Your Computer
Your computer is cooled by air circulated through the vents on the case, so keep the
vents free of dust. With your computer turned off and unplugged, brush the dust away
from the vents with a damp cloth. Be careful not to drip any water into the vents. Do
not attempt to clean dust from the inside of your computer.
Cleaning the keyboard
You should clean the keyboard occasionally by using an aerosol can of air with a narrow,
straw-like extension to remove dust and lint trapped under the keys.
If you spill liquid on the keyboard, turn off your computer and turn the keyboard upside
down. Let the liquid drain, then let the keyboard dry before trying to use it again. If the
keyboard does not work after it dries, you may need to replace it.
Cleaning the computer display
To clean a computer LCD screen or flat panel display, use a soft cloth and water to
clean the LCD screen. Squirt a little water on the cloth (never directly on the screen),
and wipe the screen with the cloth.
Caution
! A flat panel display or computer LCD screen is made of specially
coated glass and can be scratched or damaged by abrasive or
ammonia-based glass cleaners.
To clean a CRT monitor, use a soft cloth and glass cleaner to clean the monitor screen.
Squirt a little cleaner on the cloth (never directly on the screen), and wipe the screen
with the cloth.
Cleaning the mouse
If the mouse pointer begins moving erratically across the computer screen or becomes
difficult to control precisely, cleaning the mouse will likely improve its accuracy.
 To clean your optical mouse:
Wipe the bottom of the mouse with a damp lint-free cloth
- 42 -
Page 49
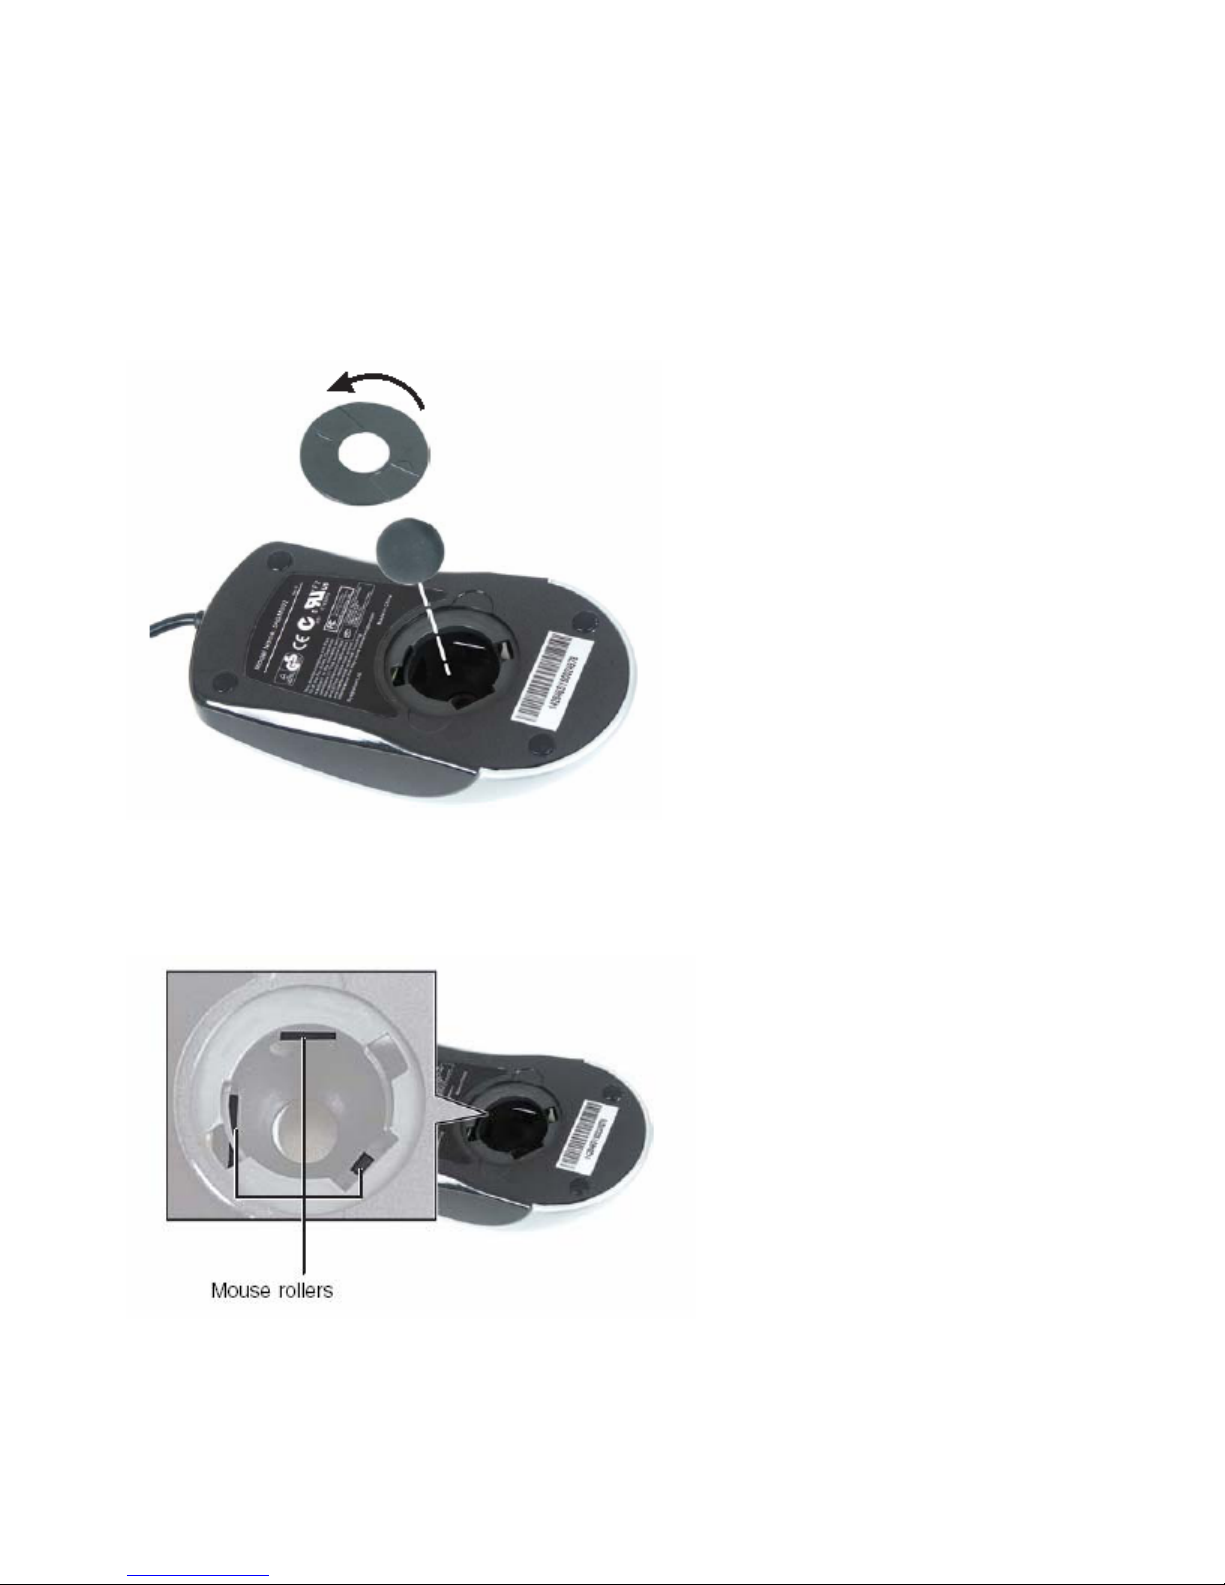
 To clean your trackball mouse:
1. Turn the mouse upside down.
2. Rotate the retaining ring on the bottom of the mouse counter-clockwise, then
remove the retaining ring and mouse ball.
Cleaning your computer
3. Remove any dust, lint, or dirt from the mouse ball with a soft cloth.
4. Clean the mouse rollers with a cotton swab dipped in isopropyl alcohol.
5. Replace the mouse ball and lock the retaining ring into place.
- 43 -
Page 50
Chapter 5: Maintaining Your Computer
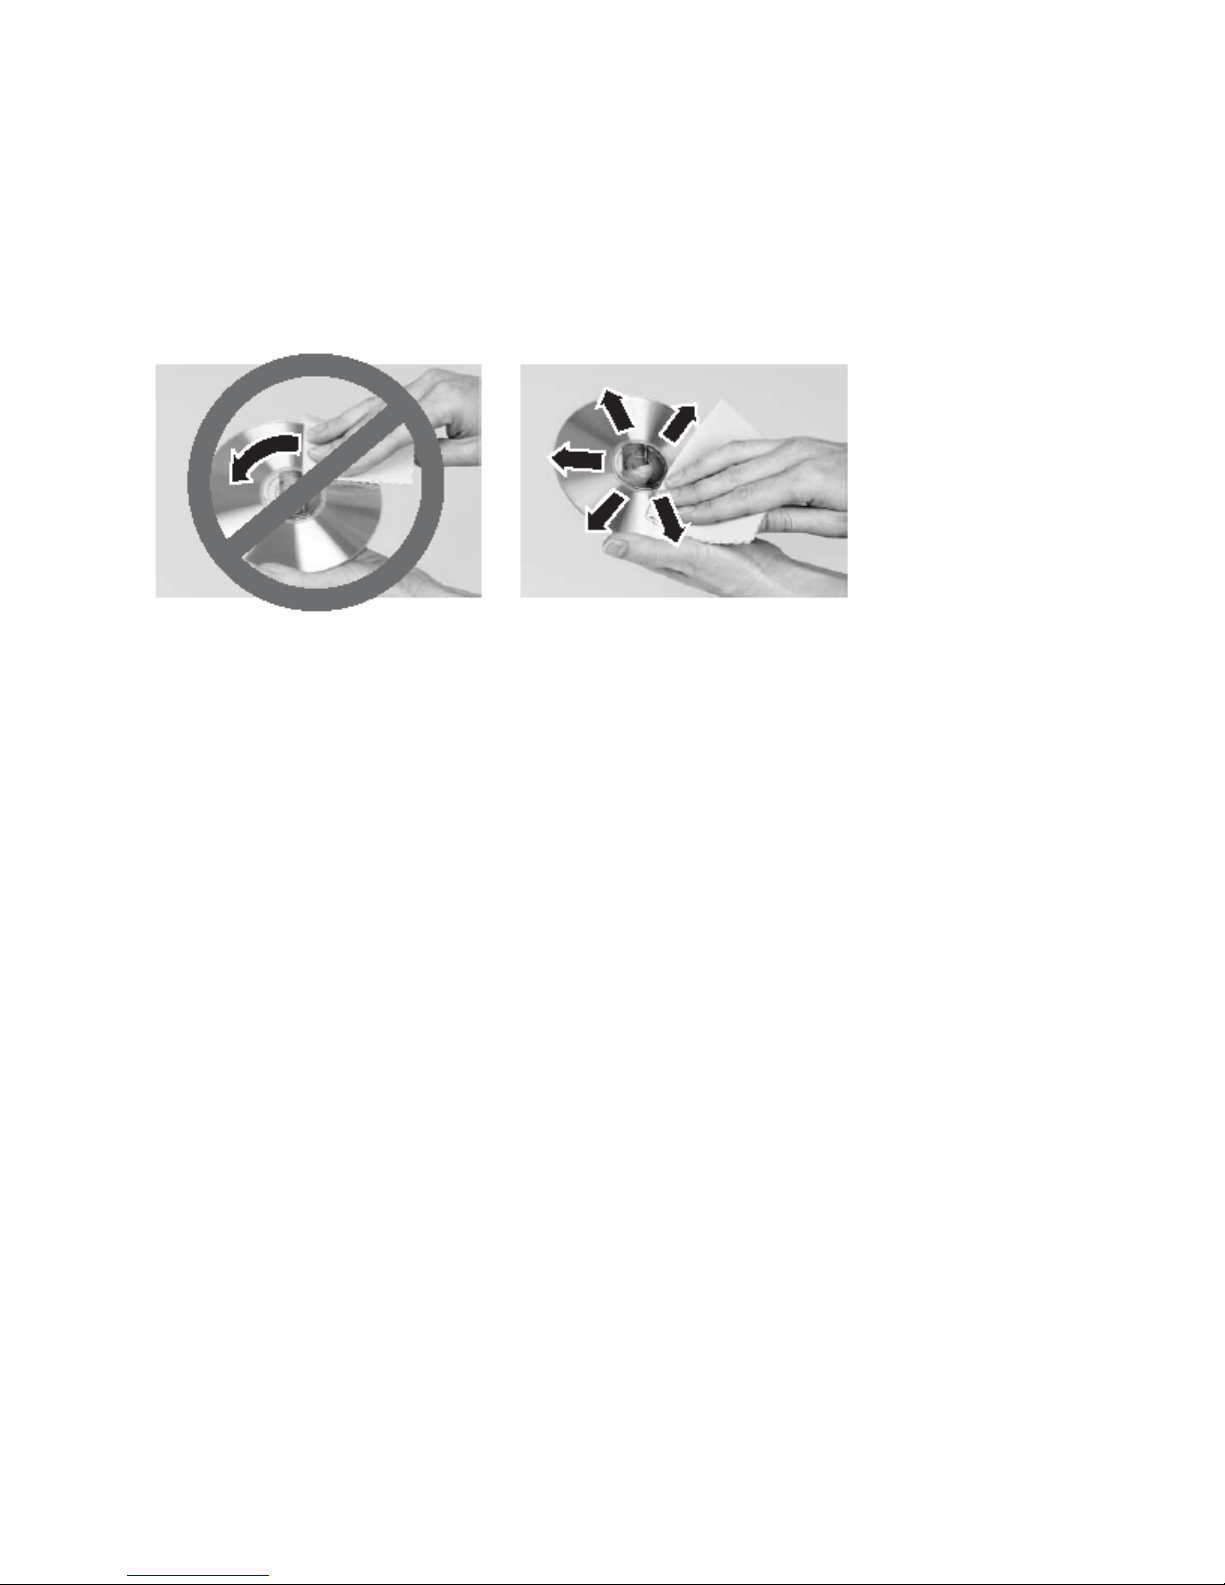
Cleaning CDs or DVDs
Wipe from the center to the edge, not around in a circle, using a product made
especially for the purpose
.
Restoring your system
All programs that were preinstalled on your computer are available on the backup
restore discs that you created with the recovery media program, on the hard drive, or
on restore discs that were included with your computer. If you need to restore your
computer to the original configuration, you can use the backup restoration disks or you
can use the backup files located on the hard drive.
The instructions for using the restoration disks or hard drive backup files are included in
the instruction booklet that came with your restore discs.
- 44 -
Page 51
Preventing static electricity discharge
Preventing static electricity discharge
The components inside your computer are extremely sensitive to static electricity, also
known as electrostatic discharge (ESD).
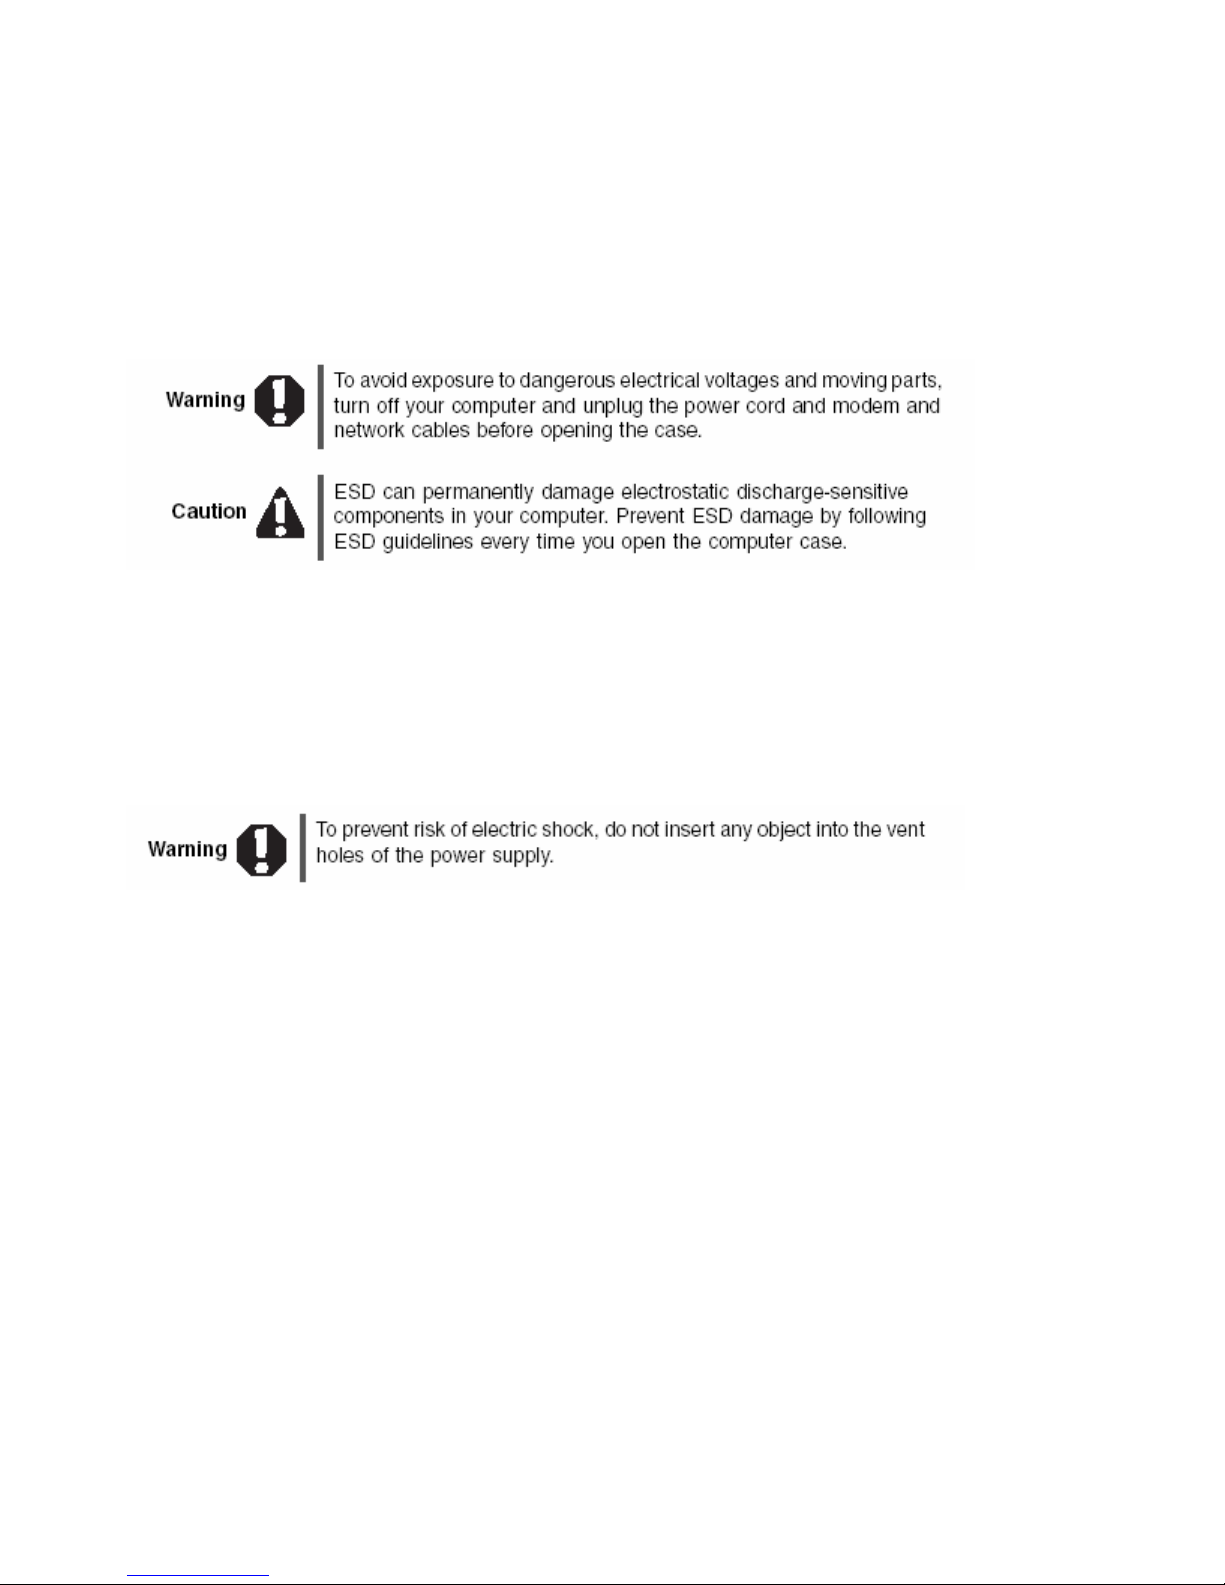
Before opening the computer case, follow these guidelines:
Turn off your computer.
Wear a grounding wrist strap (available at most electronics stores) and attach it to a
bare metal part of your computer.
Touch a bare metal surface on the back of the computer.
Unplug the power cord and the modem and network cables.
Before working with computer components, follow these guidelines:
Avoid static-causing surfaces such as carpeted floors, plastic, and packing foam.
Remove components from their antistatic bags only when you are ready to use them.
Do not lay components on the outside of antistatic bags because only the inside of
the bags provide electrostatic protection.
Always hold expansion cards by their edges or their metal mounting brackets. Avoid
touching the edge connectors and components on the cards. Never slide expansion
cards or components over any surface.
- 45 -
Page 52
Chapter 5: Maintaining Your Computer
Opening the case
Your computer case provides easy access to internal components.
Removing the side panel
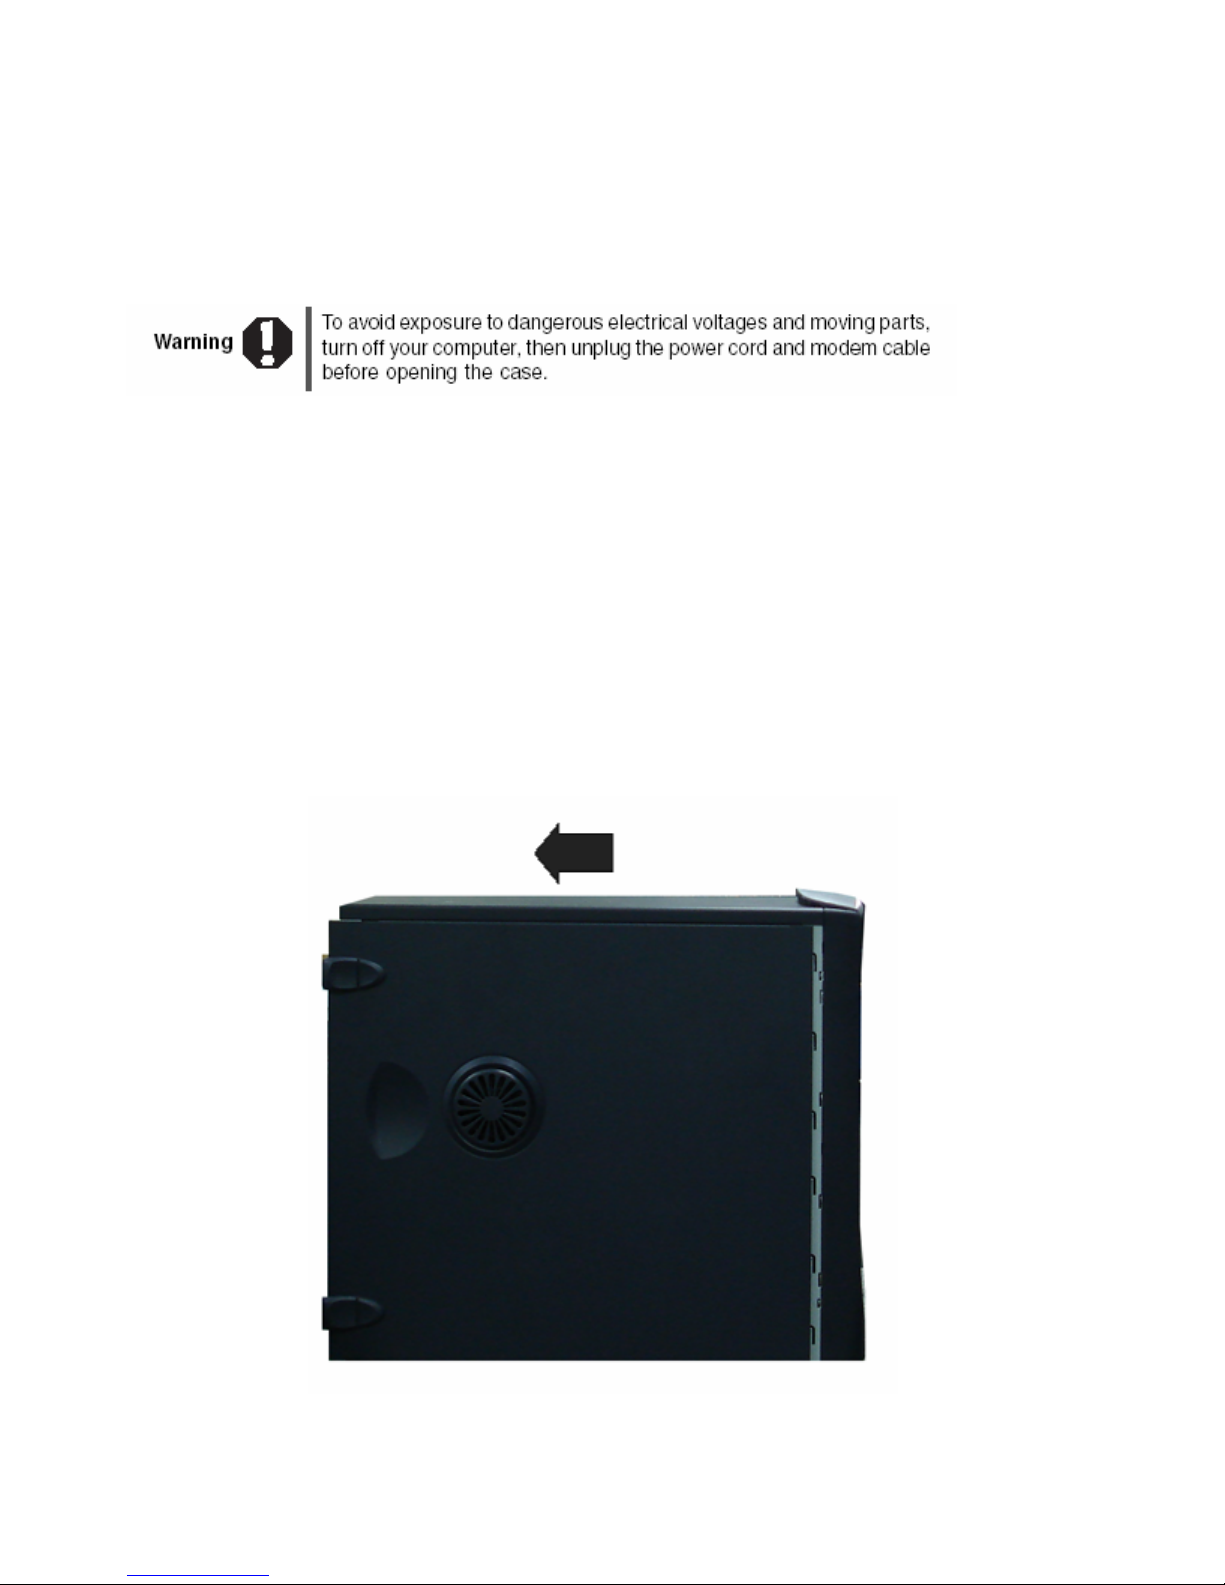
 To remove the side panel:
1. Follow the instructions in “First steps” on page 56.
2. Shut down your computer, then disconnect the power cord and modem, network,
and all peripheral device cables.
3. Press the power button to drain any residual power from your computer.
4. Remove the two thumbscrews from the side panel cover, slide the side panel
cover toward the back of the computer, then lift the panel away from the
computer.
- 46 -
Page 53
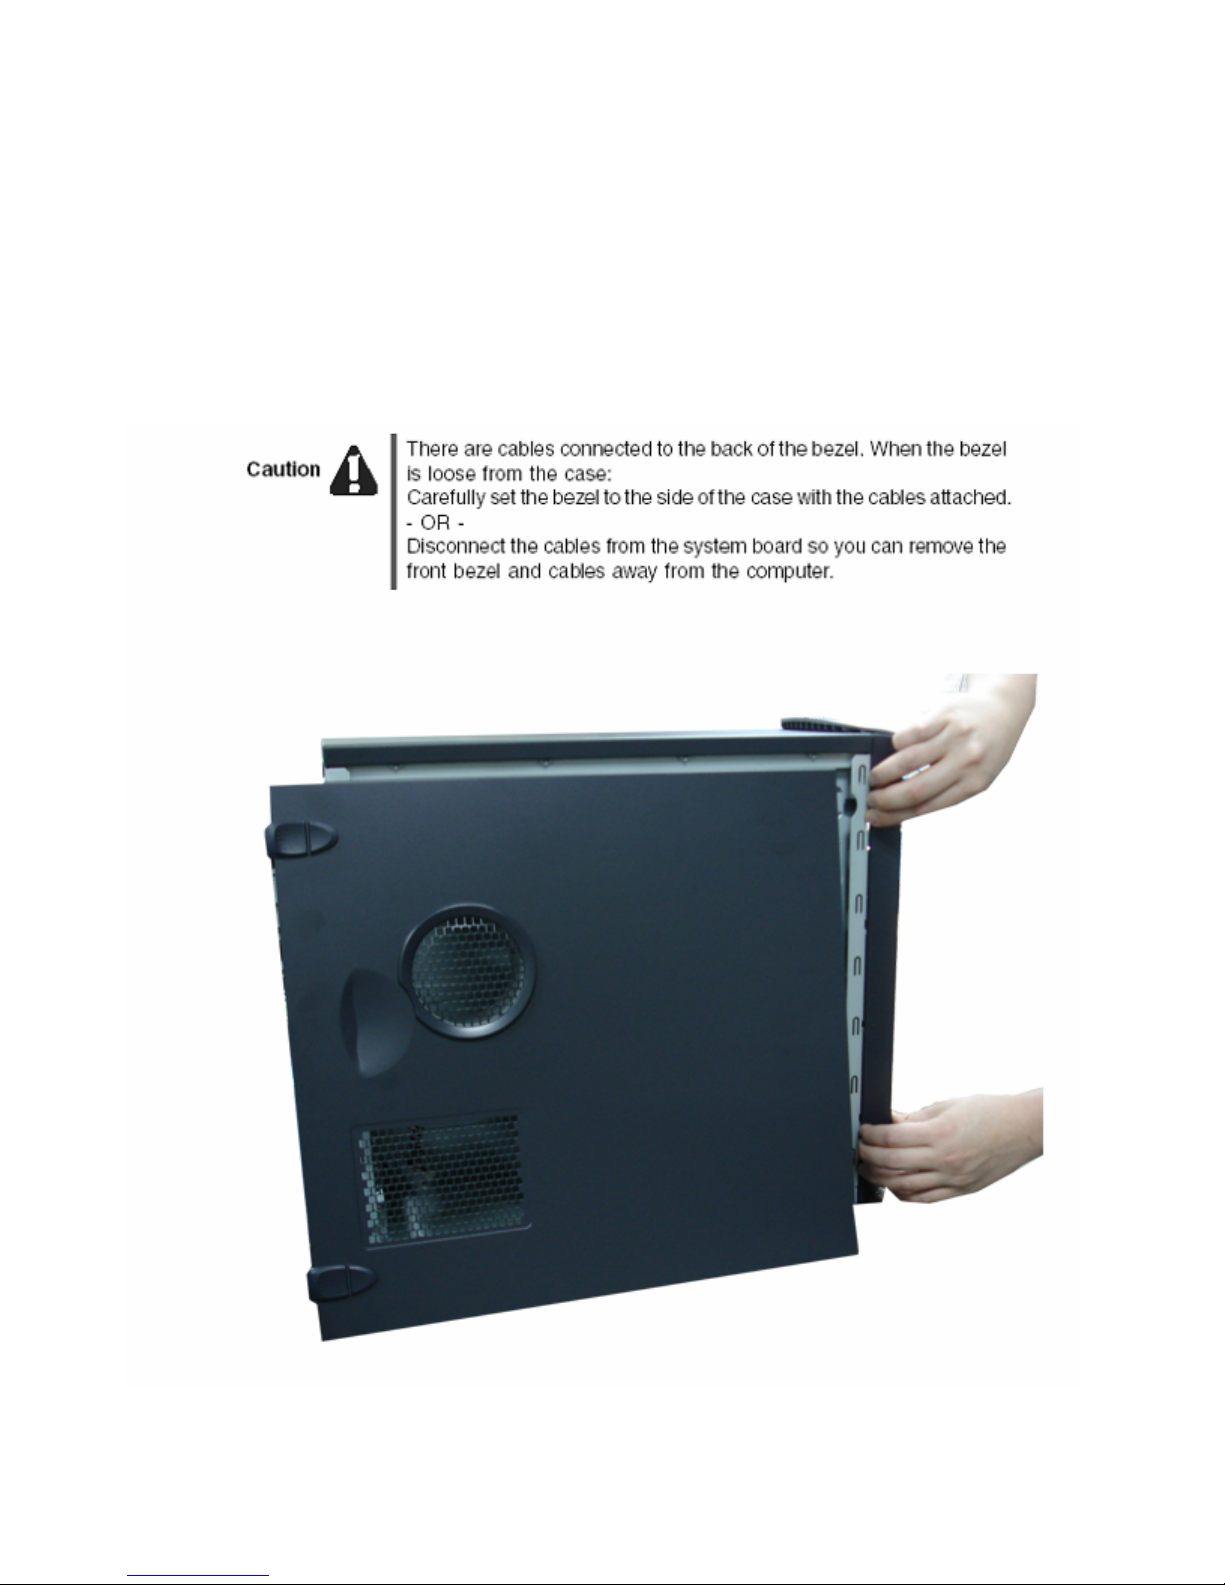
Removing the front bezel
 To remove the front bezel:
Position the computer where you can grasp the top front edge of the bezel, then pull
the bezel away from the case. Continue to loosen the bezel until you can remove it
from the front of the case.
Opening the case
- 47 -
Page 54

Chapter 5: Maintaining Your Computer
Closing the case
Replacing the side panel
 To replace the side panel:
1. Make sure that all of the internal cables are arranged inside the case so they will not
be pinched when you close the case.
2. Align the side panel, then slide the side panel toward the front of the computer to
secure it into place.
3. Replace the side panel thumbscrews.
4. Reconnect the cables and power cord.
- 48 -
Page 55
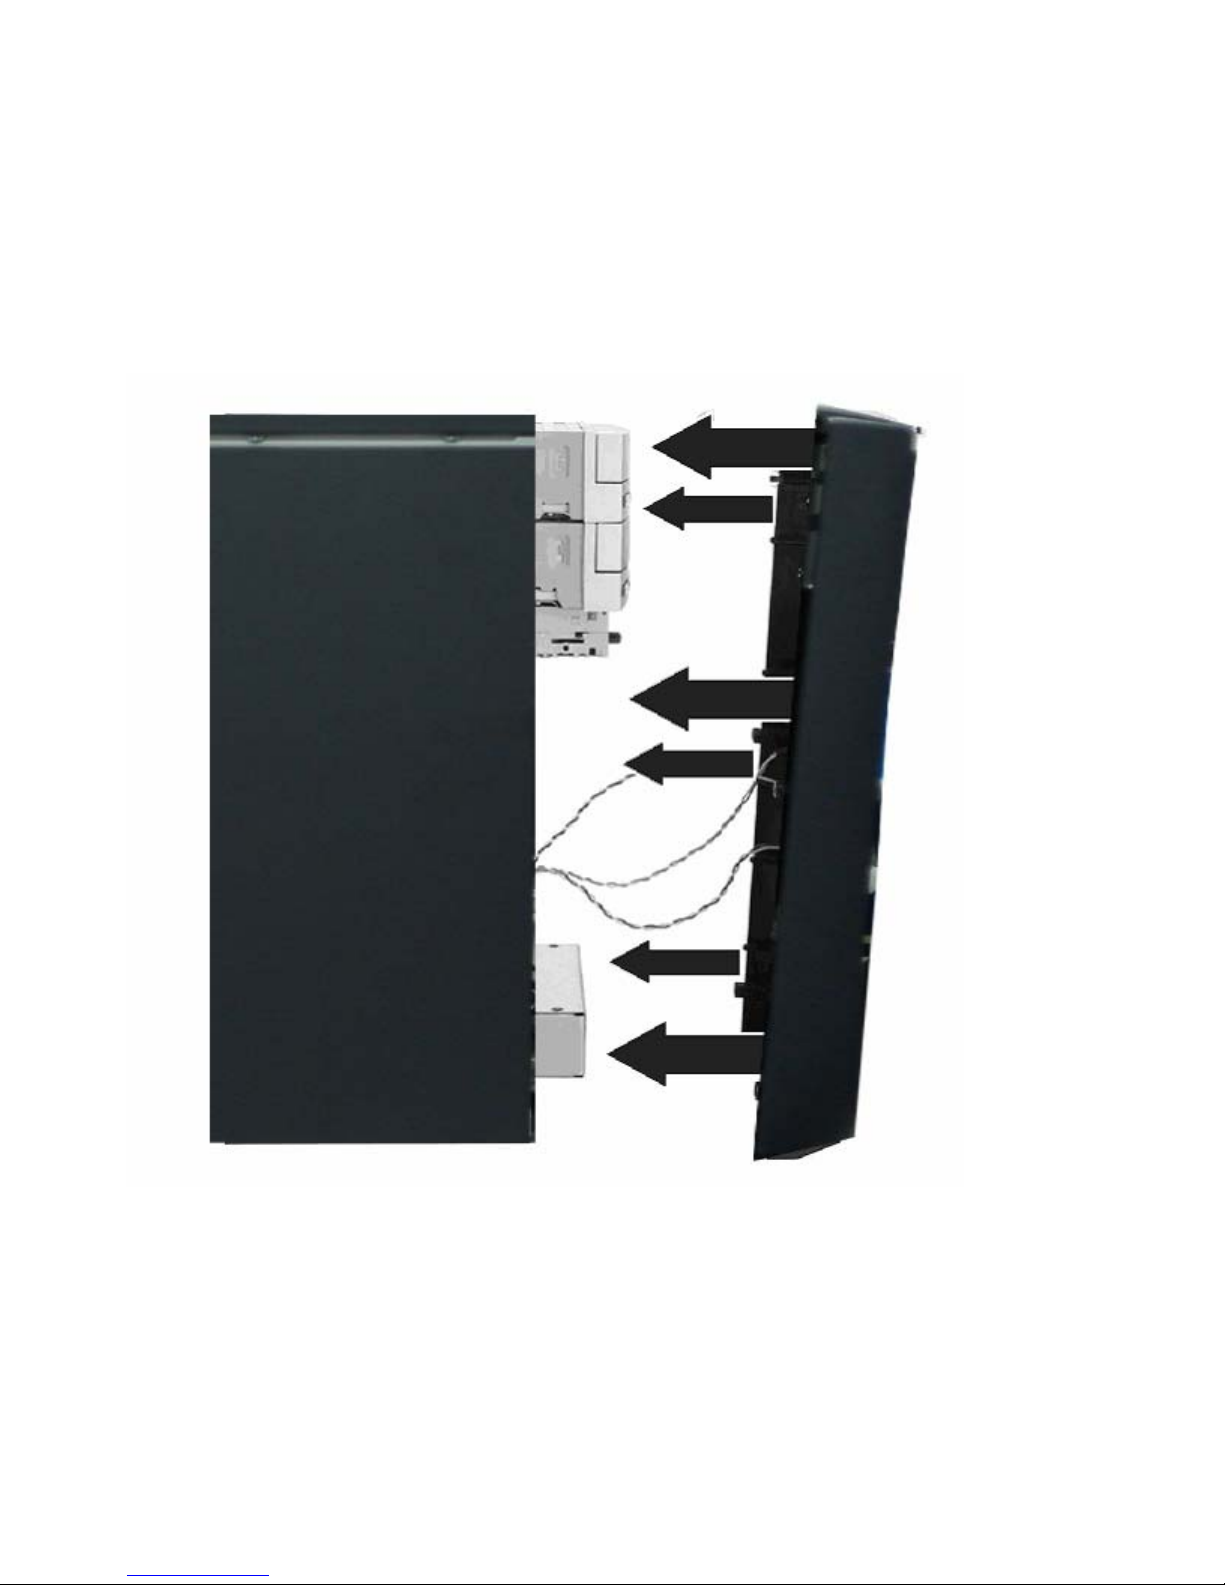
Replacing the front bezel
 To replace the front bezel:
1. Align the latch pins with the computer latch holes.
Closing the case
2. Press the bezel firmly into place.
- 49 -
Page 56
Chapter 5: Maintaining Your Computer
Installing memory
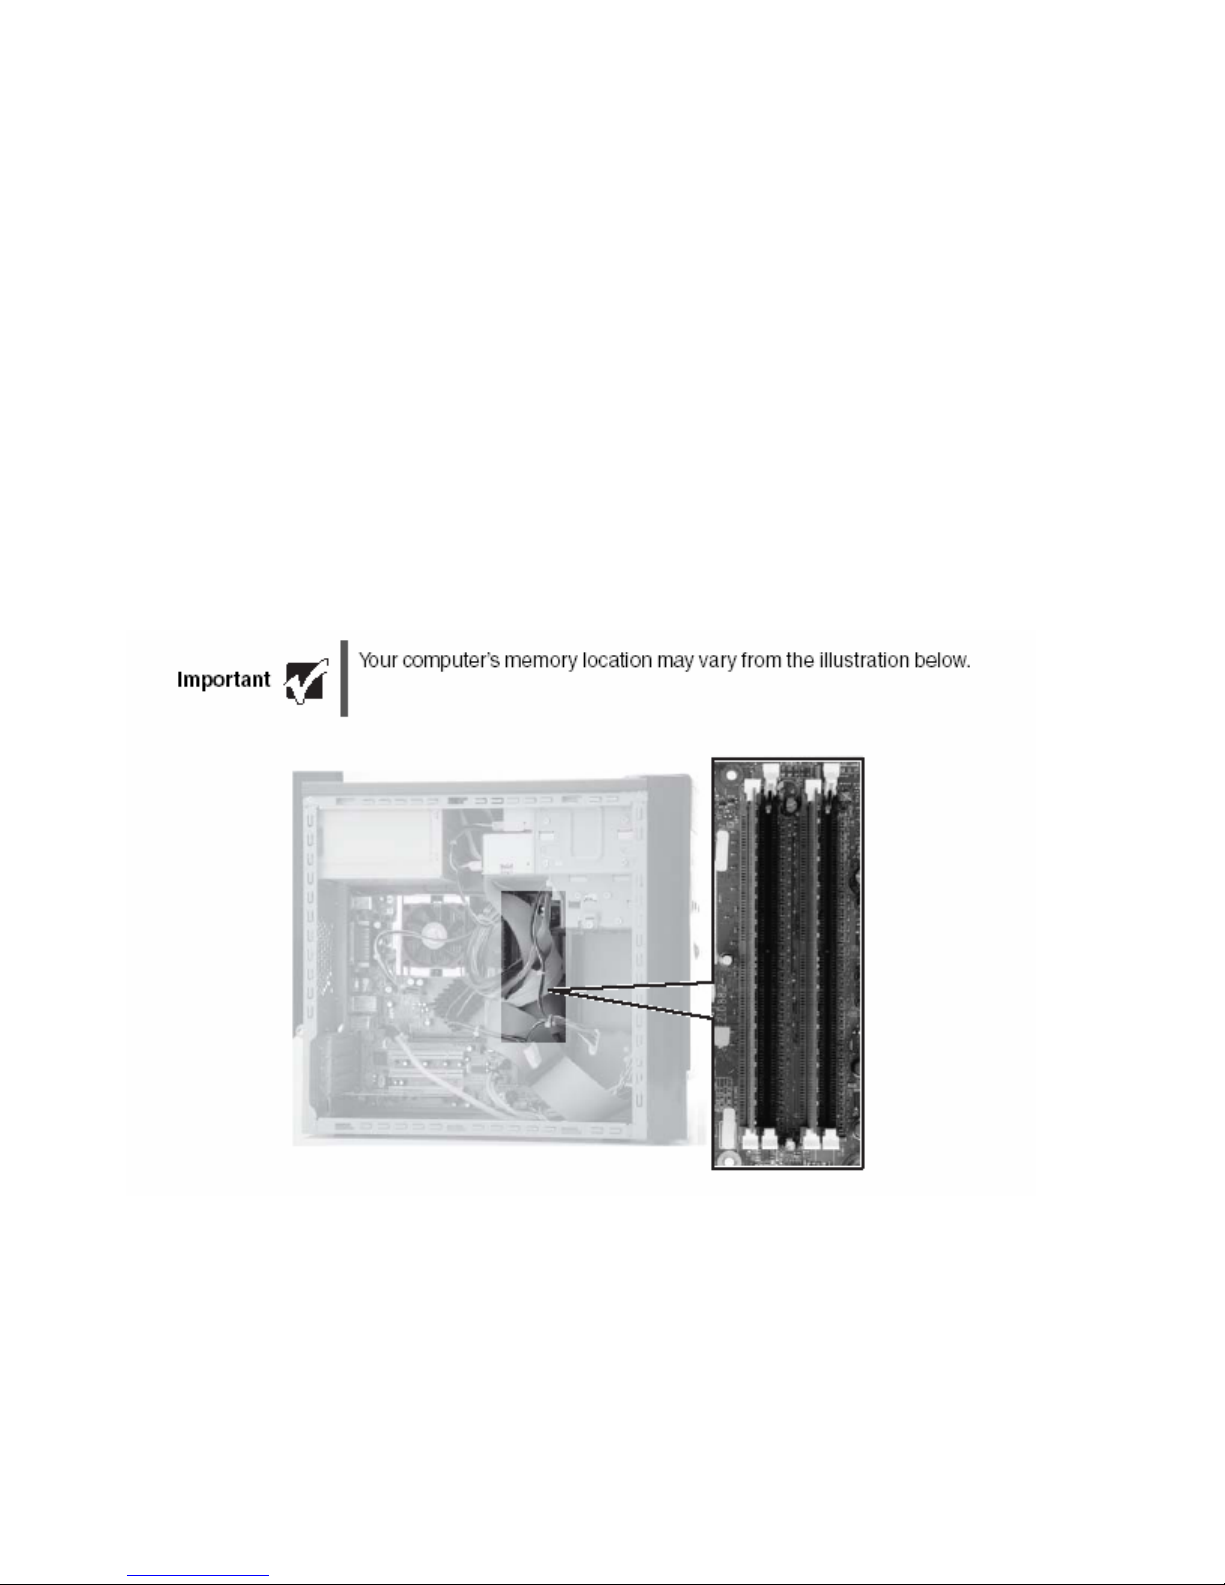
When you upgrade the computer memory, make sure that you install the correct type of
memory module for your computer. Your computer uses DIMM memory.
 To install or replace DIMM memory:
1. Remove the side panel by following the instructions in “Removing the side panel” on
page 46.
2. For more stability, place your computer on its side. To avoid scratching the case,
place it on a towel or other non-abrasive surface.
3. Find the memory module banks on your system board.
- 50 -
Page 57
Installing memory
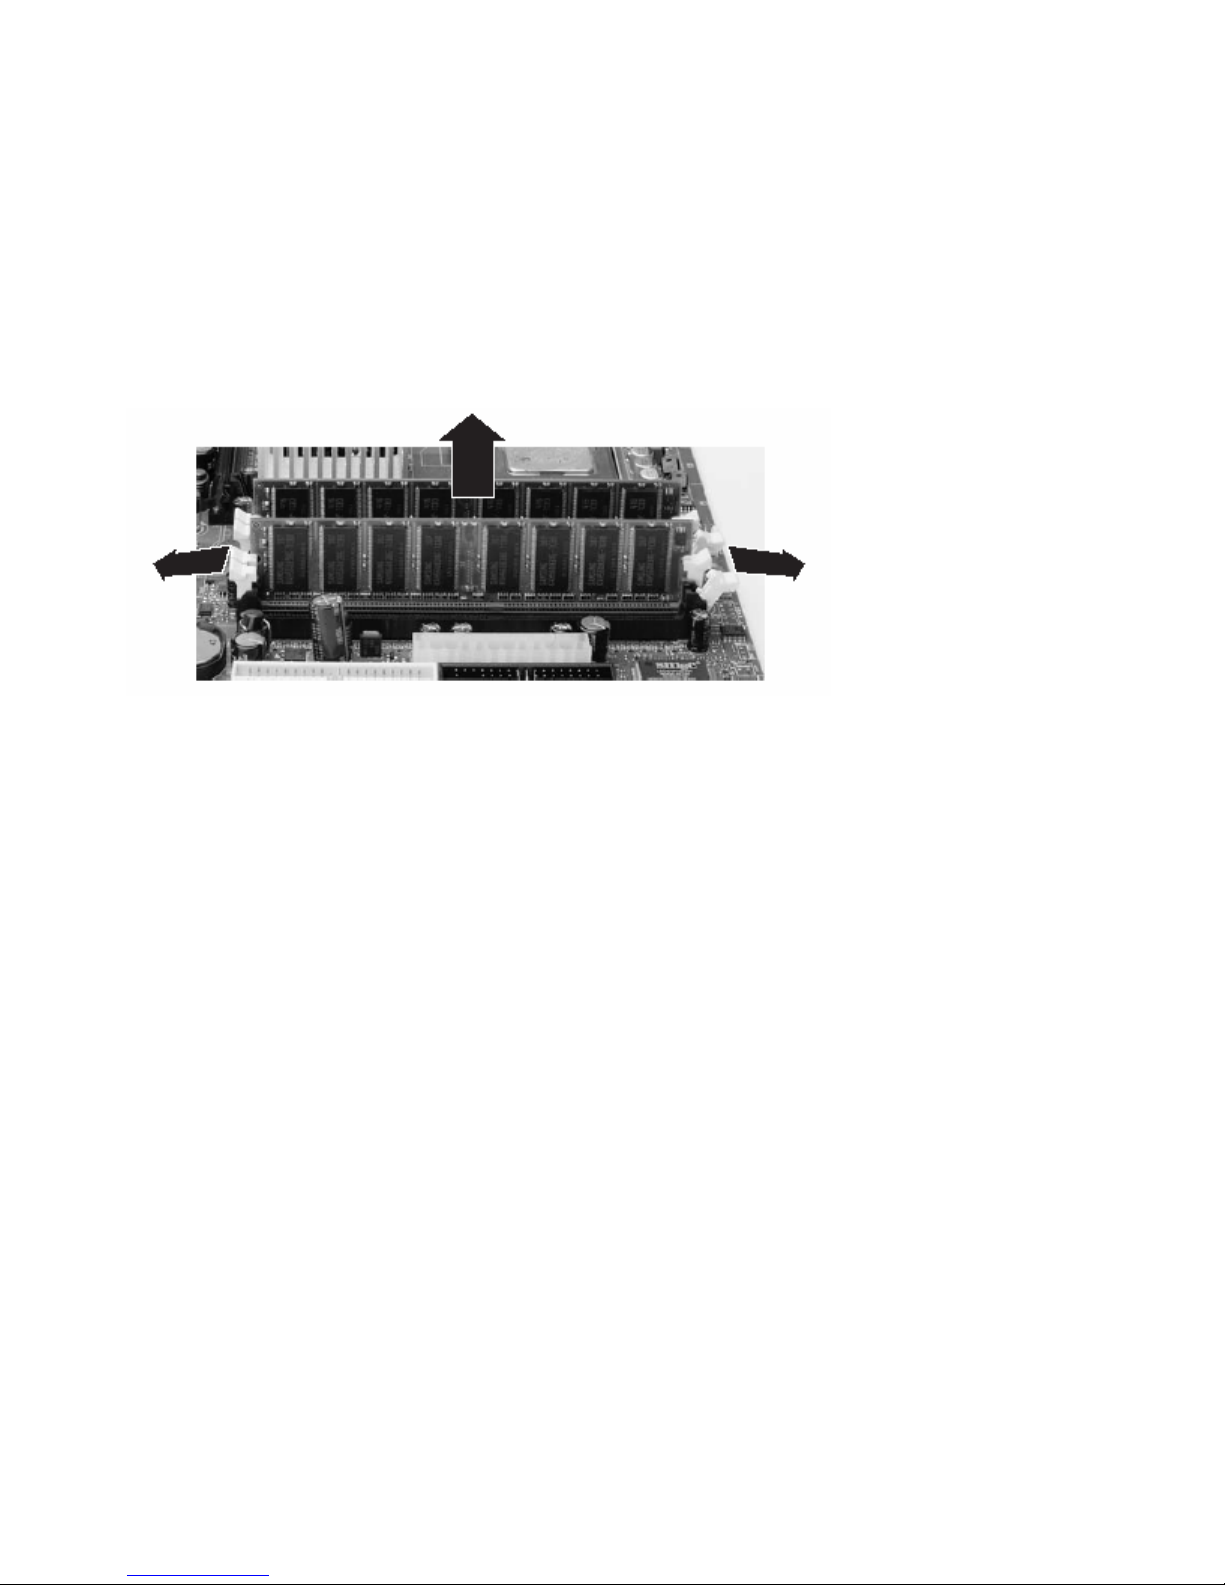
4. If you are removing a DIMM from the memory module bank, gently pull the plastic
tabs away from the sides of the memory module and remove it.
- OR -
If you are adding a DIMM to an empty memory module bank, gently pull the plastic
tabs away from the sides of the memory module bank.
5. Align the notches on the new DIMM with the notches on the memory module bank
and press the module firmly into the bank. The tabs on the sides of the memory
module should secure the memory module automatically. When the module is
secure, you hear a click.
6. Replace the side panel by following the instructions in “Replacing the side panel” on
page 48.
7. Return your computer to its upright position.
8. Reconnect the cables and the power cord.
9. Turn on your computer. Windows starts and the Windows desktop appears.
10. Click Start, Control Panel, then click Performance and Maintenance (if in Category
view). Click/Double-click System. The amount of memory in your computer is shown
at the bottom of the System Properties dialog box in the General tab.
- 51 -
Page 58
Chapter 5: Maintaining Your Computer
Replacing the system battery
If the computer clock does not keep time or the settings in the BIOS Setup utility are not
saved when you turn off your computer, replace the system battery. Use a battery of
the same size and voltage as the original battery that was in your computer.
 To replace the battery:
1. Restart your computer.
2. During the restart, press and hold the F1 key. The main menu of the BIOS Setup
utility opens.
3. Write down all the values in the menus and submenus, then exit from the utility.
4. Shut down your computer.
5. Remove the side panel by following the instructions in “Removing the side panel” on
page 46.
6. For more stability, place your computer on its side. To avoid scratching the case,
place it on a towel or other non-abrasive surface.
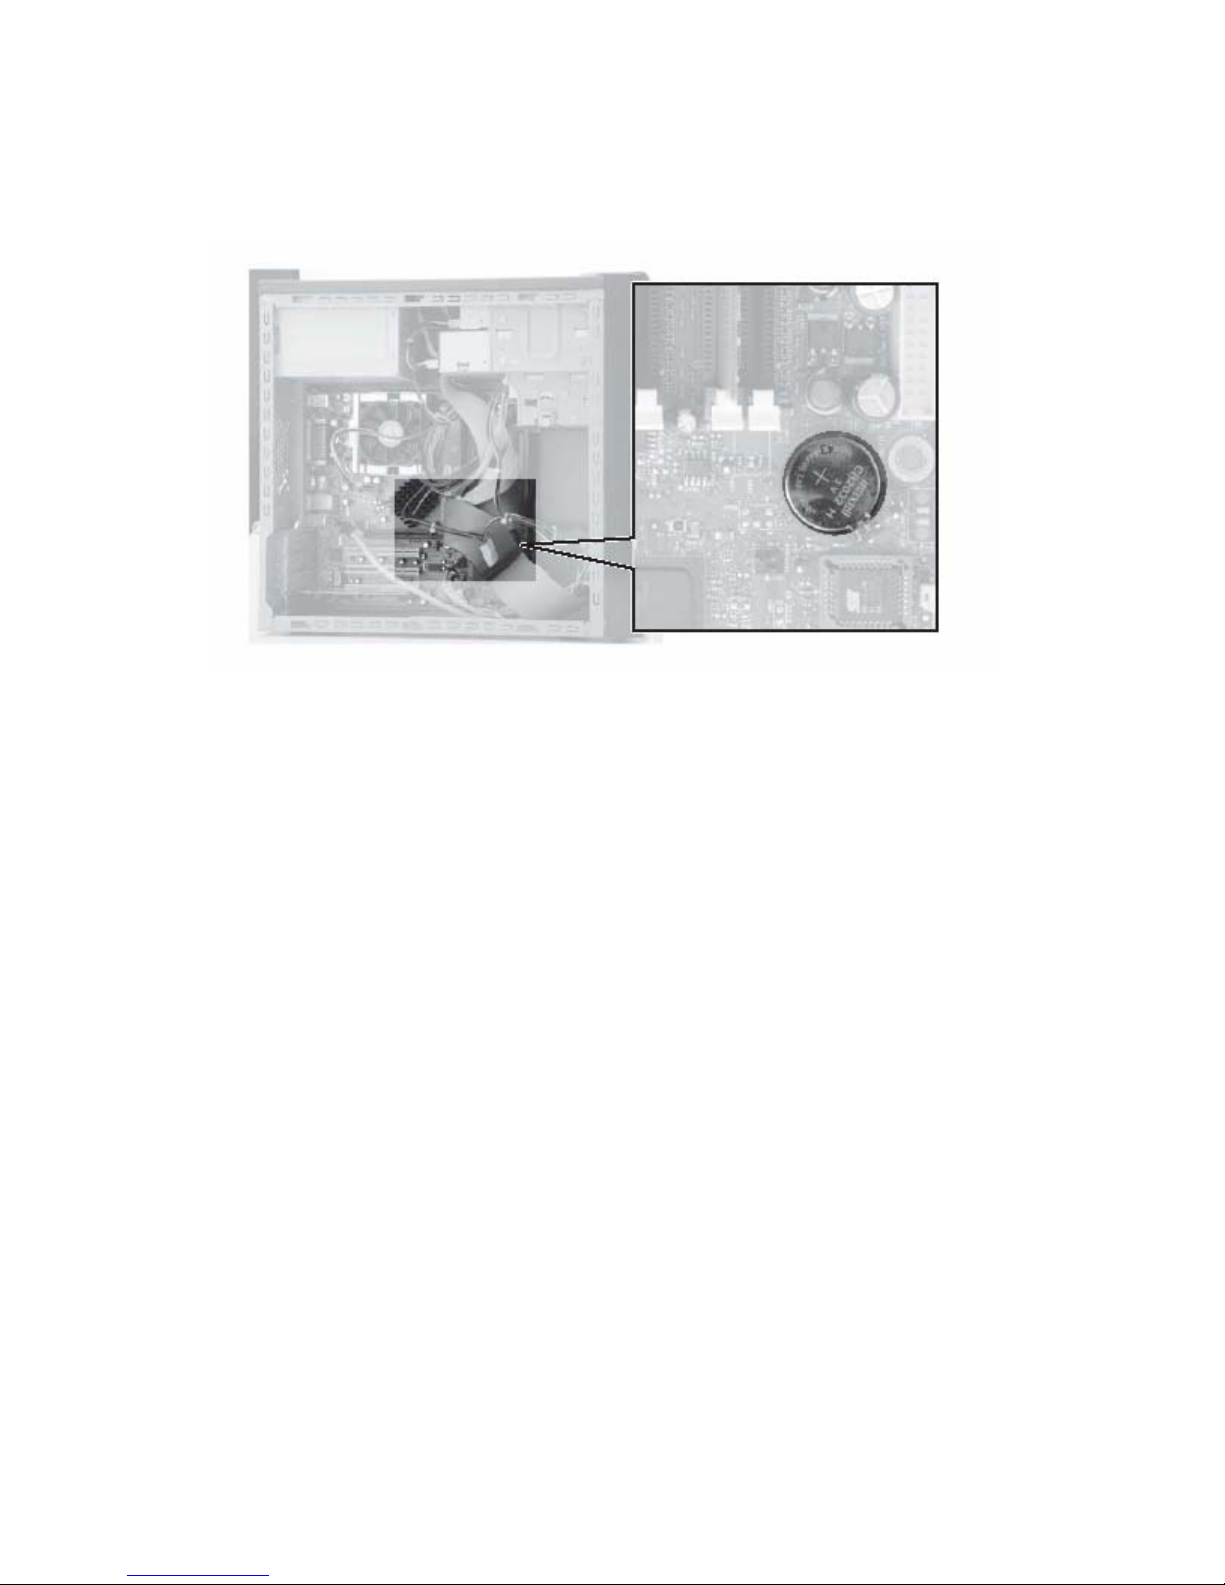
7. Locate the old battery on the system board and note its orientation. You will need to
install the new battery the same way.
8. Push the battery release tab. The battery pops out of the socket.
- 52 -
Page 59
Replacing the system battery
9. Make sure that the positive (+) side of the new battery is facing up, then press the
battery into the socket until it snaps into place.
10. Replace the side panel by following the instructions in “Replacing the side panel” on
page 48.
11. Reconnect all external cables and the power cord.
12. Turn on your computer.
13. Open the BIOS Setup utility.
14. In the BIOS Setup utility, restore any settings that you wrote down in Step 3.
15. Save all your settings and exit the BIOS Setup utility.
- 53 -
Page 60

Chapter 5: Maintaining Your Computer
- 54 -
Page 61

Chapter 6
Troubleshooting
• Troubleshooting typical hardware and
software problems
• Getting telephone support
• Using automated troubleshooting systems
• Getting tutoring and training
- 55 -
Page 62
Chapter 6: Troubleshooting
Safety guidelines
While troubleshooting your computer, follow these safety guidelines:
Never remove your computer case cover while your computer is turned on and while
the modem cable and the power cord are connected.
Make sure that you are correctly grounded before accessing internal components.
For more information about preventing damage from static electricity, see “First
steps” on page 56.
First steps
If you have problems with your computer, try these things first:
Make sure that the AC power adapter is connected to your computer and an AC
outlet and that the AC outlet is supplying power.
If you use a power strip or surge protector, make sure that it is turned on.
If a peripheral device (such as a keyboard or mouse) does not work, make sure
thatall connections are secure.
Make sure that your hard drive is not full.
If an error message appears on the screen, write down the exact message. The
message may help Customer Care in diagnosing and fixing the problem.
If you added or removed peripheral devices, review the installation procedures you
performed and make sure that you followed each instruction.
If an error occurs in a program, see the program’s printed documentation or the
online help.
- 56 -
Page 63

Troubleshooting
Add-in cards
The computer does not recognize an add-in card
Shut down and restart your computer.
Make sure that you have installed the required software. For more information, see
the documentation that came with your add-in card.
Audio
See “Sound” on page 72.
Battery
See “Power” on page 70.
Troubleshooting
CD or DVD drives
The computer does not recognize a disc or the CD or DVD drive
Make sure that the disc label is facing up, then try again.
Try a different disc. Occasionally discs are flawed or become scratched and cannot
be read by the CD or DVD drive.
Your computer may be experiencing some temporary memory problems. Shut down
and restart your computer.
Some music CDs have copy protection software. You may not be able to play these
CDs on your computer.
Clean the disc. For more information, see “Cleaning CDs or DVDs” on page 44.
Make sure that the drive is configured correctly by following the instructions in the
drive documentation.
Reinstall the device driver.
- 57 -
Page 64

Chapter 6: Troubleshooting
Audio CD does not produce sound
Make sure that the disc label is facing up, then try again.
Some music CDs have copy protection software. You may not be able to play these
CDs on your computer.
Make sure that the volume controls are turned up. For more information, see
“Adjusting the volume” on page 21.
Make sure that the mute controls are turned off. For more information, see
“Adjusting the volume” on page 21.
Make sure that the speaker cables are connected correctly and securely.
Shut down and restart your computer.
Clean the disc. For more information, see “Cleaning CDs or DVDs” on page 44.
Reinstall the audio device drivers.
A DVD movie will not play
Make sure that you have a DVD drive. To identify your drive type, see “Identifying
drive types” on page 33.
Make sure that the disc label is facing up, then try again.
Try a different disc. Occasionally discs are flawed or become scratched and cannot
be read by the DVD drive.
Shut down and restart your computer.
Clean the disc. For more information, see “Cleaning CDs or DVDs” on page 44.
Reinstall the device driver.
Make sure that the DVD program has been installed on your computer.
DVDs and DVD drives contain regional codes that help control DVD title exports and
help reduce illegal disc distribution. To be able to play a DVD, the disc’s regional
code and your DVD drive’s regional code must match.
The regional code on your DVD drive is determined by your computer’s delivery
address. The regional code for the United States and Canada is 1. The regional code
for Mexico is 4. Your DVD drive’s regional code must match the regional code for the
disc. The regional code for the disc is on the disc, disc documentation, or disc
packaging.
If the DVD movie does not play, the disc’s regional code and your DVD drive’s
regional code may not match.
- 58 -
Page 65

Computer
The computer will not start
Make sure that the power cord is connected to an AC power source and your
computer is turned on.
Diskette drive
The diskette drive is not recognized
Shut down and restart your computer.
You cannot save a file to diskette or you see the message “disk is full or
write-protected”
Make sure that the write-protection tab on the upper-right corner of the diskette is
down (unprotected).
Delete unnecessary files on the diskette and try again.
Troubleshooting
Make sure that the diskette you are using is IBM-compatible.
Try a different diskette. Occasionally diskettes are flawed and cannot be read by the
diskette drive.
Run Error-checking on the diskette.
If errors are detected and corrected, try using the diskette again.
You see a “Access Denied” or “Write protect” error message
Move the write-protection tab in the upper-right corner of the diskette down
(unprotected).
The diskette may be full. Delete unnecessary files on the diskette and try again.
Make sure that the diskette you are using is IBM-compatible.
Try a different diskette. Occasionally diskettes are flawed and cannot be read by the
diskette drive.
You see a “Disk is full” error message
Delete unnecessary files on the diskette.
Try a different diskette. Occasionally diskettes are flawed and cannot be read by the
diskette drive.
Run Error checking on the diskette.
- 59 -
Page 66
Chapter 6: Troubleshooting
You see a “Non-system disk” or “Disk error” error message
Eject the diskette from the diskette drive, then press ENTER.
Make sure that the diskette you are using is IBM-compatible.
The diskette drive LED is lit continuously
Remove the diskette from the drive. If the light stays on, try restarting your
computer.
DVD drives
See “CD or DVD drives” on page 57.
File management
A file was accidentally deleted
If a file was deleted while holding down the SHIFT key, the file cannot be restored.
 To restore deleted files:
1. Double-click the Recycle Bin icon.
restored.
2. Right-click the file you want to restore, then click Restore. The file is restored to
the place where it was originally deleted from.
If the Recycle Bin was emptied before you try to restore a file, the file cannot be
- 60 -
Page 67
Hard drive
You see an “Insufficient disk space” error message
Delete unnecessary files from the hard drive using Disk Cleanup.
Empty the Recycle Bin by right-clicking the Recycle Bin icon, then clicking Empty
Recycle Bin.
Save your files to another drive. If the hard drive is full, copy any files not regularly
used to backup media, then delete them from the hard drive.
Troubleshooting
You see a “Data error” message
This may be the result of a defective area on the hard drive. To fix hard drive problems,
run the Error checking program.
The hard drive cannot be accessed, or you see a “General failure reading drive C”
error message
If a diskette is in the diskette drive, eject it and restart your computer.
Press CTRL+ALT+DEL to restart your computer.
If your computer has been subjected to static electricity or physical shock, you may
need to reinstall the operating system.
You see a “Non-system disk” or “disk error” error message
Eject the diskette from the diskette drive, then press ENTER.
- 61 -
Page 68
Chapter 6: Troubleshooting
Internet
See also “Modem (dial-up)” on page 64.
You cannot connect to the Internet
If you are using a dial-up modem, make sure that the modem cable is plugged into
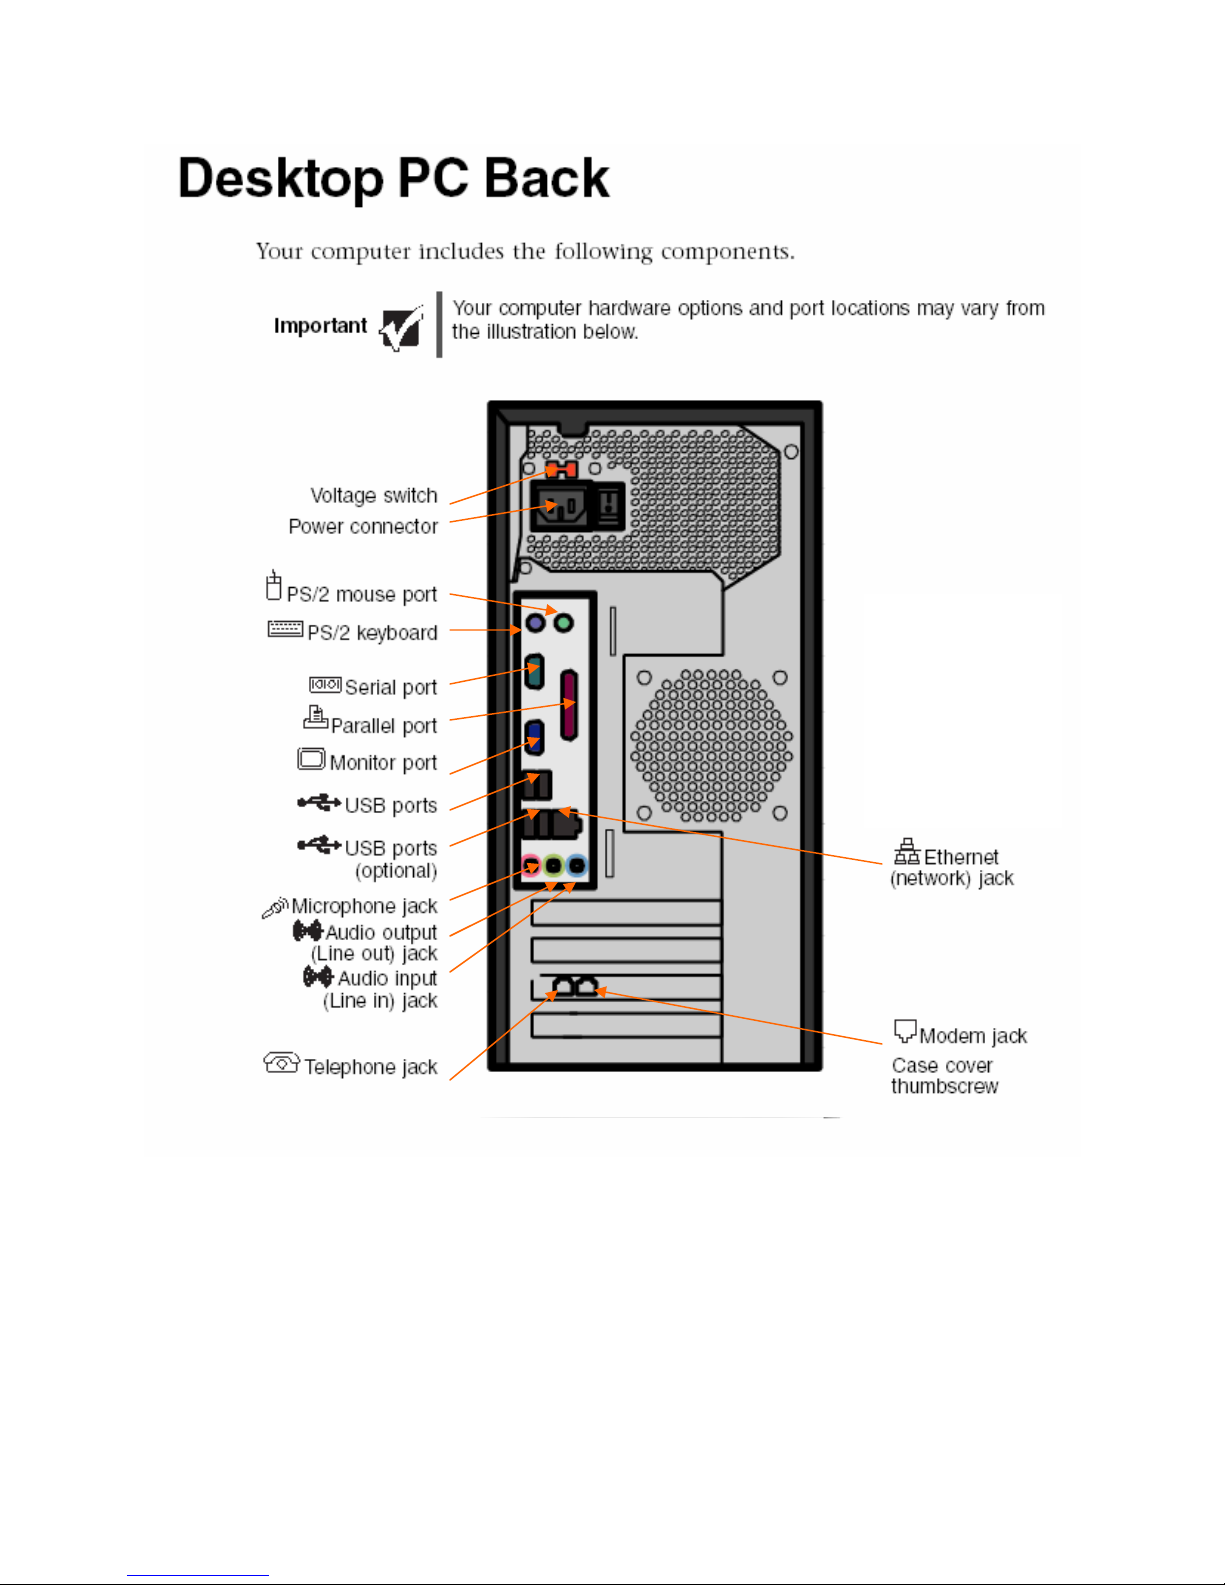
the modem jack and not the Ethernet network jack. See “Desktop PC Back” on page
10 to make sure that the connections have been made correctly.
- OR -
If you are using a cable or DSL modem, make sure that the modem cable is plugged
into the Ethernet network jack and not the modem jack. See “Desktop PC Back” on
page 10 to make sure that the connections have been made correctly.
Make sure that your account with your Internet service provider (ISP) is set up
correctly. Contact your ISP technical support for help.
Make sure that you do not have a problem with your modem. For more information,
“Modem (dial-up)” on page 64.
You see an “Unable to locate host” message and are unable to browse the Internet
This problem can occur when you have typed a URL (Web address) incorrectly, you have
lost your Internet connection, or your ISP is having technical difficulties.
Double-check the URL or try a different URL. If the error message still appears,
disconnect from the ISP connection and close your browser, then reconnect and open
the browser. If you still get the error, your ISP may be having technical difficulties.
Connecting to a Web site takes too long
Many factors can affect Internet performance:
The condition of the telephone lines in your residence or at your local telephone
service
The condition of the Internet computers to which you connect and the number of
users accessing those computers
The complexity of graphics and multimedia on Web pages
Having multiple Web browsers open, performing multiple downloads, and having
multiple programs open on your computer
- 62 -
Page 69

People are sending you e-mail messages, but you have not received any mail
Click the receive button in your e-mail program.
Make sure that your account with your Internet service provider (ISP) is set up
correctly. Contact your ISP for technical support.
Keyboard
The keyboard does not work
Make sure that the keyboard cable is plugged in correctly. For more information, see
the poster that came with your computer.
Remove all extension cables and switch boxes.
Clean the keyboard by using an aerosol can of air with a narrow, straw-like extension
Troubleshooting
to remove dust and lint trapped under the keys.
Try a keyboard that you know works to make sure that the keyboard port works.
Reinstall the keyboard device driver.
A keyboard character keeps repeating or you see a “keyboard stuck” or “key
failure” error message
Make sure that nothing is resting on the keyboard.
Make sure that a key is not stuck. Press each key to loosen a key that might be
stuck, then restart your computer.
Liquid spilled in the keyboard
If you spilled liquid in the keyboard, turn off your computer and unplug the keyboard.
Clean the keyboard and turn it upside down to drain it. Let the keyboard dry before
using it again. If the keyboard does not work after it dries, you may need to replace it.
- 63 -
Page 70
Chapter 6: Troubleshooting
Memory
You see a “Memory error” message
Use a third-party diagnostic program to help determine if a memory module is
failing.
You see a “Not enough memory” error message
Close all programs, then restart your computer.
Memory card reader
Drive letters for the memory card slots do not appear in the My Computer window
Reboot your computer.
Modem (dial-up)
See also “Internet” on page 62.
Your modem does not dial or does not connect
Make sure that the modem cable is plugged into the modem jack and not the
Ethernet network jack. See “Desktop PC Back” on page 10 to make sure that the
connections have been made correctly.
Make sure that your computer is connected to the telephone line and the telephone
line has a dial tone.
Make sure that the modem cable is less than 6 feet (1.8 meters) long.
Remove any line splitters or surge protectors from your telephone line, then check
for a dial tone by plugging a working telephone into the telephone wall jack.
If you have additional telephone services such as call waiting, call messaging, or
voice mail, make sure that all messages are cleared and call waiting is disabled
before using the modem. Contact your telephone service to get the correct code to
temporarily disable the service. Also make sure that the modem dialing properties
are set correctly.
- 64 -
Page 71
 To check the dialing properties:
1. Click Start, then click Control Panel. The Control Panel window opens. If your
Control Panel is in Category View, click Printers and Other Hardware.
2. Click/Double-click the Phone and Modem Options icon, then click the Dialing Rules
tab.
3. Click the location from which you are dialing, then click Edit.
4. Make sure that all settings are correct.
Troubleshooting
Disconnect any answering machine, fax machine, or printer that is on the same line as
the modem. Do not connect these devices to the same telephone line as the modem.
Make sure that you are not using a digital, rollover, or PBX line. These lines do not work
with your modem.
Check for line noise (scratchy, crackling, or popping sounds). Line noise is a common
problem that can cause the modem to connect at a slower rate, abort downloads, or
even disconnect. The faster the modem, the less line noise it can tolerate and still work
correctly.
Listen to the line using your telephone. Dial a single number (such as 1). When the dial
tone stops, listen for line noise. Wiggle the modem cable to see if that makes a
difference. Make sure that the connectors are free from corrosion and all screws in the
wall or telephone wall jack are secure.
You can also call your telephone service and have the telephone line checked for noise
or low line levels.
Try another telephone line (either a different telephone number in your house or a
telephone line at a different location). If you can connect on this line, call your
telephone service.
Try connecting with the modem at a lower connection speed. If reducing the connect
speed lets you connect, call your telephone service. The telephone line may be too
noisy.
- 65 -
Page 72

Chapter 6: Troubleshooting
You cannot connect to the Internet
The ISP may be having technical difficulties. Contact your ISP for technical support.
See if the modem works with a different communications program. The problem may
be with just one program.
Review the troubleshooting information under “Internet” on page 62
Your 56K modem does not connect at 56K
Current FCC regulations restrict actual data transfer rates over public telephone lines to
53K. Other factors, such as line noise, telephone service provider equipment, or ISP
limitations, may lower the speed even further.
If your computer has a v.90 modem, the speed at which you can upload (send) data is
limited to 33.6K. If your computer has a v.92 modem, the speed at which you can
upload data is limited to 48K. Your ISP may not support 48K uploads.
Your fax communications program only sends and receives faxes at 14,400 bps when
you have a 56K modem
Current fax technology only supports a maximum send and receive rate of 14,400 bps.
The modem is not recognized by your computer
Make sure that the line connected to the modem is working and plugged into the
appropriate port on your computer. See “Desktop PC Back” on page 10 to make sure
that the connections have been made correctly.
If the modem shares the telephone line with another device, make sure that the
telephone line is not in use (for example, someone is on the telephone, or another
modem is in use).
Use the modem cable that came with your computer. Some telephone cables do not
meet required cable standards and may cause problems with the modem connection.
Shut down and restart your computer.
Run Windows modem diagnostics.
 To run modem diagnostics:
1. Close all open programs.
2. Click Start, then click Control Panel. The Control Panel window
opens. If your Control Panel is in Category View, click Printers and
Other Hardware.
3. Click/Double-click the Phone and Modem Options icon, then click the
Modems tab
- 66 -
.
Page 73
Troubleshooting
4. Click your modem, then click Properties. The Modem Properties
dialog box opens.
5. Click the Diagnostic tab, then click Query Modem. If information
about the modem appears, the modem passed diagnostics. If no
modem information is available, a white screen appears with no data,
or if you get an error such as port already open or the modem has
failed to respond, the modem did not pass diagnostics.
The modem is noisy when it dials and connects
When your modem tries to connect to another modem, it begins handshaking.
Handshaking is a digital “getting acquainted” conversation between the two modems
that establishes connection speeds and communication protocols. You may hear unusual
handshaking sounds when the modems first connect. If the handshaking sounds are too
loud, you can turn down the modem volume.
 To turn down the modem volume:
1. Click Start, then click Control Panel. The Control Panel window opens. If your
Control Panel is in Category View, click Printers and Other Hardware.
2. Click/Double-click the Phone and Modem Options icon, then click the Modems
tab.
3. Click the modem you want to adjust, then click Properties.
4. Click the Modem tab, then adjust the Speaker volume control.
5. Click OK twice to close the Phone and Modem Options dialog box.
- 67 -
Page 74
Chapter 6: Troubleshooting
Monitor
The screen resolution is not correct
Change the screen resolution from the Display Properties dialog box.
The computer is running but there is no picture
Make sure that the monitor is plugged in and turned on. If the monitor is turned on,
the power LED should be lit.
Adjust the brightness and contrast controls to the center position.
Make sure that the monitor cable is connected to the video port on the back of your
computer.
Check the cable for bent or damaged pins.
Reinstall the device driver.
Connect a monitor that you know works to your computer.
The color is not uniform
Make sure that:
The monitor warms up for at least 30 minutes before making a final judgment about
color uniformity.
Non-shielded speakers are not placed too close to the monitor.
The monitor is not positioned too close to another monitor, electric fan, fluorescent
light, metal shelf, or laser printer.
You demagnetize the screen using the monitor’s degauss feature. For more
information on degauss, see your monitor’s documentation.
Why is there a horizontal line or wire visible across the monitor screen?
Your monitor may use a thin damper wire, located approximately 1/3 of the way down
from the upper screen edge and 1/3 of the way up from the lower screen edge, to
stabilize the internal aperture grille. These wires are most obvious when the monitor
displays a white background. The aperture grille allows more light to pass through the
screen for brighter colors and greater luminescence. The damper wire is a critical part
of the overall monitor design and does not negatively affect the monitor's function.
The text on the display is dim or difficult to read
Adjust the brightness and contrast controls.
- 68 -
Page 75

Use the monitor degauss feature (see your monitor documentation) or turn off your
computer and monitor, leave them off for at least a half hour, then restart your
computer.
Change the display settings.
Move the monitor away from sources of electrical interference, such as televisions,
unshielded speakers, microwaves, fluorescent lights, and metal beams or shelves.
For more information about display types, see your monitor and video card
documentation.
Mouse
The mouse does not work
Make sure that the mouse cable is plugged in correctly.
Troubleshooting
Shut down and restart your computer.
Remove all extension cables and switch boxes.
Try a mouse you know is working to make sure that the mouse port works.
The mouse works erratically
If the mouse pointer begins moving erratically across the computer display or becomes
difficult to control precisely, cleaning the mouse will likely improve its accuracy.
If you have an optical mouse, clean the mouse by wiping the bottom with a clean, damp
cloth. Make sure that the optical sensor is clean and free of debris.
If you have a trackball mouse, see “Cleaning the mouse” on page 42.
- 69 -
Page 76
Chapter 6: Troubleshooting
Networks
You cannot connect to your company network
Every network is unique. Contact your company computer department or network
administrator for help.
Passwords
Your computer does not accept your password
Make sure that CAPS LOCK is turned off, then retype the password
Power
Your computer will not turn on
Make sure that your power cord is connected correctly to your computer.
.
If your computer is plugged into a surge protector, make sure that the surge
protector is connected securely to an electrical outlet, turned on, and working
correctly. To test the outlet, plug a working device, such as a lamp, into the outlet
and turn it on.
Make sure that the power cord is free from cuts or damage. Replace any damaged
cables.
Printer
The printer will not turn on
Make sure that the printer is online. Many printers have an online/offline button that
you may need to press.
Make sure that the power cable is plugged into an AC power source.
The printer is on but will not print
Check the cable between the printer and your computer. Make sure that it is
connected to the correct port.
Make sure that the printer is online. Many printers have an online/offline button that
you may need to press so the printer can start printing. Press the button to put the
printer online.
- 70 -
Page 77

Troubleshooting
Check the cable for bent or broken pins.
If the printer you want to print to is not the default printer, make sure that you have
selected it in the printer setup.
 To set a default printer:
1. Click Start, then click Control Panel. The Control Panel window
opens. If your Control Panel is in Category View, click Printers and
Other Hardware.
2. Click/Double-click the Printers and Faxes icon. The Printers and
Faxes window opens.
3. Right-click the name of the printer you want to be the default printer,
then click Set as Default Printer.
Reinstall the printer driver. See the guide that came with your printer for
instructions on installing the printer driver.
You see a “Printer queue is full” error message
Make sure that the printer is not set to work offline.
 To make sure that the printer is not set to work offline:
1. Click Start, then click Control Panel. The Control Panel window
opens. If your Control Panel is in Category View, click Printers and
Other Hardware.
2. Click/Double-click the Printers and Faxes icon. The Printers and
Faxes window opens.
3. Right-click the name of the printer you want to use. If the menu
shows a check mark next to Use Printer Offline, click Use Printer
Offline to clear the check mark.
- 71 -
Page 78
Chapter 6: Troubleshooting
Wait until files have been printed before sending additional files to the printer.
If you print large files or many files at one time, you may want to add additional
memory to the printer. See the printer documentation for instructions for adding
additional memory.
You see a “Printer is out of paper” error message
After adding paper, make sure that the printer is online. Most printers have an
online/offline button that you need to press after adding paper.
Sound
You are not getting sound from the speakers
Make sure that the speakers are turned on.
Make sure that the volume controls are turned up. For more information, see
“Adjusting the volume” on page 21.
Make sure that mute controls are turned off. For more information, see “Adjusting
the volume” on page 21.
If you are using external speakers, see the speaker setup poster to check your
speaker connections.
- 72 -
Page 79
Telephone support
Before calling Xitrix Customer Care
If you have a technical problem with your computer, follow these recommendations
before contacting Customer Care:
Make sure that your computer is connected correctly to a grounded AC outlet that is
supplying power. If you use a surge protector, make sure that it is turned on.
If a peripheral device, such as a keyboard or mouse, does not appear to work, make
sure that all cables are plugged in securely.
If you have recently installed hardware or software, make sure that you have
installed it according to the instructions provided with it. If you did not purchase the
hardware or software from Xitrix, see the manufacturer’s documentation and
Telephone support
technical support resources.
If you have “how to” questions about using a program, see:
o Online Help
o Printed documentation
o The Microsoft Windows documentation
o The software publisher’s Web site
See the troubleshooting section of this chapter.
Have your customer ID, serial number, and order number available, along with a
detailed description of your problem, including the exact text of any error messages,
and the steps you have taken.
Make sure that your computer is nearby at the time of your call. The technician may
have you follow troubleshooting steps.
- 73 -
Page 80
Chapter 6: Troubleshooting
Telephone numbers
You can contact Xitrix to get answers to your questions:
Xitrix
Customer Care
Self-help
If you have how-to questions about using your Xitrix -supplied hardware or software, see
the following resources:
The printed or online documentation that came with your hardware or software. In
many cases, additional product information and online documentation for Xitrix-
supplied hardware can be found in our Web site's Documentation Library.
Talk to a Xitrix Customer Care
Representative about non-tutorial
technical support question.
(See “Before calling Xitrix
Customer Care” on page 73 before
calling)
Xitrix Customer Care
Telephone numbers vary
by country or region. See
the label on the side panel
of your computer. For
more information, see
“Identifying your model”
on page 13.
This user guide.
The software publisher's Web site.
- 74 -
Page 81

Appendix A
Safety, Regulatory and
legal information
• Safety information
• Regulatory statements
• Notices
- 75 -
Page 82
Appendix A:
Important safety information
Your Xitrix system is designed and tested to meet the latest standards for safety of information
technology equipment. However, to ensure safe use of this product, it is important that the
safety instructions marked on the product and in the documentation are followed.
Setting up your system
Read and follow all instructions marked on the product and in the documentation before you operate your system. Retain
all safety and operating instructions for future use.
Do not use this product near water or a heat source such as a radiator.
Set up the system on a stable work surface.
The product should be operated only from the type of power source indicated on the rating label.
If your computer has a voltage selector switch, make sure that the switch is in the proper position for your area. The
voltage selector switch is set at the factory to the correct voltage.
Openings in the computer case are provided for ventilation. Do not block or cover these openings. Make sure you provide
adequate space, at least 6 inches (15 cm), around the system for ventilation when you set up your work area. Never
insert objects of any kind into the computer ventilation openings.
Some products are equipped with a three-wire power cord to make sure that the product is properly grounded when in
use. The plug on this cord will fit only into a grounding-type outlet. This is a safety feature. If you are unable to insert
the plug into an outlet, contact an electrician to install the appropriate outlet.
If you use an extension cord with this system, make sure that the total ampere rating on the products plugged into the
extension cord does not exceed the extension cord ampere rating.
If your system is fitted with a TV Tuner, cable, or satellite receiver card, make sure that the antenna or cable system is
electrically grounded to provide some protection against voltage surges and buildup of static charges.
Care during use
Do not walk on the power cord or allow anything to rest on it.
Do not spill anything on the system. The best way to avoid spills is to avoid eating and drinking near your system.
Some products have a replaceable CMOS battery on the system board. There is a danger of explosion if the CMOS battery
is replaced incorrectly. Replace the battery with the same or equivalent type recommended by the manufacturer.
Dispose of batteries according to the manufacturer’s instructions.
When the computer is turned off, a small amount of electrical current still flows through the computer. To avoid
electrical shock, always unplug all power cables and modem cables from the wall outlets before cleaning the system.
Unplug the system from the wall outlet and refer servicing to qualified personnel if:
o The power cord or plug is damaged.
o Liquid has been spilled into the system.
o The system does not operate properly when the operating instructions are followed.
o The system was dropped or the cabinet is damaged.
o The system performance changes.
Replacement parts and accessories
Use only replacement parts and accessories recommended by Xitrix.
- 76 -
Page 83
Regulatory compliance statements
United States of America
Federal Communications Commission (FCC) Unintentional emitter per FCC Part 15
This device has been tested and found to comply with the limits for a Class B digital device,
pursuant to Part 15 of the FCC rules. These limits are designed to provide reasonable protection
against harmful interference in a residential installation. This equipment generates, uses, and
can radiate radio frequency energy and, if not installed and used in accordance with the
instructions, may cause harmful interference to radio or television reception. However, there is
no guarantee that interference will not occur in a particular installation. If this equipment does
cause interference to radio and television reception, which can be determined by turning the
equipment off and on, the user is encouraged to try to correct the interference by one or more
of the following measures:
Reorient or relocate the receiving antenna
Increase the separation between the equipment and receiver
Connect the equipment to an outlet on a different circuit from that to which the receiver is
connected
Consult the dealer or an experienced radio/TV technician for help.
Compliance Accessories: The accessories associated with this equipment are: shielded video
cable when an external monitor is connected. These accessories are required to be used in order
to ensure compliance with FCC rules.
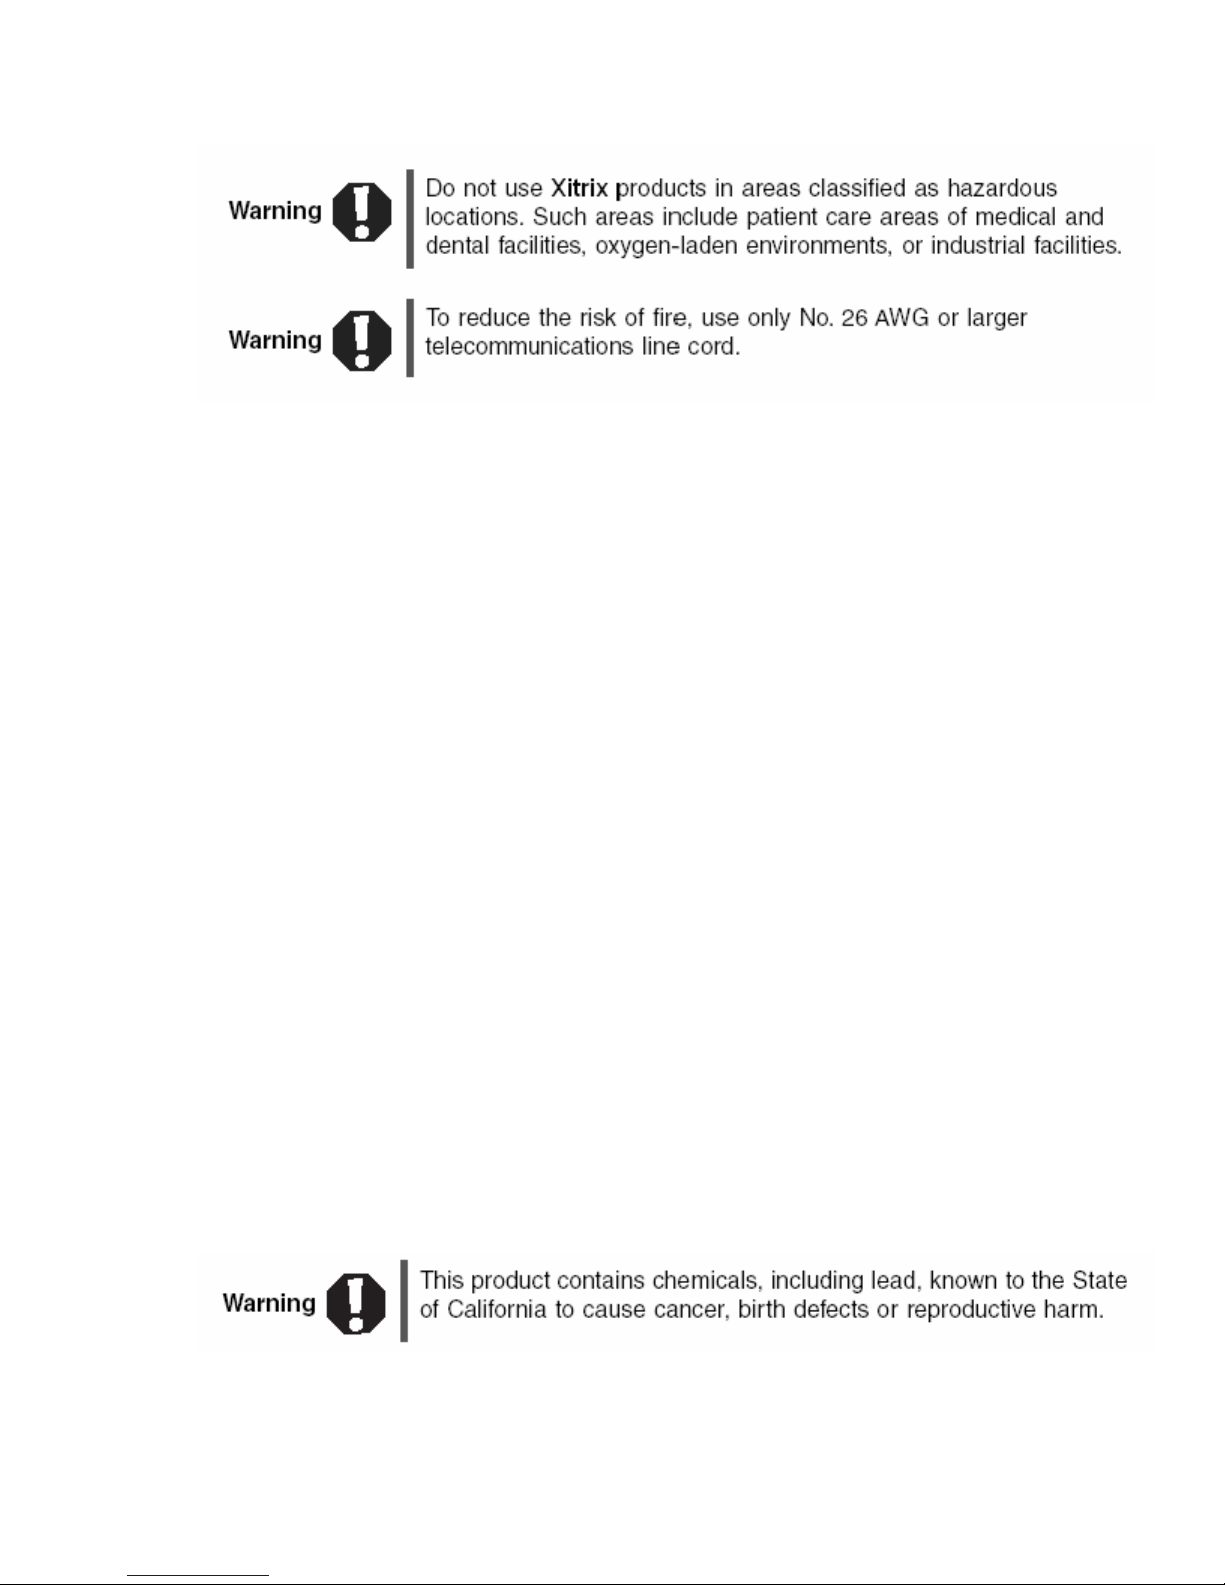
California Proposition 65 Warning
- 77 -
Page 84

Appendix A:
Telecommunications per Part 68 of the Code of Federal Regulations (CFR 47) (applicable to products
fitted with USA modems)
Your modem complies with Part 68 of the Code of Federal Regulations (CFR 47) rules. On the computer or modem card is
a label that contains the FCC registration number and Ringer Equivalence Number (REN) for this device. If requested, this
information must be provided to the telephone company.
A telephone line cord with a modular plug is required for use with this device. The modem is designed to be
connected to the telephone network or premises wiring using a compatible modular jack which is Part 68-compliant. See
installation instructions for details.
The Ringer Equivalence Number (REN) is used to determine the number of devices which may be connected to the
telephone line. Excessive RENs on a telephone line may result in the devices not ringing in response to an incoming call.
In most areas, the sum of RENs should not exceed five (5.0). To be certain of the number of devices that may be
connected to a line, as determined by the total RENs, contact the local telephone company.
If this device causes harm to the telephone network, the telephone company will notify you in advance that temporary
discontinuance of service may be required. The telephone company may request that you disconnect the equipment until
the problem is resolved.
The telephone company may make changes in its facilities, equipment, operations, or procedures that could affect the
operation of this equipment. If this happens, the telephone company will provide advance notice in order for you to make
necessary modifications to maintain uninterrupted service.
This equipment cannot be used on telephone company-provided coin service. Connection to party line service is subject
to state tariffs. Contact the state public utility commission or public service commission for information.
When programming or making test calls to emergency numbers:
Remain on the line and briefly explain to the dispatcher the reason for the call.
Perform such activities in the off-peak hours such as early morning or late evenings.
The United States Telephone Consumer Protection Act of 1991 makes it unlawful for any person to use a computer or
other electronic device to send any message via a telephone fax machine unless such message clearly contains, in a
margin at the top or bottom of each transmitted page or on the first page of the transmission, the date and time it is
sent, an identification of the business, other entity, or other individual sending the message, and the telephone number
of the sending machine or such business, other entity, or individual. Refer to your fax communication software
documentation for details on how to comply with the fax-branding requirement.
Canada
Industry Canada (IC) Unintentional emitter per ICES-003
Telecommunications per Industry Canada CS-03 (for products fitted with an IC-compliant modem)
- 78 -
This digital apparatus does not exceed the Class B limits for radio noise emissions from digital apparatus as set out in the
radio interference regulations of Industry Canada.
Le présent appareil numérique n’émet pas de bruits radioélectriques dépassant les limites applicables aux appareils
numériques de Classe B prescrites dans le règlement sur le brouillage radioélectrique édicté par Industrie Canada.
The Industry Canada label identifies certified equipment. This certification means that the equipment meets certain
telecommunications network protective, operation, and safety requirements. The Department does not guarantee the
equipment will operate to the users’ satisfaction.
Before installing this equipment, users should make sure that it is permissible to be connected to the facilities of the
local telecommunications company. The equipment must also be installed using an acceptable method of connection. In
some cases, the inside wiring associated with a single-line individual service may be extended by means of a certified
connector assembly. The customer should be aware that compliance with the above conditions may not prevent
degradation of service in some situations.
Page 85
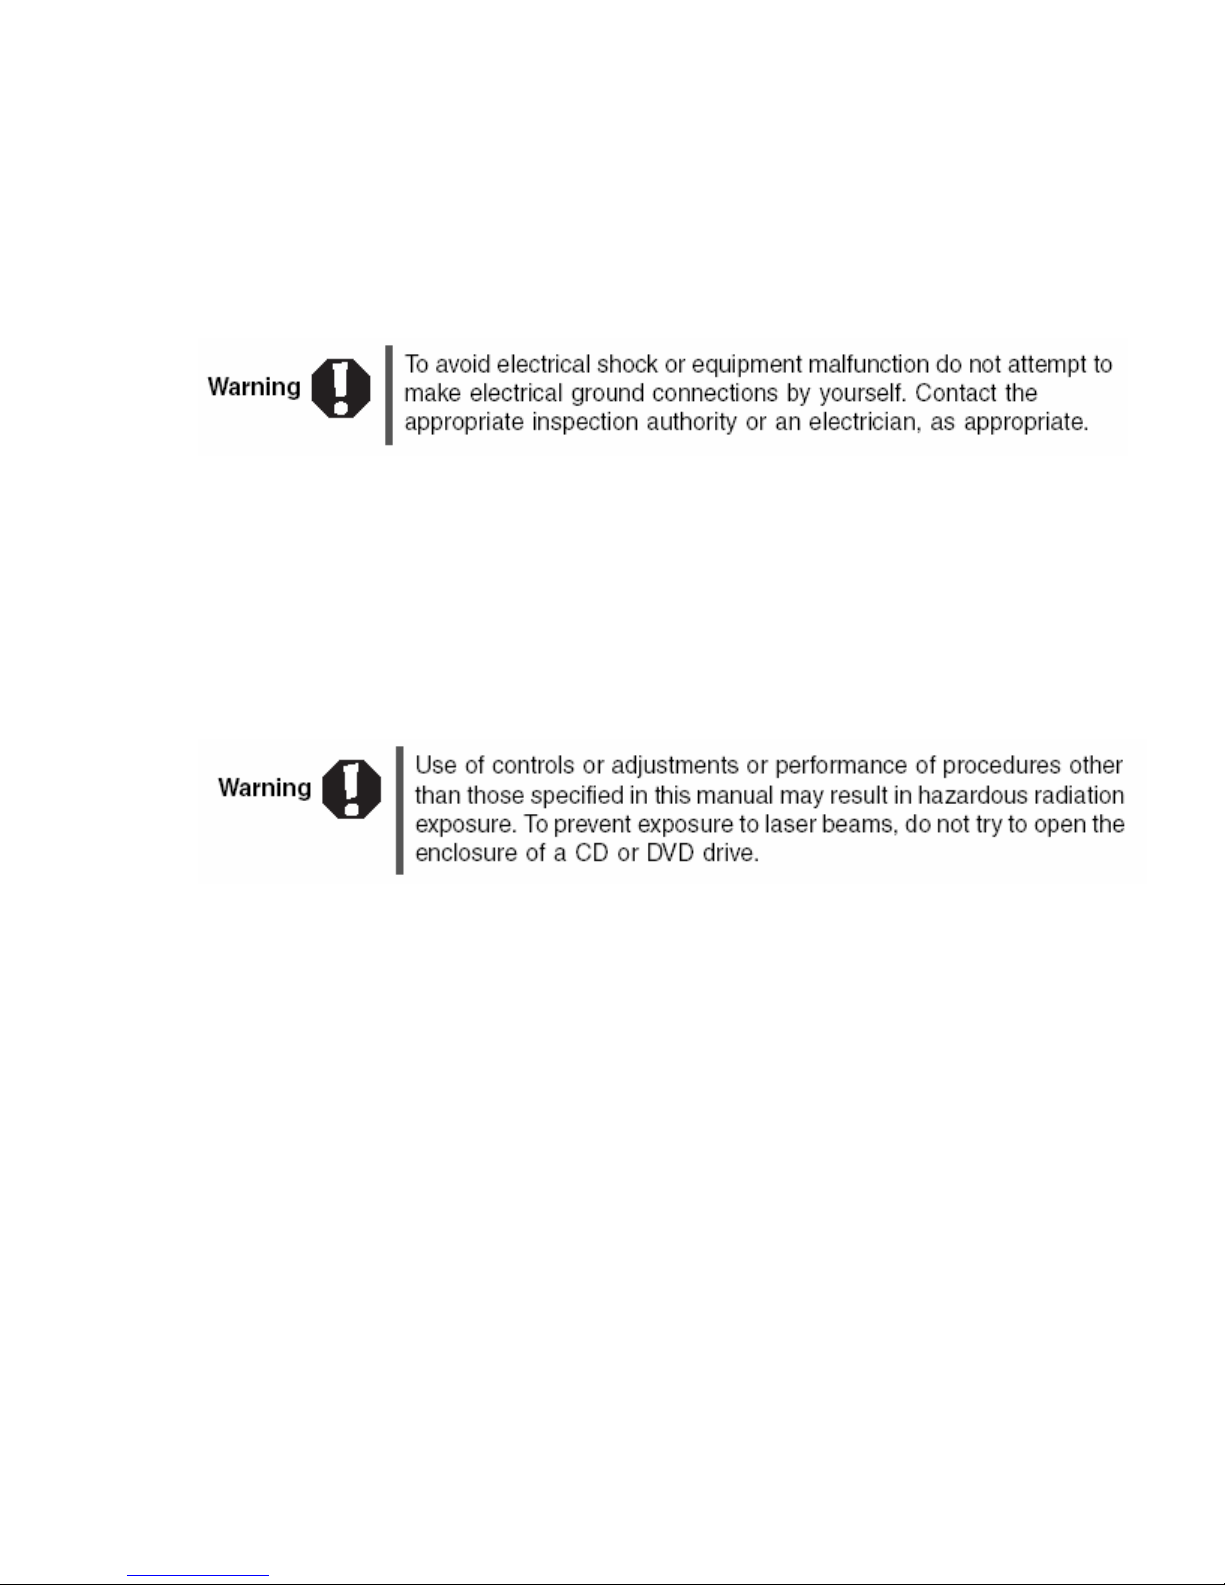
Repairs to certified equipment should be made by an authorized Canadian maintenance facility designated by the
supplier. Any repairs or alterations made by the user to this equipment, or equipment malfunctions, may give the
telecommunications company cause to request the user to disconnect the equipment.
Users should make sure, for their own protection, that the electrical ground connections of the power utility, telephone
lines, and internal metallic water pipe system, if present, are connected together. This precaution may be particularly
important in rural areas.
The Ringer Equivalence Number (REN) assigned to each terminal device provides an indication of the maximum number
of terminals allowed to be connected to a telephone interface. The termination on an interface may consist of any
combination of devices subject only to the requirement that the sum of the Ringer Equivalence Numbers of all the
devices does not exceed 5.
Laser safety statement
All Xitrix systems equipped with CD and DVD drives comply with the appropriate safety standards, including IEC 825. The
laser devices in these components are classified as “Class 1 Laser Products” under a US Department of Health and Human
Services (DHHS) Radiation Performance Standard. Should the unit ever need servicing, contact an authorized service
location.
Television antenna connectors protection (for systems
fitted with TV/cable TV tuner cards)
External television antenna grounding
If an outside antenna or cable system is to be connected to your computer, make sure that the antenna or cable system is
electrically grounded to provide some protection against voltage surges and static charges.
Article 810 of the National Electrical Code, ANSI/NFPSA 70, provides information with regard to proper grounding of the
mast and supporting structure, grounding of the lead-in wire to an antenna discharge unit, size of grounding conductors,
location of antenna discharge unit, connection to grounding electrodes, and requirements for the grounding electrode.
Lightning protection
For added protection of any Xitrix product during a lightning storm or when it is left unattended or unused for long
periods of time, unplug the product from the wall outlet and disconnect the antenna or cable system.
- 79 -
Page 86
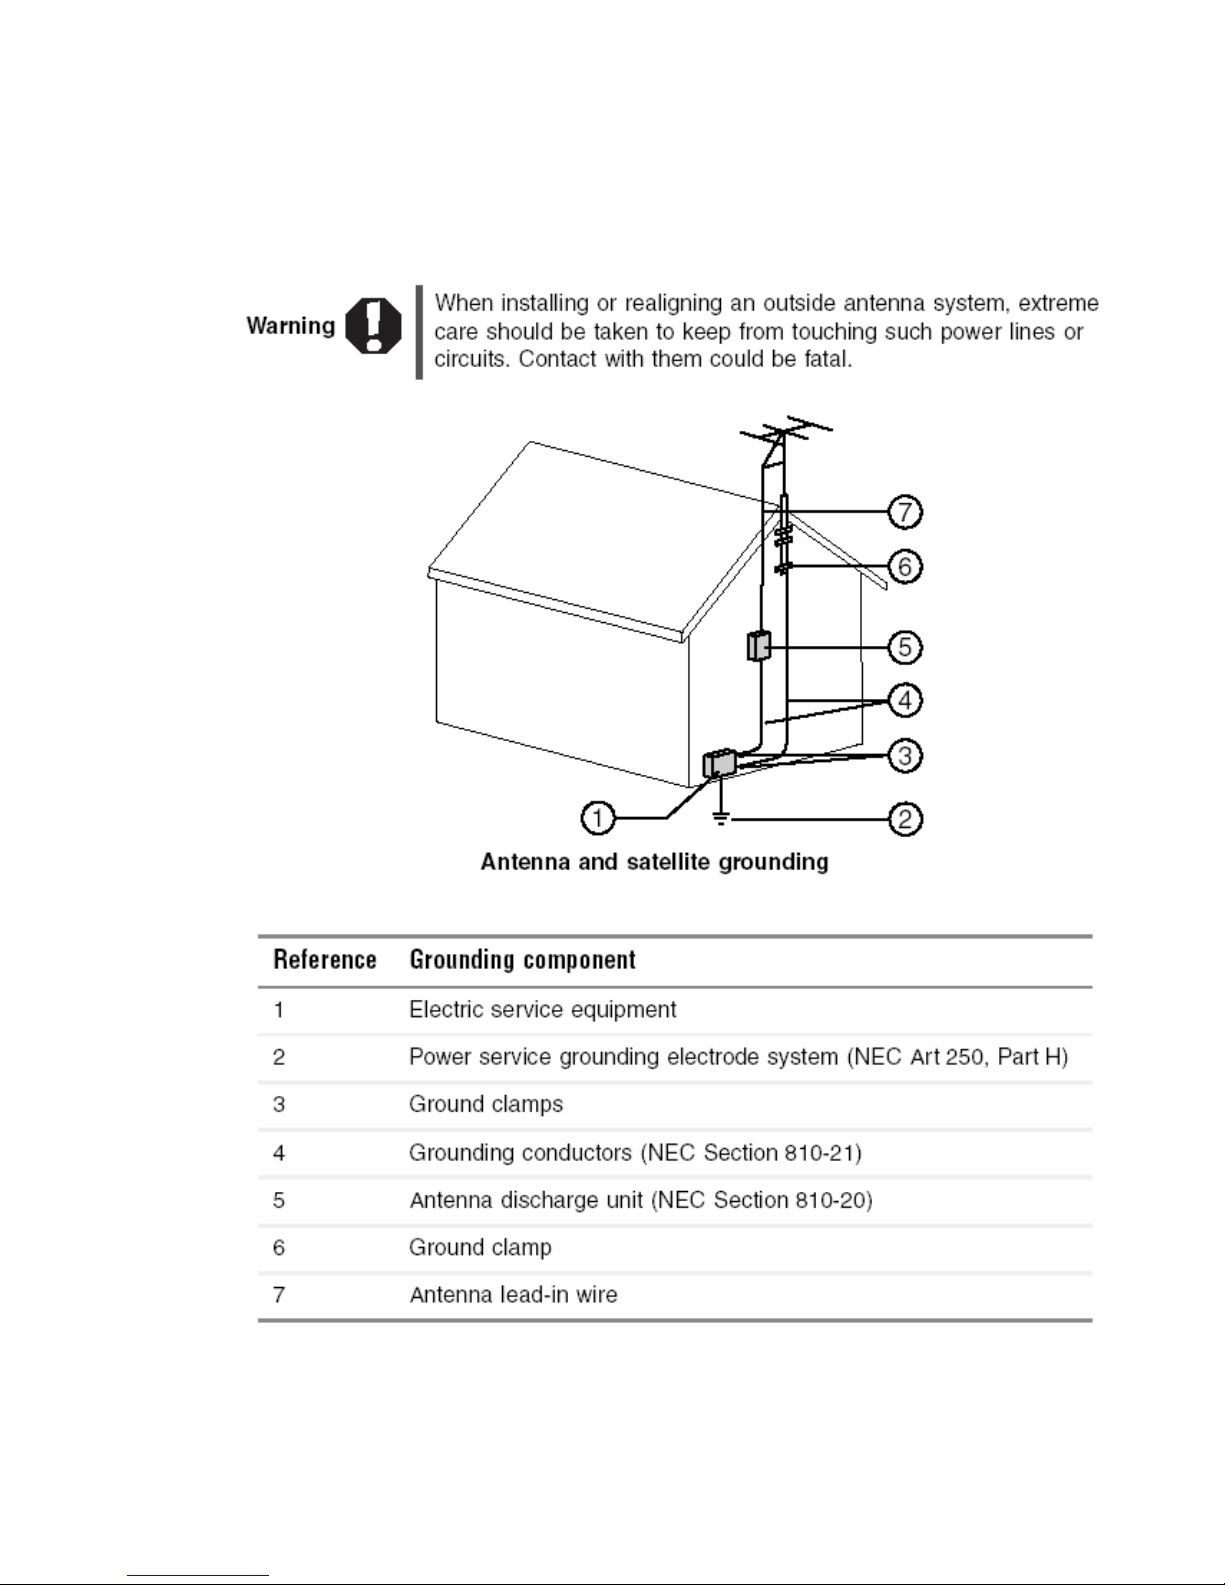
Appendix A:
Power lines
Do not locate the antenna near overhead light or power circuits, or where it could fall into such power lines or circuits.
- 80 -
Page 87

Notices
Copyright © 2004 XITRIX COMPUTER CORPORATION.
All Rights Reserved
th
1901 16
Bradenton, FL 34243 USA
All Rights Reserved
This publication is protected by copyright and all rights are reserved. No part of it may be reproduced or transmitted by any means
or in any form, without prior consent in writing from Xitrix.
The information in this manual has been carefully checked and is believed to be accurate. However, changes are made periodically.
These changes are incorporated in newer publication editions. Xitrix may improve and/or change products described in this
publication at any time. Due to continuing system improvements, Xitrix is not responsible for inaccurate information which may
appear in this manual. For the latest product updates, consult the Xitrix Web site at www.xitrix.com. In no event will Xitrix be
liable for direct, indirect, special, exemplary, incidental, or consequential damages resulting from any defect or omission in this
manual, even if advised of the possibility of such damages.
In the interest of continued product development, Xitrix reserves the right to make improvements in this manual and the products
it describes at any time, without notices or obligation.
© 2004 Xitrix Computer Corporation. All rights reserved. Xitrix, stylized “x” and figure logo are trademarks or registered
trademarks of Xitrix, Inc, in the United States and/or other countries. All other product and brand names are trademarks of their
respective owners.
Trademark Acknowledgments
Xitrix and the X Design are trademarks or registered trademarks of Xitrix Computer Corporation. in the U.S. and other countries.
Intel, Intel Inside logo, and Pentium are registered trademarks and MMX is a trademark of Intel Corporation. Microsoft, MS, MS-DOS,
and Windows are trademarks or registered trademarks of Microsoft Corporation. All other product names mentioned herein are used
for identification purposes only, and may be the trademarks or registered trademarks of their respective companies.
Place L1077
Macrovision statement
If your computer has a DVD drive and an analog TV Out port, the following paragraph applies:
This product incorporates copyright protection technology that is protected by method claims of certain U.S. patents and other
intellectual property rights owned by Macrovision Corporation and other rights owners. Use of this copyright protection technology
must be authorized by Macrovision Corporation, and is intended for home and other limited viewing uses only unless otherwise
authorized by Macrovision Corporation. Reverse engineering or disassembly is prohibited.
- 81 -
Page 88

Appendix A:
- 82 -
Page 89

- 83 -
 Loading...