

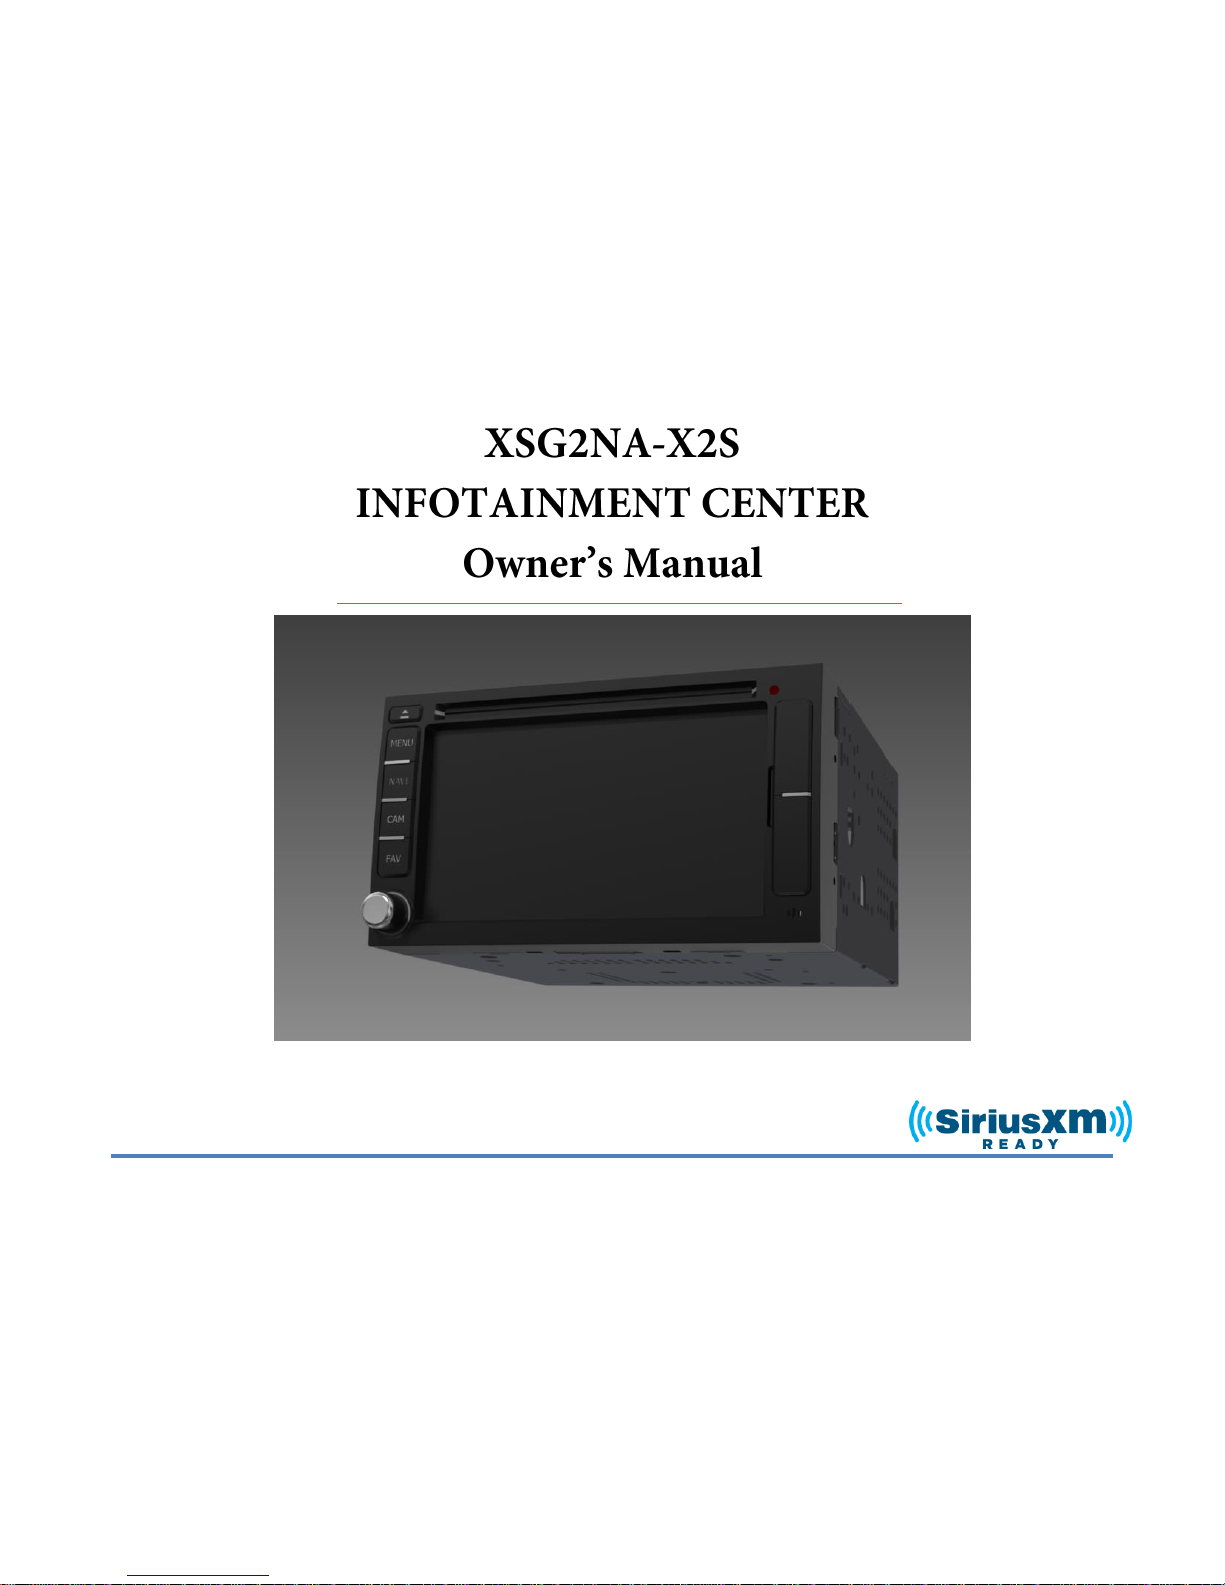
XiteSolutions XSG2NA-X2S Owner's Manual
XiteSolutions North America Inc.
1
Before using this product, please read this manual fully to ensure correct operation.
Keep the manual at hand for future reference.

Content
XiteSolutions North America Inc.
2
Content.…………………………………………………..…………………2
Disclaimer……………………………………………………………….. 3-5
1. Features………………………………………………………………….6
2. Main Unit Display…………………………………………………......7-8
2.1 Main Menu…………………………………………………………….9
2.1.1 House Mode………………………………………………………...9
2.1.2 Aux Zone……………………………………………………………..9
2.2 Information Bar…………………………………………………….....9
3. Set up………………………………………………………………..10-12
3.1 General Settings………………………………………………...10-11
3.2 Video Settings……………………………………………………….12
3.3 Audio Setup………………………………………………………....13
4. Radio Operation………………………………………………….........14
5. USB-MP3/WMA/MP4 Player Operation…………………………..…15
6. CD Player Operation…………………………………………………..16
7. DVD/VCD Player Operation……………………………………..……17
7.1 DVD System Setting…………………………………………………17
8. Bluetooth Operation……………………………...………………..18-21
8.1 Bluetooth Setup……………………………………………………..18
8.2 Pairing Your Phone……………………………………………..19-20
8.3 Incoming Calls………………………………………………………21
8.4 Outgoing Calls………………………………………………………21
8.5 AV (A2DP Audio Playback over Bluetooth)…………..………….22
9. SiriusXM® ……………………...…………..................................23-30
9.1 Subscribing to SiriusXM……………………………………………23
9.2 Operating SiriusXM…………………………………………………24
9.3 Tuning to a channel…………………………………………………25
9.4 Parental Control Channel Locking and Skipping………………..26
9.4.1 Lock Code………………………………………………………. 26
9.4.2 Lock Mode/Unlock Mode……………………………………….26
9.4.3 Mature Channel Locking………………………………………..26
9.4.4 Channel Locking……………………………………………...…26
9.4.5 Channel Skip…………………………………………………….26
9.5 Artist & Song Alerts…………………………………………………27
9.5.1 Setting Alerts…………………………………………………….27
9.5.2 Viewing & Managing Alerts…………………………………….27
9.5.3 My Artists & My Songs Virtual Categories……………………27
9.6 Replay………………………………………………………………..28
9.7 SiriusXM Settings Menu……………………………………………29
9.8 Understanding SiriusXM Advisory Messages……………………30
10. iPod & iPhone AV Interface…………………………......................31
11. F-AUX & AUX Operation…………………………………………….32
13. Navigation (Optional)…………………………………...……………33
12. Camera (Optional)……………………………………………………34
14. Premium Remote Control (Optional)…………………...………35-37
15. Customer Feedback………………………………………………….38
16. Product registration…………………………………………………..39
Notes……………………………………………………………………….40
Disclaimer
XiteSolutions North America Inc.
3
THIS IS A DISCLAIMER OF LIABILITY AND DAMAGE RESPONSIBILITY AS REGARDS TO THE INFOTAINMENT CENTER MANUFACTURER
AND YOUR USE OF THE PRODUCT. YOU ASSUME TOTAL RESPONSIBILITY AND RISK FOR USING THIS SYSTEM.
Failure to properly focus on the operation of your motor vehicle can result in death, serious injury and property damage. The Infotainment Center should never be used at a time or in a manner that
distracts you from properly focusing on operation of the motor vehicle in which it is installed.
Always operate the vehicle in a safe manner and in full compliance with speed limits, road safety signs and all other laws and devices which regulate operation of a motor vehicle.
Always remain aware of driving conditions at all times when using this system while operating a motor vehicle.
Operation of this unit, including its camera, navigation, audio and other features can be distracting to your operation of the motor vehicle. While the system is intended to provide both entertainment
and helpful vehicle and navigation information, it is not intended to, nor should you allow it to, distract you from properly focusing on operating the motor vehicle in which it is installed. It is up to you to
minimize or prevent such distraction.
Learn how to use this system before placing the vehicle in operation. Minimize the amount of time spent viewing the screen of the unit while driving and use voice prompts whenever possible. Do not
attempt to adjust settings of the system or resolve any malfunction with it while driving. Instead, pull off the road in a safe and legal manner, and then adjust its settings or deal with any malfunction.
In the event of serious malfunction, disable the unit (turn power off or remove power from the system) and contact qualified service personnel.
Your optional navigation feature is intended to assist you with guidance to your destination. The navigation is NOT intended to replace, supersede or take precedence
over any traffic signs, street signs, hazard signs, etc. IT IS YOUR RESPONSIBILITY TO ENSURE THE ROADS YOU ARE TRAVELLING ARE APPROPRIATE FOR THE
VEHICLE YOU ARE DRIVING.
Do not enter destinations, change settings or access any functions requiring prolonged use of the controls of the unit while operating your motor vehicle. For safety, pull off the road before making
any adjustments to the system or resolving any navigation discrepancies or questions.
If your Infotainment Center includes optional navigation features please refer to your navigation user manual for further specific information regarding its features, warnings, instructions and
disclaimers.
IMPORTANT SAFETY INFORMATION
CAUTION: TO REDUCE THE RISK OF ELECTRIC SHOCK, DO NOT REMOVE COVER
(OR BACK). NO USER SERVICEABLE PARTS INSIDE. REFER SERVICING TO
QUALIFIED SERVICE PERSONNEL.
CAUTION: THIS DVD VIDEO RECORDER IS A CLASS 1 LASER PRODUCT. USE OF CONTROLS, ADJUSTMENTS OR PERFORMANCE OF
PROCEDURES OTHER THAN THOSE SPECIFIED HEREIN MAY RESULT IN HAZARDOUS RADIATION EXPOSURE. DO NOT OPEN
COVERS AND DO NOT REPAIR THE PLAYER YOURSELF. REFER SERVICING TO QUALIFIED PERSONNEL.
CAUTION: FOLLOW THE LAWS AND REGULATIONS OF YOUR STATE, PROVINCE OR COUNTRY FOR INSTALLATION.
Disclaimer
XiteSolutions North America Inc.
4
Safety Information
Read the operating instructions for the Infotainment Center and all other components of the system carefully before using the system. FAILURE TO OBSERVE THE INSTRUCTIONS GIVEN IN THIS
MANUAL MAY CAUSE INJURY OR DAMAGE AND VOID THE WARRANTY.
Warnings!
Observe the following warnings when using this unit:
• The driver should neither watch the display nor operate the system while driving.
Watching the display or operating the system will distract the driver from looking ahead of the vehicle and can cause accidents. Always stop the vehicle in a safe location and use the
parking brake before watching the display or operating the system. While navigating please use voice prompts.
• Use the proper power supply.
This product is designed for operation with a negative grounded 12 V DC battery system.
Never operate this product with other battery systems, especially not with a 24 V DC battery system.
• Protect the DVD loader mechanism.
Do not insert any foreign objects into the slot of this unit. Only insert appropriate CD or DVD products.
• Do not disassemble or modify the unit.
Do not disassemble or modify the unit, or attempt to repair the product yourself. This may cause serious injury or damage and your warranty will be null and void. If the product needs
repair, consult your dealer or contact technical support (see page 5).
• Do not use the unit when it is out of order.
If the unit is out of order (no power, no sound) or in an abnormal state (has foreign objects in it, is exposed to water, is smoking, or smells), turn it off immediately and consult your dealer.
Refer installation to qualified personnel
USA-Federal Communications Commission (FCC)
This device complies with part 15 of the FCC Rules. Operation is subject to the following two conditions:
(1) this device may not cause harmful interference; and (2) this device must accept any interference received, including interference that may ca use
undesired operation.
This equipment has been tested and found to comply with the limits for a Class B digital device, pursuant to Part 15 of FCC Rules. These limits are
designed to provide reasonable protection against harmful interference in a residential installation. This equipment generates, uses, and can radiate
radio frequency energy. If not installed and used in accordance with the instructions, it may cause harmful interference to radio communications.
However, there is no guarantee that interference will not occur in a particular installation. If this equipment does cause ha rmful interference to radio
or television reception, which can be determined by turning the equipment off and on, the user is encouraged to try and correct the interference by
one or more of the following measures:
- Reorient or relocate the receiving antenna.
- Increase the distance between the equipment and the receiver.
- Connect the equipment to outlet on a circuit different from that to which the receiver is connected.
- Consult the dealer or an experienced radio/TV technician for help.

Disclaimer
XiteSolutions North America Inc.
5
Notes on Use: Video Sources and On-Screen Display
• Your Infotainment Center is designed to only display video when the parking brake is fully engaged.
• Never attempt to circumvent, defeat or bypass any of these safety features. These designs are intended to reduce driver distractions.
• Failure to use the safety features as designed could lead to serious injury, death and property damages. Your manufacturer and partners will not be liable for any injury or loss.
Notes on Use: Liquid Crystal Panel
• Do not cause impact to the liquid crystal panel. Only use your finger to gently touch the LCD panel.
• Do not touch the liquid crystal fluid if the LCD is damaged or broken. The liquid crystal fluid may be hazardous to your health or fatal. If the liquid crystal fluid from LCD contacts your bod
y or clothing, wash it off with soap immediately.
• When the temperature is very cold or very hot, the image may appear unclear or may move slowly.
• In order to protect the liquid crystal panel, keep it out of direct sunlight while the unit is not in use.
• Sudden changes in the temperature inside the vehicle such as those which occur immediately after the vehicle’s air conditioner or heater has been turned on may cause condensation
(droplets of water) to form and, as a result, the panel may not work properly. Do not use the unit while these symptoms are in evidence but leave the unit standing for about an hour and
then resume or start use.
• To clean the monitor, wipe only with a dry silicone cloth or soft cloth. Do not use a stiff cloth or volatile solvents such as paint thinner and alcohol.
2014
All rights reserved. No part of this manual may be reproduced, copied, transmitted, disseminated, transcribed, downloaded or stored in any storage medium, in any form or for any purpose without
the express prior written consent of River Park Inc. F urthermore, any unauthorized commercial distribution of this manual or any revision hereto is strictly prohibited. Information in this document is
subject to change without notice. The Manufacturer reserves the right to change the content herein without the obligation to notify any person or organization of such changes.
All trademarks used herein remain the exclusive property of their respective owners. Nothing contained in this manual should be construed as granting, by implication or otherwise, any license or
right to use any of the trademarks displayed herein. Misuse of any trademarks or any other content in this manual is strictly prohibited.
Sirius, XM and all related marks and logos are trademarks of Sirius XM Radio Inc. All rights reserved.

1. Features
XiteSolutions North America Inc.
6
6” Touch Screen LCD Display
Favorites Hot Key
Audio Information Bar for Navigation Mode (Optional)
GPS Navigation (Optional)
SiriusXM-Ready
TM
AM/FM/RDS Stereo Radio
iPod/iPhone Interface and Control
1
DVD R/RW, CD R/RW, VCD Compatible
MP3, WMA, MPEG Audio/Video File Compatible
Bluetooth Hands-Free Calling and Streaming Audio Player
2
Rearview Camera Connectivity
3
Auxiliary Monitor Support
4
2 USB Input
Front Audio input (3.5mm jack)
AUX input
ESP-Electronic Shock Protection for DVD, MP3, CD
High Power MOSFET Speaker Output 4 X 50W
Steering Wheel Control Compatible
Premium Remote Control (Optional Accessory)
Temperature Sensor/OS Display (Optional Accessory)
Compass Heading Display (Optional)
1
iPod/iPhone device not included
2
Compatible mobile phone required
3
Will connect to vehicle camera system composite video/audio output
4
Auxiliary monitor sold separately.
2. Main Unit Display
XiteSolutions North America Inc.
7
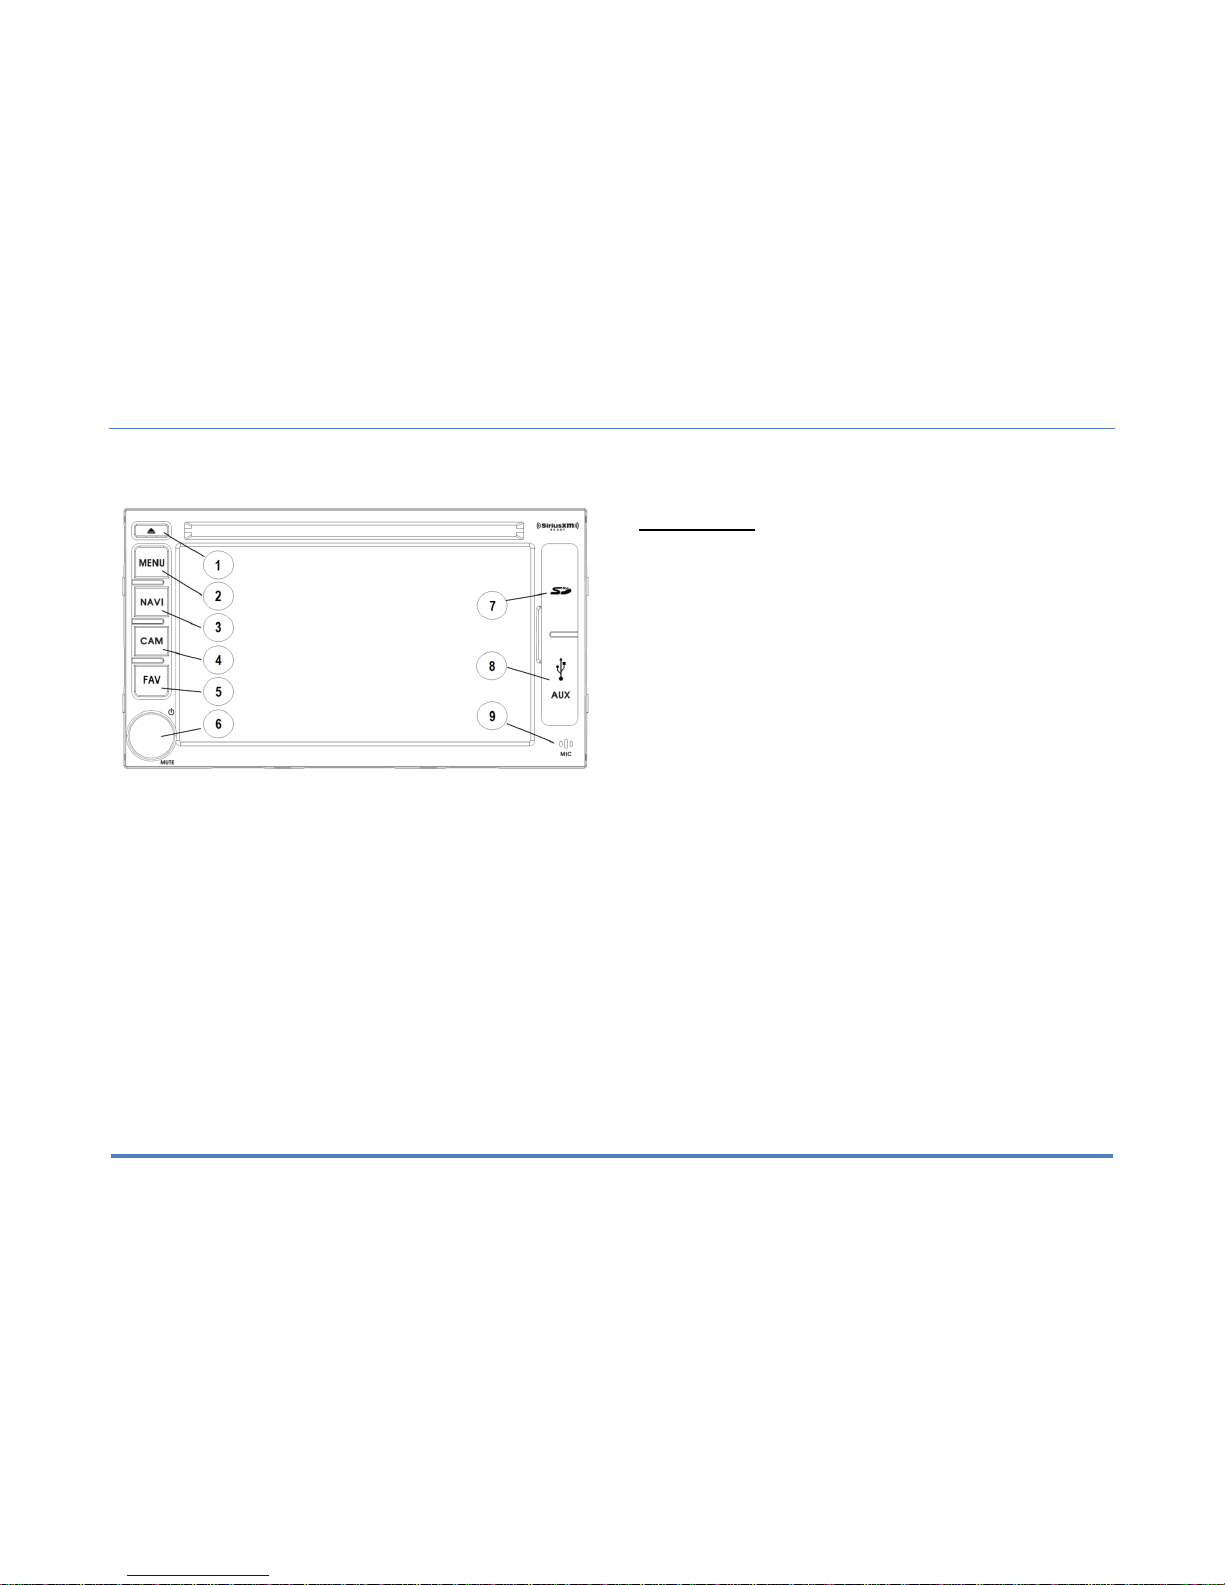
The buttons located on the Infotainment Center front display are assigned the same reference here below.
Main unit buttons
1. Eject
2. Mode (Main Menu)
3. Navigation
4. Camera
5. Favorite Button
6. Rotary button Volume/Power
7. Navigation SD Card (cover)
8. AUX/USB port (cover)
9. Bluetooth Microphone

2. Main Unit Display
XiteSolutions North America Inc.
8
EJECT
1. The EJECT buttons is used to eject the CD or DVD that is in the system. If
there is no disc in the system, the button will not react.
2. When the disc is ejected and not removed, it will automatically be pulled in
to avoid the damage to the disc.
MODE
1. Tap the Mode button to go to the Main Menu.
2. When in the Main Menu, use the touch screen to select the desired
functionality.
3. You can also access the Main Menu from any screen by tapping the
function icon in the top left of the current screen.
NOTE: When viewing video in full screen please touch the screen once to bring up the screen
header which will display the function icon. Tap the icon to return to the Main Menu.
NAVI
1. Press the NAVI button to go to the navigation system.
2. While viewing your navigation press the NAV button to return to your
active source. If you are running a navigational route, audio voice prompts
will continue to be heard over your speakers according to the Navigation
audio settings you have selected in the settings menu (see page 11).
3. To hear only your navigation audio voice prompts press and hold the
NAVI button for 2 seconds. This will mute your current audio source until
you leave the navigation screen.
CAM
1. Press to switch to Camera mode manually.
FAV
1. Your Infotainment Center is equipped with a favorite source hotkey. Press
the button to directly access your favorite audio source.
Rotary button Volume/Power
1. Turn on the ignition to power up the Infotainment Center. When the
Infotainment Center is started up, it will immediately go to the last mode
(memory on playback) before it was turned off.
2. In order to put the unit in standby mode, please press the Rotary Power
button (PWR) for more than 2 seconds. During standby, the display will
show your vehicle graphic or be off. Your preference can be set in the
Settings menu (See page 10). Press the Power button again to start up
again.
3. Turn the Rotary button to adjust the volume to the desired level.
4. Quickly pressing the Power button will mute the audio on your system.
Press again or a volume button to resume audio.
5. In order to turn the unit off completely remove ignition key and/or ensure
any auxiliary battery power to the system is turned off.
3. Setup
XiteSolutions North America Inc.
9
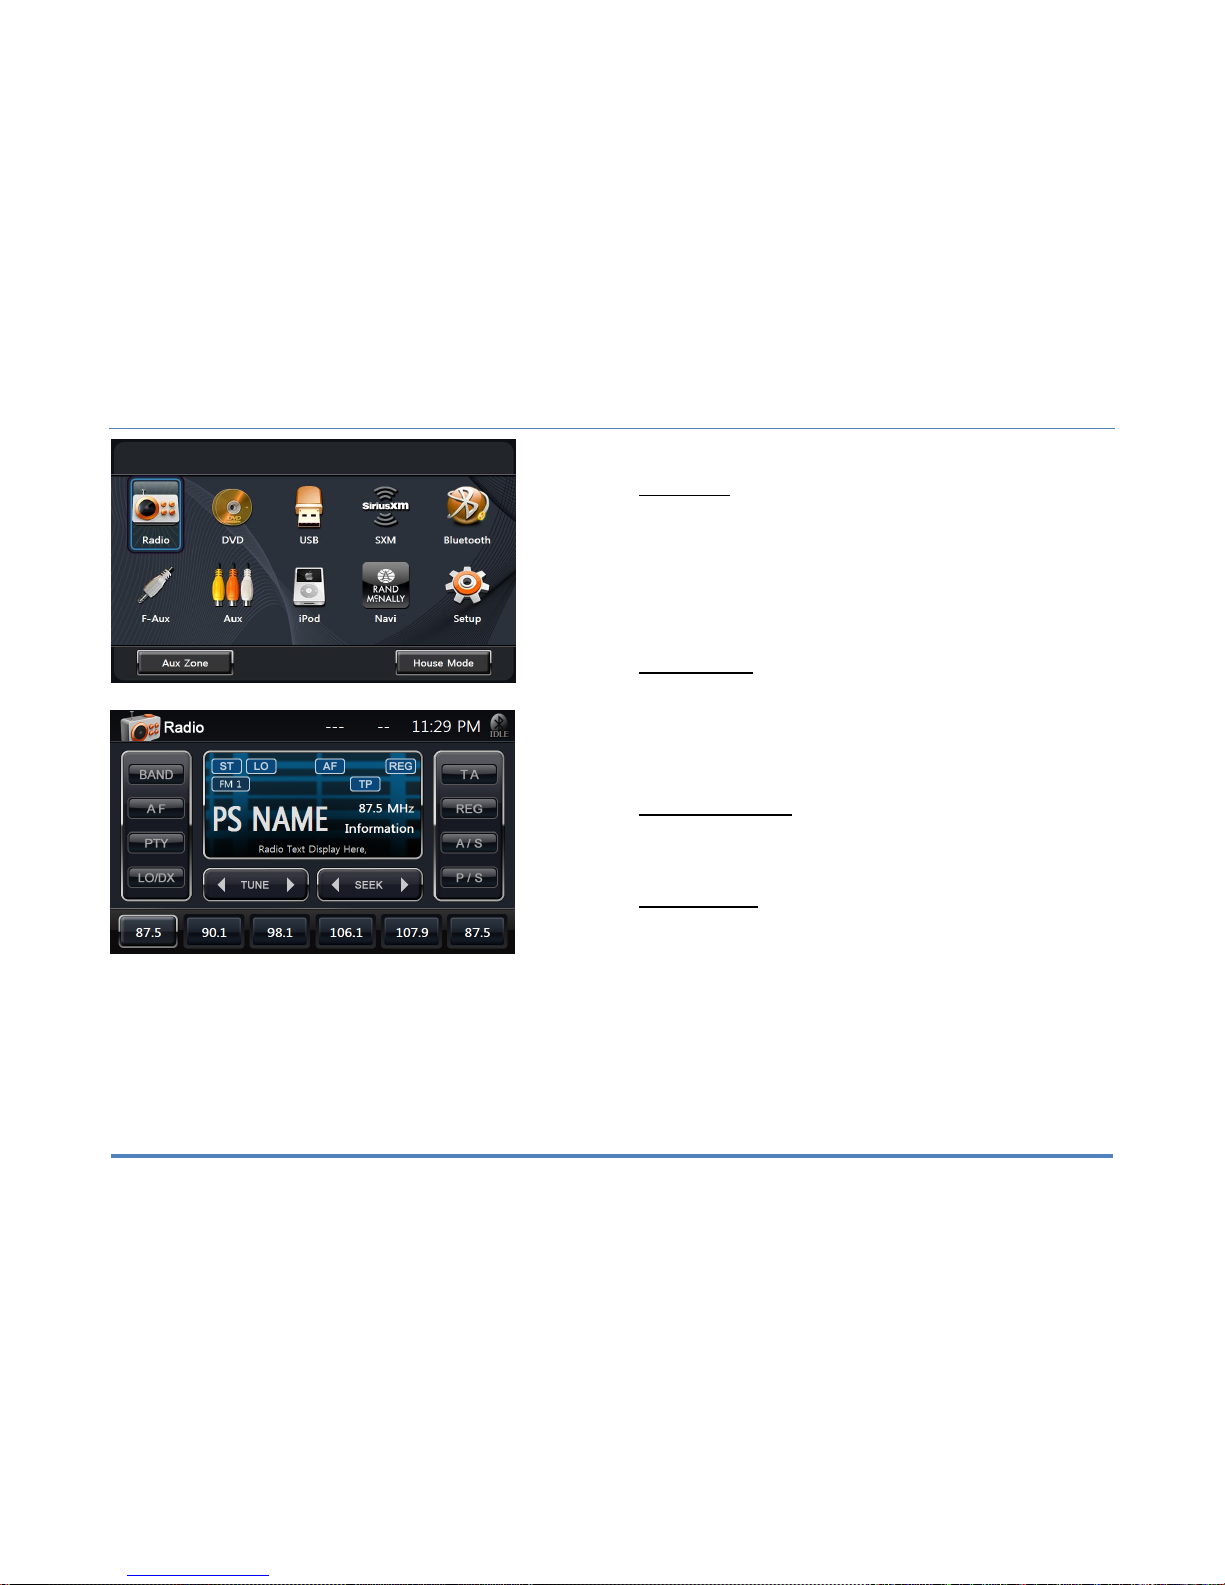
2.1 Main Menu
The Infotainment Center is designed for simple maneuvering throughout. The
screen shown on the left is the MAIN MENU screen. From here you can choose
which function to access by tapping the appropriate icon on the LCD display. To
return back to the Main Menu or change the active source touch the icon in the top
left corner of any screen.
If the device is left idle on the Main Menu or on any system settings screen, the
video will revert back to the active source (radio, etc.) after 15 seconds.
2.1.1 House Mode
This option is only accessible when parking brake is engaged. When active, house
mode sends current source audio and/or video to other areas of the coach. Control
can be done from LCD screens as normal or with remote device. Please note after 1
minute of no information, the LCD screen will enter into sleep. Touch the screen to
wake. House mode is exited when selected again, park brake disengaged or a
power cycle is performed.
2.1.2 Aux Zone(Optional)
Allows selection of source for display on in-dash secondary monitors or house
mode. A/V selections include main (mirrors main screen), DVD, Camera, Aux input,
Audio only, Radio, iPod, Sirius XM.
2.2 Information Bar
The top area of the screen is the audio information bar.
This area will display the current audio source, date and time, Bluetooth connection
status.
To return back to the main menu tap the audio source icon.
To view the information bar during video playback or manual camera view, touch the
screen once to display. Tap the audio icon to return to the main menu.
Please see System Settings page two (2/3) (Page 11) to learn how to set up your
clock
Please see Bluetooth Operation Section 8 (page 19) to learn more on connecting
and using a Bluetooth device with the Infotainment Center.
3. Setup
XiteSolutions North America Inc.
10
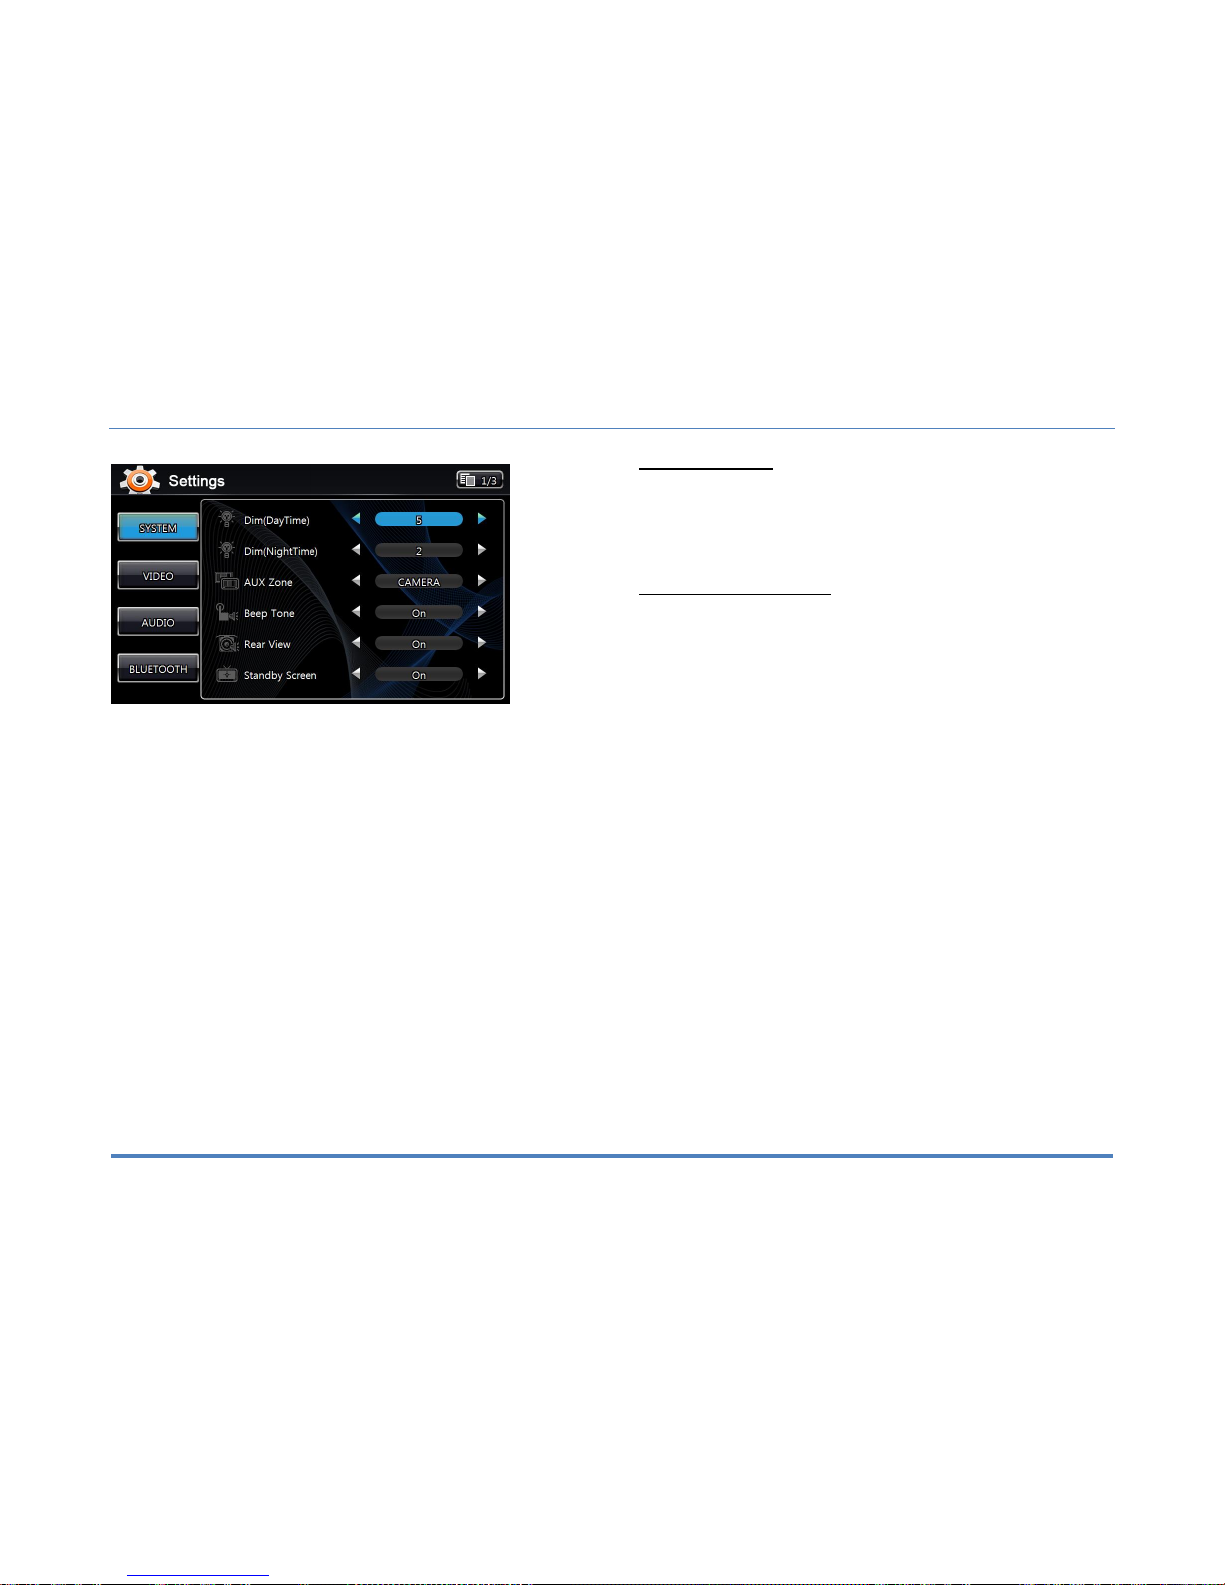
3.1 General Settings
Access the System Settings by using the Settings icon in the Main Menu.
The first screen shown is the first page of the system setup. The pages of the
Settings menu can be changed by using the on-screen button in the top right corner.
To exit the Settings menu at any time, press the Settings icon in the top left of the
screen.
System Settings page one (1/3):
DIM daytime: This option allows the setting of the illumination level of the display
during daytime usage (vehicle lights off). This level can be set in a value of 1
(lowest) to 5 (highest).
DIM nighttime: This option allows the setting of the illumination level of the display
during nighttime usage (vehicle lights on). This level can be set in a value of 1
(lowest) to 5 (highest).
AUX Zone: This option selects the AV source for a display connected to the AV
output. The following sources can be selected: Current/DVD/AUX/OFF. Audio only
sources of Radio/SIRIUSXM/iPod may be selected. Control of most functions must
be done from the main screen.
Beep Tone: Turn ON/OFF audible sound when touching the LCD screen. The Beep
Tone will also provide warning of LCD display closing.
Rear View: This option selects whether a rear view camera is connected. When ON
the display will automatically switch to camera mode when the reverse gear is
engaged or a trigger signal is received. When no camera is connected, select OFF.
Standby Screen: Selecting ON, the Infotainment Center will display your clock
when the unit is powered off by pressing the PWR button while the vehicle remains
on.
NOTE: Please use all available safety features and procedures to ensure proper driving to
avoid damage and/or injury.

3. Setup
XiteSolutions North America Inc.
11
System Settings page two (2/3):
Language: Here the language of the User Interface can be selected (English,
Spanish, French).
Auto dim: Set to Auto, LCD will dim with your vehicle lighting, if equipped.
Screen Saver (Optional): When on, the screen will enter sleep mode after a period
of no user interaction.
Temperature: Here the format can be selected how the XSG2NA-X1S should
display the outside temperature (Fahrenheit or Celsius). This feature is vehicle
depending
Compass Display: Here the compass heading format can be selected. The options
are by Direction (N, W, etc.) or bearing (degree notation).
Time Set: This setting allows the selection whether the time setting should be
automatic (based on GPS) or manually. In case manual is selected, the Time Set
option will be active and can be used to set the correct time.
Favorite Mode: Select the Favorite audio source assigned to your Fav hot key
System Settings page two (3/3)
Favorite Mode: Select the Favorite audio source assigned to your Fav hot key
Touch Calibration: This option allows the user to calibrate the touch screen
accuracy. Follow the on-screen directions step by step to complete the procedure.
This procedure is only necessary when the accuracy of the touch screen is not good
Factory Set: With this option, the Infotainment Center can be reset to factory
default.
Note: All stored settings, presets, SIRIUSXM content alerts, etc., will be erased and return to
original factory settings. Locked/Skipped channels, lock code in SIRIUSXM will remain
unchanged.
3. Setup
XiteSolutions North America Inc.
12
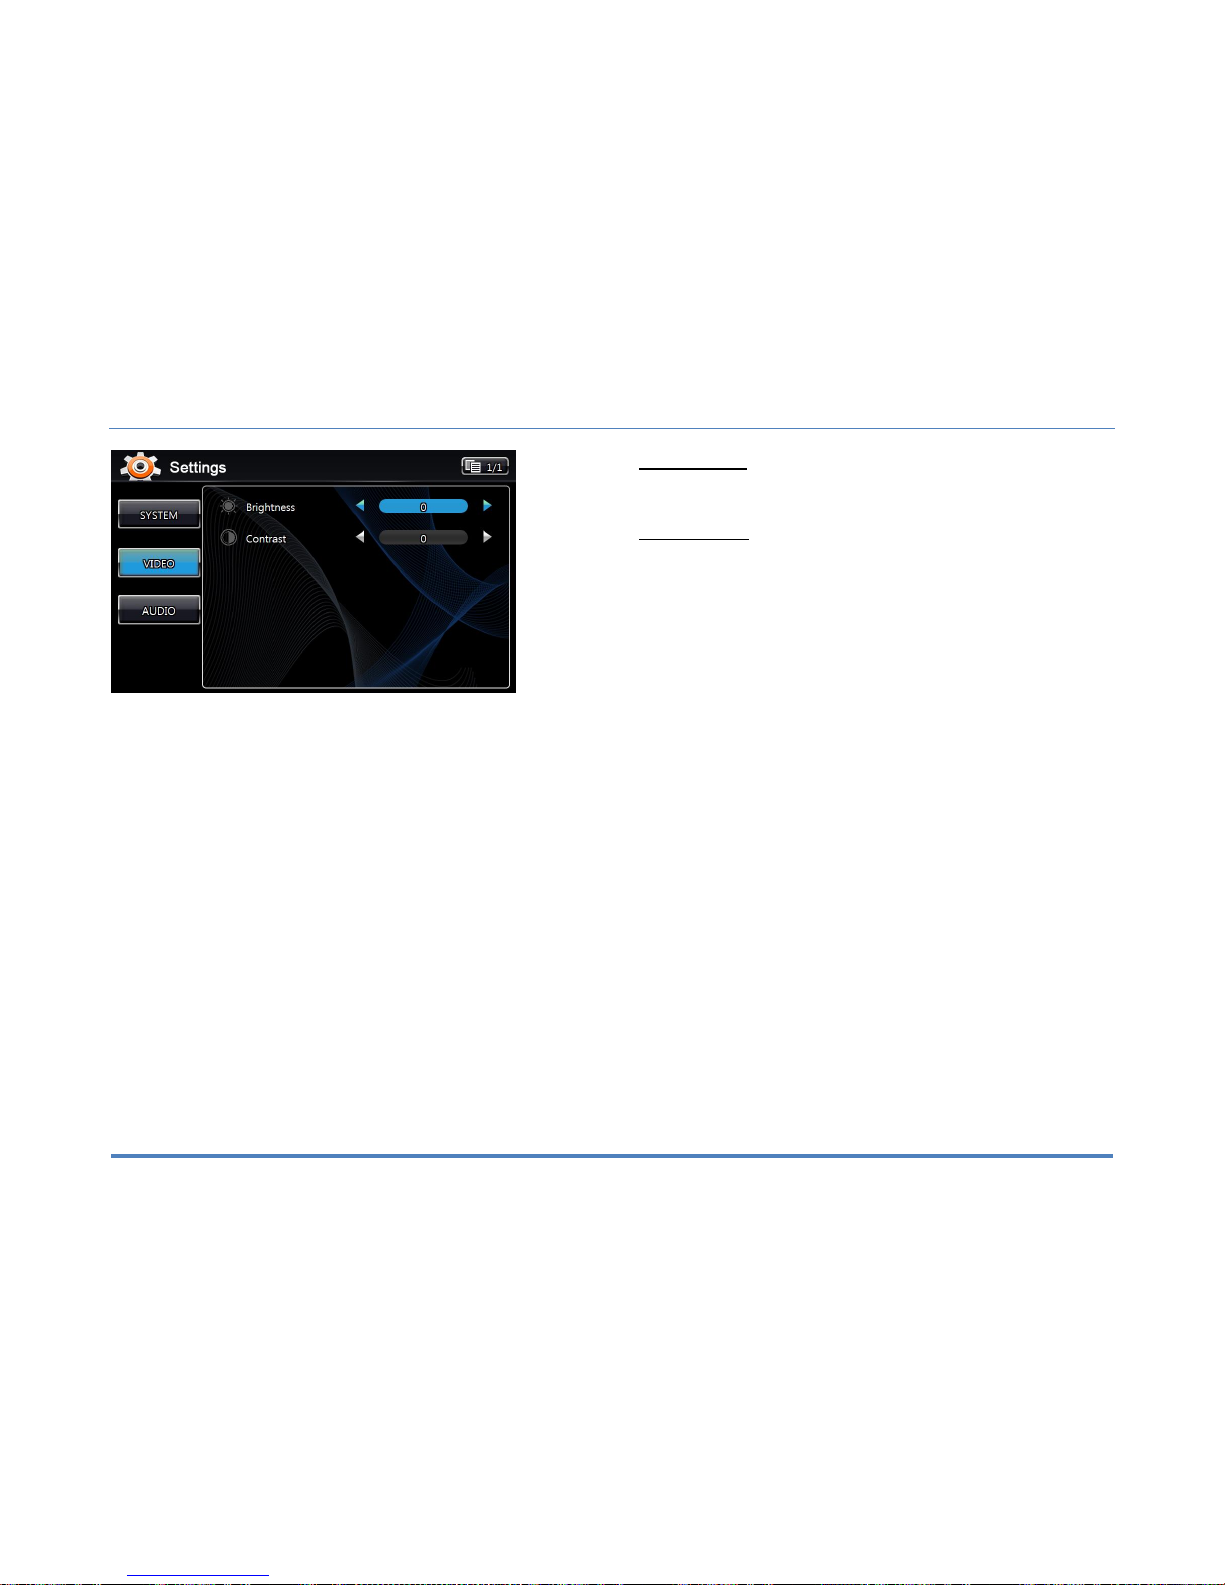
3.2 Video Setup
By tapping the VIDEO button, the settings for the video part of the Infotainment
Center can be changed.
3.2 Video Settings
Brightness: Sets the brightness level (-10 – +10).
Contrast: Sets the contrast level (-10 – +10).Tint: Sets the tint level (-10 – +10).
Note: The Infotainment Center has a factory default for optimal LCD settings, however the
level can be adjusted to set the display according to individual taste.
 Loading...