

Page 1

Pro Series Digital
SLR Auto-Focus
TTL Flash w/LCD Display
wide angle bounce diffuser & adapter
Item # XTSB1010
INSTRUCTION MANUAL
designed for
Nikon
Page 2

Features
High GN: 68
Wireless trigger sensor
Recycle time 4 seconds (with 4 pcs AA alkaline cell)
Compatible with E-TTL flash automatically
Support Multi-flash lighting Appliction (s1/s2 mode)
Power saving mode
Accurate brightness control
LCD display
Metal hot shoe
Support front curtain synchronous
Support rear-curtain synchronous
Temperature detection Automatically (overheating protection)
Memory function
-1-
Page 3
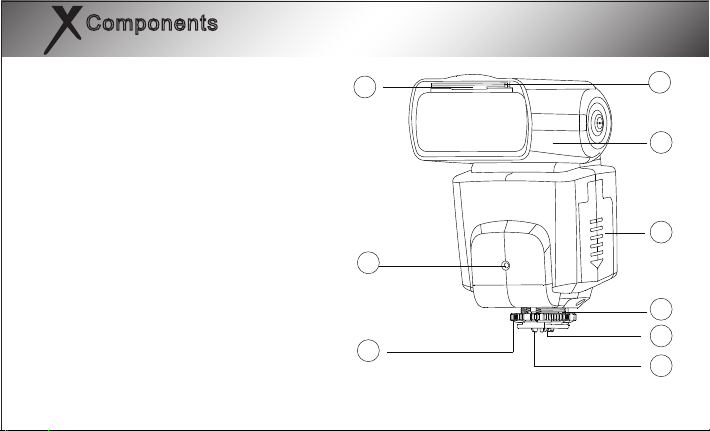
Components
1. Reflector panel
2. Wide-angle diffuser
3. Flash head
4. Wireless trigger sensor
5. Battery cover
6. Hot Shoe
7. Locking ring
8. Hot shoe pin
9. Locking pin
-2-
2
4
7
1
3
5
6
8
9
Page 4
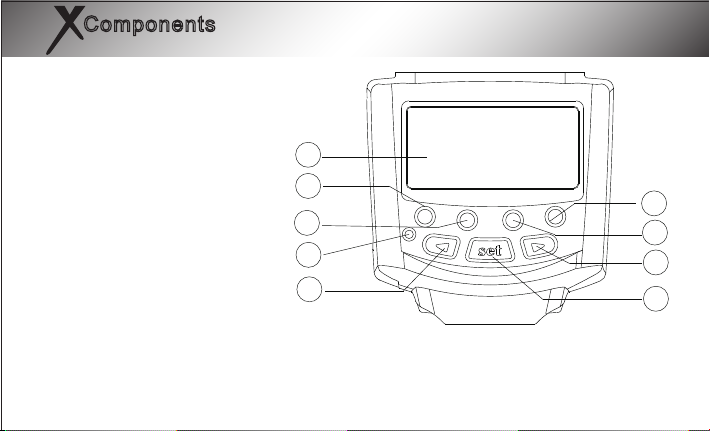
Components
10. LCD display
11. Mode switch button
12. Charging indicator
13. Test button
14. Zoom button
15.Power ON/OFF
16. Adjustment button
<left right button>
17. SET button
10
13
11
12
16
-3-
PILOT MODE ZOOM ON/OFF
15
14
16
17
Page 5
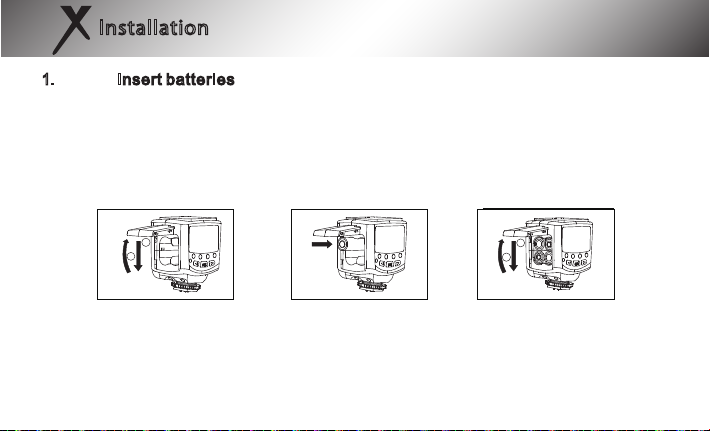
Installation
1. Insert batteries
a. Slide the battery compartment cover in the direction of the arrow to open it.
b. Insert the batteries follow the direction inside the battery compartment cover,
Make sure to place the positive and negative of the batteries correctly.
c. Slide the battery compartment cover in the direction of the arrow to close it.
a b
1
2
c
2
1
Note: Please use 4 pcs standard AA batteries.Please don't use damage batteries,
so as to avoid short circuit.
-4-
Page 6
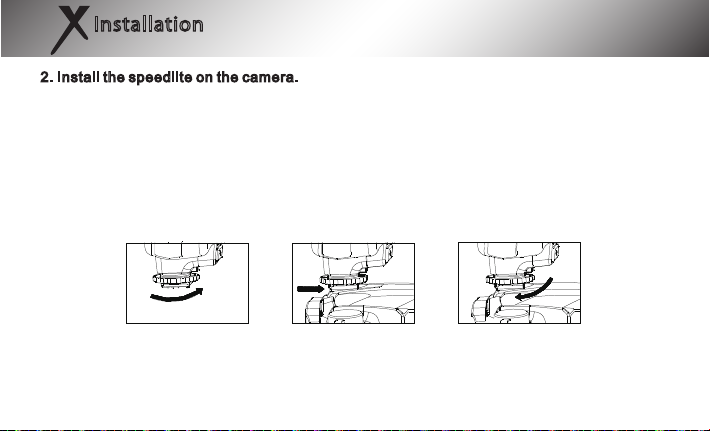
Installation
2. Install the speedlite on the camera.
a. Rotate the locking ring in the direction of the arrow to the hightest point.
b. Mount the speedlight into the camera`s hot shoe completely.
c. Turn the locking ring in the direction of the arrow tighten,if you detach the speedlight,
loosen the locking ring to the top, then remove the flashlight from camera`s hot shoe.
a b
c
-5-
Page 7
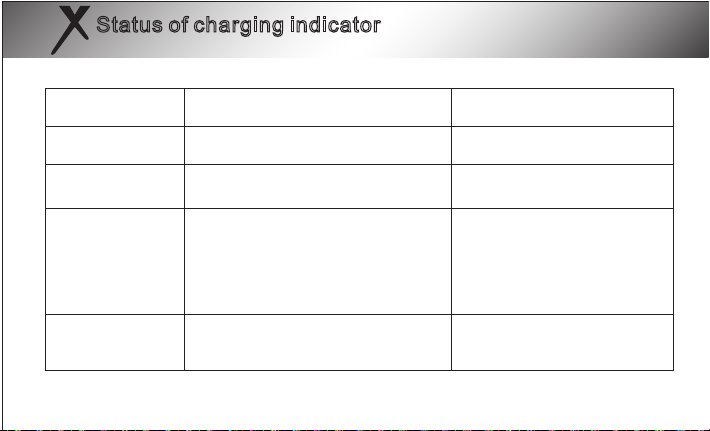
Status of charging indicator
Test status of charging indicator after turn on the speedlite.
Status of charging
indicator
The red light is lit
The green light is
lit
Green blink
Meaning
Charging
The batteries
are full
The speedlite is locked
because of the frequent
flash,overheating
protection.
Operation
Normal
Normal
Stop about 2 minutes,
waiting for flash cooling
Red blink
Low power or long time
charged
-6-
Turn off to change battery
or turn on again
Page 8
Basic functions
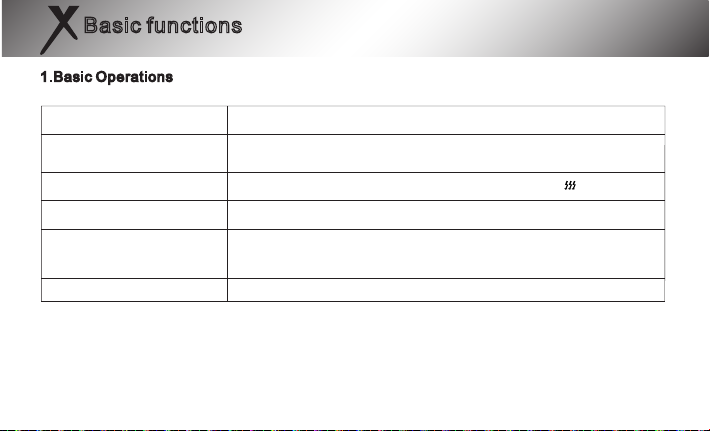
1.Basic Operations
Operation of the buttons:
Components
<Power Switch>
<Mode Switch Button>
<LEFT>and <RIGHT> button
<ZOOM> button
<Pilot> Button
Operation
The power of flashlight can be opened or closed by holding this
button for 2 seconds.
Press once, the mode will change among the TTL/M/ /S1/S2.
Press this button to adjust the output power of the speedlite.
Press this button and the up and down keys to adjust the focal range
of the speedlite. Press once,the focal range will be among 18/20/24/
28/35/50/70/85/105/135/150/180MM
Press this button to test the input brightness of the speedlite.
-7-
Page 9
Basic functions
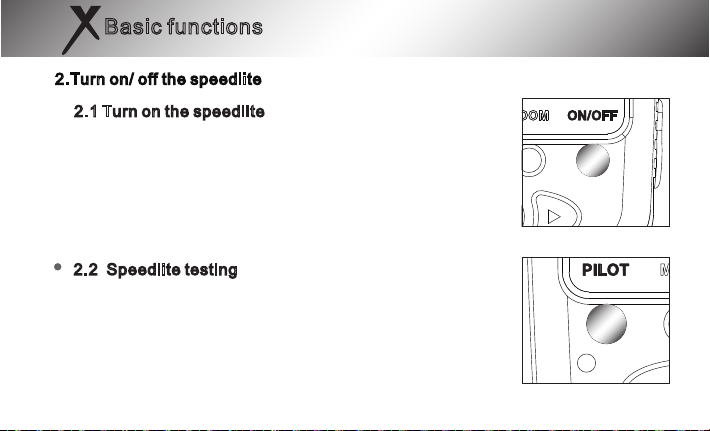
2.Turn on/ off the speedlite
2.1 Turn on the speedlite
sing ON/OFF button 2 seconds, LCD screen can
display. If the charging indicator is red, wait for it to
turn green. then the speedlite can be used. the red
light means the speedlite is charging, the green
means the flash can be used.
Speedlite testing
2.2
Press (PILOT),then the speedlite is flashing.
-8-
Page 10
Basic functions
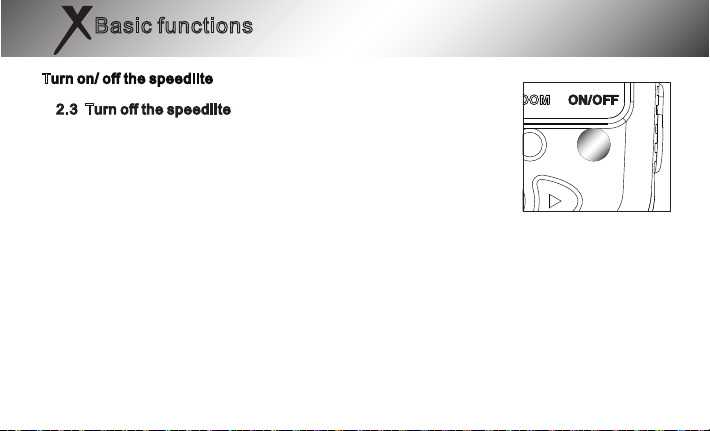
Turn on/ off the speedlite
2.3 Turn off the speedlite
The power of flashlight can be closed when pressing ON/OFF
button 2 seconds.
-9-
Page 11
Basic functions
3.Memory function
The speedlite will recover the last mode and setting when it's turned on again.
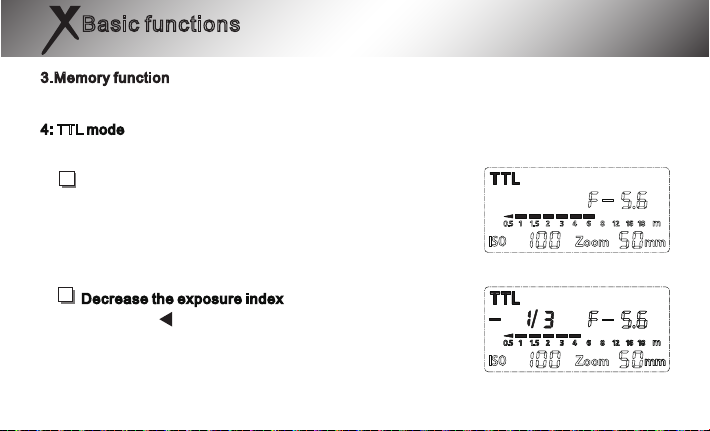
4: TTL mode
The speedlite will flash automatically via the lense of the camera.
1
The speedlite is showed as the picture when it is on.
2
Decrease the exposure index
Press the“ ”button to decrease the exposure index, fine
adjustment from 0,-1/3,-2/3,-1 -3 nine grades
......
-10-
Page 12
Basic functions
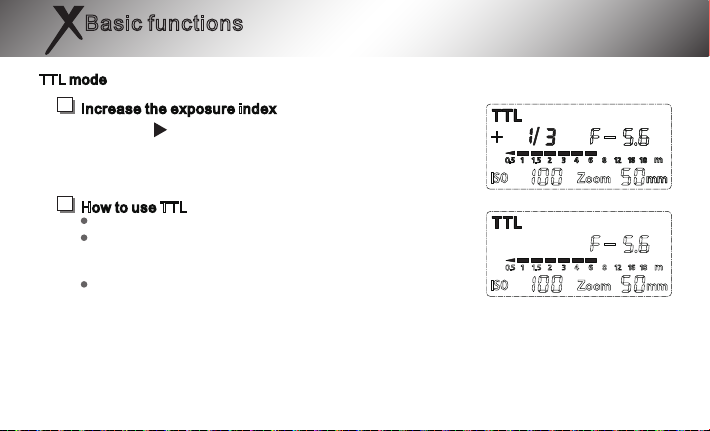
TTL mode
3
Increase the exposure index
Press the“ ”button to decrease the exposure index,
adjustment from 0,1/3,2/3,1 3 nine grades
4
How to use TTL
Half press the shutter button for focusing
The speedlite connects the camera and show the index
of the aperture of the camera and the focal length of the
lense.
Press the shutter to photo, the speedlite will flash (TTL)
automatically.
......
-11-
Page 13
Basic functions
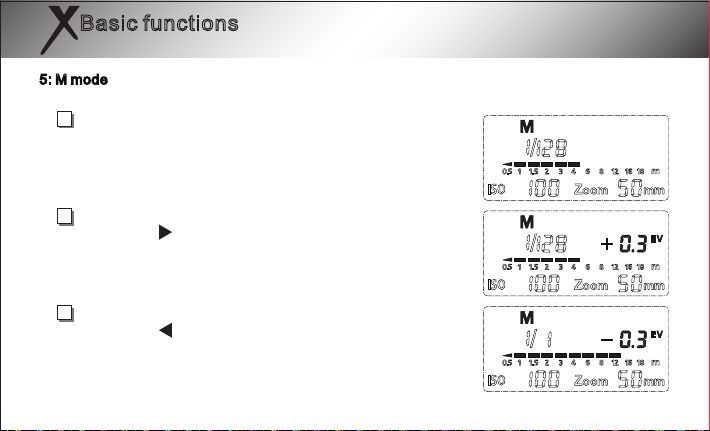
5: M mode
Under the M( Manual setting) mode,you can set the flash index as you like.
1
Press<mode> button to change to M mode
The picture is the M mode interface of the speedlite.
2
Increase the brightness of the speedlite.
Press the " " button to set the brightness of the speedlite. The maximum brightness value of the speedlite is 1/1
(The-re're 3 grades of power fine adjustment on every
gear)
3
Decrese the brightness of the speedlite.
Press the " " button to set the brightness of the speedlite. The minimum brightness value of the speedlite is 1/
128(There're 3 grades of power fine adjustment on every
gear)
-12-
Page 14
Basic functions
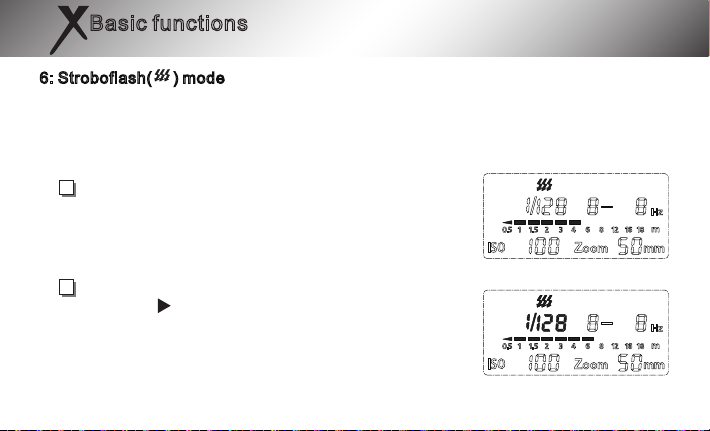
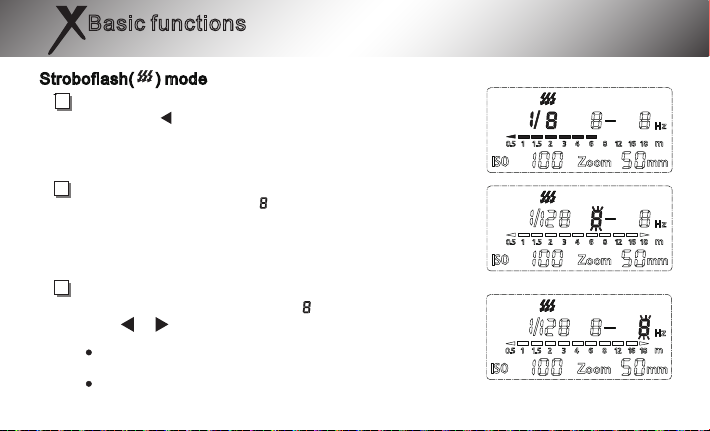
6: Stroboflash( ) mode
Stroboflash is a kind of model that can analyse the motion of subject.
Under the stroboflash mode,the flash can photo a series of moving subjects for many photos.
You can set the flash rate.( the flash times one second, use HZ to represent it),flash times
and flash input.
1
Press <mode> to change to the stroboflash mode.
The picture is the interface of the strobeflash.
2
Increase the input brightness of the flash
Press the" " button to adjust the input brightness of the
flash.The maximum brightest setting of the flash is 1/4
(There're 3 grades power fine adjustment of every gear)
-13-
Page 15
Basic functions
Stroboflash( ) mode
3
Decrease the input brightness of the flash
Press the" " button to adjust the input brightness of the
flash. The minimum brightness setting of the flash is 1/
128
4
The strobeflash setting
Press<SET>button,the “ ” is blink,then you can set
the strobeflash time of speedlite. The times of the strobeflash is from 1 to 90 (more parameters setting see P44
form). When the number of the times is set, you can
adjust flash ferquency press<SET> button again.
5
The setting of the stroboflash
Press the SET button, there's" "blink.Then you can
use” ” “ ” button adjust the frequency from 1 to 100
(more parameters setting see P44 form).
The flash parameter will be saved and quit after press
set button again.
The flash will be saved and quit if parameter was
chosen blink in 10 seconds.
-14 -
Page 16
Basic functions
4
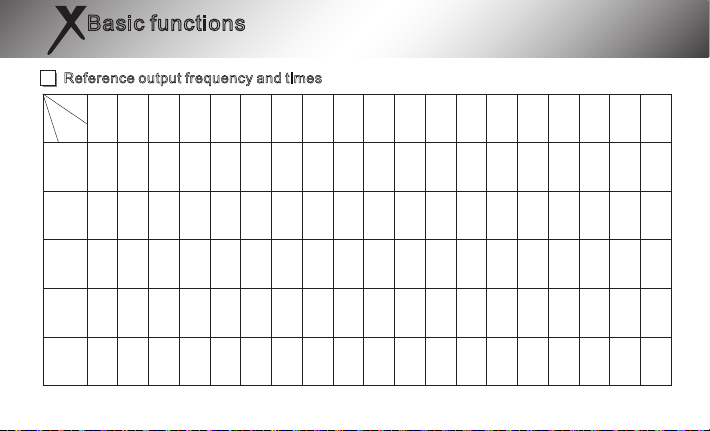
Reference output frequency and times
Frequency
Max. times
output
1HZ 2HZ
3HZ
4HZ
5HZ
6HZ
8HZ 9HZ 10HZ 20HZ 30HZ 40HZ 50HZ 60HZ 70HZ 80HZ 90HZ
7HZ
100
HZ
M1/8
M1/16
M1/32
M1/64
M1/128
14 14
30 30
60 60
90 90
90 90
12
30
60
90
90
10
20
50
80
80
8
20
40
70
70
6
20
32
56
56
6
20
28
44
44
5
10
24
36
36
5
10
22
32
32
-15-
4 4 4 4 4 4 4 4 4
4
8 8 8 8 8 8 8 8 8
8
12 12 12 12 12 12 12 12 12
20
24 24 24 24 24 24 24 24 24
28
24 24 24 24 24 24 24 24 24
28
Page 17
Basic functions
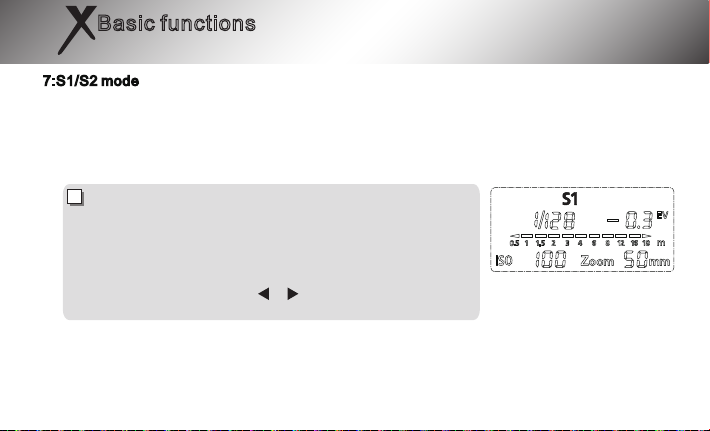
7:S1/S2 mode
S1/S2 mode is used as off-camera auxiliary to creat various lighting effects. The S1 mode is
suitable for manual flash environment, the S2 mode is suitable for TTL flash environment .
Under these two modes, the adjustment of the output brightness of the speedlite is as the M
mode.
S1
When the flash is in S1 mode,it will flash with the first
work of the master flash sync ,the same effect as the use
of radio slave.To use this mode correctly,the master flash
should be set as manual flash.And the TTL flash systm
with preflight function and the red-reduction function with
multiple flashes should not be used.
S1 flash once can press“ ” “ ” to adjust the brightness
of the flash.
-16-
Page 18
Basic functions
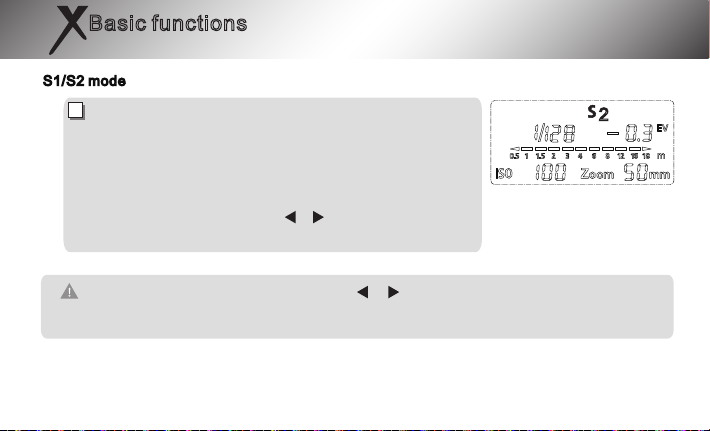
S1/S2 mode
S2
S2 mode is namely”pre-flash cancel mode”.It is similar
to S1 mode,But it can ignored the pre-flash given by TTL
flash.Therefore,it can support the main flash working in
TTL mode.In particular,if S1 mode can not flash correctly
and synchronically with your internal flash,you can try the
S2 mode.(The function is suitable for the cameras of
CANON and NIKON)
S2 preflash can through the“ ” “ ”to adjust exposure
brightness
!
1. Whatever mode your flash,press the“ ” “ ”button for more than 1 second, then
you can reset the parameters of the flash by fast-forward or fast-backward.
2. All parameters can be seted recycling,except for manual set the zoom function.
-17-
2
Page 19
Basic functions
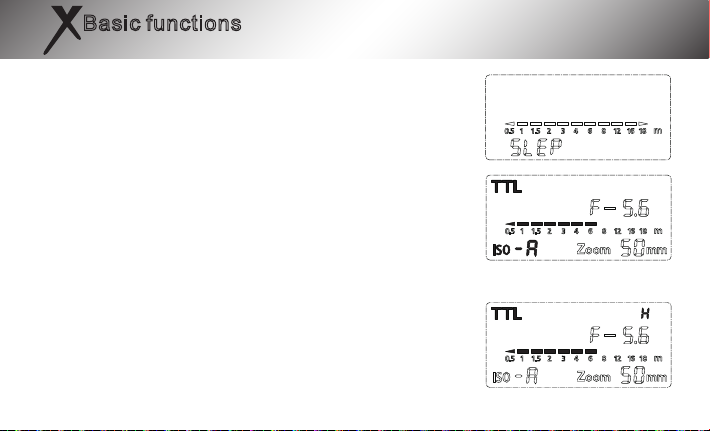
8. Sleep mode
The flash will entry sleep mode if have any operation in 30
seconds. it can be wake up through any button.
9. ISO Display
Camera ISO synchro to flash when shutter release half press, flash screen will hint “ISO-A” when camera set “auto
ISO sensitivity control” on.
10. High speed sync
The flash LCD will hint “H” word when set camera to “auto
FP” on (Pay attentiion: software support shutter release
1/320 sync).
-18-
Page 20
Basic functions
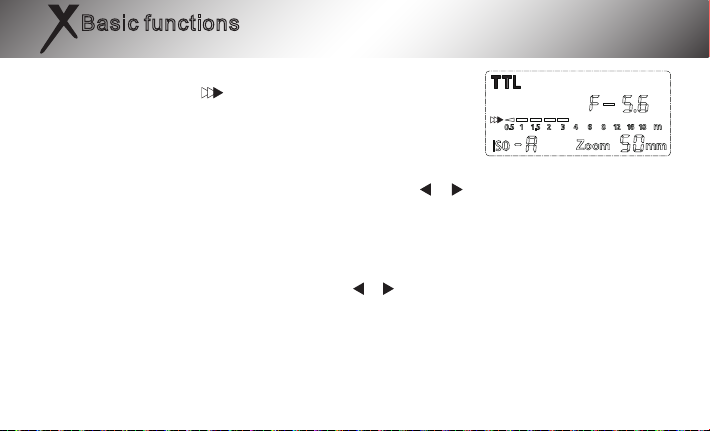
11. Rear-curtain synchronous display
Flash LCD will hint “ ” when camera set to rear-curtain
synchronous.
12. Aperture set
Press set button entry operture mode, you can use “ ”” ” button adjust aperture from
F-1.0 to F-64.
13.Manul setting the flash head zoom position
You can adjust the zoom position of the flash head whenever which mode the speedlite is.
The default focal length of the speedlite is 50MM.Press the ZOOM button, the “50” is twi nkle, then you can adjust when press the “ ” “ ”button, It will be saved when you press
zoom button again.
14. Test Flash
In any mode, you can press PILOT button to test if the flash ligth flashed normally.
-19-
Page 21

Basic functions
15. Recover factory settings data
At first continue to press <SET> button, then put batteries into speedlite, you can see
manufacture data.
16. Overheating proteciton
If the flash light is used too frequently, its overheating protection funciton will be trigge-
red, the red and green lights of the charging indicator will blink alternatively, and the
flash light will be locked. in such case, wait indicator to be green then cancel the prote-
ction before continuing the use.
* Please try to use the 1/4 output or lower when rapid shooting is needed to prevent
the effect on the shooting.
-20-
Page 22
The Advanced Application
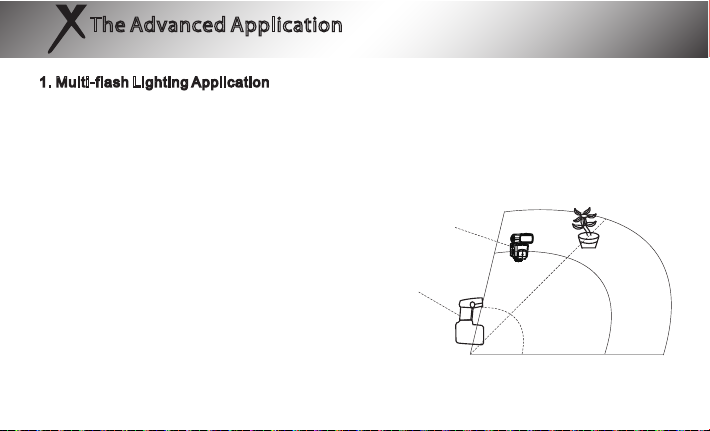
1. Multi-flash Lighting Application
Use inbuilt flash or top-mounted flash as master flash,Place speedlite in different directions.
*In indoor application,radio signals can be reflected by walls; therefore, the placement of
the slave flash should have more space. Wrieless triggering distance is up to 20-30M.
*which can be avaiable in outdoor state. The
Wireless triggering distance is as long as 10 15M, Please keep in mind the following tips;
the wireless triggering window needs to face
SLAVE
the master flash and the direct sunlight shall
be avoided.If these demands conflict with
your hoped direct ion of light irradiation,please
try to rotate the flash head in each iirection in
outdoor
MASTER
order to meet the shooting demands.
*Before placing of the slave flash,test whether
S1/S2 can be synchronous normally, Do not
place any obstacles between the host flash and the slave flash, because they may block
the transmission of radio signals.
-21-
indoor
SLAVE
80 度
30米
15米
Page 23
The Advanced Application
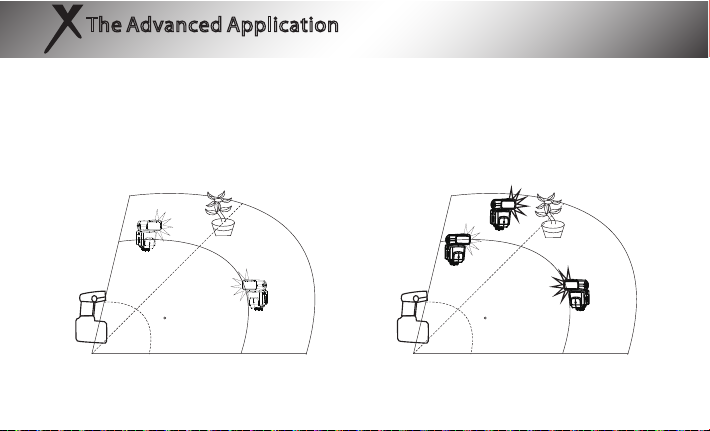
c. Multi-flash,wireless trigger
one master, two slave
INDOOR
OUTDOOR
A
15M
80
30M
SLAVE
SLAVE
One master, three or more slave
INDOOR
C
OUTDOOR
B
A
SLAVE
SLAVE
80
15M
30M
SLAVE
B
-22-
Page 24
The Advanced Application
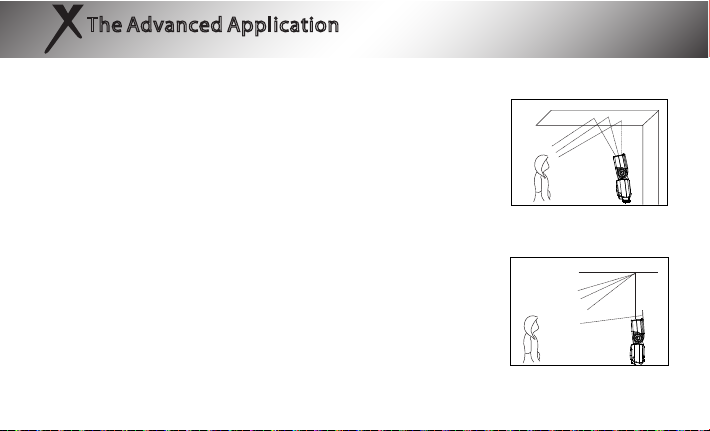
2. Reflection Flash
Bounce flash means to take photos by making flash light head
aimed at will or ceiling and using the light reflected back from
the ceiling or wall to light the desired object,so that the shade
behind the object can be decreased to ger more natural shoo ting effect. If the wall or ceiling is too far,the bounce flash may
be too weak to get enough exposure.The wall or ceiling should
be even and white inorder to get efficient reflection; if the refl ection surface is not white,clor cast may appear in photo.
3. Use Reflection Board to Take Photos
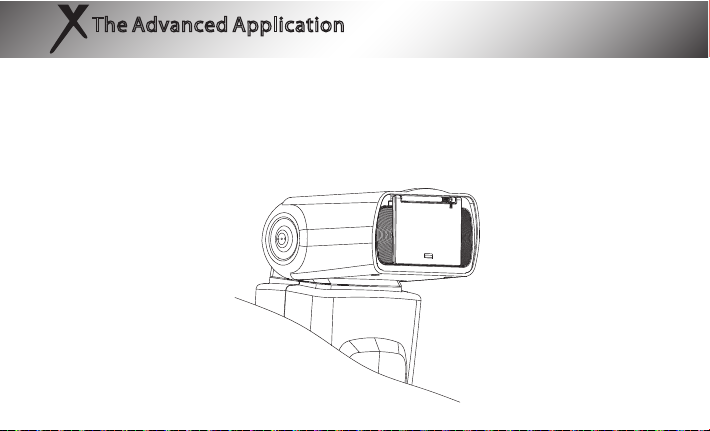
With the reflection board flash,draw the reflection board and
the wide-angle diffusion board out from the light head at the
same time and then push the wide-angle diffusion board back.
In such case, if this product is being used to take photos.it will
produce a high lighted point on the eyes of the subject and
-23-
Page 25
The Advanced Application
thus make the eyes charming(catch light), this function can reach optimal effect when the
flash head is up 90 degree.
4. Use Wide-angle Diffuser
Pull out the wide-angle diffusion board,push back the reflection board and arrange them
as per the figure; Iin such case,the flash scopes will extent to 18 mm and the flash effect
will be softer and more natural.
-24-
Page 26

Specications
Circuit design
Guide Number
Flash mode
Vertical rotation angle
Horizontal rotation angle
Power supply
Lighting times
Recycle time
Color temperature
Flash time
Flash control
Wireless triggering distance
Additional features
Dimensions
Net weight
Accessories
Insulated Gate Bipolar Transistro(IGBT)
68 meters (ISO 100,105mm)
TTL,M,MULTI,S1,S2
0-90 degrees
0-270 degrees
4XAA size batteries(Alkaline or Ni-MH are usable)
100-1500 times(AA alkaline cell used)
approx. 4s
5600k
1/200s--1/20000s
8 levels of output control(1/128--1/1)
20--30m indoor,10--15m outdoor
FEC,AEB,Manual zoom,Auto zoom
165*74.6*59.2mm
275g
Flash light(1),protecting bag(1),mini stand(1) ,manual(1)
and warranty card(1)
-25-
Page 27
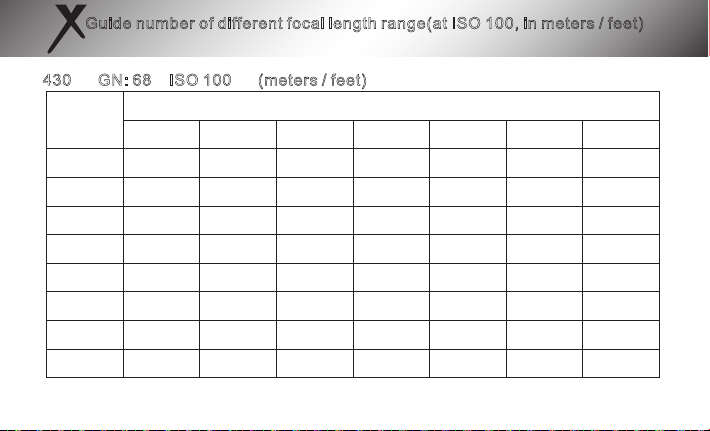
Guide number of different focal length range(at ISO 100, in meters / feet)
430 GN: 68 ISO 100 (meters / feet)
Flash
output
1/1
1/2
1/4
1/8
1/16
1/32
1/64
1/128
24
20/66 22/72.6 25/82 27/88.6
12.2/40.1 15.3/45. 9
8.8/28.9 11/36.1 12.5/41 13.5/44.3 15.5/50.9 17/55.8
6.3/20.7 7.8/25.6 8.8/28.9 9.5/31.2 11/36.1 12/39.4
4.4/14.4 5.5/18 6.3/20.7 6.8/22.3 7.8/25.6 8.5/27.9
3.1/10.2 3.9/12.8 4.4/14.4 4.8/15.7 5.5/18 6/19.7
2.5/8.2 3.2/10.5 3.1/10.2 3.4/11.2 3.9/12.8 4.3/14.1
2.5/8.2 2.7/8.9 3.2/10.5 3.7/12.1 4.4/14.4 4.7/15.4
28 35 50 7 0
Coverage(MM)
85
30/98.3 33/109.2
17.7/58.1 19.1/62.7 21.9/71.9 24/87.7
-26-
105
36/118.1
26.2/86
18.5/60.7
13.1/43
9.3/30.5
6.5/21.3
4.6/15.1
5.1/16.7
Page 28
Possible problems during use and solutions
1. Please note when use the flash outdoors:For outdoor application,please avoid direct sunlig ht to the wirless triggering sensor and ensure normanl use of the falsh.
2. Precaution for outdoor sue of lambency umbrella; The lambency umbrella mounted on the
falsh light outdoors may be blowen down easily ,and the hot shoe of the flash light may be
broken.Please fix the mounting rack or avoid outdoor use.
3. Photos are under exposure or over exposure?Check if the set shutter,aperture and ISO are
too near the flash limit or if some settings including exposure compensation in relation to
falsh are proper.
4. Vignetting appears in photos or only part of the subject is illuminated?Please check the cur rent coverage of focal length and make sure if the lens focal length exceeds the coverage
range of the falsh.The products’s zooming range is 18-180mm of the medium format system.
you can try to pull out the wide -angle diffuser to expand the flash range.
5. The flash light is abnormal?
Switch off the powr of flash light and camera,mount the flash light on the hot shoe of camera,
and switch on the power of flash light and camera again, If the abnormity continues,replace
the batteries.
6. In use process have function abnormal or part of the failure of function, can detach flash to
installed the new battery then trun on again for recover normal use. For abnormal use may
caused error state, under turning on status,replacement battery directly,the battery capacity
lack, hot shoes too loose to happen badness contact, etc.
-27-
Page 29
Possible problems during use and solutions
7. Install batteries but can not turn on?
Check the battery pack, the electricity shortage, old and new batteries or different brand
battery in practice. if have these situation pls as to the right way to install batteries.
*Caution:
The
will not be given if the design and specifications change.
long time no use, please featch out batteries.
functions of this manual are based on test conditions of our company. Further notice
-28-
designed for
Nikon
Page 30

 Loading...