

Page 1

Universal
High Power Auto-Focus
Digital SLR Flash
wide angle diffuser & reflection board
Item # XTDF260
INSTRUCTION MANUAL
designed for
D-SLR
Page 2

Warning
1. To avoid fire or electrical shock,do not expose this product to rain or moisture.
2. Do not flash at hight level output continuously for over 15 time.
3. To avoid short circuit,be sure the batteries contacts are securely packed and in
accordance with local provisinon when handling the batteries.
4. Please place the batteries and the parts which can be swallowed mistakenly away
from children. Contact a doctor immediately when it occurs.
5. To avoid possible injury to eyes, do not use the flash light on the people who need a
hight degree of attention.
6. Please take out the batteies and stop using immediately in case of below.
*This product is dropped or shocked seriously and the inner part of the product is bared.
*If this battery leaks corrosive liquieds, please take out the battery with golves.
*The product gives off strange smell, smokes or heats.
*Do not disassemble or maintain this product. Touching the internal high voltage circuit
will cause electric shock.
*Remove batteries during long periods of non-use.
-1-
Page 3

Features
* Wireless triggering sensor: It can works in outdoor environment under S1
and S2 mode, the wireless triggering distance is up to 10-15M in outdoor,
20-30m in indoor.
* Super speed of charging recycle: It only takes 4 seconds in charging
* The improved power saving mode: In the power saving mode,the flash will
get automatic sleeping.
* The brightness of the fine control: The brightness is more refined, 8 levels
of output control(1/128-1/1), every level have six fine adjustment, cooperate
different zoom valule to get the flash effects what`s you demind for.
-2-
Page 4
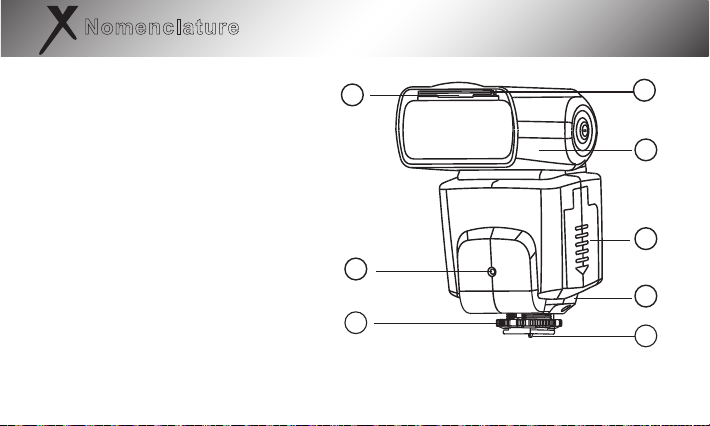
Nomenclature
1.Reflection board
2.Wide-angle diffuser
3.Flash head
4. Wireless sensor
5.Battery compartment cover
6.Hot shoe stand
7.Fixed dial
8.Contacts
9. Locking pin
-3-
2
4
7
1
3
5
6
8
Page 5
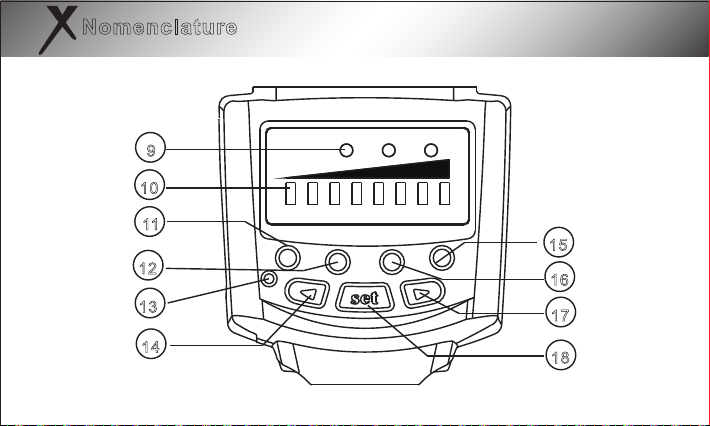
Nomenclature
10
11
12
13
14
9
ZOOM
PILOT MODE ZOOM ON/OFF
M S1 S2
24 28 35 50 70 85 mm
15
16
17
18
-4-
Page 6

Nomenclature
10. Mode indicator(M,S1 and S2): It indicateds the current flash mode.
11. O utput level indicator: It can regulate the output power by setting the button, there are 8 levels
for output level adjustment. It indicates the output power and the fine-turning; it indicates the
coverage of the current focus length when adjusting the focus length
12. Test button
13. Mode switch button: The mode of the flash ligth will be switched among the M/S1/S2 in circle for
each press.
14. Charging indicator/Test button: The lighting of green light shows that charging process is finished
and flash can be used. the lighting of red light shows that it is in charging, the alternate flashing of
the green lights shows overheat protection. The red ligh blinking shows that shortage of power.
15. Power adjust button: The output power of the flash light can be adjusted through left button
16. Power switch: The power of the flash light can be opened or closed by hoding this button
for 2 Seconds.
17. Lamp holder electric zoom button
18. Power adjust button: The output power of the flash light can be adjusted through right button
19. ”SET”button: power adjust button
-5-
Page 7
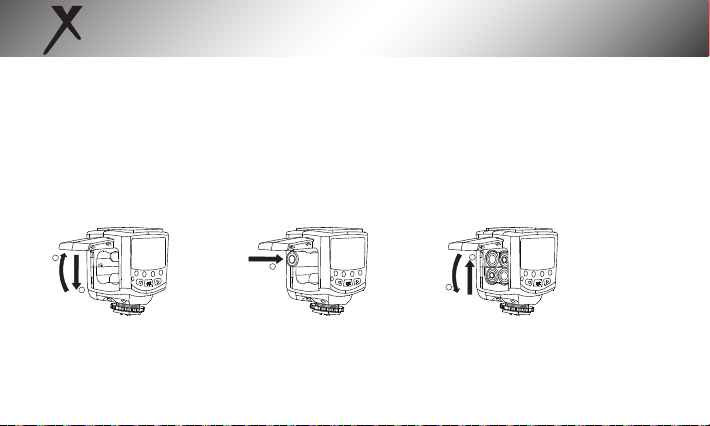
Installation Instruction
1. Install Batteries
Slide the batteries chamber’s cover in the direction of the arrow. Insert the
batteries according to the label inside battery chamber.Make sure the
direction of the batteries’ polarity is correct. Close the battery chamber cover
in the direction of the arrow.
2
1
1
2
1
-6-
Page 8
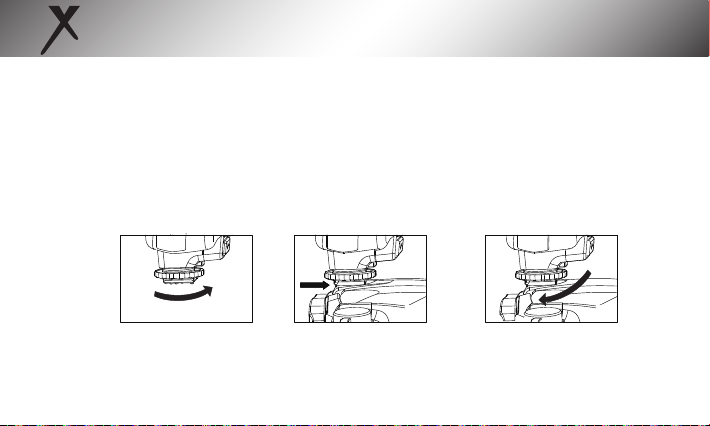
2. Mount the speedlite on your camera
a. Loosen the locking ring by turning it in the direction of the arrow.
b. Slide the speedlite hot shoe stand into the camera hot shoe stand until it
stops. Turn the locking ring in the direction of the arrow tighten.
c. To detach the speedlite,loosen the locking ring by turning it in the oppo-
site direction.
a b c
-7-
Page 9
Basic functions
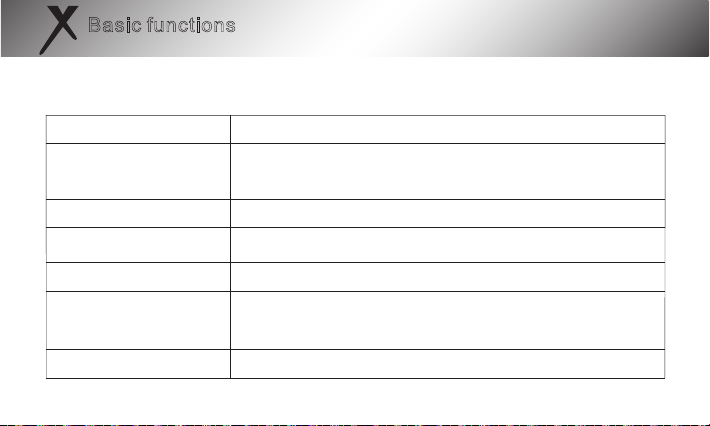
1.Basic Operations
Operation of the buttons:
Component
<Power Switch>
<Mode Switch Button>
Power and focus adjustment
<LEFT>and <RIGHT> button
Power fine adjust <SET> button
<ZOOM> button
<Pilot Button>
Operation
Power Switch of the flash light.The power of the flash light can be opened or
closed by holding this button for 2 seconds.It is suggested that the battery
shall be taken out after the power of the flash light is closed through this button.
The mode of the flash light will be switched among the M/S1/S2 in circle for each press.
The output power and focus of the flash light can be adjusted through these buttons
Press SET button into the fine adjust function
Please press Zoom Button into the fine adjust state , and cooperate left and right button
for adjust focus range, The head focus of the flash light will switch among the (24/28/35/
50/70/85/105) in circle for each press.
Press the test and the flash will test flashing in current output level
-8-
Page 10
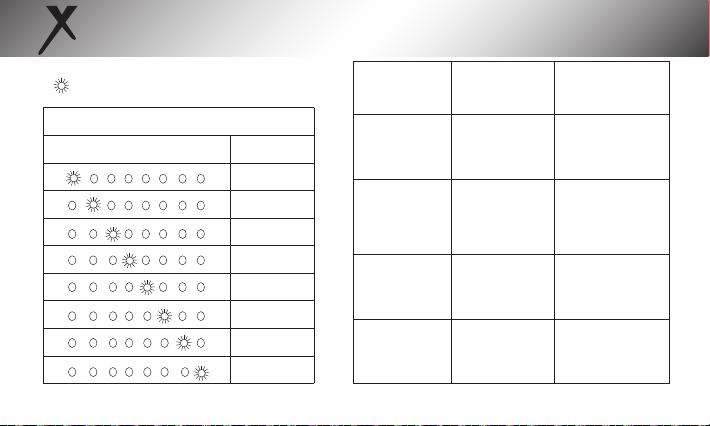
Meaning of <Charging indicator>:
Meaning of(Output control indicator)
represents <ON> state of indicator’s light.
While O represents <OFF> state .
In M/S1/S2 Mode,indicates the output level
State of <Output level indicator>
Output level
1/128
1/64
1/32
1/16
1/8
1/4
1/2
1/1
<Charging indicator>
State
The green light
is lit
The red light is lit
The green lights
blink alternatively
The red lights
blink alternatively
-9-
Meaning
The Flash ligth is
fully charged,and
can be used.
The Flash ligth has
not been fully
charged
The Flash ligth is
locked to prevent
overheating due
to frequent flashing.
Long time charged
shortage of power
supply
Operation
Normal
If the red light is lit
for 20 seconds,
replace the batteries.
Wait indicator to be
green
Charge time over
20S,please replace
batteries
Page 11

2. Turn ON/OFF:
*The power of the flash ligth can be opened or close by holding this button for 2 seconds. It is
suggested that the battery shall be taken out after the power of the flash ligth is closed thro ught this button.
*After opening the power switch of the flash,the flash will fetch the setting state saved in the
close down last time,the charging indicator is green,which indicates the flash is avallable.
*If the charging is not completed within 20 seconds, shortage of power supply can not to
flash. Then you need to replace with new batteries.
*You may press the testing button <PILOT> to test whether the flash works normally.After
use, hold the power switch for 2S to power off.
3. M Mode
In M mode, you can set the flash output level as you like. you can adjust the flash output level.
The adjustment range of the flash output level is 1/128-1/1. There are 8 levels of output and
each level has 6 fine tuning stalls. The <left><right> is used to fine tune the output power.
The output level is indicated by the output power indicator. For shooting, what you need is
to set the flash output level, adjust the camera and press the shutter.The flash will flash with
the synchronic signal of the camera.
-10-
Page 12

4. S1/S2modes
By pressing the <Mode Switch Button>,the flash will step into the S1/S2 mode.These two
modes are suitable to be used as off -camera auxiliary light,so as to create a variety of lighting
effects.They aresuitable for manual flash environment and Ttl flash environment respectively.
*Under these two modes,the way to adjust the output level is like that in M mode,which is to
press the <LEFT><RIGHT>and <OK>in the middle.When using S1/S2 mode,you can rotate the
flash head to make the wireless triggering sensor face with the master light. When the flash is in
S1 mode,it will work with the first work of the master flash synchronously,iwth the result consistent with the use of radio slave.To use this mode correctly,the master flash should be set at manual
flash and the TTL falash system with prefligth function and the red-reduction function with multiple flashes should not be used.
*S2 mode: It is also called”pre-flash cancel mode”. This mode is similar with S1 mode, but it canneglect the pre-flash given by Ttl flash.Therefore, it can support the main flash working in TTL
mode. IN particular, if S1 mode cannot flash correctly and synchronically with your internal flash,
you can try to use S2 mode.
5. Test Flash
Shether in any mode,you can press PILOT button to test if the flash ligth flashed normally.
When testing the flash,the flash will give flash at relevant output level in accordance with the shosen output power setting.
-11-
Page 13

6. Flash will eningy power save mode : if 30s have any operation, It can be wake up through
any button
7.
Overheating proteciton
If the flash light is used too frequently,its overheating protection funciton will be triggered,
the red and green lights of the charging indicator will blink alternatively,and the flash light
will be locked. in such case, wait indicator to be green then cancel the protection before
continuing the use.
* Please try to use the 1/4 output or lower when rapid shooting is needed to prevent the
effect on the shooting.
-12-
Page 14
8. Manually set the zooming position
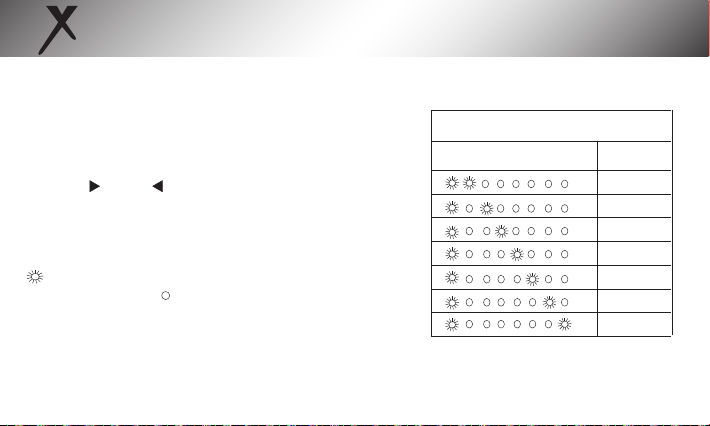
By pressing ZOOM ,you can set the zooming position, zoom will
chang green light when focus adjust status.
Pressing < >and < >.the covered focus lenght of the
flash will switch of (24/28/35/50/70/85mm).In setting the flash
zooming position.the indicator in the operational panel
will indicate the currentposition.The focus length showed by the
displayed position can be found in the table below.
represents<ON> state of indicator’s light,while
represents<OFF>state.
-13-
Application of ZOOM to set the
zooming position
State of <output
level indicator>
zooming
<mm>
24
28
35
50
70
85
105
Page 15
The Advanced Application
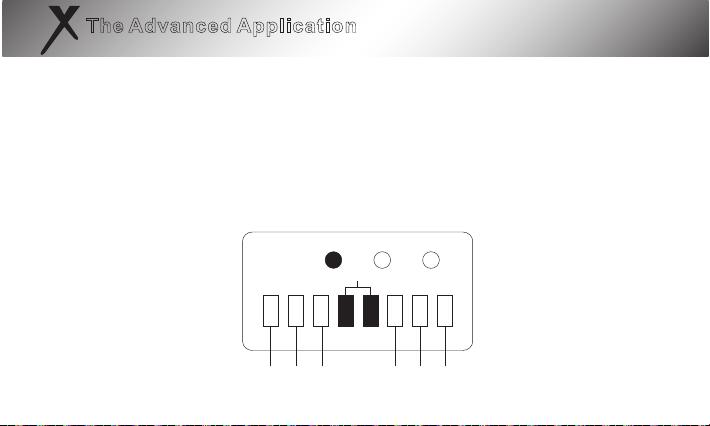
1. Output power fine adjust function:
Press the "SET" button, Among two power indicator lights up , through the left and right key
for fine-tuning, every time fine-tuning value one third, When make sure the parameters,
then press <SET > key again can save and quit, or after 15 seconds later Automatic save and
exit.
Output level indicator
-1 -2/3 -1/3
-14-
+1/3 +2/3 +1
Page 16
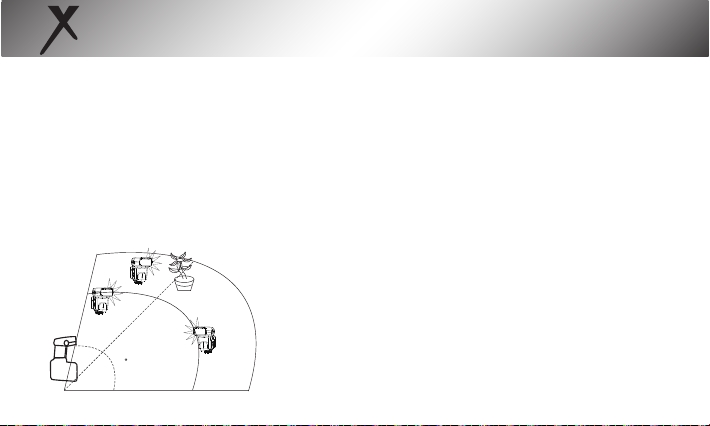
2. Multi-flash Lighting Application
Use inbuilt flash or top-mounted flash as master flash, Place ulti-speedlite in different directions.
*In indoor application,radio signals can be reflected by walls;therefore,the placement of the slave flash should
have more space. Wrieless triggering distance is up to 20-30M.
*which can be avaiable in outdoor state. The Wireless triggering distance is as long as 10-15M,Please keep in
mind the following tips; the wireless triggering window needs to face the master flash and the direct sunlight shall
be avoided.If these demands conflict with your hoped direction of light irradiation,please try to rotate the flash head
in each direction in order to meet the shooting demands.
*Before placing of the slave flash,test whether S1/S2 can be synchronous normally, Do not place any obstacles
between the host flash and the slave flash, because they may block the transmission of radio signals.
indoor
outdoor
C
A
15M
30M
SLAVE
80
B
SLAVE
-15-
Page 17
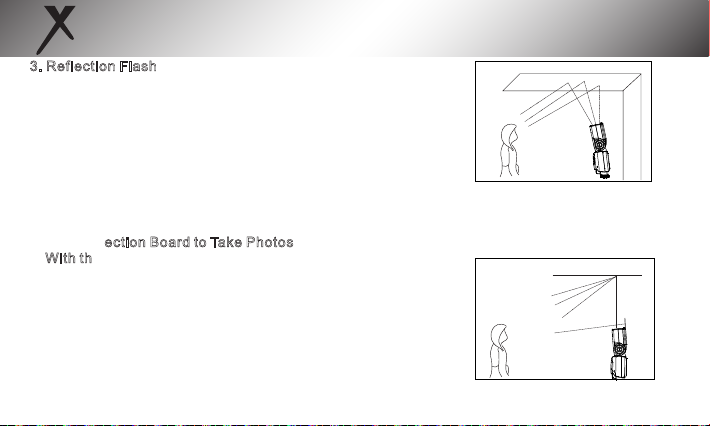
3. Reflection Flash
Bounce flash means to take photos by making flash light head
aimed at will or ceiling and using the light reflected back from
the ceiling or wall to light the desired object,so that the shade
behind the object can be decreased to ger more natural shoo ting effect. If the wall or ceiling is too far,the bounce flash may
be too weak to get enough exposure.The wall or ceiling should
be even and white inorder to get efficient reflection; if the refl ection surface is not white,clor cast may appear in photo.
4. Use Reflection Board to Take Photos
With the reflection board flash,draw the reflection board and
the wide-angle diffusion board out from the light head at the
same time and then push the wide-angle diffusion board back.
In such case, if this product is being used to take photos.it will
produce a high lighted point on the eyes of the subject and
thus make the eyes charming(catch light).This function can
reach optimal effect when the flasher head is up 90 degrees.
-16-
Page 18
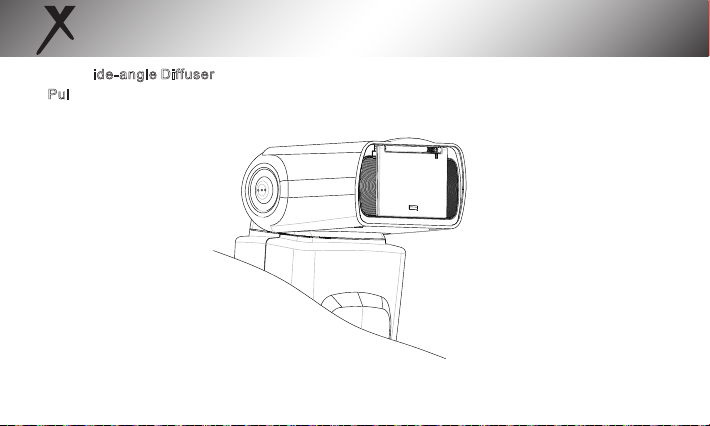
5. Use Wide-angle Diffuser
Pull out the wide-angle diffusion board,push back the reflection board and arrange them
as per the figure; Iin such case,the flash scopes will extent to 18 mm and the flash effect will
be softer and more natural.
-17-
Page 19

Specifications
Guide Number
Flash mode
Vertical rotation angle
Horizontal rotation angle
Power supply
Lighting times
Recycle time
Color temperature
Flash time
Flash control
External interface
Wireless triggering distance
Additional features
Dimensions
Net weight
ccessories
85 meters (ISO 100,85mm)
M,S1,S2
0-90 degrees
0-270 degrees
4XAA size batteries(Alkaline or Ni-MH are usable)
100-1500 times(AA alkaline cell used)
approx 4s
5600k
1/500s-1/20000s
8 levels of output control(1/128-1/1), every level have six fine
adjustment
hot shoe
20-30m indoor,10-15m outdoor
Power saving mode and over heat proteciton
165x74.6x59.2mm
250g
Flash light(1),protecting bag(1),mini stand(1) and manual(1),
warranty card(1)
-18-
Page 20
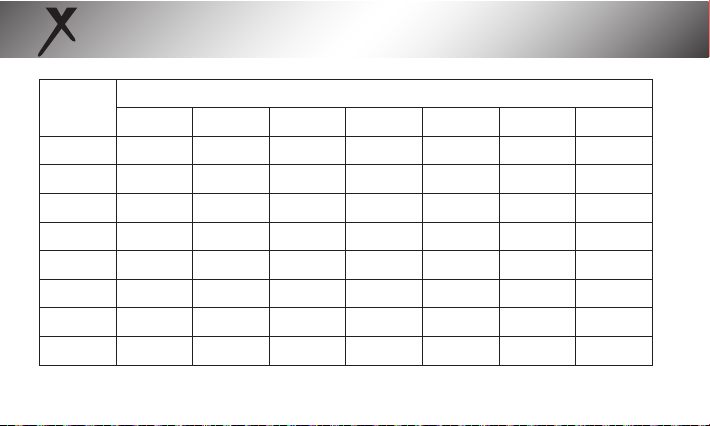
Guide number of different focus length range
GN85 ISO 100 (meters / feet)
Flash
output
1/1
1/2
1/4
1/8
1/16
1/32
1/64
1/128
Coverage(MM)
24
20/66 22/72.6 25/82 27/88.6
12.2/40.1 15. 3/45. 9
8.8/28.9 11/36.1 12.5/41 13.5/44.3 15.5/50.9 17/55.8
6.3/20.7 7.8/25.6 8.8/28.9 9.5/31.2 11/36.1 12/39.4
4.4/14.4 5.5/18 6.3/20.7 6.8/22.3 7.8/25.6 8.5/27.9
3.1/10.2 3.9/12.8 4.4/14.4 4.8/15.7 5.5/18 6/19.7
2.5/8.2 3.2/10.5 3.1/10.2 3.4/11.2 3.9/12.8 4.3/14.1
2.5/8.2 2.7/8.9 3.2/10.5 3.7/12.1 4.4/14.4 4.7/15.4
28 35 50 70
30/98.3 33/109.2
17.7/58.1 19.1/62.7 21.9/71.9 24/87.7
-19-
85
105
36/118.1
26.2/86
18.5/60.7
13.1/43
9.3/30.5
6.5/21.3
4.6/15.1
5.1/16.7
Page 21

Possible problems during use and solutions
1.Please note when use the flash outdoors:For outdoor application,please avoid direct sunlight to
the wirless triggering sensor and ensure normanl use of the falsh.
2.Precaution for outdoor sue of lambency umbrella; The lambency umbrella mounted on the falsh
light outdoors may be blowen down easily ,and the hot shoe of the flash light may be broken.
Please fix the mounting rack or avoid outdoor use.
3.Photos are under exposure or over exposure? Check if the set shutter,aperture and ISO are too
near the flash limit or if some settings including exposure compensation in relation to falsh are
proper.
4.Vignetting appears in photos or only part of the subject is illuminated?Please check the current
coverage of focus length and make sure if the lens focus length exceeds the coverage range of
the falsh.The products’s zooming range is 24-105mm of the medium format system. you can try
to pull out the wide -angle diffuser to expand the flash range.
5.The flash light is abnormal?Switch off the powr of flash light and camera,mount the flash light
on the hot shoe of camera,and switch on the power of flash light and camera again,If the abnor mity continues, replace the batteries.
*Caution: long time no use, please featch out batteries.
The functions of this manual are based on test conditions of our company .Further notice will not
be given if the design and specifications change.
-20-
Page 22

 Loading...