

Xirlink XVP510 Users Manual
C-it
Digital Video PC Camera
Model XVP510
For Windows
1
User's Guide
Release 2.0
June, 1998
Xirlink, Inc.

Copyright Information
C-it for Windows. Copyright ©1997-1998 Xirlink, Inc. All rights reserved.
Reproduction, adaptation, or translation without prior written permission is prohibited, except as allowed under the
copyright laws.
C-it, C-it Video Conference Center, C-it Video Camera, OpArt Video Mail, and C-it Video Album are trademarks of
Xirlink, Inc. The C-it logo is a registered trademark of Xirlink, Inc.
Information is subject to change without notice and does not represent a commitment on the part of Xirlink, Inc. The
software described is furnished under a licensing agreement. The software may be used or copied only in accordance
with the terms of such an agreement. It is against the law to copy the software on any medium except as specifically
allowed in the licensing agreement. No part of this document may be reproduced or transmitted in any form or by
any means, electronic or mechanical, including photocopying, recording, or information storage and retrieval
systems, or translated to another language, for any purpose other than the licensee's personal use and as specifically
allowed in the licensing agreement, without the express written permission of Xirlink, Inc.
Restricted Rights Legend
Use, duplication, or disclosure is subject to restrictions as set forth in contract subdivision (c)(1)(ii) of the Rights in
Technical Data and Computer Software Clause 52.227-FAR14.
Material scanned by this product may be protected by governmental laws and other regulations, such as copyright
laws. The customer is solely responsible for complying with all such laws and regulations.
Xirlink’s Limited Product Warranty
If you find physical defects in the materials or the workmanship used in making the product described in this
document, Xirlink will repair, or at its option, replace, the product at no charge to you, provided you return it
(postage prepaid, with proof of your purchase from the original reseller) during the 12-month period after the date of
your original purchase of the product.
THIS IS C-it'S ONLY WARRANTY AND YOUR EXCLUSIVE REMEDY CONCERNING THE PRODUCT,
ALL OTHER REPRESENTATIONS, WARRANTIES OR CONDITIONS, EXPRESS OR IMPLIED, WRITTEN
OR ORAL, INCLUDING ANY WARRANTY OF MERCHANTABILITY, FITNESS FOR A PARTICULAR
PURPOSE OR NON- INFRINGEMENT, ARE EXPRESSLY EXCLUDED. AS A RESULT, EXCEPT AS SET
OUT ABOVE, THE PRODUCT IS SOLD “AS IS” AND YOU ARE ASSUMING THE ENTIRE RISK AS TO
THE PRODUCTS SUITABILITY TO YOUR NEEDS, ITS QUALITY AND ITS PERFORMANCE,
IN NO EVENT WILL XIRLINK BE LIABLE FOR DIRECT, INDIRECT, SPECIAL, INCIDENTAL OR
CONSEQUENTIAL DAMAGES RESULTING FROM ANY DEFECT IN THE PRODUCT OR FROM ITS USE,
EVEN IF ADVISED OF THE POSSIBILITY OF SUCH DAMAGES.
All exclusions and limitations in this warranty are made only to the extent permitted by applicable law and shall be
of no effect to the extent in conflict with the express requirements of applicable law.
2
FCC Radio Frequency Interference Statement:
This device complies with Part 15 of the FCC Rules. Operation is subject to the following two conditions: 1. This
device may not cause harmful interference, and 2. This device must accept any interference received, including
interference that may cause undesired operation.
This equipment has been tested and found to comply with the limits for a Class B digital device, pursuant to Part 15
of FCC rules. These limits are designed to provide reasonable protection against harmful interference in a residential
installation. This equipment generates, uses, and can radiate radio frequency energy and, if not installed and used in
accordance with the instruction guide, may cause harmful interference to radio communications. However, there is
no guarantee that interference will not occur in a particular installation. If this equipment does cause harmful
interference to radio or television reception, which can be determined by turning the equipment off and on, the user
is encouraged to try to correct the interference by one or more of the following measures:
* Reorient or relocate the receiving antenna.
* Increase the separation between the equipment and the receiver.
* Connect the equipment into an outlet on a circuit different from that to which the receiver is connected.
* Consult the dealer or an experienced radio or TV technician for help.

Introduction ..................................................................................................................................5
Welcome to the C-it Digital Video PC Camera for video media ...............................................5
What's In the Box......................................................................................................................5
What You Need.........................................................................................................................5
A Quick Look at C-it Digital Video Camera .............................................................................7
Hints for Taking Good Pictures.................................................................................................7
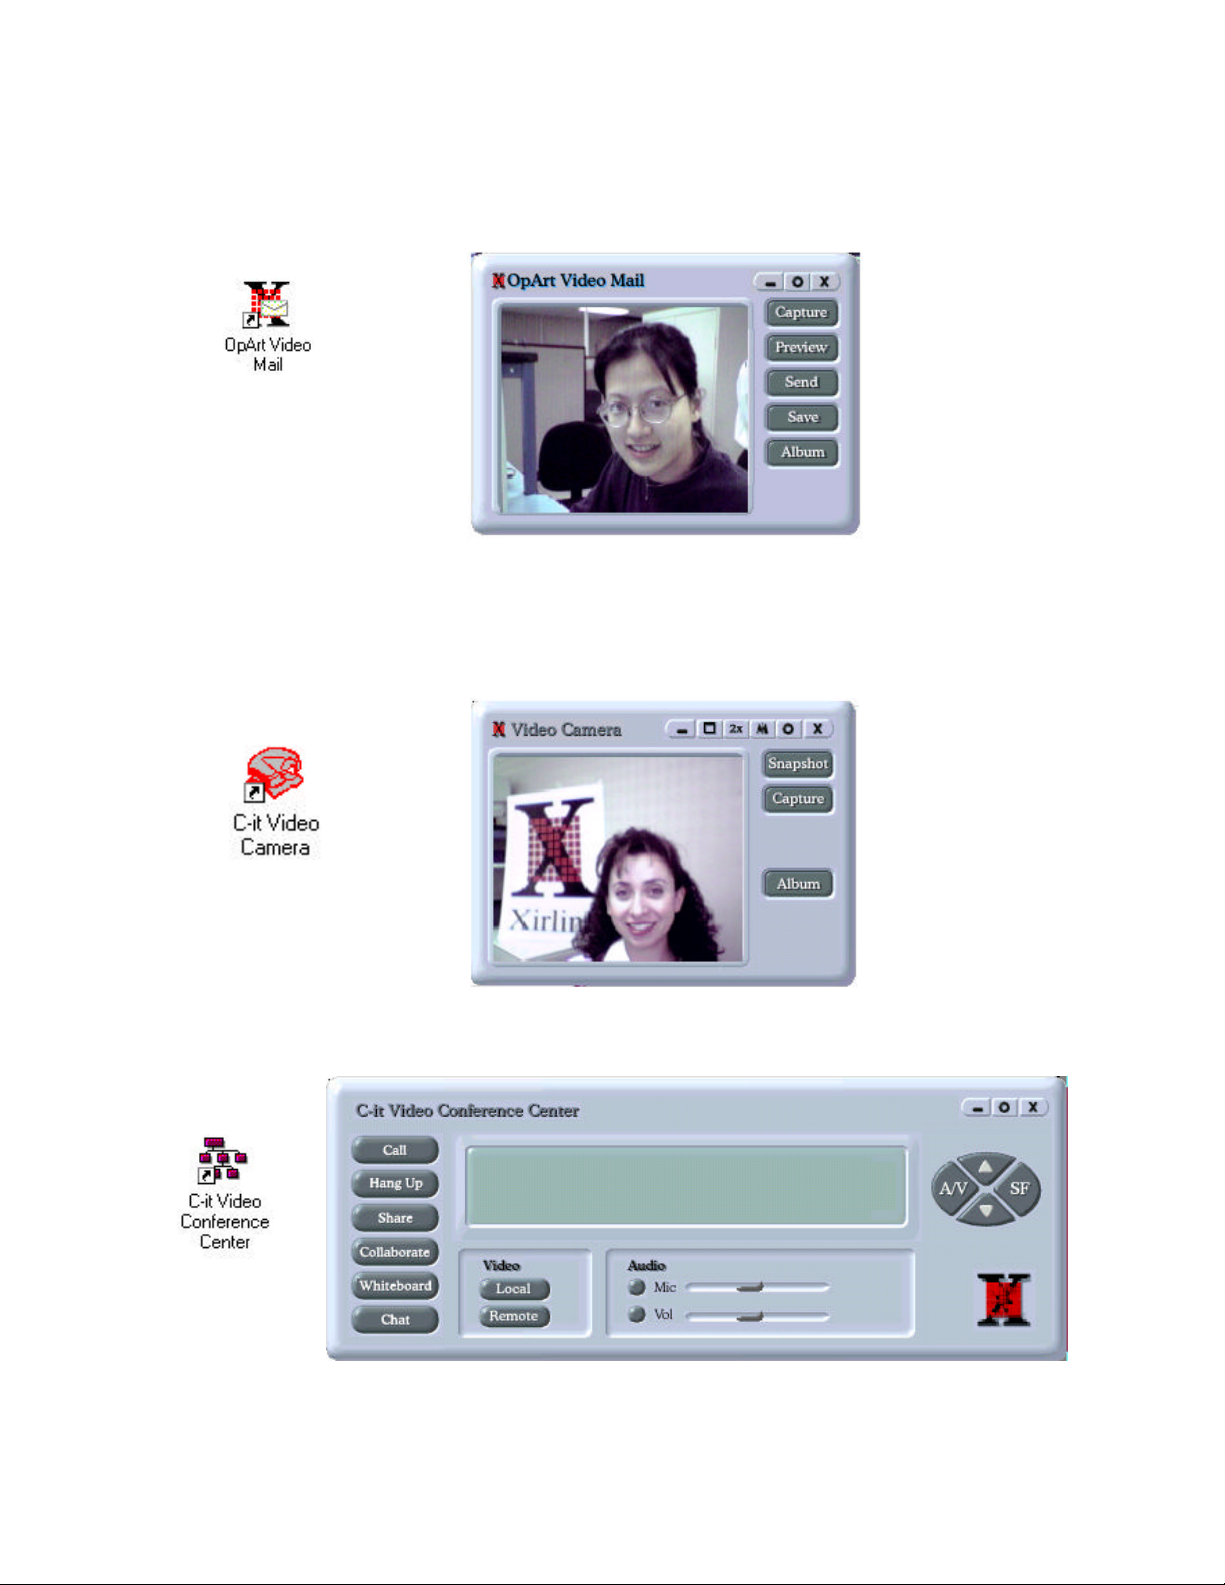
A Quick Look at C-it applications.............................................................................................8
OpArt Video Mail..................................................................................................................8
C-it Video Camera .................................................................................................................8
C-it Video Conference Center................................................................................................8
C-it Video Album...................................................................................................................9
Installation..................................................................................................................................10
Before You Begin....................................................................................................................10
Registering Your C-it..............................................................................................................10
Installing the Software.............................................................................................................10
To install the C-it Software ..................................................................................................11
To Connect the C-it Digital Video Camera ..........................................................................15
Getting Help.........................................................................................................................15
OpArt Video Mail.......................................................................................................................16
Using OpArt Video Mail.........................................................................................................16
Sample of using the OpArt Video Mail Application ...........................................................21
C-it Video Camera......................................................................................................................27
To open the Video Camera window: .......................................................................................27
To flip the image:....................................................................................................................27
To capture video clips: ............................................................................................................28
To open the Video Album:......................................................................................................29
Adjusting the Video.................................................................................................................30
To display the video settings:...............................................................................................30
To change the various options: ............................................................................................. 30
General Settings...................................................................................................................31
Image Format.......................................................................................................................33
Capture.................................................................................................................................34
C-it Video Conference Center.....................................................................................................35
Getting Started.........................................................................................................................35
To start the software for videoconferencing:........................................................................35
Placing the Call .......................................................................................................................35
Calling Options....................................................................................................................36
Window Control Buttons and Features....................................................................................37
Adjusting Settings While Conferencing...................................................................................38
Getting the Best Video Quality for a Conference.................................................................38
Adjusting Image Quality and Size........................................................................................38
Adjusting Window Size....................................................................................................40
Pause the Video ................................................................................................................40
Working While Conferencing..................................................................................................40
Conferencing with Another Participant................................................................................40
To switch among the participants to videoconference:.........................................................40
Sharing Work.......................................................................................................................41
Collaborating on Work ......................................................................................................... 42
Some Tips for Collaborating Effectively...........................................................................43
Take a Snapshot...................................................................................................................43
3

Working on the Whiteboard.................................................................................................45
Using a Chat box .................................................................................................................. 46
Sending and Receiving Files While Conferencing ...............................................................47
To send a file to the other person:.....................................................................................47
Right Mouse Menu Shortcuts...............................................................................................48
Right Mouse Menu on the Video Conference Center........................................................48
Right Mouse Menu on the Local and Remote Windows...................................................48
C-it Video Album.......................................................................................................................50
To open the Video Album:......................................................................................................50
Playing Back an exe file from Album......................................................................................51
Playing Back an avi file from Album ......................................................................................51
Seeing a Snapshot....................................................................................................................52
Sending a Video Mail, captured video clip or Snapshot with E-mail:......................................52
Setting Video Album Options .................................................................................................53
The C-it Video Album's Menu Commands and Tool Bar........................................................53
File Menu.............................................................................................................................53
View Menu ..........................................................................................................................54
Help Menu ...........................................................................................................................54
The Video Album Tool Bar..................................................................................................54
Frequently Asked Questions.......................................................................................................55
Troubleshooting..........................................................................................................................61
4
1
2.
Introduction
Welcome to the C-it for video media
The C-it with its high-quality digital Video Camera and software now makes video mail and
videoconferencing easy. Whether you're sending video mail or videoconferencing over the Internet
with someone in another part of the world, or on your business' network to a colleague in a building
across town, the C-it delivers clear video and audio to your computer.
Using the C-it application is especially effective for larger companies located in several buildings or
cities. Instead of trudging to another building or hopping on a plane and wasting a day in the air, you
can simply capture video mail and send it out or video conferencing and get the job done in a fraction
of the time. A video mail and video conferencing with the C-it is almost like being there in person.
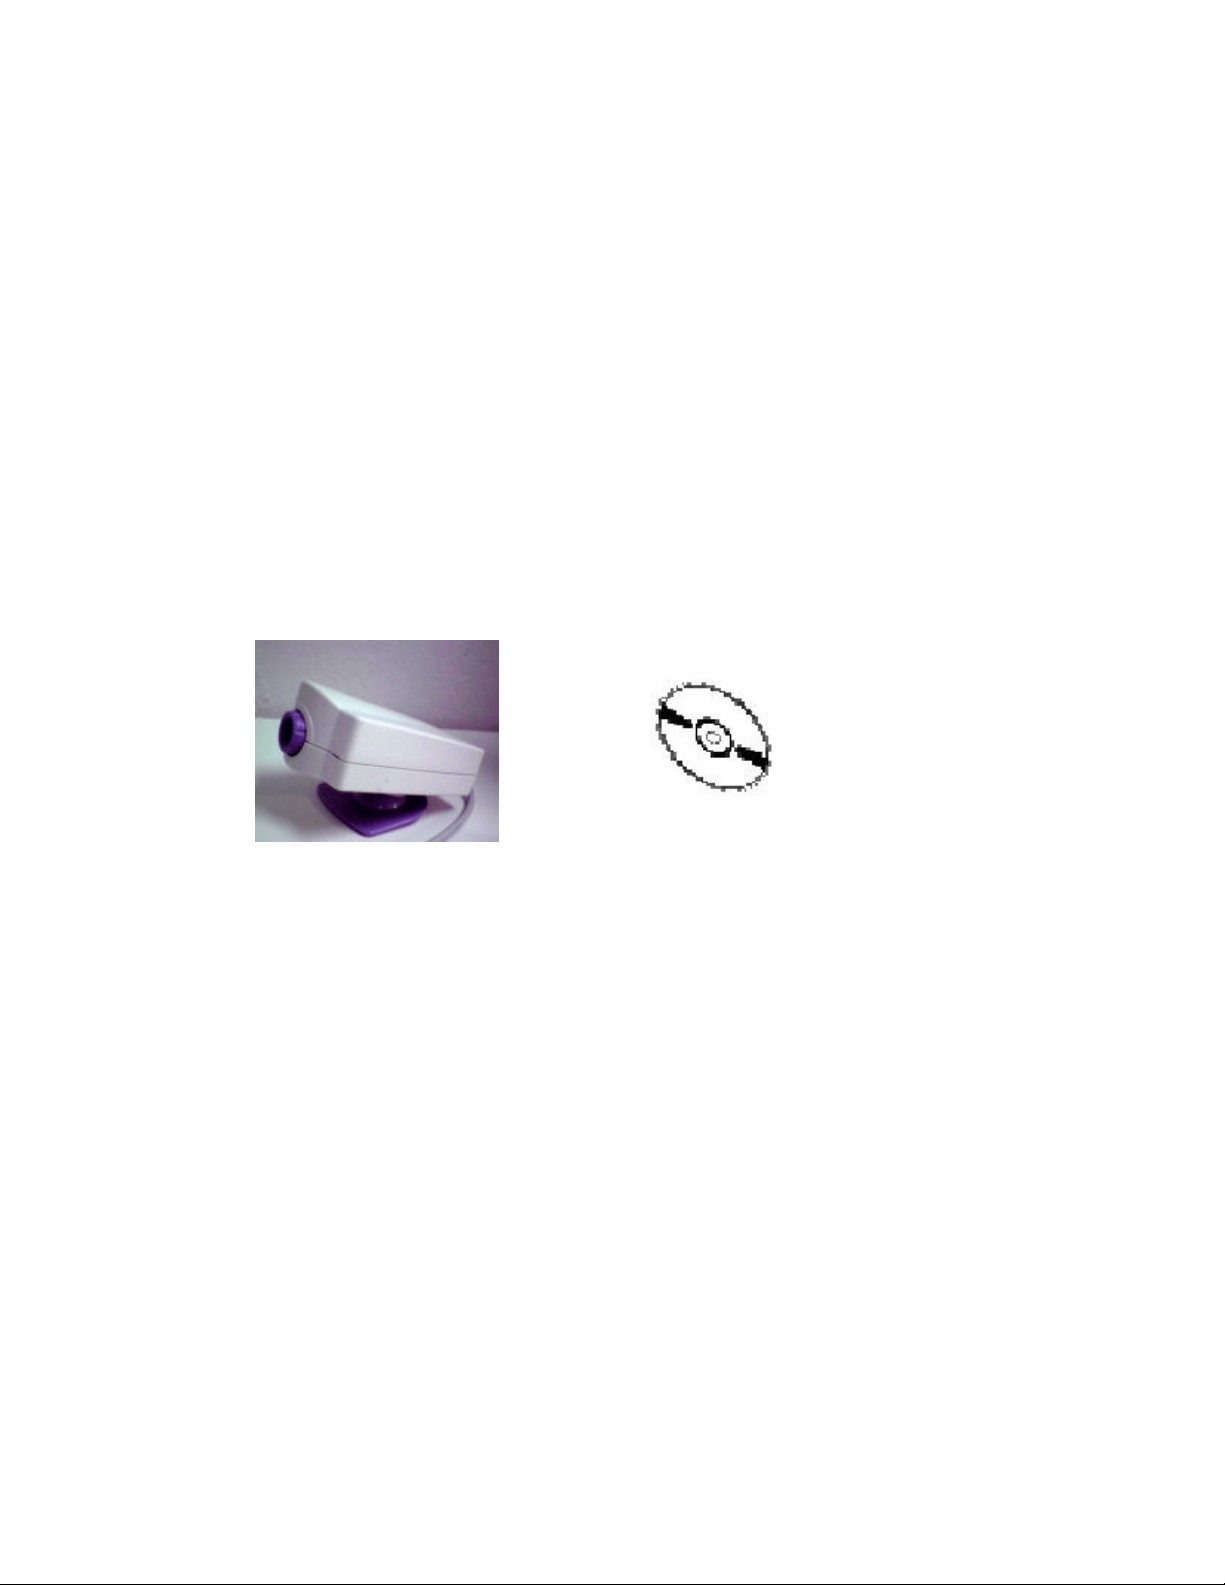
What's In the Box
Before you start the installation, please check the contents of the box to make sure that all parts are
included. There should have one C-it camera with USB cable and one C-it CD. If any items are
missing or you notice any damage, contact the dealer where you purchased the C-it product.
5
1.
C-it PC Video Camera
with USB cable
C-it CD
What You Need
Hardware
o An IBM PC (or 100% compatible) with a Pentium processor that operates at 90 Mhz or faster. The
MMX Pentium processor is recommended, and the faster the Mhz operating speeds, the better.
o 16 megabytes (MB) or more of internal memory (RAM)
o 10 MB of hard disk space
o One available USB port on your computer to plug in the C-it camera.
o An SVGA monitor.
See the user's manual for your computer if you aren't sure about its hardware features.
Software
o Microsoft Windows 95 version 4.00.950b (OSR2) or Windows 98.
o Microsoft Internet Explorer (version 3.0 or later) and Microsoft NetMeeting (version 2.1 or later).
Both Microsoft Internet Explorer and Microsoft NetMeeting are part of Windows OS. If your
computer includes a complete installation of Windows OS, Internet Explorer and NetMeeting are
already installed.
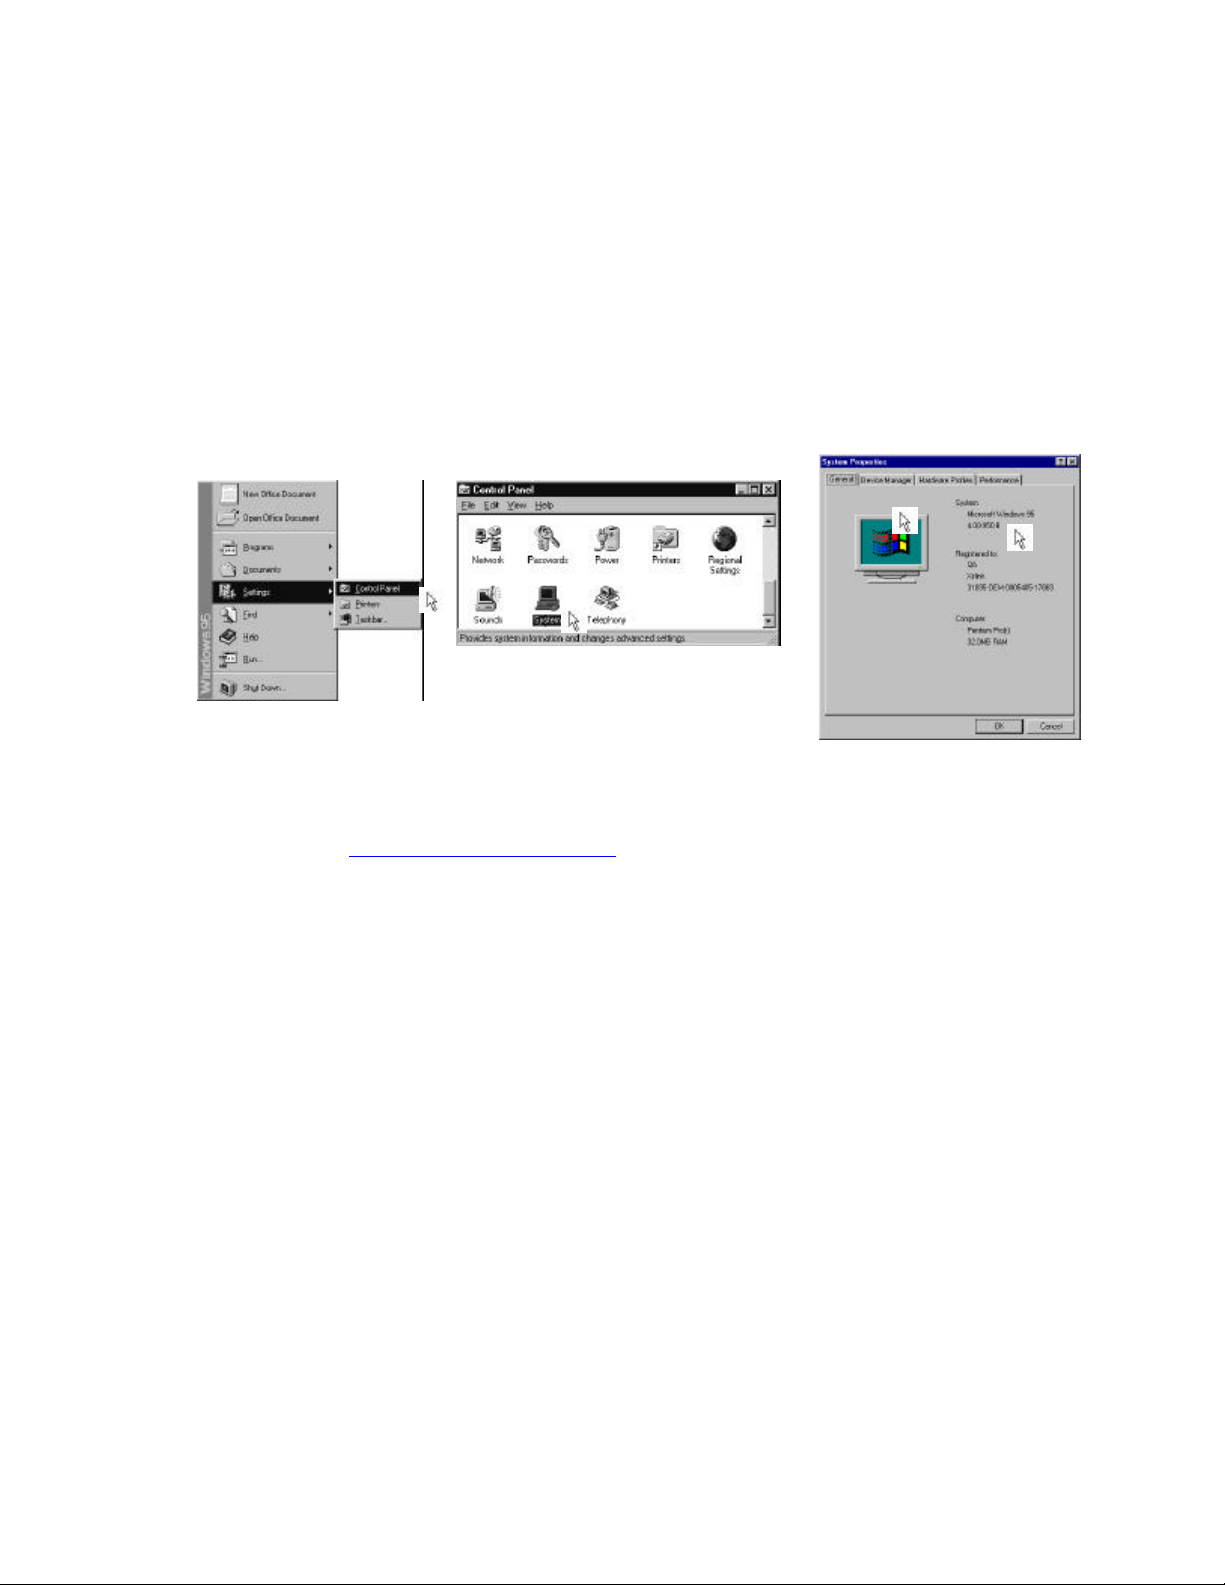
t NOTE: To find the version number of your Windows operating system, select Settings from the
Start menu, open Control Panels, and double-click on the System icon. The System Properties
dialog box shows the version number.
t NOTE: If you have problem in using our camera. Please go to Device Manager page of System
Properties dialog box, to check the Universal serial bus controller. If your PC’s USB controller is
Open Host Controller (OHCI), you may have problem using our camera under Windows 95.
Upgrade to Windows 98 is the best way to solve this problem except change your USB host
controller.
6
To find the version number of NetMeeting or Internet Explorer, open the application and then
choose About (the application) from that application's Help menu.
t TIP: If you don't have Microsoft Internet Explorer or NetMeeting, you can download them from
the Internet at: http://www.microsoft.com/download
OpArt Video Mail
o Need to have e-mail system installed, such as Microsoft Outlook, Netscape Commander, Eudora,
Lotus CC mail and so on.
Internet and Intranet Videoconferencing
o An Internet connection to video conference with the C-it Video Conference Center.
In a typical corporate environment, your computer is connected via Ethernet to the corporate
network, which is connected to the Internet over T1 or ISDN lines. The modem is provided as part
of the network.
Standard Phone Line
o Connection to the Internet through a standard telephone line to video conference with the C-it
Video Conference Center. You need connect to your Internet service provider(ISP) first.
Recipient or Participant Requirements
o For OpArt Video Mail – sender needs compatible e-mail system that allows attachment, but no
additional hardware or software is needed at recipient’s end.
o For Internet videoconferencing -- virtually any videoconferencing software that meets the ITU
H.323 standard (please refer to the software's manual to see if it meets the H.323 standard).
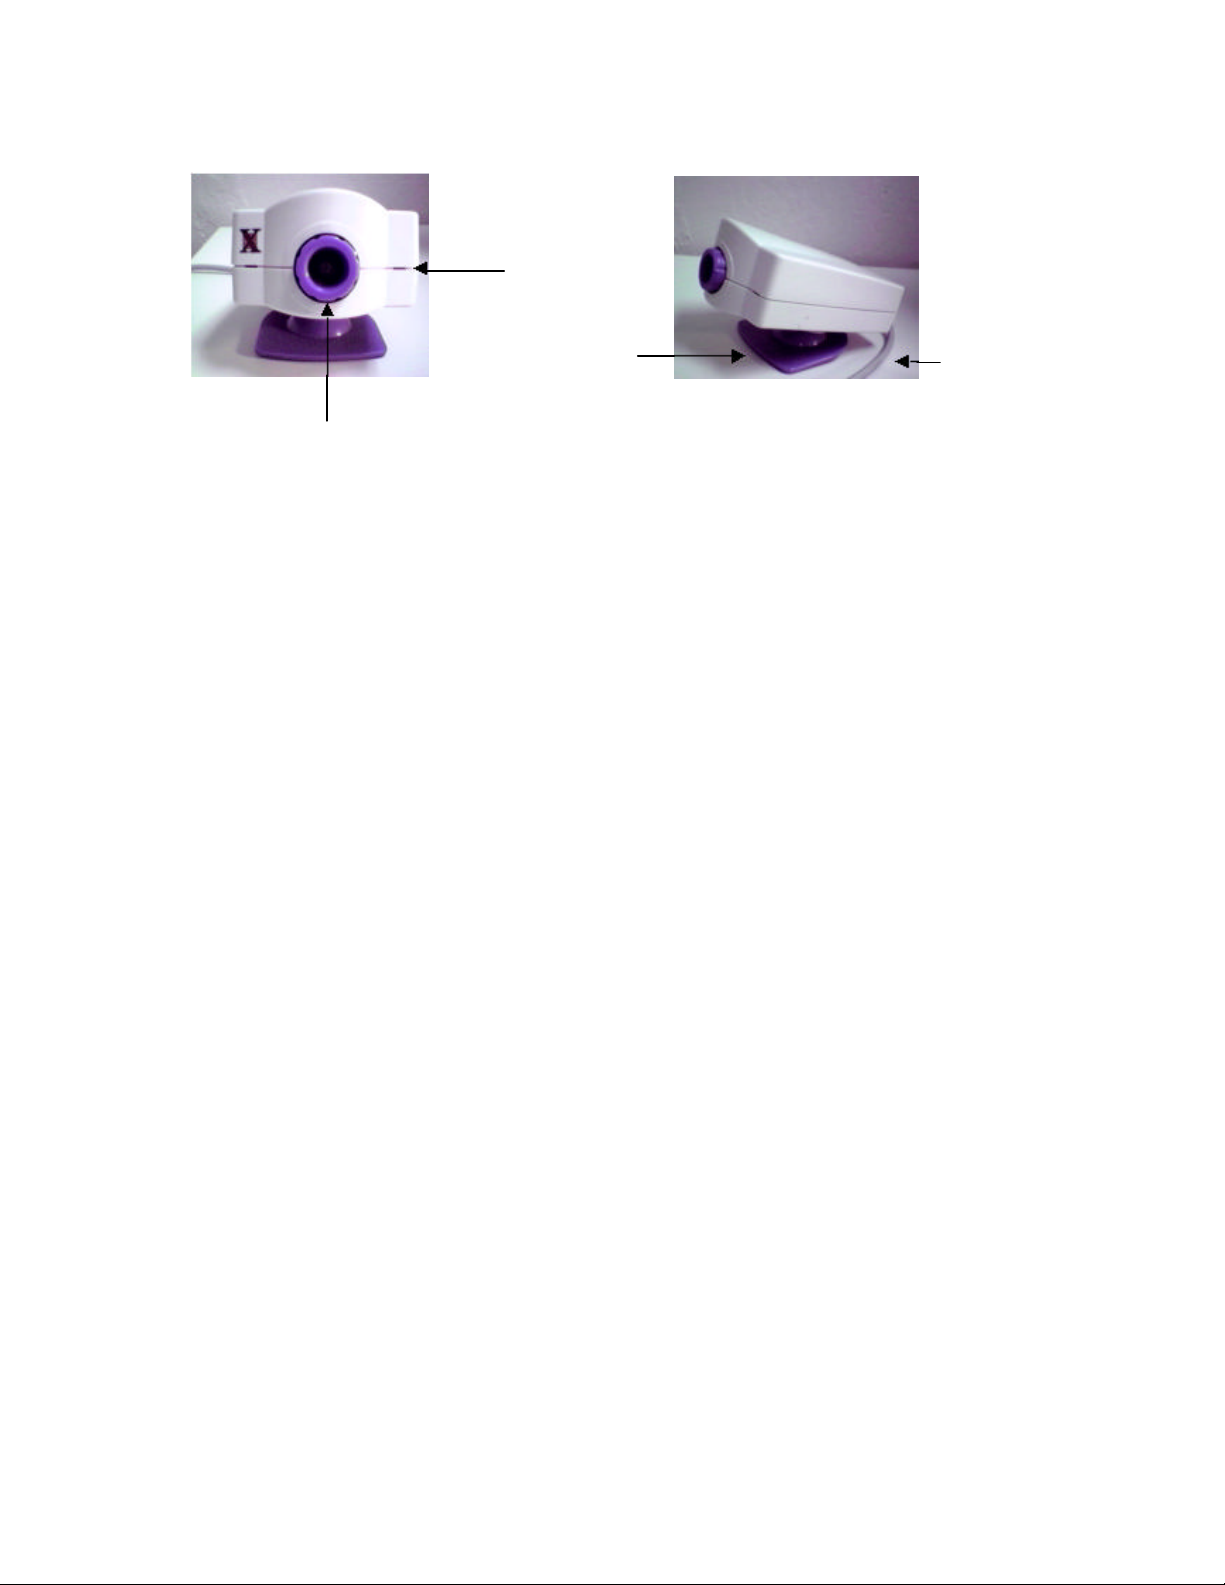
A Quick Look at C-it Digital Video Camera
Power On Light
7
Swivel Base
Focusing Ring
Rotate to focus the image
USB cable
Focus the Camera
You focus the camera with the focus ring.
Adjust the Monitor
For best results you may need to adjust the computer monitor settings.
1 With Windows running, double-click on the My Computer icon.
2 Double-click on the Control Panel icon.
3 Double-click on the Display icon.
4 Click on the Settings tab.
5 From the color palette field, select either High (16-bit) or true 24-bit (32-bit) color.
6 Click OK.
t NOTE: To set the size of the video image on the monitor using the procedure described on page
33.
Hints for Taking Good Pictures
By following these simple hints, you can take quality videos and pictures with the C-it Digital Video
Camera.
Composition
o Aim the camera so the subject is in the center of the image.
o Put the camera on a flat, steady surface. If you have to hold the camera during the shot, hold it still
when shooting.
Lighting
o Use plenty of light on the subject.
o Select similar types of light. If possible, don't mix fluorescent lights with other lights.
o Don't point the camera directly at bright lights or windows.
Video Quality
Using the C-it Video Camera or OpArt Video Mail application, you can adjust the camera settings
that control the image hue, brightness, sharpness, and so on. See pages 18-20 for details.
A Quick Look at C-it applications
OpArt Video Mail
o With this application, you can capture a series of video clip as well as audio and then send it out to
your recipient as a revolutionary new video mail. After OpArt_VM compression, a one minute
video mail will only takes about 1MB of memory space.
C-it Video Camera
o Use this for Capture, Snapshot and with its advanced design, the C-it USB Digital Video Camera
captures video at millions of color and high resolution. In addition, the connection to the USB
port provides high quality video at about 30 frames per second in Camera application, and about
10 frames per second in Conference application.
8
C-it Video Conference Center
o Use the straightforward C-it Video Conference Center to control your conference.
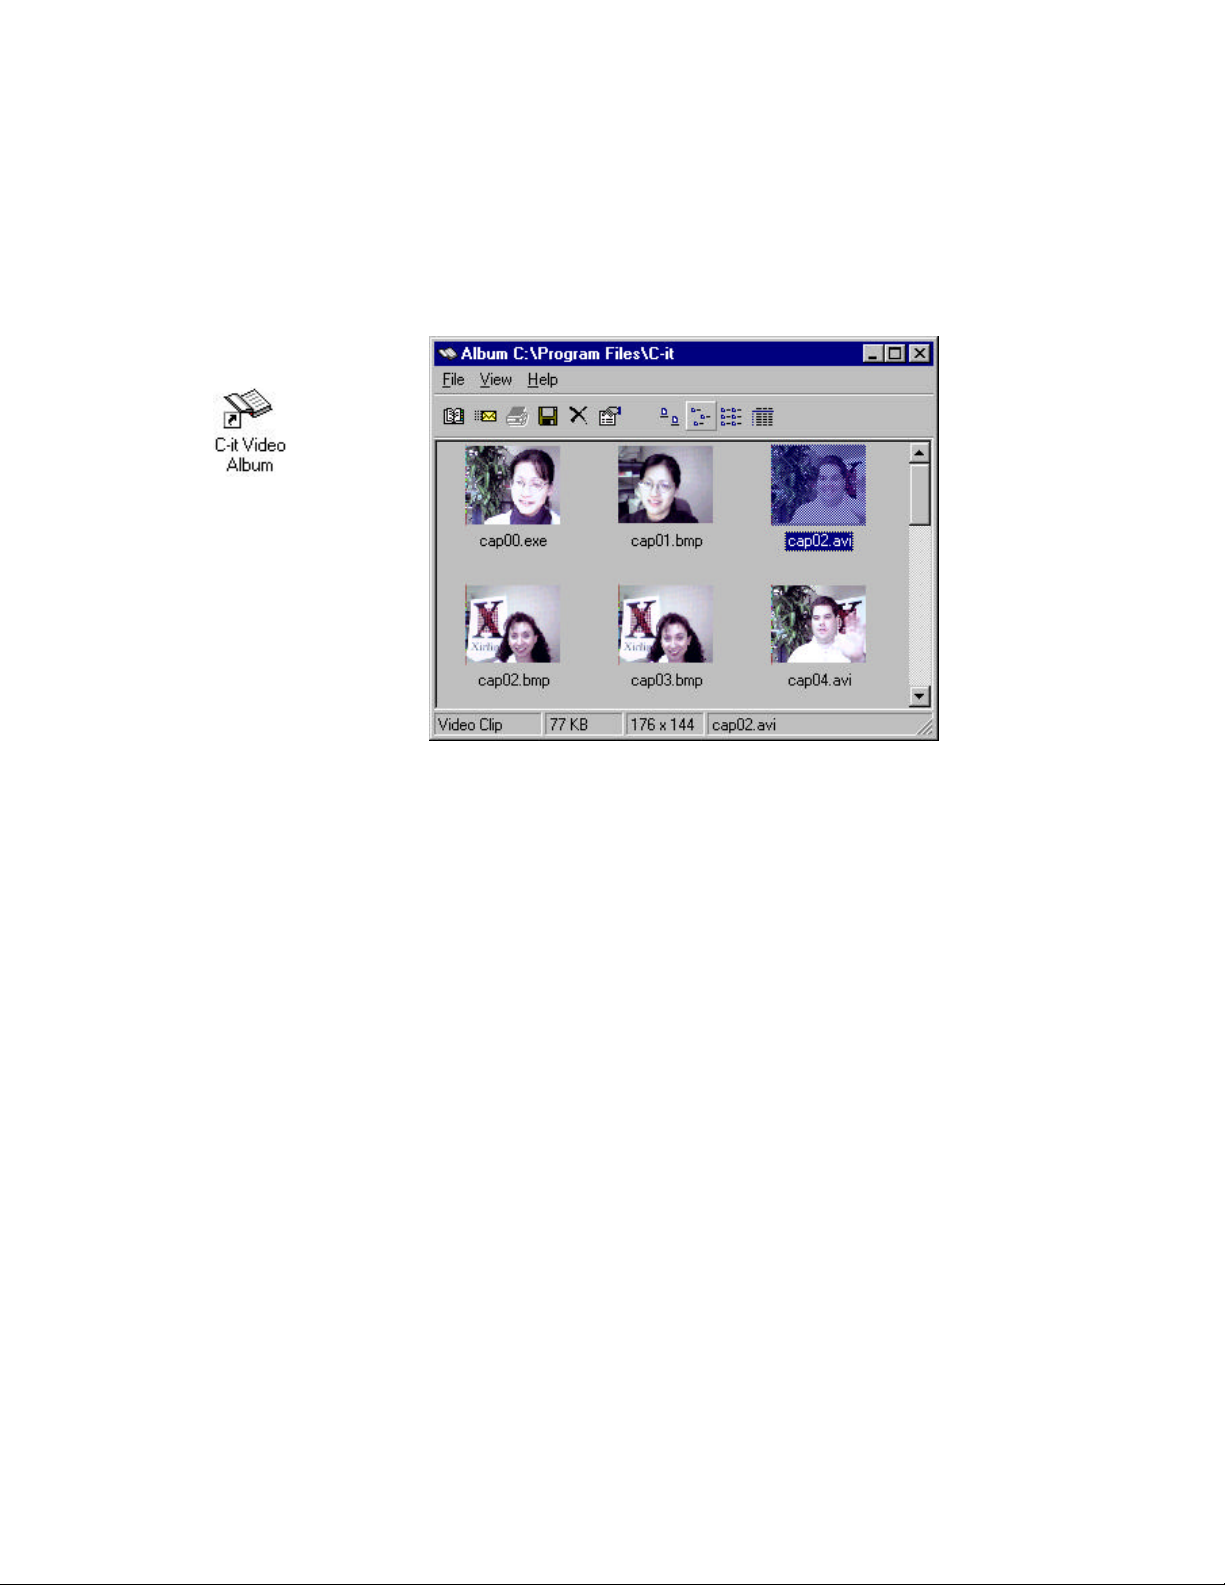
C-it Video Album
o Take snapshots -- grab a frame of the video and save it as a cap*.bmp file in the photo album.
o Take captures – record motions and save it as a cap*.avi file in the photo album.
o Take video mail – record video and audio message and save it as a cap*.exe file in the photo
album.
9

10
2
Installation
Installing the C-it on your computer takes two steps:
o Install the software – make sure you install the software first before plugging in the C-it Digital
Video PC Camera.
o Connect the C-it Digital Video Camera to a USB port
Before You Begin
Before you can send video email with OpArt Video Mail or videoconferencing with the C-it Video
Conference Center, your computer must have all the necessary hardware and software to access the
mail server, the Internet, or your company's Intranet. See "What You Need" on page 5 for a list of the
necessary hardware and software
Registering Your C-it
Please take the time to register your C-it product. Registration is very important because each
participant in a videoconferencing must have an individual copy of the software. Registration also
entitles you to information about product upgrades and other services from C-it. You can register
electronically or by fax, phone, or mail.
Installing the Software
Install the software before you connect the C-it Digital Video PC Camera.
If you've already plugged the camera into the computer, please unplug it before installing the
software.
t NOTE: Each copy of the C-it Software is licensed to be installed on only one computer. Installing
copies on other computers is in violation of the license agreement.
To install the C-it Software
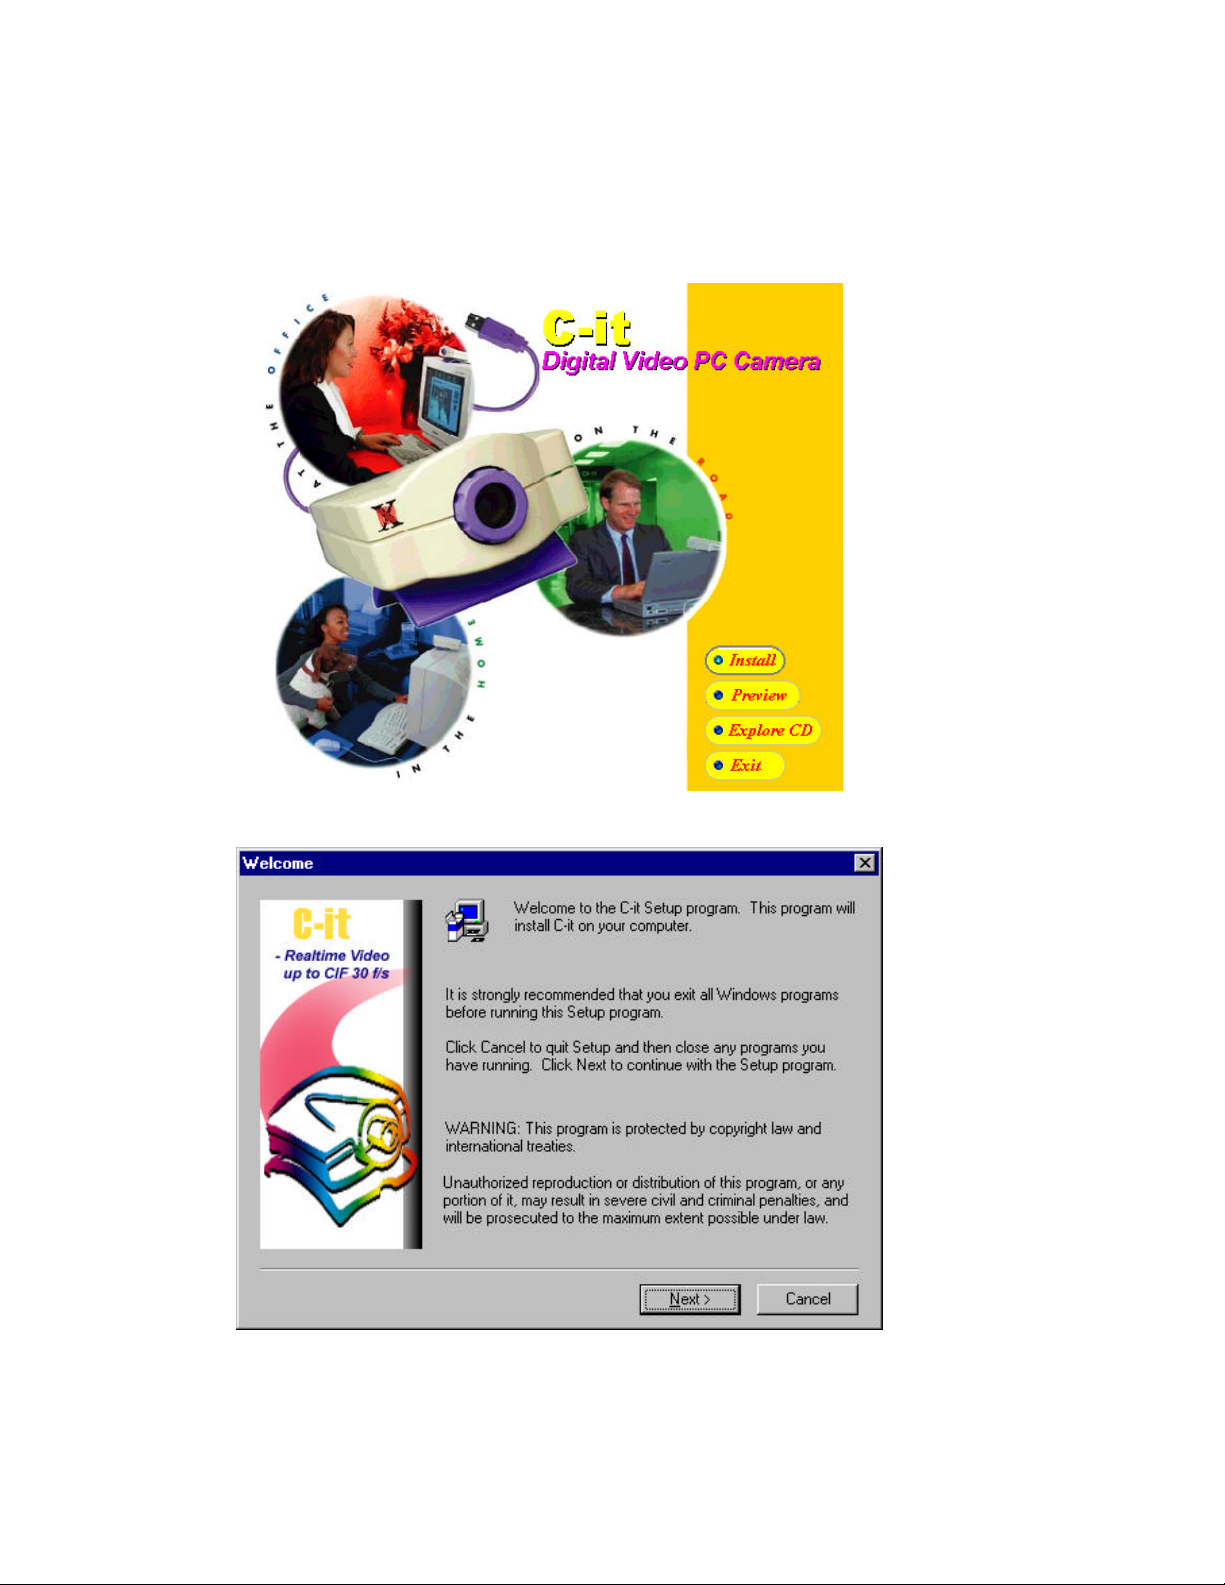
1 Turn on your PC and start Windows95 or Windows98.
2 Insert the C-it CD into your CD drive.
The Autorun starts and displays the initial screen. Click Install.
11
3 The installation procedure starts and you'll see the Welcome dialog box. Click Next.
12
t NOTE: If the Autorun does not start, choose Run from the Windows Start menu. Assuming
your CD drive is the D drive, type d:/C-itAutorun in the Run dialog box and click OK. If the CD
is in some other drive type its letter instead, such as e:/C-itAutorun.
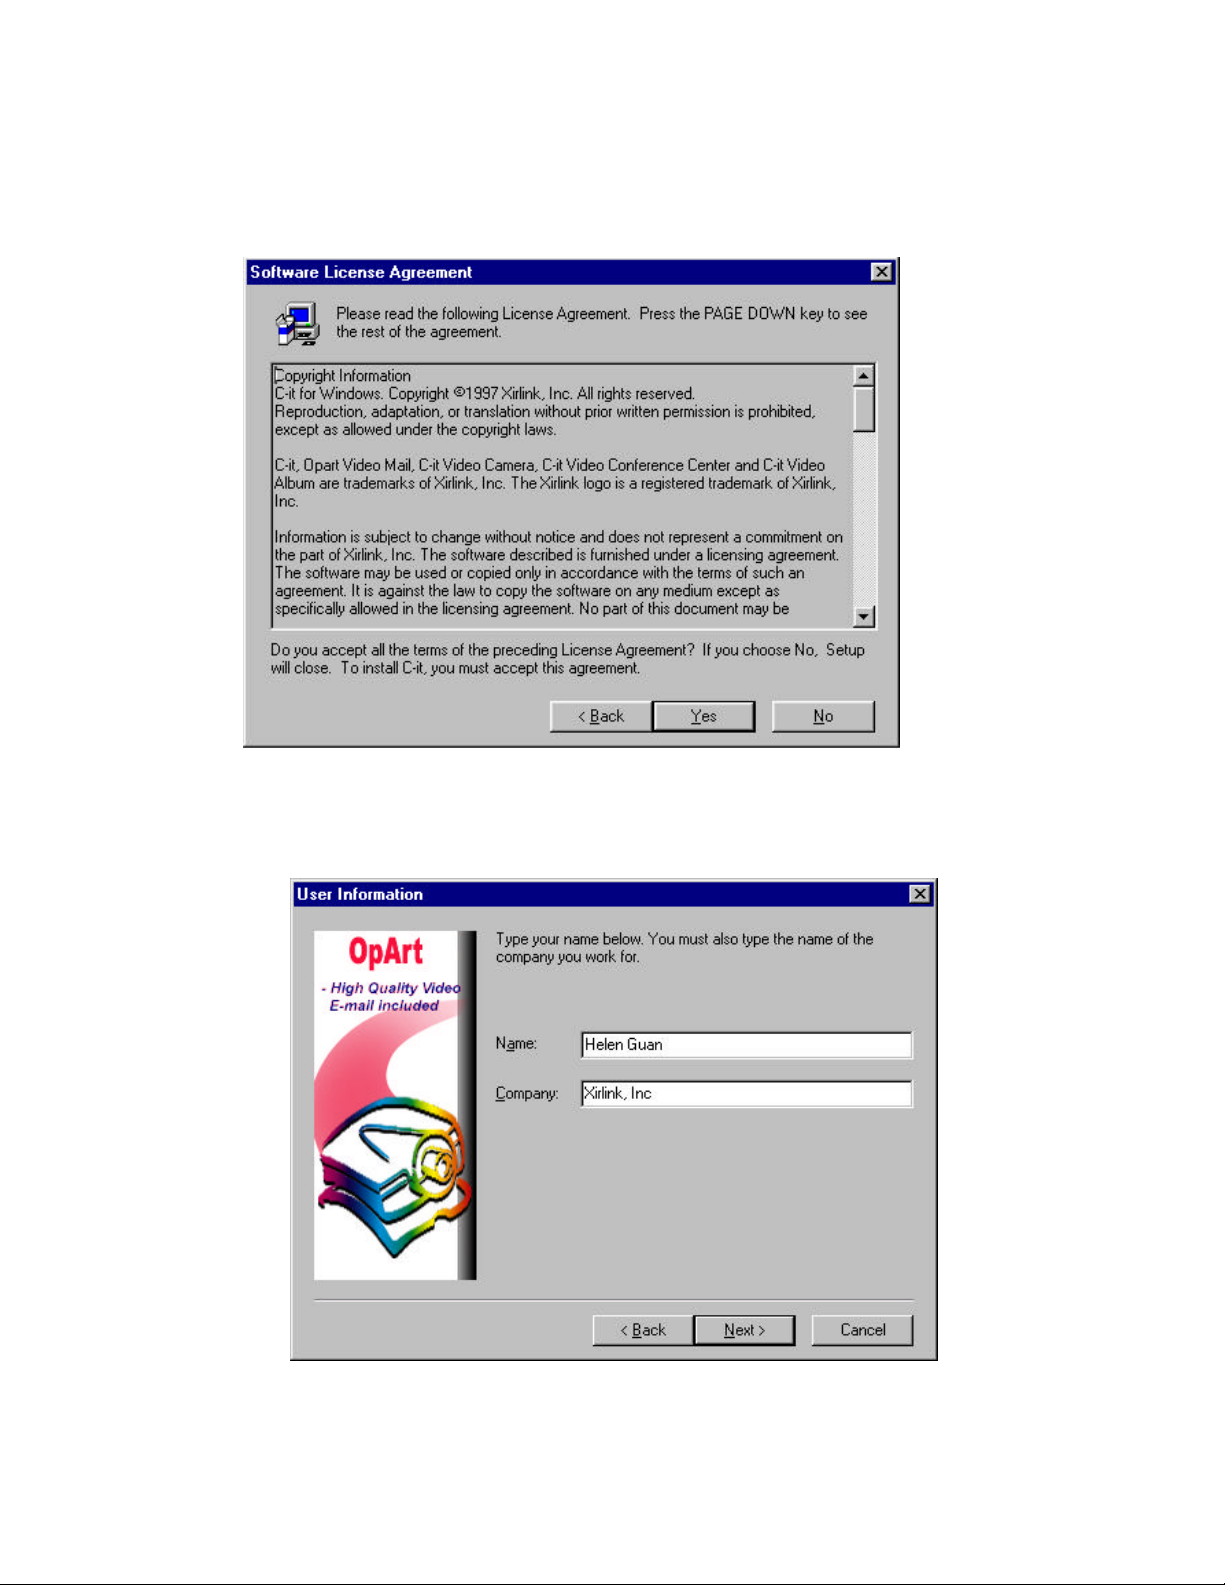
4 This dialog box show the Software Licensing Agreement. Please read this agreement carefully and
click Yes if you agreed.
5 In this next dialog box, enter your name and company name and then click Next.
By the way, to go back to a preceding dialog box during the setup process to change one of your
choices, click the Back button.
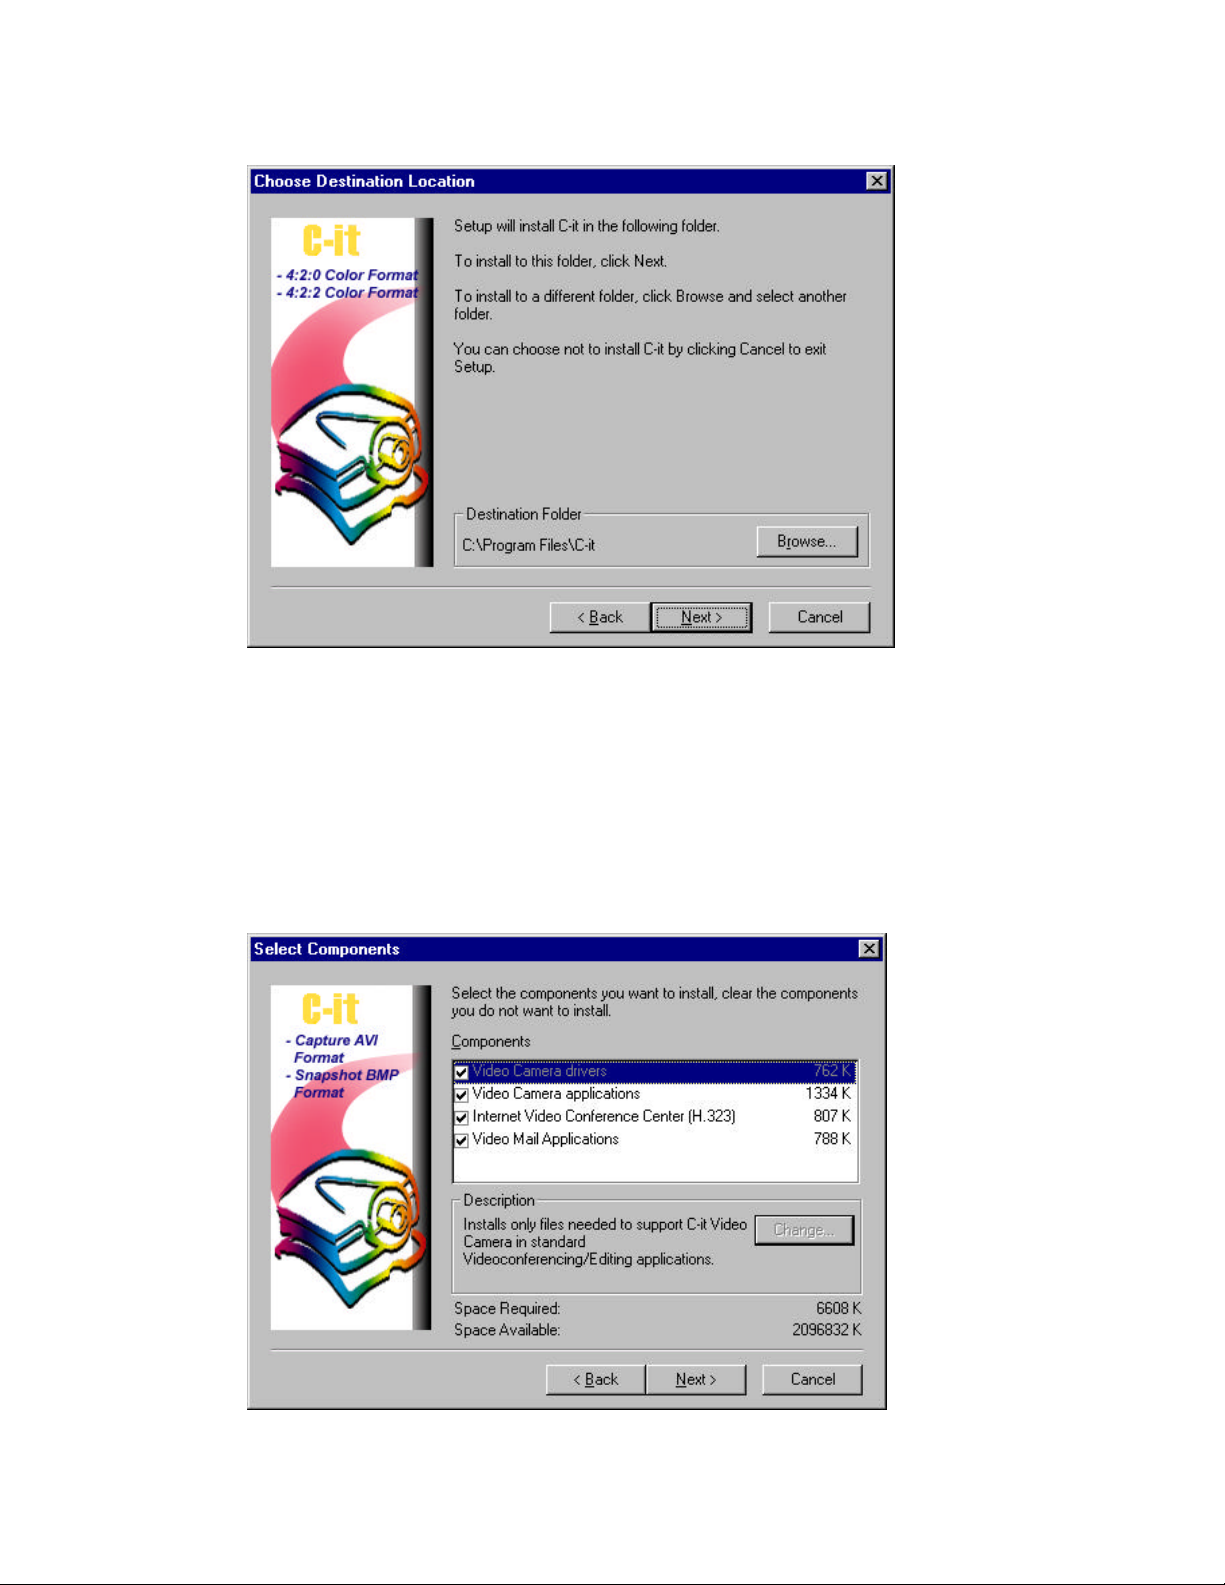
6 The next dialog box shows where the C-it files will be installed. The C-it application files will
be installed in the Destination Folder shown on the dialog box -- typically it will be C:\Program
Files\C-it. Click Next if you want to save in the default folder.
13
To install the C-it files in a different directory, click the Browse button to see the Choose
Directory dialog box. Type a new path name for the files in the Path box, or select an existing
directory from the list. You can also type a path name of a new directory, and the setup
program will create it.
7 The next dialog box show the C-IT components to be installed. Make sure that each
component that you want to install has a checkmark (4) next of it. Click Next.
The drivers must be installed in order for the camera to work properly, and typically you will
install all of the other components. However, if you don't want to install a component, remove
the checkmark (4) in front of the component by clicking on it. A component without a
checkmark won't be installed.
8 Click Next.
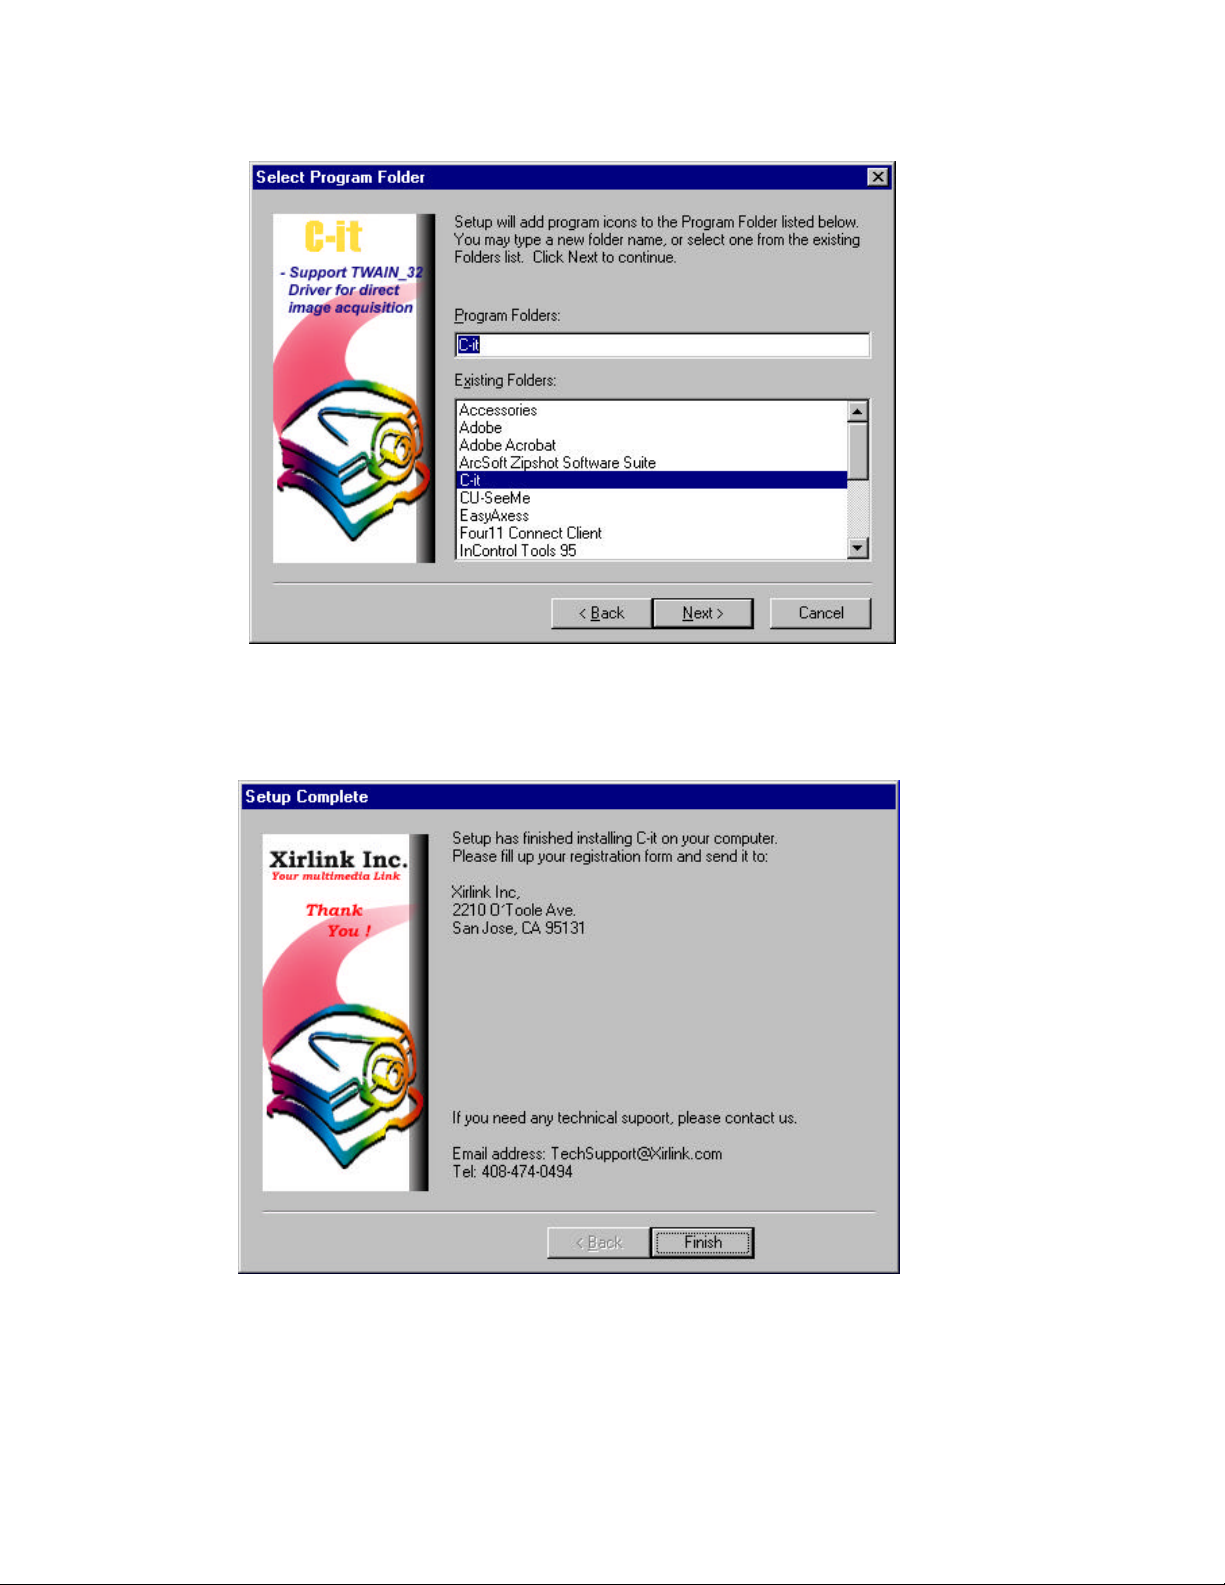
14
9 At this point, installation begins, and progress boxes show how the installation is proceeding.
10After all the files are installed the following dialog box appears. Click Finish and that's it.
You're now ready to connect the camera.
To Connect the C-it Digital Video Camera
To connect the camera:
1. Unwrap the camera carefully.
2. Plug the USB connector on the camera into any available USB port on your computer.
t NOTE: The camera does not have a power plug. It draws its power from the USB port.
You're now ready for video media.
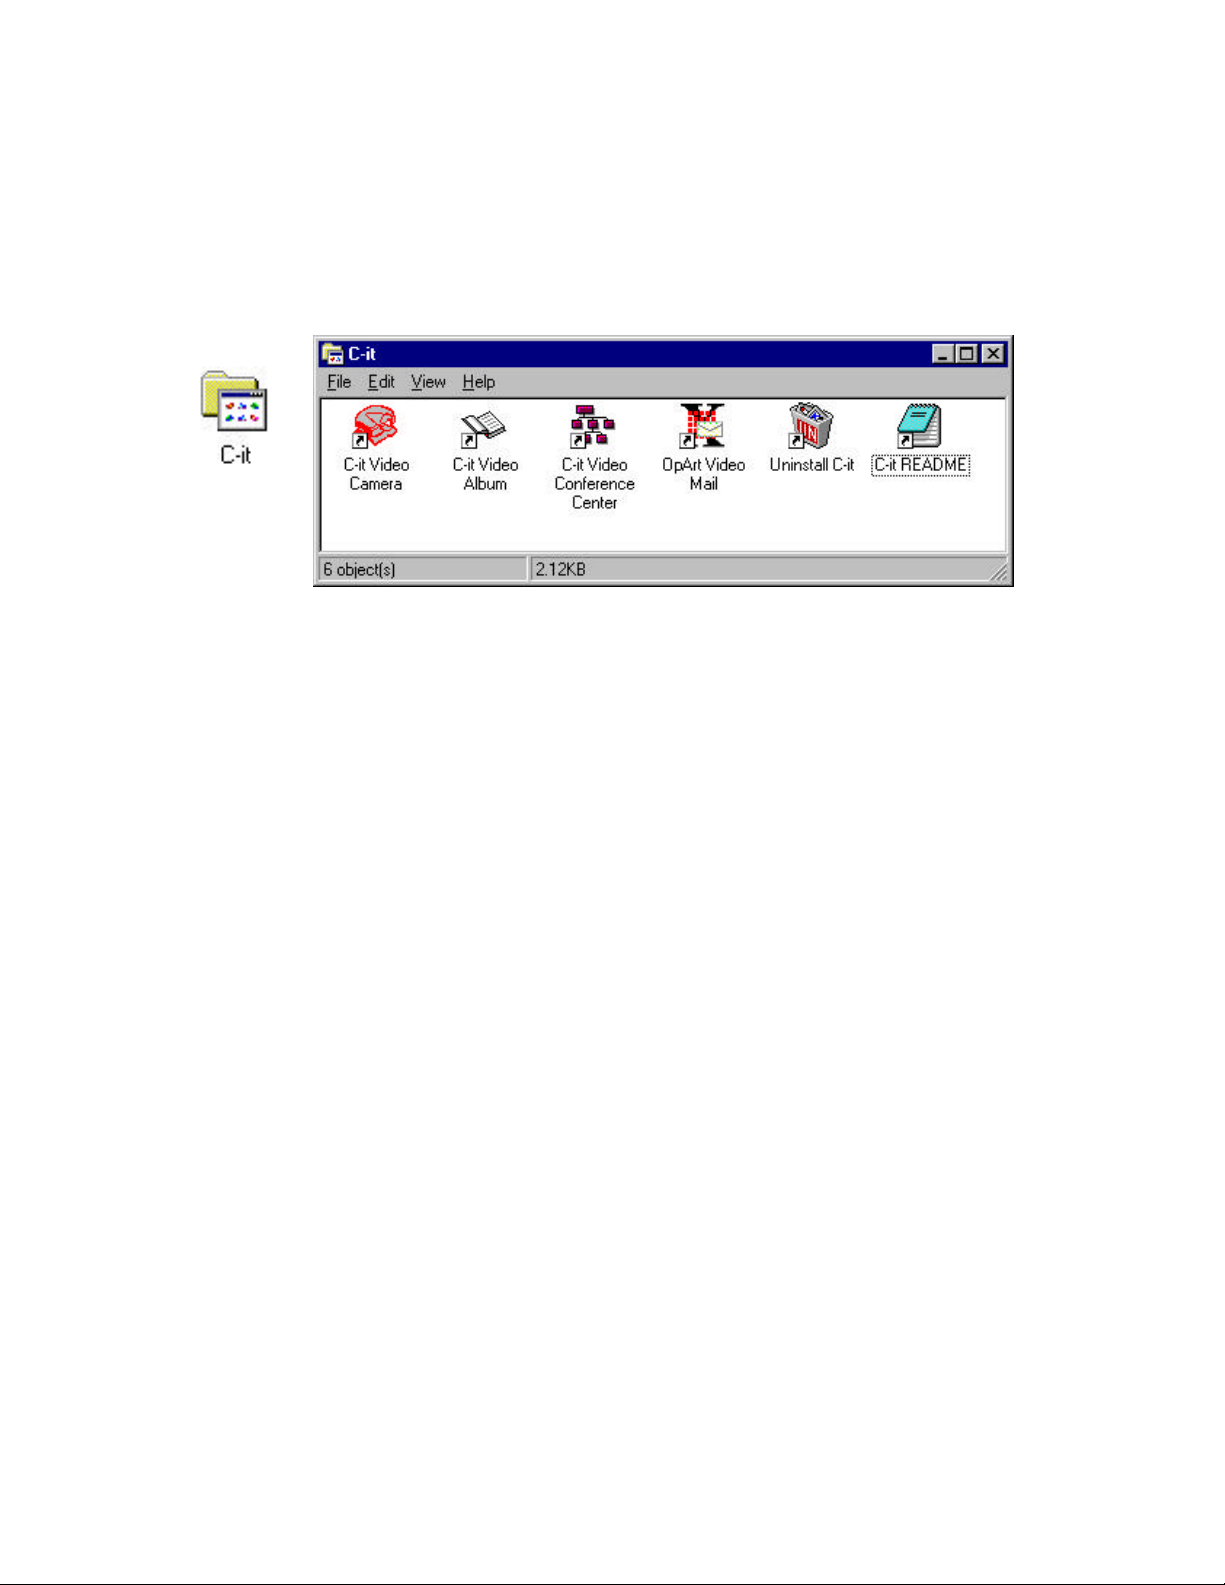
The C-it Icons
Use the C-it icons to start the C-it applications.
Getting Help
For technical support, you can reach us at: 408-474-0494
Between 9:00 a.m. and 6:00 p.m. Pacific Standard Time.
15
While logged on to the Internet, you can
1. Connect directly to our home page at http://www.xirlink.com
2. Connect directly to our product site at http://www.citnow.com
3. Contact our technical support at techsupport@xirlink.com
3
OpArt Video Mail
This Chapter explains how to compose video mail and send it out over the Internet or Intranet
Service Provider.
Using OpArt Video Mail
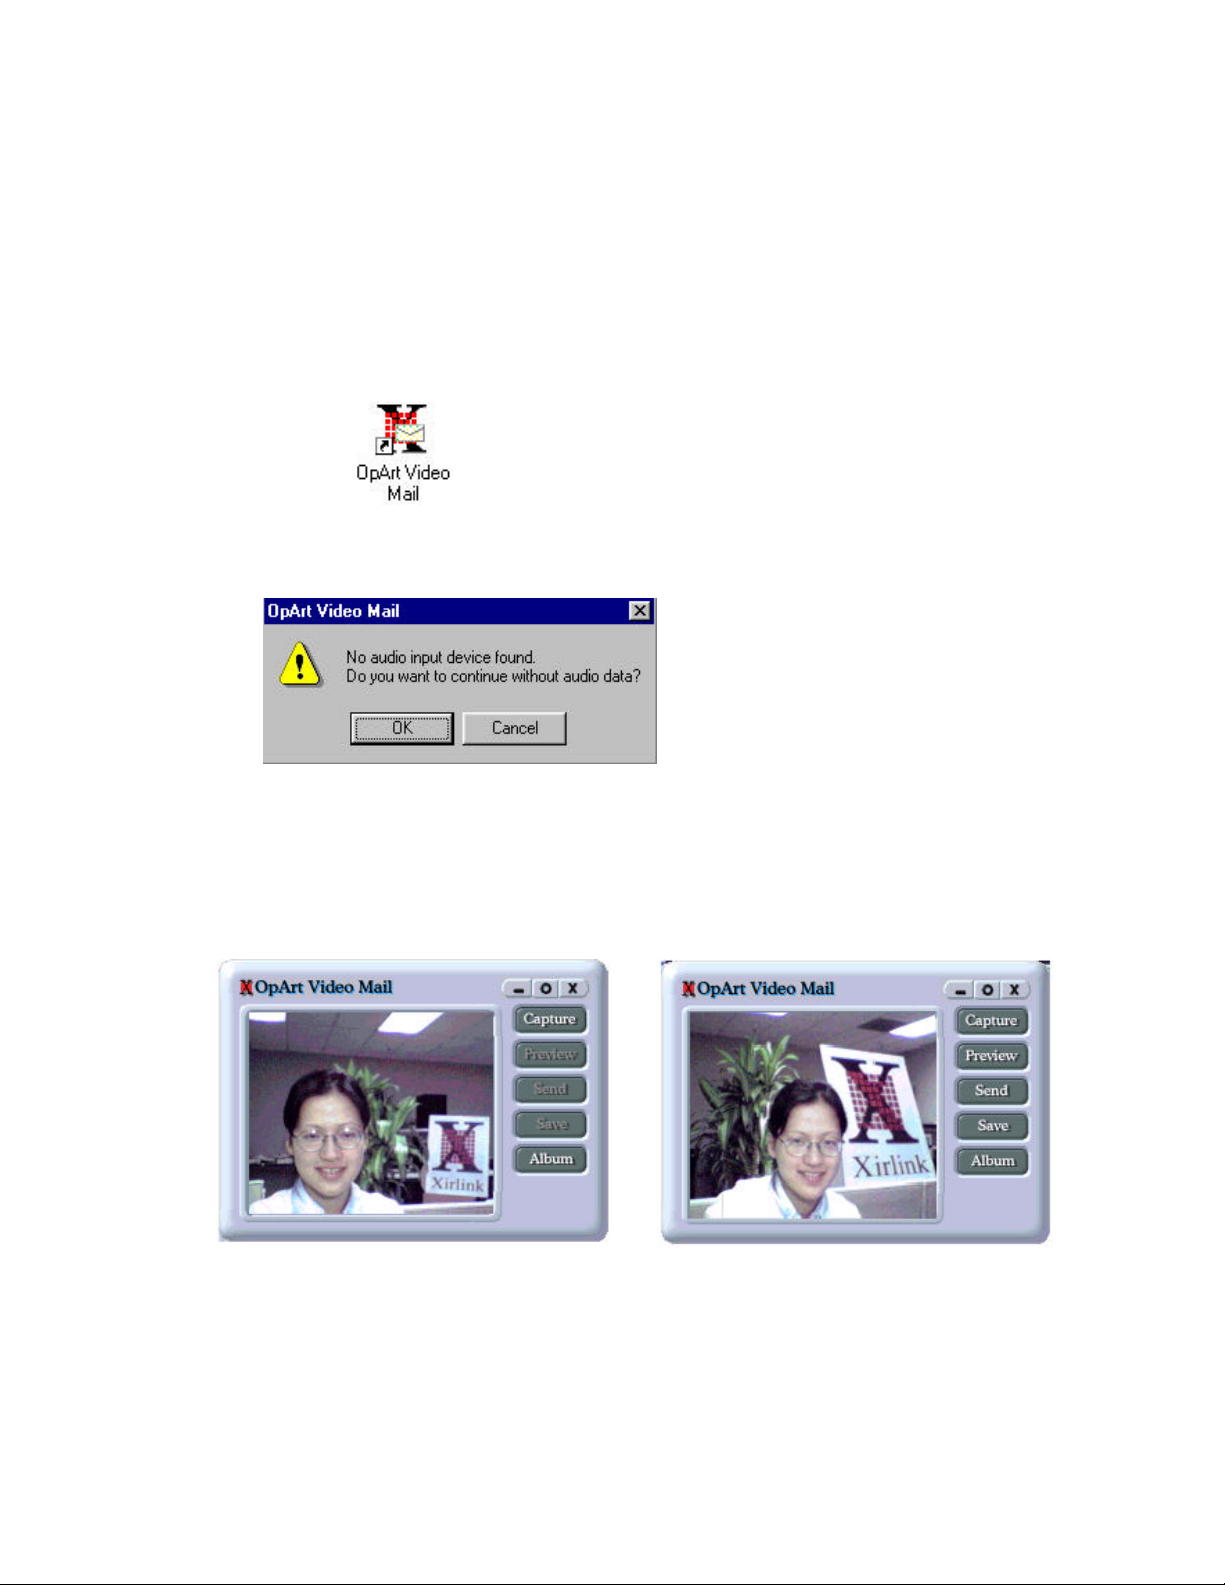
Double click on the OpArt Video Mail icon to open this application
o When start OpArt Video Mail, if you don’t have sound card previously installed, you will get the
following message:
16
Click OK if you want to continue without audio device, or Cancel if you want to go back to
install the device first before using the application.
o When OpArt Video Mail window pops up, you should be able to see
local view. Some buttons on the window will change from inactive to
active after you captures your video mail.
Capture Click on this button when you are ready to record your
video message as well as the audio and make sure you are
speaking into the microphone.
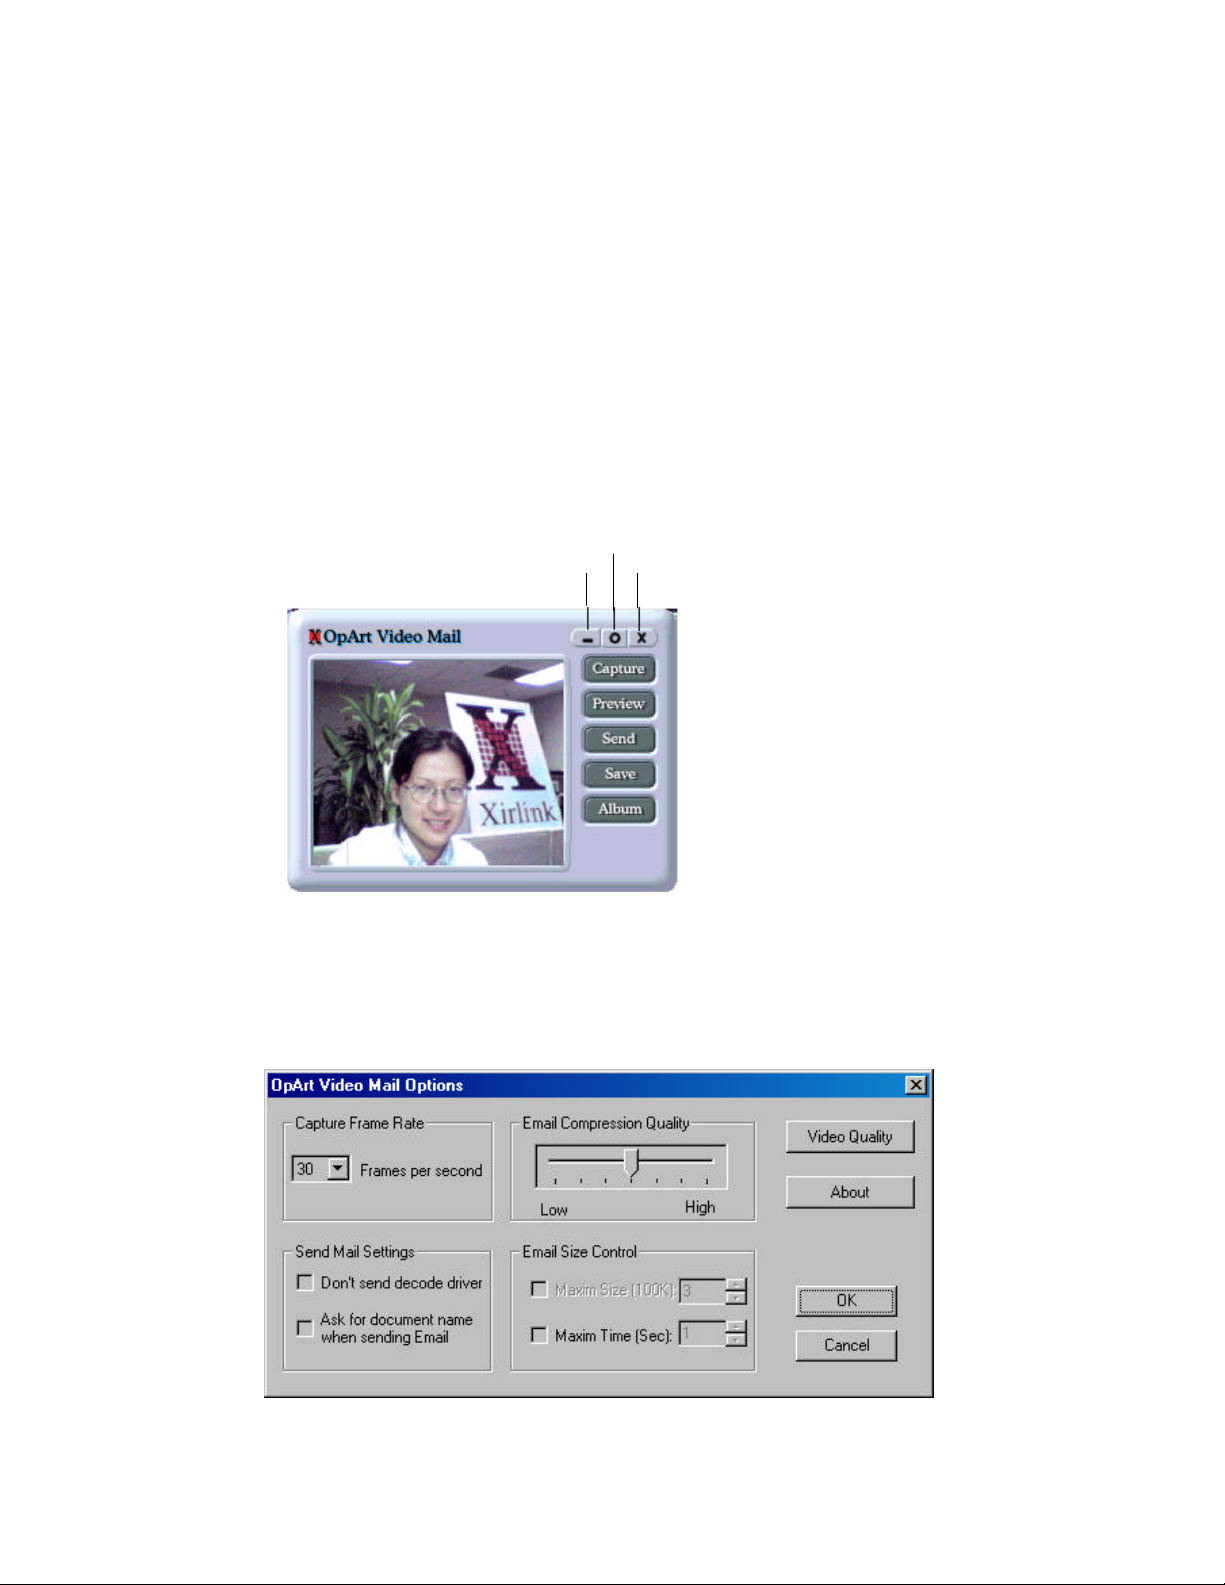
Preview This button will become active once you have recorded a
Option
message. Click on this button to view and listen to your
newly recorded message.
Send This button will become active once you have recorded a
message. Click on this button to send the mail out if you
are satisfied with what you saw in Preview.
Save This button will become active once you have recorded a
message. Click on this button to save your message to a
permanent location for future retrieval.
Album Click on this button to open C-it Album Application if
you want to view any avi or bmp file taken from the C-it
Video Camera Application.
There are three tool commands on the window bar:
17
Minimize
Close
- Click on this button to minimize the OpArt Video Mail
window. To restore, click on the icon from the task bar
o Click on this button to change the Video Mail Options,
like the Capture Frame Rate, Video Compression Quality,
Send Mail Settings, and Email Size Control:

18
Capture Frame Rate – You can select different frame rates per second for the video
capturing. The more the frames per second, the more lifelike video you will get. But
this will also increase the mail size that takes the recipient longer time to download.
Email Compression Quality – You can change the quality from low to high by
moving the bar from left to right. The higher the quality, the longer time it will take
to compress your video but you will have a much clear video image.
Send Mail Settings -- There are two options you can make from this setting:
Don’t send decode driver – a check on this box will enable you to send only
the captured video mail(data file), without any C-it decode driver.
NOTE: If you are sending the mail to someone who didn’t have the OpArt
Video Mail software previously installed, DO NOT check the box. If the
person has OpArt Video Mail installed or has received your OpArt Video
Mail (with decode driver) before, you can check that box, to minimize the
mail size and thus speed up the transmission time.
Ask for document name when sending Email – a check on this box will enable
you to give the captured video mail a name when you send the mail out.
Email Size Control – There are two options here for you to control the size of the
video mail being sent out.
Maxim Size (100K) – putting a check on the box will setup a limit on the
video mail size by the actual file size and whatever number you type into the
space will be a multiple of 100KB of data. For example, if you type 3, it
means the maximum file size of the video mail will not exceed 300KB. It is
very efficient to control the size of your outgoing emails because some email
service providers have certain limit on their clients’ mail size, and if it is over
their preset control limit, the mails will be returned back to the senders.
Maxim Time (Sec) – putting a check on the box will setup a limit on the time
length of the video mail and whatever number you type into the space will be
a multiple of 1 second. For example, if you type 10, it means the maximum
length of the video mail will not exceed 10 seconds.
Video Quality – This will open up another window for you to make changes to the
video qualities, like the white balance, brightness, sharpness, hue, gamma, and
compression control.
Compression Control -- As video captured by camera, you want to send it as
a displayable file, not as raw data. Indeed, it is compressed into a smaller file
so it can be sent in less time. Compressing video makes smoother, more
lifelike motion possible. However, compression can also reduce image
quality. On the other hand, less image compression results in a higher image
quality, but a big amount of data and therefore may produce less lifelike
motion.
No Compression -- The video is sent as uncompressed, raw video data.
This option produces the highest image quality, but probably also produces
less lifelike motion.

High Quality Compression -- Video is compressed to produce the best
quality image with adequate lifelike motion. Use this setting when you are
more concerned about image quality than motion, such as when the camera
is pointed at a presentation screen.
Fast Frame Rate Compression -- Video is compressed to produce the best
lifelike motion with adequate image quality. Use this option when motion
is more important than image quality, such as when you're conducting a
face-to-face conference.
t NOTE: These options control compression done while the camera
captures raw data to preview display mode.
Brightness -- The brightness setting is like shutter speed on a camera, staying
open longer to let in more light. The higher the setting, the more light that
reaches the camera. But if you set it too high, the camera "stays open" for so
long that moving objects will be blurred. You'll probably have to experiment
with this setting to find the best one for different lighting conditions.
If the image is:
t white or washed out -- drag the slider to the left to decrease the light.
t dark or almost black -- drag the slider to the right to let in more light.
t speckled with colored dots -- turn on more lights in the room and then
adjust the brightness.
19
Hue -- Sets the balance of colors in the image. Dragging the hue slider makes
the image look more blue or red. Drag the slider until the colors look correct.
Sharpness -- Adjusts the clarity (or resolution) of the image. Drag the slider
to the left to soften edges in the image. Drag the slider to the right to see a
sharper image.
Gamma -- Gamma is the measure of the degree of contrast of the video
image. Usually the gamma setting does not need to be changed, however, if
you notice that the picture tends to be "washed out" or, conversely, too
intensely colored, you may want to change the gamma setting.
White balance -- Adjusts the amount of white to black balance for your
camera and surrounding lighting. If the picture in the Local window looks
washed out or consists solely of whites and light colors, move the two sliders
to the left to lower the amount of light reaching the camera. If the picture
looks dark or consists solely of dark colors, move the sliders to the right to let
in more light. The Auto option has to be off (unchecked) to drag the sliders.
When the Auto option is selected, the camera tries to correct colors
automatically when the lighting or scene changes. You've set the white
balance correctly when the picture covers the color spectrum fully.
If you will not be pointing the camera in some other direction, you should
only have to set white balance once. But if you point the camera around the
room, you may have to reset the white balance for the conditions of the new
scene.
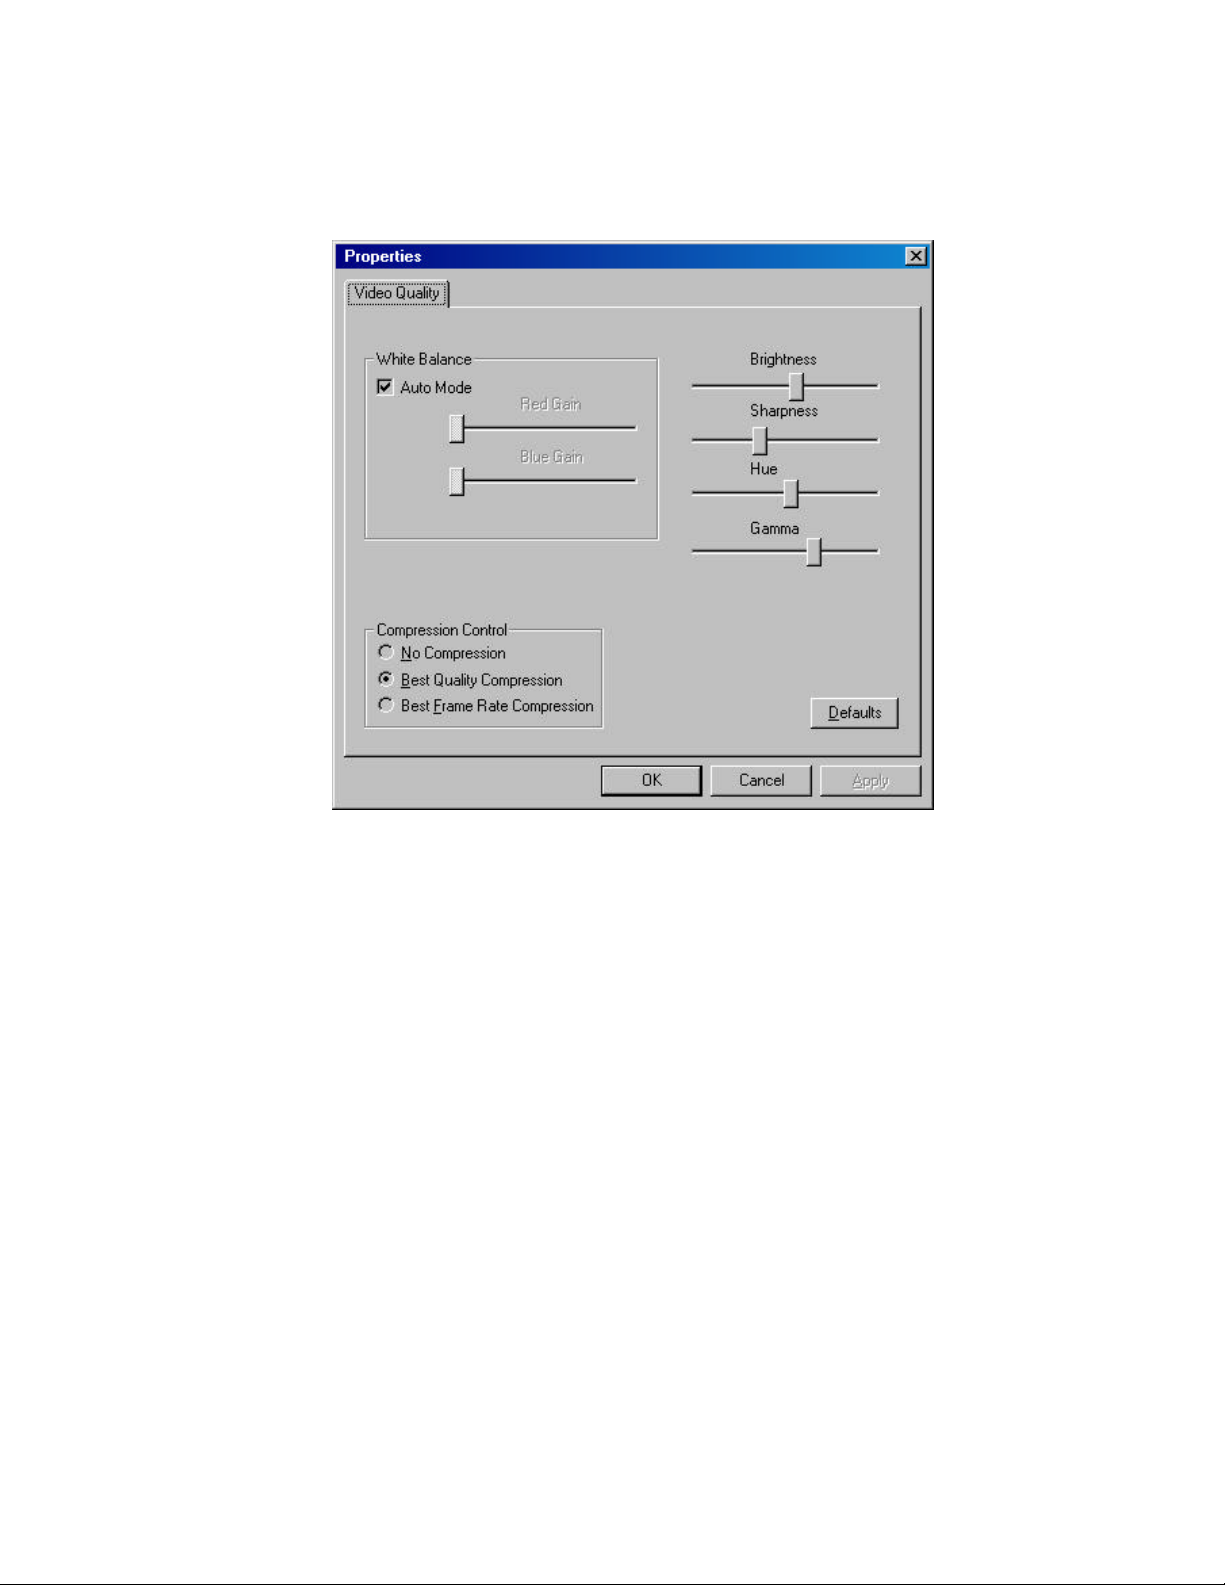
Default button -- Click to return the settings to their original, default values.
Usually you click this button after experimenting with the settings to see how
you might improve the image.
20
Click OK or Cancel to close the Option window.
x Close OpArt Video Mail application
NOTE: If you close the application without sending or
saving the message, you will lose it when program
exists.
 Loading...