

Page 1

Quick Start Guide
Page 2

2
November 2000
2000 Xircom, Inc.
All rights reserved.
Neither this public ation nor any part of this publication may be copied, photocopied,
reproduced, translated or reduc ed to any electronic m edi um or machine-readable
form without the prior written permission of Xircom.
Xircom and REX are registered trademarks of Xircom, Inc. All other product, brand, or
trade names used in t his publication are the propert y of their respective trademark
holders.
Xircom reserves the right to make improvements and/or changes i n t he products and
programs described i n this Quick Start Guide at any time without not i ce.
The software described in this Quick Start Guide i s furnished under a license and may
be used or copied only in acc ordance with such license.
801-0307-001A 11/2000
Page 3

3
Welcome to REX!
The REX 6000 MicroPDA (Personal Digital Assistant) by Xircom is the
world’s smallest, lightest full-function MicroPDA. It’s small enough to fit in
your pocket, easy, and packed with features. With REX, you can:
•
Store thousands of contacts, appointments, notes, and to-do items.
•
Type information directly into REX or automatically copy data stored
in your PC's personal organizer software.
•
Download Web content to display on REX.
•
Select items by touching the screen with your finger or a stylus.
This Quick Start Guide gives basic information about getting up and
running with REX. For detailed information including how to use REX’s
features, view the online user guide using the instructions on page 14.
Important Handling Information
Xircom's REX warranty expressly excludes damage caused by accident
or misuse. You will find the warranty in the online user guide. Please treat
REX carefully and follow these guidelines:
•
Do not bend, flex, or drop REX or strike it against another object.
•
Do not carry REX in your pocket, briefcase, or handbag without its
protective cover: It may break if you apply excessive pressure to it or
if it strikes other objects.
•
Do not allow objects other than your finger or the included stylus to
press against the display.
•
Keep REX away from water or harsh chemicals.
Installation Overview
There are five main steps to setting up REX:
1. Connect REX to your PC.
2. Install the REX software on your PC.
3. Register on
www.rex.net
for free content and services.
4. Configure the synchronization settings.
5. Synchronize the data between your PC and REX.
Page 4
4
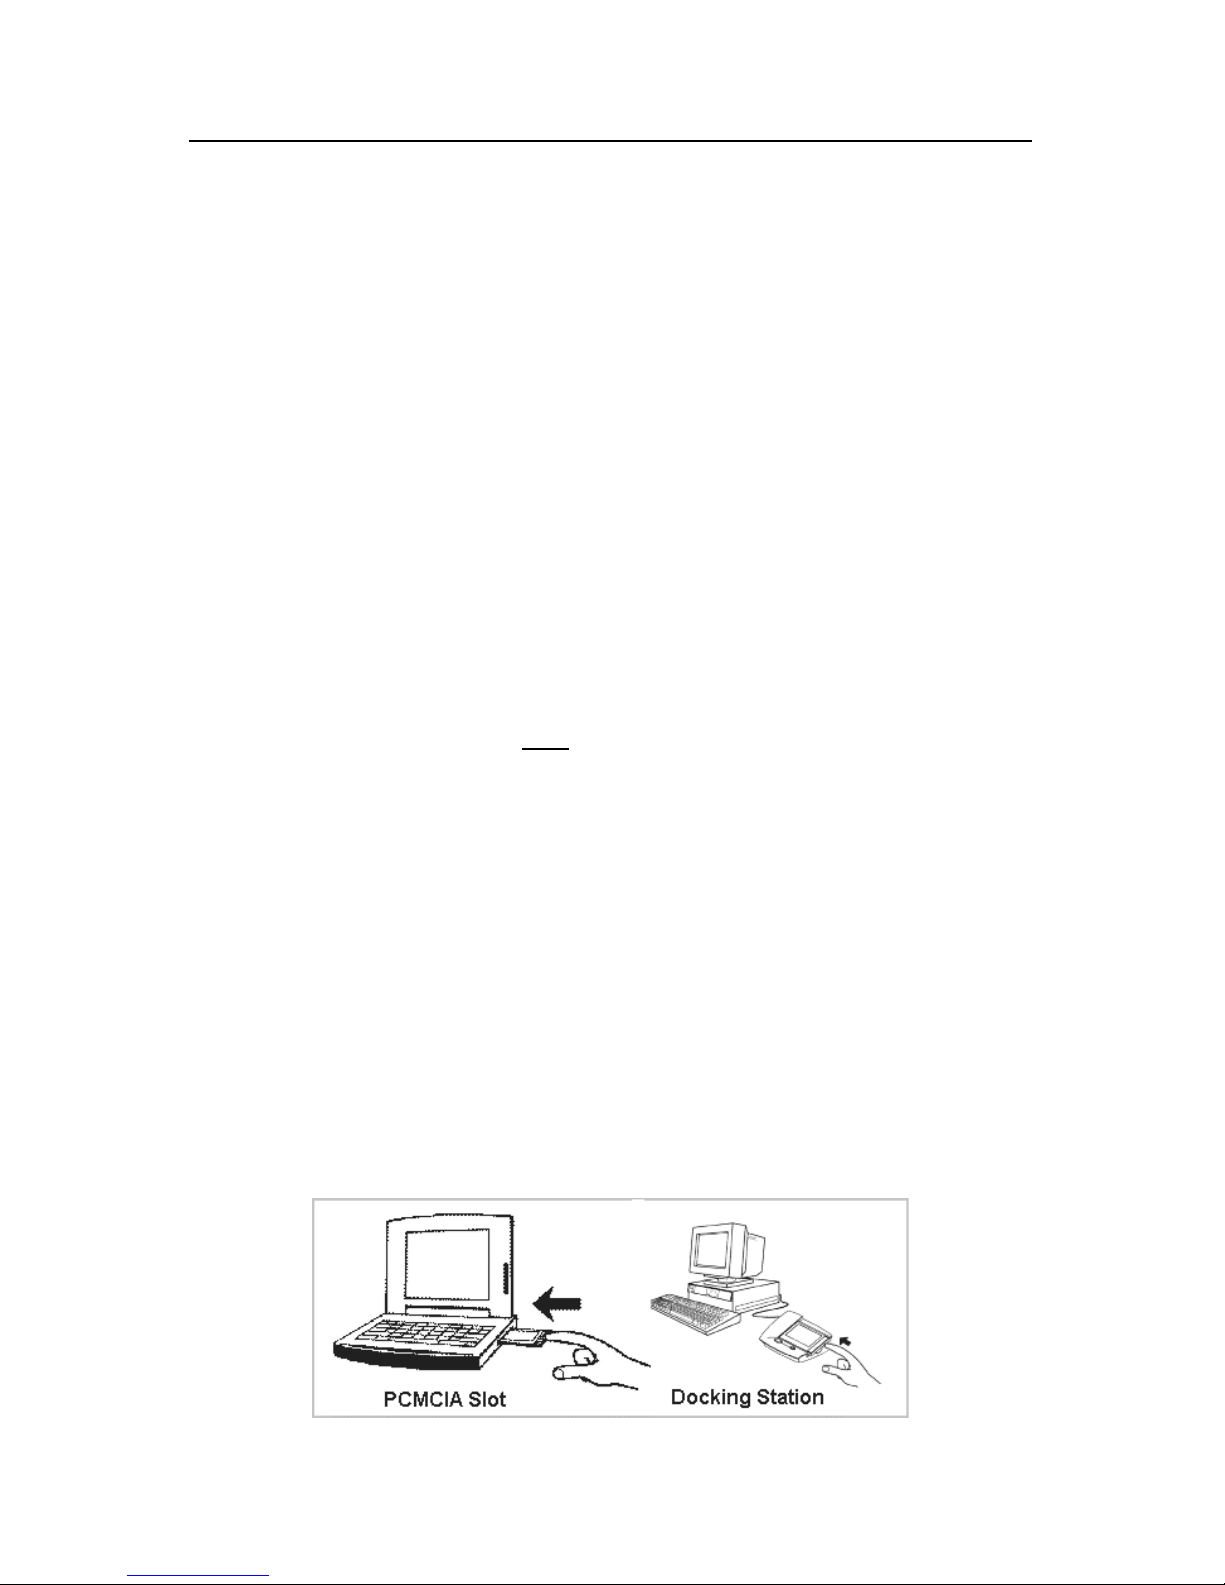
Step 1 – Connect REX to Your PC
If you plan to share data between REX and your PC’s PIM (personal
information manager program such as Microsoft Outlook), you should
connect REX to your PC before installing the REX software. If you do not
have a PIM, the installation will offer to install one for you.
Before connecting REX, write down the product ID number that appears
on the back of REX. You will need it during the registration process.
My REX product ID number
________________________________
•
If your PC has a PCMCIA slot:
Plug REX into the slot face up with
the end opposite the buttons inserted first. You will see a series of
dialog boxes for adding a new driver for a PCMCIA modem. Accept
the default settings and select the
Next
button at each screen. When
you see a
Finish
button, select it.
•
If you have the optional USB docking station:
Insert the REX
installation CD into your CD-ROM drive. Plug the docking station into
your PC's USB port. Insert REX 6000 into the docking station face up
with the end opposite the buttons inserted first. Windows displays a
new hardware wizard screen. At the first two screens, select
Next
. At
the next screen, be sure only
the
Specify location
button is
selected. You will be prompted for a file location. Windows 98 users,
type x:\WIN98
, and Windows 2000 users type x:\WIN2K
(be sure to
substitute your CD-ROM drive letter for the x). At the remaining
screens, select
Next, OK
, or
Finish
. You will go through this process
with the hardware wizard three times, once for each driver to be
installed. At the end of the procedure you will see the New Serial Port
screen, listing Xircom REX Cradle. A green light will illuminate on the
docking station. This completes the process. If you see a red light,
re-insert the REX card and try again.
•
If you have the optional serial-port docking station:
Install the
batteries in the docking station. Power your PC off. Then plug the
docking station into your PC's serial port and power your PC back on.
Insert the REX 6000 into the docking station face up with the end
opposite the buttons inserted first.
Page 5

5
Step 2 – Install REX Software on Your PC
To install the REX software:
1. If it’s not already there, insert the REX CD into your PC’s CD-ROM
drive.
2. Select
Run
from Windows' Start menu. When the Run dialog box
displays, type x:\setup
(substitute your CD-ROM drive's letter for the
x). Then click OK.
3. Select
Install your REX 6000
and follow the on-screen instructions.
A PIM is personal information management software that runs on
your PC and stores contacts, appointments, memos etc. During the
installation you will have three choices with respect to a PIM:
•
Intellisync PIM
–Choose this option if you do not have a PIM and
you want to install the Intellisync PIM provided with REX.
•
Microsoft Outlook
–Choose this option if you have Microsoft
Outlook (part of Microsoft Office) and you want to use it as your
PIM. REX does not support Microsoft Outlook Express.
•
None/Other
–Choose this option if you want to use REX without a
PIM or you have a PIM other than Microsoft Outlook. If you have
another PIM, visit
www.rex.net
.
Follow the remaining on-screen instructions. When the installation is
complete, you may optionally choose from the following selections:
•
View Documentation
– view the online user guide.
•
Visit www. rex.net for free services
– visit the REX Web site to
read about updates and other information pertaining to REX. You
can also sign up for Web services and register your product
online. You will need the product ID number (see page 4).
•
Register your REX 6000
– register your REX card. You will need
the product ID number (see page 4). This step is unnecessary if
you register at
www.rex.net
.
•
Exit
– exits the install program.
When you are done with these options, select
Exit
and remove the CD-
ROM from the drive.
Page 6

6
Step 3 – Register for Free REX Content and Services
If you did not visit
www.rex.net
during the installation, we encourage you
to do so now. By registering online, you can access the following:
•
Service
– Update REX with daily news, sports, entertainment
happenings, and stock quotes.
•
Knowledge
– Learn more about REX and download REX
applications.
•
Community
– Free gifts, contests, exclusive access, and sneak
previews, and a forum for sharing ideas with the REX community.
To register online:
1. Be sure you are logged on to the Internet.
2. Use your Web browser to go to
www.rex.net
.
3. At the opening screen, select
Join Now
.
4. Fill in the form on the sign-up screens and create a user name and
password. Select
Next
at the bottom of the screens to continue.
5. You will see a screen where you can select content to download onto
REX. Follow the on-screen instructions. The content will be
downloaded when you synchronize REX with your PC.
Be sure to visit
www.rex.net
frequently for the latest information,
updates, content, and services.
Page 7

7
Step 4 – Configure Your Synchronization Settings
Synchronization is the process you use to copy data between your PC
and REX and download content from
www.rex.net
. The application you
use to synchronize REX and your PC is called Intellisync for REX.
Before you synchronize data, you must configure your synchronization
settings. Once you have performed a configuration, you need not do it
again, unless you want to change your settings.
To configure synchronization settings:
1. Be sure REX is connected to your computer.
2. Double-click the
Intellisync for REX
icon on the Windows desktop,
or from the Windows Start menu, select
Programs
/
REX 6000
/
Intellisync for REX
.
3. You may see a COM Port Selection dialog box, prompting you to
select a COM port. If so, select the COM port suggested by
Windows.
4. If you have not previously configured Intellisync, you will see the
Intellisync for REX Configuration dialog box. (Otherwise, you will see
the Intellisync for REX dialog box and you can select
Config
.)
5. The central portion of the window lists several REX applications. You
can select the applications you want to synchronize with your PC's
PIM, one at a time. We suggest you choose each of the applications
listed. If you prefer not to synchronize certain applications or you
Page 8

8
want more information, select the
Help
button. Highlight a REX 6000
application (e.g.,
Anniversary
), and then select the
Choose
button.
6. The Choose Translator dialog displays. Here you select the PC PIM
you want to synchronize with REX for the application you chose in the
previous step. Select your PIM from the list of translators.
The File name field is filled in automatically with the name of your
PIM’s data file. If you need to change this field, select the
Help
button
for more information.
7. Once you have made your selection in the Choose Translator dialog,
select the OK button.
You will be back at the Configuration dialog box and the application
you selected will be preceded by a check mark, signifying that the
data is selected for synchronization.
8. Repeat steps 5 through 7 above for the remaining REX applications.
9. When you have finished selecting all the REX 6000 applications,
select OK at the Configuration dialog box. You will see the Intellisync
for REX dialog box and you can proceed with synchronization.
Intellisync will remember your configuration settings and use them
every time you synchronize.
Page 9

9
Step 5 – Synchronize REX with Your PC
Once you have configured your settings as explained above, you will see
the Intellisync for REX dialog box and you can proceed with
synchronization.
1. If you want to download Web content from
www.rex.net
, be sure
you are connected to the Internet.
2. Use the menus to select your synchronization options.
Synchronize
menu:
•
Quick Sync
– Copies only data that has changed since the last
synchronization. Use this method when you sync with only one PC.
•
Full Sync
– Compares all REX and PC data before copying. Use this
method if you sync REX with multiple PCs (e.g., home and office).
Preferences
menu:
•
Check
Sync PIM
to synchronize y our PIM data.
•
Check
Sync REX.net
to copy Web content to REX (requires a
rex.net account, see page 6).
3. Select the
Synchronize
button to start the sync process. When the
process is complete, disconnect REX from your PC.
We suggest you synchronize regularly to keep your data up to date on
your PC and REX. To start the configuration process in the future, first
connect REX to your PC as described earlier. Launch Intellisync for REX
from the Windows desktop or Start menu. If you are using the optional
USB docking station, you can alternatively start the synchronization by
pressing the button on the left side of the docking station.
Now that you are finished with installation and synchronization, it is time
to learn how to use REX 6000.
Page 10

10
Powering the REX Card On and Off
To power on REX, press any of the buttons along the side of the unit. To
power off REX, press and hold the
Home
button (the top button).
To prolong battery life, REX powers off automatically after one minute of
inactivity. For information on changing the time before auto-power-off,
see the
Controls
section in the online user guide. You will find
instructions for displaying that guide at the end of this manual
The Home Screen
When you power on REX, the screen you were at when the unit was last
powered down will display. If you are powering on REX for the first time,
you will see the home screen.
The main modules are:
•
Calendar
– keeps track of your appointments and important dates
•
Contacts
- stores contact information
•
Tasks
– a place to enter to-do items
•
Memos
– a place to make notes, lists, reminders, etc.
•
Web
– a feature you can use to read specially tailored content you
have downloaded from the Web onto REX
•
Calc
– an on-screen calculator
•
Clock
– a clock you can use to keep track of the time and date in
major cities around the world
•
Controls
– where you set up your user preferences, such as whether
to display time in 12-hour or 24-hour mode and the amount of time
before REX automatically powers off
Page 11

11
Operating REX
There are three basic ways to operate REX: touch screen, navigation
buttons, and application buttons.
Touch Screen
Using the touch screen is easy--just touch the item you want to select on
the screen with your finger or the stylus. Most people prefer the stylus
because it makes it easier to be precise in pointing.
Navigation Buttons
You can perform most of REX's operations using the navigation buttons
along the right side of the unit. Here is a summary of what the buttons do:
Home
Goes to the Home screen, and when pressed and held,
powers REX on/off.
Back
Moves back one screen.
Select
Launches the highlighted option.
Up
.
Scrolls up or left, highlighting the previous item in a list.
Down
Scrolls down or right, highlighting the next item in a list.
Application Buttons
The application buttons appear in a horizontal strip along the bottom of
the screen. You can touch them with the stylus or your finger to select
REX's different applications (e.g., Calculator, Calendar, Contacts, etc.).
Page 12

12
Replacing REX’s Batteries
Rex’s batteries should last for 4 to 6 months. REX will display a warning
when the batteries are running low. Use two replacement batteries, size
CR2016, available at most electronic and watch stores. To replace
batteries:
1. Power off REX.
2. The battery compartments are on the edge nearest the buttons.
Position the REX card so the battery compartments are facing you.
Unbend a paper clip and insert its tip into the small hole on one of the
battery compartment doors.
3. Gently push the battery compartment door outward toward the
outside edge of the unit. Push the door out to about a 45-degree
angle with the body of the unit.
4. Remove the old battery and insert a new one with the positive (+)
side facing the front of the REX card.
5. Gently close the battery compartment door until it snaps shut.
6. Repeat the above steps for the second battery.
7. After replacing the batteries, you must recalibrate the touch screen
(see the picture in the next section). When you see the calibration
screen, touch the center of the on-screen target. We suggest using
the stylus rather than your finger, for greater accuracy. When the
target moves to a different location, touch its center again. Repeat
this step until the calibration screen disappears.
Page 13

13
Resetting REX
On rare occasions, you may experience a system failure. REX’s screen
may “freeze” and the touch screen and buttons will not operate properly.
If this happens, you will need to reset REX. When you reset the unit, all
your data will be kept intact except for anything you did not save before
the freeze.
To reset REX:
1. Unbend a paper clip and insert its end into the small hole on the back
of the unit. The hole is located near the edge opposite the battery
compartments. The Touch Screen Calibration screen displays.
Touch the center of the on-screen target. We suggest using the
stylus rather than your finger, for greater accuracy.
2. The target will move to a different location. Touch its center again.
Repeat this step until the calibration screen no longer displays.
Using the Intellisync Mobile Desktop Software
During installation, you had the chance to specify what PC software to
use as your PIM. If you chose the Intellisync PIM, the installation program
copied the Intellisync Mobile Desktop software to your PC. You may w ant
to use the Intellisync Mobile Desktop to keep track of your contacts,
memos, calendar items, etc. on your PC, and to synchronize this data
with REX.
To start the Intellisync Mobile Desktop:
•
From the Windows Start menu, select
Programs
/
REX 6000
/
Intellisync Mobile Desktop
.
For information on how to use Intellisync Mobile Desktop, select the
Help
menu after starting the program.
Page 14

14
For More Information on Using REX…
For detailed information on how to use REX, use your PC to view the
online user guide. The user guide is in HTML format and will display in
your Web browser. There are three ways to view the guide:
•
From the Windows Start menu, select
Programs
/
REX 6000 /
Online Documentation
.
•
You can view the documentation on the REX Web site:
www.rex.net
•
You can view the documentation directly from the included REX
installation CD-ROM. Insert the CD-ROM into the drive. Select
Run
from Windows' Start menu. When the Run dialog box displays, type
x:\setup
(substitute your CD-ROM drive's letter for the x). Then click
OK
. When the REX 6000 screen comes up, select
View
Documentation
.
 Loading...