

Xircom RBEM56G-100BTX User Manual

RealPort
TM
CardBus Ethernet 10/100
+Modem 56
User’s Guide

March 1999
Xircom reserves the right to make improvements and/or changes in
the products and programs described in this User’s Guide at any
time without notice.
The software described in this User’s Guide is furnished under a
license and may be used or copied only in accordance with such
license.
©1999 Xircom, Inc. All rights reserved. Neither this publication nor any part of this publication may be copied, photocopied,
reproduced, translated or reduced to any electronic medium or
machine readable form without the prior written permission of
Xircom.
Xircom is a registered trademark and RealPort, RealView,
GlobalACCESS, Xcessories, BatterySave, CountrySelect, Digital
Shield, Cellular Connection Kit, and GSM Connection Kit are
trademarks of Xircom, Inc. K56flex is a trademark of Lucent
Technologies, Inc. and Rockwell International.
Some of the product names herein have been used for identification purposes only and may be trademarks of their respective
companies.
801-0273-001A 3/99

Contents
Hardware Installation............................ 1-1
Windows 95 and 98 Installation ............ 2-1
Plug and Play Installation .................................................... 2-1
Troubleshooting Modem Installation ................................... 2-3
Windows 95 and 98 Driver Parameters ................................ 2-5
Windows NT 4.0 Installation .................. 3-1
Installing under NT 4.0........................................................ 3-1
Windows NT Driver Parameters ...........................................3-3
Diagnostics and Troubleshooting .......... 4-1
Diagnostic Self Tests ..........................................................4-1
Troubleshooting Checklist................................................... 4-3
Keyword Reference (All Drivers) .......................................... 4-4
Appendixes............................................A-1
A. Support Services.............................................................A-1
B. Specifications ................................................................. A-4
C. Lifetime Limited Warranty ............................................... A-5
D. Regulatory Agency Notices .............................................A-8
E. Software License Agreement.........................................A-18
Windows 95, 98 and NT Online Documentation
See the Help file HELPDOCS.HLP on the Xircom CD-ROM
for additional information. After running SETUP.EXE, access
this file from the Xircom Utilities program group.
Windows 3.x Installation Utility
For Windows 3.x environments, run the Installation
Program INSTALL.EXE from the Xircom CD-ROM. For
additional configuration information, see the Windows Help
file HELPDOCS.HLP on the Xircom CD-ROM.

iv RealPort CardBus Ethernet 10/100+Modem 56 User’s Guide
IBM OS/2 installation
For IBM OS/2 installation instructions, see the Windows
Help file HELPDOCS.HLP on the Xircom CD-ROM.

Hardware Installation 1-1
CHAPTER 1
Hardware Installation
The Xircom RealPort CardBus Ethernet 10/100+Modem 56 provides access to both 10Mbps and 100Mbps networks with a single
cable, and auto-negotiates 10Mbps or 100Mbps network speed.
Modem speeds up to 56Kbps are supported, using either the V.90
or K56flex standard. The RealPort Integrated PC Card plugs into a
Type III or dual Type II PC Card slot.
Category 5 (data grade) unshielded twisted pair (UTP)
cabling is required for 100Mbps, Category 3 or 5 for 10Mbps.
Installation Overview
Follow the instructions in this chapter to install the RealPort™
CardBus Ethernet 10/100+Modem 56 Integrated PC Card hardware
and network cabling. Then proceed to the software installation
chapter for your operating system environment, as follows:
Chapter 2. Windows 95 and 98 Installation
Chapter 3. Windows NT Installation
Chapter 4. Diagnostics and Troubleshooting
Additional documentation for Windows 95, 98, NT, and 3.x,
IBM OS/2, and 32-bit ODI, is supplied in the file
HELPDOCS.HLP on the Xircom CD-ROM. After running
SETUP, view the file in the Xircom Utilities program group.
Power-Saving Modes
The RealPort CardBus Ethernet 10/100+Modem 56 includes Xircom
BatterySave™ technology for maximum battery life on the road.
When the network cable is detached, the adapter enters low-power
mode. Normal power is restored when the cable is reattached.

1-2 RealPort CardBus Ethernet 10/100+Modem 56 User’s Guide
Additional Features
Optional ISDN Connection Kit (Worldwide)
The Xircom ISDN Connection Kit provides high-speed digital
communications by connecting your Xircom GlobalACCESS™
RealPort Integrated PC Card Modem to an ISDN line.
Optional Digital Wireless Connection Kit (Worldwide)
The Xircom GSM Connection Kit™ (for digital wireless systems in
Europe, Asia, and the Americas) enables data transmission from your
mobile phone using the RealPort Integrated PC Card Modem.
Popular mobile phones using the following standards are supported:
GSM 900, 1800, 1900; DCS 1800; and PCS 1900.
Optional Analog Cellular Kit (U.S. and Canada only)
The Xircom Cellular Connection Kit™ (for analog cellular systems in
the U.S. and Canada) enables data transmission by cellular phone
using the RealPort Integrated PC Card Modem. Popular mobile
phones using AMPS analog cellular technology are supported.
Visit www.xircom.com for additional information on these kits..
Hardware Installation
Package Contents
• Xircom RealPort CardBus Ethernet 10/100+Modem 56 (Model
RBEM56G-100BTX)
• RJ-11 telephone line cord
• User’s Guide and Quick Installation Card
• Software and online documentation on CD-ROM
Other Requirements
1 For connection to a 100Base-TX Ethernet network, a
Category 5 (data grade) unshielded twisted pair (UTP) network
cable terminating in a male RJ-45 connector and connected to
a 100Mbps hub or switch.
2 For connection to a 10Base-T Ethernet network, a network
cable terminating in a male RJ-45 connector and connected to
a 10Mbps hub or switch.
Hardware Installation 1-3
3 For modem operations: an analog telephone line, RJ-11
modular telephone cable (supplied), and if needed, RJ-11
adapter for the local telephone system. Communications
software is required for modem and fax operations.
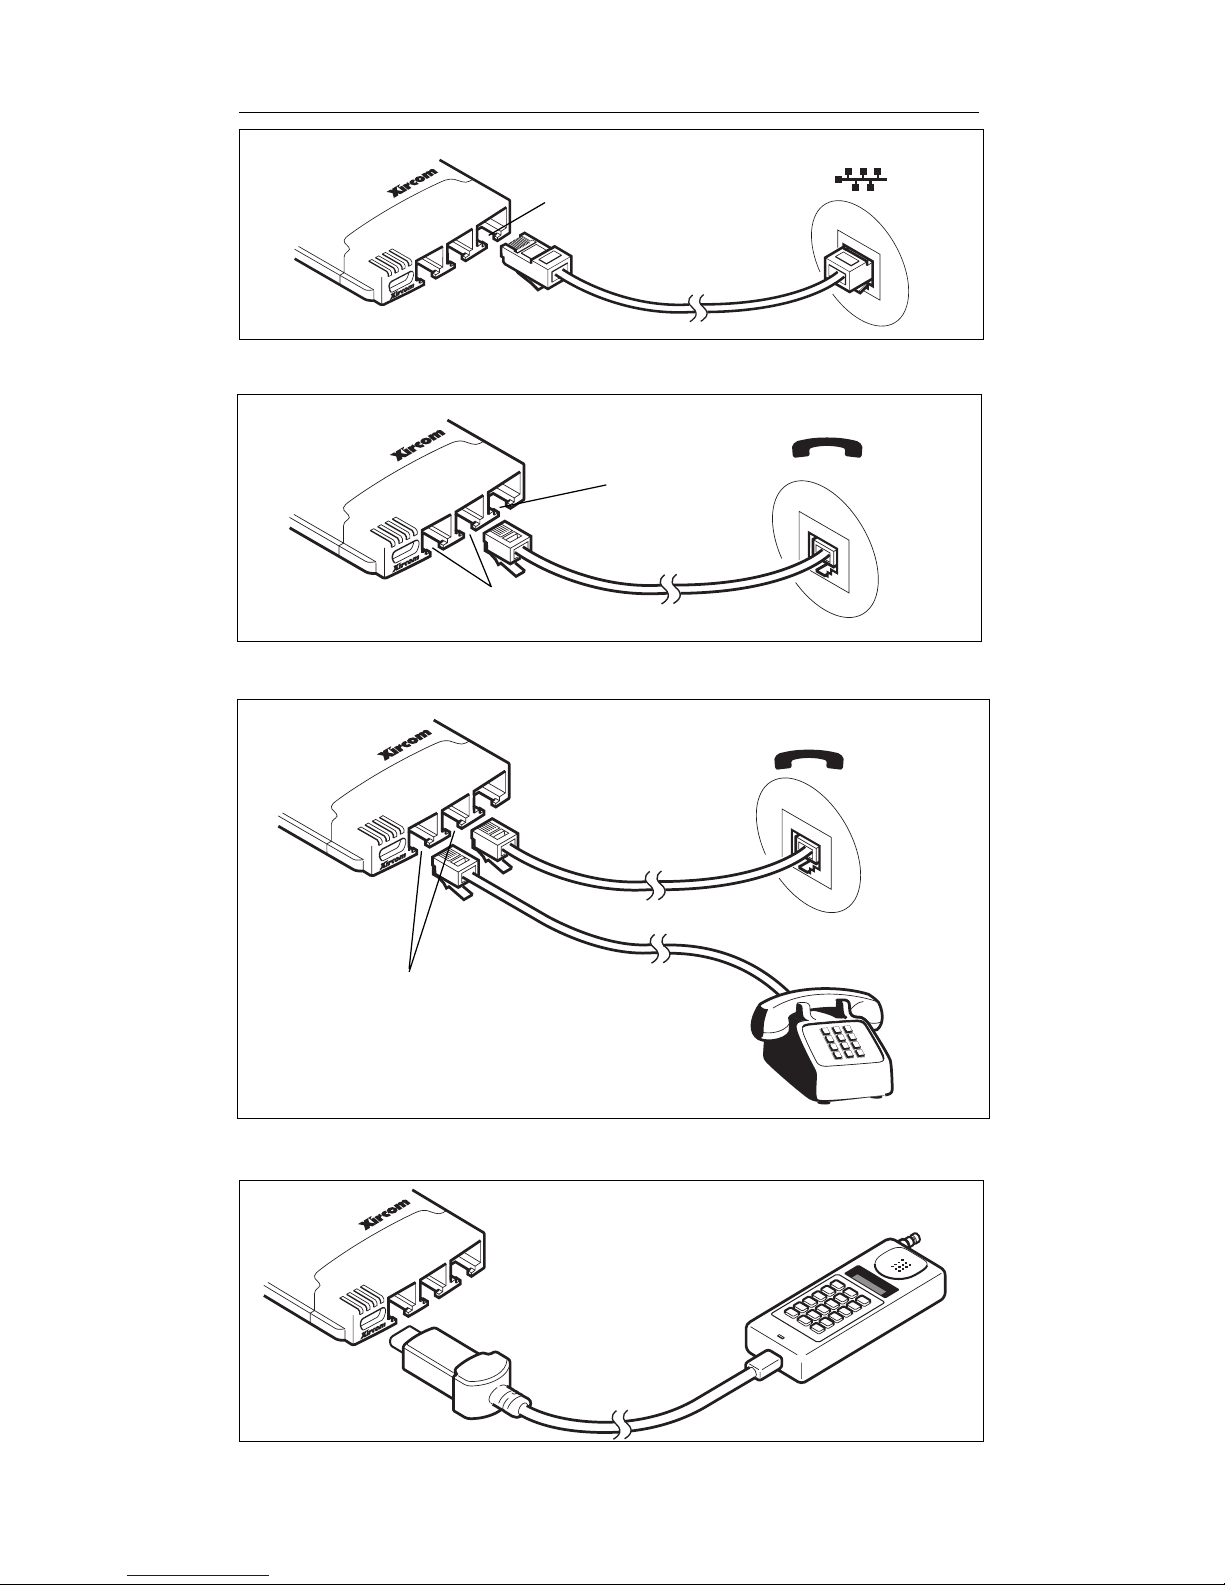
The two RJ-11 ports on the RealPort Integrated PC Card are
identical: use one to connect the modem to the telephone
line, the other for an approved telephone set. Some
countries prohibit or restrict use of two RJ-11 connections.
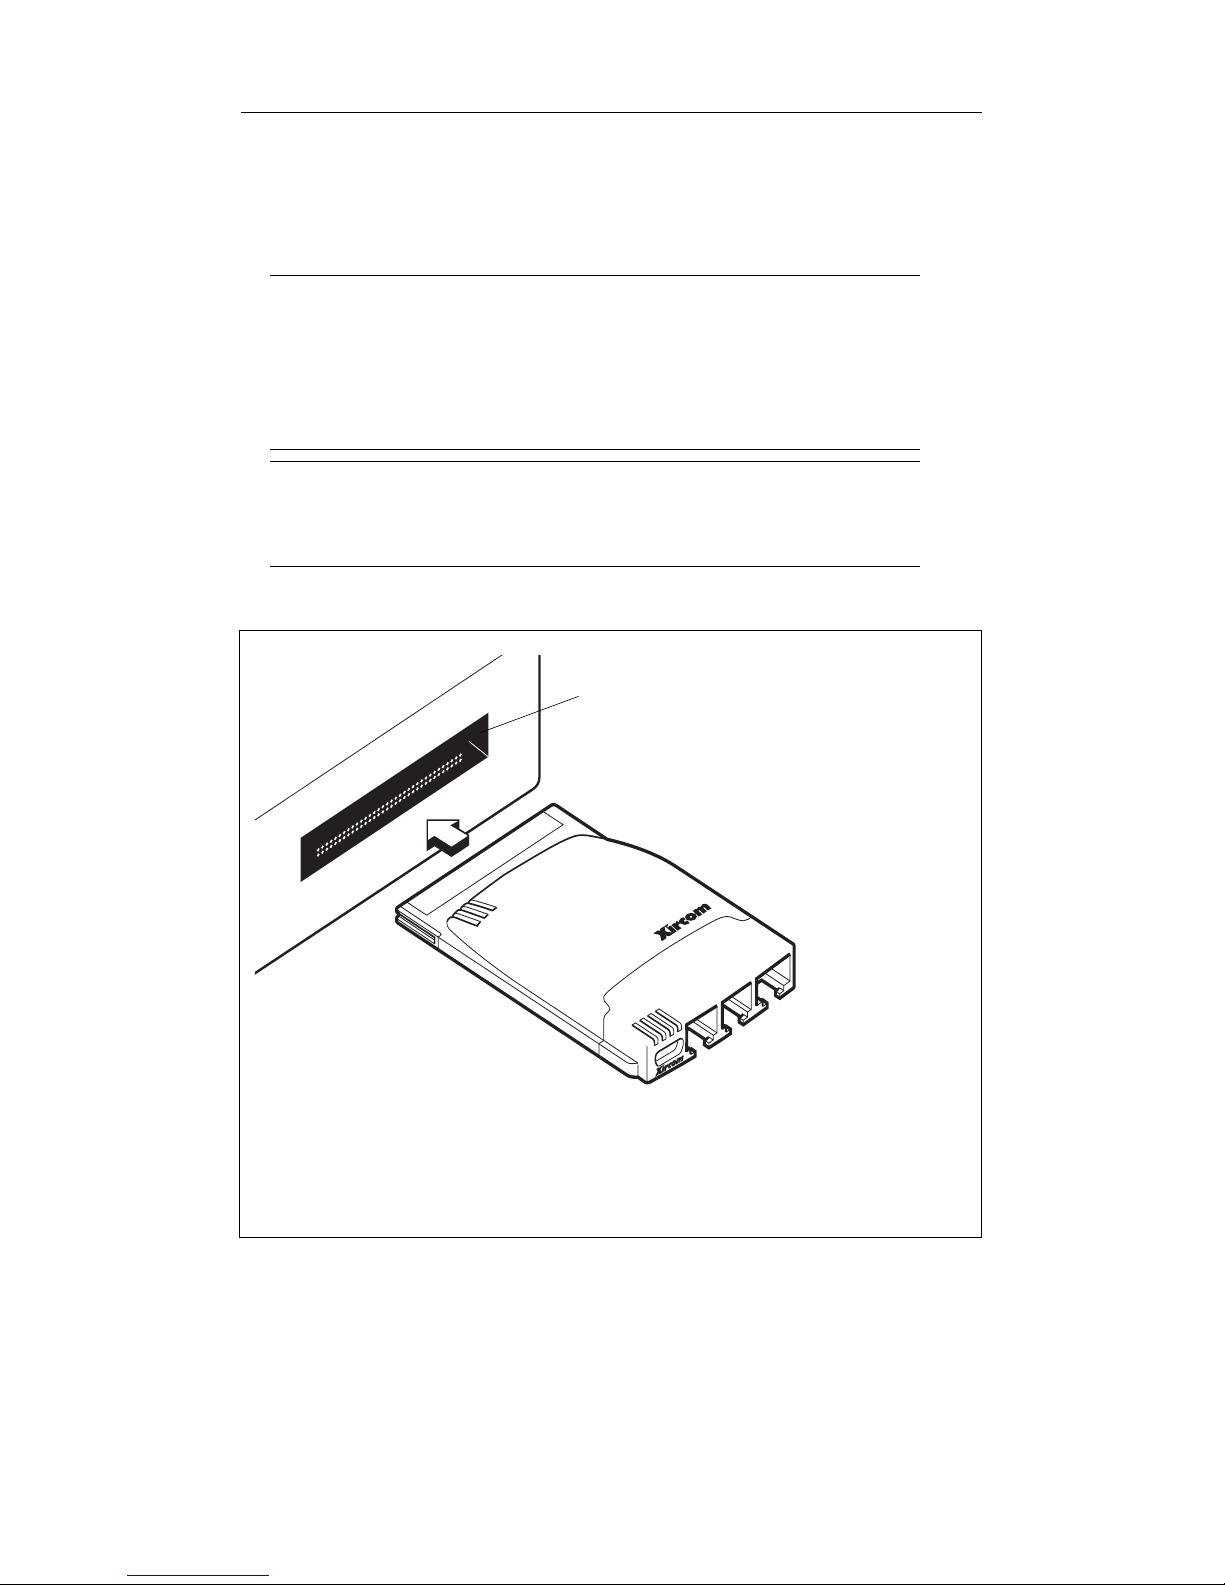
The CardBus adapter can only be used in CardBus-compliant PC Card slots.
Inserting the RealPort Integrated PC Card
4 LAN LINK
ORANGE - 100Mbps
GREEN - 10Mbps
1 TRANSMIT/RECEIVE (YELLOW)
2 CARRIER DETECT (GREEN)
3 LAN ACTIVITY (YELLOW)
MODEM LEDs LAN LEDs
PC CARD TYPE III OR DUAL
TYPE II SLOT
1
2
34
1-4 RealPort CardBus Ethernet 10/100+Modem 56 User’s Guide
Connecting to a 100Base-TX or 10Base-T LAN (RJ-45)
Connecting Modem to the Telephone Network (RJ-11)
Connecting an Approved Telephone (RJ-11)
Connecting to a Wireless Handset for Data Transmission
RJ-45
RJ-11 connectors are identical: use
one for modem link, one for an
approved telephone. Some
countries prohibit or restrict use of
a second RJ-11 connection.
RJ-11
DO NOT PLUG AN RJ-11
CONNECTOR INTO THE
RJ-45 SOCKET.
GSM 900, 1800, 1900;
DCS 1800; PCS 1900;
AMPS Cellular; ISDN
(optional kits available)

CHAPTER 2
Windows 95 and 98 Installation
Plug and Play Installation
Plug and play installation of the Xircom RealPort CardBus Ethernet 10/100+Modem 56 is supported under Windows 98 and
Windows 95 version 950b (OSR2) and later. Installation with these
versions of Windows is described in this chapter. For the latest
information on support for Windows 95 versions 950/950a, see
the README file on the Xircom CD-ROM.
Drivers Available
The following drivers for Windows 95 and 98 are supplied with
the RealPort CardBus Ethernet 10/100+Modem 56:
• NDIS3 (CBE.SYS)
• NDIS4 (CBEN4.SYS)
• 32-bit ODI (CBE.LAN) with promiscuous support
The NDIS3 driver CBE.SYS is installed by default using the
procedures in this chapter. For NDIS4 instructions, see the
README file on the Xircom CD-ROM.
32-Bit ODI Driver
If your environment requires use of the 32-bit ODI client driver
under Windows 95 (as indicated by your network administrator),
see the Windows Help file HELPDOCS.HLP on the Xircom CDROM for instructions.

2-2 RealPort CardBus Ethernet 10/100+Modem 56 User’s Guide
Installing under Windows 95 OSR2 and 98
Notes on Installation under Windows 95 OSR2 and Later
Windows 95 OSR2 (version 950b) and later has limited support for
CardBus multifunction (LAN+modem) devices. The RealPort
CardBus Ethernet 10/100+Modem 56 includes Xircom software
which enhances support for CardBus multifunction devices. See
the README file on the Xircom CD-ROM for additional information on this software and for complete details on installation
under OSR2.
Prompt for Updated Files
During installation, the Xircom software may display a message
stating that certain Windows 95 VXD files need to be updated. See
the README file on the Xircom CD-ROM for additional information on these files.
COM Port Assignment under Windows 95 and 98
COM5 is automatically assigned to the modem when the RealPort
CardBus Ethernet 10/100+Modem 56 is installed under Windows
95 or 98. TAPI-compatible Windows applications support the
COM5 setting. For applications that do not support COM5, you
can change the COM port assignment by running SETUP.EXE after
installation, then running the Xircom COM Port Selector from the
Xircom Utilities program group.
How to Create Floppy Disks for Software Installation
To create a set of floppy disks for use in installation, as an
alternative to using the Xircom CD-ROM, run MAKEDISK.BAT
from the Xircom CD-ROM to copy the required installation files to
two blank floppy disks.
Installing the RealPort CardBus Integrated PC Card
1 With Windows running, insert the RealPort CardBus Ethernet
10/100+Modem 56 into the CardBus PC Card slot and connect
cables as shown in Chapter 1. Hardware Installation.
Proceed to step 2.

Windows 95 and 98 Installation 2-3
Plug and Play Installation (Versions 950b and later)
2 When Windows displays the New Hardware Found window,
type the path to the Xircom CD-ROM and follow the instructions on the screen to complete the installation. Xircom files will
be copied from the Xircom CD-ROM and network and modem
functionality will be installed. If prompted again for network
drivers, type the path to the Xircom CD-ROM and click OK.
If you are using Windows 95 and the New Hardware Found
window does not appear, you are probably using Windows
95 version 950 or 950a. For the latest information on support
for Windows 95 versions 950/950a, see the README file on
the Xircom CD-ROM.
3 After installation, select No if prompted to reboot. Proceed to
step 4.
Xircom Utilities
4 Use Start/Run to execute A:\SETUP.EXE from the Xircom
diskette. Xircom utilities and online documentation will be
installed in a program group on your hard drive.
5 When prompted to reboot, choose Yes. After the computer
restarts and Windows reloads, Xircom CountrySelect and
online registration software will launch. Make a country
selection (U.S.A. is the default) and complete the registration.
Troubleshooting Modem Installation
Review this section if any of the following problems occur:
• Modem initialization errors occur when attempting to dialout using a communications application.
• Connection fails or other problems occur.
It may be necessary to define a modem type within your communications application. If the Xircom modem is not listed, choose a
“Generic Hayes compatible” device.

2-4 RealPort CardBus Ethernet 10/100+Modem 56 User’s Guide
If your computer is equipped with an infrared communications port,
you may need to disable this port. These ports often use COM port
resources required for other communications devices. Disable the
infrared port both in the computer’s CMOS or BIOS setup program
and the Windows 95 Device Manager, as follows:
1 Some computers use a hardware setup utility to configure the
infrared port in the BIOS. See your computer documentation.
2 To disable the infrared communications port in Windows 95,
go to Device Manager tab under System in the Control Panel.
3 Double-click the Ports (COM & LPT) entry and the IR Serial
Port entry. Remove the check mark under Device Usage.
(Note: In Windows 95 version 950b or later check the Disable
in this Hardware Profile option to disable the device.)
Use the Modem Diagnostics Tool to verify the computer-tomodem interface.
1 In the Modems option in Control Panel, click Diagnostics.
2 In Diagnostics properties, highlight the COM port associated
with the Xircom modem and click the More Info button. This
causes Windows to send commands to and read responses
from the modem and display information about the modem
and its COM port. The Port Information box should display the
following information:
• The IRQ and I/O address of the modem’s COM port.
These should match the physical configuration of the port
or modem adapter.
• Modem responses to various AT commands. The Xircom
modem may return ERROR for some AT commands that
are not supported. This does not indicate a failure.

Windows 95 and 98 Installation 2-5
3 A log file can be useful to help identify modem problems by
recording modem commands and responses. Windows 95 and
98 have slightly different procedures for creating and maintaining a log file:
• In Windows 95, go to Control Panel, Modems, Properties,
Connection, Advanced. In the Advanced Connection Settings
window, place a check mark in the Record a log file option
box. A MODEMLOG.TXT file will be created in the
C:\WINDOWS directory the next time the modem is used.
• Windows 98 creates a log file by default in the Windows
directory, using a filename based on the modem device
identifier, with a .LOG extension, such as
"Xircom_CardBus_modem.log" (or a shortened version in
MS-DOS). To continue adding information to the log file,
place a check mark in the Append to Log option box in the
Advanced Connection Settings window (in the path Control
Panel, Modems, Properties, Connection, Advanced).
Windows 95 and 98 Driver Parameters
CBE.SYS and CBEN4.SYS Driver Settings
CBE.SYS is an NDIS3 driver. CBEN4.SYS is an NDIS4 driver. Both
conform to the Microsoft Network Driver Interface Specification
(NDIS).
Required files for using CBE.SYS with Windows 95 and 98 include:
NETCBE.INF Installation file for Windows 95 and 98
CBE.SYS NDIS3 driver for Windows 95 and 98
There are user-configurable parameters to the CBE.SYS and
CBEN4.SYS drivers which can be modified using the Network
Control Panel built into Windows 95 and 98. This applet queries
the user for parameter selections and sets the corresponding
parameters in the registry. User-configurable parameters follow:

2-6 RealPort CardBus Ethernet 10/100+Modem 56 User’s Guide
Parameter Valid Values Reg. Value
CableDetect OFF 0
ON 1
DirectEnable AutoDetect 0
OFF 1
ON 2
EarlyTransmit OFF 0
ON 1
InterruptStyle AutoDetect 0
PCI-IRQ 1
ISA-IRQ 2
LineSpeed AutoDetect 0
10 Mbps 1
100 Mbps 2
LineMode AutoDetect 0
Half-Duplex 1
Full-Duplex 2
Network Address See Network Administrators note below.
Socket AutoDetect 0
1, 2, 3, 4 1, 2, 3, 4
For Network Administrators Only. The network node address
can be modified by specifying a value for Network Address such as
0080C7112233. If the user does NOT specify a Network Address,
then the CBE.SYS driver uses the network node address contained
in the RealPort CardBus Ethernet 10/100+Modem 56 Card Information Structure.
For definitions of the keywords above, see the Keyword
Reference in Chapter 4. Diagnostics and Troubleshooting.
 Loading...