

Xinje VB3, VB5, V5 User Manual

Xinje Electronic Co.,Ltd.
VB3/VB5/V5 frequency inverter
User manual
No. INV C 01 20081130 204

VB3/VB5/V5 seires inverter
2
VB3/VB5/V5
Series Inverter
User Manual
Table of Contents
Preface
———————————————
Safty Precautions
———————————————
Product Introductions
———————————————
Installation and Wiring
———————————————
Operation Descriptions
———————————————
Function Parameters
———————————————
Fault Diagnosis and Disposal
———————————————
Maintenance
———————————————
Communication Protocol
———————————————
VB3/VB5/V5 series inverter
This manual includes the basic caution items that you should obey to ensure your personal safety, as well as to protect the
product and the connected equipments. These items are highlighted in the manual by a warning triangle. Please comply
with the essential electric operation `rules that are not indicated in this manual.
Please comply with these items, incorrect operation may cause the system error working even abnormal.
More serious would cause possession loss.
The device and its components can only be used in the applications described in the catalog and the
technical manuals, can only be connected with devices or components from other manufacturers which
have been approved or recommended by Xinje.
The products will run normally in the condition of been transported, stored, configured and installed
correctly, been operated and maintained as recommended.
Xinje Electronic Co., Ltd. Copyright reserved
Without written authority, please do not copy, transfer or use this document and its content. Anyone who disobeys this
should take responsibility for the loss.
Obligation Declare
We have checked and confirmed that the contents in this manual were compatible with the hardware and software described. Since mistakes are hard to avoid, we cannot promise total accordant. This manual is subject to change without notices.
2010.01
Correct Applications
Installing Precautions


VB3/VB5/V5 series inverter
i
CATALOG
PREFACE .......................................................................................................................................1
SAFETY PRECAUTIONS ...............................................................................................................2
1 PRODUCT INSTRUCTION ..........................................................................................................6
1-1. Product overview .............................................................................................................................................................. 6
1-2. Product technical specification ......................................................................................................................................... 7
1-3. Product appearance .......................................................................................................................................................... 9
1-4. Product dimension .......................................................................................................................................................... 12
2 INSTALLATION AND WIRING ..................................................................................................15
2-1. Installation environment ................................................................................................................................................ 15
2-1-1. Environment requirement .......................................................................................................................................... 15
2-1-2. Mounting location and space ..................................................................................................................................... 15
2-1-3. Mounting and removing............................................................................................................................................. 15
2-2. Wiring ............................................................................................................................................................................. 16
2-3. Wiring of main circuit terminals .................................................................................................................................... 16
2-3-1. Wiring diagram ......................................................................................................................................................... 16
2-3-2. Terminal assignment and description .......................................................................................................................... 17
2-4. Basic running wiring ...................................................................................................................................................... 18
2-5. Setting and wiring of control circuit ............................................................................................................................... 18
2-5-1.Position and function of terminals and jumpers on control panel .................................................................................. 18
2-5-2.Terminals on control panel .......................................................................................................................................... 20
2-5-3. Analog I/O terminal wiring ........................................................................................................................................ 22
2-5-4. Connection of communication terminals .................................................................................................................... 23
2-6. Mounting guide according with EMC ............................................................................................................................ 24
2-6-1. Control the noise ....................................................................................................................................................... 24
2-6-2. Local wiring and grounding ....................................................................................................................................... 25
3 OPERATING INSTRUCTIONS ..................................................................................................26
3-1. Run the inverter.............................................................................................................................................................. 26
3-1-1. Command channel of inverter .................................................................................................................................... 26
3-1-2. Frequency setting channel .......................................................................................................................................... 26
3-1-3. Running state ............................................................................................................................................................ 26
3-1-4. Running modes ......................................................................................................................................................... 27
3-2. Use the keyboard ............................................................................................................................................................ 28

VB3/VB5/V5 seires inverter
ii
3-2-1. Keyboard layout ........................................................................................................................................................ 28
3-2-2. Keyboard function ..................................................................................................................................................... 28
3-2-3. Fucntion description of LED and indicator ................................................................................................................. 29
3-2-4. Display of the operation panel.................................................................................................................................... 29
3-2-5. Panel operation method ............................................................................................................................................. 31
3-3. Power on the inverter ..................................................................................................................................................... 33
3-3-1. Checking after power on ............................................................................................................................................ 33
3-3-2. Power on the inverter for the first time ....................................................................................................................... 33
4 FUNCTION PARAMETERS .......................................................................................................35
4-1. Function code .................................................................................................................................................................. 35
4-2. Function code description ............................................................................................................................................... 51
4-2-1. Basic operating function parameters (Group P0) ........................................................................................................ 51
4-2-2. Parameters of frequency setting (Group P1) ............................................................................................................... 56
4-2-3. Starting and braking parameters (Group P2) ............................................................................................................... 57
4-2-4. Auxiliary running parameters (Group P3) ................................................................................................................... 59
4-2-5. Function parameters of terminal (Group P4)............................................................................................................... 64
4-2-6. Protection function parameters (Group P5)................................................................................................................. 73
4-2-7. Fault recording parameters (Group P6) ...................................................................................................................... 75
4-2-8. Close-loop control parameters (Group P7) ................................................................................................................. 75
4-2-9. Simple PLC operation parameters (Group P8) ............................................................................................................ 78
4-2-10. Swing frequency function parameters (Group P9) .................................................................................................... 81
4-2-11. Vector control parameters (Group PA) ...................................................................................................................... 83
4-2-12. Special application function parameters (Group PB) ................................................................................................. 84
4-2-13. Default setting and password (Group PF) ................................................................................................................. 85
5 FAULT DIAGNOSIS AND SOLUTION.......................................................................................86
5-1. Fault diagnosis and solution ........................................................................................................................................... 86
5-2. Check the fault records ................................................................................................................................................... 88
5-3. Fault reset ....................................................................................................................................................................... 88
6 MAINTENANCE ........................................................................................................................89
6-1. Maintenance ................................................................................................................................................................... 89
6-1-1. Routine maintenance ................................................................................................................................................. 89
6-2. Periodical care and maintenance .................................................................................................................................... 89
6-2-1.Periodical care ............................................................................................................................................................ 89
6-2-2. Periodical maintenance .............................................................................................................................................. 89
6-3. Warranty of the inverter................................................................................................................................................. 90
7 COMMUNICATION PROTOCOL ...............................................................................................91
7-1. Overview of communication protocol............................................................................................................................. 91

VB3/VB5/V5 series inverter
iii
7-2. Communication protocal ................................................................................................................................................ 91
7-2-1. Communication networking mode ............................................................................................................................. 91
7-2-2. Communication protocol modes................................................................................................................................. 92
7-2-3. Communication port .................................................................................................................................................. 92
7-3.Modbus-RTU communication protocol ........................................................................................................................... 92
7-3-1. Character structure .................................................................................................................................................... 92
7-3-2. Communication information ...................................................................................................................................... 92
7-3-3.Communication parameter .......................................................................................................................................... 95
APPENDIX A ACCESSORIES .....................................................................................................97
A-1. Brake resistor ................................................................................................................................................................. 97
A-2. Operate panel ................................................................................................................................................................. 98
A-3. Extension cable of operate panel ................................................................................................................................... 98
APPENDIX B FUNCTION CONFIGURATION LIST .....................................................................99


1
——Essential introduction for this manual
Preface
Thank you for purchasing Xinje inverter, this manual should be read and understood before attempting relevant operations.
1. Purpose of this manual
This manual offers guidance and introductions about how to use and maintains the inverter correctly, including functions,
usages, installation, maintenance, etc.
2. Qualified personnel
This manual is intent for the following personnel:
Inverter installation personnel
Project technical personnel(electric engineer, electrician)
Design personnel
The above personnel should read and understand this manual carefully before operating and debugging.
3. Validity of this manual
This manual may only be used for inverters made by Xinje.
4. Electronic Documents
In addition to our written manuals, we offer electronic documentations of our products by the following ways.
User CD
There are software, user manual and application tip of relevant products.
Website
Please visit www.xinje.com to obtain all variable electronic documents.
VB3/V5/VB5 series inverter
2
——Essential introduction about product operation
Safety Precautions
Upon unpacking, please confirm that: Check whether the model and the rated values on the nameplate of the inverter are in
accordance with your order. Check if there is any damage occurred during transportation; pleases contact us or the distributor if you find any missing or damage of the products.
In order to use this product correctly, the user who uses the product for the first time must read this manual carefully and
pay close attention to the safety precautions.
Please keep this manual properly, hand it to the terminal user and lay it on the place where the operators can read it easily.
Confirmations Upon Delivery
Notice
1. Never install an inverter that is damaged or missing components. Doing so can result in injury.
Installation
Notice
1. Always hold the bottom of the inverter when carrying it. If the inverter is held by the front cover, the main body
of the inverter may fall, possible resulting in injury.
2. Attach the inverter to metal or other noncombustible materials. Fire can result if the inverter is attached to a
combustible material.
3. Install a cooling fan or other cooling device when installing more than one inverter in the same enclosure so that
the temperature of the air entering the inverters is below 45℃. Overheating can result in fires or other accidents.
Wiring
Danger
1. Always turn off the input power supply before wiring. Otherwise, an electric shock or fire may occur.
2. Wiring must be operated by an authorized person qualified in electrical work. Otherwise, an electric shock or
fire may occur.
3. Make sure to ground the ground terminals. Otherwise, an electric shock or fire may occur.
4. Always check the operation of any emergency stop circuits after they are wired. Otherwise, possibly result in
injury ( user responsibility for the wiring).
5. Never touch the output terminal directly by your hands or let the output terminals to come into contact with the
inverter case. Never short the output terminals. Otherwise, an electric short or ground short may occur.
6. Never touch the internal circuit or the zero-component until power off and the charge indicator is off as
there may still be high voltage inside the AC motor dirver.
Notice
◎ Safty Precautions ◎
VB3/V5/VB5 series inverter
3
1. Confirm that the voltage of the main AC power supply satisfies the rated voltage of the Inverter. Injury and fire
may occur if the voltage is not right.
2. Do not perform voltage withstand tests on the Inverter. Otherwise, semiconductor elements and other devices
can be damaged.
3. Connect braking resistors, Braking Resistor Units, and Braking Units as shown in the I/O wiring examples.
Otherwise, a fire may occur.
4. Tighten all terminal screws to the specified tightening torque.
Otherwise, a fire may occur.
5. Do not connect AC power to output terminals U, V, and W.
The interior parts of the Inverter will be damaged if voltage is applied to the output terminals.
6. Do not connect phase-advancing capacitors or LC/RC noise filters to the output circuits.The Inverter may be
damaged or internal parts burnt if these devices are connected.
7. Do not connect electromagnetism switch, electromagnetism contactor to output circuit. When the inverter is
running with load, the electromagnetism switch and electromagnetism contactor will generate inrush current
which will cause inverter’s over current protection.
8. Do not disassemble the whole front cover as disassembling the top front while wiring is ok. Otherwise, inverter
internal parts may be damaged.
Maintenance and Inspection
Danger
1. Do not touch the inverter terminals, as they may carry high voltage.
Otherwise, an electric short may occur.
2. Make sure to have protective cover .Always have the protective cover in place when power is being supplied to
the Inverter. When attaching the cover, please with the power turns off.
Otherwise, an electric short may occur.
3. Maintenance, inspection, must be performed only by authorized personnel.
Otherwise, an electric short may occur.
Notice
1. A CMOS IC is used in the control board. Handle the control board and CMOS IC carefully. The CMOS IC can
be destroyed by static electricity if touched directly.
2.Do not change the wiring, or remove connectors or the Digital Operator, during operation.
Otherwise, The devices may be damaged.
Constant torque low speed running
When the inverter outputs to a common motor at low speed for a long term, the output rated torque should be derated due
to the worsening radiating effect. If low speed constant torque long term running is required, then a special variable frequency motor is needed.
Motor insulation
When using the V5/F5 series inverter, make sure to confirm the insulation of the motor which will be used to avoid device
damage. Besides, do the periodic check for the insulation condition of the motor located in the bad environment to guarantee the system can operate safely.
Negative torque load
If in the case of improving load, negative torque may occur. Braking units should be connected with the inverter, or over
current and over voltage fault may happen.
◎ Usage Precautions ◎
VB3/V5/VB5 series inverter
4
Mechanical resonance point of load
The inverter may encounter the mechanical resonance point of load within certain output frequency range. Jump frequencies have to be set to avoid it.
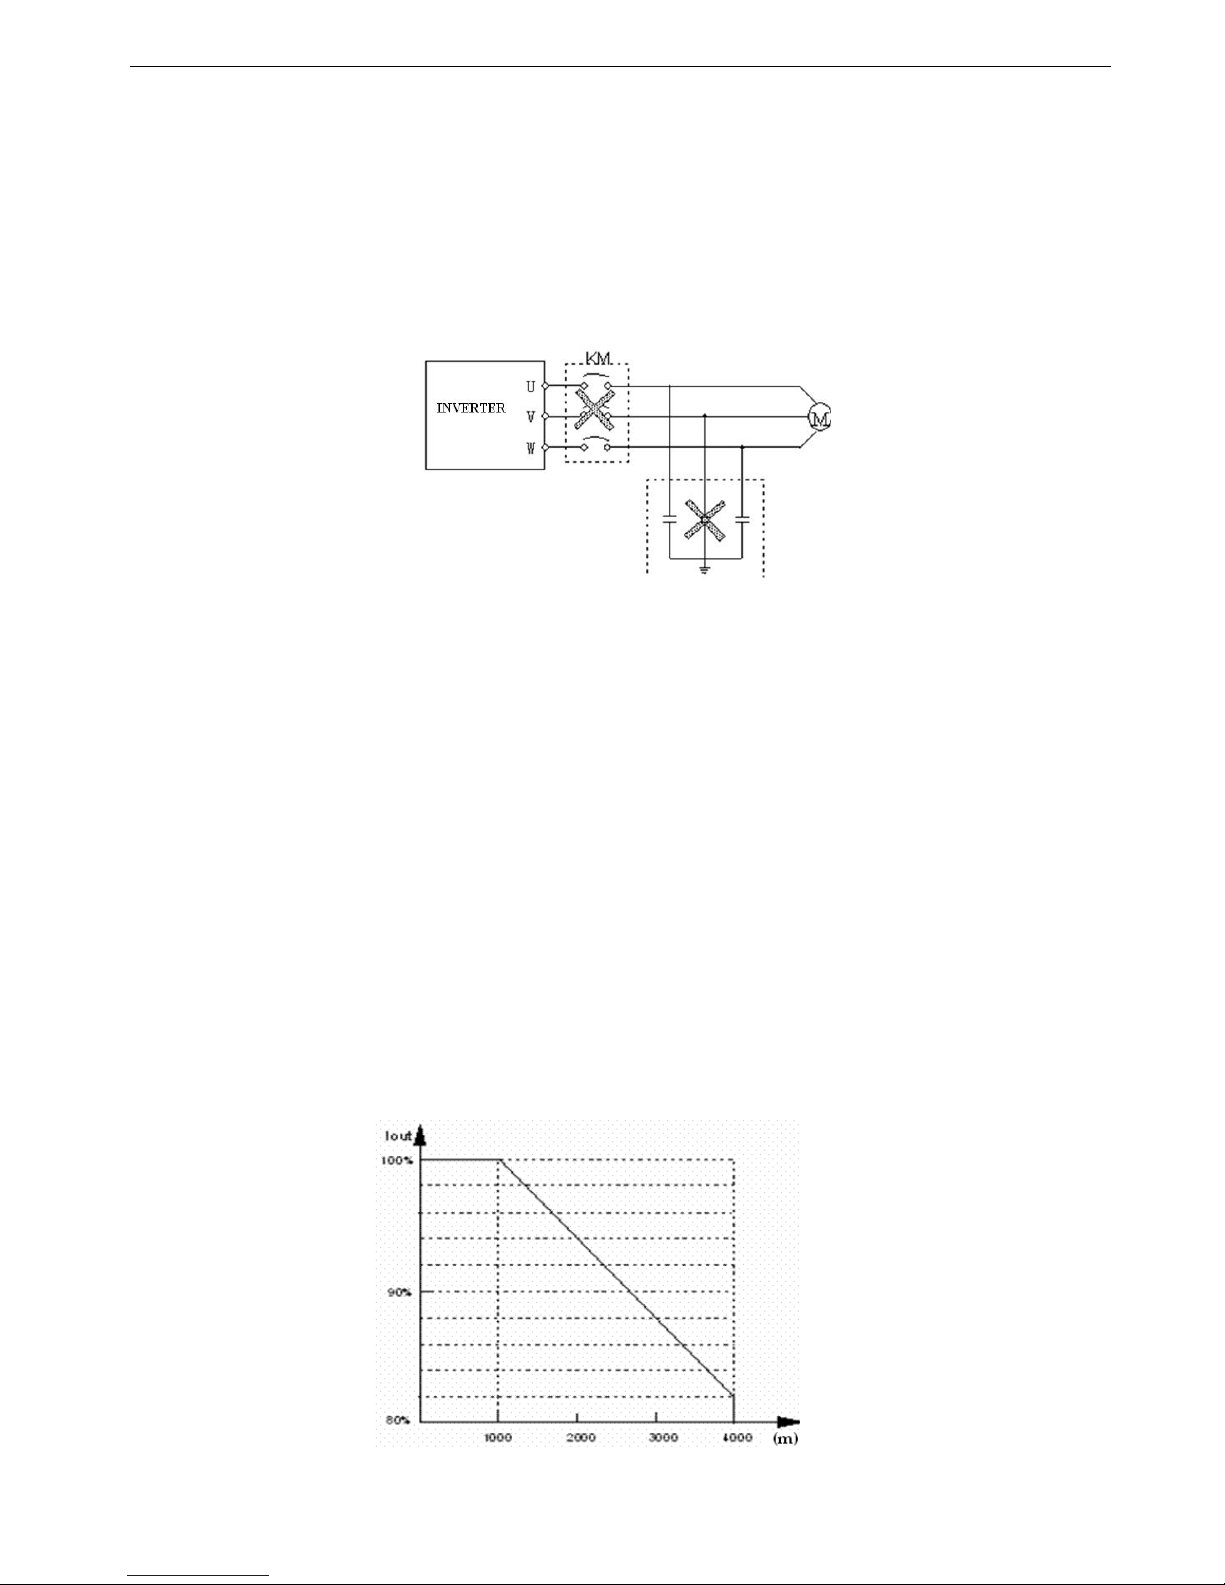
Capacitor and resistor
Because the inverter output pulse wave, capacitor and resistors shouldn't be connected with the output terminals of the inverter, or the inverter may trip or components may be damaged; Besides, don’t connect switch components such as air
switch and contactor with the output terminals is recommended, as shown in Fig.0-1(If switch components need to be
connected with the output terminals, make sure output current of the inverter is zero when switch is acting).
Fig.0-1 Capacitor is prohibited to be connected with
output terminals of inverter
Derate according to basic frequency setting
When the basic frequency is lower than the reference frequency, please consider duration for the motor so as to avoid motor’s damage caused by overheating.
Running at frequency above 50Hz
If running at frequency above 50Hz, besides the increment of vibration and noise, the ranges of running speed of motor
shaft and mechanical device have to be guaranteed. Be sure to make an enquiry first.
The electro-thermal protective value of motor
If the applicable motor is selected as per requirements, the inverter can perform the thermal protection to the motor. If the
ratings of applied motor are not in compliance with the inverter, be sure to adjust the protective value or adopt other protective measures to guarantee the safe running of motor.
Altitude and derate
When the altitude is higher than 1000m, the cooling effect of inverter is deteriorated because of the rareness of air, deration
must be considered, shown in Fig.0-2 which indicates the relationship between the altitude and rated current of frequency
inverter.
Fig. 0-2 The relationship between the altitude and rated
current of frequency inverter

VB3/V5/VB5 series inverter
5
About protection classes
The protection class of V5/F5 series inverter IP20 is reached in the case of status display unit or keyboard.
When you scrap the inverter, please pay attention to:
Explosion risk of capacitor: The capacitors in the main circuits may explode when they are burned.
Waste gas when plastic parts are burned: Poisonous gas may be generated when front panel is burned.
Dispose method: Please dispose as industrial rubbish.
◎ Note For Scrap ◎

VB3/V5/VB5 series inverter
6
1 Product Instruction
1-1. Product overview
VB3/VB5/V5 series inverter is produced by Xinje Co., Ltd with high performance, easy operating and low noise. It is a
innovative product with a series advanced and practical running and control functions such as practical PI, flexible input
and output terminals, parameter modification online, fixed length control, traverse operation, RS485 control, bus-mastering.
It provides OEM customers with high integrated, reliable, cost-effective solution.
V5 only has 380V level types; VB3/VB5 series frequency inverter has 220V and 380V voltage levels. Suitable motor capability is from 0.4KW to 55KW.
Please note 220V level types have no vector control.
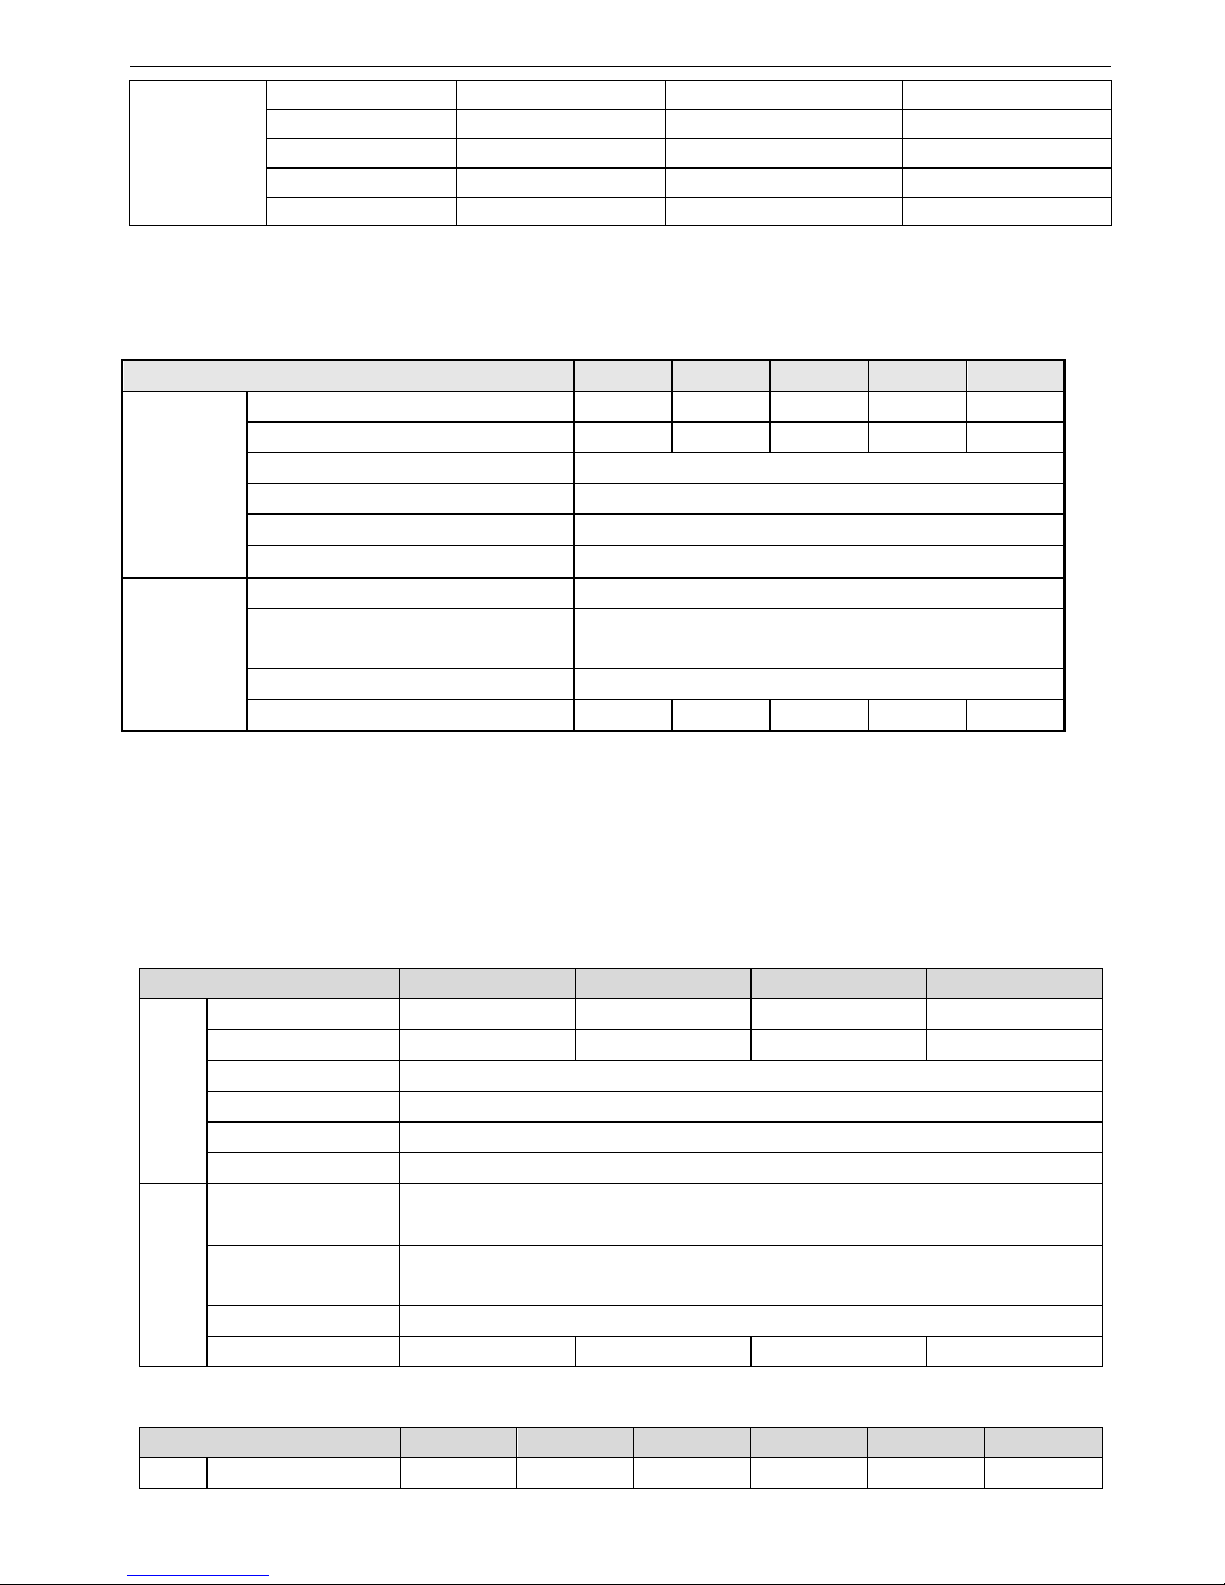
Voltage level Type Rated capacity (KVA) Rated output current (A) Match motor (kW)
220V
Single-phase
VB3-20P7 1.5 4.7 0.75
VB5-20P7 1.5 4.7 0.75
VB5-21P5 2.8 7.5 1.5
VB5-22P2 4.5 10.0 2.2
380V
3-phase
VB3-40P7 2.1 2.5 0.75
VB3-41P5 2.5 4.0 1.5
VB3-42P2 3.0 6.0 2.2
VB3-43P7 5.9 9.6 3.7
VB5-40P7 2.1 2.5 0.75
VB5-41P5 2.5 4.5 1.5
VB5-42P2 3.0 6.0 2.2
VB5-43P7 5.9 9.6 3.7
VB5-45P5
8.5 14.0 5.5
VB5-47P5 11 17.0 7.5
V5-4011 15 25 11
V5-4015 20 33 15
V5-4018 25 38 18.5
Name Designation Rules
VB 5
-
4 3 P 7
Max Suitable Motor's Capacity
011: 11KW
1P5: 1.5KW
And so on
( P: Stands for radix Point)
Voltage Level
2:220V
4:380V
Type
Inverter Series
V5: VVVF/vector control
VB5: VVVF/vector control
VB3: VVVF control, mini type
VB3/V5/VB5 series inverter
7
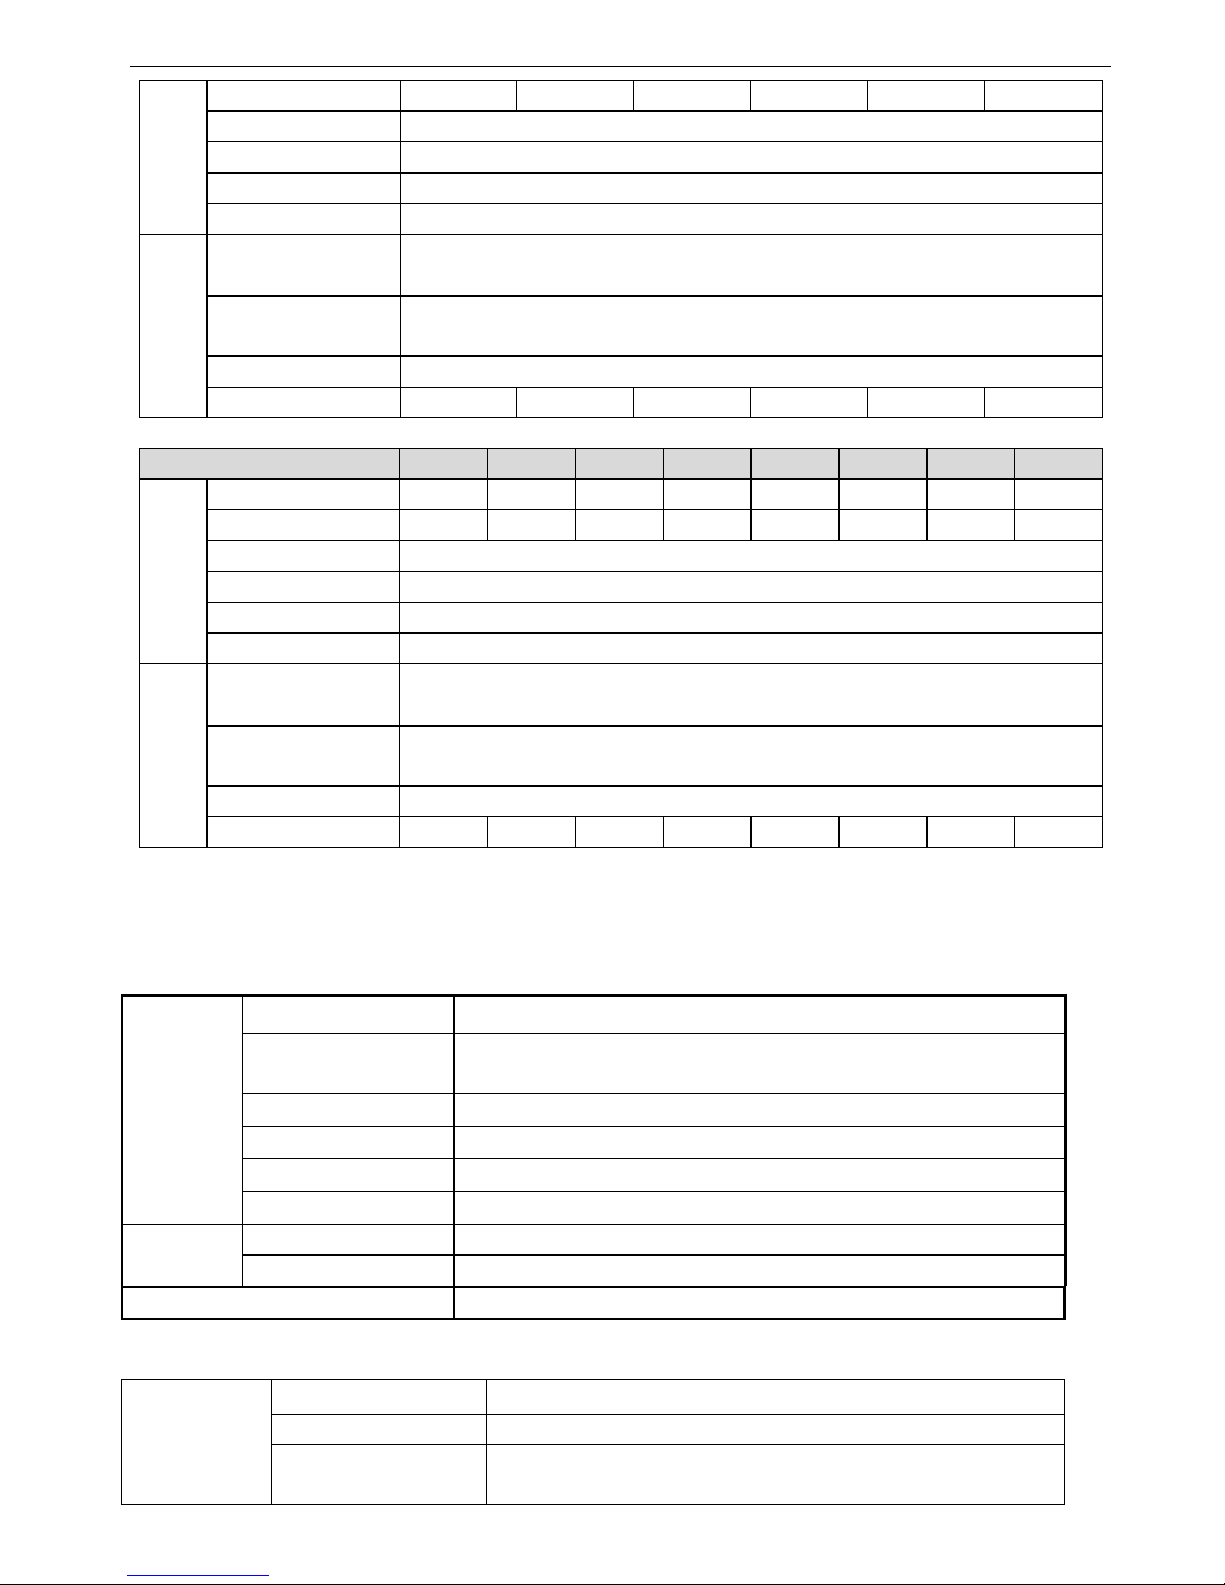
1-2. Product technical specification
1. Technical specification
220V
Type VB3-20P4 VB3-20P7 VB5-20P7 VB5-21P5 VB5-22P2
Output Match Motor (kW) 0.4 0.75 0.75 1.5 2.2
Output Current (A) 3.0 4.7 4.7 7.5 10.0
Voltage (V) AC 200
Frequency Range (Hz) 0~500
Frequency Resolution (Hz) 0.01
Overload Ability 150%Rated Current for 1 minutes,180% Rated Current for 1 second
Input Rated Voltage/Frequency Single-phase 220V,50/60Hz
AC voltage permit fluctuate range Voltage: -20% ~ +20%
Voltage Unbalance Rate: < 3%
Frequency fluctuate Range Frequency:±5%
Power Capacity (kVA) 0.9 1.5 1.5 2.8 4.5
380V
V5-4022 30 46 22
V5-4030 40 60 30
V5-4037 50 75 37
V5-4045 60 90 45
V5-4055 75 110 55
VB3-4_ _ _ 0P7 1P5 2P2 3P7
output
Suitable motor (kW) 0.75 1.5 2.2 3.7
Rated current (A) 2.5 4.0 6.0 9.6
Rated voltage ( V) AC 380
frequency range (Hz) 0~500
frequency accuracy (Hz) 0.01
Overload Ability 150% Rated Current for 1 minute, 180% Rated Current for 1 second
Input
Rated voltage
/Frequency
Three phase 380V; 50Hz/60Hz
AC voltage fluctuate range Voltage:-20% ~ +20%
Voltage Unbalance Rate:<3%
Frequency fluctuate range
Frequency: ±5%
Power Capacity (kVA) 2.1 2.5 3.0 5.9
VB5-4_ _ _ 0P7 1P5 2P2 3P7 5P5 7P5
Suitable motor (kW) 0.75 1.5 2.2 3.7 5.5 7.5
VB3/V5/VB5 series inverter
8
Common characteristics
Environment Application environment In-door, free from direct sunlight, dust, corrosive gas, oil mist, steam, water drop etc
Elevation Lower than 1000m (The inverter should be derated when the elevation is higher than
1000m )
Ambient Temperature -10
℃
~ +40℃
Humidity Less than 90% RH, No condensation
Vibration Less than 5.9 m/s2 (0.6M)
Storage Temperature -20
℃
~ +60℃
Structure Protect Configuration IP20 (In the state of state display units or keyboard)
Cooling Manner Fan cooling
Installation Wall mounted or install inside cabinet
2. General Specification
Modulation mode
Optimized space voltage vector SVPWM modulation
Control mode SVPWM control (dead zone compensation for optimized low-frequency)
Frequency precision
Digital Setting: max frequency × ±0. 01%;
Analog Setting: max frequency × ±0.2%
output Rated current (A) 2.5 4.0 6.0 9.6 14.0 17.0
Rated voltage ( V) AC 380
frequency range (Hz) 0~500
frequency accuracy (Hz) 0.01
Overload Ability 150% Rated Current for 1 minute, 180% Rated Current for 1 second
Input
Rated voltage
/Frequency
Three phase 380V; 50Hz/60Hz
AC voltage fluctuate range Voltage:-20% ~ +20%
Voltage Unbalance Rate:<3%
Frequency fluctuate range
Frequency: ±5%
Power Capacity (kVA) 2.1 2.5 3.0 5.9 8.5 11
V5-4_ _ _ 011 015 018 022 030 037 045 055
output
Suitable motor (kW) 11 15 18.5 22 30 37 45 55
Rated current (A) 25 33 38 46 60 75 90 110
Rated voltage ( V) AC 380
frequency range (Hz) 0~500
frequency accuracy (Hz) 0.01
Overload Ability 150% Rated Current for 1 minute, 180% Rated Current for 1 second
Input
Rated voltage
/Frequency
Three phase 380V; 50Hz/60Hz
AC voltage fluctuate range Voltage:-20% ~ +20%
Voltage Unbalance Rate:<3%
Frequency fluctuate range
Frequency: ±5%
Power Capacity (kVA) 15 20 25 30 40 50 60 75
VB3/V5/VB5 series inverter
9
Main Control
Function
Frequency resolution Digital Setting: 0.01Hz; Analog Setting: max frequency × 0.1%
Start frequency 0.40Hz ~ 20.00Hz
Torque boost Auto torque boost, manual torque boost 0.1% ~ 30.0%
V/F curve
Five modes: constant torque V/F curve, 1 V/F curve mode by user and 3 kinds of
torque-derating modes (2nd power, 1.7th power, 1.2nd power)
Accelerate/Decelerate curve
Two modes: linear Acc/Dec, S curve Acc/Dec; seven kinds of Acc/Dec time,
Maximum: 6000 minutes, the time unit (minute or second) is selectable
DC brake
Initial frequency of DC braking: 0~15.00Hz
Braking time: 0~60.0 s
Braking current: 0~80%
Power consumption brake Built-in brake unit, can connect external brake resistor
Jog Range of jog frequendy: 0.1Hz~50.00Hz, Acc/Dec time of jog 0.1~60.0s
Built-in PI Easy to form close loop control system
Multi-step speed running Multi-step speed work through built-in PLC or control terminals
Textile wobble frequency Adjustable preset frequency and center frequency
Auto voltage regulation
(AVR)
When the power system voltage changes, maintain the constant of output voltage
Auto energy saving running
Auto-optimize V/F curve according to the load condition to realize energy saving
operation
Auto current limit Auto-limit running current to avoid trip caused by overcurrent
Fix-length control The frequency inverter will stop running when reaching the fixed length
Communication
function
With RS485 port, support Modbus-RTU protocol. Be with master-slave mul-
ti-device linkage function
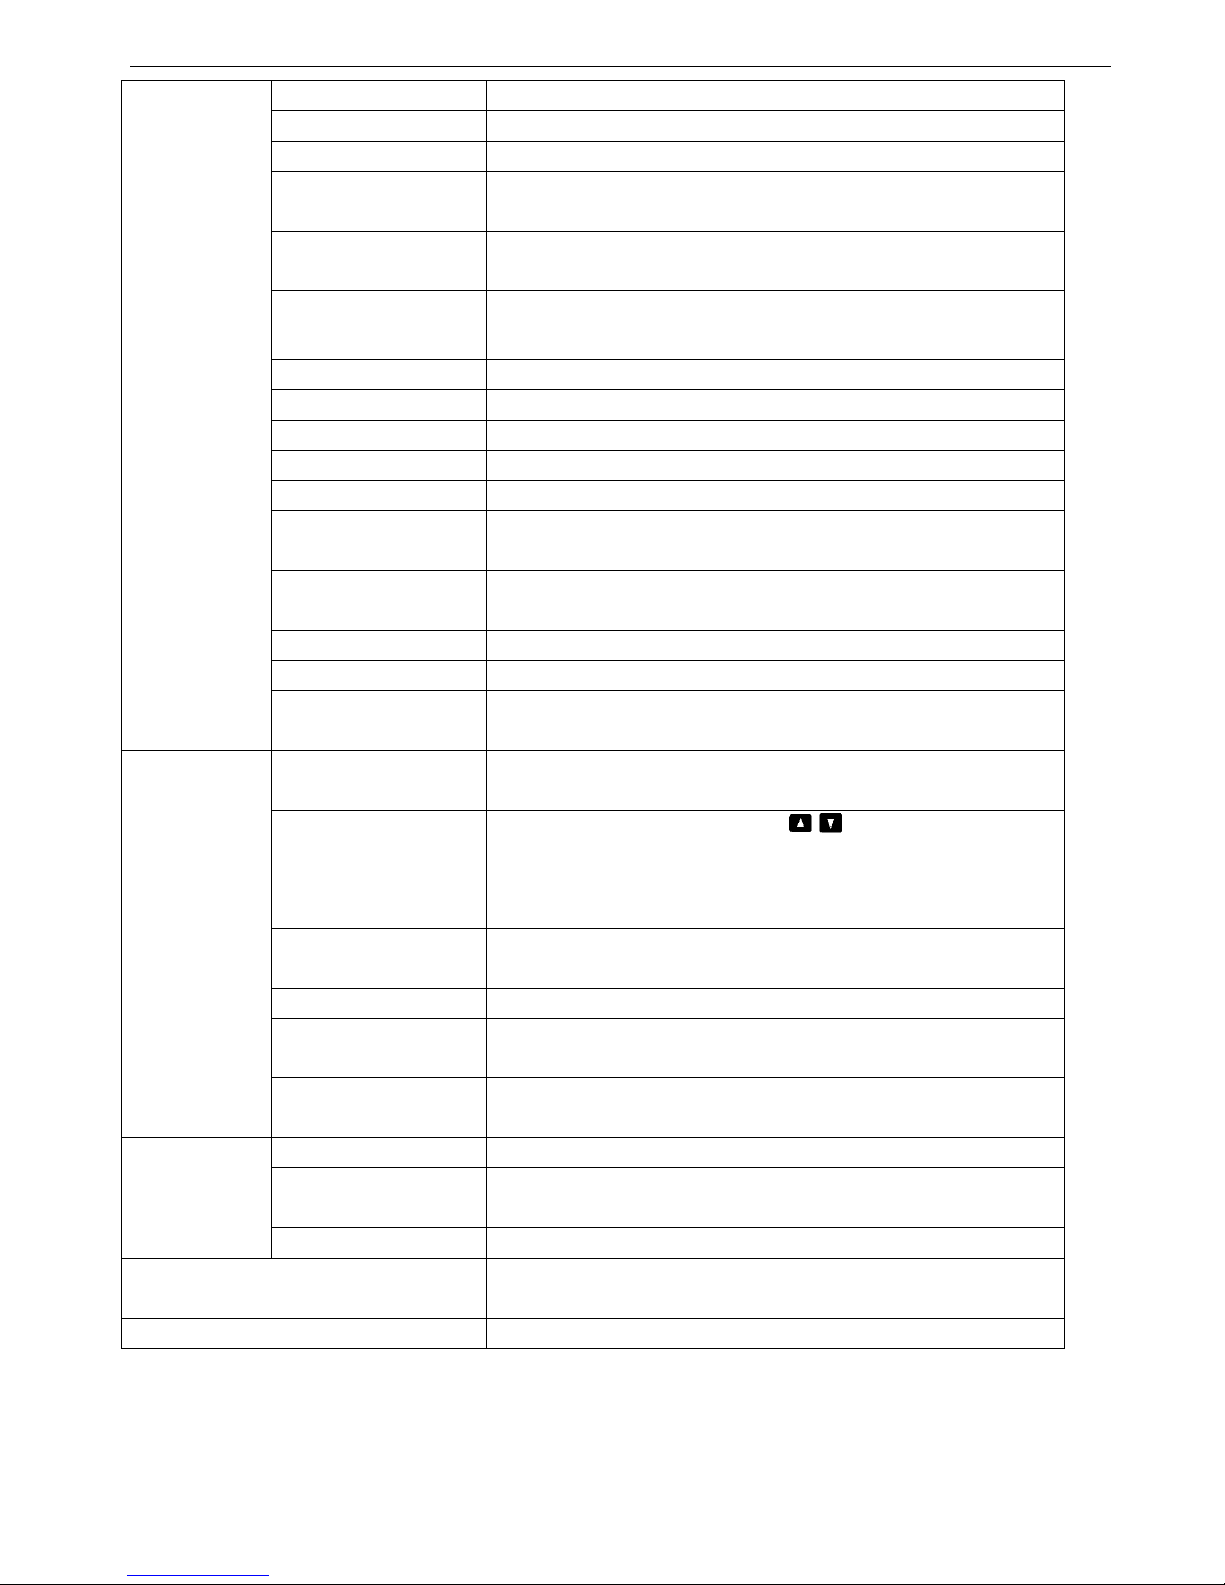
Operate function
Command channel
Operation panel setting;control terminals setting;serial port setting; three modes
are exchangeable
Frequency channel
Keyboard analog potentiometer setting; , keys setting;function code
digital setting; serial port setting;UP/DOWN terminal setting;analog voltage
setting;analog current setting; pulse setting;combination setting; different setting
modes can be switched
Digital input channel
Forward/Reverse running command;6 channels programmable digital input,can
set 35 kinds of function,X6 support 0~20KHz pulse input
Analog input channel 2 channels analog input , 4~20mA and 0~10V can be selected
Analog output channel
1 channel analog output: 0~10V/4~20mA, can output setting frequency, output
frequency
Digital/pulse output channel
1 channel programmable open-collector output; 1 channel relay output; 1 channel
0~20KHz pulse output
Operation panel
LED Display Can display setting frequency, output voltage, output current and other parameters
External meter Display
Display output frequency, output current, output voltage and other physical quan-
tities
Button Lock
Lock all the buttons
Protection Function
Over current protection;over voltage protection;under voltage protection;over
heat protection;over load protection
Optional parts
Brake parts, operation panel, extension cable of operation panel
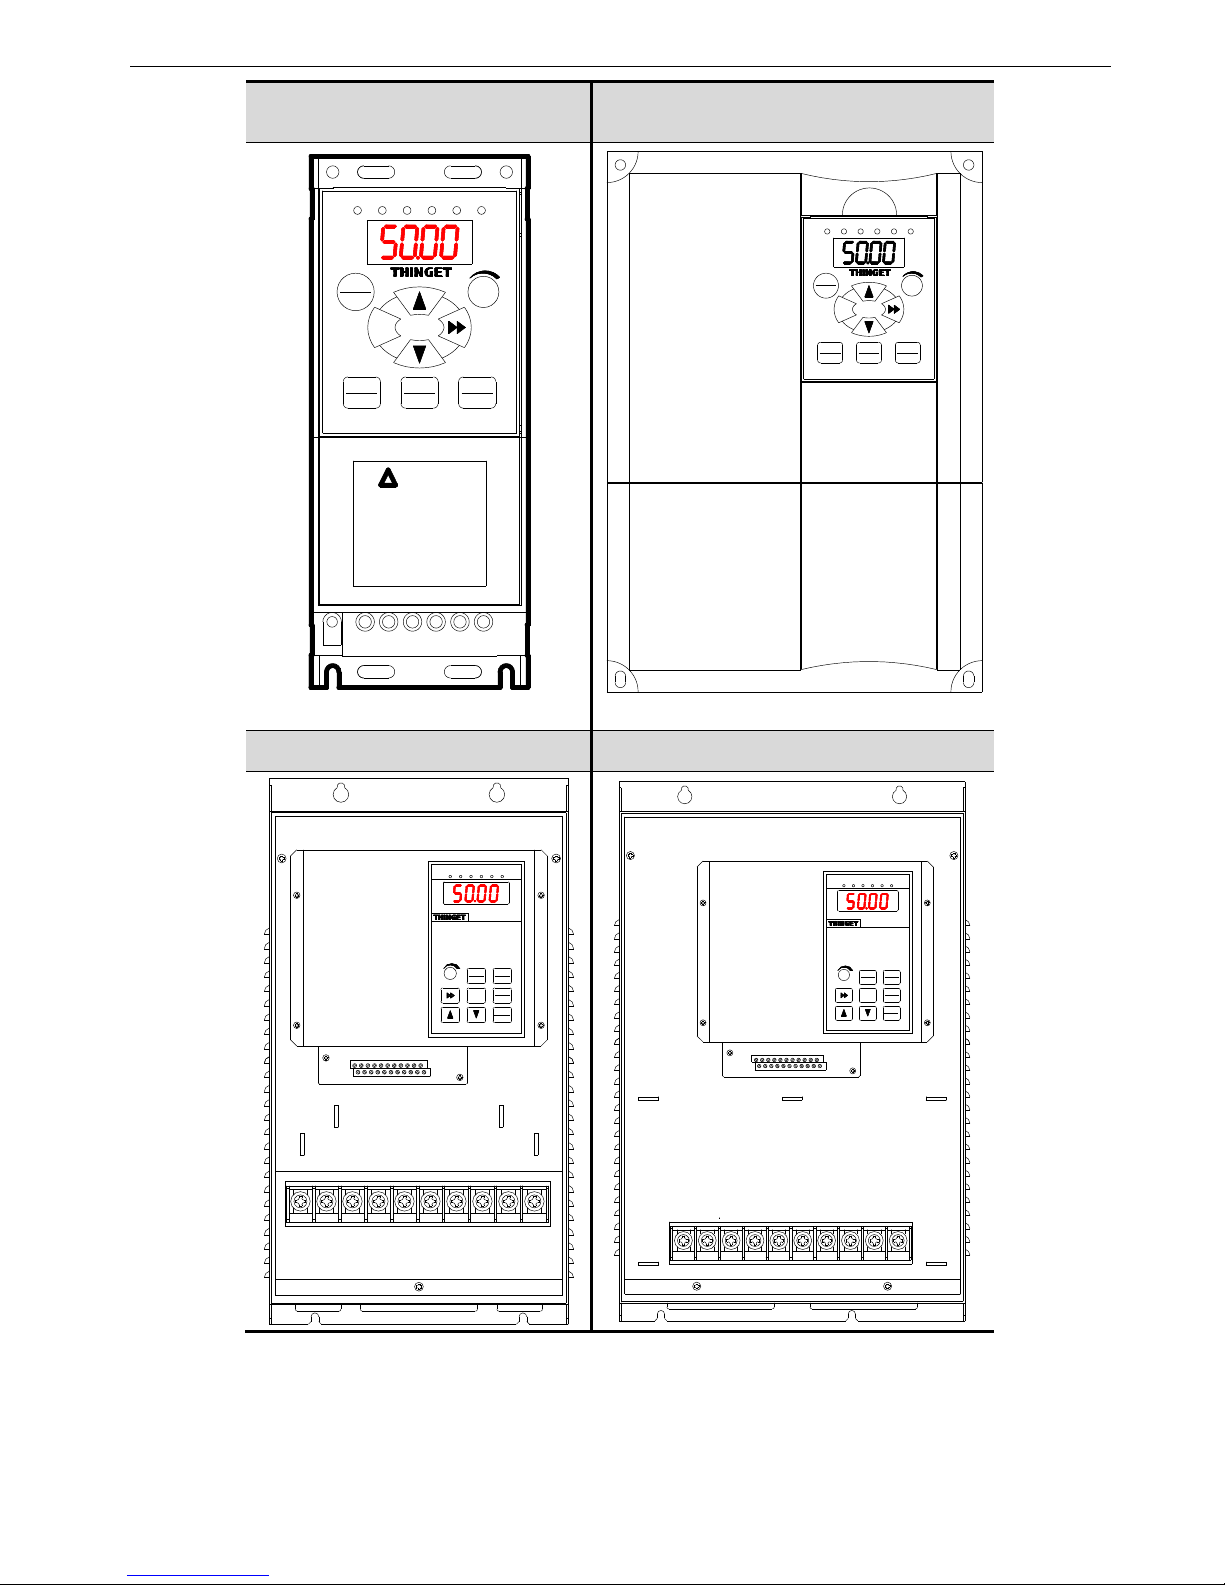
1-3. Product appearance
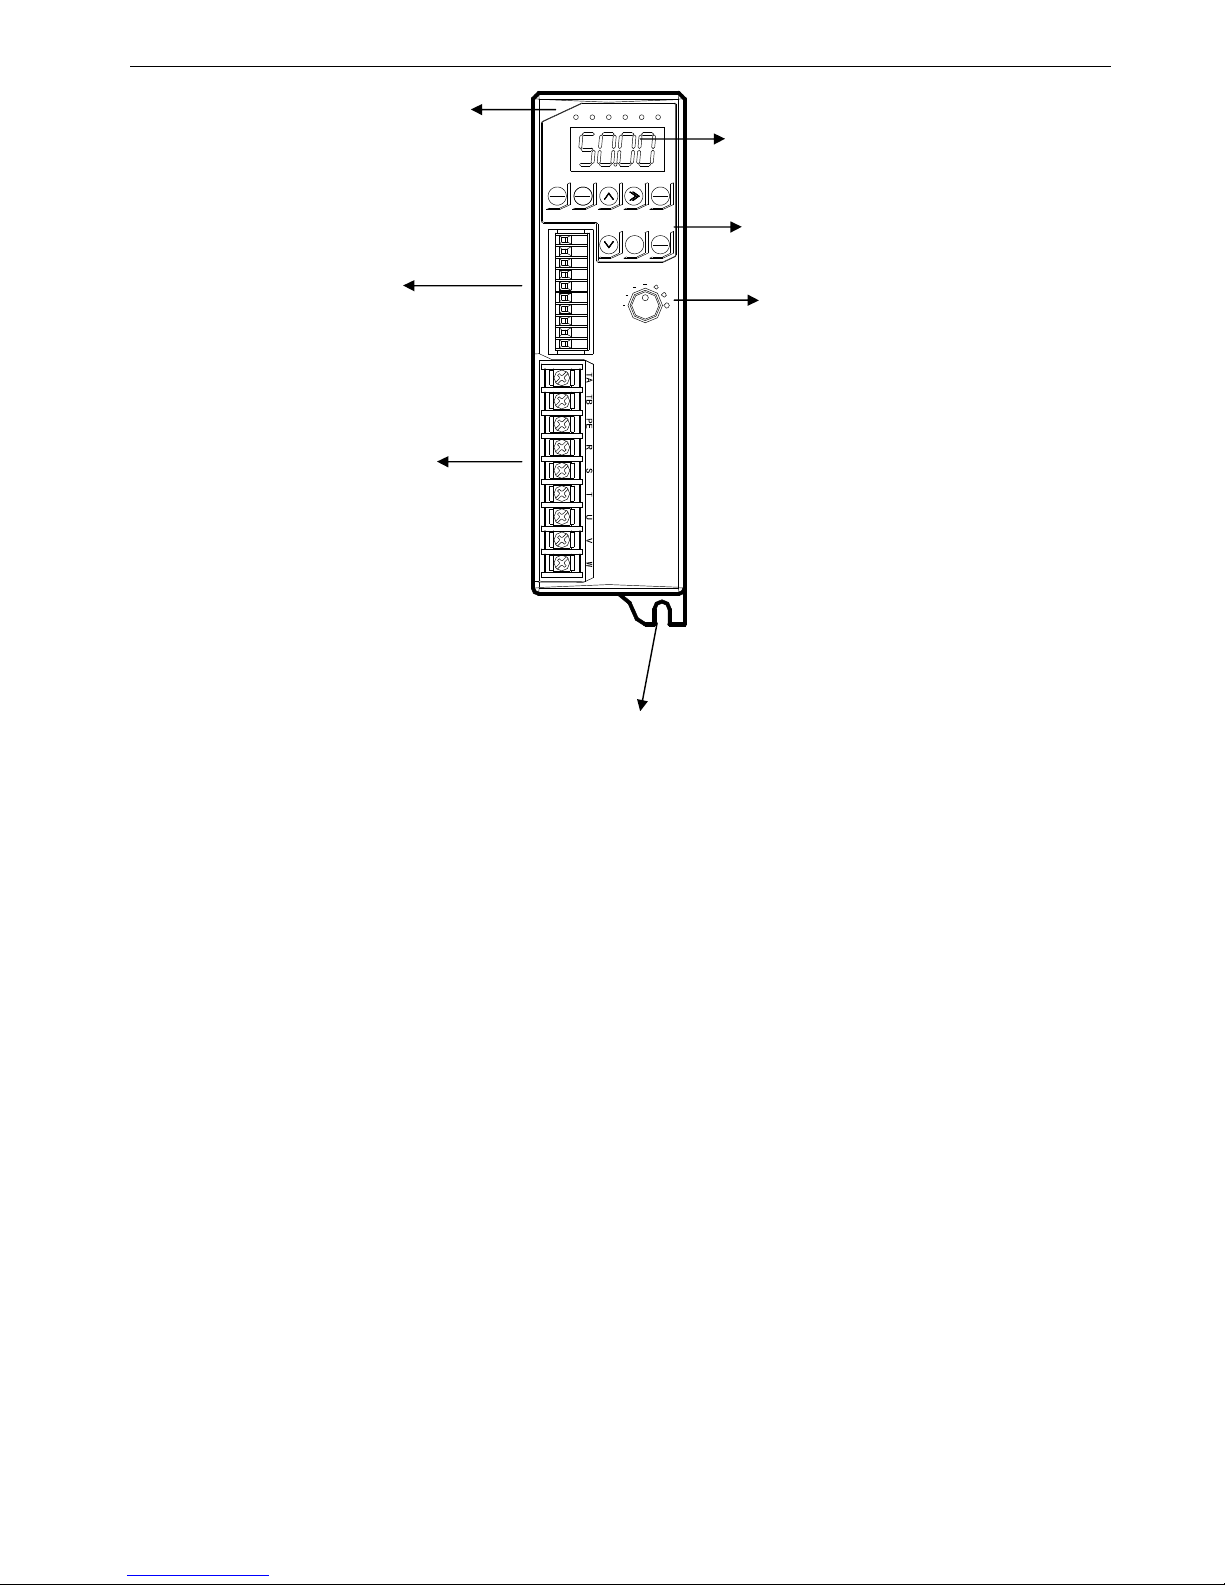
VB3 series 0.4~0.75KW
VB3/V5/VB5 series inverter
10
MENU
ESC
JOG
REV
ENT
DATA
FWD
STOP
RESET
FWD REV ALM HZ V A
LED
Control
terminals
Power
terminals
Mounting hole
4 bits LED display
Buttons
Analog potentiometer
VB3/V5/VB5 series inverter
11
VB5 series single-phase 0.75~2.2KW
VB3/VB5 series 3-phase 0.75~3.7KW
VB5 series 5.5KW~7.5KW
V5 series 11~18.5KW V5 series 22~55KW
MENU
ESC
FWD
ENT
DATA
JOG
REV
STOP
RESET
FWD REV ALM HZ V A
WARNING
!
* STORED CHARGE DO NOT TOUCH
UNTIL 10 MIN. AFTER DISCO-
* RISK OF ELECTRIC SHOCK-DUAL
SUPPLY DISCONNECT MAINS AND
* DO NOT CONNECT AC POWER TO
OUTPUT TERMINALS OF "U V W"
LOADSHARING BEFORE SERVICE
NNECTION
MENU
ESC
FWD
ENT
DATA
JOG
REV
STOP
RESET
FWD REV ALM HZ V A
MENU
ESC
ENTER
DATA
FWD
JOG
REV
STOP
RESET
FWD REV ALM HZ V A
MENU
ESC
ENTER
DATA
FWD
JOG
REV
STOP
RESET
FWD REV ALM HZ V A
VB3/V5/VB5 series inverter
12
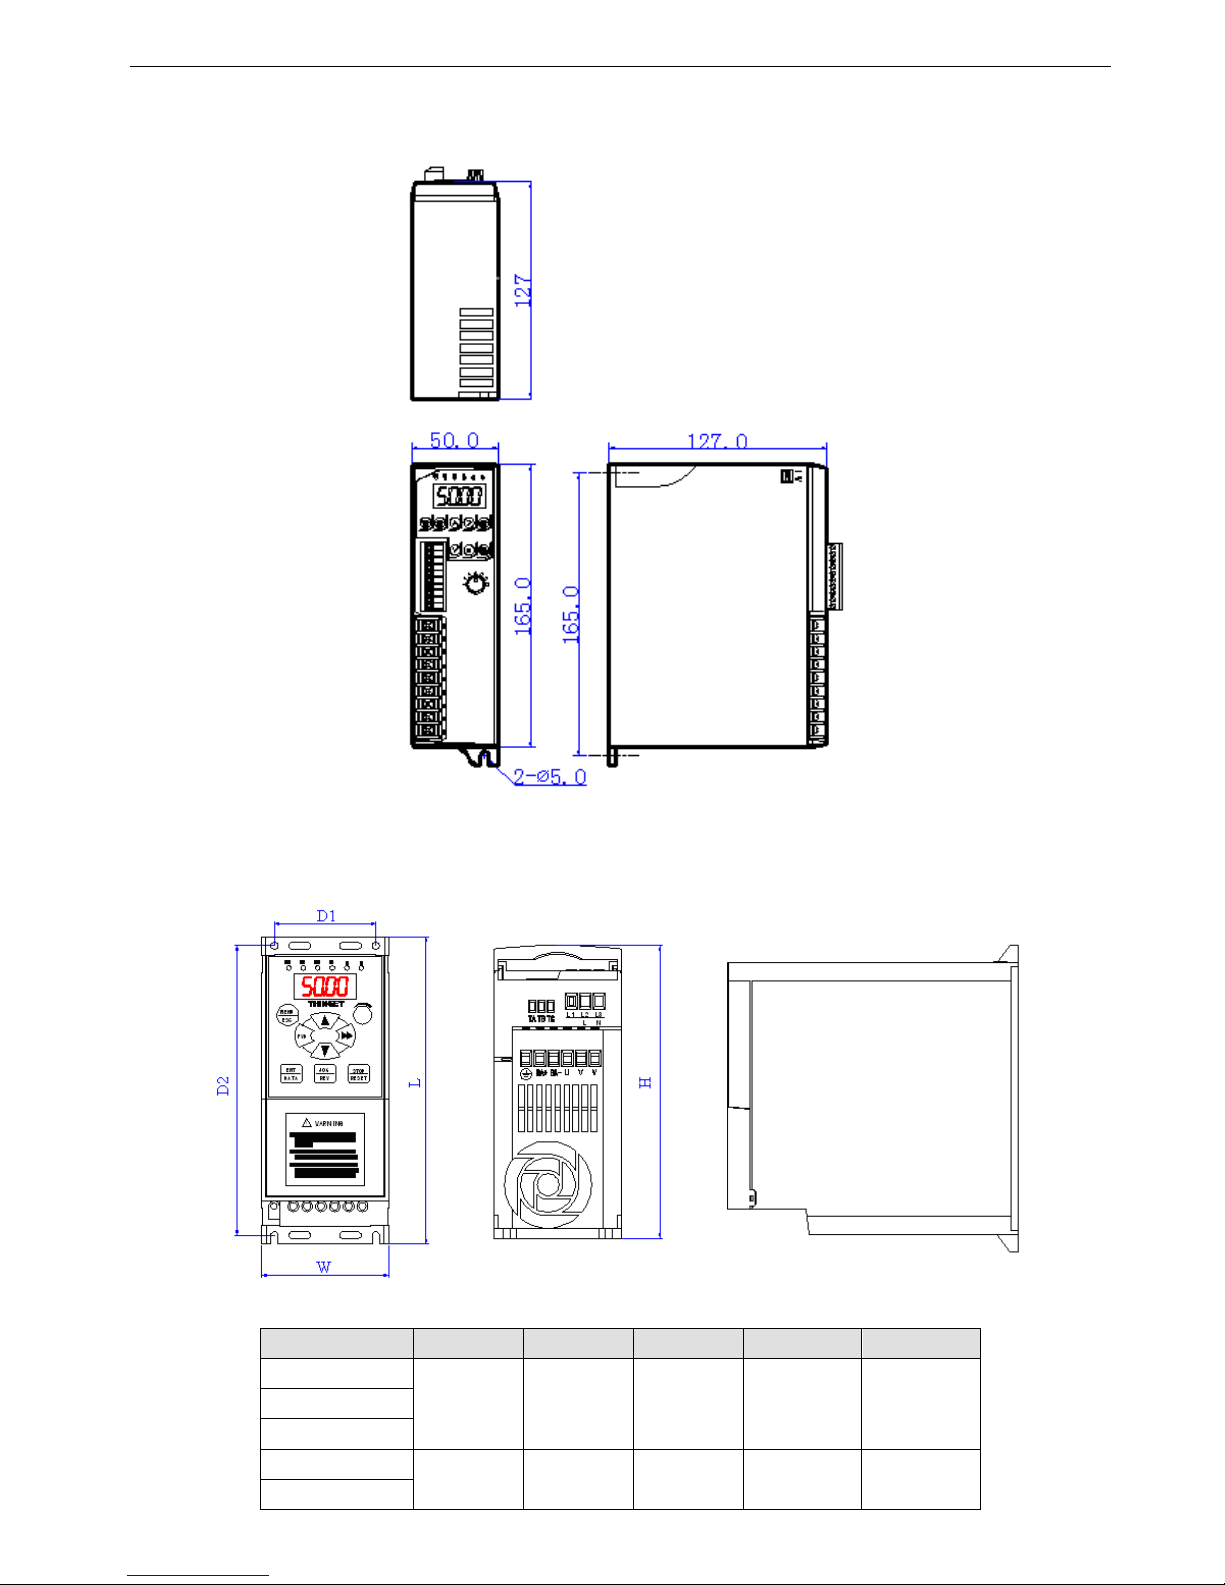
1-4. Product dimension
VB3 series 0.4~0.75KW (Unit: mm)
VB3, VB5 series 0.75~3.7KW (Unit: mm)
The details of the dimension:
Type W D1 L D2 H
VB5-20P7
70 56 170 160 162 VB5-21P5
VB5-22P2
VB3/VB5-40P7
80 56 200 190 162
VB3/VB5-41P5
VB3/V5/VB5 series inverter
13
VB3/VB5-42P2
VB3/VB5-43P7
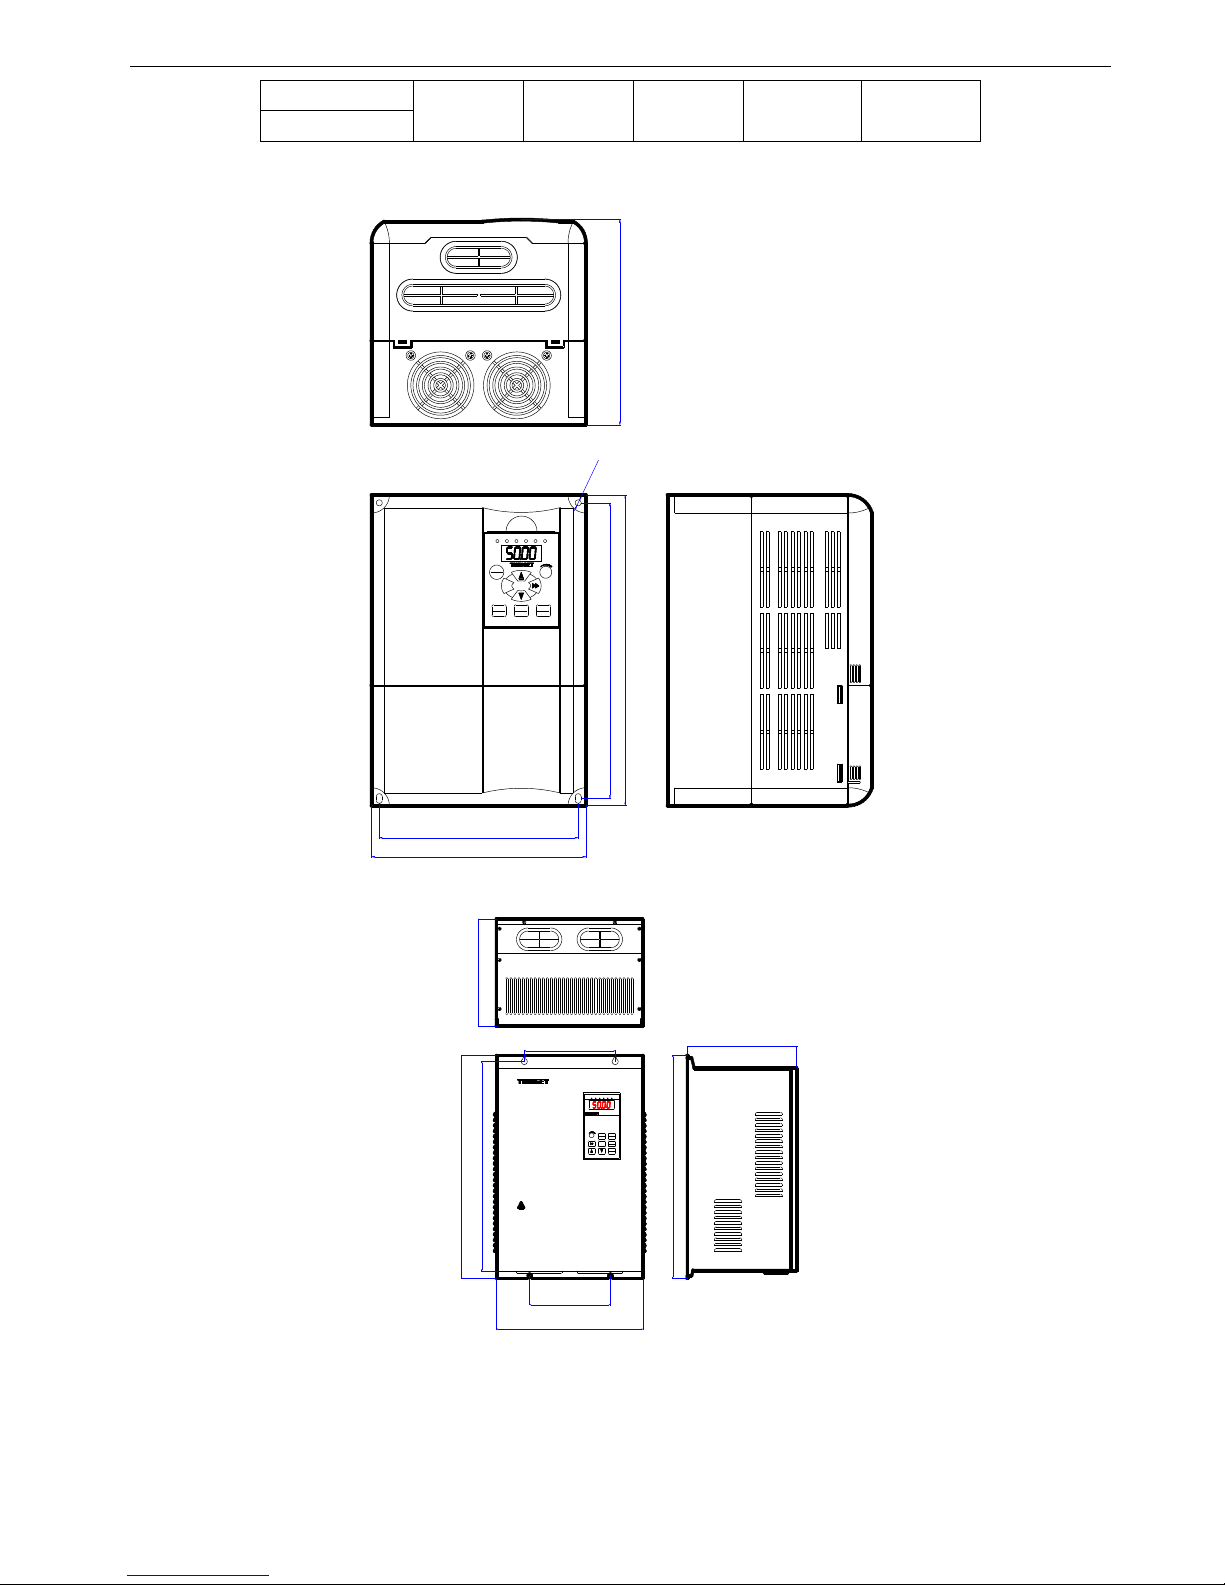
VB5 series 3-phase 5.5~7.5KW (Unit: mm)
V5 series 3-phase 11~55KW (Unit: mm)
MENU
ESC
FWD
ENT
DATA
JOG
REV
STOP
RESET
FWD REV ALM HZ V A
180.0
167.0
260.0
247.5
171.8
?5.0
MENU
ESC
ENTER
DATA
FWD
JOG
REV
STOP
RESET
FWD REV AL M HZ V A
L
W
D2
D3
D1
L
H
* STORED CHARGE DO NOT TOUCH UNTIL
10 MIN. AFTER DISCONNECTION
* RISK OF ELECTRIC SHOCK-DUAL SUPPLY
DISCONNECT MAINS AND LOADSHARING
WARNING
!
* DO NOT CONNECT AC POWER TO OUTPUT
TERMINALS OF "U V W"
BEFORE SERVICE
H

VB3/V5/VB5 series inverter
14
The details of the dimension:
Type W D1 L D2 H D3
V5-4011
230 120 420 160 218 400 V5-4015
V5-4018
V5-4022
290 180 450 210 217 430
V5-4030
V5-4037
375 230 581 230 261 551 V5-4045
V5-4055
V5 series inverter
15
2 Installation and Wiring
2-1. Installation environment
2-1-1. Environment requirement
Ambient tempeature: -10ºC~40ºC. The inverter should be derated when the temperature over 40ºC, at the same time
ventilation and heat dissipation should be enhanced.
Far away from the location with direct sunlight, dust, floating fiber or metal powder.
Mount in the location free of corrosive gas and combustible gas.
Mount in the location free of condensation, and the humidity should less then 95%RH.
Mount in the location where vibration less than 5.9m/s²(0.6G)
Far away from electramagnetism interfere source and other electric instruments sensitive with electramagnetism in-
terfere.
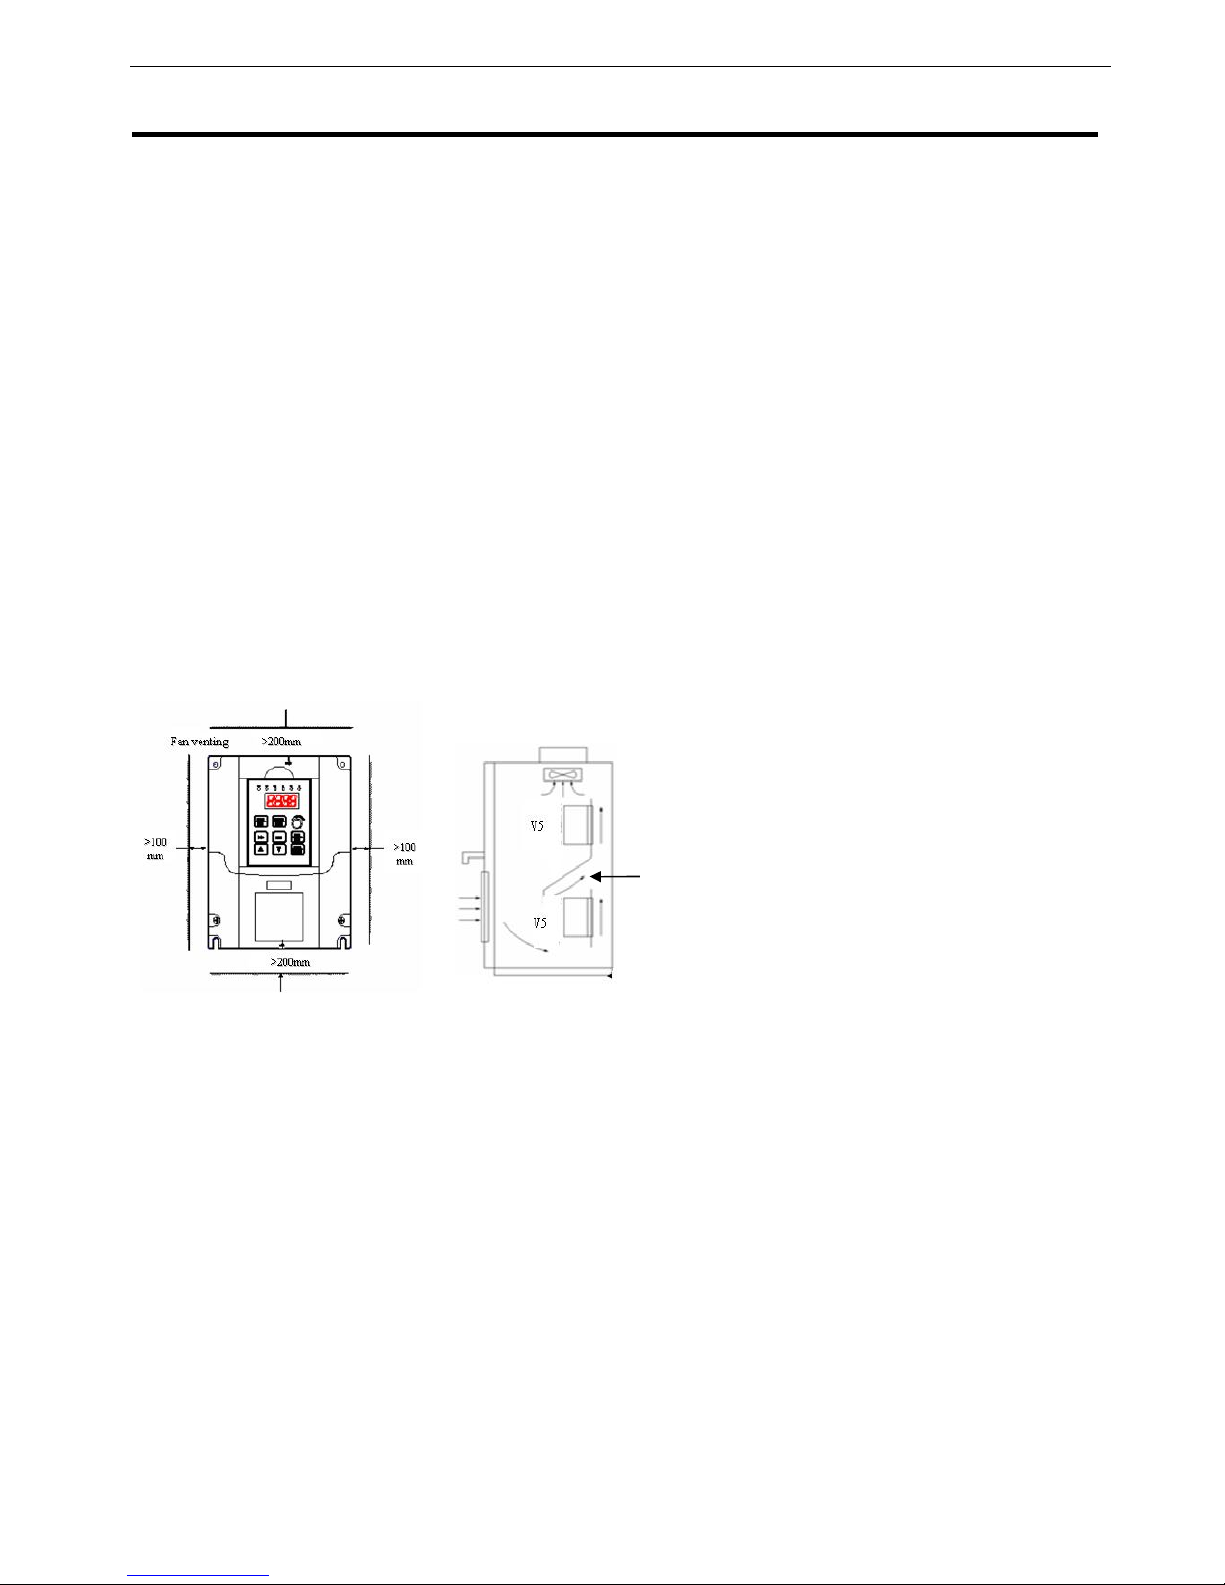
2-1-2. Mounting location and space
Mount the inverter vertically under general condition.
The mounting space and distance are shown in Fig. 2-1.
When several inverters are mounted up and down, air diversion plate should be fixed in the middle as shown in Fig.
2-2.
Fig. 2-1 Mounting Space Fig.2-2 Mounting of Multi-Inverters
2-1-3. Mounting and removing
Removing: Romove the four screws on the cover with phillips screwdriver
Mounting: Allign the mounting holes and then fix the screws.
Air diverting
plate
V5 series inverter
16
2-2. Wiring
Wiring after power off for at least 10 minutes, otherwise, an electronic short may occur.
Do not connect AC power to output terminals U, V and W.
Both the inverter and the motor should be safety grounded as there is leakage current inside the inverter.The diameter
of grounding copper cable must be more than 3.5mm², grounding resistor must be less than 10ohm.
Withstand voltage test of the inverter has been done in the factory, users would better not do it again.
Do not install electromagnetic contactor, absorption capacitor or other resistance-capacitance absorption devices, as
shown in Fig2-3.
In order to make the input over-current protection and power off maintenance easily, the inverters should connect
power supply via braker.
The connection cable of relay I/O circuit (X1~X6, FWD, REV, OC, DO) should select the twisted-pair or shield cable
with diameter over 0.75 mm². One terminal of the shield layer should be hung in the air and the other terminal should
be connected with the inverter’s grounding terminal E, the cable length should be less than 50m.
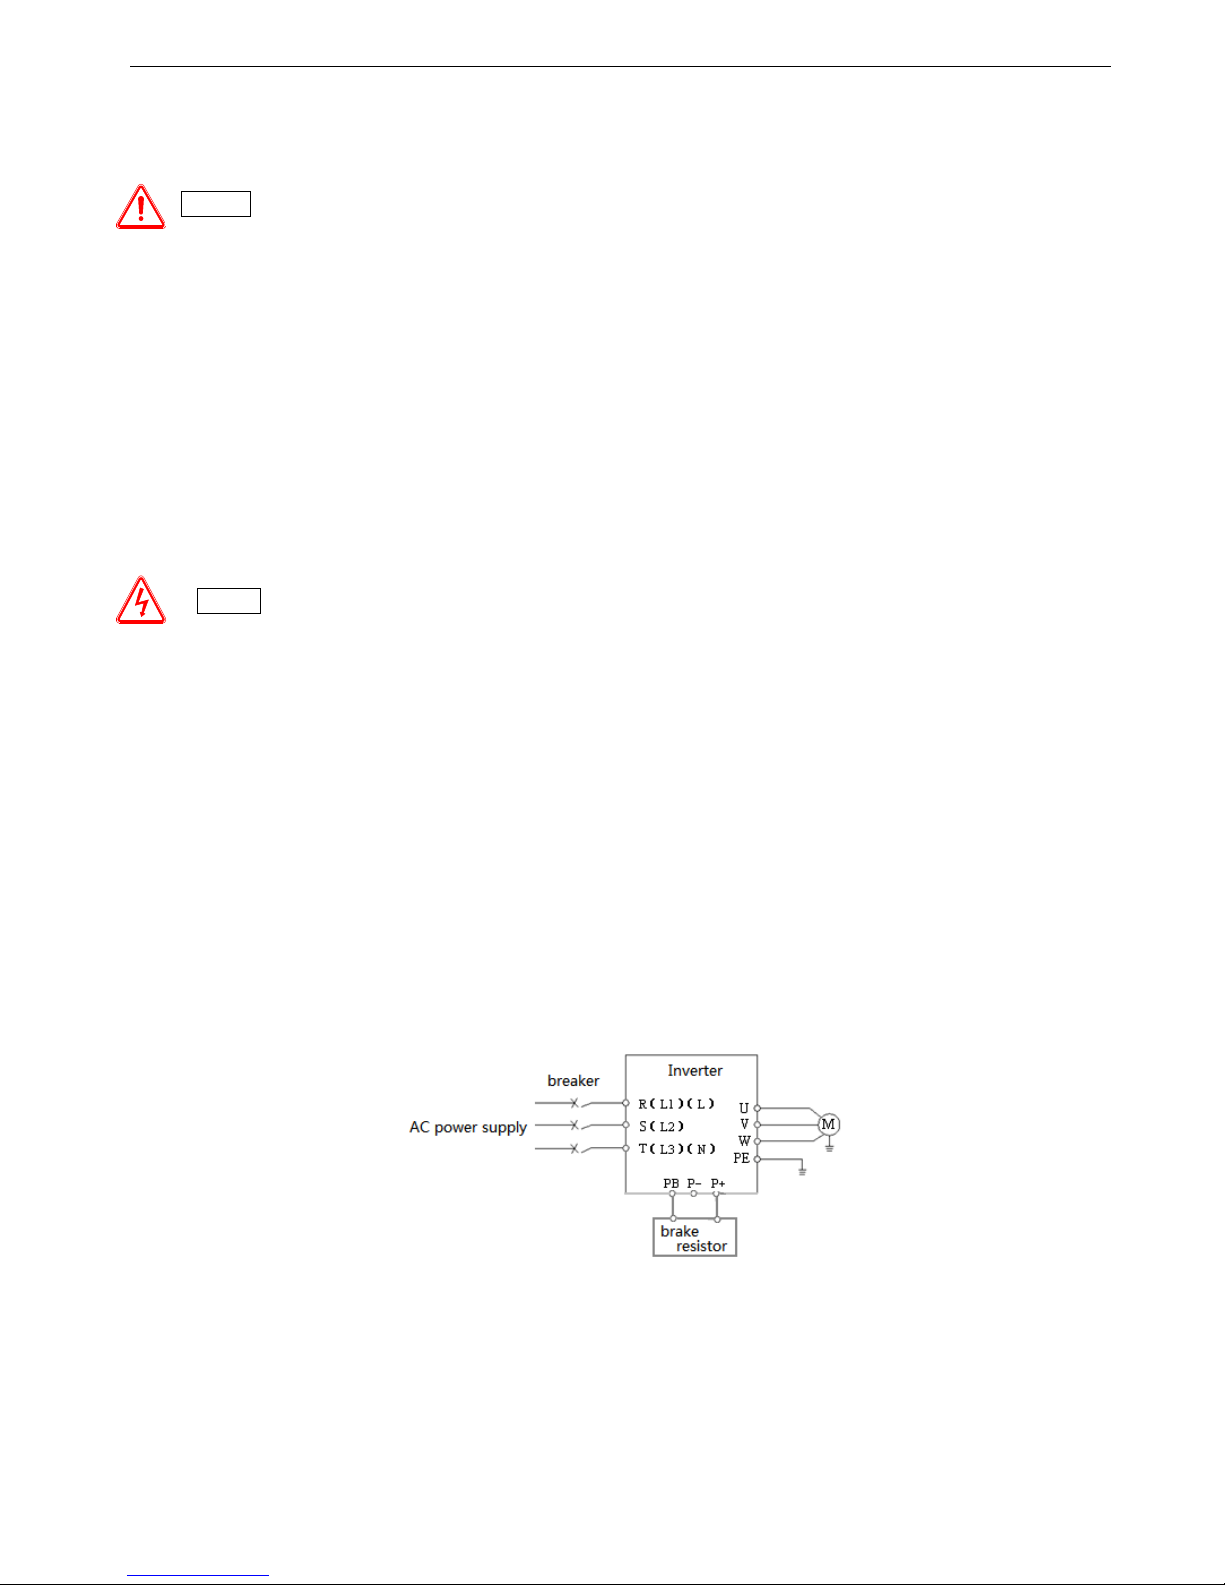
2-3. Wiring of main circuit terminals
2-3-1. Wiring diagram
Fig. 2-3 Wiring of main circuit
Caution
Danger
Before layout operation, make sure the power supply of inverter is cut off, all the LED on the operate panel is black out
and delay for more than 10 minutes.
Wiring work can be performed after the voltage between internal electrolesis capacity “+” and “–” is below DC36V.
Wiring work can only be done by trained and professional personnel.
Before power on, please check if the power supply voltage is consistent with the inverter voltage level, otherwise
device damage, human injuries and deaths may occur.
V5 series inverter
17
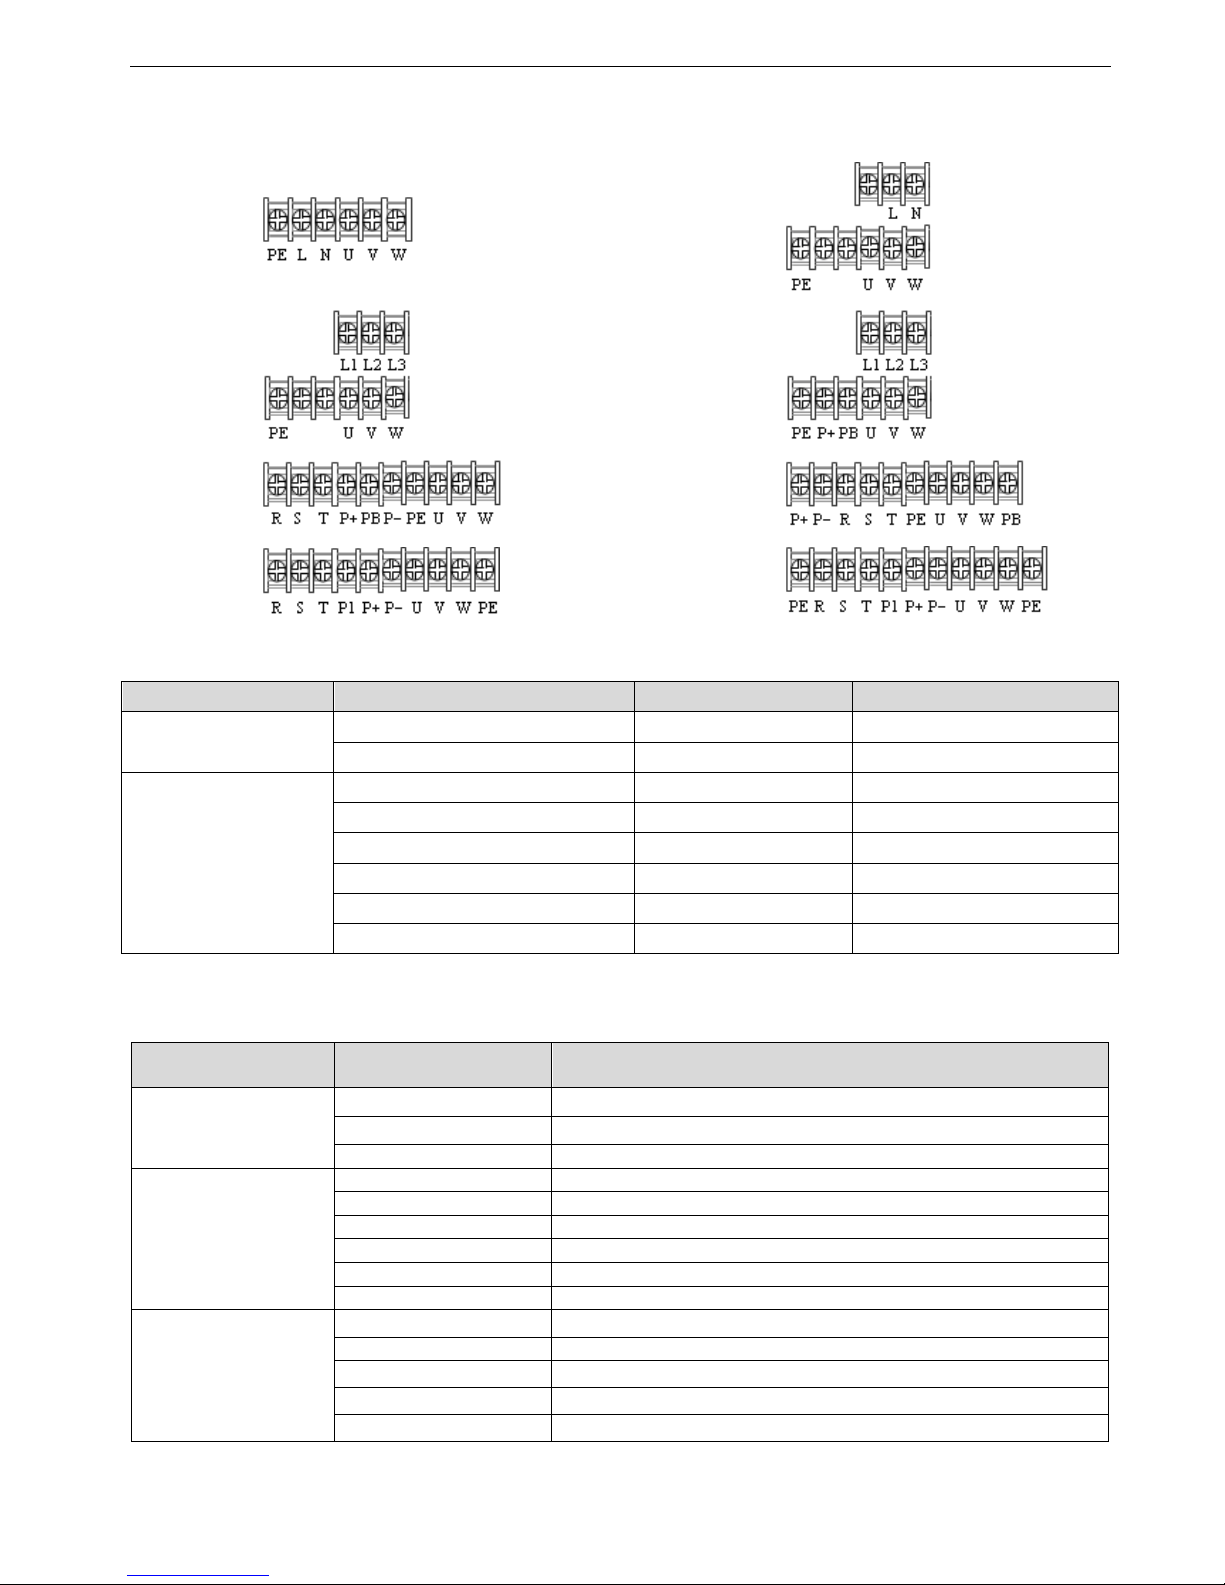
2-3-2. Terminal assignment and description
Fig. A
Fig. B
Fig. C
Fig. D
Fig. E
Fig. F
Fig. G
Fig.H
The relationship between main circuit terminals and product types:
Voltage level Power (KW) Figure Series
220V
0.4~0.75 Fig. A VB3
0.75~2.2 Fig. B VB5
380V
0.75~3.7 Fig. C VB3
0.75~3.7 Fig. D VB5
5.5~7.5 Fig. E VB5
11~18.5 Fig. F V5
22~30 Fig. G V5
37~55 Fig. H V5
I/O terminals of main circuit:
Table 2-1 main circuit I/O terminals
Voltage
Terminal Function
VB3, VB5 series
Single phase 220V
L, N Single phase AC 220V input
U, V, W Three phases AC output
PE G
round
VB3, VB5 series
Three phases 380V
L1, L2, L3 T
hree phase
s AC 380V input
(fit for power below 3.7KW )
R, S, T Three phase
s AC 380V input
(fit for power below 3.7KW )
P+, PB Brake
resistor
(some types don’t have brake unit)
P+, P- G
eneratrix + and
- U, V, W T
hree phase
s AC output
PE Ground
V5 series
Three phases 380V
R, S, T Three phases AC 380V input
U, V, W T
hree phase
s AC output
P+, P- Generatrix + and -
P1, PB Brake resistor
PE Ground
V5 series inverter
18
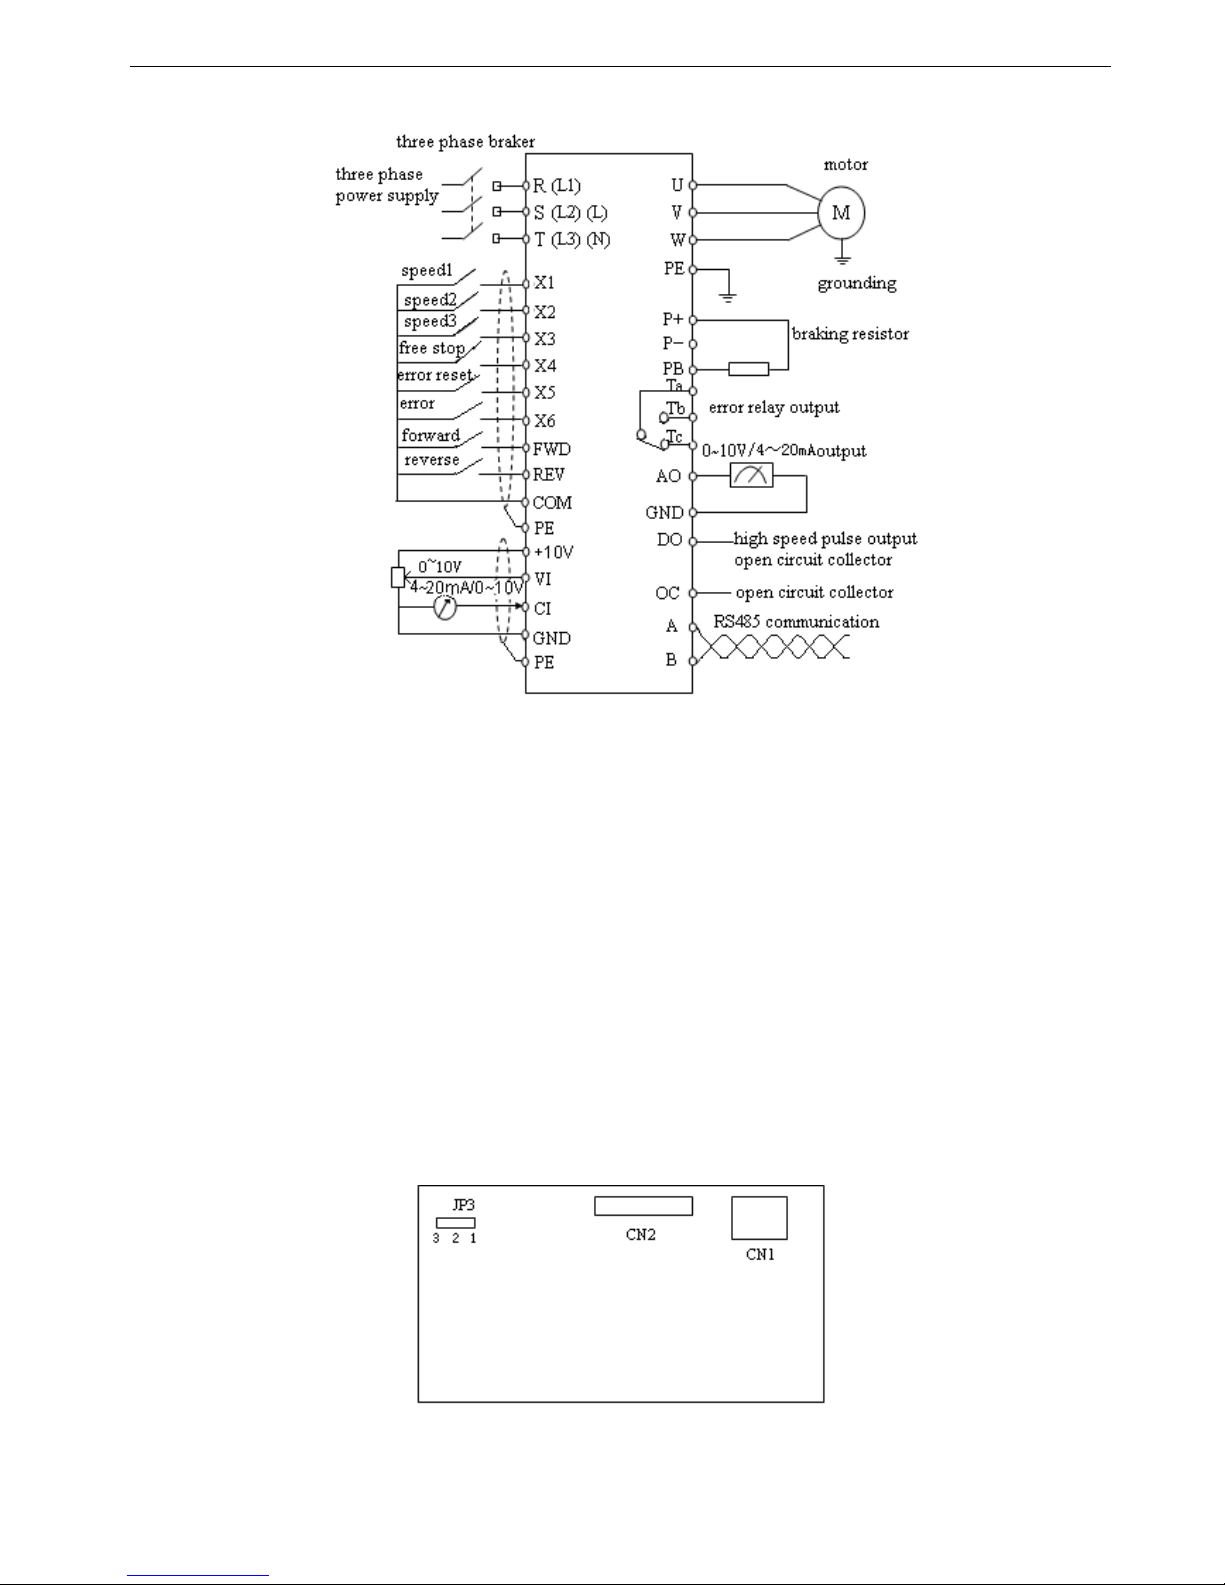
2-4. Basic running wiring
Note:
(1) P- terminal is only used in 5.5KW and larger inverters.
(2) L, N terminals are suitable for 220V single phase inverters.
(3) L1, L2, L3 terminals are suitable for VB5 series 0.75~3.7KW three phases types.
(4) VB5 series 0.75~3.7KW three phases have no digital input X5, analog input VI and digital output DO.
(5) VB3/VB5 series single phase have no X4~X6, VI, AO, DO, OC, P+, P-, PB.
(6) VB3 series 0.75~3.7KW three phases have no terminal X5, X6 and VI, DO, P+, P-, PB.
2-5. Setting and wiring of control circuit
2-5-1.Position and function of terminals and jumpers on control panel
Please open the front cover of inverter, there is the PCB board inside. The jumper is on the board.
0.4 ~0.75KW VB3 series inverter jumper position
Fig 2-4(a) jumper position on control board
V5 series inverter
19
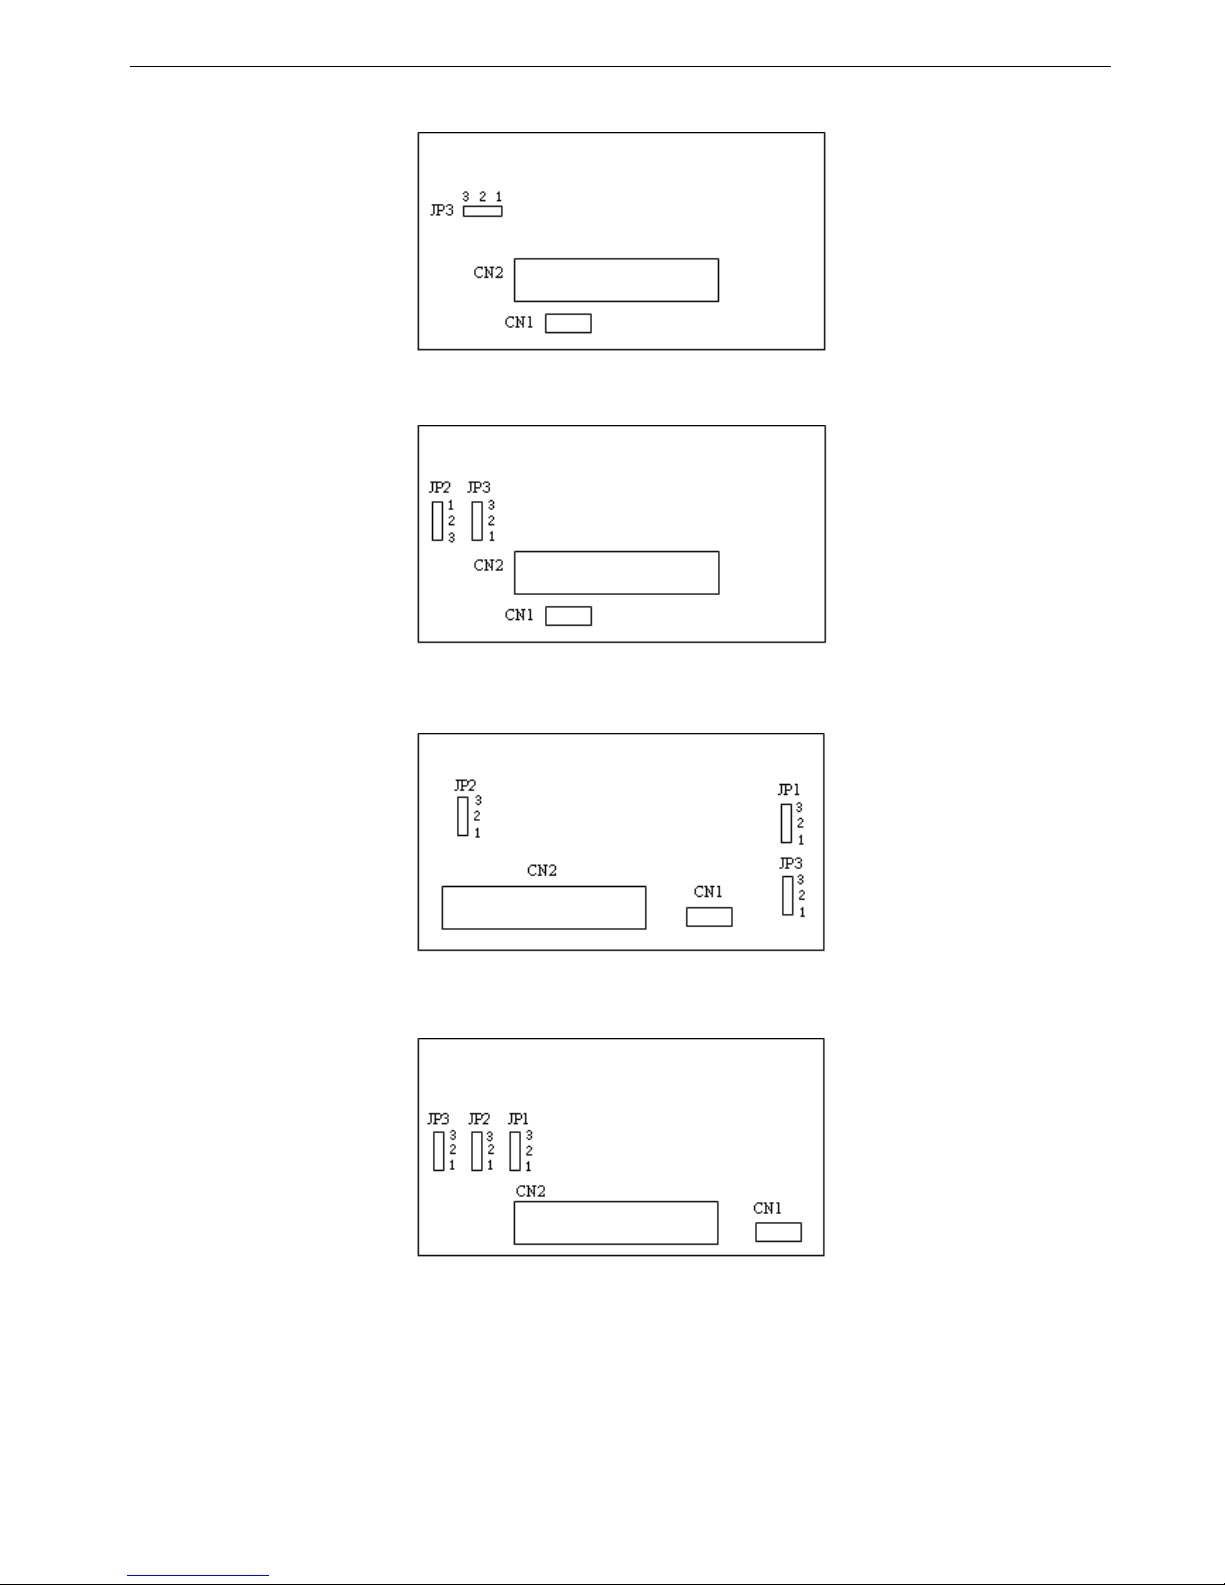
0.75~2.2KW VB5 series single phase inverter jumper position
Fig 2-4 (b) jumper position
0.75~3.7KW VB3, VB5 series three phases inverter jumper position
Fig 2-4 (c) jumper position
5.5~7.5KW VB5 series three phases inverter jumper position
Fig 2-4 (d) jumper position
11~55KW V5 series inverter jumper position
Fig 2-4 (e) jumper position
The position of jumpers are shown in Fig. 2-4, the function of jumper terminals are shown in Table 2-3 and the function descriptions of jumpers and their setting method are shown in Table2-2. Before running the inverter, make sure terminals wiring
and jumpers setting have been done, more than 1mm2 cables are recommended to use.
V5 series inverter
20
Table 2-2 Function of jumpers
Jumper Function Setup Default Setup
JP1
Pulse output terminal
DO power selection
1-2 connect: External power supply
2-3 connect: Inverter’s internal 24V power supply
External power
supply
JP2
Analog output terminal
AO output
1-2 connect: 4~20mA, AO terminal outputs current signal
2-3 connect: 0~10V, AO terminal outputs voltage signal
0~10V
JP3
CI current/voltage input
modes selection
1-2 connect : V side: 0~10V voltage signal
2-3 connect : I side: 4~20mA current signal
4~20mA
2-5-2.Terminals on control panel
1. Functions of CN1 terminal are shown in Table 2-3:
Table 2-3 Function of CN1
Type
Terminal
Mark
Name Function Description Specification
Relay output
terminal
TA
Multi-function
relay output
terminals
Multi-functional relay output
terminals. Please refer to function parameters P4.11 and description of output terminals
TA-TC: normal close
TA-TB: normal open
Contactor Capacity:
AC250V/2A (COSΦ=1)
AC250V/1A (COSΦ=0.4)
DC30V/1A
TB
TC
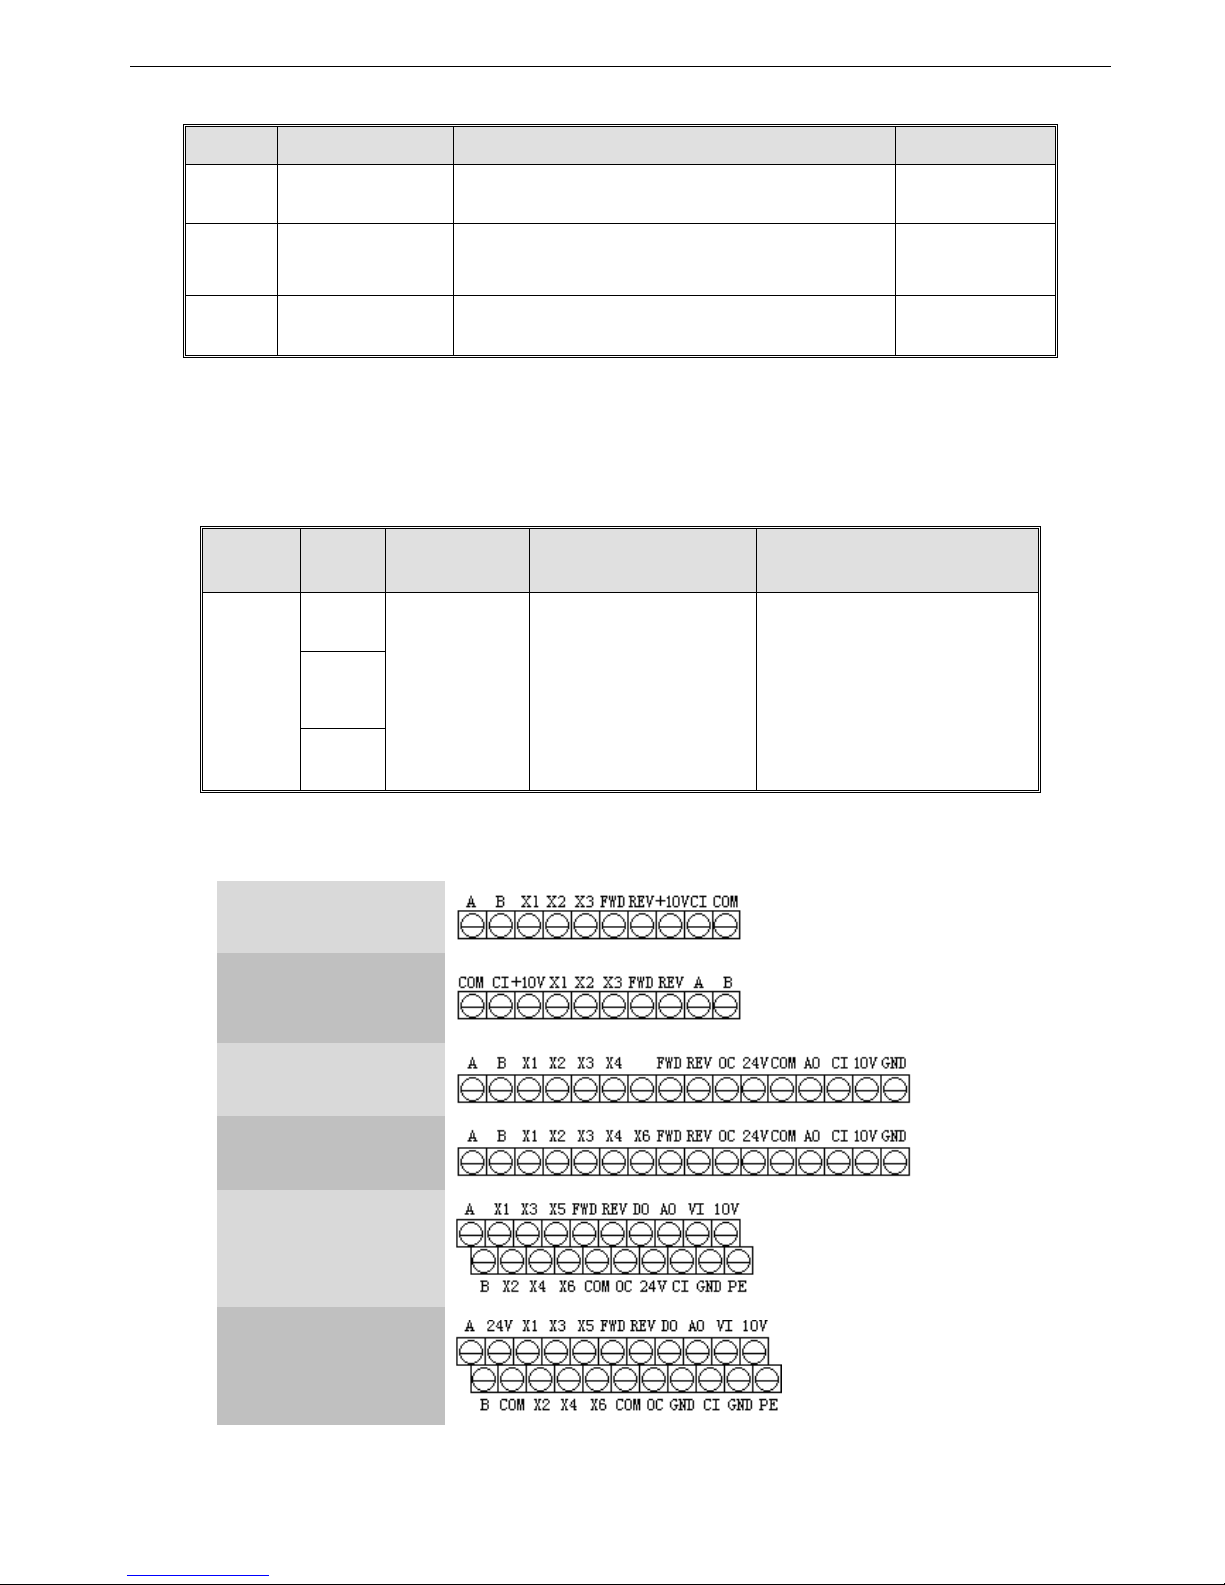
2. Control circuit terminals CN2
VB3 3-phase
0.4~0.75KW
VB5 1-phase
0.75~2.2KW
VB3 3-phase
0.75~3.7KW
VB5 3-phase
0.75~3.7KW
VB5 3-phase
5.5~7.5KW
V5 3-phase
11~55KW
Fig. 2-5 Terminals on control panel
V5 series inverter
21
3. CN2 terminals’ function description are shown as below:
Table 2-4 CN2 terminals’ function description
Type Terminal Name Terminal Function Description Specification
Communication
A
RS485 port
RS485 difference signal +
standard RS485 port, please use
twisted cable or shielded cable
B RS485 difference signal -
Multifunction
output terminal
OC
Open collector output
terminal 1
Multi-function digital
output terminal,
refer to P4.10 for details
(common
terminals: COM)
optical coupling isolation output
voltage range: 9~30V
max output current: 50mA
please refer to P4.10 for details
Pulse output
terminal
DO
Open collector pulse
output terminal
Multi-functional pulse output terminal, refer to P4.20, P4.21 for details
(common terminals: COM)
Output frequency range: set
P4.21, the max is 20KHz
Analog input
VI Analog input VI
analog voltage input
(reference ground: GND)
Input voltage range:
0~10V (input
resistance:47KΩ)
Resolution: 1/1000
CI Analog input CI
Analog current/voltage input, vol-
tage and current are selected by
jumper JP3 and the default is current.
(reference ground: GND)
Input voltage range:
0~10V (input
resistance: 47KΩ)
Input current range:
4~20mA
(input resistance: 500Ω)
Resolution: 1/1000
Analog output AO Analog output AO
Analog voltage/current ouput, they
are selected by jumper JP2 and the
default is voltage which can indicate 7 values. (reference ground:
GND)
Voltage output range: 0~10V
Current output range: 4~20mA
Running control
terminal
FWD
Forward running com-
mand
Forware/reverse digital command.
Refer to P4.08 for details (instruction about 2-wire and 3-wire control function).
Optical coupling isolation input
Input resistance: R=2KΩ
Highest input frequency: 200Hz
Input voltage range: 9~30V
REV
Reverse running com-
mand
Multifunction
input terminal
X1 Multifunction input 1
Multi-function digital input terminals, refer to parameter P4.
(common terminal: COM)
X2 Multifunction input 2
X3 Multifunction input 3
X4 Multifunction input 4
X5 Multifunction input 5
X6 Multifunction input 6
Power supply
24V +24V power supply
Supply +24V power supply
(negative terminal: COM)
-
10V +10V power supply
Supply +10V power supply
(negative terminal: GND)
Max output current: 50mA
GND
+10V
power supply common
terminal
Reference ground of analog signal and
+10V power supply
COM is isolated with GND
inside
inverter
COM
+24V power supply
common terminal
Digital signal I/O common terminal
Shield PE Shield terminal
V5 series inverter
22
2-5-3. Analog I/O terminal wiring
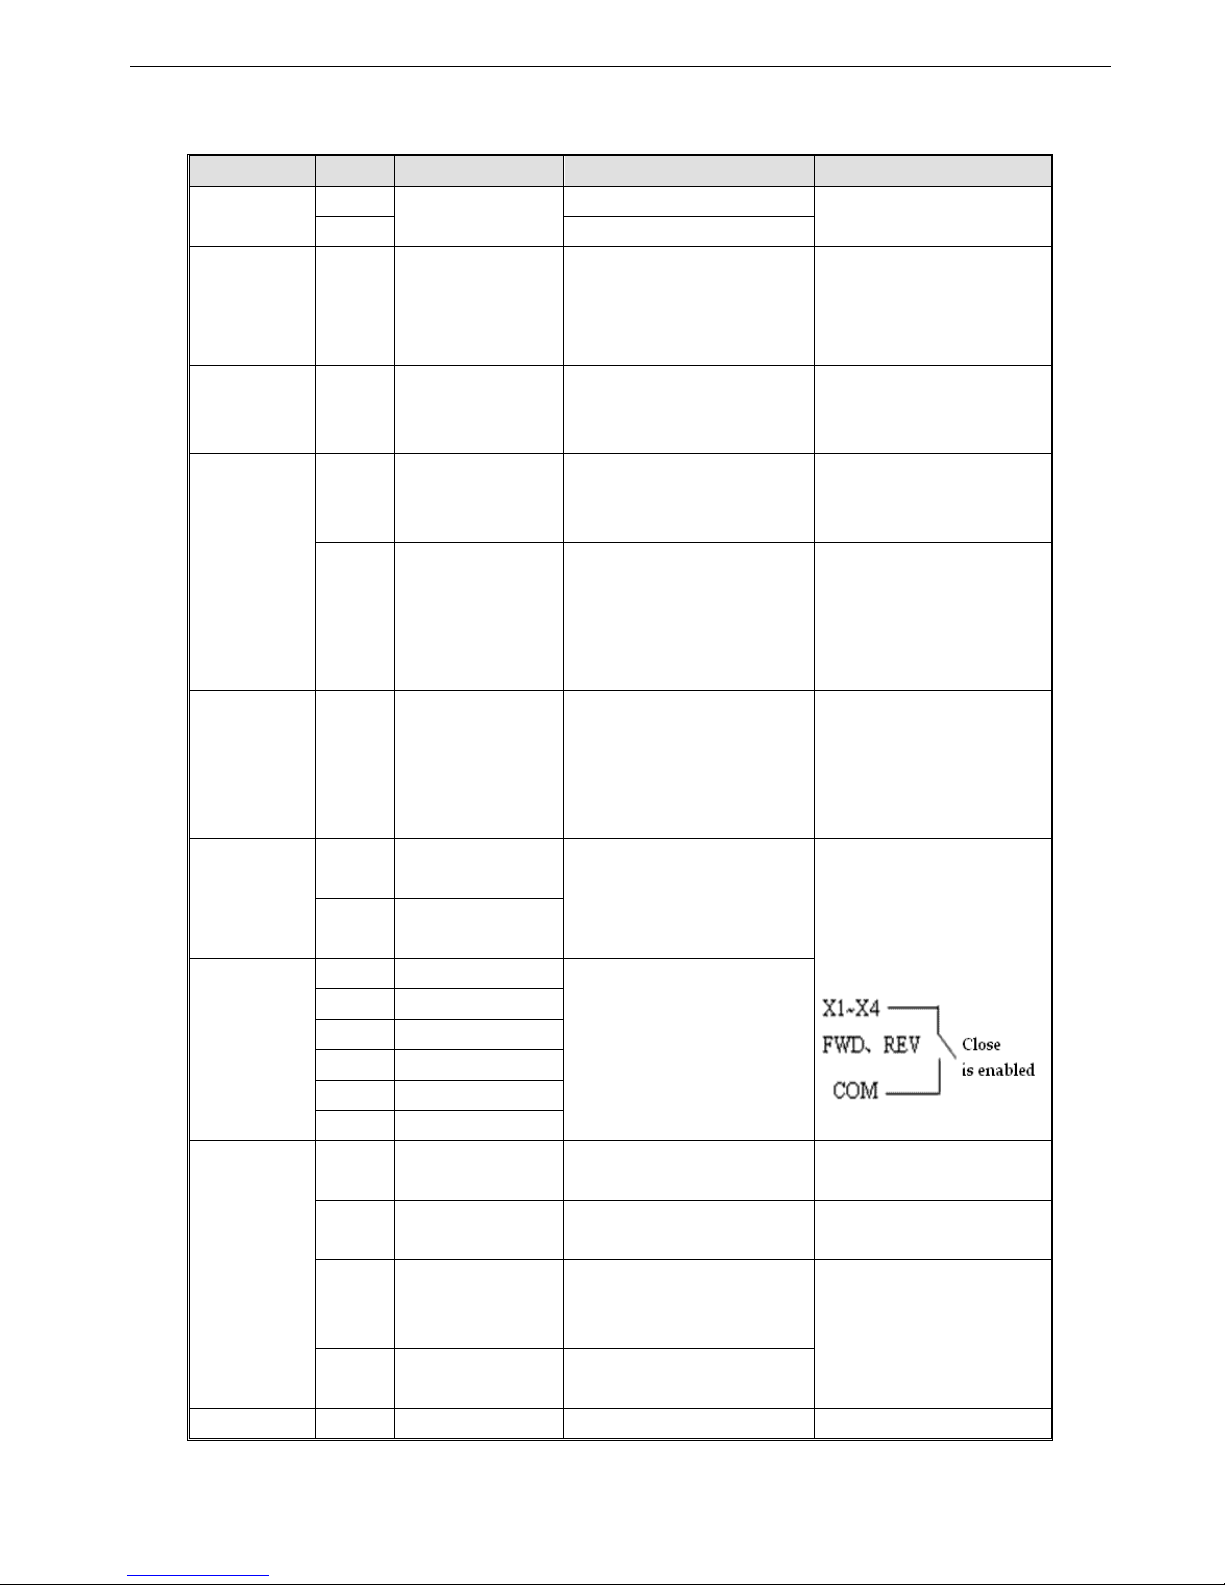
1. The wiring of VI terminal voltage signal input
Fig. 2-6 VI terminal wiring diagram
2. CI terminal analog input, jumper select voltage input(0~10V) or current input(4~20mA):
Fig. 2-7 CI terminal wiring
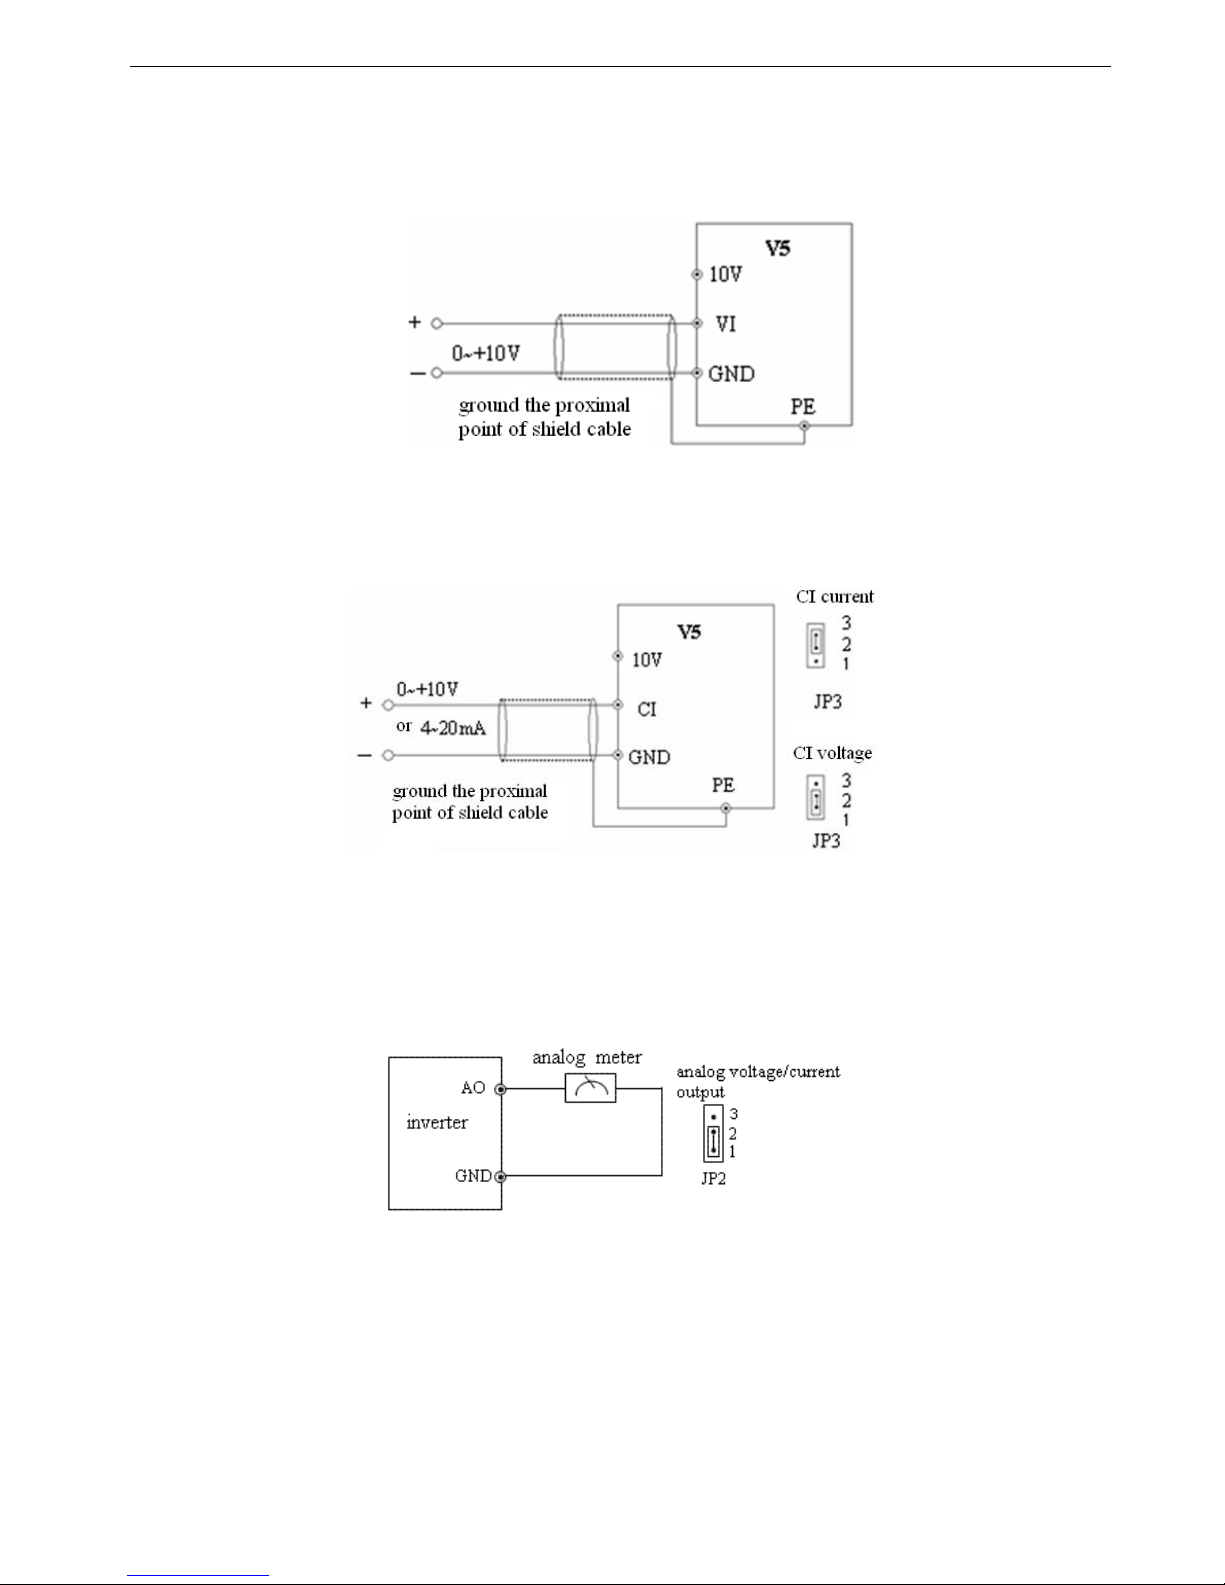
3. Wiring for analog ouput terminal AO
Analog output terminal AO can display various physical quantities. The output voltage is 0~10V, output current is
4~20mA.
Fig. 2-8 Analog output wiring
Note:
(1) When using analog input, you can connect filter capacitor or common mode choke between VI and GND, or CI and GND.
(2) Because analog input signal is easily interfered by outside, the shield cable is required, the cable length must be short
and the shield layer must be grounded well.
 Loading...