

Page 1

CL-3684
Wireless Digital
Video Doorbell
USER’S MANUAL
Page 2
3
Congratulations
Safety Precautions
Prior To Use
...on purchasing our high quality product. Please read the
manual carefully before installing your system and follow
all of the directions to ensure proper installation.
To reduce the risk of electrical shock and injury, please follow
these basic safety precautions before using the product.
1.Carefully read and observe the instructions in this manual.
2.Follow all warnings marked on the unit.
3.Must set the time and the date when replace batteries.
4.Unplug this product from the wall outlet before cleaning, then
use a damp cloth to wipe. Do not use liquid or aerosol
cleaners.
5.Do not place objects on the line cord that may cause
damage.
6.Do not place the Outdoor station near the metal.
7.Pay attention to the polarity of the batteries, insert the
rechargeable batteries in accordance with polarity symbols
(this instruction is found in the installing batteries section.)
8.Keep out of the reach of children.
9.Use only in the described manner.
10.Stop using if it becomes damaged.
1
Page 3
Supports up to 4 outdoor units
2.4'' (320x240) QVGA LCD display
Video resolution: 320 x 240, with 25pics per second
Wide angle lens and LED for night vision
Long standby doorbell (battery up to 2 years or connect with
DC+9 12V )
Water-proof outdoor station Ip55
Microphone and speakerphone
Brightness and talk volume are adjustable
Remote door opening ( Optional)
DIY installation to save high labor cost
~
Crystal sound quality
Transmitting distance : with up to 200m range out of doors
Transmitting distance : with up to 50m range indoors
Introduction
2
Page 4
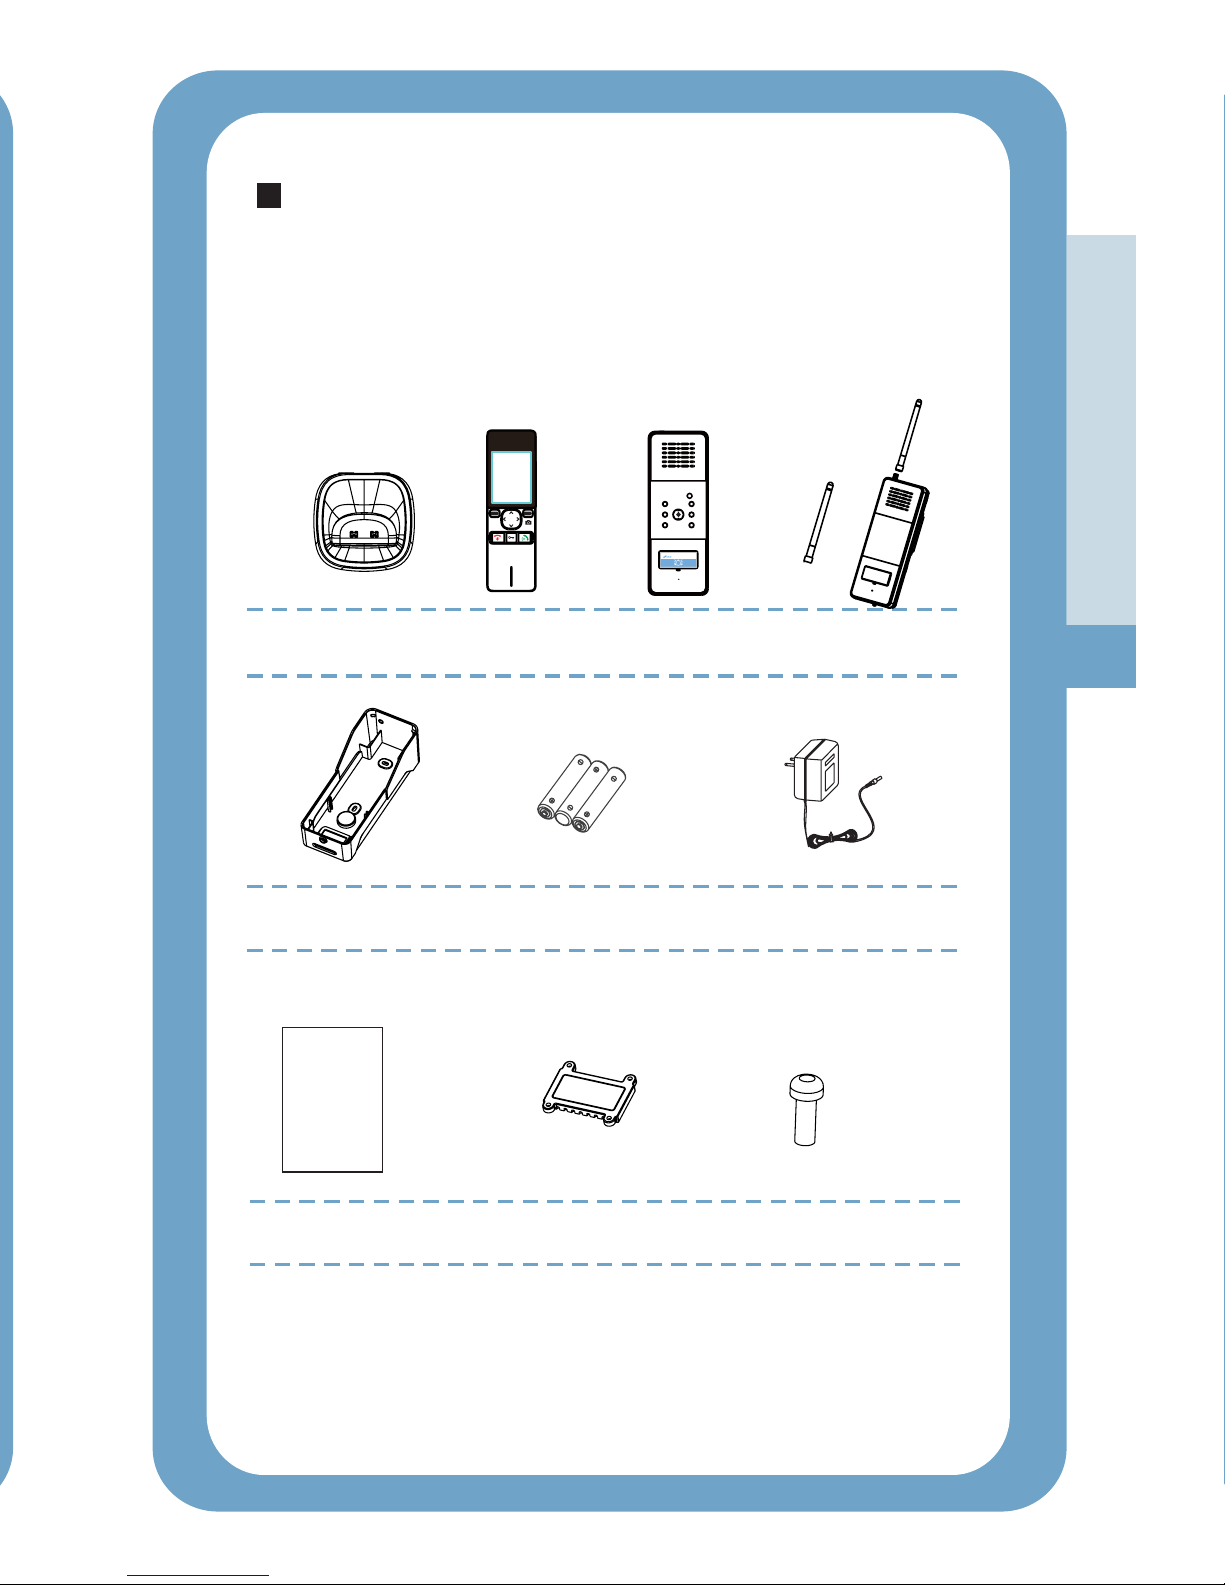
Once you have unpacked your product, make sure that all the
parts shown below are available. If any pieces are missing or
broken, please promptly call your dealer.
Adapter
(7.5V, 300mA)
3 AAA Ni-MH
batteries
Outdoor station
rear cover
Rain Cover
User' s Manual
Unpacking
Screws
3
ReceiverCharger
Outdoor station
Antenna
(Optional)
CL-3684
Wireless Digital
Video Doorbell
USER’S MANUAL
Page 5
Layout
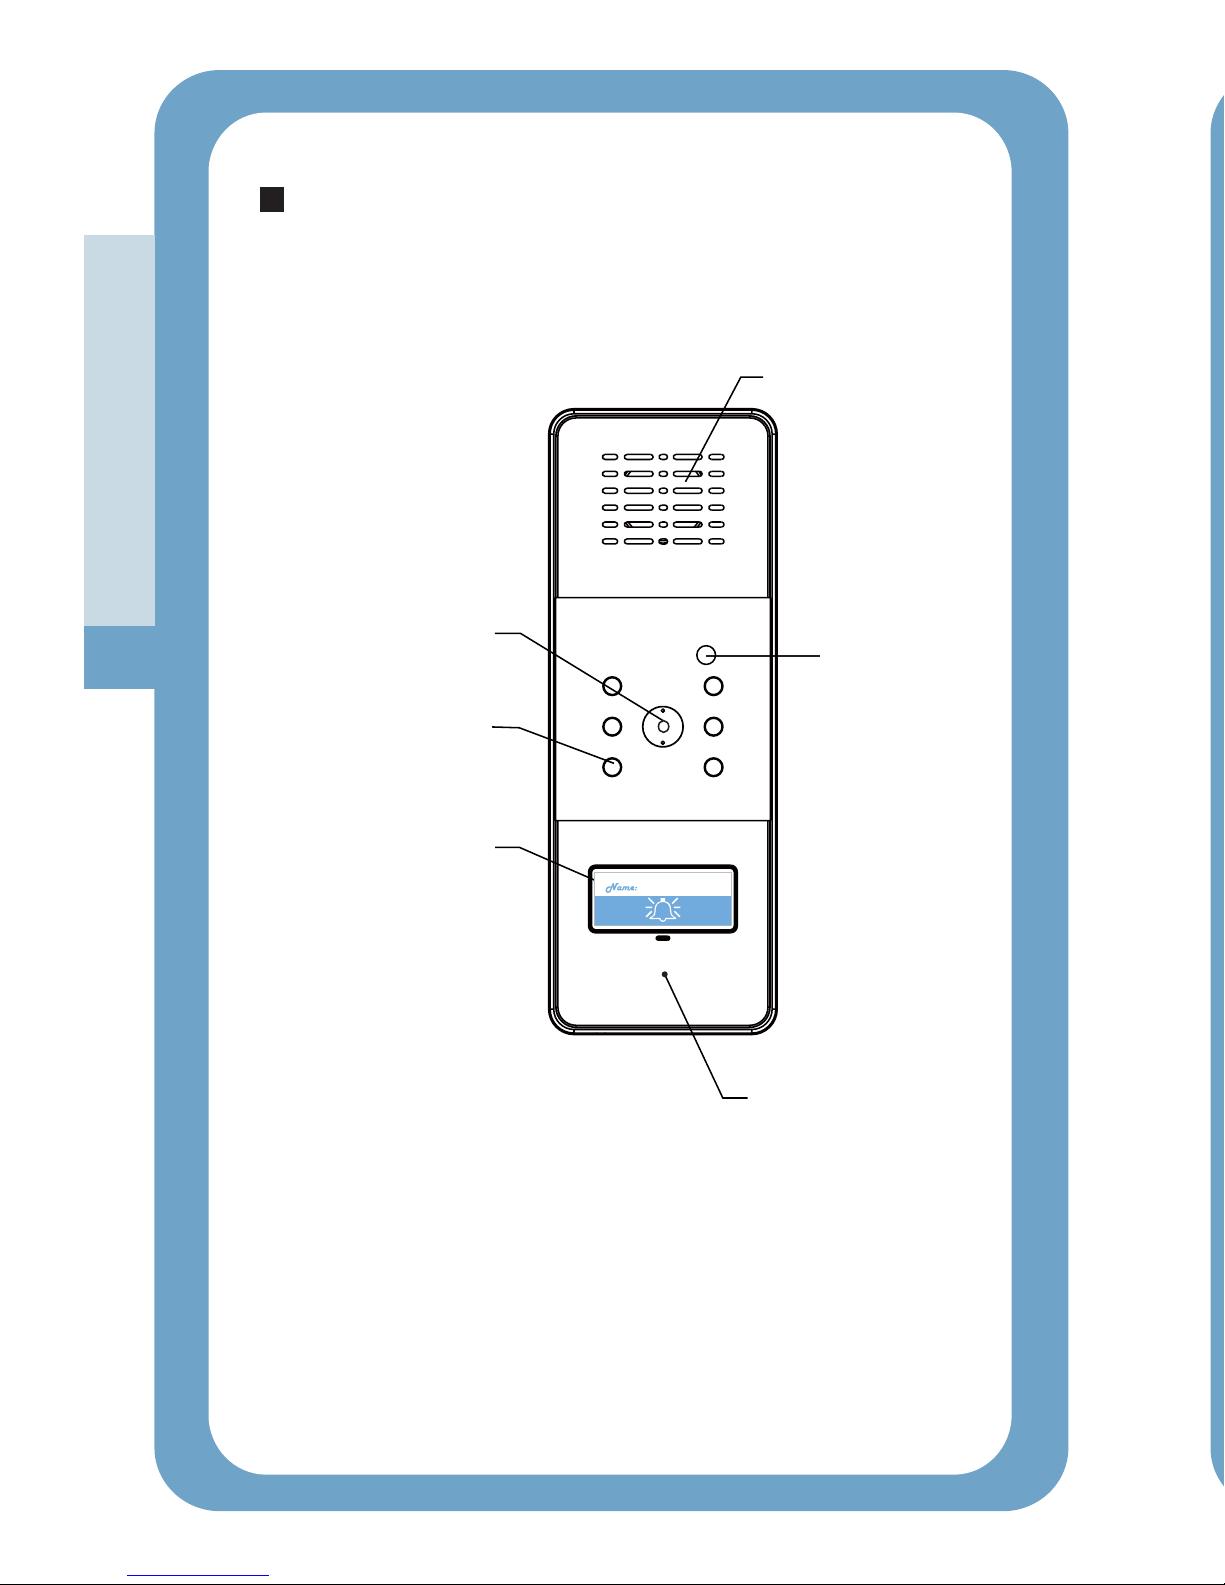
Camera
LED light
Microphone
Speaker
Call button
(with name tag
on it)
Sensor light
Outdoor Station
4
Page 6
5
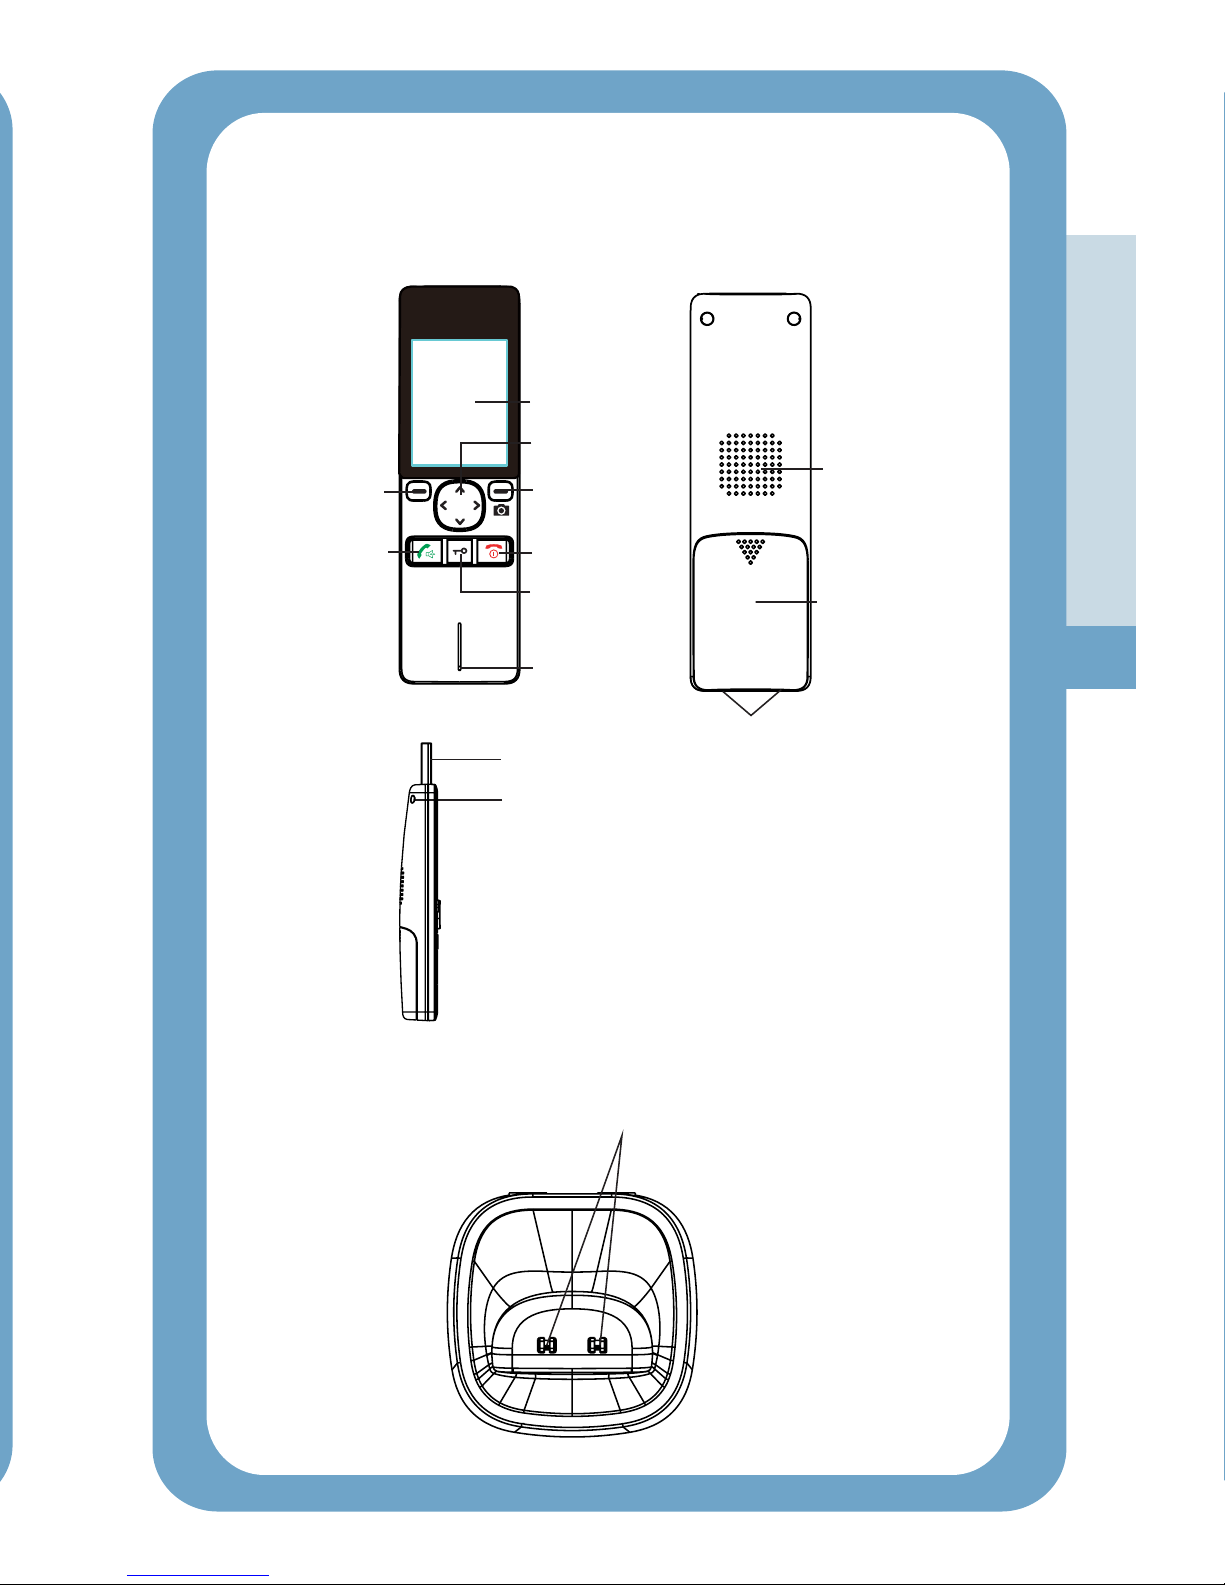
Receiver
Charger
Charge pins
Left Soft key
Right Soft key
(Manual Snap)
LCD display
Navigation
key
Power/
End key
Accept key
Unlock key
Microphone
Antenna Locking Switch
Speaker
Battery
compartment
cover
Charging pins
Antenna
Page 7
6
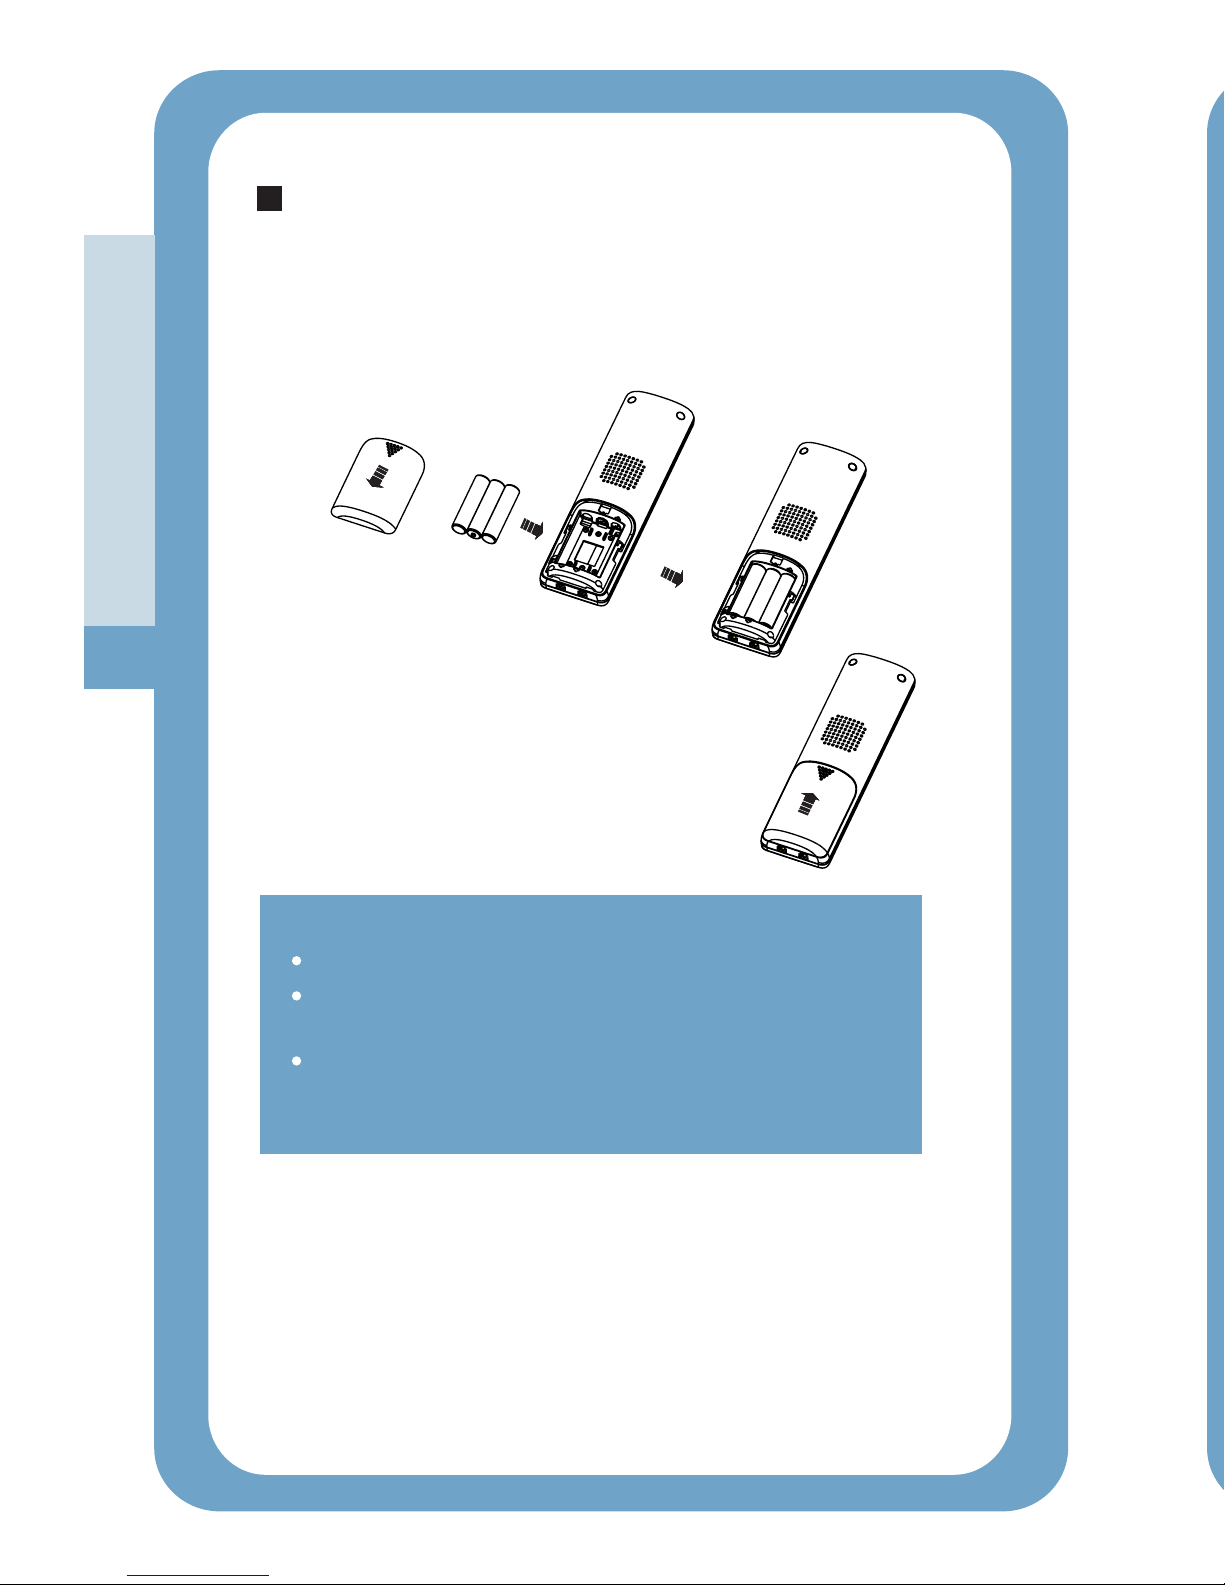
The rechargeable Ni-MH batteries (AAA size,
come with your receiver. Install the batteries before use.
1.2V, 800mAh)
1.
Receiver
2.
3.
To replace the battery cover, slide the
cover up until it snaps in place.
Reversing the orientation may damage the handset.
The batteries need to be replaced if they do not
recover their full storage capacities after recharging.
When replacing the batteries, always use good
quality Ni-MH re-chargeable batteries. Never use
other batteries or conventional alkaline batteries.
Notes:
Installing Batteries
Insert new batteries as indicated,
matching correct polarity(+,-).
Chapter 7:Default Setting
You can save or delete the recorded photos under this menu.
The outdoor station's number will also be displayed on the upper
left of photo correspondingly.
1.Press beneath to display the main menu items.
2.Press or to choose , then press
3.Press or to browse pictures.
4.
5.Press beneath to return to the previous menu.
Chapter 6: Snap Show
This function allows you to reset the receiver settings to the
factory default.
1.Press beneath to display the main menu items.
2.Press or to choose , then press
3.Press or to choose or to enable
4.Press beneath to save the settings.
Result:
Page 8
Outdoor station
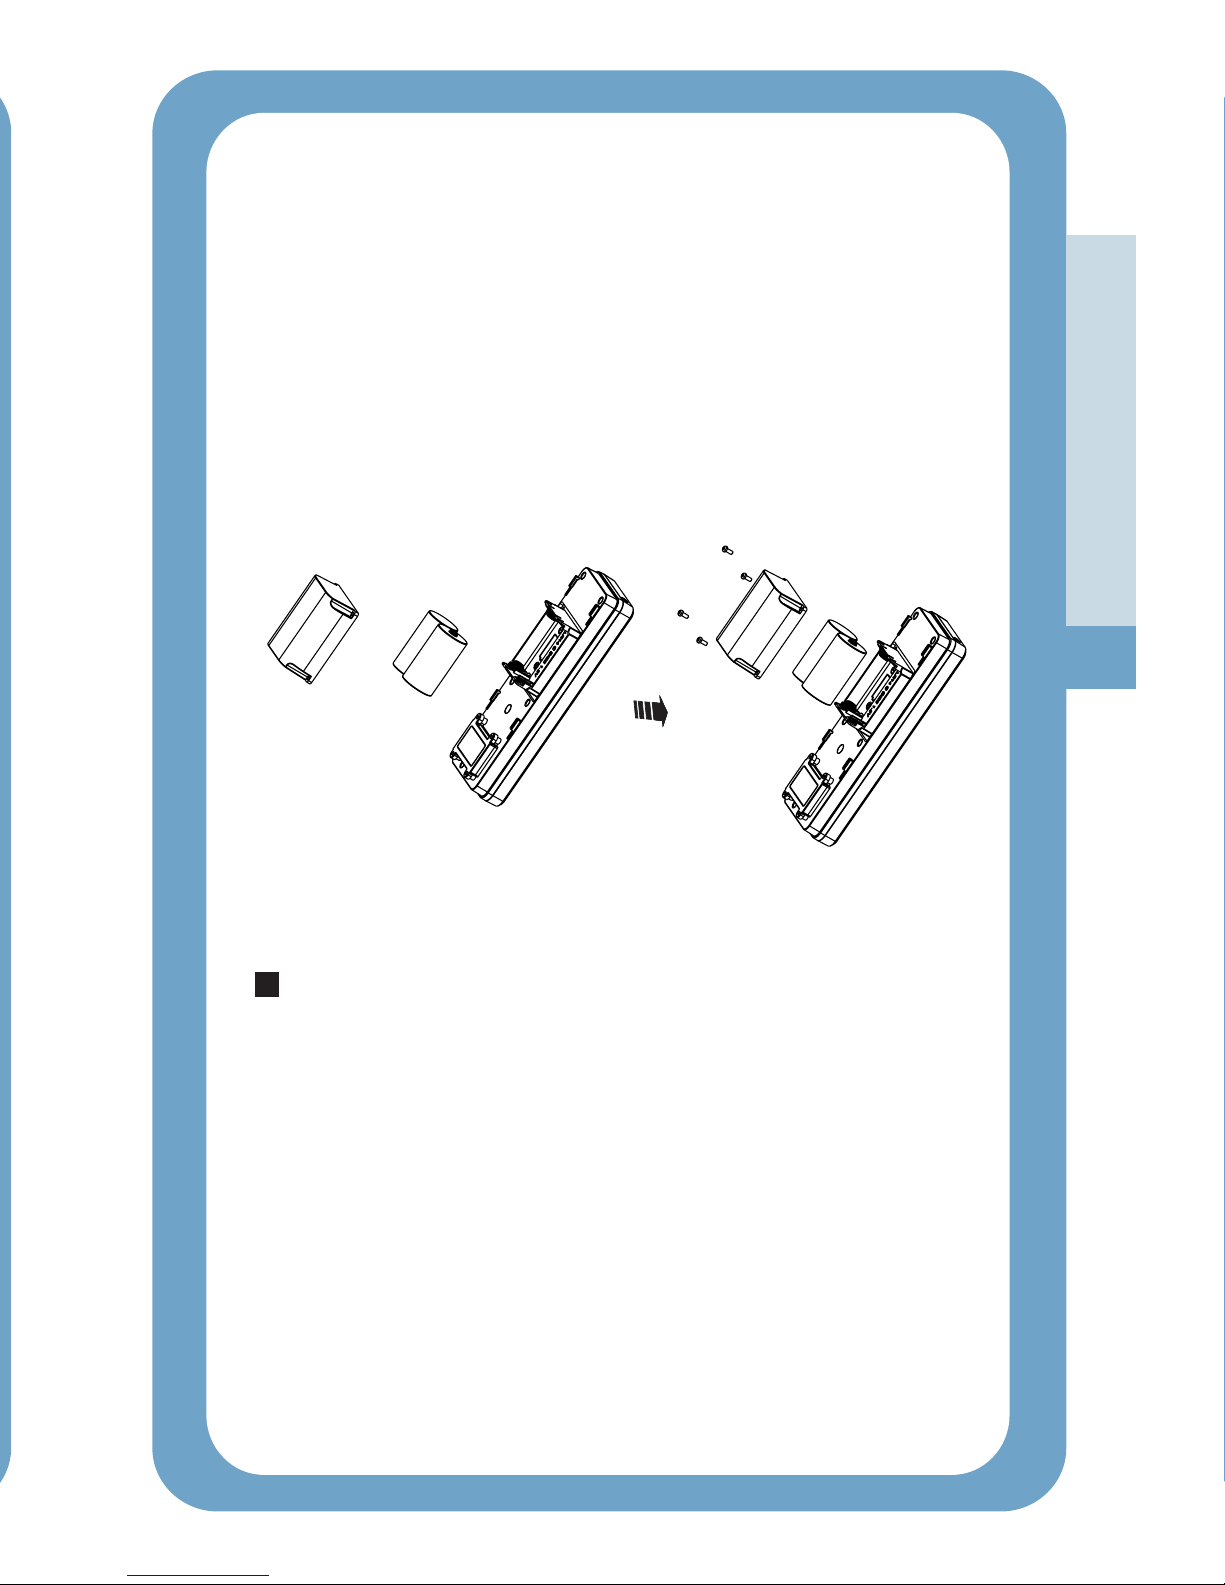
1.Install two C size batteries (not supplied) into the battery
2.Drill four screws to fix the battery up.
compartment.
cover
7
! Important Note YOU SHOULD
FULLY CHARGE THE RECEIVER
15
: Before initial operation,
for
about hours.
To charge the receiver, you should place it on the charger.
Charging Receiver
Page 9
Installation Instruction
Receiver
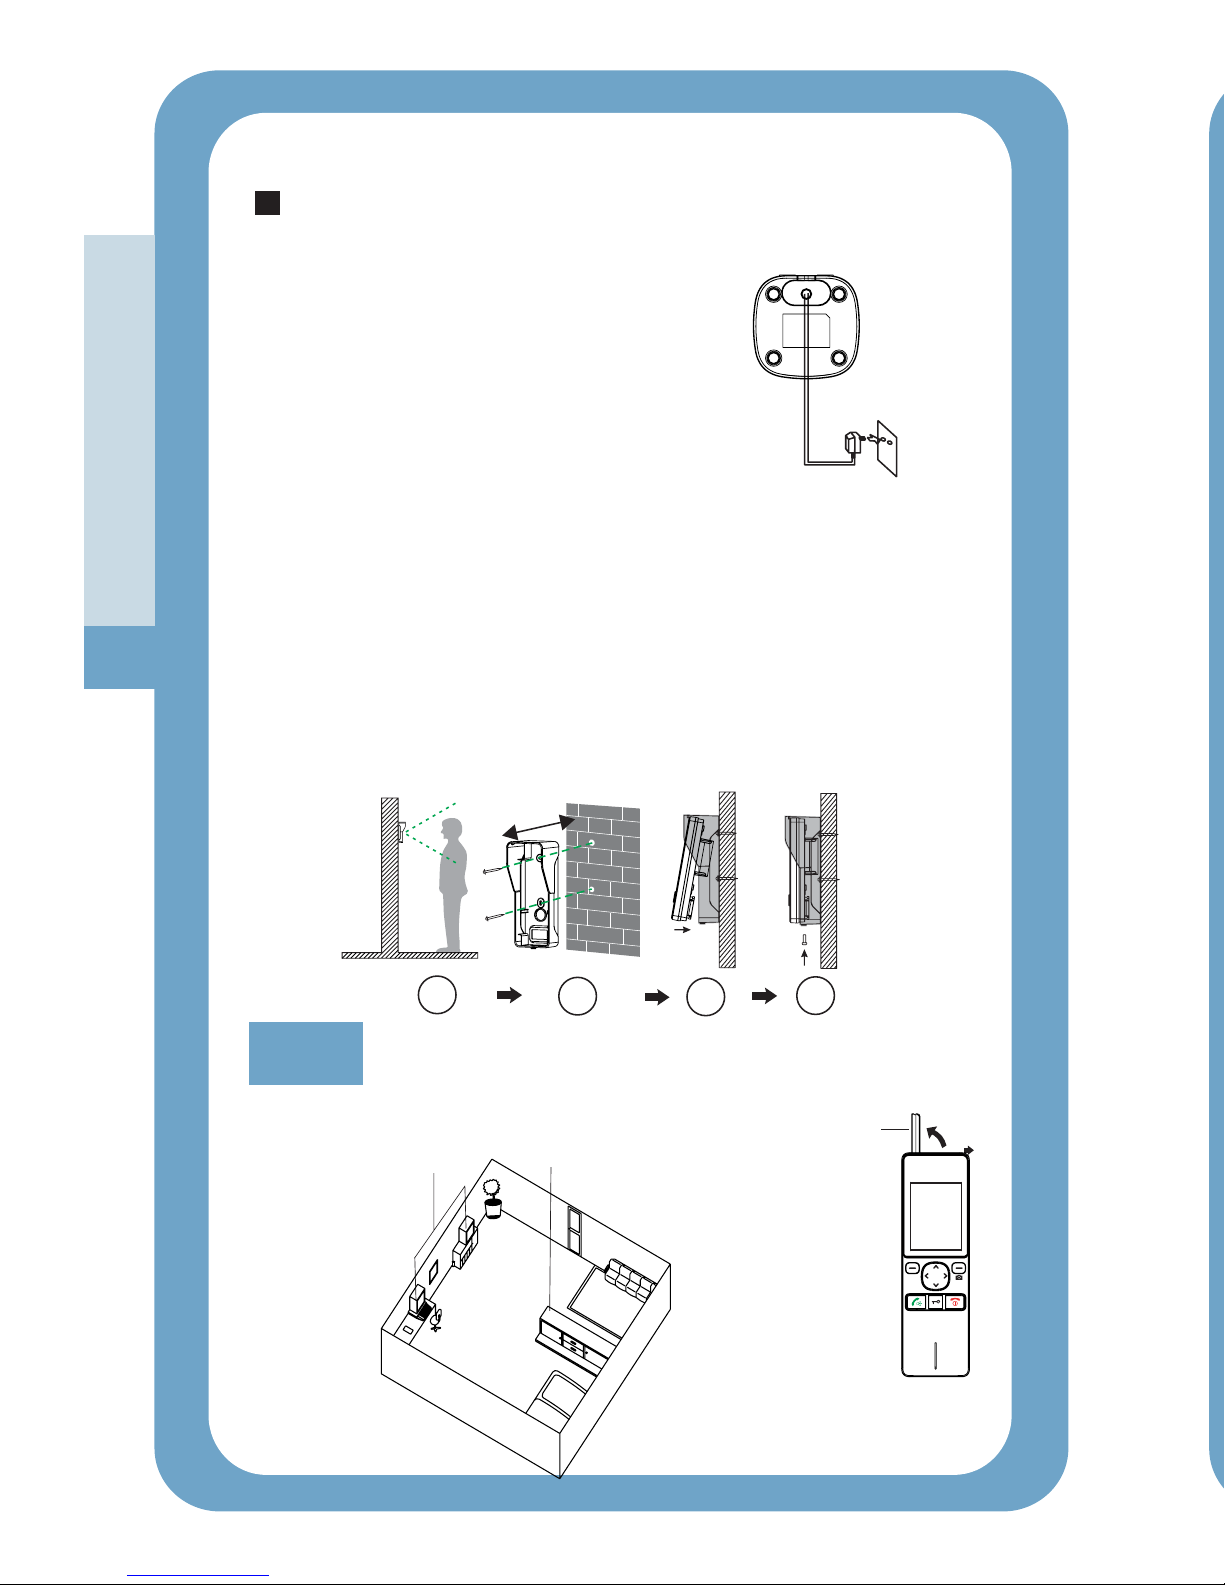
Connect the modular end of the AC
power adapter to the power jack of
the charger, then plug the AC adapter
into a standard AC wall outlet.
Outdoor station
1.Choose a proper location for the outdoor station. Be sure to
consider the average height of visitors.
2.Align the rain cover and screws with the holes in the wall.
3.Install the outdoor station into the rain cover. Please refer to
the picture 3 below
4.Drill a screw to fix.and finish the installation.
To AC wall outlet
Align
1
2
3
4
8
Away from electrical
appliances, such as a TV,
personal computer or
another cordless phone.
In a HIGH and CENTRAL
location with no
obstructions such as walls
microwave oven and WIFI.
,
Slide the
antenna locking
switch to
unlocking
position the
receiver
antenna will pop
up to receive
better signal.
,
Notes:
Every time you press a key, your receiver acknowledges it with a
key tone. You can disable the key tones for a silent use. In
certain error conditions, a warning tone will sound when an
incorrect key is pressed.
1.Press beneath to display the main menu items.
2.Press or to choose ,then press
3.Press or to choose or to enable
4.Press beneath to save the settings and return to
Page 10
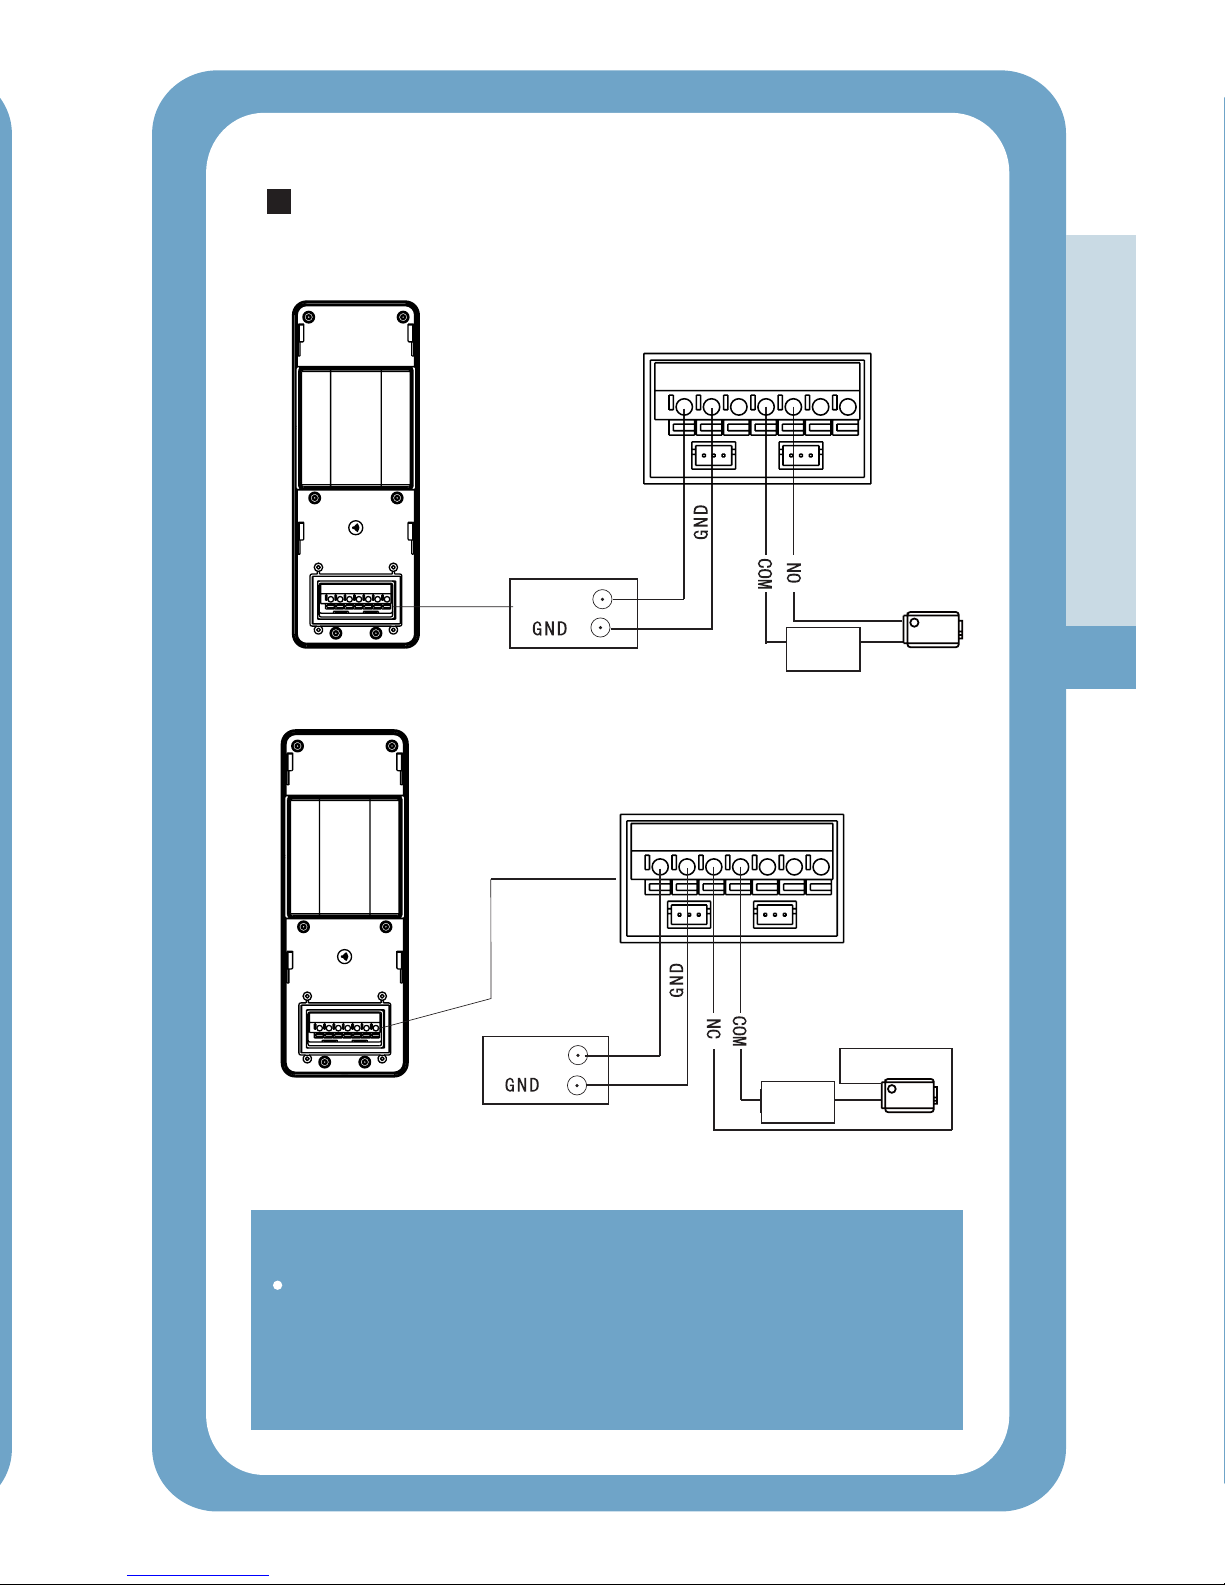
Diagram
9
Note:
Both the batteries and the power supply are available, but
not to use them at the same. To support some special
functions, like monitoring, backlight on the call button and
unlocking, please connect the power supply.
Outdoor Station
+
9
1
2
V
~
The maximum output
current can be 1A.
DC Power
+9 12V
~
+9 12V~
For normal
close lock
DC Power
+9 12V~
For normal
open lock
The maximum output
current can be 1A.
Outdoor Station
Connection Mode 1
Connection Mode 2
Lock
+
+
_
_
DC Power
for Lock
Lock
+
+
_
_
DC Power
for Lock
Page 11
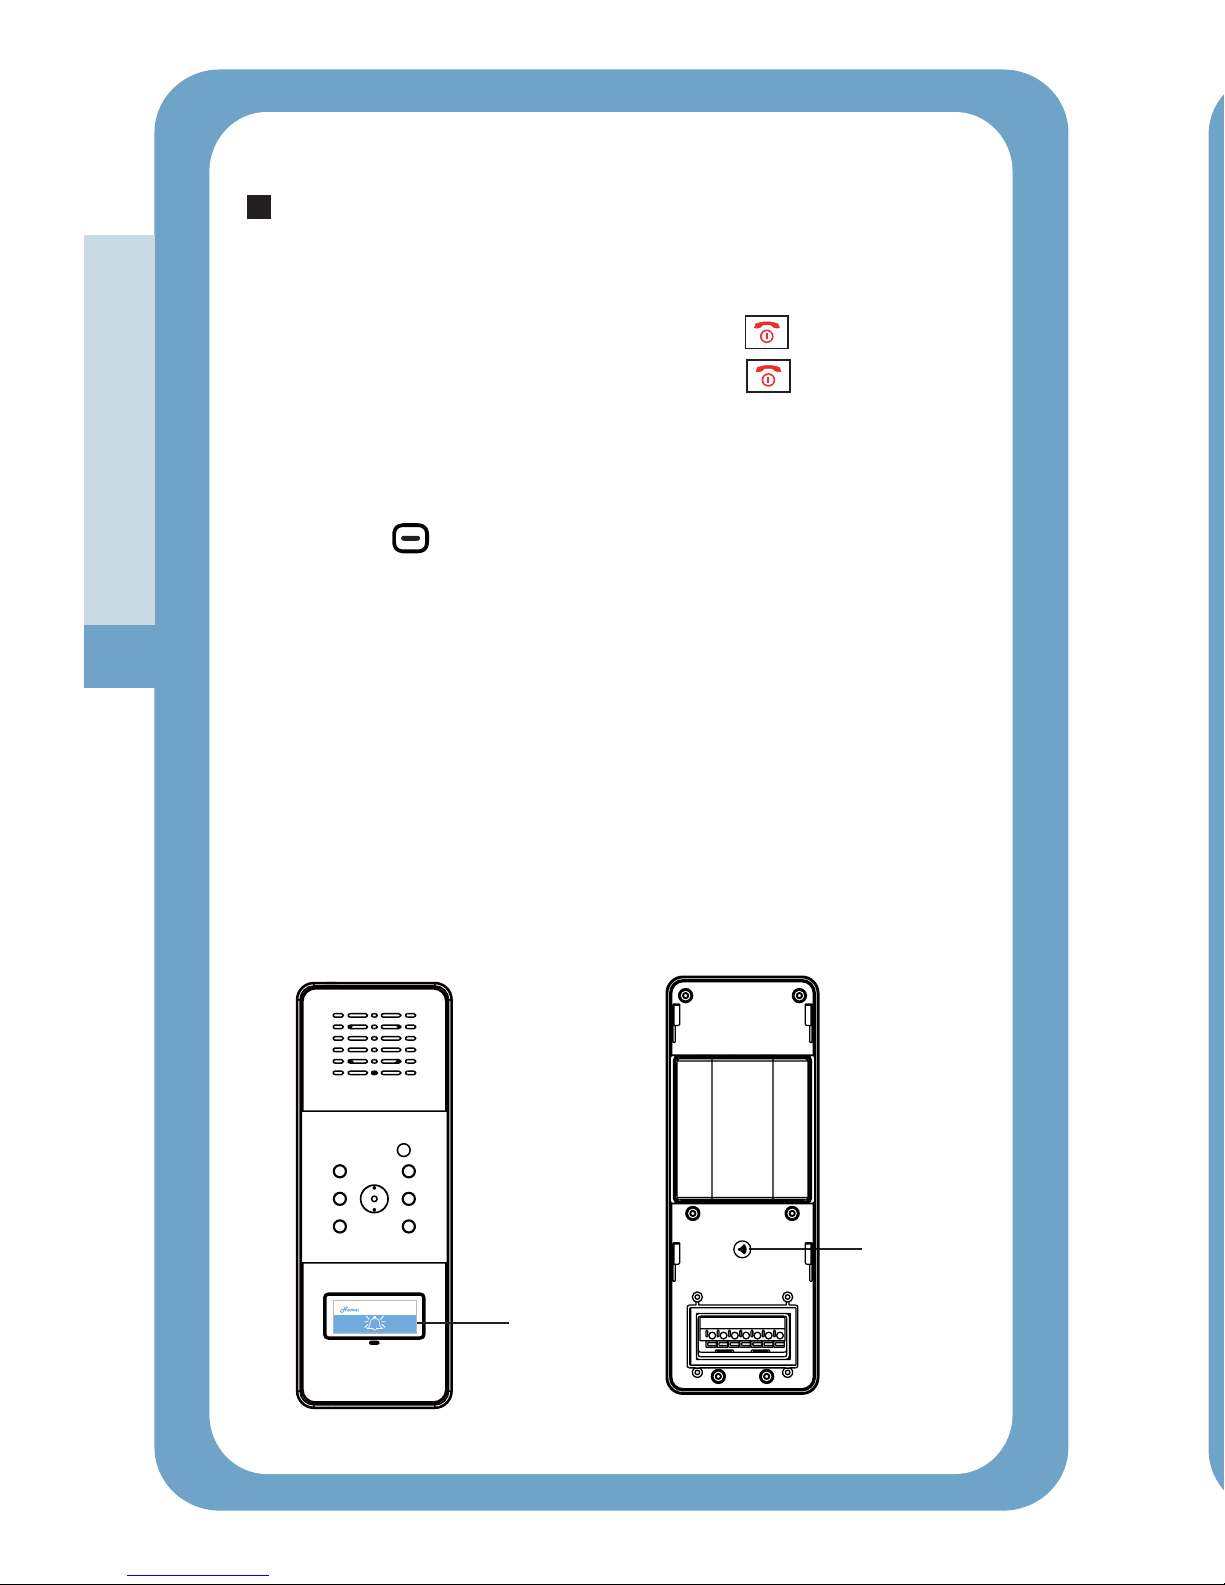
To turn the indoor phone on, press .
To turn the indoor phone off, press and hold .
and hold
Turning On / Off
First,
press the button of the
, then hold the key on the back of the Outdoor
until the LED light blinks. Once a prompt tone is heard,
the has been registered to the
successfully.
If , the regis ration was
unsuccessful, turn off the and remove the batteries from
the before you hold the key. Then turn
on the Receiver , re-install the batteries
and try again.
press beneath on the Receiver, then select the
menu. Second, Outdoor
station
station
Outdoor station Receiver
twice prompts tones is heard t
Receiver
Outdoor station
Outdoor station
Menu
Register Call
Register
Register
again ’s
Register
Register
Button
Call button
(with name tag
on it)
10
Operations
Chapter2: Volume
This function allows you to adjust the volume (9 levels are
adjustable) during a call.
1.Press beneath to display the main menu items.
2.Press or to choose then press
3.Press or to select the volume that you like.
4.Press beneath to save the settings and return to the
Page 12
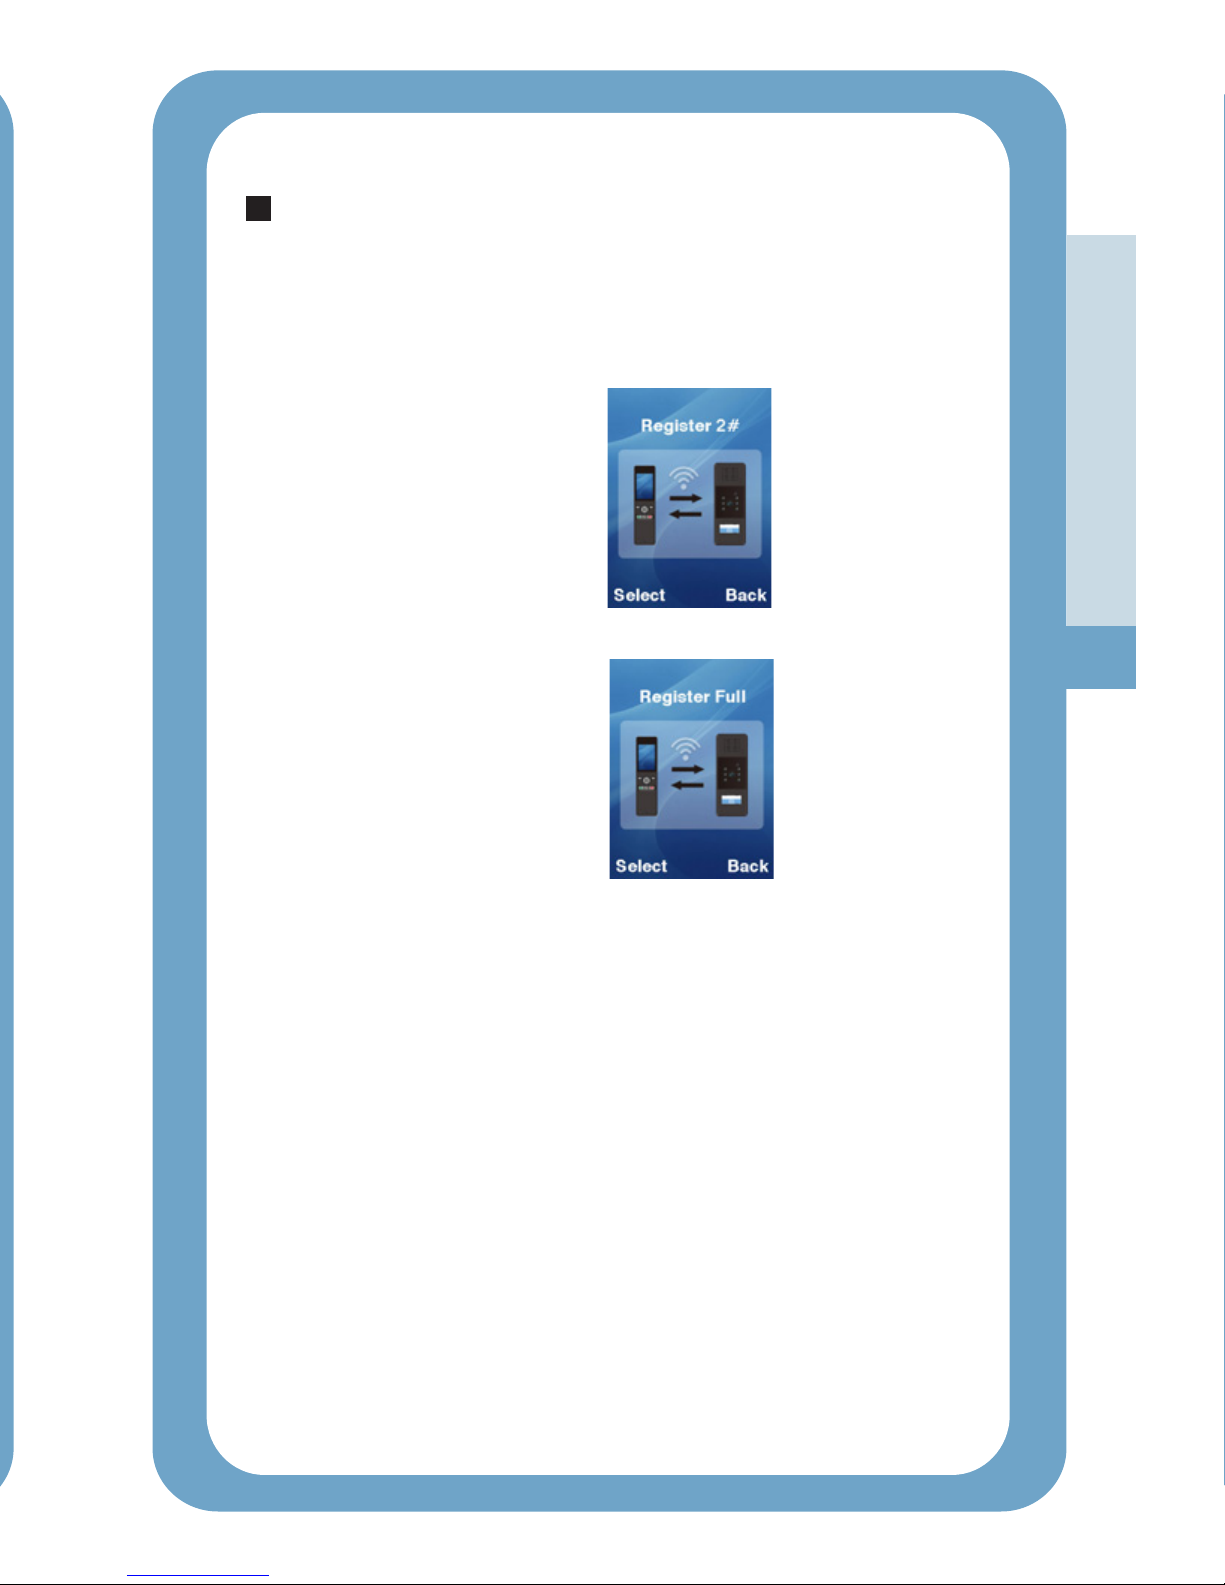
11
Operations
Register(Continued)
The Receiver can support up to 4 Outdoor s.
1.When you have registered one Outdoor , the register
interface will display as follow
2.When you have registered 4 Outdoor s, the register
interface will display as follow::
station
station
station
Page 13
12
Operations
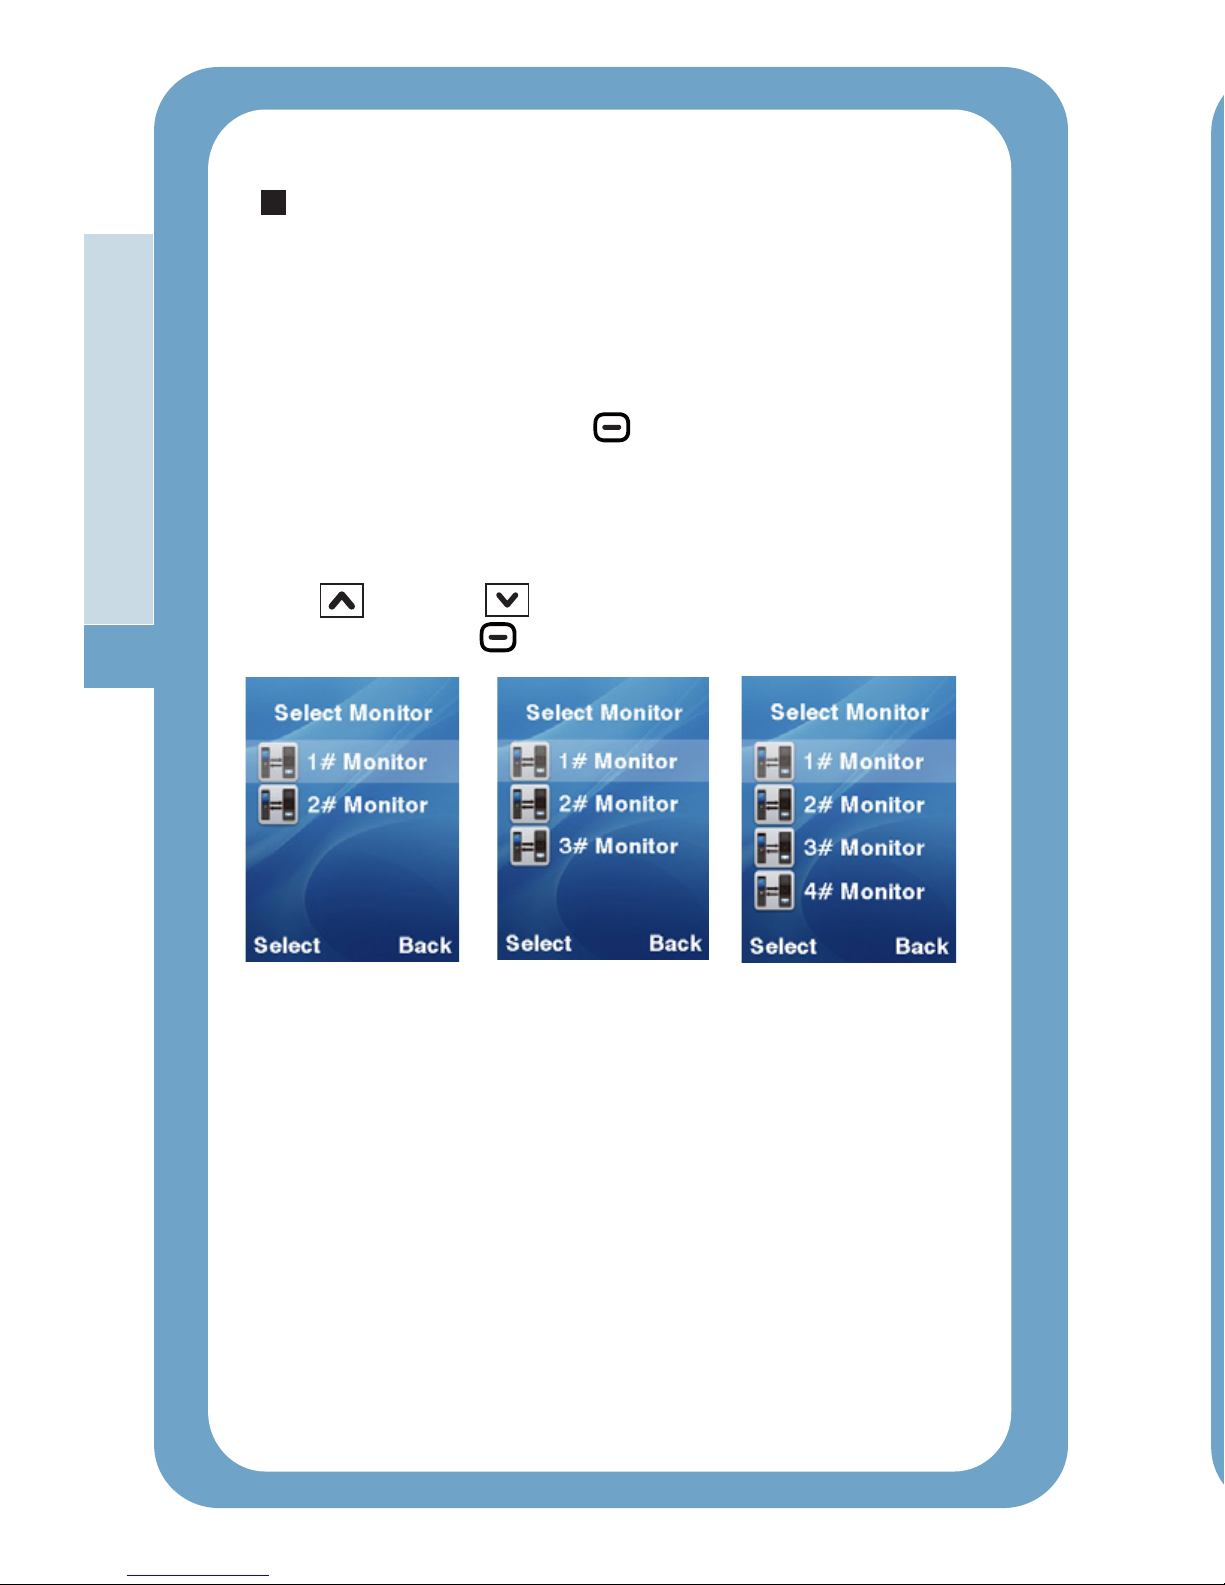
Monitor
About the monitor function , the LCD will automatically
display the corresponding menu according to the
registered Outdoor s.
1.In the standby mode, press
2.When registers one Outdoor , the LCD will display 1#
Monitor.
3.When registers two or more Outdoor s, the LCD will
display 1# , 2# ...Monitor(Pictures below) ,and you can press
Up Down
station
beneath .
station
station
or to choose the monitor which you
need, then press beneath .
Mon
Select
When someone presses the button on the Outdoor station,
all the LED lights will light on if the ambient environment gets
too dim.
Light Sensor
During a conversation, to unlock the door, press the
Receiver.
In standby mode, press the button on the Outdoor .
The corresponding rings, and the image of the visitor
appears on the LCD of the .
1. If the master does not want to answer, press to cancel
3. Press to end the conversation.
Page 14
13
When someone presses the button on the Outdoor station,
all the LED lights will light on if the ambient environment gets
too dim.
Call
Light Sensor
Unlocking
During a conversation, to unlock the door, press the
Receiver.
on
Operations
Calling Receiver
In standby mode, press the button on the Outdoor .
The corresponding rings, and the image of the visitor
appears on the LCD of the .
Call station
receiver
receiver
1. If the master does not want to answer, press to cancel
the ringer and the video.
receiver2. After the master press , the will stop ringing.
Then the conversation starts.
3. Press to end the conversation.
Notes:
The conversation can be up to 2 minutes. After 2 minutes,
the line will be disconnected automatically.
The monitor process can be up to 5 minutes. After 5
minutes, the receiver will exit monitor mode automatically.
Page 15
The Receiver can support up to 4 Outdoor s.
1.When you have registered one Outdoor , the register
2.When you have registered 4 Outdoor s, the register
14
Chapter 1:Date&Time
1.Press beneath to display the main menu items.
2.Press or to choose , then press
beneath .
3.If you want to set the time, you can press or
to choose the or the , and press the
or to adjust.
4.If you want to select the date, you can press or
to choose the or the or the ,
and press the or to adjust.
5.Press beneath to return to the previous menu.
Menu
Up Down
Select
Left Right
Hour Minute Up
Down
Left
Right Year Month Date
Up Down
Back
Menu Description
Notes:
The time format is 24-hour format and the date format is
YY-MM-DD.
The must be set beforehand to ensure that the
time displayed on the monitoring pictures are correct.
When you replace batteries, you must set the time and the
date again.
The setting order is
Date&Time
Date&Time Hour ---
-.
>>>
>
Minute Year
Month Date
Page 16
15
Chapter2: Volume
This function allows you to adjust the volume (9 levels are
adjustable) during a call.
1.Press beneath to display the main menu items.
2.Press or to choose then press
beneath .
3.Press or to select the volume that you like.
Each time you press or , the
sounds with the selected volume.
4.Press beneath to save the settings and return to the
previous menu.
receiver
Menu
Up Down
Select
Left Right
Left Right
Back
,
Menu Description (continued)
Note:
Also, you can use or key to adjust the
volume in the standby mode.
Left Right
Page 17
16
Chapter3: Brightness
This function allows you to adjust the light level (9 levels are
adjustable).
1.Press beneath to display the main menu items.
2.Press or to choose then press
beneath .
3.Press or to select the light level that you
like. Each time you press or , the receiver
displays with the selected light level.
4.Press beneath to save the settings and return to the
previous menu.
Menu
Up Down
Select
Left Right
Left Right
Back
,
Menu Description (continued)
Note:
Also, you can use or key to adjust the
light level in the standby mode.
Up Down
Page 18
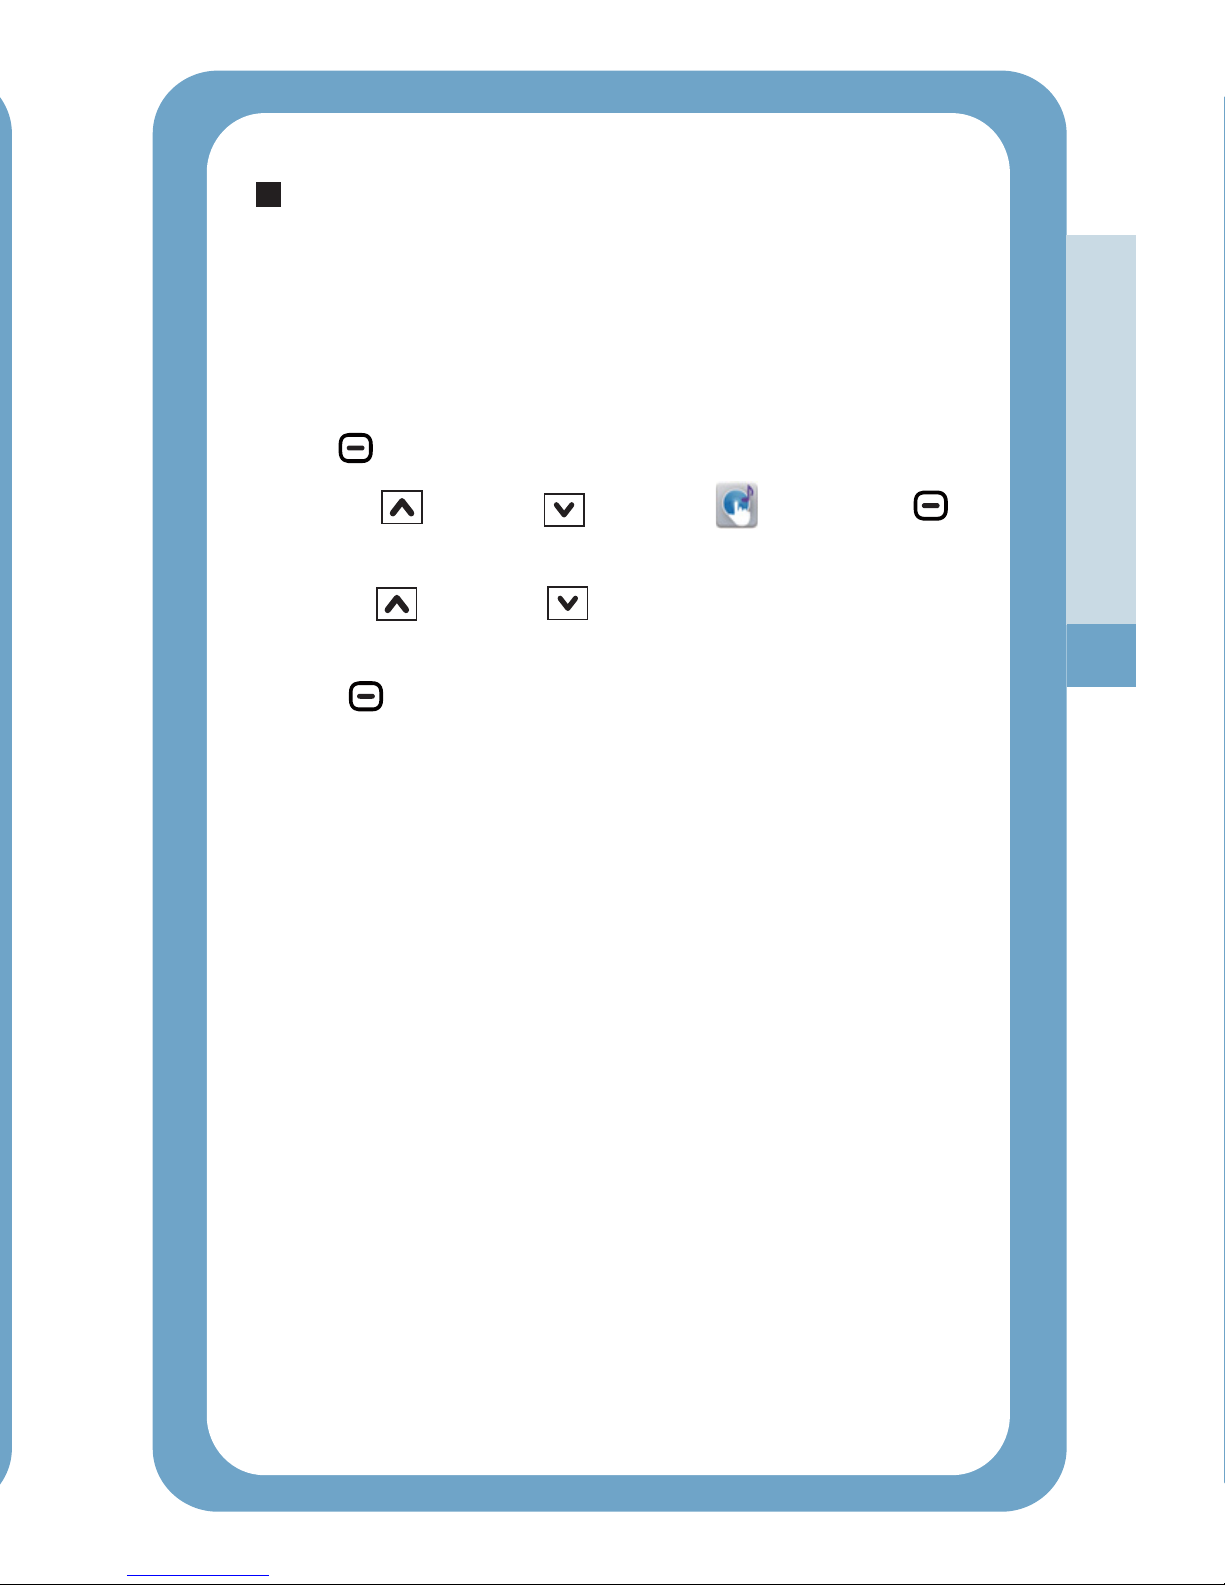
Chapter 4: Key Tone
Every time you press a key, your receiver acknowledges it with a
key tone. You can disable the key tones for a silent use. In
certain error conditions, a warning tone will sound when an
incorrect key is pressed.
1.Press beneath to display the main menu items.
2.Press or to choose ,then press
beneath .
3.Press or to choose or to enable
or disable the function.
4.Press beneath to save the settings and return to
the previous menu.
Menu
Up Down
Select
Up Down On Off
Select
Menu Description (continued)
17
Page 19
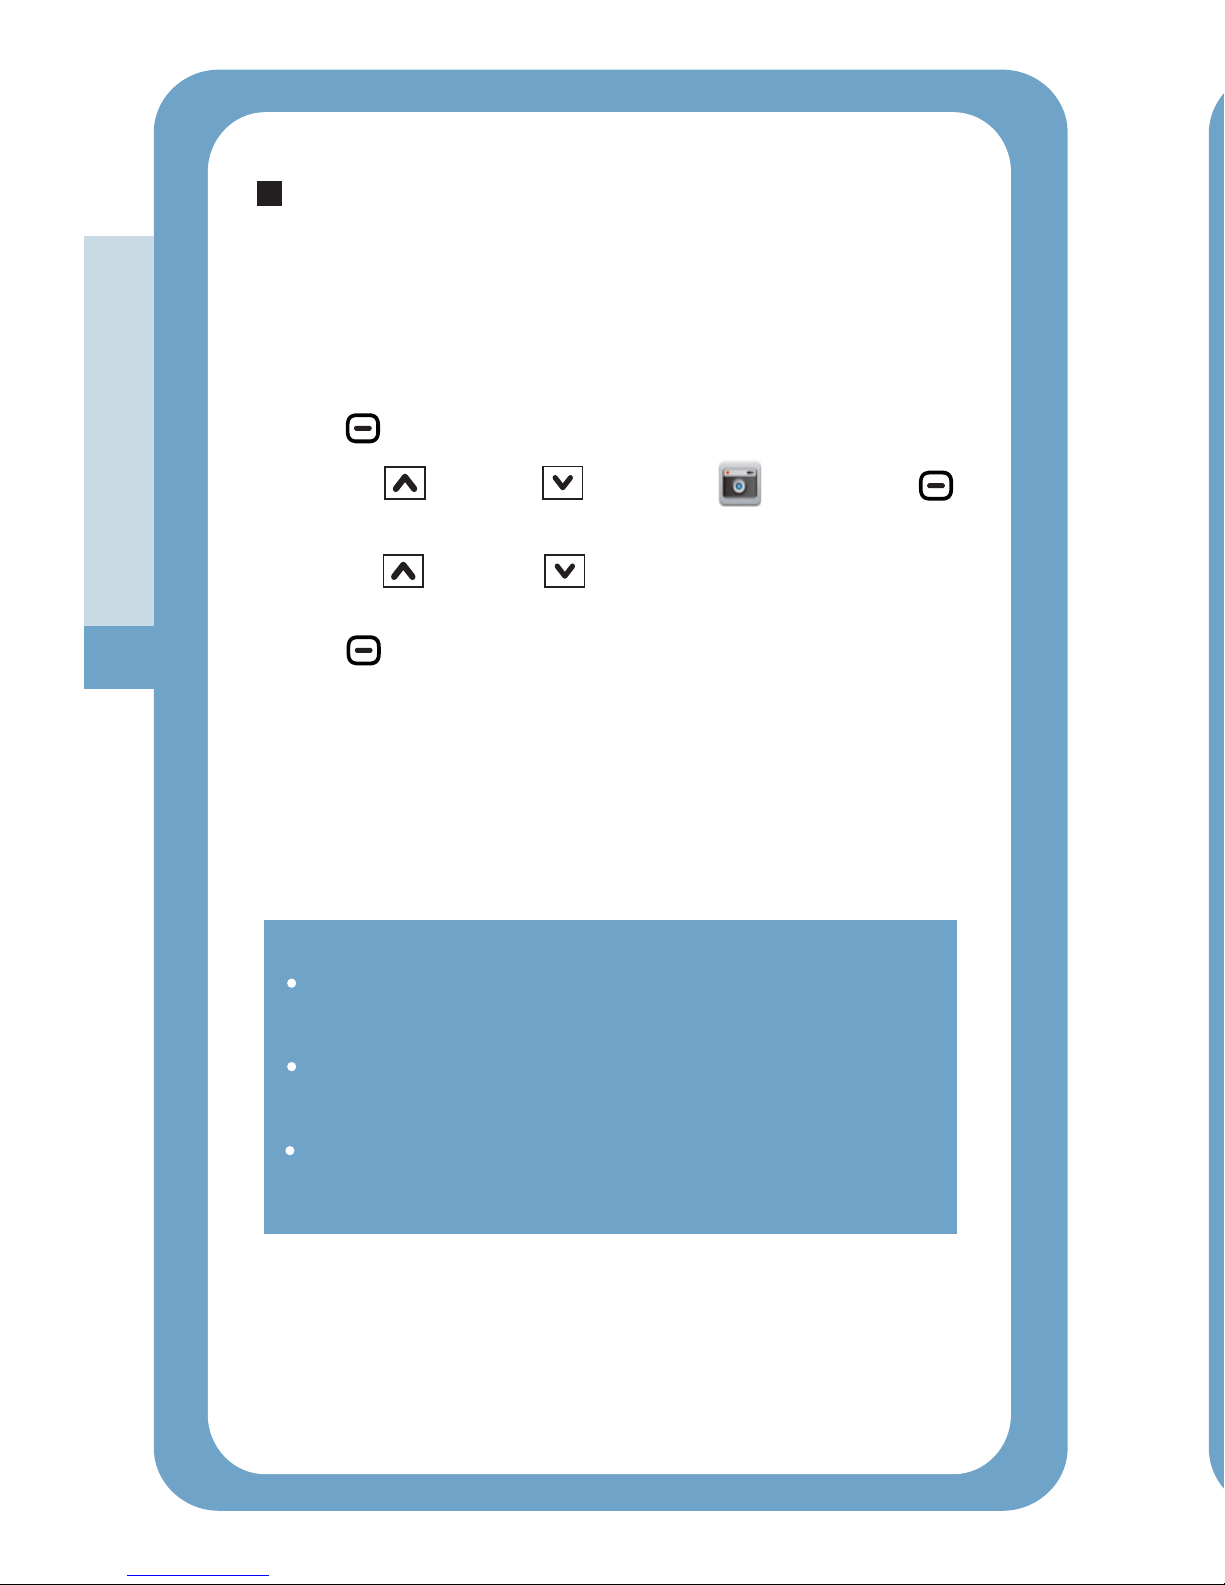
With this , the camera will take a photo of visitor
automatically when visitors press the button on the Outdoor
station. You then can pick up this photo easily in the receiver.
Auto Snap On
Call
Menu Description (continued)
Note:
During a conversation, the camera can take a photo of
visitor if you press the key and save it into the
receiver.
During a monitoring, the camera can take a photo of the
view if you press the key and save it into the
receiver.
Up to 50 photos can be stored in the handset. The
previous ones will be removed automatically if the photos
are exceeding 50 pieces in the receiver.
Snap
Snap
Chapter 5: Snap Setting
The unique function records up to 50 photos of
whoever visit your home whether you are there or not. To get this
, please set it up in the receiver as follow.
1.Press beneath to display the main menu items.
2.Press or to choose ,then press
beneath .
3.Press or to choose or to enable or
disable the function.
4.Press beneath to save the settings and return to the
previous menu.
Auto Snap
Menu
Up Down
Select
Up Down On Off
Select
Snap Shot
18
1.Install two C size batteries (not supplied) into the battery
2.Drill four screws to fix the battery up.
! Important Note YOU SHOULD
To charge the receiver, you should place it on the charger.
Page 20
19
Chapter 7:Default Setting
Note:
If you reset the receiver to the factory default, all of the
settings will return to the factory default.
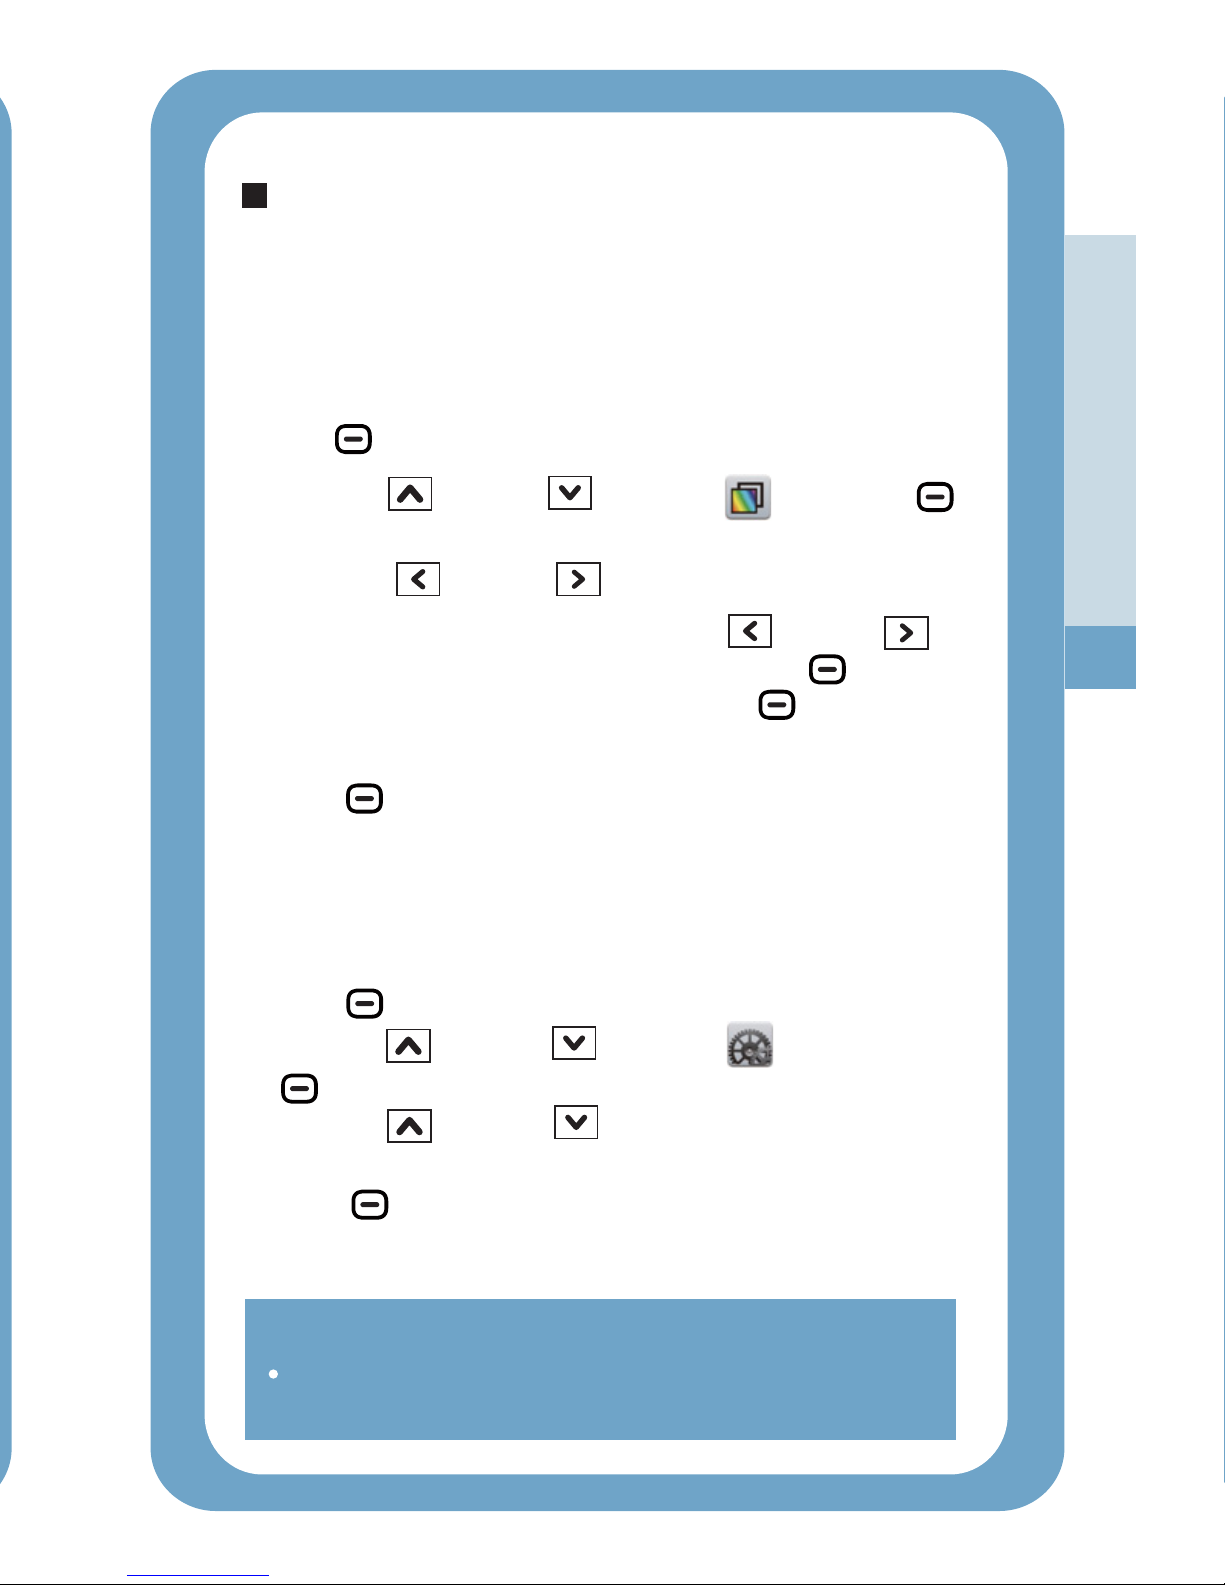
You can save or delete the recorded photos under this menu.
The outdoor station's number will also be displayed on the upper
left of photo correspondingly.
1.Press beneath to display the main menu items.
2.Press or to choose , then press
beneath .
3.Press or to browse pictures.
4.
The display will show , Press beneath
to confirm. After a beep the LCD shows the next photo.
5.Press beneath to return to the previous menu.
Menu
Up Down
Select
Left Right
Delete? Yes
Back
If you want to delete the photo, use or to
choose the photo you want to, then press the beneath
Left Right
Del.
Chapter 6: Snap Show
This function allows you to reset the receiver settings to the
factory default.
1.Press beneath to display the main menu items.
2.Press or to choose , then press
beneath .
3.Press or to choose or to enable
or disable the function.
4.Press beneath to save the settings.
After resetting, the receiver will return to standby mode.
Menu
Up Down
Select
Up Down YES NO
Select
Result:
Menu Description (continued)
Page 21
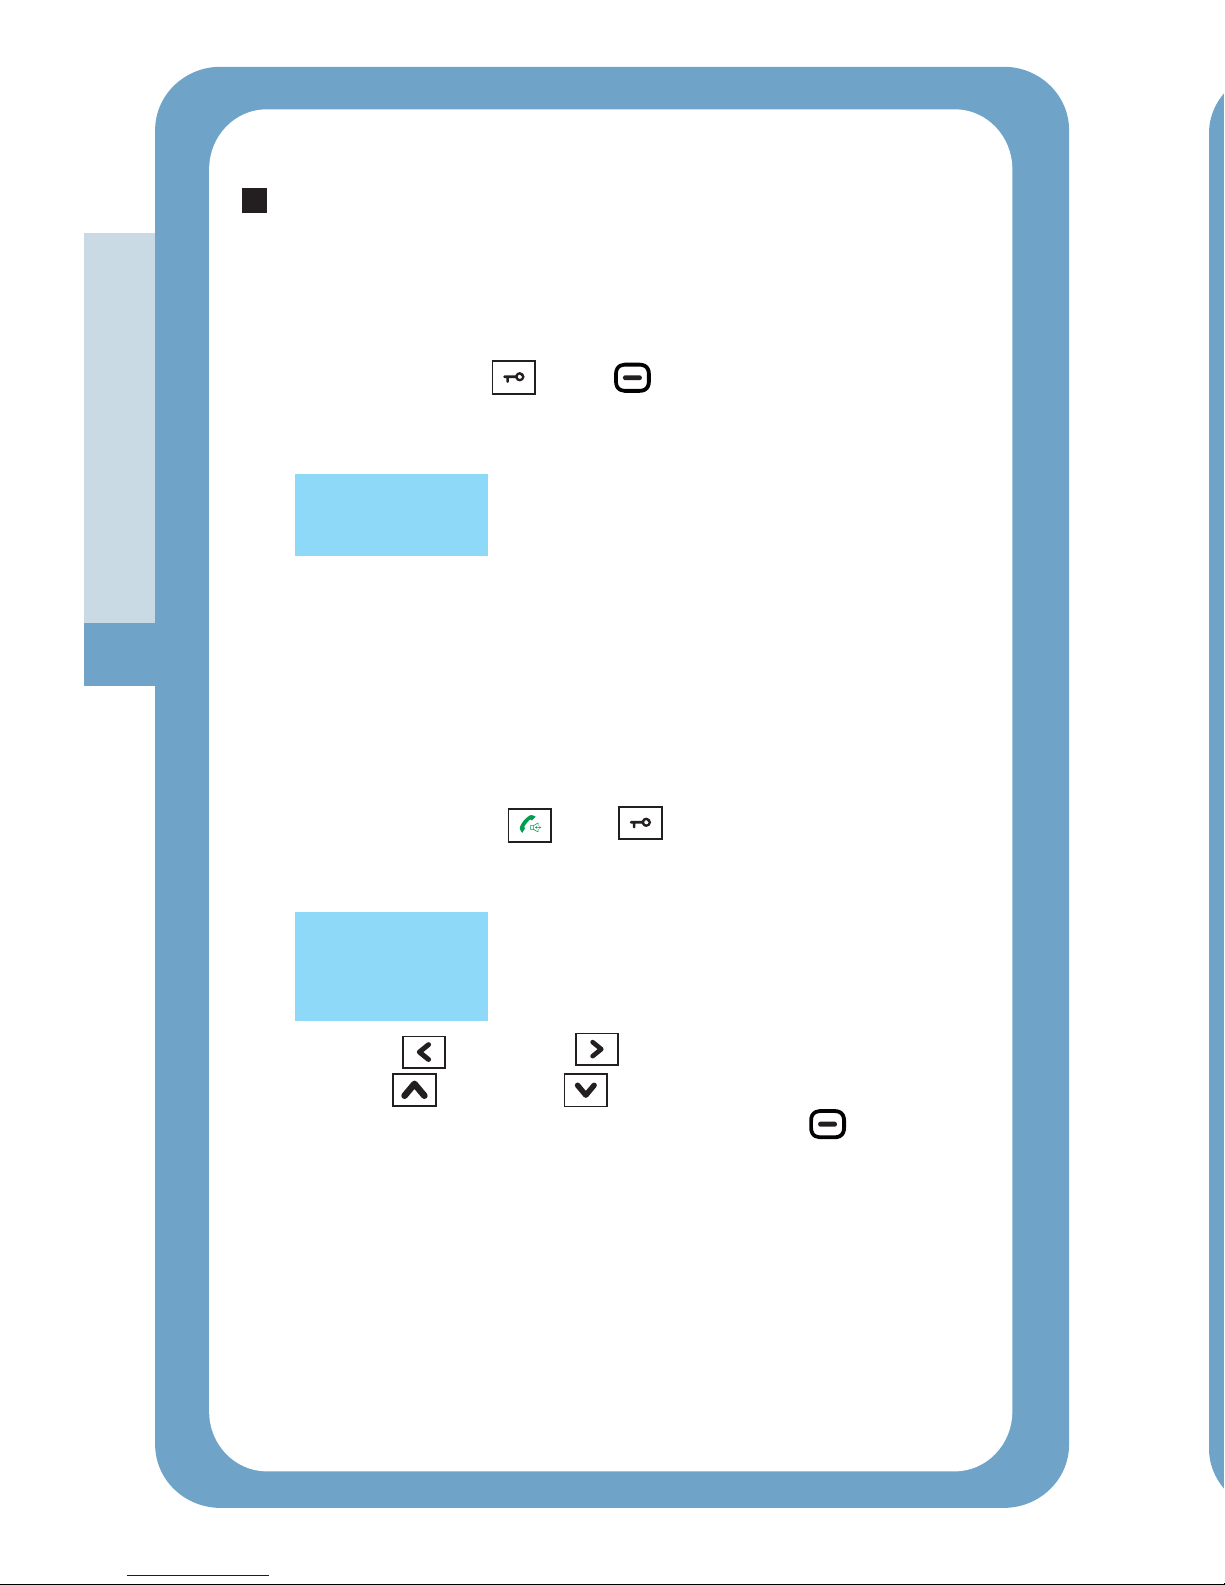
Engineering Mode
1.Press and hold the and beneath at the same
time about 5 seconds in standby mode, then the display will
show as follow:
2.After 5 seconds, it will exit automatically.
Menu
Registration
Cleared !
1.press and hold the and at the same time about 5
seconds in standby mode, then the display will show as
follow:
2.Press or to select the Outdoor station.
3.Press or to select the unlock time(1-25
are selectable), then press the soft key to confirm,
the display will show .
4.After 5 seconds, it will exit automatically.
Left Right
Up Down
Right
SAVE OK
Delete the Registered Outdoor Station
Change the Unlock Time
20
Unlock Time
1# 5 S
Page 22
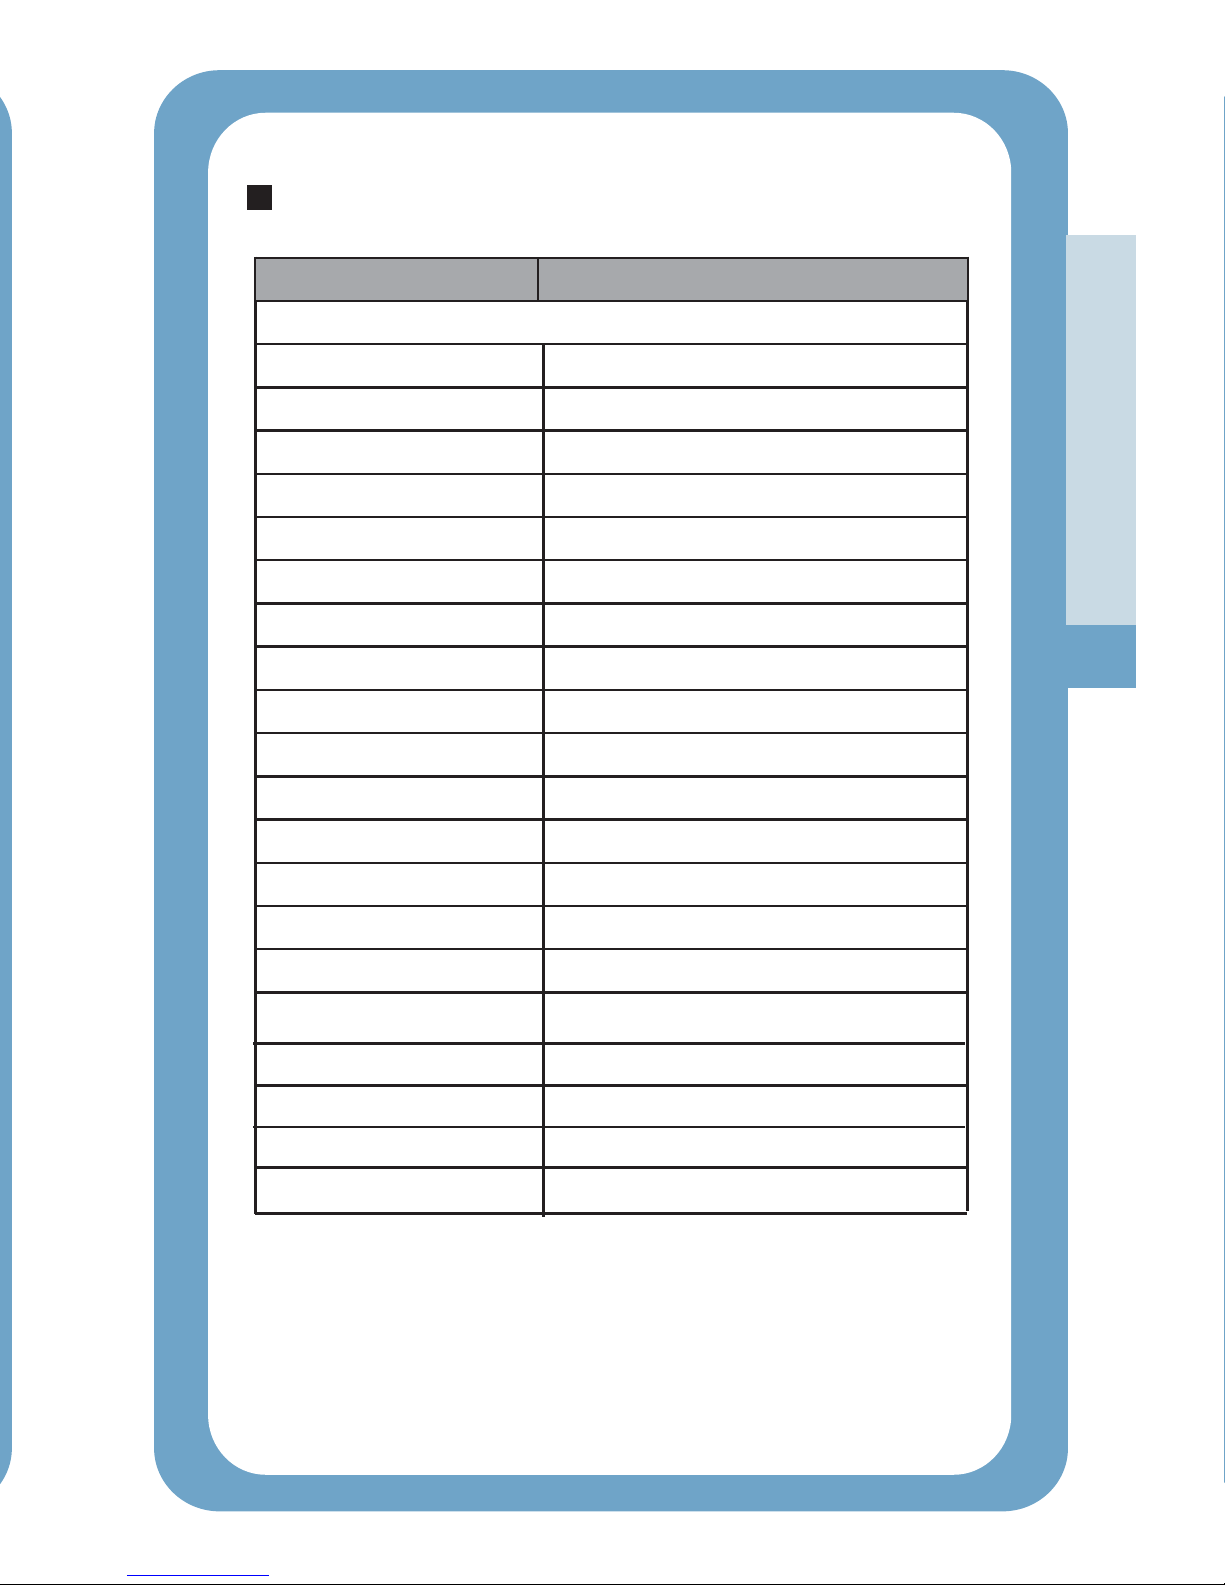
Technical Specification
Outdoor station
Transmit Frequency Range
2.400GHz 2.4835GHz~
Data Rate
2.0Mbps
Transmitting Power
19dBm (TYP)
Modulation Type
GFSK/FSK
Transmitting Distance
Outdoor:200m, Indoor:50m
Image Sensor Type
1/4 Color CMOS Image Sensor″
Effective Pixels
H:320 V:240
Image Processing
Motion JPEG
Image Resolution / Frame Rate
H:320 V :240 / 25fps
White Balance
Auto
Lens
4.9mm / F2.8
Viewing Angle (Diagonal)
50
Minimum Illumination
1 LUX (without LED illumination)
LED
6 LEDs
Power Requirement
+9 12V DC 5% /2 LR14(C) ,1.5V batteries+-~
Power Consumption
500mA Max (cells),
400mA Max (+12V DC)
Operating Temperature
-30 40℃~ ℃
Operating Humidity
0% 85%RH~
Weight
166g
Size(WXHXD)
185 68 50mm
Item
Detail
21
Page 23
Once you have unpacked your product, make sure that all the
parts shown below are available. If any pieces are missing or
broken, please promptly call your dealer.
? Design and specifications are subject to change without notice.
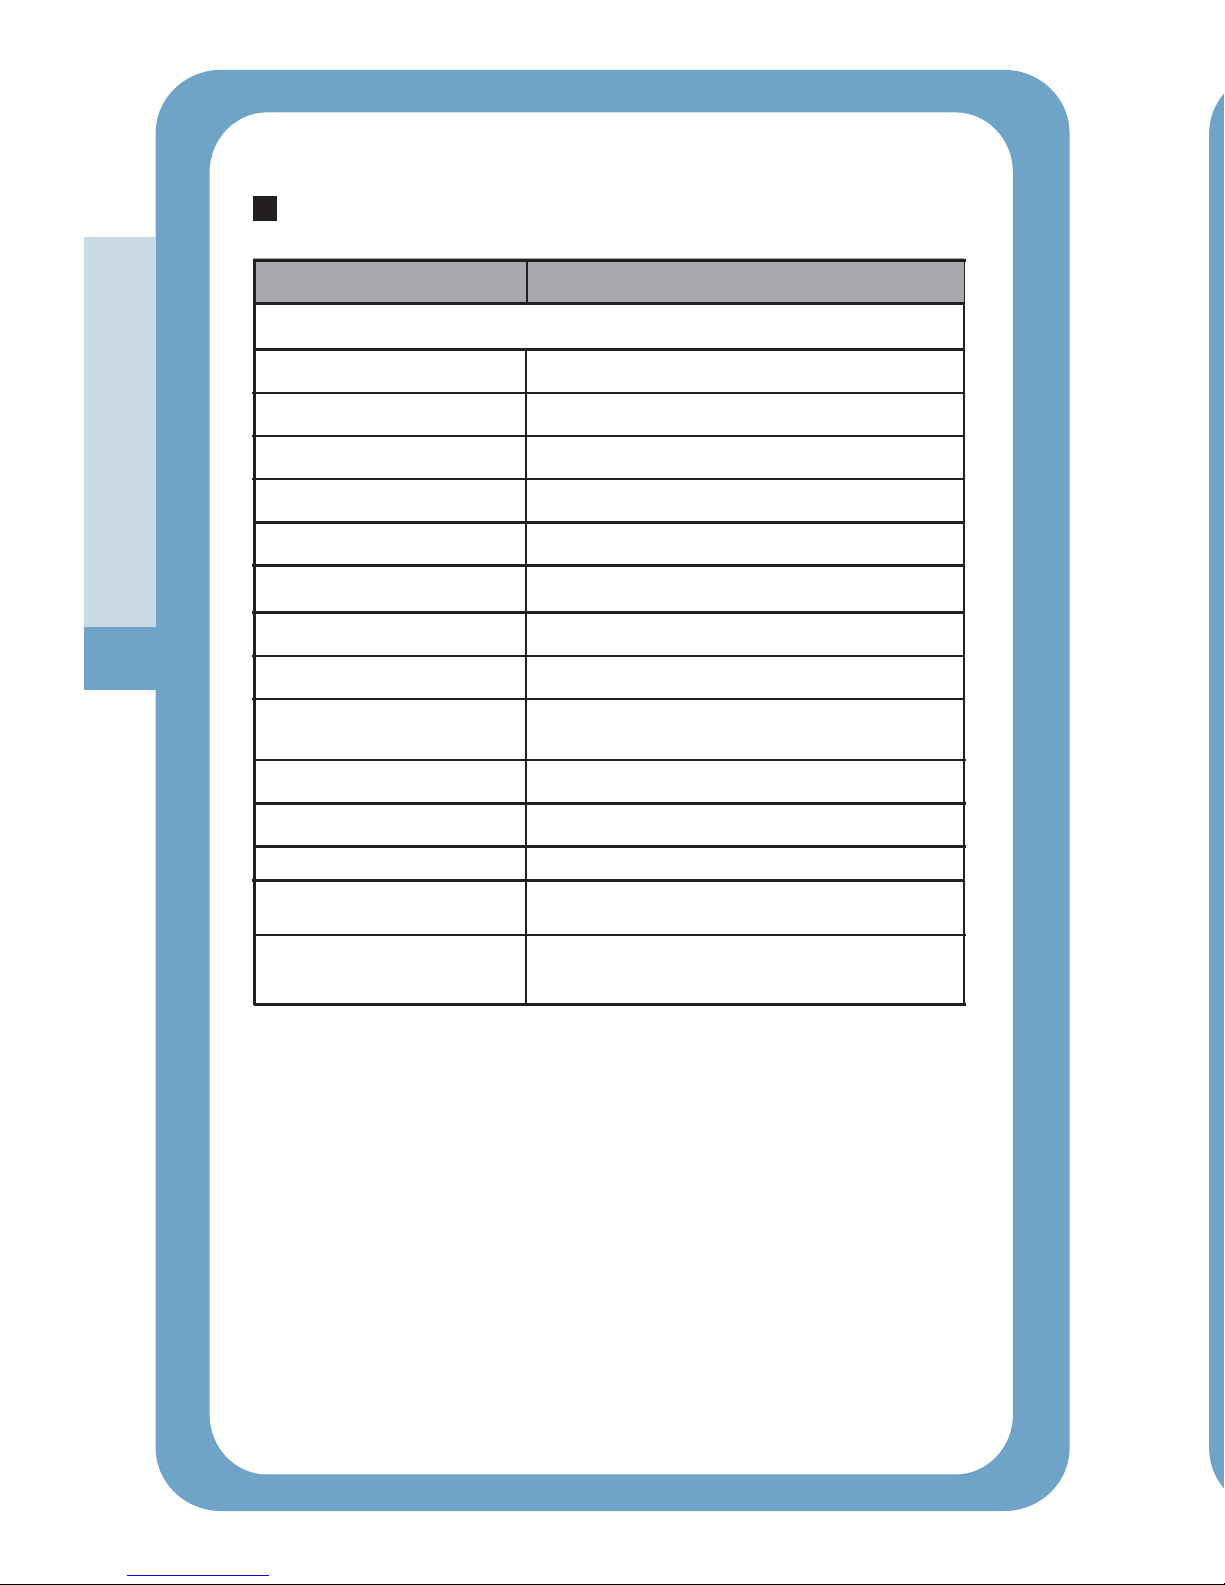
Receiver
Receiving Frequency Range
2.400GHz 2.4835GHz~
Monitor
2.4''Color LCD
Data Rate
2.0Mbps
Receiving Sensitivity
-90dBm
Demodulation Type
GFSK/FSK
Resolution
320 240(RGB)
Transmitting Power
19dBm(TYP)
Power Requirement
3 Ni-MH1.2V,800mAh
Power Consumption
450mA Max
Operating Temperature
-10 40℃~ ℃
Operating Humidity
0% 85%RH~
Weight
110g
Size(WXHXD)
Receiver: 165 50 27mm
Charger: 79 77 42mm
No. of outdoor stations
supported
Max.4
Item
Detail
Technical Specification
22
 Loading...