

Page 1

Wi-Fi Doorbell
CL-3239
Quick Guide
Page 2
1
Unpacking
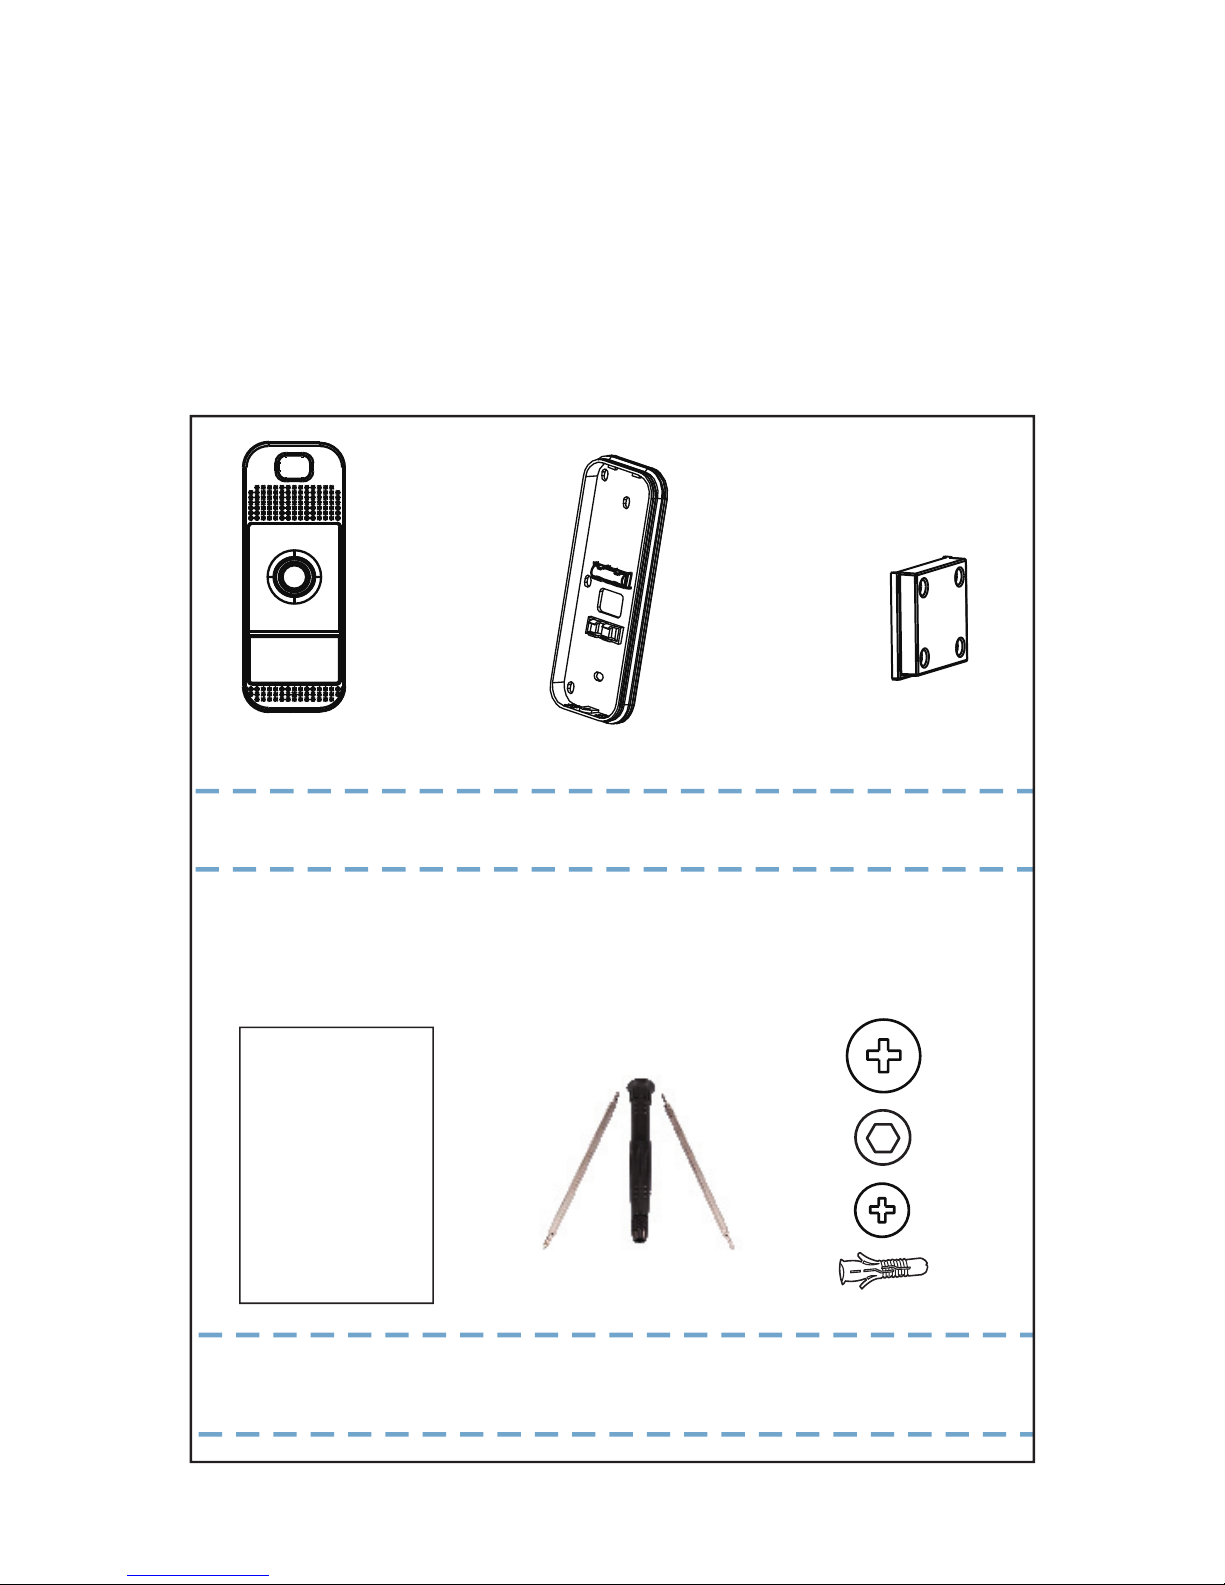
Once you have unpacked your product, make
sure that all the parts shown below are available.
If any pieces are missing or broken, please get in
touch with your dealer.
Cover Plate
Wall-mount Case
Quick Guide
Anchors and
Screws
Doorbell
CL-3239
QuickGuide
Wi-FiDoorbell
Screwdriver
X 2
X 1
X 4
X 2
Page 3
2
Introduction
The Wi-Fi doorbell is a smart video doorbell that
allows you to answer your door with smartphones
and tablets anytime anywhere.
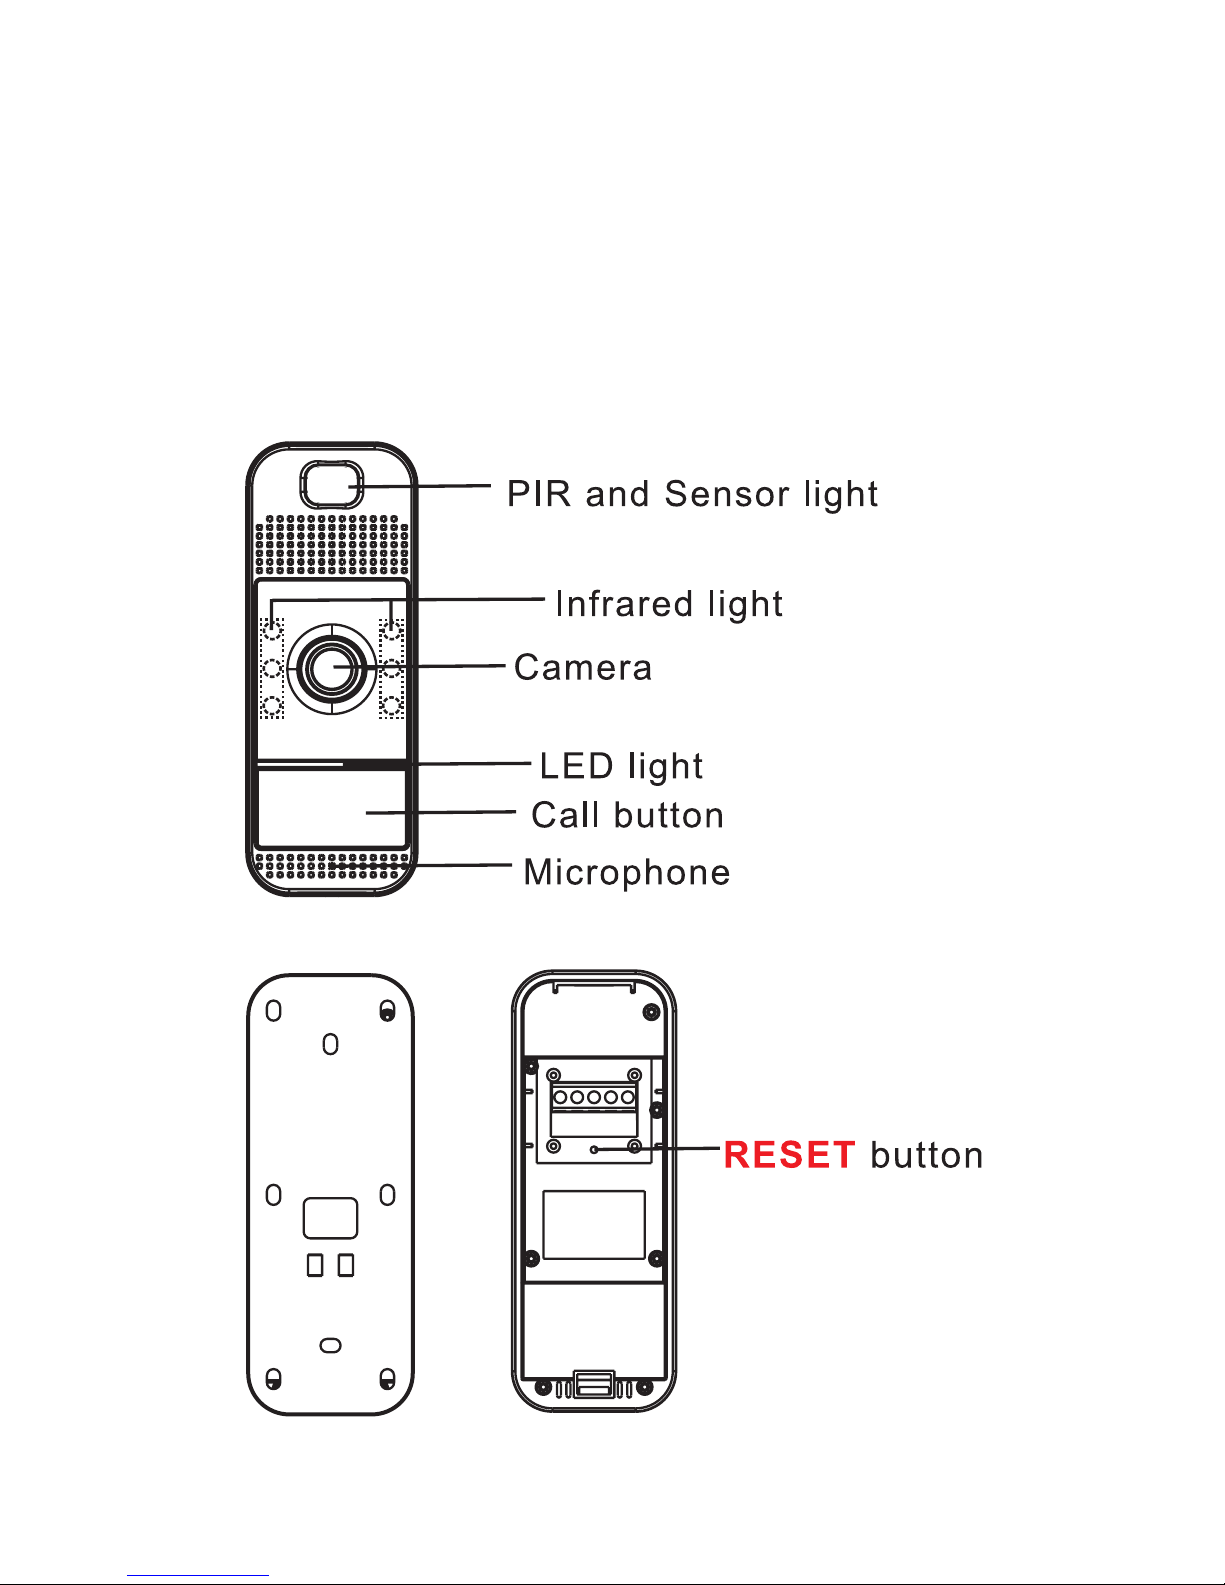
Layout
Page 4
3
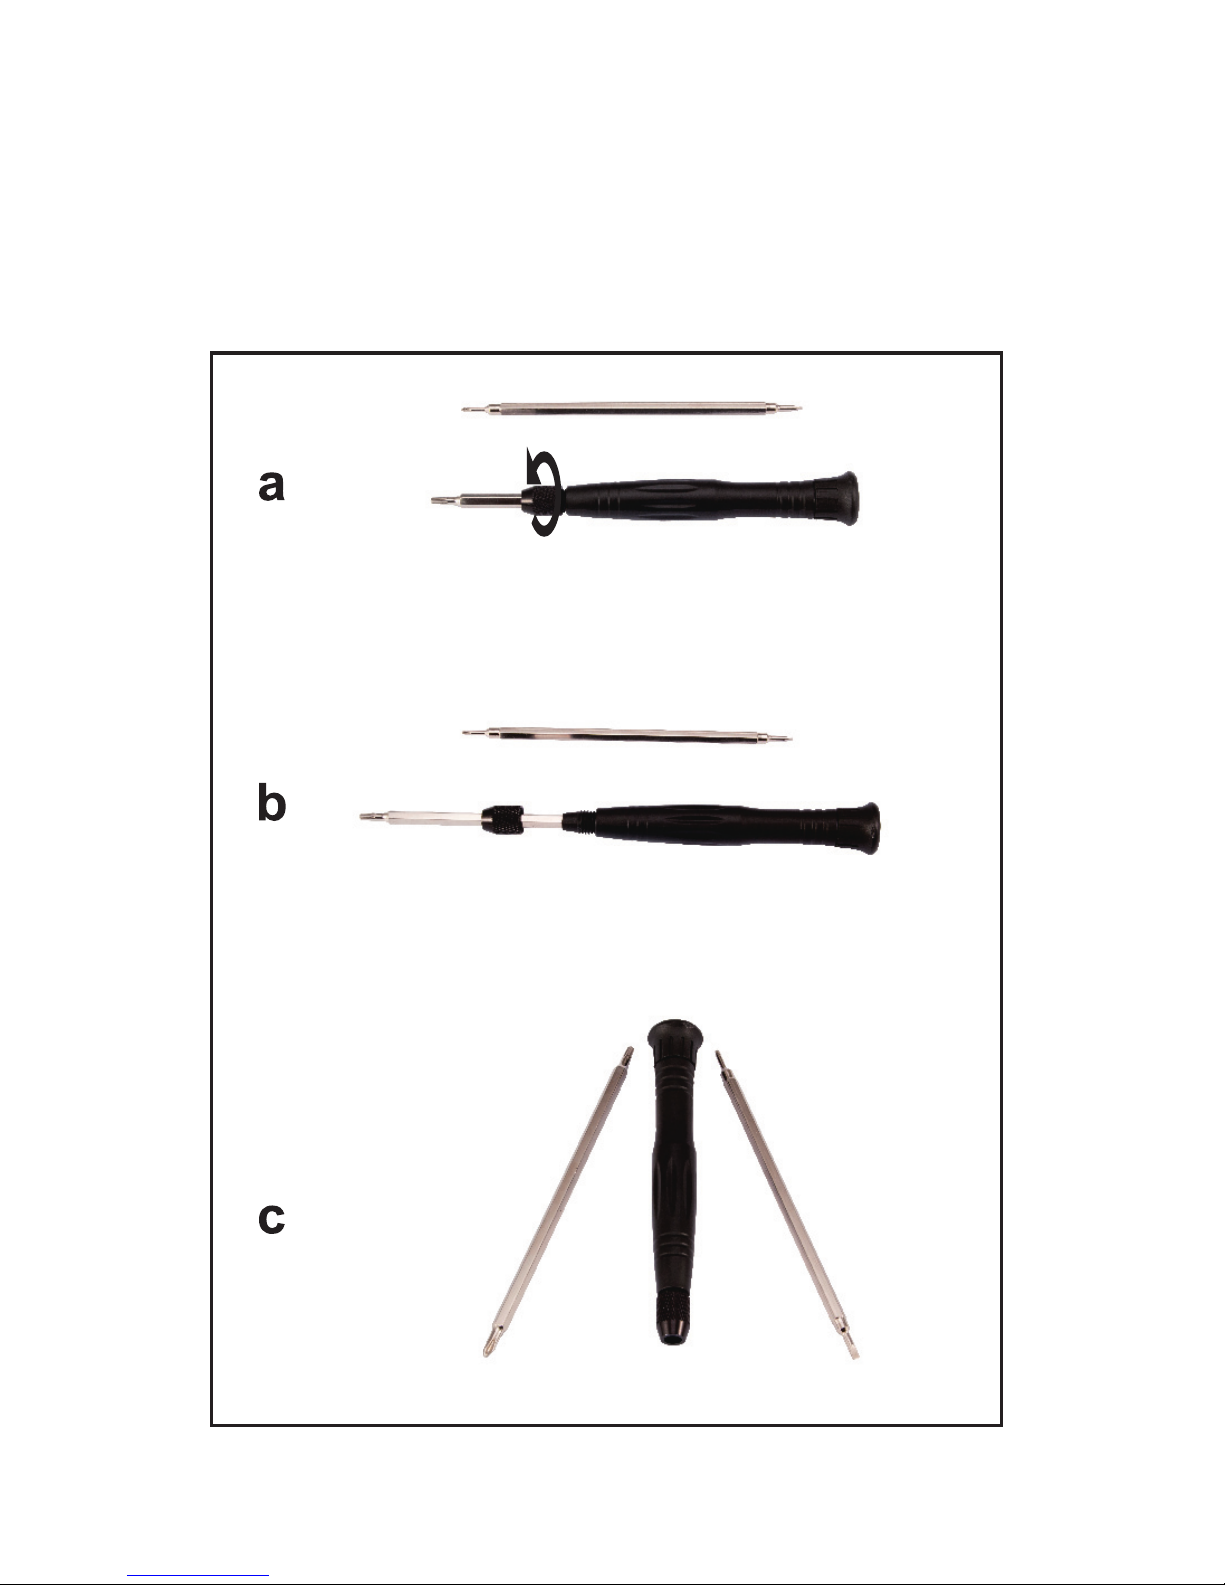
Screwdriver
You can replace the screwdriver’s heads as per
your needs.
Page 5
4
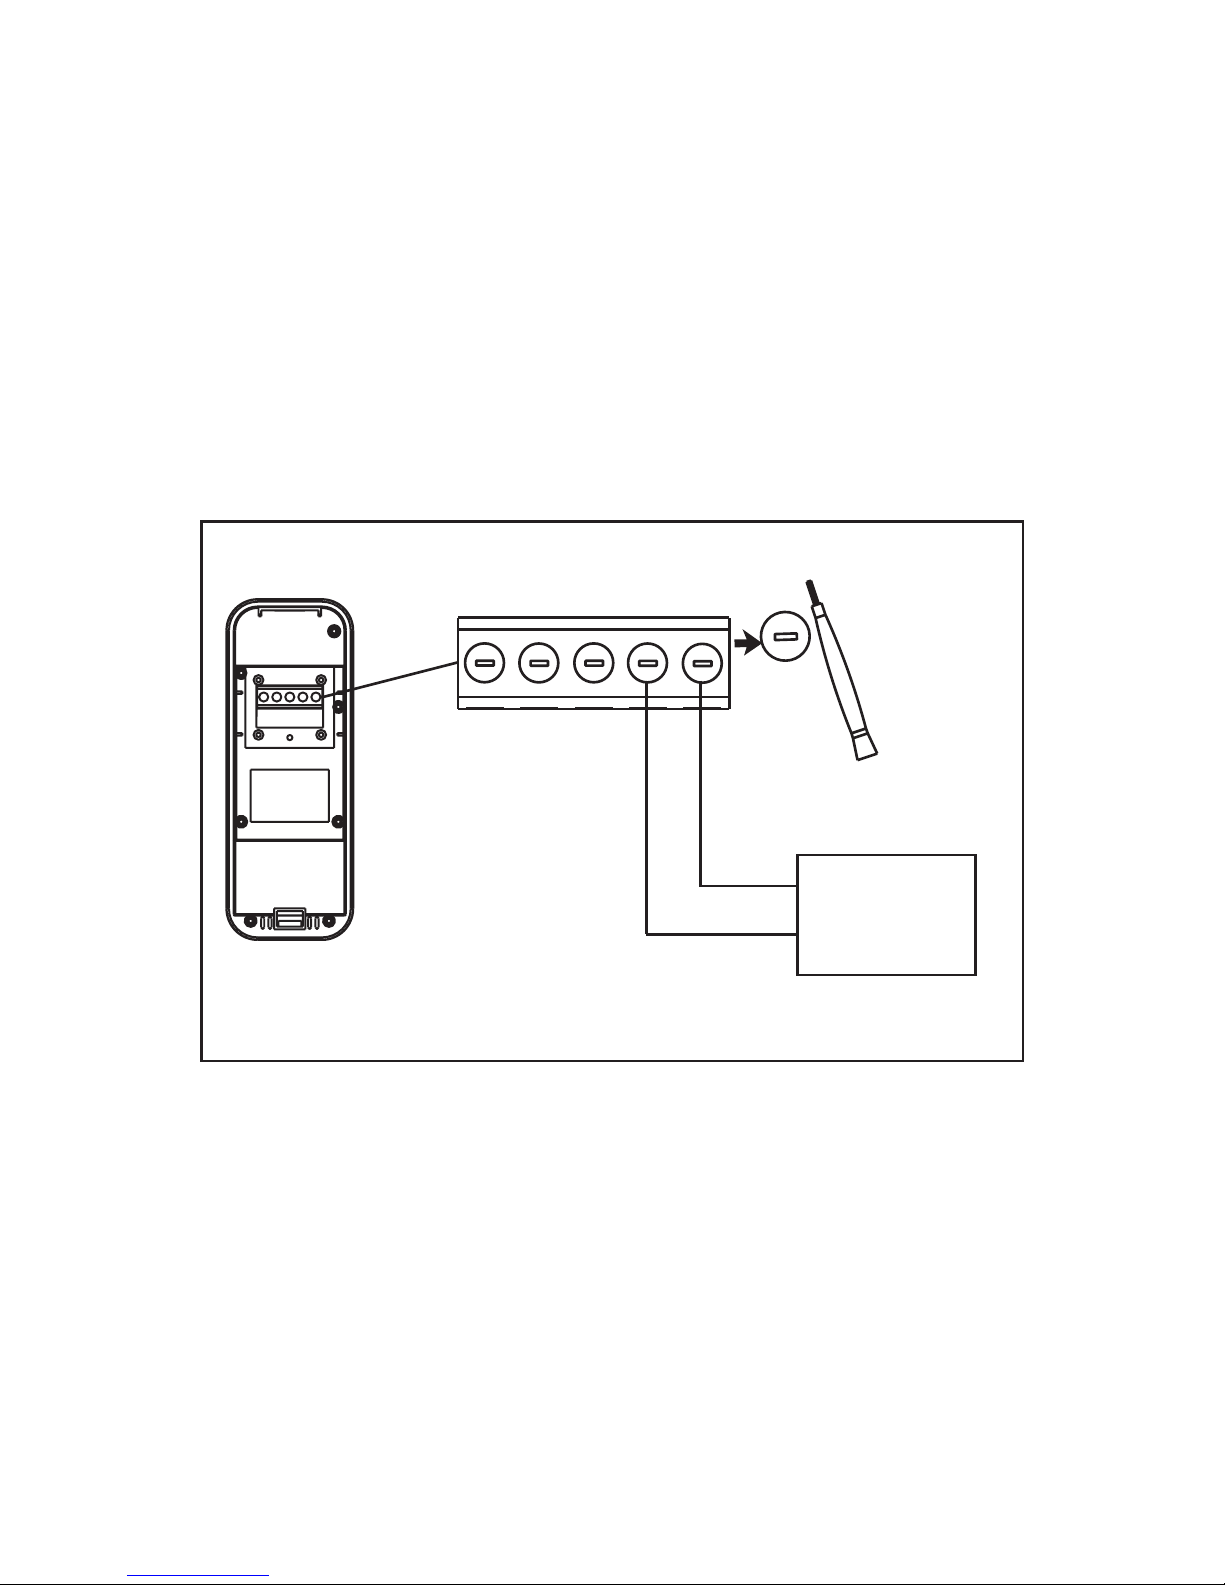
Diagram For Connection
Remove your existing doorbell from the wall and
disconnect the wires, then connect this doorbell
to your existing wires.
It doesn’t matter which wire connects to which
screw.
9-24VAC
or
9-36VDC
Page 6
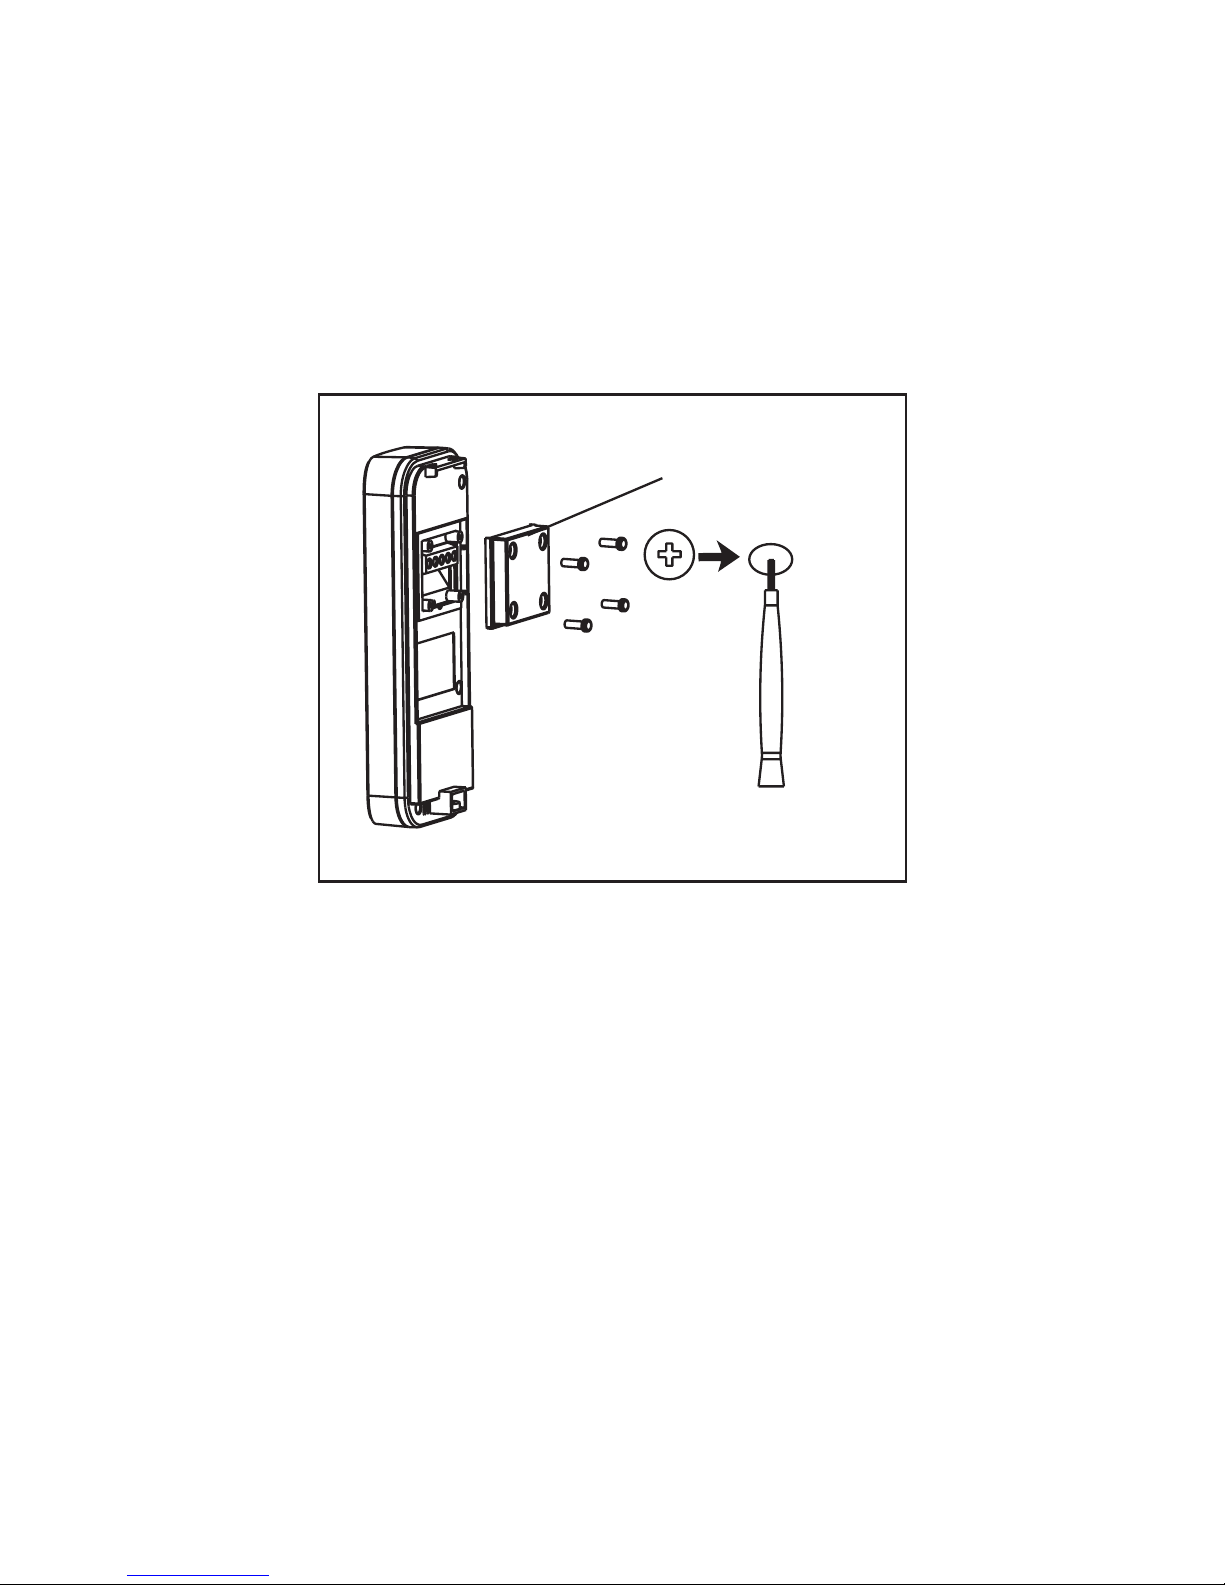
5
Diagram For Installation
After the connection, install the cover plate to the
doorbell.
Cover plate
Page 7
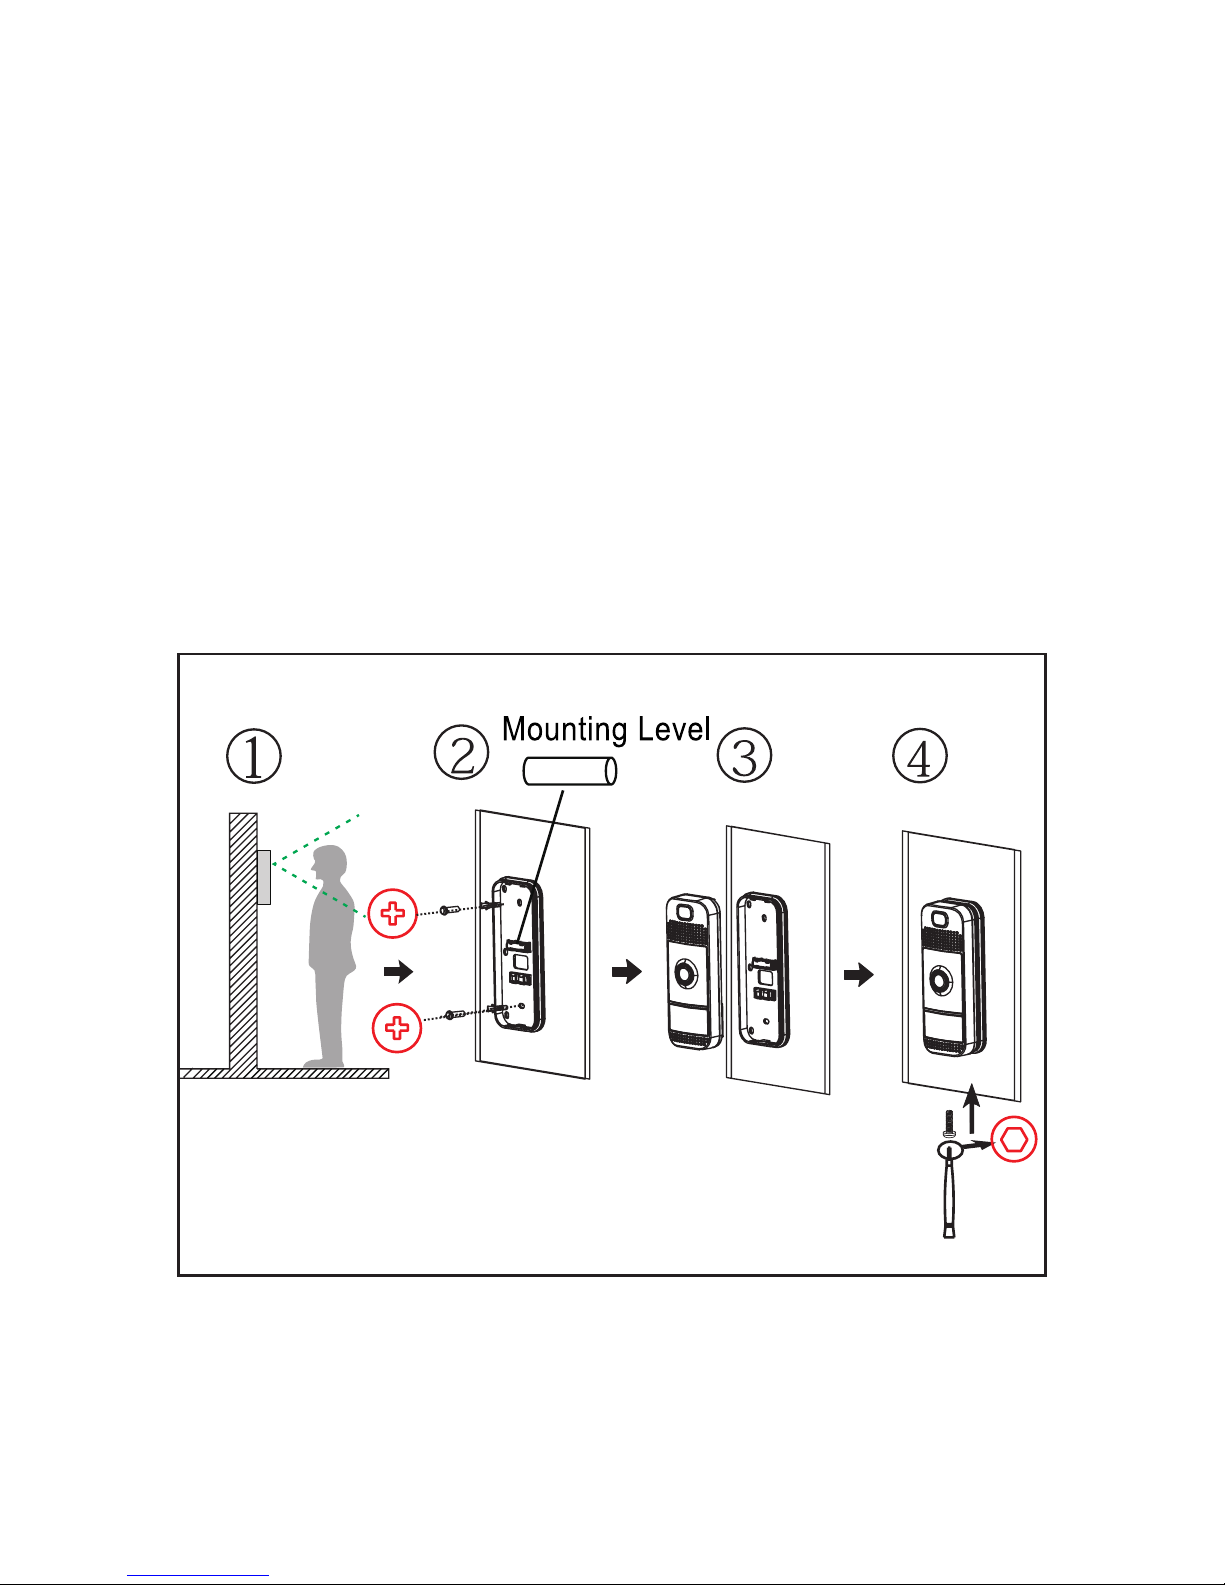
6
Wall-mount Case Installation
1. Choose a proper location for the doorbell. Be
sure to consider the average height of visitors.
2. line up the wall-mount case using the provided
mounting level, install the wall-mount case and
screws with the holes in the wall.
3. Install the doorbell into the wall-mount case.
4. Insert and tighten a screw to nish the installation.
Page 8
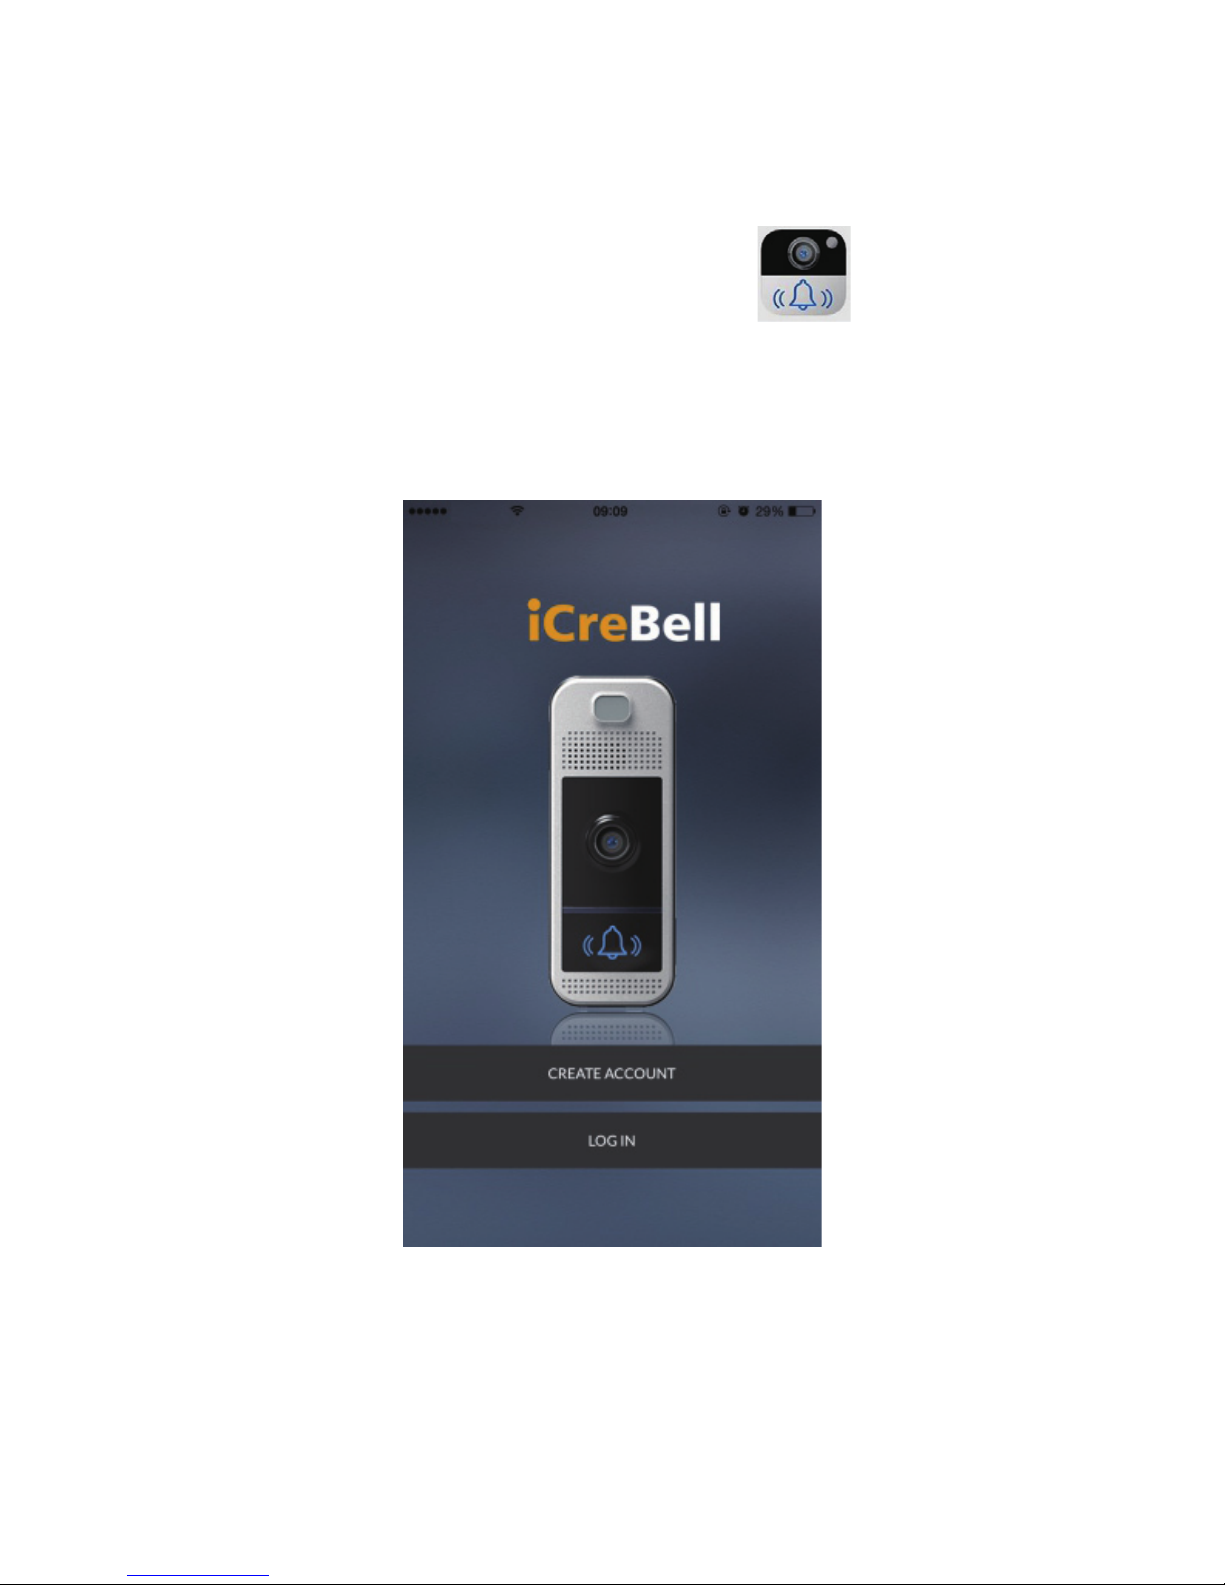
7
Operations
iCreBell APP Introduction
1. Download the iCreBell APP from app
store.
2. Install iCreBell APP on your smartphones.
3. Lauch the APP.
Page 9
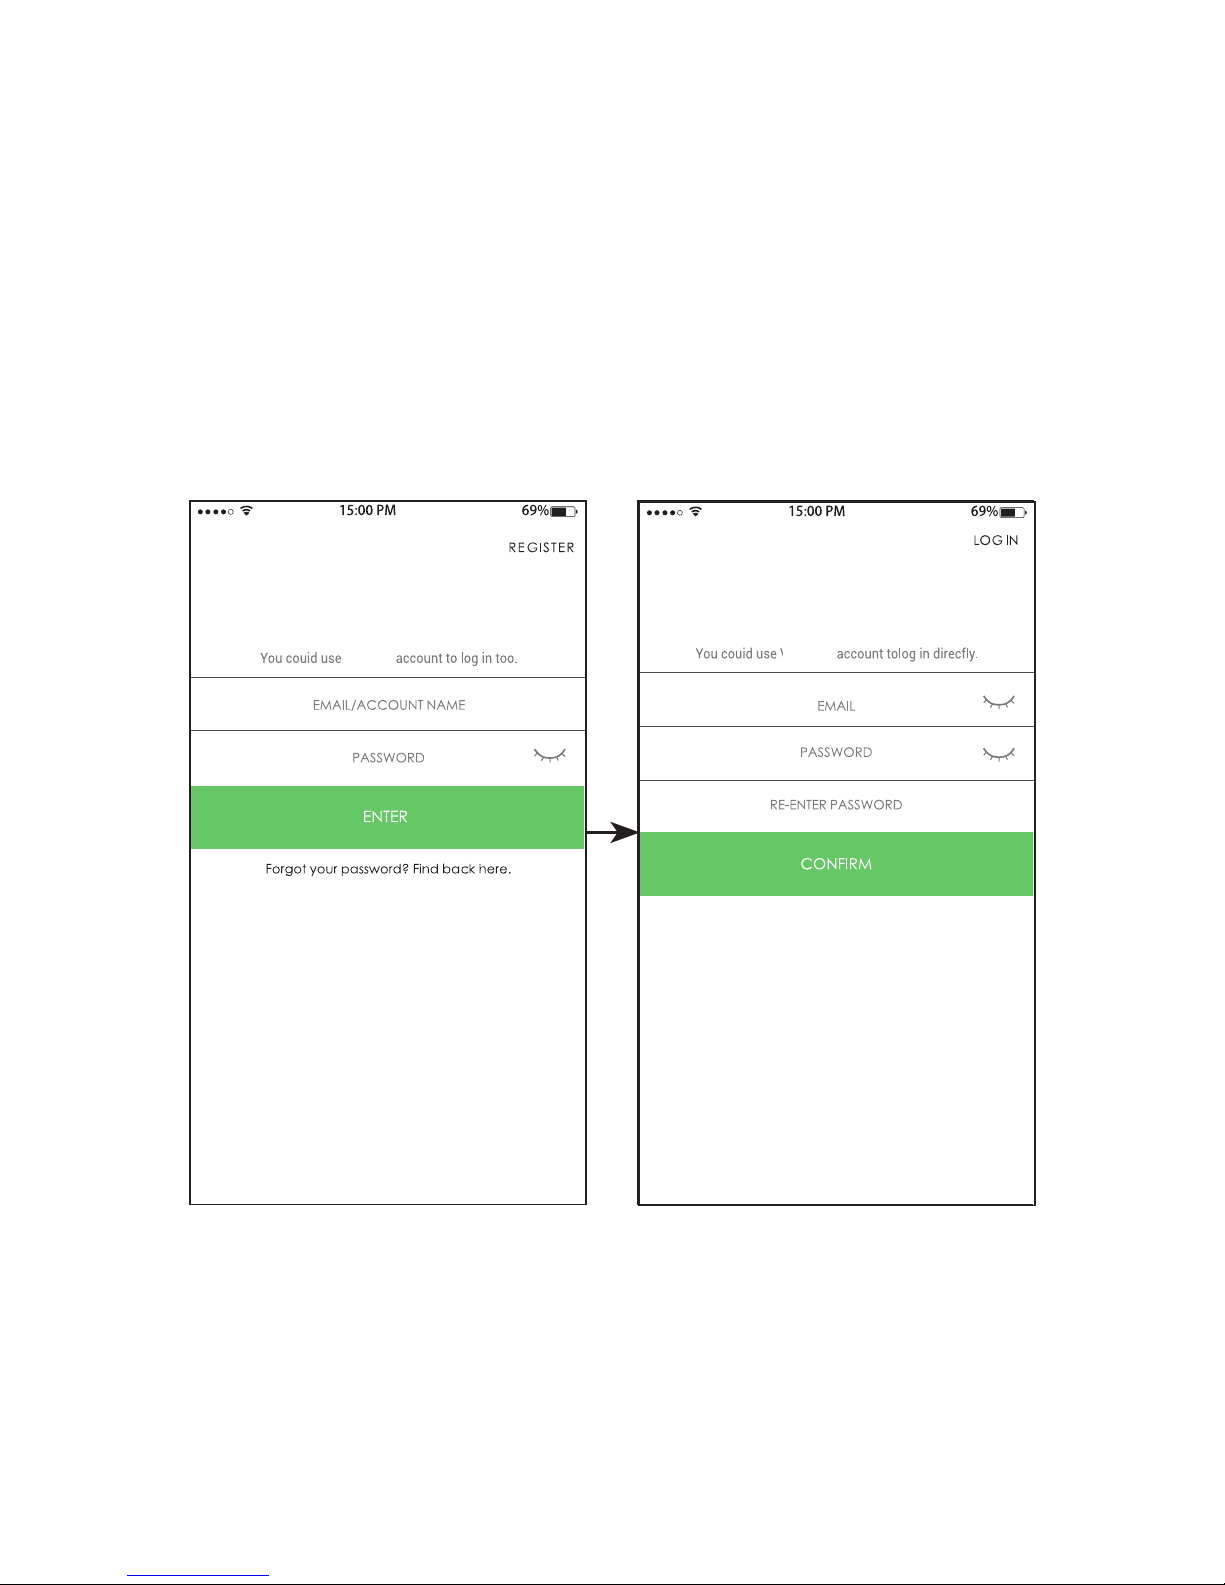
8
Operations
iCreBell APP Introduction
Follow the instructions and start the registration.
Note:
Password must be at least 8 charaters and contains
numbers, uppercase letters and lowercase letters.
REGISTER LOG IN
iCreBell
iCreBell
Page 10
9
Operations
iCreBell APP Introduction
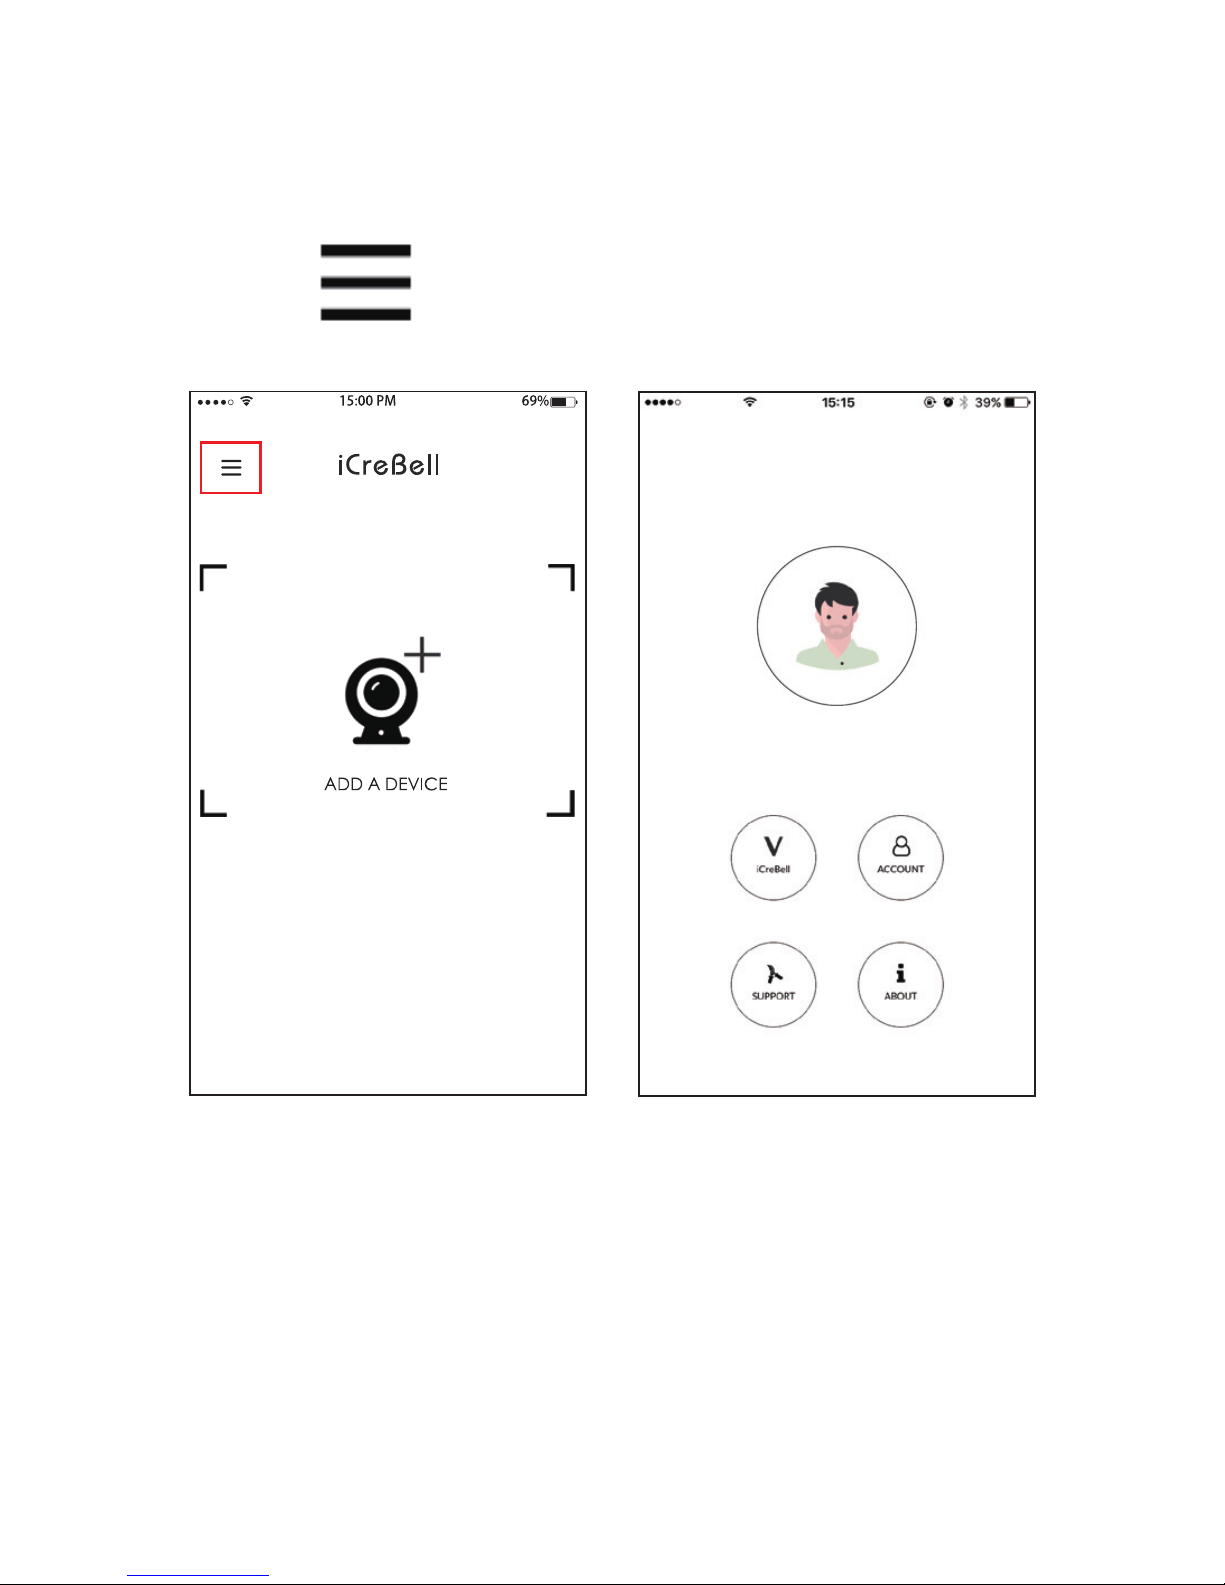
Press to enter account management.
Page 11
10
Operations
iCreBell APP Introduction
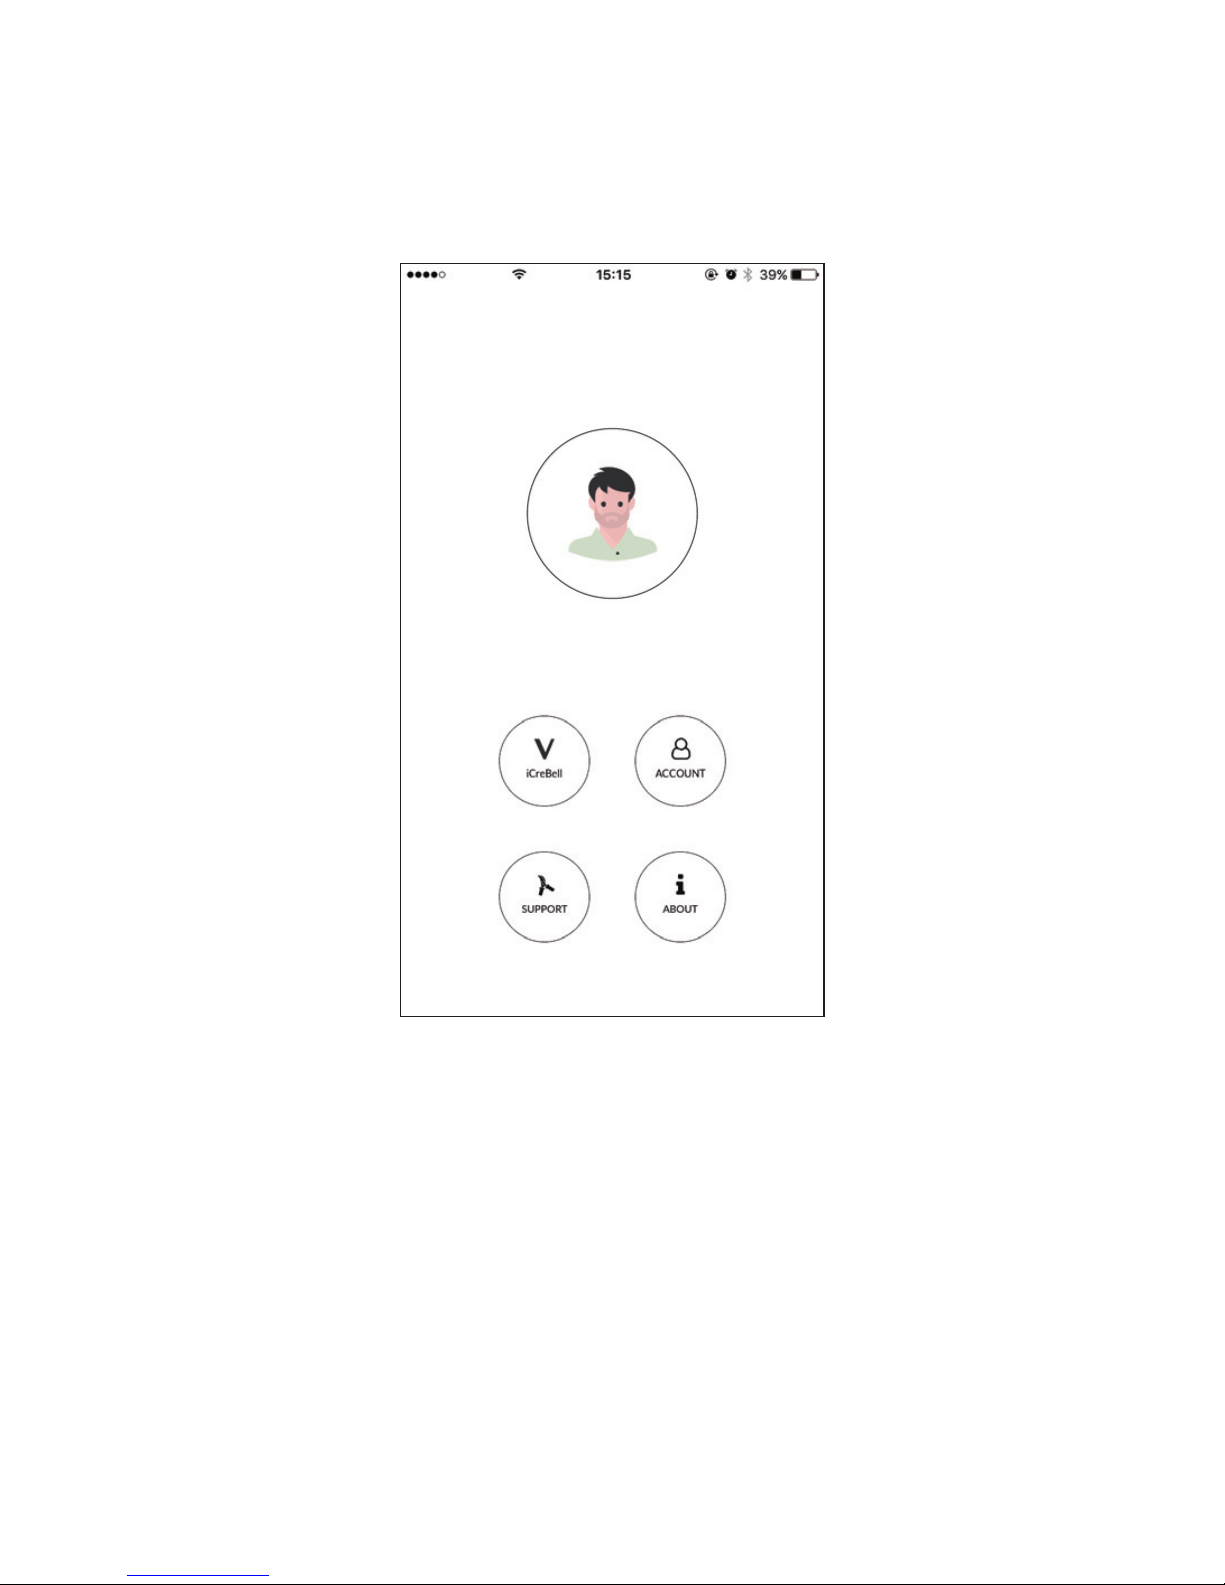
1. iCreBell: Enter the iCreBell homepage.
2. ACOUNT: Holds account information.
3. SUPPORT: Frequently asked questions and the
solutions.
4. ABOUT: APP version
Page 12
11
Operations
iCreBell APP Introduction - Account
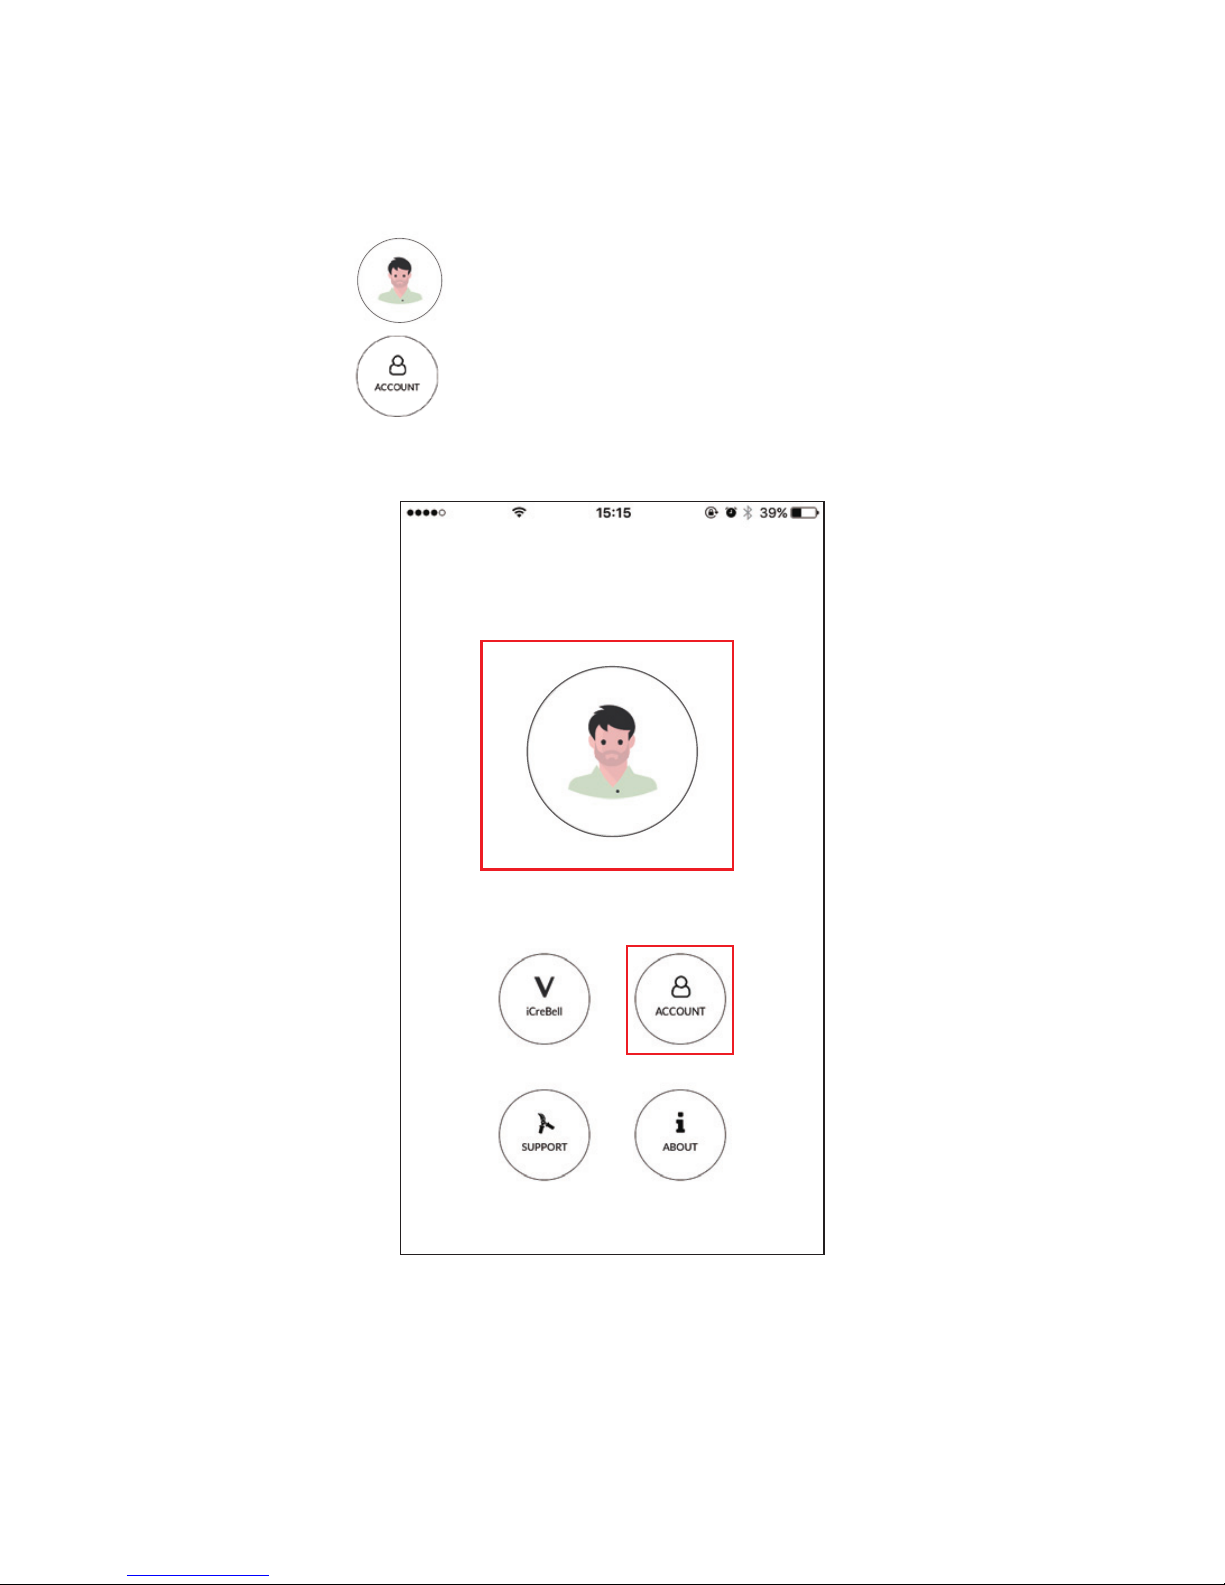
2. Press to view and change the account
information.
1. Press to change the prole picture.
Page 13
12
Operations
iCreBell APP Introduction - Account
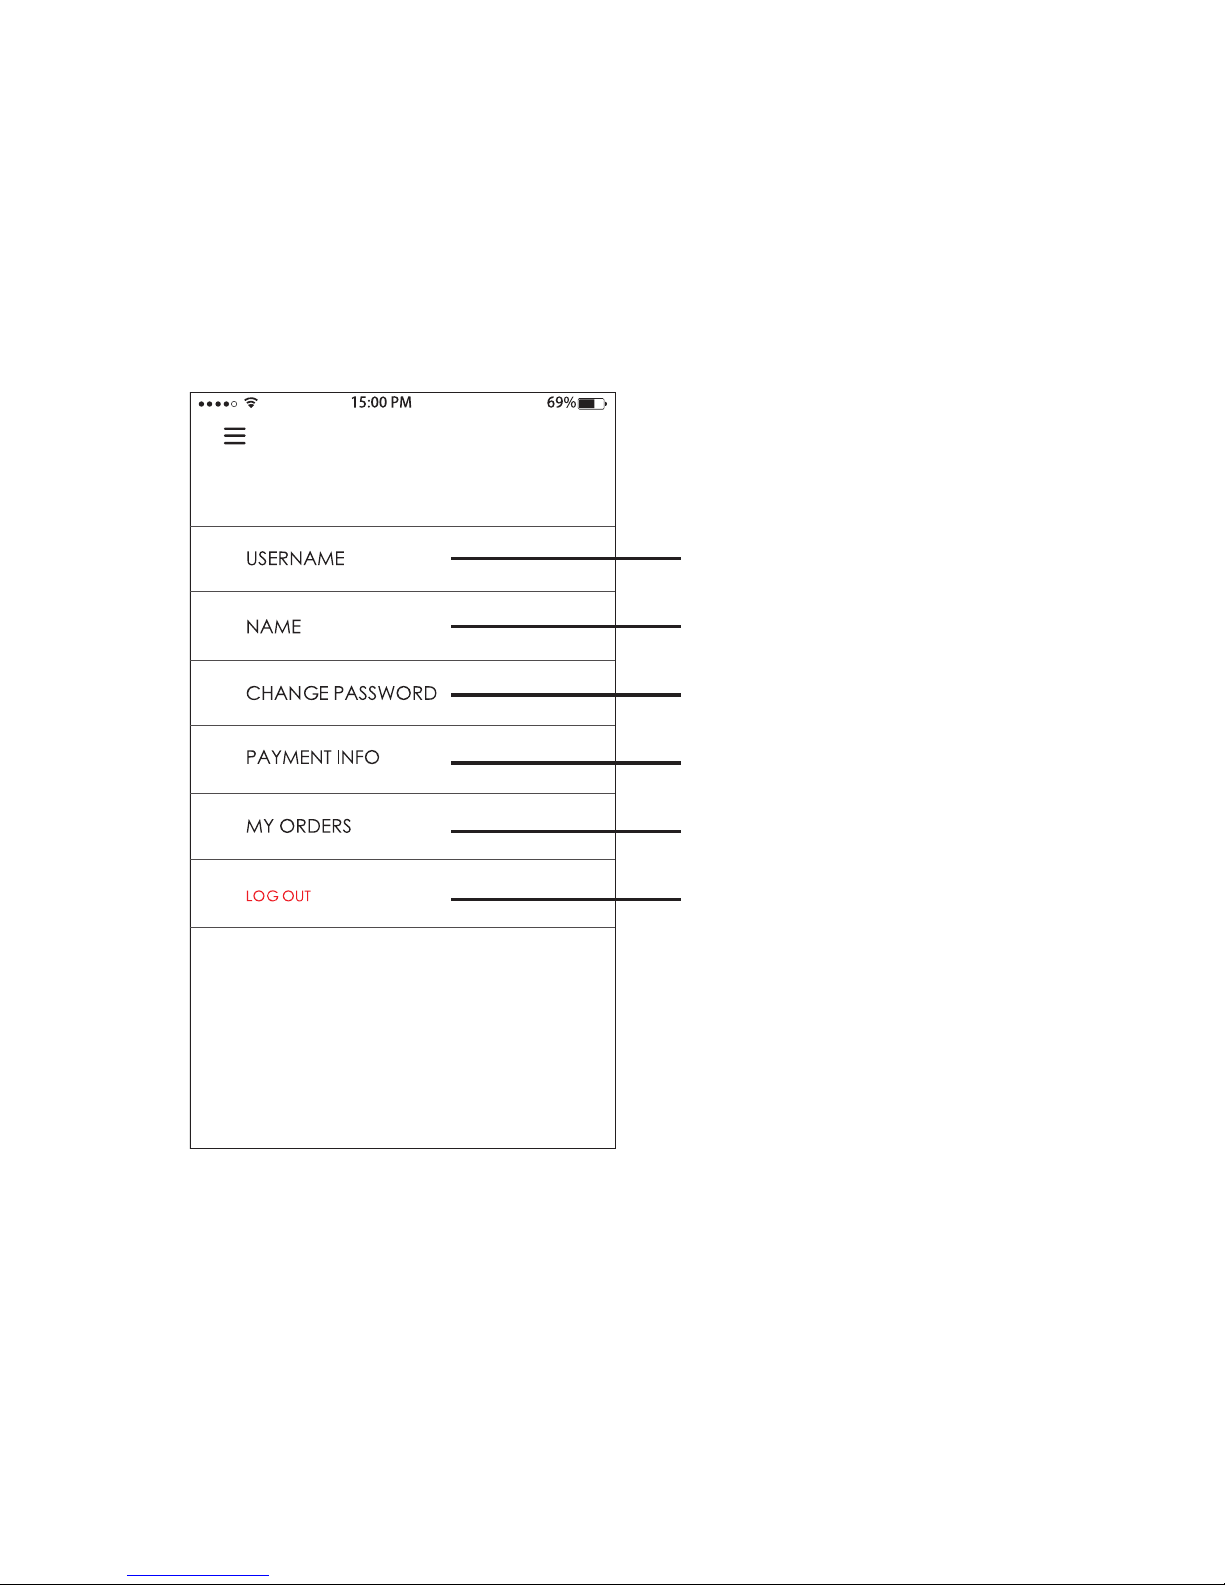
3. View and change the account information.
View account name
Change the nickname
Change password
Management of
payment information
View order
Log out of your account
Page 14
13
Operations
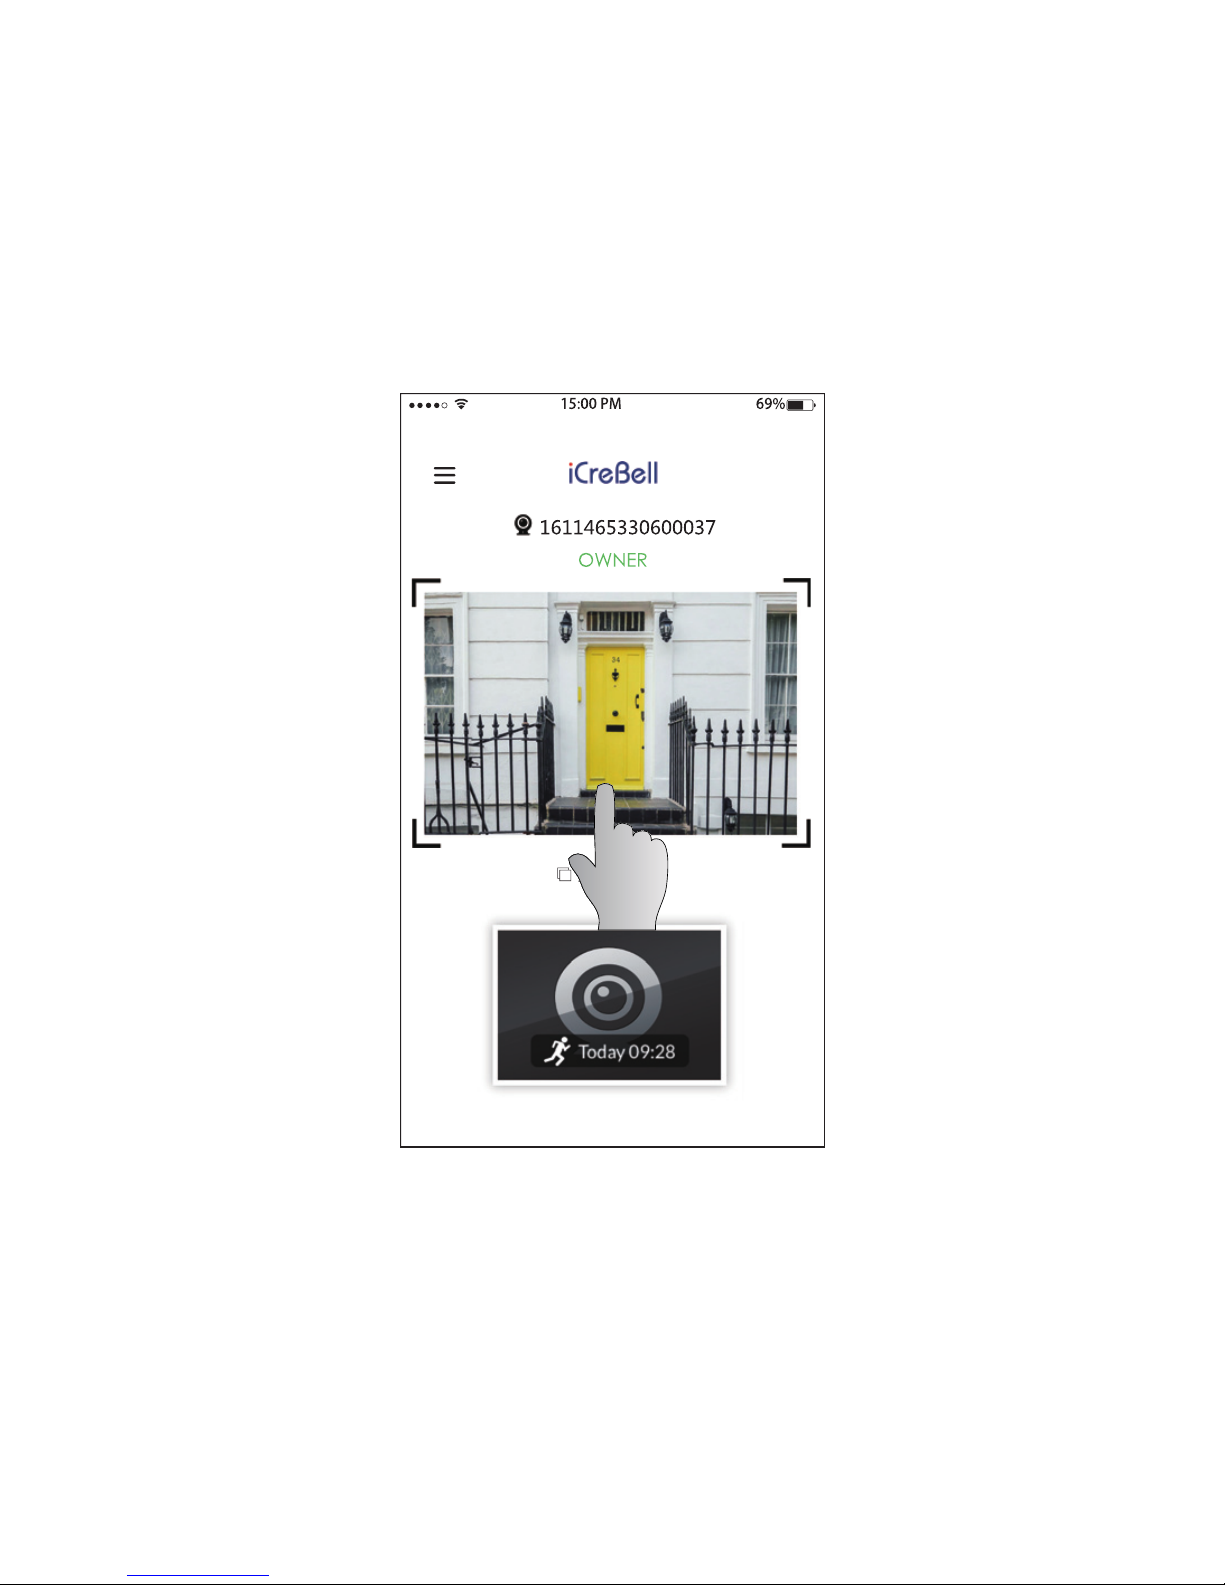
iCreBell APP Introduction - Screen
1. Tap any part of the view screen.
Page 15
14
Operations
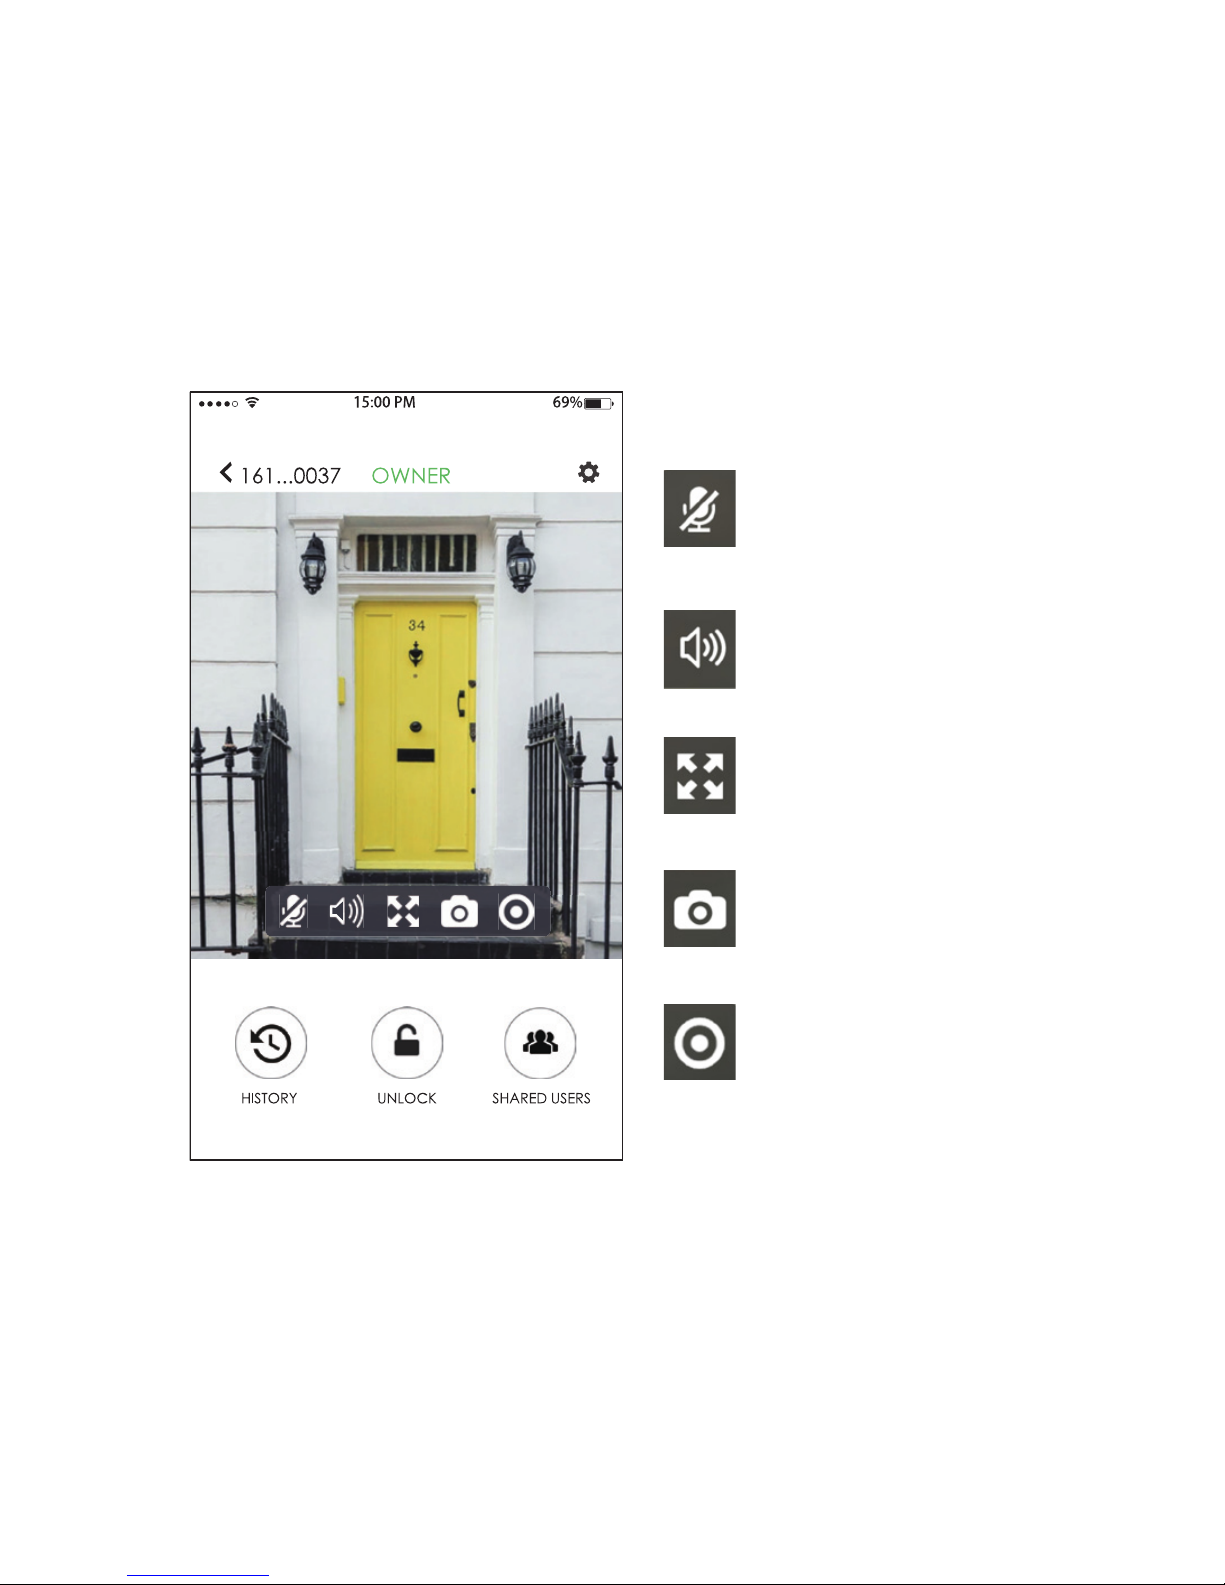
iCreBell APP Introduction - Screen
2. Operate according to the icon.
Sound off
Volume
Full screen
Screen shot
Record the vedio
Page 16
15
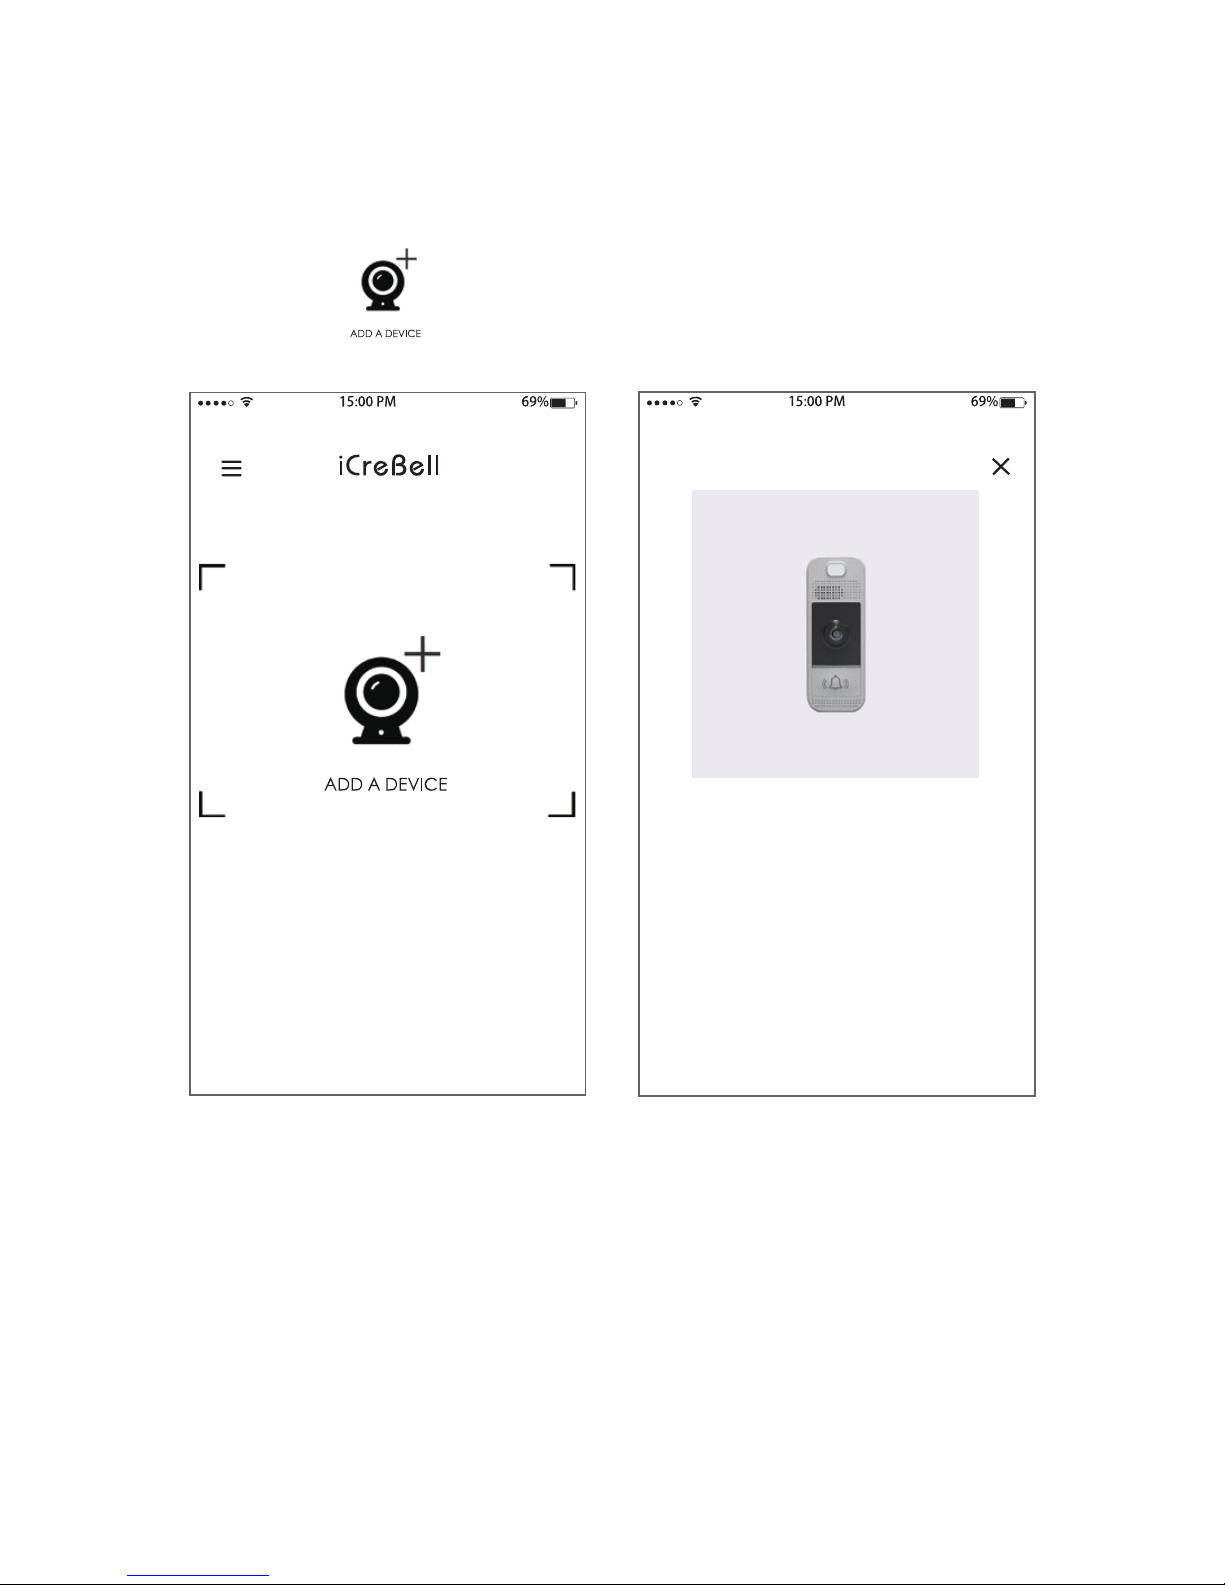
1. Press to add the a device.
Operations
Add doorbell in iCrebell account
Page 17
16
Operations
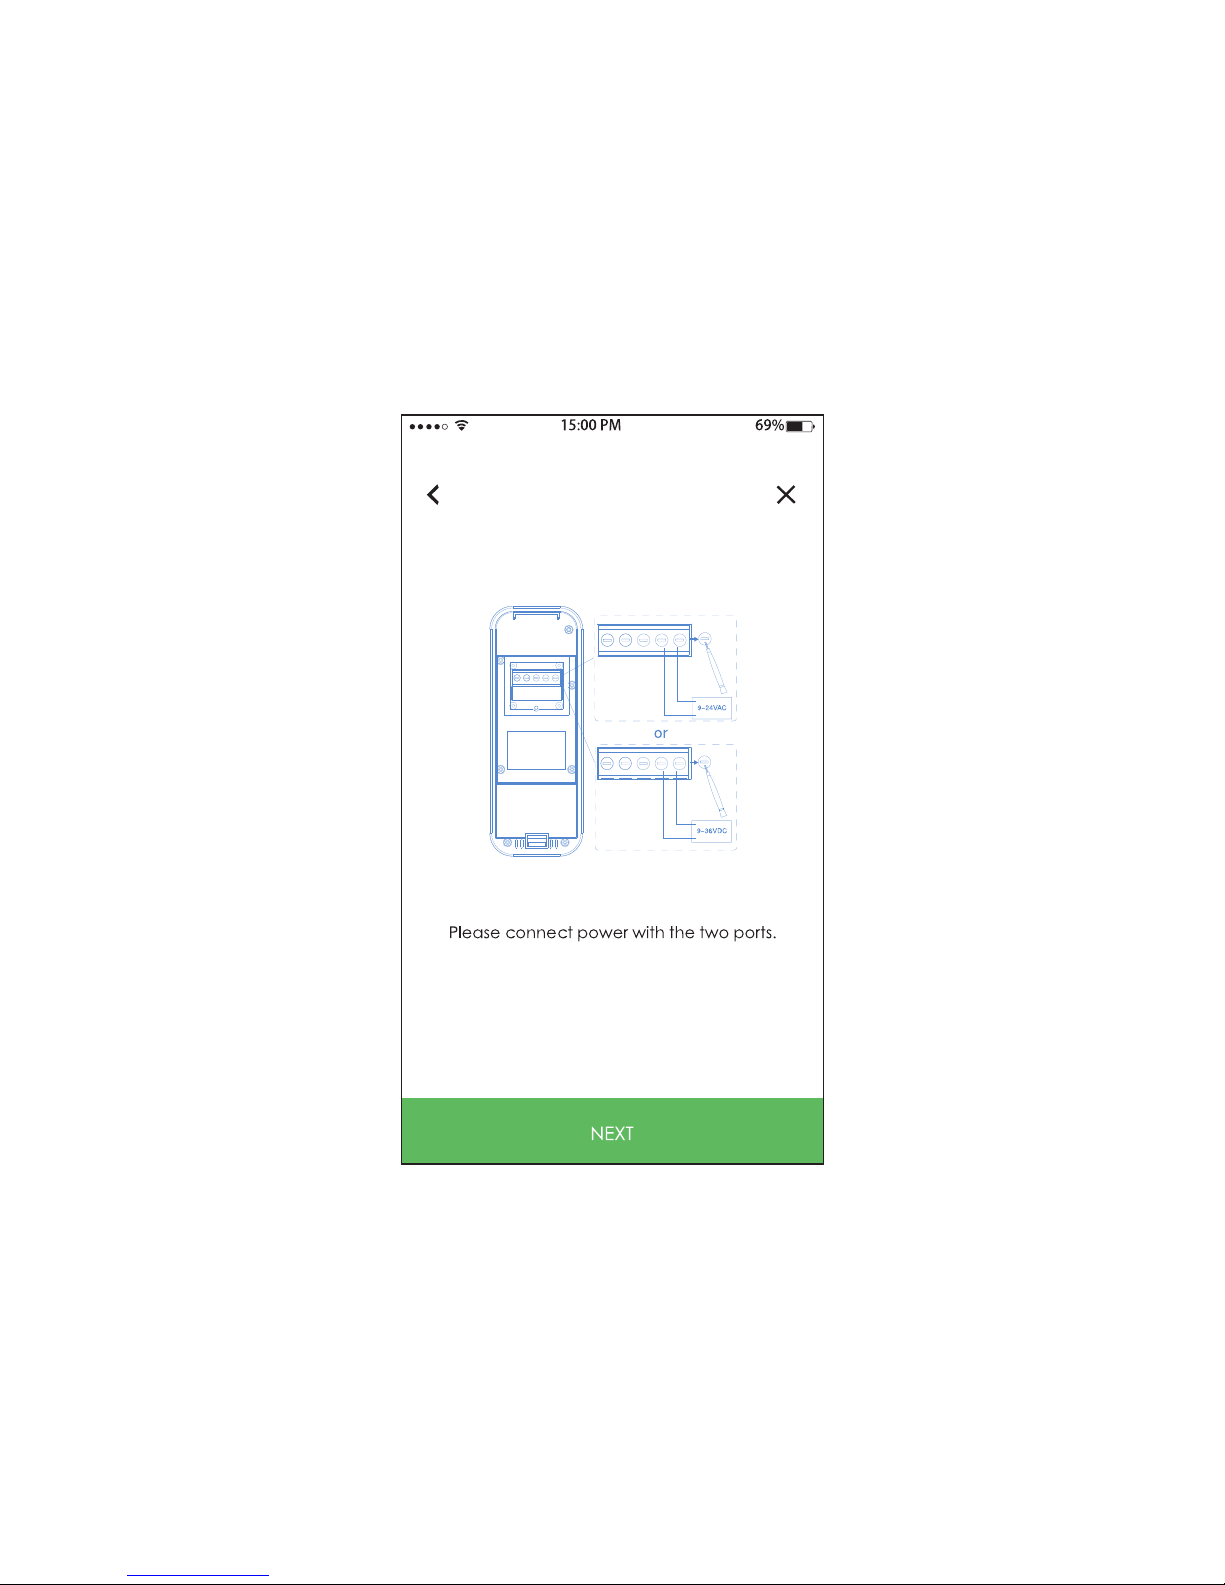
Add doorbell in iCrebell account
2. Connect the iCreBell with AC or DC power, then
press NEXT.
Page 18
17
Operations
Add doorbell in iCrebell account
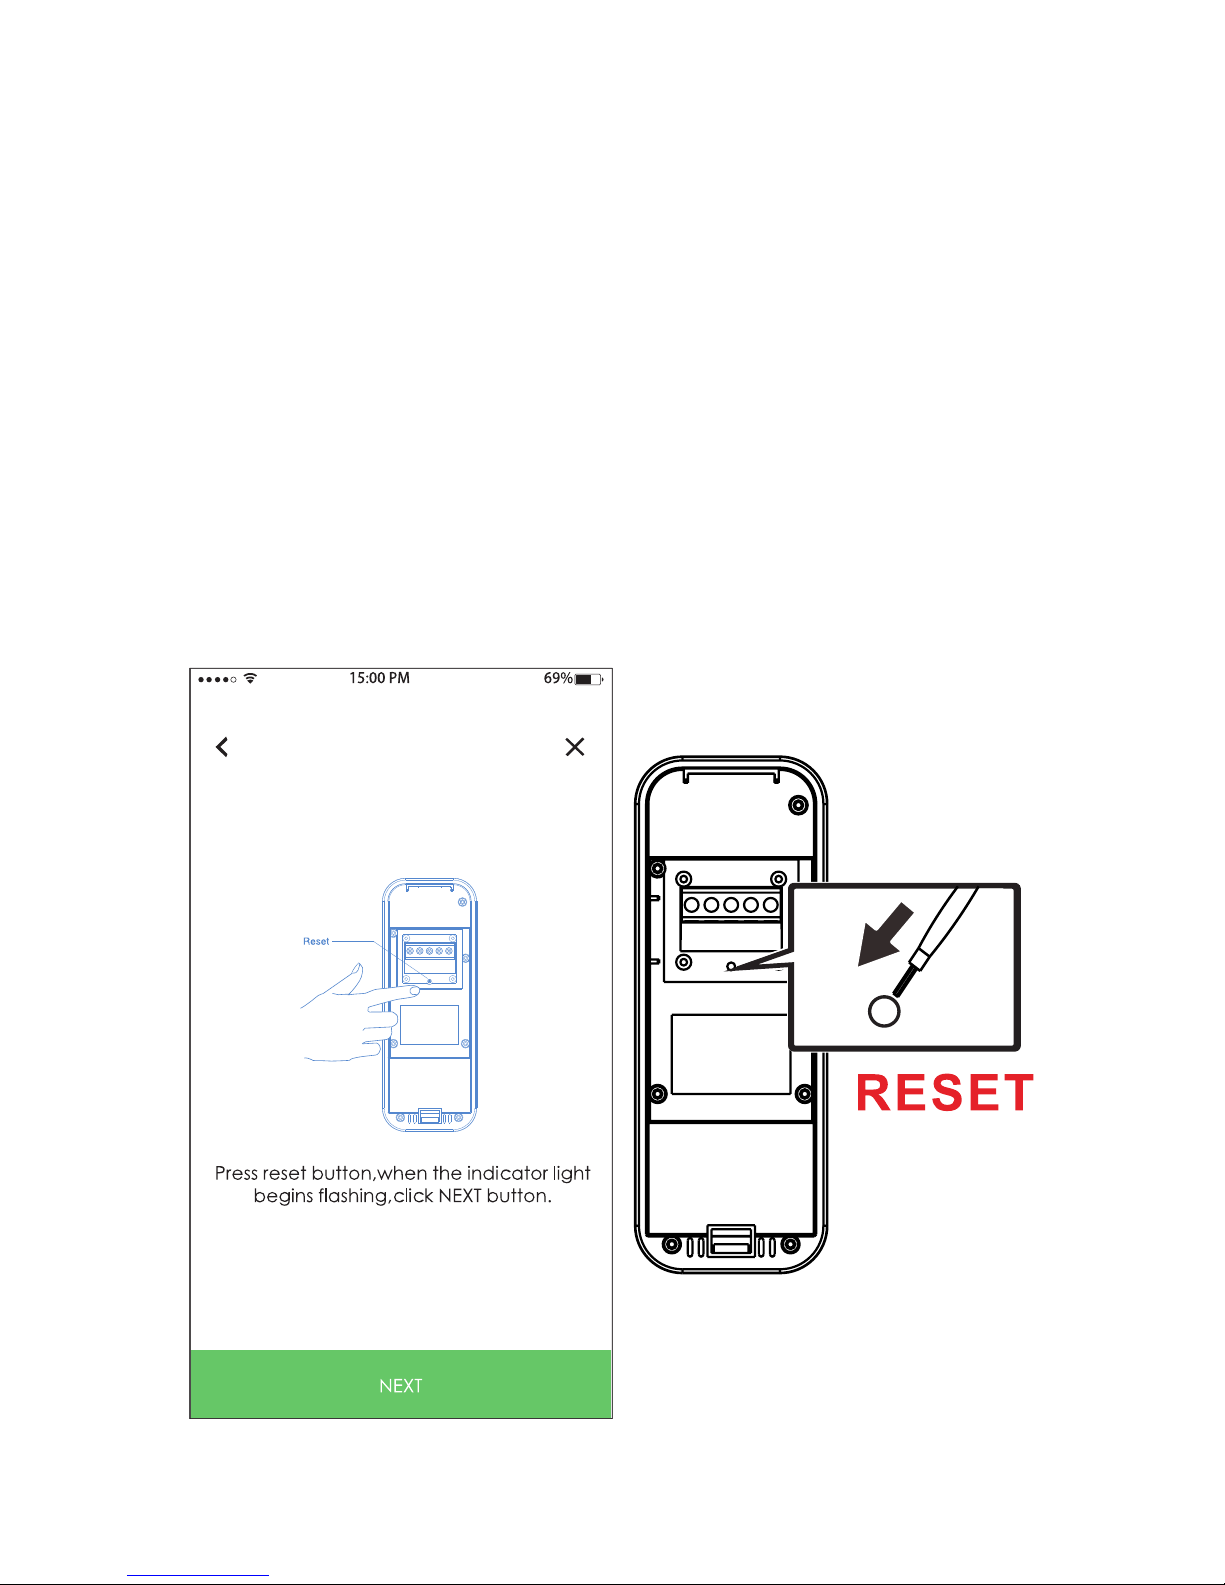
3. Please wait for the white light indicator ashes
slowly, then using the small screwdriver to press
the RESET button to reset the iCreBell, and when
the white light indicator flashes rapidly, press
NEXT.
Note: Please make sure your mobile device is
connected to Wi- before this operation.
Page 19
18
Operations
Add doorbell in iCrebell account
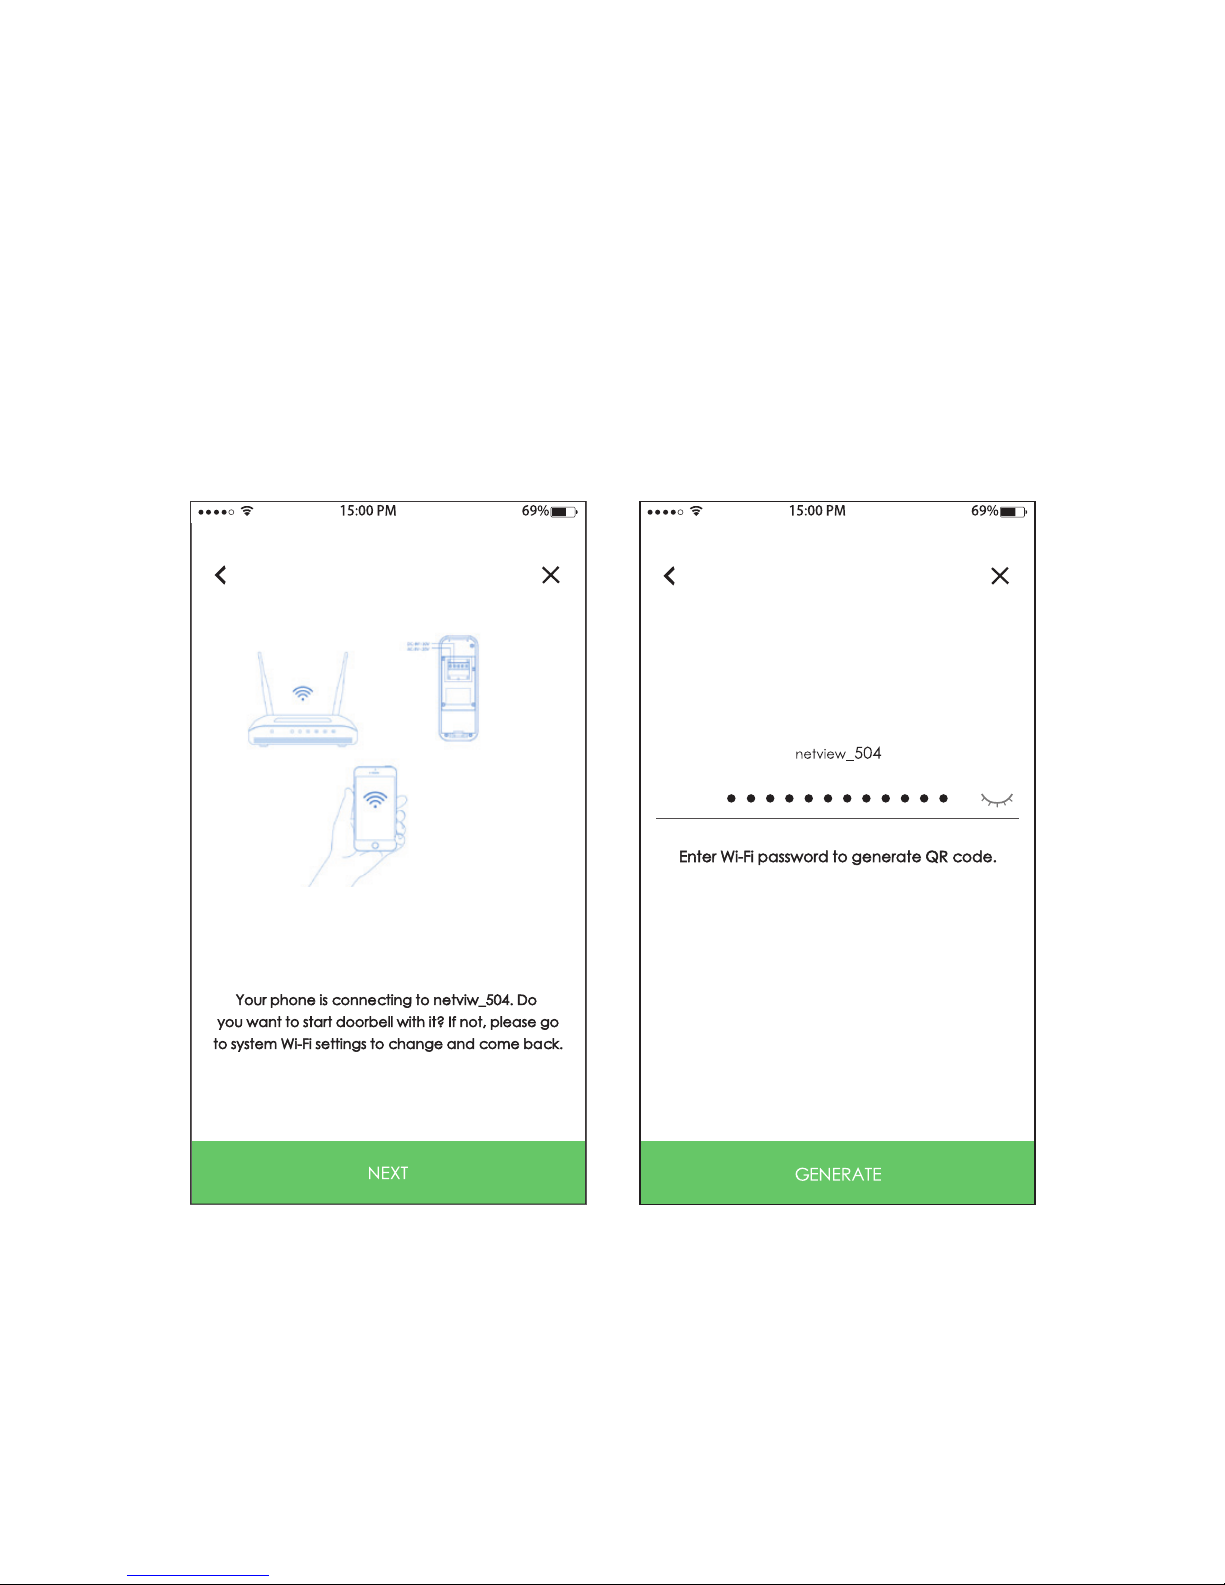
4. Make sure all the
devices are on the
same network, then
press NEXT.
5. Connect to the WiFi network, then press
GENERATE.
Note: Only support 2.4GHz Wi-Fi.
Page 20
19
Operations
Add doorbell in iCrebell account
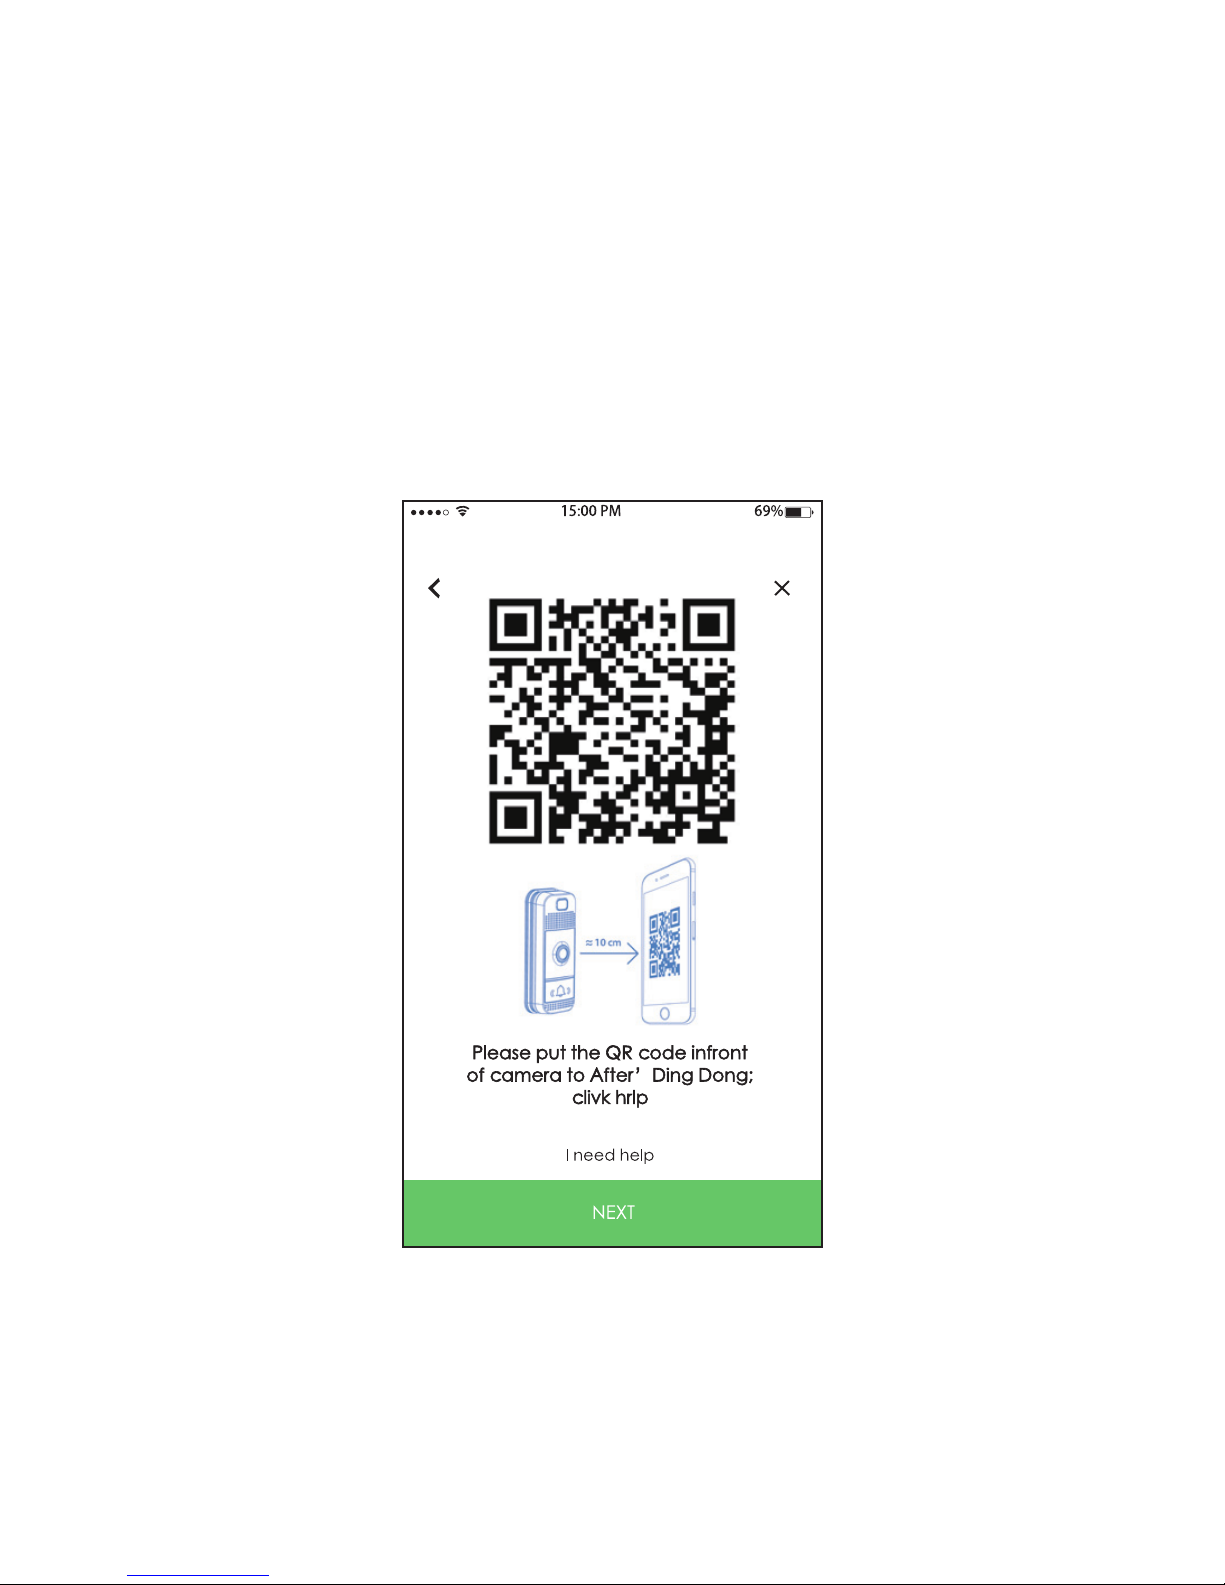
6. Scan the QR code with the doorbell camera,
once you heard ‘Ding Dong’, press NEXT.
Page 21
20
Operations
Add doorbell in iCrebell account
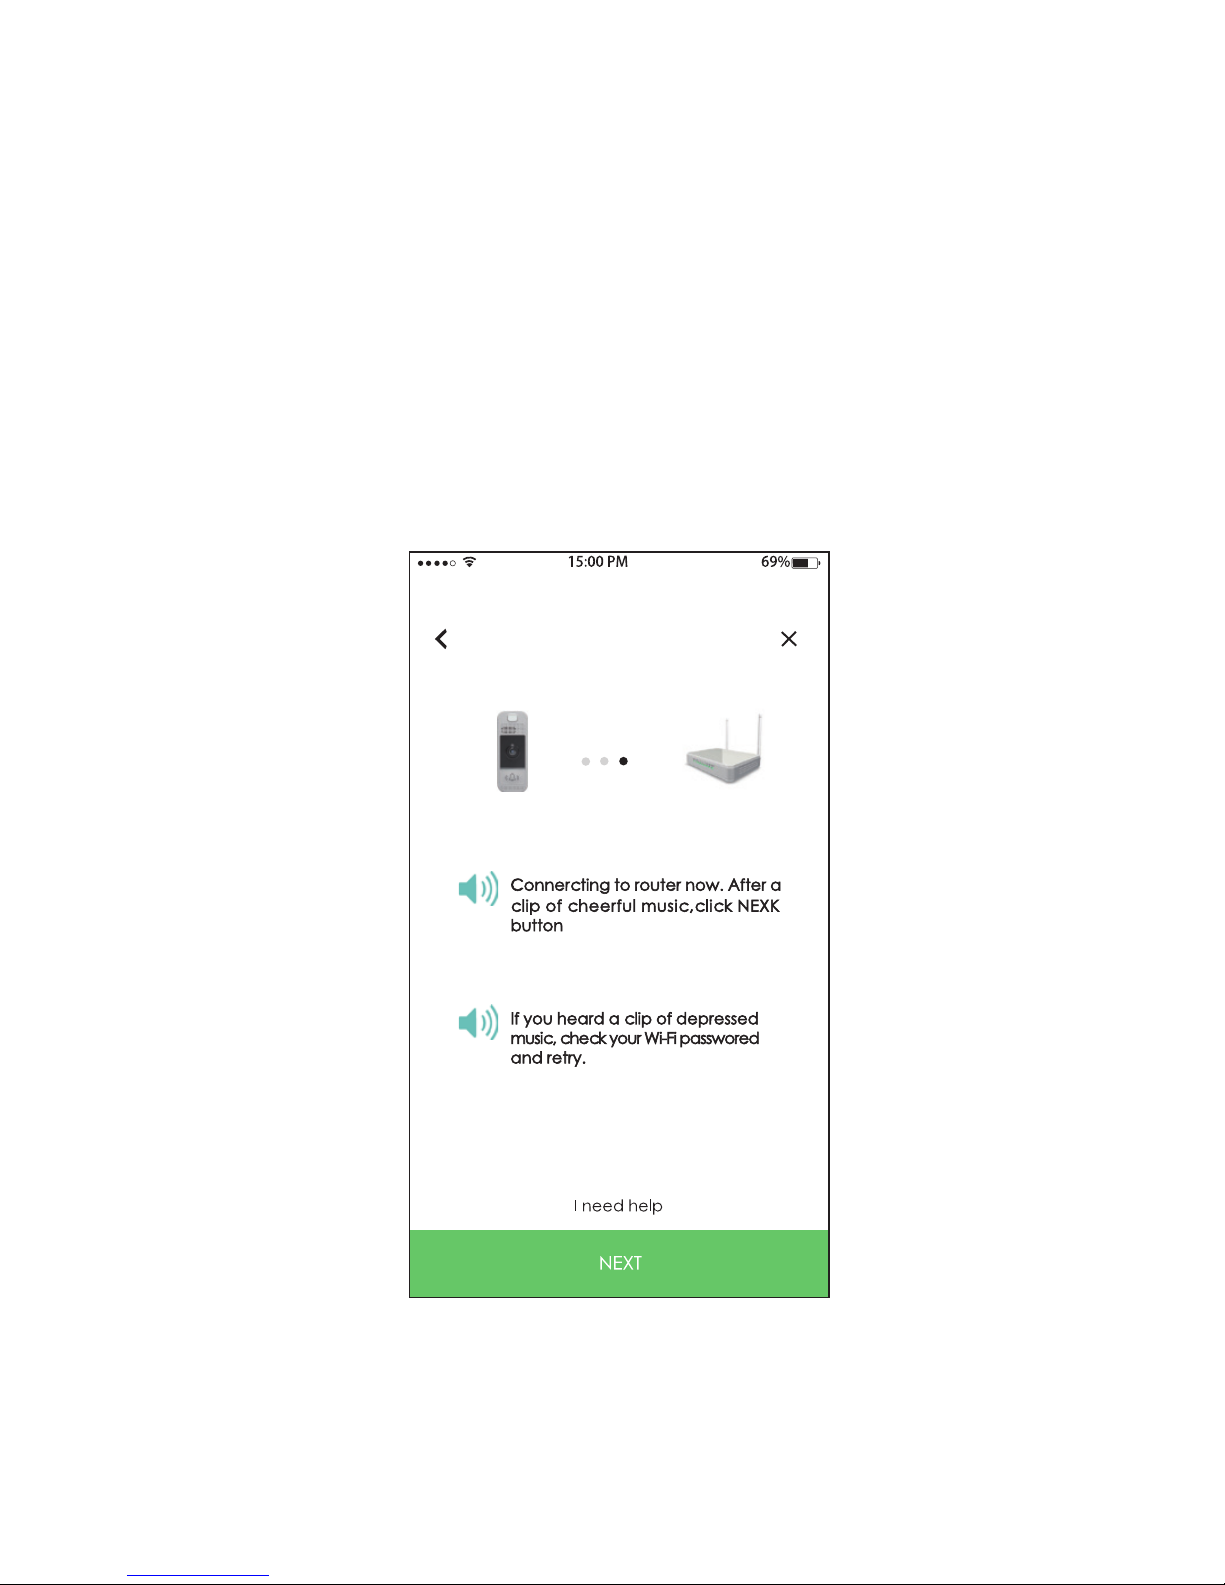
7. Establish the connection
Once you scan the QR code and establish the
Wi-Fi connection. Please wait for the blue light
indicator to ash slowly after you hear a cheerful
music, then press NEXT.
Note: Please reset the doorbell and scan the QR
code again if you can not see the blue light
indicator ash slowly.
Page 22
21
Operations
Add doorbell in iCrebell account
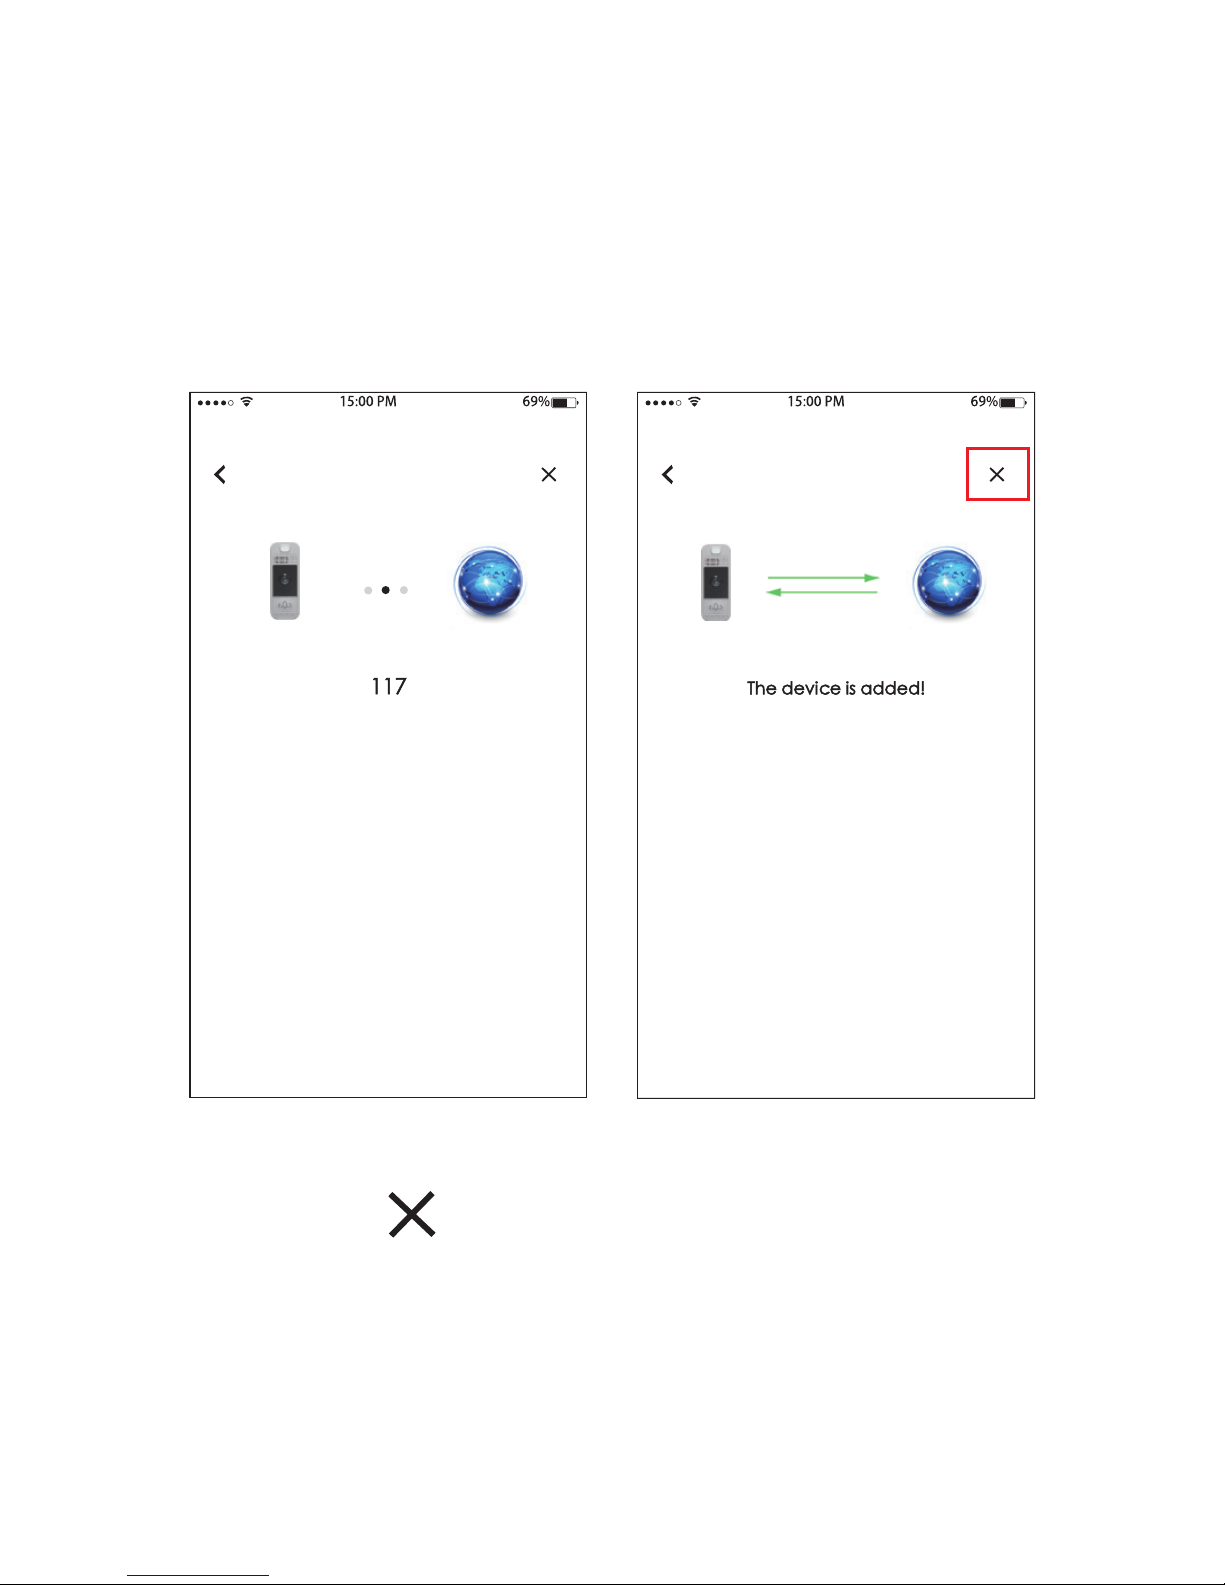
8. Wait for the iCreBell to connect with the network.
Note: When the Wi-Fi conguration is successful,
press to complete the connection.
Page 23
22
Operations
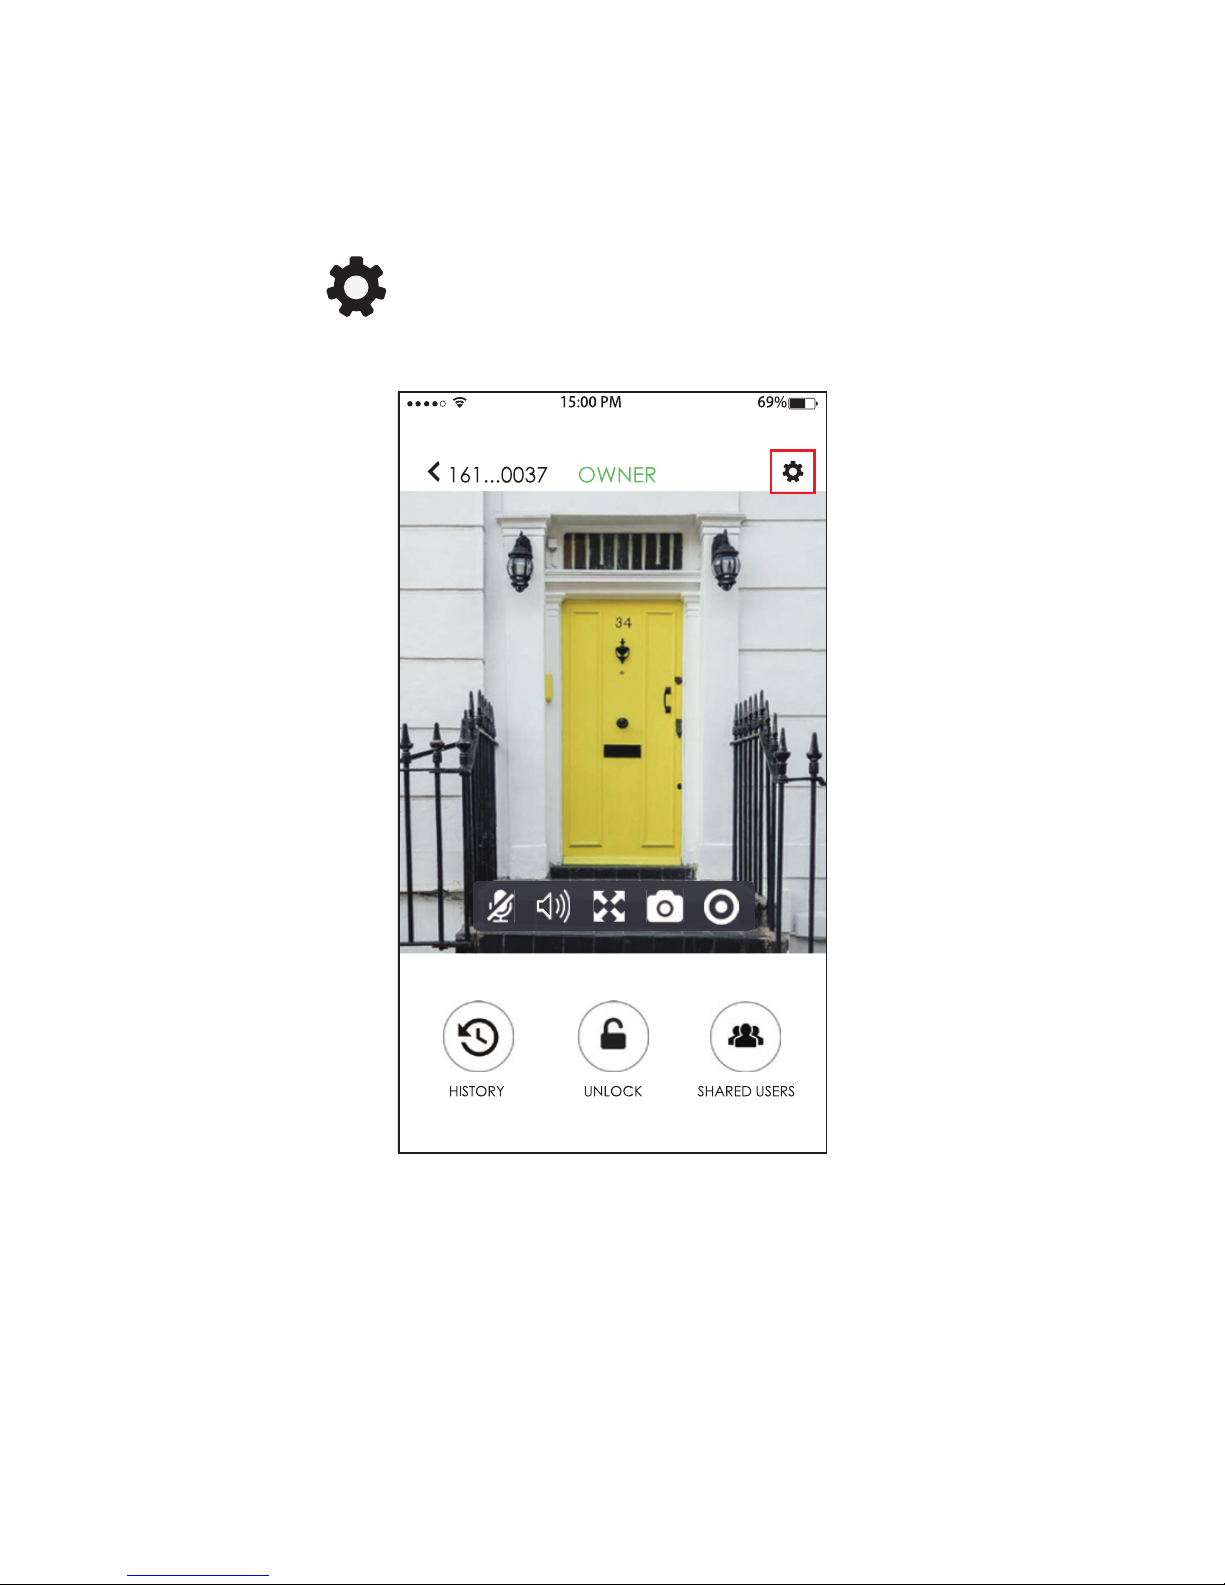
iCreBell APP Introduction - Setting
Press to enter the settings menu.
Page 24
23
Operations
iCreBell APP Introduction - Setting
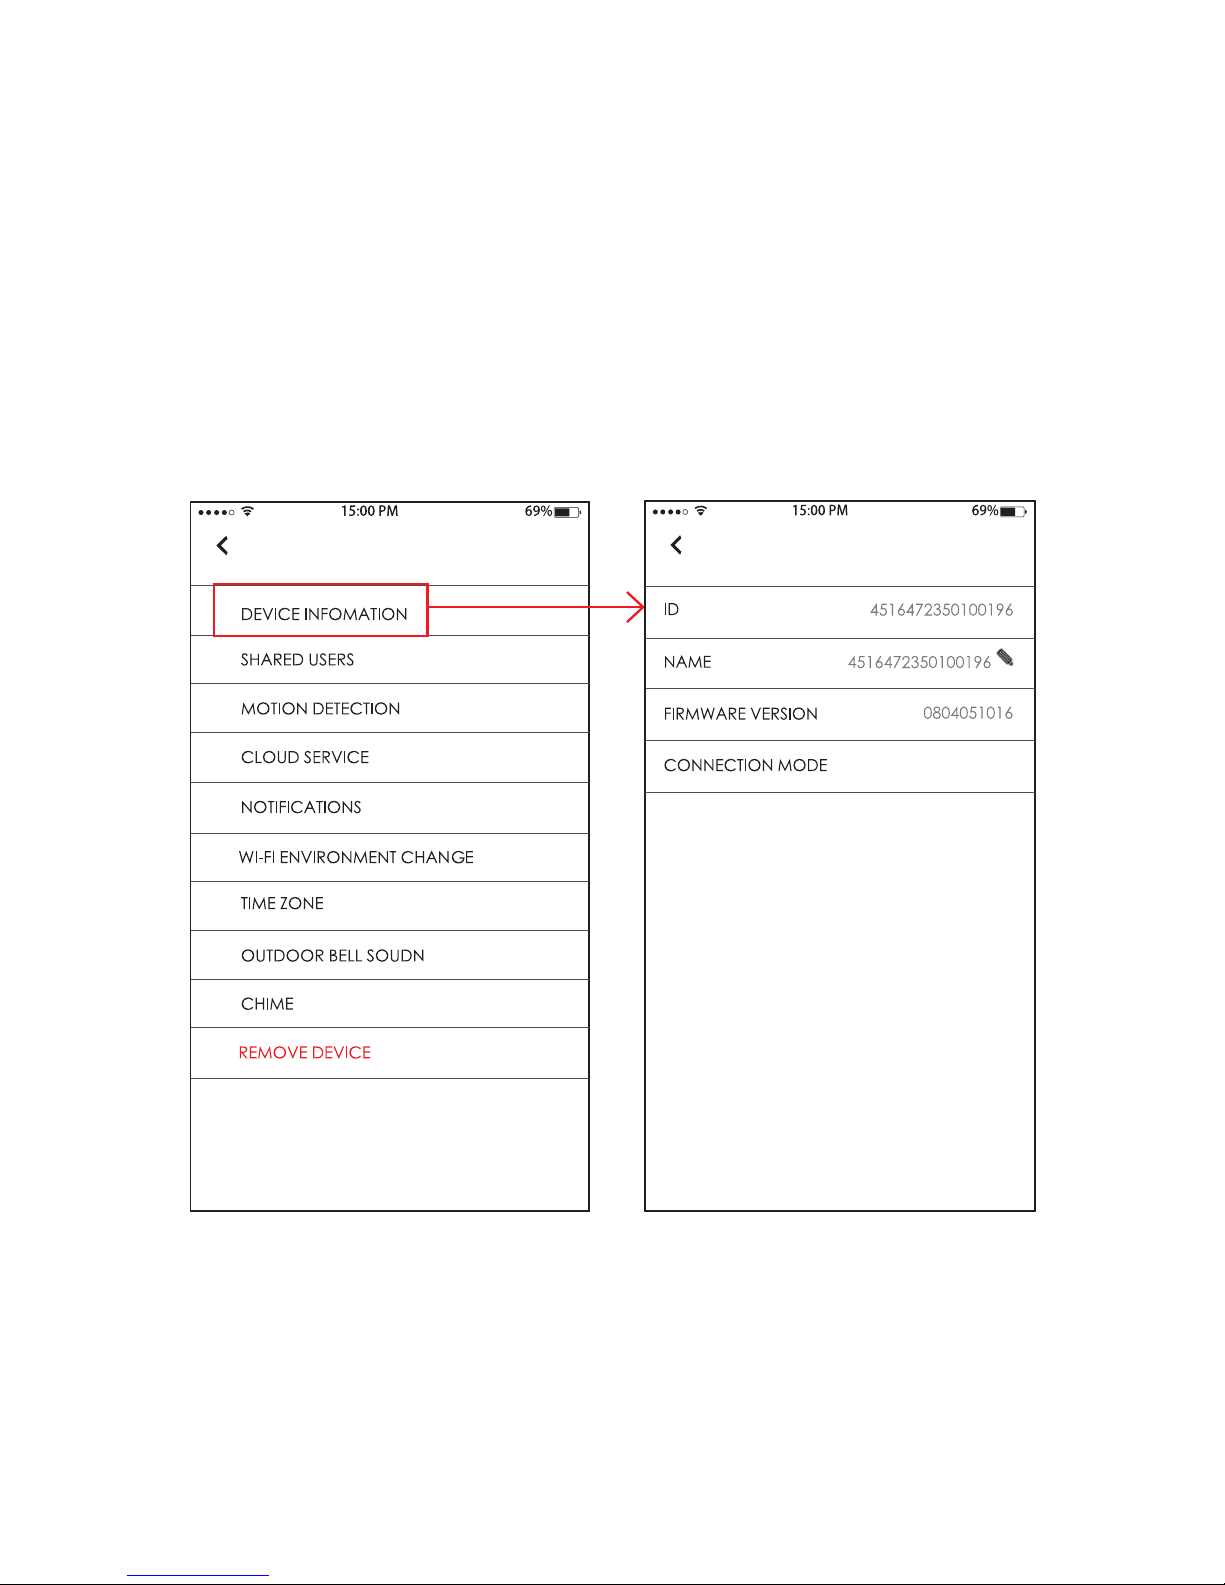
View and modification of your device
information
Press DEVICE INFORMATION.
Page 25
24
Operations
iCreBell APP Introduction - Setting
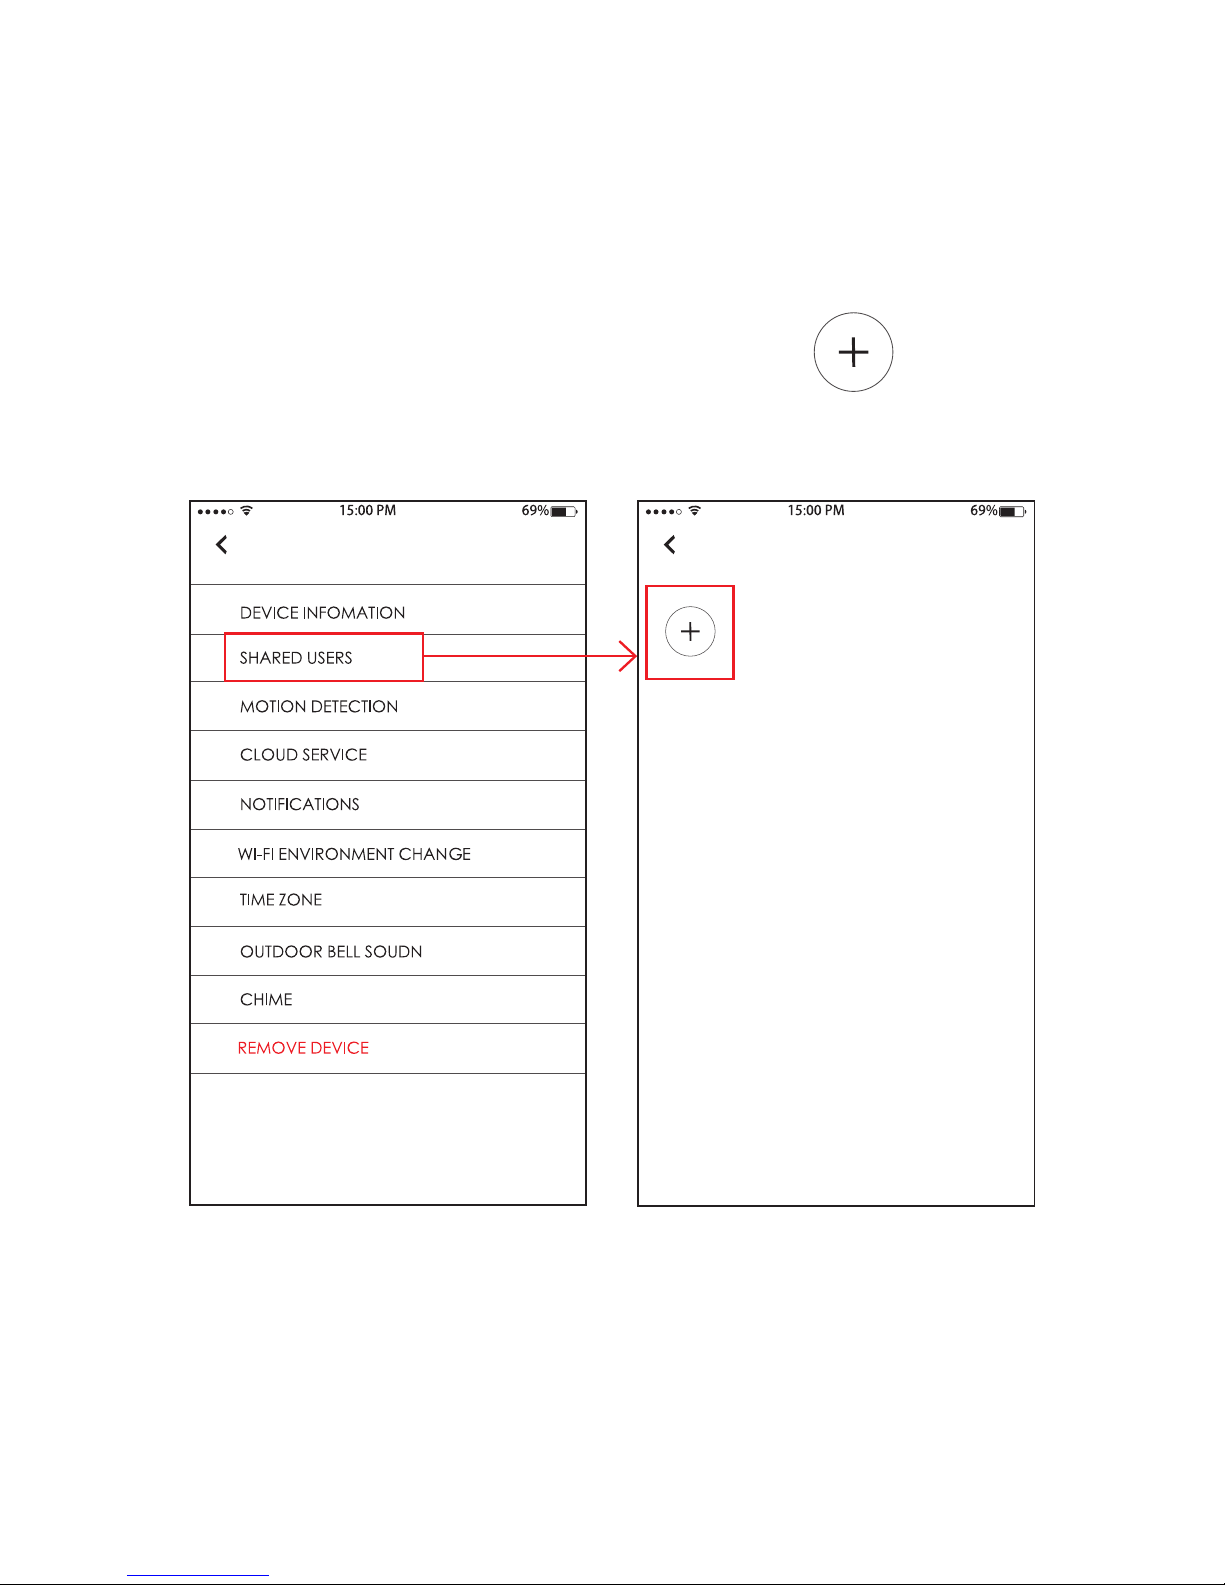
Managment of shared users
1. Press
SHARED USERS.
2. Press to add
new users
Page 26
25
Operations
iCreBell APP Introduction - Setting
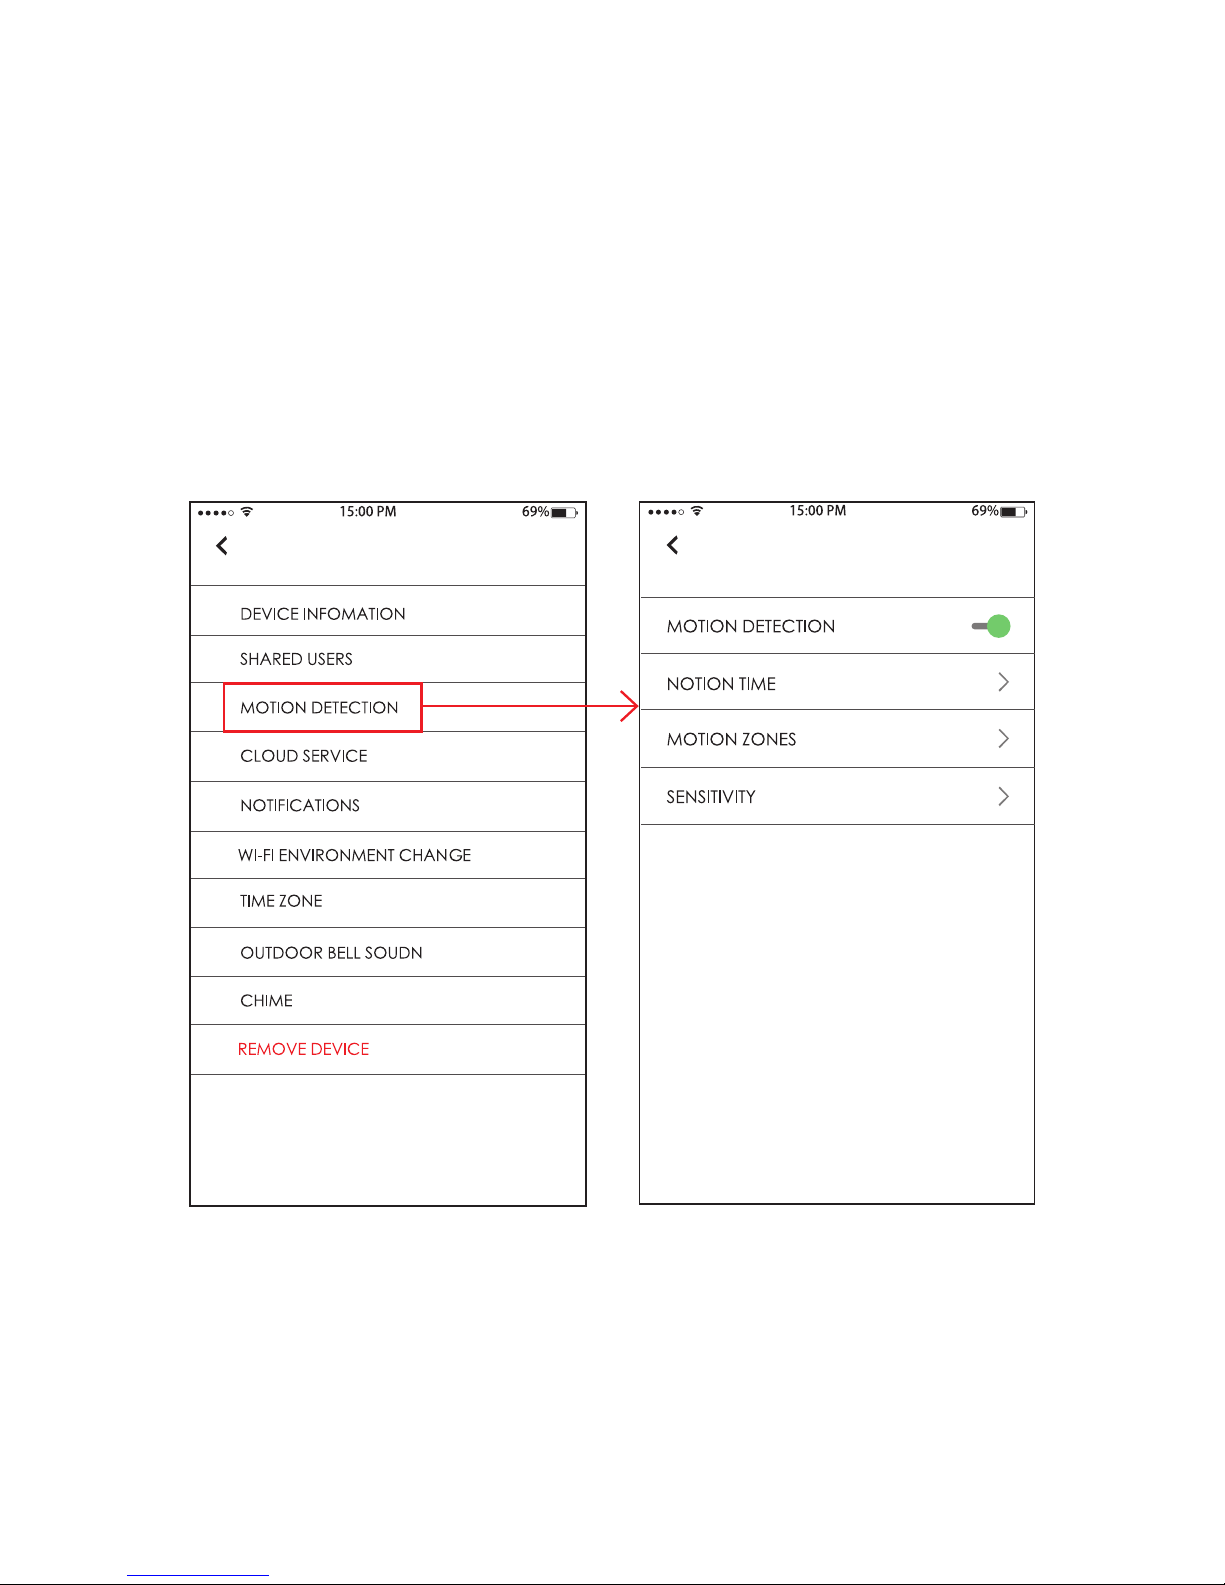
Adjustment of detection parameters
1. Press
MOTION DETECTION
2. Adjust paremeters
as needed.
Page 27
26
Operations
iCreBell APP Introduction - Setting
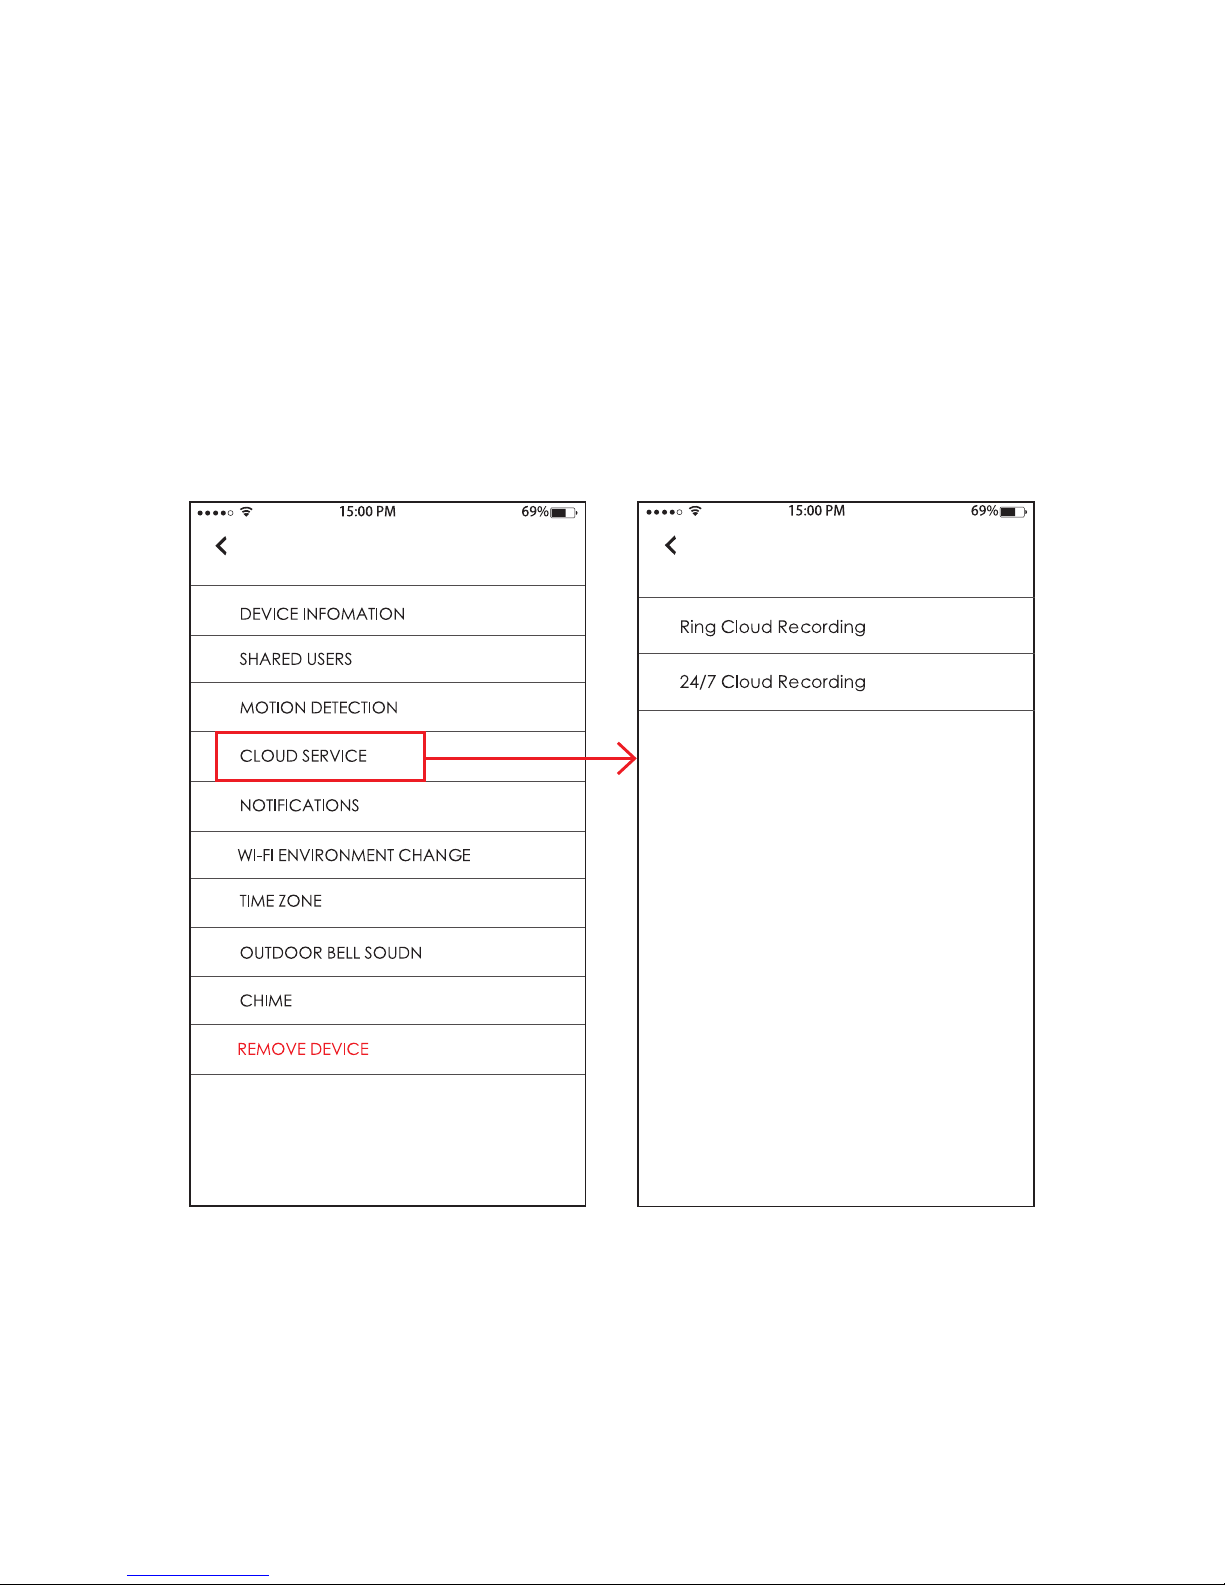
View the cloud service recording
1. Press
CLOUD SERVICE.
2. Select the recording
mode and conrm.
Page 28
27
Operations
iCreBell APP Introduction - Setting
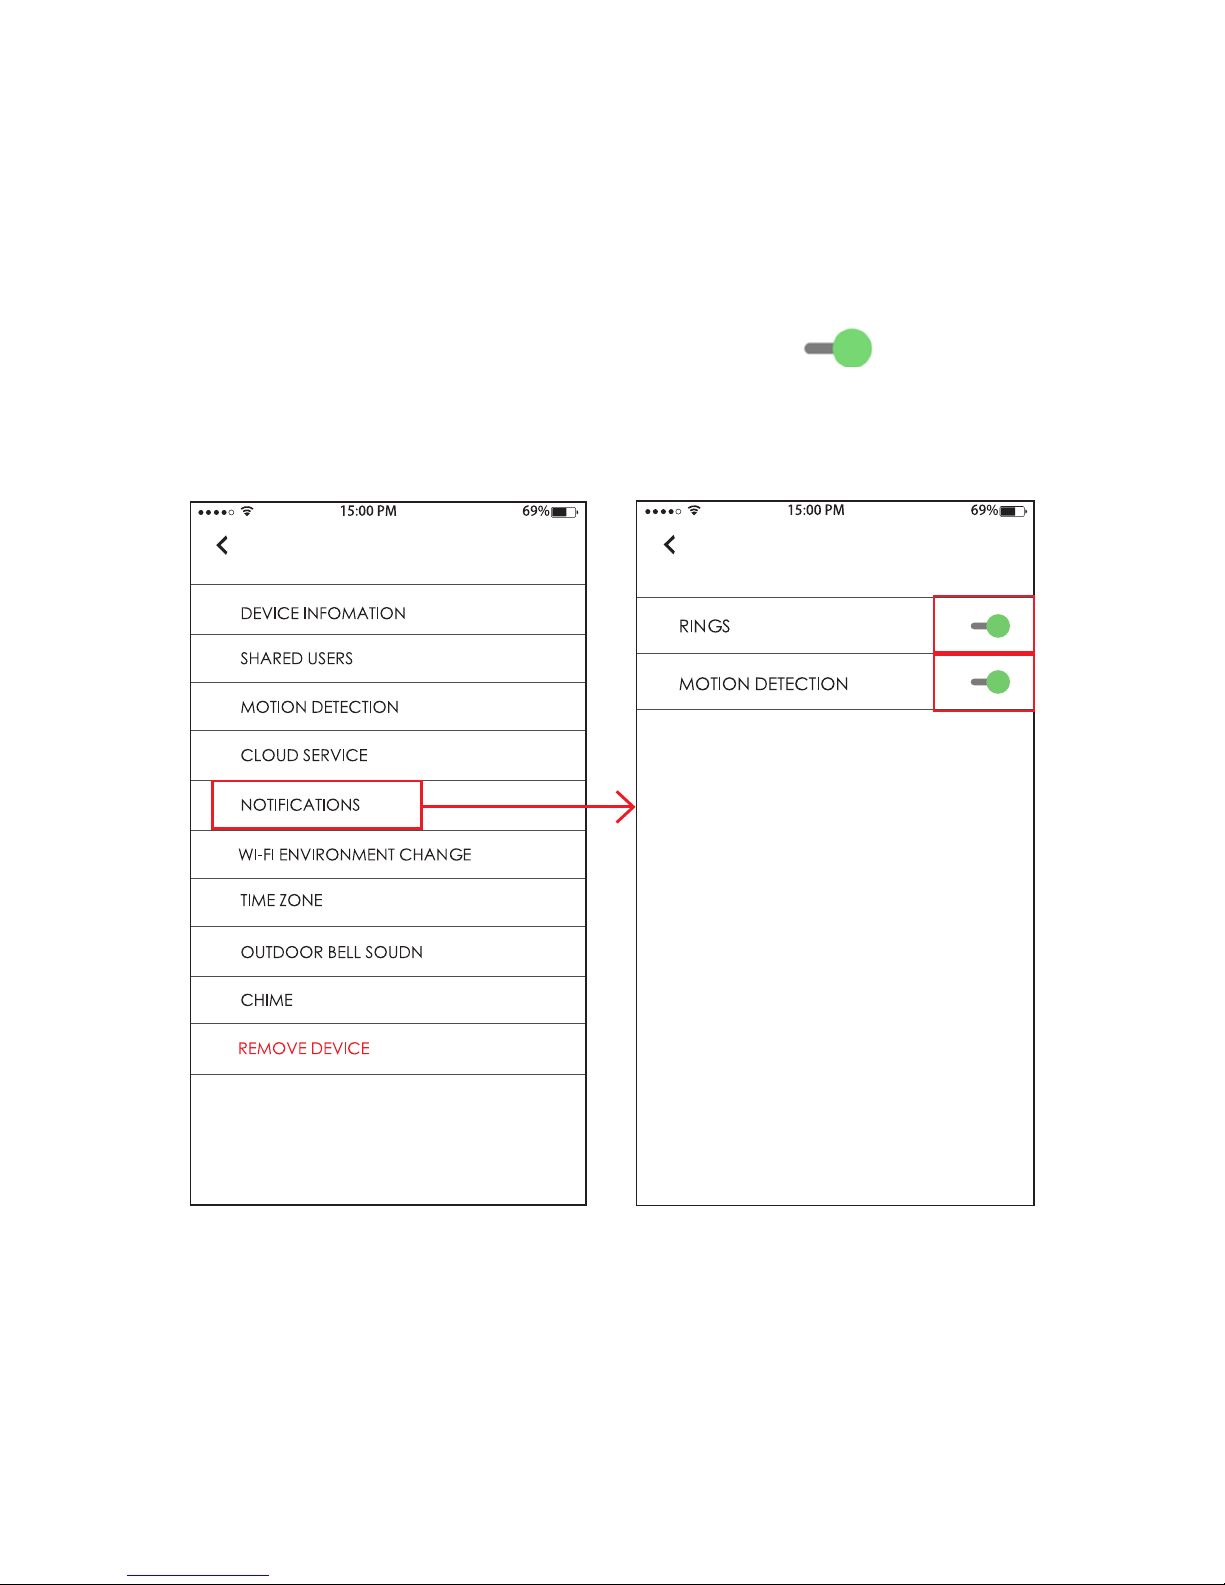
Notification Toggle
1. Press
NOTIFAICATIONS.
2. Press to toggle
the options between
ON and OFF.
Page 29
28
Operations
iCreBell APP Introduction - Setting
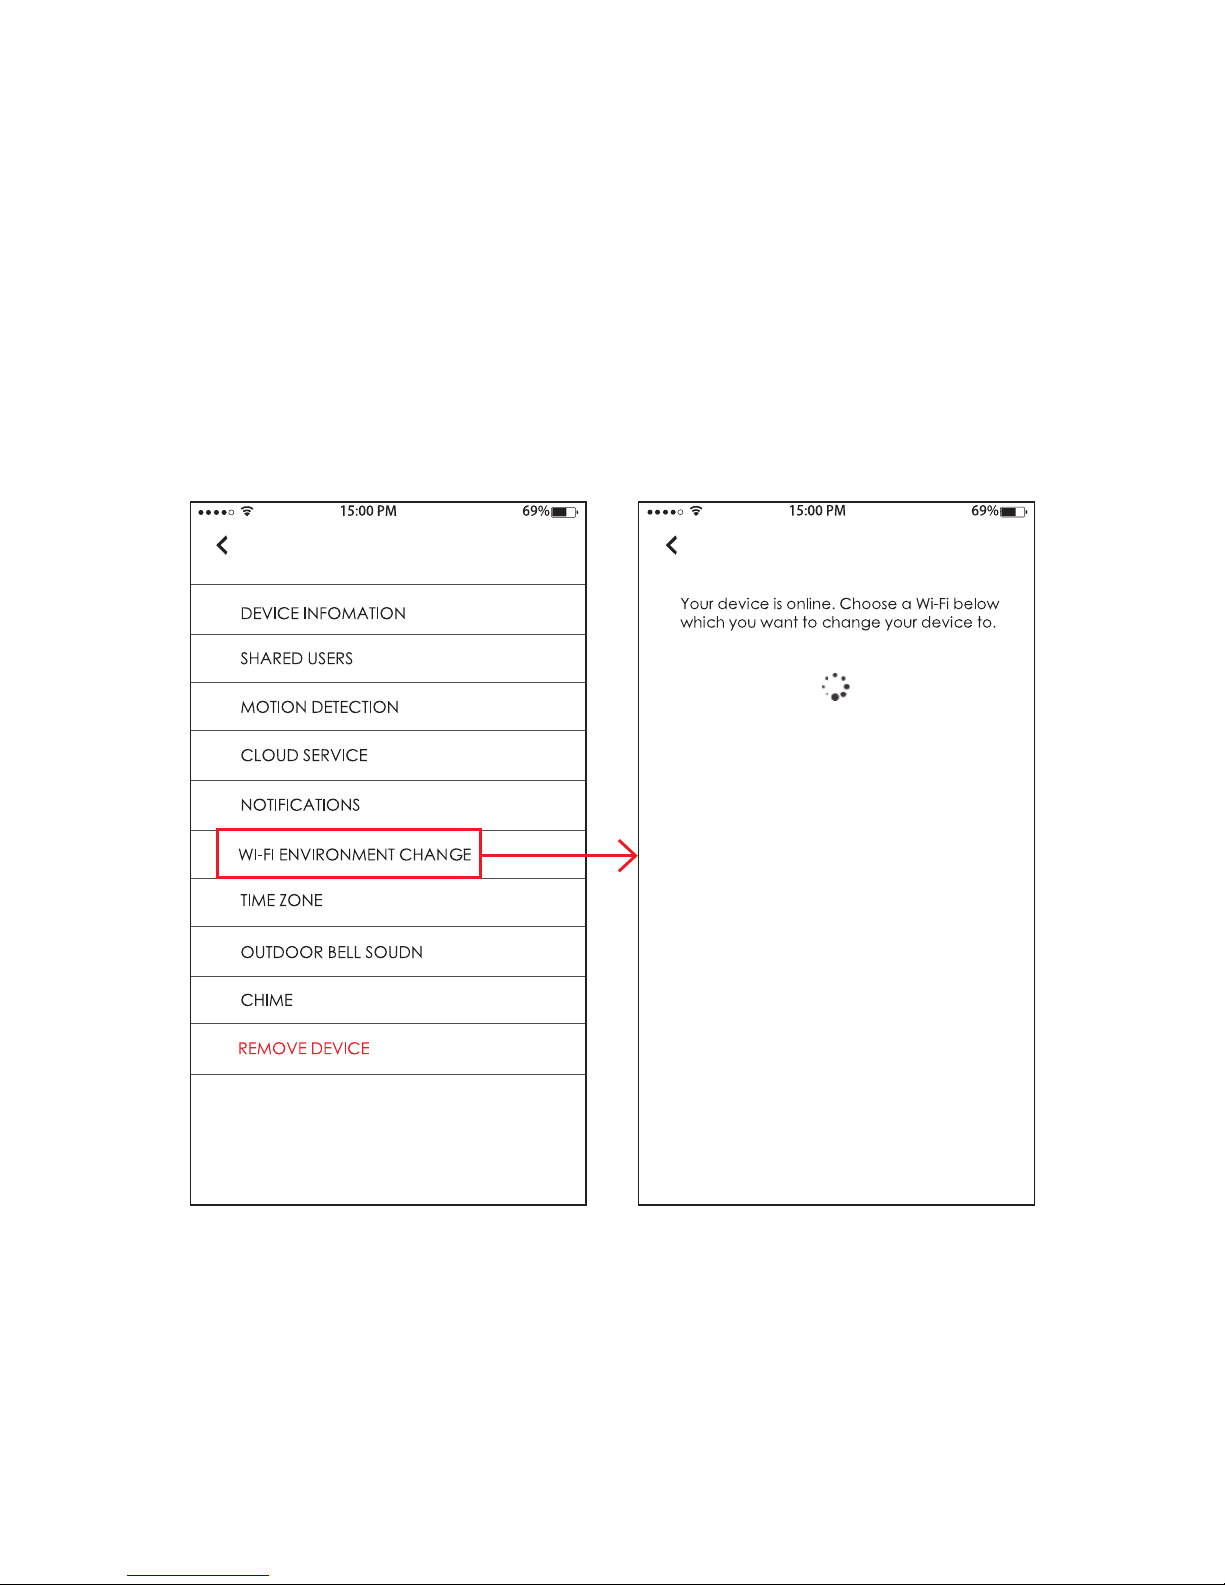
Wi-Fi environment change
1. Press
Wi-Fi ENVIRONMENT
CHANGE.
2. Select Wi-fi network
you want to edit.
Page 30
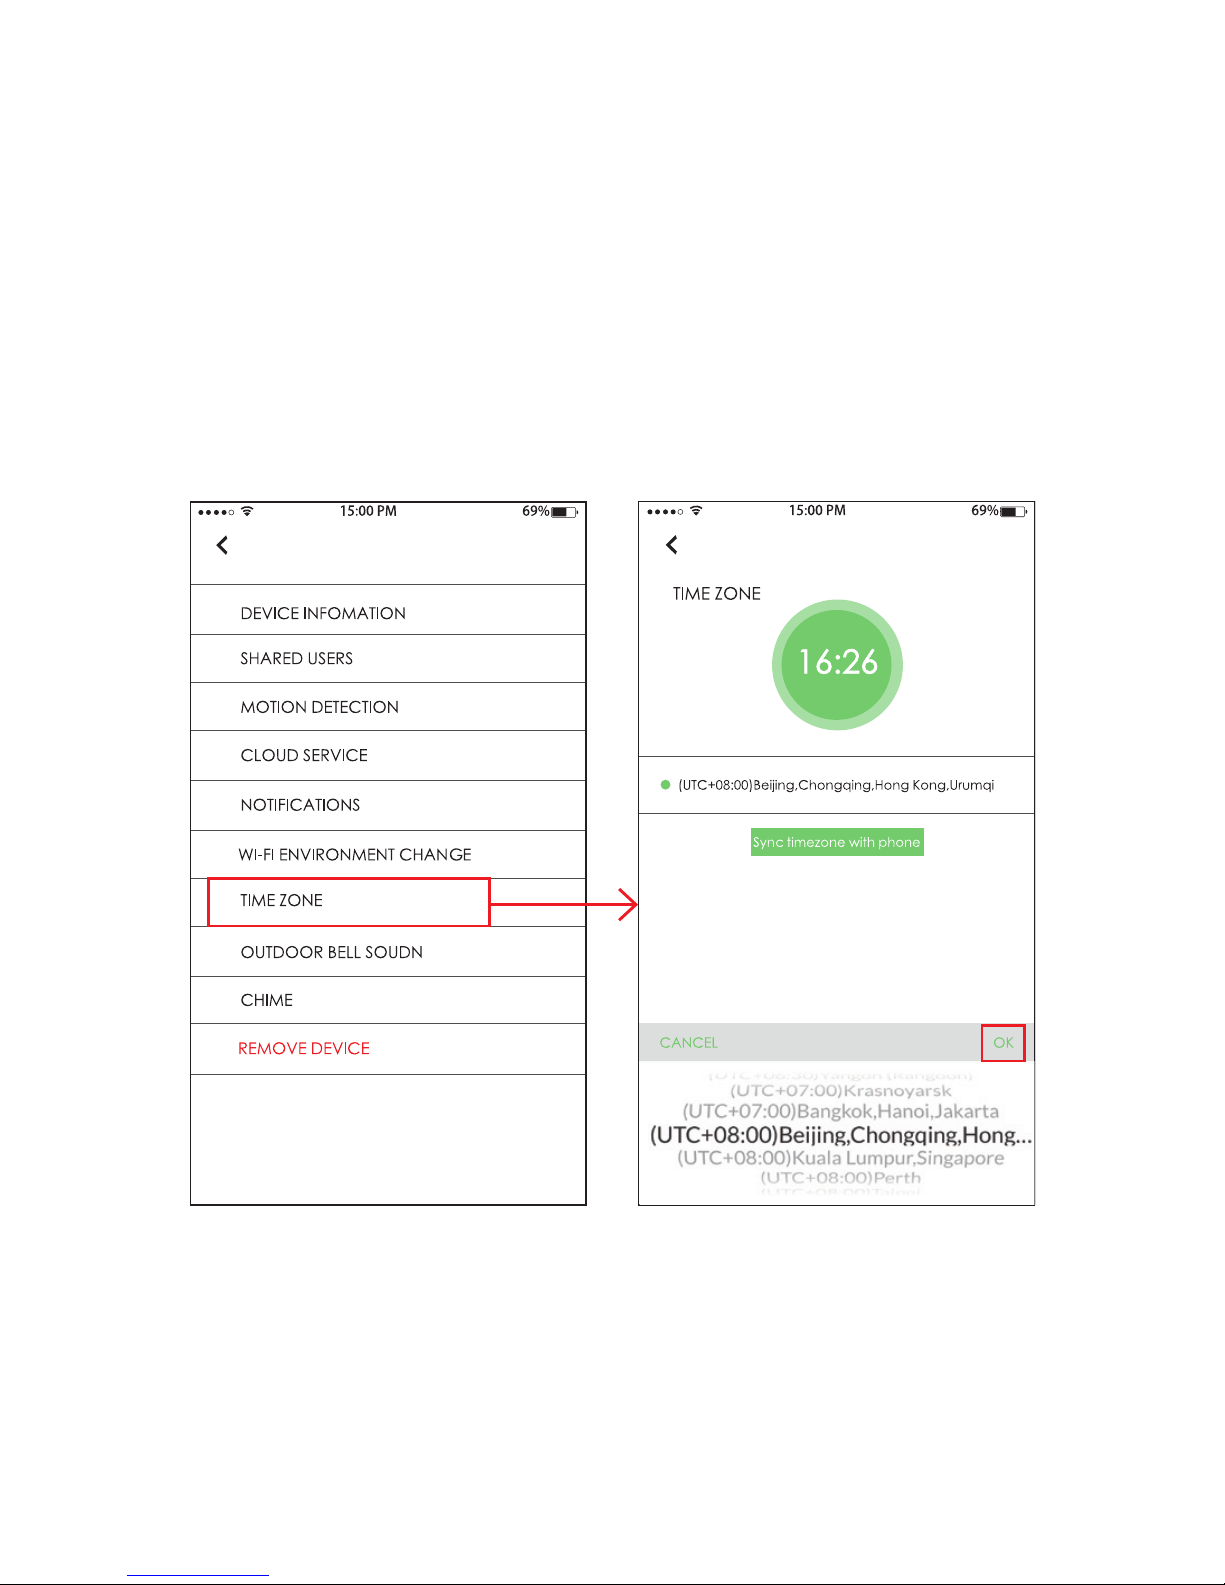
29
Operations
iCreBell APP Introduction - Setting
Time zone setting
1. Press
TIME ZONE.
2. Select time zone
in the scroll area and
press OK to conrm.
Page 31
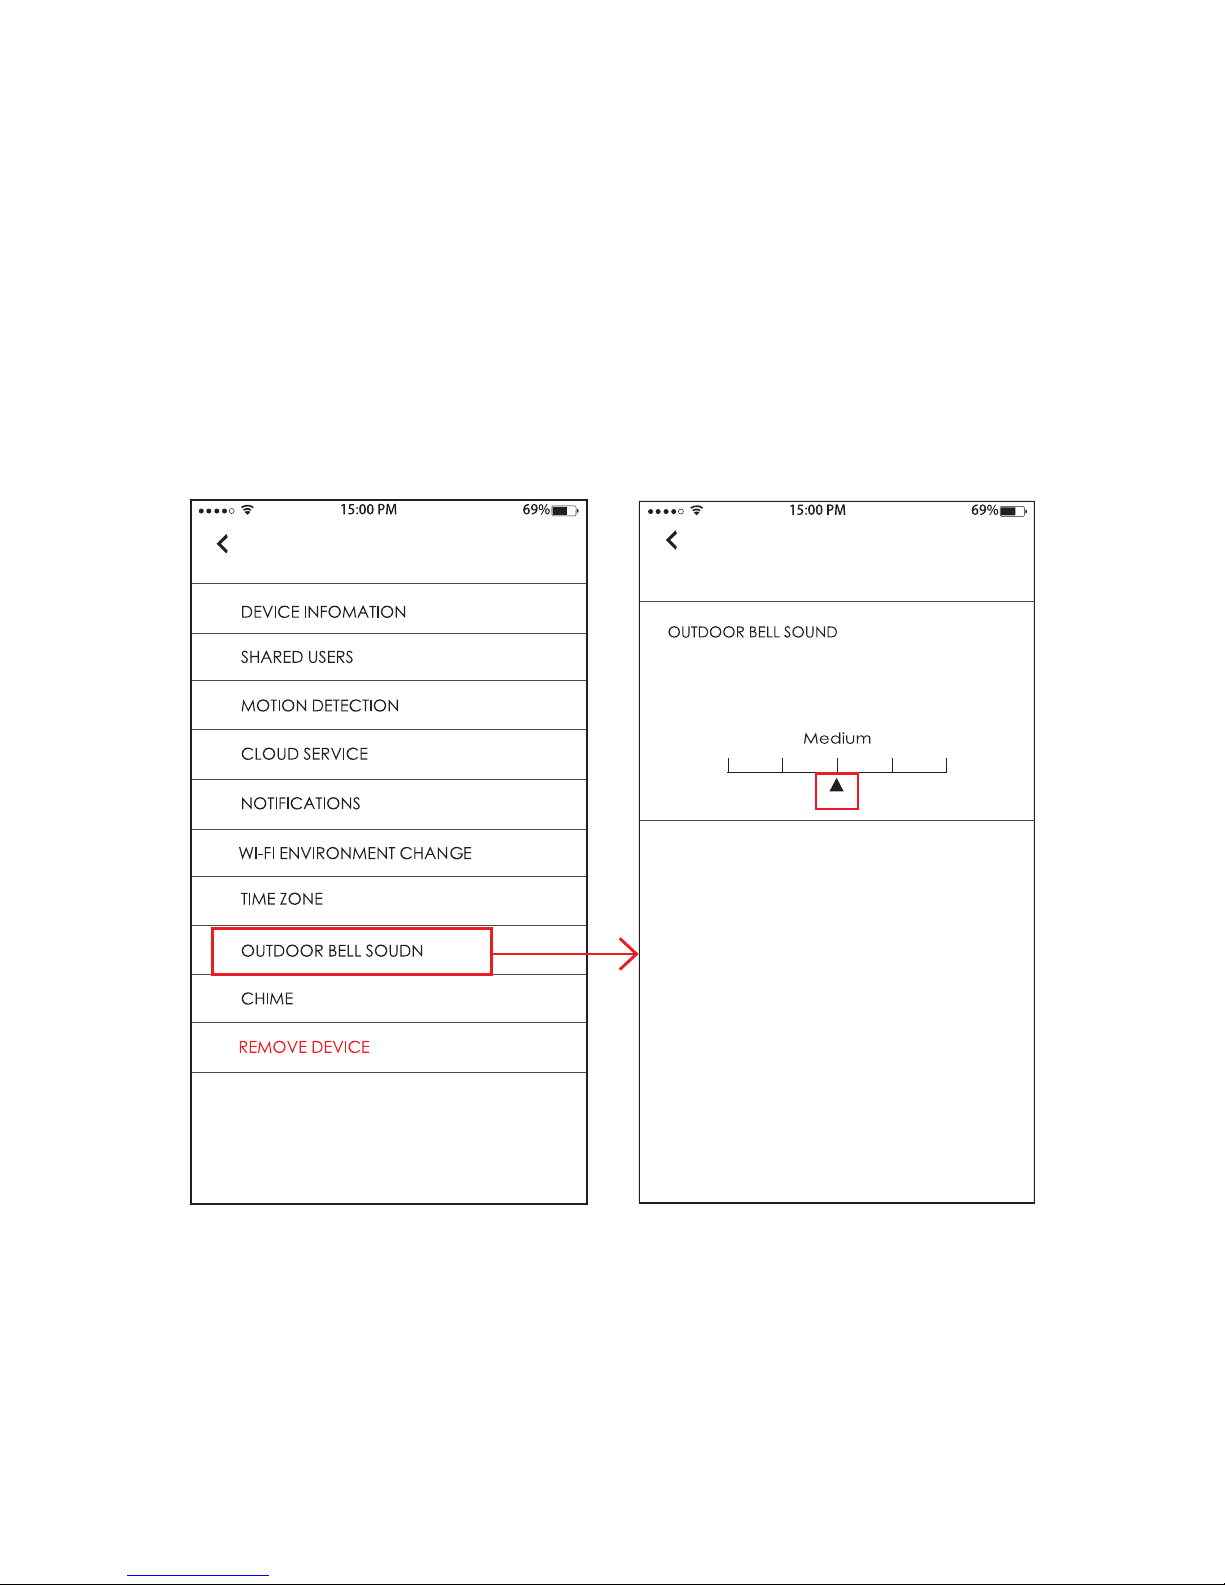
30
Operations
iCreBell APP Introduction - Setting
Adjust the volume of outdoor bell
1. Press
OUTDOOR BELL
SOUND.
2. Move ▲ to adjust
the volume.
Page 32
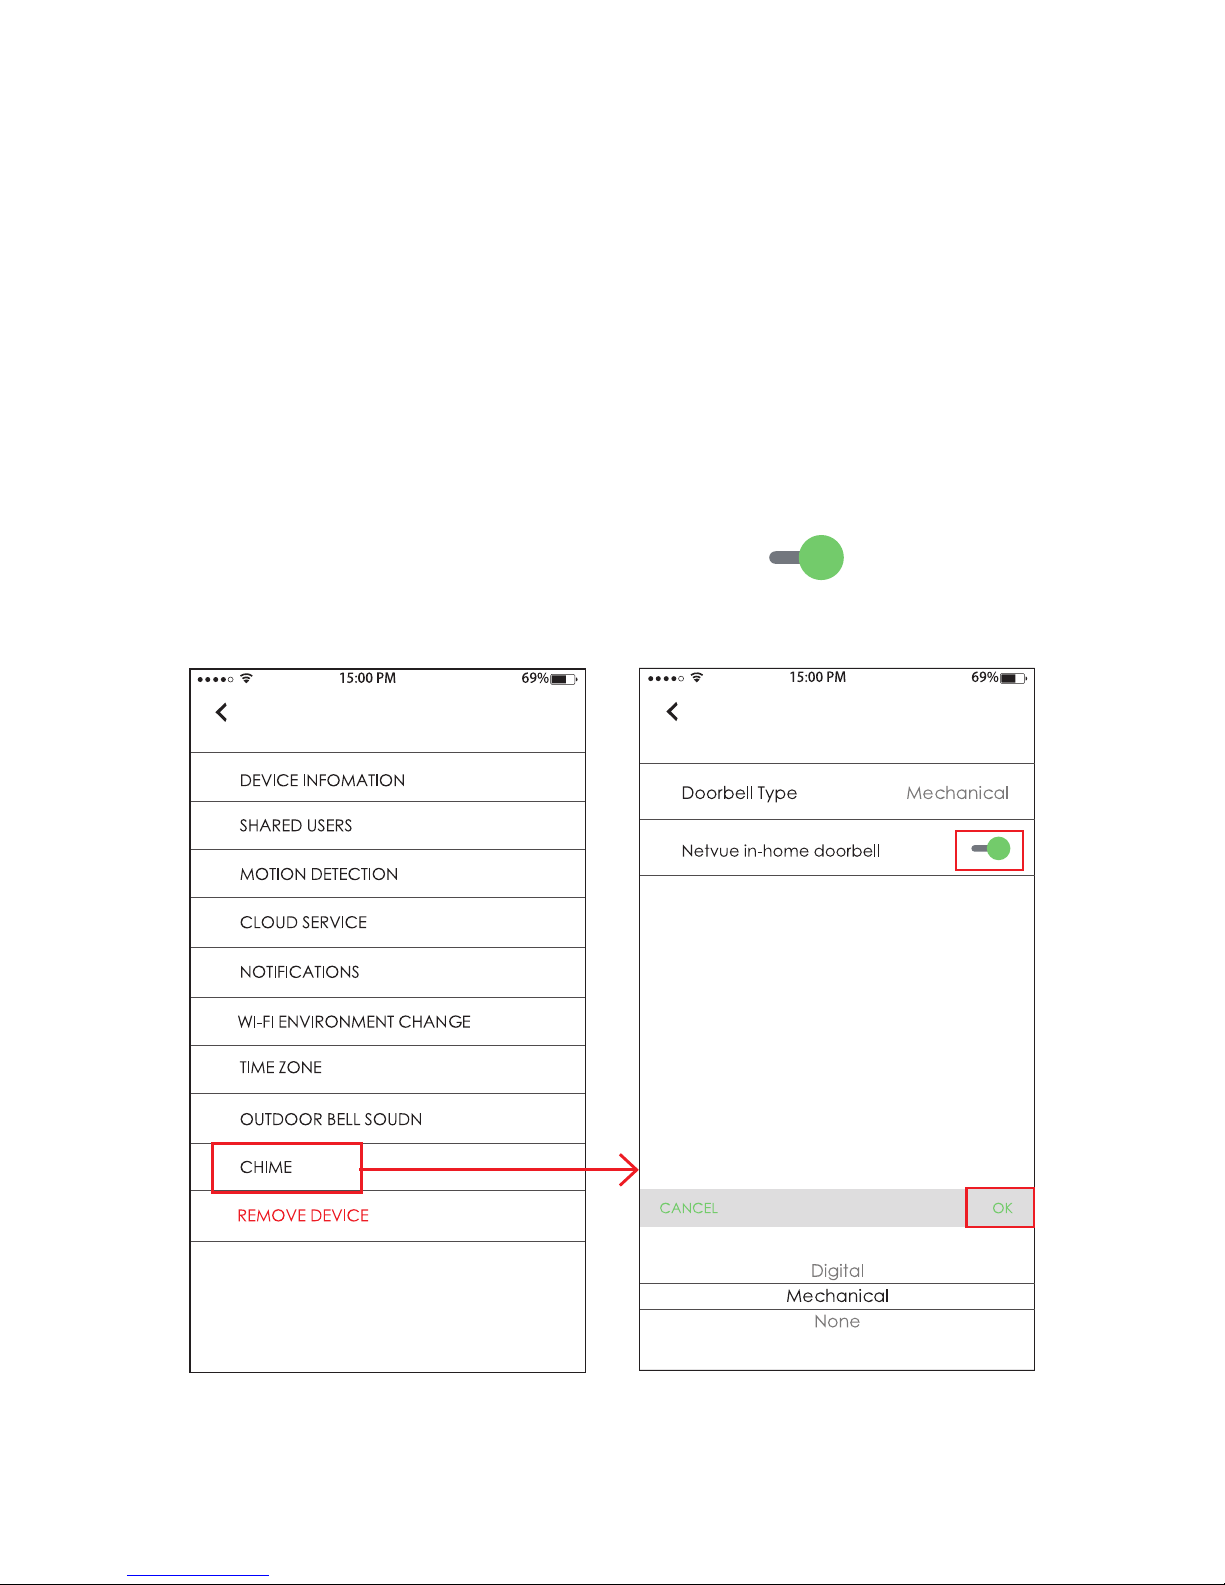
31
Operations
iCreBell APP Introduction - Setting
Set indoor chime
1. Press CHIME. 2. Select the Doorbell
type in the scroll area
and press OK t o
conrm.
Press to toggle
between ON and OFF.
Page 33
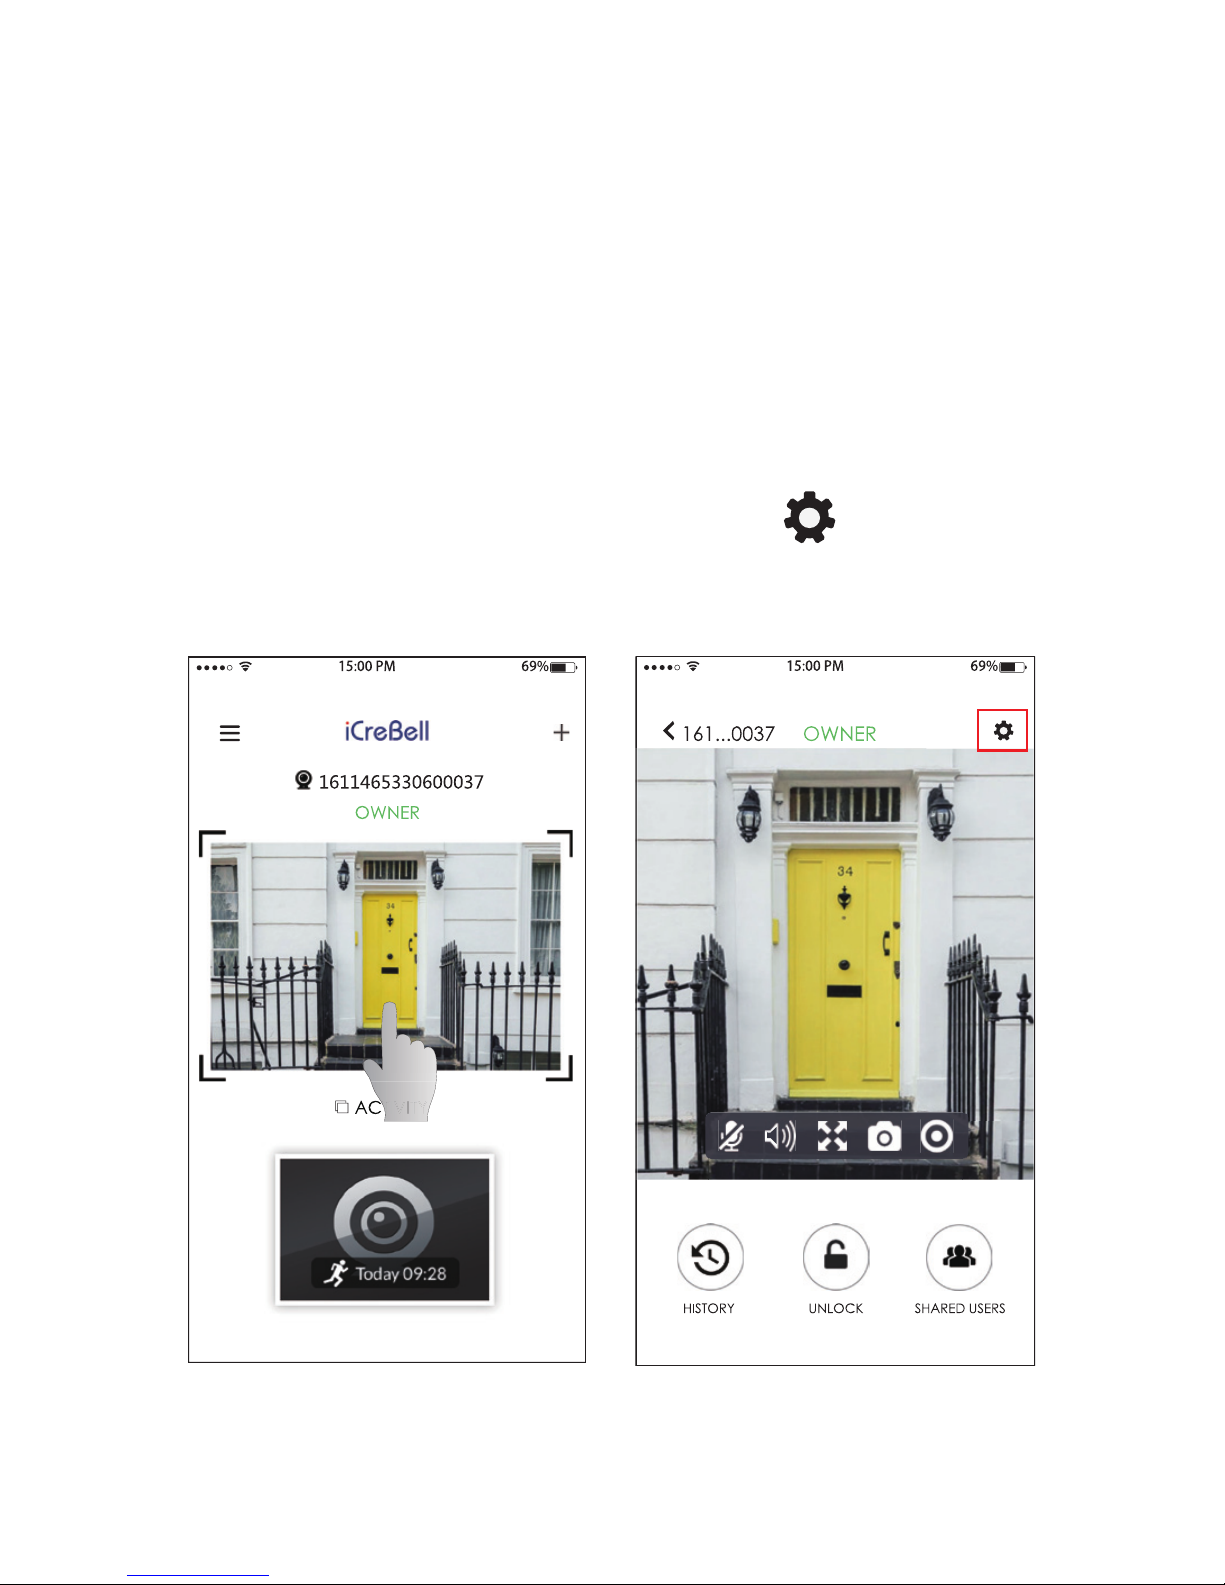
32
Operations
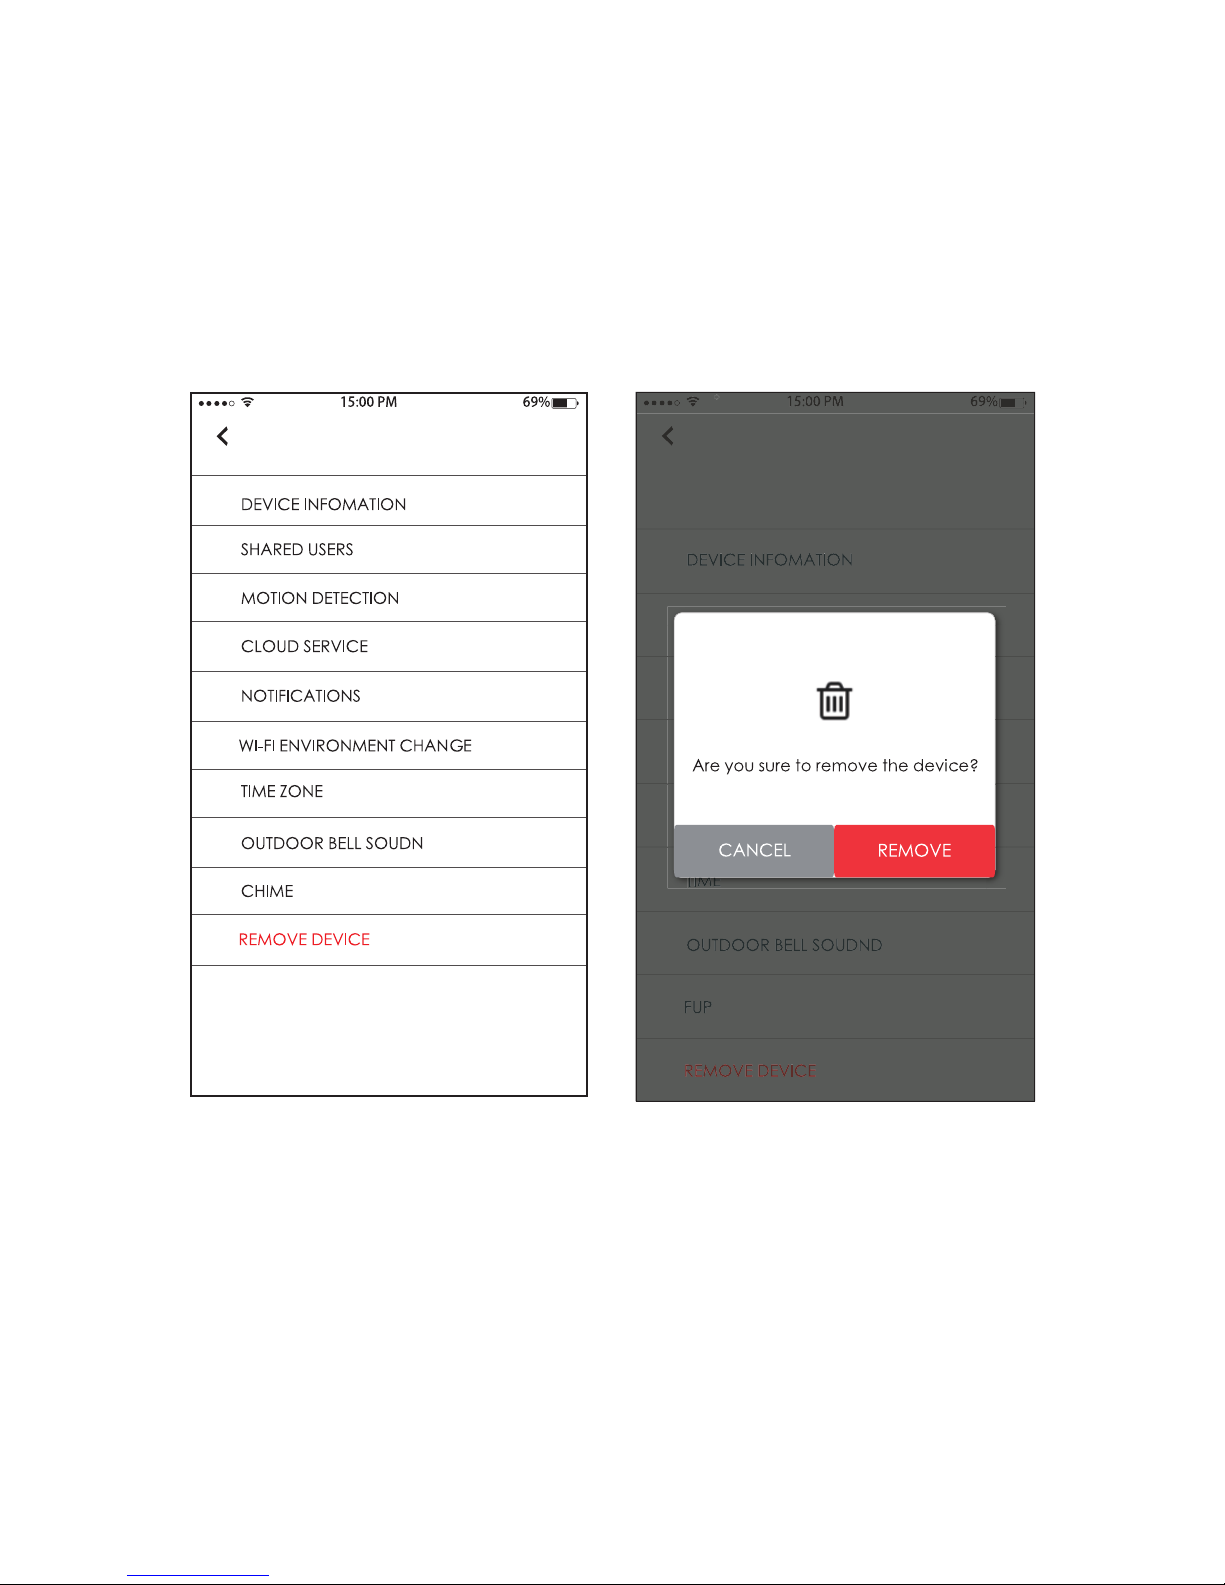
Delete doorbell in iCrebell account
NOTE:
To protect your privacy, please ensure to delete
your doorbell device from APP if you must remove
the doorbell or change phones.
1. Select the doorbell
which you want to
delete.
2. Press
Page 34
33
Operations
Delete doorbell in iCrebell account
3. Press
REMOVE DEVICE.
4. Press REMOVE to
conrm.
Page 35
34
Operations
iCreBell APP Introduction
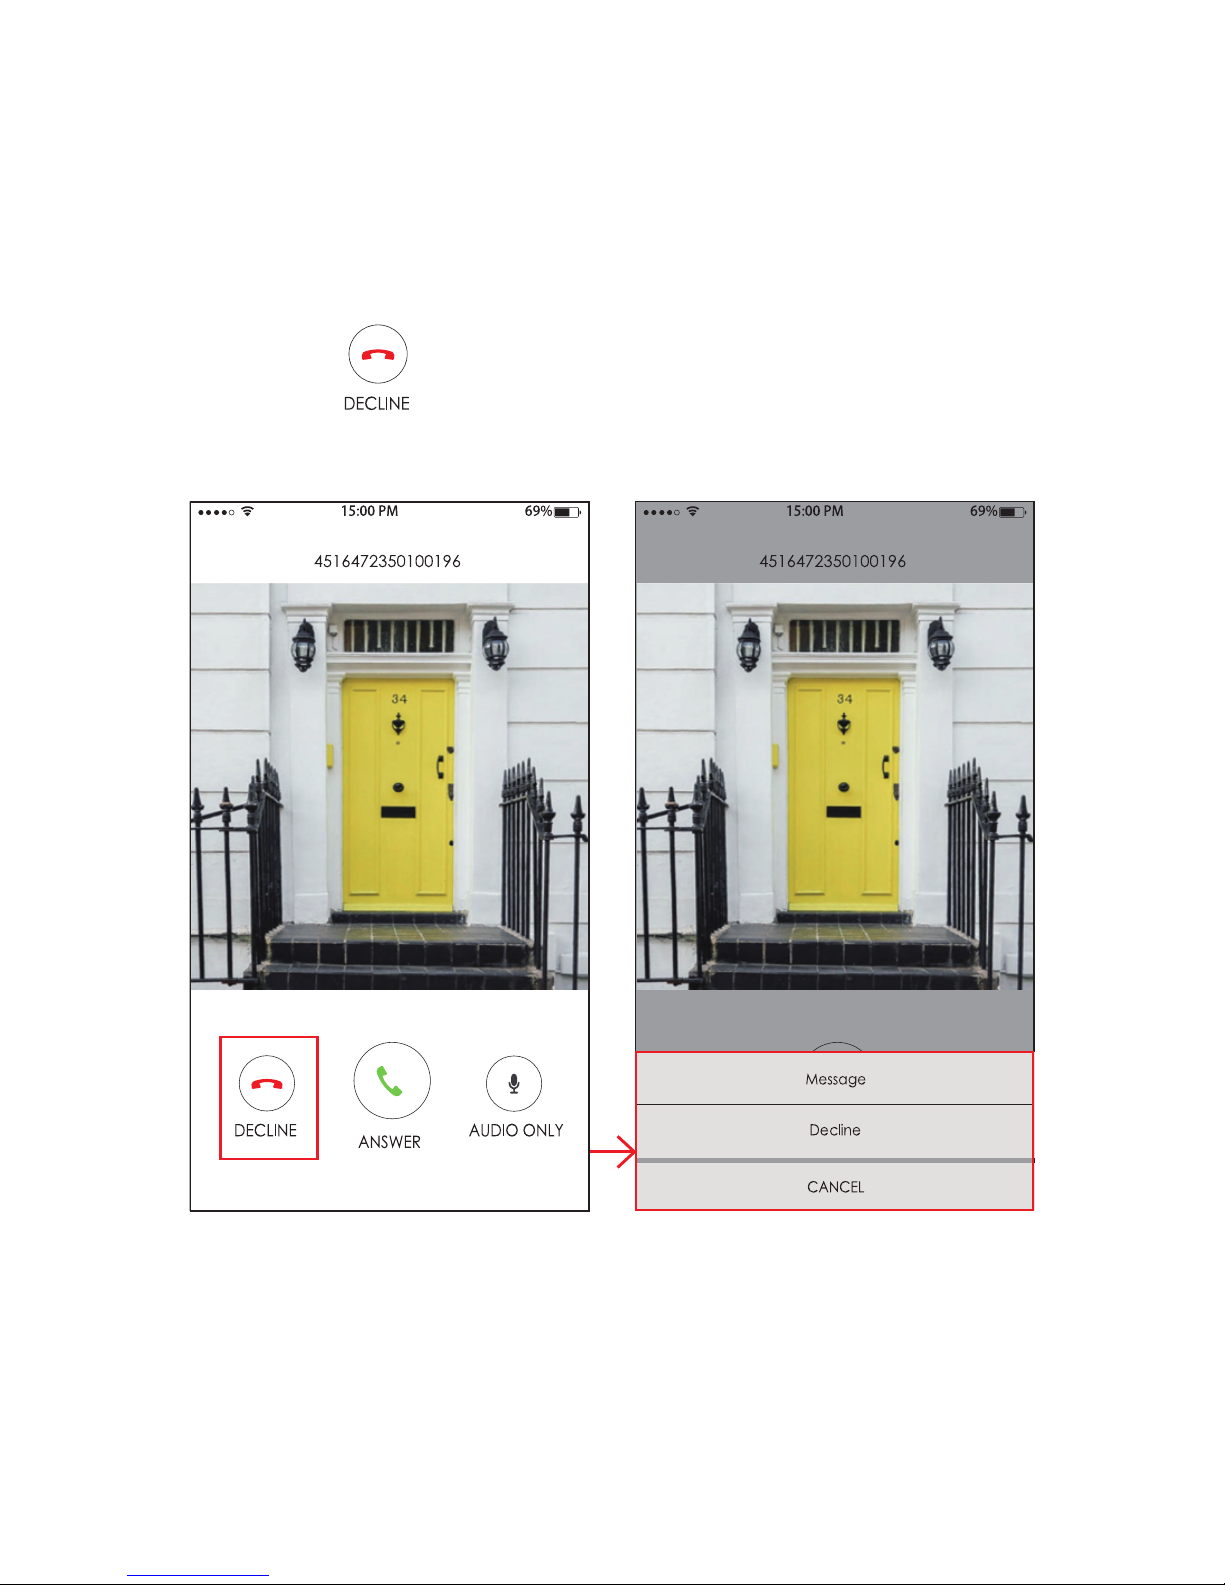
Decline a call
1. Press
2. Select the reject
mode.
Page 36
35
Operations
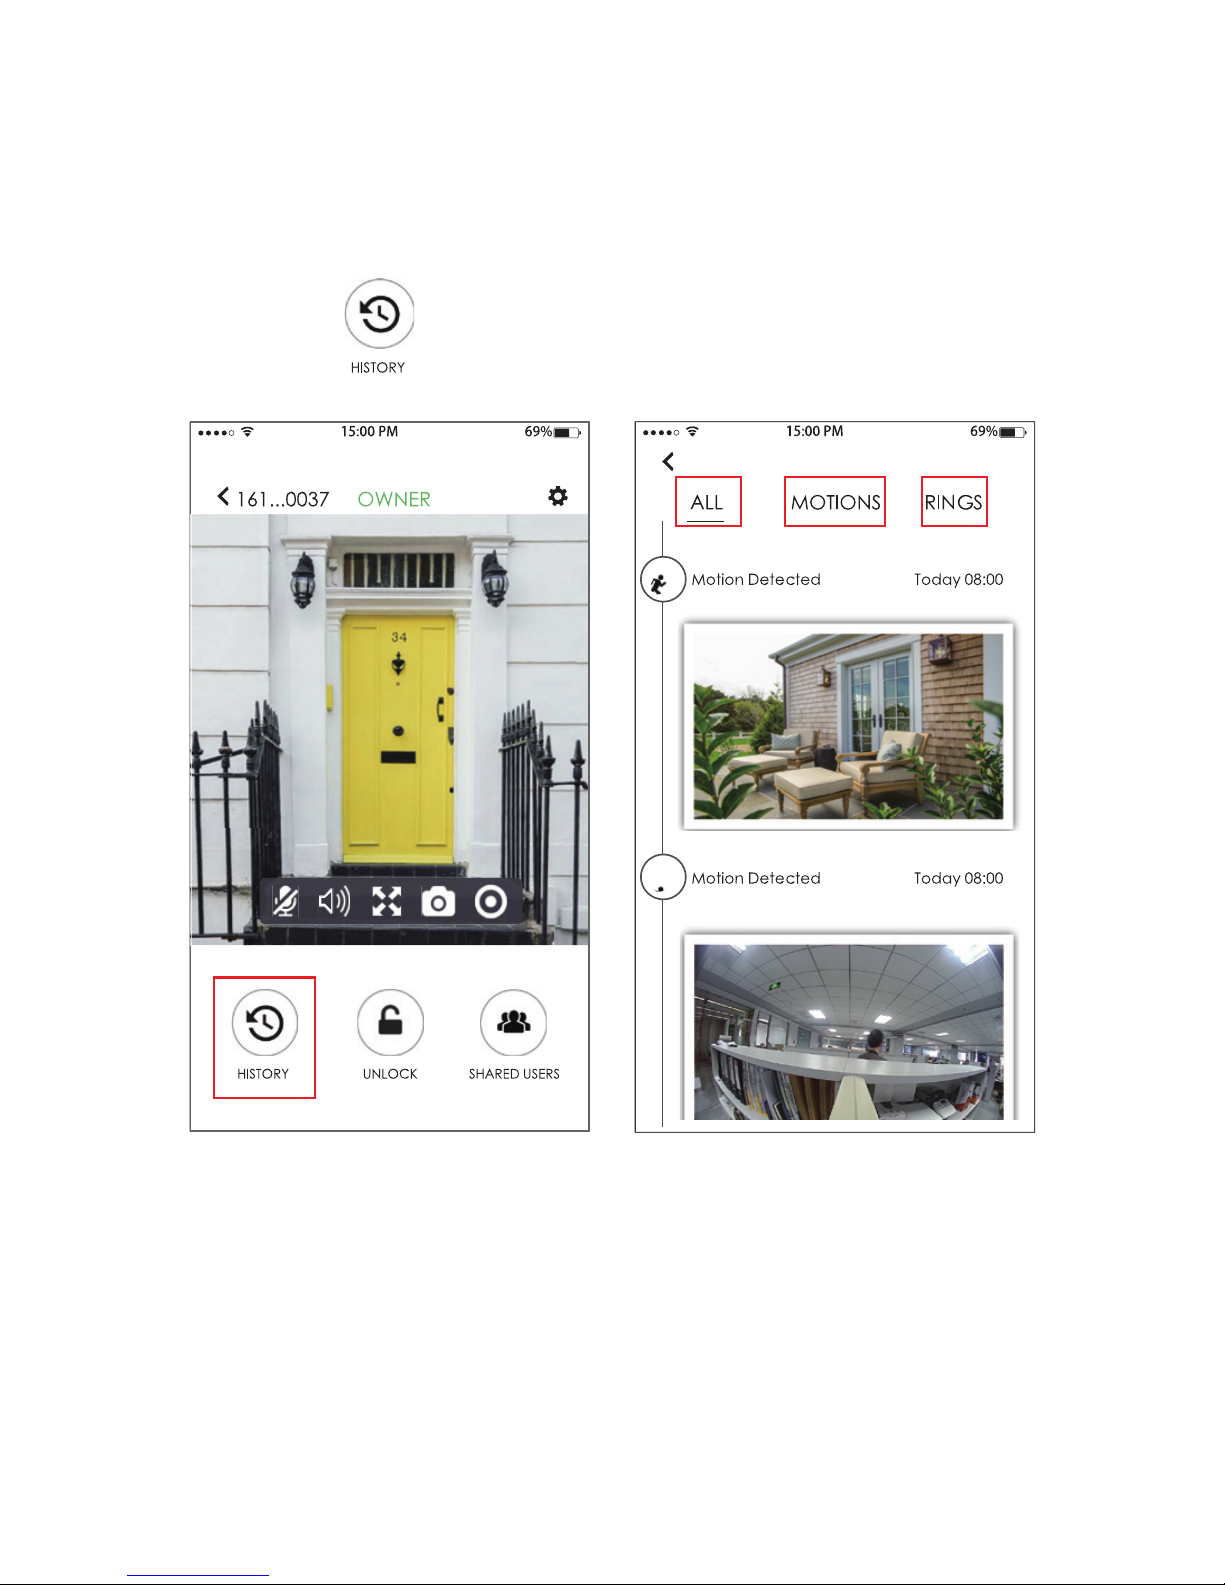
iCreBell APP Introduction - History
1. Press
2. Press ALL, MOTIONS
or RINGS to view history.
Page 37

36
FCC and IC Regulations
FCC Information For Users
This device complies with part 15 of the FCC
Rules. Operation is subject to the following two
conditions: (1) this device may not cause harmful
interference, and (2) this device must accept any
interference received, including interference that
may cause undesired operation.
Any changes or modifications not expressly
approved by the party responsible for compliance
could void the user's authority to operate the
equipment.
NOTE: This equipment has been tested and found
to comply with the limits for a Class B digital
device, pursuant to Part 15 of the FCC Rules.
These limits are designed to provide reasonable
protection against harmful interference in a
residential installation. This equipment generates,
uses and can radiate radio frequency energy
and, if not installed and used in accordance with
the instructions, may cause harmful interference
to radio communications. However, there is no
guarantee that interference will not occur in a
particular installation.
If this equipment does cause harmful interference
to radio or television reception, which can be
determined by turning the equipment off and
Page 38

37
on, the user is encouraged to try to correct the
interference by one or more of the following
measures:
-- Reorient or relocate the receiving antenna.
-- Increase the separation between the equipment
and receiver.
-- Connect the equipment into an outlet on a
circuit different
from that to which the receiver is connected.
-- Consult the dealer or an experienced radio/TV
technician for help.
To maintain compliance with FCC’s RF Exposure
guidelines, This equipment should be installed
and operated with minimum distance between
20cm the radiator your body: Use only the
supplied antenna.
FCC ID: QMH-CL3239
IC Statement and Warning
This device complies with Industry Canada
licence-exempt RSS standard(s). Operation is
subject to the following two conditions:
(1) This device may not cause interference, and
(2) This device must accept any interference,
including interference that may cause undesired
operation of the device.
IC ID:4002A-CL3239
Page 39

38
Safety way to remove the battery or the battery
from the equipment:
Remove the old battery or battery pack, follow
the steps in reverse order than the assembly. To
prevent contamination of the environment and
bring on possible threat to human and animal
health, the old battery or the battery put it in the
appropriate container at designated collection
points. Do not dispose of batteries or battery
together with other waste. It is recommended
that you use local, free reimbursement systems
batteries and accumulators. The battery shall
not be exposed to excessive heat such as
sunshine, re or the like. Do not remove battery
incorporated with product for your safety. If you
need to replace the battery, take it to the nearest
authorized EcoBoulder+ service point or dealer
for assistance.
Correct Disposal of this product. This marking
indicates that this product should not be disposed
with other household wastes throughout the EU.
To prevent possible harm to the environment or
human health from uncontrolled waste disposal,
recycle it responsibly to promote the sustainable
reuse of material resources. To return your used
device, please use the return and collection
systems or contact the retailer where the product
was purchased. They can take this product for
environmental safe recycling. WEEE directive
 Loading...