

Page 1
http://www.potaz.com
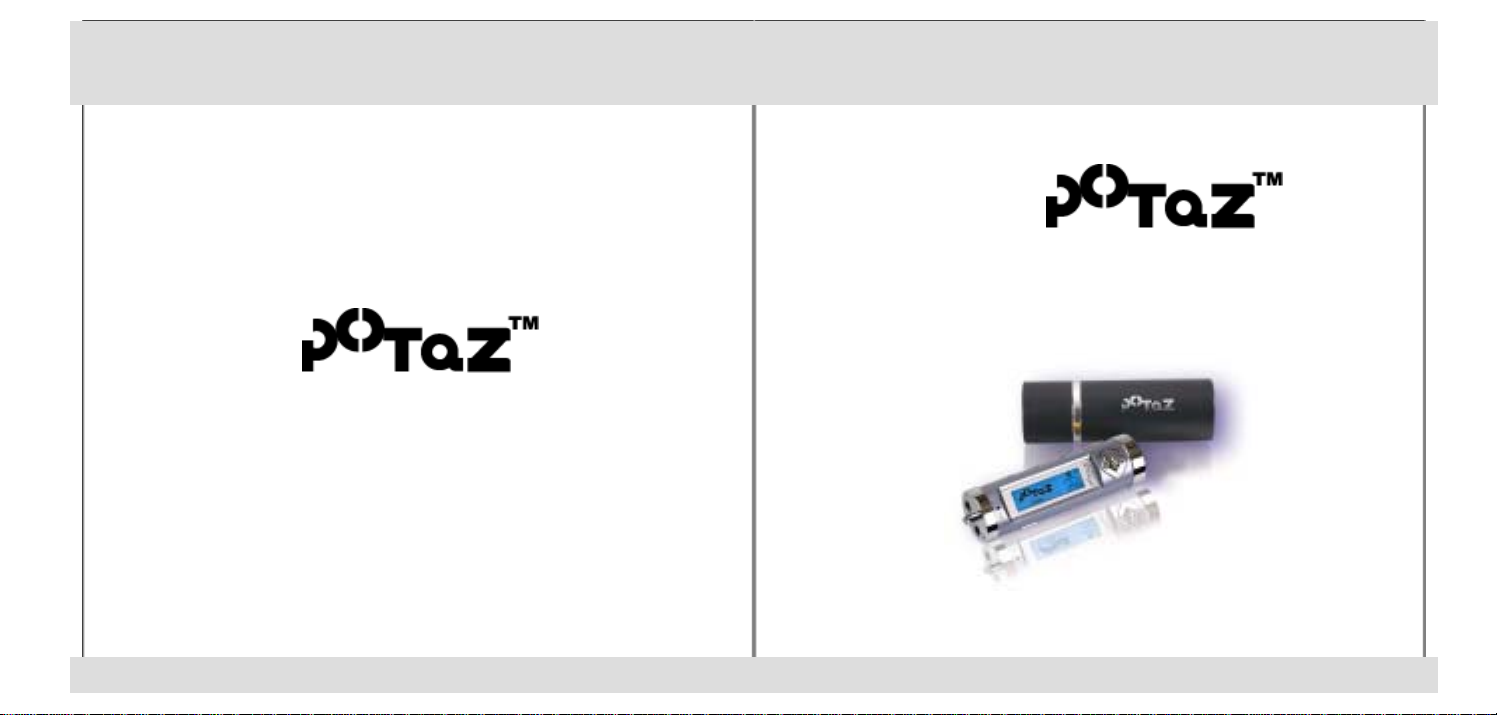
Digital multi player
PM-101T/102T/105T(E)
User’s Manual
Version 1.0
Please read carefully thi s manual before you start to use.
Thank you for choosing this product.
http://www.potaz.com http://www.potaz.com
Page 2
Caution Contents
For optimum performance and safet y, pl ease read carefully the follo wing ins tructions.
*. Safety Notes
1. Do not use the product at the following places.
- Direct expose to high temperat ure(over 60℃)
- Isolation in closed spac e such as inside of a car
- Humidity
- Direct expose to sunlight or he at
- Dusty place
2. Do not apply heavy sh ock to the unit.
3. Do not use while driving or walk i ng t o avoid accident.
4. Do not use the device in pl aces where aviation or electronic equipment is restricted.
*. Warnings on Battery
1. Do not disassemble or at t empt to dispose of batteries in fire.
2. Any surface contac t to electrolyte should be cleansed out with water,
and if electrolyte enters the eyes, rinse out with clean water and seek medical
treatment immediately.
*. Discard batteries promptl y, if probl ematic symptoms like smoke or deform at i on from
heat occur.
*. Check the remaining capac i ty of batteries before recordi ng, for the
recording stops if the batteri es become exhausted.
*. Beware that we cannot warrant any damage or third party liabilities
out of using the unit.
*. Make sure that any memory or dat a l oss due to other reasons than the breakdown
● Product feature ----------------------- 3
1. Package contents -------------------- 5
2. PC requirements --------------------- 6
3. Exterior view and displays ------- 7
4. Basic functions of MP3 player --- 8
(1) To listen to music
- Power on/off
- Playback/Pause/FF&REW
- EQ mode/3D surround sound
- Volume up/down
(2) A-B Repeat
(3) Using various playback modes
(4) Browser function
5. Additional features ------------------ 15
(1) FM Radio(Listening/Recording)
(2) Voice recorder
(3) Direct encoding
6. Using menu keys -------------------- 19
(1) Setting equalizer
(2) Setting record
(3) Setting system
(4) Managing memory
7. UMS function ------------------------ 25
(1) Installing/Removing driver
(2) Using UMS
8. MANAGEMENT program --------- 28
(1) Running the program
(2) Display
(3) Button keys and menus
(4) Disk mode
(5) Upgrade mode
(6) Other functions
9. E-MAILING program ---------------- 40
(1) Installing/Removing Plug-In Mail
(2) Getting started Plug-In Mail
(3) Account manager
(4) Address manager
(5) Favorites manager
(6) Folder menu
(7) Mail menu
(8) Opening mail
(9) Print menu
(10) View/Help menu
(11) Other important information on
E-MAILING program
10. Appendix ----------------------------- 55
(1) Check points before enquiry
(2) Warrant
or repair of the device are not o n warranty list.
1 2
http://www.potaz.com http://www.potaz.com
Page 3
Product features
(1) Supporting Multi-Codec
- Supports playback for MP3 and WMA files.
(2) E-Mailing
- You can check your e- mail and internet explorer favorites almost anywhere even
on your trip with Plug-In mail program in the POTAZ, just by connecting the
device to the PC. You can upgrade the speed of your business.
(3) Removable storage device
- Provides USB mass storage function usable as a removable hard disk,
which enables to save data whenever or wherever with Windows Explorer
without extra driver .
(4) FM radio & recording
- Provides auto scan and channel memory to let you listen to FM radio easily.
You can record sound anytime while listening to FM radio. And you can
experie nce recording sound of the best quality just as original sound.
(5) Best quali ty sound
- Brings you the full, eloquent sounds of the best quality as original sound.
You can enjoy exquisite sound effects with 3D surr ound sound.
(Sound effect func tions may be different with eac h mo del. )
(6) Plug & Play
- You do not need any additional program . You can use ri gh t awa y just by
connecting to the PC.
(However, You have to install an extra program on Windows 98)
(7) Language study function(A-B Repeat)
- the POTAZ is the best product for language study with its A-B repeat function.
(8) Various EQ Modes
- You can enjoy versatile sound effects with Normal, Rock, Pop, Classic, Live
and user mode.
3 4
http://www.potaz.com http://www.potaz.com
(9) Direct encoding
- Provides direct encoding function, which enables you to convert tracks from
your Walkman or CDP to MP3 file in real-time.
(10) Voice recording
- Provides voice record function, which enables you to record meeting or lecture
for maximum eight and a half hours.
You don’t have to worry about missing important data.
(11) Stylish des ig n and acce ssories
- The innovative design of the POTAZ with versatile colors and its aluminum
cover case create a classy look.
(12) Easy control(Jog Button)
- You can control functions easily with jog button.
(13) Supporting multi-language
- the POTAZ services diverse languages including Korean, English, Chinese,
Japanese.
(14) Folder navigation
- Supports maximum 256 folders and 1000 files. You may categorize tracks by
singer, period, genre and so on.
(15) Firmware upgrade
- You can regularly update the latest functions for this device.
(16) Ultra-lightness
- You can enjoy fist-sized the POTAZ while moving or exercising and you even
can put it around your neck because it weighs only 32 g.
(17) Playback over 10 hours with an AAA battery
- Enables to playback continuously over 10 hours.
Page 4
1. Package contents 2. PC requirements
* IBM compatible computer with above 100MHz CPU of AMD or Intel Pentium
* Minimum 32MB memory (64MB recommended)
* Port supporting USB 1.1 or higher
* CD-ROM Drive (for S/W Installation)
* Operating System
: Microsoft Windows series (98SE, ME, 2000, XP or higher)
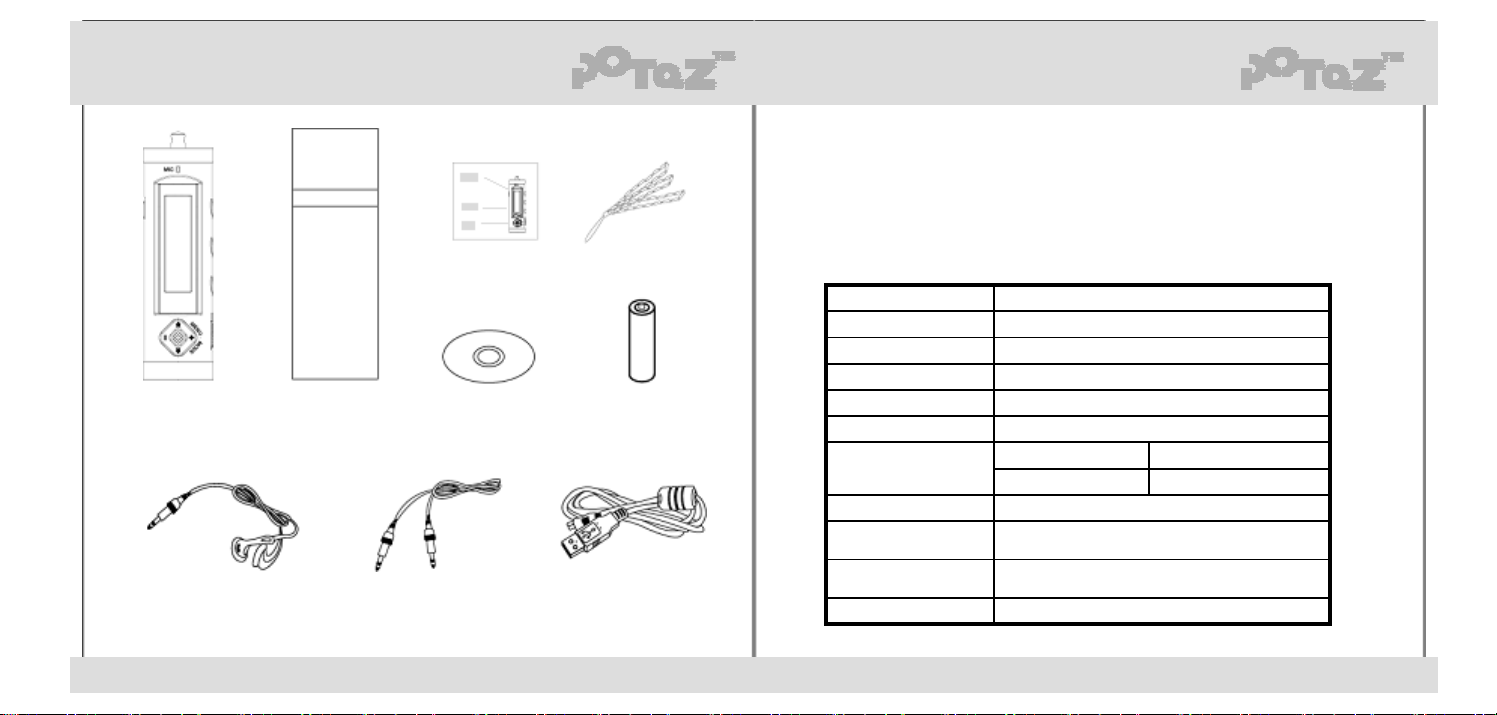
USER’S MANUAL NECK STRAP
PLAYER CASE
USER’S CD BATTERY
EARPHONE LINE-IN CABLE USBCABLE
These accessories are subject to change for performance improvement or user’s convenience without any prior notice.
5 6
http://www.potaz.com http://www.potaz.com
* Specifications
PM-101T/102T/105T(E)Model Name
25 mm×85 mm×25mmD im e nsions (W ×H ×D)
32g (battery excluded)Weight
Default Memory: 128MB, 256MB, 512MBMemory
1 AAA Alkaline Battery
More than 10 hoursContinuous playback time
Normal MODEEarphone output
User MDDE
92dbS/N (Sound-to-Noise) ratio
20Hz-20KHzFrequency range
4MbpsTransfer rate
USB1.1Computer interface
8.5mW+8.5mW
20mW+20mW
Page 5
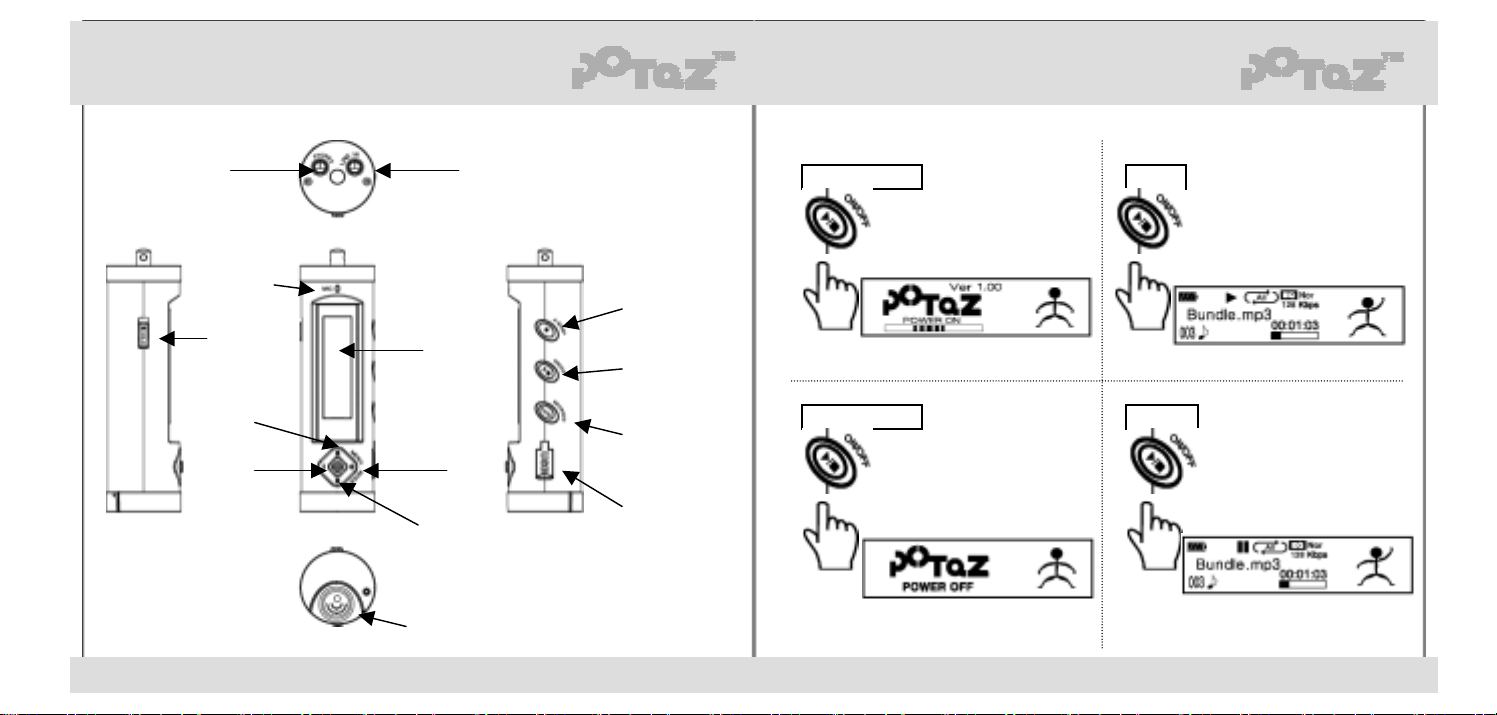
3. Exterior views and displays 4. Basic functions of MP3 player
(1) To listen to music
Earphone Line-In
Microphone
HOLD
REW
Volume (-)
LCD
Volume (+)
FF
A-B/REP
(Record/A-B Repeat)
ON/OFF
(Play/Stop/Power)
BROWSER
(EQ/3D SURROUND)
USB Connector
POWER ON PLAY
Press the Play button long.
long
short
POWER OFF PAUSE
Press the Play button long when
The power is set to on.
Press the Play button shortly
when the power is set to on.
Press the Play button shortly
During playback.
long short
Battery Cover
7 8
http://www.potaz.com http://www.potaz.com
Page 6
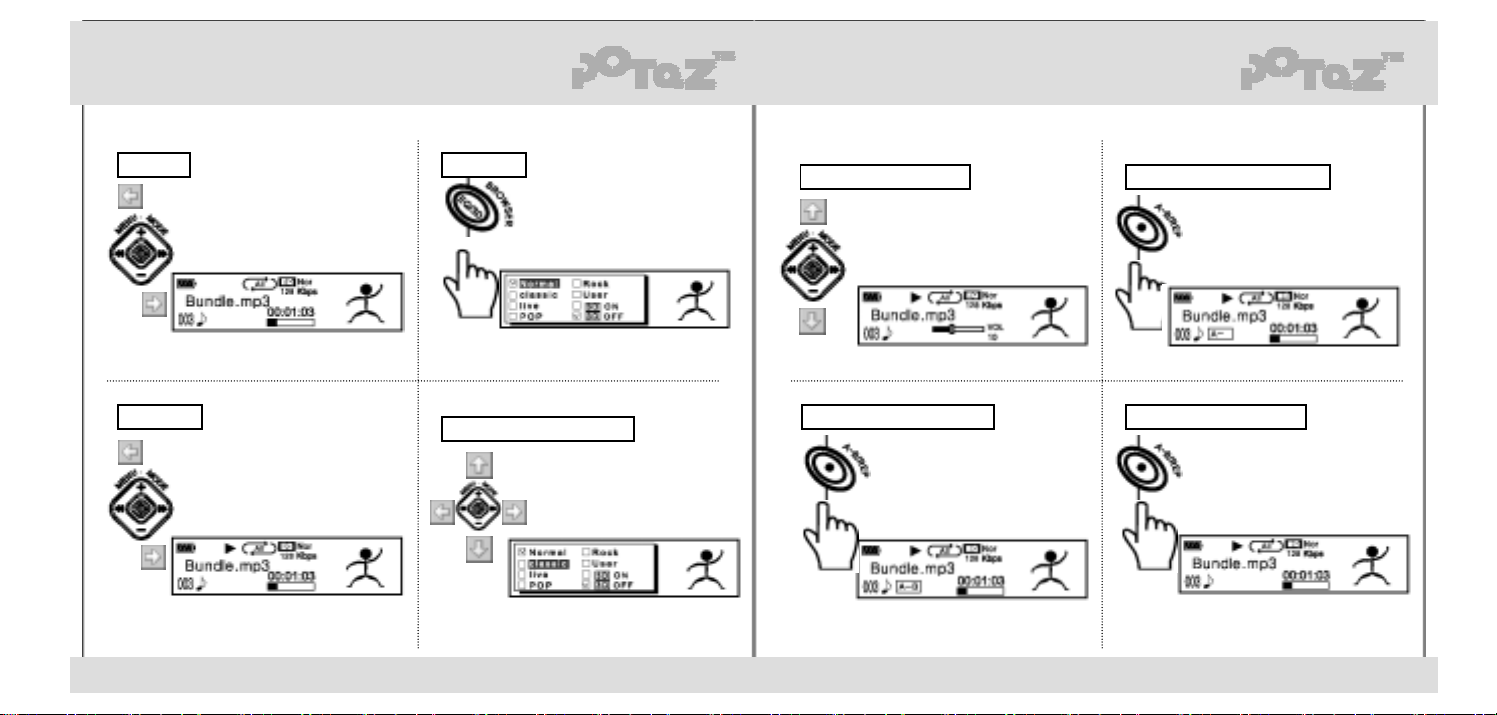
2) A-B repeat
STOP EQ MODE
Push the Jog button to the
FF/REW position during pause.
long
FF/REW
Push the Jog button to the
FF/REW position during playback.
You can explore the music by pushing
The Jog button 5 Sec to the FF/REW
Position during playback
9 10
http://www.potaz.com http://www.potaz.com
3D SUROUND SOUND
Press the EQ button long and
adjust the EQ in the box.
NOMAL, CLASSIC, LIVE, POP, ROCK modes
Are available. For more information on the
User mode, refer to the “Using menu keys”.
Choose the mode with Jog stick
and press the Jog button.
(“√”mark shows your choice)
(Only available in models including the
character ’E’ at the closing point of the name.)
VOLUME UP/DOWN To set the start A-B repeat
Push the Jog button to the +/position to adjust volume.
Press the A-B button shortly during
playback to set A-B repeat start.
short
To set the end A-B repeat To release A-B repeat
Pres the A-B button once again
Shortly during A-B repeat to
Release A-B repeat.
short
Press the A-B button once again
shortly after A-B repeat start. Then it
starts to play A-B repeat.
short
Page 7
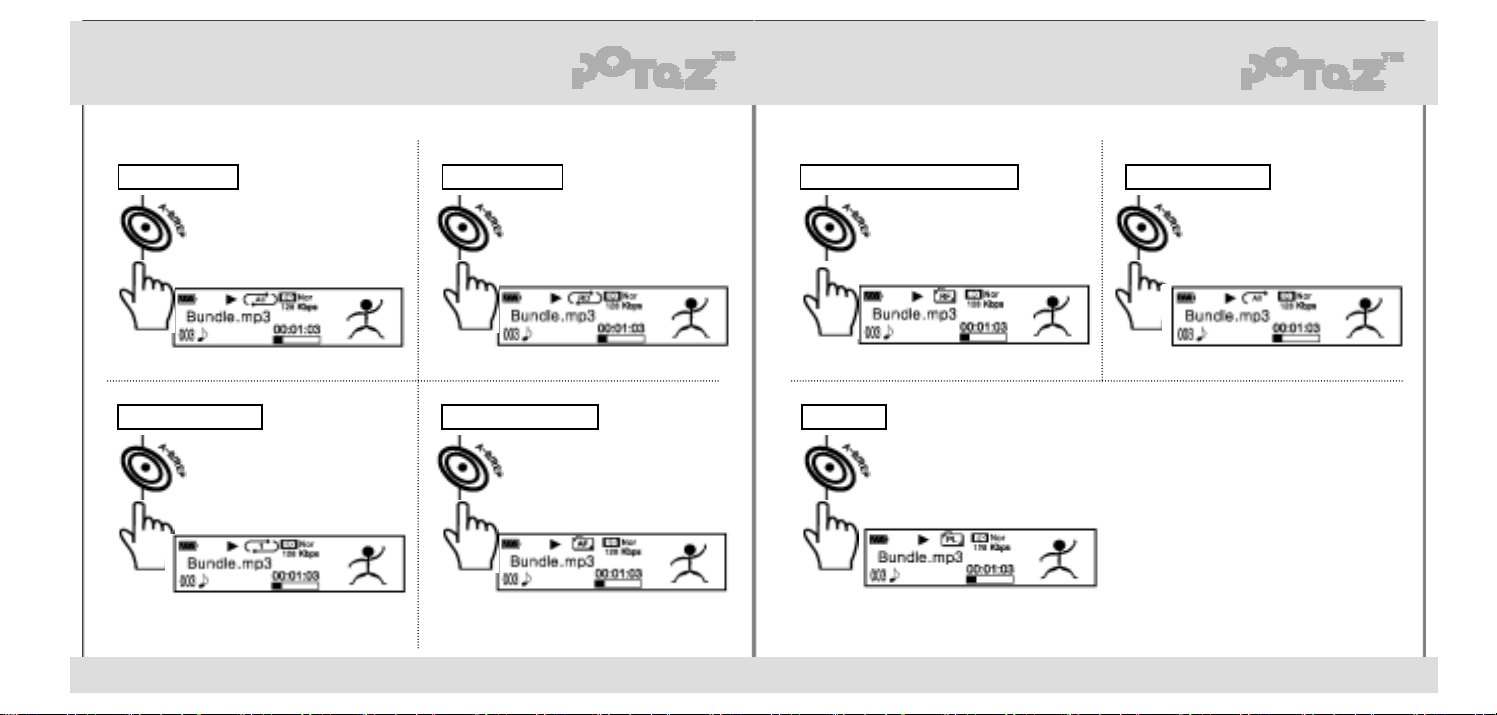
3) Using various playback modes
All file mode Random mode Repeat all folders random All tracks once
Default is set to the all file mode,
which all tracks repeat in sequence.
long
Single file mode
Press the A-B button long to change
mode to the Single file mode and
repeat only the selected track.
long
Repeat all folders
long long
11 12
http://www.potaz.com http://www.potaz.com
Press the A-B button long to
change the current mode to the
Random mode.
Press the A-B button long to change
mode to play all tracks of all folders
repeatedly.
long
Playlist
long
Press the A-B button long to change
mode to play all tracks of all folders
randomly.
Press the A-B button long to change
mode to play tracks in playlist.
Press the A-B button long to change
mode to play all tracks once and stop.
long
* To edit playlist, refer to the
“MANAGEMENT program”
* If no playlist exist, you can not see
this mode.
Page 8
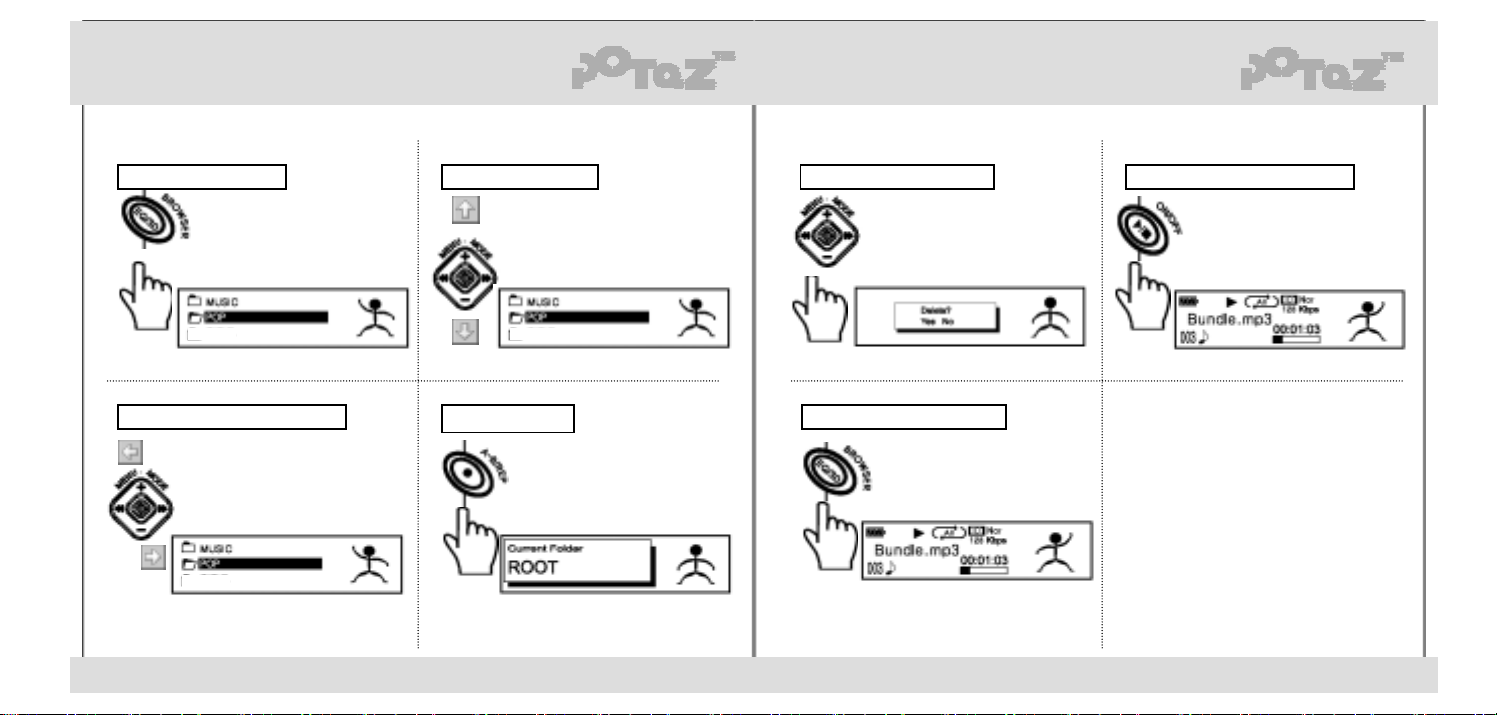
4) BROWSER function
BROWSER function To move to a folder To delete a fi l e or f ol der To playback the selec t ed track
Press the EQ button shortly during
stop or pause to use file browser.
shot
To go to the parent /sub f ol der
Press the FF/REW button in the
browser mode to go the parent/sub
folder. press the Jog button shortly to
select a folder.
To show a folder
short
13 14
http://www.potaz.com http://www.potaz.com
Use the +/- button in the browser
mode to go to a different folder.
Press the REP key shortly to see a
playing folder. Then press the
REP key once again to return.
long
To exit the Browser mode
short
Press the Jog button long in the
browser mode to delete a selected
file or folder.
Press the EQ button shortly in the
browser mode to return to the
previous mode.
short
Press the Play button shortly to
playback the track.
Page 9
5. Additional features
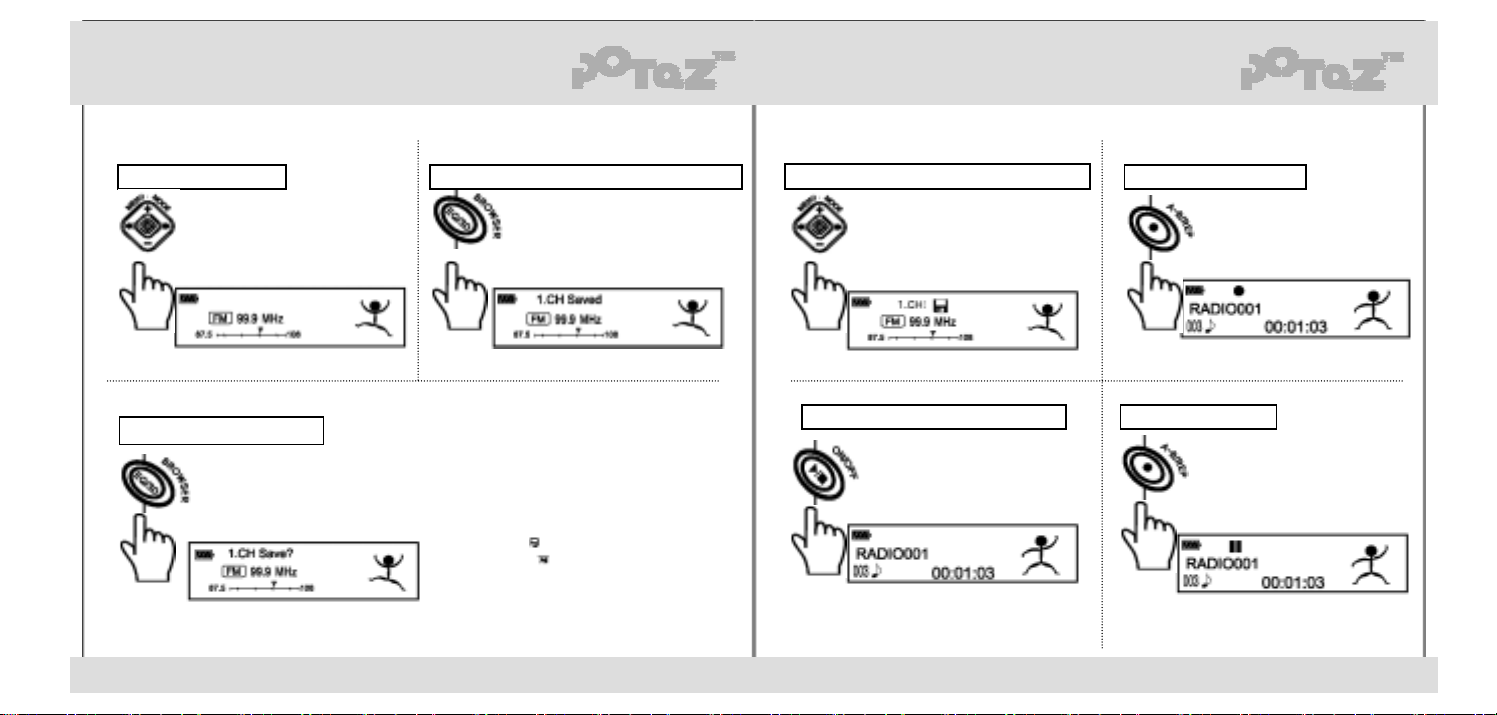
1) FM RADIO (Listening/Recording)
To listen to FM radio To search and save channel automatically To start recording FM
Press the EQ button long in the FM
Mode. Then the device to search and
save up to 20 channel automatically.
long
Press the Jog button long
during playback, stop or pause
to listen to FM radio.
long
To save channel manually
Use the FF/REW button to search
frequency in the Manual mode and
press the EQ button shortly to display
the save window.Then, press the EQ
button once Again to save the channels.
* Press The play button shortly
to cancel “save”.
* You can save up to 20 channels. Channels
detected by Automatic Channel Search are
saved with ( ) sign and ignored channels are
marked with ( ).
short
15 16
http://www.potaz.com http://www.potaz.com
To move to the saved channels(Channel mode)
Press the Jog button shortly In the FM
mode to display the channel. Press the
FF/REW button to change channels and
press the Jog button once again to
return to the Manual mode.
short
To finish recording & Return to the FM
Press the Play button during FM
recording to finish recording.
If recording is finished, the mode will
return to the FM mode automatically.
short
To save as another file, press the play
button during FM recording, and
press the recording button again.
Press the REP button in the
FM mode to start recording.
short
To pause recording
Press the REP button to pause FM
recording. press it again to restart
recording in a same file.
short
* Recorded files are saved with names
such as RADIO001,RADID002 in the
”Recorded” folder.
Page 10
2) Voice Recorder 3) Direct Encoding
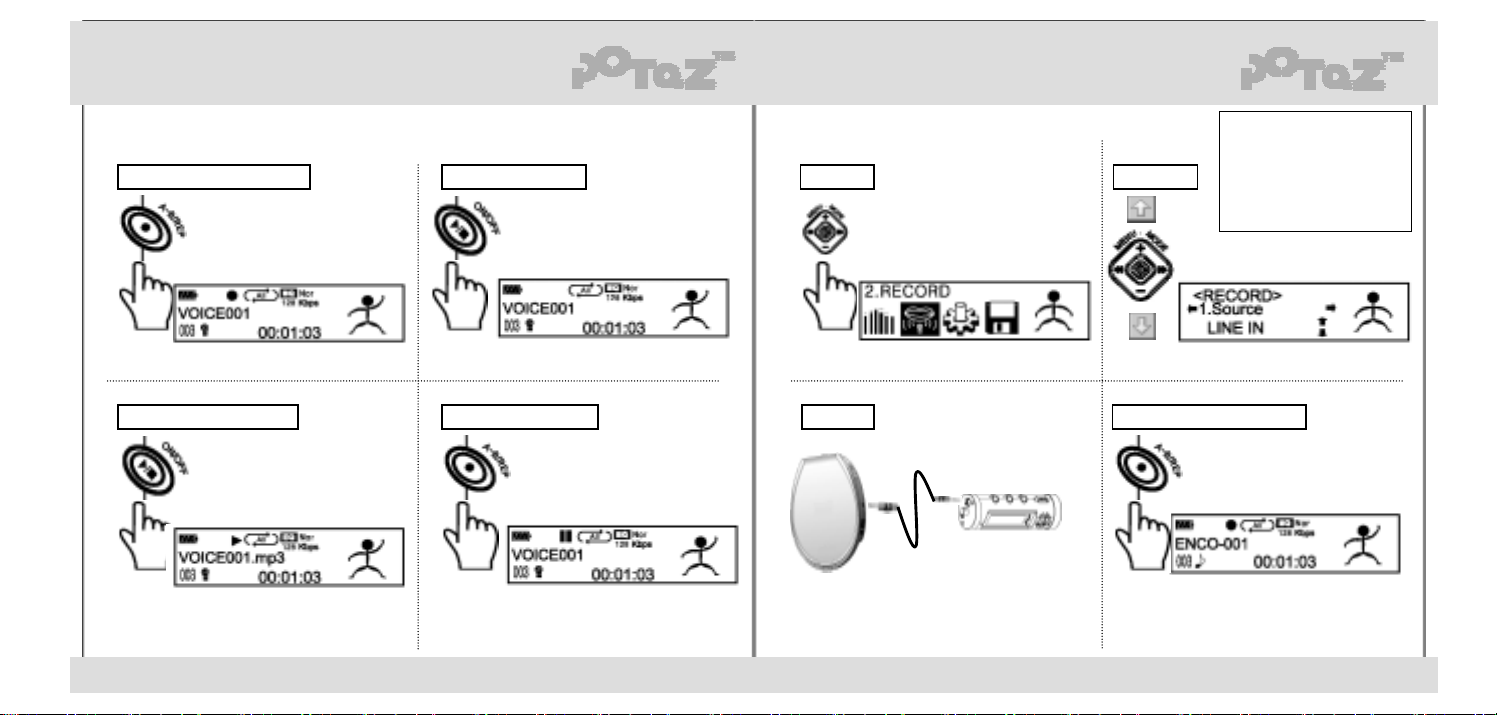
(For recording setup, refer to “Setting record” section of “Using menu keys”)
To start voice recording To finish recording Step 1 Step 2
Press the A-B button shortly
during stop or pause to start voice
recording.
Press the Play button shortly
during voice recording to finish
recording.
Push the Jog button shortly during
stop or pause and select “2. Record”.
* What is direct encoding?
Direct encoding is the function to
convert audio data from other
devices to MP3 files in real-time.
(Ex : Music from cassette tape
player can be converted to
MP3 files)
Press the +/- button to select LINE IN.
short
short
To playback recording To pause recording Step 3 To start direct encoding
Press the Play button to playback
recorded file.
Press the REP button once
again to pause voice recording.
short
17 18
http://www.potaz.com http://www.potaz.com
short
Ex) Connecting to CDP
Connect the cable between line-out port of
CDP and line-in port of the mp3 player.
Then, playback the CDP.
Press the A-B button shortly during
stop or pause to start direct encoding.
The rest is the same as “voice recorder”.
shortshort
* Encoded files are saved with names such
as ENCO001,ENCO002 in the ”Recorded”
folder.(The volume during encoding is the
maximum playback volume.)
Page 11
6. Using menu keys
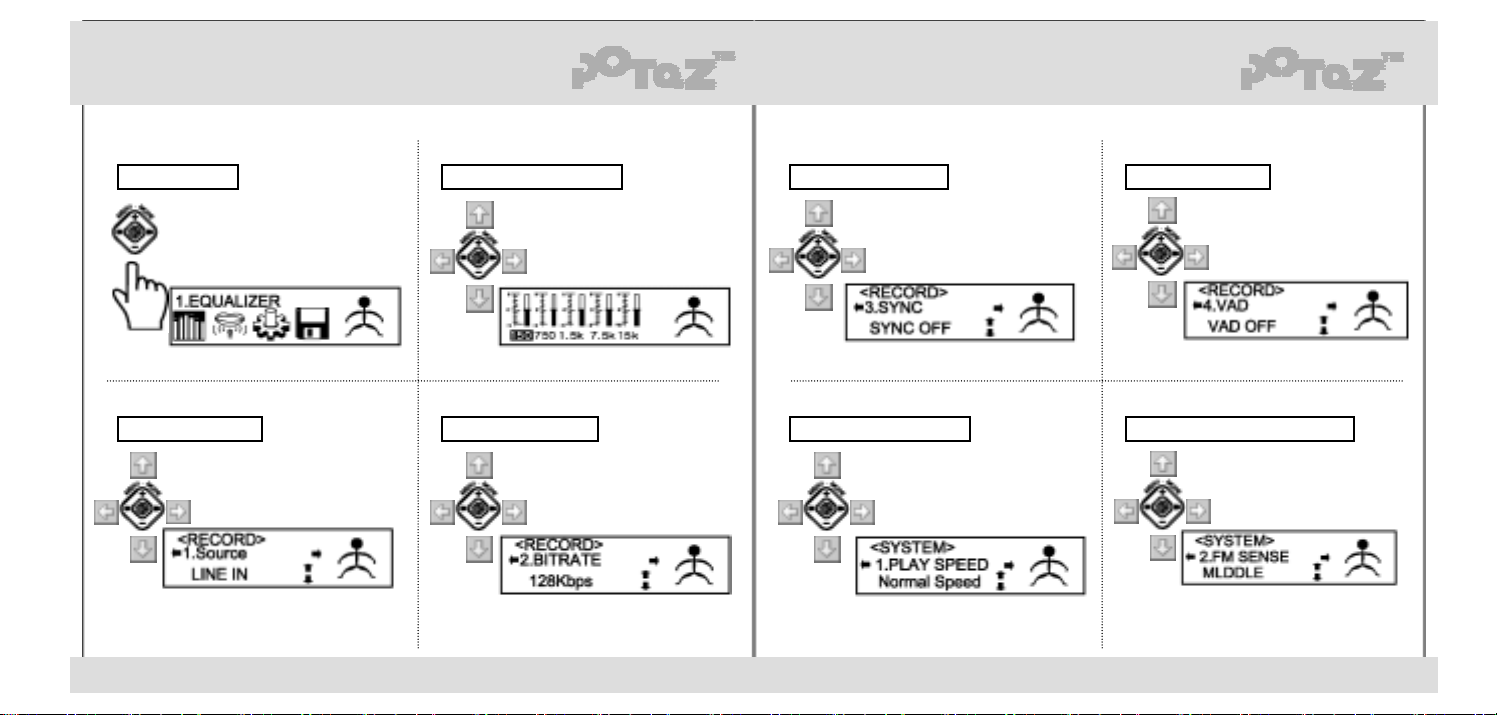
1) Setting equalizer
To go to menu 1-1. Adjusting user EQ 2-3. To set SYNC 2-4. To set VAD
Press the +/- button to choose SYNC
ON/OFF during direct encoding. SYNC
Push the Jog button shortly
during stop or pause to go to
the Menu mode
Press the FF/REW to choose a band.
Press the +/– key to adjust volume.
Press the Jog button again to exit.
is the function to create separate MP3
files using mute intervals between each
track from different recorder sources.
Press the +/- button to choose VAD
ON/OFF during voice recording.
VAD is the function to stop recording
if there is no sound. You can reduce
file size.
short
2) Setting record
2-1. To set source
Press the +/- button to choose the
source to record as Voice or
Direct Encoding.
Press the FF/REW button to change the menu.
Press the Jog button or use “5.Exit”to exit the
current settings.
19 20
http://www.potaz.com http://www.potaz.com
2-2. To set bit-rate 3-1. To set Play Speed 3-2. To adjust FM sensitivity
Press the +/- button to choose the
bit rate within 32 to 224 Kbps. Files
with higher Kbps are closer to original
sounds, but the file size increases.
SYNC On is recommended for recording many music files.
3) Setting system
Press the +/- button to change
playback speed.
(Range : SLOW1 ~ SLOW5)
Press the +/- button to change
sensitivity for FM radio. Setting
to “HIGH” may increase noise,
though it makes sound clearer.
Set the sensitivity to “High “ only when sound is
not good with “MIDDLE”.
Page 12
4) Managing memory
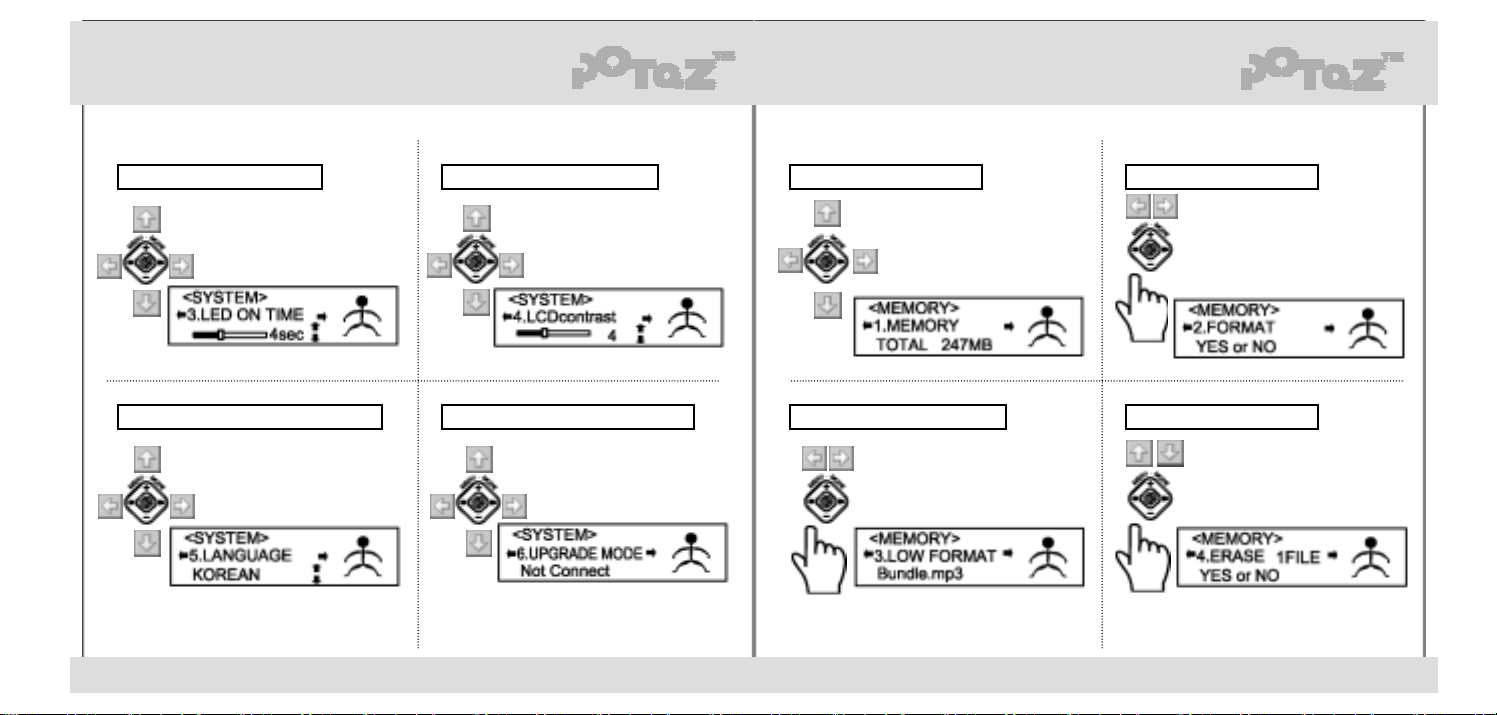
3-3. To adjust LED on time 3-4. To adjust LCD contrast 4-1. Viewing memory size 4-2. Formatting memory
Press the +/- button to change
the time that the LED stays on.
(Range : Always, 4 sec. 8sec, OFF)
Press the +/- button to change
the contrast of LCD. Higher the
contrast is brighter the LCD becomes.
(Range : 0 ~ 10)
This menu displays total memory
size and remaining capacity.
Press the Jog button to format memory.
Press it again to start formatting.
All data will be erased after formatting.
short
3-5. To select supporting language
Press the +/- button to change
the supporting language. It supports
Korean, English, Japanese and
Chinese etc.
21 22
http://www.potaz.com http://www.potaz.com
3-6. To go to the Upgrade mode 4-4. Deleting a single file
You can go to the Upgrade mode to
download firmware or font file.
Refer to “Upgrade mode” of
“MANAGEMENT program”
to upgrade.
Press the Jog button in “UPGRADE
MODE” and connect the USB cable.
4-3. Low formatting memory
Press the Jog Button to format memory
in low level.
Press it again to start formatting.
short short
Select a file first using the +/-button
and press the Jog button to delete
a file.
Page 13
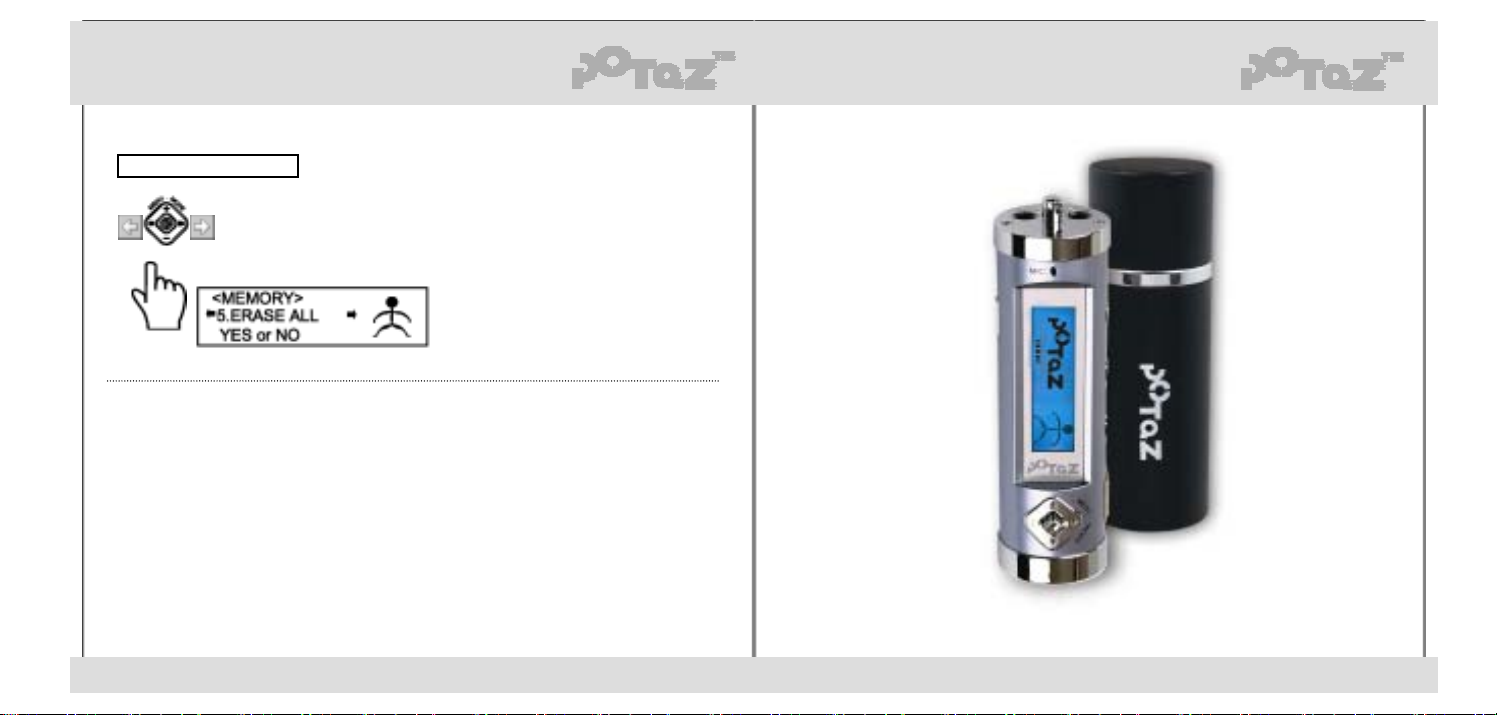
4-5. Deleting all files
Press the Play button shortly
to delete all files in memory.
short
* If YES or NO is prompted, press the Menu
button for YES and move the FF/REW to
rightward/leftward for NO.
23 24
http://www.potaz.com http://www.potaz.com
Page 14
7. UMS functions
(1) Installing/Removing driver
the POTAZ provides UMS (USB Mass Storage) function, which enables you to use the device as
removable disk just by connecting to PC.
You can use the device in Microsoft Windows ME or higher without additional driver.
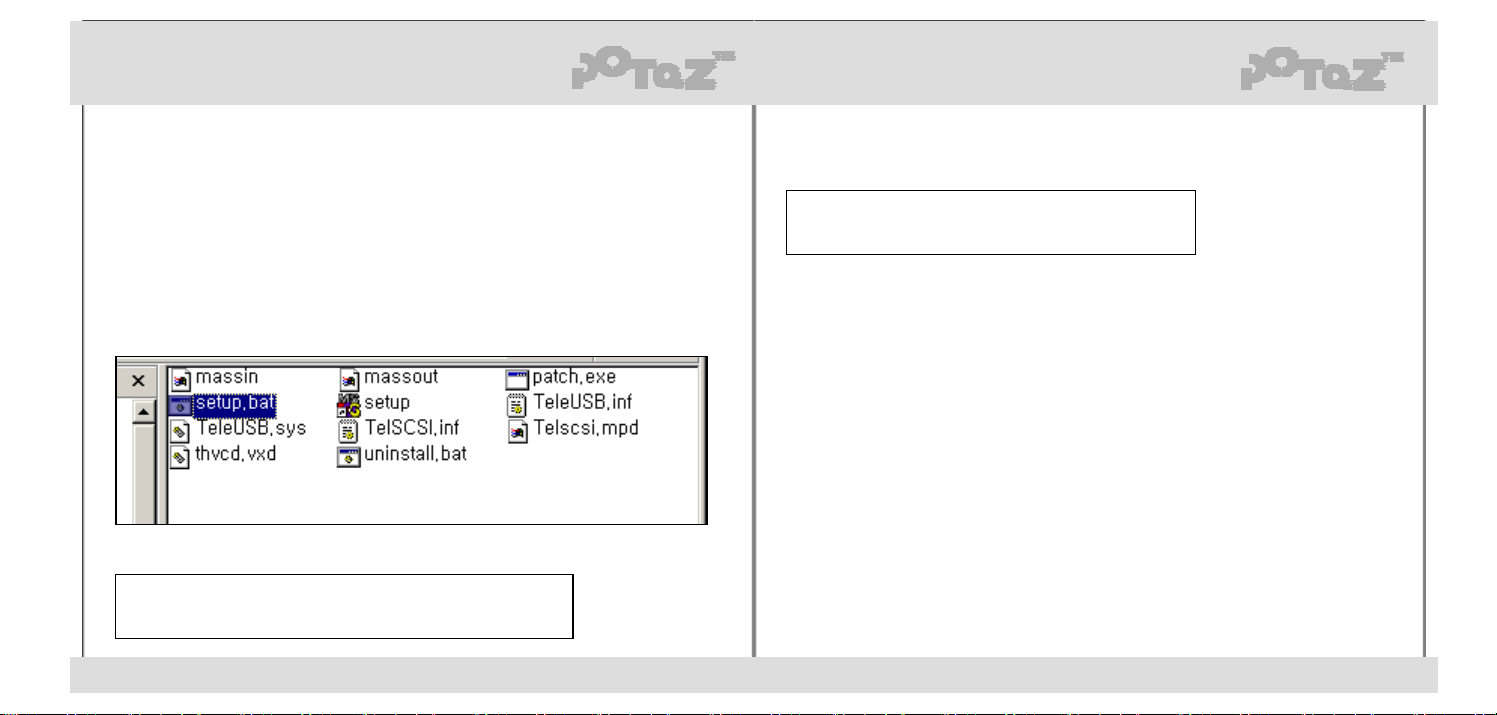
Microsoft Windows 98 users can utilize the device as removable disk after installing driver as follows.
1. Remove th e POTAZ from the PC.
2. Run the “setup.bat” file in the “Driver\Win98DiskDriver” folder of user’s CD.
3. Restart the PC if the following message appears after the installation completes.
4. Connect the POTAZ to the PC after restarting.
5. If the following message appears during installation, restart the PC and then install again.
YOU NEED REBOOT YOUR COMPUTER
and RUN THIS PROGRAM AGAIN !
6. To remove driver, do as follows.
- Disconnect the POTAZ from the PC.
- Run “uninstall.bat” file in “Driver\Win98DiskDriver” folder of user’s CD.
- Res ta r t th e PC.
All Installation Is Completed !
We Recommend To REBOOT Your Computer
25 26
http://www.potaz.com http://www.potaz.com
Page 15
8. MANAGEMENT program
(2) Using UMS (1) Running the program
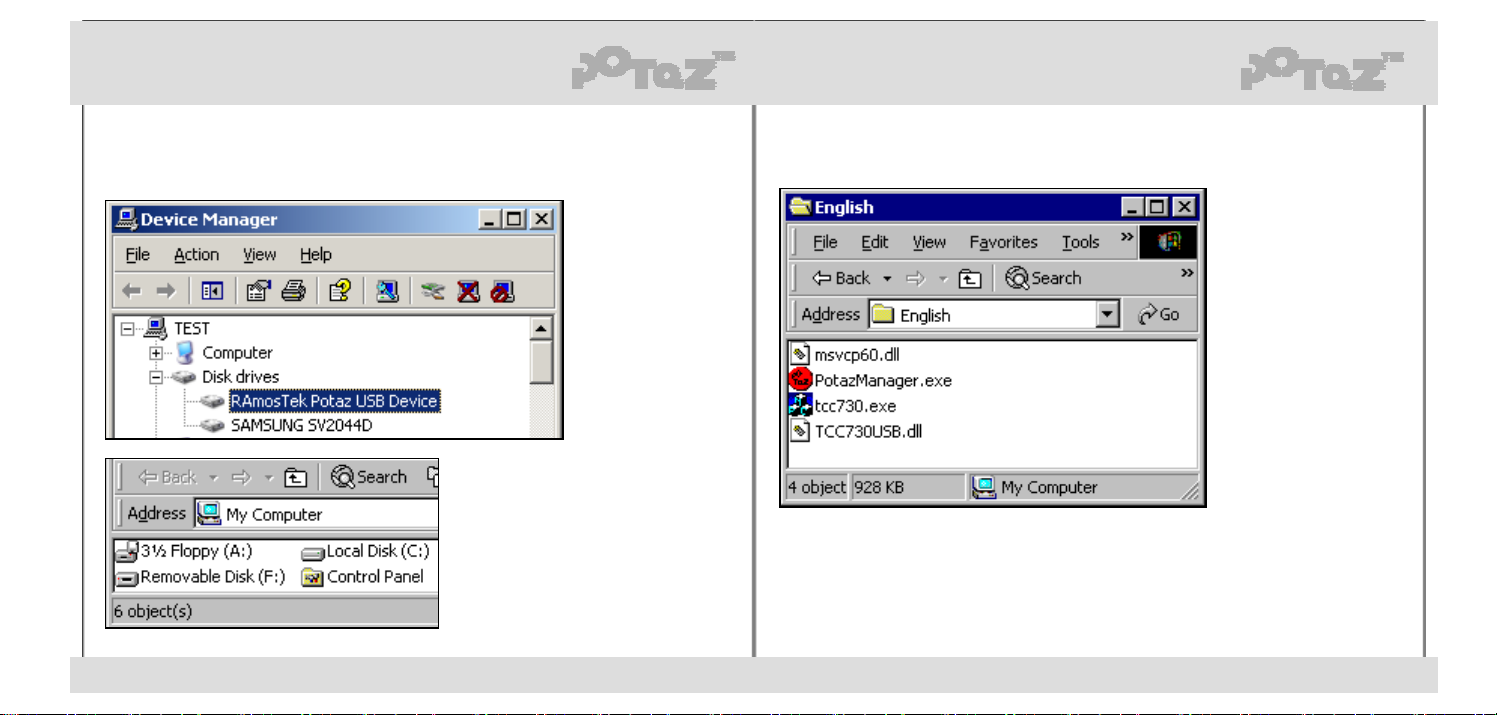
1.If the POTAZ is installed as removable disk, System Device Manager menu appears as follows.
(Device names may be different in each O/S)
2. To check the POTAZ installed as removable di sk , run “My Computer ” or “Wi ndows
Explorer”.
(Drive letters may be displayed differently
in each O/S)
3. If the installation is completed, the device
can be used with the same method as
other hard disks.
1. Run “PotazManager.exe” file in “PotazManager\English” folder of user’s CD.
2. To run the program on hard disk , co p y “Pot a zMan ager\English” folder of user’s CD to the
relevant hard disk first.
(To run the program, all files as in the illustration are needed.)
27 28
http://www.potaz.com http://www.potaz.com
Page 16
(2) Display
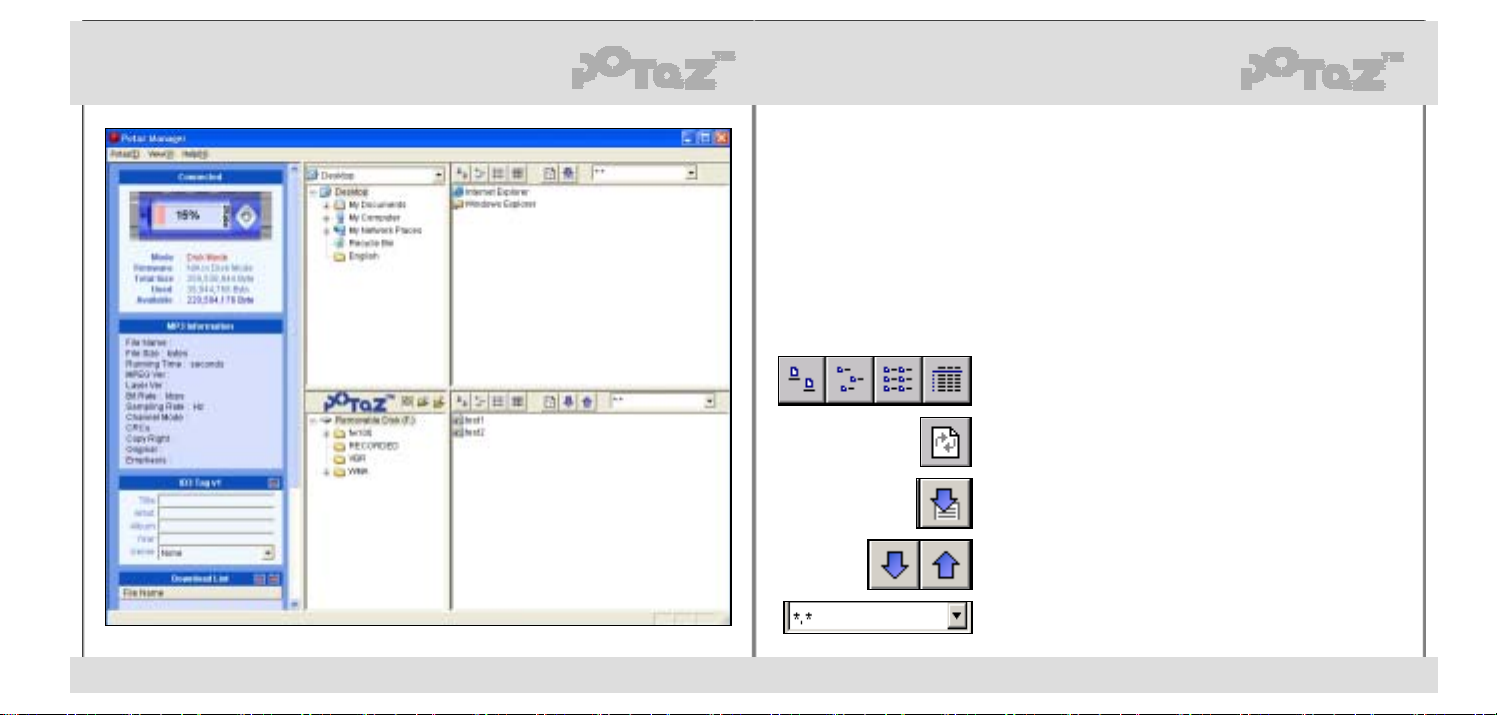
Display of the POTAZ Manager consi st s of th e following s.
- Le ft Window : displays the POTAZ status , MP 3 fil e inform a ti on and edits ID3 Tag / Download list.
- Upper Right Window : displays folder and file structure of the computer being connection to the
- Lower Right Window : displays folder and file structure of the POTAZ.
POTAZ.
If the POTAZ is being connected in the Upgrade mode,
folder/file structure is not displayed.
(3) Button keys and menus
1. Select display method for eac h Ico n.
(Big Icons, Small Icons, List, Details from left)
2. Refresh the curren t windo w.
3. Add selected files to the download list.
4. Download files from the PC or upload the POTAZ files
to the PC.
5. Display files on the current window by filtering.
29 30
http://www.potaz.com http://www.potaz.com
Page 17
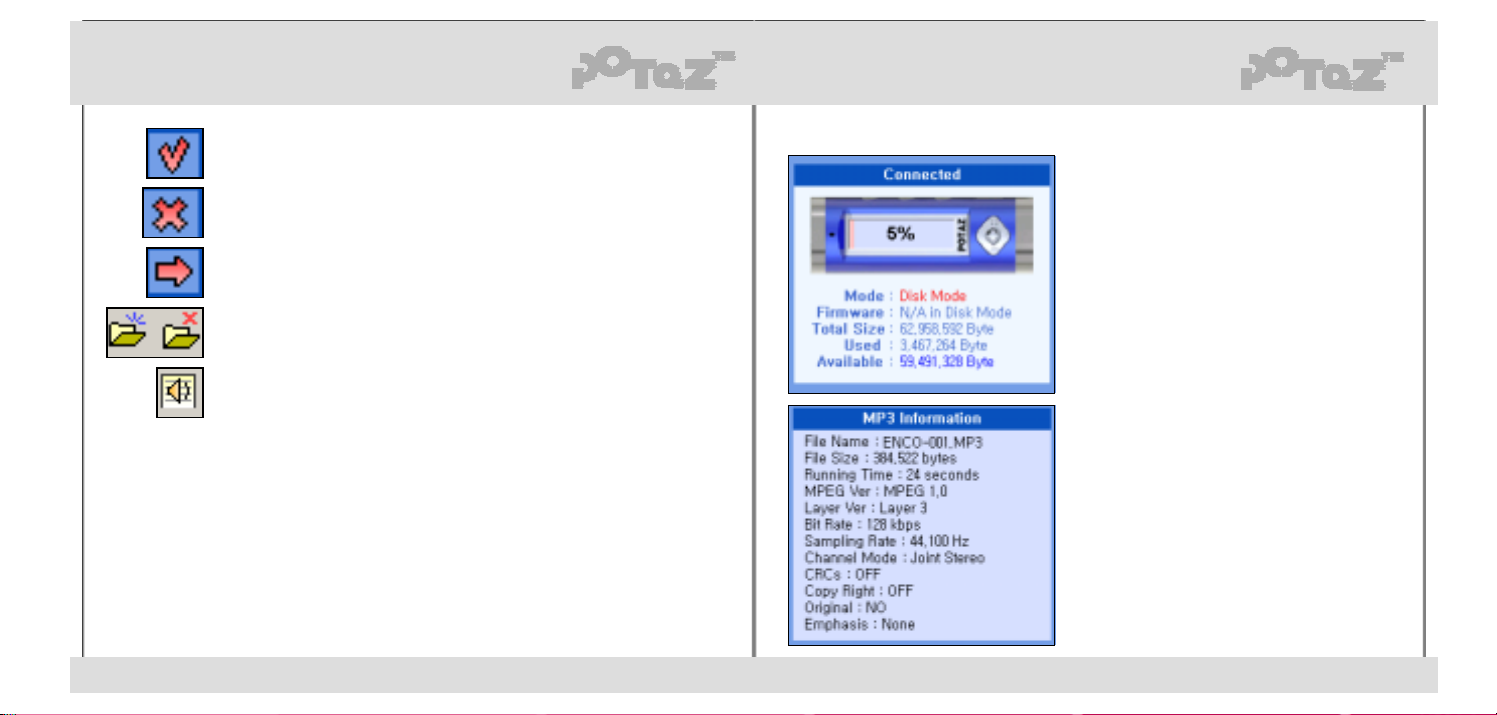
6. Update ID3 Tag information of selected files.
7. Delete selected files from the download list
8. Download files from the download list to the POTAZ.
9. Create a new folder or remove an empty one in the selected path.
10. Edit the play list of the POTAZ.
11. “POTAZ” Menus
- Visit POTAZ Homepage : Check the latest information on the POTAZ products.
- Upgrade Firmware : upgrade the POTAZ firmware.
(Beware that the m enu can func ti on only in the Upgra de m ode )
- Download Firmware : download a firmware file to upgrade from the POTAZ Homepage.
12. View menu : display or hide status bar at the lower side of the program.
13. Help menu : indicate the information about the program.
(4) Disk mode
If the POTAZ is being connected in the Disk mode,
“DISK Connect” message appears on LCD display.
Manager program can perform functions similar to
Windows Explorer.
1. Upper left box indicates current status of
the POTAZ.
Firmware version may be displayed only in the
Upgrade mode.
2. Left center box displays detailed information
on selected MP3 file.
31 32
http://www.potaz.com http://www.potaz.com
Page 18
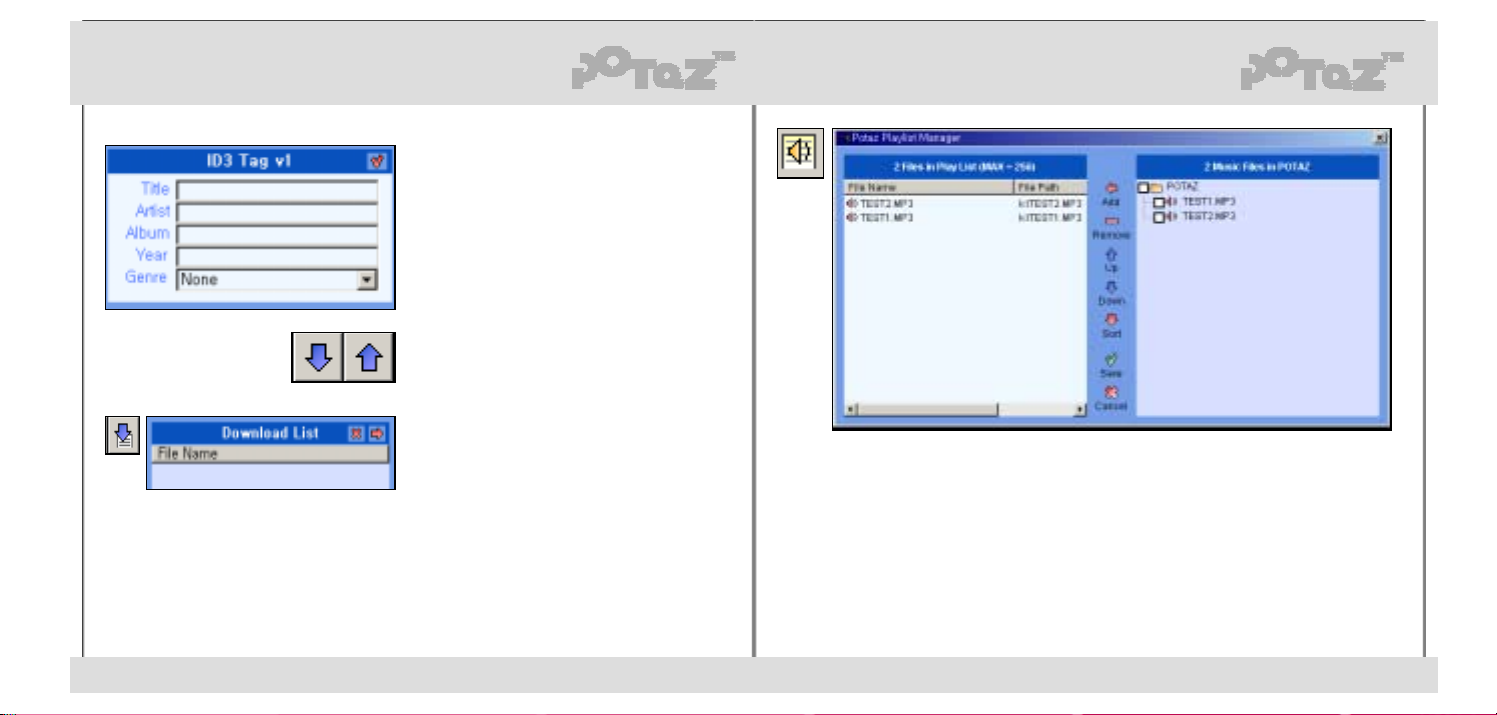
3. Lower left box displays ID3 Tag information on
selected file.
User can edit the information on his/her own.
Click the check button to save the changes.
4. Select file(s) to transfer and press the arrow
button to transfer files between PC and
the POTAZ.
5. To send files of many folders at a time, add
them to the download list first.
8. To change the playback order, Click the button “Edit Playlist”.
6. Right-click “DELETE” with mouse or press the “Del” key to delete a file.
7. Other funct ions concerning files and folders ca n be operated in the ways similar to
Windows Explorer.
33 34
http://www.potaz.com http://www.potaz.com
9. You can add or delete the POTAZ file(Right side) to(from) Playlist(Left side).
Also you can change the order “Up”, “Down” button.
With “Sort” button, you can sort the Playlist in name order.
10. After editing of the play list, don’t forget to save with ‘save’ button.
Page 19
(5) Upgrade mode
1. Installing upgrade driver
You can enjoy improved perf ormance of the device with Firm wa re Upgra de .
Firmware upgrade can perform only if the device is being connected in the Upgrade mode.
To connect the device in the Upgrade mode, Upgrade driver must be installed first.
(Common in all O/S)
1) Remove the POTAZ from the PC.
2) Run “setup98MeXp.bat” file in “Driver\UpgradeDriver” folder of user’s CD.
(Windows 2000 users run “setup2000.bat” file.)
3) Connect the POTAZ to the PC in the Upgrade mode.
(For detailed information, refer to the section of “Using menu keys”)
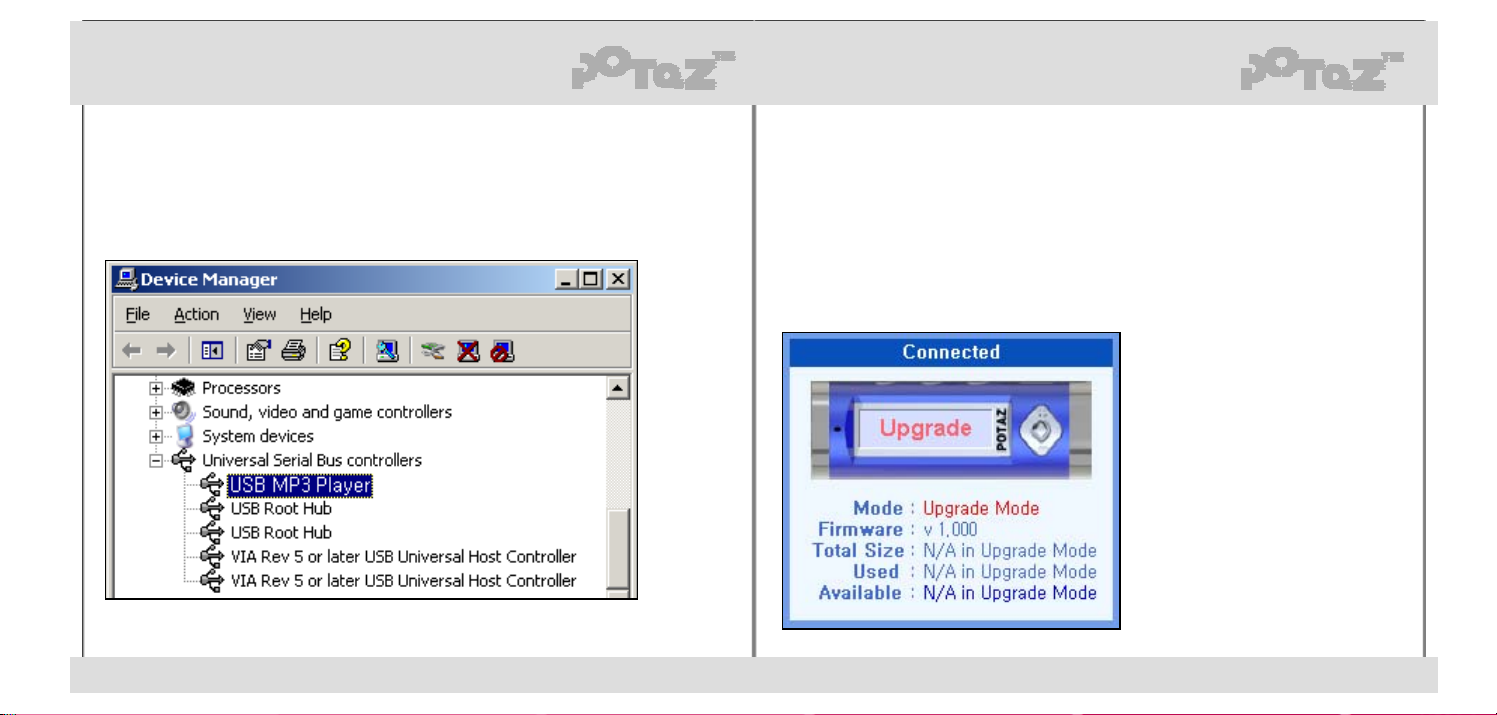
4) If you set the POTAZ to the Upgrade mode, System Device Manager menu appears as in
the illustration below.(Device names may be different in each O/S)
2. Firmware download
If the POTAZ is being connected in the Upgrade Mode, “Upgrade mode” message appears
on the LCD of the device. And Manager program is run to help firmware upgrade.
1) Check your firmwa re versi on .
2) Go to the “Download Firm wa r e” men u
of the “POTAZ”menu and save a
firmware file to the PC.
If you are connected to the POTAZ
Homepage, go “Suppo r t” or “Downlo ad” .
(Version 1.0 is connected directly to the
POTAZ Homepage. And automatic
check function will be supported later)
35 36
http://www.potaz.com http://www.potaz.com
Page 20
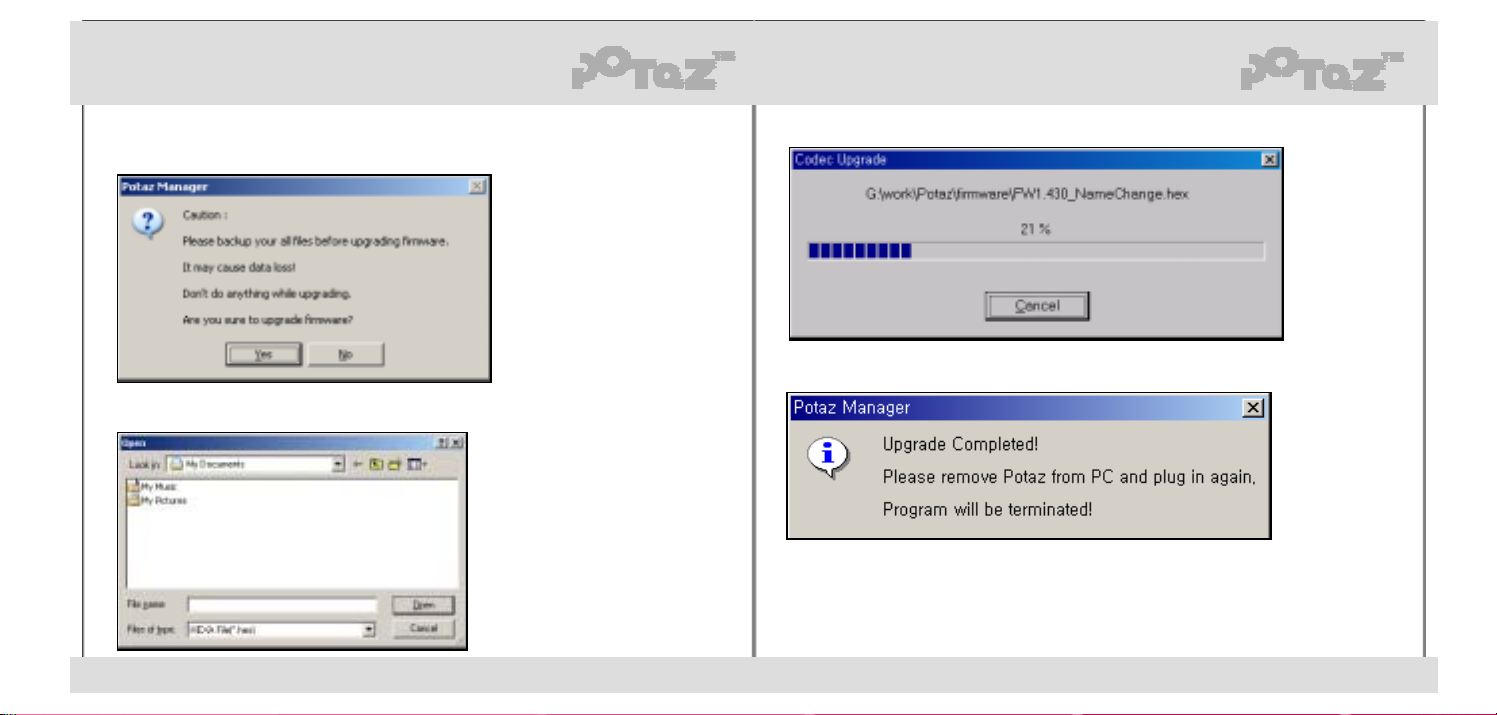
3. Firmware Upgrade 4) Do not perform oth er task s while up gra de proce eds .
1) If firmware file download is completed, run the “Upgrade Firmware” menu.
5) If Upgrade is completed , rem ov e the POT A Z f rom th e PC and reco nnec t it again.
The program is finished automatically.
2) If there are important data in the POTAZ, press “NO” to back up the data in different device.
3) Press “YES” to select a downloaded file.
37 38
http://www.potaz.com http://www.potaz.com
Page 21
9. E-MAILING program
(6) Other functions (1) Installing/Removing Plug-In Mail
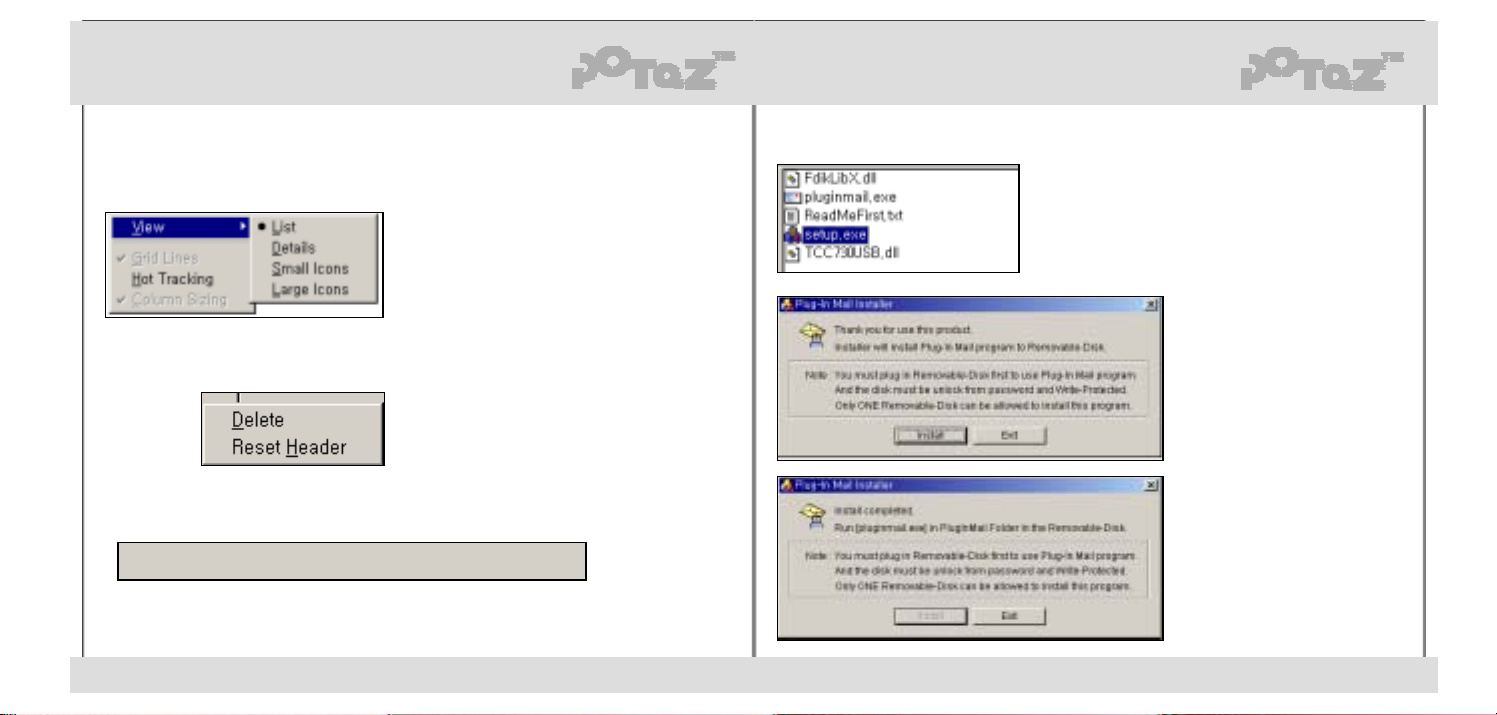
Right-click the mouse on Explore windo w (f rom upp er right or lower right) to set ot he r fu nction s.
1. View: select a display method for each Icon.
2. Grid Lines: “Details” view function to display lines.
3. Hot Tracking: selects a file automatically.
One click can run the file.
4. Column Sizing: column size may be adjusted in
“Details” view function.
5. Click column header in “Details” view to delete or
reset header.
6. When you select the file to copy, the status bar shows the numbe r of fil es & capaci t y.
10 Files Selected (51,218,593 Bytes) : Exceed to Copy
39 40
http://www.potaz.com http://www.potaz.com
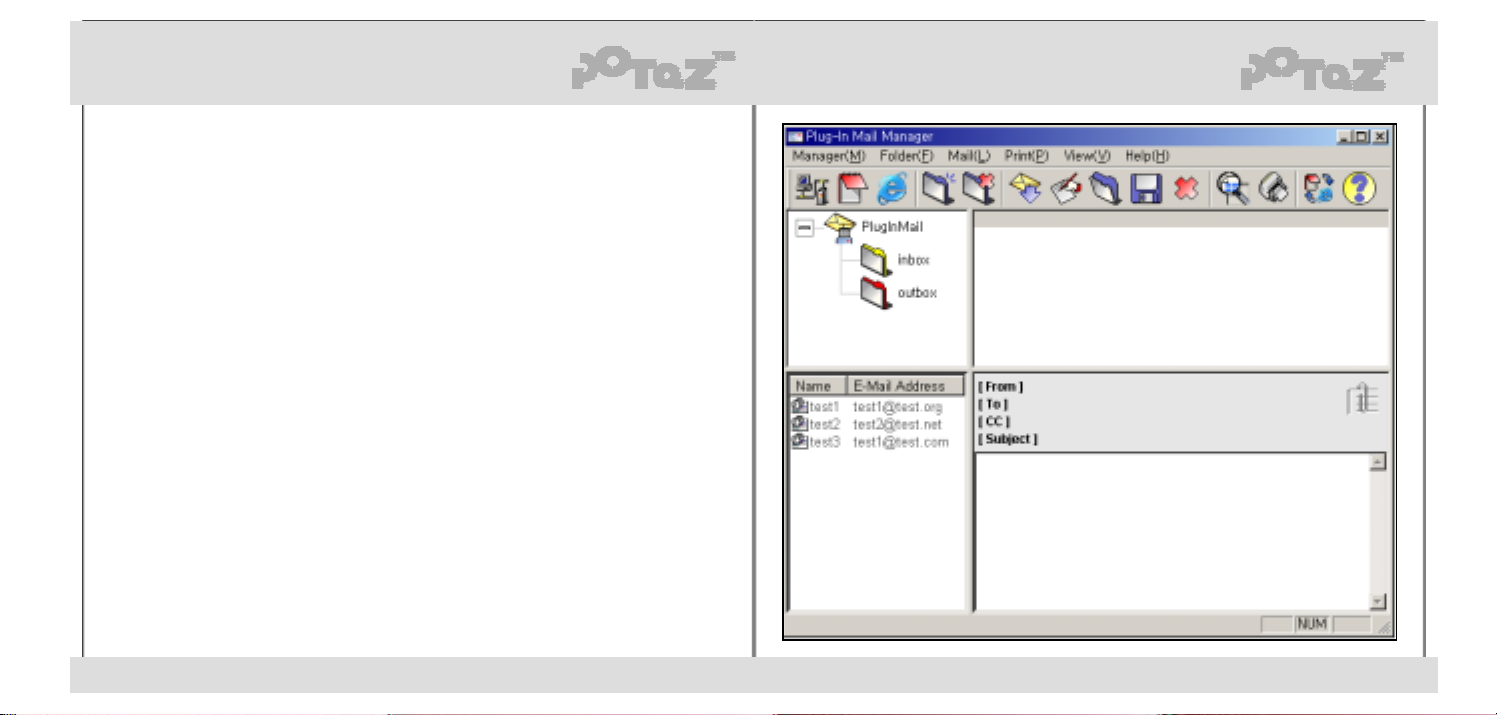
1. Run 'Setup.exe' in ‘PlugInMail\English' folder
inside the CD.
2. When the left dialogue box
“Plug-In Mail Installer”
appears, then click “Install”.
3. When “Install completed”
message appears, click “Exit”.
Then, run the “pluginmai l.e x e ”
in the “PlugInMail” folder
in Removable-Disk, and start
to use the program.
Page 22
4. The Plug-In Mail program works only in the ‘PlugInMail' folder of Removable-Disk.
5. Please delete the ‘PlugInMail' folder in Removable-Disk to remove the Plug-In Mail program.
6. When you delete ‘PlugInMail' folder, all of your saved data and mails will be deleted.
(2) Getting started Plug-In Mail
Run ‘plufinmail.exe' in the ‘PlugInMail' folder in Removable-Disk.
Then the program will be started.
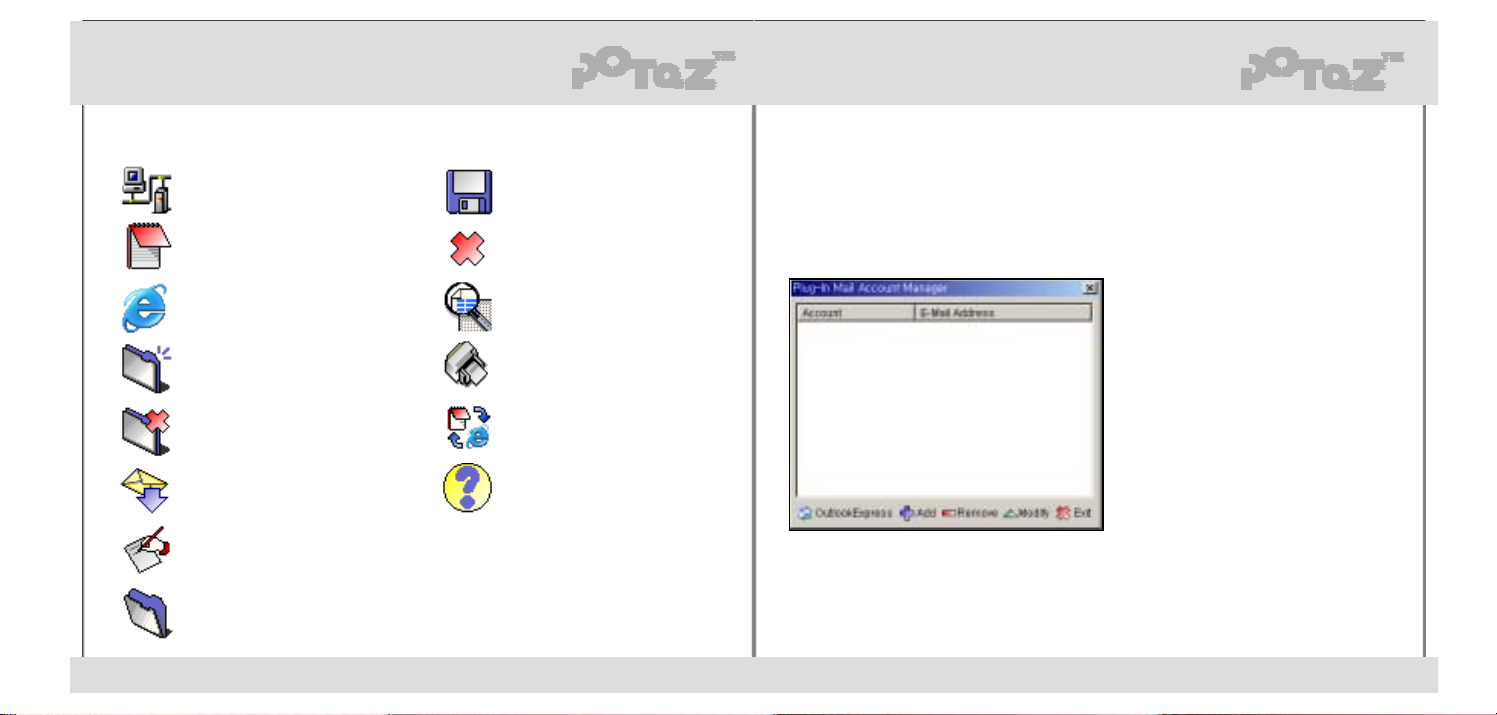
1. Each window shows like below.
- Left, Up : It shows the folder's structure that saves mail.
- Right, Up : It shows a mail list of the selected folder.
- Left, Down : It shows Address/Fa vorites li st.
- Right, Down : It previews the selected mail of the list.
2. The following are basic folders. So, you can't delete these folders.
- PlugInMail : The folder that drives a program.
- inbox : The folder that saves a received mail.
- outbox : The folder that saves a sent mail.
You can read a mail in another new window using double-lick or Enter.
You can connect to a new mail & Internet Exp lorer by double-click.
you can't move any mail to here.
41 42
http://www.potaz.com http://www.potaz.com
Page 23
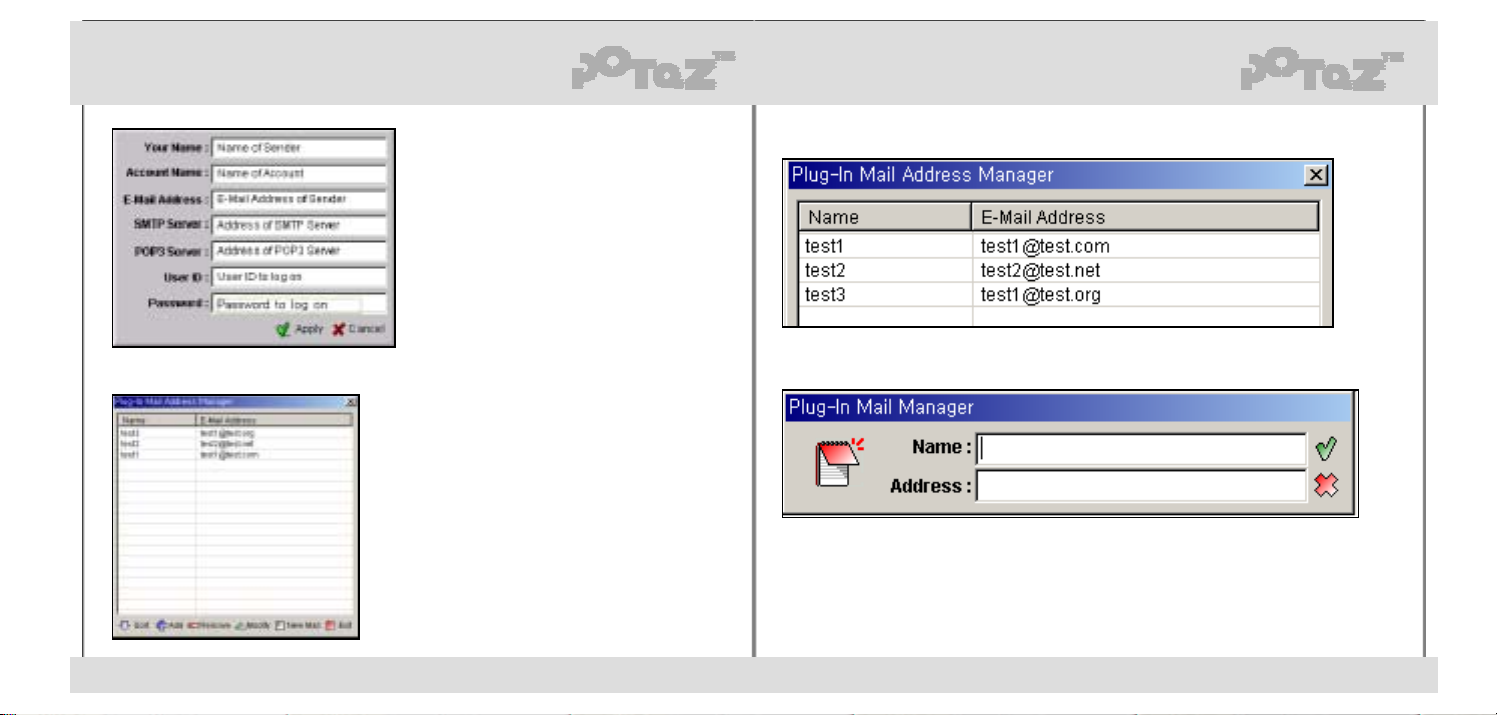
3. The Meaning & Function of each icon on the tool bar is like below.
to run 'Account Manager'
to run 'Addr ess Manager'
to save as another name
to delete the selected mail
(3) Account manager
Account Manager is for the functions of server address, user's name and password.
Refer to the next, please set up your mail account. If you don't have any information of your account,
then ask to your mail server manager.
(Some mail server doesn't support POP3 and SMTP.
Then, you can't use it in mail programs such as the Plug-In Mail, the OutlookExpress, etc.)
to run 'Favorites Manager'
to make a new folder
to delete a n empty folder
to receive a mail from saved
account
to write a new mail
to open a mail
43 44
http://www.potaz.com http://www.potaz.com
to preview the selected mail
before print
to print the selected mail
to toggle Address / Favorites view
Program information
2. Load an account from the OutlookExpress : The mail account that is already set up into the
OutlookExpress Program of your PC will be added. But, you should enter the password.
(In some Vaccine programs, the OutlookExpress mail account was changed to prevent Virus
attack. In this case, stop th e P OP3 supe rviso r y function of that vaccine program During load the
account.)
1. When you use this program at first time,
or you don't have any saved acco un t,
Account Manager will be executed
automatically.
Page 24
3.Add : You have to put your data to set up
a mail account.
1. Sort : Sort your address in name order.
(4) Address manager
Address Manager is for the functions of user's
address-book.
45 46
http://www.potaz.com http://www.potaz.com
2. Add / Remove : Add / Remove an address.
3. A new mail : Write a new mail to the selected address.
Page 25
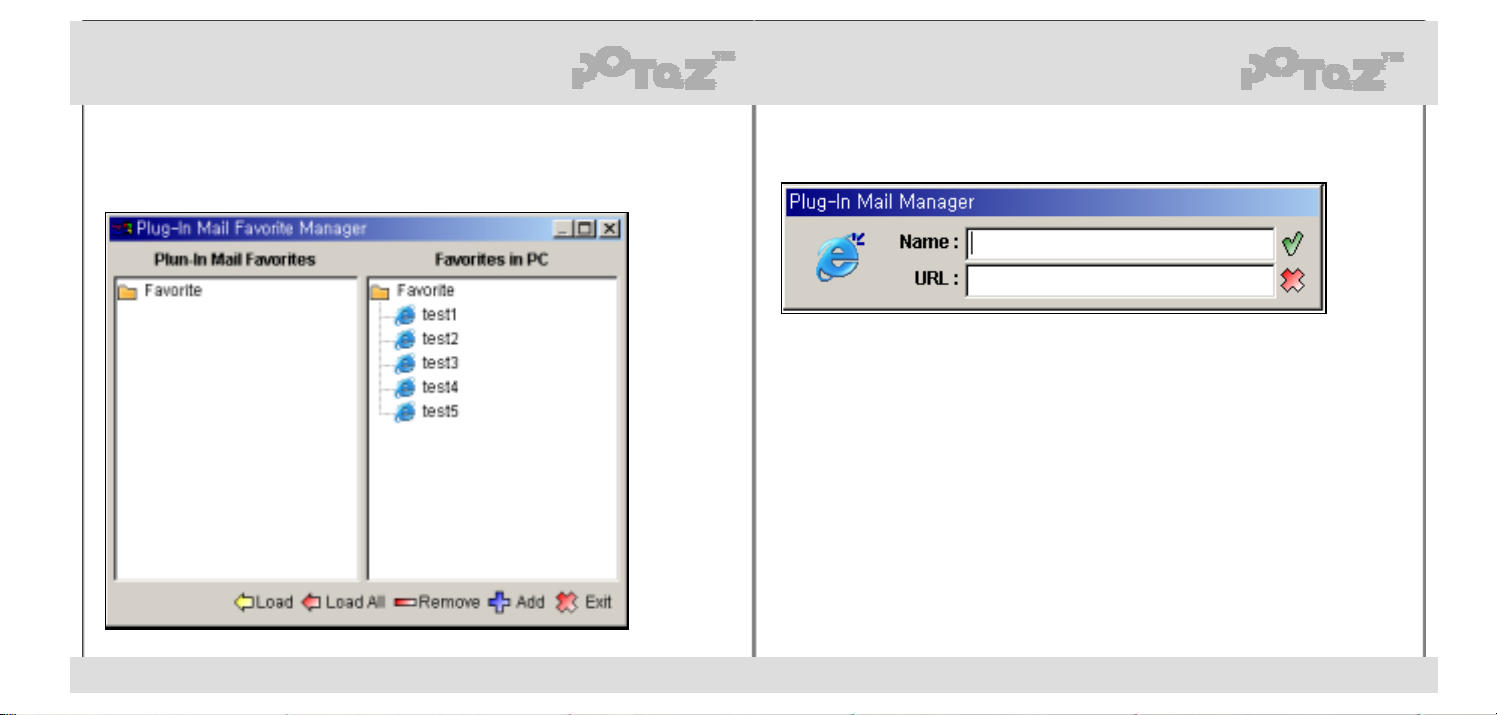
(5) Favorites manager
Favorites Manager is for the functions of user's Inte rn et Favo rite s(B o ok Mark ) .
Save Favorites into Removable-Disk, and you can use it in other PCs anywhere.
1. Load, Load All : Load some or all Favorites from current PC.
2. Sort : Sort your Favorites in name order.
3. Add : Add a new Favorites.
(6) Folder menu
You can make or delete a folder.
1. You can't make same named folder that already exist.
2. You can't remove a folde r tha t has ev en a m ail or a fil e inside.
3. You can't remove th e basic fol de rs : PlugInMail, inbo x and outb o x.
47 48
http://www.potaz.com http://www.potaz.com
Page 26
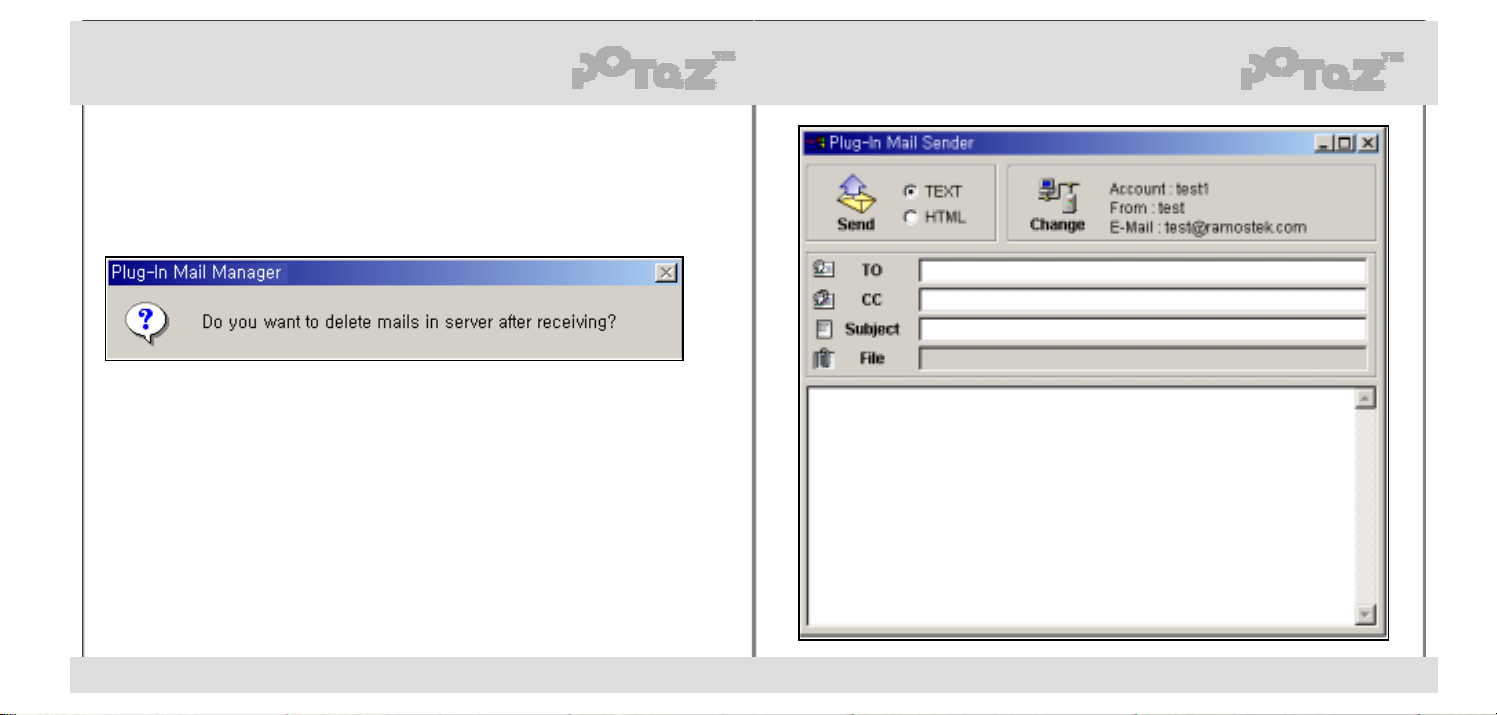
(7) Mail menu
Mail Menu is for the functions to receive, write and save a mail.
1. To receive mail
- Receive mails from the server. If there are many servers, it will try to connect one by one.
- If you leave mails in the server after you received all your mails,
you can receive same mail s in other places.
2. New mail
- To write a new mail.
- Send : Send your written mail to the selected server.
- TEXT/HTML : Choose your content type.
- Change : Choose a sending account from many ones.
-From / CC : you can add an addre ss f r om yo ur address-book. each addres s h as to be divided by
- Subject : cursor moves to this line to write a subject.
- Attach a file : attach or delete a fil e by running 'A tt ache d Fil e Man age r' .
3. Open mail : Open a mail in another window.
4. Save as... : Save the selected mail as another name.
5. Remove mail : Remove the selected mail.
semicolon[ ; ] or comma[ , ].
49 50
http://www.potaz.com http://www.potaz.com
Page 27
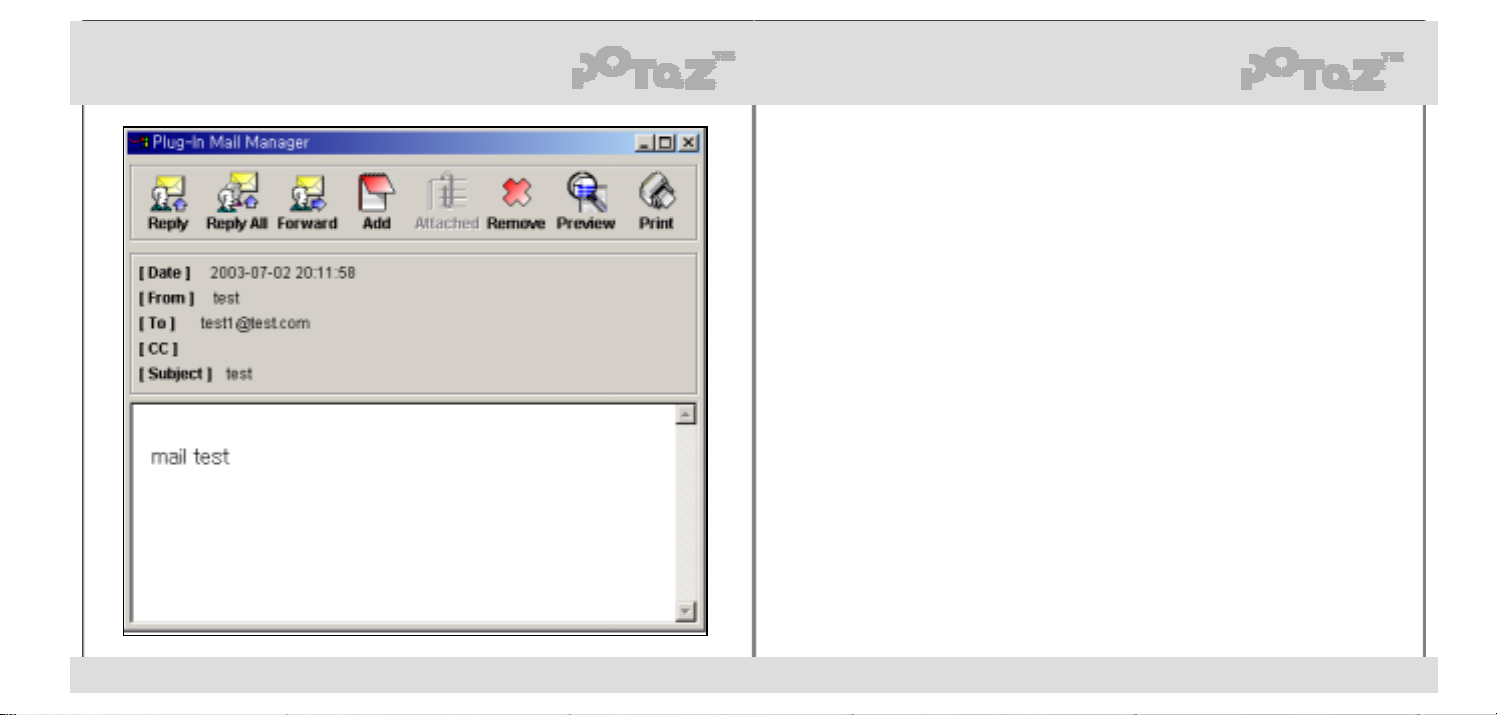
(8) Opening Mail
You can read your mail in a new window, using “open mail” in the menu or “double-click” the mail in
the mail list.
1. Reply : to reply to mail sender.
2. Reply All : to reply to all in [From], [CC] list.
3. Forward : to send this mail to another(including attached files).
4. Add : to add all address in the [From], [To], [CC] to add res s - book .
5. Attached : to save at tach ed files by runni ng “Att ache d Fi le Mana ge r ”.
6. Remove : to remove this mail.
7. Preview, Print : to preview or print this mail.
(9) Print Menu
Print menu is for all the functions of mail print.
1. Print Setup : Set up the option of the printer that is connected PC.
2. Print Preview : To preview selected mail before print.
3. Print : Print the selected mail.
51 52
http://www.potaz.com http://www.potaz.com
Page 28
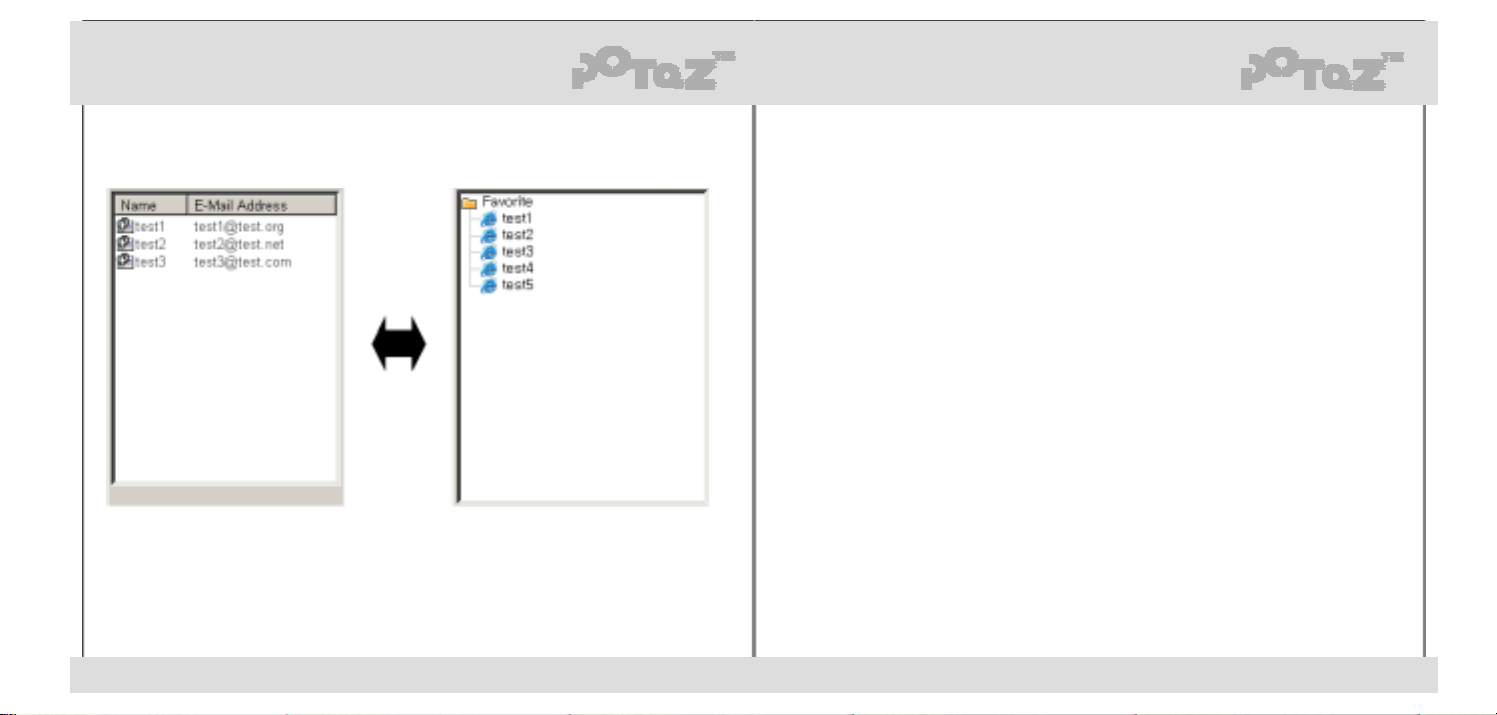
(10) View/Help menu (11) Other important information on E-MAILING program
This menu is for setting of program's view.
1. Toggle Address/Favorite : To toggle Address and Favorite view in the left-down.
2. To toggle tool bar : make to show or hide the 'to ol bar '.
3. To toggle Status bar : make to show or hide 'status bar' in bottom of the window.
4. About Plug-In Mail Manager : You can check program version & language.
1. Shortcut Key & Additional function
- Receive mail : F5
- Select all in the mail list window : A
- Remove the selected mail in the mail list window : Del
- Open in new window in the mail list window : Enter
- Sort mail list in the mail list window : Click the Header(From, Subject, Date)
that you want to sort b y orde r.
- Remove the selected folder in the folder list window : Del
- Write a new mail in the address window : Double-click
- Connect to Internet Explorer on the Favorite window : Double-click
- Run th e at tached file in “Attached File Mana ge r ” : Double-clic k
2. Program Update
- You can check your program version in Help menu : “About Plug-In Mail Manager”.
- Please visit our Homepage to update the program.
- Hom epa ge : http://www.po ta z.com
http:// www.rundisk.co.kr
3. Inquiry & update requi r em en ts
- If you have any questions about our products or programs,
Please call us or leave your opinion in our homepage.
We're ready to answer with our best.
53 54
http://www.potaz.com http://www.potaz.com
Page 29
10. Appendix
(1) Check points before enquiry
If the device does not function properly, please check once again before enquiry!
1. If the power doesn't turn on.
• Check the remaining battery capacity.
• Check if the battery is inserted in according to its polarity marked in compartment.
• Try to turn the power on again after extracting and reinsertingthe battery.
2. If there is no sound or too much noise.
• Check if the volume is set to “0”.
• Files with damaged data can cause noise or break. Try to playback a different file.
3. If FM radio is not received.
• Try different directions for earphone.
• Move to window side if you use the device indoors.
• Check if earphone is being connected properly. Earphone functions as antenna
for reception of radio signal.
4. If LCD displays unidentifiable letters.
• Go to MENU -> 3. SYSTEM -> 3. LANGUAGE and check if language is set properly.
5. If you can’t download.
• Check if the computer and the player are being connected properly with USB cable.
6. If the device cannot recognize files or stop playback
• Check if it is identified as removable disk, back up and formatthe data.
• Go to MENU -> 4. MEMORY -> 2. FORMAT and try to format again.
55 56
http://www.potaz.com http://www.potaz.com
2) Warrant
1. This is strict quality-tested product.
2. If customer used the product properly and normally, sales agent of the purchase or
registered customer service center will fix any breakdown ofthe device free of charge
during warranty period.
3. If warranty period expires or in case of chargeable service as follows though within
the warranty period, service fee will be charged.
- Breakdown from reckless use
- Breakdown from any modification or dismantlement at customer’s discretion.
- Breakdown from natural disaster such as fire, drought, flood, or earthquake
4. Present this Warrant Statement always when claiming repair service.
5. Please keep the Warrant Statement, for it is not to be replaced for loss.
6. This Statement is valid only in Korea.
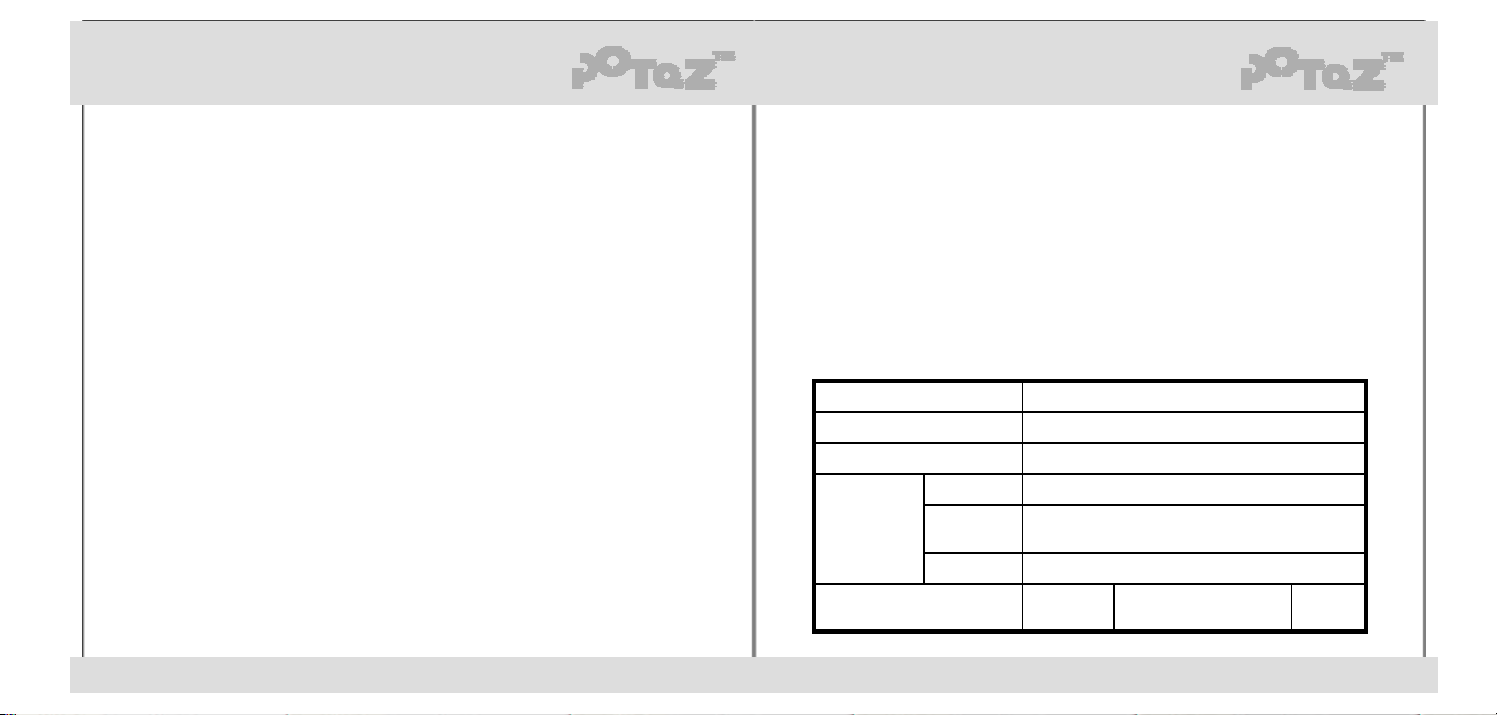
At the time of sales, fill out customer’s name and purchase date in the box below.
Product
Model Name
Production Number(P/No.)
Customer
Contact No.
Date of Purchase
Name
Contact
No.
Address
Warranty Period
Duration
1 year
Page 30
REGULATORY INFORMATION
Radio Frequency Interference Requirements
Caution: Changes or Modifications not expressly approved by the party responsible for compliance could void the
users authority to operate the equipment.
This equipment has been tested and found to comply with the limits for a Class B digital device, pursuant to Part
15 of the FCC Rules. These limits are designed to provide reasonable protection against harmful interference in a
residential installation. This equipment generates, uses and can radiate radio frequency energy and, if not
installed and used in accordance with the instructions, may cause harmful interference to radio communications.
However, there is no guarantee that interference will not occur in a particular installation. If this equipment does
cause harmful interference to radio or television reception, which can be determined by turning the equipment off
and on, the user is encouraged to try to correct the interference by one or more of the following measures:
Reorient or relocate the receiving antenna.
Increase the separation between the equipment and receiver.
Connect the equipment into an outlet on a circuit different fromthat to which the receiver is connected.
Consult the dealer or an experienced radio/TV technician for help.
This device complies with Part 15 of the FCC Rules. Operation issubject to the following two conditions: (1) this
device may not cause harmful interference, and (2) this device must accept any interference received, including
interference that may cause undesired operation.
57 58
http://www.potaz.com http://www.potaz.com
Note.
 Loading...