

Xineron XIN-VCL-0510 Installation Manual
INSTALLATION MANUAL

2
DISCLAIMER
While every effort has been made to ensure that the information contained in this guide
is accurate and complete, no liability can be accepted for any errors or omissions.
We reserve the right to change the specifications of the hardware and software
described herein at any time without prior notice.
No part of this guide may be reproduced, transmitted, transcribed, stored in a retrieval
system, or translated into any language in any form, by any means, without prior written
permission of us.
We make no warranties for damages resulting from corrupted or lost data due to a
mistaken operation or malfunction of the Speed Dome Cameras, peripheral devices, or
unapproved/unsupported devices.

3
W ARNING AND CAUTION
WARNING
TO REDUCE THE RISK OF FIRE OR ELECTRIC SHOCK, DO NOT EXPOSE THIS
PRODUCT TO RAIN OR MOISTURE. DO NOT INSERT ANY METALLIC OBJECTS
THROUGH THE VENTILATION GRILLS OR OPENINGS ON THE EQUIPMENT.
CAUTION
The lightning flash with arrowhead symbol, within an equilateral triangle, is
intended to alert the user to the presence of uninsulated “dangerous
voltage” within the product’s enclosure that may be of sufficient magnitude
to constitute a risk of electric shock to persons.
The exclamation point within an equilateral triangle is intended to alert the
user to the presence of important operating and maintenance (servicing)
instruction in the literature accompanying the product.

4
FCC COMPLIANCE STATEMENT
CE COMPLIANCE STATEMENT
FCC INFORMATION: THIS EQUIPMENT HAS BEEN TESTED AND FOUND TO
COMPLY WITH THE LIMITS FOR A CLASS A DIGITAL DEVICE, PURSUANT TO
PART 15 OF THE FCC RULES. THESE LIMITS ARE DESIGNED TO PROVIDE
REASONABLE PROTECTION AGAINST HARMFUL INTERFERENCE WHEN
THE EQUIPMENT IS OPERATED IN A COMMERCIAL ENVIRONMENT. THIS
EQUIPMENT GENERATES, USES, AND CAN RADIATE RADIO FREQUENCY
ENERGY AND IF NOT INSTALLED AND USED IN ACCORDANCE WITH THE
INSTRUCTION MANUAL, MAY CAUSE HARMFUL INTERFERENCE TO RADIO
COMMUNICATIONS. OPERATION OF THIS EQUIPMENT IN A RESIDENTIAL
AREA IS LIKELY TO CAUSE HARMFUL INTERFERENCE IN WHICH CASE THE
USER WILL BE REQUIRED TO CORRECT THE INTERFERENCE AT HIS OWN
EXPENSE.
CAUTION: CHANGES OR MODIFICATIONS NOT EXPRESSLY APPROVED BY
THE PARTY RESPONSIBLE FOR COMPLIANCE COULD VOID THE USER'S
AUTHORITY TO OPERATE THE EQUIPMENT.
THIS CLASS A DIGITAL EQUIPMENT COMPLIES WITH CANADIAN ICES-003.
CET APPAREIL NUMÉRIQUE DE LA CLASSE A EST CONFORME À LA
NORME NMB-003 DU CANADA.
WARNING
THIS IS A CLASS A PRODUCT. IN A DOMESTIC ENVIRONMENT THIS
PRODUCT MAY CAUSE RADIO INTERFERENCE IN WHICH CASE THE USER
MAY BE REQUIRED TO TAKE ADEQUATE MEASURES.

5
IMPORTANT SAFEGUARDS
1. Read these instructions.
2. Heed all warnings.
3. Follow all instructions.
4. Do not use this equipment near water.
5. Clean only with dry cloth.
6. Do not block any ventilation openings. Install in accordance with the manufacturer's
instructions.
7. Do not install near any heat sources such as radiators, heat registers, stoves, or other
equipment (including amplifiers) that produce heat.
8. Do not defeat the safety purpose of the polarized or grounding-type plug. A polarized
plug has two blades with one wider than the other. A grounding type plug has two
blades and a third grounding prong. The wide blade or the third prong is provided for
your safety. If the provided plug does not fit into your outlet, consult an electrician for
replacement of the obsolete outlet.
9. Protect the power cord from being walked on or pinched, particularly at plugs,
convenience receptacles, and the point where they exit from the equipment.
10. Only use attachments/accessories specified by the manufacturer.
11. Unplug this equipment during lightning storms or when unused for long periods of
time.
12. Refer all servicing to qualified service personnel. Servicing is required when the
equipment has been damaged in any way, such as power-supply cord or plug is
damaged, liquid has been spilled or objects have fallen into the equipment, the
equipment has been exposed to rain or moisture, does not operate normally, or has
been dropped.
13. CAUTION - THESE SERVICING INSTRUCTIONS ARE FOR USE BY QUALIFIED
SERVICE PERSONNEL ONLY. TO REDUCE THE RISK OF ELECTRIC SHOCK
DO NOT PERFORM ANY SERVICING OTHER THAN THAT CONTAINED IN THE
OPERATING INSTRUCTIONS UNLESS YOU ARE QUALIFIED TO DO SO.
14. Use Certified/Listed Class 2 power supply transformer only.

6
TABLE OF CONTENTS
DISCLAIMER .................................................................................................................................. 2
WARNING AND CAUTION ......................................................................................................... 3
FCC COMPLIANCE STATEMENT ................................................................................................ 4
CE COMPLIANCE STATEMENT .................................................................................................. 4
IMPORTANT SAFEGUARDS ........................................................................................................ 5
INTRODUCTION............................................................................................................................ 7
CONTENT VERIFICATION ........................................................................................................... 8
DIMENSIONS ................................................................................................................................. 8
ADJUSTING THE 3-AXIS BRACKET ........................................................................................... 9
WIRING DIAGRAM ................................................................................................................... 10
REMOTE CONTROLLER KEYS & DESCRIPTIONS ................................................................ 12
ADJUSTING THE LENS & SETUP MENU .............................................................................. 13
OSD MENU CONTROLS & NAVIGATION ............................................................................ 14
FOCUS ................................................................................................................................... 15
WB SETUP (WHITE BALANCE SETUP) ............................................................................ 16
AE SETUP (AUTO EXPOSURE SETUP) ............................................................................. 17
BLC SETUP (BACK LIGHT COMPENSATION) ................................................................ 18
SPECIAL ................................................................................................................................ 20
DISPLAY ................................................................................................................................ 22
FUNCTION ............................................................................................................................ 23
IR RADIATOR ....................................................................................................................... 26
TECHNICAL SPECIFICATION ................................................................................................... 27

7
INTRODUCTION
Features
The ZOOMMATIC Cameras feature high resolution 1/4” Interlace transfer CCD Imager for
enhanced lowlight sensitivity. User-friendly, on-screen pull-down menus and short-cuts
make it easy to setup and program functions.
Super Resolution – 550 TV Lines
True Night Shot function with ICR Day/Night function
Auto Focus & Auto Iris
0.1 Lux(Color w/ Normal Mode), 0.01 Lux(B/W), 0.0001 Lux(DSS On)
OSD for Camera Setup
8 programmable presets
Home Function
RS-485 Communication
EZ-CoaxTM Communication (Telemetry Control)
IR Remote Controller
10X A/F Optional Zoom Lens(3.8~38mm), 16X Digital ZOOM
24 power IR LEDs
1 Relay Out
1 Alarm In
IR Adjustments: On/Off, & Brightness Level
IR Distance: Up to 150 ft
Fan & Heater (Built-in)
Weatherproof – IP66
12DC / 24VAC
8
CONTENT VERIFICATION
Before installing the camera, please make sure that the following items are included in the
box:
1. Integrated Camera
2. Sunshield
3. Remote Controller(Optional)
4. Instruction Manual
5. Mounting Hardware
If any of these materials are missing, please contact the vendor customer service
department immediately.
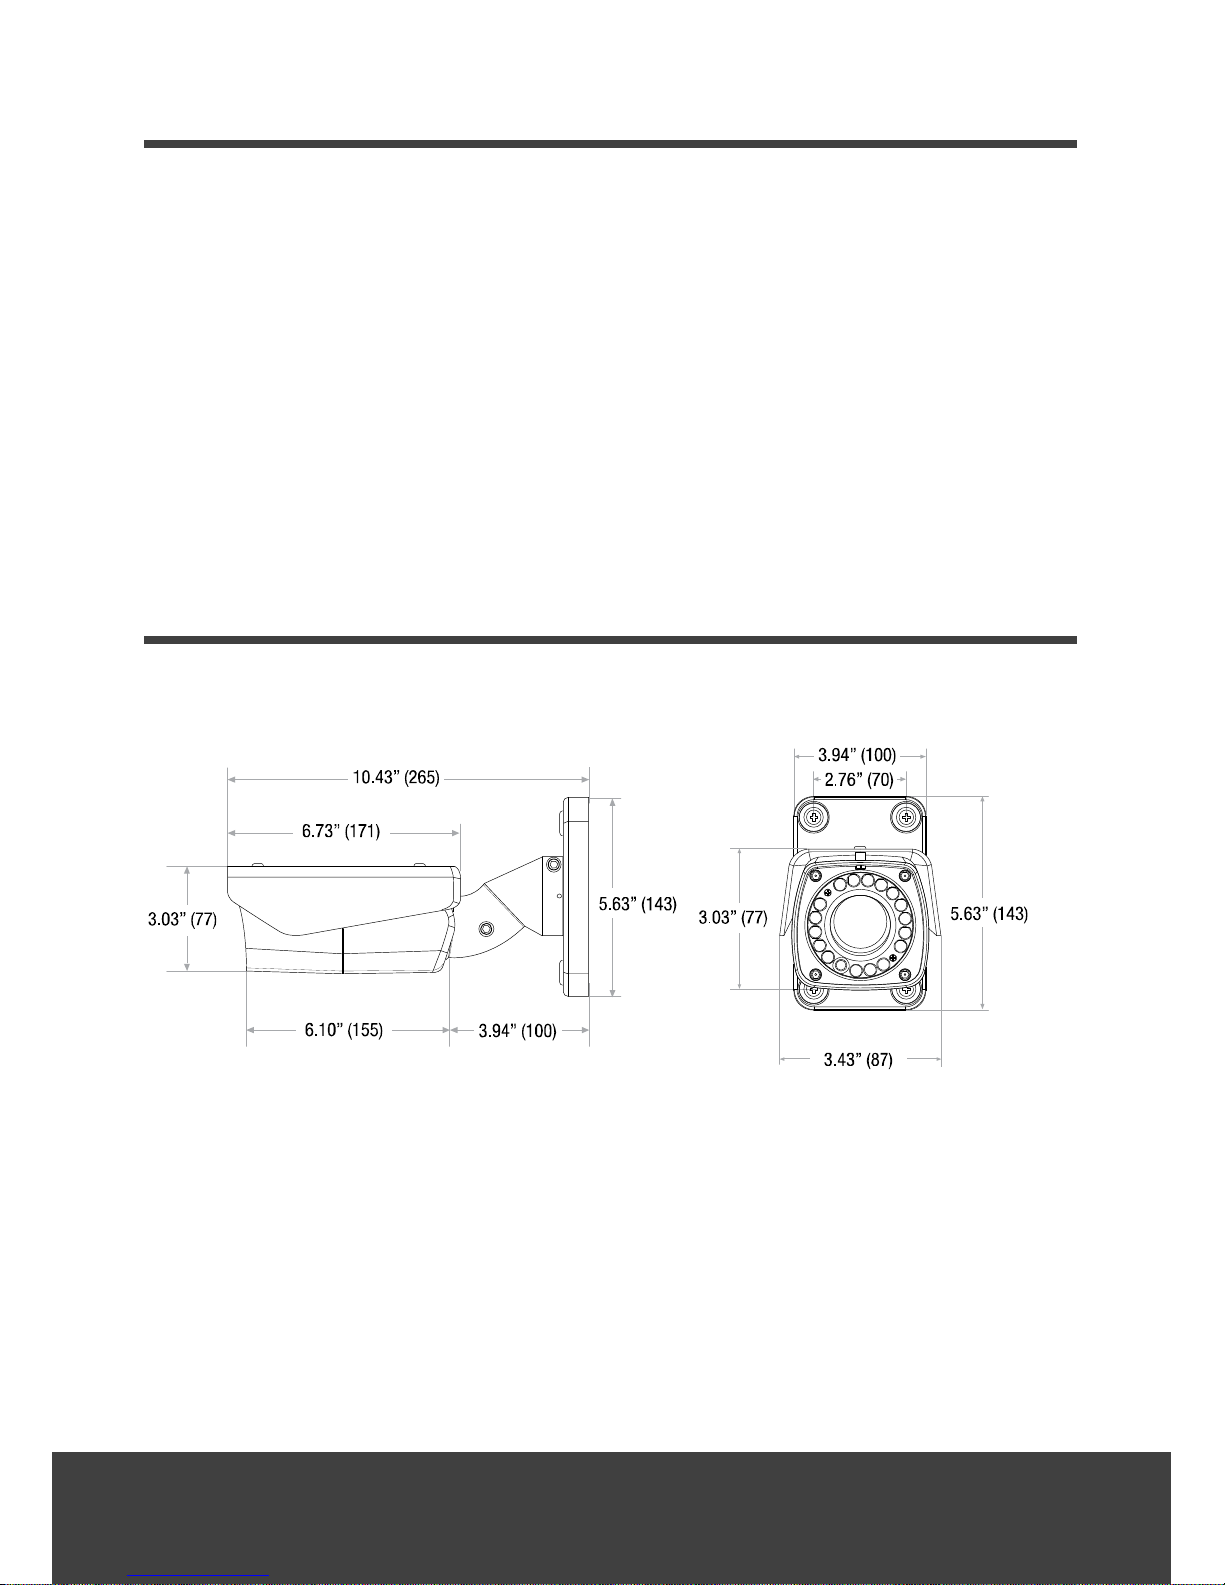
DIMENSIONS
Unit : Inch (mm) :
9
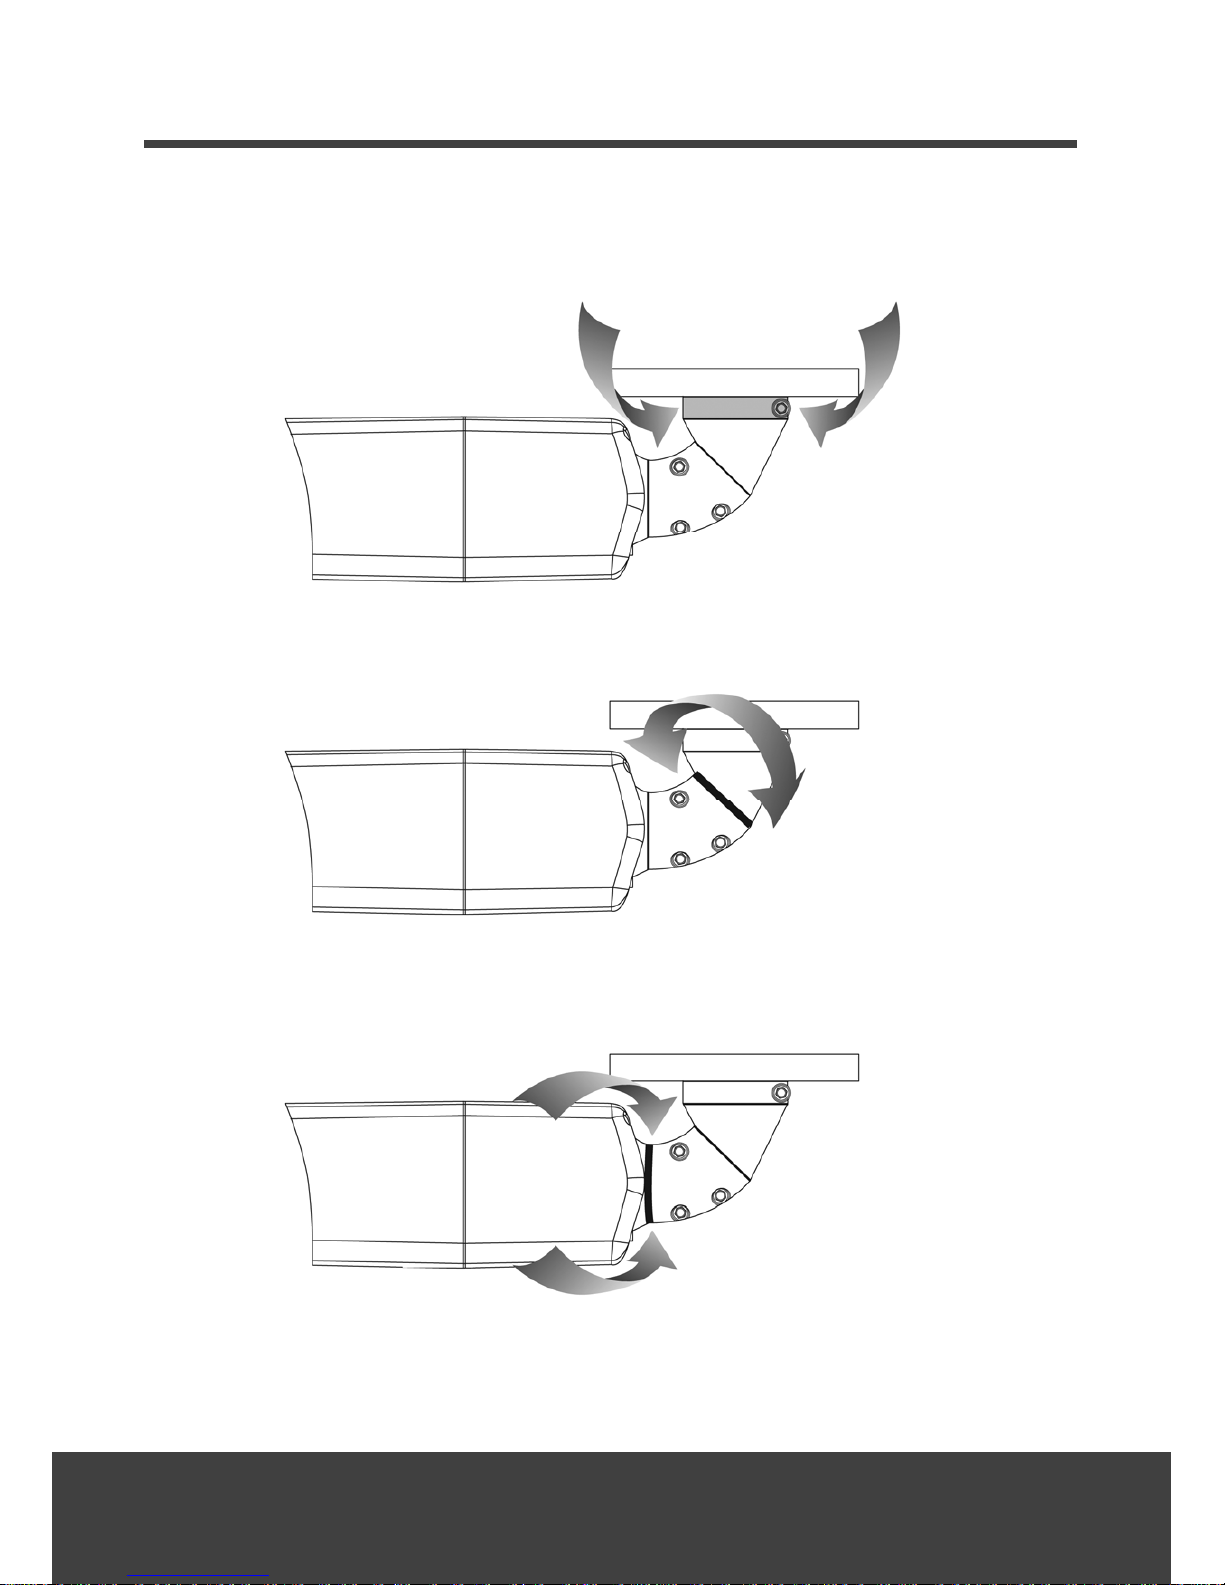
ADJUSTING THE 3-AXIS BRACKET
Loosen the corresponding screws before attempting to make Pan, Tilt and Rotation
adjustments.
 Loading...