

Page 1

®
INSTRUCTIONS
DIGITAL TO ANALOG CONVERTOR
DAC-8
Page 2

DAC-8
DIGITAL TO ANALOG CONVERTOR
COPY RIGHT
The copyright is in procession of CHENGDU XINDAK ELECTRONIC (XINDAK). Without permission
in written from Xindak, anyone can not copy or spread any content in this manual in any form.
TRADEMARK:
All the trademark and names which are mentioned in this manual are in procession of Xindak.
NOTICE
Please do not tear any sticker on this appliance. Otherwise, it will influence the cognizance on
production date.
Since the swift development on technology, there may be some outdated description which is not
applicable any more, please understand.
Our company does not assure that there will be no updating version on this manual when there is no
mistake or neglect. If there is any change on the manual, there will be no notice.
Page 3

DAC-8
Chapter 1
CAUTION
Important Safety Instruction
!
!
Dangerous Voltage
The lightning flash with arrowhead symbol, within an equilateral triangle,
is intended to alert the user to presence of uninsulated “Dangerous
voltage” within the product’s enclosure that may be of sufficient magnitude
to constitute a risk of electric shock to persons.
Important Instructions
The exclamation point within an equilateral triangle is intended to alert the
user to presence of important operating and maintenance (servicing)
1
Page 4
DAC-8
Chapter 2
Notice
2.1 Before Use
Please read all instructions and precautions carefully and completely before operating your DAC-8 Digital D/A Converter.
1.Read these instructions.
2.Keep these instructions.
3.Heed all warnings.
4.Follow all instructions.
5. Do not use this apparatus near water.
6. Clean only with dry cloth.
7. Always keep this unit out of the reach of children.
8. Do not install near any heat sources such as radiators, heat registers, stoves, or other apparatus ( including amplifiers) that
produce heat.
9. Protect the power cord from being walked on or pinched particularly at plugs, convenience receptacles, and the point where
they exit from the apparatus.
10. Unplug this apparatus during lightning storms or when unused for a long time.
11. Always disconnect your entire system from the AC mains before connecting or disconnecting any cable, or when cleaning any
component.
12. This product must be terminated with a three conductor AC mains power cord which includes an earth ground connection, to
prevent shock hazard, all three connections must always be used.
13. AC extension cords are not recommended for use with this product.
14. Never use flammable or combustible chemicals for cleaning audio components.
15. Never operate this product with any cover removed.
16. Never pour or spill liquids directly onto this unit.
17. Never block air flow through ventilation slots or heat sinks.
18.Never by pass any fuse.
19. Never replace any fuse with a value or type other than those specified.
20. Never attempt to repair this product, if a problem occurs, contact your dealer.
21. Never expose this product to extremely high or low temperatures.
22. Never operate this product in an explosive atmosphere.
2.2 Check Accessory
Unpack your DAC-8 products and keep all packing materials for future transport or service, locate and remove all
accessory items from the accessory box within the shipping carton.
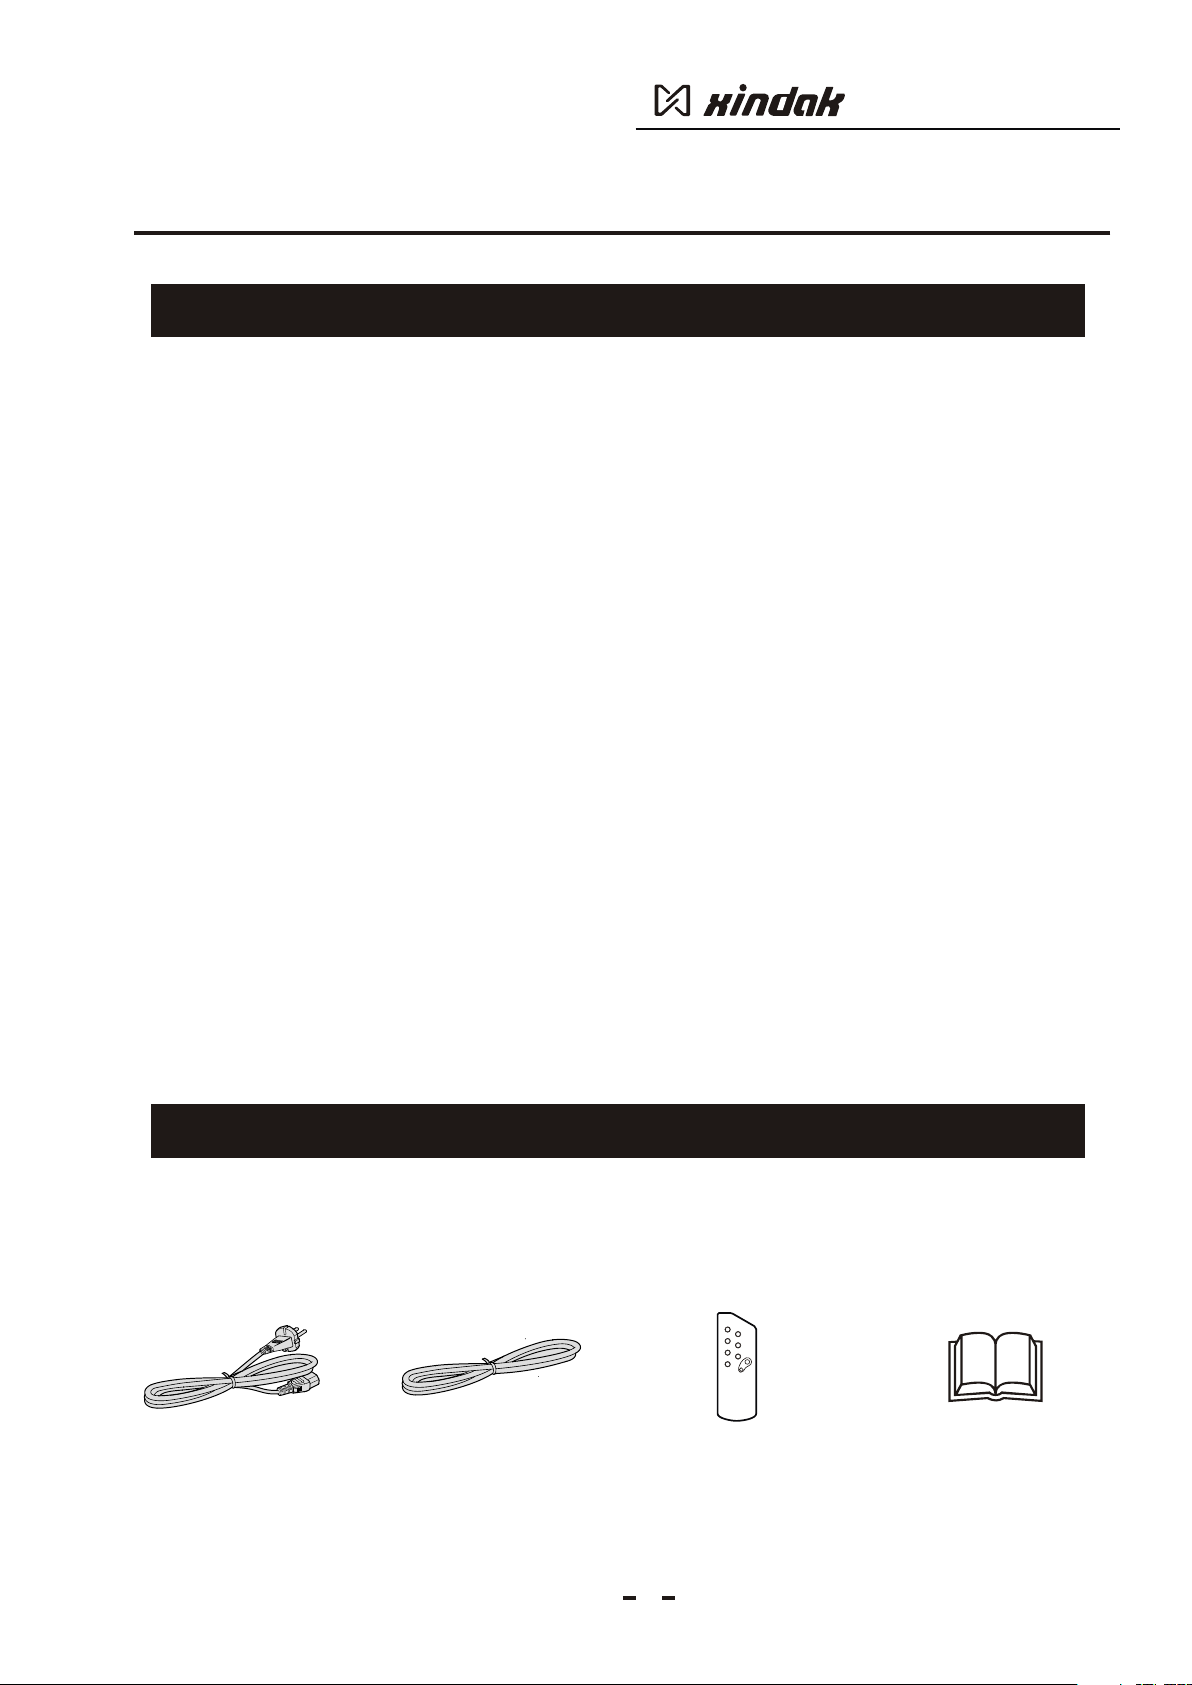
Accessories Included:
POWER
MUTE
COAXIAL
MODE
OPTICAL
DIMMER
VOLUME
USB
+
-
REMOTE CONTROLLER
1. AC power cord × 1
2. Optical fiber× 1
3. Remote Controller × 1
3. Users’ manual (This manual)
2
Page 5
DAC-8
Chapter 2
2.4 For Using the Remote Controller
Install Batteries
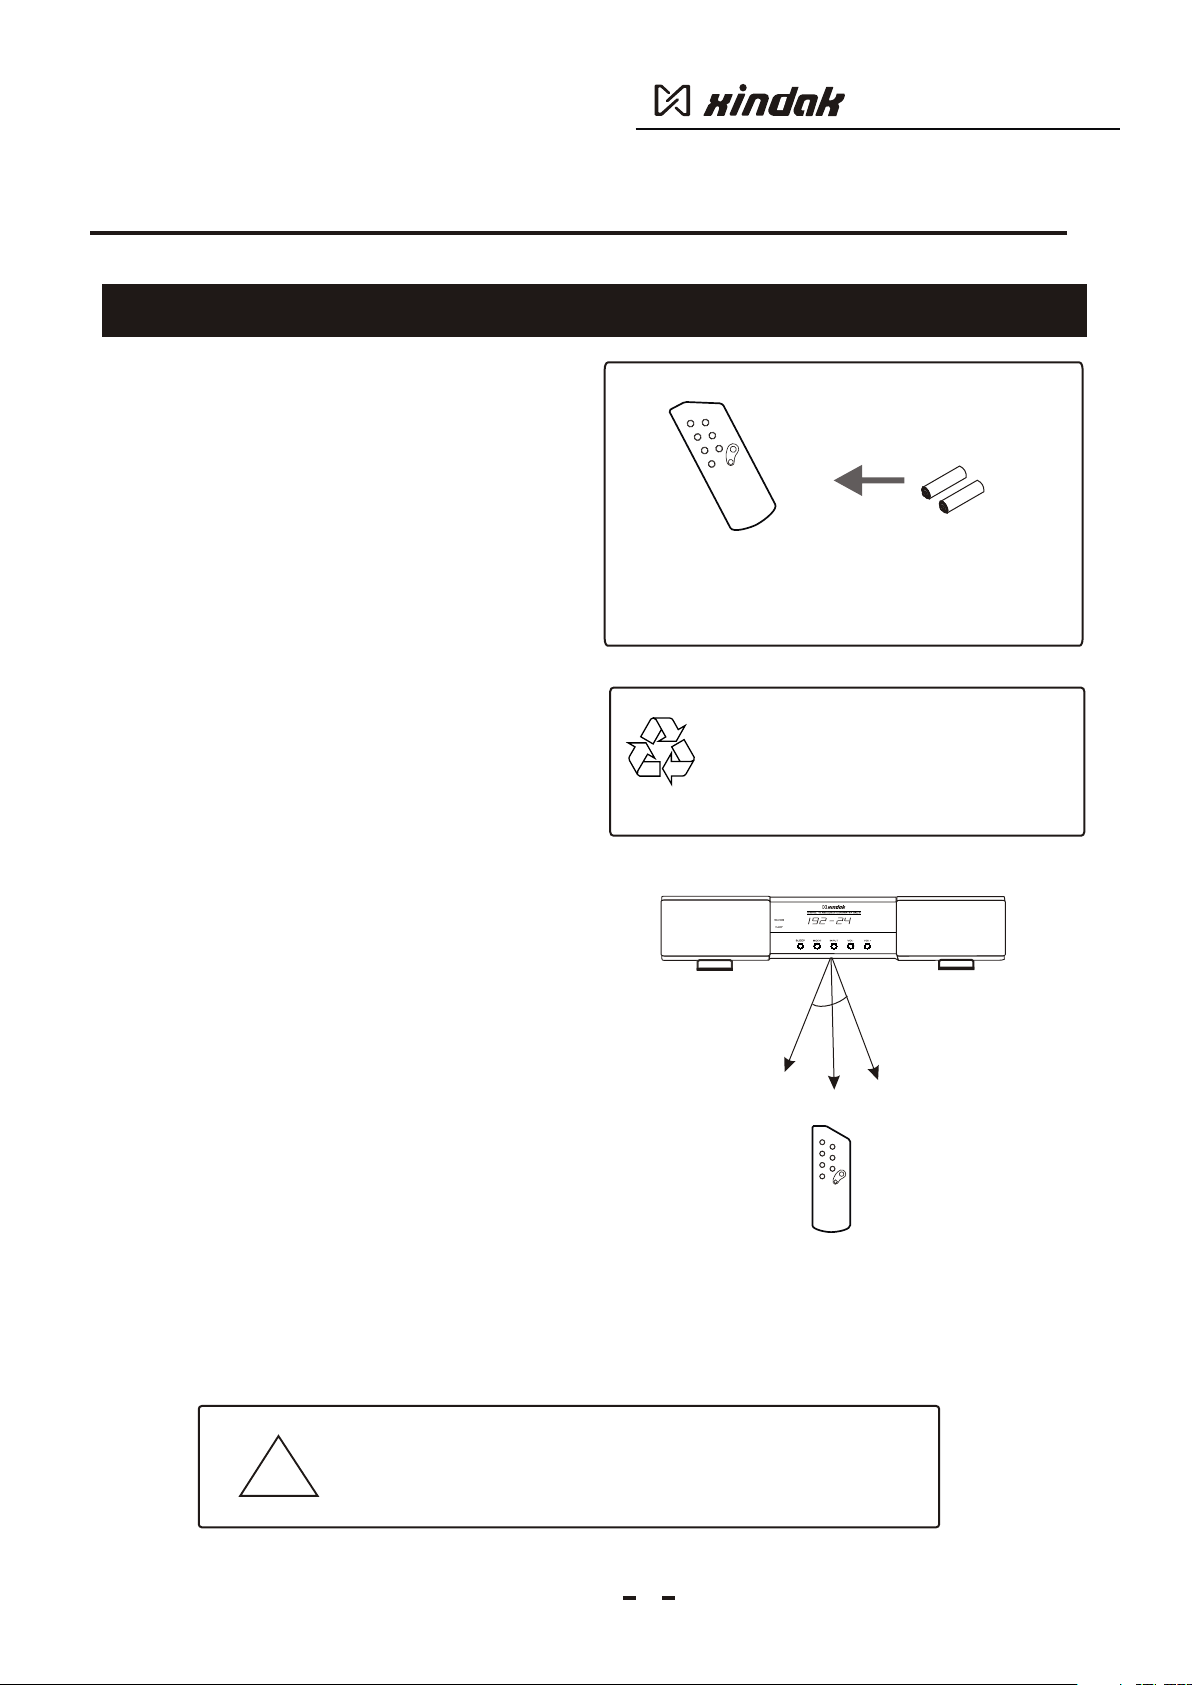
Before using the remote controller for the first time, you need install
the new battery in the remote controller.
Process
1. Use the tool to remove the rear cover of the remote control unit.
2. Install the 2 batteries (AAA)
with correct +/-
3. Reinstall the rear cover of the remote control unit.
Battery Replacement
1. Use the tool remove the rear cover of the remote control unit.
2. Take out the old batteries from remote control unit.
. Install the 2 batteries (AAA) polarity.
3 with correct +/-
4. Reinstall the rear cover of the remote control unit.
Caution
1. Do not use new and old batteries simultaneously.
2. Batteries with similar shapes may have different rated voltage,
be sure to use the correct batteries.
3. Remove batteries from the remote control unit if it will not be used
for a long period of time.
polarity.
Precaution
E
T
R
U
M
OWE
P
E
D
L
O
IA
M
X
AC
O
E
UM
OL
V
EDIMMR
A
IC
PT L
O
+
SB
U
-
R
LR
O LE
OTE CONTR
M
E
AAA Batteries
Install Batteries
Battery Reclaim
Please send the waste batteries to local battery
reclaim center. DO NOT discard the waste
batteries discretionarily, in order to avoid
environment pollution.
IR Sensoer
Using Remote Controller
If you use the remote control unit to control the amplifier:
1.The remote control range is approximately 5 meters.
2.Pointing the remote control on an angle to the receiver, will
shorten the useful distance of the remote control.
Incorrect use of batteries
!!
The lower temperature, the
30°30°
3
3
°0
°0
POWER
MUTE
COAXIAL
MODE
OPTICAL
DIMMER
VOLUME
USB
+
-
REMOTE CONTROLLER
may cause corrosion or damage.
n shorter battery life.
3
Page 6
DAC-8
Chapter 3
Introduction
3.1 Product Features
Dear user, thank you for purchasing our DAC-8 Digital D/A Convertor. This is a specially-designed model for the
audiophiles who have high requirements on the sound-reproduction ability. As a high quality stereo Digital/Analog Audio
Convertor of both 24Bit/96KHz and 24Bit/192KHz, it’s extremely suitable for the owners of VCD, DVD and CD player as
well as computer owners to upgrade their current audio system.
In order to improve the sound quality, Xindak engineers have also used patent technology on avoiding dynamic invalidation
of capacitors, which could decrease the distortion on the High especially. It can upgrade the digital signal recorded in PCM
format of common CD player to 24Bit/192Khz to achieve higher processing precision and highly improve the dynamics and
treble extension, making the sound more mellow with richer soundstages.
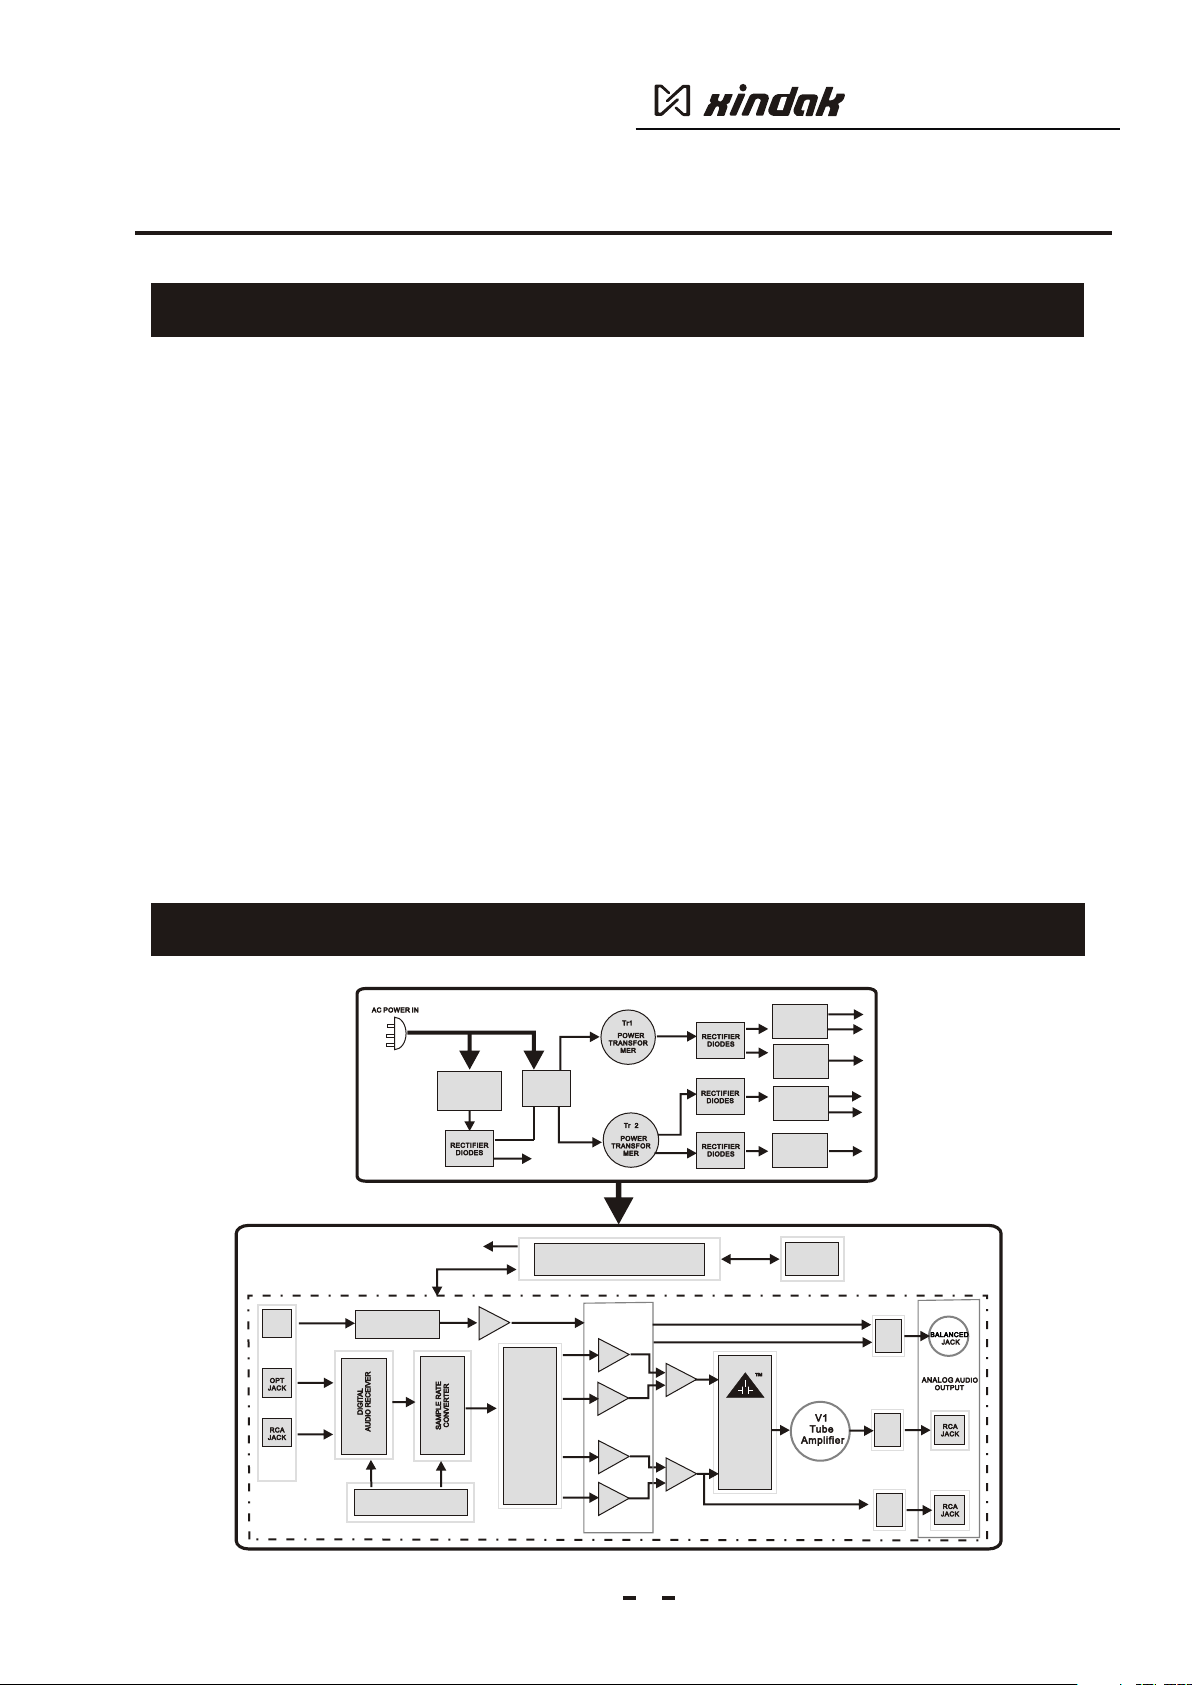
It adopts AD1852 24Bit/192KHz of AD company to convert digital signal to analog signal. The analog filtering circuit adopts
low-noise resistance and OPA2064 of BB company. The double annular transformers and six independent stable power
supplies can afford abundant and pure power to the circuits and ensure their most stable and best working status.
Additionally, it also corrects the Jetter time base errors at the same time. The 6922EH(JJ E88CC) tube for the analog
output amplifying to achieve exquisite and mellow sound.There are three output ports available: signal-terminal tube
analog RCA output port, OPA analog RCA output port and OPA balanced output port to afford various chooses for the
users.
3.2 Block Diagram
LL
GG
NN
USB
JACK
DIGOTAL
INPUT
USB
D/A CONVERTER
U3,U5 ,XT1 MASTER CLOCKU3,U5 ,XT1 MASTER CLOCK
Tr3
power
TRANFORMER
+5VD+5VD
DIGITAL
DIGITAL
ANALOG
ANALOG
CONVERTER
CONVERTER
POWER
RELAY
TO
TO
MAIN
Microcontroller
C-BIAS TECHC-BIAS TECH
avoiding
avoiding
dynamic
dynamic
invalida tion
invalida tion
of
of
capacito rs
capacito rs
DIGITAL
DIGITAL
POWER
POWER
ANALOGUE
ANALOGUE
POWER
POWER
ANALOGUE
ANALOGUE
POWER
POWER
ANALOGUE
ANALOGUE
POWER
POWER
DISPLAYDISPLAY
+5VD+5VD
+6.3V+6.3V
+5VA+5VA
+12V+12V
-12V-12V
+100V+100V
4
Page 7
DAC-8
Chapter 3
3.3 Front panel
IR SensoerIR Sensoer
3 4
21 9
5 7
6
8
Introduction
10
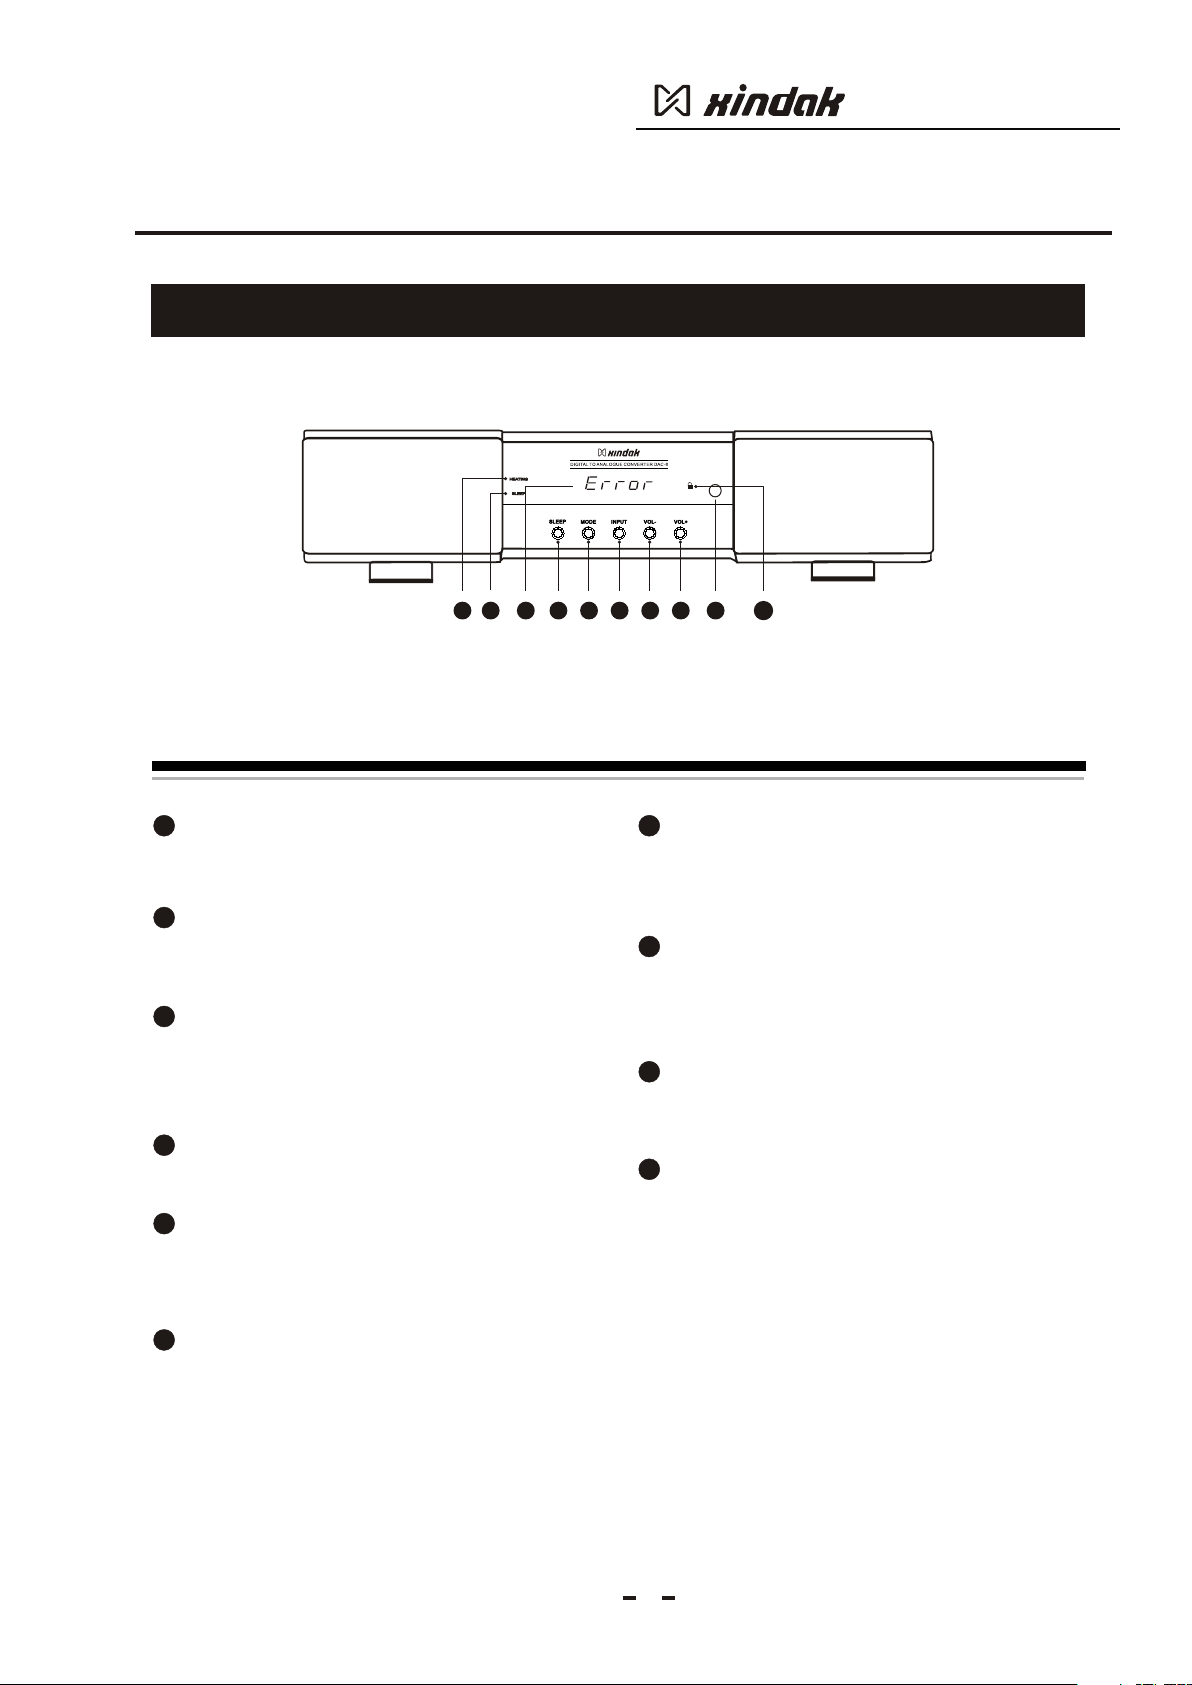
Indicator for warm-up:
1
It needs 30 seconds for system warm-up after
power on. During this period, the window will display
the rest warm-up time needed.
Sleep indicator:
2
Press the sleep button on panel or power button on
remote control, and then the D/A converter will enter
"sleep" mode this indicator will be light.
Receiver error indicator:
3
When there is serial data which is no PCM format
inputted from optical fiber or coaxial input, or plug
and unplug the digital cable in wrong way, the
product will stop work and enter production state.
The display screen will display "error".
Sleep button:
4
Press this button to make the D/A converter enter
"sleep" mode.
Mode button:
5
Press this button, can set the work mode as
192kHz/24bit or 96kHz/24bit. The display screen will
display corresponding work mode.When the input
is USB, this button does not work.
Input Selection Button:
6
Press this button can select between "COA”
coaxial input, "Opt” optical fiber input and PC
USB digital input. The display screen will
display the corresponding input way.
Vol- button:
7
Press this button can reduce analogy output
volume. The display screen will display current
volume level. Min is 0. When the input is USB,
this button does not work.
8
Vol+ button:
Press this button can increase the analog
volume, and the display screen will display
current volume level, max is 60.When the input
is USB, this button does not work.
9
Sensor window for remote control
The remote control receiving window will
receive the controlling signal produced by the
remote controller.
10
Digital Signal locked indicator:
This indicator will be light when the steady digital
signal are received. When the input is USB, this button
does not work.
5
Page 8
DAC-8
Chapter 3
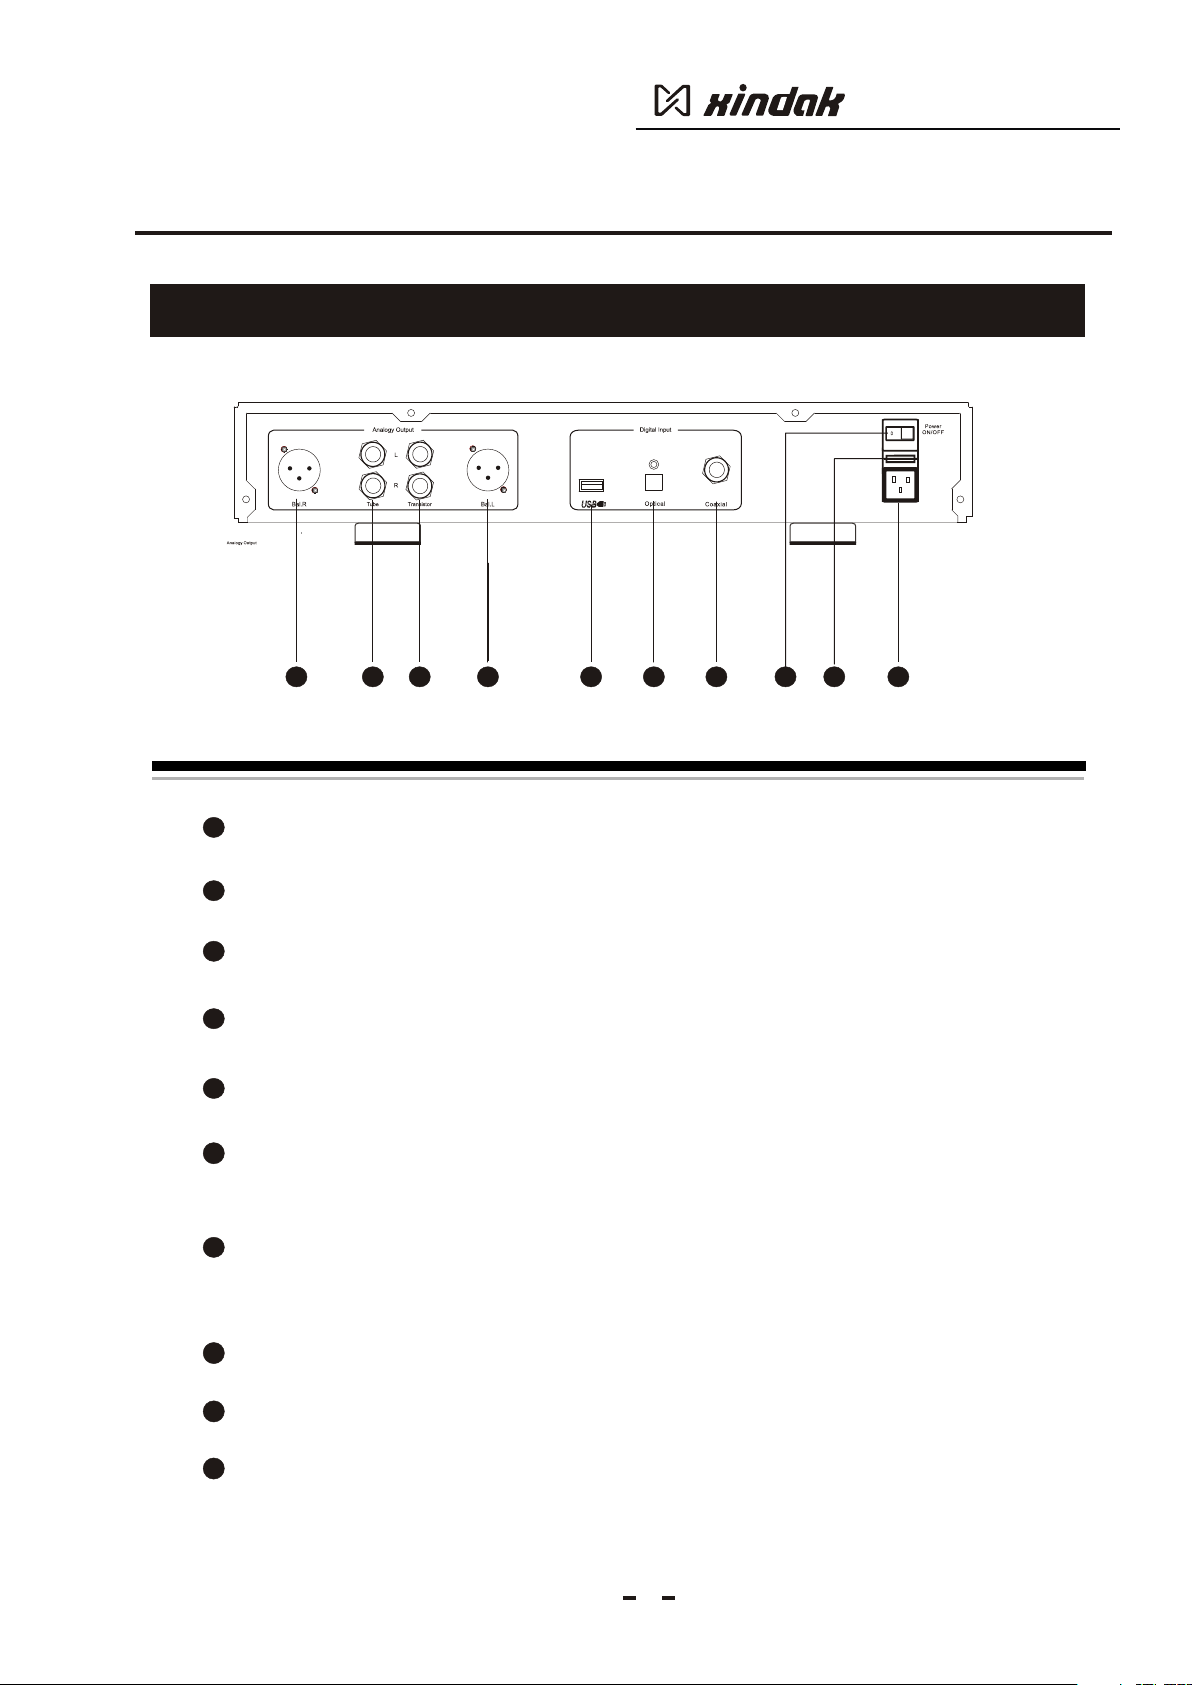
3.4 Rear Panel
1 2
Introduction
1
3
4
5
6
7
8 9
10
Right Balanced Audio Output Terminal
1
Output the balanced audio signal (analog stereo)amplified by transistor to the input port on the amplifier.
2
Audio Output Terminal
Output the analog stereo audio signal amplified by tube to the input port on the amplifier.
3
Audio Output Terminal
Output the analog stereo audio signal amplified by transistor to the input port on the amplifier.
4
Left Balanced Audio Output Terminal
Output the balanced audio signal (analog stereo) amplified by transistor to the input port on the amplifier.
5
USB Input Socket
Please connect this port to the computer by USB connection cable. (USB connection cable is not attached).
Digital Optical Input Terminal
6
t is used to input the digital audio signal. You could input the digital audio signal of the CD, VCD, DVD or the
I
computer to this unit by Optics cable.
7
Digital Coaxial Input Terminal
It is used to input the digital audio signal. You could input the digital audio signal of the CD, VCD, DVD or the
computer to this unit by .
8
Power ON/OFF
Press this button turn on or turn off the power.
9
Fuse Socket
Use to install the fuse.
AC Input Socket
10
75Ohm coaxial cord
Connect the power cord to the AC inlet.
6
Page 9
DAC-8
Chapter 3
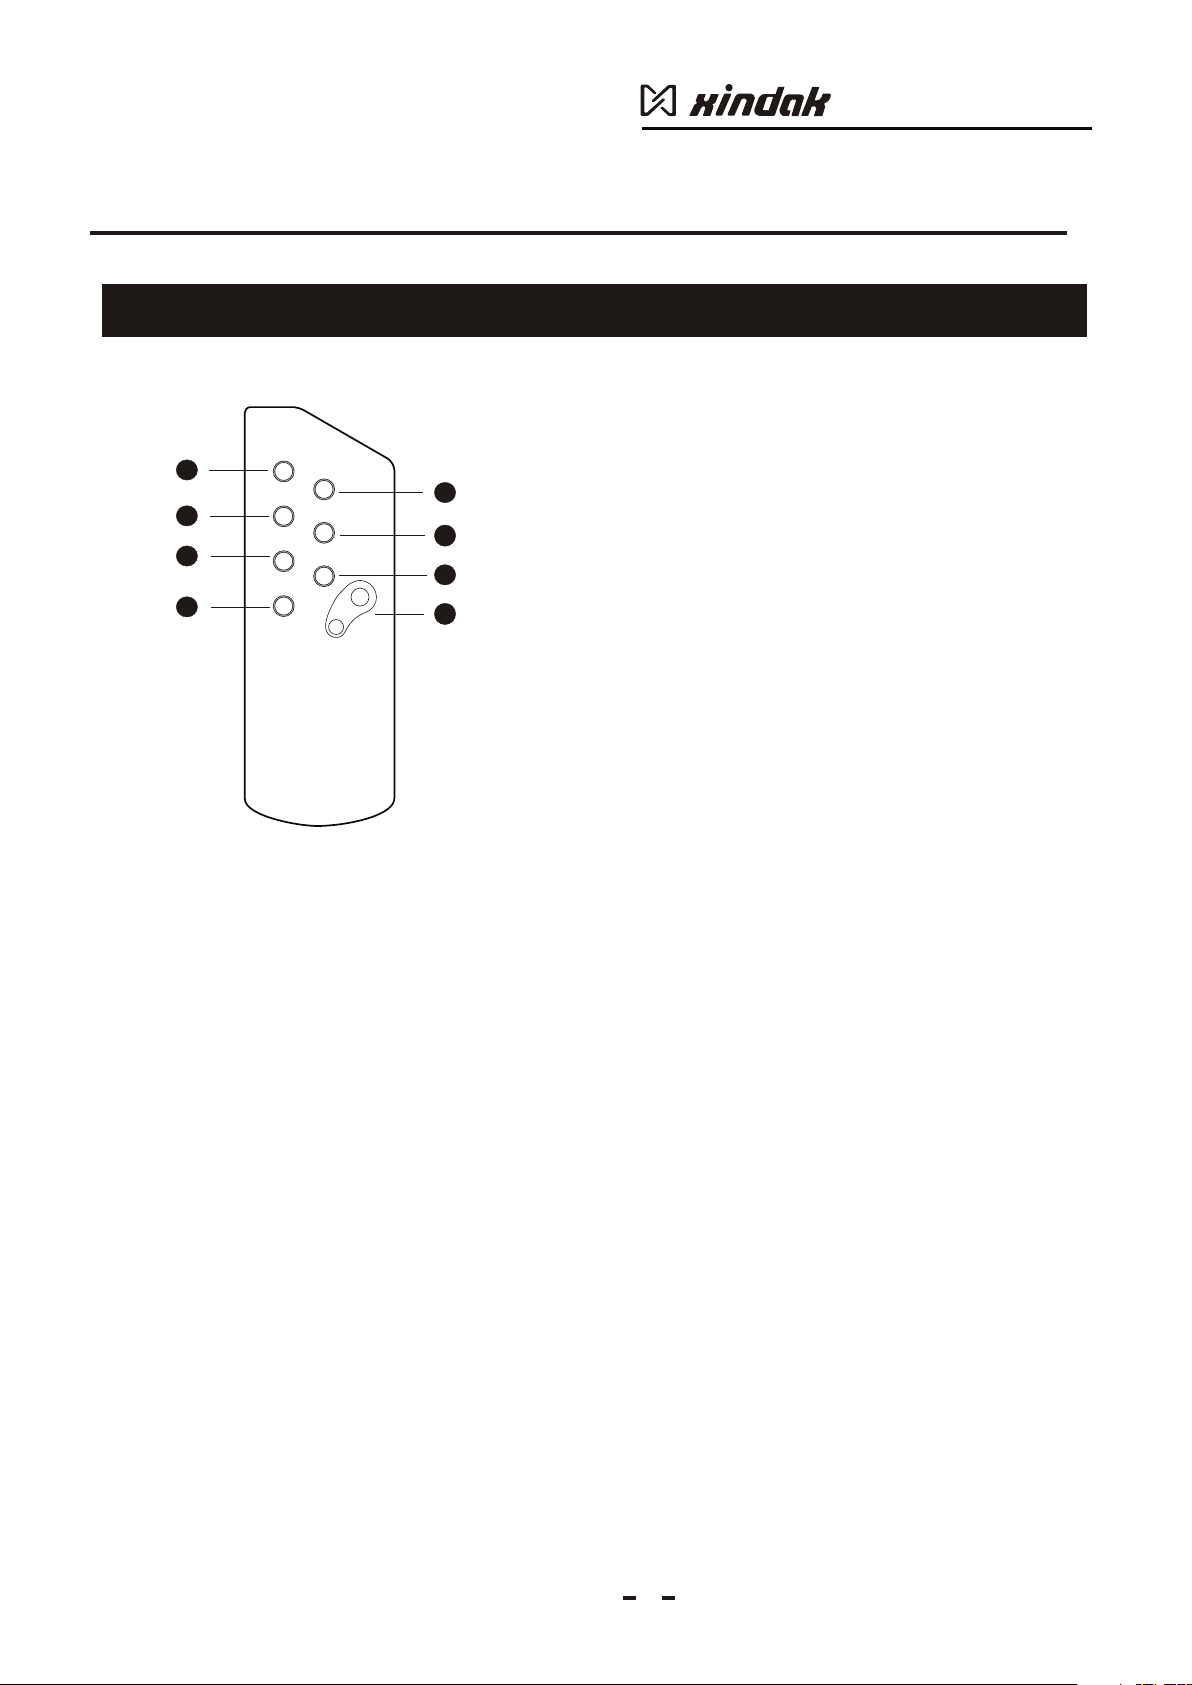
3.5 Remote Controller
POWER
1
2
3
4
MUTE
COAXIAL
MODE
OPTICAL
DIMMER
USB
REMOTE CONTROLLER
Precaution
1. Power Button:
Press this button to make the D/A converter enter "sleep”
mode.
5
6
VOLUME
+
-
7
8
2. COAXIAL Button:
Press this button can select "COA” coaxial input.
3.OPTICAL Button:
Press this button can select "Opt” optical fiber input .
4.USB Button:
Press this button can select PC USB digital input.
5. MUTE Button:
Press this button, for turn on or turn down the output
volume.
When the product is in mute state, the display screen
will display "VOL:---”corresponding function.
6. MODE Button:
Press this button, can set the work mode as 192kHz/24bit or
96kHz/24bit. The display screen will display corresponding
work mode.When the input is USB, this button does not
work.
7.DIMMER Button:
(not available for this unit).
8. Volume Control Button:
Press " Vol+" button can reduce analogy output volume.
The display screen will display current volume level. Min is
0. When the input is USB, this button does not work.
Press "Vol-" button can increase the analog volume, and
the display screen will display current volume level, max is
60.When the input is USB, this button does not work.
7
Page 10
DAC-8
Chapter 4
4.2 Specification
System: Stereo audio digital to analog converter
Temperature: +5°C~+35°C
Humidity 5%~85%
Power Specifications Specified on rear panel decal
Power Consumption max. 25W
Frequency Range 20Hz-20KHz, 0.5dB
Dynamic Range 114dB
100dB (USB input)
THD +N 0.0008%( )
0.002% (USB input)
Signal-To-Noise Ratio 114dB
105dB (USB input)
Interchannel Crosstalk
Pass Band GainInequality 0.00001dB
Digital Coaxial Input 0.5Vp-p
Digital Coaxial Input Impedance 75Ω
Channel Gain Inequality <0.05dB
Output Voltage 2V(RMS,0dB)
0.002% (USB input)
Dimensions(WΧHΧD) 430mmx104mmx340mm
Specification
With A-Weighted
-120dB
NOTE
Specification and design subject to change without notice for improvements.
8
Page 11
No.126, Section 2, East 1 Round Chengdu, Sichuan, China P.C. 610051
You can find your nearest authorized distributor and more product information on our website:
www.xindak.com
XD3.834.098sms
 Loading...