

StiX
by Xils
User Manual
www.xils-lab.com
1

Table des matières
StiX by Xils.................................................................................................................................................................................................3
Installing StiX.................................................................................................................................................................................. 4
eLicenser drivers..............................................................................................................................................................................4
iLok drivers .....................................................................................................................................................................................4
Windows (XP, VISTA, Windows 7)................................................................................................................................................ 4
Mac (OSX 10.5 and later)................................................................................................................................................................5
Getting Started with StiX.................................................................................................................................................................6
StiX Overview................................................................................................................................................................................ 8
The Drum Pads & Drum Kit area.................................................................................................................................................. 10
Drumkits............................................................................................................................................................................. 10
Managing Drumkits............................................................................................................................................................10
DrumPads Area...................................................................................................................................................................11
Editing Drum Sounds.....................................................................................................................................................................11
The Easy Edit Synthesis Page............................................................................................................................................ 11
The Drum Pad Name Zone and Display (8) :......................................................................................................... 13
The Advanced Edit Page................................................................................................................................................................15
The 3 Envelopes : VCA, VCF, and Pitch EV (1)............................................................................................................... 15
The Filter Section (6)..........................................................................................................................................................17
The Oscillators Section (4).................................................................................................................................................17
Samples management......................................................................................................................................................... 18
LFO Section........................................................................................................................................................................19
The Modulation Matrix Area..............................................................................................................................................19
The Macro Modulation Matrix Area.................................................................................................................................. 20
Pattern Management...................................................................................................................................................................... 20
The Time Signature : Number of beats per bar (4)................................................................................................. 21
The Song Panel.............................................................................................................................................................................. 22
The Sequencer : Creating and editing Patterns..............................................................................................................................23
The XoX MultiLine Sequencer Editor............................................................................................................................... 23
The Time Division Parameter (6)............................................................................................................................23
The Sequencer Single Lane Editor..................................................................................................................................... 24
The Position Parameter (1) : You can shift, and adjust in a very precise way, the position ( temporal position) of each step
of any sequencer line in StiX. You can therefore apply both swing and/or micro shifts to any sequencer line.. ..24
The Velocity Parameter (2) You can specify a different velocity for each step of the sequencer lane...................24
Gate Time Parameter (3).........................................................................................................................................24
The Step Matrix Modulation 1 & 2 Lines (4)......................................................................................................... 25
The Gang Mode (5) :...............................................................................................................................................25
The Mixer Area .............................................................................................................................................................................26
The FX Mixer Area........................................................................................................................................................................27
Crusher/Distortion...................................................................................................................................................27
The Effect Area.............................................................................................................................................................................. 27
Reverb Unit ( Stereo )............................................................................................................................................. 27
Delay Unit............................................................................................................................................................... 28
Phaser : StiX Phaser emulates generic Stereo Analog Phasers models................................................................. 28
The Transport Area........................................................................................................................................................................ 29
Play Modes : Song and Pattern Modes...............................................................................................................................29
The Transport & MIDI OUT Buttons. The Live Keyboard Control Zone......................................................................... 29
Options...........................................................................................................................................................................................30
Automation with Midi Controllers..................................................................................................................................... 30
Display options...................................................................................................................................................................30
Credits :..........................................................................................................................................................................................31
2

StiX by Xils
StiX is a virtual analog and multisynthesis Drum Machine coupled with a sophisticated Drum Sequencer, and incredibly deep control.
For each of its ten Drumpad StiX combines an Easy Synthesis Page populated with Macro Controls, making it fast and intuitive to
operate, with an Advanced Synthesis Page, where you can have total control on the drumpad synthesis options.
In the same spirit, the XoX Sequencer offers two separate pattern grids, one to build quickly grooves, and the other to control each
step of each drumpad with plethora of options.
Synthesis : StiX combines pristine Virtual Analog sounds with Sample Sounds, giving you the very best of both worlds. FM @ audio
rate is possible between all oscillators. You can switch each analog oscillator to a sine + wave shaping type. CroSS Synthesis is also
on board ( Intermodulation between samples and all synthesis parameters @ audio rate )
Sequencing : StiX offers you a next level XoX Drum Pattern edit and a Per DrumPad sequencer line edit with an incredible number of
per step options : Step time Division MicroPlacement, Gate Time, Velocity, Modulation Matrix
3

Installing StiX
XILS-lab offers you the choice of using eLicenser, iLok and Soft Ilok. This first section describes the process for authorization for
eLicenser. ¨Please note that the Soft Ilok Option doesn’t require a physical dongle
eLicenser drivers
StiX uses an eLicenser dongle. You must have this dongle connected to a USB port on your computer to run StiX work.
Important : Please take care of your dongle: you need it to run the StiX and it carries your license!
Important Note: Even if you have already installed the eLicenser drivers for a previous product, please update your eLicenser License
Control to the latest version.
To download the latest eLicenser Control Center (eLC), please go to:
http://www.elicenser.net/en/latest_downloads.html
You’ll need a StiX Activation Code to load your license onto the dongle (This Activation code has been sent to you in the email confirmation
of your purchase)
First, plug your dongle into a USB port of your computer. Then launch the License Control Center.
Select “Enter authorization code” and Enter your Activation Code in the reserved field, and press Next.
Wait for the license to be downloaded and then check to see if the license is correctly loaded on the dongle in the main section of the
License Control Center.
iLok drivers
With the iLok version of the StiX, you need to plug an iLok USB key into your computer or use the Soft-iLok (computer based
protection)
After you have downloaded and installed the latest PACE drivers, justLaunch the iLok License manager, login, and select “redeem
iLok code” to create your license.
Then drag your license to the location you want (iLok USB key or computer).
To download the latest PACE drivers, please go to:
https://www.ilok.com/#!license-manager
Windows (XP, VISTA, Windows 7)
To install the StiX on Windows XP, Vista or Windows 7, launch the StiX installer file downloaded from the XILS-lab website. ( Please make
sure you install the latest version)
http://www.xils-lab.com/pages/StiXbyXils_Download-Installer.html
Once you have accepted the license agreement, you will be asked to select the installation directory. A destination directory is provided as a
default. Presets and various files, like this manual, used by the StiX will be stored in this directory. Please note that this location is different
from the VST install directory, which you will need to specify in the next step of the installer.
Once the installation directory is specified, you will be asked to select the VST plug-in directory, with a suggested default location. Keep this
default directory if you do not use the VST version.
4

Important notice for Vista or Windows 7: be sure to use a folder write enable and owned by the user (do not use “c:/program files” for
instance). Otherwise you will have to run your music application with “administrator rights”.
The RTAS plug-in and its table control management Pro-Tools are directly copied into the following directory: C:\Program
Files\Common Files\Digidesign\DAE\Plug-Ins
Mac (OSX 10.5 and later)
To install the StiX on a computer equipped with Mac OSX 10.5 or later, download the latest version of either the iLok or eLicenser versions
from the XILS-lab website to make sure you have the latest version of the software.
http://www.xils-lab.com/pages/StiXbyXils_Download.html
Then launch the install program, StiX by Xils.pkg, and follow the instructions.
Warning: the install program will ask you for your system password.
The various files of the StiX will be copied into the following directories:
Library/Application Support/Digidesign/Plug-Ins
Library/Audio/Plug-Ins/Components
Library/Audio/Plug-Ins/VST
Library/Application Support/Documentation/XILS-lab/StiX
..users/username/Library/Preferences/XILS-lab/StiX
5

Getting Started with StiX
The best way to become familiar with StiX is probably to watch the overview video & tutorials, then to try different Global Presets,
then experiment, but before don’t forget one thing :
ALWAYS insert a LIMITER on your Master Audio outputs. StiX is capable of violent audio modulations. A clipper is inserted on
each Drum Channel to prevent the most extreme distortion, but you will still experience overloads during the process of creating your
own sounds, or when you randomize a drumkit for example . Protect your ears, and gear !
StiX overview : https://www.youtube.com/watch?v=VyFHPUTL4X4
StiX R-Claps Envelopes : https://www.youtube.com/watch?v=C2toH0SimEk
StiX Wave Alchemy Drumkits : https://www.youtube.com/watch?v=d0BED-MpM3I
A GLOBAL PRESET includes ALL StiX elements : Sequencer Pattern(s) or Song, all Drumpads, a Drumkit, All Mixer and effects
settings. Global Presets can be browsed, and changed using the Preset Bar located at the top of StiX GUI. (A)
By default, Global Presets are sorted by TEMPO RANGE, then by GENRE. So, go straight to the tempo and /or genre you have in
mind and try a few Global presets; until you find one you want to experiment with.
The drumpads you hear when you play the first pattern of a global preset are the ones whose Sequencer Lines are populated. In StiX,
each of the 10 drumpads has its own sequencer line.
While the sequence is playing, click on the Solo Diode ( Located under each drumpad Mixer Channel) to hear each drumpad in
isolation. To cancel the solo mode, just click on any active Solo Diode again. Now you know what does what in your pattern.
Let’s Change the sounds of the drums
First, you must select which sound you want to edit. Click on a Drum pad in the Drumpads area, OR on its name label in the
Sequencer area or the Mixer area to select it. The selected Drumpad will become highlighted in blue.
Now turn each of the following knobs, and listen to the changes in the sound : Stretch, Cut-Off, Global Pitch, Rez, and Macro1&2.
You should hear interesting changes in the sound. With StiX, it’s very easy to make from subtle to amazing changes to one drum
sound with only the knobs of the Eazy Synthesis page.
Macro 1 and Macro 2 are different for each Drumpad, and were programmed by our Sound Designers. You can program your own
Macros in the Advanced Synthesis Sound Page for each Drumpad you will create.
Repeat this process for each Drumpad, to get a feel of how you can change the sound of the other drumpads.
Note : At any moment, if you wish to revert to the original sounds of the Global preset, just reload it.
If you have moved a lot all these Macro Knobs, chances are that your rhythm now sounds vastly different from the original one.
Macro Knobs might be all you’ll need to manipulate when editing or writing rhythms, and you can interact with sounds in a more
powerful and interesting way than most vintage Drum Machines could. Yet, they are only the emerged side of the iceberg.
In StiX, each Drumpad is actually a whole complex synthesizer. To have a glimpse at this synthesizer, just click on the Advanced
Synthesis Toggle Button, labelled Eazy : It’s all there ( Just one click away)
Let’s change all the sounds –With One Click-
Sometimes you’ll want the machine to really surprise you, and the two following functions just do that. Click on the Intelligent
Random button to generate a new Drumkit. StiX will try to replace all drumpads sounds with equivalent Most of the time, this
function will not bring you 100% satisfaction. So you can click again to get better results, keep the drumpads you like and change the
other ones, or revert to the original sounds. It’s also a good way to create completely new drumkits. If you want the galactic type
6

surprise, just click on the Random button. This time, StiX will change all drumkits with total random : A snare can become a kick, or
an FX, or anything else. This can lead to total chaos, or less.
The XoX sequencer.
Changing the rhythm of a sequencer line is very easy. Just click in an empty slot in any sequencer line to make a hit, and click again
on it to delete it. It’s as simple as that.
Experiment a bit with the different sequencer lines to change the rhythms played by each Drumpad. You can change, or create, a
rhythm in a minute with StiX
Some actions can be performed faster : Left Click on the Fill Button located at the left of each sequencer line will fill the entire line
wih hits. This can be handy for HH patterns for example. Right Click on this button to completely erase a sequencer line.
Randomize a sequence line : Click on the Random Diode, located at the right of each sequencer Line to generate a naw sequence line.
You can also Copy/Paste sequencer lines. This is useful for example to layer two or more sounds.
Let’s Play with StiX ( Live and Daw use )
In the pattern area, at the top right of StiX GUI, click on the copy button. Click on the Pattern B. Pattern B is now playing. Whether it
is empty, or already populated, click on the Paste Button to copy the content of Pattern A in Pattern B.
Now experiment a bit ( Change rhythm, erase some sequencer lines, fill some others, make holes in the filled lines etc) so that you
now have two different patterns. Repeat the process by copying Pattern B to C, and make another variation, or build a break, or a roll
etc. You now have three patterns.
You can switch patterns live by pressing the keys of your midi Keyboard in the C2-B2 range while stix is running : C is pattern A, B
is pattern B, aso. You can record pattern changes in your Daw, and build entire tracks very quickly.
No need to make another pattern just to add a few drum hits : Just play them live while StiX is running ! You can trigger the 10 Drum
Sounds by playing them on your Midi keyboard in the C1-B1 range. C1 should be the Bass Drum, or the sound in the Bass Drum slot.
D2 the Snare, aso.
So far you have learned that you can control StiX with the two first octaves. The third Octave is used to mute, and unmute drumpads.
Press C3, and you’ll mute the Bass Drum, D3 the Snare. The sound will be muted as long as you hold the different keys pressed, and
will come back as soon as a note off event message is received. Another way to make great variations, and build entire intros or outros
out of a single pattern.
Effects : When you select a Drumpad, you can use its FX sends or FX insert buttons. So you can add Reverb, Delay, Phaser on any
drumpad. And insert a Crusher with different settings for every drumsound if you wish.
7
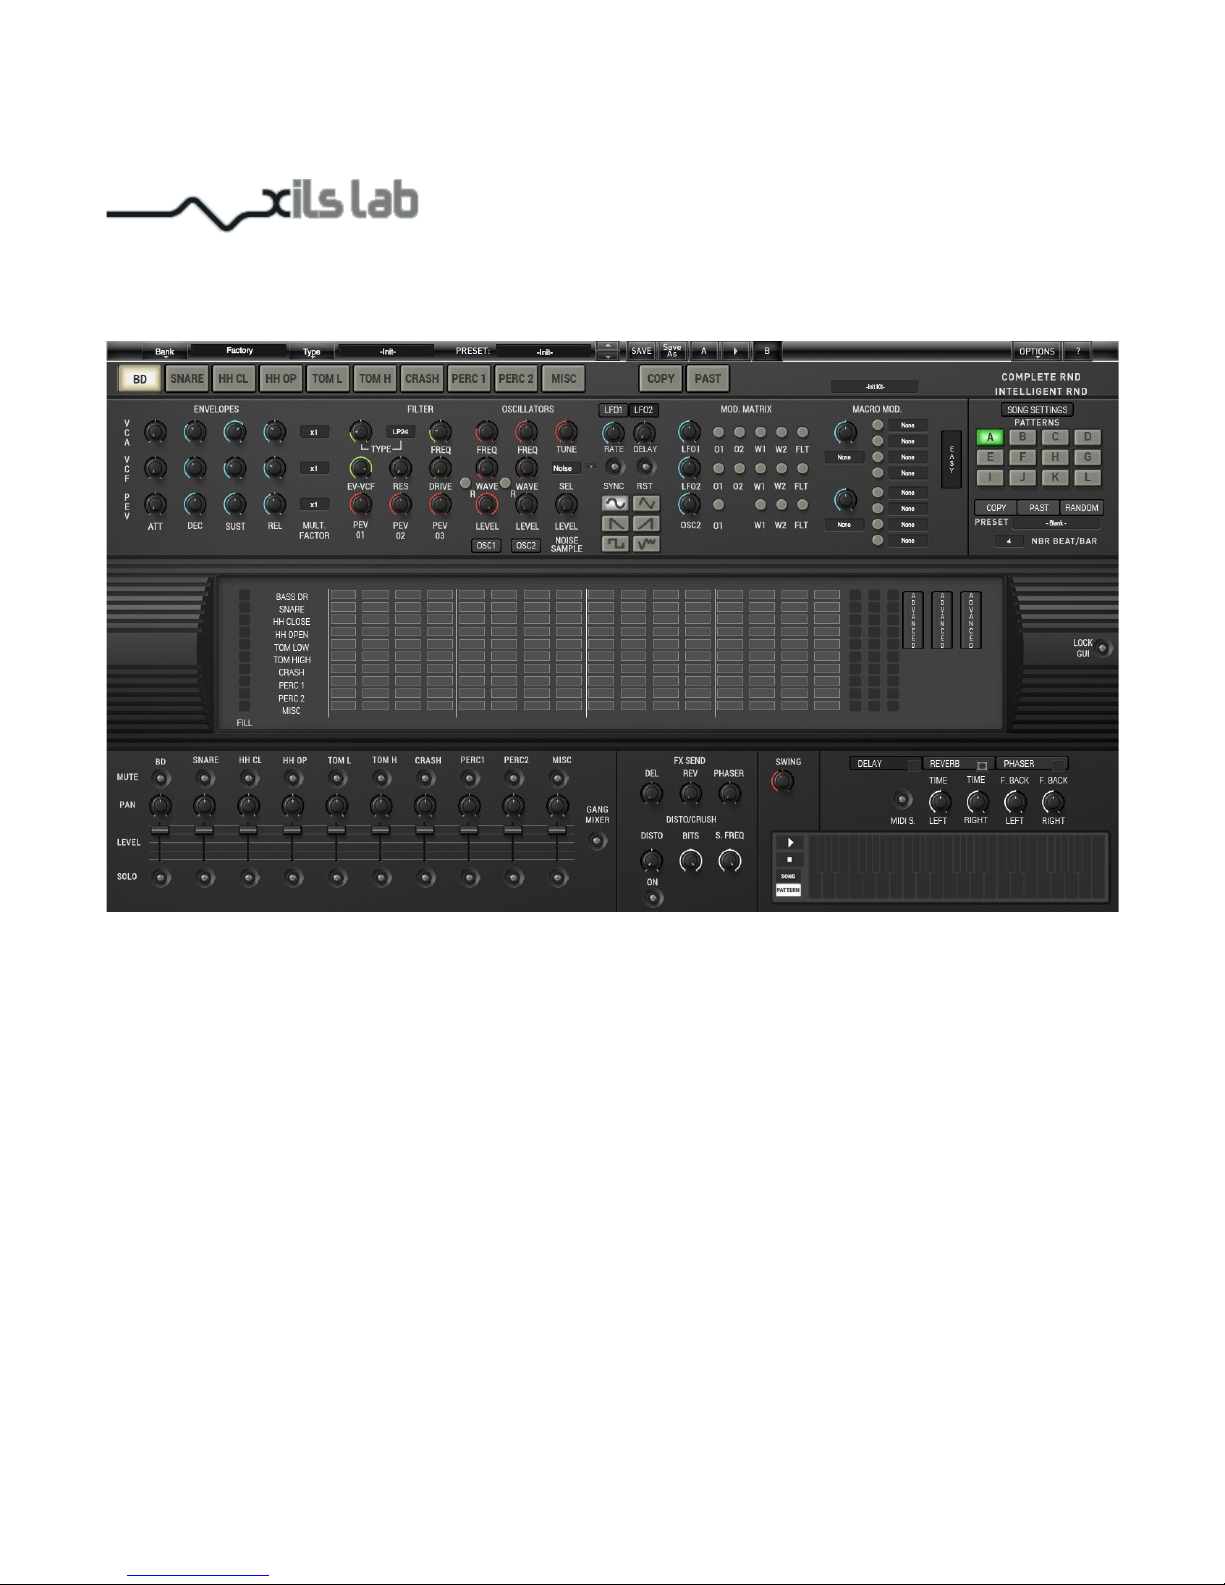
StiX Overview
StiX UI is divided into 7 logical areas.
1/ The Global Preset bar : Where you can load, save, browse and sort Global Presets
2/ The Drumpads Area : Used to select the Drumpad to edit. Manage & randomize Drumkits Presets.
3/ Eazy and Advanced Synthesis area : Where you can load, save and edit the Drums Sounds using Synthesis parameters
4/ The Patterns & Song Area : Where you manage Patterns, SuperPatterns, and Song arrangement
5/ The Sequencer area : Where you create rhythms in the multiview or single line view editors
6/ Mixer & Fx : Where you mix your drums, and add effects
7/ Transport and Live Play area : You can change patterns, play drum sounds, or mute them via the virtual keyboard
All sections except the synthesis and sequencer pages are always visible. You can switch between two views to edit sequences and
sounds.
You can edit drum sounds in two ways : In the Eazy Edit Page (as in the picture above –(3) with enough Macro Controls to fully
change the sound, or in the Advanced Synthesis Page, with complete Synthesizer with plethora of parameters. (Image Below)
8
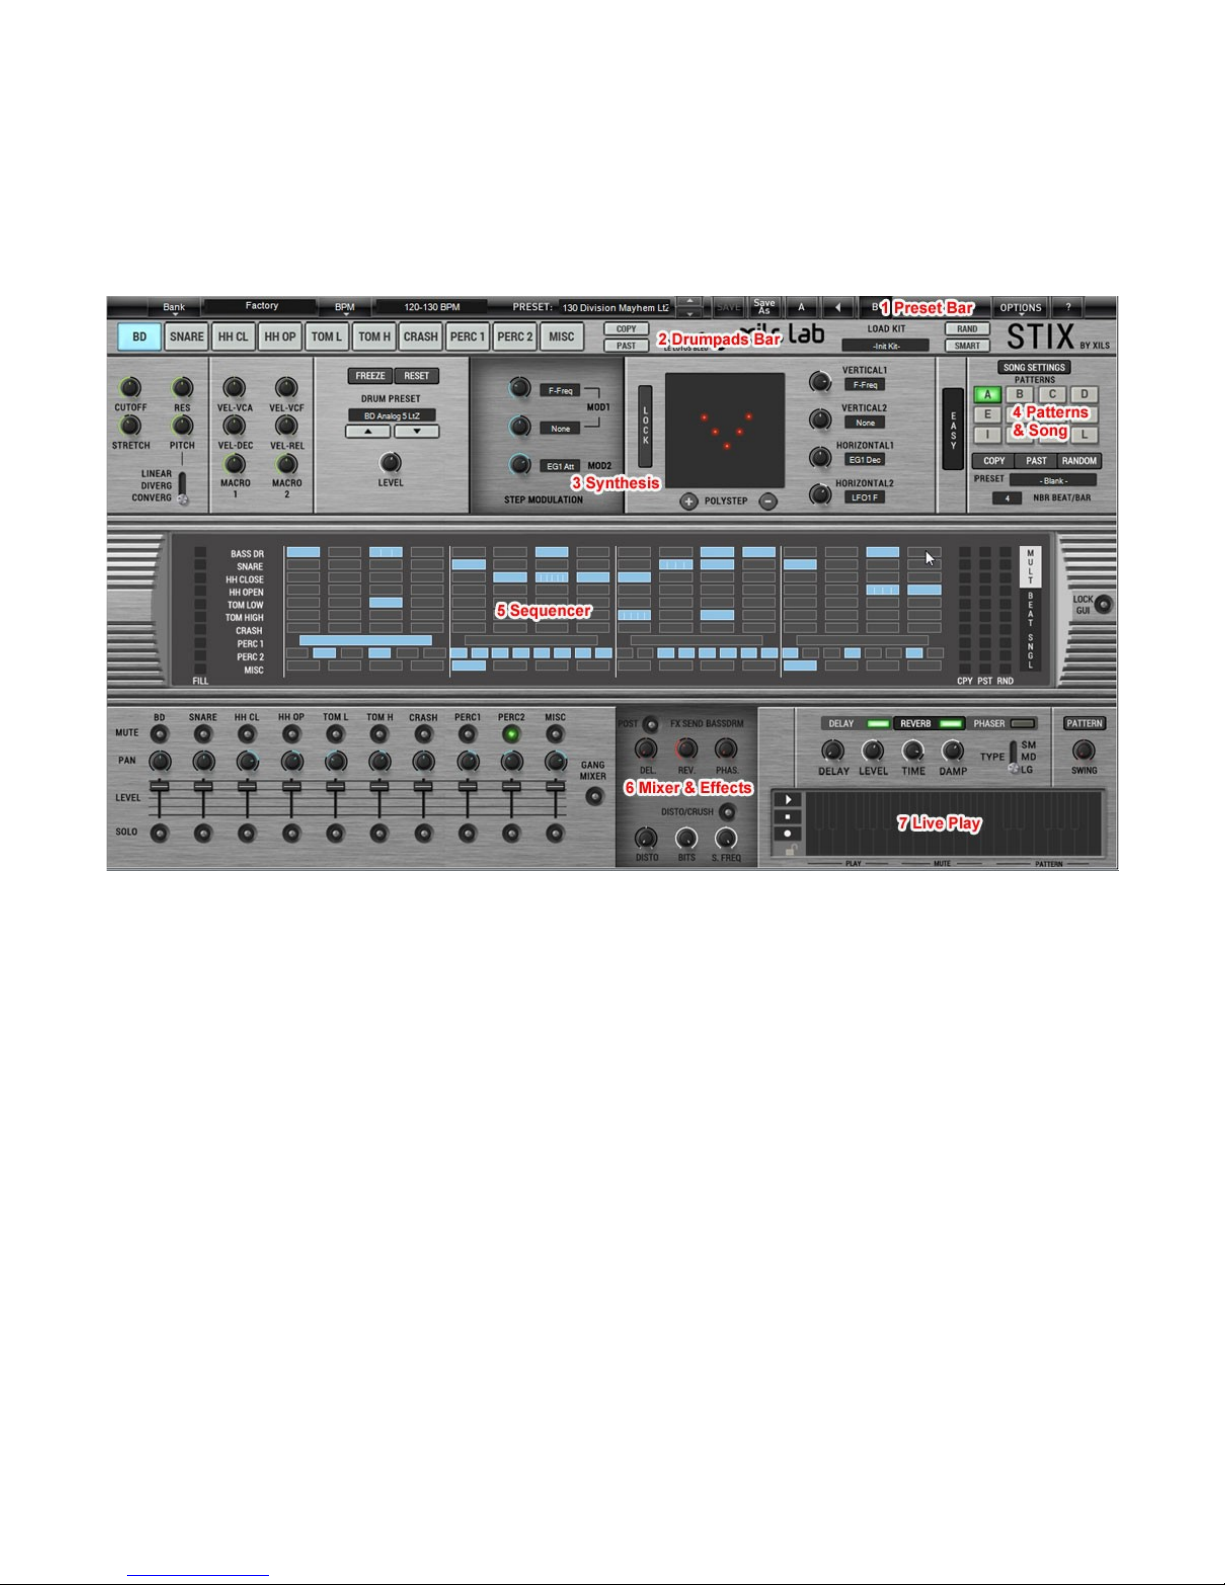
StiX Advanced Synthesis Page
To go back to the Eazy Synthesis page, just click on the Advanced Button at the right of the pane (1)
You can edit Sequences in two ways : In the MultiLine XoX editor, where all 10 sequences lines are visible, or in the Single Lane
Editor, where you can customize controls for each Step of ONE sequence line
To go back to the MultiLine Editor, just click on the Toggle Sequencer Editors button (1)
With StiX, you’re never more than one click away from the task you wish to perform.
Now let’s detail the different parts of the instrument
9
The Drum Pads & Drum Kit area
Drumkits
A drum kit is comprised of 10 drum pads, and each drum pad can of course have a different sound. You can save load, create, save,
rename, randomize drumkits. Drumkits have their own dedicated Preset file format.
Play drumkits : Right click on a drumpad (1)
Load Kit : Load a DrumKit (3)
Save Kit : Save your Kit and allows you to give it a name and a category (3)
Intelligent Random Kit : Will replace current Drum Pads sounds with similar sounds ( Kicks will remain Kicks, Snare will remain
kits etc ) (4)
Total Random Kit : Will replace all drumkits with random sounds ( A kick might be replaced by a percussion, etc ) Will give you
very surprising results. (4)
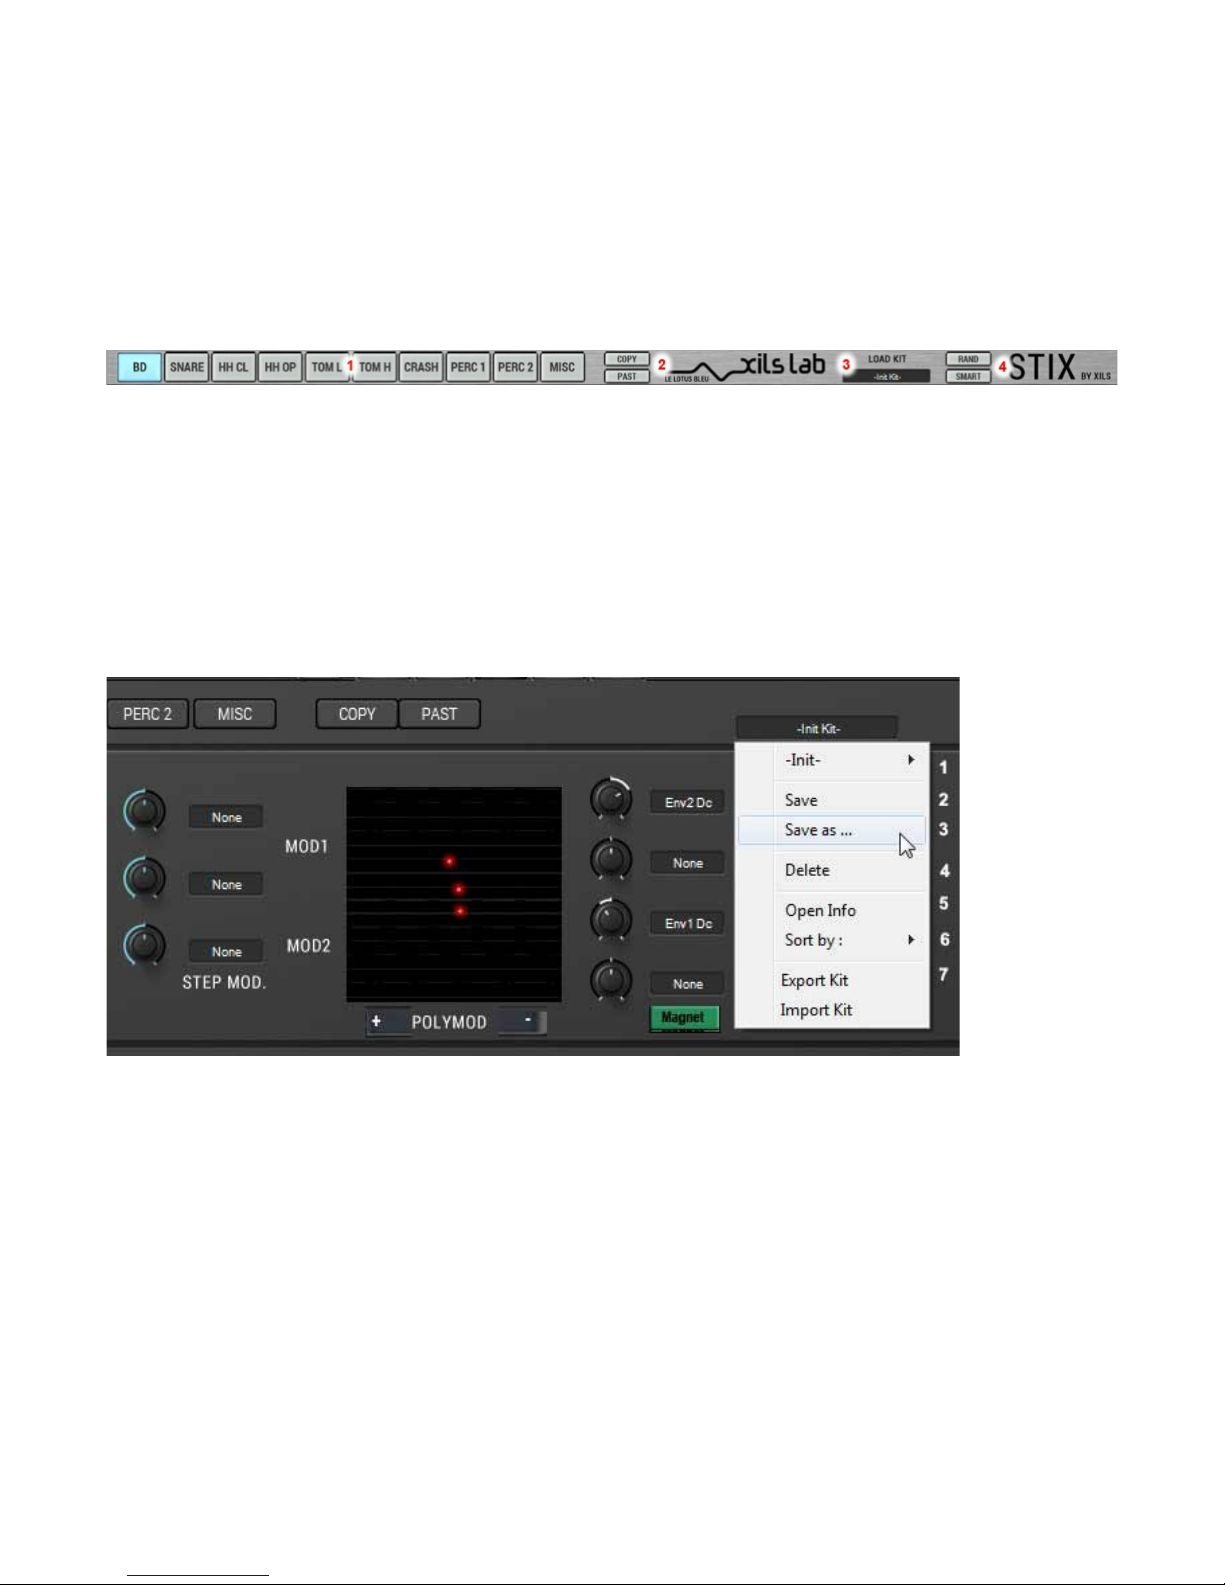
Managing Drumkits
If you left click on the DrumKit name zone, the following dropdown menu will appear.
Load Drumkit : A list will appear with all available DrumKits (1) Select one drumkit in this list will load it. The DrumKit list will be
sorted according to the criteria chosen with the ‘Sort By’ Option. (6)
Save (2) : Will save the current DrumKit with its current settings. ( It will erase the previous version )
Save As (3) : Will save the current drumkit with a new name. Previous version will remain unchanged.
Delete (4) : Will delete the current DrumKit ( Data is not lost until you select another drumkit )
Open Info (5) : Will allow you to edit DrumKit criteria ( Name, Synthesis, feeling etc )
Sort Drumkits (6) : You can filter the list of drumkits presets according to various criterias (Synthesis, Genre, Author etc)
10

Export Kit (7) : Will export the current drumkit as a file. You can specify a name for this file, and it will open your OS browser to let
you choose the location on your HDs
Import Kit (7) : Will open a dialog box allowing you to browse your HDs and load a previously saved DrumKit.
Please note that StiX Drumkits have their own file format. They are very useful to port DrumKits between systems running under
different OS on different computers, or for Workgroups to exchange data.
DrumPads Area
There are 10 drumpads, with familiar names, though you can create or load any sound in any pad if you wish so.
( So you can load a second snare drum sound in the Low Tom slot for example )
The 10 Drumpads are located at the top of StiX GUI, and are always visible. (1)
Select ing Drumpads : Left Click on a pad : When you left click on a drumpad, you select it, and therefore can edit it’s settings in
the Eazy or Advanced synthesis pages. The selected Drumpad will also be the one edited in the Advanced Sequencer Tab
Playing Drumpads : Right Click on a drumpad : By Right Clicking on the pads you’ll trigger the drum sounds associated to each
drum pad. You can also play the drumpads on your Midi Keyboard ( C1 Octave range ), or by clicking on the virtual keyboard located
at the bottom left of StiX GUI.
Copy Drumpad : Will copy the drum sound currently loaded in the selected DrumPad (2)
Paste Drumpad : Will paste the previously copied drum sound in the selected DrumPad. (2)
Editing Drum Sounds
Each Drum Pad has its own synthesis engine, and you can save and recall any Drum Pad as a preset
Drumpads can be edited in two ways : The Easy Page, and the Advanced Synthesis Page.
To select the drumpad you want to edit, just click on it in the Drumpad area. The Easy or Advanced synthesis editor will immediately
reflect the synthesis parameters for this drumpad.
Note : Alternative methods to select a drumpad for edition : Click on its name in the Sequencer
The Easy Edit Synthesis Page
The Easy Page is populated with a few Magic Buttons (Macro Commands) that let you edit your drum sounds in a very fast,
convenient and efficient way :
11

Stretch (1) : Will stretch all envelopes ( VCA, VCF, PITCH-AUX) to make your sound shorter or longer. Turn the knob clockwise to
increase the length of the sound, and anti clockwise to reduce it
If the modulation is positive ( Longer. To the right ) :
VCA Attack Identical
VCA Decay + Vstretch
VCA Sustain + Vstretch
VCA Release + V/2Stretch
Same for EV-Vcf and EV3 values.
IF the modulation is negative ( Shorter. To the left )
VCA Attack Identical
VCA Decay - Vstretch
VCA Sustain - Vstretch
VCA Release - V/2Stretch
Same for EV-Vcf and EV3 values.
Global Pitch (2) : Will increase or decrease the pitch of all oscillators in a relative way and allow you to tune your sound very easily
• Linear : Increase or decrease pitch of all 3 oscillators in a linear way
• Convergent : Pitch of the oscillators will converge until they are identical
• Divergent : The pitch of the oscillators will diverge more and more
Cut Off (11) : Changes the filter’s cut-Off (Offset)
Reso (11) : Changes the filter resonance (Offset)
Macro 1 and 2 (3) : Will change the sound according to the macro modulations controls defined in the Drumpad Advanced Synthesis
page
Level (10) : Set the output level of the sound
Freeze Eazy Page Settings (4) : Once you have reached a point where you’re satisfied of your edits in the Easy Page, you can freeze
the parameters of the Easy Page, so that their value in the advanced Synthesis Page reflects your edits. This is done by clicking on the
Freeze button. Please note than until you have clicked this button, parameter’s values on the Advanced Synthesis page will NOT
reflect their true values if you have edited them in the easy page. The following controls will be frozen: Stretch, Cut Off, Res, Global
Pitch.
Note : It’s not a bad idea to save your Drumpad as a new preset with a new name after you have frozen the Easy Pad settings and are
satisfied with your edits.
Reset Eazy Page Settings (4) : Will reset the Macro Buttons to their default –neutral- position, in case you’re not happy with your
edits, and wish to revert to the original sound
Velocity Modulations (5) : When playing drums, velocity driven modulations can be important, to help make a groove being more
alive, natural, or interesting, especially if you want to get away from the familiar robotic sound of the early vintage machines, where
most often the only velocity parameter was the possibility to add an accent on a step.
StiX offers you 4 hardwired modulations responding to velocity per pad
• Velocity to VCA : Will tie Velocity to the output volume of the Pad.
• Velocity to Filter : Will tie Velocity to the Filter Cut-Off Value
• Velocity to Decay : Will Tie velocity to the Decay of the Amp Envelope
• Velocity to Release : Will tie Velocity to the Release of the Amp Envelope.
Please note that : The last two parameters will help you to approach the way real drums act in the real world : The harder you hit a
real tom, and the longer the Decay and Release of the sound will be.
12

Of course anti-natural behavior is sometimes desired. This is why all Velocity controls are bipolar, and can influence the sound with a
positive or negative increase of their tied parameters.
More velocity driven modulations : Please note that you can further alter the character of the sound regarding velocity by using the
Macros Controllers : By selecting Sequencer Velocity as a source in the Macro Matrix Modulation, and assigning it to modulate LFO
parameters, or Oscillators Pitch, you can achieve a wide array of affects. ( Please consult the Advanced Synthesis/Macro part of this
manual for more details about this subject )
Step Modulators (6) : Here you can define wich parameters will be modulated by the two Macro 1 & 2 controls in the Advanced
Sequencer Single Line editor. In other words, you can change the drum sound for EACH step of a sequencer line according to these
parameters. The modulation amount can be positive, or negative, and is set using each of the amount knobs.
You can choose two parameters for the Macro 1 line, and one for the Macro 2 line.
Tip : Common targets for these parameters can be the filter, or the envelope segments ( Decay or Release are especially recommended
to try ) You can use this feature for example to make an HH closed or open, depending of the value of these modulators, for each step.
The PolyStep Modulator (7) : The PolyMix modulator will add a touch of automatic dynamic variations to your sound. You can add
automatic variations to 4 parameters.
Balls : You can add up to 8 balls in the PolyStep Area
(1), and each new ball will be be triggered by a step of
the sequencer in a circular way : The first step of the
sequence will always trigger the first ball, then each
new step will trigger the next ball, until the last ball is
triggered, and the cycle begins again from the
beginning.
To add/remove balls, just click on the + and – controls
(2)
Balls action : Up to 4 parameters can be defined (3) that will be affected by the Polystep : If a ball is centered, then no effect will be
heard, if a ball is not centered, it will generate some modulations according to the 4 destinations parameters defined, following these
rules : A ball located at the left of the center will generate inverse ( negative ) modulation to each of the two parameters choosen as
Horz11/2 –Horizontal- destinations, while a ball centered at the right will generate positive modulations of these parameters. The
same apply for the vertical axis : Balls located above the center will generate positive ( increase) modulations of the 2 parameters
linked to the V1/V2 modulations, while balls located under the center position will generate negative (inverse/decrease) modulations
of these parameters. The amount of each modulation is fixed by the 4 Amount knobs (4)
Polymod Dynamic modulations : Is that all ? No. By clicking on the LOCK Button (6), you’ll add an automatic chaotic MOTION to
the balls. So the location of the balls will actually vary over time according to the initial option you have defined. To disengage
motion, click again on the button ( MOVE )
Note : The PolyStep Modulator is an extremely powerfull tool to add automatic variations to a beat. You can achieve spectacular
electronic effects with it. Or be as subtle as desired. It’s one of the sequencing/synthesis tools available on StiX that CAN’T be
emulated within your regular DAW, and it will add a unique touch to your tracks
The Drum Pad Name Zone and Display (8) :
Here you can see which Drum Sound is currently assigned to the selected Drum Pad.
Browse presets with the +- Arrows : You can browse the different drum sounds of the current category by clicking on the two
arrows located at the right of the Name Zone ( Please note that if you have previously made some edits on the sound and have NOT
saved it, all your edits will be lost as soon as another Drum Sound is selected and loaded to replace the current edited preset ) The
Down arrows will select the next preset, and the Down arrows the previous one.
13

Changing the Drumpad preset : Left Click in the LCD name zone : A two criterias dropdown menu Will Display a list of all the
Drum sounds included in your libraries, sorted by category ( Snares, Kicks, HH, etc) . You can replace the current sound by another
one by selecting it in the list.
Save your Drum Sound with a different name : Left Click in the LCD name zone : Select the ‘Save As’ menu item. A dialogue Box
will open. From top to Bottom
New name : Click in the name zone, write a new name for your drumpad preset. Click again to validate this name.( Or click ‘enter’ )
Additionally you’ll find the following functions in the drop down menu thats is displayed when you Left Click on the Drumpad Name
area :
Save : Will overwrite the current incarnation of your preset ( please note that factory presets can’t be overwritten, so choose the Save
As function oif you want to save an edited factory preset )
Delete : Will delete the current preset ( Factory presets can’t be deleted )
Sort By : You can choose a second criteria to filter and refine the list of the drumpads. By default the first display criteria of a
Drumpad is it’s category ( BD, Snare, etc) , and it can’t be changed. The criteria available to filter the list are :
• Bank : Will filter the drumpads by Category, then by Soundbank
• Author : Will filter the drumpads by Category, then by Author
• Recommended Gate Time : Will filter the drumpads by Category, then by Recommended Gate Time
• SubCategory : Will filter the drumpads by Category, then by SubCategory ( Example If Cymbal is the category, Ride and
Crashes will be subcategories. IF Snare is the Category, Rimshots and claps will appear in the SubCategories etc )
• Synthesis : Will filter the drumpads by Category, then by Synthesis ( Synthesis can be Virtual Analog, Samples, Virtual Analog +
Sample, FM + Analog etc )
• All : No second criteria is chosen. The list will only be sorted using the Category criteria.
Example 1 : You want to display only the Snares made with virtual Analog Synthesis : Choose Synthesis in the ‘Sort By’ menu, then
the ‘Analog’ Kicks in the list
Example 2 : You wish to choose only the drumpads created by Sound Designer J.Doe or yourself : Choose Author in the ‘sort by’
menu, and J.Doe, or yourself, in the list.
Please note that now browsing the list with the +- arrows will cycle thru a sublist of the drumpads restricted by the TWO criteria you
have chosen
Export Drums : This function will exported all the drumpads included in the current list in a single file. Current list means all
drumpads sorted with the main and secondary criteria. So for example if you have filtered your list with your Sound Designer name
( Author field) the exported file will include all the drumpads for this category (Like the snares) that you have created.
Import Drums : Will import a file exported with the above function
Import/Export function : Please note that the FACTORY drumpads are automatically excluded from the Drumpads export/import
function, as you don’t need to export them, as they are always present in StiX.
Return to the Eazy Edit Page (9) : Click on the Eazy toggle control, located at the right of the Advanced Synthesis tab.
14

The Advanced Edit Page
In this page you have total control over the selected drum sound synthesis parameters.
In StiX, each drum sound is made with a complete and complex modeled analog synthesizer, which can also make use of samples in a
primitive, but efficient way, and of FM synthesis. The Advanced Edit Page is a bit crowded, but the reward is an incredible flexibility
to create your sounds.
Therefore you’ll find on the Advanced Pad Edit a lot of controls that some of you might be familiar with if you’re used to work with
hardware analog synthesizers and samplers, or their virtual counterparts.
The 3 Envelopes : VCA, VCF, and Pitch EV (1)
StiX provides two different envelope types : A traditional ADSR one, and our exclusive R-CLAP envelope model, where R stands for
both ‘Rhythm’ and ‘Repeats’.
The traditional ADSR envelope emulates the analog behavior of the RSF Kobol vintage analog synthesizers, that was famous for its
fast and snappy envelopes. The R-CLAP envelope is inspired by the Clap sound of a legendary vintage analog Drum Machine, that
we took to the next level, to make it much more versatile, and the source of many rhythmic effects.
Whatever the Envelope type you choose :
• VCA Envelope : controls the volume of the sound over time.
• VCF Envelope : controls the Filter’s Cut-Off Point over time
• Pitch Envelope will control the Pitch of the Oscillators over time (1 & 1B)
Additionally :
• The VCA Envelope always control the overall volume of the drum sound
• The action of the Filter Envelope depends of the EV/VCF amount knob, located in the Filter area
• The action of the Pitch Envelope on each of the three oscillators depends on the amount of modulation set buy the three PEV
knobs, located at the right of the Envelope Area.
Tip : Please note that each envelope can be used as a modulation source to control any destination parameters in the various
modulation engines (Mod Matrix, Macro Matrix etc)
The Traditional ADSR envelope : It has 4 knobs.
A : Set the attack of the envelope (The time to reach maximal volume)
D : Set the decay of the envelope (Time to go to the sustain level)
S : Set the Sustain Level
R : Set the release of the envelope (Time to go from the sustain Level to zero)
15

Time Multipliers (2) : Synthesizers Standard ADSR are well suited for certain drum sounds, and less for others. Due to their nature,
Drum Sounds mostly require very fast and punchy envelopes. To ensure the maximum versatility, you can multiply the global length
of each envelope (ie all its segments ) by a certain factor, that is specified in the Multiply Display Box. Please note : You can specify a
different Multiply factor setting for each of the three envelopes
The R-CLAP Envelope :
This exclusive envelope has been created to make a wide range of percussives sounds including Claps, ruffs, ras, rolls etc.
To switch between the ADSR and R-CLAP envelopes, click on the Envelope Waveform Button, located at the left of each of the 3
envelopes.
When R-CLAP is selected :
The ADSR Factor knob becomes a REPEAT knob. The REPEAT parameter set the number of alternate Attack-Decay stages the
envelope will execute before it reaches the Release segment. For example, setting the Repeat number to 3 will result in an ADADAR
envelope (in the last iteration the decay becomes the release parameter ). The number of repeats can be set to : 2,3,4 or 5
A : Set the Attack of the envelope
D : Set the Decay of the envelope
S : Set the Global Slope of the envelope (i.e relative maximum level of the different repeats)
R : Set the release of the envelope
‘Sustain’ in R-CLAP envelope : If S= 1, all the peaks will have the same value, if S= 0.5, level will increase from 0,5 to 1, if S=0, the
level will go from 0 to 1 (The first AD repeat will not be heard)
More info : Watch our video tutorial about StiX R-Claps Envelopes : https://www.youtube.com/watch?v=C2toH0SimEk
The Global Envelope Shaper selector (4) :
Set the relative rate of the ALL envelopes, whether ADSR or R-CLAP envelopes are selected.
This selector has 3 positions :
16

1/ Left : Slower attack, Faster Decay and Release
2/ Center : Faster attack, Slower Decay and Release
3/ Right : Slower Attack, Decay and Release
Important note on the envelopes : Their behavior is heavily related and tied to the GATE TIME parameter specified in the Sequencer
line. In a traditional ADSR envelope, the release parameter is only heard when the sustain level is not set to zero. Keep this in mind,
and please read the chapter of this manual on the Sequencer Gate Time parameter, where this relationship is explained in detail.
The Filter Section (6)
Deep in the heart of all analog synthesizer are filters. StiX filters make use of the famous Xils-Lab modeled
analog filters, with their unique 0df and non linear algorithms.
Filter Type : The first knob let you specify the filter type, which is simultaneously displayed in the Filter
Display box. The choices are :
1/ LP 24 DB Cem334 Filter ( also used in PolyKB II Xils-Lab Synthesizer and units like RSF
Kobol/Polykobol )
2/ LP 12 DB XXY22 Filter ( Also Used in the Syn’x 2/Minisyn’X synthesizer and Elka Synthex )
3/ BP 6 DB ……. (Also Used in the Syn’x 2/Minisyn’X synthesizer and Elka Synthex )
4/ BP 12 DB …….. (Also Used in the Syn’x 2/Minisyn’X synthesizer and Elka Synthex )
5/ HP 12 DB …….. (Also Used in the Syn’x 2/Minisyn’X synthesizer and Elka Synthex )
6/ CMBF : Comb Filter with finite impulse response
7/ CMBI : Comb Filter with infinite impulse response
Cut-Off : Specifies the cut-off point of the selected filter.
Resonance : Set the resonance factor of the filter. ( Resonance adds emphasis to frequencies that are around the
Cut-Off point )
EV-VCF : Sets the amount of modulation of the VCF envelope to the cut off point.
Drive : Applies pre or post filter drive to the signal. ( Click on the label to toggle between pre and post drive
action )
The Oscillators Section (4)
You can combine up to 3 oscillators to sculpt each drum sound.
The first two oscillators are modeled analog morphing oscillators. Morphing
means that you can morph in a continuous way between waveforms, going
from Triangle (Wave knob full left) to a Pulse (Wave Knob Full Right ) . You
can switch any of these two oscillators to a Sine by clicking on the Oscillator
Label (1) (It will become « Sine » ) In this case the Waveform Button (3) will
perform WaveShaping on the Sine signal, instead of Wave Morphing.
The last Oscillator let you choose between Noise (White) and a Sample (5).
You can load this sample from StiX Factory content, or choose any Sample of
your collections. ( In this case, please note that the Sample length is limited to
2 seconds, and that it will be converted into a mono file if it’s stereo)
Oscillator 1 & 2 Pitch (FREQ) (2) : Let you specify the pitch of the Oscillator
Oscillator 1 & 2 WaveForm (WAVE) (3) : Set the waveform of the oscillators ( From Triangle to Pulse, center position is a
Sawtooth ) If the Oscillator is set to Sine, the WaveForm button allows to perform WaveShaping on the Sine Waveform.
17

Tip : Waveform Dynamic control : Please note that you can dynamically control the WaveForm of the 2 analog Oscillators by
assigning Waveform as a modulation target in either the Modulation Matrix, or Macro pages. It’s very easy to assign an LFO, or an
envelope, to control the waveform of any or both oscillators in these pages.
Sine Oscillator (1) : If you click on either Osc 1 or Osc 2 label, you’ll switch them to a Sine oscillator. In this case the associated
Waveform control performs as a waveshaper, instead of WaveMorphing. To revert to the standard Triangle to Pulse Morphing
oscillator, just click on this control again
Tip : When the Sine oscillator is choosen, modulating it by itself (FM) , using a Macro Modulation Slot, can give birth to a large
variety of ‘Noise’ oscillators.
R, Reset oscillators (6) : When engaged, this switch allows to reset the oscillator phase, each time it is activated. Three positions are
available, Green, Red and Grey. When Green is chosen, the frequency of the oscillator is also not drifted, ensuring both oscillators to
be stable in time. When Grey is chosen, the oscillators are free running, like in an analog synthesizers.
Noise & Sample oscillator (5) : Let you specify if Noise or a Sample used as the 3rd Oscillator, and its volume. You can click on the
Noise 3/SMP 3 Label to switch between Noise and Sample oscillator
Samples management
Samples : If you click on the Sample name zone (5), a drop-down list (1) will display all the available Samples of StiX internal
sample libraries, sorted by category ( BD, Snare etc), including the banks you have created. You can change the sort order by selecting
other criteria with the ‘Sort By’ option (3)
Additionally you’ll be given the opportunity to load any
sample of your sample collection present on your HDs to
load it into the current sample slot. To load a custom
Sample, choose ‘Import Wave File’ (2), then follow your
OS browser method ( You can play the samples to hear
them while browsing )
You can export a Sample Bank, or Import it (4)
In this picture, the sounds were sorted by ‘SubType’to show the different subtypes of percussions
Once a Sample is loaded you can use the browse arrows located at the right of the sample name to browse all the samples in the
selected category. No need to display the whole list anymore !
Please note that if a Sample is loaded, the Noise oscillator is deactivated, and the loaded sample will replace it. To switch back to the
Noise oscillator, just select it again in the dropdown list.
03 Tune : Set the pitch of the sample loaded in the sample slot (see above ). Please note that when ‘Noise’ is selected, and that there is
no sample loaded in the Sample Slot, this control is greyed and deactivated.
Important Note : When you have imported custom samples, it's important that you back up the internal sample pool on a storage
device. by exporting it (select “export bank” in the wave menu). In that way, in case of crashdisk or computer change, you can always
recover your sounds and projects
Note : All samples in StiX are exclusive material. The Wave Alchemy Drumkits were build by courtesy of our partner WA. They were
derived from their 1st class Sample Collections, and we have added a lot of control to each of the Drum Sounds, so they’ll never sound
identical imported in other samplers or drum machines than combined in StiX.
You can hear these Drumkits in this tutorial video: https://www.youtube.com/watch?v=d0BED-MpM3I
18

LFO Section
StiX LFO section includes two polyphonic LFOs that can be midi synced. Each LFO has the
same properties, and you can cumulate waveforms. You can specify if the LFO will be free
running, or reset on each note On event.
The 6 (Six) LFO waveforms are : Sine, Ramp Down & Up, Sawtooth, Square and Sample &
Hold
In this picture, LFO 1 is selected, with 3 waveforms. (Cumulative waveforms), and the Sync
Diode is activated, while the Trig Reset Diode is deactivated.
Rate (2) : Set the rate (speed) of the LFO.
Delay (2) : Set the Delay Time before the LFO will begin its action.( Note : Too long Delay times might make the LFO action not
being triggered, and it’s action not being heard, depending on the Tempo of the track)
Waveforms (4) : You can select several waveforms simultaneously by clicking on their respective labels ( Highlighted = On ) If no
waveform is selected, then the LFO is disabled.
The Midi Sync Diode (Label Sync) (3) : Syncs the LFO to the Host Midi Clock. When this diode is ON the LFO values will be
displayed in musical values.
The LFO Trig Diode (Rst Label) (3) : When this diode is on the LFO will be triggered by each note on ( drum hit) and reset to the
beginning of the waveform.
Tip : Please note that you can use the LFOs parameters as modulation sources to control any parameter in the Mod Matrix area. If
no modulation for the LFOs are set in these pages, it can be a good idea not to select a lot of waveforms in the LFO module to save
CPU
Tip : When the Trig diode is activated you can use the LFO as an additional envelope
The Modulation Matrix Area
StiX offers different modulations options, some (the most usual) are
hardwired in the Modulation Matrix, to save you the time it would need to
connect the sources and destination in the Macro Modulation Matrix.
The Modulation Matrix allows you to modulate up to 5 fixed destination
parameters with the 3 following fixed sources : Lfo1, Lfo/Noise, Oscillator
2.
The destination parameters are :
1/ Pitch of Oscillator 1
2/ Pitch of Oscillator 2
3/ Oscillator 1 Waveform
4/ Oscillator 2 Waveform
5/ Filter Cut Off
When Oscillator 2 is the source, it can’t control its own pitch, and its own
waveform.
19

Amount Knobs : The amount of modulation is set by these three knobs located just above each source label. Please note that these
knobs are unipolar.
Activating Modulations (3) : Clicking on each modulation node will activate the modulation set by the amount knob(s). Modulations
can be positive, negative or deactivated. A green diode indicates a positive modulation. A red diode a negative modulation. When the
node is greyed, no modulation is engaged. Clicking on the controls follows the following cycle : Positive mod activated Negative
mod activated Neutral state (no modulation) Positive modulation activated aso.
The Macro Modulation Matrix Area
The Macro Area works in a very similar way to the Matrix Area, except that, this
time, the modulations sources and targets are not fixed, and that you can freely define
them by selecting up to 2 sources (1) , and 8 targets (4) among more than one
hundred parameters.
The Macro Modulations knobs are also replicated in the Eazy Page, so its a good way
for sound designers to build some more/less crazy modulations that less advanced
users can benefit of when playing the drumkits (or just to program your own macros
and have quick access to them in the Eazy Synthesis Page)
To program a Macro :
1/ Just select the source parameter ( named Modulator ) by clicking in the Source Name Control located under the amount knob. (1)
2/ Select up to 4 targets ( Destinations ) in the drop-down list displayed when you click in one of the 4 target zone names.(4)
3/ Once the source and at least one destination have been selected, don't forget to specificity the intensity of the modulation with the
amount knob (2) .
4/ Activate the modulation by clicking on the Activation Diodes (3) . A green diode indicates positive modulation, and a red diode
negative modulation. A grey diode indicates that the modulation is not active. You can cycle thru the 3 states of the Activation Diode
(Positive, Negative, deactivated) by repeatedly clicking on it.
List of Modulation Sources : The 3 Envelopes, the 2 LFOs, Fixed, Sequencer line parameters (Velocity etc), the three oscillators
( Whatever they status )
List of Modulation Targets : Oscillators ( Frequency, level, waveform), Envelopes levels and Segments values (ADSR), LFOs :
(Rate, waveforms, Level) Filter ( Cut-Off, Resonance, Drive ), Some effects parameters
Note : LFO Waveform refers to the symettry of the waveform ( similar to PWM in case of the Pulse wf) Please note that modulating
the LFO width has no effect when the Sine Waveform is selected.
FM synthesis : The Macro Modulation Matrix is the place where you can perform FM synthesis between all oscillators. Just select
one oscillator as a source, and up to 3 oscillators as destination(s).
Tip : Midi Automation : Please note that most parameters can also be assigned to a Midi Controller to be automatized. To know more
about this, please consult the Midi Cc assignation part of this manual.
Pattern Management
StiX offers 12 (Twelve) Patterns where you can store different sequences & rhythms. These Patterns can be organized and combined
in the Song Mode (Next Chapter of this manual) to build complex, sophisticated drum tracks. They can also be chained Live by
triggering them via your Midi Keyboard or device.
20

One Pattern is always selected, and you can only edit the current
selected Pattern. The 12 Patterns are saved within each StiX Global
Preset. Patterns also have a dedicated save format, and you can
copy/paste them between two different Global Presets
Tip : To play, or control, patterns Live : Just click on any note of your
midi keyboard in the C2/B2 range : C2 will select Pattern A, C#2
Pattern B, aso.
Selecting the active Pattern (1) : Just click in one of the 12 Buttons of the Pattern Area to begin editing the pattern
Copy/Paste Pattern (2) : Click on the Copy Button to copy the current pattern into the buffer. Simply select another pattern, then
click on the Paste button to copy the content of the buffer to this pattern.
Randomize Pattern (2) : All lines of the XoX editor will be populated with random hits. Please note that all the current content of the
Pattern will be lost, and your edits gone.
Pattern Preset Management (3) : Works in an identical way to the other Presets in StiX : You can define criteria, sort patterns using
filters, save/load/Delete patterns, rename them or save them with new names etc
Open Song Panel Mode (5) : Will open the Song Panel where you can combine patterns to build complete drum tracks ( See Next
Chapter of this manual )
Pattern Area Randomize Function : Please note that
• Only the XoX editor will be randomized,
• The Single Line Editor data will remain unchanged
• Tip : You can also randomize only one Sequencer Line in the XoX Pattern Editor
The Time Signature : Number of beats per bar (4)
Here you can select the Time Signature of the track by changing the number of beats per bar. It is recommended to choose the same
time signature as the one used in your Daw, but you can also experiment with this control to create polyrhythmic tracks by setting
both controls to different values Furthermore this will modify the way beats and bar separations lines are displayed in both the XoX
and the Single Lane editors.
21

The Song Panel
In this area you can combine patterns and write complete drum tracks.
Rather than offering you an archaic rows/Lines of little squares where you
can enter a Pattern Number, StiX will let you build song in a more
traditional way of thinking, and proposes you a ‘semi archaic system’
where you can both select a pattern number AND the number of times this
pattern will be repeated before going to the next part of the song (1) . This
system is much quicker to build tracks.
Songs have their own dedicated preset format, so its easy to build templates
of standards tracks : Intro-break-Verse-Chorus-Outro etc, and reuse them as
a starting basis in future works.
Building a DrumTrack in the song editor :
1/ Enter the Letter ( A to L ) of the pattern in the drop-down list ( Left click in the Pattern Zone )
2/ Select the number of times the pattern will be repeated before the next pattern is played
Repeat these operations until the track is completed.
Beginning of Song Control Display (Start) : Here you can choose the bar, and the beat, when StiX will start and begin to play its
first pattern in Song Mode. Left Click in this area and select the bar number in the DropDown menu
Cycle : Set the number of song slots the song will cycle thru
Song Presets : Works in a similar way to all other Presets in StiX: You can define criteria, sort Songs presets using filters,
save/load/Delete patterns, rename them or save them with new names etc
Go back to the Pattern editor : Just click on the Patterns toggle button to go back to the patterns editor
22

The Sequencer : Creating and editing Patterns
Patterns can be created and edited in two modes : The traditional XoX Pattern Editor let you build or edit rhythms in a flash, as you
can see the 10 different drum tracks simultaneously. The Drum Lane Editor let you edit a single Sequencer Line for a single Drum
Pad, but with much more possibilities and in depth editing including Step Velocity, Gate Time, Division, MicroPlacement, as well as
user defined per step modulations.
The XoX MultiLine Sequencer Editor
Everyone who has worked with a vintage hardware Rhythm Machine, or may DAW drum editor will be familiar with this kind of
rhythm editors : The Different drum sounds are displayed in rows, while columns represent the different beats and their subdivisions.
If you want to create the Snare rhythm, just click on one of the squares in the Snare row where you want the Snare to hit. Please note
that you can write sequence lines for any drumpads, even if the drumpad is not the currently selected one.
Create a Drum hit at a given time position (1) : Just left click on the square in the desired DrumPad Line.
Delete a Drum Hit (2) : Click again in the drumpad hit square to erase it.
Fill/Populate a Row (2) : Just Left Click on the diode located at the left of a drum lane and all hits will be automatically populated.
This can be very handy to populate quickly an HH line for example
Delete a Sequence line ( Erase all hits) (2) : Right click on the Fill Button.
Copy a row (Sequence Line) (3) : Click on a button in the Copy column located at the right of a row
Paste a row (Sequence Line) (3) : Click a the button in the Copy column located at the right of a row
Randomize a row ( Sequence Line) (3) : Click a the button in the Randomize column located at the right of a row
Single Lane Editor Switch Button (4) : Let you switch between the XoX MultiLine editor and the Single Lane Editor. Please note
that, when you engage the Single Lane Editor, you will edit the Sequencer Line of the SELECTED DRUMPAD.
Step per Beat Editor (4) : Click on the Single Line Editor toggle button to enter it.
Lock Pattern Function (5) : The selected pattern will always be visible in Song mode, allowing you to edit it without the risk of
automatic switching patterns when StiX runs.
The Time Division Parameter (6)
In default mode, the drum sound will be triggered only ONCE per sequencer step. You can however trigger the drum sound several
time per step by using the Time Division parameter. This is useful to make rolls, or part of rolls, triplets, pentolets, or sextolets effects,
or different ras/ruffs effects like the ‘ras de 3’, or ghost notes to add life to drum part. These expression features are very common in
real drumming world, but rarely found in both digital or analog drum machines world.
To increase the number of hits for a sequencer step, just right click in the desired step, then choose the value with the left click in the
Time Division drop-down list. Possible values are 2 ( two strokes during this sequencer step) 3 ( triplets of the set time value), 4, 5
( pentolets ), 6 ( sextolets ).
23

Note : When you create a hit on the sequencer lane with the mouse, the default value 1 ( = no time division = 1 drum strike per step )
is set.
Tip : Please also consider the opportunity to change the number of steps per beat in the Step per Beat Panel if you want total control
on each drum strike (like velocity) . You can also combine a custom number of Step per Beat AND the Time Division parameter to get
very uncommon metrics, like pentolets of triplets, or 7 sextolets per beats. Or more crazy ones like : 5 steps per beats (pentolets) and
each pentolet get a different time division parameter. The number of possibilities is almost endless here.
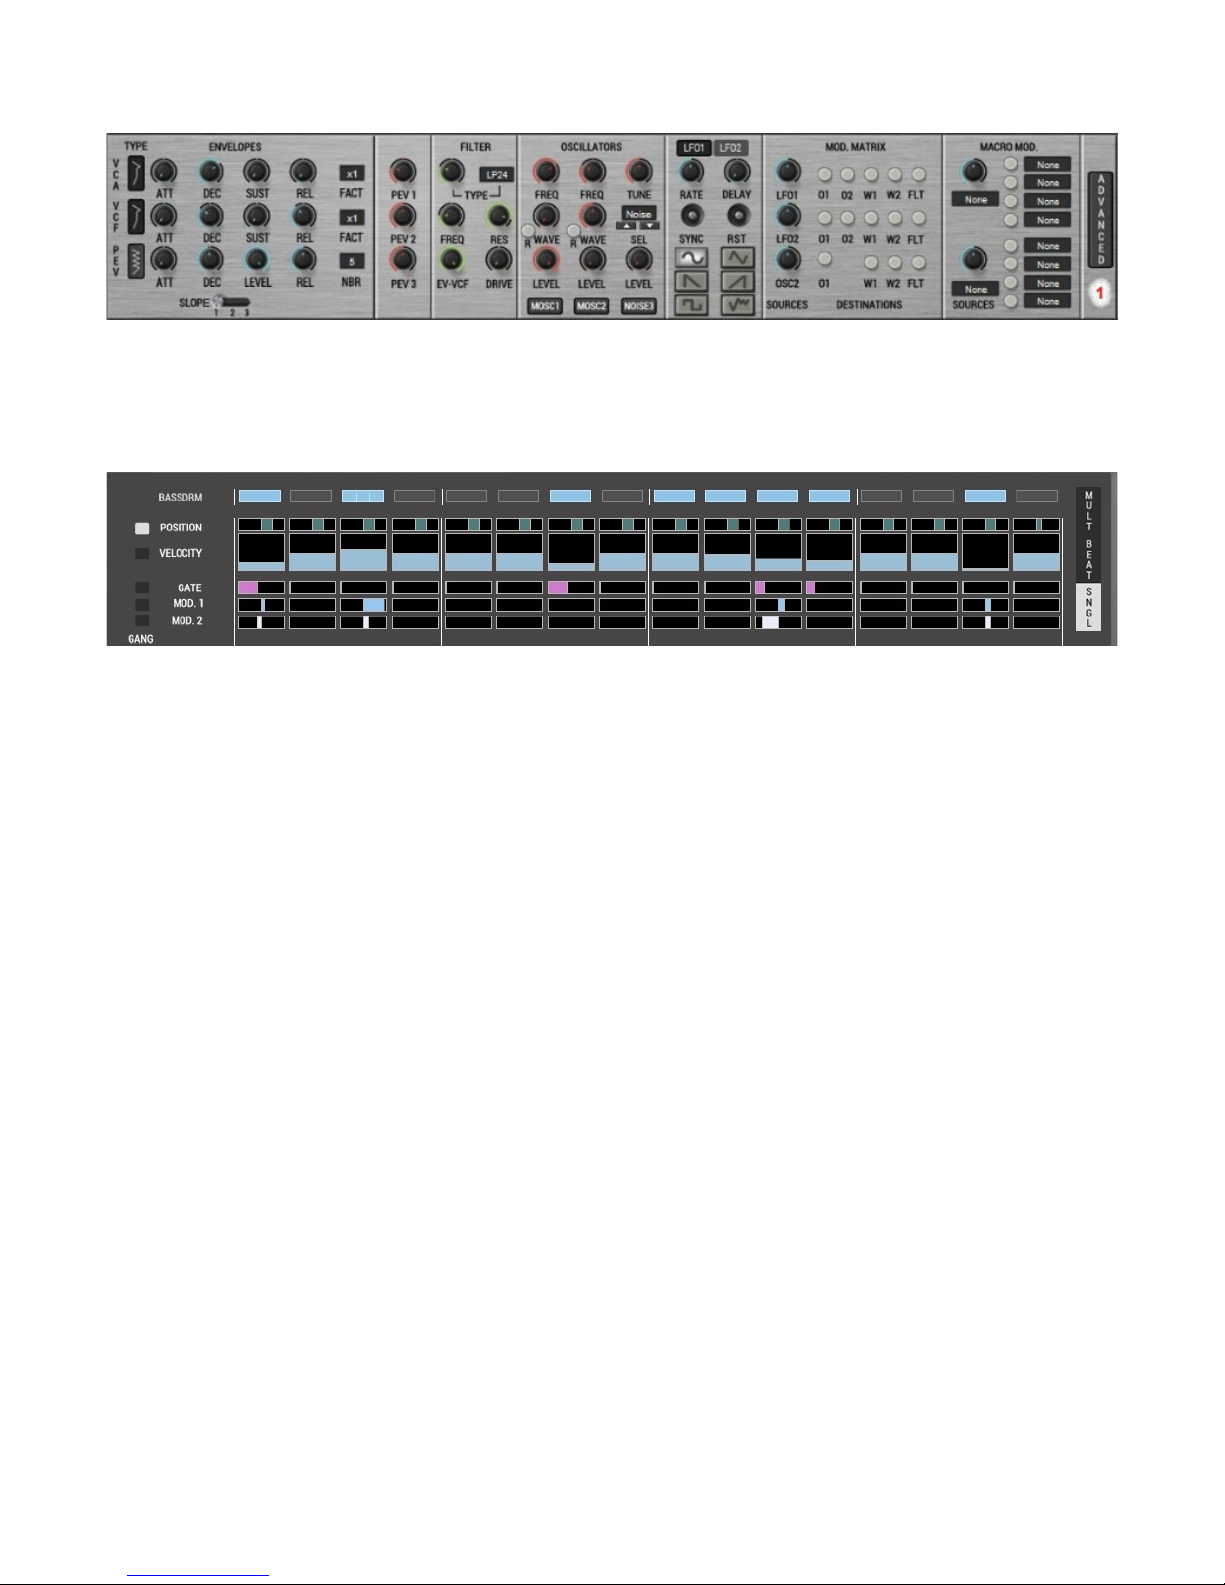
The Sequencer Single Lane Editor
The Single Lane Editor lets you customize each STEP of a sequencer line with 5 different parameters : Velocity, Gate Time, Micro
Position, Mod 1 and Mod 2.
Velocity, Gate Time and Micro Position are permanent controls : They are identical for all Sequencer Lanes.
Mod 1 and Mod 2 are custom controls, and are linked to the the Macro Modulations defined by the original Sound Designer of the
Drumpad, or yourself, for each different drumpad
The Position Parameter (1) : You can shift, and adjust in a very precise way, the position ( temporal position) of each step of any
sequencer line in StiX. You can therefore apply both swing and/or micro shifts to any sequencer line.
If the parameter is centered, the instrument line will be played perfectly quantized. If position is put to the left, the step will be played
before the quantized exact time value. If Position is set to the right, the instrument will play after the exact quantize value for this step.
Tips : How to use the Position Parameter ?
• Make a Snare/Clap stack as LARRRGE (or COMPACT) as you want
• Make Flams ( using two drumpads and two sequencer lines )
• Make, or adapt to, any *human* Shuffle ( different of Swing because Swing implies symmetry amongst beats of a bar, while
shuffle/Groove can be any strike(s) )
• Play the shaker/Cabassa/maracas on the beat ( and not after ) This is really the burden of many sequencers, they just can’t play
these instruments properly. With StiX, your shaker peak will be spot on the beat.
• Play *in haste* and *lazy/laid/Back*
• Change micro timing of a percussion so that it doesn't pile brutally with the BD/Snares/etc but plays just a bit behind or before
(so that the natural resonances of the drum instruments breathe and can be heard/separated in the mix). Though .... brutal can be
desired, in this case all you have to do is to let the sequence line as it is ( And StiX will function as the terrible brute drum
machine it can also be).
• Micro position adjustment also sounds useful for getting reverse snares to land on the beat.
• Set the Global Swing of a Sequencer line independently from the Global Swing Factor : Put the sequencer line in GANG mode,
to shift all steps simultaneously, the move the position slider to the right.
So, to recreate this kind of micro time shift that will make your music breathe and feel incredibly organic and alive, just slightly
move, in gang mode, the Position parameter of a sequencer line.
The Velocity Parameter (2) You can specify a different velocity for each step of the sequencer lane
Important : Please note that the step velocity value might interact with the synthesis engine of the sound in other aspects than trcit
volume. If there’s no velocity assigned to parameters in the synth engine, the step velocity parameter will have no effect.
Default Velocity : When a note is created by clicking in the sequencer line, it is created with an average velocity of 64. Velocity range
is 0-128
24

Gate Time Parameter (3)
The Gate time parameter will let you specify how long the key stroke that triggers the hit will be held down ie how much of the decay,
and possible sustain stage and release of the 3 envelopes will be played for this drum hit in this step.
To specify the Gate time of each step : Just move the bar to the left or to the right in the active step display. The more to the left the
bar will be, the longer the drum sound will play.
Important Notes for the per step Gate Time parameter :
• Default value of the Gate Time when triggering a Hit in the XoX editor is 50% of the total length of the Step.
• If the Gate Time is set to zero, the drum sound will still be heard, and the Note On/Note Off interval will be set to 10ms, with the
consequence that only the Attack and the Release part of the sound will be heard. Furthermore, if the attack of the sound has been
set to a slower value than 10 ms, the sound will not be heard
• In the same spirit, you can raise the Gate Time of each step to up to 200% of the length of the step ( ie Double length). Please
note however that if the sound is rby the next sequencer step, all envelopes will be reset to zero by the next step. So it might be a
good idea to avoid to make the next step hit the drumpad ( unless you want to generate some kind of repeat FX effects )
VERY IMPORTANT : StiX uses analog modeled traditional ADSR envelopes. If the sustain level is set to ZERO, the release
will be ZERO, because in this kind of envelopes, the RELEASE parameter starts with the value of the SUSTAIN parameter,
which is a Level, and not a Time factor. Therefore, depending on how the drum sound is programmed, some parts of the
envelope will be active ( heard), or not, depending on the GATE time in the sequencer. To ease the use of StiX, each factory
Drum Sound have been tagged with a recommended Gate Time. You can use this criteria to sort the displayed drum sounds
of a category.
Tip : In all cases, if you replace a Drum Sound by another one, or work to create your own drum sound, and find that the drum
sounds ‘weird’ ( ie very short or on the opposite with strange sustained part) you can/should change the Gate Time of all the steps of
the Sequencer Line by activating the Gang Mode for the Gate Time. Most of the problems are solved with this solution.
The Envelopes Segment/ Sequencer Gate relation and interdependencies are one of the most important things to master in StiX to
get full control on it. Once you’ll have mastered it, nothing will stop you. In most Drum Machines, there’s simply no Sustain
parameters, and sometimes there’s only a decay acting as a release, and the sound always sounds like a one shot. StiX allows you
much more control, and much more diversity in the sounds, dynamics and shapes. But there is a little price for this : The better you
understand this relation, the better you will manage your sounds, that will behave like you want them to behave.
The Step Matrix Modulation 1 & 2 Lines (4)
You can fully control up to three freely chosen Synthesis parameters inside the Single Lane itself, and specify the value of these
parameters for each step of the sequence. You can create extreme and impressive effects with these two parameters, especially if you
consider that they compliment very well the PolyStep modulator, and can be used simultaneously.
These three parameters are defined in the Step Modulation area of the Eazy Synthesis tab
To change the Modulation for each step of the sequence : Just move the cursor of a step. The Cursors are bipolar :
• To the right of Center : A positive modulation will occur.
• To the left of Center: Negative (inverted) modulation will occur)
• Cursor Centered (Neutral position) : No modulation is applied, and no changes in the sound can be heard.
Please note that you can revert to the default value of each step ( Center ) by a Ctrl + Click command
Tip : Reset Default values also work in Gang Mode. Just activate it if you want to reset all the values of a Macro control line to the
neutral position ( Center )
The Gang Mode (5) :
25

You can select the Gang Mode for all parameters of a sequencer line to edit all the values of all steps simultaneously, and increase, or
decrease their values with a single mouse operation. This is very useful to increase all the velocities of a sequencer lane for example,
or adjust the Gate Time of all the steps quickly.
How it works : Just click on the Gang Mode Diode of the sequencer lane you wish to edit, then move any cursor on any step of the
lane.
Available sequencer lanes parameters : Position, Velocity, Gate Time, Mod Matrix Parameter 1-2 & Parameter 3-4
Tip : Reset Values to Default also works in Gang Mode. It’s very useful to return all the controls of a line to their neutral point after
unsuccessful edits for example.
Multi XOX Editor Button (6 - MULT) : Will let you go back to the standard MultiLine XoX editor
Step per Beat Button (6 - Beat) : Will let you enter the Step Per Beat Editor
Drumpad Name (7) : This label displays the current selected drumpad name
And finally : You can also add/remove drumhits in this editor, as well as Divisions. The Hit Line of the edited drum sound is identical
to the one in the MultiLine XoX view, and any edits you make in the Single Lane editor will be immediately hear, and reflected when
you go back to the XoX multiline editor.
The Mixer Area
The Mixer Area is always visible, and let you build a precise mix of your Drum Track inside StiX
For those who need even more control, and want to process individual drums channels inside their DAW, you can also select different
audio outputs for each drum sound in StiX Multi Out version
Each of the 10 Drum Channels has identical controls :
Mute Diode : Will mute the current channel when lit ( Left Click on the Diode to alternate its states )
Pan Knob : Let you specify the Pan Position of the Channel
Attenuator/Volume Slider : Let you specify the volume of the drum channel
Solo Led : Activates the Solo Function for this Channel ( All other Channels are muted ) (You can solo several channels)
Output : Let you allow this Output mixer to be used for the Master output (Only in StiX Multi Out Version )
Gang Mode : When this diode is activated, you can control all volume sliders by moving only one of them. You can use this feature
to control StiX global output volume without changing the relative levels of the different drum sounds.
26

Note : Please note that the reverb and delay effect are always directed to the Main Stereo Output (Stereo Output 1)
The FX Mixer Area
You can specify in a precise way the wet part of any selected Drum Pad in this area. The 4
available channel effects are : Reverb, Delay, Phaser and Crusher/Distortion
Reverb, Delay, and Phaser are Global Effects, and each one have its own auxiliary bus : All
drumpads will share the same settings. Crusher/Disto is an insert effect, and each drumpad
can have a different Crusher/Disto effect.
Each effect has its associated Knob : Turning it’s knob clockwise will increase the linked
effect, while turning it anticlockwise will decrease the effect.
Please note that : The reverb and Delay sends are auxiliary sends, and they will feed two
respective independent auxiliary channels that will be mixed in the Stereo Output 1 bus
channel/ The Crusher and Distortion units however are insert effects, which means that the
amount knob will act as a dry/wet mix knob, and the resulting sound will be sent to whatever
output the channel is assigned to.
Effects settings can be specified in the Effect Area (Please consult the next section of this
manual for more details about this subject)
Important : Please not that the Send levels can only be specified one by one for the
SELECTED DRUM SOUND : If the BD is selected, you can set the Delay/Reverb/Phaser
send level for it. You must select the Snare Drumpad in order to set its dedicated Send levels.
Crusher/Distortion
Each channel can have its own Crusher/Distortion unit with different settings. To activate the unit for a channel, just click on the
On/Off Diode (it will be lit ) (1)
The following parameters are available :
Distortion Level (2) : Set the distortion level
Bits Number (3) : Sets the bits number. Standard values like 8 or 12bits can be easily reached to emulate the standard character of the
vintage 80s hardware Digital Drum Machines
Sampling Frequency (4) : You can reduce the sample frequency
The Effect Area
Here you can taylor StiX Reverb, Delay, Phaser and Crusher/Distortion Fx units. Only one effect can be visible at a time. Just click on
the Label of the effect you want to edit to display its controls.
Reverb Unit ( Stereo )
27

StiX reverb is stereo, and its signal will always be
directed to the Main Stereo Bus output.
You can specify the amount of reverb for each drum
sound.
Reverb Predelay Time : Set the time before the reverberated signal occurs
Reverb Level : Set the output level of the Reverberation unit
Reverb Time : Set the length of the Reverb
Reverb HF Damp : Set the amount for damping ( Hi frequencies level fall )
Reverb Type : Use the three positions selector to choose your Reverb algorithm. The three Reverb algorithms are ( from bottom to
top) : Large, Medium and small
Delay Unit
Midi Sync Diode : Click on this diode to sync the delay with the Midi
Clock of your Daw. Please note that the tempo will be displayed in
tempo values rather then in milliseconds.
Left Delay Time : Set the delay time of the left delay line
Left Delay Feedback : Set the amount of feedback of the left delay Line
Right Delay Time : Set the delay time of the Right delay line
Right Delay Feedback : Set the amount of feedback of the Right delay
Line
Phaser : StiX Phaser emulates generic Stereo Analog Phasers models
Speed : Set the rate of the phaser
Amount : Set the amount of the phaser
Sweep : Set the sweep width
Resonance : Set the resonance factor
Stereo : Controls the Stereo Width of the phaser unit. ( Full = Largest
stereo image )
28

The Transport Area
Play Modes : Song and Pattern Modes
StiX can operate in two main transport modes : The Song Mode and the Pattern Mode. While the Song Mode is essential for complex
Drum Track creation, the Pattern mode can be very handy to just make a pattern turn and loop while you’re experimenting with other
instruments.
Song/Pattern Mode Toggle : Just click on this button to switch between the Pattern Mode and the Song Mode. When the Pattern
Mode is selected StiX will loop the pattern selected in the Pattern Area display. Each time you select a new pattern in this mode, the
new pattern will begin to play at the fist beat of the next bar.
Note : You can also select patterns directly by playing notes on your Keyboard in the relevant Octave (C2/B2). This is very handy for
Live Playing and improvisation. For more details about this please consult the Live Keyboard Control section f this manual
The Transport & MIDI OUT Buttons. The Live Keyboard Control Zone
Stop/Play/Pause buttons are self explanatory.
The record button allows MIDI OUT. Select it if you want to
record StiX midi out data in your Daw
LIVE Control : You can control StiX in various ways from your Midi Keyboard or Midi Drums device, or playing them by clicking
on the keys of the virtual mini keyboard of this area.
Each Octave of your Midi Keyboard has different functions
• Octave 1 ( C1-A1 Range) : Will play the 10 DrumPads. You can mix this with the sequencer playing the Pads to add variations or
fill ins, breaks, etc
• Octave 2 ( C2-B2 Range ) : Will Change the current pattern playing to the one you selected as soon as the first beat of the next
Bar is played
• Octave 3 ( C3-B3 Range ) : Will Mute/Unmute the respective DrumPads. Press one key to mute a DrumPad, and press again that
key to unmute it.
Note : Playing Drumpads Live : Please be aware that if you play a drum pad more or less simultaneously while the sequencer plays it,
all envelopes will reset, and no priority order is set, possibly resulting in some noise artifacts like flanging, or abruptly cut envelopes
Note 2 : You can also built entire drum tracks without using StiX internal Sequencer. We recommend if you do this to put the
Sequencer in Stop Mode
Note 3 : Changing patterns via keyboard strokes will always take effect on the first beat of the next bar, regardless if StiX plays in
Pattern or Song Mode. You can also create entire tracks using this feature in your DAW if you feel its more convenient this way. Just
play or insert in StiX Midi track the correct Midi Notes and StiX will follow them. We strongly advise to use this feature only when
using StiX in PATTERN MODE , to avoid possible conflicts with the song mode.
29

Options
Automation with Midi Controllers
You can assign midi Cc to almost each StiX parameter to control it with an external midi device, or make automation lines in your
Daw. As StiX has more than hundreds of parameters, this automation is ‘channelized’
This means that to control the drumpad 1 ( Bass Drum parameters ) you must use the midi channel 1 to make automations. The
Drumpad 2 ( Snare will be controlled by the midi channel 2. Aso.
Example : Let’s say you have assigned midi Cc 25 to the the Filter Cut-off. Whatever the drumpad, Midi Cc 25 will ALWAYS control
the cut-off. The drumkit ( BD, Snare, Tom, etc ) affected by the automation will depend on which midi channel the automation is
transmitted to StiX.
To assign a Midi Cc to a StiX parameter : Open the Option menu, then click on ‘Open Midi Settings panel’
In the dialog box, choose the parameter you wish to tie to a certain Midi Cc. To assign a controller to this parameter, use the Midi
learn function ( StiX will learn the first message received ), or type directly its number in the dialog box.
Please note that the Midi Controller Map is saved in a specific file, and is automatically updated when you close the dialog box.
Display options
Pop Up options will show the value of a control when you
mouse over it
Gui Update Speed : Fast will give you more visual
comfort, but will eat a bit of Cpu
Three sizes are available to fit all needs. Please note that
you have to relaunch StiX before the new size is
applied.
30

Credits :
The UI /GUI were originally created by Laurent Bourgeon, Adapted by Xavier Oudin and Laurent Bourgeon. The final GUI has been
created by Yannick Bonnefoy, based on Xavier Oudin and Laurent Borugeon original designs and works
Algorithms and DSP were done by Xavier Oudin.
The Plug In design and functions were originally created by Laurent Bourgeon.
The Presets were made by :
Lotuzia, Xavier Oudin, Greg Cole (Empty Vessel)
This manual was written by Laurent Bourgeon and Xavier Oudin
Modules Licenses :
The ‘Stretch’, ‘Global Pitch’ ‘PolyStep’ ( Macros Controls based on a Step Sequencer number of cycling steps ) are licensed to XilsLab by Laurent Bourgeon for the exclusive use in ‘StiX by Xils’ Drum Machine.
The Drums Samples Factory Library content is licensed to Xils-Lab by Laurent Bourgeon for the exclusive use in ‘StiX by Xils’
Drum Machine.
Our partner Wave Alchemy provided some demo samples, used to build demo kits of famous drum machines
The ‘Different Steps per Beat’ algorithm is licensed to Xils-Lab by Xavier Oudin for the exclusive use in ‘StiX by Xils ’ Drum
Machine
31
 Loading...