

Xilica Audio Design RIO R22, RIO R44 Quick Start Manual
Quick Start Guide Rio Series – R22 and R44 Models
Xilica Audio Design Canada
Page 1
www.xilica.com
___________________________________________________________________
Rio Series – R22 & R44 Dante Interface Models - Quick Start Guide
1. What’s in the Box
The Rio Series R22-P, or R44-P, or R22-WP-X, or R22-WP-M, Dante interface device hardware
This hard copy of the Quick Start Guide
USB drive with the Dante Controller software & this Quick Start Guide
External power supply (can also be PoE powered)
Detachable 3.81mm Euro terminal block connectors
A pair of surface mount brackets (R22-P & R44-P models only- as shown attached above)
2. What you need to provide
A Windows PC for our processors software use. A Windows or Mac OSX computer for Dante Controller
software use.
See minimum system requirements in both software’s Help File.
Network (Ethernet) interface
Ethernet cable (Cat5, Cat6 or better)
3. Getting Help
Technical Support at support@xilica.com Web Site: www.xilica.com
North America: Contact Technical Support at 905-770-0055 ext 3 (forwards to tech support
cell phone after regular office hours – 9am-6pm EST - Eastern Standard Time)
Europe: Contact Technical Support (Marco Koorstra) at +31 29940 1100
Asia: Contact Technical Support (Tim Cheung) at +86 13602279067
Quick Start Guide Rio Series – R22 and R44 Models
Xilica Audio Design Canada
Page 2
www.xilica.com
___________________________________________________________________
Important Safety Information
1. READ THESE INSTRUCTIONS
All the safety and operating instructions should be read before the product is operated.
2. KEEP THESE INSTRUCTIONS
The safety and operating instructions should be retained for future reference.
3. HEED ALL WARNINGS
All warnings on the product and in the operating instructions should be adhered to.
4. FOLLOW ALL INSTRUCTIONS
All operating and use of instructions should be followed.
5. DO NOT USE THIS APPARATUS NEAR WATER
Do not use the product near water. For example, near a bathtub, washbowl, kitchen sink, or laundry tub, in a wet basement, or near a swimming pool, and the like.
6. CLEAN ONLY WITH DRY CLOTH
Unplug the unit from the wall outlet before cleaning
7. DO NOT BLOCK ANY VENTILATION OPENINGS
Slots and openings in the cabinet back or bottom are provided for ventilation, to ensure reliable operation of the limit and to protect it from overheating. These openings must not be blocked or covered.
The openings should never be blocked by placing the product on a bed, sofa, rug, or similar surface. This product should never be placed near or over
a radiator or heat source. This product should not be placed in a built-in installation such as a bookcase or rack unless proper ventilation is provided or the manufacturer’s instructions have been adhered
to.
8. DO NOT INSTALL NEAR ANY HEAT SOURCES
This Product should be situated away from heat sources such as radiators, stoves, or other products (including amplifiers) that produces heat.
9. DO NOT DEFEAT THE SAFETY PURPOSE OF THE POLARIZED OR GROUNDING-TYPE
PLUG
A Polarized plug has two blades with one wider than the other. A grounding-type plug has two blades and a third grounding prong. The wide blade or the third prongs are provided for your safety. If the
provided plug does not fit into your outlet, consult an electrician for replacement of the obsolete outlet.
10. PROTECT THE POWER CORD FROM BEING WALKED ON OR PINCHED PARTICULARLY AT PLUGS, CONVENIENCE RECEPTACLES, AND THE POINT WHERE THEY EXIT FROM THE
APPARATUS.
11. ONLY USE ATTACHMENTS/ACCESSORIES SPECIFIED BY THE MANUFACTURER.
12. USE ONLY WITH CART, STAND, TRIPOD, BRACKET, OR TABLE SPECIFIED BY THE MANUFACTURER, OR SOLD WITH THE APPARATUS. WHEN A CART IS USED, USE CAUTION WHEN
MOVING THE CART/APPARATUS TO AVOID INJURY FROM TIP-OVER.
Do not place this unit on an unstable cart, stand, tripod, bracket, or table. The unit may fall, causing serious injury to someone, and serious damage to the appliance. A unit and
cart combination should be moved with care. Quick stops, excessive force, and uneven surfaces may cause the product and cart combination to overturn.
13. UNPLUG THIS APPARATUS DURING LIGHTNING STORMS OR WHEN UNUSED FOR LONG PERIODS OF TIME.
For added protection for this unit during a lightning storm, or when it is left unattended and unused for long periods of time, unplug it from the wall outlet and disconnect the
antenna or cable system. This will prevent damage to the unit due to lightning and power line surges.
14. REFER ALL SERVICING TO QUALIFIED SERVICE PERSONNEL. SERVICING IS REQUIRED WHEN THE APPARATUS HAS BEEN DAMAGED IN ANYWAY, SUCH AS
WHEN THE POWER SUPPLY CORD OR PLUG IS DAMAGED, LIQUID HAS BEEN SPILLED OR OBJECTS HAVE FALLEN INTO THE APPARATUS, THE APPARATUS HAS BEEN EXPOSED TO
RAIN OR MOISTURE, DOES NOT OPERATE NORMALLY, OR HAS BEEN DROPPED.
15. WARNING: TO REDUCE THE RISK OF FIRE OR ELECTRIC SHOCK, DO NOT EXPOSE THIS APPARATUS TO RAIN OR MOISTURE.
16. APPARATUS SHALL NOT BE EXPOSED TO DRIPPING OR SPLASHING AND NO OBJECTS FILLED WITH LIQUIDS, SUCH AS VASES, SHALL BE PLACED ON THE
APPARATUS.
Quick Start Guide Rio Series – R22 and R44 Models
Xilica Audio Design Canada
Page 3
www.xilica.com
___________________________________________________________________
4. Introduction and Description:
Thank you
Hello from everyone here at Xilica Audio Design Canada and thank you for purchasing our Rio Series Dante
enabled interface.
Rio Series – R22-P, R44-P, R22-WP-X, and R22-WP-M Dante Interface Devices
Like all of our products, the Rio Series interface devices are designed and engineered in Canada.
The R22 and R44 interface models provide bidirectional Dante network audio to analog breakout and analog to Dante
input conversion and transport via Dante network audio over Ethernet cable.
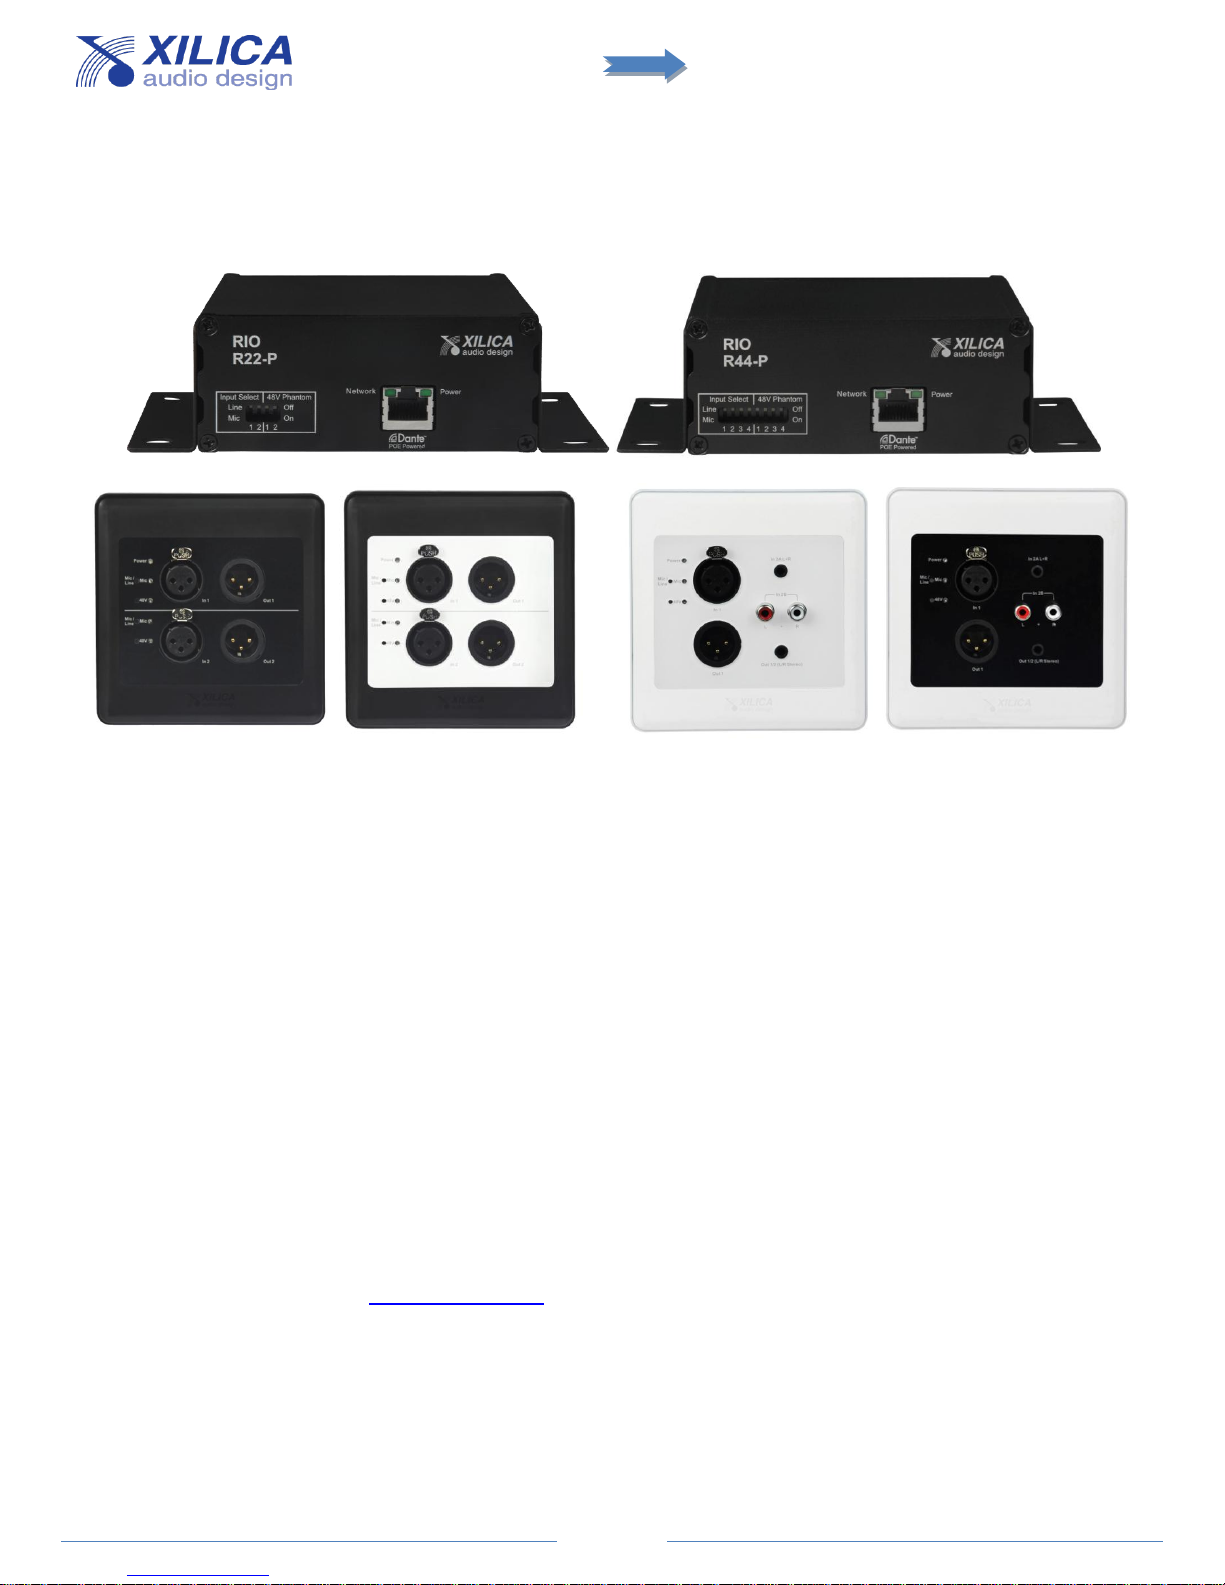
R22-P and R44-P Models:
The R22-P (2x2 analog and 2x2 Dante I/O) and R44-P (4x4 analog and 4x4 Dante I/O) models are ¼ rack chassis size
Dante interfaces and include removable surface mount brackets to secure them to a rear rack rail, to rack shelves, or any
wall surface. Optionally, you can purchase a rack mount panel and rack four (4) of the R22-P or R44-P units side by side
in a 19” rack. An external power supply is included but you can also power them using a PoE switch or router.
R22-WP-X and R22-WP-M Models:
The R22-WP-X and R22-WP-M models are 2x2 analog / 2x2 Dante I/O interfaces on a 2 gang sized flush or surface
mount wall plate (surface mount back box included). These panels are a two piece design with the decora-style outer
plastic cover snapping onto and off of the installed main body panel. From the front of the panel - place a small slotted
screwdriver in the cutout located in the middle of the bottom edge of the plastic outer cover to assist removing the outer
cover from the main body panel (see page 4). They are available in back, white, or black/white combination colours. An
external power supply is included but we recommend powering them with a PoE switch or router. The only major
difference between these two models is the analog I/O connectors provided on the front panel of each model.
- The R22-WP-X wall plate model provides XLR analog I/O connections only.
- The R22-WP-M wall plate model provides a mix of XLR, dual RCA (L+R summed), and stereo 3.5mm (L+R summed)
analog I/O connections.
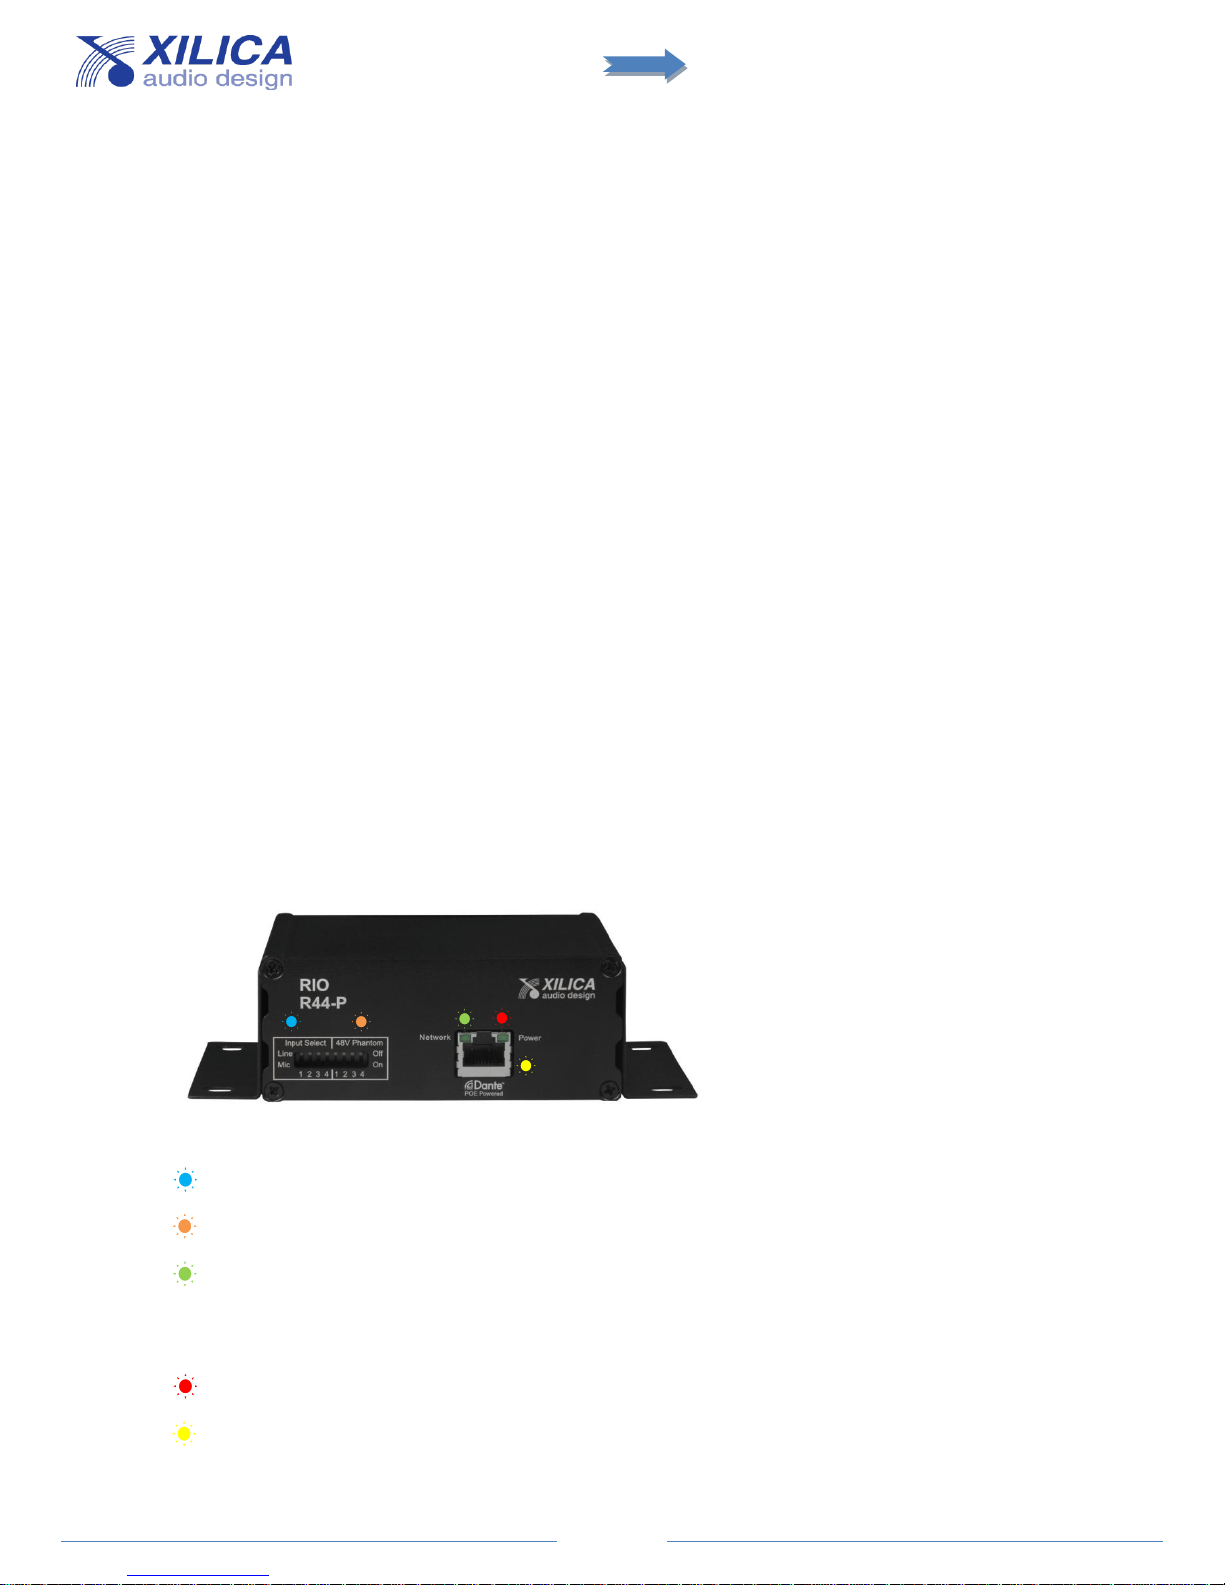
5. Hardware / Connections:
R22-P and R44-P Models (Front of R44-P Example Shown)
1. Input Select Dip Switches
Select Mic or Line input status on a per input basis using the Dip switches.
2. 48V Phantom Power Dip Switches
Select and activate 48v phantom power on a per input basis using the Dip switches.
3. Network Status LED
When the interface device has a Dante network cable connected the Network status LED on the front will light. If there
is no network cable attached it remains off.
When the interface device is properly connected to the Dante network and communicating the Network status light on the RJ45
network audio connector will flash.
4. Power Status LED
Power Status LED will light to notify you that the interface device is connected to a power source.
5. Dante Network Audio RJ-45 Connector
Use a Cat5, Cat6 or better network cable to connect the Rio R22-P and R44-P device to your Dante network.
 Loading...