

Page 1
A User's Guide for the X1M PRO Transceiver
Frederick A. Lesnick, VE3FAL
Paul W. Ross, W3FIS
Charles O. Vest, W5COV
Revision 3.1.4 – 12/19/13
This guide is for the X1M HF PRO (Platinum) model QRP transceiver, manufactured by Chonqinq
Xiegu Technology Co., Ltd. of China.
Technical Specifications
The published specifications for the radio are as follows:
Receive: 0.1 - 30MHz continuous.
Transmit: Band 1 3.5 – 4.0 MHz (80 Meters)
Band 2 7.0 – 7.3 MHz (40 Meters)
Band 3 14.0 – 14.35 MHz (20 Meters)
Band 4 21.0 – 21.45 MHz (15 Meters)
Band 5 28.0 – 29.7 MHz (10 Meters)
The full range of transmission from 0.1 to 30 MHz is available with suitable external
bandpass filters. Otherwise, transmission is limited to the listed amateur bands via
internal programming.
Operating modes: USB, LSB, and CW.
Receiver sensitivity: better than 0.45 μVolts.
RF power output: 4.5 Watts.
Frequency stability: better than 0.5 parts per million.
Memory storage locations: 32 pairs of VFO settings (both VFOa and VFOb)
Operating voltage: 9.6 – 14.5 Volts DC
1
Page 2
Receive/Standby current: 0.5A
Transmitting current: 1.8A, Maximum
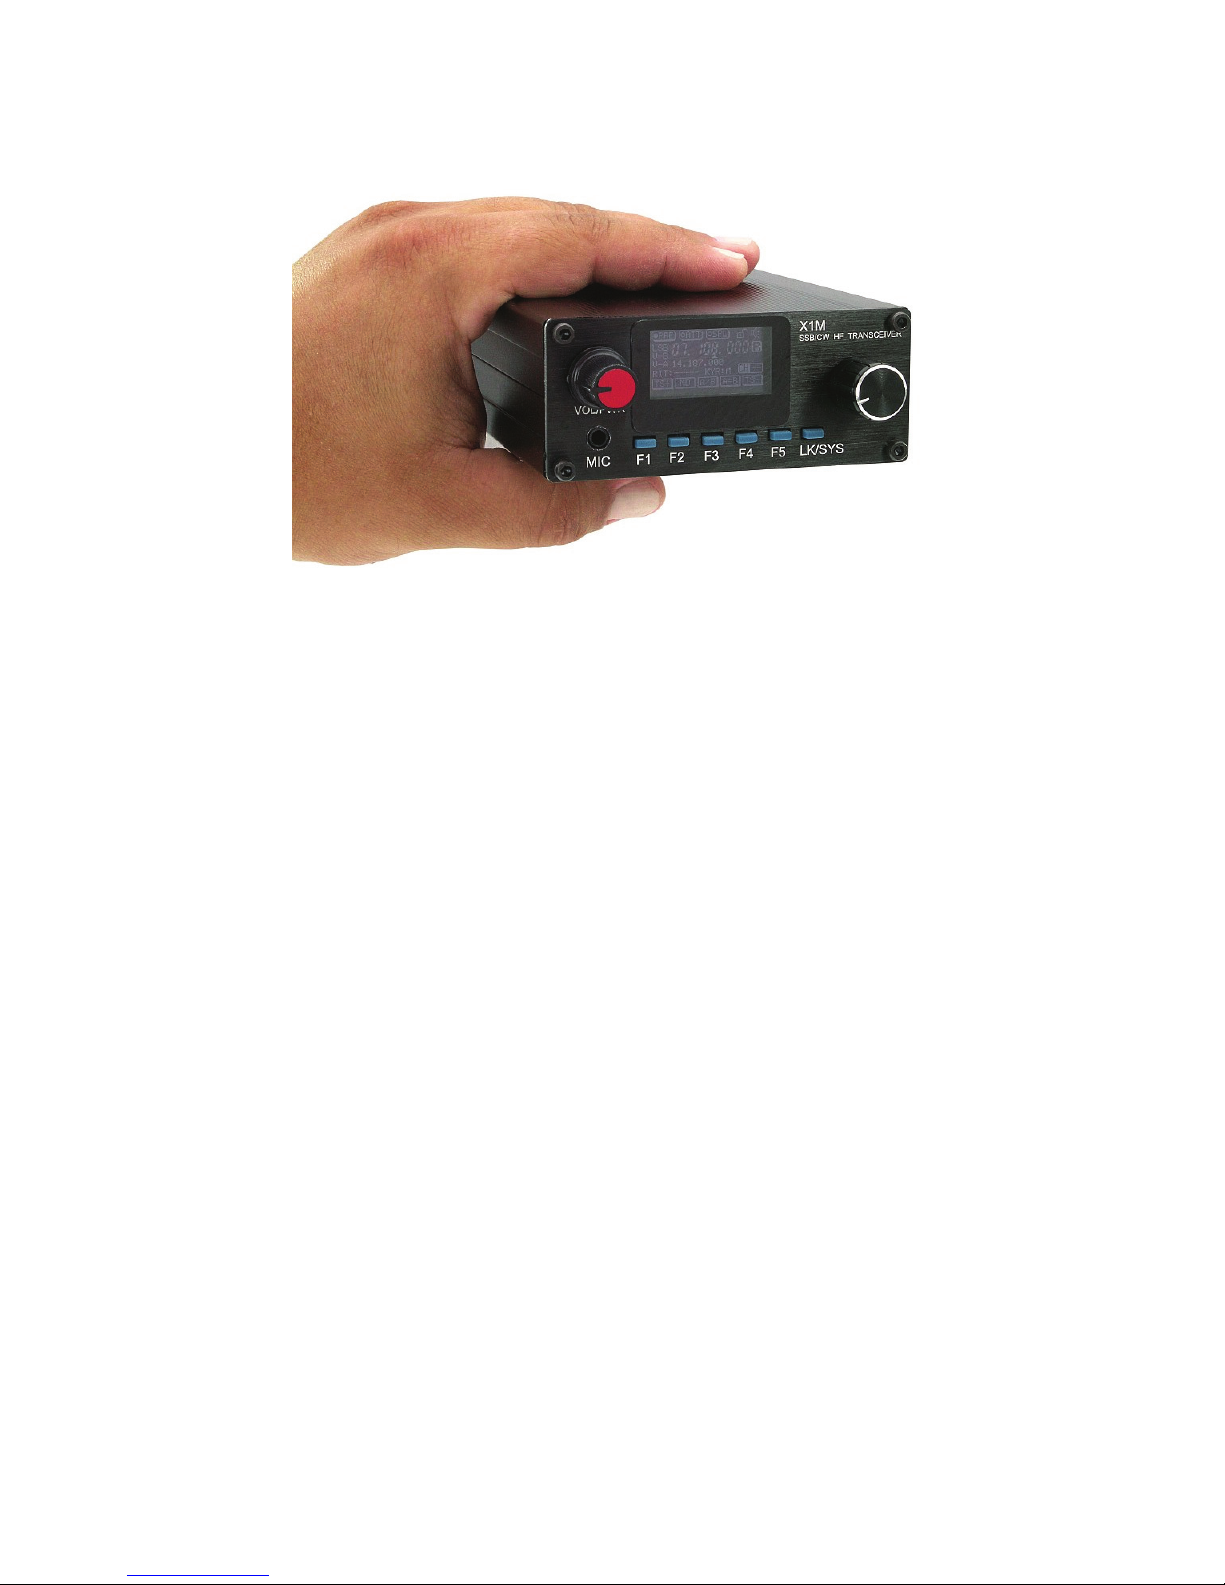
Size: 97 x 40 x 155 mm [3-13/16 x 1-9/16 x 6-1/8 inches]
Connecting the Radio
The power jack is a standard 5.5 x 2.1 mm jack coaxial power jack. The center pin is the positive
connection, and the outer shell is the negative connection. Connect the radio to a suitable power
source of 9.6 to 14.5 volts, direct current.
A key or paddle is connected with a standard 3.5 mm stereo plug. The tip is the “dot,” and the ring
is the “dash.” The common connection is to the sleeve. The dit/dah arrangement may be changed
in a menu for left-handed operators. For “straight key” operation, use only the tip and sleeve, and
leave the ring floating.
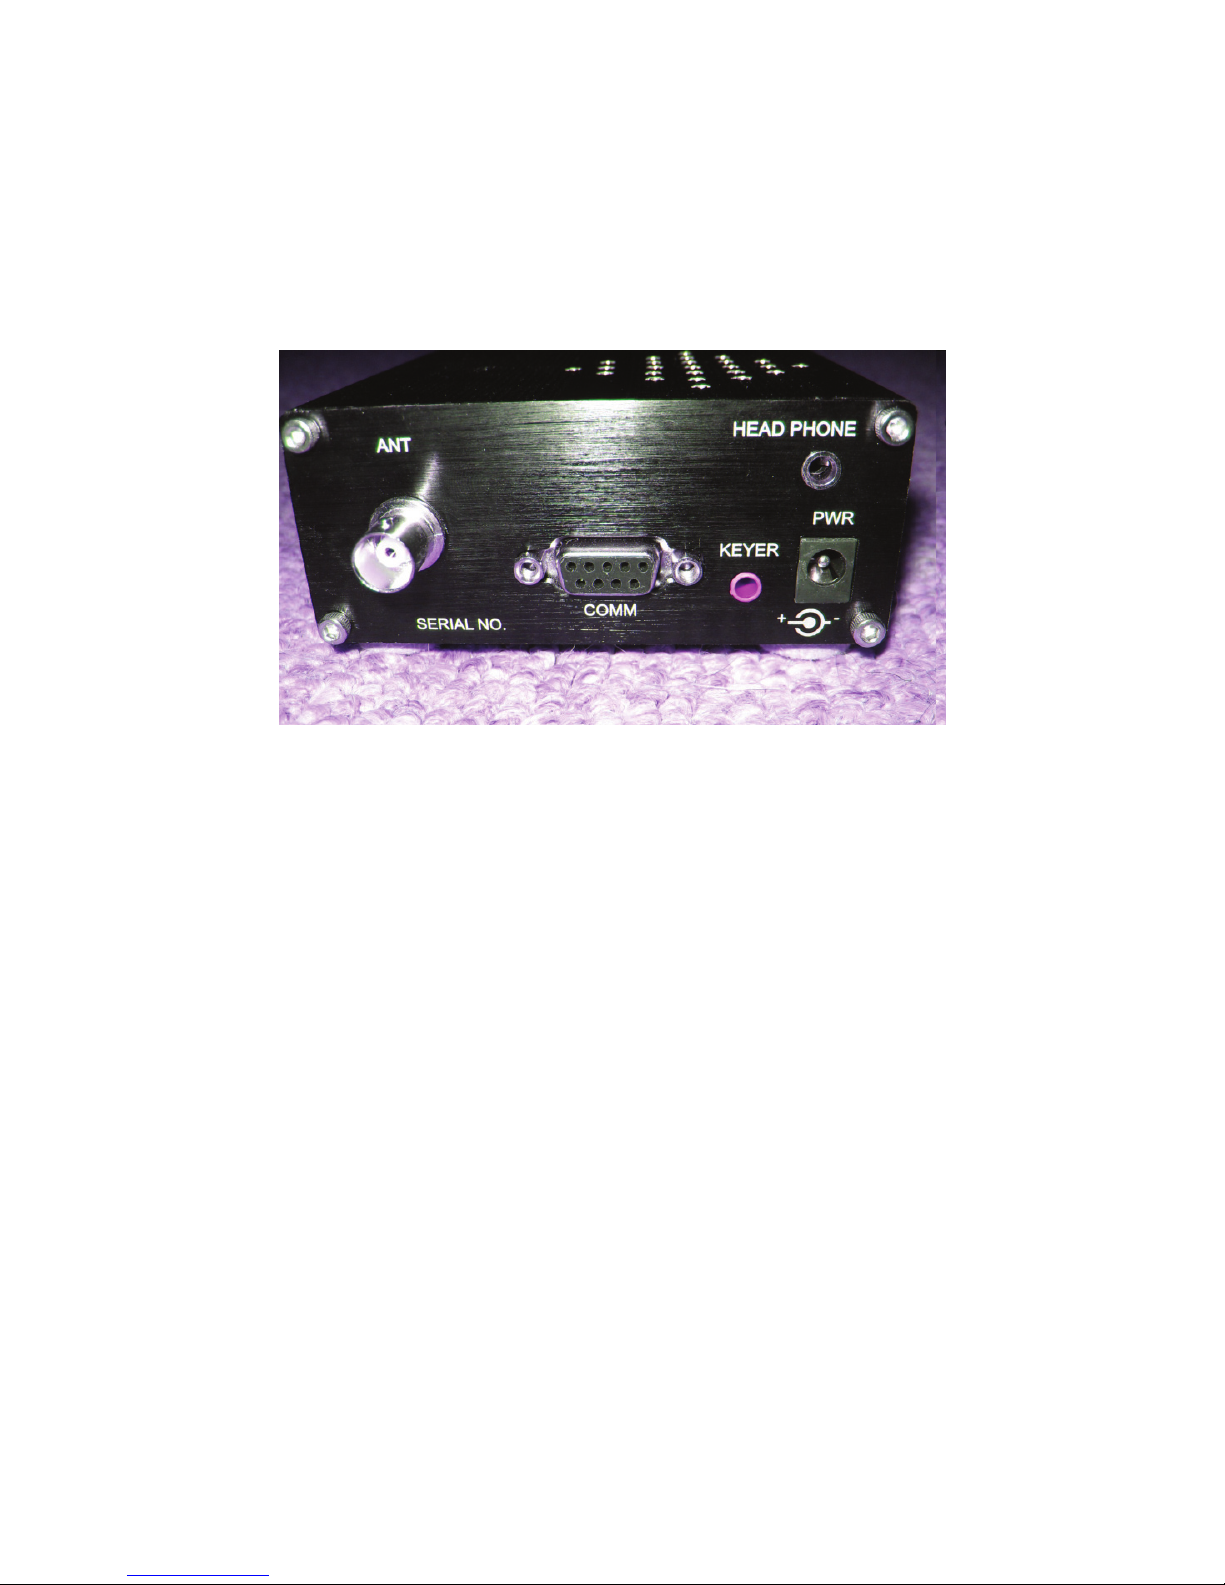
The RF antenna connection is a standard BNC female connection.
The COMM connection – this is a standard 9 pin RS-232 connector for computer interfacing.
However, the signal levels however, are TTL level signals, not the standard RS-232 level signals.
An appropriate adapter cable is available for computer connection. Do not plug the radio
directly into a computer fitted with an RS-232 connection.
A set of headphones may be plugged into the headphone jack on the back panel. This disables
the built-in speaker when the headphones are connected.
The supplied microphone plugs into the front panel. The connection is a standard 3.5 mm stereo
plug. The microphone is a re-purposed speaker microphone, with the speaker circuit
disconnected. Ignore the connection on the microphone for an ear bud. A dab of RTV Silicon
rubber can be inserted into the plug for greater mechanical stability. A red LED is activated on the
microphone when the PTT switch is pushed.
A set of four small rubber or vinyl feet on the bottom will protect your X1M case from scratches
and improve air circulation for cooling, as the case serves as a heat sink.
2
Page 3
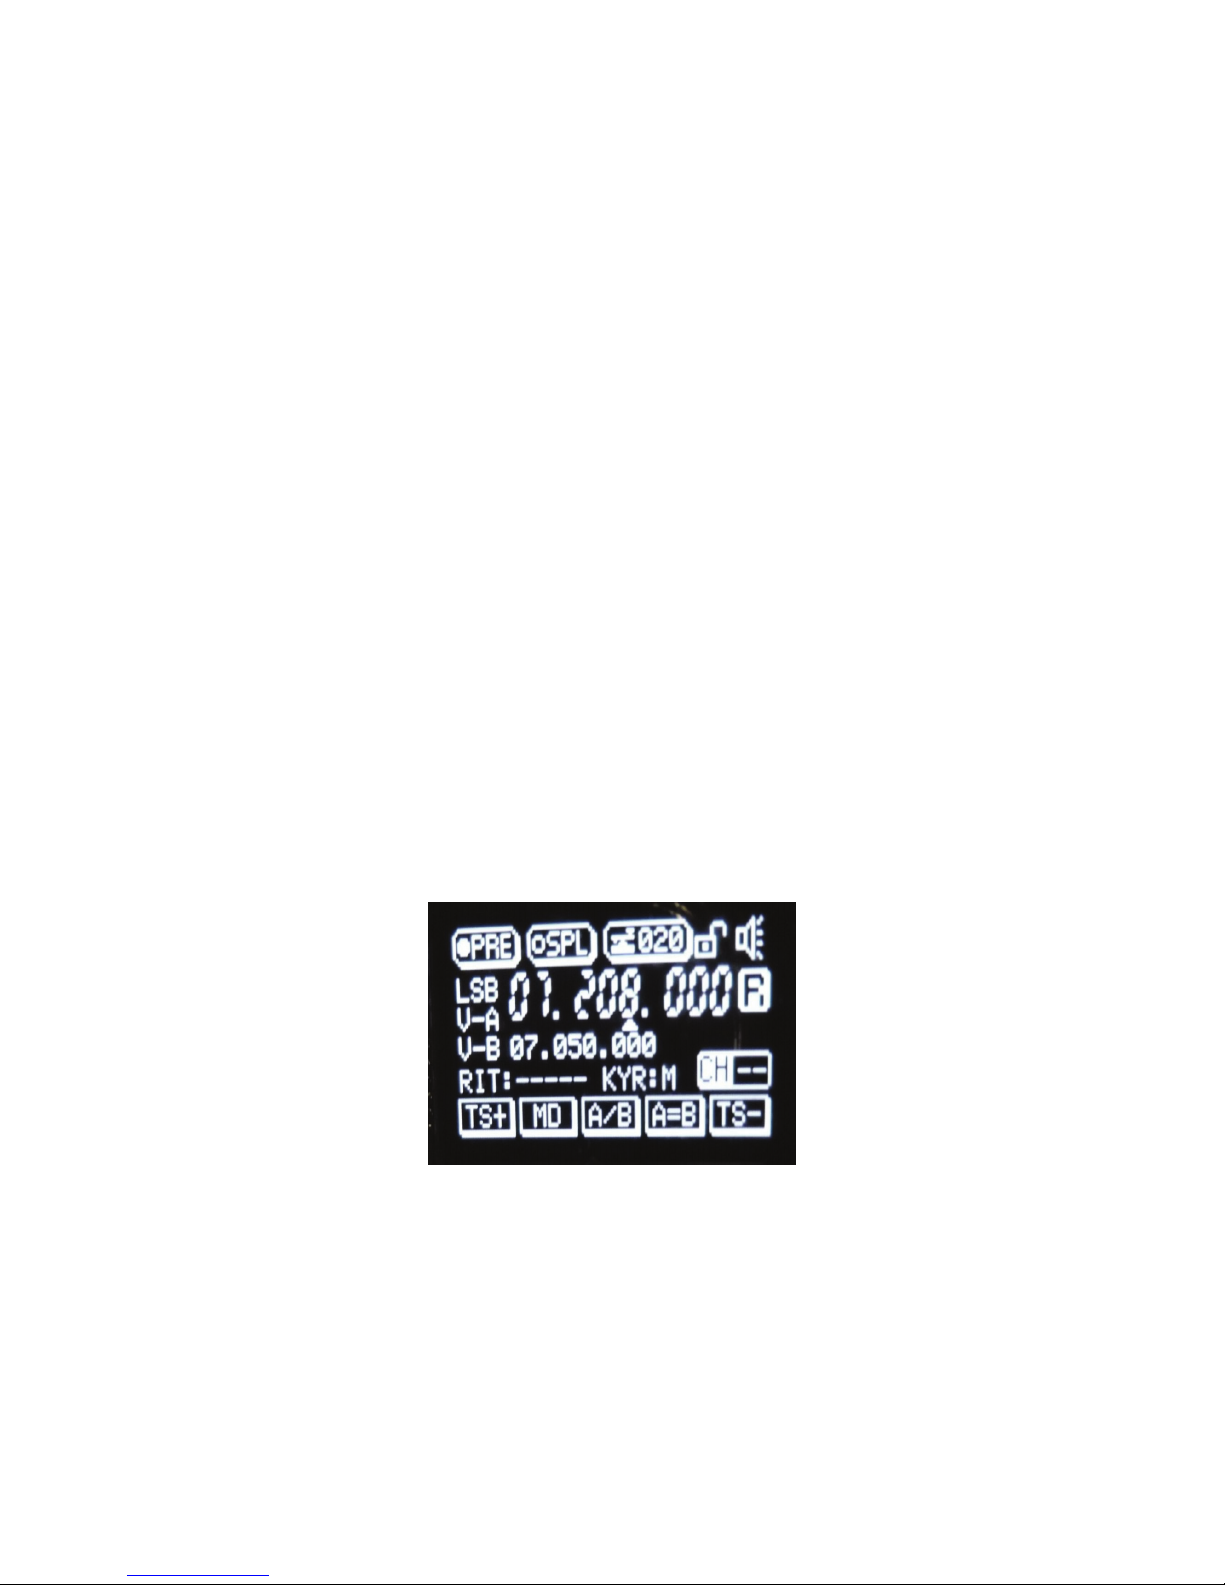
Screen Icons
R/T Receive mode /Transmit mode.
USB/LSB/CW Current operating mode.
PRE Receive pre-amplifier is on when there is a solid dot on the icon.
SPL Split-Frequency Mode is on when there is a solid dot on the icon.
Key Symbol – keyer speed.
RIT Receiver Incremental Tuning. Change the value with the frequency knob.
CH00 Memory mode operating channel being used. No digits shown when in VFO mode.
07.209.000 VFO mode current operating frequency. The active VFO is the top one.
V-B VFOb frequency.
V-A VFOa frequency.
KYR Keyer mode. Manual, auto left, auto right.
Lock Symbol Keyboard lock mode. All functions except on/off and volume disabled.
Loudspeaker Mute on/off for indicator “beeps.”
Operating Controls
Control of the various functions of the transceiver is through the buttons and knobs on the front
on the unit. Pressing and holding the F5 key will return the build date/time and firmware release
version of the unit. Press the frequency knob to return to normal operation. The firmware may be
updated by the user. The LK/SYS key either locks the function keys (short push), or allows
access to the system menu (long push).
Power off/on and volume – This is the knob on left side. Rotate it clockwise to turn the radio on,
and increase the volume.
There are a series of four menus, which are accessed though successively pushes of the
frequency knob on the right hand side of the front panel. The function keys – F1 through F5
correspond to the five various items directly over the function keys.
Screen 1:
TS+: Frequency Step up. Underline shows digit that can be changed. Move with frequency knob.
MD: Mode for LSB-USB-CW.
A/B: Toggle between VFOa and VFOb.
A=B: Set VFOa and VFOb the same. Active VFOa into inactive VFOb.
TS-: Frequency Step down. Underline shows digit that can be changed. Move with frequency
knob.
3
Page 4

Screen 2:
V/M: Frequency mode or Channel mode.
MC: Under channel mode, clears the current selected channel.
V>M: Save the VFO frequencies and modes to the currently selected channel.
Screen 3:
PRE: Turn the preamplifier on or off.
KS: Keyer Speed – adjust with Frequency Knob, press KS again to set.
SPL: Run in “split” mode.
Screen 4:
RIT: Receiver incremental tuning on/off. If on, set with frequency knob. Normal frequency setting
is inhibited.
MUT: Mute the system beep.
KYR: Key mode (manual, automatic left hand, or right hand mode).
Changing the Frequency Setting – This is done with the right-hand knob. Rotate to set the
radio to the desired frequency. Use F1 or F5 to move to the desired digit to change.
4
Page 5

Storing Frequencies into Memory
1. Set VFO frequency and transmit mode, and preamp options as desired. The system will
remember the mode and preamp setting as well as the frequency. Both VFOa and VFOb
are stored to memory. When in memory mode, the A/B button will toggle between the
two stored VFOs.
2. Press the V/M button to enter memory mode.
3. Rotate the frequency knob until the word “Blank” appears above a channel number,
unless you want to write over an existing stored channel value.
4. A long press of the V>M button stores the VFOs and modes into the desired channel.
Press V/M a second time to confirm the change.
Channel selection is determined in memory mode by rotating the frequency knob. There are
effectively 64 memory storage locations in pairs. See the following for use of the split mode,
where storing VFO pairs is useful.
Doing “splits” with the two VFOs
Set desired transmit frequency into VFOb. Set the desired receive frequency into VFOa. Activate
the SPL mode. Reception will be from VFOa and transmit will be from VFOb. Splits only work in
the SSB modes. VFOa and VFOb can be reversed with the A/B key. Transmission is from the
inactive VFO.
Systems Menu
Like all modern ham radios, the functionality and options for the radio are programmed via an
extensive set of internal menus. To access the various menus, press and hold the LK/SYS button
for two seconds to give access to the following functions. Make sure the keyboard is not locked!
Rotate the frequency knob to select the desired menu item. Press the knob again the allow
alteration of the value. Use the frequency knob and F1/F5 keys to select the desired digit. When
you are done, press LK/SYS again for a “Yes – No” to save or not save the settings. Use the
frequency knob to select “Yes” or “No.” Press the frequency knob to make your selection and
return to normal operation. The various options are as follows:
01. IF OFST: Set the intermediate frequency offset.
02. LSB BFO: Set the LSB BFO frequency.
03. USB BFO: Set the USB BFO frequency.
04. CW BFO: Set the CW BFO frequency.
05. CW TONE: Sets the side tone value in CW mode. Default is 800 HZ.
06. CW TDLY: CW transceiver delay. “QSK” delay
07. KYR SPD: Speed for automatic keyer rate adjustment. Default is 20 WPM.
08. TXP TIM: Transmitting time set. This is to avoid “frying the finals." Works in all modes.
09. BRITNES: Screen intensity setting. The display cannot be turned off.
10. CNTRST: Screen contrast setting.
11. FBND TX: Inhibit transmission on non-amateur frequencies. Spurious radiation will occur
when transmitting outside of the five pre-filtered bands shown in the specifications. Some type of
external band pass filter should be used if transmitting outside the five Amateur bands!
12. DDS CLK: DDS clock setting.
5
Page 6

13. DDS MLT: RCLK Ratio DDS frequency setting.
14. RST ALL: Reset all parameters to factory values. A reset resets only the items in this
parameter menu. Mode, VFOs, channel memories, etc., are not altered.
A caveat ---
Setting (and storing) Parameter 11 (a value of “1”) to the value to “open up” the radio is done at
your own risk.
There are two considerations:
1. Out-of-band transmission is enabled. This may be illegal where you live, and may cause
interference with other radio services.
2. Spurious transmissions may occur when transmitting out-of-band. One strategy to
eliminate these is to install a suitable external band pass filter for the band in question
(WARC bands, for example), from a company like Kits and Parts. Their web site is at:
HUhttp://kitsandparts.com/UH.
Use of the Computer Interface
This transceiver can be connected to your computer to operate with the Ham Radio Deluxe
software. A built-in CAT interface makes the X1M also suitable for automatic logging and control.
The interface emulates an Icom radio (IC-718).
The serial interface (9pin Sub-D) on the rear
supplies TTL level signals. An optional interface
provides a level converter to RS-232 levels.
Ham Radio Deluxe works satisfactorily with the
Icom 718 option. Other command suites should
work if they can generate the IC-718 command
set.
The following functions in HRD have been determined to work:
• VFOa and VFOb switching. Toggle option does not work. Select the specific VFO.
• Frequency setting. Change digits, or move slider.
• Frequency change with “fine” indicator at end of slider – increments of 500 Hz.
• Mode switching between LSB/USB/CW.
• Split ON/OFF.
• Preamplifier ON/OFF.
• Memory/VFO switching.
• Memory write – Select desired channel with frequency knob.
• Clear selected memory channel.
• Select memory channel (you get a drop down list). Only entries 01 through 32 work.
Digital modes can be run as well. It will require a suitable interface, such as the SignaLink USB
interface and appropriate cables for input to the microphone and output from the headphone jack.
Audio Filter Option
An external audio filter is available as an option. It is a very useful device to “sharpen up” the
pass band for CW work. Alternatively, it may be set for SSB voice use. The center frequency is
adjustable from 400 to 1100 Hz, with a bandwidth from 60 to 1800 Hz. It is a switched capacitor
6
Page 7

audio filter, which provides for the design of a very compact audio filter without the necessity of
either bulky or precision components.
The left hand knob sets the center frequency for the filter. When turned on, the unit powers up
from the power applied to the rear of the unit (9 volt battery, or 12.8 volt supply), with a standard
5.5 x 2.1 mm power jack. With power off, the filter is bypassed.
The LED on the front between the two knobs indicates that the power on.
The right hand knob sets the overall bandwidth, with maximum bandwidth at full clockwise
rotation of the knob. This then provides satisfactory SSB voice reception.
The two jacks on the back are for audio input from the X1M or other audio source, and the output
jack provides a signal to headphones, a small loud speaker, or an amplified computer speaker.
The jacks are standard 3.5 mm stereo jacks.
(Das Filter ist voraussichtlich ab März 2014 erhältlich)
Microphone Pin Out
The microphone pin connections are as follows. The microphone connector is a standard 3.5 mm
stereo plug. The color coding of the wires may vary, as this is a re-purposed commercial speaker
microphone.
Sleeve – common. (Black)
Ring – PTT button – closure to sleeve. (White)
Tip – Microphone. (Red)
Case Removal
1. Disconnect all wiring.
2. Slip both knobs off.
3. Remove the nuts on the volume control and frequency adjustment shafts.
4. Remove ALL four screws on front panel. Gently remove the front panel.
5. Remove ONLY the two top screws on the back panel.
6. Do NOT remove the screw on the bottom of the case! This retains the final amplifier
transistor.
7. The top of the case simply slides forward and off.
A 2.5 mm or 3/32" Allen wrench can be used to remove the screws. The 2.5 mm Allen wrench is
a better fit.
Re-assembly -- reverse the foregoing procedure. Do not press the frequency knob on too far, or
you will not be able to access “push” functions. Make sure that the rubber function buttons clear
the holes in the front panel.
Some of the loudspeakers have come loose in transit. A small dab of hot glue will take care of
this. Check this if things “rattle,” or examine the speaker when you have the case off.
7
Page 8

Setting the Side Tone
The side tone is often too loud. This is controlled by an internal trim pot setting.
1. Remove the case – see the foregoing instructions.
2. There are two trim pots on the display end of the board.
3. Note the setting of the trim pots, in the event you need to reset them.
4. The left hand trim pot is for side tone level setting. An adjustment of appropriately 90
degrees clockwise seems to be satisfactory. Put the case back on.
The microphone level trim pot is on the right. It is generally not necessary to adjust the
microphone gain pot.
Firmware Update
From time-to-time, firmware updates are made available. To upgrade your firmware, carefully
follow these instructions.
First , power up the radio and make a note of the current firmware information by pressing and
holding the F5 button. This will be used as a comparison once the firmware upgrade has
completed. It may also be worth making a copy of all of the alignment settings by pressing and
holding the SYS button. This procedure will NOT change your alignment settings such as the IF
OFFSET, LSB/USB BFO etc.
Download the firmware program from the yahoo group files area.
Ensure that the radio is turned off prior to starting the update process. Connect your radio to your
computer with the proper interface cable. Execute the update software program that you have
downloaded.
On the update software, press the program button on the top left hand side. Select the proper
Baud rate -- 2400 Baud is appropriate.
Power on the radio – The display on the front of the radio will remain off till the firmware flashing
is completed.
After a short delay, at the bottom of the screen you’ll notice a “progress bar” which indicates how
much of the firmware image has been copied over to the radio. Do not turn off the radio during
the update procedure! This update procedure can take as long as five minutes. Once the
firmware update is completed, the radio will beep as if you have just turned it on.
To confirm the version of the new firmware, press and hold F5 which should either show you the
8
Page 9

same firmware version as previously (if the firmware update did not work, or the versions are the
same), or a newer firmware version indicating build time and date etc.
Alignment Procedure
If you find that the radio sounds “muffled” on either USB or LSB, you likely do not have the radio
aligned correctly. This is a simple procedure.
1. Set the IF OFFSET first, or you'll chase your tail. With the radio hooked to an antenna
receiving noise but no signal, adjust the IF OFFSET setting until you can switch back and
forth between USB and LSB modes and the "wooshing"; or "timbre" sounds about the
same. Looking at the audio signal with a program like Spectran is helpful. Save the
setting. The IF OFFSET is the adjustment you need to make in a dual conversion
receiver's conversion process so as to center the signal up in the final IF filters.
2. Now, adjust USB by moving USB BFO until a voice USB signal received from a local
accurate receiver is correct. Save the setting.
3. Adjust LSB by moving LSB BFO until a voice LSB signal received from a local accurate
receiver is correct. Save the setting.
4. Adjust CW only after you do the IF OFFSET, USB BFO, and LSB BFO settings. Once
you have USB/LSB set to your liking, CW setup is easy. Simply set the CW BFO (Menu
Item #4) = to your IF OFFSET value. Go to Menu item #5 and set the CW Tone to the
tone you like to listen to when copying the station you are working. Typically the value will
be between 500Hz and 800Hz. Note that this value effects only the receive frequency.
Save your changes by pressing the SYS key again, select “Yes,” and confirm your choices by
pressing the frequency select knob.
One final word is necessary and must be heeded if you are to be zero beat with the station you
are working. Because of the way the IF and SSB filter are currently set up in firmware, you will
hear both sides of zero beat, when tuning a station on CW. You MUST use the low side of
zero beat. If you use the high side, your CW signal will be off zero beat by two times your CW
Tone value.
Write down your settings for IF OFFSET, USB BFO, LSB BFO, and CW BFO for future reference.
If you manage to make a mess of things, you can always do a “General Reset,” and set the
system parameters back to factory values. There are other alternative strategies for alignment,
but moving the signal to the center of the IF pass band is the critical issue.
9
Page 10

Notes
This will save you some headaches later on. Keep your notebook handy to make notes in for the
actual operation of your X1M PRO. Also, note any problems and what you were doing when the
problem showed up.
Everyone should access the SYSTEMS MENU and record the present values currently stored for
each item in the list. This will allow you to restore these values in the case they get changed for
some reason. These values are typical as of release V1.021 of the firmware:
Acknowledgments
The authors would like to acknowledge specific contributions from the following people:
Ray Motte, KD4HJT, for the photos of the rear panel of the X1M and the side tone trim pot.
Ken Fest, N2LZV, for the photos of the front of the X1M and various screen shots.
Ed Griffin, W4KMA, for providing the initial manuals and answering all sorts of questions, as well
as the photo of the front of the transceiver, and firmware update material.
John Tracy, W6SB, for discussions on circuit internals and SWR considerations.
Steven Johnston, WD8DAS, Ken Downs, W1KRT, Heath, VK3TWO/VK6TWO,
and Mark Francis, KI0PF for help with the alignment procedures. Heath also provided the
firmware update procedure, which we have edited for this manual. Dale Parfitt, W4OP, for
clarifying the issues in adjusting CW operation.
Volkmar Junge, DF2SS of WiMo Antennen und Elektronik GmbH, Ed Griffin, Dale Parfitt, and
Charlie Vest for working with the factory on firmware and hardware issues.
The Yahoo News Group members of the X1M transceiver group for many helpful suggestions,
critiques, and comments.
Frederick A. Lesnick, VE3FAL, Thunder Bay, Ontario
Paul W. Ross, W3FIS, Fenwick Island, Delaware
Charles O. Vest, W5COV, South Coffeyville, Oklahoma
Function Factory My Settings
IF OFST 08999850
01
LSB BFO 08998750
02
USB BFO 09000950
03
CW BFO 08999850
04
CW TONE 0800
05
CW TDLY 0300
06
KYR SPD 020
07
TXP TIM 0000
08
BRITNES 100
09
CNTRST 100
10
FBND 0
11
DDS CLK 032768000
12
DDS MLT 1
13
RST ALL 0
14
10
 Loading...