

Page 1
PANTONE Cool Gray 11 C+K
(V1.0)
成品尺寸:80×80mm
材质:太空梭70g无光铜
图号:Y30
料号:609
Manufacturer: Shanghai Xiaoyi Technology Co., Ltd.
Address: 16F,Building 1 , No. 515, Huanke Road, Shanghai, China
Tel: +86-21-6881 6918
http://www.yitechnology.com
2019-02-19
EU V1.0
FCC ID: 2AFIB-YYS3017
IC: 20436-YYS3017
Thank you for chooseing YI Dome X
Page 2
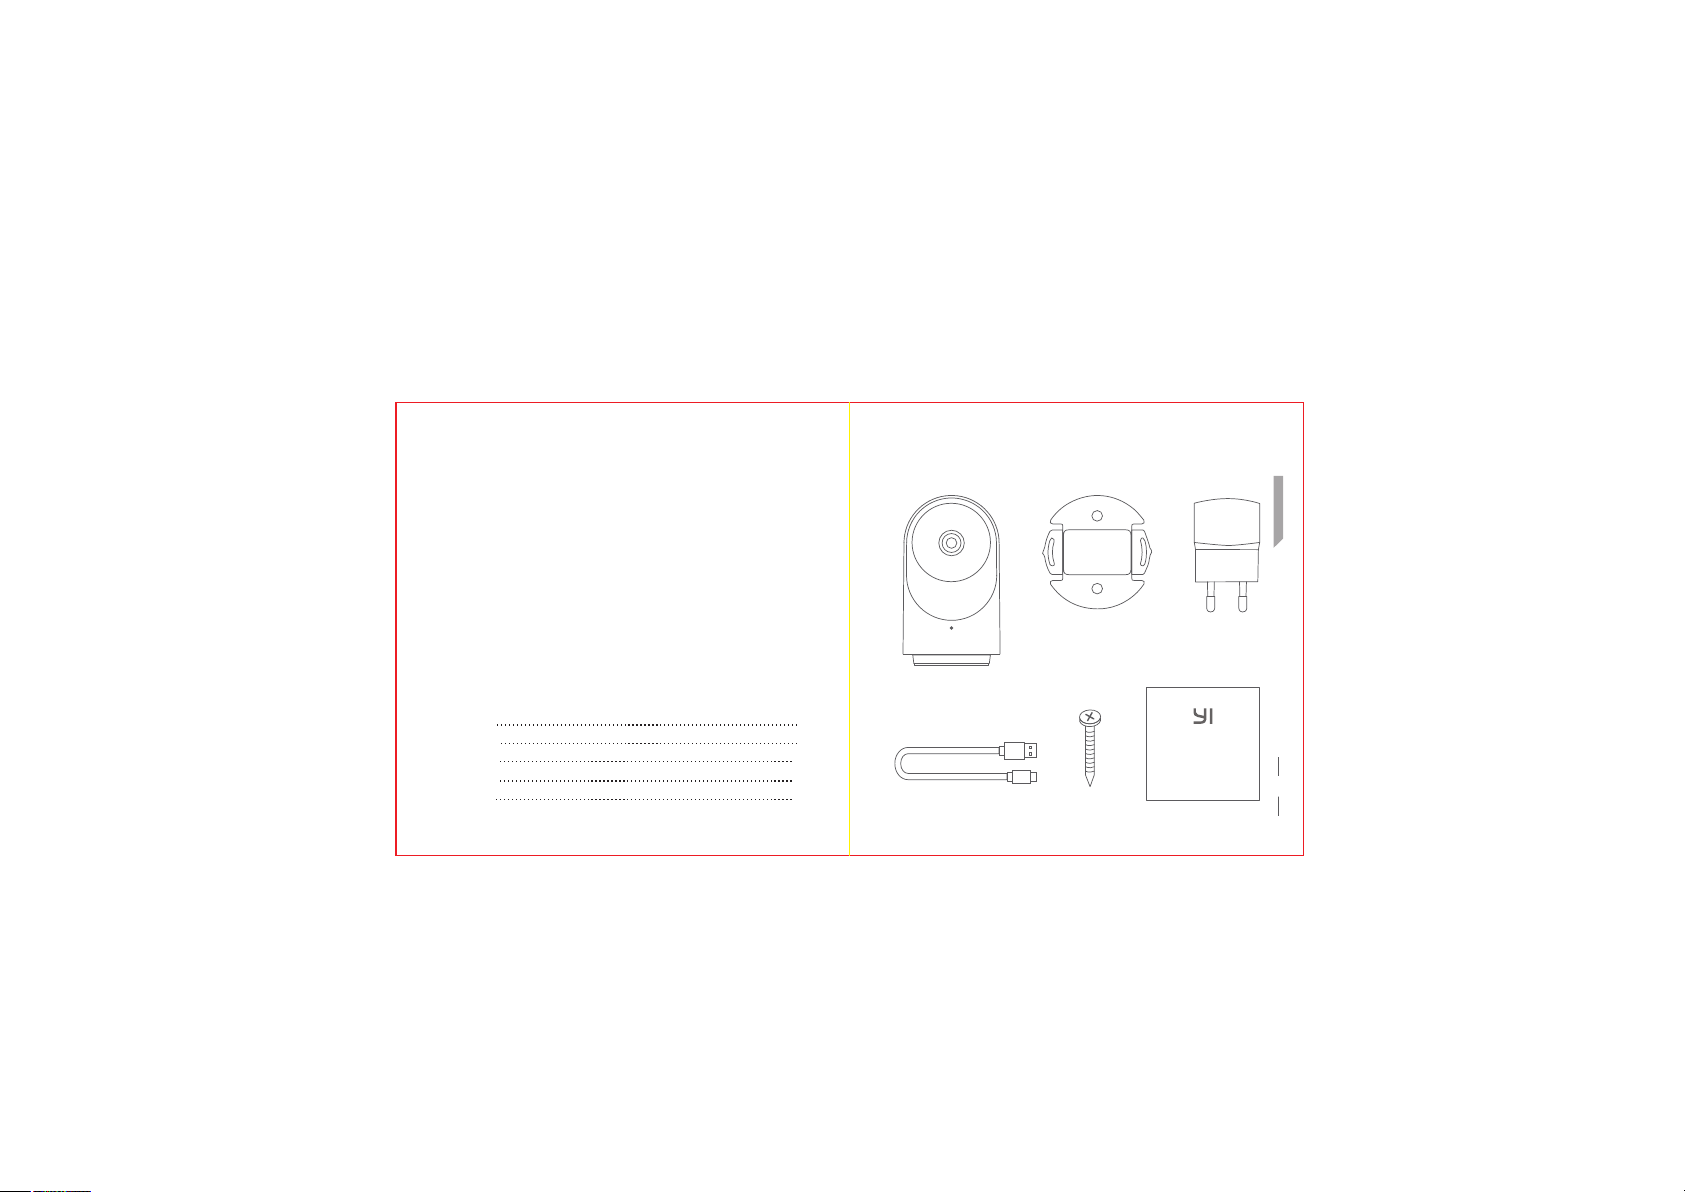
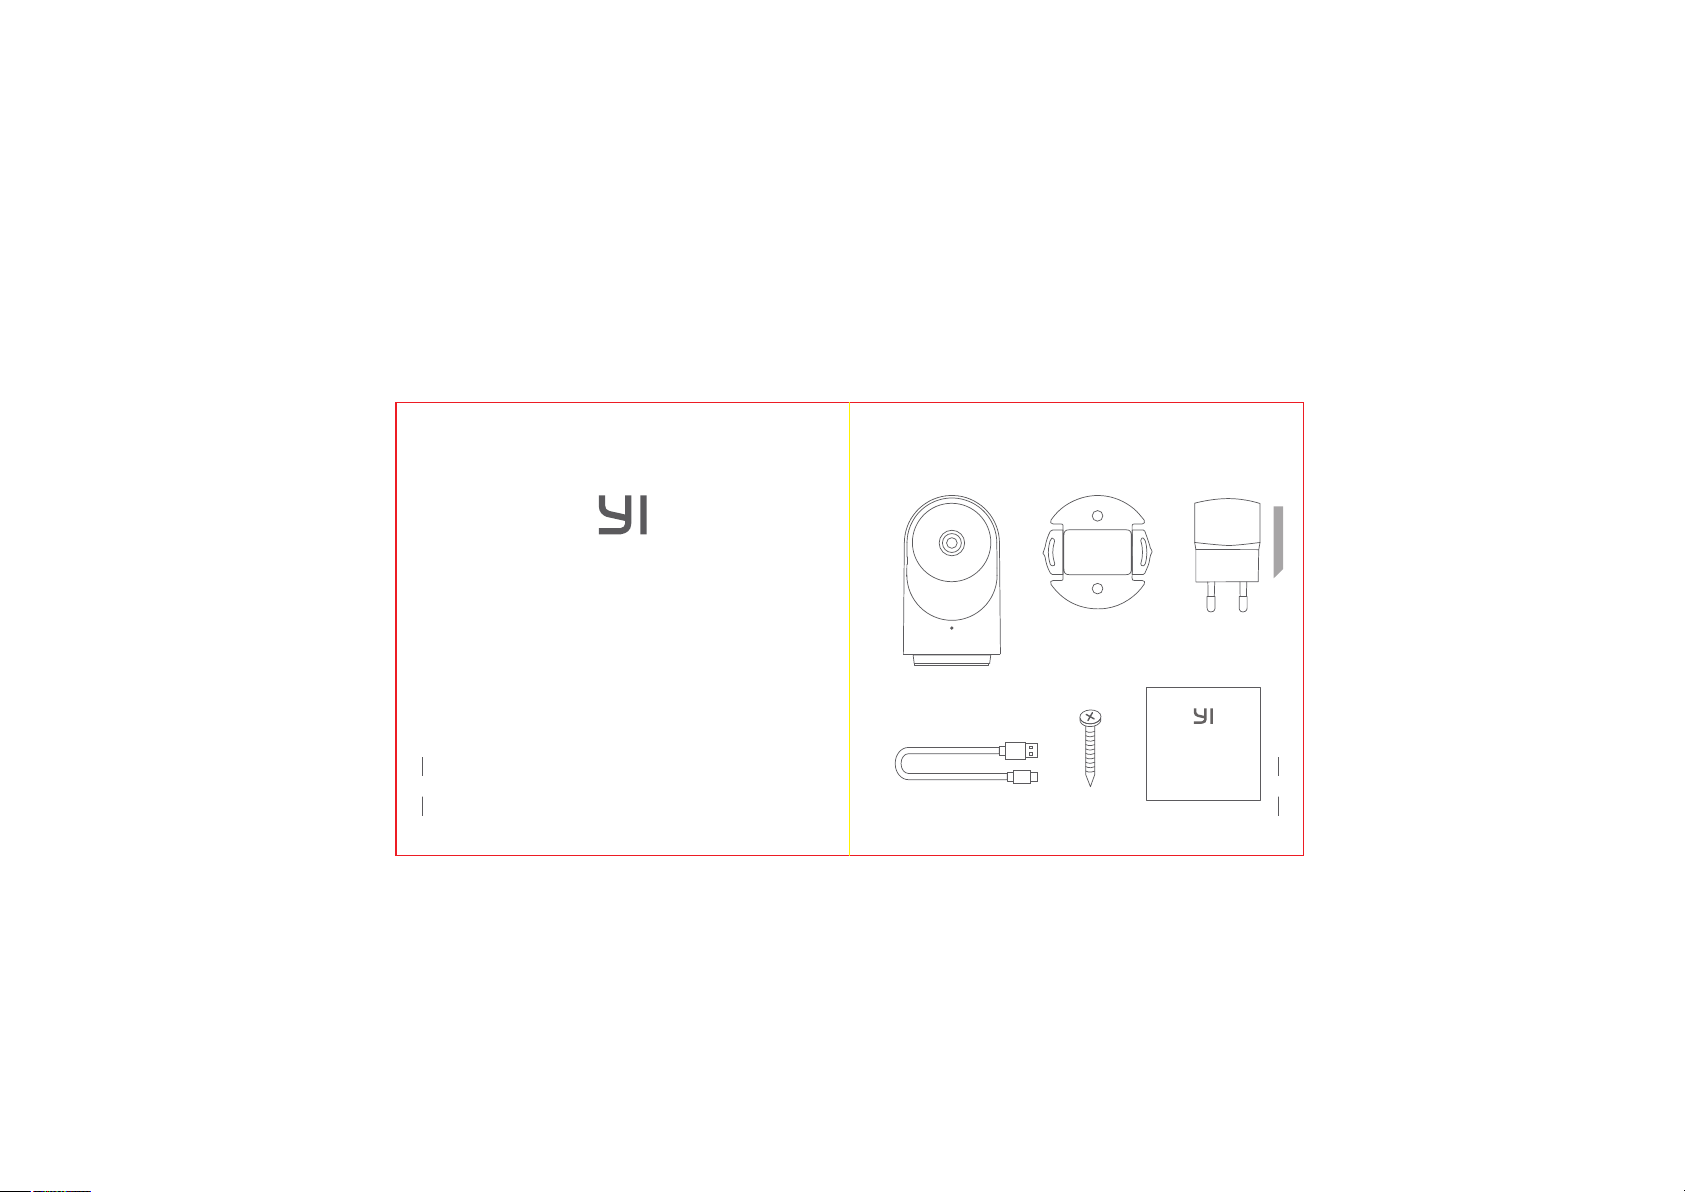
1. What in the box
Engli sh
Table of Contents
1. English
2. Français
3. Deutsch
4. Español
5. Itali ano
Camer a Wall Holder ×1
YI Dome X ×1
1
8
16
24
32
Power Adap ter ×1
1
User Man ual ×1 Screws ×2USB Power Cab le ×1
Page 3
Engli sh
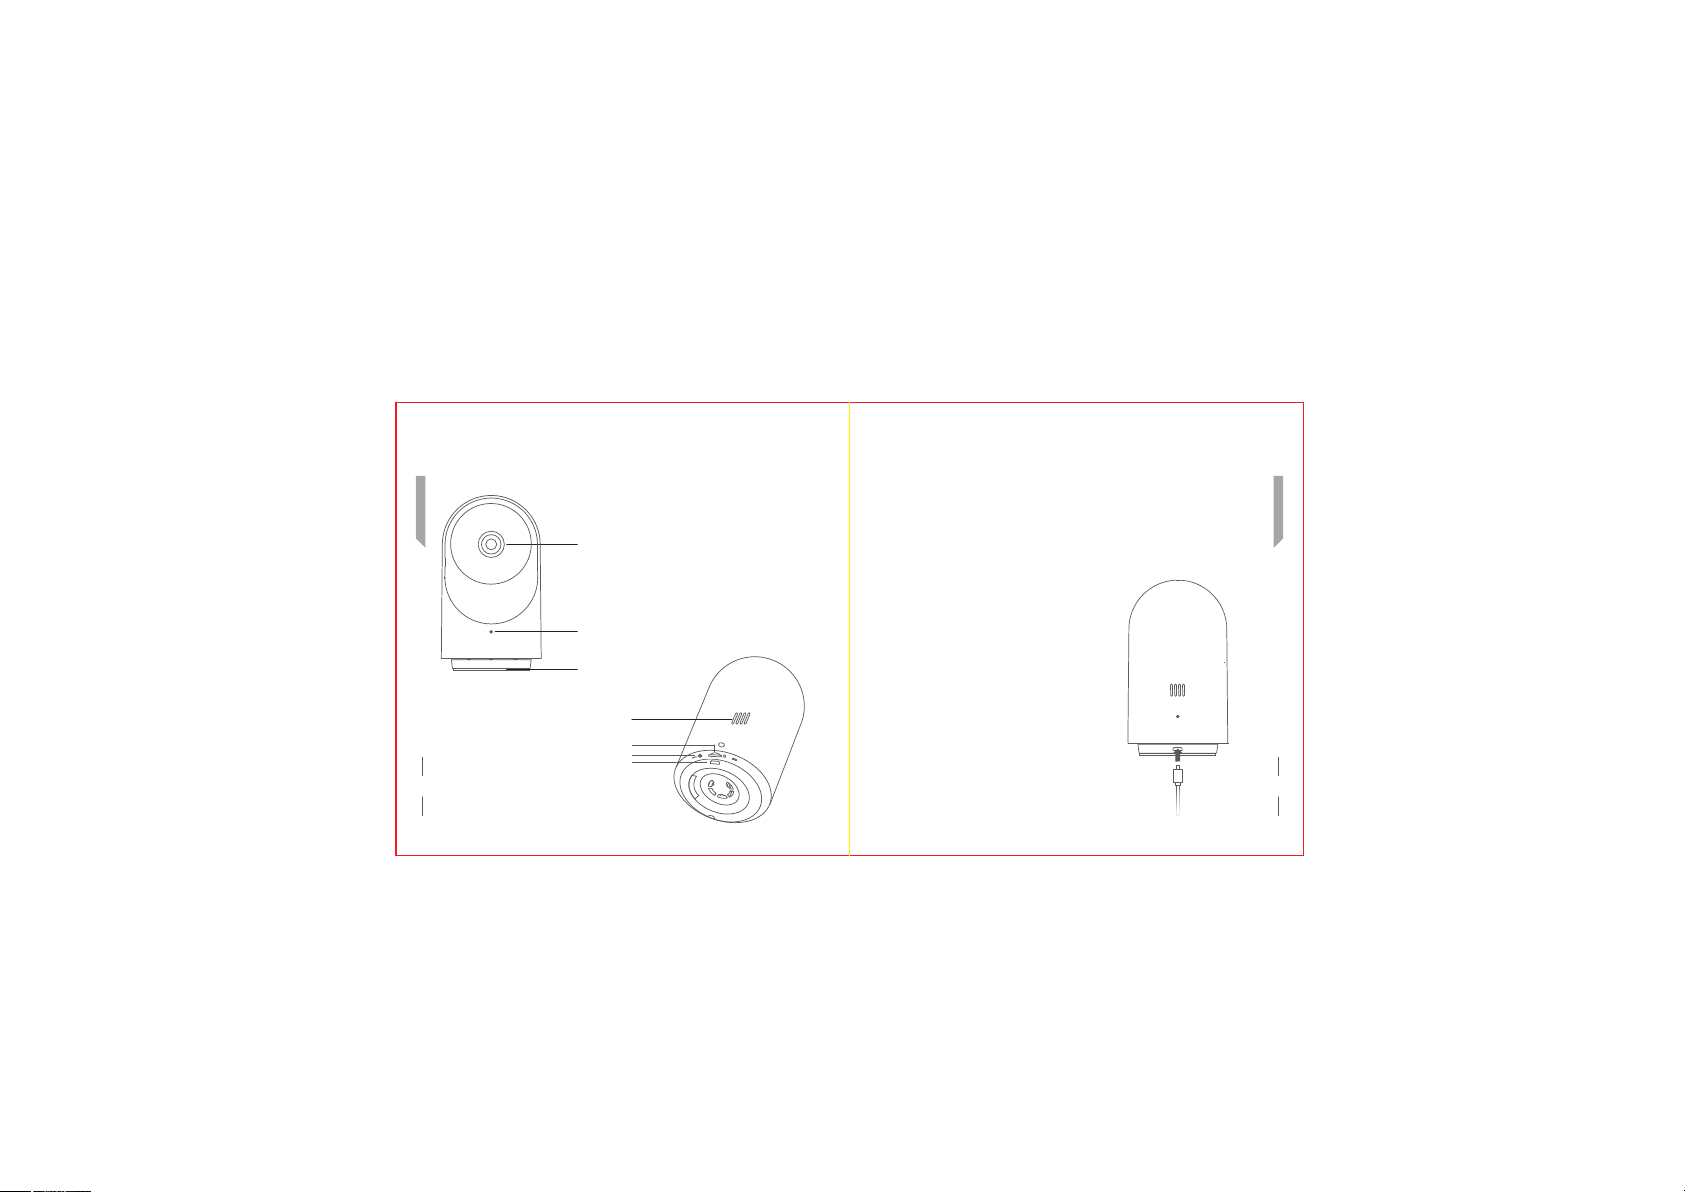
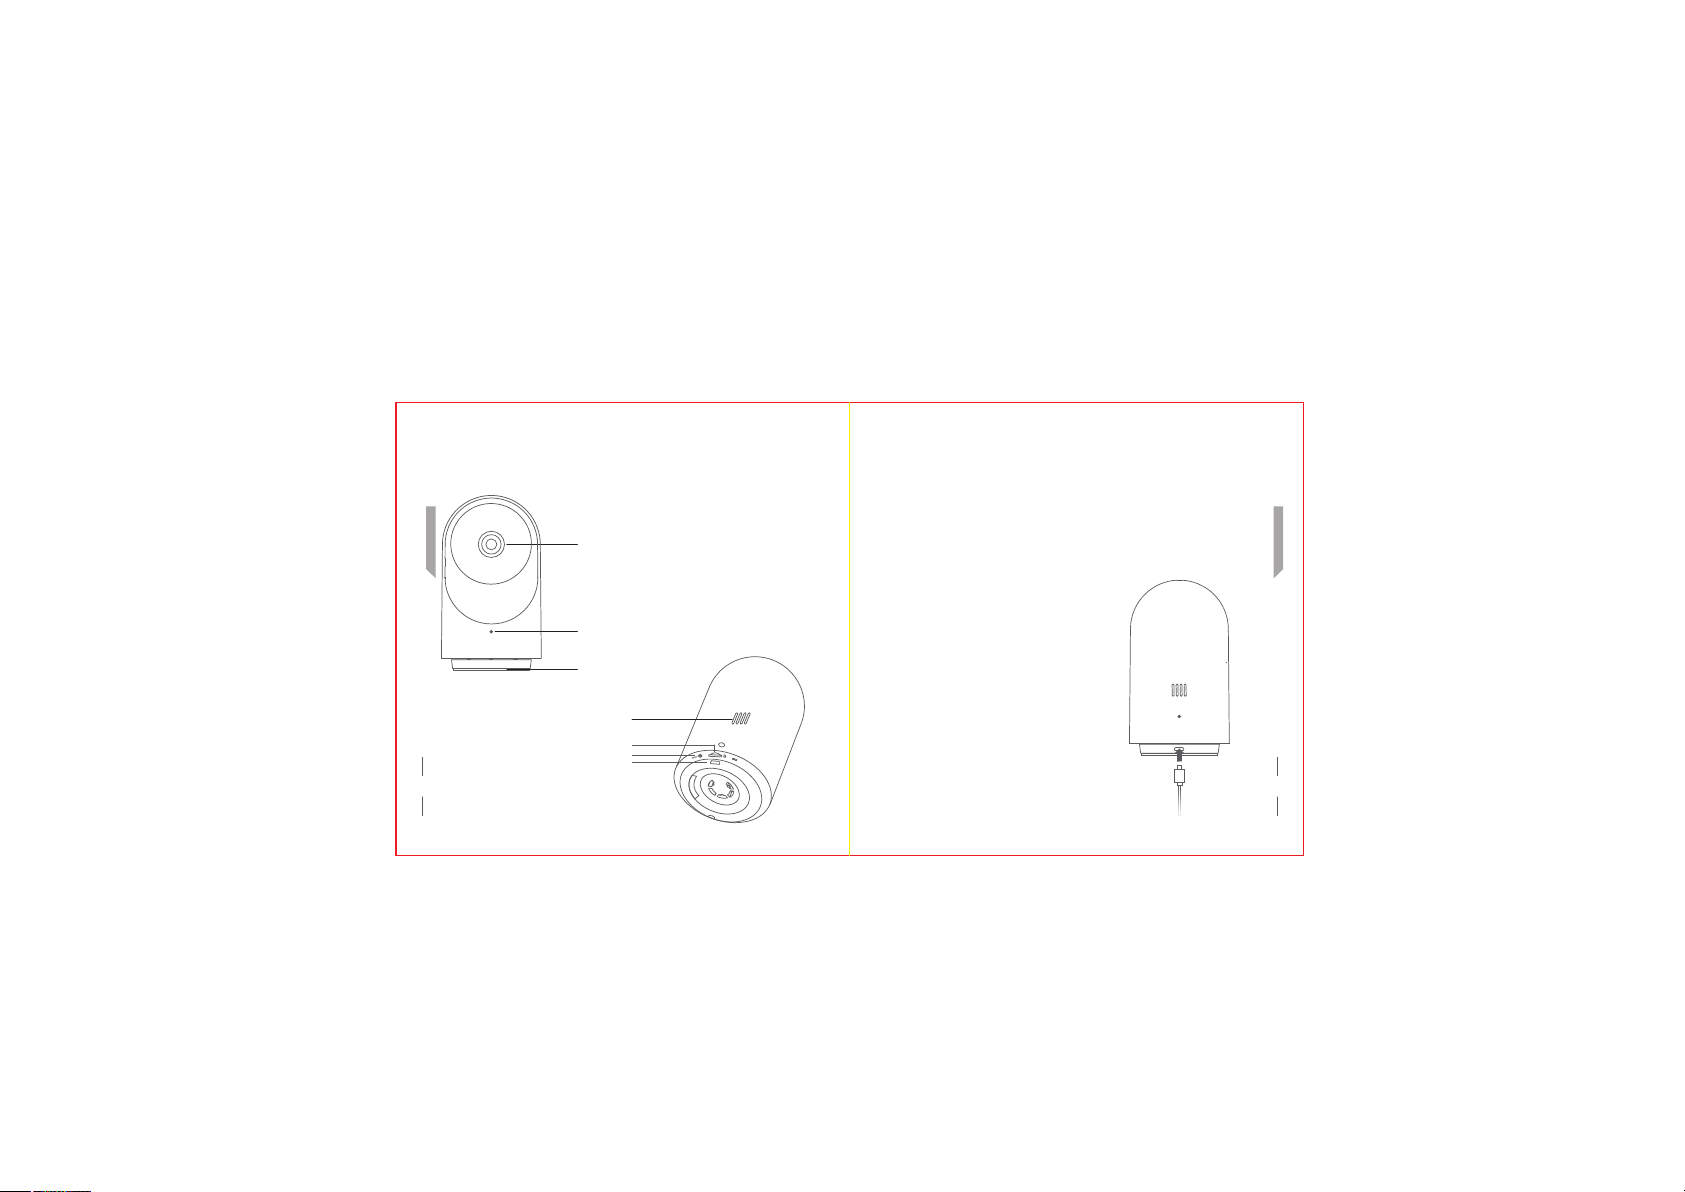
2. Getting to know the Camera parts
Lens
Indic ator Ligh t
MIC
Speak er
micro SD Solt
Reset Bu tton
USB Power Por t
2
3. General Introduction
a) Power on the camera
Locate the USB cable on the bottom of the camera and plug in the data cable.
The other end of the cable is powered by the power adapter.
The front indicator lights up to indicate that the camera is powered.
Also ensure that there is a WiFi network available.
Engli sh
3
Page 4
Engli sh
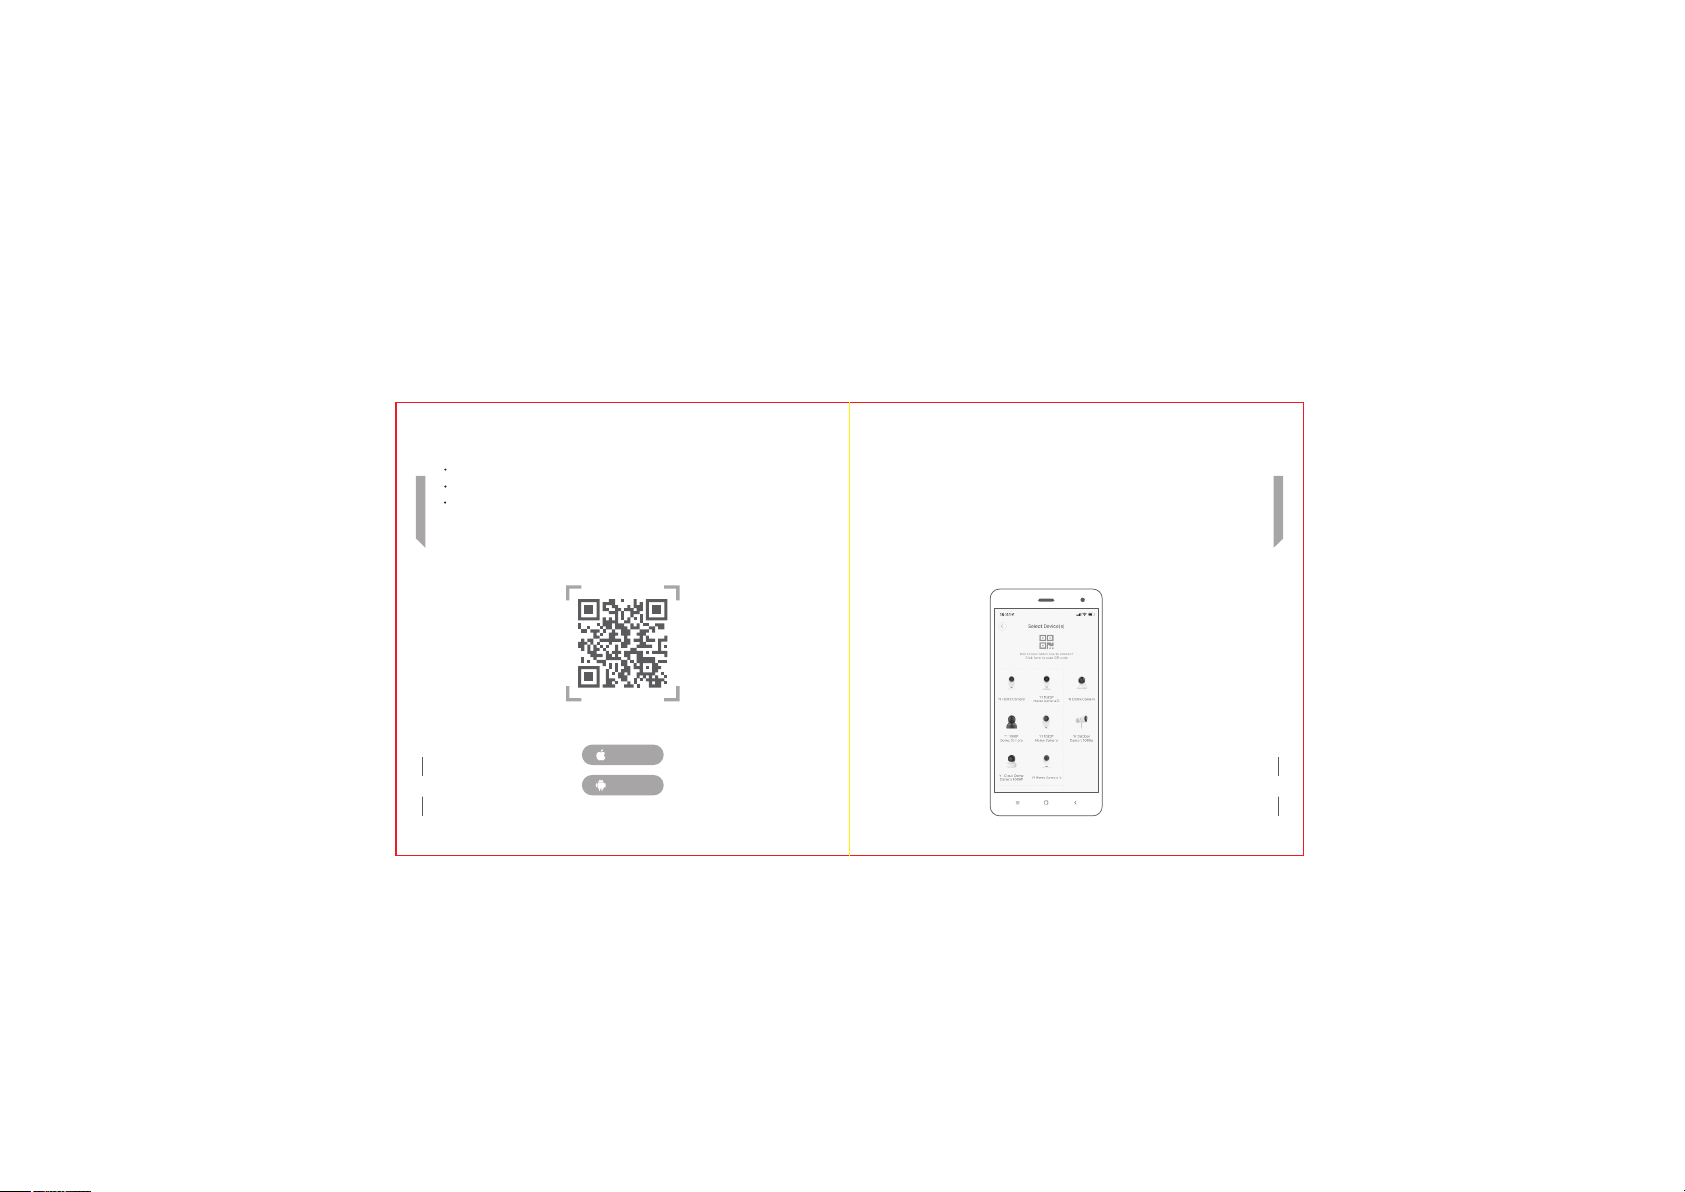
b) Connect to the YI camera app
Download and install the app.
Scan the QR code of the YI Home APP below and complete the installation.
If you have a YI account, log in directly and add the device according to the app's
add process.
YI Home APP QR Code
iPhone
4 5
Android
c) Adding the device to YI account
After logging in to the app, enter the device selection interface, the camera flashes
yellow and the voice prompts “Waiting for connection”.
Then click on “I heard waiting to connect” and point the QR code displayed on the
phone towards the camera lens, waiting for the scan.
After the QR code is scanned successfully, click “Next”. Waiting for the voice prompt
"Pairing successful", you can start using it.
Engli sh
Page 5
Engli sh
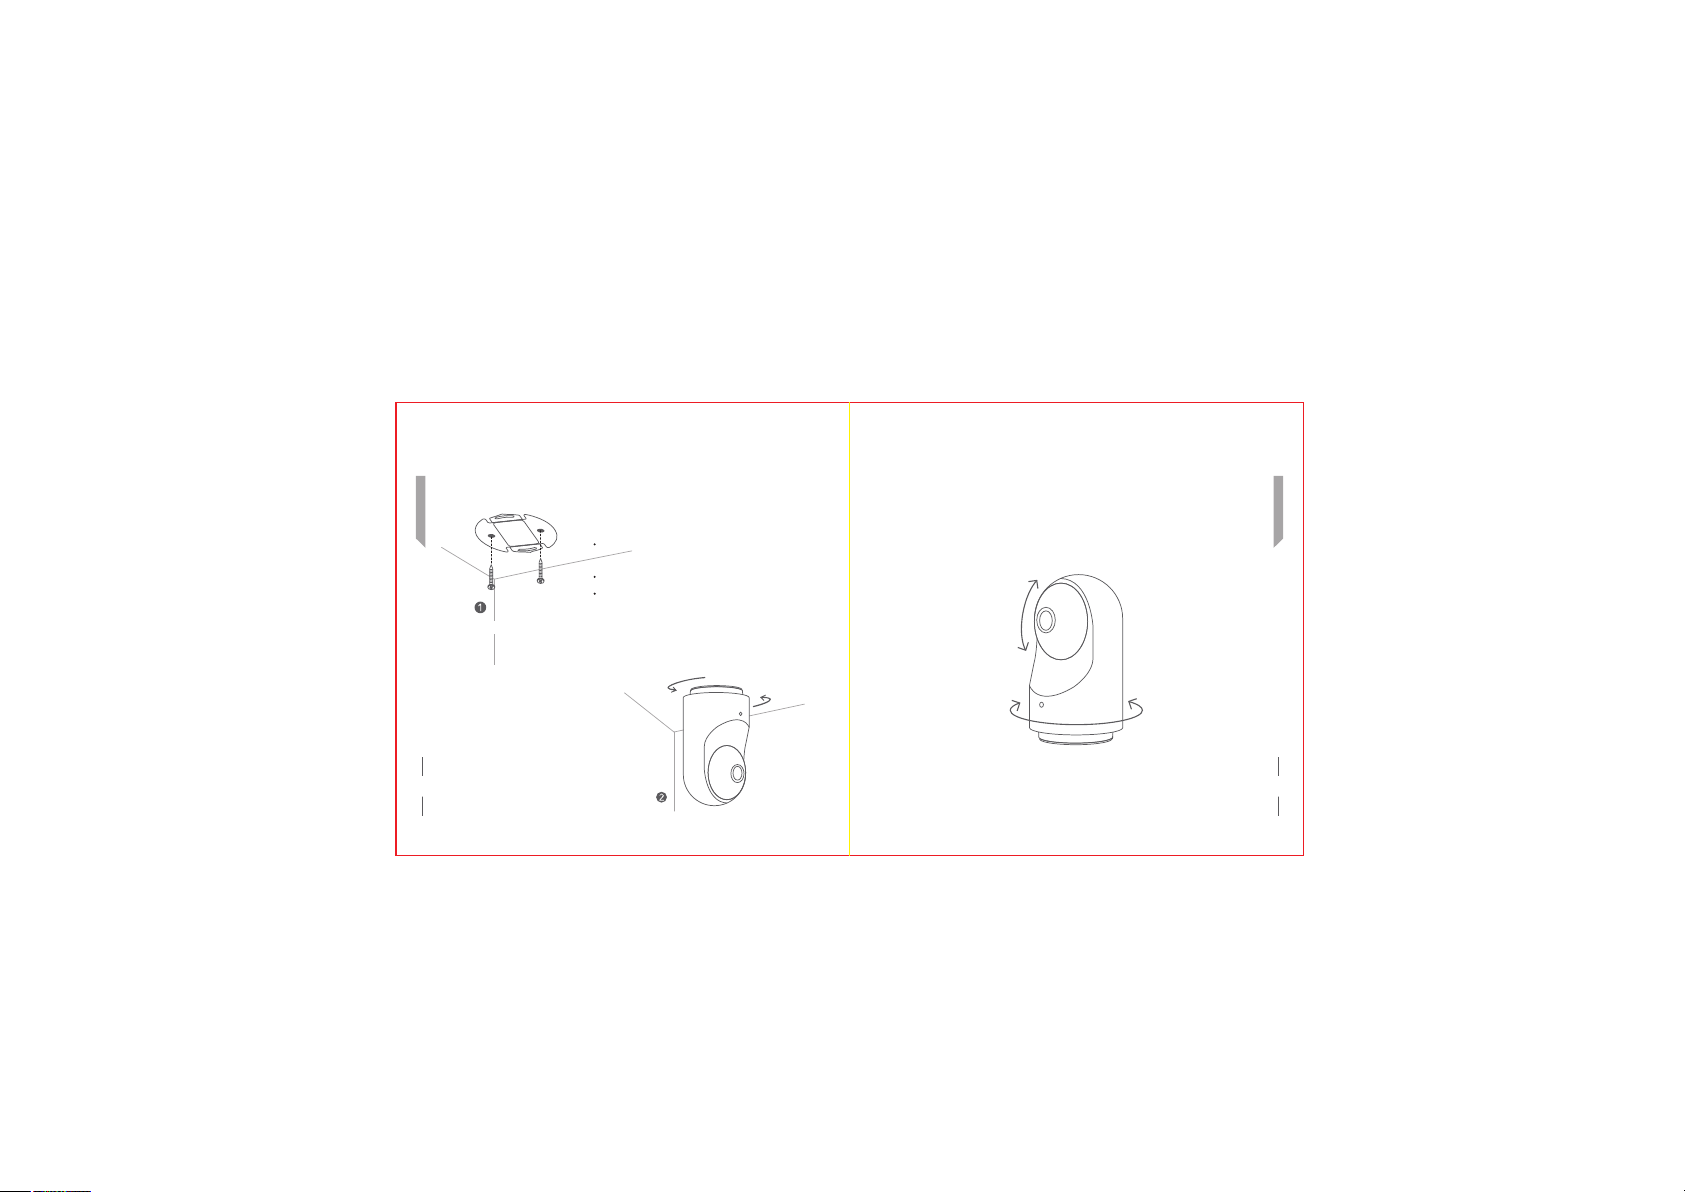
4. Wall mounting diagram (optional)
Tips: The mounting wall should support at least 3times the total weight of the bracket
and the camera.
Use the screws to install the wall mount on a
flat wall/ceiling.
Install the camera into the wall mount.
Connect the USB power cable to the camera
and switch it on; the camera will automatically
Secure the mount with screws
connect to the last configured WiFi network.
Engli sh
5. PTZ Angle
Activity angle:
Horizontal 0°-340°, vertical up 85°, vertical down 10°
Vertical Roll
Up 85°
Down 10°
Horizontal Roll 340°
6 7
lnstall the device
Page 6
1. Accessoires officiels
Franç ais
Suppo rt d´inst allation
mural e ×1
YI Dome X ×1
Adapt ateur
élect rique ×1
8 9
Merci d´avoir choisi YI Dome X
Câble d' alimentati on USB ×1
Vis ×2
Guide d´ utilisatio n ×1
Page 7
Franç ais
2. Configuration du Produit
Objec tif
Voyant lum ineux
MIC
Haut- parleu r
micro SD Solt
Bouto n de réiniti alisation
USB Interf ace d´alimen tation
3. Instruction de base
a) Allumez le dispositif
Trouvez l'interface USB en bas et insérez le câble de données, puis branchez à la
source d'alimentation. Une fois que le voyant lumineux à l'avant s'allume, cela indique
que la caméra est sous tension; veuillez-vous assurer que le WiFi est disponible.
.
10 11
Franç ais
Page 8

Franç ais
b) Connectez YI Caméra à l´App
Téléchargez et installez l´App pour YI PTZ Caméra.
Scannez le code QR de l´App pour YI Smart Caméra et installez.
Si vous avez un compte YI, connectez-vous directement et ajoutez l'appareil en
fonction des instructions de l'interface.
YI Home APP Code QR
iPhone
12 13
Android
c) Ajouter le dispositif au compte YI
Sélectionnez l´interface du dispositif après la connexion à l´App, et lorsque le voyant
jaune clignote et que l'instruction vocale " En attente de connexion " s'affiche, veuillez
cliquer sur " J'ai entendu l'invite vocale " et laissez le code QR se visualiser sur le
téléphone face à l'objectif de la caméra, en attente d'être scanné.
Cliquez sur " Suivant " lorsque la numérisation du code QR est terminée, cela peut
être utilisé après que l'instruction vocale de " Liaison réussie " s´affiche.
Franç ais
Page 9

Franç ais
4. Schéma de l'installation sur le mur
(sélectionnable)
INSTRU CTION BIENVEIL LANTE: Le mur d'installation doit pouvoir supporter au
moins 3 fois le poids total du support et de la caméra.
Installez la base, fixez la base sur le mur plat
avec des vis.
Installez l'appareil sur la base.
Branchez le câble d'alimentation du dispositif.
Ensuite, le dispositif configuré se connectera
Fixez la vis
automatiquement au réseau sans fil lorsqu'il
sera allumé.
5. Angle du PTZ
Angle du PTZ:
Horizontal 00-3400, verticalement vers le haut: 850,vers le bas: 100
Tour Vertical
85° vers le haut
10° vers le bas
340° tour horizontal
Franç ais
14 15
lnstallez la poignée sur l´hôte
Page 10

1. Offizielles Zubehör
Deuts ch
Winke l zur
Wandbefestig ung ×1
YI Dome X ×1
Netza dapte ×1
16 17
Vielen Dank, dass Sie sich für YI Dome X
Bedie nungsa nleitung×1 Schrau ben×2USB- Stromkabe l ×1
Page 11

2. Produktkonfiguration
Deuts ch
USB Netz-S chnittste lle
Linse
Anzei geleuc hte
Mikro fon
Lauts preche r
micro SD Solt
Reset Taste
3. Grundlegende Anleitung
a) Gerät einschalten
Suchen Sie die USB-Schnittstelle auf der Unterseite, stecken Sie das Datenkabel
ein und schließen Sie die Stromversorgung an. Sobald die Anzeigeleuchte an der
Vorderseite aufleuchtet, zeigt sie an, dass die Kamera eingeschaltet ist; stellen Sie
bitte sicher, dass WiFi verfügbar ist.
18 19
Deuts ch
Page 12

b) YI-Kamera APP anschließen
Laden Sie die APP für die YI PTZ-Kamera herunter und installieren Sie sie.
Scannen Sie den QR-Code der APP für die YI Smart-Kamera und installieren Sie ihn.
Deuts ch
Wenn Sie über ein YI-Konto verfügen, melden Sie sich direkt an und fügen Sie das
Gerät gemäß den Eingabeaufforderungen der Schnittstelle hinzu.
YI Home APP QR-Code
iPhone
20 21
Android
c) Gerät zum YI-Konto hinzufügen
Wählen Sie nach dem Einloggen in der APP das Device Interface aus, und wenn das
gelbe Licht blinkt und die Sprachausgabe von „Wartet auf Verbindung“ ertönt, klicken
Sie bitte auf „Ich habe die Sprachausgabe gehört“, und stellen Sie den QR-Code, der
auf dem Telefon angezeigt wird, vor das Kameraobjektiv und warten Sie darauf,
gescannt zu werden.
Klicken Sie auf „Weiter“, wenn der QR-Code-Scan abgeschlossen ist, dann kann er
verwendet werden, nachdem die Sprachaufforderung von „Bindung ist OK“
ausgegeben wurde.
Deuts ch
Page 13

4. Schematische Darstellung der
Wandmontage (wählbar)
Deuts ch
WARMPROMPT: Die Installationswand muss mindestens das Dreifache des
Gesamtgewichts von Halterung und Kamera tragen können.
Montieren Sie den Sockel, befestigen Sie den
Sockel mit Schrauben an der flachen Wand.
Installieren Sie das Gerät auf dem Sockel.
Schließen Sie das Netzkabel des Geräts an.
Dann verbindet sich das konfigurierte Gerät
automatisch mit dem drahtlosen Netzwerk,
Die Schraube befestigen
wenn es eingeschaltet wird.
5. Winkel des PTZ
Winkel des PTZ:
Winkel des PTZ: Horizontal 00-3400, Senkrecht nach oben: 850, Nach unten: 100
Senkrechte Drehung
Nach oben 85°
Nach unten 10°
Horizontale Drehung 340°
Deuts ch
22 23
lKnopf auf Host installieren
Page 14

1. Accesorios Oficiales
Españ ol
Sopor te para Mont aje
en Pared ×1
YI Dome X ×1
Adapt ador de
Corri ente ×1
24 25
Gracias por elegir la YI Dome X
Guía par a el Usuario ×1Tornillos ×2Cable de Alim entación US B ×1
Page 15

2. Configuración del Producto
Españ ol
Lente
Lámpa ra Indica dora
Micrófo no
Altav oz
micro SD Solt
Botón de "R eset"
USB Interf az de Energía
3. Instrucción Básica
a) Encienda el dispositivo
Encuentre la interfaz USB en la parte inferior, inserte el cable de datos, y conecte al
suministro de energía. Una vez que la lámpara indicadora en el extremo frontal se
encienda, la cámara se habrá encendido; asegúrese de que la red WiFi esté
disponible.
26 27
Españ ol
Page 16

b) Conéctese a la aplicación de la Cámara YI
Descargue e instale la aplicación para la Cámara PTZ YI.
Escanee el código QR de la aplicación para la Cámara Smart YI, e instálela.
Si ya posee una cuenta de YI, ingrese directamente y añada el dispositivo según
Españ ol
las indicaciones que se muestran en la interfaz.
YI Home APP código QR
iPhone
28 29
Android
c) Añada el dispositivo a la Cuenta YI
Seleccione la interfaz del dispositivo luego de ingresar a la aplicación, y cuando la luz
amarilla brille y se escuche la indicación de voz de "Esperando Conexión", presione
"He escuchado el comando de voz", y enfrente el código QR que se muestra en el
teléfono al lente de la cámara para su escaneo.
Pulse "Siguiente" cuando se haya completado el escaneo del código QR. La cámara
estará lista para su uso luego de que el comando de voz indique "Unión correcta".
Españ ol
Page 17

4. Diagrama de Instalación en la Pared
(Seleccionable)
ADVERTE NCIA: La pared de instalación debe ser capaz de soportar, al menos, 3
veces el peso total del soporte y la cámara juntos.
Españ ol
Instale la base, y fíjela en la pared plana con los
tornillos.
Instale el dispositivo en la base.
Conecte el cable de alimentación del dispositivo.
Seguidamente, el dispositivo configurado se
Fije el tornillo
conectará de manera automática a la red
cuando sea encendido.
5. Ángulo del PTZ
Ángulo del PTZ:
Horizontal 0º-340º, Vertical hacia Arriba: 85º, Hacia Abajo: 10º
Españ ol
Giro vertical
Hacia arriba 85°
Hacia abajo 10°
Hacia abajo 10°
30 31
Fije el tornillo
Page 18

1. Accessori ufficiali
Itali ano
Adatt atore di
alime ntazio ne ×1
YI Dome X ×1
Adatt atore di
alime ntazio ne ×1
32 33
Grazie per aver scelto la YI Dome X
Manua le dell’u tente ×1Vite ×2Cavo di cor rente USB ×1
Page 19

2. Configurazione del prodotto
Itali ano
USB Interf accia di alimen tazione
Lenti
Luce del l’indicato re
Micro fono
Altop arlant e
micro SD Solt
Tasto per Reset
3. Istruzioni basiche
a) Accendere il dispositivo
Trovare l’interfaccia USB nella parte in fondo e inserire il cavo dei dati, poi connettere
l’alimentazione. Quando la luce dell’indicatore nella parte anteriore si illumina, ciò
indica che la fotocamera è accesa; si prega di assicurarsi che la wifi sia disponibile.
34 35
Itali ano
Page 20

b) Collegare l’applicazione della fotocamera YI
Scaricare e installare l’applicazione per la fotocamera YI PTZ.
Scannerizzare il codice QR per la fotocamera intelligente YI e installarla.
Se hai un account YI, accedere direttamente e aggiungere il dispositivo secondo I
suggerimenti dell’interfaccia.
Itali ano
YI Home APP codice QR
iPhone
36 37
Android
c) Aggiungere il dispositivo all’account YI
Selezionare l’interfaccia del dispositivo dopo aver fatto accesso all’applicazione, e
quando la luce gialla lampeggia e si sente il suggerimento vocale “In attesa di
connessione”, si prega di cliccare “Ho ascoltato il suggerimento vocale” e far sì che il
codice QR appaia sul telefono posto di fronte alle lenti della fotocamera, in attesa di
essere scannerizzato.
Cliccare “Successivo” quando la scannerizzazione del codice QR è stata completata,
poi questo può essere usato dopo che appare il suggerimento vocale di
“Accoppiamento avvenuto”.
Itali ano
Page 21

4. Diagramma di installazione sulla parete
(Selezionabile)
SUGGER IMENTO IMPORTANTE: la parete per l’installazione sarà in grado di
supportare almeno 3 volte il peso totale della staffa e della fotocamera.
5. Angolo di PTZ
Angolo di PTZ:
Orizzontale 00-3400, Verticale verso l’alto: 850, Verso il basso: 100
Itali ano
Regolare la vite
38
Installare la base, regolare la base sulla parete
piana con le viti.
Installare il dispositivo sulla base.
Collegare il cavo di potenza del dispositivo.
Poi il dispositivo configurato si collegherà
automaticamente alla rete senza fili quando
viene accesa.
Installare la manopola sull’host
Itali ano
Tirare verticalmente
in alto 85°
in basso 10°
Girare in orizzontale 340°
39
Page 22

This device complies with Part 15 of the FCC Rules / Industry Canada licenceexempt RSS standard(s). Operation is subject to the following two conditions: (1) this
device may not cause harmful interference, and (2) this device must accept any
interference received, including interference that may cause undesired operation.
Le présent appareil est conforme aux CNR d'Industrie Canada applicables aux
appareils radio exempts de licence. L'exploitation est autorisée aux deux conditions
suivantes : (1) l'appareil ne doit pas produire de brouillage, et (2) l'utilisateur de
l'appareil doit accepter tout brouillage radioélectrique subi, même si le brouillage est
susceptible d'en compromettre le fonctionnement.
Changes or modifications not expressly approved by the party responsible
for compliance could void the user's authority to operate the equipment.
This equipment has been tested and found to comply with the limits for
a Class B digital device, pursuant to part 15 of the FCC Rules. These
limits are designed to provide reasonable protection against harmful
interfere nce in a residentia l instal lation. T his equi pment gen erates
uses and can radiate radio frequency energy and, if not installed and
used in accordance with the instructions, may cause harmful interference
to radio communications. However, there is no guarantee that interference
will not occur in a particular installation. If this equipment does cause
harmful interference to radio or television reception, which can be
determined by turning the equipment off and on, the user is encouraged
to try to correct the interference by one or more of the following measures:
Reorien t or relocate the receiving antenna.
Increas e the separat ion between th e equipment a nd receiver.
Connect the equipmen t into an outle t on a circuit different fro m that to
which th e receiver is connected.
Consult the dealer or an experience d radio/TV te chnician for h elp.
Under Industry Canada regulations, this radio transmitter may only operate
using an antenna of a type and maximum (or lesser) gain approved for the
transmitter by Industry Canada. To reduce potential radio interference to other users,
the antenna type and its gain should be so chosen that the equivalent isotropically
radiated power (e.i.r.p.) is not more than that necessary for successful communication.
Conformément à la réglementation d'Industrie Canada, le présent émetteur radio
peut fonctionner avec une antenne d'un type et d'un gain maximal (ou inférieur) approuvé
pour lé' metteur par Industrie Canada. Dans le but de réduire les
radioélectriqueà l 'intention des autres utilisateurs, il faut choisir le type d'antenne et son
gain de sorte que la puissance isotrope rayonnée équivalente (p.i.r.e.) ne dépasse pas
l'intensité nécessaire à l'établissement d'une communication satisfaisante.
MPE Requirements
To satisfy FCC / IC RF exposure requirements, a separation distance
of 20 cm or more should be maintained between the antenna of this device and
persons during device operation.To ensure compliance, operations at closer than this
distance is not recommended.
Les antennes installées doivent être situées de facon à ce que la population ne
puissey être exposée à une distance de moin de 20 cm. Installer les antennes de
facon à ceque le personnel ne puisse approcher à 20 cm ou moins de la position
centrale de l’antenne.
La FCC des éltats-unis stipule que cet appareil doit être en tout temps éloigné d’
au moins 20 cm des personnes pendant son functionnement.
FCC ID: 2AFIB-YYS3017
IC: 20436-YYS3017
risques de brouillage
 Loading...