

Page 1

Table of Contents
1. English
2. Français
3. Deutsch
4. Italiano
5. Español
1
17
34
51
68
Thank you for choosing YI Dash Cam - Nightscape
Page 2
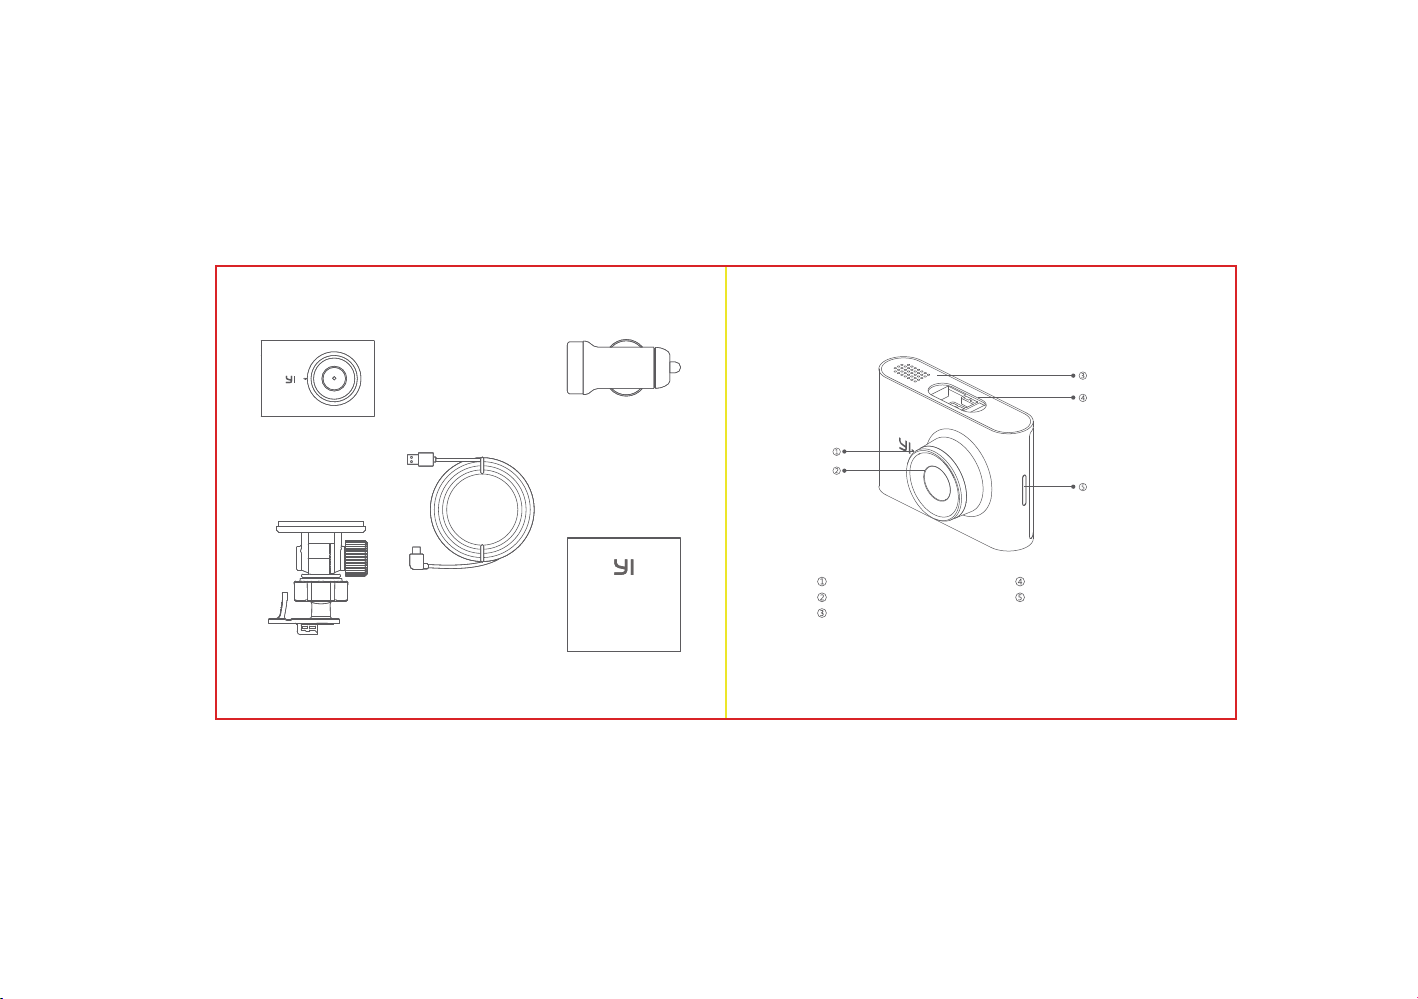
1. Configuration
YI Dash Cam Nightscape×1
USB Cigar Charger ×1
[Input:DC 12-24V, Output:DC 5V]
(the picture is only for reference, please
make the object as the standard.)
2. Camera Components
Adhesive 3M Mount
Bracket ×1
11.5 ft. Standard Micro USB
Power Cord ×1
1 2
User Manual ×1
Mic
Lens
Air Vent
Please use a genuine 8-64 GB microSD card (Class 10 and above), otherwise the camera may
be unable to record or recording may be interrupted.
Bracket Mount Slot
Speaker
Page 3
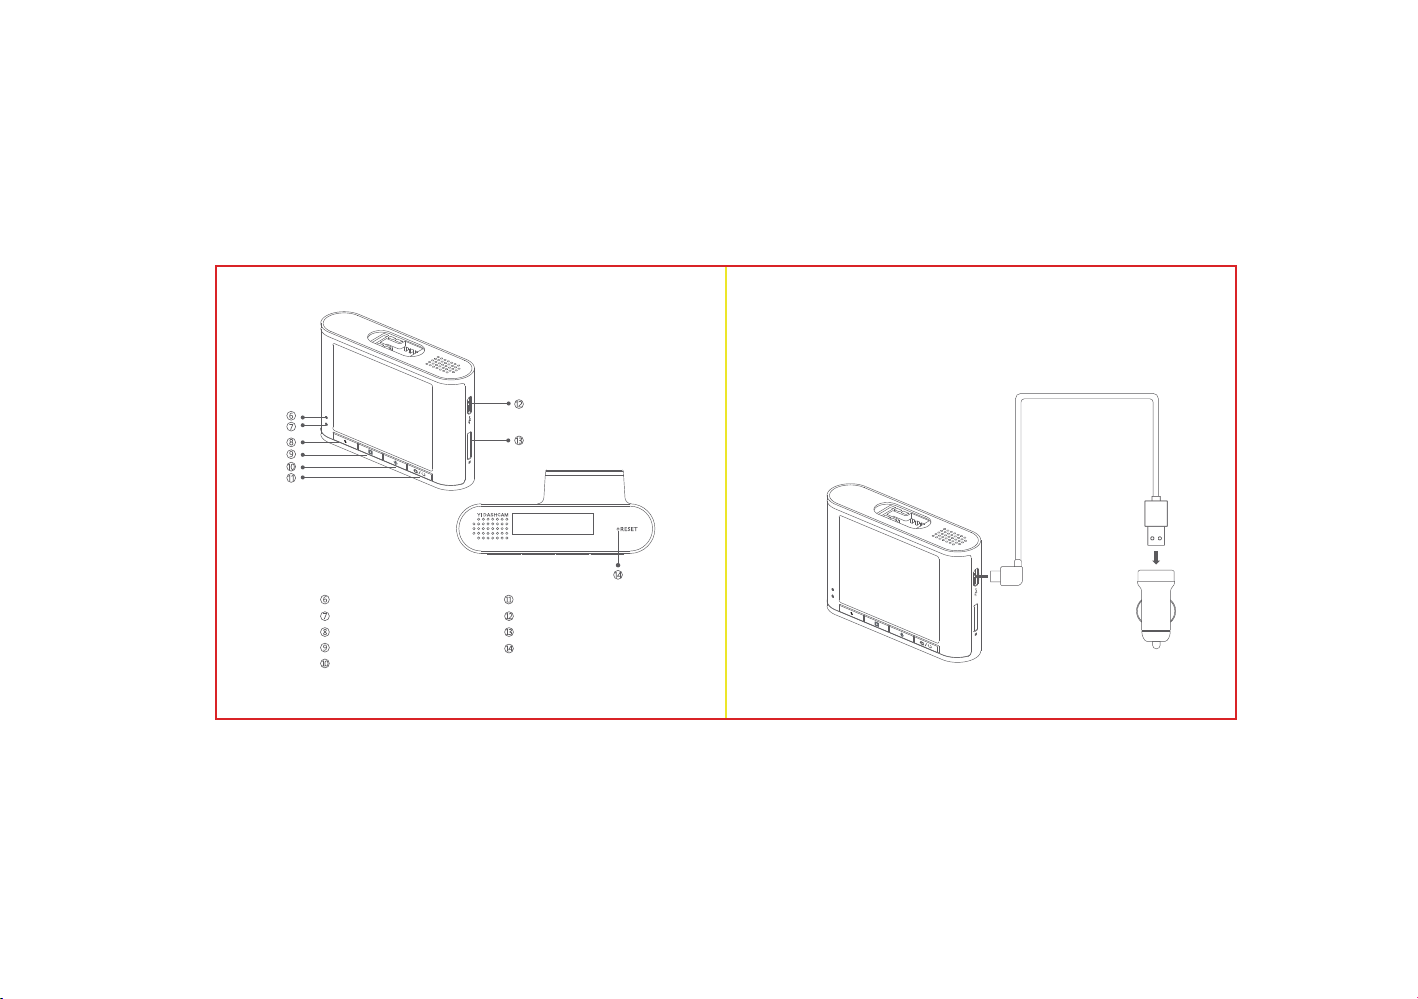
3. Connect to power source
Gift box will include a 11.5 ft. Standard Micro USB Power Cord for power supply.
1. Insert the USB car charger into your car's cigarette lighter socket.
2. Insert the USB power cord into the USB car charger.
3. Insert the Micro USB into the dash cam USB port.
[Charger Specifications:
In: DC 12-24V, Out: DC 5V].
Status LED Indicator
Power LED Indicator
Video Record Button
Video Playback Button
Audio Switch Button
Setting/Power Button
Micro-USB Power Port
MicroSD Card Slot
Reset Pinhole
3 4
Page 4

4. Connect YI Smart Dash Camera to Mobile
YI Smart Dash Camera can work independently without app when you are driving. App provides
additional features and improves user experience.
1) Installing the YI Dash Camera App
Scan the QR code below or download YI Dash Cam App from Apple App Store or Google Play.
(App requires Android 4.1 / iOS 8.0 or above)
5 6
2) Wi-Fi QR code
Find “Wi-Fi connection” in the user menu via the device(different devices have different QR
codes)Scan QR code and follow the steps which the device showed to establish Wi-Fi
connection.
3) Firmware updating
To improve user experience, please use the latest firmware with improvements. When the app is
connected to the Internet, it will automatically check for the latest firmware updates. Please
follow the prompts to update.
Page 5

5. Basic function instruction
2) Settings
Press the setting/power button to enter the setting interface, toggle the menu via the direction
key to select the menu you wanna set.
1) Power on/off
Power on: Camera will be powered on automatically when power cord is inserted. You can not
power on the camera without inserted power cord.
Power off: Camera will be automatically powered off while the power cord was removed, or you
can press and hold the setting/power button to power off the camera.
7 8
Back Enter
Up
Down
Page 6

3) Emergency Recording
EMR function will be triggered when the car encounters vibration or collision while driving.
You can change the sensitivity via the device menu.
In order to protect the EMR files, EMR files can not be deleted via device, so you can delete the
protected EMR files via app.
LED will always be on
when recording video.
Emergency recording
status bar
4) Video Playback
1.Press the playback button to enter the video files list interface, use direction key to select the
video clips, press Enter key to playback the video clip.
2.Press the Enter button to pause the playback function, press the Enter key again to continue,
or select delete function to delete video clips.
Video clips file list interface
Enter
Playback button
Please make sure SD card was inserted before using, or the camera will not work normally.
9 10
Video playback interface
Play / Delete
Page 7

5) Indicators
Status LED indicator
1.Recording:LE D indicator will be always on.
2.Standby:Status LED indicator will be off.
3.Upgrading: Status LED indicator will keep flickering.
Power LED indicator
Power LED indicator will keep on when power on.
Status LED indicator
Power LED indicator
6) ADAS
ADAS function can be found in the list of Settings. ADAS is
off by default, it only works when the device is connected to
“Yi DashCam” App. After ADAS is opened at the speed of
over 50 km/h, it will make the sound prompt
when recognizing the driving risk.
Note:
This device will NOT automatically apply brakes, control the steering, or control other
functions of your vehicle to avoid traffic accidents. Therefore, it is the sole responsibility of the
driver. These device will automatically power on and charging will begin when you start your
car. There are many variables that can cause these ADAS features to not function correctly
and therefore it is the sole responsibility of the driver to operate their vehicle according to all
the local safety and traffic laws.
Always use your best judgment, and operate the vehicle in a safe manner. Do not become
distracted by the device while driving, and be fully aware of all driving conditions. Minimize the
amount of time spent viewing the device screen while driving.
1211
Page 8

6. Wiring Installation Diagram
Find the proper position to fix
the bracket, then install the
camera, plug in the power cord
Charging instruction: Perhaps some car models will not cut off power after parking, please
manually power off the device to prevent the car power consumption.
Please be sure that the device function, interface and app has been updated after sold out. If
you encounter anything that doesn’t comply with the product,please refer to the official website
to get the latest information.
Place the power cord along
the interior wall of the car
Plug the power cord into the
car charger and then insert
the car charger into the car
cigar lighter’s position
7. YI Smart Dash Camera Basic Parameters
Maximum Resolution: 1920×1080
Video Resolution: 720P 30fps+WDR / 720P 60fps / 1080P 30fps+WDR / 1080P 60fps
Display: 2.4″LCD display/320×240
Audio: mic/speaker
Video Format: H.264/MP4 format
Wireless Encrypt: WPA2
Power Port: DC 5V/1A
Wi-Fi Standard: 802.11n
Smartphone Platform Support: Android / iOS
Model: YCS.2A19
Operate Temperature: -10℃ ~ 60℃
Operate Humidity: 10 ~ 80%RH
Storage Temperature: -30℃ ~ 85℃
Power Consumption: 5.0 W
Website: www.yitechnology.com
E-mail: support@yitechnology.com
1413
Page 9

8. Customer Support
Please visit https://help.yitechnology.com/hc/en-us or email support@yitechnology.com
Find us on social networks:
www.facebook.com/YITechnologyOfficial
www.youtube.com/YIcamera
www.google.com/+YIcamera
Instagram: yitechnology
IMPORTANT SAFETY GUIDELINES
1. READ this user manual carefully.
2. CLEAN ONLY with a dry cloth.
3. DO NOT use near any heat sources such as radiators, heaters, stoves, or other apparatus
(including amplifiers) that produce heat.
4. ONLY USE attachments/accessories specified by the manufacturer.
5. For the best results please check our site regularly for the latest version of the app and firmware.
9. Safe Driving Declaration
This product features an ADAS (Advanced Driver Assistance System), including Forward
Collision Warning and Lane Departure Warning. After it is turned on, the ADAS will display
some of the driving data, to help the driver understand current driving conditions.However,
you should continue to observe the road conditions, obey traffic regulations and drive carefully.
The use of this product will not prevent accidents.
The products, apps, functions and screens etc mentioned in this guide may have been
improved after the product has gone on sale. If you encounter inconsistencies during the
actual use of the product and related apps, please refer to the instructions on the YI
official website. This guide should not be taken independently from other instructions
“Xiaoyi”and “YI”logo are trademarks of Shanghai Xiaoyi Technology Co.,Ltd.
Thank you for choosing the YI Dash Cam - Nightscape, please read the instructions carefully
before using the product and keep it in good condition.
1615
Page 10

This device complies with Part 15 of the FCC Rules. Operation is subject to the following two
conditions: (1) this device may not cause harmful interference, and (2) this device must accept
any interference received, including interference that may cause undesired operation.
This device contains licence-exempt transmitter(s)/receiver(s) that comply with Innovation,
Science and Economic Development Canada’s licence-exempt RSS(s). Operation is subject
to the following two conditions:
This device may not cause interference.
This device must accept any interference, including interference that may cause undesired
operation of the device.
L’émetteur/récepteur exempt de licence contenu dans le présent appareil est conforme aux
CNR d’Innovation, Sciences et Développement économique Canada applicables aux appareils
radio exempts de licence. L’exploitation est autorisée aux deux conditions suivantes :
L’appareil ne doit pas produire de brouillage;
L’appareil doit accepter tout brouillage radioélectrique subi, même si le brouillage est
susceptible d’en compromettre le fonctionnement.
This equipment complies with ISED RSS-102 radiation exposure limits set forth for an
uncontrolled environment. This equipment should be installed and operated with a minimum
distance of 20cm between the radiator and any part of your body.
Pour se conformer aux exigences de conformité CNR 102 RF exposition, une distance de
séparation d'au moins 20 cm doit être maintenue entre l'antenne de cet appareil ettoutes les
personnes.
Caution: The user is cautioned that changes or modifications not expressly approved by the
party responsible for compliance could void the user's authority to operate the equipment.
Note: This equipment has been tested and found to comply with the limits for a Class B digital
device, pursuant to part 15 of the FCC Rules. These limits are designed to provide reasonable
protection against harmful interference in a residential installation. This equipment generates
uses and can radiate radio frequency energy and, if not installed and used in accordance with
the instructions, may cause harmful interference to radio communications. However, there is
noguarantee that interference will not occur in a particular installation. If this equipment does
cause harmful interference to radio or television reception, which can be determined by turning
the equipment off and on, the user is encouraged to try to correct the interference by one or
more of the following measures:
—Reorient or relocate the receiving antenna.
—Increase the separation between the equipment and receiver.
—Connect the equipment into an outlet on a circuit different from that to which the receiver is
connected.
—Consult the dealer or an experienced radio/TV technician for help.
FCC RF Radiation Exposure Statement:
This equipment complies with FCC radiation exposure limits set forth for an uncontrolled
environment. This equipment should be installed and operated with a minimum distance of
20cm between the radiator and any part of your body.
 Loading...