

Heart to perfection、Born for maker
Hea rt to per fecti on、Born f or make r
Xiao R Robots Instructions
she nzhen C hina

Catalog
1、The tech ni cal data an d the copyr ig ht of system soft ware which are
provided b y this produc t on e and onl y be longs to th e Sh enzhen Xi ao
Er Geek te ch nology Co ., LTD. (Xiao R tec hn ology C o. ,LTD),an d the use
is protected b y th e copyr ig ht law of the Pe ople's Repu bl ic of China.
Withou t the written p ermissi on , any uni t or i ndividu al shall no t sell ,
rental, co py, modify, or dis cl ose the tec hn ical data a nd sof twa re c on tent
to third par ties, a nd y our side wi ll b eheld res po nsible fo r all the con se quence s for its all p ro pe r ty p ro per ty disp ut es w hich crea ti ved by the
techni ca l data or sof twarevers io n .
2、This produ ct is suita bl e for 12 year s of a ge and olde r us ers, an d
enthus iasts and e du catio n or t eaching a im s, shall no t suitabl e for
indust rial, con su mer, militar y a nd o ther fi el ds.
4、The compan y re ser ves the rig ht to change wi thout pri or n otice of
this produ cts descr ib ed in thi s ma nual. For p rinting e rr or s and progr am
change s ,the compan y ca n make the nece ss ary chan ge s at any time t o
the new ma nual.
5、The compan y re ser ves the rig hts of s of tware upg rade and in te re sts
of the final f un ction a t th e actual si tuation i n th e machi ne ,and the
company ha s the final e xp lanat io n right.
6、I have caref ul ly read and not ed t he best sta te ment of the con te nt.
3、Please u se the batter y and e lectronic a cc essor ie s as our compan y
standa rd . If the user s change to the o ther acce ss ories , al l mista kes or
damage s of rob ot c an not enjo y the warra nty.
Solemnly declare
Sole mnl y declare:
一、The l is t of i tems
二、 Mat te rs need in g atten ti on
三、
Comm on prob lems an d troub lesho oting s oluti on
03-0 4
四、The i nst ruction of m ain contro l board
05
01
02
1、51duin o Mainboard
2、 Arduino PWR Po we r-M otor driver b oa rd
06
五、
5.1、
1、51duin o
2、Arduino/ STMduin o
Asse mbl y drawings
Integr al w iring d ia gram of elect ro ni c system
07
08
六、
6.1、 Sens or instal la tion fo r fu ll functi on mode
1、
2、Arduino/ STMduin o
6.2、
Extras fu nctions of S ensors and mode s witch
51duin o sensors
sensor s
The tuto ri al of switching m od e in the soft ware
25
23
24
1、Oper ation i nstru ction s of the pr oduct (PC)
27-2 8
29-3 0
2、 HONE /PADOper ation i nstru ction s of the pr oduct (P )
七、Using th e tutorial
... ..... ..... ..... ..... ..... ..... ..... ..... ..... ..... ..... ..... ..... ..... ..... ... ..... .
... ..... ..... ..... ..... ..... ..... ..... ..... ..... ..... ..... ..... .
... ..... .
... ..... ..... ..... ..... ..... .. ... ..... ..... ..... ..... ..... ..... ..... ..... .. ... ..... .
... ..... ..... ..... ..... ..... ....
... ..... ..... ..... ..... ..... ..... ..... ..... ..... ..... ..... ..... ..... ..... ...
... ..... ..... ..... ..... ..... ..... ..... ..... ..... ....
... ..... ..... ...
... ..... ..... ..... ..... ...
... .
5.2、
5.2.1、
5.2.2、 instal lation
5.2.3、
5.2.4、
Hardware ins tallati on
Hardware ins tallati on
Rob ot Link WiF i
Assemb ly drawin gs for Came ra a nd Cradle
Motors a ssembly
5.3、As sembly dr aw ings over v iew for DS Robot
5.4、
5.4.1、
5.4.2、
Assemb ly drawin gs over view fo r TH Rob ot
TH Ro bo t as se mb ly d ra wi ng s
19-2 0
07-0 8
09
10-1 4
15-1 6
17-1 8
21-2 2
The elec tronic syst em i nstalla tion of manip ul ator
... ..... ..... ..... ..... ..... .. ... ..... ..... ..... ..... ..... ....
... ..... ..... ..... ..... ..... ..... ..... ..... ..... ..... ..... ..... ..
... ..... .....
... ..... ..... ..... ..... .
... ..... ..... ..... ..... ..... ..... ..... ..... ..... .
... ..... ..... ..... ..... ..... ..... ..... ..... .

/// ///// ///// ///// ///// ///// ///// ///// ///// ///// ///// ///// ///// ///// ///// ///// // 1 // ///// ///// ///// ///// ///// ///// ///// ///// ///// ///// ///// ///// ///// ///// /// ///// ///// ///// ///// ///// ///// ///// ///// ///// ///// ///// ///// ///// ///// //// 2 // /// ///// ///// ///// ///// ///// ///// ///// ///// ///// ///// ///// ///// ///// ///// //
一、 The list of items
一、DS Ro bo t
①、PCB m at er ia l ch assis*1
②、Mai n co nt ro l bo ard *1
③、Reg ul at ed p ow er supply a nd m ot or d ri ver board (P WR b oa rd )*1
(no this t yp e in 5 1d ui no )
④、Ro bot-Link W iF i video d at a module* 1
⑤、Ro bot-Eye s US B camera* 1
⑥、Te batter y and t he c harger* 1
⑦、The whe els and mot or *4
⑧、SG90 se r vo * 2
⑨、The nyl on part s of c ra dle*1
⑩、USB2. 0 to M icroUSB cab le *1
⑪、Hardw ar e in b ag *1
⑫、Wire *1
二、TH Robot
①、Cra wl er c ha ss is*1
②、Mai n co nt ro l bo ard *1
③、
④、Ro bot-Link W iF i video d at a module* 1
⑤、Ro bot-Eye s US B camera* 1
⑥、Te batter y and t he c harger* 1
⑦、SG90 se r vo *2
⑧、The nyl on part s of *1
⑨、USB2. 0 to M icroUSB cab le *1
⑩、Hardware in bag *1
⑪、Wire* 1
⑫、Fou r degrees of freedo m ma nipulat or
(The ver sion with m an ipula to r)
⑬、Dri ve r board of m anipula to r(The ver sion with m an ipula to r)
⑭、Ext en sion card of motor* 3( The ver si on with m an ipulato r)
⑮、Inf rared senso r* 2(The ver si on with lin e pa trol)
infrared s ensor*3
(The vers ion with li ne pat ro l&obs ta cle avoid an ce & foll ow ing)
⑯、Uit ra sonic s en sors* 1( The ver si on with obs tacle avoid ance)
⑰、Miu nt ing base of senso r(The ver si on with s en sor)
Regu la te d po we r supply an d mo to r dr iv er board( PW R bo ar d) *1
(no this t yp e in 5 1d ui no )
cradle
Not e (Each p roduc t packa ges are n ot the sa me,th e real ob ject sh ould
be co nside red as fi na l act ual pur ch ase o f goods )
1, pleas e do not inst al l the battery in t he m other b oa rd at fi rst step. I t
will eas ily burne d ci rc uit bec au se of short circuit wh il e insta ll ing,
please i nstall th e ot her ele ct rical e qu ipment, a nd then put t he
batter y into th e ma in cont ro l bo ard.
2, Before po we r on, ple as e carefully c heck the wi ri ng is cor re ct , if there
are other me tal objec ts o n the circu it b oa rd , elimina te a ll shor t
circuit co ndition s be fore you can tu rn i t on.
3, The batte r y is n ot allowe d to i nversel y co nnect , ot her wise it w ill
cause ir re ve rsibl e damage.
4, The robot o nly allow s on e clien t software acce ss at a time, i f yo u
have a cli en t softw are in t he control co nd ition , it n eeds to qui t th e
current cl ientsof tw are to access a no ther ne w on e.
5, 【Speci al attentio n】Before elec trify t he rob ot with c ra dle or
robotic ar m, the use rs should rea d sp ecifi ca tion of clien t software,
then acc ording it to adju st the angl e of eac h steerin g ge ar,fi nally
use the 'l ocking' f un ction to lo ck a ll angl es of se r vo .
Withou t this step, it w ill lead to the s ervo damage ca use
long tim e to g o to t he unavaila ble zone.
6,【Speci al attentio n】Please do n ot turn on th e ro bo t when TX , RX
of WiFi board in sho rt ci rc ui t conditi ons, othe r wi se it wil l ca use the
lights i n WiFi board alwa ys s hinin g, a nd the user s can not s ea rc h
the sing le. Find mo re s ol ve ways in
.
Note: wh en i nstalli ng nylon co lumn to the WiF i
module , it is impor tan t to n ote that resist ance in R68 m ar k on the
WiFi mod ule.We sugges t clamp nut n ot m oving ,a nd use the rota ting
way to ins ta ll the colu mn nylon on t he o thers ide, othe r wi se the
rotary nut in t hi s side of is likely to le ad to R68 resista nce touch off
by exter na l forces.
Comm on p ro bl em s and troub le
shoo ti ng s ol ut ion
7,【Speci al attentio n】
二、 Matters needing attention

三、Common problems and trouble shooting solution
Q1:The p ow er i s on , an d I can searc h th e wi fi s ig nal of robo t, b ut I c an n ot o r
hardly c on ne ct .
S:Pl ea se c ha rg e up the batt er y of r ob ot a nd then try to co nt ro l ag ai n.
Q2:Tu rn o n th e switch, t he L ED l ig ht o f WiFi modu le i s bl in ki ng contin uo us ly .
S:1) .A t th e mo me nt o f power on, q ui ck ly p re ss the Rese t bu tt on o f Wi fi board
rapidl y an d co nt in uousl y, until th e LE D li gh t is b linking q ui ck ly. U se t he R j4
5 cable to c on ne ct W if i board and P C, t he n se t th e local IP as 192.1 68 .1 .3 ,
run co mm an d ‘t el net 192.1 68 .1 .1 ' in C MD,and ru n co mm an d ‘f irstboo t’ .
2).If th e fi rs t st ep i s not worki ng , pl ea se c ontact th e cu st om er s ervicer t o so lv e
this pro bl em .
Q3: Op en t he c li en t software of P C, s ho wi ng t hat I shoul d se t up t he s of tware of .
net fram ew or k.
S: 1). Goo gl e or B ai du the keyw or ds '. ne t fr amewo rk d ow nl oa d', find th e ve rs io n
of frame wo rk , do wn load and in st al l it .
Q4: The softwa re o f co mp ut er can not co nt ro l th e ro bot, but mo bi le p ho ne o r Pad
can.
S:1) .C lo se t he f irewall o f co mp ut er.
2).R em ov e th e RJ 45 Ethern et c ab le o f PC , th en restar t co mp ut er.
3).U se t he a no th er c omputer t o co nt ra st .
Q5: You ca n se ar ch t he s ignatur e of r ob ot , an d it can show t he r ad io o f ro bot, but
the soft wa re o f PC a nd m obile pho ne c an n ot c on trol the ro bo t.
S:1) . Pl ug t he t wo j umper cap , ma ke s ur e th e in structi on t ra ns mi ssion is co rr ec t.
2).cha ng e th e US B ca ble.
3). If the s te ps a s ab ov e is not work in g, p le as e use the exp lo re r to l og i n 192.1
68.1.1 w hi ch i s a ma na gemen t in te rf ac e of W ifi board ( Th e co de i s ad min),
find the c la ss if ic ation of sy st em , th en p ress the bu tt on o f re st ore the fac to ry
settin gs .
Q6: The robot ca n be c on tr ol led, but th e di re ct io n of all side i s on t he c on tr ary.
S: in se tt in g ve rs ion of uppe r ma ch in e, c hange the i ns tr uc ti on of oppos it e ac ti on ,
then s av e it .
Q7: The video is n o pr ob le m, b ut when cho os in g th e Wi fi mode opt io ns o f co nt rol
ling sof tw ar e in c om puter, the s of tw ar e wi ll displa y a wr on g po p-up hint b ox .
S:1) . Cl os e th e fi rewll of co mp ut er, r es ta rt the robo t an d so ft wa re, wait fo r ab ou t
30 secon ds , th en c on nect afte r mo du le s ys tem initi al iz at io n is comple te .
2).U se t he e xp lo rer to land i n 19 2. 16 8. 1.1 manag em en t in te rface mod ul e, r es t ore the fa ct or y se tt ings agai n. ( Th es e qu es ti ons are pro vi de d in Q 5)
Q8: Ch oo si ng t he W ifi mode in P C cl ie nt s of tw are, ther e is n ot a w ro ng p op-up
hint box , bu t ca n no t co ntrol the r ob ot c ar, b ut m obile pho ne c an .
S:1) . Us e th e ex pl orer to log i n 19 2. 16 8. 1.1 manag em en t in te rface mod ul e, r e store th e fa ct or y se ttings ag ai n. ( Th es e qu es tions are p ro vi de d in Q 5)
2).If th e fi rs t st ep i s not worki ng , ma yb e th e MicroUS B is l oo se , it c ause the
data can n ot p as s th ro ugh the USB c ab le t o th e ma in board. At t he s am e ti me ,
use the Du po nt L in e in T TL seria l po rt p in o f Wi Fi m odule
Q11: T he c am er a has no phot os , th e ro bo t can contr ol .
S:1) . Ch ec k th e US B interfa ce i s co nn ec ti ng corr ec tl y.
2).U se t he c am er a with comp ut er, t ry t o ch at b y video, ma ke s ur e th e ca mera
is perfe ct , if i t ca n no t be used by co mp ut er, p le ase conta ct c us to me r service r
to chang e it .
Q12: The dista nc e of r ob ot c ontroll in g is n ea r (l ess than 2 me te rs )
S:1) . Ch ec k wh et her the ant en na i s lo os e, please t ig ht en . 2) , Avo id u si ng the robo t
surrou nd in g th e en viron me nt o f ma ny w ir eless rou te r. 3) , us in g the explo re r
login 19 2. 16 8. 1. 1 WiFi modu le m an ag em ent inter fa ce , Un de r the "WiFi " ca t
egory, change t he c ha nn el e leven (11) to 1 or 3, and sa ve t he S et ti ngs.
Q13: M an ua l co nt rol mode is n or ma l, b ut t he robot mo ve me nt i s am iss in line w al king and o bs ta cl e av oidan ce a nd o th er m ode of auto ma ti c.
S:1) . Acc or di ng t o the tutor ia l, c ar ef ul ly chec k if t he s en so r wi ring is cor re ct , th e se nsitiv it y ad ju st ment is cor re ct .
2).In th e pa tr ol s ti ll or other a ut om at ic m ode, the ro bo t sh ou ld b e overall p er fo r mance fo r th e fo rw ar d, please o bs er ve l ef t and right s id e of t he m ot or rotati on
direct io n, e xc ha nge the pos it io n of t he r etreat si de o f mo to r wi ring, mak in g th e
state of t he v eh ic le g o forward , an d th en r ef er to "Q6" ad ju st t he d ir ection of t he
robot in m an ua l co nt rol mode.
Q14: Af te r el ec tr ify, ro bo t itself re gu la rl y mo ve around , un co nt ro lled.
S: 1.C on ta ct c li ent servi ce r, qu it t he t es t mode.
Q15: The users c an n ot d ow nl oad burni ng p ro gr am w hen secon da ry d ev el opment.
S: 1). Re mo ve t he U SB cable wh ic h is c on ne cted with t he m ai n co nt rol board .
2).Red uc e th e ba ud rate of the bu rn in g so ft ware.
3). Re pl ac e th e bu rn tool or co mp ut er .
Q16: Th e US B is i ns talled co rr ec tl y, an d tu rn o n th e switch, t he L ED l ig ht i s not on
in WiFi mo du le , an d ca n not find th e Wi re le ss s ignal.
S:Ch ec ki ng w he ther the R6 8 re si st an ce touch off by exter na l fo rc es . If off , pl ease
cont ac t th e cl ie nt s ervicer t o so lv e it .
Q9:The c ra dl e or r ob otic arm ma ke n oi se w he n turn to the d ea d zo ne o f po sition.
S: Sto p th e se rv o of c ra dle and a rm s, t he n co nn ect each se rv o ac co rd ing to the
inst ru ct io n , an d ad just the an gl e an d lo ck the prop er o ne .
Q10: Th e vi de o of c amera is no t cl ea r.
S: Rot at in g ca me ra lens by ha nd s, a dj us t the focal l en gt h.
/// ///// ///// ///// ///// ///// ///// ///// ///// ///// ///// ///// ///// ///// ///// ///// // 3 //// /// ///// ///// ///// ///// ///// ///// ///// ///// ///// ///// ///// ///// ///// /// ///// ///// ///// ///// ///// ///// ///// ///// ///// ///// ///// ///// ///// ///// ///// 4 / /// ///// ///// ///// ///// ///// ///// ///// ///// ///// ///// ///// ///// ///// ///// //
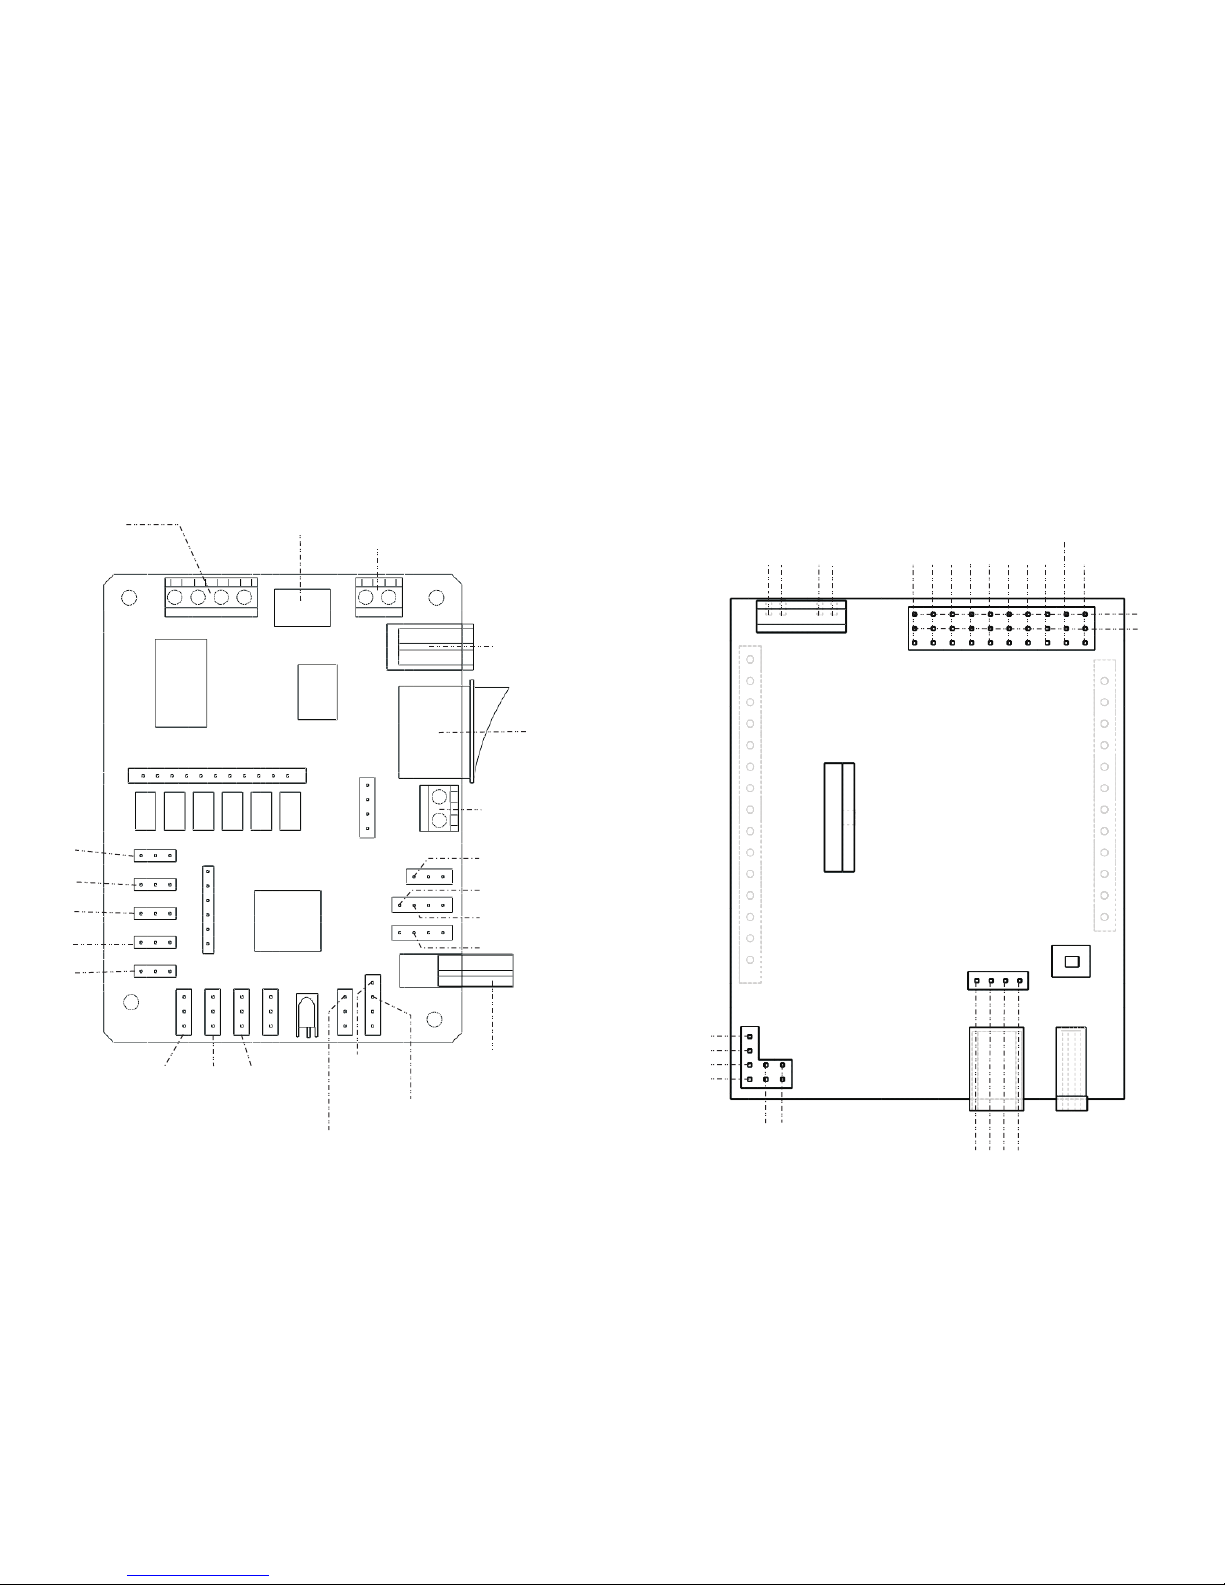
Arduino PWR Power-Motor driver board
5V
RX
TX
GND
GND
5V
SDA
SCL
4
PWM3
电机M 2-
电机M 2+
电机M 1-
电机M 1+
2
PW M1 1
AO
A1
A2
A3
A4
A5
GND
5V
Moto rs I nt er fa ce
Outp ut v ol ta ge
5V out pu t
serv o1
serv o2
serv o3
serv o4
serv o5
serv o6
serv o7
serv o8
USB po we r su pp or t
and UA RT in te rface
P22M ai nl ig ht
inte rf ac e
Swit ch
7-15 V in pu t
—— 51duino Mainboard
serv o1
serv o2
/// ///// ///// ///// ///// ///// ///// ///// ///// ///// ///// ///// ///// ///// ///// ///// // 5 // ///// ///// ///// ///// ///// ///// ///// ///// ///// ///// ///// ///// ///// ///// /// ///// ///// ///// ///// ///// ///// ///// ///// ///// ///// ///// ///// ///// ///// //// 6 // /// ///// ///// ///// ///// ///// ///// ///// ///// ///// ///// ///// ///// ///// ////
The se ns or o f in fr ared obst ac le a vo id ance
ultras onic ECHO
ultras onic TRIG
The i nfrar ed trac ing lef t
The i nfrar ed trac ing rig ht
The i nfrar ed foll owing l eft
The i nfrar ed foll owing r ight
四、Mainboard instructions
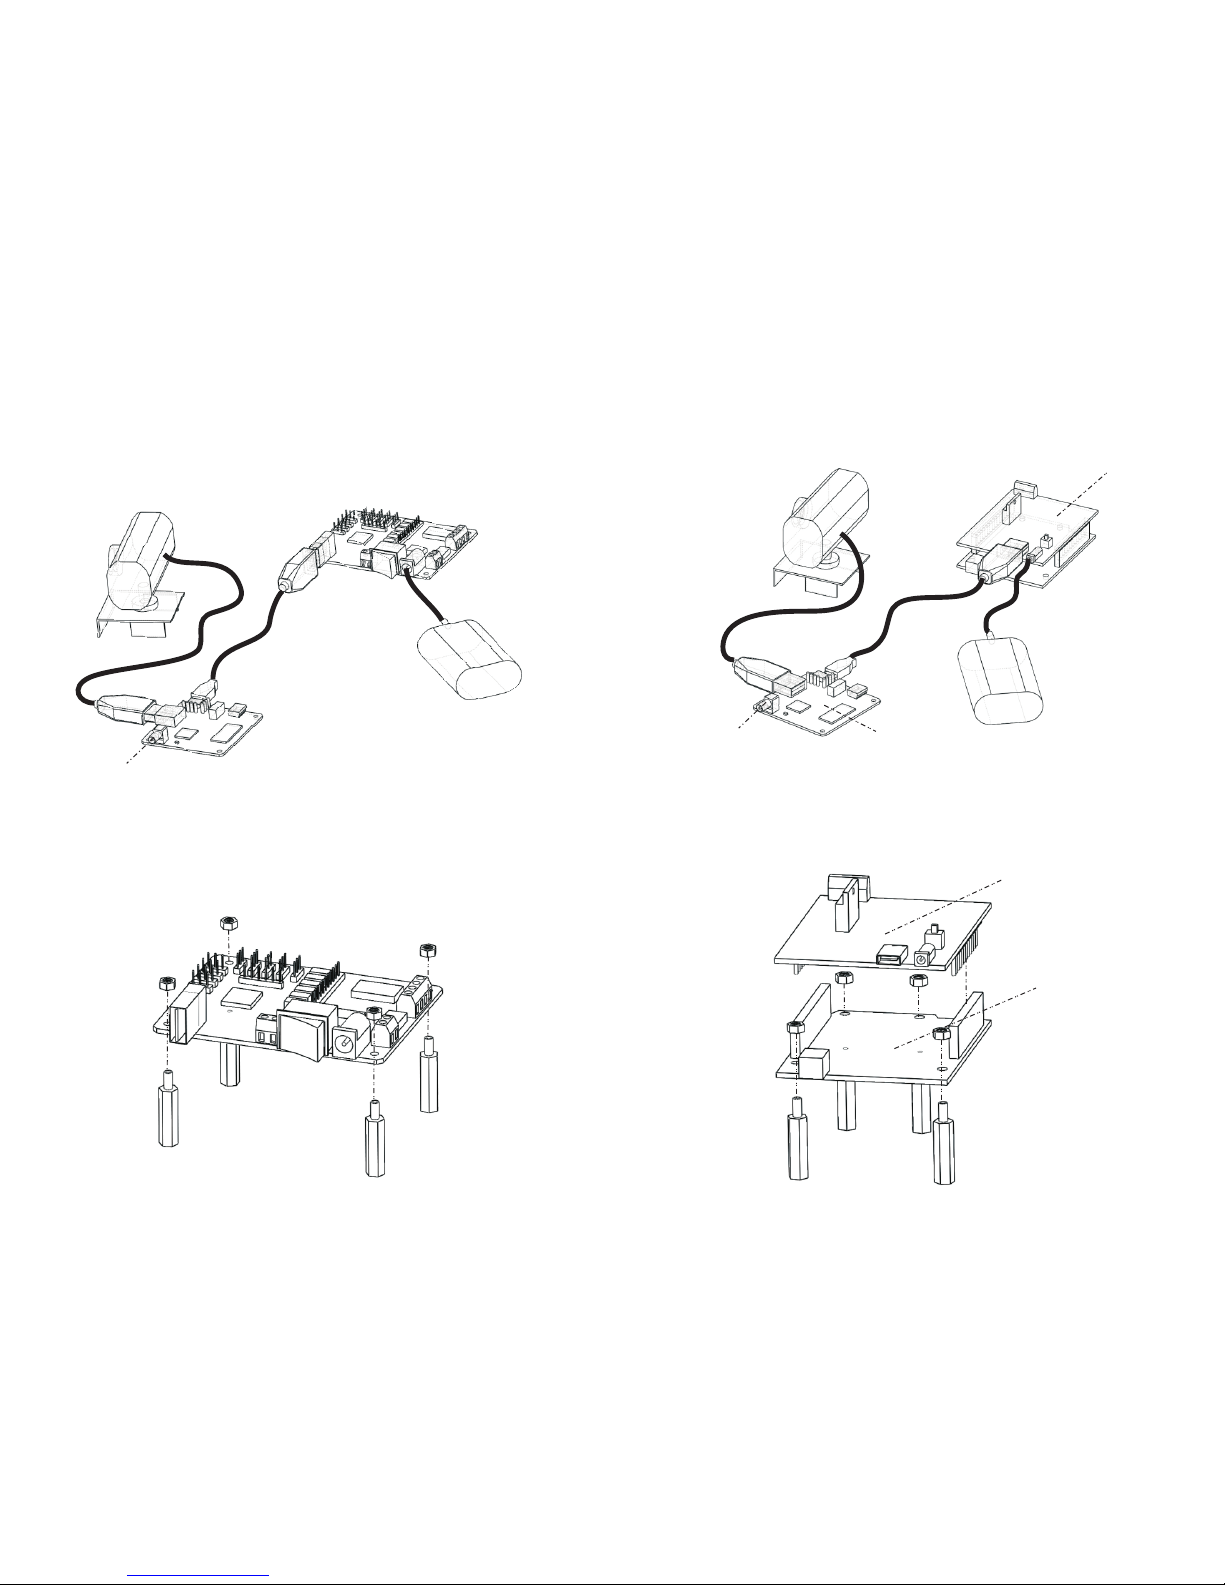
USB2. 0- Mi cr oU SB C able
WiFi mod ule
Batte ry
51duino Mainboa rd
Power c ab le
Camera
USB2.0 inte rface
5.2、Hardware installation
PW R Pow er & M ot or-Driver
Ard ui no U NO R 3 Ma in b oa rd
Ard ui no M ai nb oa rd
Camera
WiFi module
Batte ryUSB2.0 inte rface
USB2. 0- Mi cr oU SB C able
Power c ab le
/// ///// ///// ///// ///// ///// ///// ///// ///// ///// ///// ///// ///// ///// ///// ///// / 7 /// ///// ///// ///// ///// ///// ///// ///// ///// ///// ///// ///// ///// ///// /// /// ///// ///// ///// ///// ///// ///// ///// ///// ///// ///// ///// ///// ///// ///// /// 8 /// /// ///// ///// ///// ///// ///// ///// ///// ///// ///// ///// ///// ///// ///// ////
五、Assembly drawings
5.1、In tegra l wirin g diagr am of ele ctron ic syst em for 51 duino
5.1、In tegra l wirin g diagr am of ele ctron ic syst em for Ar duino
5.2.1、 Hardware installation for 51duino
5.2.1、 Hardware installation for Arduino
注意:裸露的电子系统禁止做静电测试!
注意:裸露的电子系统禁止做静电测试!

a) 、Use s ho r t ny lon col um ns to fix WiF i bo ar d in T H Robo t
/// ///// ///// ///// ///// ///// ///// ///// ///// ///// ///// ///// ///// ///// ///// ///// / 9 /// ///// ///// ///// ///// ///// ///// ///// ///// ///// ///// ///// ///// ///// /// / ///// /// ///// ///// ///// ///// ///// ///// ///// ///// ///// ///// ///// ///// ///// // 10 /// ///// ///// ///// ///// ///// ///// ///// ///// ///// ///// /// ///// ///// ///// ////
b) 、Use l on g nylon c ol umns to fix W iF i board in DS Ro bot
【Spe cial at tenti on】Note : when in stall ing nyl on colu mn to the Wi Fi modu le, it is i mpor tant
to no te that re sista nce in R6 8 mark on t he WiFi m odule .We sug gest cl amp nut n ot movi ng,
and u se the ro tatin g way to ins tall th e colum n nylon o n the oth ersid e, othe rwis e the rot ary
nut i n this si de of is li kely to le ad to R68 r esist ance tou ch off by e xtern al forc es.
5.2.3、 Assembly drawings for Camera and Cradle
5.2.2 、 Robot Link WiFi installation
Servo whe el m ay not su it able for cr adle,ma nu al cut it
Follow t he drawin gs t o install t he c radle , us e screw to fix parts
(1)
(2)
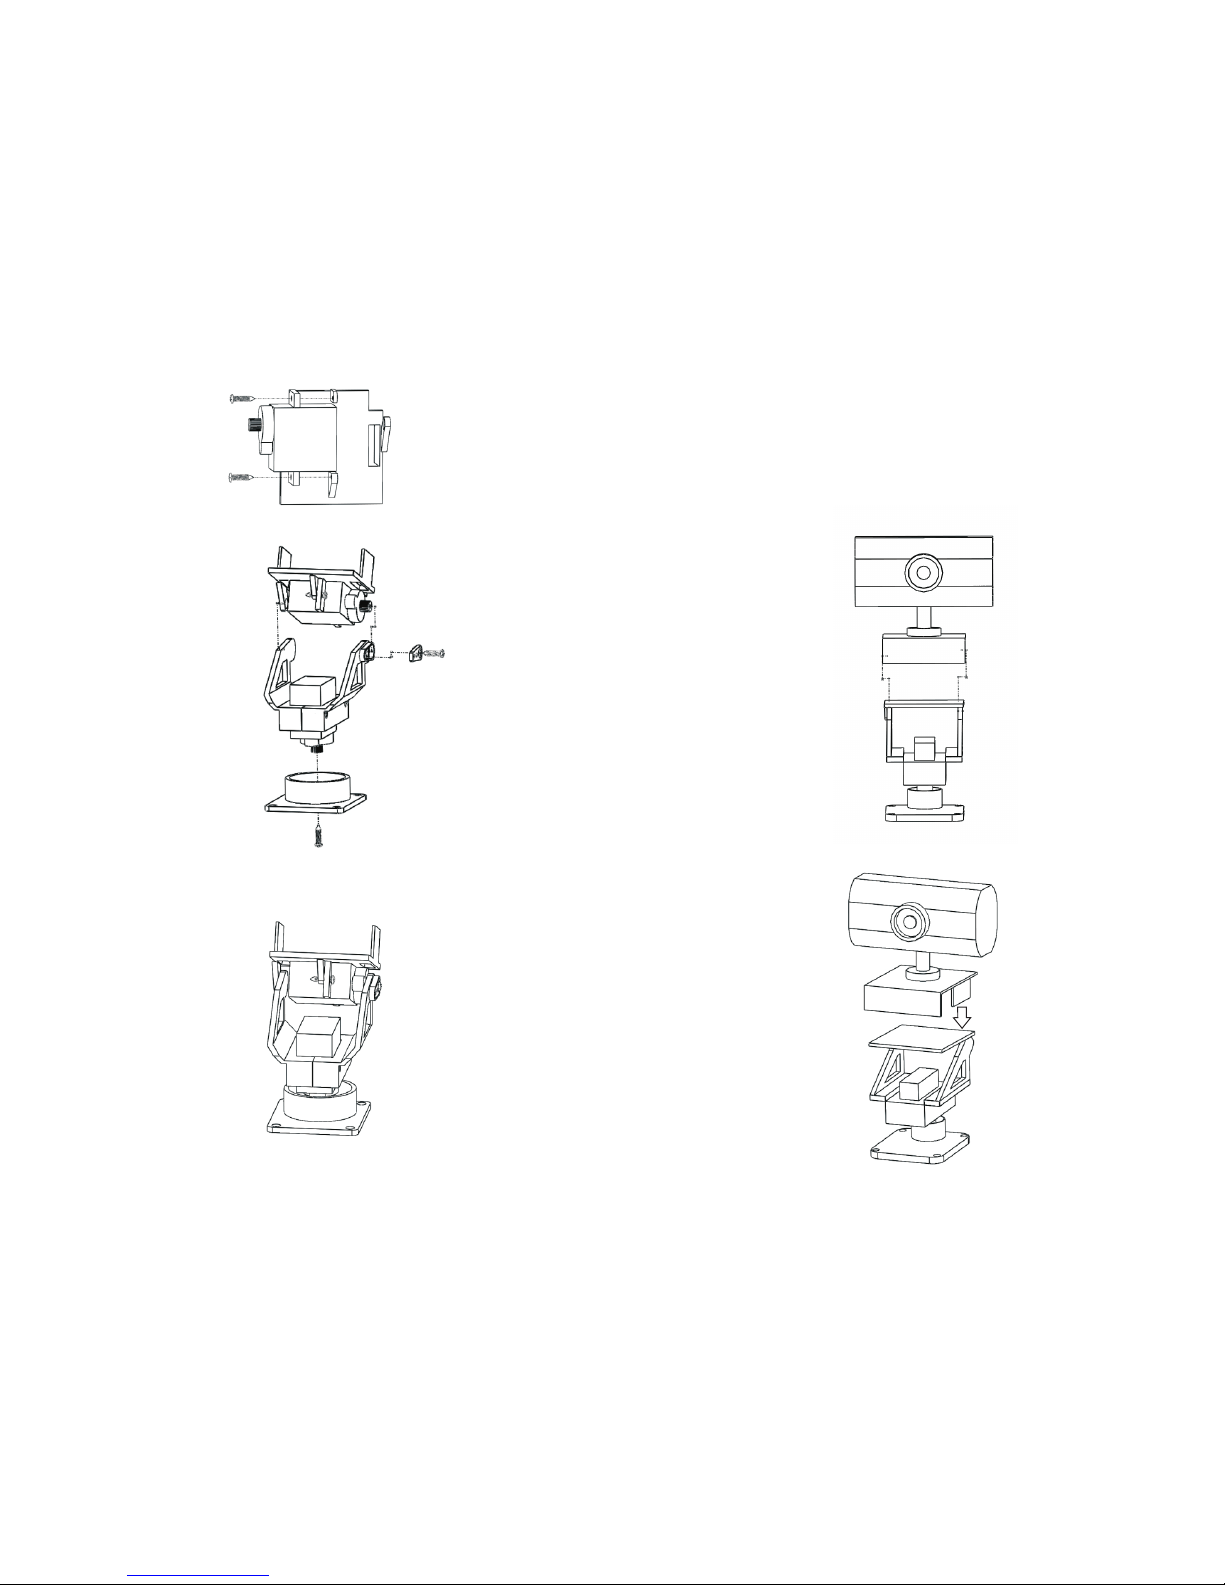
Came ra a nd C ra dl e install at io n
5.2.3、 Assembly drawings for Camera and Cradle
(3)
assemb le the parts of c radle a nd s ervos
Final prod uct
(4)
(5)
/// ///// ///// ///// ///// ///// ///// ///// ///// ///// ///// ///// ///// ///// ///// ///// 11 / /// ///// ///// ///// ///// ///// ///// ///// ///// /// ///// ///// ///// ///// ///// /// ///// ///// ///// ///// ///// ///// ///// ///// ///// ///// ///// ///// ///// /// ///// 1 2 ///// ///// ///// ///// ///// ///// ///// ///// ///// ///// ///// ///// ///// ///// /////

serv o7
serv o8
serv o8
serv o7
serv o2
serv o1
serv o1
serv o2
/// ///// ///// ///// ///// ///// ///// ///// ///// ///// ///// ///// ///// ///// ///// ///// 1 3 ///// /// ///// ///// ///// ///// ///// ///// ///// ///// ///// ///// ///// ///// ////
/// ///// ///// ///// ///// ///// ///// ///// ///// ///// ///// ///// ///// ///// ///// //// 14 / /// ///// ///// ///// ///// ///// ///// ///// ///// ///// ///// ///// ///// ///// /////
The connection of s er vo:
The yellow on e is P WM
The red o ne i s VCC
The bro wn o ne i s GN D
The connection of s er vo:
The yellow on e is P WM
The red o ne i s VCC
The bro wn o ne i s GN D
The conn ection of cra dl e with 51du ino main board
The conn ection of cra dl e with Arduin o main board
5.2.3、Assembly drawings for Camera and Cradle

Moto rs Inst allat ion tut orial
Motor installation
M1+
M1-
Paral le l co nn ec t th e same si de o f mo to rs i n cr oss ,th en c on ne ct
to moto r in te rf ac e M1 +,M1- or M2 +, M2 - in m ai nb oard.
Motor connect installa tion
/// ///// ///// ///// ///// ///// ///// ///// ///// ///// ///// ///// ///// ///// ///// ///// / 15 // ///// ///// ///// ///// ///// ///// ///// ///// ///// ///// ///// ///// ///// //// /// ///// ///// ///// ///// ///// ///// ///// ///// ///// ///// ///// ///// ///// ///// //// 16 / /// ///// ///// ///// ///// ///// ///// ///// ///// ///// ///// ///// ///// ///// /////
5.2.4 Motors assembly(DS only)

Mainboard( 51duino o r Ar du ino)
batt er y
Mainboard
WiFi mod ule
Installation of electronic systems Ⅰ
Installation of electronic systems Ⅱ
Camera a nd Cradle
/// ///// ///// ///// ///// ///// ///// ///// ///// ///// ///// ///// ///// ///// ///// ///// 1 7 /// ///// ///// ///// ///// ///// ///// ///// ///// ///// ///// ///// ///// ///// //// //// ///// ///// ///// ///// ///// ///// ///// ///// ///// ///// ///// ///// ///// ///// /// 18 // ///// ///// ///// ///// ///// ///// ///// ///// /// ///// ///// ///// ///// ///// ////
5.3 Assembly drawings overview for DS Robot

5.4. 1 、The ele ctron ic syst em inst allat ion of 51 d uino ma nipul ator
5.4. 1、The ele ctron ic syst em inst allat ion of Ar duino m anipu lator
A
B
CD
A
B
C
D
E F
E
F
A
B
C
D
Conne ct io n de ta il s:
Maint ai ni ng a s tr ic t
one-t o- on e co rr el ation
betwe en AB CD i n ma in
board a nd m ec ha ni ca l
hand , E F is c ra dl e
inter fa ce
/// ///// ///// ///// ///// ///// ///// ///// ///// ///// ///// ///// ///// ///// ///// ///// 1 9 /// ///// ///// ///// ///// ///// ///// ///// ///// ///// ///// ///// ///// ///// //// /// ///// ///// ///// ///// ///// ///// ///// ///// ///// ///// ///// ///// ///// ///// //// 20 / /// ///// ///// ///// ///// ///// ///// ///// ///// ///// ///// ///// ///// ///// ///// /
The connection of s er vo:
The yellow on e is P WM
The red o ne i s VCC
The bro wn o ne i s GN D
The connection of s er vo:
The yellow on e is P WM
The red o ne i s VCC
The bro wn o ne i s GN D
【Spec ial att entio n】Befor e elect rify
the ro bot wit h cradl e or robo tic arm ,
the us ers sho uld rea d speci ficat ion
of cli ent sof tware ,then a ccordi ng it
to adj ust the a ngle of e ach ste ering
gear, final ly use th e 'lock ing' fu nctio n
to loc k all ang les of se rvo. Wi thout
this s tep, it w ill lea d to the se rvo
dama ge caus e long ti me to go to t he
unav ailab le zone .
Conne ct io n de ta il s:
Maint ai ni ng a s tr ic t
one-t o- on e co rr el ation
betwe en AB CD i n ma in
board a nd m ec ha ni ca l
hand , E F is c ra dl e
inter fa ce
【Spec ial att entio n】Befor e elect rify
the ro bot wit h cradl e or robo tic arm ,
the us ers sho uld rea d speci ficat ion
of cli ent sof tware ,then a ccordi ng it
to adj ust the a ngle of e ach ste ering
gear, final ly use th e 'lock ing' fu nctio n
to loc k all ang les of se rvo. Wi thout
this s tep, it w ill lea d to the se rvo
dama ge caus e long ti me to go to t he
unav ailab le zone .
5.4 Assembly drawings overview for TH Robot
A
B
C
D

5.4.2、51duino version TH Robot assembly drawings
5.4.2、Arduino version TH Robot assembly drawings
51duin o ve rsion T H Robo t fi nished ph otograph
Arduino ve rsi on TH Ro bot fin ish ed photograph
/// ///// ///// ///// ///// ///// ///// ///// ///// ///// ///// ///// ///// ///// ///// ///// / 21 // ///// ///// ///// ///// ///// ///// ///// ///// ///// ///// ///// ///// ///// //// / ///// /// ///// ///// ///// ///// ///// ///// ///// ///// ///// ///// ///// ///// ///// /// 22 // ///// ///// ///// ///// ///// ///// ///// ///// ///// ///// /// ///// ///// ///// /////

6.1、The instruction of Arduino sensors with full functions
6.1、The instruction of 51duino sensors with full functions
The left s en so r of
autom at ic t ra ck in g
function P2^1
The left s en so r of
line pa tr ol a nd a uton om ou s tr ac in g/
cliff avo id an ce P 2^ 3
The middle sensor
of au to ma ti c tr ac king and Infrared
ray avo id s bl oc ke r
P3^3
The right sensor of
line pa tr ol a nd
auton om ou s tr ac in g/
cliff avo id an ce
ultrasonic sensors /distance
measure s en so rs E ch o= P3 ^4
Trig =P 3^ 5
The right sensor of
autom at ic t ra ck in g
function P3^7
The left s en so r
of li ne p at rol
and auton om ou s
tracing/ cliff avoi dance A2
The middle sensor
of In fr ar ed r ay
avoids bl oc ke r A4
The right sensor of
line pa tr ol a nd a utonomous tracing/
cliff avo id an ce A 3
ultrasonic sensors /
distance measure
sensors Echo=AO
Trig =A 1
/// ///// ///// ///// ///// ///// ///// ///// ///// ///// ///// ///// ///// ///// ///// ///// / 23 // ///// ///// ///// ///// ///// ///// ///// ///// ///// ///// ///// ///// ///// //// /// ///// ///// ///// ///// ///// ///// ///// ///// ///// ///// ///// ///// ///// ///// //// 24 / /// ///// ///// ///// ///// ///// ///// ///// ///// ///// ///// ///// ///// ///// /////
refer to page 13
Extras functions of Sensors and mode switch
refer to page 14

/// ///// ///// ///// ///// ///// ///// ///// ///// ///// ///// ///// ///// ///// ///// ///// / 25 //// /// ///// ///// ///// ///// ///// ///// ///// ///// ///// ///// ///// ///// ////
The switching ins tr uction in cu st om c om ma nd m od e:
FF130100FF The follow in g mo de
FF130200FF The line pat ro l mo de
FF130300FF The infrar ed o bs ta cl e av oi da nc e mo de
FF130400FF The ultras on ic o bs ta cl e av oi da nc e mo de
FF130000FF The norm al m od e
Bring up the multi-func ti on al o pt io ns b y pr es si ng t he p ho ne m en u
or clicking the sma ll w hi te c ir cl e on t he i nter fa ce
Choosing custom c om ma nd s in t he m ul ti -f un ct io n op ti on s of mobile phone
6. 2、The tutorial of switching mode in the software
/// ///// ///// ///// ///// ///// ///// ///// ///// ///// ///// ///// ///// ///// ///// /// 26 // /// ///// ///// ///// ///// ///// ///// ///// ///// ///// ///// ///// ///// ///// /////

七、Operation instructions to the product(PC)
1、Turn o n the power sw itch of rob ot, the LED li ghts of W ifi module
and ma in co ntrol b oard start blin king, wait abou t 30 seconds, the
LED li ght s of W ifi module and ma in control b oard is always o n, the
LED li ght of 51 duino main cont rol board i s closed, it repres ents the
syst em is star tin g competel y.
2、Use th e computer 's wirele ss to sea rch the hot sp ot signal of
robot, our ho t spo t is "wifi-robots .co m" at the begi nni ng of list,
then c onn ect.
3、Sta r ting the sof twa re of PC, cho ose t he 'control mode'-'Wi Fi
mode' o n the top of the sof twa re, if th ere is no error in soft ware
inte rface, t he users can start c ont rolli ng the ro bot.
4、WAS D is default oper ation of controlling fou r directio ns movement w ith robot in t he keyboa rd .Choosi ng 'Auxiliary funct ion '- '
The mo use a nd cradle of camera ' , t hen the users can drag
and co ntrol the mo vement of came ra an d cradle in vi deo .
5、More functions reference the " hel p" option of sof twa re.
/// ///// ///// ///// ///// ///// ///// ///// ///// ///// ///// ///// ///// ///// ///// ///// / 27 //// /// ///// ///// ///// ///// ///// ///// ///// ///// ///// ///// ///// ///// ////
/// ///// ///// ///// ///// ///// ///// ///// ///// ///// ///// ///// ///// ///// ///// //// 28 / /// ///// ///// ///// ///// ///// ///// ///// ///// ///// ///// ///// ///// ///// /////

1、Open t he power swi tch of robo t, the LED lig hts of Wi fi module
and ma in co ntrol b oard start blin king, wait abou t 30 seconds, the
LED li ght s of W ifi module and ma in control b oard is always o n, the
LED li ght of 51 duino main cont rol board i s closed, it repres ents the
syst em is star tin g competel y.
2、Use th e phone's wireless to se arch th e hot spot signal of robot,
our ho t spo t is "wifi-robots .co m" at the begi nni ng of list, then
conn ect .
Open t he software in mobile phone , s elect start i tem ,the use r
can co trol th e robot if see t he real -time video screen . The user s
may ne ed to activate t he software at first time usi ng by long pre ssing ac tivat ion informati on to copy ID of mob ile p hone ,and sen d
it to th e custo mer
servicer.
The de fau lt mode of operatio n is the circu lar cotrol boa rd
on the i nterfa ce to control the directio ns of robot move ment .
Usin g the f ingers slide sc reen can con trol th e cradle of robo t.
Find ing m ore fun ctions in softw are prompts.
七、Operation instruction s to the product(PHON E/PAD)
/// ///// ///// ///// ///// ///// ///// ///// ///// ///// ///// ///// ///// ///// ///// ///// / 29 //// /// ///// ///// ///// ///// ///// ///// ///// ///// ///// ///// ///// ///// ////
/// ///// ///// ///// ///// ///// ///// ///// ///// ///// ///// ///// ///// ///// ///// //// 30 / /// ///// ///// ///// ///// ///// ///// ///// ///// ///// ///// ///// ///// ///// /////
 Loading...